19 Modern Crimped Hairstyles for a Cool 90s Revival

Crimped hairstyles are defined by small, repeated bends that create texture and visible volume without forming traditional curls. A modern version can cover the full length or appear only through the roots, face frame, mid-lengths, or ends. Long cuts show the pattern dramatically, while bobs and lobs keep it compact. Clean center parts, soft side parts, straighter roots, and restrained face-framing layers can make the texture feel more intentional rather than turning the whole silhouette into one uniform cloud of volume.
Straight and wavy hair can take a pressed crimp pattern easily, while curly and coily textures can create a similar broken-up effect through heatless braids or twist-outs. Density matters because crimping visually expands the hair. Lower-density lengths may benefit from that fullness, while very dense hair often needs selective placement instead of maximum texture everywhere. Face framing can remain smooth, lightly crimped, or deliberately separated.
Styling effort depends on how much hair receives the pattern. A few accent sections can be refreshed quickly, while full-head crimping requires considerably more time. Heat styling should include heat protectant, and repeated passes are unnecessary once a section holds its shape. The haircut itself does not need to change unless you already want different layers, bangs, or perimeter weight.
Quick List
- Sleek Center-Part Crimped Hairstyle
- Long Brushed Crimped Hairstyle
- Crimped Blunt Bob Hairstyle
- Half-Up Crimped Volume Hairstyle
- High Crimped Ponytail Hairstyle
- Low Crimped Ponytail Hairstyle
- Crimped Shag Layers Hairstyle
- Face-Framing Crimped Pieces Hairstyle
- Root-Lift Crimped Hairstyle
- Crimped Ends Hairstyle
- Side-Part Crimped Waves Hairstyle
- Heatless Mini-Braid Crimped Hairstyle
- Crimped Low Bun Hairstyle
- Claw Clip Crimped Twist Hairstyle
- Crimped Curtain Bangs Hairstyle
- Soft Crimped Lob Hairstyle
- Coily Crimp-Effect Twist-Out Hairstyle
- Crimped Bubble Ponytail Hairstyle
- Mixed-Texture Crimped Hairstyle
Sleek Center-Part Crimped Hairstyle
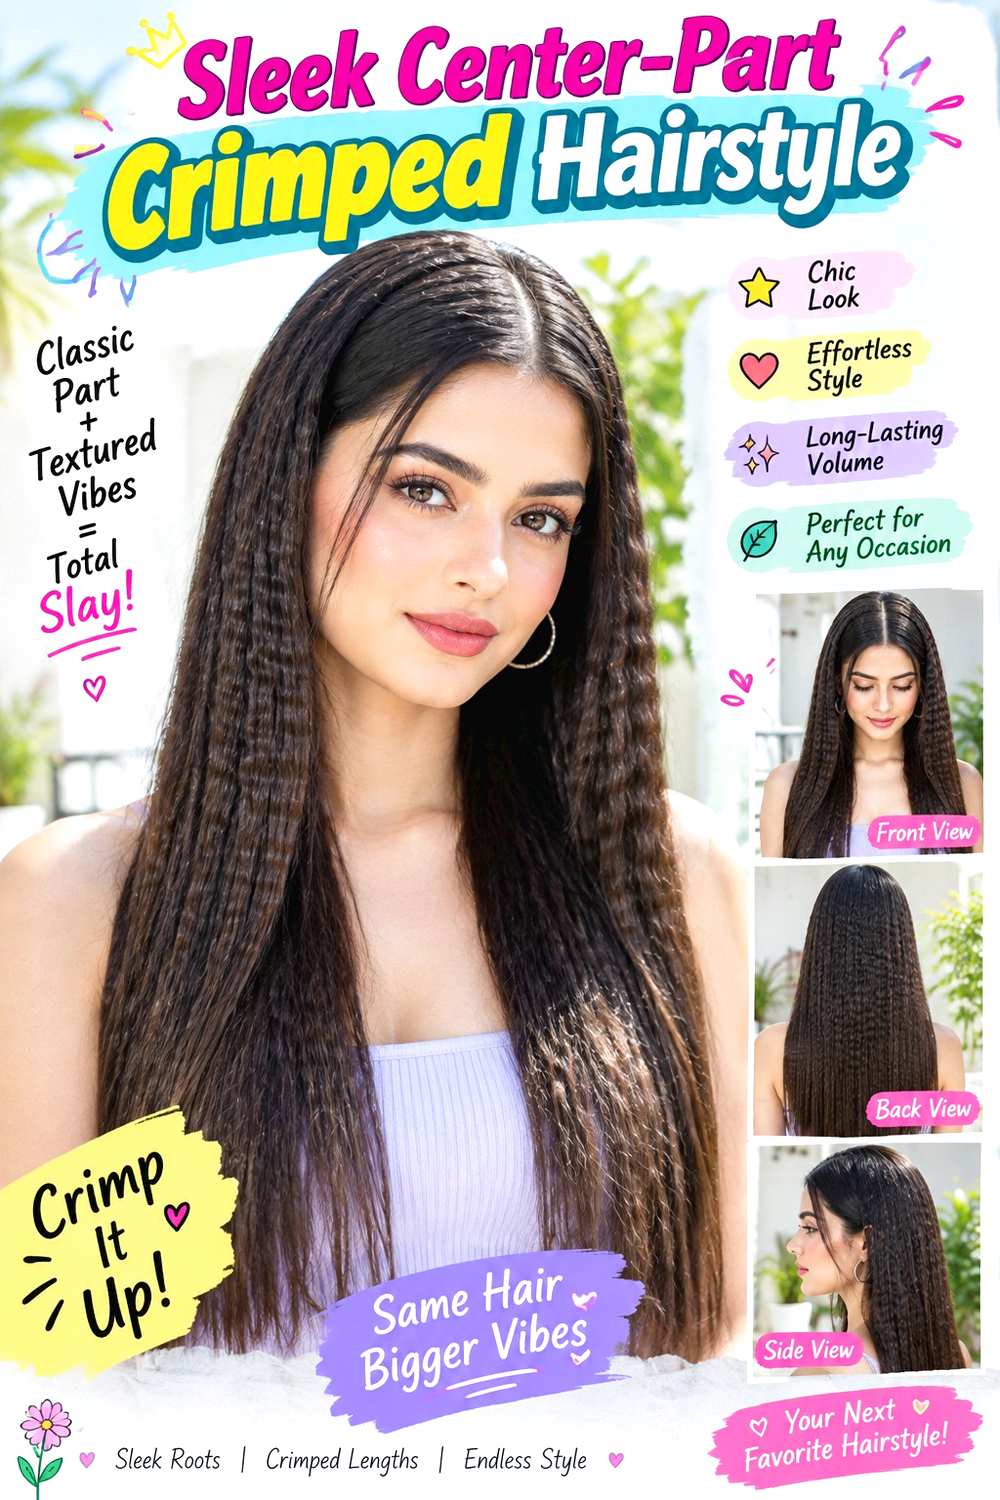
A clean center part gives full-length crimping a controlled framework. Keep the roots relatively smooth for the first inch or two, then let small, repeated bends continue through the mid-lengths toward the ends. On long hair, the texture creates substantial width, so straighter face-framing pieces or a slightly calmer upper section can prevent the shape from becoming uniformly bulky. Full ends help the repeated pattern look dense rather than frayed.
Straight and softly wavy hair are convenient starting points, especially when the goal is an even crimp pattern. Very dense hair may look more balanced when only selected layers receive strong texture. Apply heat protectant before pressing sections with a crimping iron, then mist flexible hairspray lightly over the finished lengths for hold without stiffness. A few flattened pieces can be refreshed fairly quickly; completing an entire head after washing takes considerably longer.
Avoid repeatedly clamping the same section once the bend is visible. For a haircut that supports this finish, ask your stylist to preserve enough perimeter weight if you want the ends to remain substantial. If you already have layers, explain that you plan to wear strong crimped texture so their placement can be considered without cutting specifically for a temporary style.
Pro tip:
Work in consistent sections and leave a little space at the roots before the first press. That calm upper area makes the center part clearer and keeps the texture from expanding too abruptly.
Make It Work for You:
If your hair is very dense, crimp the surface and selected interior sections instead of every strand. You can keep the recognizable texture while reducing excessive width through the sides.
Watch Out For:
Avoid pressing one section several times simply to make the pattern stronger. Repeated heat adds unnecessary exposure; use a clean section size and stop once the bend has formed.
Long Brushed Crimped Hairstyle

Brushing through a crimped pattern softens the individual ridges and turns them into airy, expanded texture. Keep the hair long, with a center or soft side part and most of the movement beginning below the roots. The mid-lengths should look full and slightly fuzzy rather than sharply pressed, while the ends remain blended into the overall shape. Long face-framing pieces around the jaw or collarbone can prevent the front from appearing too heavy.
This version is especially useful when you like volume more than an obvious geometric crimp. Straight and wavy hair can be pressed first, while lower-density lengths may visually benefit from the expanded finish. Use heat protectant before a crimping iron, then loosen the cooled texture with a wide-tooth comb rather than repeatedly brushing until it loses all structure. Full-head styling takes time on long or dense hair; a next-day refresh may require only several top sections.
Some softening is expected as the style wears, so avoid chasing every flattened area with more heat. If you already plan to change the cut, ask for a perimeter that retains enough weight to balance the airy surface. Very short layers can create noticeably more width when brushed-out texture is added.
Pro tip:
Let the crimped sections cool completely before loosening them. Then work from the ends upward with gentle passes so the pattern expands without becoming unnecessarily tangled or shapeless.
Make It Work for You:
If your ends are sparse, keep the crimp stronger through the mid-lengths and soften it less near the bottom. This can preserve a more substantial outline through the longest sections.
Watch Out For:
Over-brushing can turn defined texture into uncontrolled frizz. Stop once the crimp ridges have softened into the volume you want rather than continuing until the pattern disappears.
Crimped Blunt Bob Hairstyle

A blunt bob keeps crimped texture compact by pairing visible bends with a strong bottom edge. Let the length finish around the jaw or just below it, keep layering minimal through the perimeter, and use a center or side part depending on your preferred balance. Fine crimping through the mid-lengths creates width, while leaving the roots calmer stops the bob from becoming overly rounded. The solid ends provide contrast against the broken-up surface texture.
Straight and softly wavy hair can show the pressed pattern clearly. Lower-density hair may benefit from the combination of crimped volume and retained bottom weight, while dense hair often needs less texture through the interior. Apply heat protectant before using a crimping iron, then use a light flexible hairspray for hold. A bob takes less time to crimp than very long hair, though full-head work is still more involved than refreshing a few visible sections.
The cut needs reshaping when its perimeter loses the intended jaw-level line, not because crimping itself requires a special trim schedule. At the salon, specify the exact dry length and how full you want the bottom edge to remain. Heavy thinning can weaken the blunt contrast that makes this version distinct.
Pro tip:
Leave the final half-inch of the ends slightly less crimped if you want the blunt perimeter to read clearly. That small smooth zone can make the bottom line look more deliberate.
Make It Work for You:
If your bob is very dense, use stronger crimping through the surface and lighter texture underneath. This keeps the effect visible without making the entire shape expand equally.
Watch Out For:
Avoid combining very heavy crimping with aggressive thinning at the ends. The surface gains volume while the perimeter loses weight, which can make the bob look unbalanced.
Half-Up Crimped Volume Hairstyle
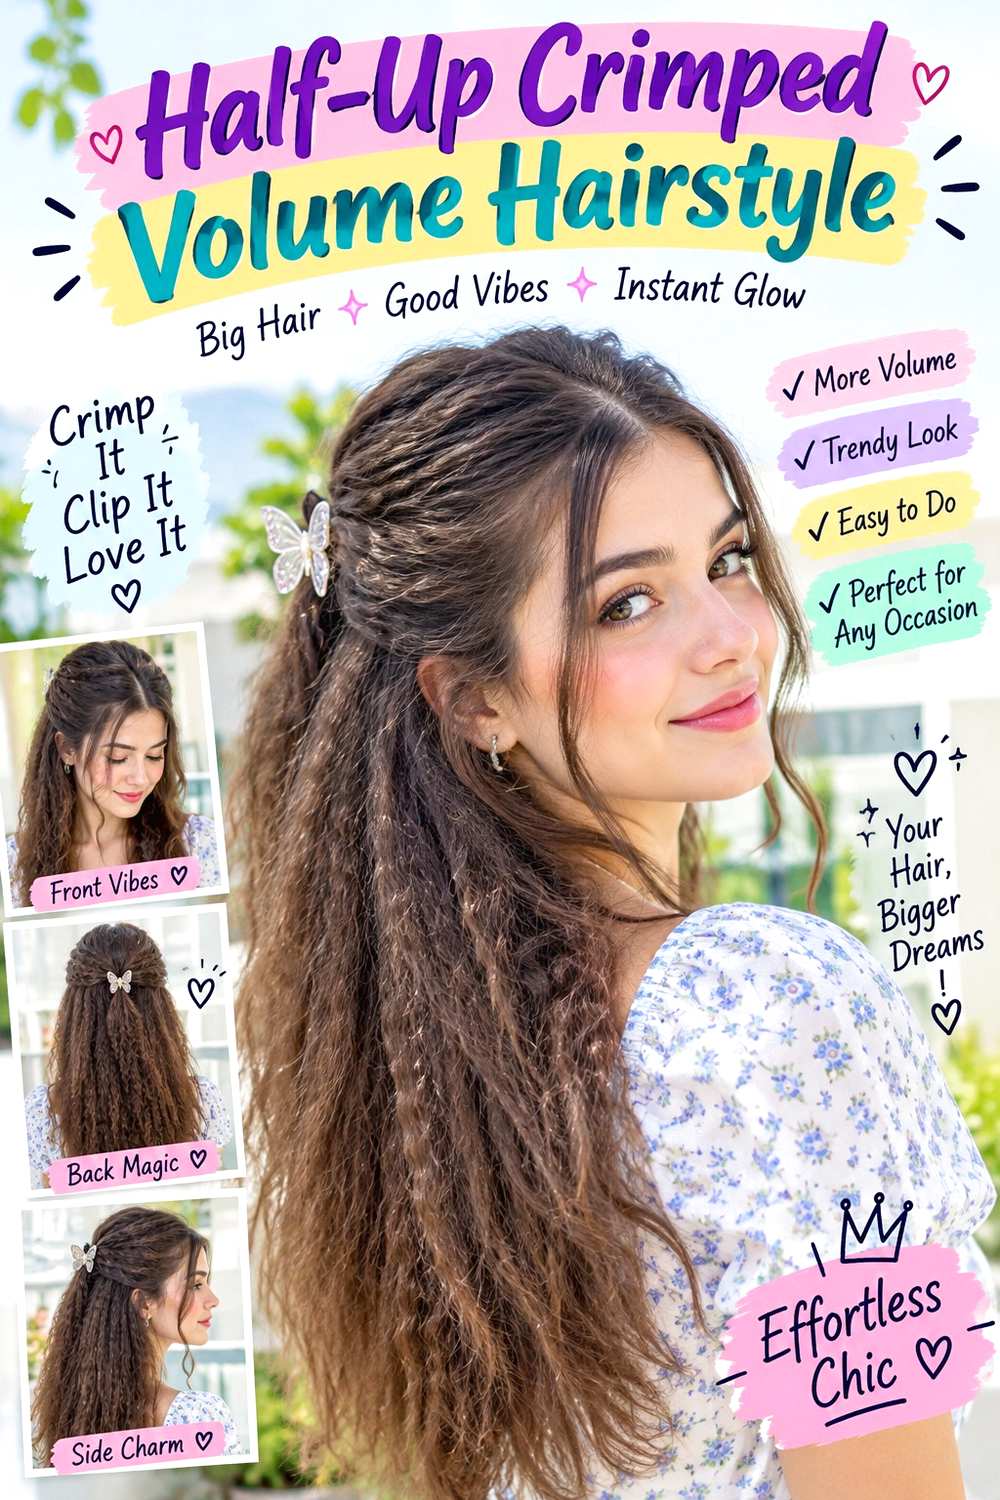
A half-up style gives crimped hair structure by pulling the upper sides away from the face while leaving the textured lengths visible. Keep a center or soft side part, gather hair from just behind the temples, and secure it around the back of the crown. Fine crimping through the loose hair creates volume below the anchor, while the upper section can stay smoother for contrast. A little crown lift keeps the gathered area from looking flat.
Medium and long hair provide enough length to show both the half-up structure and the repeated texture. Apply heat protectant before using a crimping iron, then secure the upper section with a fabric-covered elastic. The full crimping process can take time, but rebuilding only the half-up anchor on second-day hair is a quick refresh. If sections flatten overnight, retouch only the visible areas rather than repeating the whole set.
This temporary style does not require a haircut. If you already want face-framing layers, explain to your stylist which pieces you expect to leave loose when the rest is half-up. Their finished length will determine whether the front feels intentional or simply falls out of the secured section.
Pro tip:
Crimp the loose lengths before creating the half-up anchor. You can then judge how much hair needs gathering without flattening fresh texture by repeatedly taking the section apart.
Make It Work for You:
If your hair has lower density, gather a smaller upper section and leave more crimped hair down. The texture provides volume while the half-up shape still keeps the sides controlled.
Watch Out For:
Do not pull the upper section overly tight to contrast with the textured lengths. A little softness near the crown usually blends better and keeps the anchor more comfortable.
High Crimped Ponytail Hairstyle
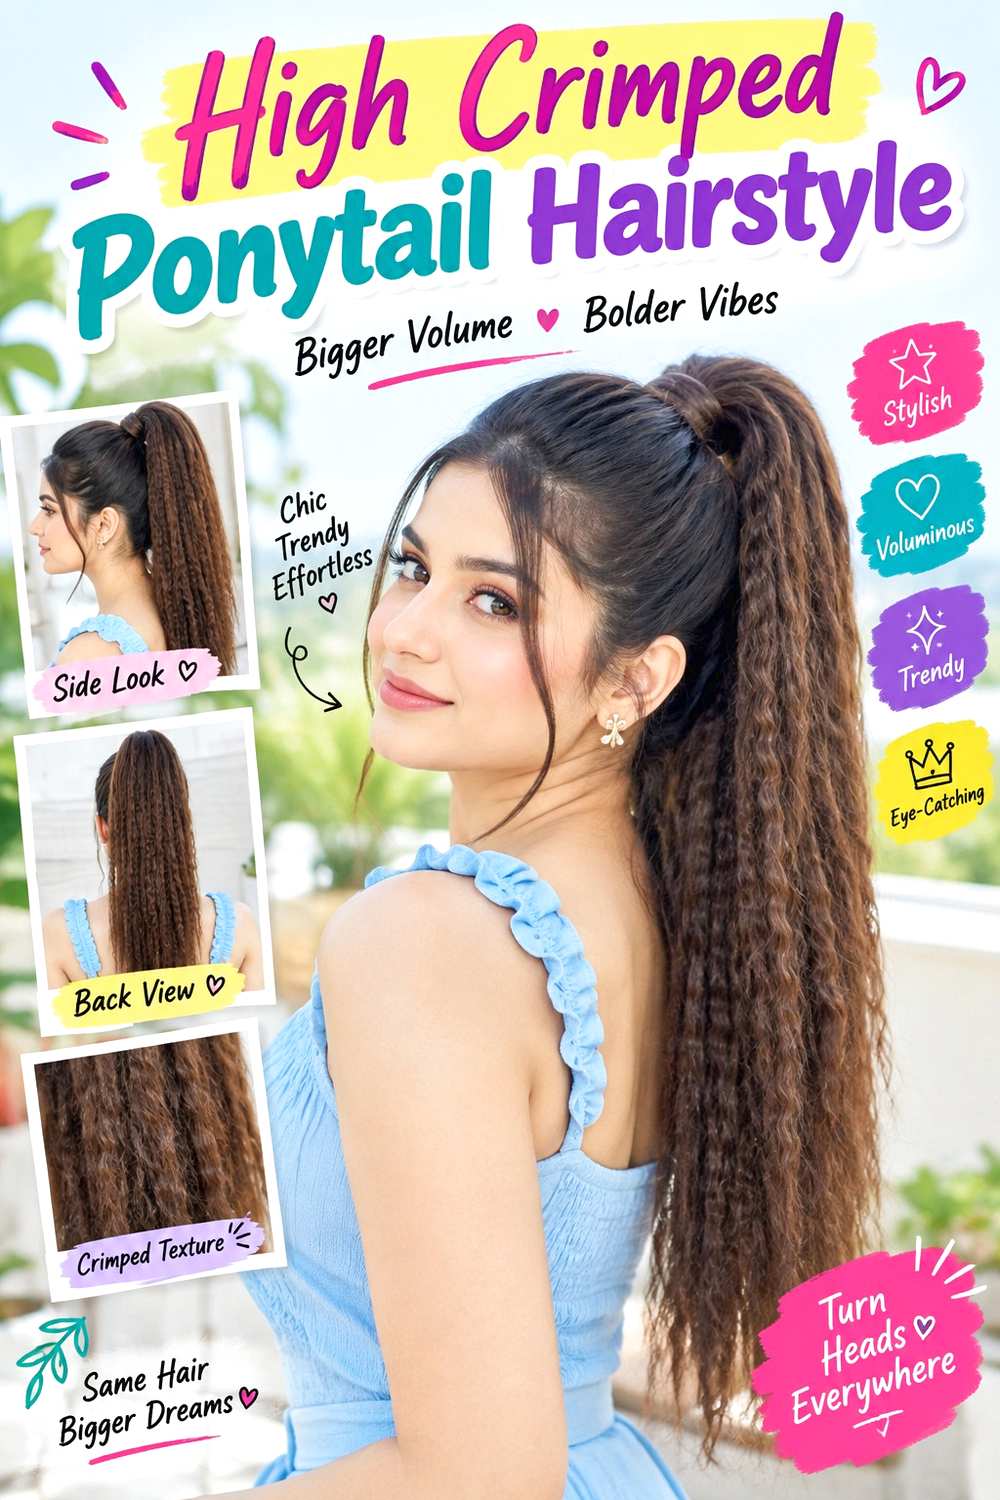
A high ponytail concentrates crimped texture in the tail while keeping the head shape clean. Place the anchor around the upper back of the head and smooth the sides, then let the ponytail expand into small repeated bends from near the base through the ends. The front can be brushed back or center-parted before gathering, and a slightly calmer crown creates a stronger contrast with the textured tail.
Medium to long hair works best, and the style can make lower-density ponytails appear visually fuller because crimping increases separation between strands. Apply heat protectant before using a crimping iron on the tail, then secure the base with a fabric-covered elastic. Crimping only after the ponytail is built can shorten the styling process compared with texturizing the entire head. A morning refresh may involve only rebuilding the base and pressing several flattened tail sections.
The anchor should stay comfortable even when the ponytail feels fuller than usual. If it begins slipping, rebuild it rather than tightening repeatedly. This is a temporary style, so no haircut is necessary. If you already have layers, tell your stylist you frequently wear high ponytails so shorter pieces can be planned around your preferred gathered finish.
Pro tip:
Secure the ponytail first and crimp the hanging length afterward. This lets you focus the texture exactly where it will be visible without spending time on sections hidden inside the base.
Make It Work for You:
If your hair is very dense, use a larger crimp pattern or texture only selected tail sections. The ponytail will still look dimensional without becoming excessively wide or heavy.
Watch Out For:
Avoid crimping directly against the elastic where the hair is under tension. Leave a small smooth area at the base so the anchor remains neat and comfortable.
Low Crimped Ponytail Hairstyle
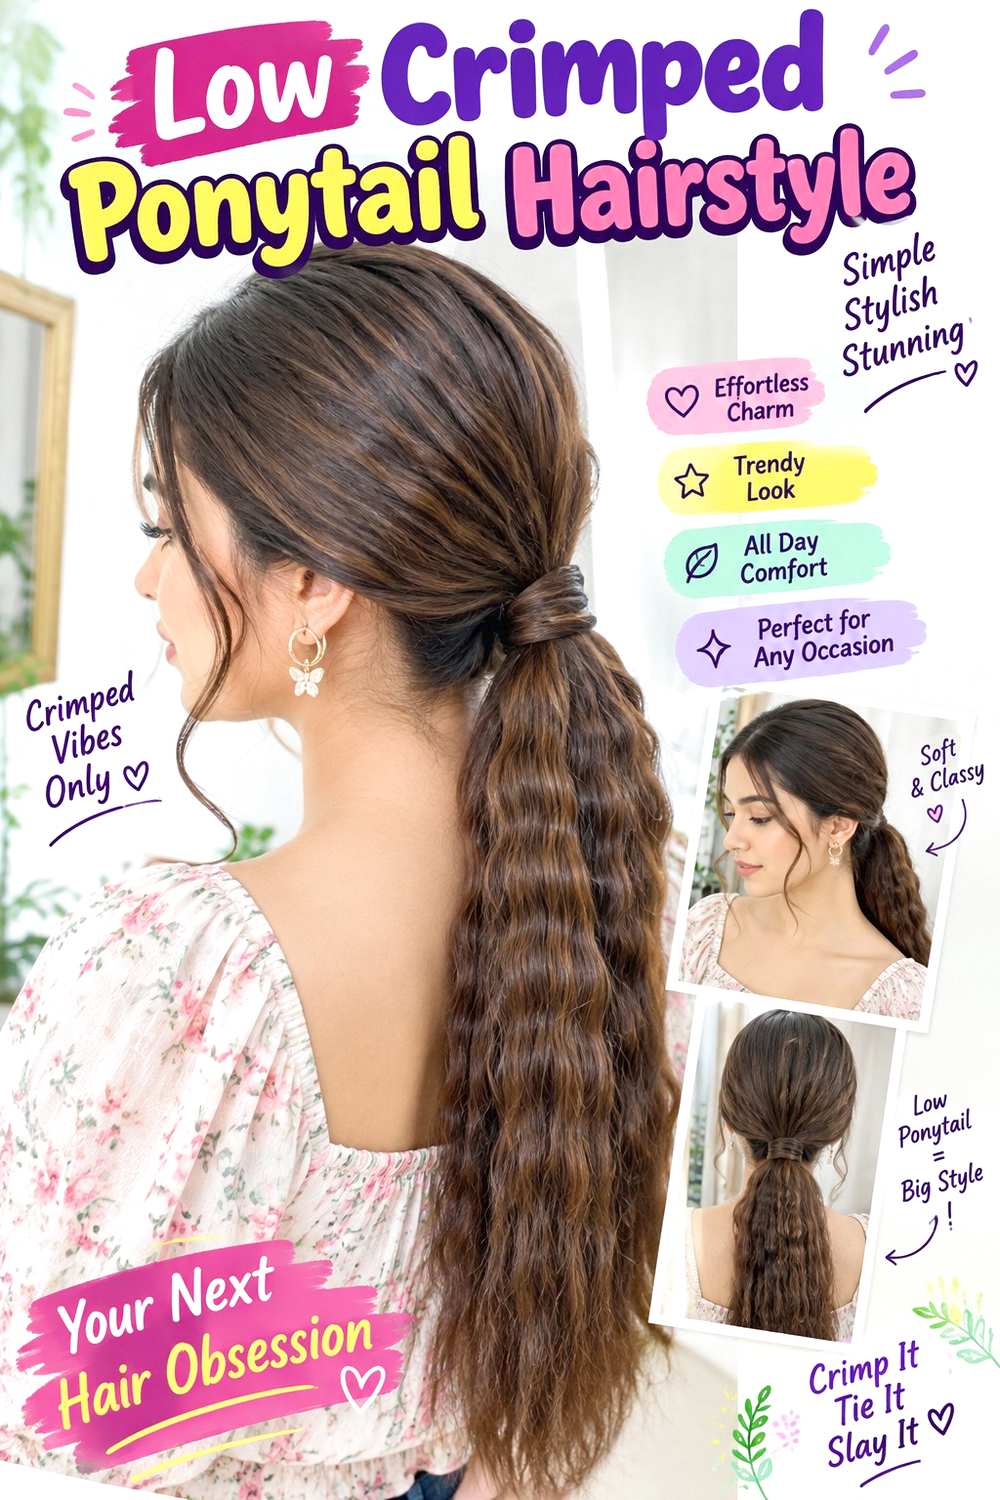
A low ponytail gives crimped texture a calmer, more wearable outline. Set the anchor just above the nape, keep the front smooth with a center or side part, and let the tail carry most of the repeated bends. A little natural crown softness prevents the top from looking pasted down, while the crimped tail adds visual fullness below. The ends can stay fully textured or slightly softer for a less geometric finish.
Medium and long hair are easiest to gather, and straight or wavy starting textures make the contrast especially clear. Apply heat protectant before using a crimping iron on the ponytail, then use a fabric-covered elastic for a secure base. Styling the tail alone is quicker than completing a full-head crimp. Between wears, you may need to refresh only the outermost sections that have flattened.
If the ponytail rubs against a collar or jacket, move the base slightly higher rather than tightening it. The style itself does not require a cut. For permanent face-framing pieces, tell your stylist whether you want them loose or gathered when wearing low ponytails. That detail matters more than creating layers specifically for the crimp.
Pro tip:
Keep the top smooth but not rigid, then begin the strongest crimp a little below the elastic. The separation between sleek roots and textured tail makes the style easier to read.
Make It Work for You:
If your hair has lower density, keep almost all the hair inside the ponytail instead of releasing many front pieces. The crimped tail can provide the softness and volume.
Watch Out For:
Do not keep reclamping the outer tail sections when the texture softens naturally. Refresh only clearly flattened areas so the hair is not exposed to unnecessary repeated heat.
Crimped Shag Layers Hairstyle
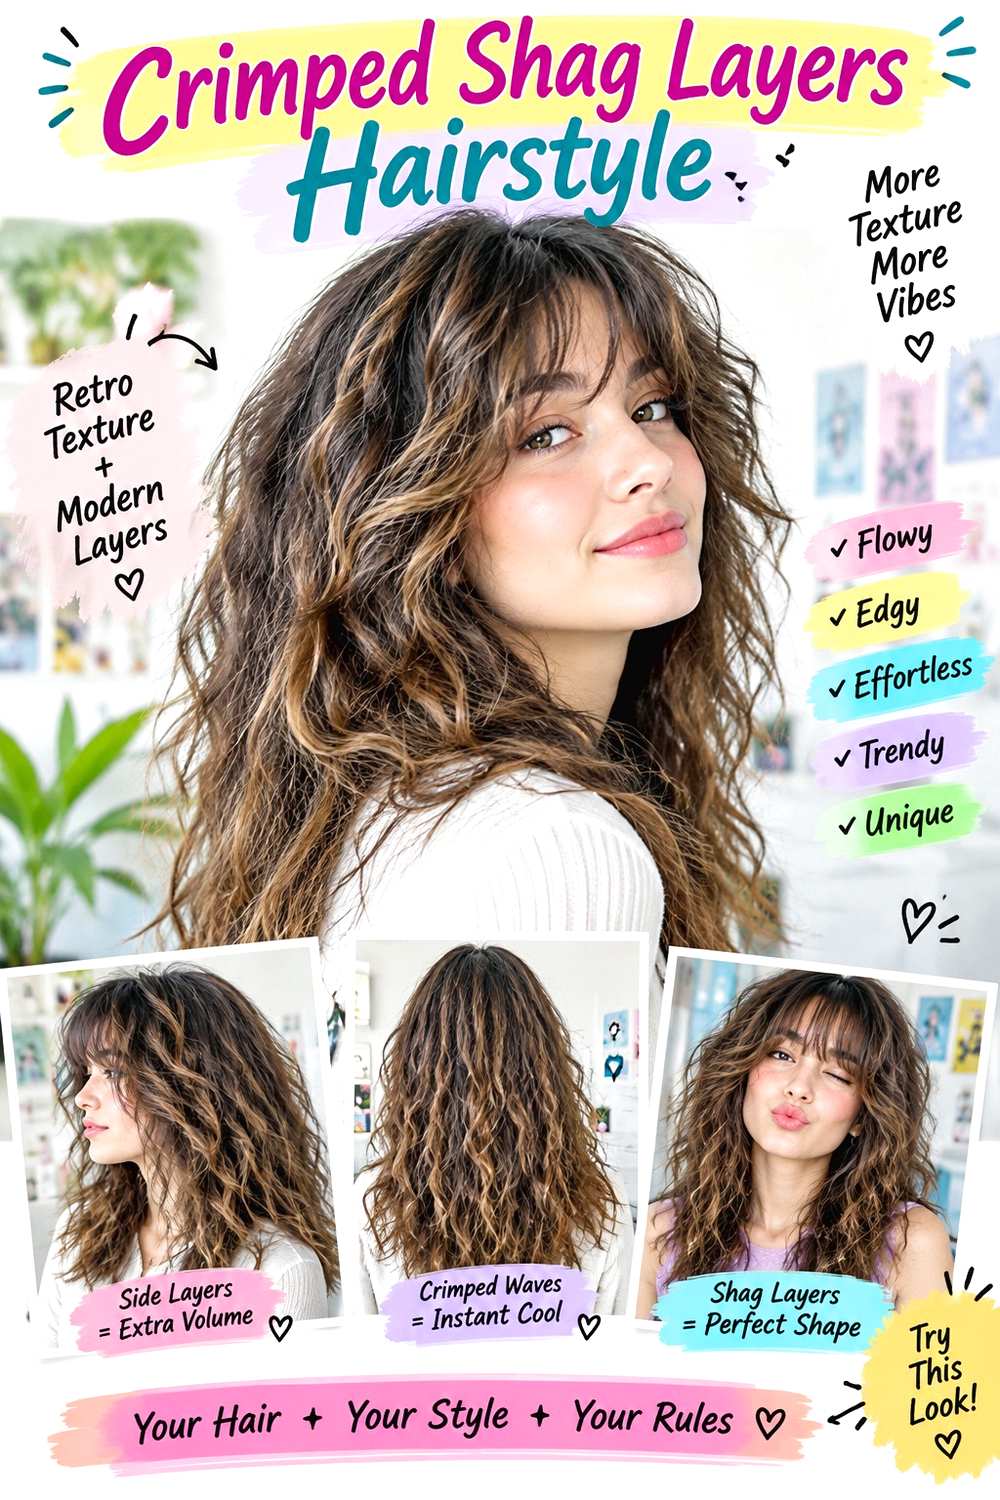
A shag gives crimping built-in variation because shorter crown layers, face-framing pieces, and longer ends all expand differently. Keep the overall length around the shoulders or below, with layers beginning through the crown and around the cheekbones. Fine crimping can be strongest through selected mid-lengths, while some ends remain straighter to stop the cut from looking uniformly puffy. A center or slightly off-center part keeps the irregular texture grounded.
Naturally straight or wavy hair can show the broken-up pattern clearly. Dense hair may need selective crimp placement because both the cut and styling add volume, while lower-density hair usually benefits from retaining enough perimeter weight. Apply heat protectant before using a crimping iron, then add lightweight mousse near the crown only if extra support is needed. Full styling can be time-consuming because the layers fall at different lengths; quick refreshes should target the top and face frame.
Cut upkeep matters when the shortest layers stop creating separation or the perimeter becomes too thin. At the salon, identify where you want the shortest crown layer to begin. Because crimping expands those pieces, a very short crown can create much more height than expected.
Pro tip:
Crimp the crown in fewer sections than the lower lengths. Leaving small gaps between textured pieces creates separation and helps the shag retain movement instead of becoming one dense mass.
Make It Work for You:
For lower-density hair, keep the shortest layers more restrained and concentrate crimping around the crown and front. Preserve a fuller bottom edge to balance the expanded upper texture.
Watch Out For:
Avoid combining extremely short crown layers with maximum root-to-end crimping unless you want substantial volume. Start with selective texture and increase it only where the shape needs more lift.
Face-Framing Crimped Pieces Hairstyle
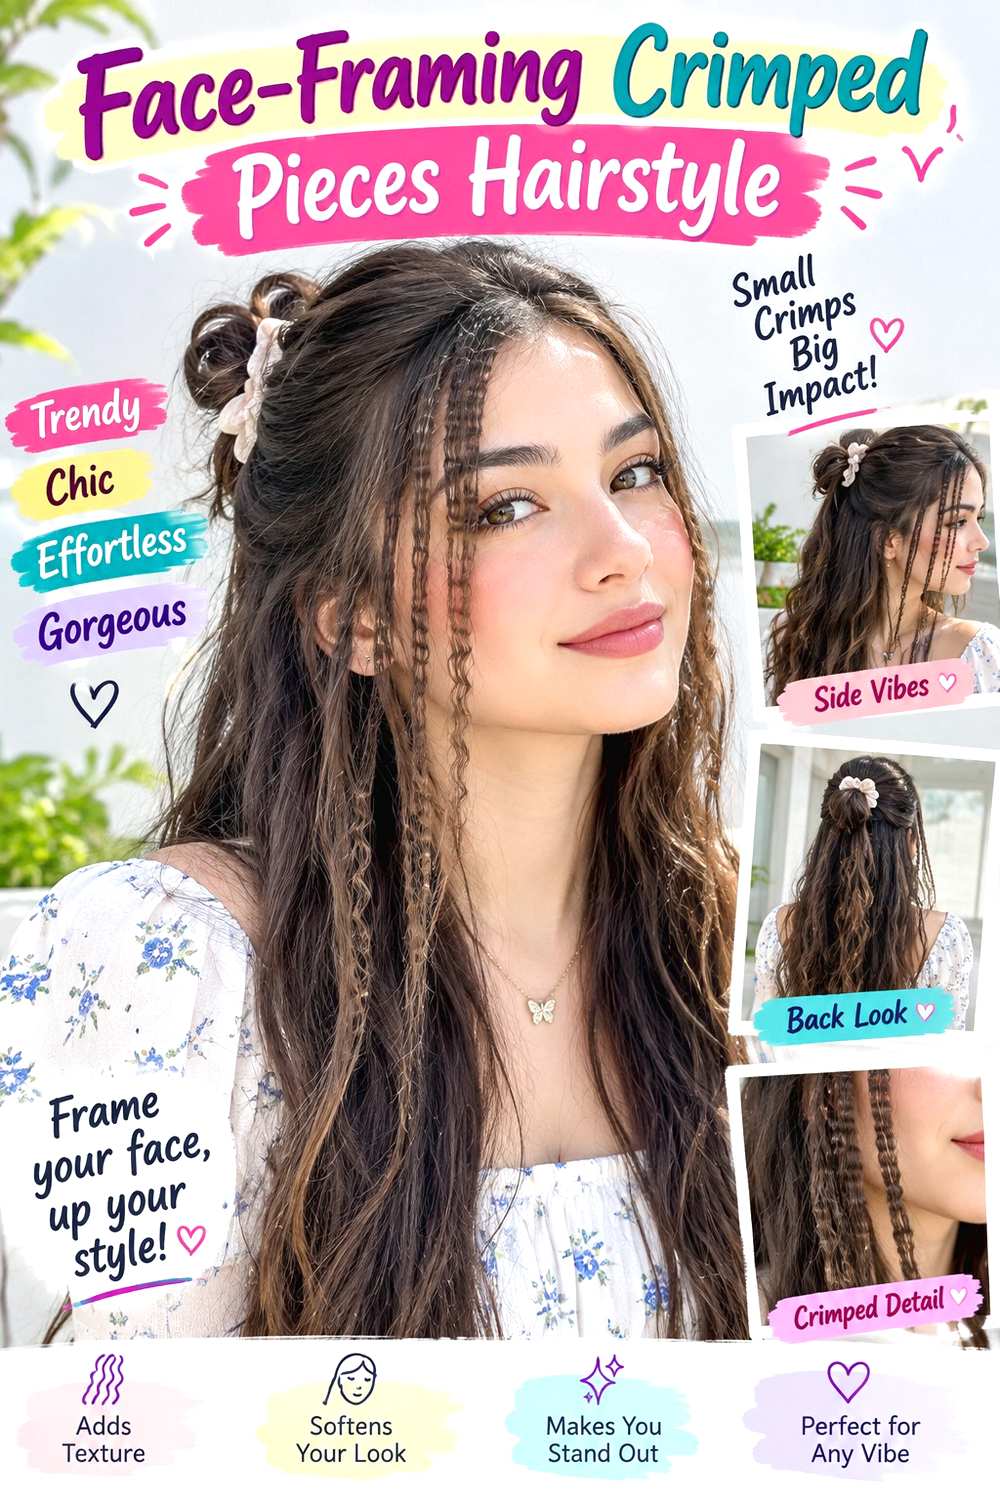
Crimping only the face-framing pieces gives the 90s reference without changing the texture of the whole head. Keep the main hair straight, softly waved, or naturally textured, then isolate narrow sections around the temples and front. Small crimps can begin below the roots and continue toward the ends, creating a deliberate contrast against smoother lengths. A center part makes the two accent pieces symmetrical, while a side part creates a less even, more directional frame.
This works across many lengths, from bobs to long hair, and it is especially practical if you want a short styling routine. Apply heat protectant to the front pieces before using a narrow crimping iron, then use flexible hairspray lightly if the texture needs more hold. The accent sections can be refreshed quickly compared with a full-head set. Avoid reheating them daily if the pattern still remains.
No special haircut is required, although existing face-framing layers change the finished position. If you already plan to add them, tell your stylist where the shortest piece should fall when worn loose. Keeping enough length around the temples can make the crimped accents easier to tuck away on days when you prefer a smoother finish.
Pro tip:
Keep each accent section narrow and leave the roots slightly smooth. The contrast is easier to see when the crimped pieces look intentional rather than blending into the entire front hairline.
Make It Work for You:
If your hair is fine, use one slim section on each side instead of taking a wide face frame. You get visible texture without removing too much fullness from the main lengths.
Watch Out For:
Do not repeatedly crimp short front pieces simply because they lose definition first. Their proximity to the face makes heat exposure frequent, so refresh only when truly needed.
Root-Lift Crimped Hairstyle
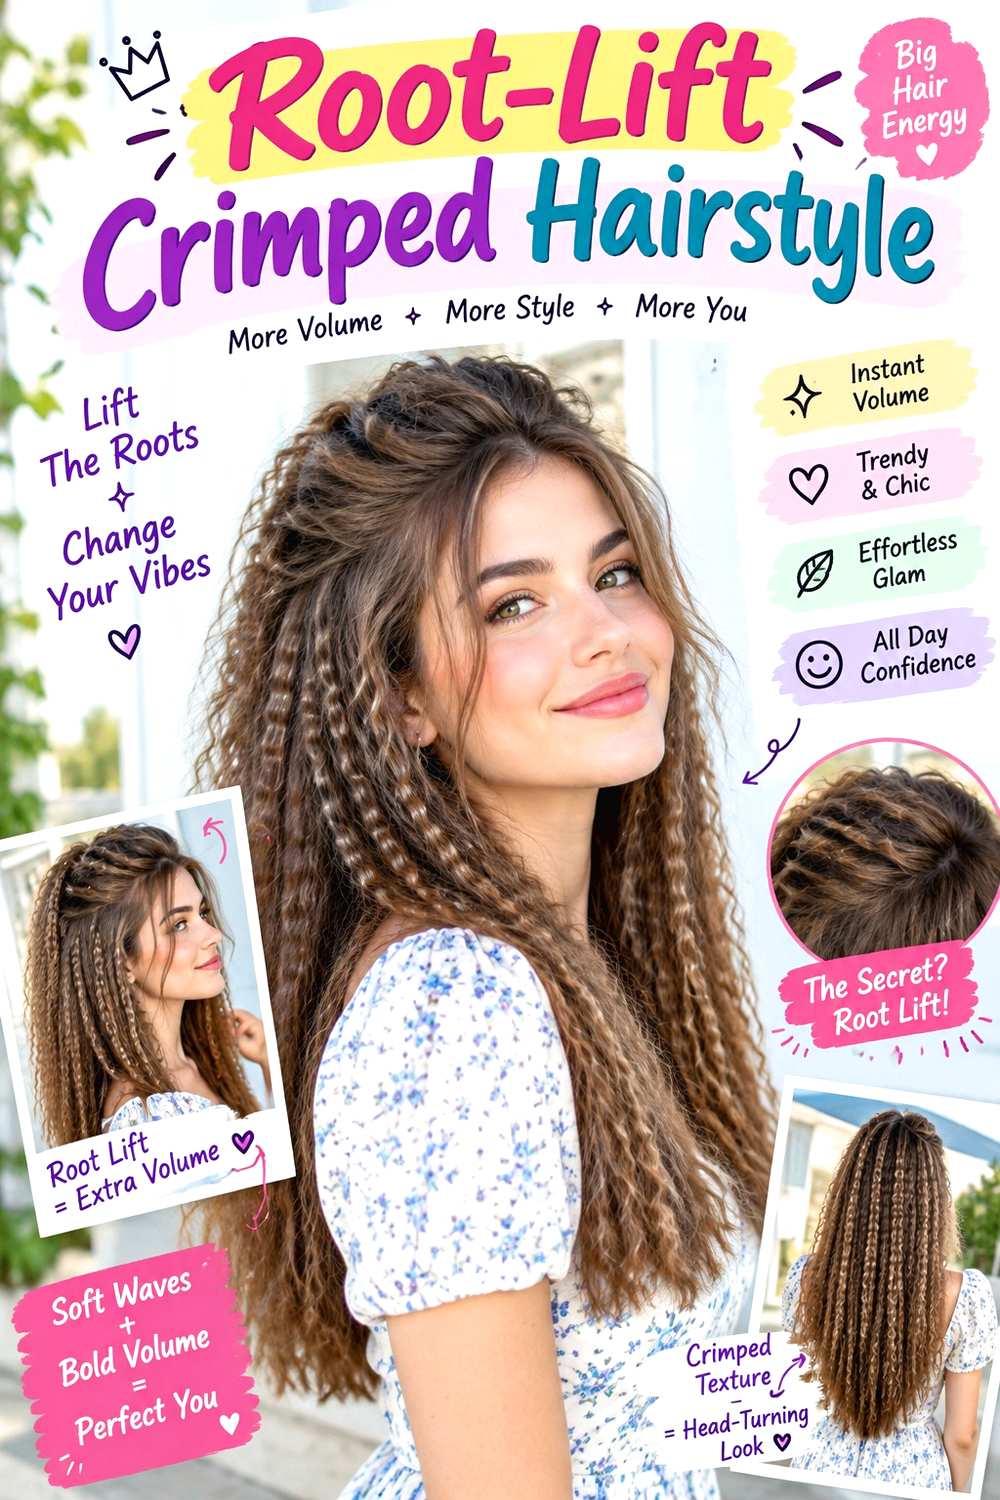
Crimping can be used mainly underneath the roots to create hidden lift rather than obvious texture through the whole length. Take narrow interior sections around the crown, leave the visible top layer untouched, and press one or two small crimps close to—but not directly against—the scalp. When the smooth surface hair falls back over them, the texture underneath supports subtle height without changing the ends.
This technique can be useful for straight or wavy hair that tends to lie flat at the crown, particularly when the lower lengths already have enough volume. Apply heat protectant before using a small crimping iron, then use a sectioning clip to keep the untreated surface hair separate while you work. The process is shorter than a full-head crimp because only selected roots are textured. Refreshing every day is unnecessary; use it only when the hidden pattern has relaxed.
The haircut itself does not need changing for this technique. If the crown remains flat regardless of styling, discuss your desired shape with your stylist before assuming more layers are required. Root direction, density, and product weight may all affect lift. Keeping the topmost layer smooth is what makes this variation feel controlled rather than fully retro.
Pro tip:
Crimp only the concealed sections beneath the part and crown, then lay the smooth top layer back over them. This gives lift while keeping the visible surface polished.
Make It Work for You:
If your hair is already dense, use this technique only in one or two flat areas. Extra hidden texture everywhere may create more crown volume than the overall shape needs.
Watch Out For:
Avoid placing the hot tool directly against the scalp. Work with a small amount of root clearance and use selected sections instead of trying to crimp every hidden strand.
Crimped Ends Hairstyle
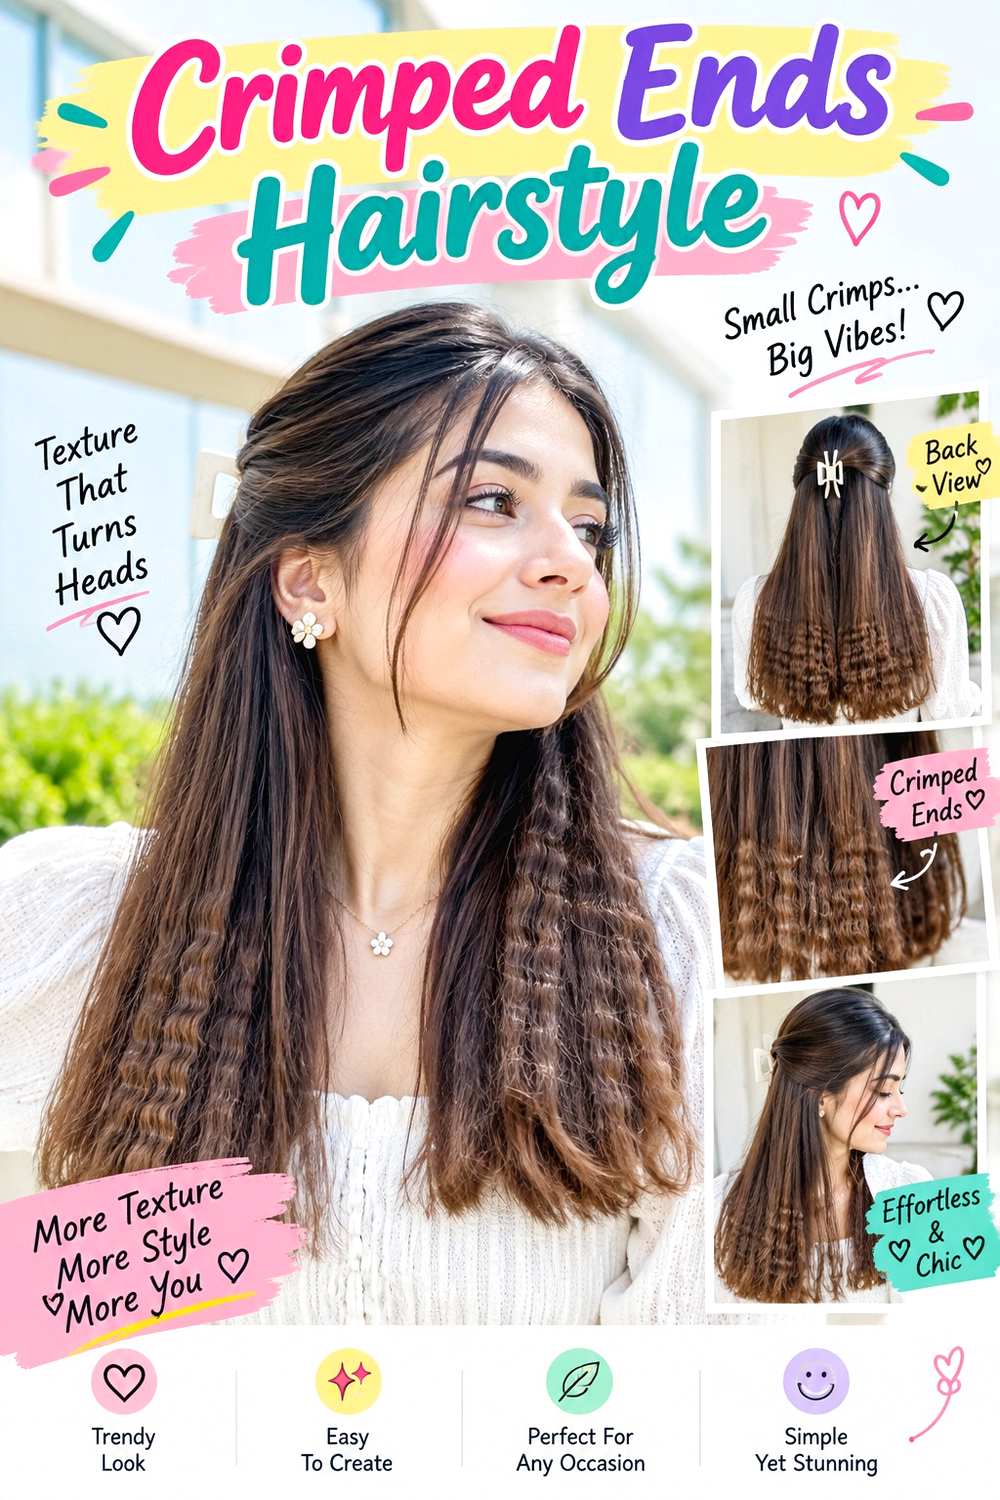
Crimped ends put the texture low in the silhouette, leaving the roots and mid-lengths relatively smooth. Keep the part clean, let the upper hair fall straight or softly waved, and begin small repeated bends only through the final several inches. On long hair, the effect creates a textured border; on shoulder-length cuts, it produces a compact burst of movement near the perimeter. Fuller ends make the contrast easier to see.
Straight and wavy hair are particularly suited to this placement because the transition from smooth to textured remains obvious. Apply heat protectant before using a crimping iron through the lower lengths, then mist flexible hairspray lightly over the finished ends. The limited placement makes this much faster than a full-head set, and a refresh usually requires only a few outer sections.
If the ends are already dry or fragile, adding repeated heat may not suit the routine, so a heatless braid set through the bottom can be considered instead. For a cut that supports the effect, ask your stylist to preserve suitable perimeter weight if fullness matters to you. Heavy thinning through the bottom can make the crimped area look more scattered than intentionally textured.
Pro tip:
Mark a consistent starting point before you begin so the crimped section sits at a similar height around the head. An uneven transition can look accidental from the back.
Make It Work for You:
If your ends are lower in density, start the texture slightly higher but use a softer crimp pattern. This can add fullness without making the very tips appear overly separated.
Watch Out For:
Avoid clamping repeatedly over fragile ends to make the pattern sharper. A softer result is preferable to unnecessary heat exposure when the bottom length already needs careful handling.
Side-Part Crimped Waves Hairstyle
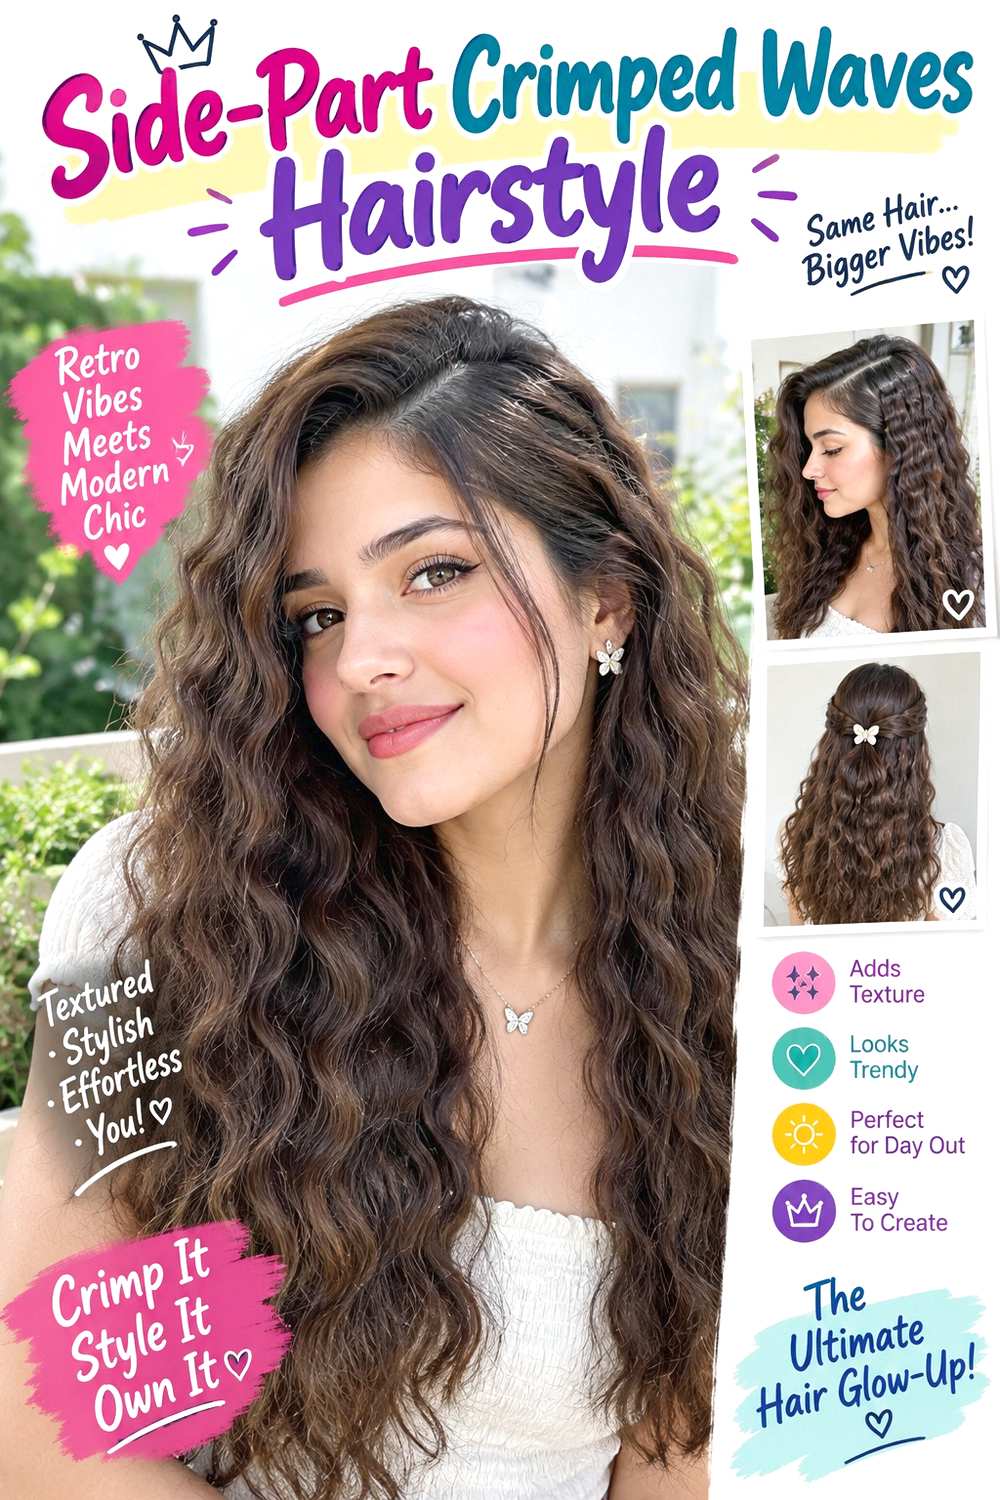
A deep side part gives crimped texture more direction by concentrating volume toward one side. Keep the lighter side smoother or tucked behind the ear, then add repeated bends through the heavier section from around the cheekbone downward. The texture can soften gradually into looser waves through the ends, creating a blend rather than one uniform pattern. This asymmetry works especially well on medium and long hair.
Straight and wavy textures make the transition easy to control, while very dense hair may need less crimping through the heavier side to prevent excessive width. Apply heat protectant before using a crimping iron, then use flexible hairspray to support the side sweep. A full set takes moderate time, but a next-day refresh can focus on the front and visible surface sections.
Set the part before styling so the crimp placement reflects how the hair will actually fall. Moving a finished part afterward can create an uneven mass of texture. No specific haircut is required, although front layers influence the sweep. If you already want face framing, tell your stylist which side you normally part on and where the shortest piece should finish so it works with the asymmetrical styling.
Pro tip:
Style the lighter side first and tuck it away, then crimp the heavier side while it is already in its final position. This makes the volume easier to judge.
Make It Work for You:
If your hair is dense, leave some interior sections smooth beneath the heavier sweep. The visible crimp remains strong while the overall width stays easier to control.
Watch Out For:
Do not create equal crimped volume on both sides if you want a clear deep-part effect. Keep the lighter side calmer so the asymmetry remains intentional.
Heatless Mini-Braid Crimped Hairstyle
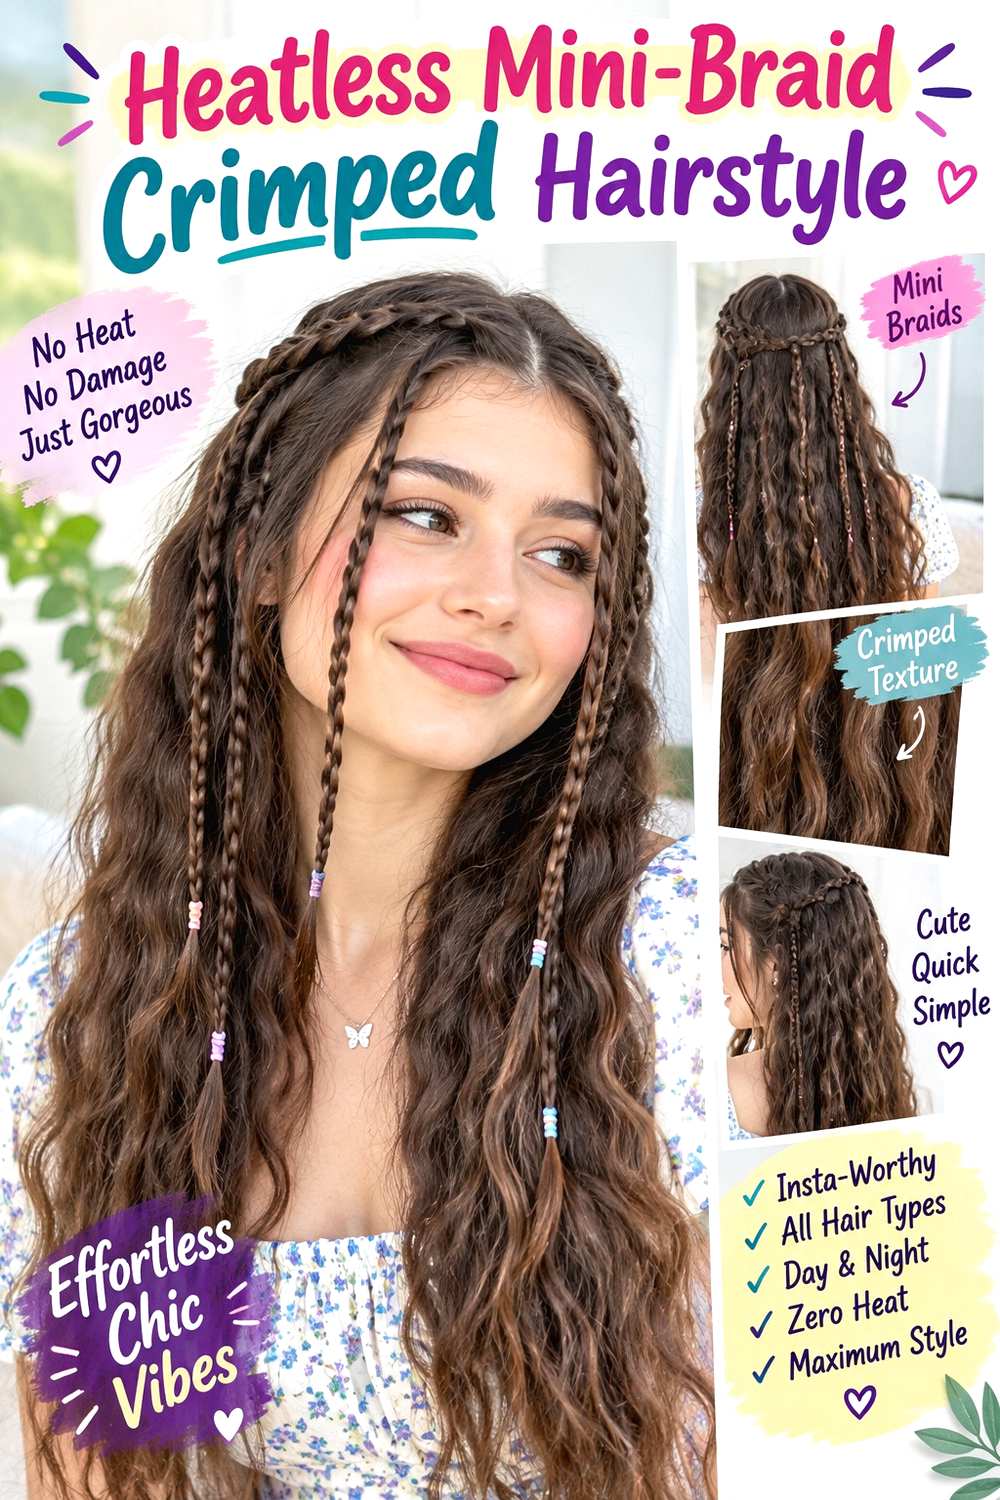
A mini-braid set can create a crimp-like pattern without using a hot crimping tool. Divide damp hair into multiple small braids, let them dry completely, then undo them gently to reveal narrow, repeated bends. A center part gives an even finish, while a side part shifts more texture to one side. Keeping the braids slightly larger near the roots and smaller through the lengths can produce a softer transition rather than extreme expansion everywhere.
This method works across straight, wavy, curly, and coily textures, though the final pattern will reflect the hair’s natural behavior and braid size. Use lightweight mousse through damp hair for support and small fabric-covered elastics to secure the ends. The hands-on process can take time because of the number of braids, and complete drying is essential before release. The next-day refresh is usually minimal if the pattern remains intact.
This is temporary styling, so a haircut is unnecessary. If you already have many short layers, expect some ends to release earlier from the braids and create a less uniform finish. For salon discussions, focus on your actual haircut goals rather than requesting layers solely for this heatless texture.
Pro tip:
Let every braid dry fully before undoing it. Releasing damp sections too soon can leave the pattern uneven and encourage the bends to drop before the rest of the hair is ready.
Make It Work for You:
If your hair is very dense, use slightly larger braid sections underneath and finer ones on the surface. This reduces setup time while keeping visible texture through the outer layers.
Watch Out For:
Avoid braiding damp hair so tightly that the scalp feels uncomfortable. Secure each section firmly enough to hold its pattern without relying on excessive root tension overnight.
Crimped Low Bun Hairstyle

A low bun uses crimping as hidden and visible texture rather than displaying every bend at full length. Create fine texture through the mid-lengths first, then gather the hair above the nape and fold or wrap it into a loose, compact bun. The crimped surface gives the shape more dimension, while a smooth center or side part keeps the front controlled. A few longer face-framing pieces can remain sleek for contrast.
Medium and long hair work well because the expanded texture helps the bun appear fuller without needing an oversized anchor. Apply heat protectant before using a crimping iron, then secure the bun with bobby pins. On already crimped hair, rebuilding the updo can be quick; creating the texture and bun from scratch takes more time. If the surface begins loosening, reinforce individual pinned sections rather than tightening the entire base.
The style is temporary and does not require a special cut. If the bun is part of your regular routine, tell your stylist whether shorter layers repeatedly escape so their length can be considered during any haircut you already want. Comfortable anchor placement matters more than maximum tightness.
Pro tip:
Crimp the sections before forming the bun, then keep the front smoother. The texture inside the updo creates fullness while the cleaner hairline prevents the finish from looking overly busy.
Make It Work for You:
If your hair is very dense, crimp only selected sections before pinning. The bun will still have textured dimension without becoming too large or difficult to secure.
Watch Out For:
Do not compensate for a slipping bun by adding more scalp tension. Rebuild the hidden anchor and redistribute the textured sections so the weight sits more evenly.
Claw Clip Crimped Twist Hairstyle
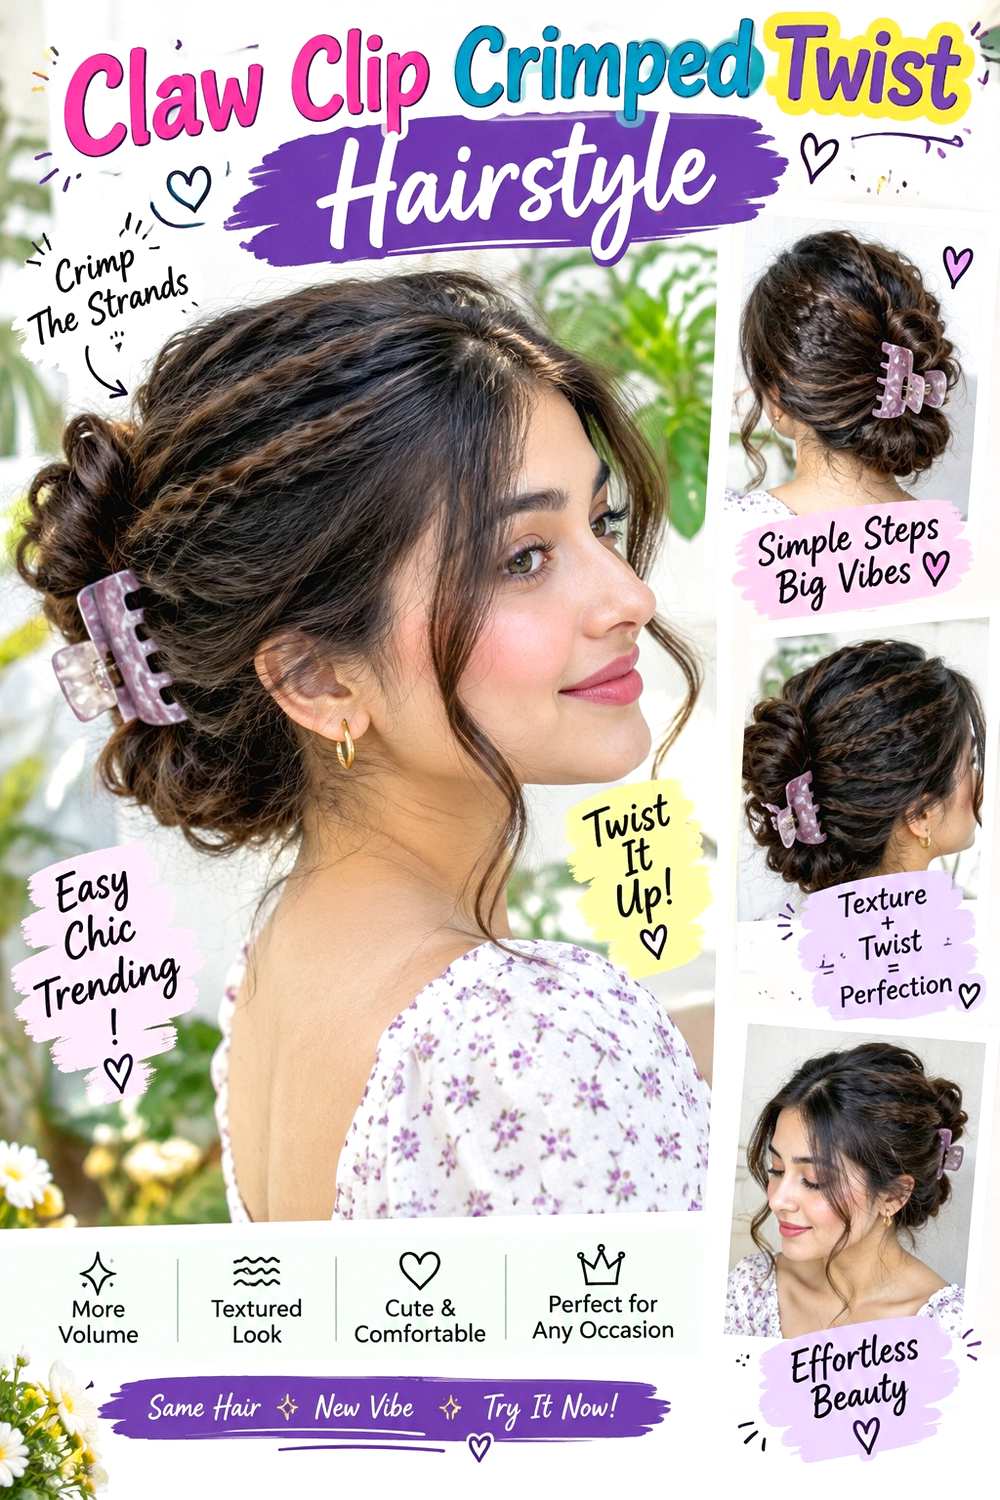
A claw clip twist lets small crimped ridges peek through a quick updo. Add texture through the mid-lengths and ends, gather the hair low, twist it upward against the back of the head, and secure it with the clip. The exposed ends can fan over the top with visible crimping, while the front stays smooth or softly side-parted. The mix of a practical twist and textured ends keeps the 90s reference clear without requiring a full formal updo.
Medium and long hair are easiest to twist. Straight or slippery hair can gain useful grip from the texture itself, while very dense hair requires a clip with enough capacity. Apply heat protectant before using a crimping iron, then secure the finished twist with a sturdy claw clip. Once the crimping is done, assembling the twist takes very little time. If the clip slips, rebuild the anchor rather than reclamping it harder.
This temporary style does not call for a haircut. If shorter layers repeatedly fall out, pinning or leaving them intentionally loose is more appropriate than cutting solely for the clip. For professional styling advice, focus on clip size, twist placement, and comfortable hold.
Pro tip:
Leave the top few inches of the exposed ends visibly crimped after clipping. That small textured fan makes the pattern readable even though most of the hair is secured.
Make It Work for You:
If your hair is very dense, create a flatter twist and use a larger clip. You can keep the crimped ends visible without forcing too much hair into undersized hardware.
Watch Out For:
An undersized clip may slide even when the textured hair has grip. Choose hardware that closes comfortably around the twist instead of relying on pressure for security.
Crimped Curtain Bangs Hairstyle
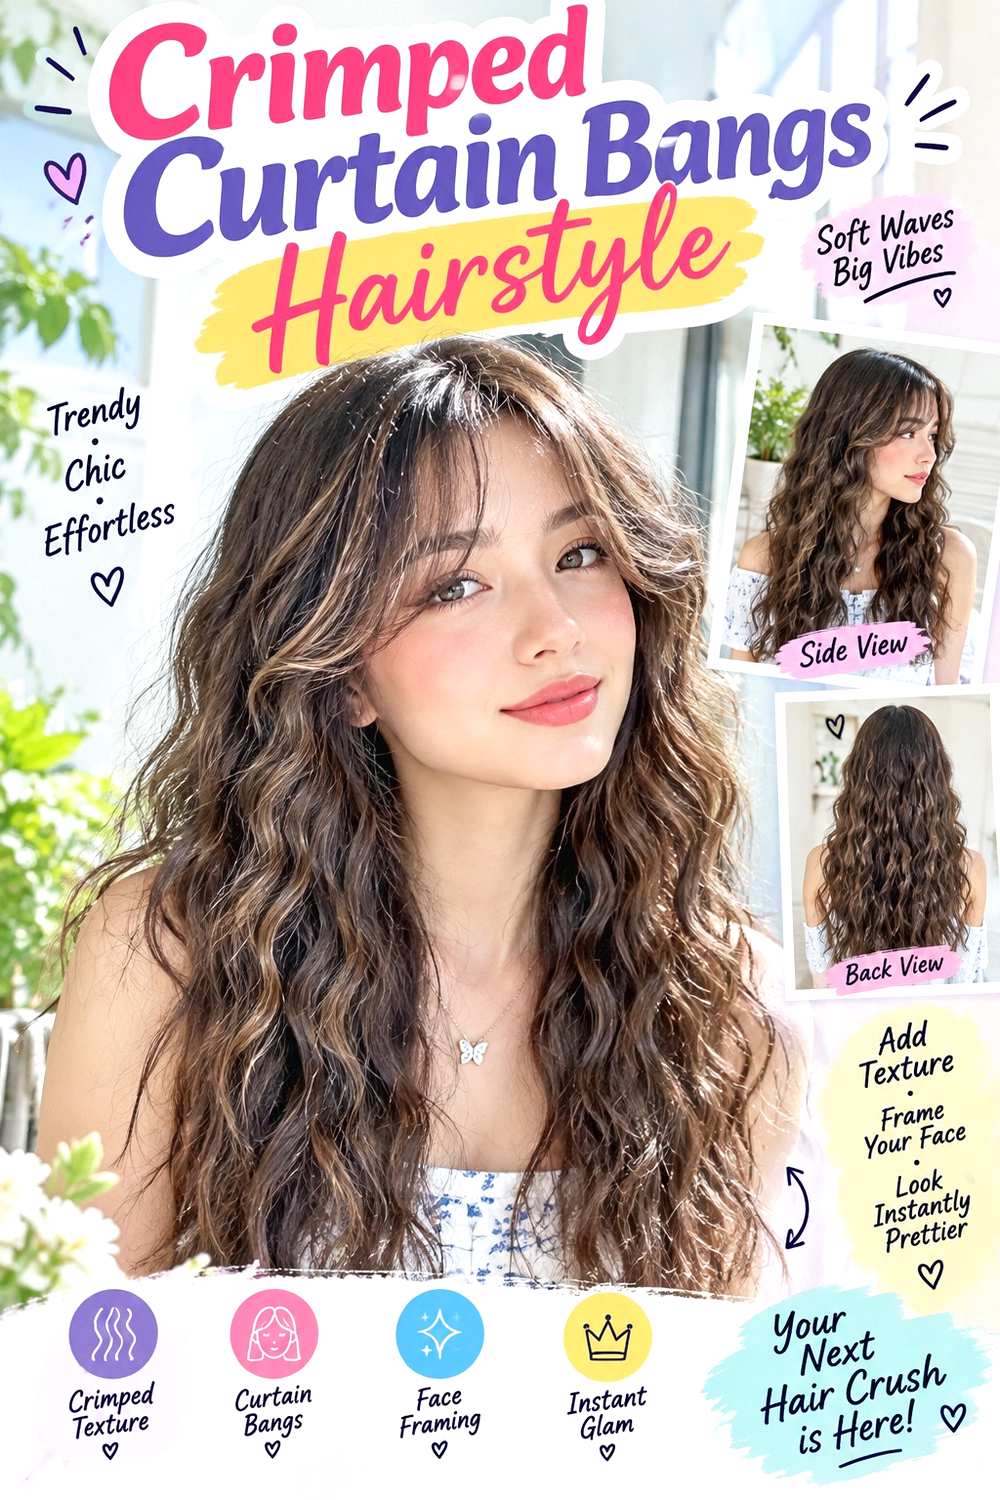
Curtain bangs can carry a subtle crimp while the surrounding hair stays smoother, creating texture around the face without overwhelming the whole cut. Keep the fringe shorter through the center and longer toward the cheekbones, then add very light bends through selected outer pieces rather than sharply pressing every strand. A center or softly offset part maintains the open curtain shape, while longer layers blend the fringe into the sides.
This version is easiest when the bangs already have enough length to separate naturally. Straight and wavy hair can show the small pattern clearly; curly hair may prefer a softer heatless texture rather than repeated straightening and crimping. Apply heat protectant before using a narrow crimping iron, then use flexible hairspray sparingly so the fringe remains movable. Refreshing only the bangs can be quick, but repeated daily heat is unnecessary if the texture still holds.
Fringe upkeep depends on finished length and growth direction. Reshape the cut when the center repeatedly enters the eyes or the outer pieces stop blending smoothly. At the salon, identify where you want the center and outer corners to finish, especially if you intend to wear the fringe textured as well as smooth.
Pro tip:
Crimp only the mid-length of selected fringe pieces and leave both roots and tips softer. This keeps the curtain opening visible instead of turning the bangs into a stiff textured block.
Make It Work for You:
If your fringe is fine, use just a few narrow textured pieces among smoother hair. The contrast can suggest crimping without making the bangs appear separated or sparse.
Watch Out For:
Avoid pressing short bangs repeatedly because the tool is close to the face and roots. Use controlled sections, heat protectant, and stop as soon as the intended bend appears.
Soft Crimped Lob Hairstyle
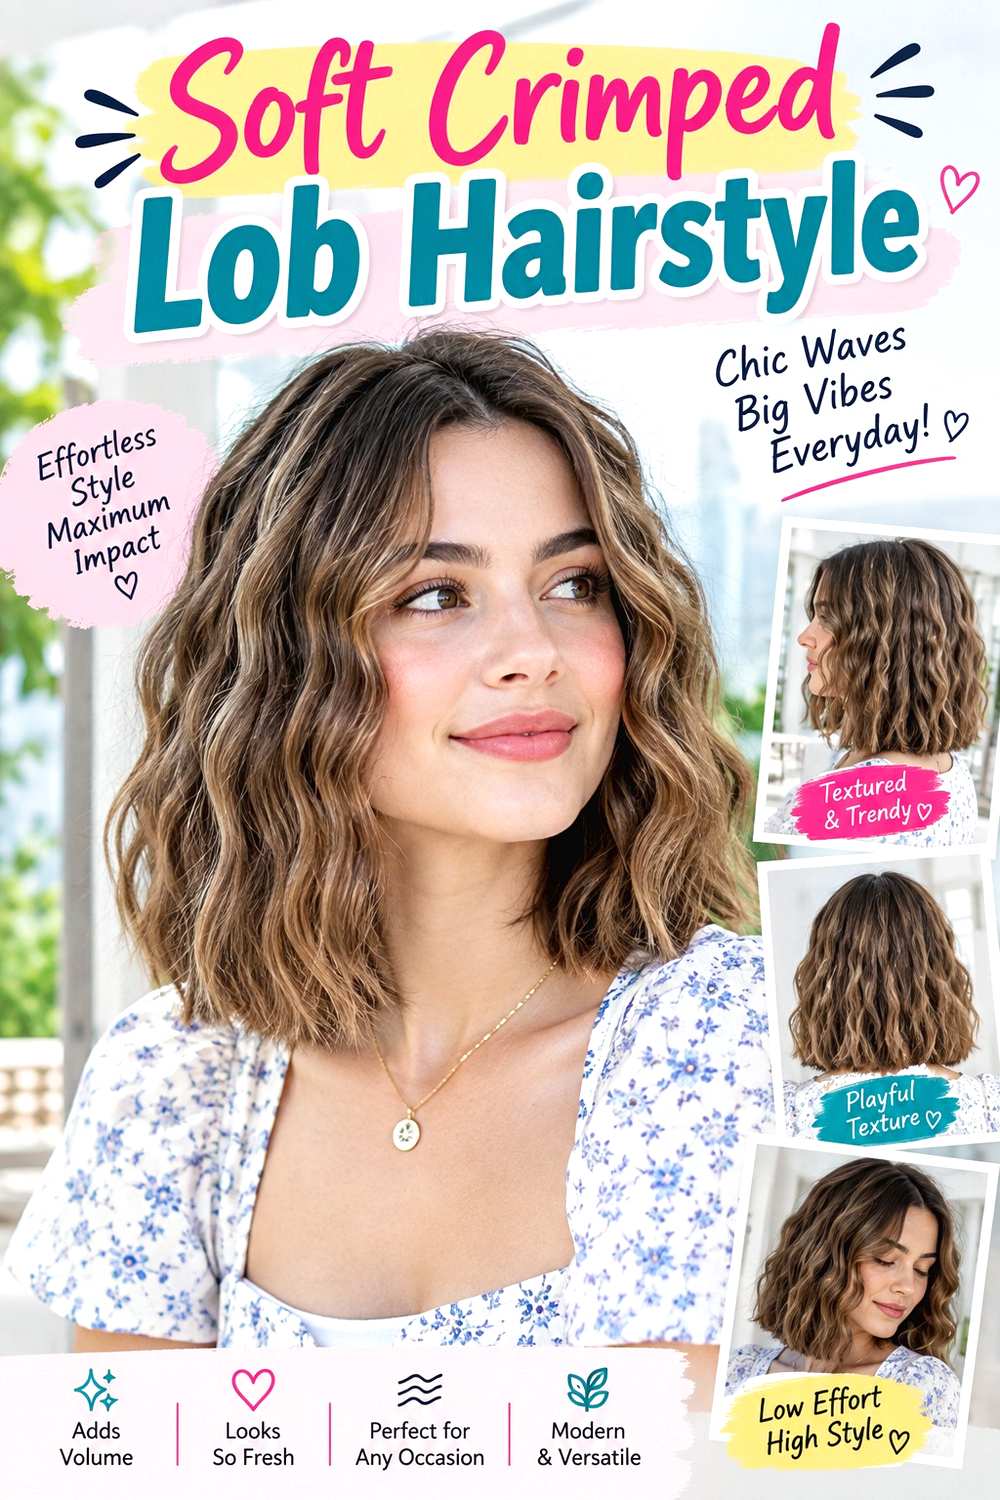
A lob gives crimped texture enough length to move while keeping the overall volume manageable. Let the perimeter fall between the jaw and shoulders, keep a strong bottom edge, and use a center or slight side part. Choose a wider, softer crimp through the mid-lengths rather than tiny ridges from root to tip. Straighter roots and slightly relaxed ends help the texture read as modern movement rather than an all-over rigid pattern.
Straight and wavy hair are natural starting points, while dense hair may benefit from selective texturing instead of full coverage. Apply heat protectant before using a wide-barrel crimping iron, then finish with flexible hairspray to keep the bends touchable. A full lob set takes moderate time, while next-day maintenance can focus on the front and outer sections that flatten during sleep.
The cut should retain enough perimeter weight to balance the expanded surface. If you already want layers, ask your stylist where they should begin rather than requesting heavy thinning for the crimped finish. A cheekbone or jaw-level face frame can add movement, but too many short sections may increase width at the sides once texture is added.
Pro tip:
Keep the roots smooth and begin the first visible bend around the cheekbone or slightly lower. This prevents the lob from expanding too widely across the upper sides.
Make It Work for You:
If your hair is lower in density, preserve a fuller bottom edge and crimp the surface more than the interior. You can gain visible texture without weakening the perimeter.
Watch Out For:
Avoid using a very fine crimp pattern everywhere if your lob is already dense and layered. Start with broader bends, then add smaller texture only where more definition is useful.
Coily Crimp-Effect Twist-Out Hairstyle
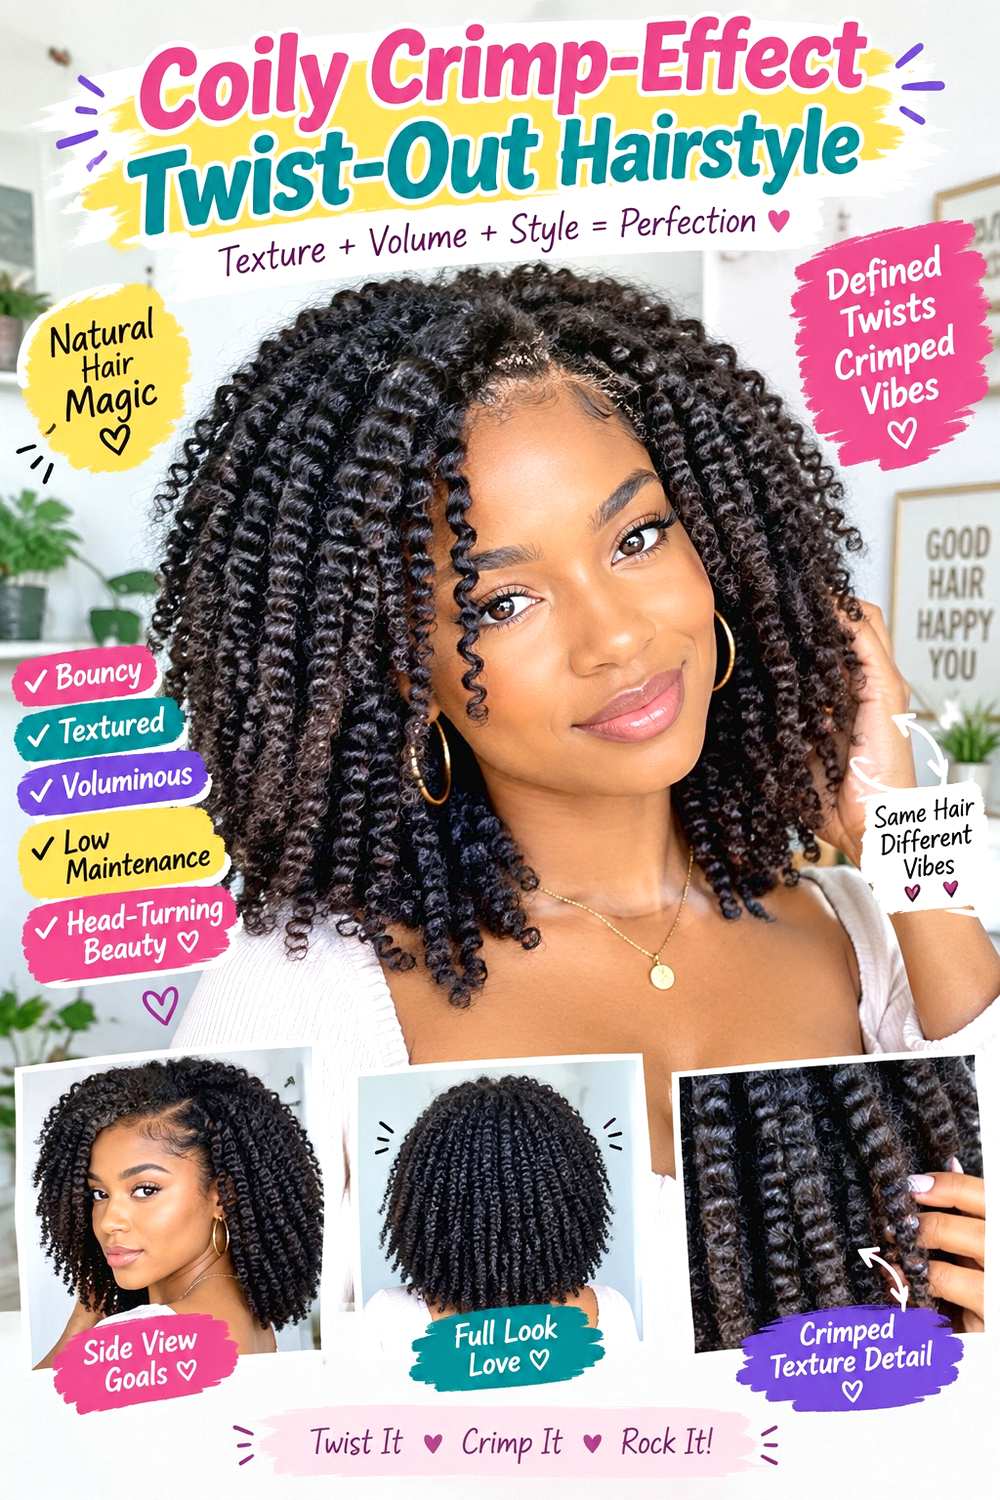
A twist-out can create a broken, repeated texture that gives a crimp-inspired effect while working with coily hair rather than pressing it into uniform ridges. Divide damp hair into small two-strand twists, let them dry completely, then separate them selectively so the resulting pattern stays defined. A center or side part can frame the shape, while keeping the roots softly lifted allows the texture to expand without flattening the crown.
Coily hair responds differently depending on shrinkage, density, and twist size, so the finished pattern will not mimic a heated crimp exactly. Use lightweight leave-in conditioner for softness, curl cream for definition, and small fabric-covered elastics only where the ends need extra security. Full wash-day setup takes time because twisting and drying are substantial steps. A later refresh can focus on retwisting only sections that have lost definition.
No special haircut is required for the texture. If you already want shaping, discuss the dry silhouette and where bulk naturally sits rather than asking for layers based only on a stretched view. Preserving comfortable root tension is also important because tighter twists do not automatically create a better final pattern.
Pro tip:
Separate each dried twist only as much as needed for fullness. Too much separation at once can blur the repeated pattern and create more frizz than the finished shape requires.
Make It Work for You:
If your hair shrinks strongly, use slightly larger twists where you want more visible length and smaller ones only in accent areas. The mixed scale can keep the silhouette balanced.
Watch Out For:
Do not undo twists before they are completely dry. Damp sections can lose definition quickly, leaving an uneven pattern that is harder to correct without restarting those areas.
Crimped Bubble Ponytail Hairstyle

A bubble ponytail combines two distinct 90s-inspired textures: repeated crimping and segmented ponytail sections. Start with a mid-height or high ponytail, crimp the hanging length, then place small elastics at even intervals down the tail. Gently expand each section into a rounded bubble while allowing the small ridges to remain visible. Keep the front smooth so the decorated tail does not compete with extra texture around the hairline.
Long hair gives the clearest series of bubbles, while medium lengths can use fewer sections. Apply heat protectant before using a crimping iron, then use small fabric-covered elastics to create the divisions. The full process takes more time than a simple ponytail because both texture and segmentation are involved. A refresh can target one flattened bubble or replace a slipped elastic without rebuilding everything.
The style is temporary, so there is no need for a haircut specifically for it. Existing layers may cause shorter ends to escape from lower bubbles, which can be pinned or incorporated rather than automatically trimmed. For styling, decide the bubble spacing before expansion; close spacing creates more sections, while longer spacing keeps the overall shape cleaner.
Pro tip:
Add every elastic before expanding the bubbles. Once the spacing looks balanced, loosen each section gradually so the crimped texture stays visible instead of becoming stretched flat.
Make It Work for You:
If your hair has lower density, create fewer, longer bubbles and expand them only slightly. The crimped pattern already adds fullness, so extreme pulling is unnecessary.
Watch Out For:
Avoid making one bubble much wider than the others. Uneven expansion can distort the ponytail, so compare each section before loosening it further.
Mixed-Texture Crimped Hairstyle
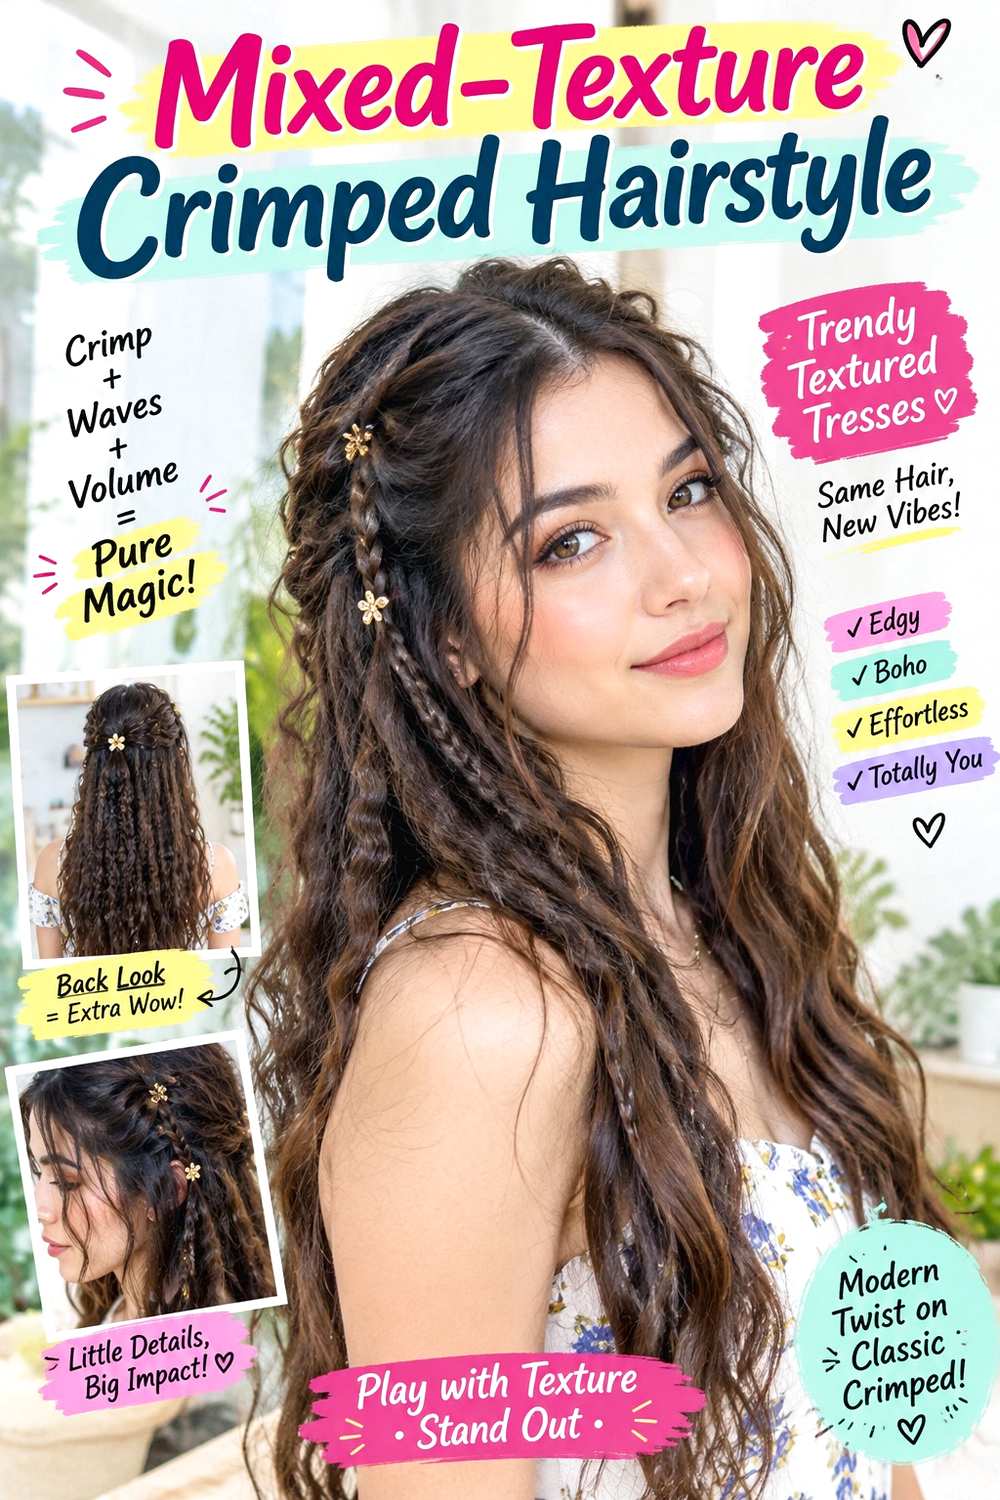
A mixed-texture finish uses crimping as one element rather than making it the entire hairstyle. Keep some sections smooth, add small crimps through selected mid-lengths, and allow a few looser bends or natural waves through the rest. The contrast works especially well on long hair with a center or soft side part because each texture has room to appear separately. Keeping the roots controlled prevents the varied surface from becoming visually chaotic.
Straight and wavy hair can transition easily between the different finishes, while curly hair can preserve some natural bends alongside lightly crimped accent sections if heat styling suits the routine. Apply heat protectant before using a crimping iron, then mist flexible hairspray lightly over the completed shape. Styling takes moderate time because placement matters more than covering every strand. Refresh only the texture that has visibly dropped instead of repeating the full pattern.
No special haircut is necessary. If you already plan to add layers, discuss where the shortest pieces begin because mixed texture can make short sections appear more prominent. Keeping enough perimeter weight helps the finish stay cohesive even when the surface varies. The key is deliberate repetition: several crimped sections should relate to each other rather than appearing randomly scattered.
Pro tip:
Choose your crimped sections before styling and repeat them in a loose pattern around the head. Intentional placement keeps the mixed texture cohesive rather than looking like unfinished work.
Make It Work for You:
If your hair is very dense, leave more interior sections smooth and concentrate texture on the surface. You can show the contrast clearly without adding unnecessary overall width.
Watch Out For:
Do not keep adding new textures simply because the style feels flat. Check root direction and section placement first; too many competing patterns can make the finish lose its structure.
Conclusion
Modern crimped hairstyles can be sharp, soft, subtle, or highly textured depending on where the repeated bends are placed. Full-length crimping creates the most volume, while textured ends, face-framing pieces, or hidden root crimps give a smaller 90s reference. Bobs and lobs keep the pattern compact, whereas long hair allows brushed-out or mixed textures to move more freely. Density matters because crimping expands the silhouette, and natural curls or coils can use braid sets or twist-outs instead of heat. Consider your part, layers, perimeter fullness, texture, and daily styling effort before choosing a version. The most practical option is often the one that uses texture selectively and can be refreshed without repeatedly reheating the entire hairstyle.
Before Your Salon Visit
Choose one or two favorites and save references that clearly show the crimp size and placement you like. Discuss your natural texture, density, face shape, preferred length, upkeep, and usual styling routine. Point out the exact fringe, layers, perimeter weight, root volume, or textured section that appeals to you. Because most crimped looks are temporary, focus mainly on styling placement and heat habits rather than requesting a haircut unless you already want a new shape.
FAQs
Do crimped hairstyles require a crimping iron?
No. A crimping iron creates a more regular pressed pattern, but small braids can produce a heatless crimp-like texture once fully dry. Coily hair can also create a related broken-up effect through twist-outs. The exact result depends on natural texture, section size, and how much the finished pattern is separated.
How can I keep crimped hair from looking too wide?
Leave the roots smoother, crimp selected sections instead of every strand, or concentrate the pattern through the mid-lengths and ends. Dense hair often needs less all-over texture than lower-density hair. A clean part and fuller perimeter can also give the expanded surface a clearer shape.
Can I crimp fine or lower-density hair?
Yes. Crimping can add visible fullness, but very small sections and excessive brushing may also expose gaps. Start with selected surface pieces or a softer pattern, preserve weight through the ends, and avoid taking too much hair into short face-framing layers solely for the textured finish.
How can I reduce heat use with crimped styles?
Use mini braids on damp hair and let them dry completely before releasing them, or reserve heat crimping for selected accent sections instead of the whole head. When using a heated tool, apply heat protectant and avoid repeated passes over sections that already hold the intended pattern.