14 New Year’s Eve Hairstyles for Short Hair
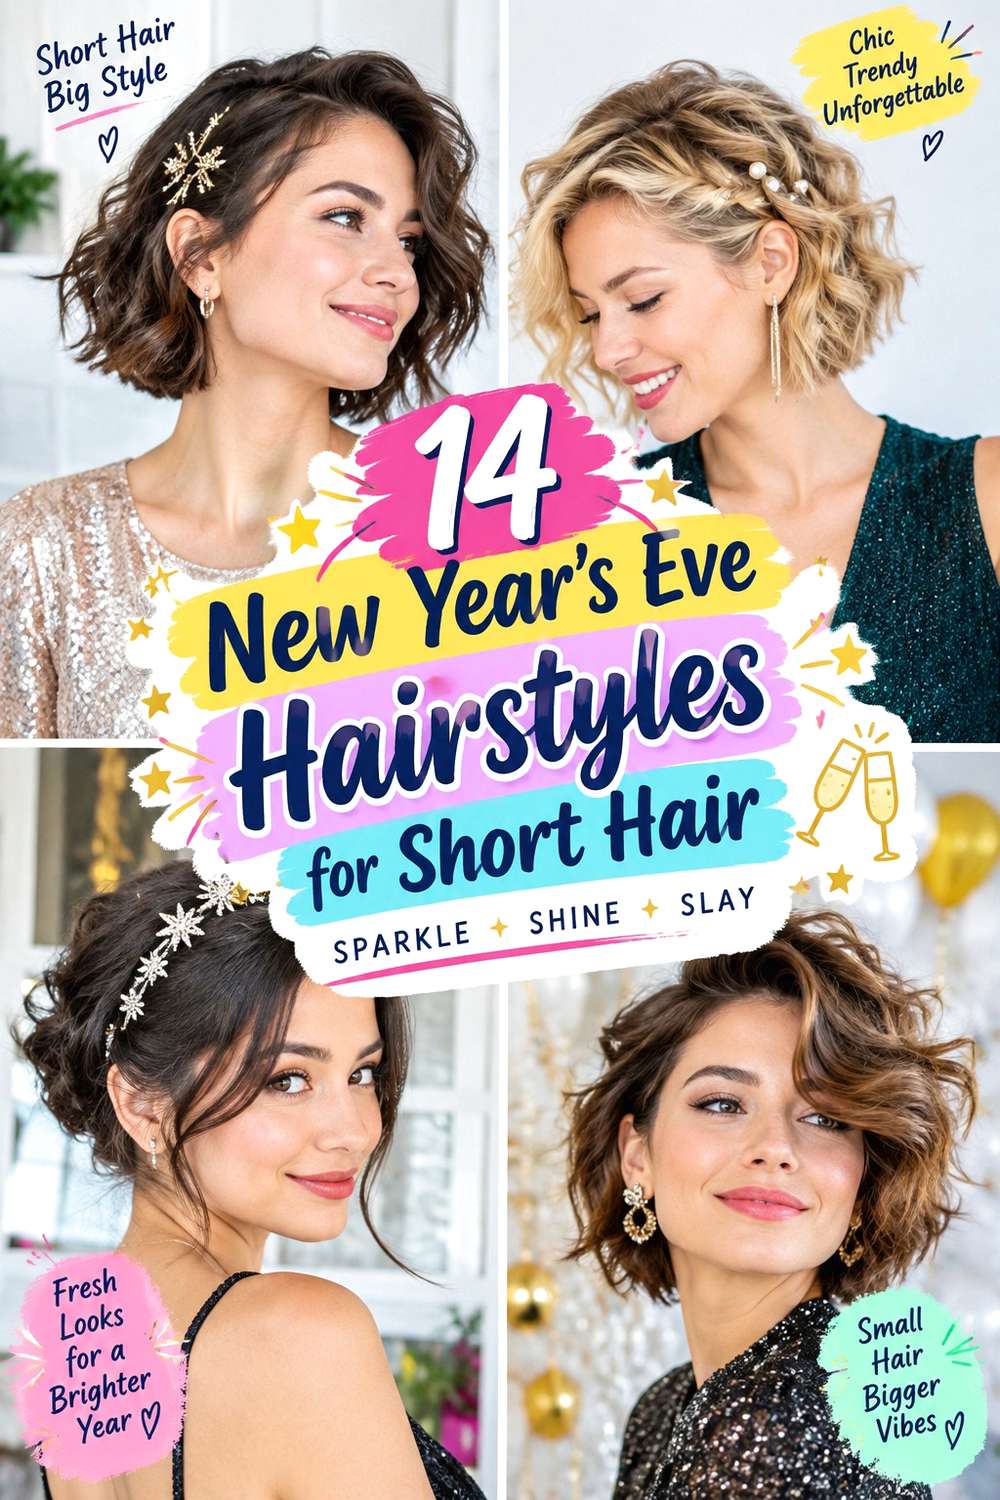
New Year’s Eve hairstyles for short hair rely more on shape, parting, texture, and placement than on long braids or oversized updos. Pixies can use directional volume, a glossy sweep, or decorative pins, while bobs can shift from smooth and tucked to waved, flipped, or softly tousled. A fringe changes the front immediately, and a strong jaw- or chin-length perimeter can keep shorter cuts looking intentional even when the finish has plenty of movement.
Straight, wavy, curly, and coily textures can all support party styling without being pushed into the same finish. Fine strands may benefit from lighter product and carefully placed lift, while dense hair can need controlled internal weight so a short shape does not spread too widely. Curly and coily cuts should be judged at their finished dry length because shrinkage changes fringe placement, side volume, and how much hair reaches an accessory.
Short hair can also make the difference between a full styling session and a refresh very clear. Heat-shaped waves or a smooth blowout take more preparation, while a barrette, headband, mini twist, or curl refresh can be much faster. Practical choices include secure accessory placement, flexible hold, manageable frizz, and enough comfort for dancing or outdoor countdown plans.
Quick List
- Metallic Barrette Side-Swept Bob Hairstyle
- Wet-Look Pixie Sweep Hairstyle
- Crystal Headband Textured Bob Hairstyle
- Soft Finger-Wave Crop Hairstyle
- Velvet Bow Mini Half-Up Bob Hairstyle
- Curly Pixie With Jeweled Pins Hairstyle
- Deep Side-Part Flipped Bob Hairstyle
- Sleek Tucked Ear Bob Hairstyle
- Tousled French Bob With Wispy Fringe Hairstyle
- Mini Twisted Crown Bob Hairstyle
- Sculpted Curly Bob Side Sweep Hairstyle
- Short Shag With Piecey Waves Hairstyle
- Claw Clip Mini Twist Lob Hairstyle
- Polished Bixie Volume Hairstyle
Metallic Barrette Side-Swept Bob Hairstyle
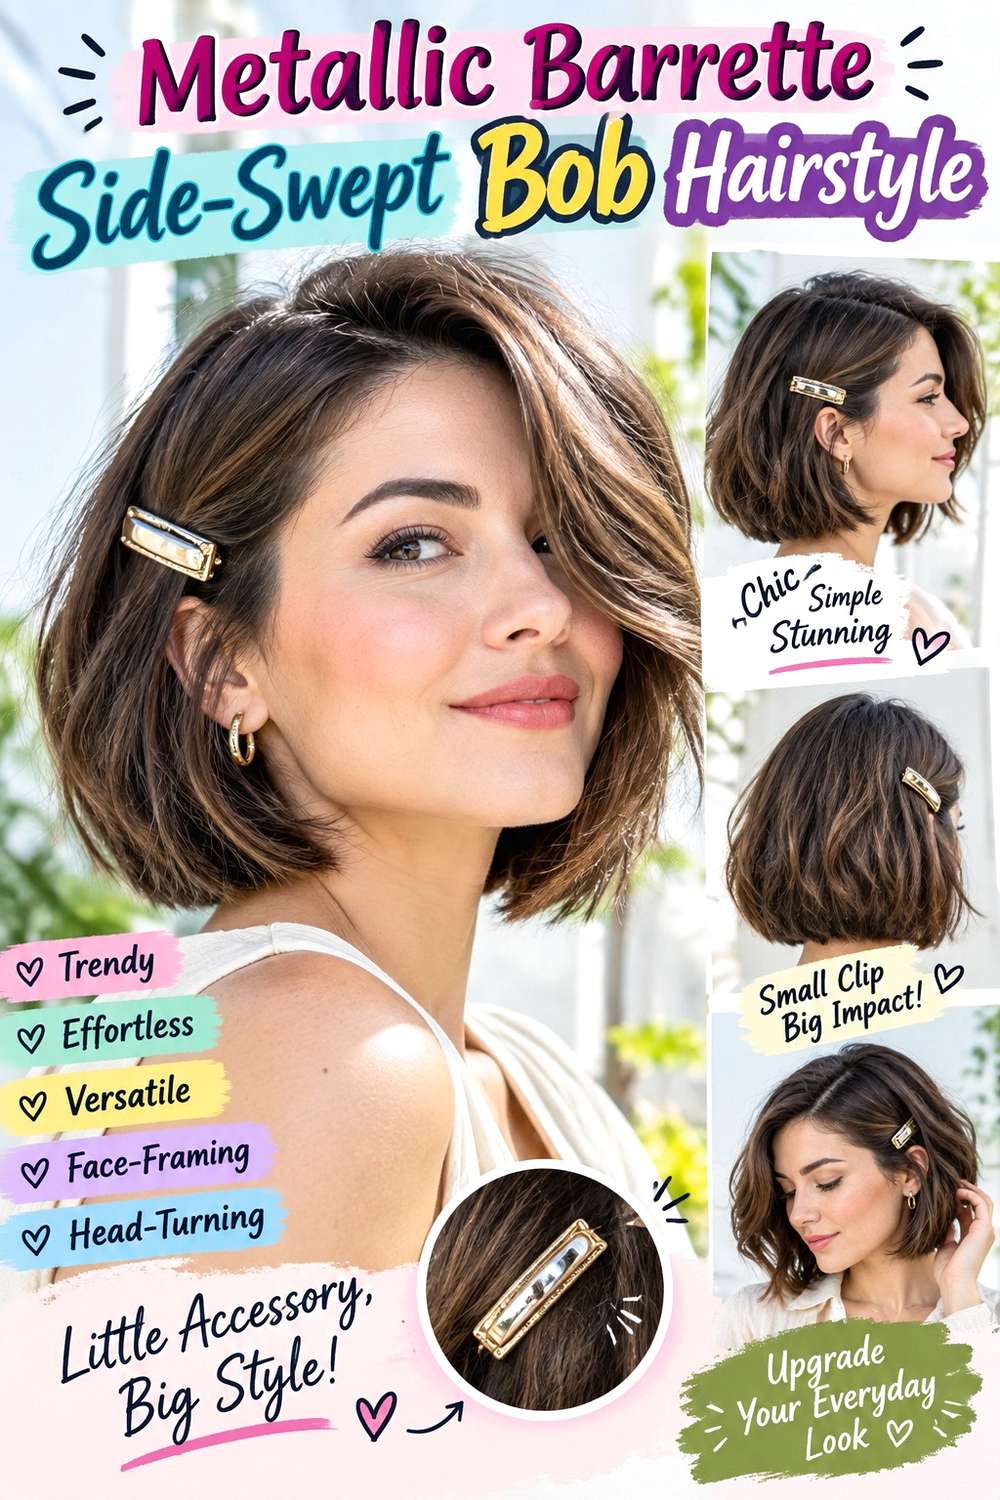
A metallic barrette gives a short bob a clear party detail without demanding extra length. Keep the cut between jaw and chin length, create a deep side part, and let the fuller side sweep across the forehead with a soft bend through the middle. Tuck the lighter side behind the ear and place the barrette over that controlled section. A fairly strong bottom edge helps the bob retain its shape while the asymmetry adds movement.
Apply heat protectant before using a flat iron to create a gentle bend, then add a small amount of lightweight serum through the ends for surface smoothness. Straight and wavy hair usually need a moderate full styling session, while naturally curly hair can keep more texture and use only the side placement. A later refresh can focus on the front bend and barrette rather than the whole bob.
At the salon, point to the finished jaw or chin landmark you want and explain whether the perimeter should remain blunt-looking or lightly softened. If you tuck one side often, mention that preference so the area around the ear remains manageable. If the barrette slips during the evening, strengthen the tucked section rather than pushing the accessory more tightly against the scalp.
Pro tip:
Create the ear tuck and let it settle before adding the barrette. A stable section keeps the accessory level and preserves more lift on the fuller side of the bob.
Make It Work for You:
For lower-density hair, choose a slim lightweight barrette and tuck only a narrow section. Leaving more hair loose helps the bob maintain a fuller outline.
Watch Out For:
Avoid placing serum exactly where the barrette grips. A slippery surface can encourage sliding, so keep smoothing product concentrated through the exposed middle lengths and ends.
Wet-Look Pixie Sweep Hairstyle
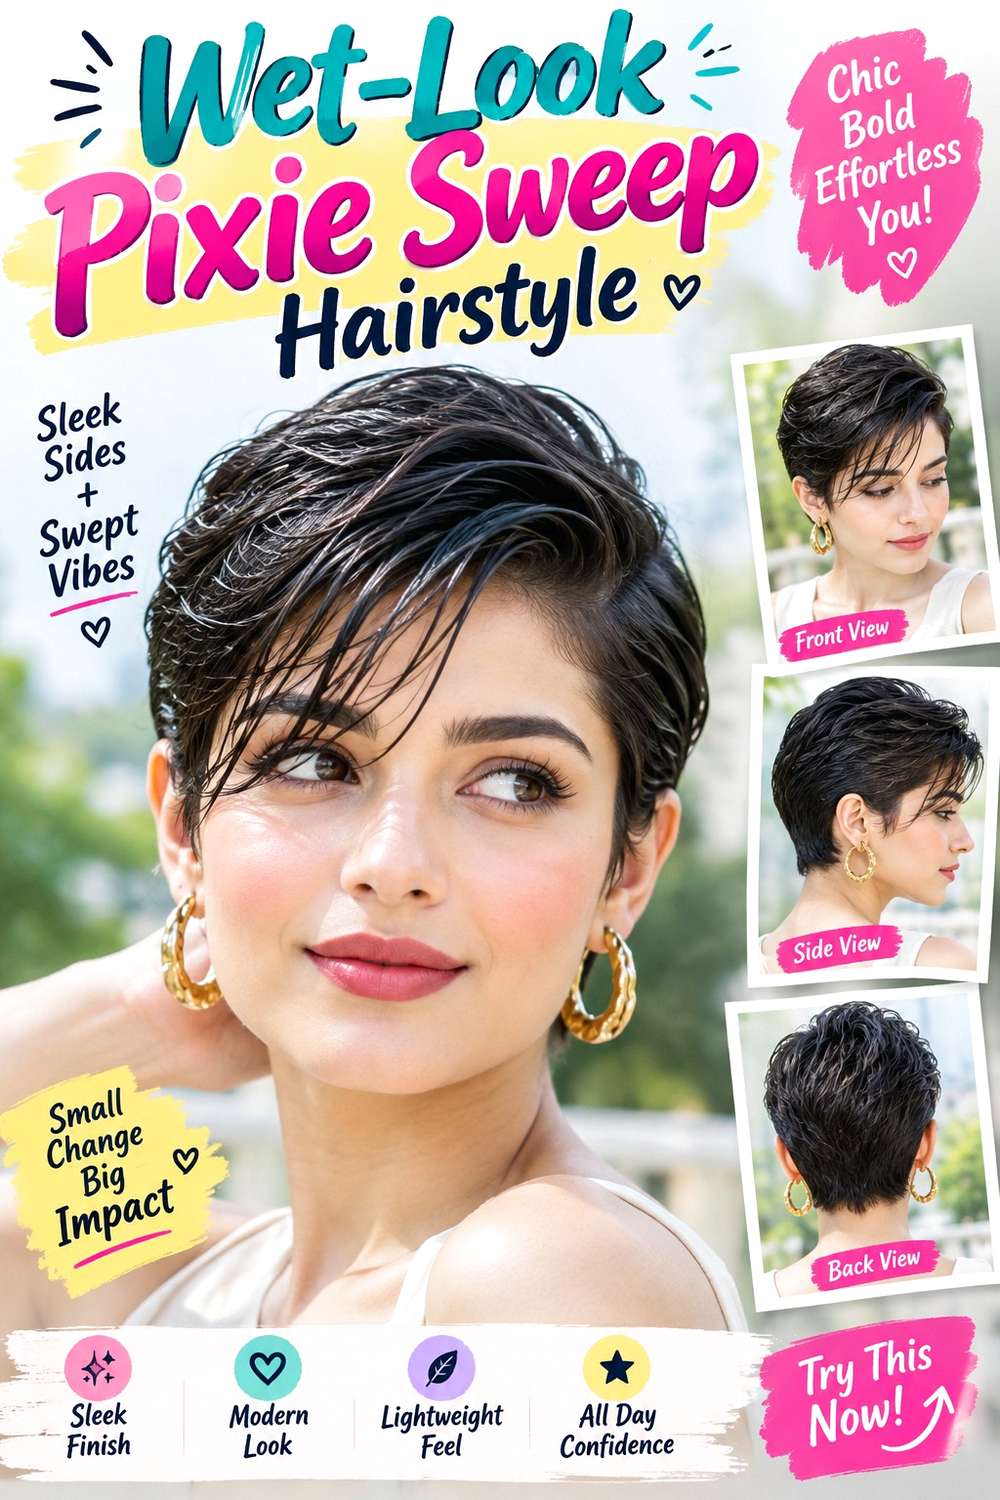
A wet-look sweep works especially well on a pixie because the short length allows the direction of every section to remain visible. Use a deep side or off-center part, guide the longer top across the forehead or diagonally backward, and keep the sides close without flattening the crown completely. The finish should look glossy and controlled, with enough separation through the top to prevent the hair from becoming one solid shell.
Use strong-hold gel to establish direction and a fine-tooth comb to create clean lines, then add lightweight shine serum sparingly to the exposed top. Straight and wavy textures can usually create this finish quickly, while curly or coily pixies can use a more textured interpretation rather than being forced smooth. The full styling session is relatively short on cropped hair; a quick refresh may mean resetting only one lifted section near the front.
At the salon, explain how much length you want left through the top and where the shorter sides should meet it. That transition determines whether the sweep has enough hair to move. As the pixie grows, reshape it when the top stops falling in the intended direction or the sides begin changing the silhouette. Add product only where separation appears instead of coating everything again.
Pro tip:
Work the top into its final direction before the gel fully sets. Small adjustments are easier while the surface is still flexible and can prevent stiff ridges.
Make It Work for You:
For a curly pixie, slick the sides more closely while leaving the top textured. You keep the directional party finish without removing the natural curl pattern above.
Watch Out For:
Do not keep layering gel every time one section lifts. Excess product can flake or become sticky; rework only the area that actually loses its direction.
Crystal Headband Textured Bob Hairstyle
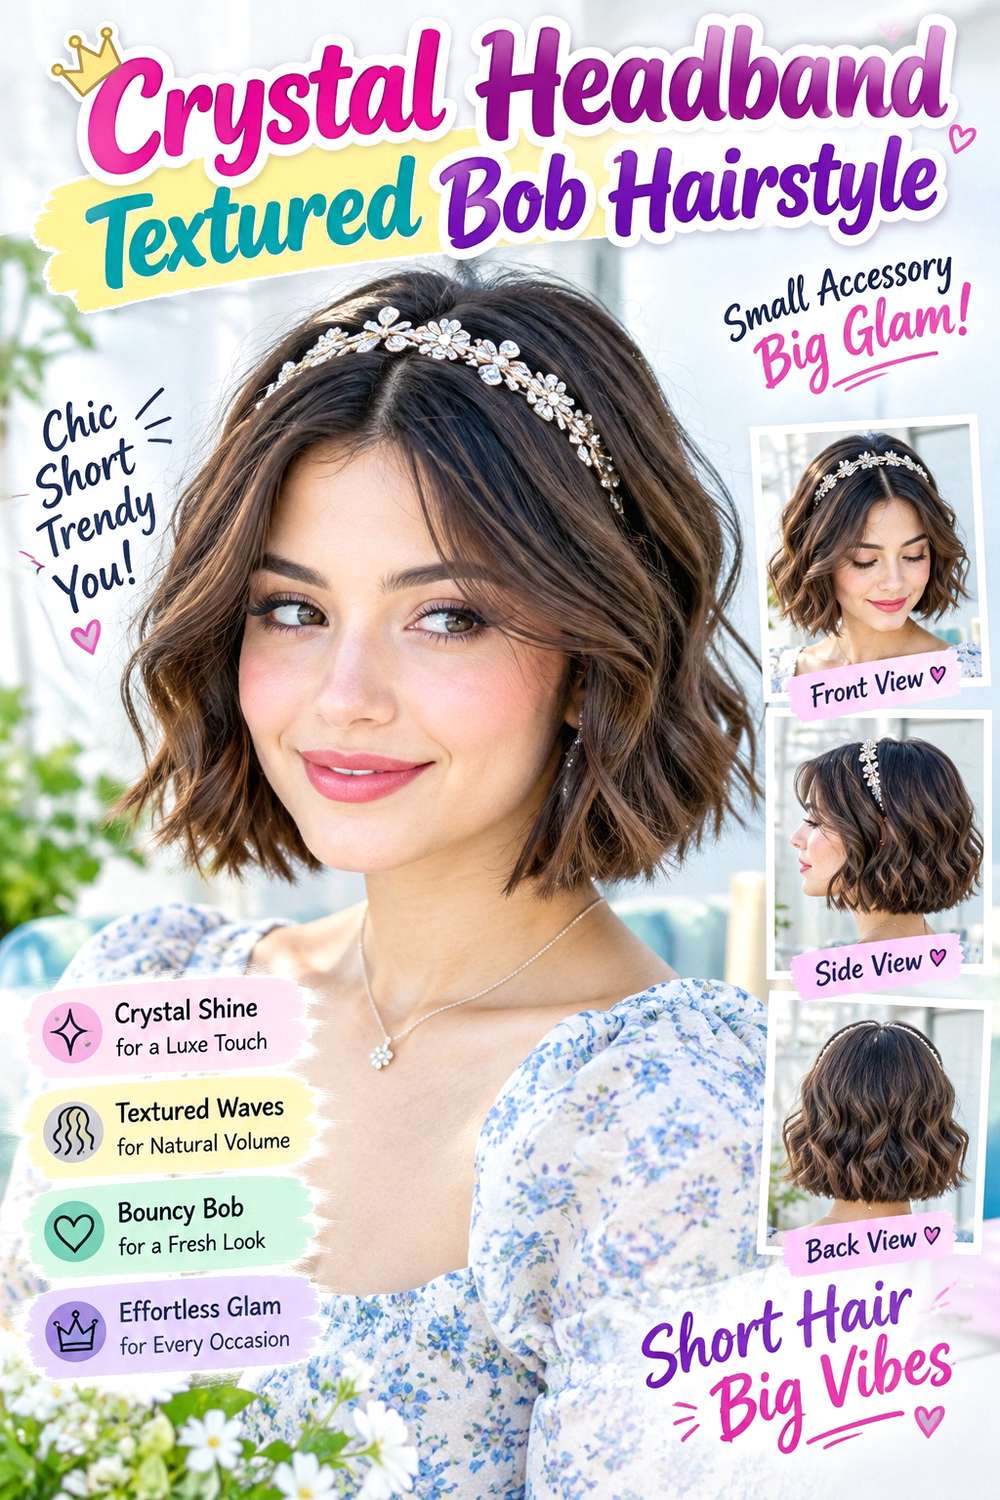
A slim crystal headband adds sparkle to a bob while textured bends keep the shape from feeling too formal. Let the cut sit between the chin and shoulders with a clear perimeter, then create irregular bends through the middle while leaving some tips straighter. A center part keeps the balance even, and a little crown lift behind the headband stops the accessory from pressing the top flat.
Apply heat protectant before creating bends with a flat iron, then use light texture spray through the middle sections for separation. Straight and wavy hair usually need a moderate full styling session; naturally curly hair can keep more of its own pattern and add the headband after drying. A quick refresh can focus on the front pieces and any sections flattened beneath outerwear.
For salon planning, specify the exact bob length and whether you want the bottom edge strong or softly broken up. Dense hair may need controlled internal weight removal where the shape widens, while fine strands can often benefit from preserving more perimeter. Place the headband after the styling is complete and adjust crown volume around it. If it starts sliding, change its resting point instead of increasing painful pressure behind the ears.
Pro tip:
After placing the headband, lift a small amount of hair just behind it. Restoring that crown volume keeps the accessory from looking pressed into the bob.
Make It Work for You:
For fine hair, choose a narrow lightweight headband and keep texture concentrated near the front. This preserves more fullness through the short perimeter.
Watch Out For:
Avoid overworking every section into a different bend. Too much variation can blur the bob’s outline; keep the perimeter calm enough to remain clearly visible.
Soft Finger-Wave Crop Hairstyle
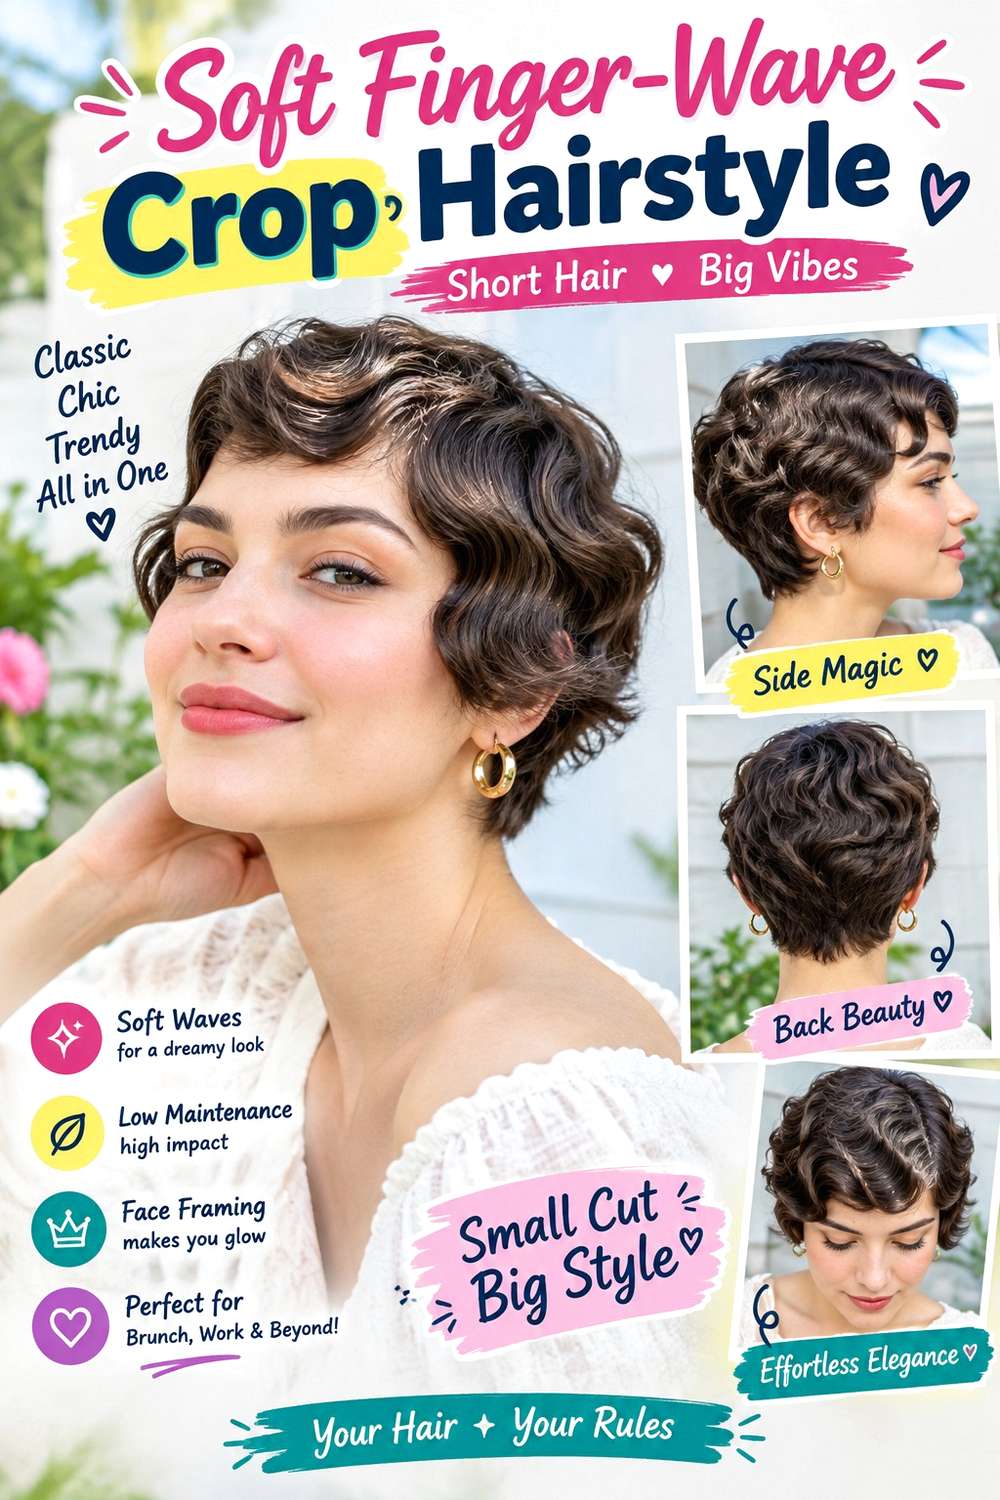
A finger-wave inspired crop creates a sculpted New Year’s Eve finish through directional curves rather than height. Keep the hair close through the sides and nape, then shape the longer top into one or two smooth S-shaped bends across the forehead or temple. The wave can follow a deep side part, with the front skimming the brow or sweeping away from it depending on available length.
Use styling gel for flexible control, a fine-tooth comb to guide the curved ridges, and flexible hairspray once the shape is set. Short straight or wavy hair often requires less reshaping, while curly and coily textures can keep more natural movement if a fully sculpted surface does not suit the routine. The full party set needs patience because the wave direction must be placed carefully, but refreshing later usually involves only a small front section.
At the salon, discuss how much length you need through the top and front to support the wave and where you want the shortest side sections to sit. If you already wear fringe, show where it should finish when dry. As the crop grows, the wave may become easier to form but less compact; reshape the cut when the sides or front stop supporting the intended silhouette.
Pro tip:
Build one clean curve before starting the next. Clear transitions between bends make a short finger-wave shape easier to read than several small, crowded ridges.
Make It Work for You:
For naturally curly hair, sculpt only the front section and let the crown retain softer texture. The wave detail stays visible without requiring complete smoothing everywhere.
Watch Out For:
Do not force a wave into hair that is too short to bend comfortably. Use a simpler side sweep until enough front length grows for a stable curve.
Velvet Bow Mini Half-Up Bob Hairstyle
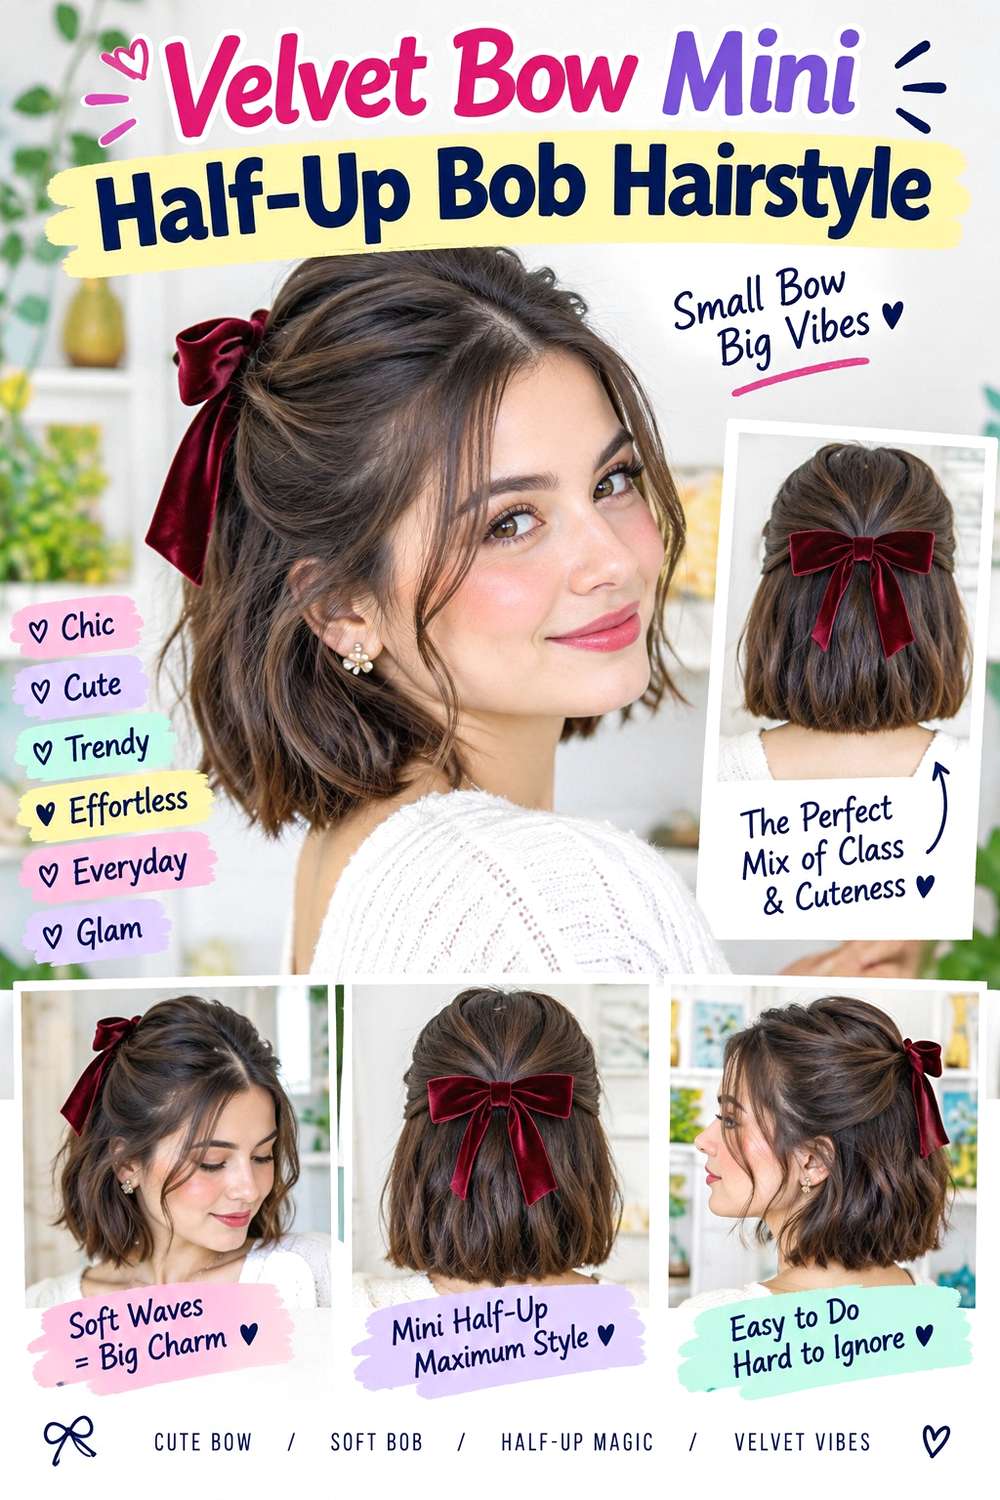
A mini half-up section can work on a bob when the gathered area stays small and the bow matches the short scale. Take narrow pieces from both temples, bring them together around the upper back of the head, and leave the rest loose. The lower hair can stay softly waved or straight, while a little crown volume above the anchor prevents the top from looking pulled flat. A chin-to-shoulder length gives the easiest balance.
Use light texturizing spray to add grip, a small clear elastic for the hidden half-up base, and a compact velvet bow as decoration. This can be a quick party refresh on second-day hair; a full wash-day session takes longer only if the loose bob also needs reshaping. Fine or lower-density hair usually looks fuller when very little is gathered, while dense hair can support a slightly wider top section.
For salon styling, specify how much length you want around the temples and whether short face-framing pieces should stay loose. This matters because heavily layered sides may not reach the anchor comfortably. If the bow tilts, correct the hidden base rather than pulling more hair backward. The style should feel secure without sacrificing the bob’s loose perimeter.
Pro tip:
Build the half-up section with less hair than you think you need, then check the balance from behind. Short bobs often look fuller with a smaller gathered area.
Make It Work for You:
For a jaw-length bob, place the anchor slightly higher so shorter side pieces travel less distance. Choose a small bow with short tails to match the length.
Watch Out For:
Do not use the velvet bow itself as the only fastener. Fabric can slide on short hair, so secure the section first and keep the bow decorative.
Curly Pixie With Jeweled Pins Hairstyle
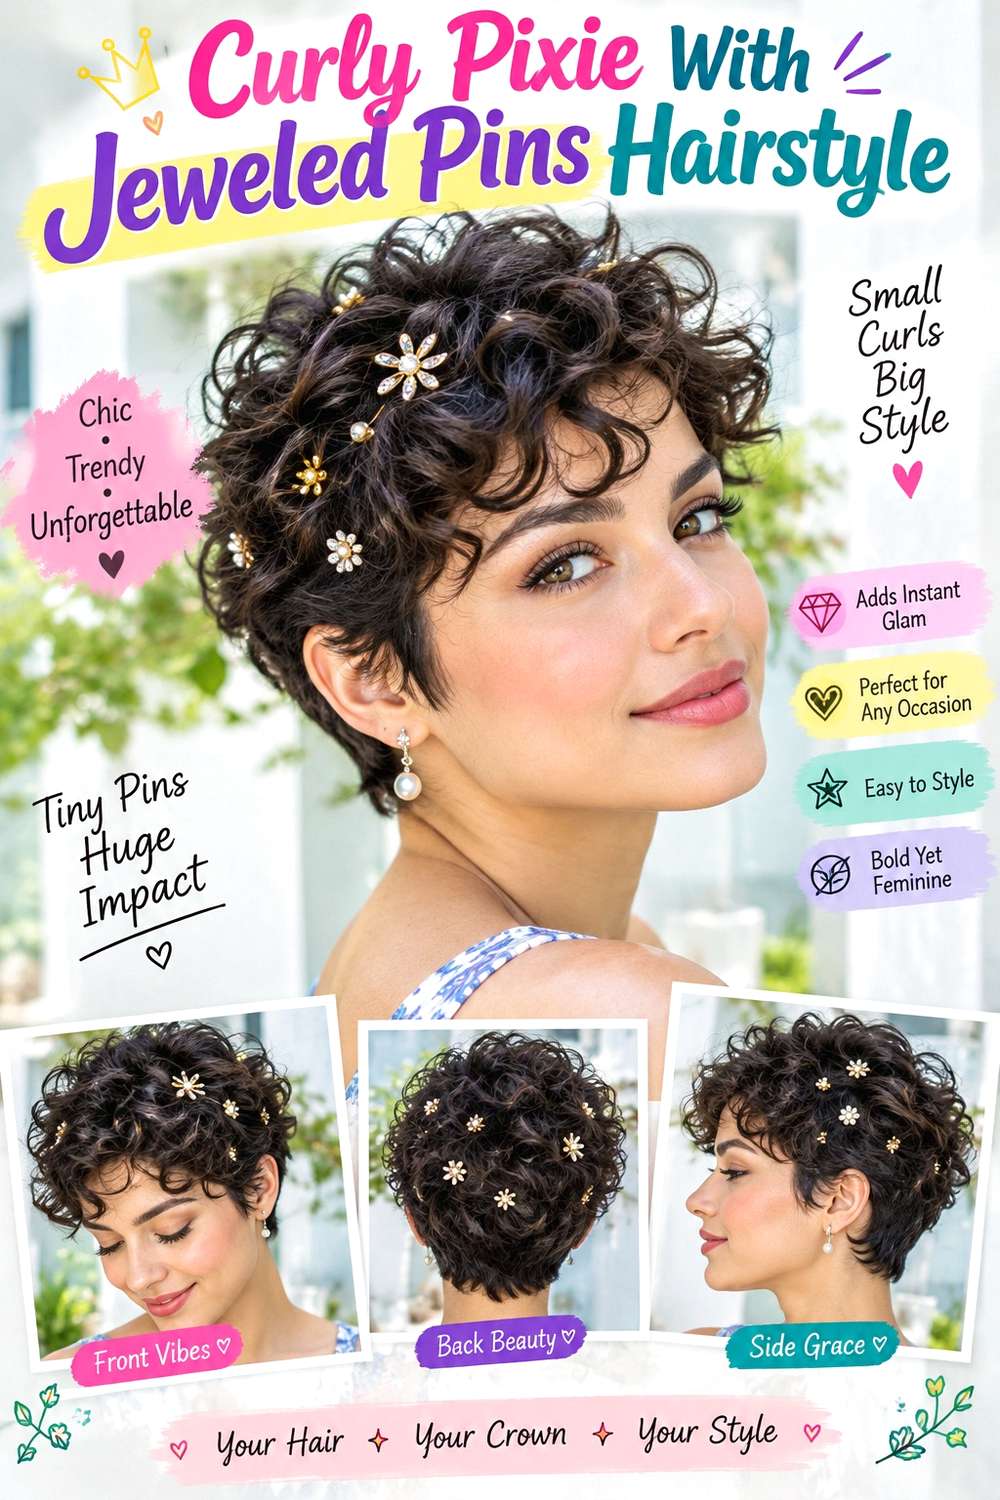
Jeweled pins can give a curly pixie a party finish while keeping the natural curl pattern as the main shape. Let the curls dry fully, then create a soft side part and place two or three small decorative pins along the lighter side above the ear. Keep the opposite side fuller through the top, with the shortest front curls positioned away from the eyes. The contrast between compact decoration and textured volume makes the short cut feel intentional.
Use lightweight leave-in conditioner for softness, curl gel to define the curl groups, and jeweled pins as the finishing accents. A full wash-day routine can take longer than the final styling because the curls need to dry in their finished shape. Once dry, the party refresh is brief: redefine flattened curls, reset the part, and place the pins. Lower-density curls often suit fewer accessories so more texture remains visible.
At the salon, discuss the pixie at its dry finished length, especially around the fringe and temples. Shrinkage can change how much hair sits above an accessory, so wet measurements alone are not enough. If the pins start sliding, anchor them in a more stable section rather than pressing them deeper into loose curls.
Pro tip:
Place the jeweled pins after the curls are completely dry and arranged. You can judge the open space near the temple more accurately and avoid crushing fresh definition.
Make It Work for You:
For dense curls, use slightly larger pins but keep the decorated area narrow. The fuller side can retain enough volume to balance the metallic or jeweled detail.
Watch Out For:
Avoid pinning through fragile outer curl loops repeatedly. Open and reposition the accessory carefully so its edges do not snag or stretch the visible curl pattern.
Deep Side-Part Flipped Bob Hairstyle
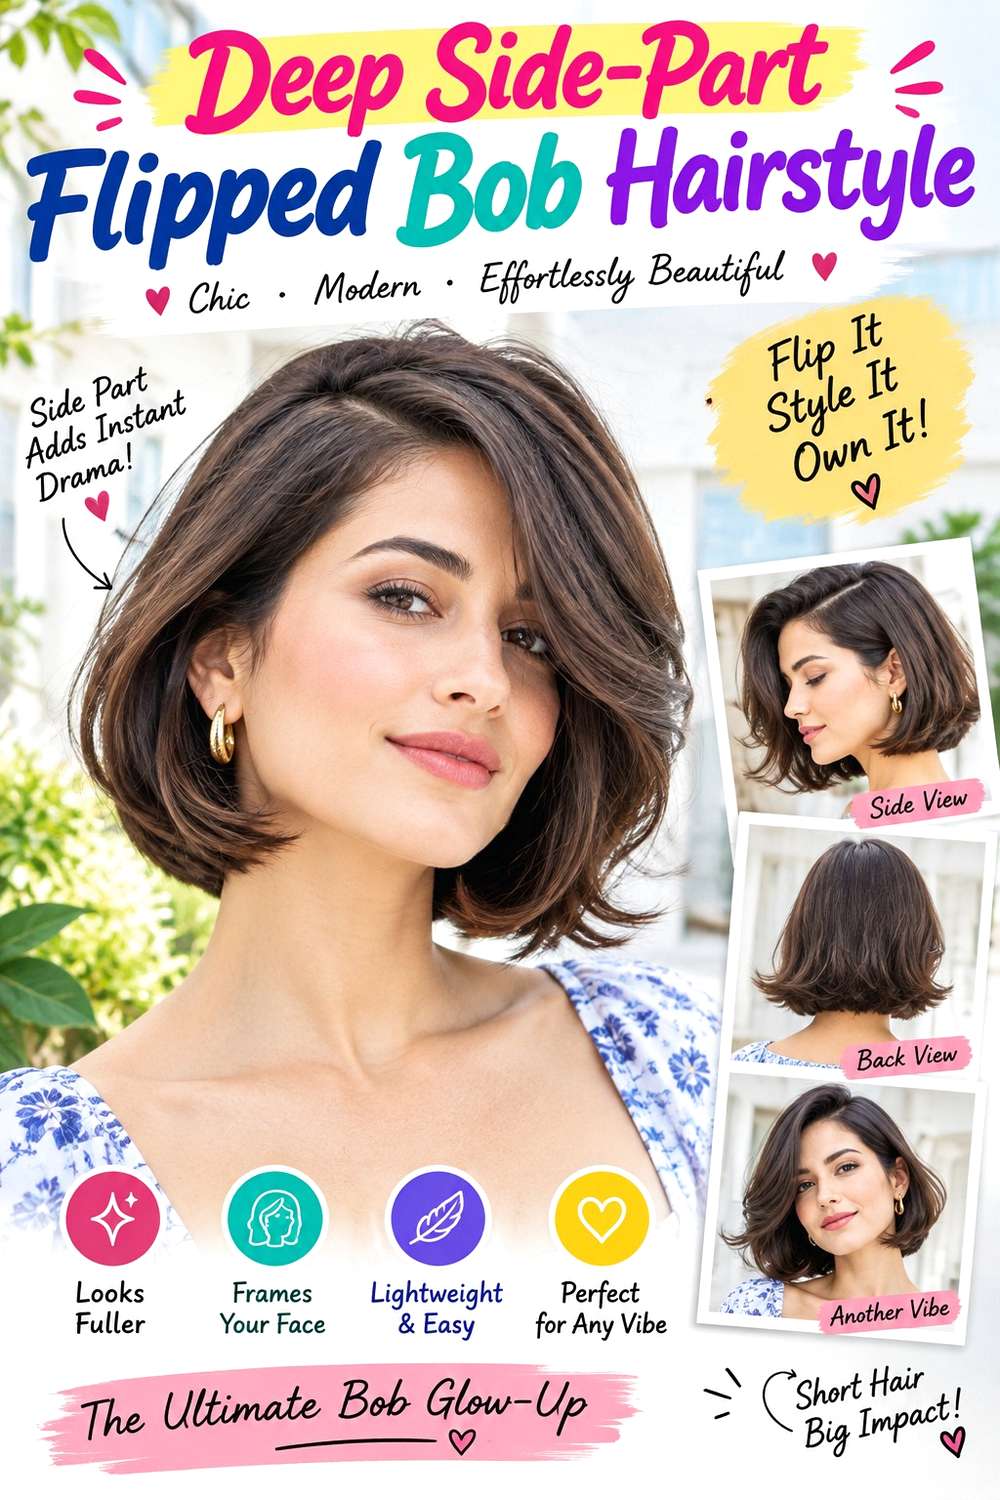
A flipped bob brings movement to short hair by turning the ends outward instead of curling the whole shape. Keep the cut around the jaw, chin, or just above the shoulders, create a deep side part, and leave the roots relatively smooth. The final inch or two can turn outward in broad sections, while the heavier front piece sweeps across the forehead and away from the cheek. A strong perimeter keeps the flip looking deliberate.
Apply heat protectant before using a flat iron to guide the ends outward, then add flexible hairspray after the shape cools. Straight and wavy hair usually need a moderate full styling session, while curly hair can use a looser version without completely smoothing the internal texture. A later refresh should focus only on ends that have collapsed or turned inward, especially after wearing a coat.
At the salon, point to the exact finished bob length and explain that you want enough weight through the bottom edge to support the flip. Dense hair may need bulk assessed inside the shape, but aggressive thinning can make the perimeter too wispy. Reshape the cut when it grows beyond the landmark where the outward bend sits cleanly and begins catching unpredictably on the shoulders.
Pro tip:
Keep the roots and middle sections calmer before flipping the ends. Concentrating movement at the bottom gives the short cut a clearer, more graphic silhouette.
Make It Work for You:
For fine hair, use fewer broad flipped sections and preserve a stronger bottom line. This creates movement without making the perimeter appear overly separated.
Watch Out For:
Do not flip every tiny section at a different angle. Broad, consistent bends make the perimeter look intentional; scattered directions can make the ends appear uneven.
Sleek Tucked Ear Bob Hairstyle
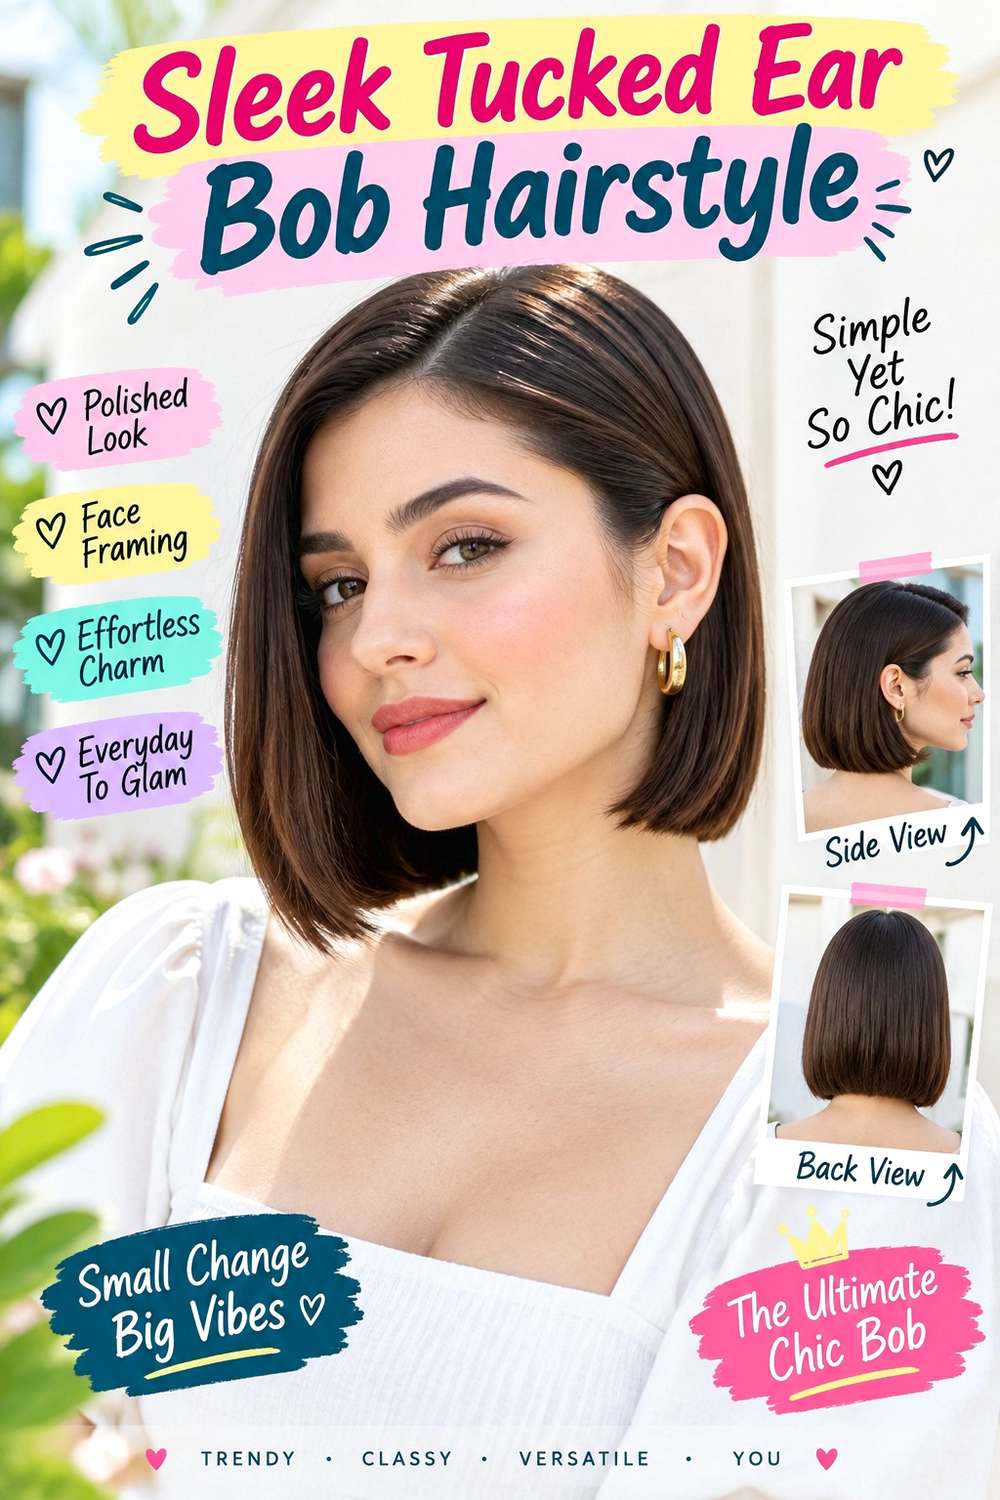
A sleek ear tuck makes a short bob look polished by emphasizing the perimeter and opening one side of the face. Use a center or soft side part, smooth the lengths toward the jaw, and tuck one or both sides neatly behind the ears. Keep the ends straight or slightly curved inward, with the crown controlled but not flattened. The clean outline works especially well on chin- and jaw-length bobs where every millimeter of perimeter is visible.
Apply heat protectant before smoothing with a flat iron, then use lightweight serum through the lower lengths for surface shine and frizz control. Naturally straight hair may need only a quick full styling session, while wavy or curly textures require more work if a sleek result differs from the usual pattern. Between washes, refresh the front and tuck rather than applying heat to the entire bob again.
At the salon, specify the finished length in relation to the jaw or chin and how much weight you want retained around the bottom. If ear tucking is part of your routine, mention it so the side sections can be assessed in that position. Maintain the haircut when the perimeter stops sitting cleanly or the sides begin pushing forward after the tuck.
Pro tip:
Set the ear tuck before applying serum near the sides. A less slippery section often stays behind the ear more reliably through movement and dancing.
Make It Work for You:
For naturally wavy hair, smooth only the perimeter and tucked section while leaving slight movement inside. The clean outline remains visible without flattening every bend.
Watch Out For:
Avoid pressing the crown completely flat in pursuit of sleekness. A small amount of natural lift keeps the bob from looking pasted against the head.
Tousled French Bob With Wispy Fringe Hairstyle
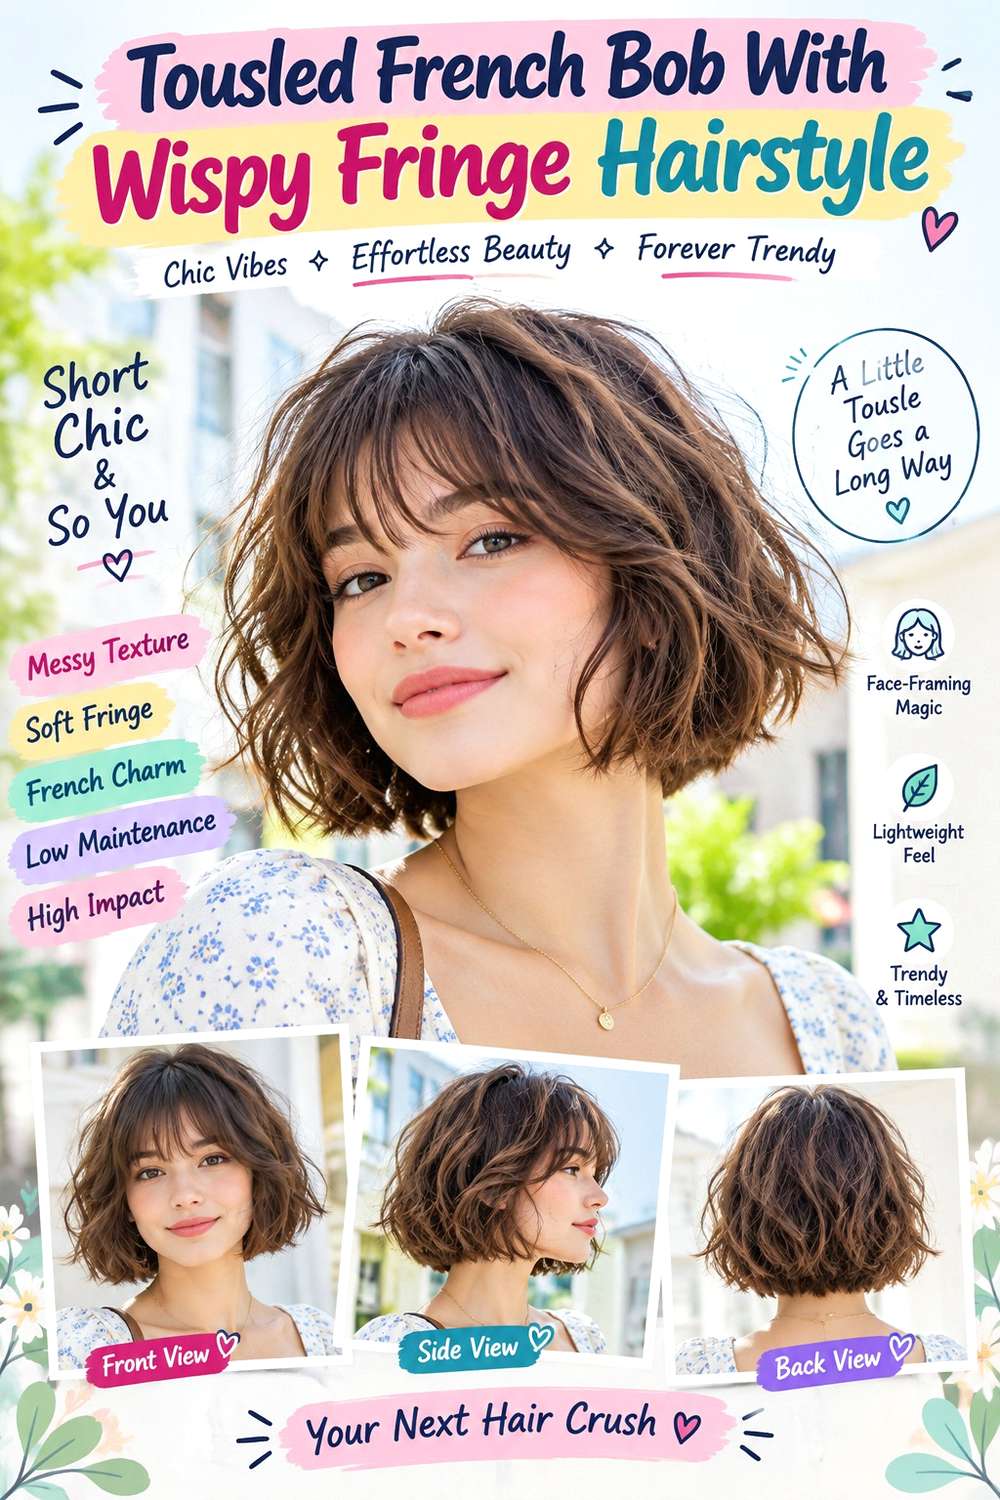
A French bob with wispy fringe creates a short party shape through soft separation rather than heavy volume. Keep the length around the jaw or slightly below, with the bottom edge still visible beneath light movement. The fringe can skim the brows in separated pieces, with slightly longer outer corners connecting toward the temples. Loose bends through the sides should begin around the cheekbones, while the ends stay softer than the middle.
Apply heat protectant before using a small curling iron for selective bends, then mist light texture spray through the middle lengths. Straight and wavy hair can reach the tousled finish with a moderate full styling session; curly hair can retain more natural texture and focus on fringe placement. A quick refresh should target the fringe and front bends rather than rebuilding every section.
At the salon, discuss the fringe at its finished dry length, including how wide the section should be and where the outer corners should land. Growth direction affects how wispy fringe separates, so that matters as much as the cut length. Maintain the fringe when it starts falling into the eyes or clumping differently, while the bob itself may need reshaping when the jaw-length outline drops noticeably.
Pro tip:
Shape the fringe first, then work on the sides. Once the front separation is right, you can judge how much additional texture the bob actually needs.
Make It Work for You:
For lower-density hair, keep the fringe section narrow and preserve more weight through the bob perimeter. The front remains airy without thinning the overall outline.
Watch Out For:
Do not overload wispy fringe with texture product. Too much can make the short pieces clump together; keep most product on the side sections instead.
Mini Twisted Crown Bob Hairstyle
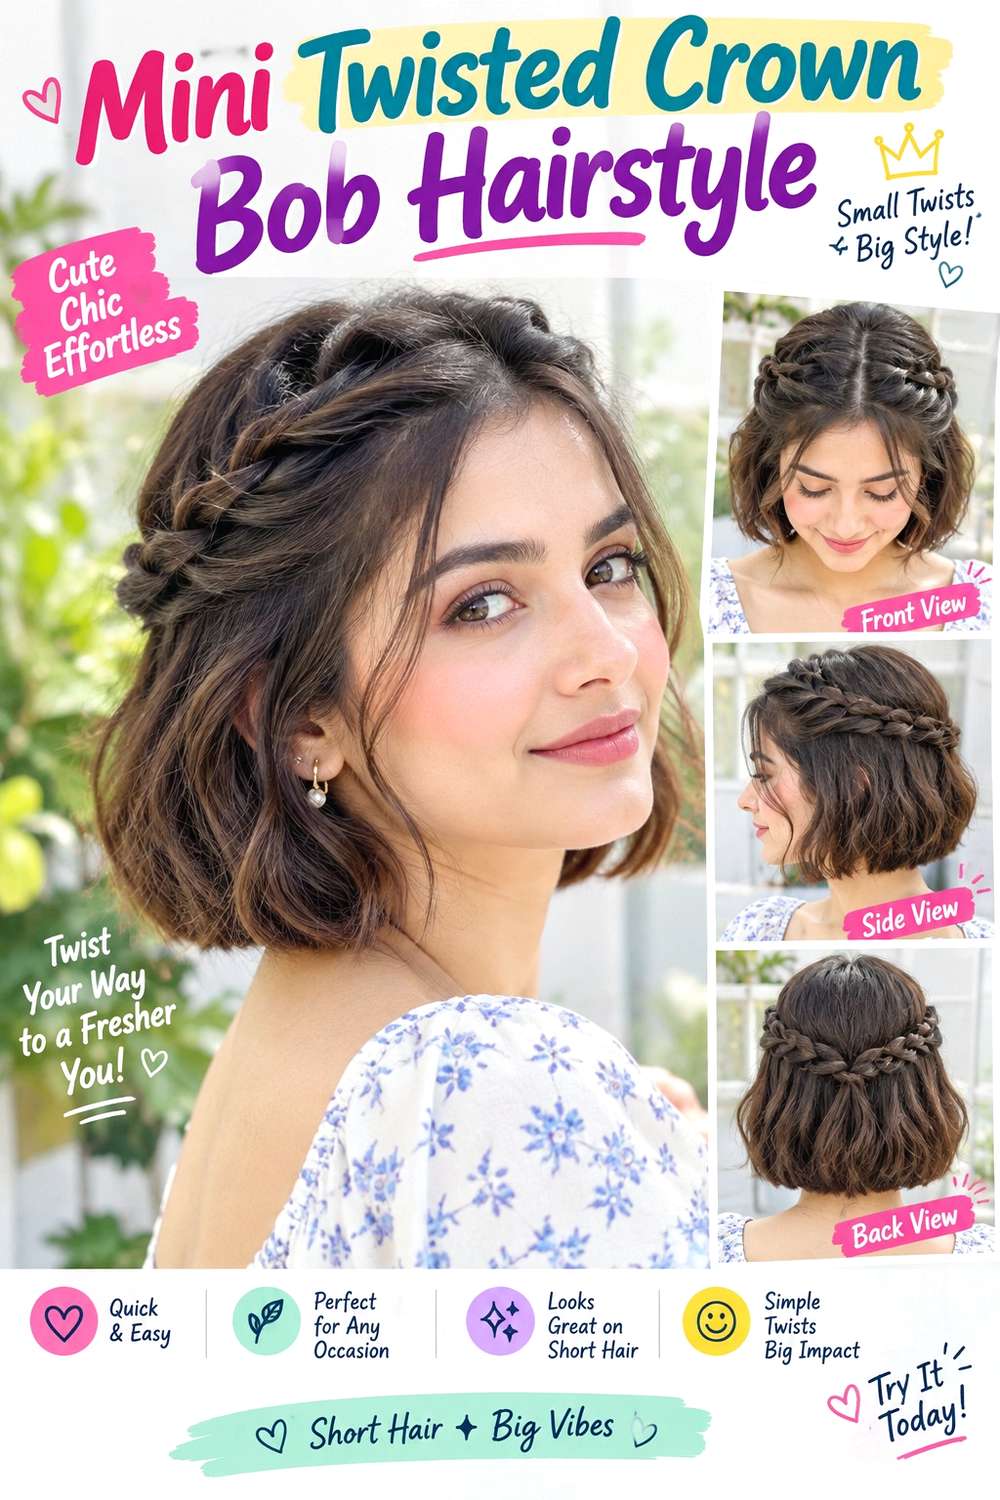
A mini twisted crown gives bob-length hair the feel of a partial updo without requiring enough length for a full braid. Take a narrow section from each temple, twist both backward, and secure them near the upper back of the head. Leave the lower bob loose so its perimeter remains visible, and allow shorter front pieces to stay around the cheeks if they cannot reach comfortably. A slight crown lift keeps the twists from flattening the top.
Use light texturizing spray to improve grip, small bobby pins to secure each twist, and flexible hairspray for short flyaways that need gentle control. The style can be assembled fairly quickly on dry second-day hair, while a full wash-day version takes longer only if the loose bob needs separate waves or curl definition. Medium-density hair often holds the twists easily; very fine or slippery hair may need smaller sections.
For professional styling, specify where the two twists should meet and how wide you want each one. Shorter bobs usually work better with a higher meeting point because the side pieces travel less distance. If one twist loosens, repair that anchor rather than tightening both sides, which can pull the front uncomfortably.
Pro tip:
Secure each twist independently before joining their visual line at the back. Separate support makes it easier to correct one side without changing the other.
Make It Work for You:
For layered bobs, use very narrow sections and let shorter pieces remain loose. The twisted crown can stay neat without forcing every side layer into the anchor.
Watch Out For:
Do not twist the sides so tightly that the temples look stretched. Add grip and secure the ends instead of using extra tension to compensate for short length.
Sculpted Curly Bob Side Sweep Hairstyle
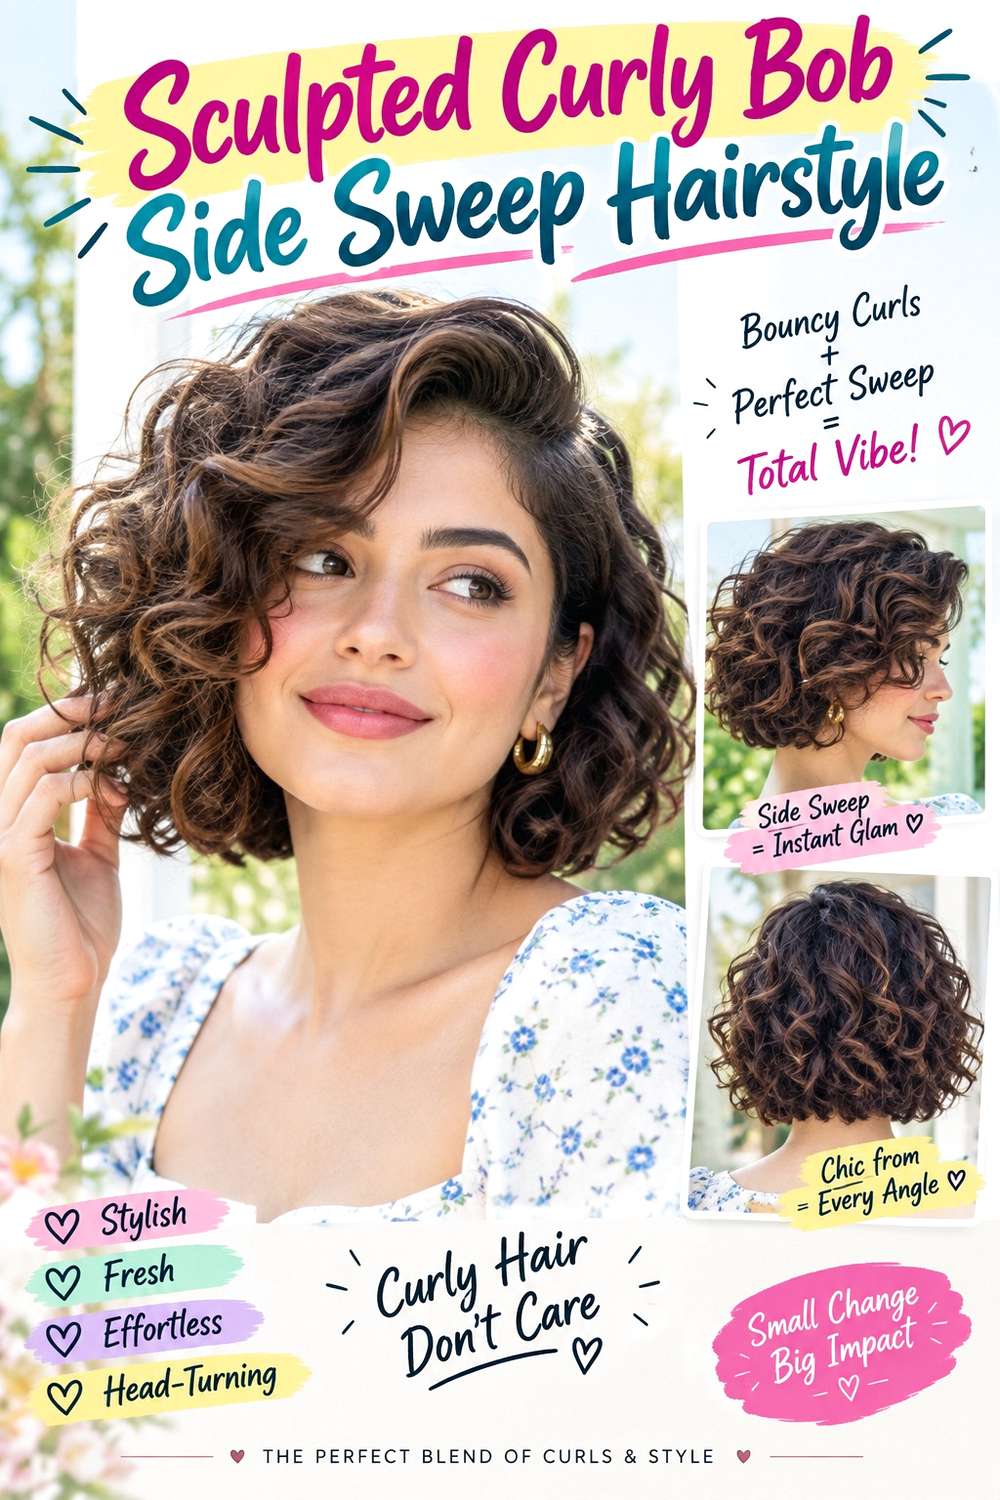
A side-swept curly bob creates New Year’s Eve drama through natural volume rather than added accessories. Let the curls dry fully, then move the part deeper to one side and keep the lighter section closer to the head. The fuller side can expand around the cheek and jaw, with defined curls continuing into a clear jaw- or chin-length perimeter. The shape should stay asymmetrical without allowing the front curls to cover the eye continuously.
Use lightweight leave-in conditioner for softness, curl gel for definition, and a diffuser for controlled drying. The full wash-day session takes longer than the final side-sweep adjustment, especially on dense hair. Once dry, a quick refresh should revive only flattened curls and reset the part. Lower-density hair can use a shallower part so the lighter side does not become too sparse.
At the salon, discuss the bob’s finished dry length and where you prefer the widest part of the silhouette to sit. Dense curls may need controlled internal weight adjustment where the sides spread, while the outer perimeter should stay strong enough to define the bob. If the front loses shape during the party, reposition the sweep rather than repeatedly separating curl groups for more volume.
Pro tip:
Choose the final side part only after the curls are dry. Shrinkage changes both length and volume, so finished placement gives a more reliable balance.
Make It Work for You:
For tighter coils, keep the sweep concentrated through the front and upper side. The lower bob can remain balanced, reducing excessive weight on one side.
Watch Out For:
Avoid excessive fluffing through the fuller side. Too much separation can hide the bob’s perimeter in frizz; lift at the roots while preserving defined curl groups.
Short Shag With Piecey Waves Hairstyle
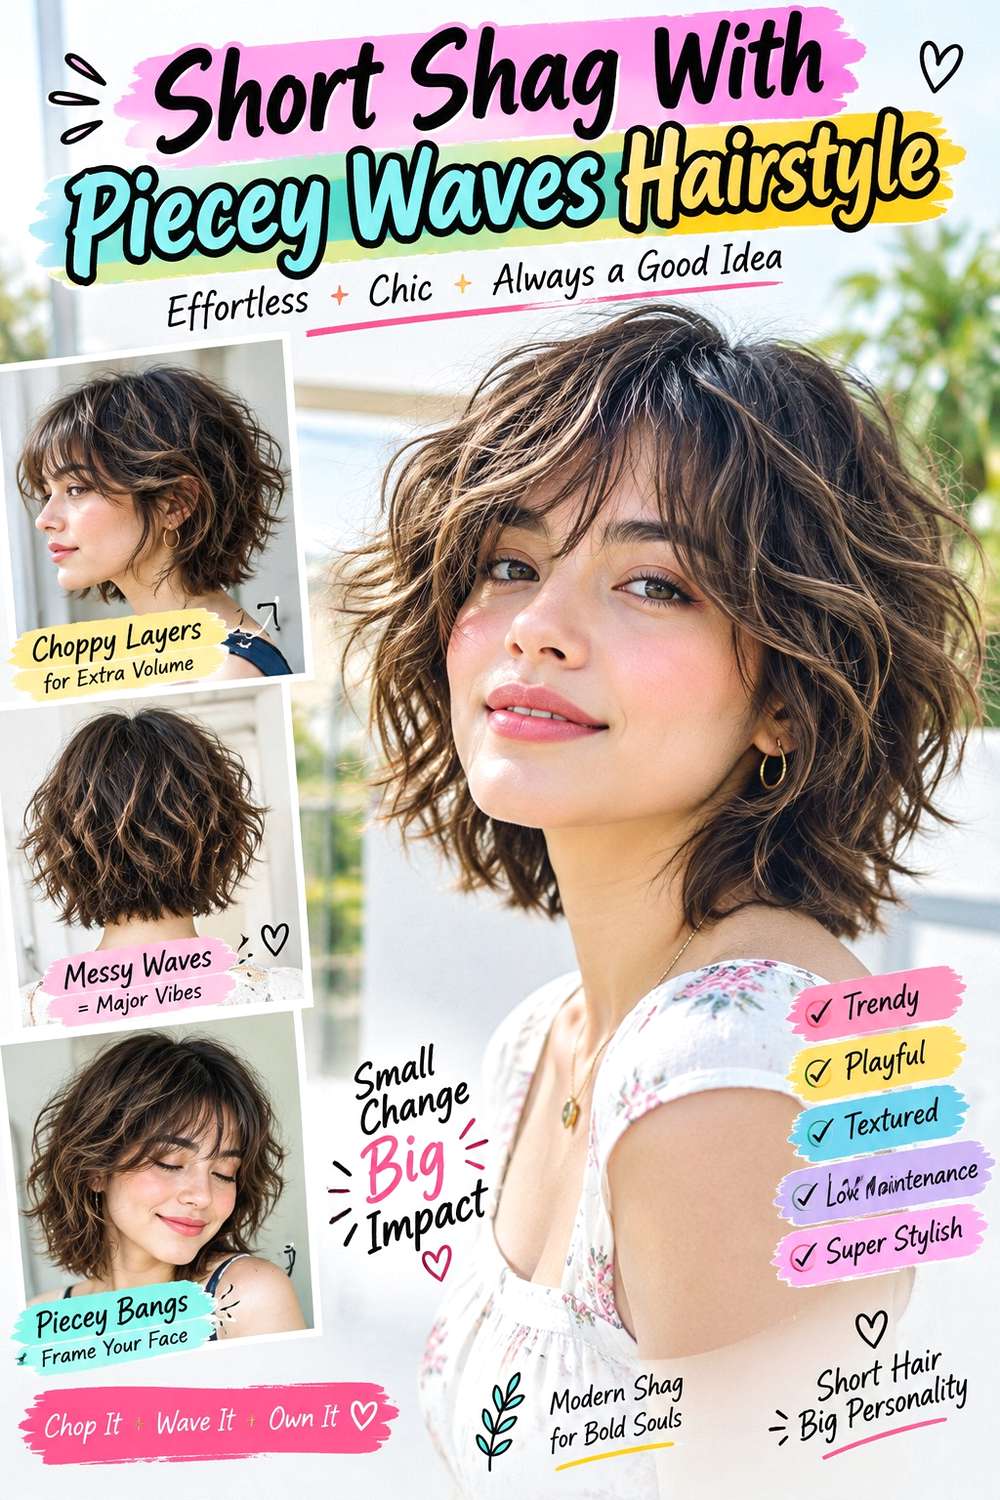
A short shag brings movement to New Year’s Eve styling through visible layers, a lighter perimeter, and piecey waves rather than a smooth bob line. Keep the length around the jaw to upper neck, with shorter crown layers creating lift and longer pieces framing the cheekbones. A center or slightly off-center part works, while a narrow fringe can remain separated rather than dense. The ends should flick and bend in varied directions without becoming uniformly curled.
Apply heat protectant before using a small curling iron on selected pieces, then use light texture spray to emphasize separation. Straight and wavy textures can create the finish with a moderate styling session, while curly hair may use its natural pattern and focus on definition. A short refresh between washes should reshape only flattened crown pieces and the front rather than recreating every bend.
At the salon, point to where you want the shortest crown layer and front pieces to finish. A shag needs enough internal movement, but excessive removal can make lower-density ends look sparse. Maintain the cut when the crown stops lifting easily or the layers begin collapsing into one length. Styling effort and grow-out are separate; a flatter morning does not automatically mean you need more layers.
Pro tip:
Style the shortest crown pieces first and let them cool before touching the lower layers. Their direction sets the shag’s overall lift and prevents random overworking.
Make It Work for You:
For fine strands with good density, keep the perimeter more substantial and concentrate shorter layers near the crown. You can retain movement without overly thinning the ends.
Watch Out For:
Do not curl every layer identically. Uniform bends can erase the shag’s broken-up shape; vary direction selectively while keeping the overall silhouette controlled.
Claw Clip Mini Twist Lob Hairstyle
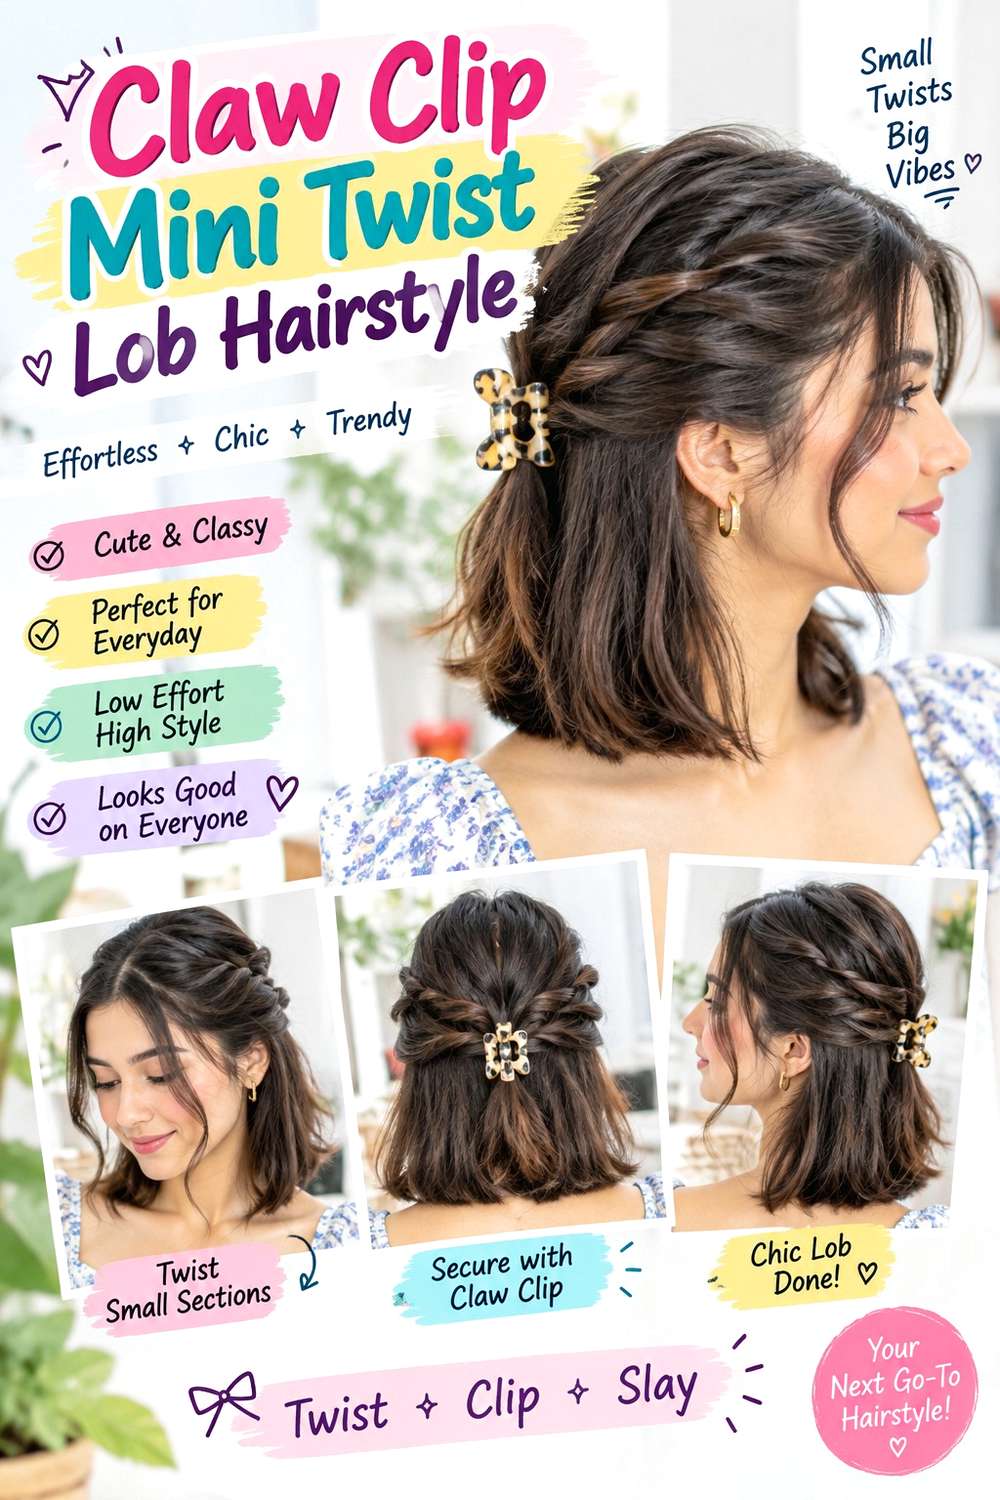
A mini claw-clip twist works when short hair reaches around the shoulders and enough of the back can gather without strain. Take a central section from the sides and back, twist it upward once or twice, and secure it with a small or medium clip. Let shorter face-framing pieces and lower layers remain loose instead of forcing everything into the anchor. The result should feel compact, with visible ends above or around the clip.
Use light texturizing spray for grip and a sturdy claw clip as the main anchor. This is one of the fastest New Year’s Eve refreshes on second-day hair, and it does not require a full wash-day restyle unless you also want to change the loose texture. Straight, wavy, curly, and coily lobs can all use the idea when the clip capacity matches density.
For professional styling, specify how high you want the clip and how much of the lob should remain loose underneath. Heavily layered hair may need a narrower gathered section so short pieces do not pop out under tension. If the twist loosens, reopen the clip and rebuild the base rather than squeezing harder. Check coat and jacket collars before heading out so they do not repeatedly knock the accessory upward.
Pro tip:
Try the clip placement while wearing your planned party jacket. Raising the twist slightly can keep the accessory clear of collars that would otherwise loosen it.
Make It Work for You:
For dense lobs, gather a smaller central section and leave more side hair down. The mini twist stays secure without forcing too much volume into one clip.
Watch Out For:
Do not use a clip that barely closes. A strained accessory can spring open; choose more capacity or reduce the gathered section instead of increasing tension.
Polished Bixie Volume Hairstyle
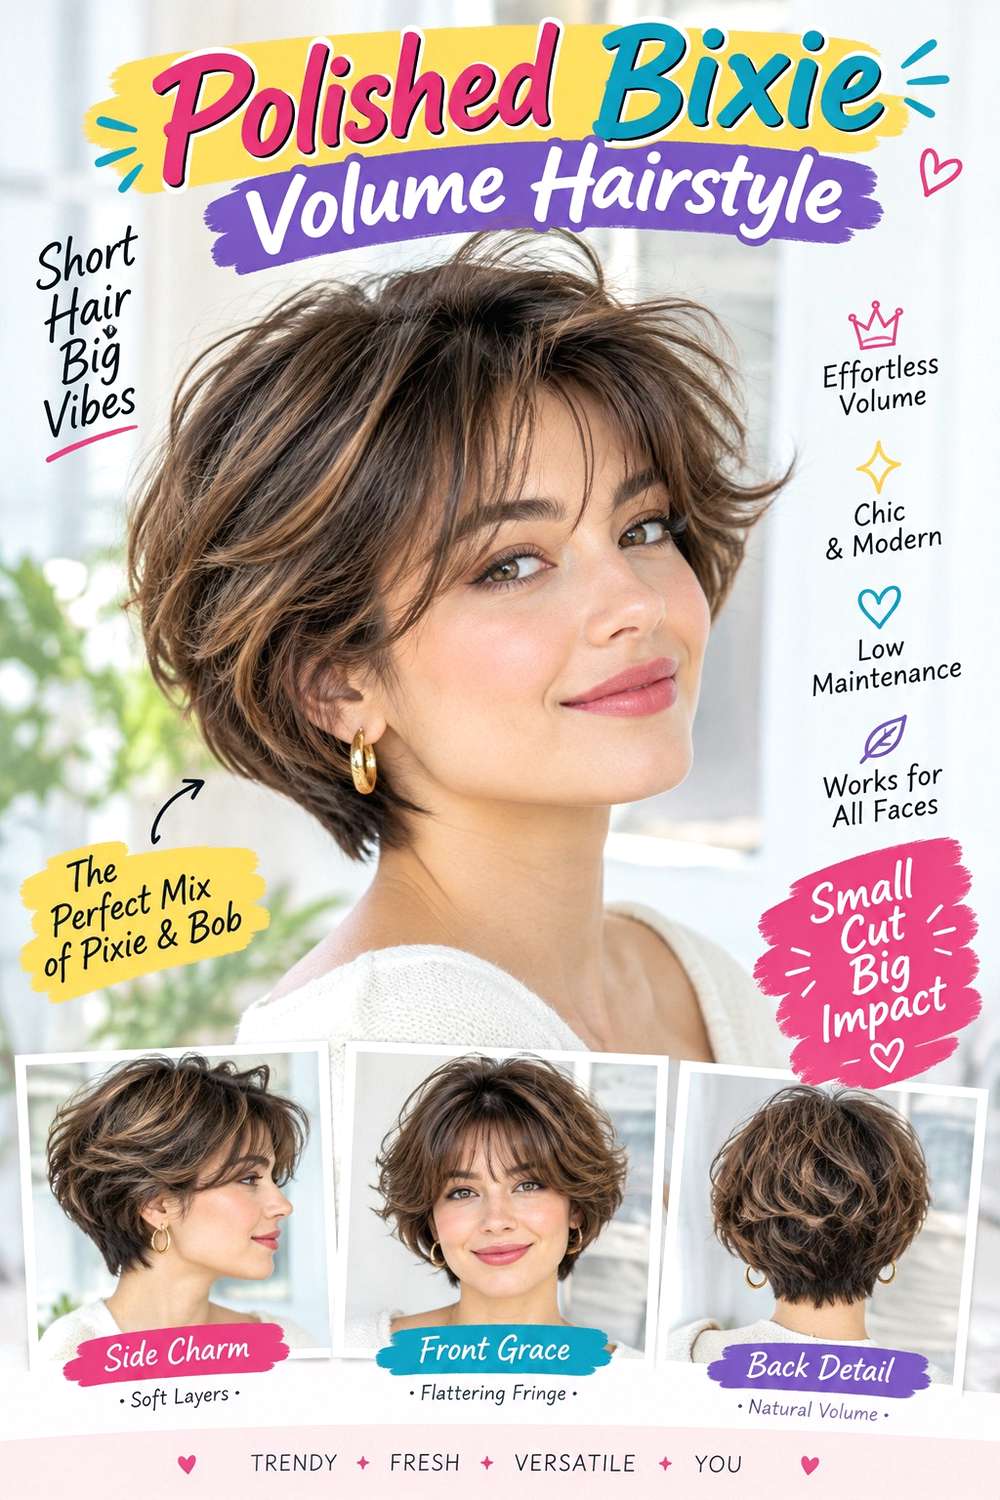
A bixie sits between a pixie and bob, giving enough top length for volume while keeping the nape and sides compact. For a party finish, use an off-center part and lift the longer crown sections upward and slightly back. Let the front skim the brow or sweep away from it, while the sides remain controlled around the ears. The ends should look separated but not spiky, creating movement without losing the rounded short silhouette.
Apply heat protectant before blow-drying and use a small round brush to lift the crown, then add lightweight mousse near the roots for support. Straight and wavy textures usually need a short full styling session; curly hair can interpret the bixie with natural volume instead of smoothing everything. A quick refresh between washes should focus on root direction and the front rather than adding more product throughout.
At the salon, discuss how much length should remain on top, where the front should finish when dry, and how closely the sides should sit around the ears. These proportions determine whether the cut reads more pixie-like or bob-like. Reshape when the sides become bulky or the top no longer lifts cleanly, rather than compensating indefinitely with styling product.
Pro tip:
Lift the crown in the opposite direction from where it naturally falls, then settle it back into place. That root redirection can create volume without excessive product.
Make It Work for You:
For dense hair, ask the stylist to assess bulk specifically around the sides and back. Keeping top length while controlling width can preserve the bixie’s balanced silhouette.
Watch Out For:
Avoid coating the entire top with mousse when only the roots need support. Too much product can make short separated pieces stick together and reduce movement.
Conclusion
New Year’s Eve hairstyles for short hair can create impact through proportion rather than length. Pixies and bixies respond well to directional volume, glossy sweeps, curls, and pins, while bobs offer room for tucked sides, flipped ends, textured bends, or mini half-up details. A strong perimeter gives fine or lower-density ends more presence, whereas dense hair may need controlled bulk placement so short shapes stay balanced. Curly and coily cuts can use their natural movement, with shrinkage considered before choosing fringe or accessory placement. Parting also matters: center parts feel balanced, while deep side parts create stronger asymmetry. Choose between sleek, textured, pinned, or naturally curly finishes based on your routine and how much refreshing you want during the night.
Before Your Salon Visit
Choose one or two favorites and save references that clearly show the short-hair details you want to recreate. Discuss your natural texture, density, face shape, preferred length, upkeep, and normal styling routine. Point out the exact fringe length, perimeter, crown volume, parting, side tuck, curl shape, or accessory placement you like. For temporary New Year’s Eve styling, focus on secure accessories and workable texture rather than changing your haircut unless you already want a new short shape.
FAQs
Can very short pixie hair still work for a New Year’s Eve party style?
Yes. A pixie can use a glossy side sweep, defined curls, lifted crown, jeweled pins, or a sculpted front without needing extra length. The most useful choice depends on how much top length you have and whether your natural texture holds direction, volume, or definition easily.
What New Year’s Eve styles work best for a short bob that cannot go into a ponytail?
Try a deep side part, ear tuck, flipped ends, textured bends, a headband, barrette, or small twisted section. These designs use the bob’s existing perimeter instead of forcing short pieces into a weak ponytail. Choose accessories that grip a stable section without pulling around the temples.
How can I keep party accessories secure in short hair?
Match the accessory to the amount of hair available and create a stable base before attaching it. A small tuck, twist, or controlled section often gives clips better grip than loose strands alone. If an accessory slides, correct its anchor instead of tightening it painfully against the scalp.
Does short hair need more salon upkeep before a New Year’s Eve event?
Only if the shape has grown beyond the outline you want. A pixie may need attention when the sides become bulky, while a bob may need reshaping when the perimeter loses its landmark. Styling issues such as flat roots or dropped waves do not automatically mean the haircut needs changing.