18 Loose Low Ponytail Hairstyles for Fall

Loose low ponytail hairstyles for fall keep the anchor close to the nape while allowing softness through the crown, sides, face-framing pieces, and tail. Instead of pulling every strand flat, these versions use gentle bends, natural curls, soft texture, relaxed parts, or small accessories to create movement. The ponytail may sit directly at the nape or just above it, while fringe and shorter layers can remain loose when they do not comfortably reach the base.
The style adapts easily to straight, wavy, curly, and coily textures. Lower-density hair often benefits from preserving more hair in the tail and keeping loose sections narrow, while dense hair can support fuller crown movement or broader face-framing pieces. A center part creates balance, a side part adds direction, and brushed-back versions can keep a softer root shape rather than a tightly slicked finish.
Fall styling adds practical considerations such as collars, scarves, jackets, and drier air. A quick refresh may involve smoothing flyaways, reshaping two front pieces, or resetting the elastic, while a full wash-day style takes longer if waves or curl definition need rebuilding. A comfortable anchor matters most; repeated tightening will not fix a ponytail that is slipping because of poor placement or an unsuitable elastic.
Quick List
- Center-Part Soft Bend Low Ponytail Hairstyle
- Deep Side-Part Loose Low Ponytail Hairstyle
- Curtain-Fringe Loose Low Ponytail Hairstyle
- Cheekbone-Piece Loose Low Ponytail Hairstyle
- Brushed-Wave Low Ponytail Hairstyle
- Natural-Curl Loose Low Ponytail Hairstyle
- Coily Soft-Volume Low Ponytail Hairstyle
- Air-Dried Texture Low Ponytail Hairstyle
- Wrapped-Base Loose Low Ponytail Hairstyle
- Slim-Ribbon Loose Low Ponytail Hairstyle
- Velvet-Bow Loose Low Ponytail Hairstyle
- Scarf-Ready Nape Low Ponytail Hairstyle
- Tucked-Behind-Ears Loose Low Ponytail Hairstyle
- Twisted-Side Loose Low Ponytail Hairstyle
- Braided-Accent Loose Low Ponytail Hairstyle
- Soft Claw-Clip Low Ponytail Hairstyle
- Oversized-Scrunchie Loose Low Ponytail Hairstyle
- Short-Length Loose Low Ponytail Hairstyle
Center-Part Soft Bend Low Ponytail Hairstyle
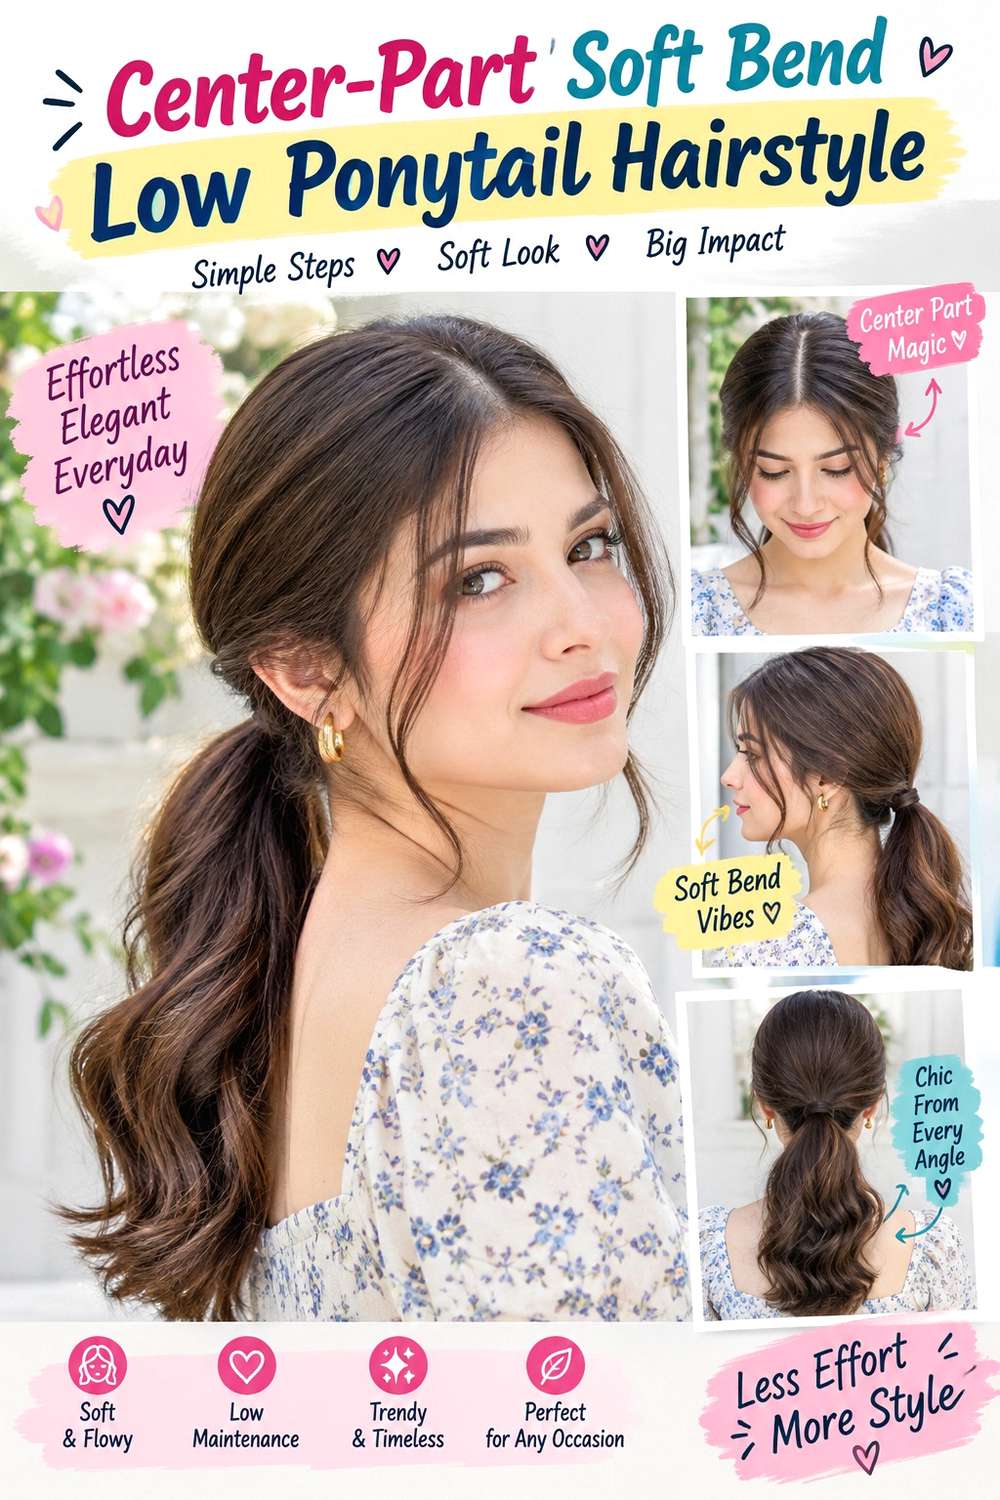
A clean center part gives this loose ponytail balance, while broad bends through the tail stop the finish from feeling severe. Keep the crown softly fitted rather than flat, gather the hair at the nape, and allow a little fullness above the elastic. Two narrow front sections can stay loose near the cheekbones or jaw, while the tail carries gentle S-shaped movement through the mid-lengths and straighter tips.
Medium and long hair provides enough space for the bends to show clearly, and naturally wavy hair may need very little reshaping. Straight hair can use heat for controlled movement, while curly hair can keep more natural texture if a softer interpretation suits the routine. Apply heat protectant before using a curling iron for broad bends, then secure the ponytail with a fabric-covered elastic. A quick next-day refresh may involve reshaping one front piece and one flattened bend; a full wash-day style takes longer because the texture should be created before the hair is gathered.
If a stylist is recreating it, specify where the shortest front piece should finish and how low you want the anchor. Keeping the bend pattern below the base prevents excess bulk where scarves or jacket collars may rub.
Pro tip:
Let each heated bend cool before loosening it, especially through the upper ponytail. This helps the movement stay soft but defined without requiring a heavy layer of finishing product.
Make It Work for You:
If your hair is naturally wavy, refine only the sections that fall unevenly. Keeping most of the existing movement reduces heat use while preserving the relaxed center-part shape.
Watch Out For:
Avoid adding tight curls directly beneath the elastic. Too much expansion at the base can make the ponytail bulky and encourage friction against fall collars or scarves.
Deep Side-Part Loose Low Ponytail Hairstyle
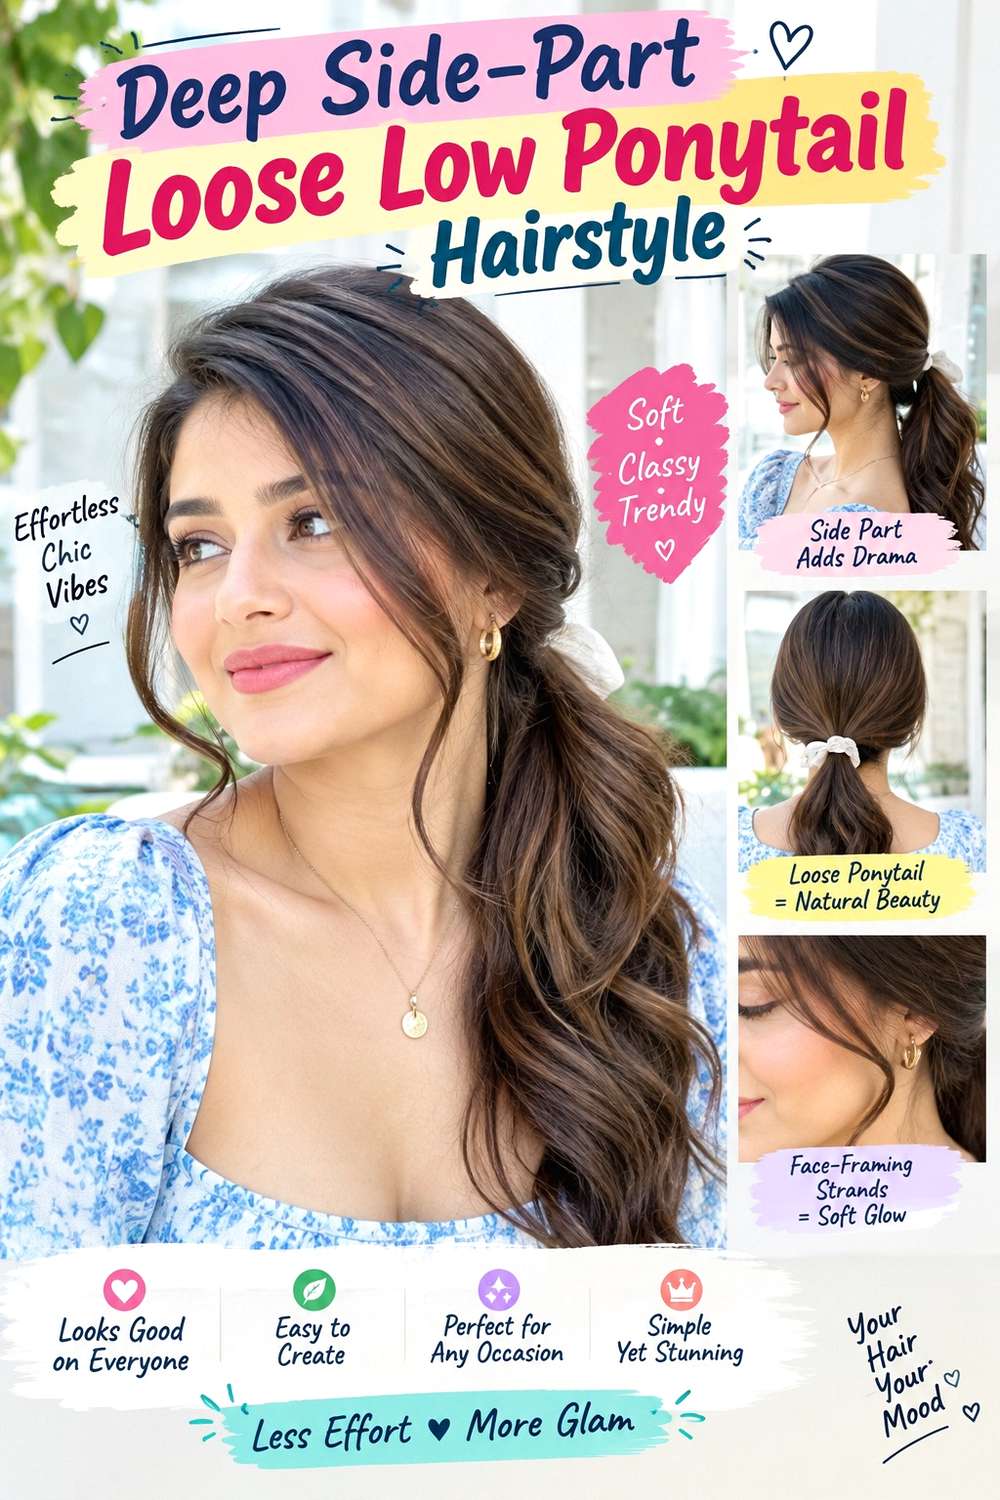
A deep side part shifts the visual weight toward one side while the ponytail itself remains centered at the nape. Sweep the fuller section gently across the crown, allowing a little root lift instead of pressing it flat. Leave one longer face-framing section near the jaw or below it, and keep the opposite side more contained behind the ear. The tail can fall straight, softly bent, or naturally textured.
This version works especially well when the hair already prefers to separate on one side. Straight and wavy textures show the directional sweep clearly, while curls can retain more volume through the fuller side. Use a tail comb to establish the part, a fabric-covered elastic for the low anchor, and light styling cream to control flyaways without making the surface rigid. A quick refresh means redefining the part and resetting the loose front section; full wash-day styling takes longer if the root direction needs to be rebuilt.
When a stylist creates it, explain exactly how deep you want the part and whether the fuller side should partially cover the ear. Keep the actual ponytail anchor centered so the style remains comfortable beneath coats and scarves instead of pulling toward one side.
Pro tip:
Create the side sweep before securing the ponytail and follow the hair’s natural direction toward the nape. This helps reduce ridges and keeps the fuller side softly controlled.
Make It Work for You:
If one side naturally has more root lift, let that side carry the deeper sweep. Working with existing growth direction usually means less product and less daily reshaping.
Watch Out For:
Do not drag the fuller side tightly across the crown to make it perfectly smooth. Uneven tension can shift the ponytail and make the opposite temple feel strained.
Curtain-Fringe Loose Low Ponytail Hairstyle

Curtain fringe brings built-in softness to a low ponytail because the center opens around the forehead and the outer corners blend toward the temples. Gather the rest of the hair low without flattening the crown, then let the fringe fall independently. The center can skim near the brows or sit slightly longer, while the outer pieces extend toward the cheekbones. Keep the tail relaxed with a natural bend or soft wave.
This works best when the fringe already has enough length to split and move outward. Straight and wavy hair often need only a brief front refresh, while curly fringe should be assessed at its dry length because shrinkage changes where the center and outer corners land. Use a round brush to direct the fringe away from the face, heat protectant whenever warm styling is used, and a fabric-covered elastic for the ponytail. A quick fringe refresh can be short, while a full wash-day style takes longer because the overall texture must also be reset.
If a stylist is cutting or shaping the front, specify the finished dry length of the center and ask for longer outer corners that blend gradually. Fringe upkeep becomes necessary when the center no longer opens cleanly or starts dropping into the eyes.
Pro tip:
Dry the fringe away from the center on both sides, then allow it to cool before touching it. This helps the opening stay soft instead of separating into a sharp split.
Make It Work for You:
For wavy or curly fringe, keep the finished center slightly longer if shrinkage is noticeable. The curtain effect can remain open without making the outer corners too short.
Watch Out For:
Avoid shortening the outer corners too aggressively. If they stop abruptly near the temples, the fringe can look disconnected from the loose low ponytail and side layers.
Cheekbone-Piece Loose Low Ponytail Hairstyle

Two cheekbone-length pieces give a loose ponytail a clear frame without taking much hair away from the base. Separate narrow front sections before gathering the rest at the nape, then allow those pieces to curve slightly away from the face. Keep the crown soft and the tail uncomplicated, with either a natural bend or straight finish. The contrast between the simple ponytail and defined front pieces keeps the style relaxed but intentional.
This version is practical for medium and long hair and especially useful when existing face-framing layers already land near the cheekbones. Lower-density hair should keep those sections narrow, while dense hair can support slightly broader pieces. Use a fabric-covered elastic for the anchor, light styling cream to keep the framing sections together, and a round brush if you want a gentle outward bend. A quick refresh usually involves reshaping the two loose pieces and smoothing the crown; full wash-day styling takes longer only when the overall texture needs resetting.
If a stylist is adjusting the cut, point to the exact finished length you want around the cheekbones and discuss how those sections should blend into longer layers. Keep the ponytail anchor low enough that the loose pieces do not feel disconnected from the softer nape placement.
Pro tip:
Choose the cheekbone pieces before making the ponytail and compare their width from the front. It is easier to rebalance them while the rest of the hair is still loose.
Make It Work for You:
For lower-density hair, leave very narrow face-framing pieces and preserve more hair in the tail. The front still gains definition without making the ponytail look sparse.
Watch Out For:
Do not keep pulling additional strands free after the ponytail is secured. Removing too much from the sides can weaken the anchor and make the base look unintentionally loose.
Brushed-Wave Low Ponytail Hairstyle
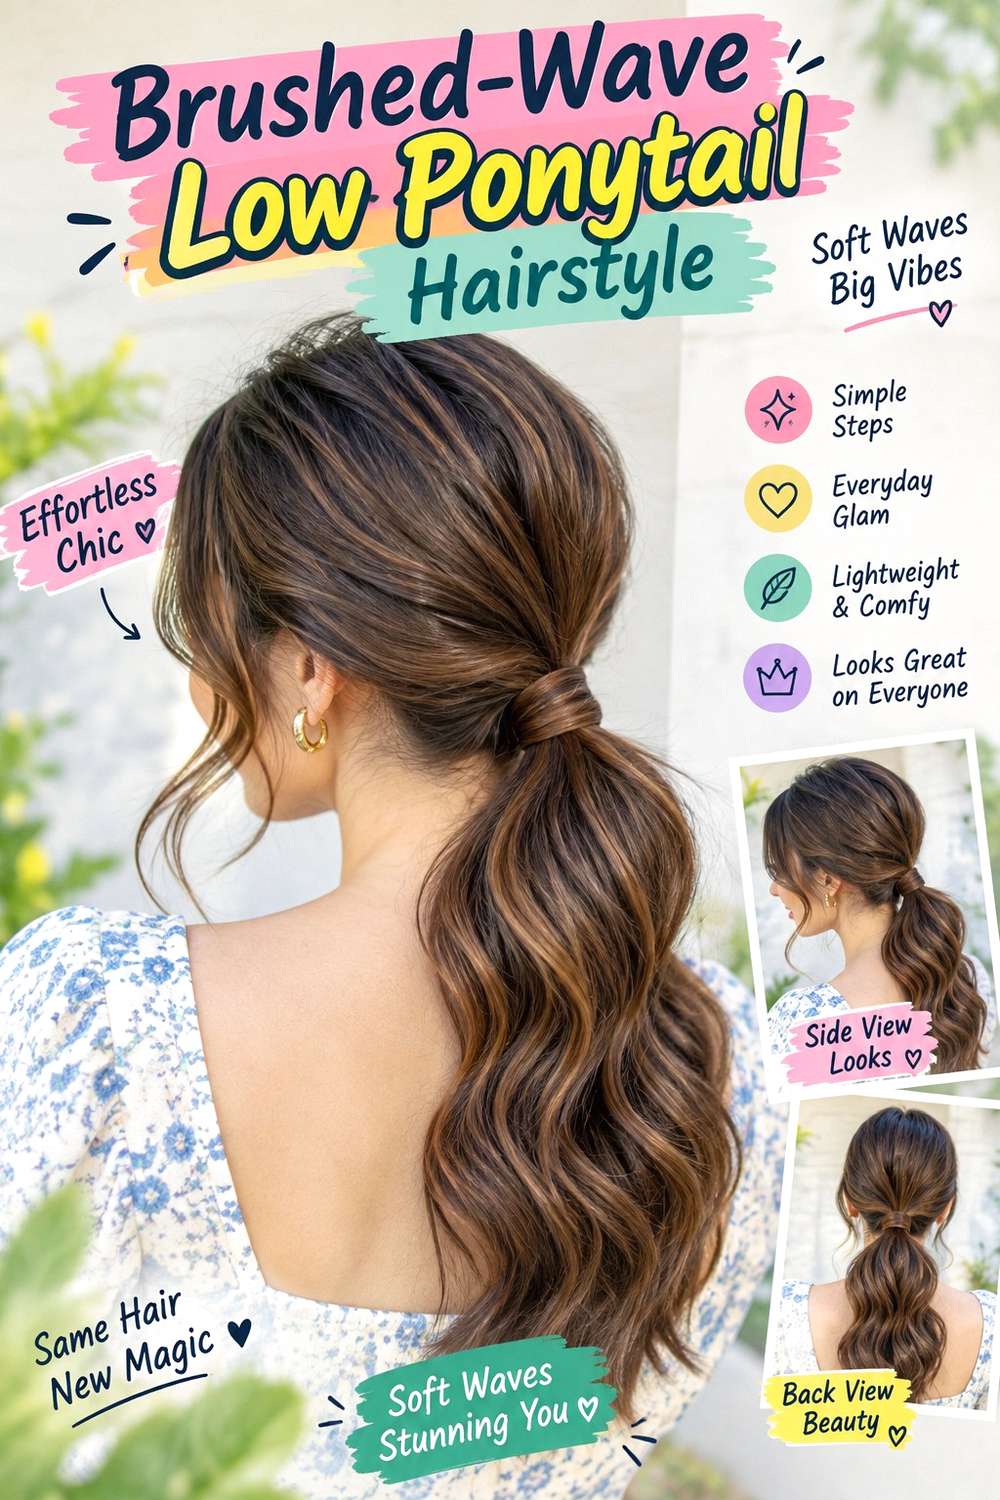
Brushed waves create a soft, blended tail instead of separate curls, making them useful for a loose autumn ponytail that still looks finished. Form broad bends through the length, allow them to cool, then gently blend them together before gathering the hair at the nape. Keep the crown softly fitted with a center or shallow side part, and leave the ends slightly straighter so the tail does not become too rounded.
Medium and long hair gives the wave pattern enough room to develop. Naturally wavy hair may need only selective reshaping, while straighter hair requires more styling time. Apply heat protectant before using a curling iron, then use flexible hairspray after the waves are blended to support movement without stiffness. A quick refresh may involve reshaping one flattened section rather than redoing the entire tail; a complete wash-day style takes longer because the wave set should be finished before the ponytail is secured.
If a stylist is creating it, show where you want the first broad bend to begin and how smooth you want the crown compared with the tail. Keeping wave volume below the nape makes the style easier to wear with jackets and scarves without creating a thick, crowded base.
Pro tip:
Wait until the waves are fully cool before blending them. Brushing too early can stretch out the bends before they set, especially through the upper half of the ponytail.
Make It Work for You:
If your hair already has loose waves, reshape only the sections that need more consistency. This keeps natural texture visible and shortens the full styling process considerably.
Watch Out For:
Avoid brushing the waves repeatedly after the ponytail is secured. Too much handling can create frizz and uneven expansion; smooth only the sections that genuinely need correction.
Natural-Curl Loose Low Ponytail Hairstyle

A low ponytail can keep natural curls fully visible while staying loose through the crown and face frame. Gather the hair near the nape after curl groups have formed, leaving selected pieces around the temples, cheeks, or jaw. The ponytail should retain spring through the length instead of being stretched into a smooth tail, while the roots can keep a little volume for a softer outline.
This approach works best when the anchor position is judged at the hair’s finished dry length because shrinkage affects reach and ponytail placement. Use lightweight leave-in conditioner for moisture and slip, curl gel to support grouped definition, and a fabric-covered elastic to hold the low base. A quick refresh may involve lightly reactivating visible curls and resetting the elastic; a complete wash-day style takes longer because definition needs to be rebuilt throughout the hair.
If a stylist is creating the look, discuss how low the ponytail should sit after shrinkage and identify which curl groups should remain free. A fall collar or scarf can compress curls near the nape, so keeping the base slightly clear of bulky fabric may help preserve the shape. Comfortable tension is more important than capturing every short curl.
Pro tip:
Choose complete curl groups for the loose front sections before gathering the ponytail. Moving them as units helps preserve definition and reduces unnecessary separation around the face.
Make It Work for You:
For tighter curls with stronger shrinkage, place the ponytail slightly higher than the lowest nape point if needed. The style can still look low while reducing excessive stretching.
Watch Out For:
Do not repeatedly separate dry curls to make the ponytail look fuller. Excess handling can increase frizz; reshape grouped curls together and leave natural variation in the tail.
Coily Soft-Volume Low Ponytail Hairstyle

Coily hair can create a softly rounded low ponytail with natural volume at the crown and through the tail. Keep the front gently parted or brushed back, release a few coils near the temples if they do not naturally reach the base, and secure the rest close to the nape. The ponytail can stay compact or expand naturally, while the crown remains softly shaped rather than tightly flattened.
This version suits routines that prioritize natural texture over a slick finish. Shrinkage changes both the visible tail length and the amount of hair that reaches the elastic, so placement should be decided when the hair is near its intended finished state. Use lightweight leave-in conditioner for pliability, curl gel to support grouped coils, and a fabric-covered elastic for the anchor. A quick refresh may involve reshaping front coils and checking the base; full wash-day styling takes longer because the pattern must be reset.
If a stylist is creating it, discuss the dry ponytail position, how much crown volume you want, and which shorter coils can remain free. Fall scarves can press directly against the nape, so a slightly raised low anchor may be more practical on days with thicker neckwear. The goal is security without stretched roots.
Pro tip:
Select the ponytail position after the coils have settled close to their finished shape. This gives a more realistic view of the final length, volume, and nape coverage.
Make It Work for You:
If your coils shrink strongly, keep the base compact and allow shorter temple or nape pieces to remain loose. The result stays soft without forcing extra reach.
Watch Out For:
Avoid tightening the elastic simply to capture every short coil. If pieces do not reach comfortably, leave them free rather than creating unnecessary tension around the hairline or nape.
Air-Dried Texture Low Ponytail Hairstyle
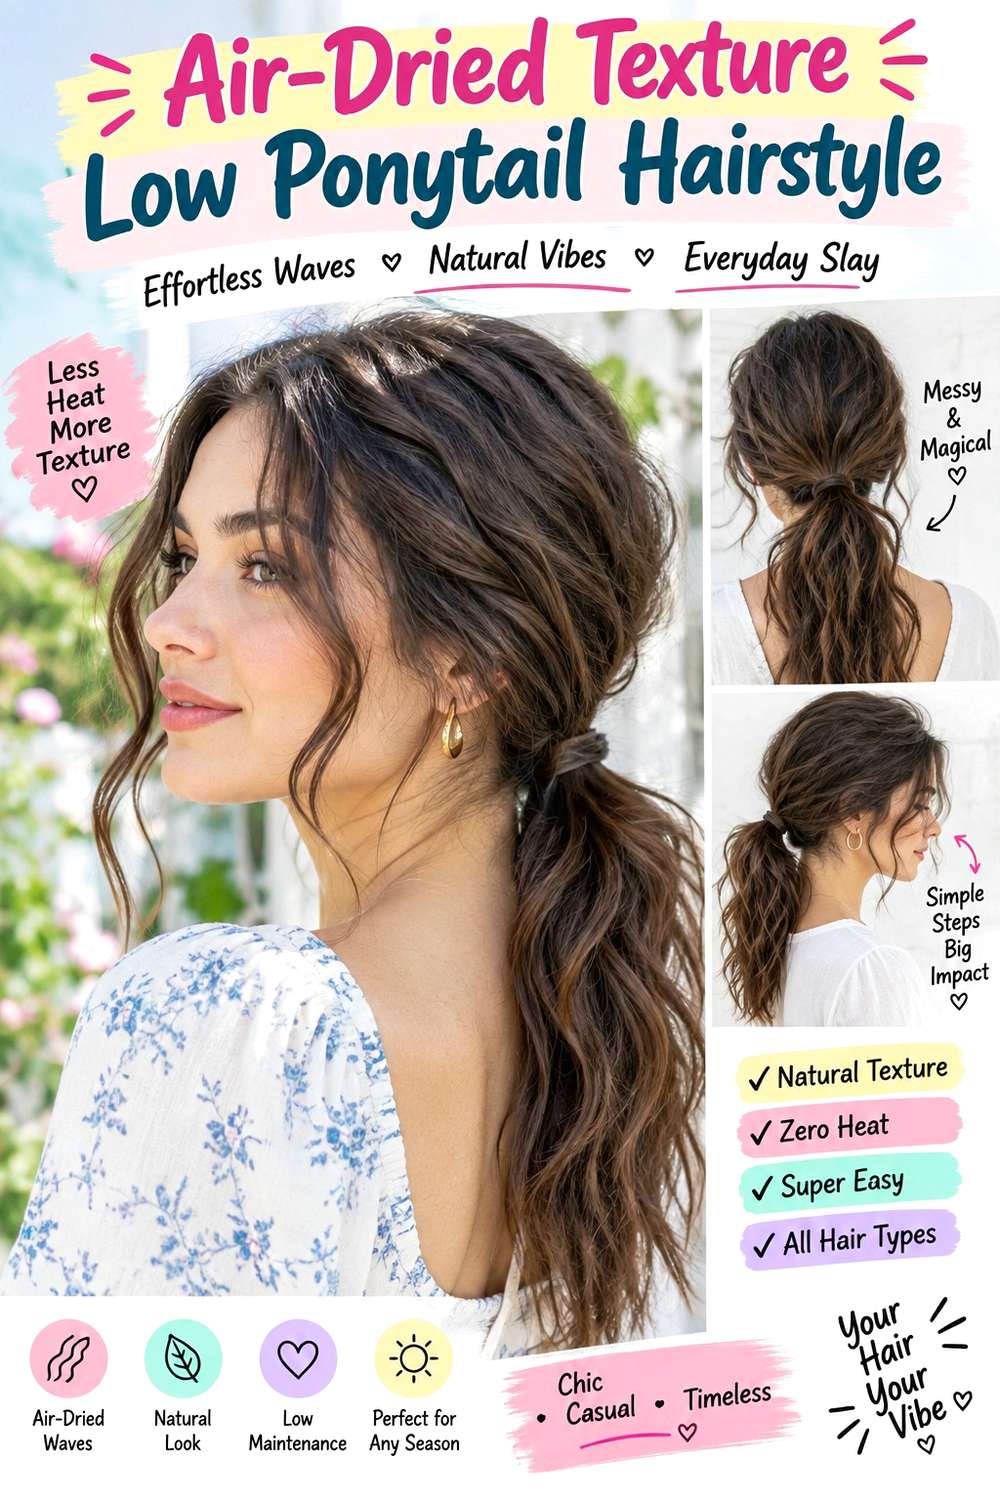
Air-dried movement gives a low ponytail an easy, irregular texture that works well when you do not want a polished wave set. Let the hair dry in its natural pattern, then gather it loosely at the nape without brushing out every bend. A center, side, or natural part can remain visible, and shorter front pieces can stay loose. Keep the tail slightly separated so its natural movement does not collapse into one heavy section.
This version is particularly useful for wavy or softly textured hair, though other patterns can adapt the idea according to their normal drying routine. Use lightweight leave-in conditioner to reduce roughness, a wide-tooth comb only where gentle separation is needed, and a fabric-covered elastic for the low anchor. A quick refresh can involve dampening one flattened area and resetting the base; full wash-day styling takes longer mainly because the hair needs time to dry before gathering.
If a stylist is helping prepare the look, explain that you want the natural pattern preserved rather than brushed smooth, and specify how much crown softness you prefer. In fall, jackets and scarves can flatten the nape, so setting the ponytail just clear of bulky collars can reduce repeated friction and help the texture remain visible.
Pro tip:
Wait until the hair is fully or nearly dry before securing the low ponytail. Gathering it too early can stretch the natural pattern unevenly around the elastic.
Make It Work for You:
For lower-density hair, keep the tail lightly separated and avoid heavy leave-in amounts near the roots. A softer product application can preserve movement without collapsing the crown.
Watch Out For:
Do not repeatedly brush the dried texture to make it neater. If one section looks uneven, correct that area specifically instead of removing the natural movement from the whole ponytail.
Wrapped-Base Loose Low Ponytail Hairstyle
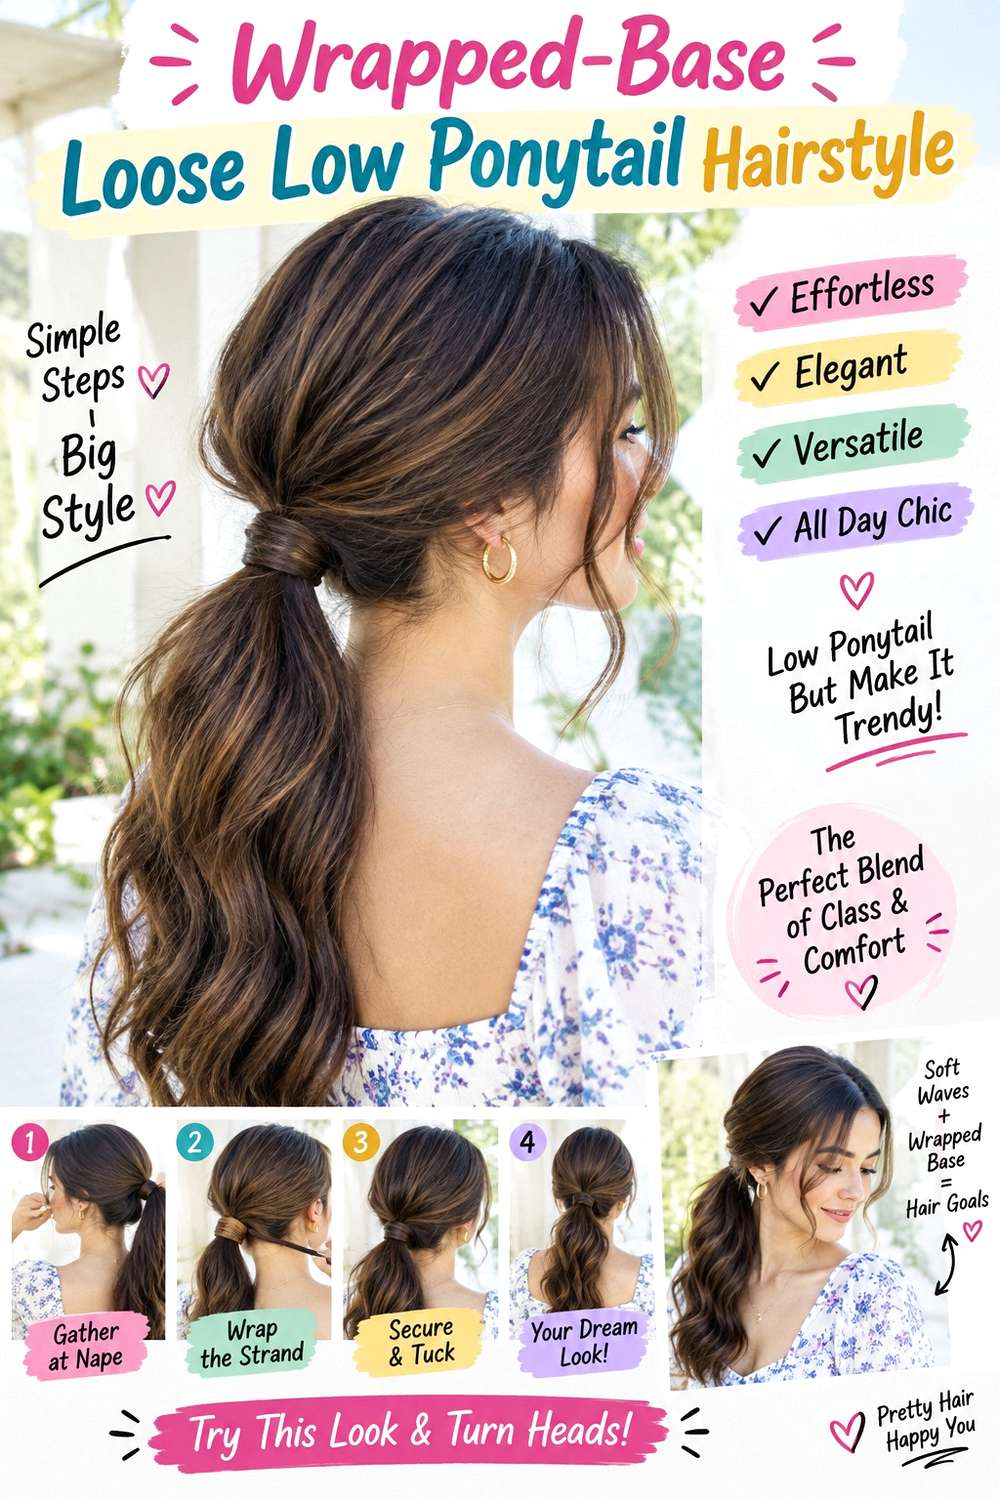
A narrow hair wrap hides the elastic while the rest of the ponytail stays deliberately soft. Gather the hair at the nape with a center, side, or natural part, allowing a little crown looseness and optional face-framing pieces. Reserve a slim section from underneath the ponytail, wind it around the elastic once or twice, and hide the end beneath the base. Keep the tail naturally straight, bent, or lightly textured.
Medium and long hair provides enough length for the wrap without taking too much volume from the tail. Lower-density hair should use a very narrow section, while dense hair can make the band slightly wider. Use a fabric-covered elastic for the structural anchor, bobby pins to secure the wrapped end, and light styling cream to keep the wrap controlled. A quick refresh generally means retucking the hidden end and smoothing the band; full wash-day styling depends on the chosen tail texture.
If a stylist is creating it, specify how wide the wrapped band should be and how much looseness you want at the crown. Because fall collars may rub directly against the nape, keep the tucked end flat and protected underneath rather than leaving it exposed where fabric can catch it.
Pro tip:
Take the wrapping section from underneath the ponytail and pin its end beneath the base. This keeps both the starting point and finish hidden from the most visible angles.
Make It Work for You:
For lower-density hair, use the smallest section that can conceal the elastic. Keeping more length in the ponytail preserves fullness while still creating the wrapped finish.
Watch Out For:
Do not use the wrapping strand to tighten a slipping base. Rebuild the elastic anchor first; over-winding the decorative section can distort the ponytail and increase nape tension.
Slim-Ribbon Loose Low Ponytail Hairstyle

A narrow ribbon adds a small fall-friendly accent while letting the low ponytail remain soft and uncomplicated. Secure the hair at the nape, keep a few face-framing pieces loose if desired, and tie the ribbon around an already stable elastic. Use a simple knot or compact bow with short tails rather than a large decorative shape. The ponytail itself can stay straight, wavy, curly, or lightly textured.
This works on medium and long hair and can also suit shorter ponytails if the ribbon is scaled down. The accessory should be light enough that it does not pull the base downward during wear. Use a fabric-covered elastic for structural support, a slim ribbon as the accent, and light styling cream to control front pieces or surface flyaways. A quick refresh means retightening the ribbon knot and reshaping the loose sections; full wash-day styling depends on the natural texture underneath.
If a stylist is creating the look, specify the ribbon width, knot position, and desired tail length. For fall outfits with scarves or high collars, keep ribbon tails shorter so they do not tangle repeatedly with fabric. The ribbon should decorate the secure base rather than function as the main anchor.
Pro tip:
Tie the ribbon only after the ponytail feels stable during normal movement. This keeps the accessory decorative and makes it easier to reposition without disturbing the actual anchor.
Make It Work for You:
For shorter or lower-density hair, choose a very slim ribbon with short tails. Smaller proportions preserve the loose ponytail as the main feature instead of overwhelming it.
Watch Out For:
Avoid wrapping the ribbon around the base many times to stop slipping. Extra fabric can create bulk and friction; correct the underlying elastic instead and retie lightly.
Velvet-Bow Loose Low Ponytail Hairstyle
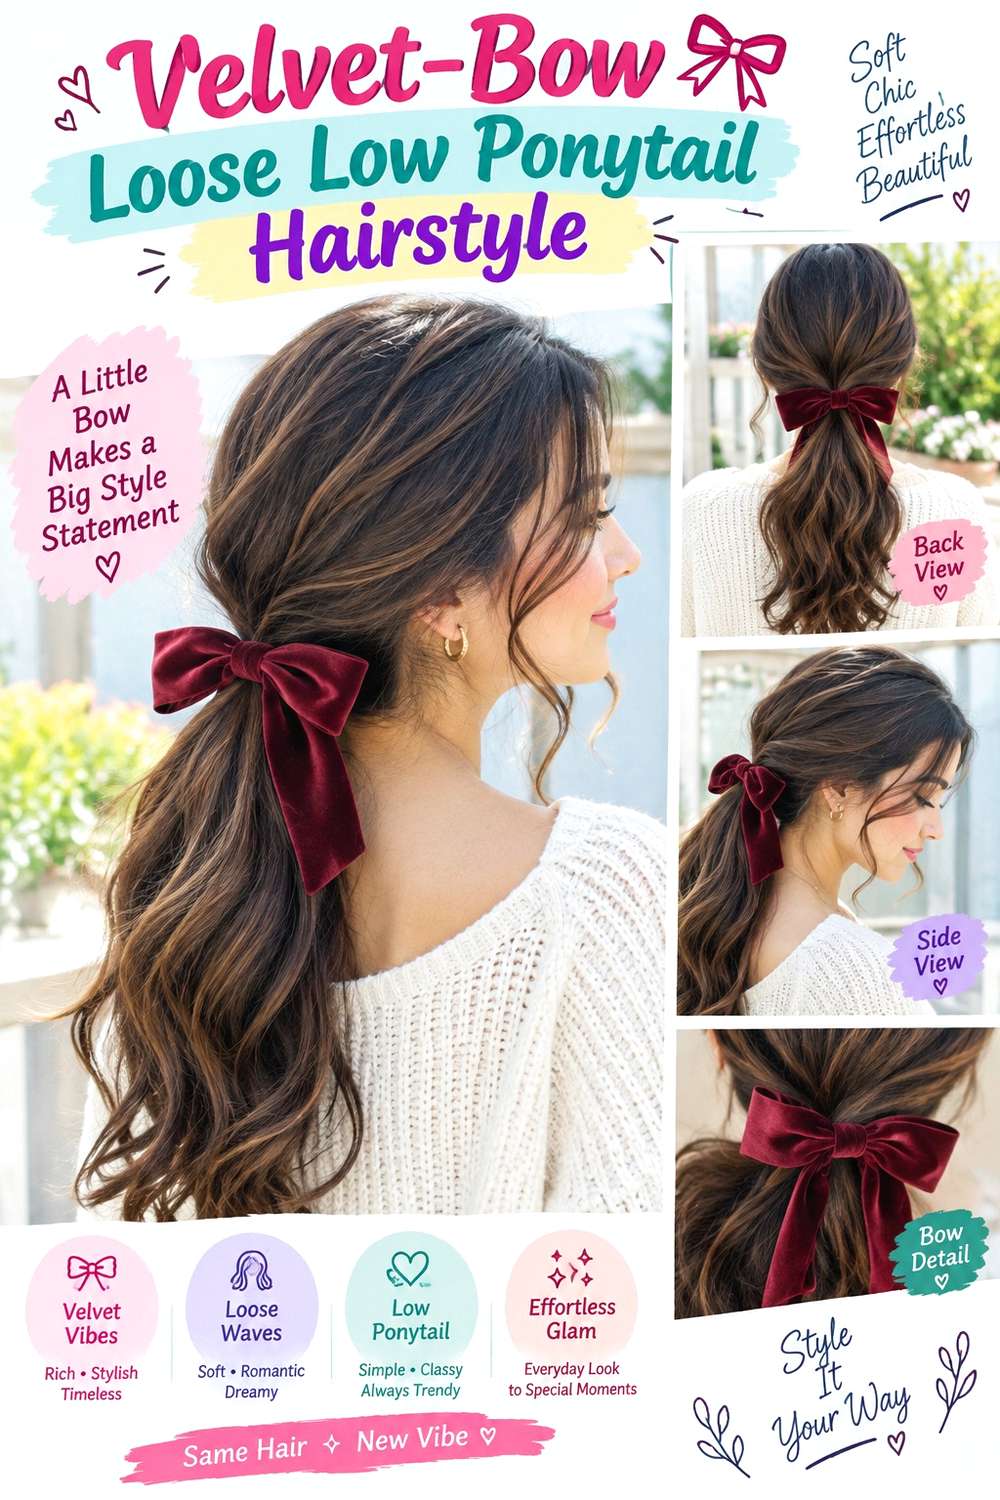
A velvet bow gives a loose low ponytail a richer seasonal texture without changing the hairstyle’s basic construction. Keep the hair softly parted or brushed back, secure it at the nape, and attach the bow directly over the elastic. Let the fabric tails fall alongside the ponytail rather than covering the entire length. Gentle waves or natural texture pair well with the softer surface of velvet.
Medium and long hair can support a broader bow, while shorter or lower-density ponytails often look more balanced with a smaller one. Use a fabric-covered elastic for the anchor, a velvet bow clip as the decorative element, and light styling cream to keep nearby strands controlled. A quick refresh generally means recentering the bow and smoothing the base; a full restyle depends on whether the tail is naturally textured or heat-shaped.
If a stylist is creating it, specify the bow width and how long you want the fabric tails compared with the ponytail. A high coat collar or scarf can push a large bow upward, so place it where clothing will not repeatedly press against the clip. The bow should attach to a stable base rather than carry the ponytail’s weight.
Pro tip:
Check the bow placement while wearing the coat or scarf you plan to pair with it. This reveals whether the accessory will rub, tilt, or become hidden by the neckline.
Make It Work for You:
For a smaller ponytail, choose a compact velvet bow with shorter tails. You still get the seasonal texture without allowing the accessory to dominate the available hair length.
Watch Out For:
Do not use a large bow to conceal a loose elastic. The added weight may increase slipping, so rebuild the ponytail base before attaching the decorative clip.
Scarf-Ready Nape Low Ponytail Hairstyle

A scarf-ready ponytail sits low enough to feel relaxed but high enough that thick neckwear does not constantly rub against the elastic. Gather the hair just above the lowest point of the nape, keep the crown softly fitted, and let the tail fall over or outside the scarf rather than becoming trapped beneath it. A center or shallow side part and a few controlled face-framing pieces keep the front soft.
This is useful for medium and long hair during cooler weather when collars and scarves can create friction at the base. Straight, wavy, curly, and coily textures can all work; the key adjustment is anchor placement rather than texture. Use a fabric-covered elastic for security, light styling cream to control flyaways caused by fabric friction, and a wide-tooth comb where gentle tail separation is needed. A quick refresh may mean smoothing the nape and resetting the elastic after removing a scarf; full wash-day styling depends on the natural texture.
If a stylist is creating it, show the neckline or scarf thickness you usually wear and explain where you want the ponytail to clear the fabric. The anchor should remain low in appearance while avoiding the exact point where a stiff collar repeatedly presses.
Pro tip:
Test the ponytail with your scarf before finalizing the anchor. Raising it even slightly can prevent constant rubbing while keeping the overall silhouette low and relaxed.
Make It Work for You:
For very dense hair, let more of the tail fall outside the scarf rather than tucking it underneath. This reduces compression at the nape and preserves movement.
Watch Out For:
Avoid placing the elastic exactly where a stiff collar rests. Repeated friction can loosen the base and roughen the nape, so shift the anchor slightly above that line.
Tucked-Behind-Ears Loose Low Ponytail Hairstyle
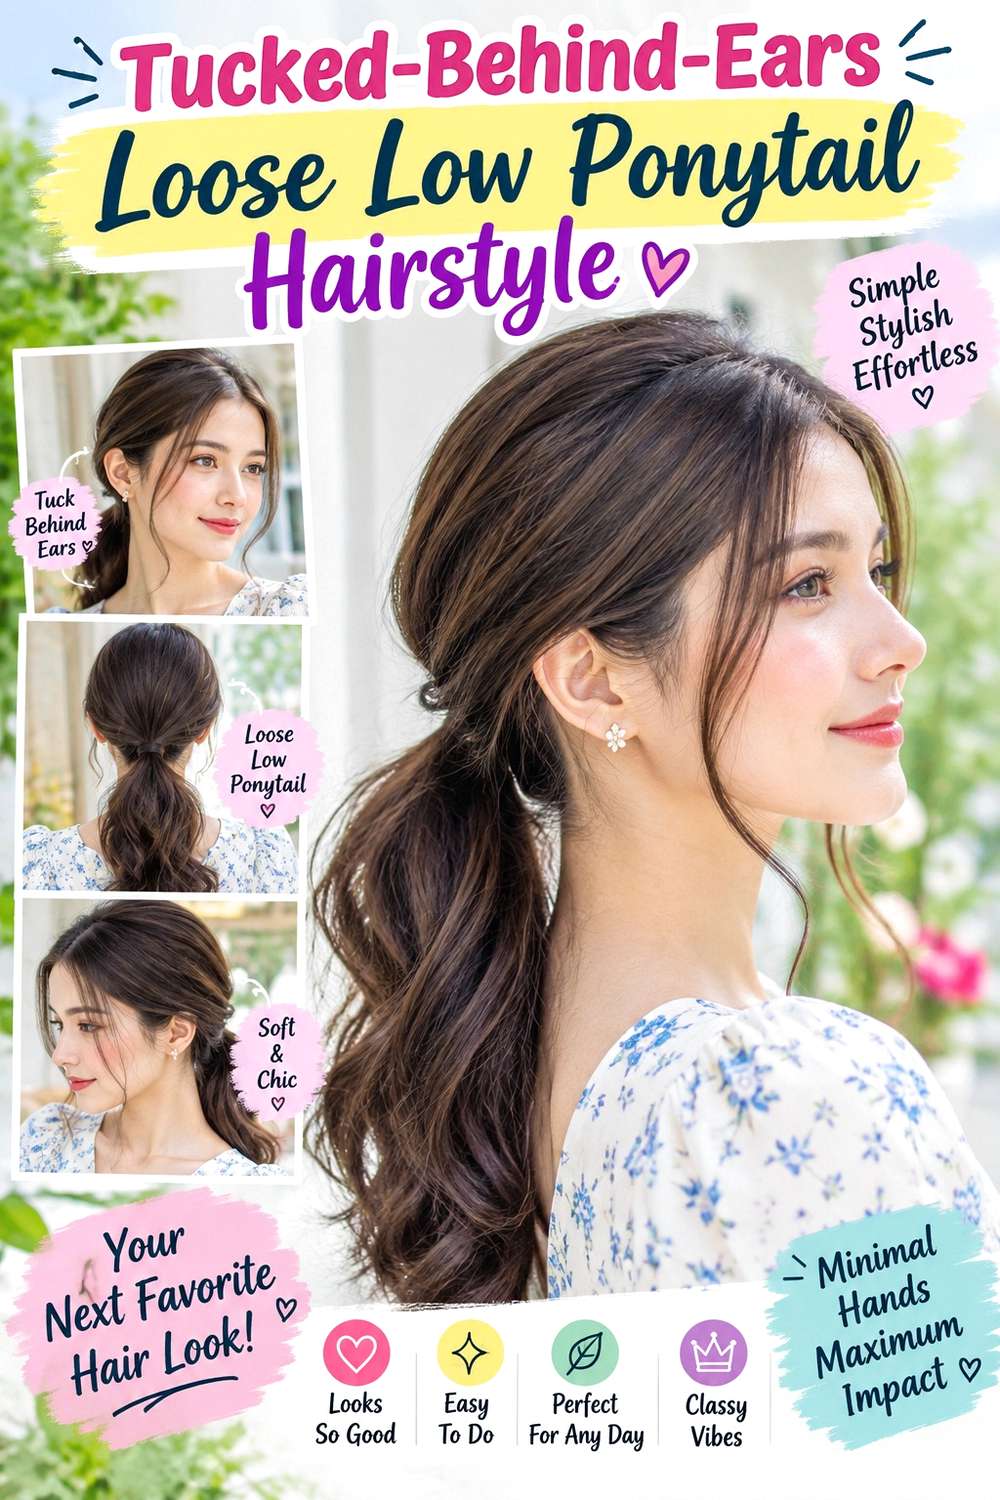
Tucking both sides behind the ears creates an open front while the low ponytail remains soft through the crown and tail. Use a center or shallow side part, guide the side sections behind the ears before gathering the hair, and secure the base at the nape. Leave a slight amount of looseness above the elastic and let the tail follow its natural movement rather than pulling everything tight.
This version works well for straight and wavy hair and can also suit curls when the side sections naturally stay tucked. Shorter layers may need to remain loose instead of being forced behind the ears. Use a tail comb to refine the part, a fabric-covered elastic for the ponytail, and light styling cream to help the ear sections stay controlled. A quick refresh means retucking the sides and smoothing the nape; full wash-day styling depends on the tail texture.
If a stylist is recreating it, specify whether you want the ears completely exposed and how low the ponytail should sit behind them. This placement works well with autumn jackets because the face remains open while the tail stays contained. Comfort should come from correct side placement rather than pulling the elastic harder.
Pro tip:
Tuck both sides behind the ears before securing the ponytail. Establishing that direction first helps prevent bumps from forming above the ears when the elastic is tightened.
Make It Work for You:
If shorter layers keep escaping, leave one narrow piece loose on each side instead of forcing everything backward. The ponytail can remain tidy while keeping a softer front.
Watch Out For:
Do not tighten the base repeatedly when the ear sections slip. Correct those sections directly; extra nape tension will not necessarily keep short side layers tucked in place.
Twisted-Side Loose Low Ponytail Hairstyle

Soft side twists add detail without making the ponytail feel formal. Begin with a center or relaxed side part, take one section from each side, and twist them gently toward the nape before combining them with the remaining hair in a low ponytail. Keep the twists broad and loose rather than rope-tight, and let a few shorter pieces remain free around the temples if they suit the existing length.
Medium and long hair gives the side sections enough reach to twist comfortably. Straight and wavy hair show the rolled lines clearly, while curls create softer, fuller twists. Use a fabric-covered elastic for the main ponytail, bobby pins to stabilize the side sections near the anchor, and light styling cream for short surface pieces. A quick refresh generally means resetting one loose twist or smoothing the nape; full wash-day styling takes longer when the tail texture also needs preparation.
If a stylist is creating it, specify where the twists should begin and how loose they should look around the ears. The side sections should guide hair toward the nape without pulling the temples tightly. For fall wear, keep the final pins tucked flat so scarves or coat collars are less likely to catch them.
Pro tip:
Secure each twist lightly near the final ponytail position before joining everything together. This keeps the side detail from unraveling while the low anchor is formed.
Make It Work for You:
If your side layers are shorter, begin the twists farther back and leave the front pieces loose. The twisted detail remains visible without forcing limited length toward the nape.
Watch Out For:
Avoid twisting one side much more tightly than the other. Uneven tension can shift the ponytail off center and make the crown look asymmetrical instead of softly balanced.
Braided-Accent Loose Low Ponytail Hairstyle
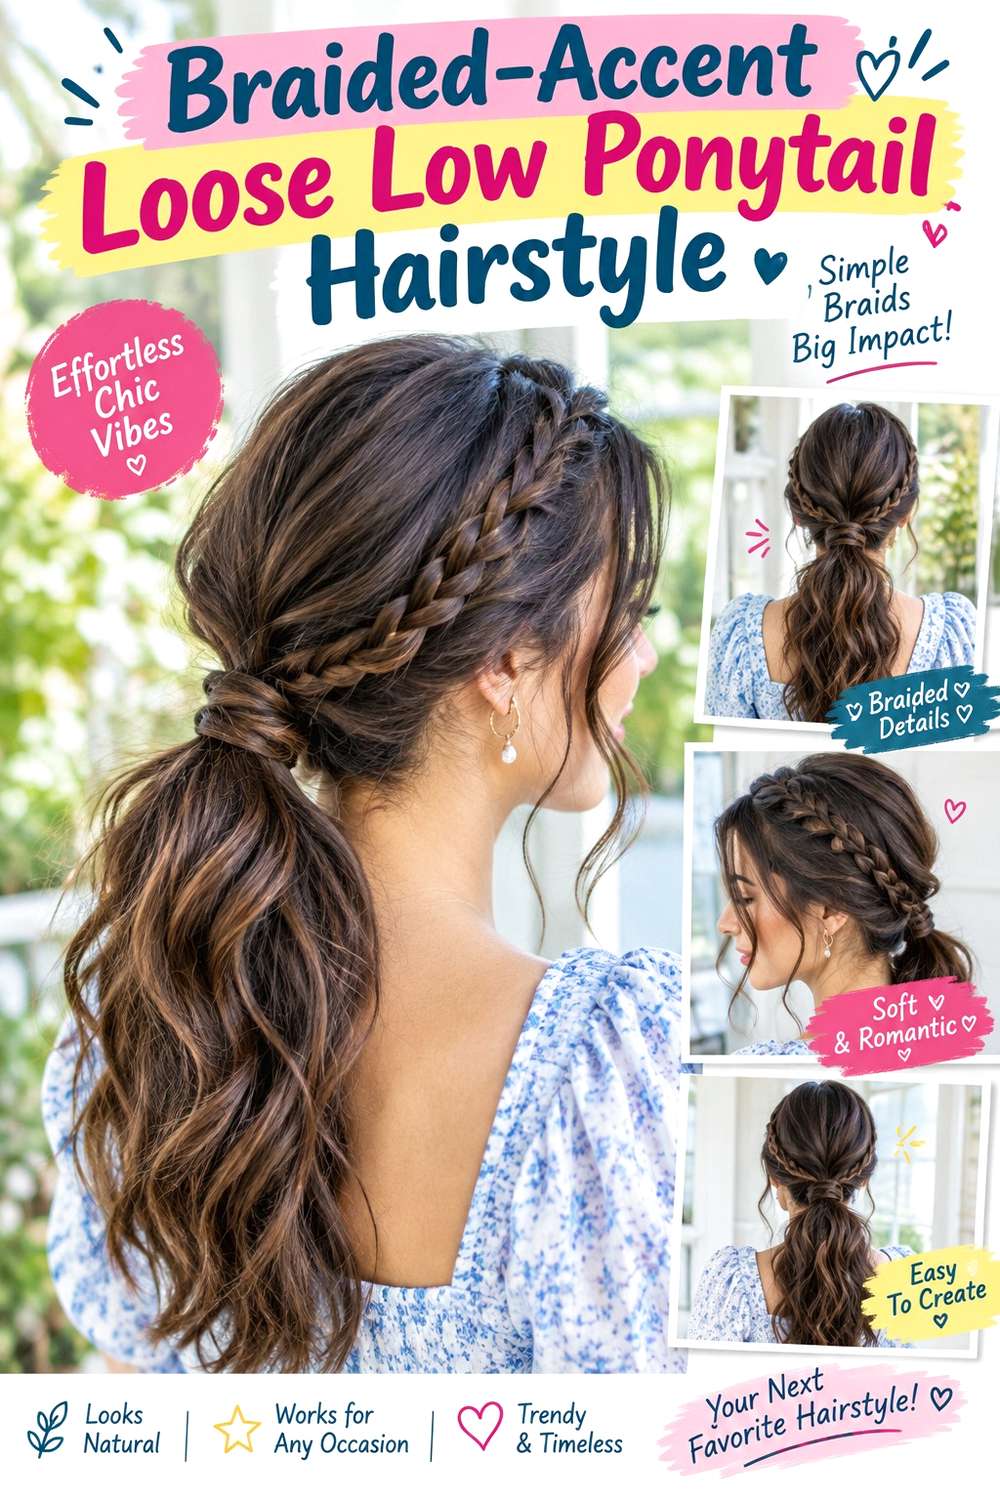
A single narrow braid can add texture to a loose ponytail while keeping most of the hairstyle simple. Start the braid near one temple or above the ear, direct it gently toward the nape, and combine it with the rest of the hair in a low ponytail. Keep the braid relatively slim and the remaining hair softly gathered, with natural bends or waves through the tail and optional face-framing pieces on the opposite side.
This style works best on medium and long hair because the braid needs enough length to reach the anchor without excessive tension. Straight and wavy textures show the braided line clearly, while curls can create a softer accent. Use a small snag-free elastic for the braid end, a fabric-covered elastic for the ponytail, and light styling cream to control the braided section. A quick refresh means smoothing the braid edge and resetting the low base; a full wash-day style takes longer if the tail texture needs rebuilding.
If a stylist is creating it, specify the braid width, starting point, and comfortable tension above the ear. A fall hat may cover the upper braid, so placing the detail slightly lower can help it remain visible. The braid should decorate the style rather than pull the ponytail sideways.
Pro tip:
Finish the braid before securing the main ponytail, then check how much of it remains visible near the nape. Adjust its route before combining the sections.
Make It Work for You:
For lower-density hair, use a narrow braid from a small side section. Most of the hair remains available for the ponytail, preserving fullness through the tail.
Watch Out For:
Do not braid tightly at the temple simply to keep the accent neat. If the section feels strained, loosen the first crossings or start the braid slightly farther back.
Soft Claw-Clip Low Ponytail Hairstyle

A claw clip can sit over the base of a loose low ponytail as an accent without turning the style into a full clipped updo. Secure the ponytail first at the nape, then place a medium clip vertically or diagonally over a small section above the elastic. Keep the tail fully hanging and allow the crown to retain softness, with a center or side part and optional loose pieces around the face.
This version suits medium and long hair, especially when you want an accessory that can be removed easily. Dense hair may need the elastic to carry all structural weight while the clip grips only a surface section. Use a fabric-covered elastic for the base, a medium claw clip for decoration, and light texturizing spray for grip around the attachment point. A quick refresh usually means resetting the clip angle and smoothing the nape; full wash-day styling depends on the texture of the tail.
If a stylist is creating it, specify how visible you want the clip from behind and whether it should sit above or partly across the elastic. During fall, bulky collars can press against larger clips, so choose placement that clears the neckline instead of forcing the accessory against the scalp.
Pro tip:
Check the clip placement with your usual jacket or scarf on. If the neckline pushes it upward, move the clip slightly higher or choose a shorter accessory.
Make It Work for You:
For very dense hair, let the elastic hold the full ponytail and use the claw clip only on a smaller surface section. This keeps the accessory comfortable.
Watch Out For:
Do not force an undersized clip around the entire ponytail. If the teeth cannot close comfortably, use the clip decoratively rather than increasing pressure at the nape.
Oversized-Scrunchie Loose Low Ponytail Hairstyle
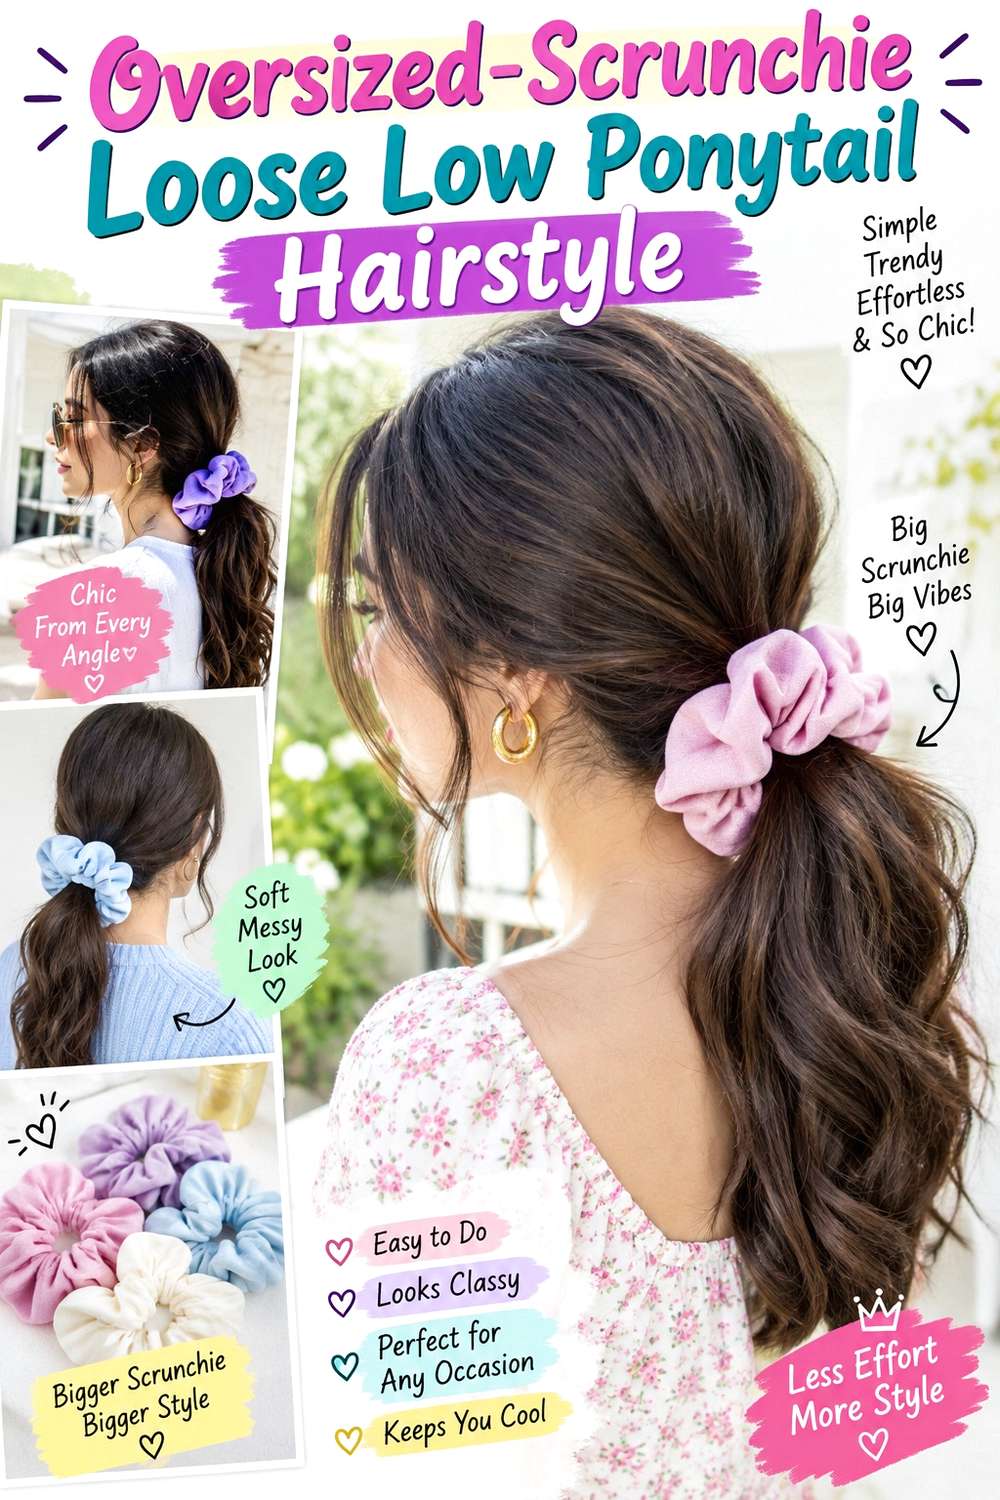
An oversized scrunchie gives a loose low ponytail visible texture at the base while keeping the rest of the style simple. Gather the hair softly at the nape, leave slight crown volume and optional face-framing pieces, then secure the ponytail with the scrunchie rather than hiding it. The tail can stay straight, wavy, curly, or coily, but the base should remain relaxed enough that the accessory does not look tightly compressed.
This option works across many lengths as long as the hair reaches a stable low ponytail. Dense hair can support a larger scrunchie, while lower-density hair may look more balanced with a softer, medium-scale version. Use a fabric-covered scrunchie for the anchor, light styling cream to manage flyaways, and a wide-tooth comb only if the tail needs gentle separation. A quick refresh usually means resetting the scrunchie and loosening compressed crown sections; full wash-day styling depends on the natural texture.
If a stylist is creating it, specify the anchor height and how much crown softness you want. For fall, plush fabrics can pair well with heavier clothing, but an overly bulky scrunchie may rub against high collars. Keep the accessory clear of the neckline when possible.
Pro tip:
Place the scrunchie with your coat collar in mind. A small change in anchor height can keep the accessory visible and prevent repeated rubbing throughout the day.
Make It Work for You:
For lower-density hair, choose an oversized scrunchie made from light fabric rather than a heavy padded design. You get visual scale without dragging down the ponytail.
Watch Out For:
Avoid twisting a thick scrunchie too many times to create extra security. Excess compression can flatten the soft base; choose an accessory that grips well with fewer turns.
Short-Length Loose Low Ponytail Hairstyle
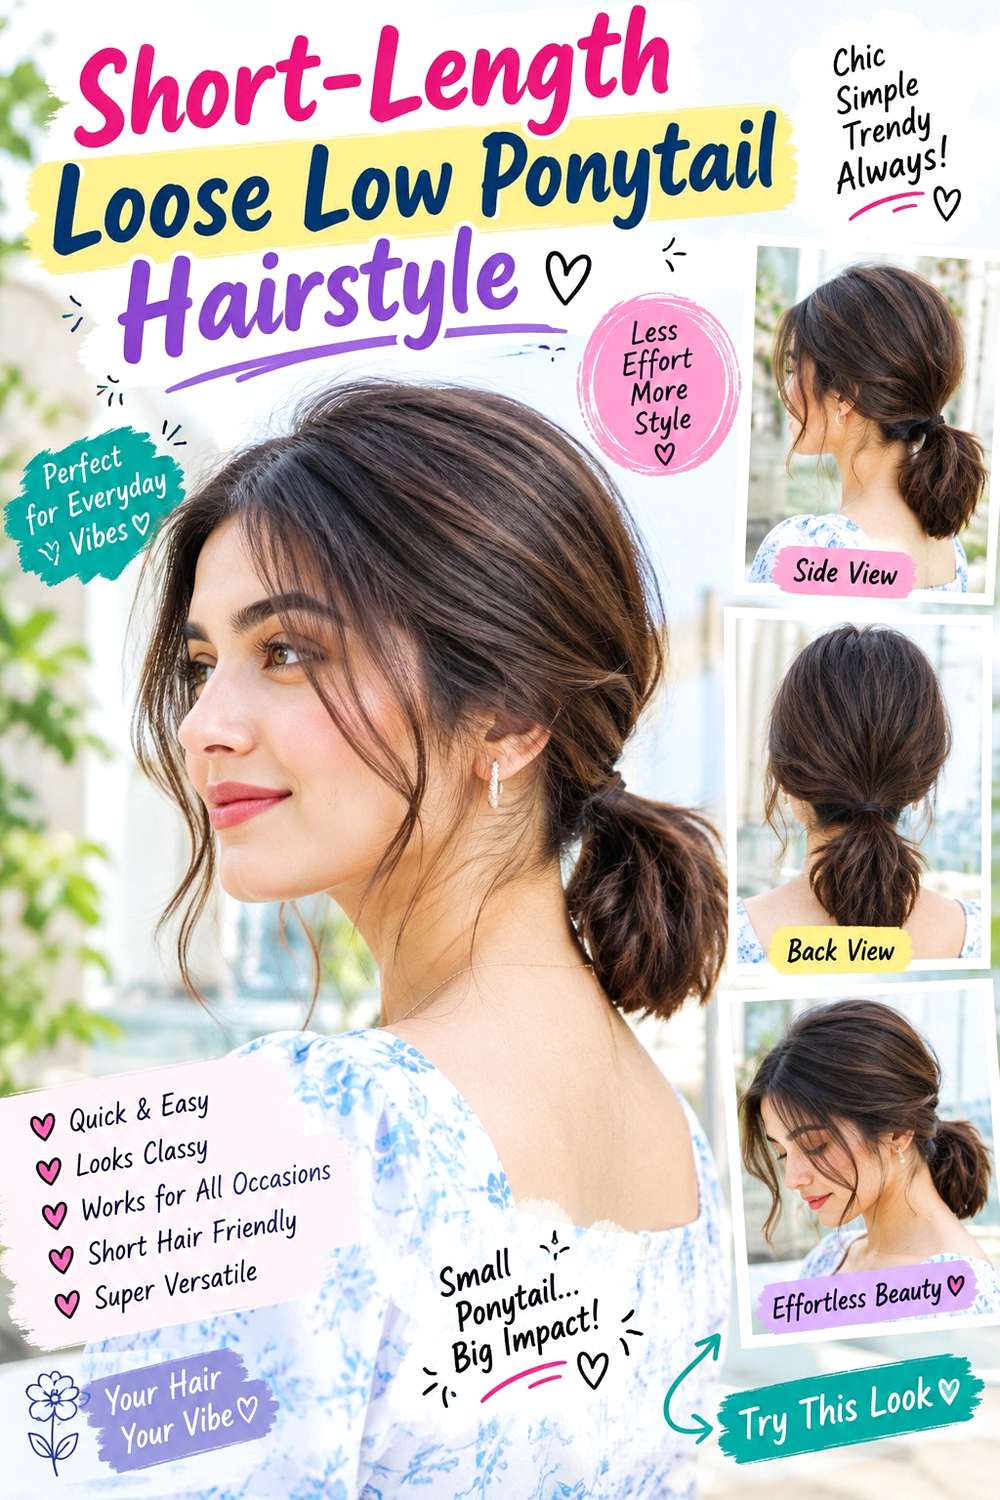
Shorter hair can still create a loose autumn ponytail when the base sits close to the nape and shorter pieces are allowed to remain free. Gather whatever length reaches comfortably, keep the crown softly shaped, and let face-framing or nape sections stay loose rather than forcing them into the elastic. A center, side, or natural part can define the front, while the small tail follows its existing straight, wavy, curly, or coily texture.
This version works best on shorter medium lengths that form a stable low base without strong stretching. Curly and coily hair should be judged near its finished dry length because shrinkage changes how much reaches the anchor. Use a small snag-free elastic for the ponytail, light styling cream to define loose pieces, and bobby pins only where a reachable side section needs gentle support. A quick refresh may mean resetting the elastic and reshaping two front pieces; full wash-day styling takes longer when natural texture needs preparation.
If a stylist is creating it, identify exactly which shorter sections can remain loose and where you want the anchor to sit. Fall scarves can catch nape pieces, so keeping them softly controlled without over-pinning may make daily wear easier.
Pro tip:
Test the low ponytail before tightening it fully. If several short sections barely reach, raise the base slightly or let those pieces remain loose instead of stretching them.
Make It Work for You:
For curls or coils, assess the ponytail at the finished dry length. A compact low base with natural loose pieces can respect shrinkage while preserving softness.
Watch Out For:
Do not add several tight pins just to capture every short strand at the nape. Too much hardware can feel uncomfortable beneath fall collars and scarves.
Conclusion
Loose low ponytail hairstyles for fall can stay simple with natural texture or become more defined through brushed waves, face-framing pieces, narrow wraps, twists, ribbons, or soft accessories. Longer hair allows larger wave patterns and more decorative detail, while shorter hair often works best with a compact nape anchor and intentionally loose pieces. Lower-density hair benefits from preserving fullness in the tail, while dense hair can support more crown volume without needing tighter tension. Straight finishes look cleaner, whereas waves, curls, and coils add movement. Parting, accessory scale, scarf clearance, and styling effort should all suit your routine. The most wearable option is the one that remains secure, comfortable, and practical with the fall layers you actually wear.
Before Your Salon Visit
Choose one or two favorites and save references showing the front, nape, and ponytail texture. Discuss your natural texture, density, face shape, preferred length, usual parting, styling routine, and how often you wear scarves or high collars. Point out the exact face-framing length, crown volume, anchor height, wave pattern, loose-piece placement, or accessory scale you like. Because these are mostly temporary styles, focus on comfortable placement and realistic styling rather than requesting new layers unless you already want a haircut.
FAQs
How can I keep a loose low ponytail from looking messy in fall?
Keep the anchor secure and choose a few intentional loose areas rather than pulling random strands free. A controlled crown, defined face-framing pieces, and a tidy nape create softness without disorder. If wind or clothing causes frizz, smooth the surface selectively instead of tightening the entire ponytail.
What ponytail placement works best with scarves and high collars?
A low anchor slightly above the exact point where the scarf or collar rubs is often more practical than placing the elastic at the very bottom of the nape. Test the style with your actual outerwear, because collar height and hair length change where friction occurs.
Do loose low ponytails work with curly or coily hair?
Yes. Keep the natural pattern through the tail, judge the anchor at the hair’s finished dry length, and allow shorter curls or coils to remain free when needed. Shrinkage and density affect placement, so the goal is comfortable gathering rather than forcing every section into a smooth base.
Do I need heat to create a soft fall ponytail?
No. Natural waves, curls, coils, or air-dried texture can all create softness without heat. Hot tools are optional when you want a specific bend or brushed-wave finish. When using them, apply heat protectant and focus only on the sections that need reshaping rather than repeatedly styling the entire length.