16 Hair Gem Hairstyles for Holiday Parties
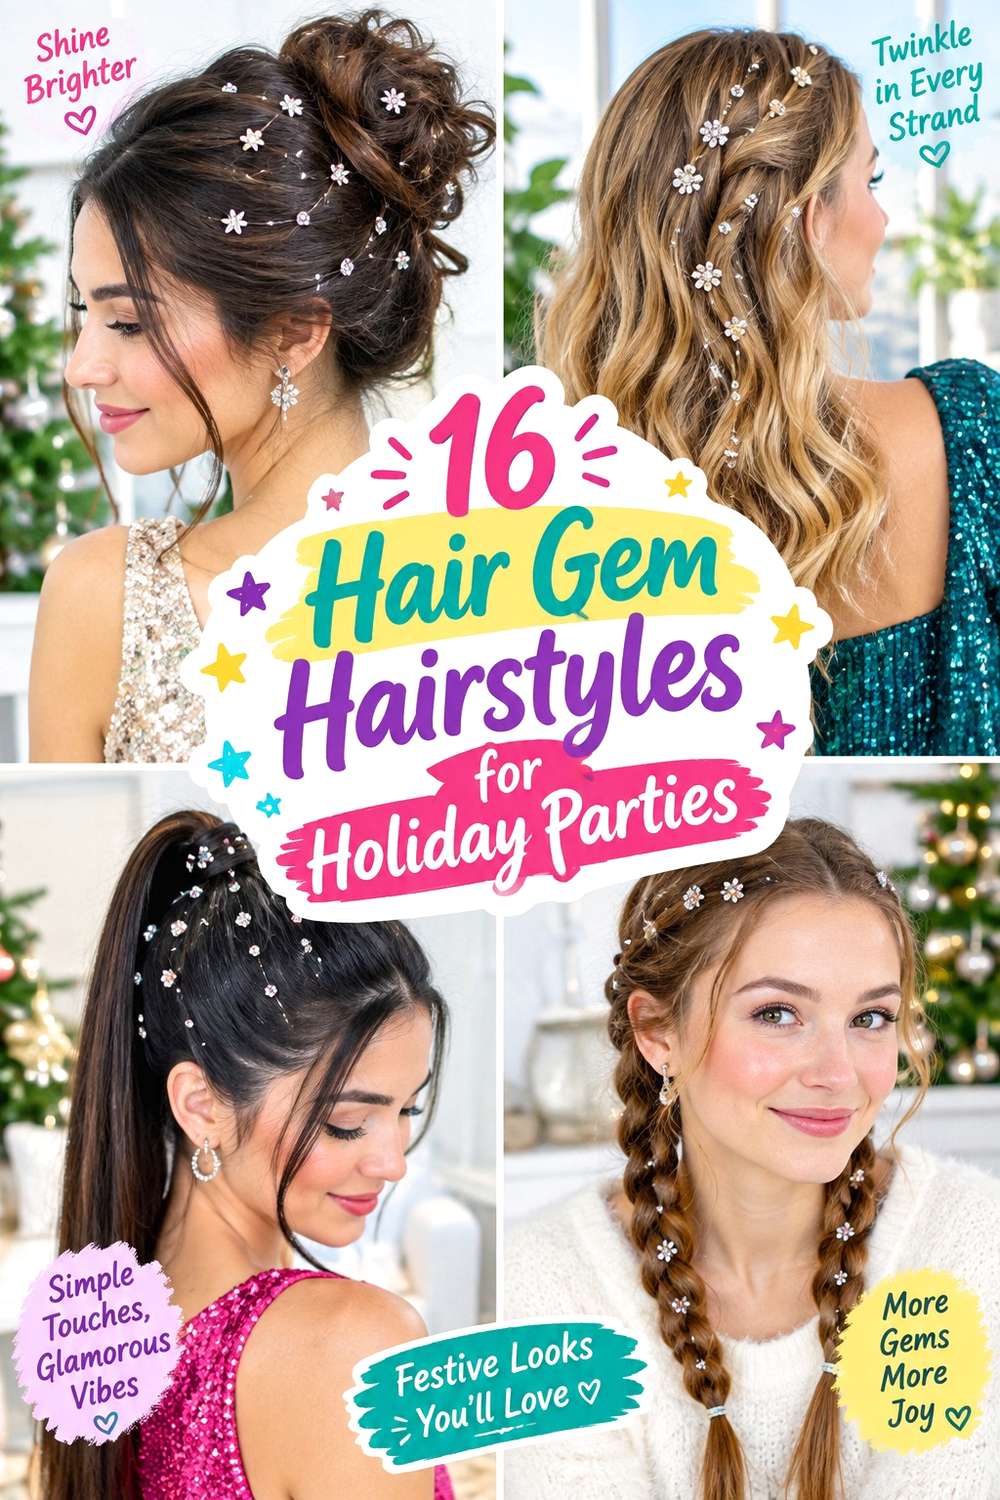
Hair gems work best when they follow the structure of the hairstyle instead of looking randomly scattered across it. For holiday parties, they can trace a clean center part, sit along braids, highlight a low bun, or form small clusters beside curls and waves. The base style matters just as much as the sparkle: smooth sections give individual stones definition, while textured hair creates a softer backdrop where gems can appear between curl groups or braided sections.
Straight, wavy, curly, and coily textures can all support hair gem hairstyles, but placement should respect density and movement. Fine or lower-density hair may look balanced with a few small gems concentrated in one area, while dense hair can support larger groupings or multiple decorated sections. Face-framing can stay loose, tuck behind the ears, or sweep into an updo. Temporary gems also avoid requiring a new haircut simply for one party.
Styling effort ranges from a quick temple cluster on already finished hair to a longer wash-day routine involving waves, coils, braids, or an updo. Secure anchoring matters for dancing and long events, but comfort comes first. Gems should sit on a stable base without pulling strands or creating painful tension.
Quick List
- Gem-Studded Center-Part Waves Hairstyle
- Scattered Side-Part Gem Curls Hairstyle
- Sleek Hairline Gem Ponytail Hairstyle
- Gem-Accented Low Bun Hairstyle
- Crystal Crown Half-Up Hairstyle
- Gem-Studded Single Braid Hairstyle
- Twin Gem Braids Hairstyle
- Pearl-And-Gem Hollywood Waves Hairstyle
- Gemmed Curtain Bangs Blowout Hairstyle
- Coily Gem Halo Hairstyle
- Gem-Accented Bubble Ponytail Hairstyle
- Side-Swept Gem Cascade Hairstyle
- Braided Crown Hair Gem Hairstyle
- Minimal Temple Gem Hairstyle
- Starburst Gem Cluster Updo Hairstyle
- Gem-Studded Twisted Half-Up Hairstyle
Gem-Studded Center-Part Waves Hairstyle
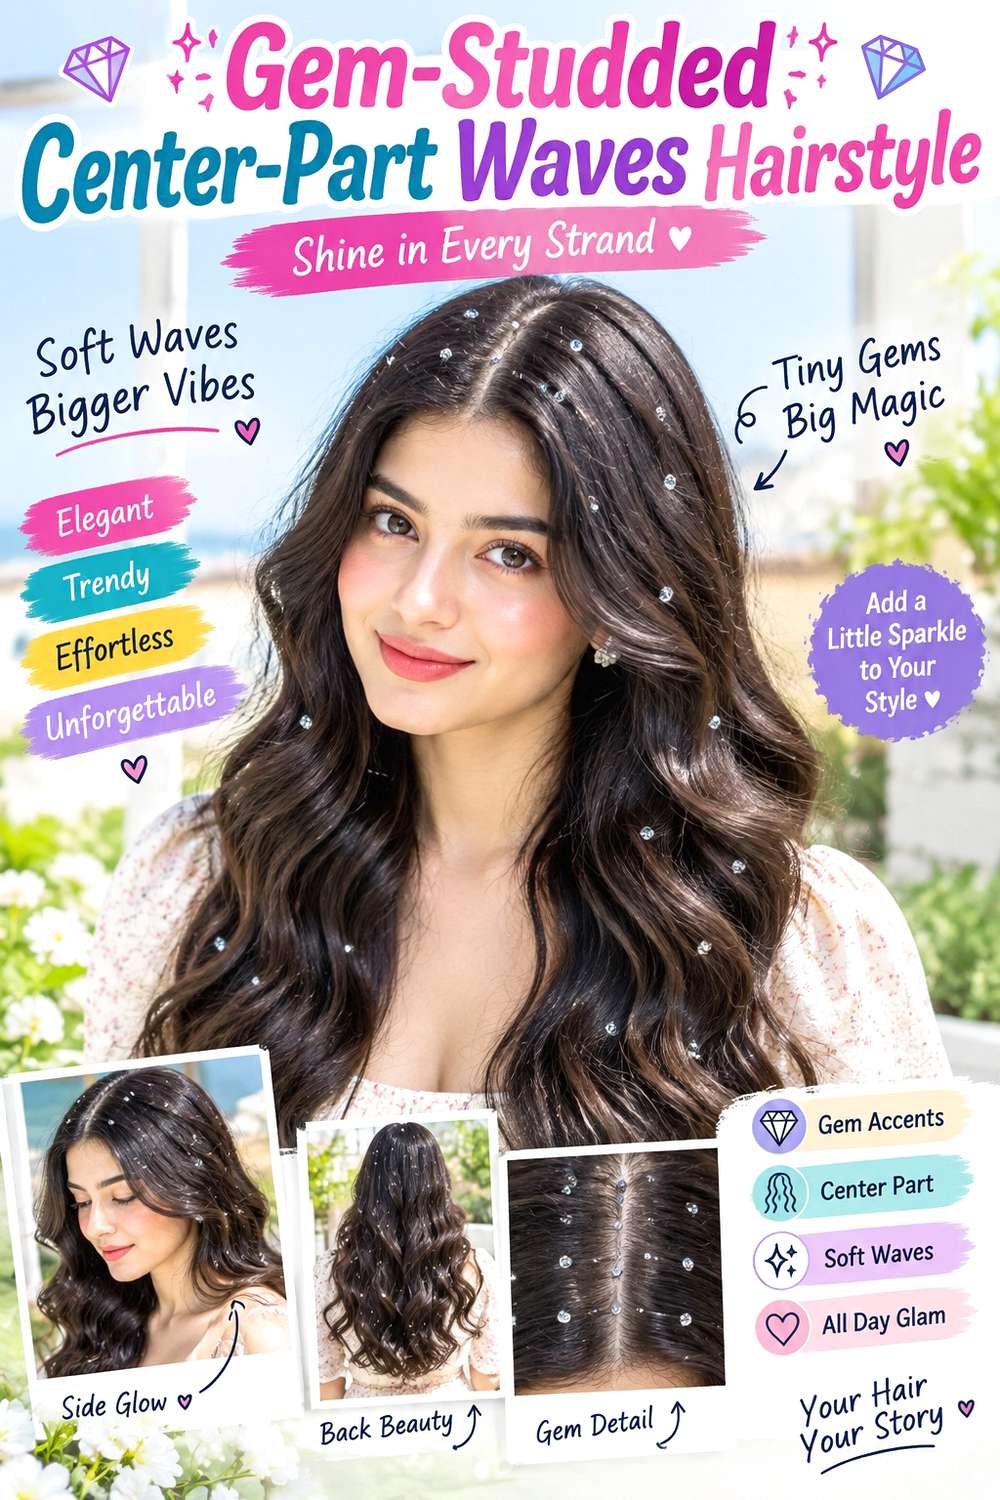
A clean center part gives the gems an obvious path, while loose waves keep the rest of the hairstyle soft. Place small stones in a short, symmetrical line beside each side of the part rather than carrying them all the way toward the crown. Let broad bends begin around the cheekbones and keep the ends slightly looser so the decorated roots remain the sharpest detail. This arrangement works especially well on medium to long hair with enough length for visible movement below the gems.
For a heat-styled version, apply heat protectant before forming broad bends with a curling iron. Add hair-safe gem stickers only after the roots have cooled and the surface is completely dry. The complete wave set is the longer part of the process; a party-day refresh can be limited to reshaping a few flattened bends and replacing any loose gems.
If you are having the style done professionally, specify exactly how far back you want the gem rows to travel and whether you want perfect symmetry or a softer staggered pattern. Keeping the decoration near the part avoids overwhelming lower-density hair. Remove temporary gems slowly after the event instead of pulling them through the hair.
Pro tip:
Set both gem rows while looking straight ahead rather than tilting your head. Compare their starting points near the forehead first, then work backward so small spacing differences do not become increasingly obvious.
Make It Work for You:
If your hair is lower in density, use fewer gems and leave more space between them. The center-part design stays recognizable without covering too much visible hair near the scalp.
Watch Out For:
Avoid placing gems before using hot tools near the front. Heat and repeated handling can loosen them. Finish the waves first, allow the roots to cool, and decorate only afterward.
Scattered Side-Part Gem Curls Hairstyle
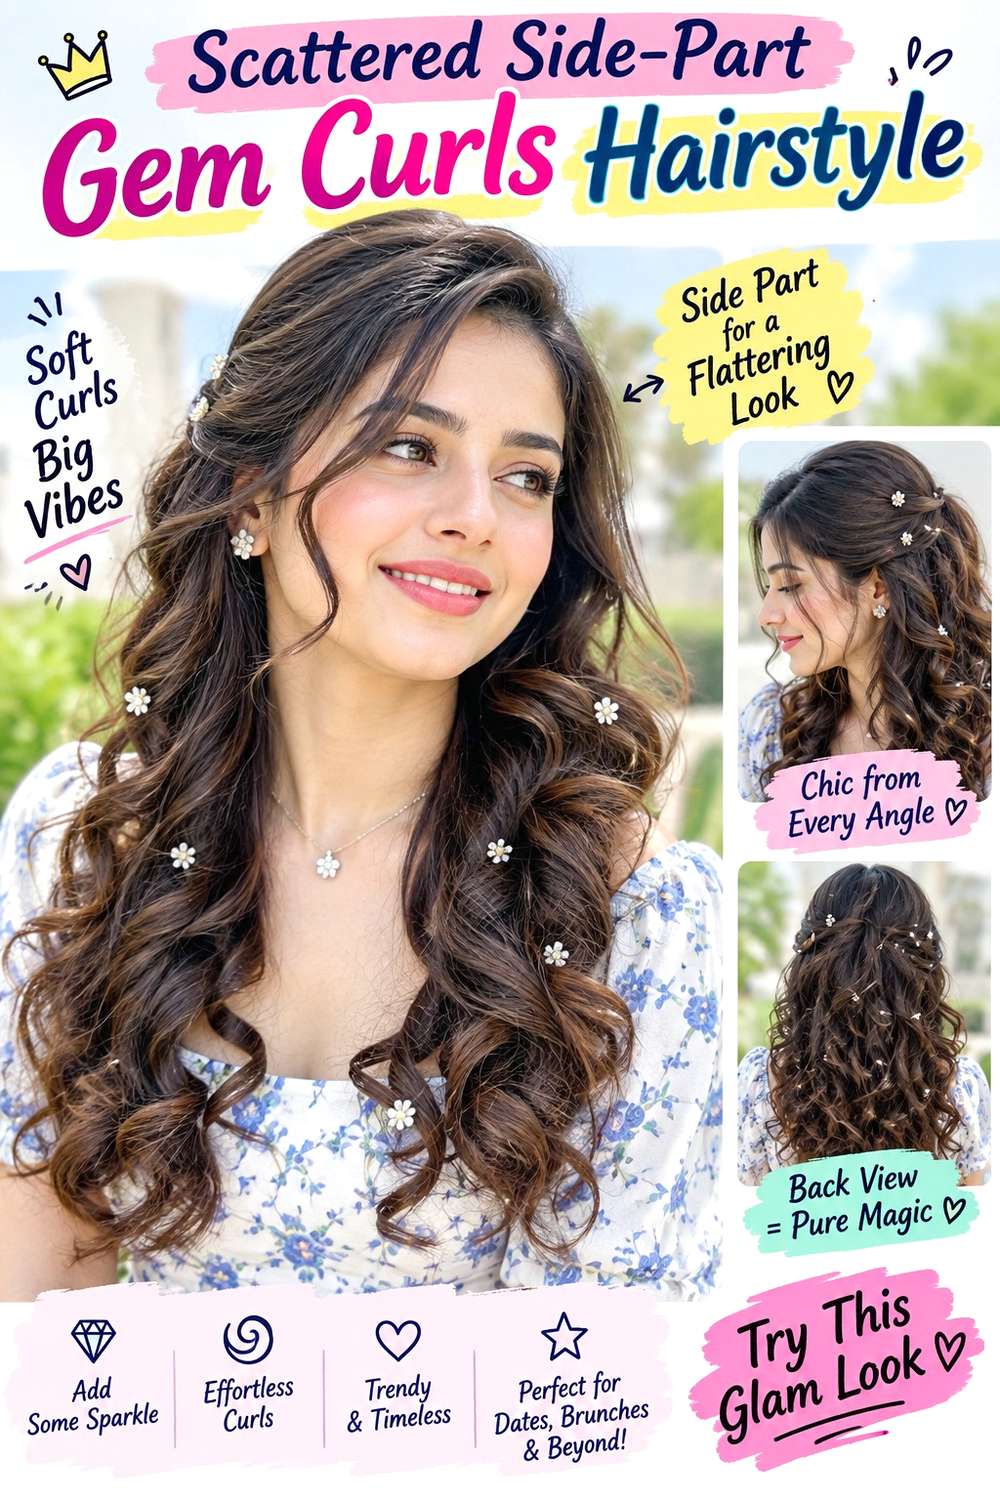
A deep side part creates an uneven canvas that suits scattered gems better than a perfectly mirrored pattern. Concentrate the decoration on the lighter side of the part, beginning near the temple and moving diagonally toward the crown. Let defined curls remain full through the opposite side, with a few pieces framing the cheek. The contrast between a decorated, more controlled section and a fuller curl section gives the style its holiday-party shape.
For naturally curly hair, work in curl cream for definition and use a diffuser to dry without disturbing the curl groups. Small gem clips can then attach to selected sections without coating the entire surface. Wash-day definition takes longer than the accessory placement; on party day, refresh only stretched curls and check that each clip closes securely without pinching.
If the style is created at a salon, explain whether you want the gems concentrated at the temple, extended toward the crown, or scattered into the curls. Placement affects balance more than the exact number of stones. Dense curls can support several accents, while finer or lower-density sections may look clearer with fewer pieces. Keep the clips away from areas where they repeatedly rub against glasses or earrings, and lift them out individually after the event.
Pro tip:
Place the largest visible gem closest to the temple, then use smaller accents as you move backward. This creates a controlled fade rather than making the scattered arrangement look accidental.
Make It Work for You:
For tighter curls, attach gems to individual curl groups without pulling those sections straight. The decoration remains visible while the natural coil or curl shape stays intact around it.
Watch Out For:
Do not overload one curl with several heavy clips. The section may stretch and hang lower than its neighbors. Spread the decoration across separate curl groups to distribute the weight.
Sleek Hairline Gem Ponytail Hairstyle
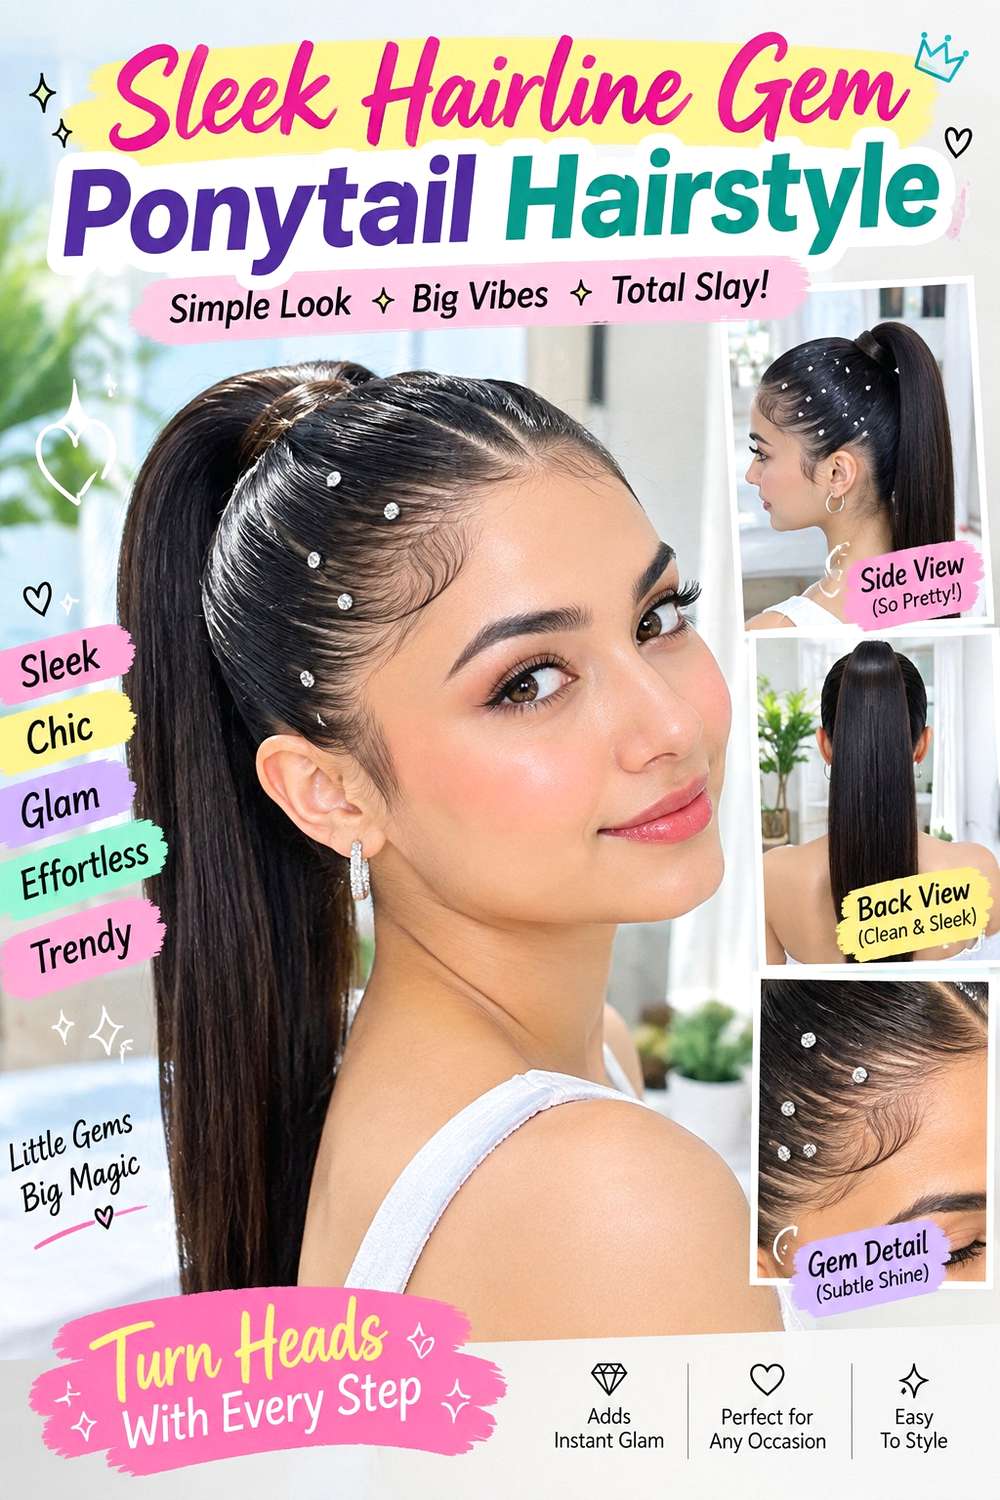
A sleek ponytail gives hair gems a smooth surface where their placement can look precise. Sweep the front back into a mid or high ponytail, then arrange a short row of gems near one side of the hairline instead of covering the entire crown. The ponytail itself can stay straight, softly waved, or naturally textured; keeping the base neat makes the contrast between the clean front and moving length easy to see.
Use styling gel to control flyaways, a smoothing brush to direct the hair toward the anchor, and rhinestone pins for the decorative line. Building the ponytail on already dry hair is relatively quick, while washing, drying, and styling the length beforehand takes longer. If the base loosens during a party, rebuild the ponytail rather than repeatedly tightening individual sections around the hairline.
At a styling appointment, specify the ponytail height, comfortable tension, and exact starting point of the gems. The decorative pins should not carry the ponytail’s weight; they are accents on an already secure base. This matters particularly for dense or very long hair. Keep the hairline smooth without pulling it painfully tight, and position gems far enough from the skin that they do not rub when you move or dance.
Pro tip:
Build and test the ponytail first, including a few head turns, before adding any gems. Decorating a stable base prevents you from having to remove the accents if the anchor needs repositioning.
Make It Work for You:
If you prefer a softer front, release two balanced face-framing pieces before setting the gems. Keep the decorative row slightly farther back so it does not compete with those loose sections.
Watch Out For:
Do not use decorative pins as structural anchors for a heavy ponytail. Secure the hairstyle independently first; otherwise the gems can pull strands, tilt, or become uncomfortable as the ponytail moves.
Gem-Accented Low Bun Hairstyle
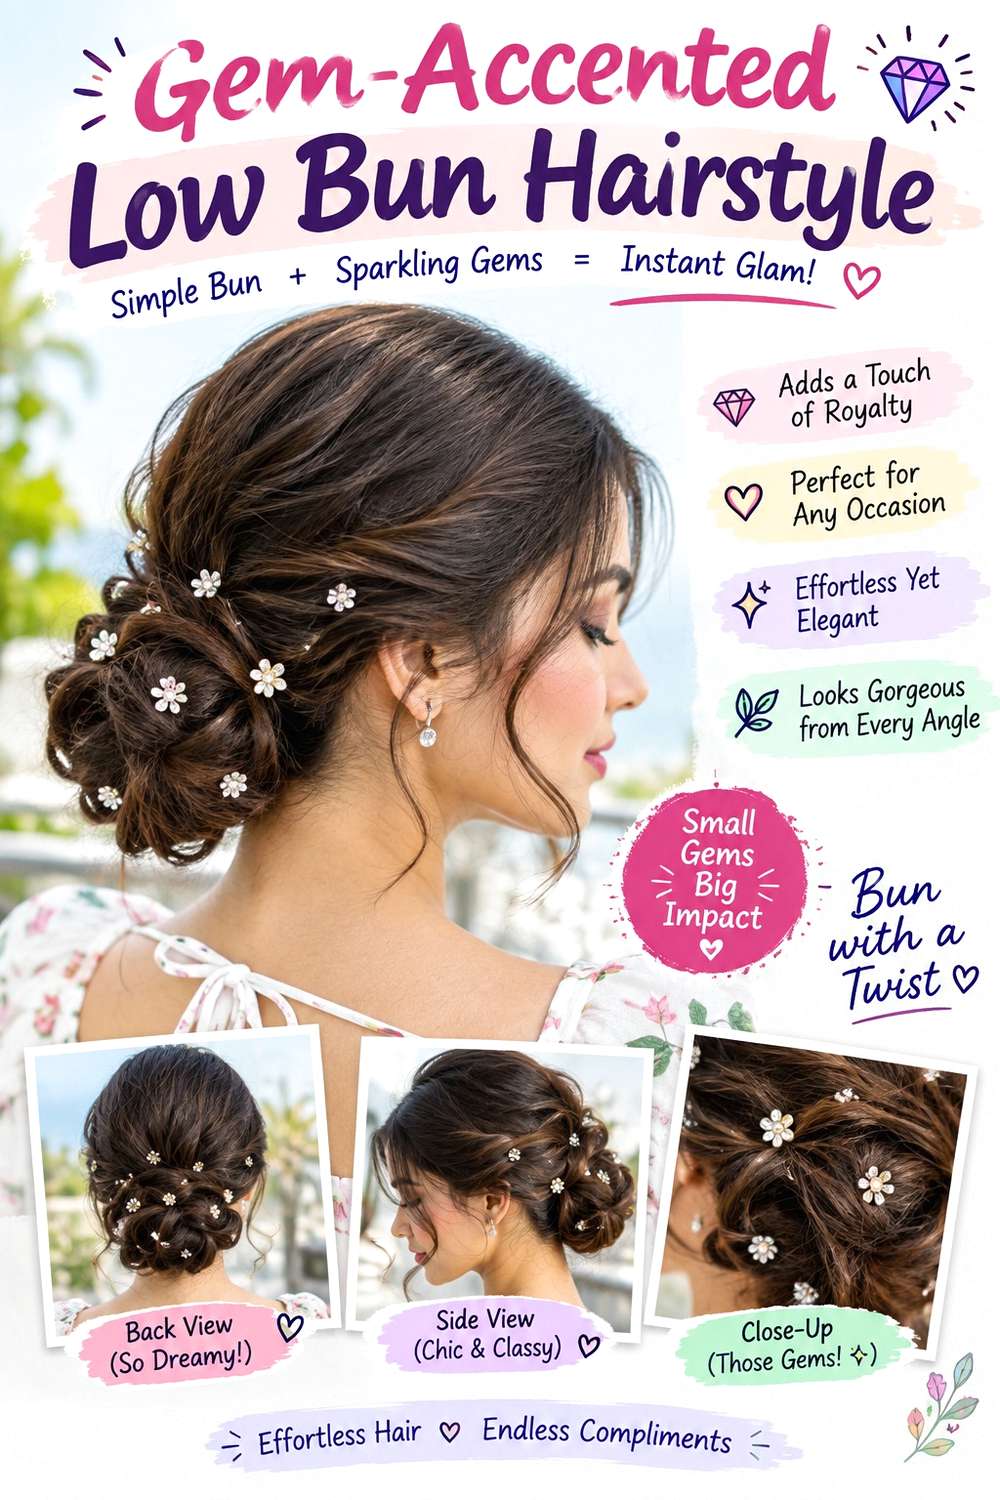
A low bun gives gems a compact area to highlight without spreading sparkle across the whole head. Part the hair in the center or slightly to one side, gather it at the nape, and form a smooth or softly twisted bun. Place gems along one edge of the bun or in a small crescent just above it. Leaving the crown relatively clean keeps the decorated anchor as the main focus.
A fabric-covered elastic creates the base, bobby pins secure the wrapped length, and gem pins add decoration after the bun is stable. On already prepared hair, the updo is a moderate party-day task rather than a full wash-day routine. If short pieces loosen, smooth or repin them individually instead of tightening the entire bun and increasing tension.
For professional styling, specify the bun height, whether you want a centered or side-biased gem arrangement, and how much softness you want around the face. Dense or long hair may need a broader bun base so the weight is distributed comfortably. The decorative pins should slide into the outer structure without being forced against the scalp. Check the finished style from the side as well as the back, since gems sitting beautifully in a rear view can still project awkwardly if their stems are not fully concealed.
Pro tip:
Add the gems after every structural pin is secure. Work around the outer curve of the bun and leave a little space between accents so each stone remains visible under party lighting.
Make It Work for You:
If your hair is very long, wrap the bun in flatter layers instead of stacking it outward. The broader base gives you more stable areas for decorative gems without creating excessive bulk.
Watch Out For:
Avoid inserting gem pins directly into the scalp for extra security. They should catch the hairstyle itself. If an accent feels sharp or painful, remove it and choose a different anchor point.
Crystal Crown Half-Up Hairstyle
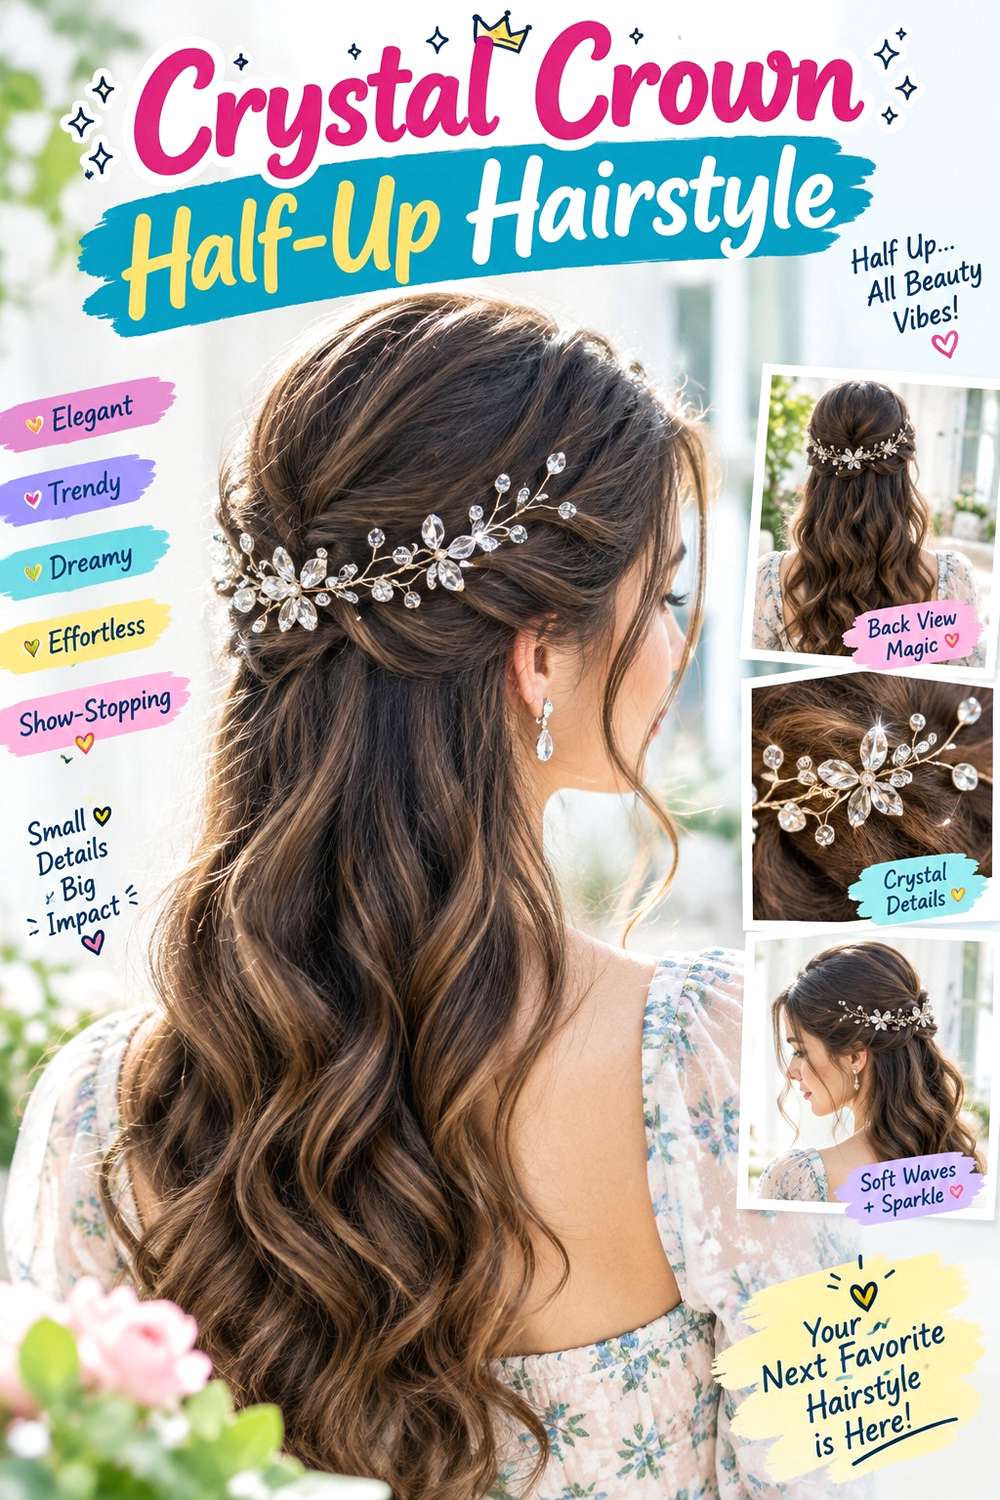
A half-up style creates a natural line across the back of the crown where small crystals can form a delicate arc. Gather the upper side sections toward the back while leaving the lower hair loose in waves, curls, or a straight finish. Instead of covering the entire crown, place the gems along the gathered section so the decoration follows the hairstyle’s structure and remains visible from several angles.
Use texturizing spray on very smooth hair to add grip, a mini elastic to secure the half-up section, and gem clips to create the crystal arc. Building the gathered section takes only a few minutes once the hair is styled; preparing full waves or curls from wash day takes longer. Check the clips after putting on coats or scarves because fabric rubbing the crown can shift small accessories.
At an appointment, explain how high you want the half-up anchor and how wide the gem arc should extend. The crystal line can stay concentrated at the center or travel farther toward the sides, but it should not be responsible for holding the style together. Lower-density hair often suits a smaller gathered section, preserving more loose fullness underneath. Keep the tension comfortable and allow the lower lengths to move naturally rather than pulling excessive hair into the crown.
Pro tip:
Secure the half-up section and gently loosen the crown before adding gems. Doing this first preserves a little height and prevents later adjustments from moving the finished crystal arrangement out of alignment.
Make It Work for You:
For fine or lower-density hair, gather a narrower section and use a shorter gem arc. More hair remains loose underneath, while the crown still has a clearly decorated focal point.
Watch Out For:
Do not attach every crystal to the same small section of hair. Concentrated weight can make the anchor sag. Spread the clips along the secured half-up base instead.
Gem-Studded Single Braid Hairstyle
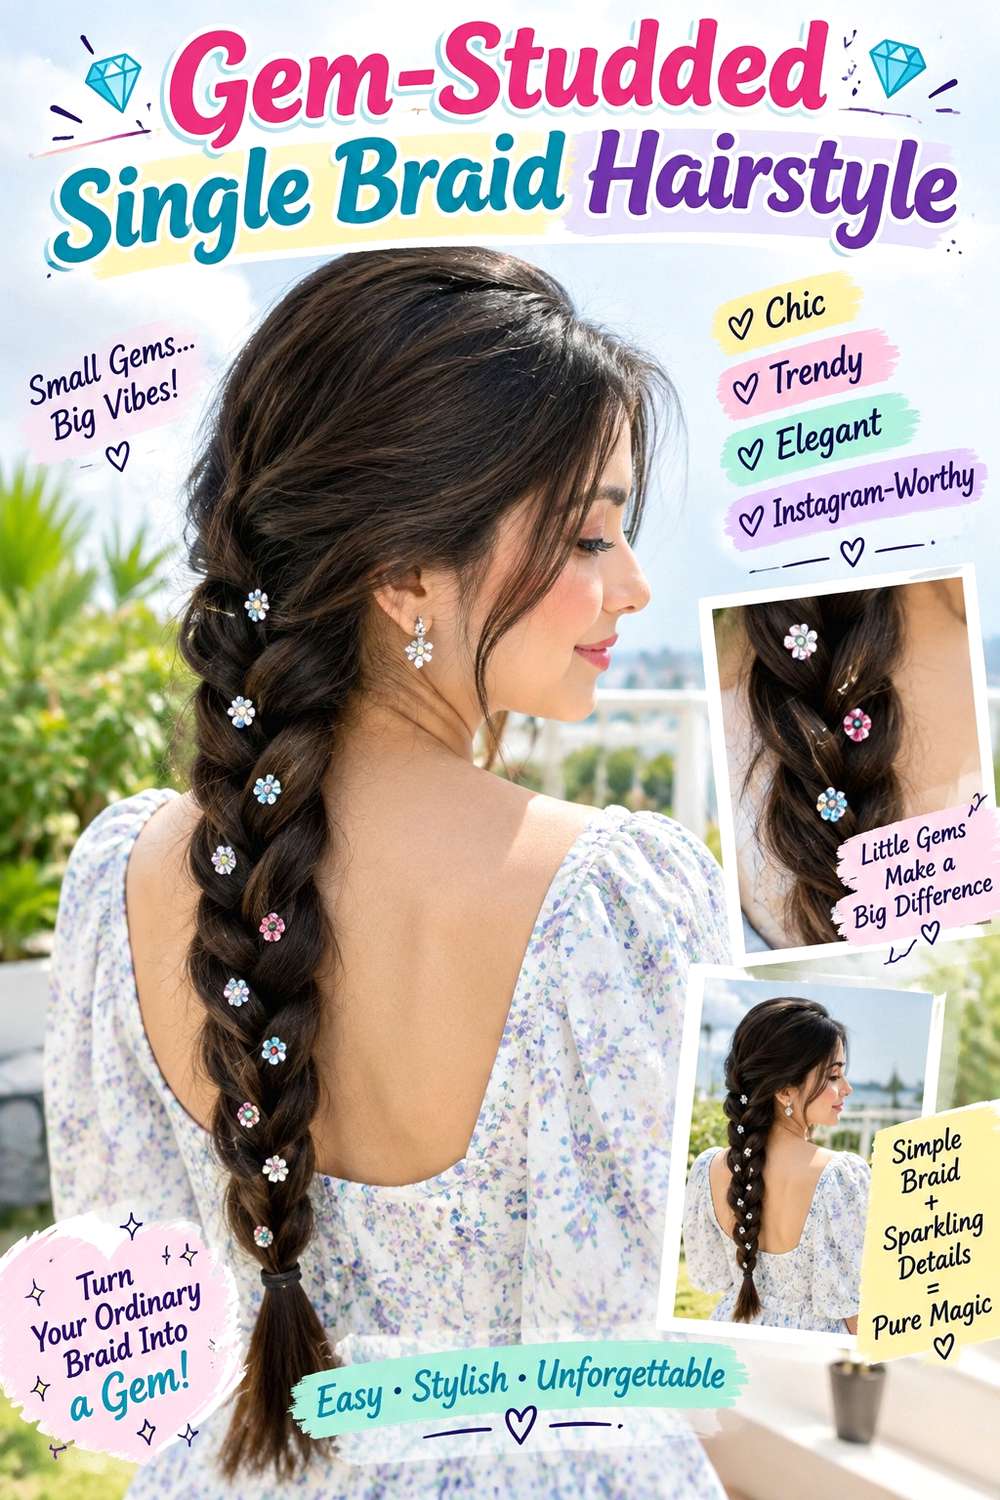
A long single braid gives gems a clear route from the nape toward the ends. Wear the braid centered down the back or bring it over one shoulder, then place small accents at selected crossings rather than decorating every loop. A smooth crown gives a cleaner finish, while loose face-framing sections can soften the front. Wider braid sections make individual gems easier to see during an evening event.
Work a small amount of lightweight styling cream through flyaways, secure the end with a clear elastic, and add braid charms to chosen sections once the plait is complete. Braiding dry, detangled hair takes moderate effort depending on length and density; the accessory step itself should be quick. If the braid loosens unevenly during the party, rebuild the affected portion rather than pulling on the charms.
For a professionally styled version, specify braid width, starting point, and comfortable tension before discussing gem placement. A low, broad braid creates a different display area from a tighter braid beginning higher on the head. The charms should attach to stable crossings without pinching or dragging the strands downward. Layered hair may produce shorter pieces along the braid, so decide whether you prefer a polished surface or a few deliberate wisps rather than forcing every layer into a tight structure.
Pro tip:
Decorate every second or third braid crossing instead of every section. The small gaps help each gem stand out and make the design easier to adjust if one accent shifts.
Make It Work for You:
For lower-density hair, loosen the braid gently after securing the end, then add only a few well-spaced gems. A broader-looking braid can support the decoration without requiring more accessories.
Watch Out For:
Do not widen the braid after attaching the charms. Pulling sections outward can dislodge or twist them. Finish all braid shaping first, then add the decorative pieces to stable crossings.
Twin Gem Braids Hairstyle
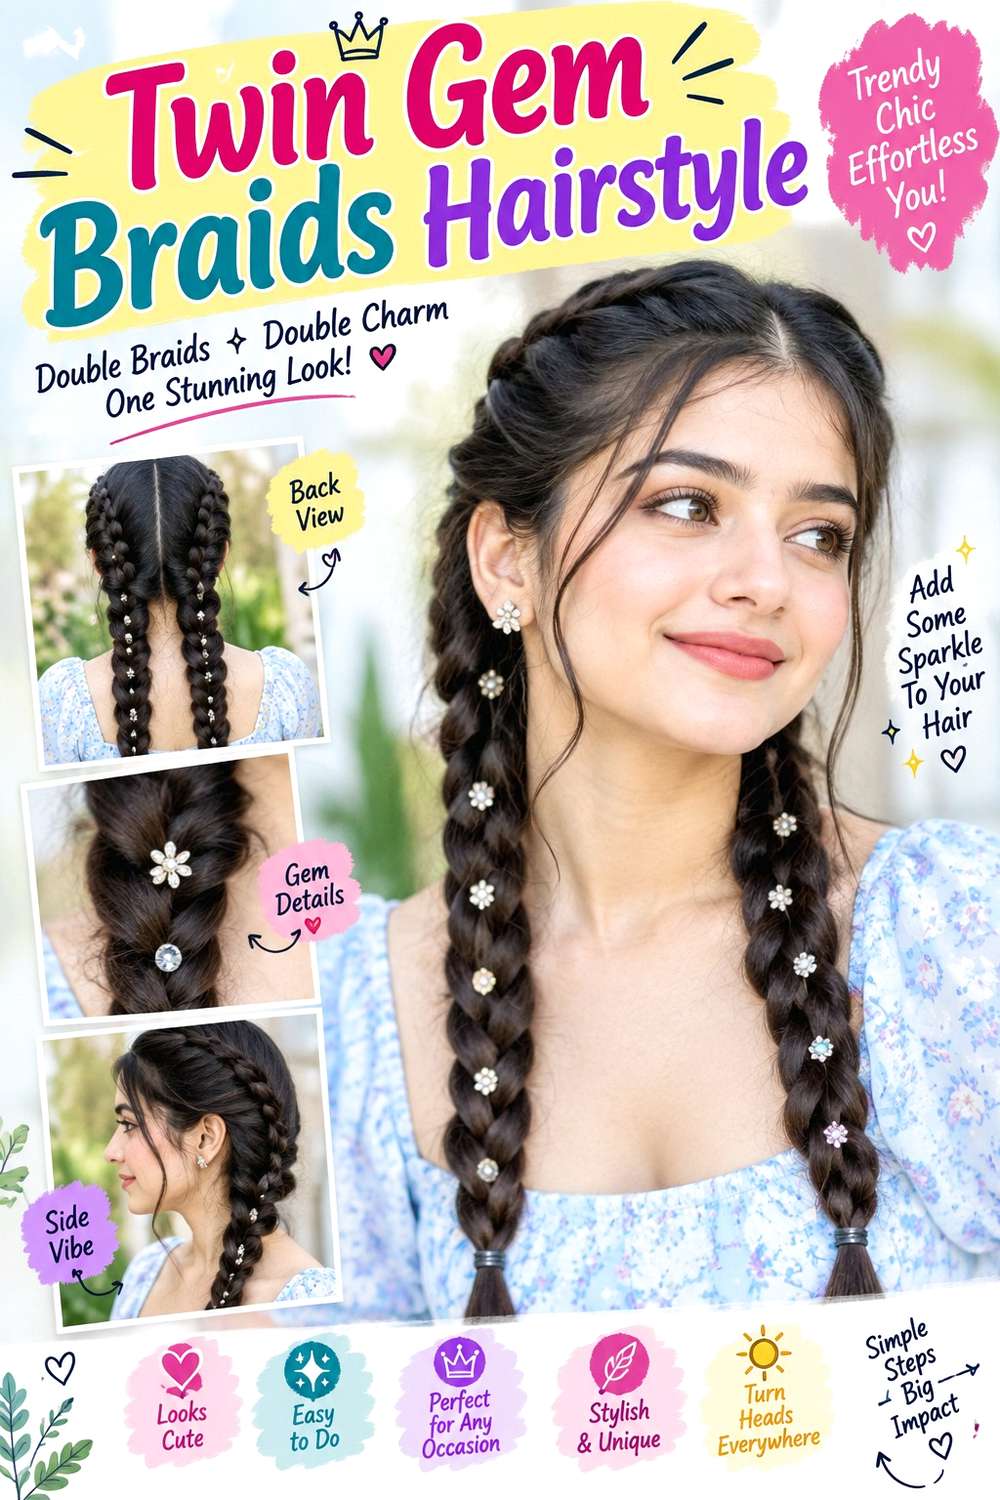
Twin braids split the decoration into two balanced lines, making them useful when you want noticeable sparkle without a concentrated cluster. Divide the hair through the center and create one braid on each side, beginning near the nape or behind the ears. Place small gems at matching or lightly staggered points down both braids. Keep the front smooth, or release two face-framing pieces for a softer party finish.
Clear elastics secure the ends, styling cream controls shorter layers, and small gem rings add shine along selected braid sections. Two simple braids are usually quicker than a full wave set once the hair is dry and detangled. The party-day refresh involves checking the braid bases, smoothing escaped pieces, and making sure the gem rings remain closed.
If someone else is creating the style, specify braid width, starting height, and whether you want exact symmetry. Comfortable tension behind the ears matters because the gems should add decoration, not compensate for loose braids. Dense hair can support broader plaits with more spacing between gems, while finer hair may look balanced with smaller accents. Keep each decorative ring on a secure portion of the braid rather than near wispy ends, where movement can make it slide free.
Pro tip:
Lay both braids forward after finishing them and compare gem heights before leaving for the party. Adjust any obvious mismatch while the accents are still easy to reach.
Make It Work for You:
If your hair is layered, begin the braids slightly lower and leave the shortest face-framing pieces loose. This reduces escaping strands while keeping the twin decorated lines clean and comfortable.
Watch Out For:
Avoid tightening one braid more than the other just to make them appear equal. Uneven tension can change their length; rebuild the looser side instead of pulling harder.
Pearl-And-Gem Hollywood Waves Hairstyle
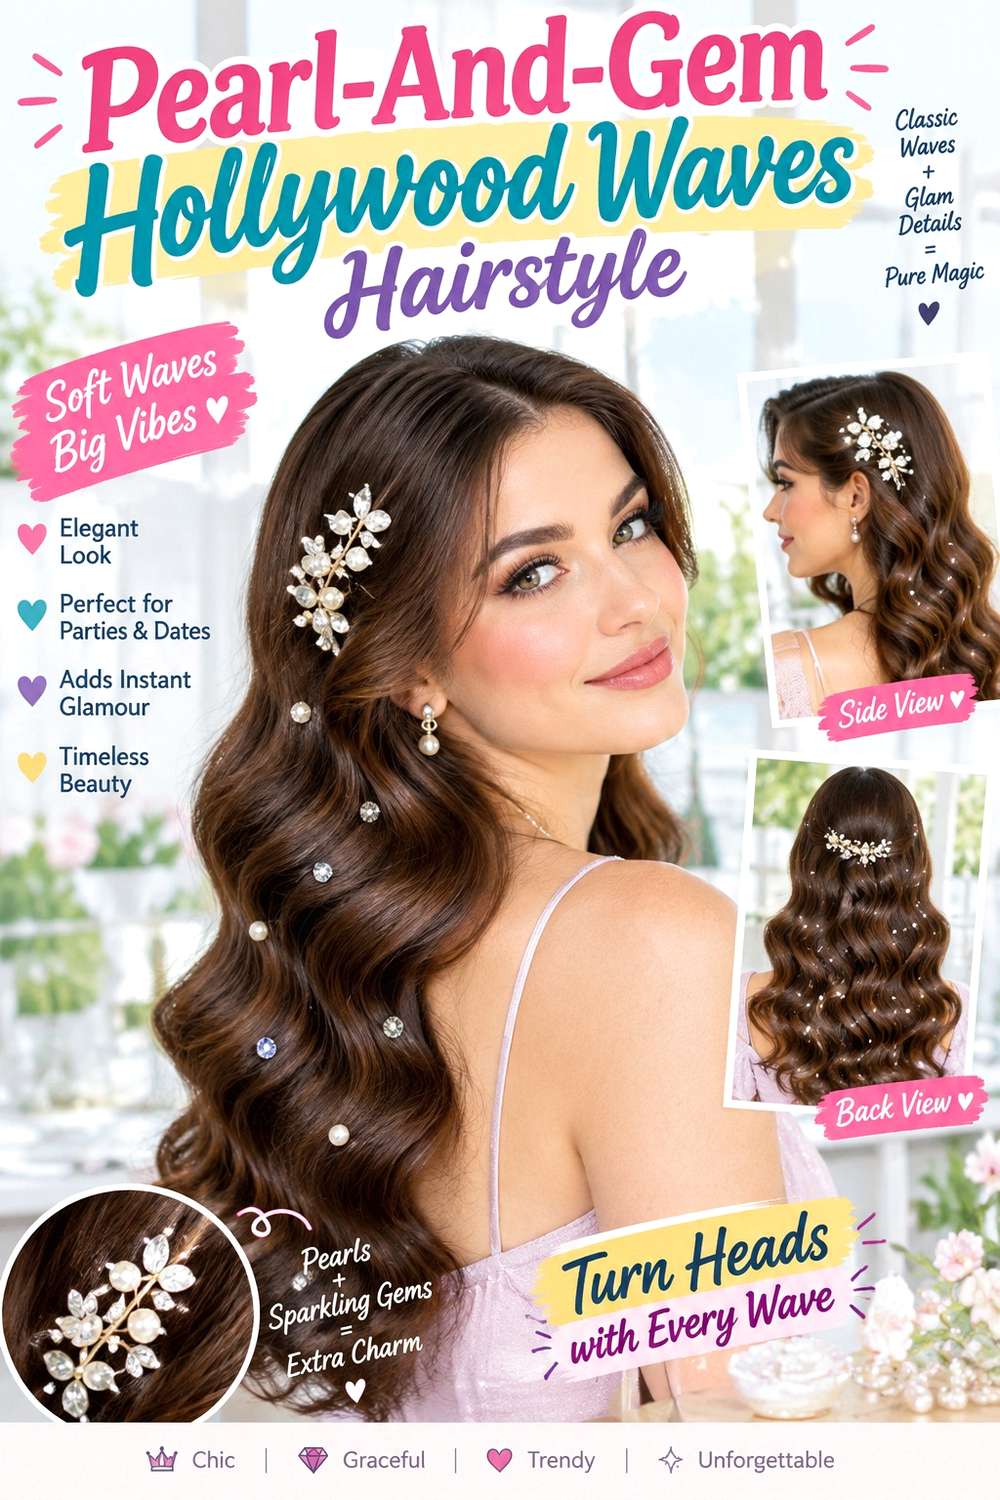
Smooth, side-swept Hollywood-style waves provide a polished base for a small mixture of pearls and clear gems. Create a deep part, direct the fuller side into continuous S-shaped bends, and keep the opposite temple smoother. Concentrate the decorations on the tucked or flatter side so they contrast with the larger wave pattern rather than disappearing inside it.
Apply heat protectant before shaping sections with a curling iron, then use pearl-and-gem clips to create a controlled cluster near the temple. Flexible hairspray supports the brushed wave pattern without making it completely rigid. The initial set is a longer styling job because the curls need shaping and cooling; later touch-ups should focus on restoring the front ridge and checking the accessory cluster.
At a party styling appointment, specify which side you want exposed, how far the decoration should extend, and whether the cluster should remain compact or trail toward the ear. The clips should attach to a smooth, stable section rather than holding the wave structure together. Fine hair may need fewer, lighter accents to avoid dragging the temple section downward. Keep earrings in mind too, leaving enough separation that the hair accessories and jewelry do not catch one another when you turn your head.
Pro tip:
Form and brush the waves completely before clipping in any pearls or gems. Once the S-shaped pattern is balanced, decorate the smoother side without disturbing the ridges you worked to create.
Make It Work for You:
If your hair does not hold a strong wave easily, use a softer side-swept bend and keep the gem cluster compact. The asymmetrical party shape still reads clearly without forcing rigid definition.
Watch Out For:
Do not scatter clips across the highest wave ridges. They can interrupt the continuous pattern. Keep most decoration on the flatter side and let the sculpted waves remain visually uninterrupted.
Gemmed Curtain Bangs Blowout Hairstyle
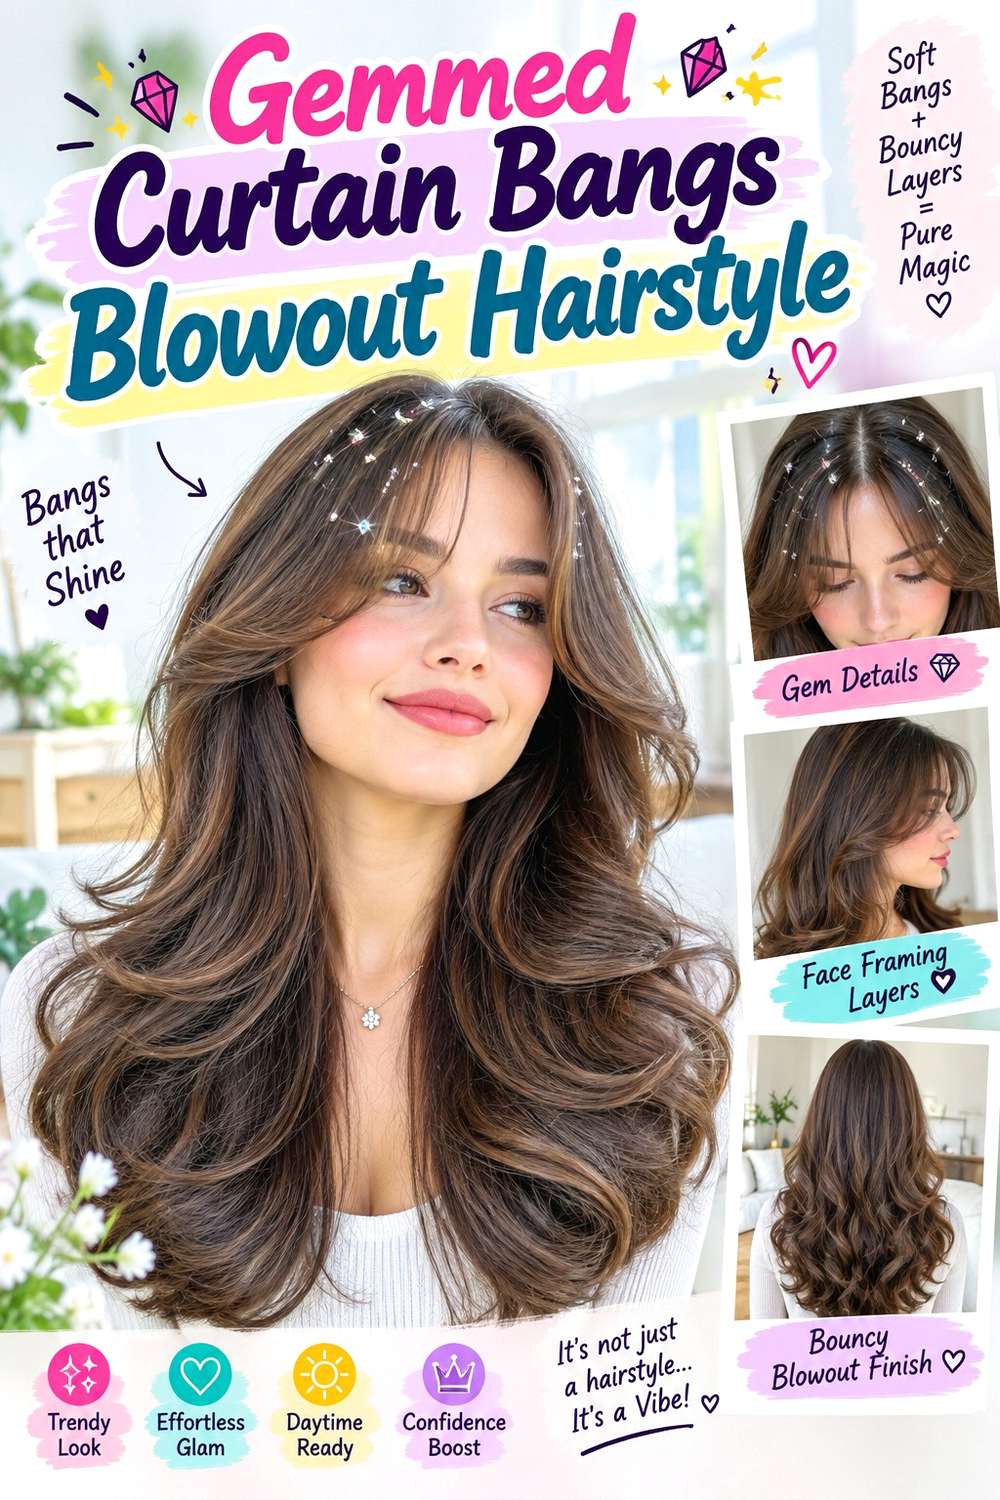
Curtain bangs can frame the face while small gems sit farther back along the sides of the part. Keep the shortest fringe pieces open across the forehead, curve the longer outer corners away from the cheekbones, and place the decoration behind those moving sections. The rest of the blowout can carry broad bends through the lengths, giving the sparkle a cleaner background near the crown.
Apply heat protectant before shaping the fringe and lengths with a round brush, then use hair-safe gem stickers on completely dry sections behind the bangs. Flexible hairspray can support the outer fringe curve without coating the gem area heavily. A full blowout is the longer wash-day task, while the party refresh can focus on the bangs and a few flattened ends.
If the hairstyle is prepared professionally, specify the finished fringe opening and exactly where the gems should begin so they do not trap the outer corners. Existing curtain bangs should be styled around their natural growth direction rather than pressed flat for the accessory. If you are considering a fringe trim, discuss the dry finished length independently from the temporary gems. During the party, check only loose decorations rather than repeatedly touching the bangs, which can break apart the smooth blowout.
Pro tip:
Shape the curtain bangs first and leave them completely forward while applying gems farther back. This prevents the stones from catching the outer corners when you move or adjust your fringe.
Make It Work for You:
For curly or springy bangs, keep their natural dry length and place the gems outside the moving fringe area. You can preserve texture without straightening the front solely for decoration.
Watch Out For:
Avoid applying gems where the fringe repeatedly brushes them. Constant contact can loosen the decoration and disrupt the bang shape, so move the accents slightly farther toward the sides.
Coily Gem Halo Hairstyle
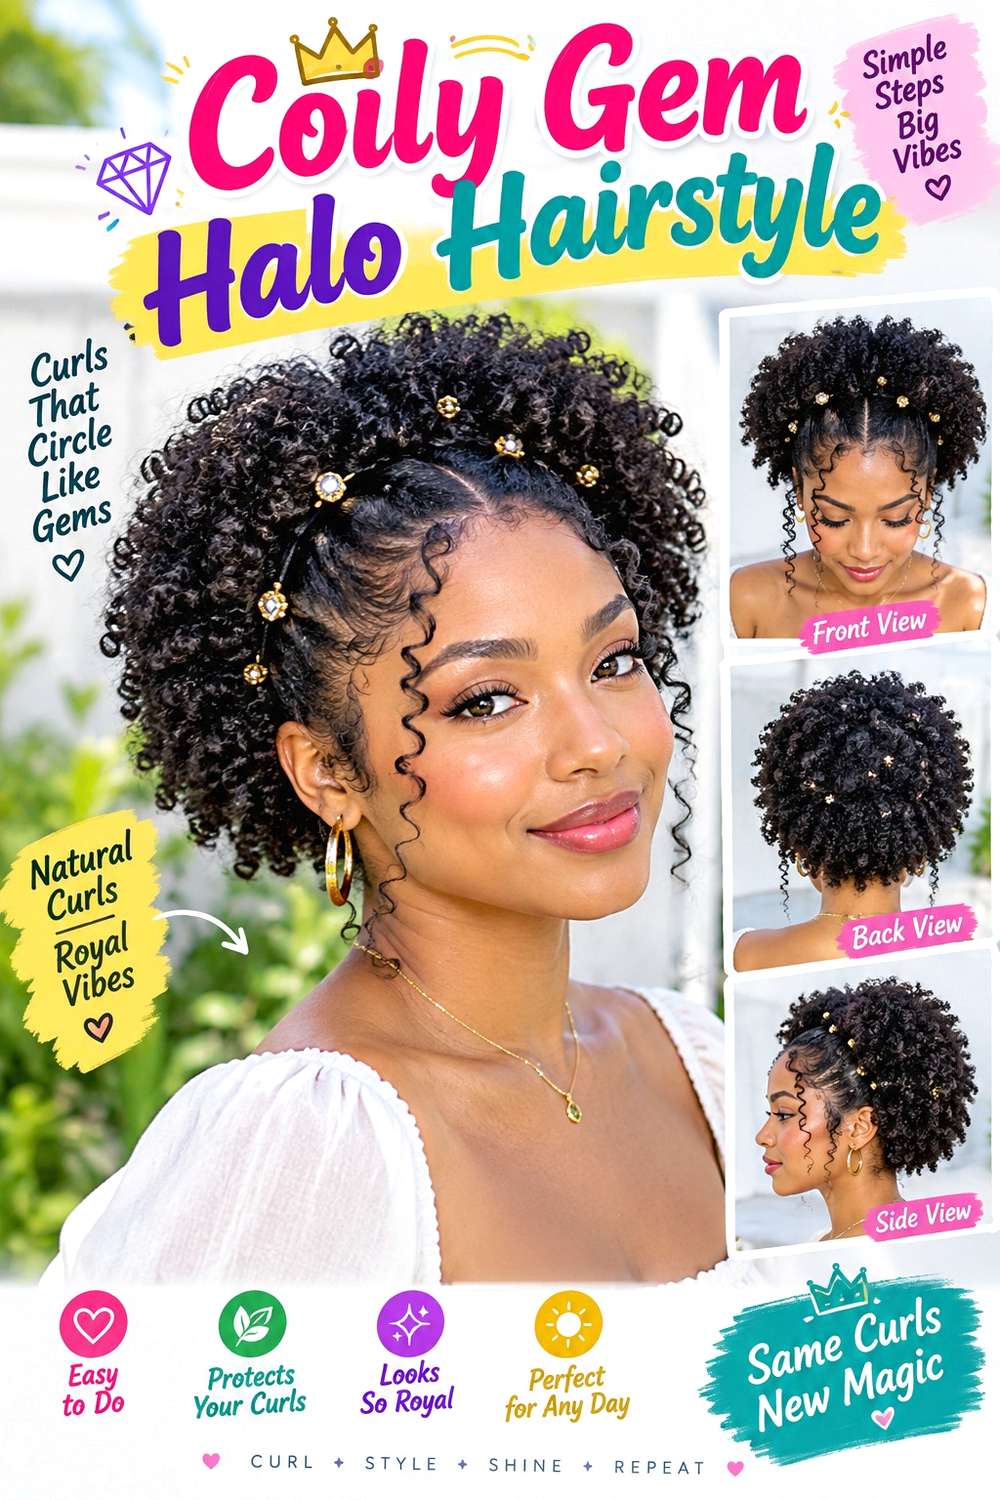
A gem halo can follow the front edge of a coily style without flattening the natural volume behind it. Leave the coils full through the crown and sides, then place small decorative accents in a curved line from one temple toward the other. The halo can sit a little behind the hairline so individual front coils remain visible, giving the gems a defined path without covering the texture.
Use lightweight leave-in conditioner for slip, curl gel to support coil grouping, and small gem clips for the decorative arc. Wash-day definition takes the most time because the hair must dry and settle before accessories are added. Party-day maintenance should be simpler: refresh only flattened coil groups and check that each gem clip sits securely without catching neighboring strands.
If the style is done professionally, explain how close to the hairline you want the halo and whether the gems should be evenly spaced or slightly scattered. The decoration should follow the finished dry silhouette rather than forcing coils into a flatter shape. Dense hair can support a wider arc, while lower-density sections may benefit from more open spacing. Remove each clip individually after the event, lifting it away from the coil instead of dragging it through the surrounding texture.
Pro tip:
Let the front coils dry completely before mapping the halo. Once the shape is settled, place gems between or beside curl groups instead of splitting defined coils apart to make room.
Make It Work for You:
If you prefer more forehead coverage, leave several front coils free and move the gem arc slightly backward. The halo remains visible while the natural texture continues framing the face.
Watch Out For:
Do not flatten the crown just to create a straighter gem line. Follow the existing curve of the hairstyle instead; forcing the texture down can create an obvious compressed strip.
Gem-Accented Bubble Ponytail Hairstyle
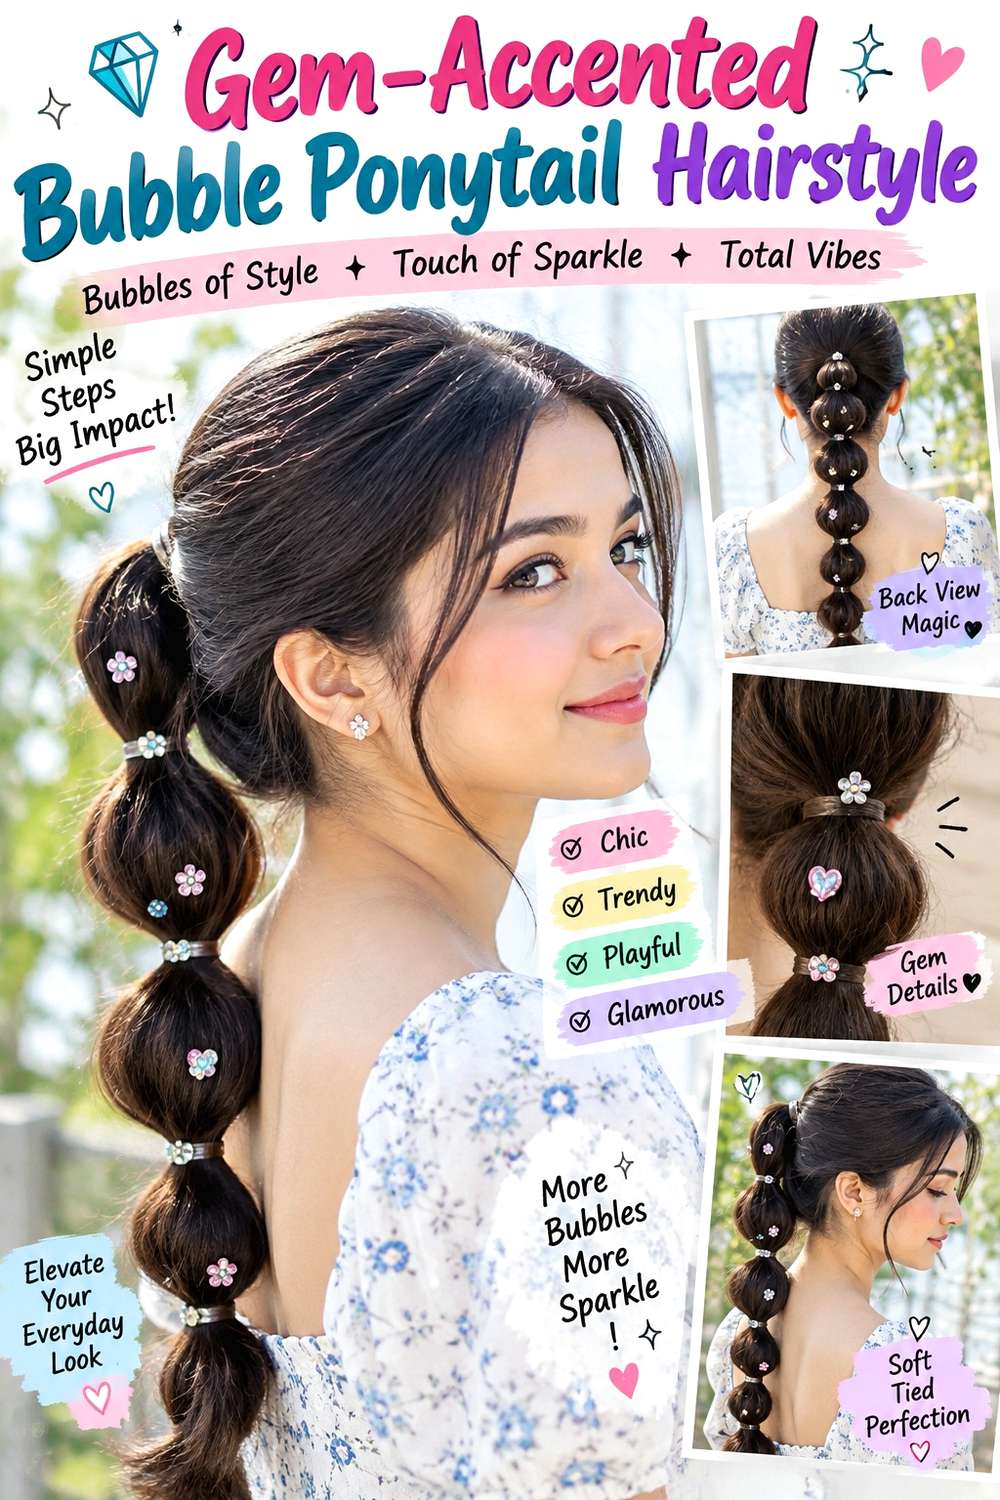
A bubble ponytail gives gems repeated sections to decorate down the length. Start with a mid or low ponytail, add evenly spaced elastics, then gently expand the hair between them into rounded bubbles. Place one small gem accent near selected elastic points rather than covering every section. Keeping the crown smooth lets the decorated ponytail remain the strongest detail from the side and back.
Soft elastic bands form the structure, smoothing cream controls flyaways, and gem cuffs highlight selected divisions. The style takes longer than a simple ponytail because every bubble needs balancing, but it can be built on already dry hair without heat. A quick party refresh means re-expanding any compressed section and checking that each decorative cuff remains centered.
For professional styling, specify the ponytail height, bubble size, spacing, and how many sections you want decorated. Very long hair can support more bubbles, while shorter lengths may look clearer with fewer, larger divisions. The cuffs should sit around secure sections without squeezing the strands. If the ponytail feels heavy, adjust the main anchor rather than tightening the gem pieces. Leave deliberate face-framing sections out before building the ponytail if you want softness; pulling them free afterward can disturb the smooth crown and shift the first bubble.
Pro tip:
Expand every bubble before adding decorative cuffs. Start at the top and compare sizes as you move downward, then place the gems only after the silhouette looks balanced.
Make It Work for You:
For lower-density hair, keep the bubbles slightly smaller and closer together. Gentle expansion can create shape without overstretching each section or making the spaces between elastics look thin.
Watch Out For:
Avoid attaching heavy gems to every division. Repeated weight can pull the ponytail downward and distort the bubbles, so alternate decorated and undecorated sections for a lighter structure.
Side-Swept Gem Cascade Hairstyle
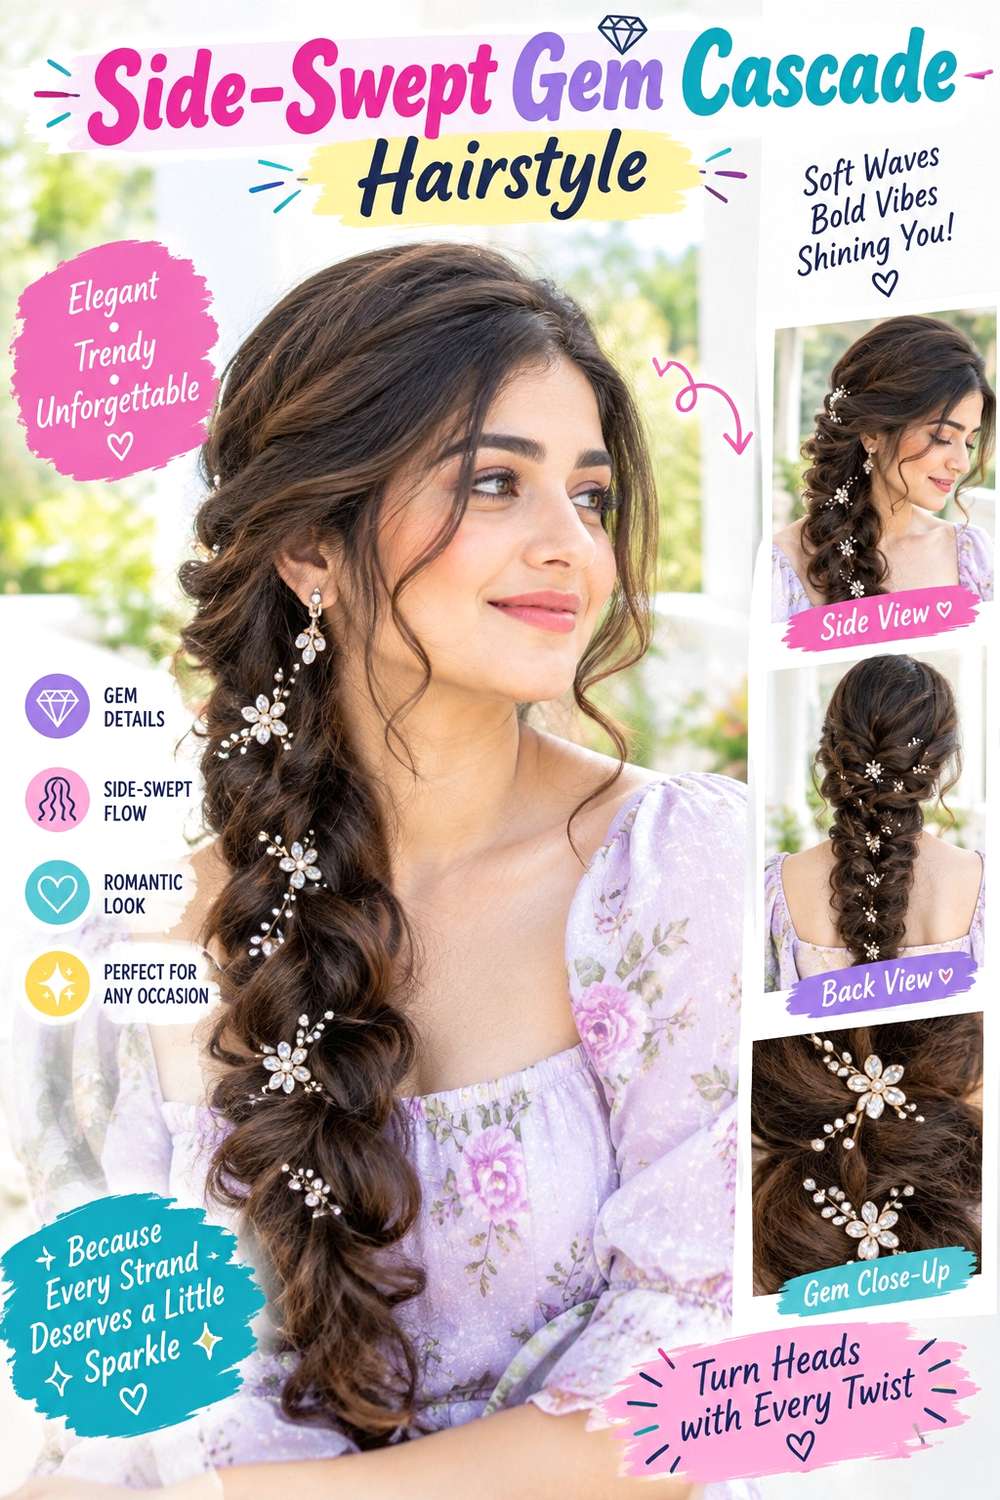
A gem cascade follows one side of the head while the hair sweeps toward the opposite shoulder. Create a deep side part, keep the lighter side close to the head, and let small gems travel diagonally from the temple toward the area behind the ear. The fuller lengths can remain wavy or softly curled, creating movement that contrasts with the more controlled decorated side.
Apply heat protectant before shaping the lengths with a curling wand, then use small gem clips to build the diagonal line. Flexible hairspray can reinforce the swept section without turning it stiff. Full wave styling takes longer, especially on long or dense hair, while the accessory placement is a shorter finishing step. The next-day refresh should focus only on the front sweep and flattened curls.
If you are having the style created professionally, specify which shoulder the hair should fall over and how far the gem cascade should travel. The decorated side should feel secure without being tightly pulled behind the ear. Medium and dense hair can support a longer trail, while lower-density hair may suit a shorter cluster with more spacing. Keep the lowest gem above areas where earrings or collars might repeatedly touch it. If the sweep loosens, rebuild its base rather than adding more decorative clips to hold structural weight.
Pro tip:
Map the diagonal with three main gems first—one near the temple, one midway, and one near the ear. Fill between them only after checking the overall angle in a mirror.
Make It Work for You:
If you have shorter face-framing layers, leave one or two pieces loose on the fuller side. The cascade remains clear while the shorter sections avoid being stretched across the head.
Watch Out For:
Do not extend the lowest gems directly into the earring area. Repeated contact can snag hair or shift the clips, so leave a small undecorated gap around the ear.
Braided Crown Hair Gem Hairstyle
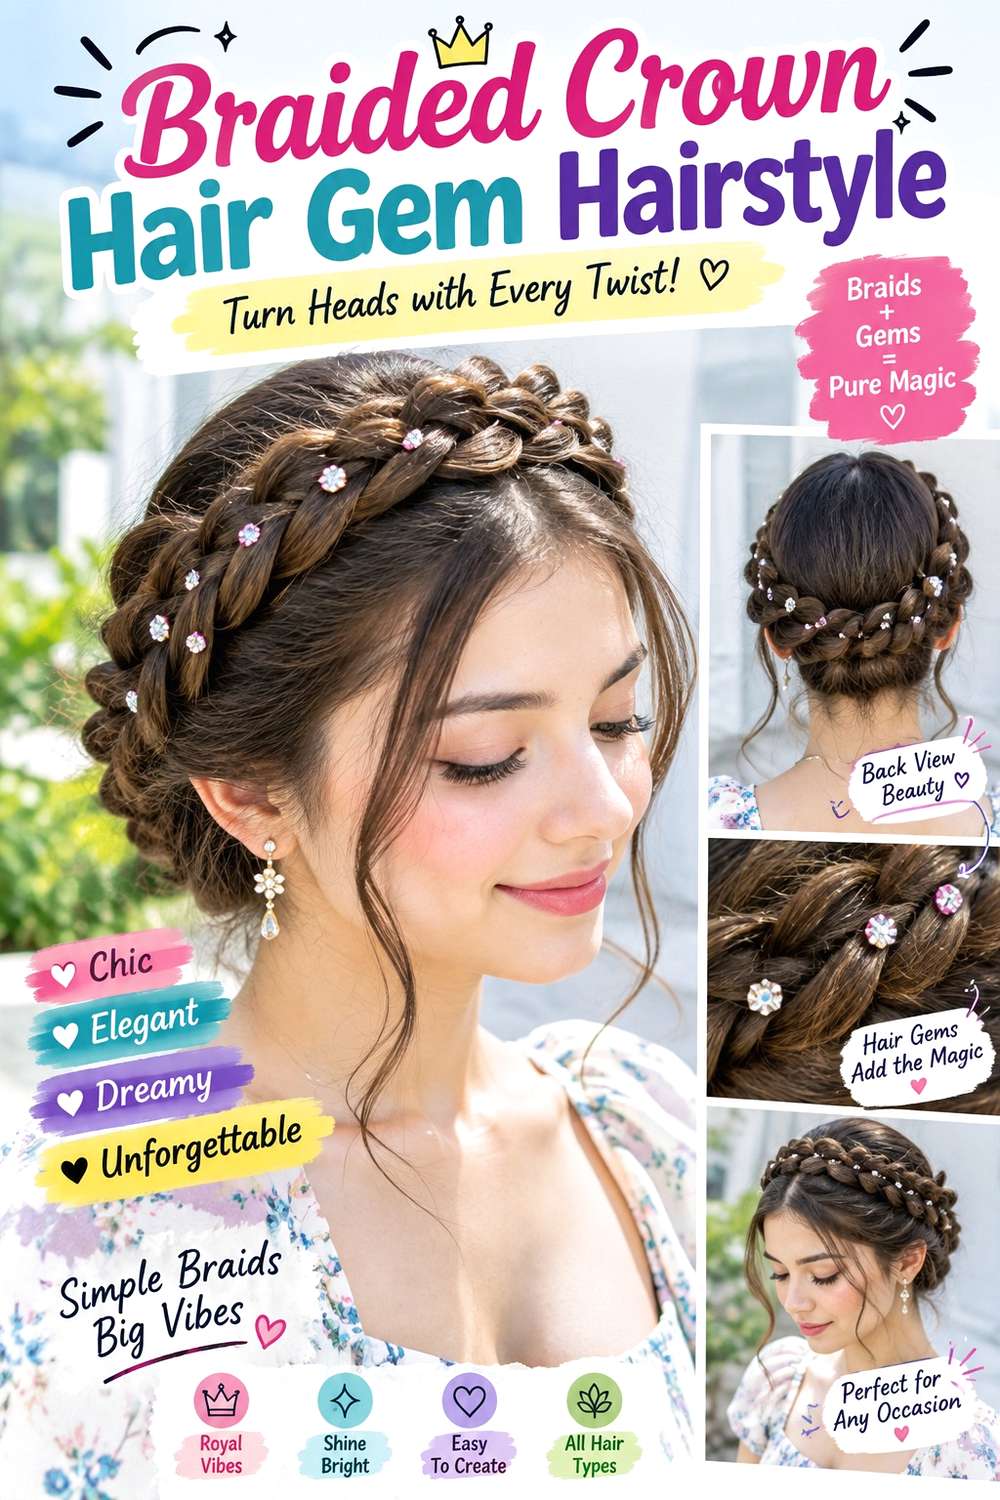
A braided crown offers built-in anchor points for gems while keeping most of the decoration away from loose ends. Create one or two braids around the upper sides of the head and secure them across the back like a crown. The remaining hair can stay down, gather into a low style, or curl softly beneath the braid. Add gems at selected braid crossings rather than forming one solid sparkling strip.
Use texturizing spray for grip, bobby pins to anchor the crown braid, and small gem charms for decoration. The braid construction is the longer part, especially when the hair is layered, while adding the charms afterward is relatively quick. Refreshing involves checking hidden anchors and smoothing escaped strands rather than rebuilding the entire hairstyle unless the crown itself loosens.
For a salon or party appointment, specify braid width, how high the crown should sit, and the tension you find comfortable. A wider braid provides more obvious decoration space, but it should not pull at the temples. The gem charms should attach after the crown is structurally secure. If your hair is very smooth, prioritize the hidden anchors instead of relying on the gems for grip. Leave enough room around the ears for comfortable movement and any jewelry you plan to wear.
Pro tip:
Finish and pin the complete braided crown before inserting a single gem. Once the base feels secure during gentle head movement, decorate the most visible crossings rather than every loop.
Make It Work for You:
If your layers are too short for a full crown, braid smaller side sections and join them at the back. The gem placement can still trace a crown-like line without forcing shorter pieces.
Watch Out For:
Do not tighten the braid whenever a gem shifts. The decoration and structure are separate. Reattach the loose accent while keeping the crown at the comfortable tension you originally set.
Minimal Temple Gem Hairstyle
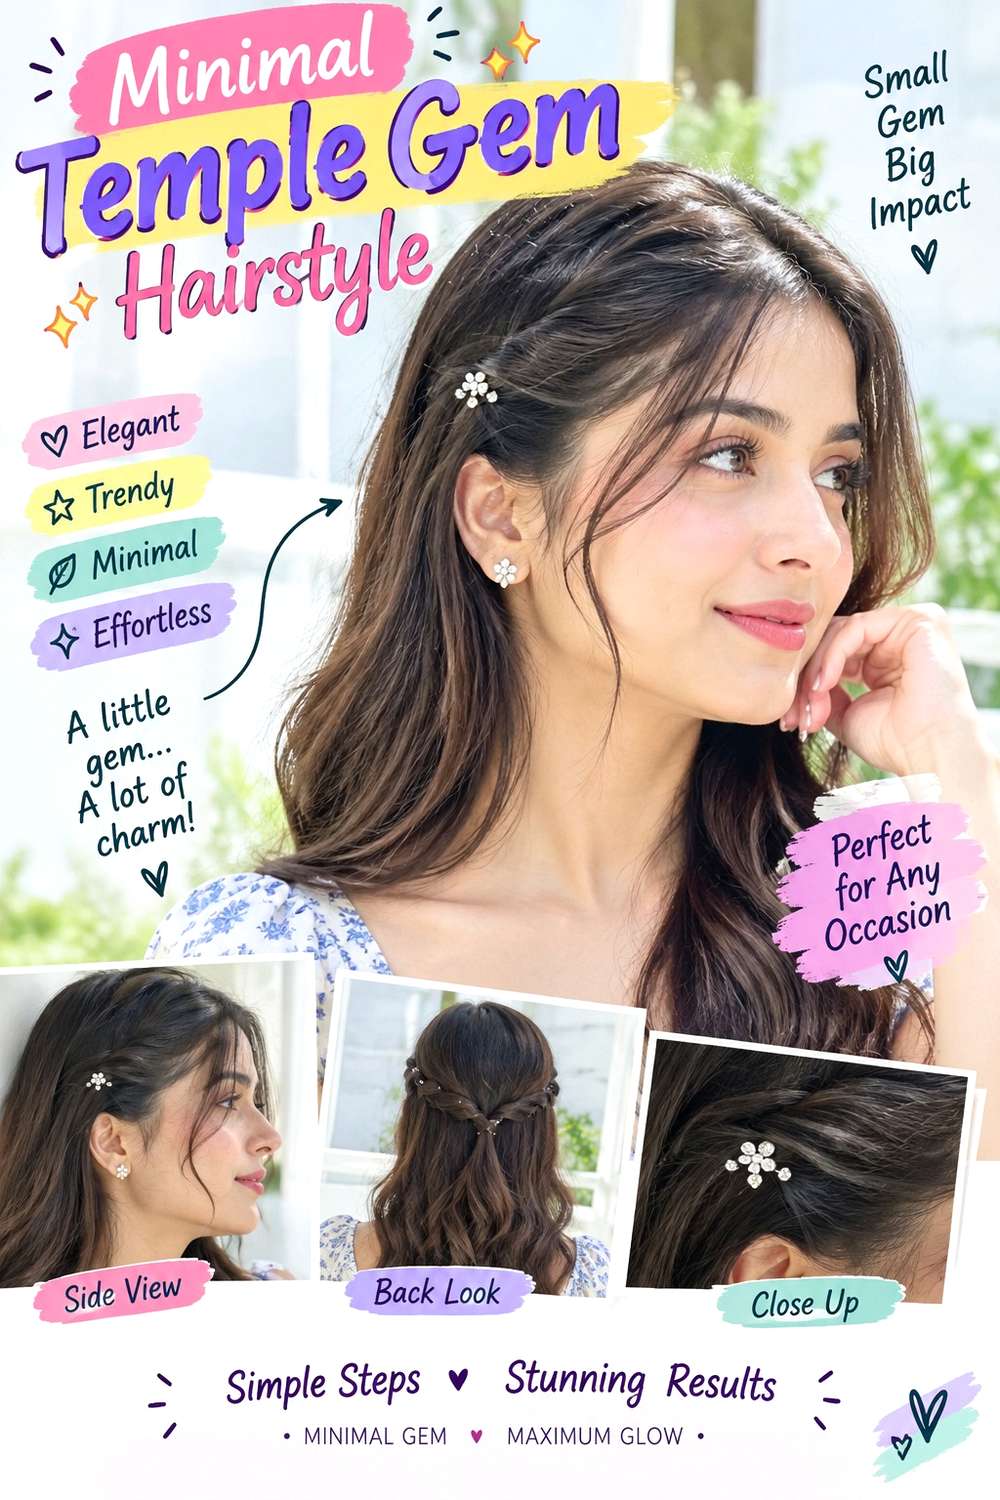
A small gem cluster at one temple is the simplest option when the base hairstyle already has enough movement. Wear the hair straight, softly waved, or naturally textured, then tuck or smooth one side enough to expose the temple. Three to five well-spaced gems can create a defined focal point without spreading decoration across the crown. A side part naturally directs attention toward the exposed area.
Use light styling cream to control the temple section, a discreet grip clip to hold it if needed, and hair-safe gem stickers for the cluster. Preparing the underlying hair may take time depending on the texture, but adding the decoration itself is a quick party-day step. This also makes the design practical when you want something festive without building an updo.
If you have the placement done professionally, show exactly how large you want the cluster and whether it should sit near the hairline or farther toward the ear. The supporting section should stay secure independently of the gems. Lower-density hair often suits this restrained approach because the accents do not cover much visible surface. Keep the cluster clear of glasses arms and earrings, and remove the temporary gems slowly at the end of the night rather than rubbing the whole area.
Pro tip:
Start with the central gem and build outward one accent at a time. Stop before the cluster reaches the ear so you can assess the balance without automatically filling every available space.
Make It Work for You:
For dense curls or waves, place the cluster on a small smoothed section at the temple and leave the surrounding texture full. The contrast helps a minimal number of gems remain visible.
Watch Out For:
Do not keep adding gems simply because the cluster looks small up close. Check it from normal viewing distance first; too many accents can turn a clean temple detail into clutter.
Starburst Gem Cluster Updo Hairstyle
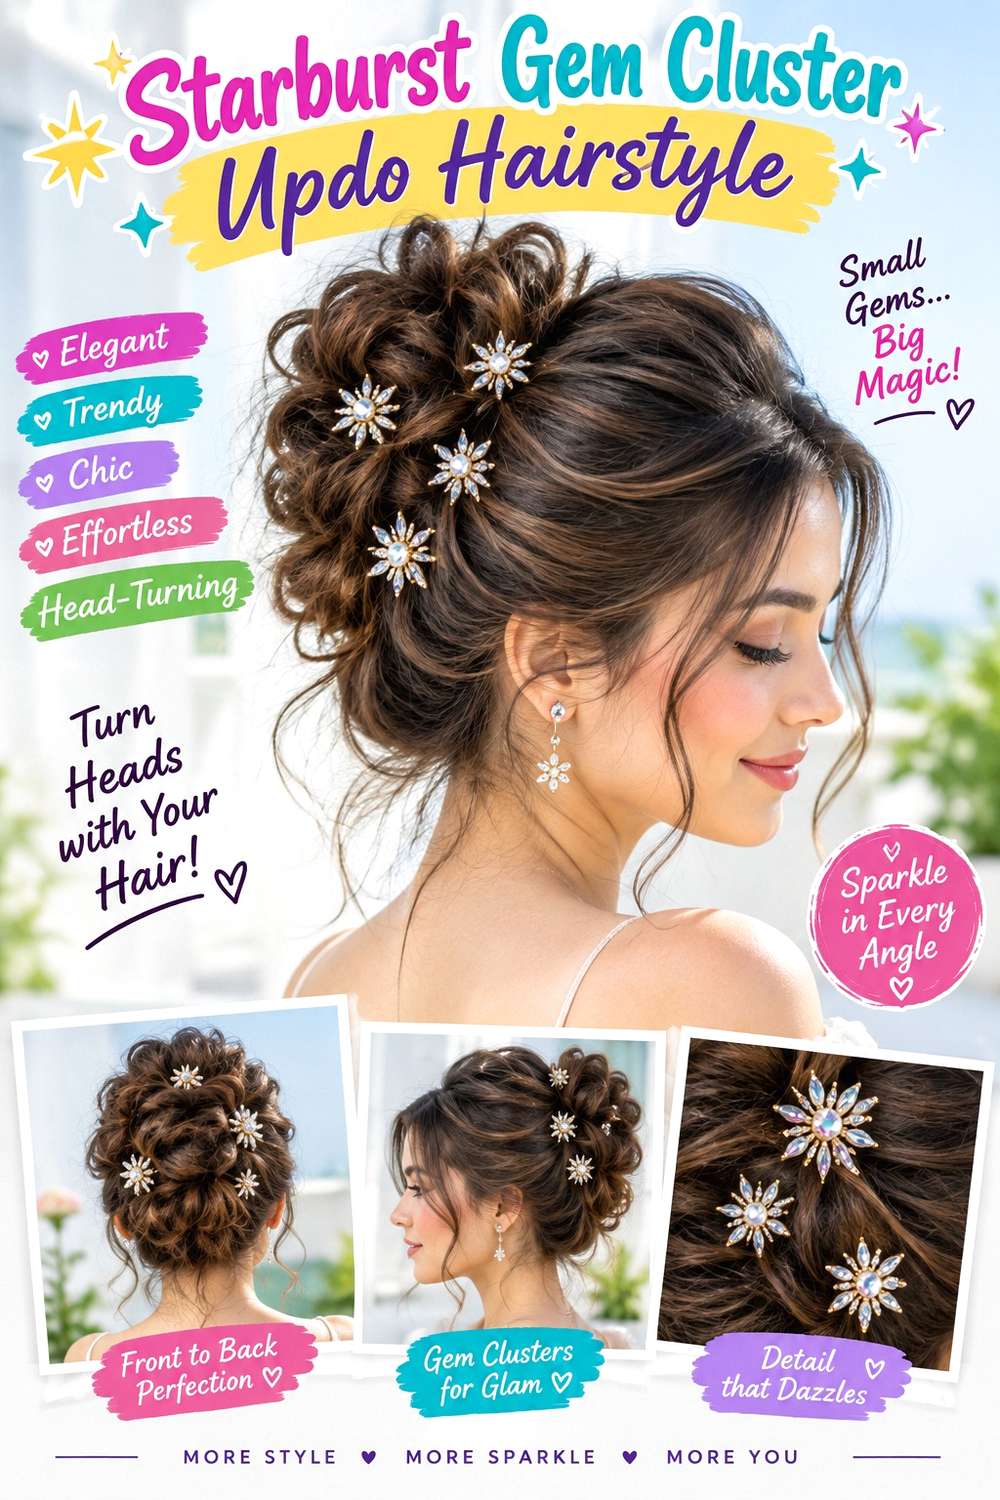
A starburst cluster works well with an updo because the gems can radiate from one stable anchor instead of being scattered across loose hair. Gather the length into a mid or low twisted updo, leaving the crown smooth or lightly lifted. Place the cluster beside the bun, with one larger central gem and smaller accents spreading outward in different directions. Keep the opposite side relatively undecorated for balance.
A fabric-covered elastic establishes the updo base, bobby pins secure the twist, and gem pins create the starburst after the structure is finished. Building the updo is the longer task; decorating it should be a careful final step. During the event, check for movement by gently turning your head rather than pressing individual gems deeper against the scalp.
At a professional styling appointment, specify the updo height, comfortable tension, and the exact side where the starburst should sit. The central gem should attach to a stable outer section, while the smaller pieces can spread through nearby loops. Dense or very long hair may require a broader anchor to distribute weight. Do not use decorative pins as substitutes for hidden structural pins. If the finished cluster feels heavy or sharp, reduce the number of accents rather than accepting discomfort for the entire party.
Pro tip:
Place the largest gem first, then add smaller accents in three or four directions. Check the shape after each addition so the cluster expands intentionally instead of becoming an uneven patch.
Make It Work for You:
If your updo is compact or your hair is lower in density, use a smaller starburst with shorter spacing. The radiating effect remains clear without overwhelming the hairstyle’s proportions.
Watch Out For:
Avoid pushing long gem pins deeper whenever the cluster shifts. They can become uncomfortable against the scalp. Re-anchor the updo if necessary and place the decoration into stable outer sections.
Gem-Studded Twisted Half-Up Hairstyle
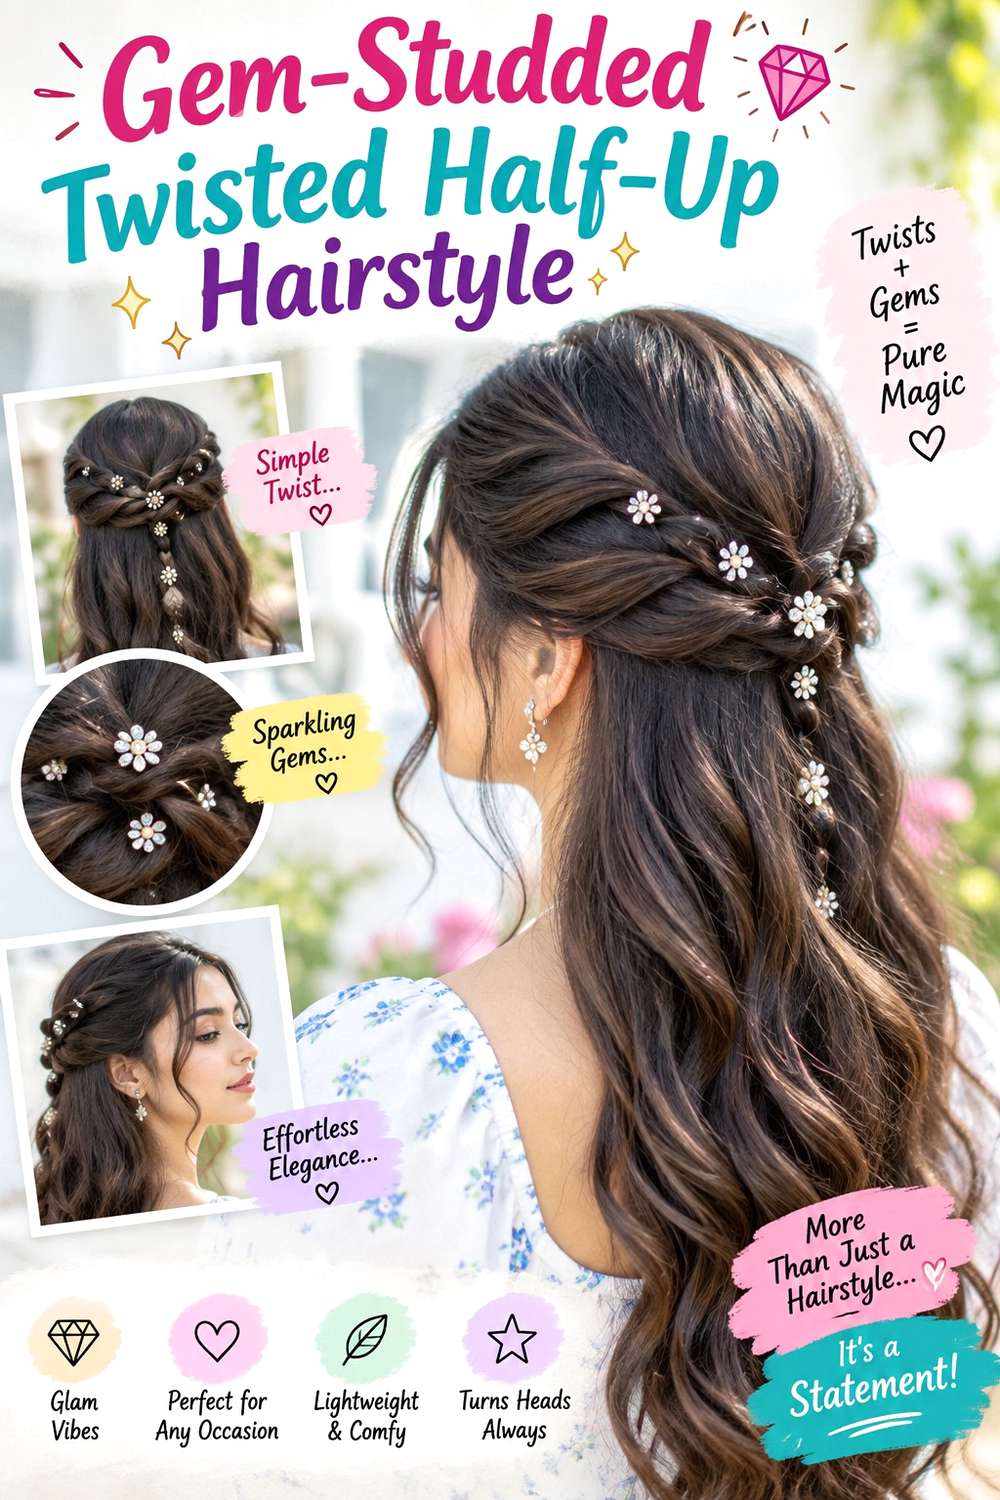
Two side twists create a simple path for gems while leaving the lower hair free for waves, curls, coils, or a smooth finish. Take sections from above each ear, twist them backward, and join them at the center. Place small gems along the outer edge of each twist so they lead toward the meeting point. A balanced arrangement looks decorative from both sides without covering the entire crown.
Use texturizing spray for grip, a mini elastic to connect the twists, and tiny gem clips for the accents. Creating the half-up base is fairly quick on already styled hair, while preparing the loose lengths may be the longer wash-day task. If a twist loosens during the party, rebuild its anchor before adjusting the decorative clips.
For professional styling, specify how thick you want the twists, where they should meet, and whether the gems should be evenly spaced or concentrated near the center. Wider twists can carry more visible decoration, while finer hair may look cleaner with small, spaced accents. Keep the twists comfortably secure rather than pulled tightly above the ears. The lower hair should move independently so the style still feels soft. When removing the gems, open each clip first instead of pulling it through the twisted section.
Pro tip:
Secure both twists and compare their height before decorating them. Once they look even, place matching gems from the center outward so the two sides remain visually connected.
Make It Work for You:
For curly or coily hair, form the twists without smoothing away all natural texture. Small gems can sit along the outer edges while the lower curls or coils remain full.
Watch Out For:
Do not attach gems before deciding the final twist tension. Tightening a decorated twist afterward can rotate the clips underneath, making the accents disappear or catch neighboring strands.
Conclusion
Hair gem hairstyles can be subtle or highly decorative without requiring a permanent change. Loose waves and curls give gems movement around them, while braids, ponytails, buns, and half-up styles provide firmer anchor points. A concentrated temple cluster suits a quieter finish, whereas halos, cascades, and starburst arrangements make the decoration more prominent. Density and natural texture should guide the size, number, and spacing of the accents, while comfortable tension matters more than forcing every gem into place. For holiday parties, consider how long you will wear the style, whether you plan to dance, and what jewelry or clothing may touch the hair. Secure the base first, then let the gems remain decoration rather than structural support.
Before Your Salon Visit
Choose one or two favorite ideas and save references that clearly show the gem placement and the underlying hairstyle. Discuss your natural texture, density, face shape, preferred amount of volume, and how long you expect the party style to last. Point out the exact braid width, ponytail or bun position, loose-piece placement, gem spacing, or finish you like. Because hair gems are temporary, focus on comfortable styling and reliable anchoring instead of changing your haircut solely for the accessory.
FAQs
How do I keep hair gems from falling out during a holiday party?
Start with a stable hairstyle and attach each gem according to its design rather than asking the accessory to hold loose sections together. Check clips, charms, or temporary stickers after dressing, since scarves and collars can shift them. Comfortable, secure placement is more reliable than excessive tension.
Can hair gems work on curly or coily hair?
Yes. Place gems beside or between defined curl groups instead of flattening the texture to create a smooth surface. Small clips and charms can follow braids, twists, or individual coils, while a halo arrangement can sit around the front without requiring the natural volume to be compressed.
Do I need a special haircut for hair gem hairstyles?
Usually not. Hair gems are temporary accessories, and most party designs depend more on styling, placement, and secure anchoring than on a specific haircut. Existing layers or bangs may affect where decorations sit, but you generally do not need to cut your hair solely to wear gems.
How should I remove hair gems after the party?
Remove each piece individually and slowly. Open clips or rings before sliding them away, and avoid pulling accessories through curls, braids, or tangled sections. Temporary stick-on gems should also be lifted gently rather than rubbed across the hair. If anything catches, free the surrounding strands first.