13 Crystal Hair Pin Half Up Hairstyles

Crystal hair pin half up hairstyles combine a secure gathered section with enough loose hair to keep movement through the back and ends. The defining shape can be sleek, twisted, braided, curly, or softly waved, but the crystal pin should sit on an established anchor rather than carry the entire hairstyle. A center or side part changes the front balance, while face-framing pieces, curtain bangs, and crown volume determine how open or soft the finished outline feels.
Straight, wavy, curly, and coily textures can all support a half-up arrangement. Density matters mainly when deciding how much hair to gather and how large the decorative pin should be. Lower-density hair may look fuller with a smaller crown section, while dense hair often needs a broader, well-secured anchor. Curl shrinkage and natural growth direction should be respected instead of forcing every front section into the same shape.
Most styles are quick once the loose hair is prepared. Waves and blowouts need a longer wash-day session, while twists and braids can be added to existing texture. Comfortable tension, stable pin placement, and keeping decorative pieces separate from structural support are the main maintenance priorities.
Quick List
- Center-Part Soft Wave Crystal Pin Half-Up Hairstyle
- Side-Swept Crystal Barrette Half-Up Hairstyle
- Twisted Crown Crystal Pin Half-Up Hairstyle
- Braided Back Crystal Pin Half-Up Hairstyle
- Sleek Straight Crystal Pin Half-Up Hairstyle
- Voluminous Blowout Crystal Pin Half-Up Hairstyle
- Curtain Bang Crystal Pin Half-Up Hairstyle
- Curly Crystal Cluster Half-Up Hairstyle
- Coily Crystal Crown Half-Up Hairstyle
- Low-Twist Crystal Pin Half-Up Hairstyle
- Crossed Crystal Pins Half-Up Hairstyle
- Mini-Braid Crystal Pin Half-Up Hairstyle
- High-Crown Crystal Pin Half-Up Hairstyle
Center-Part Soft Wave Crystal Pin Half-Up Hairstyle
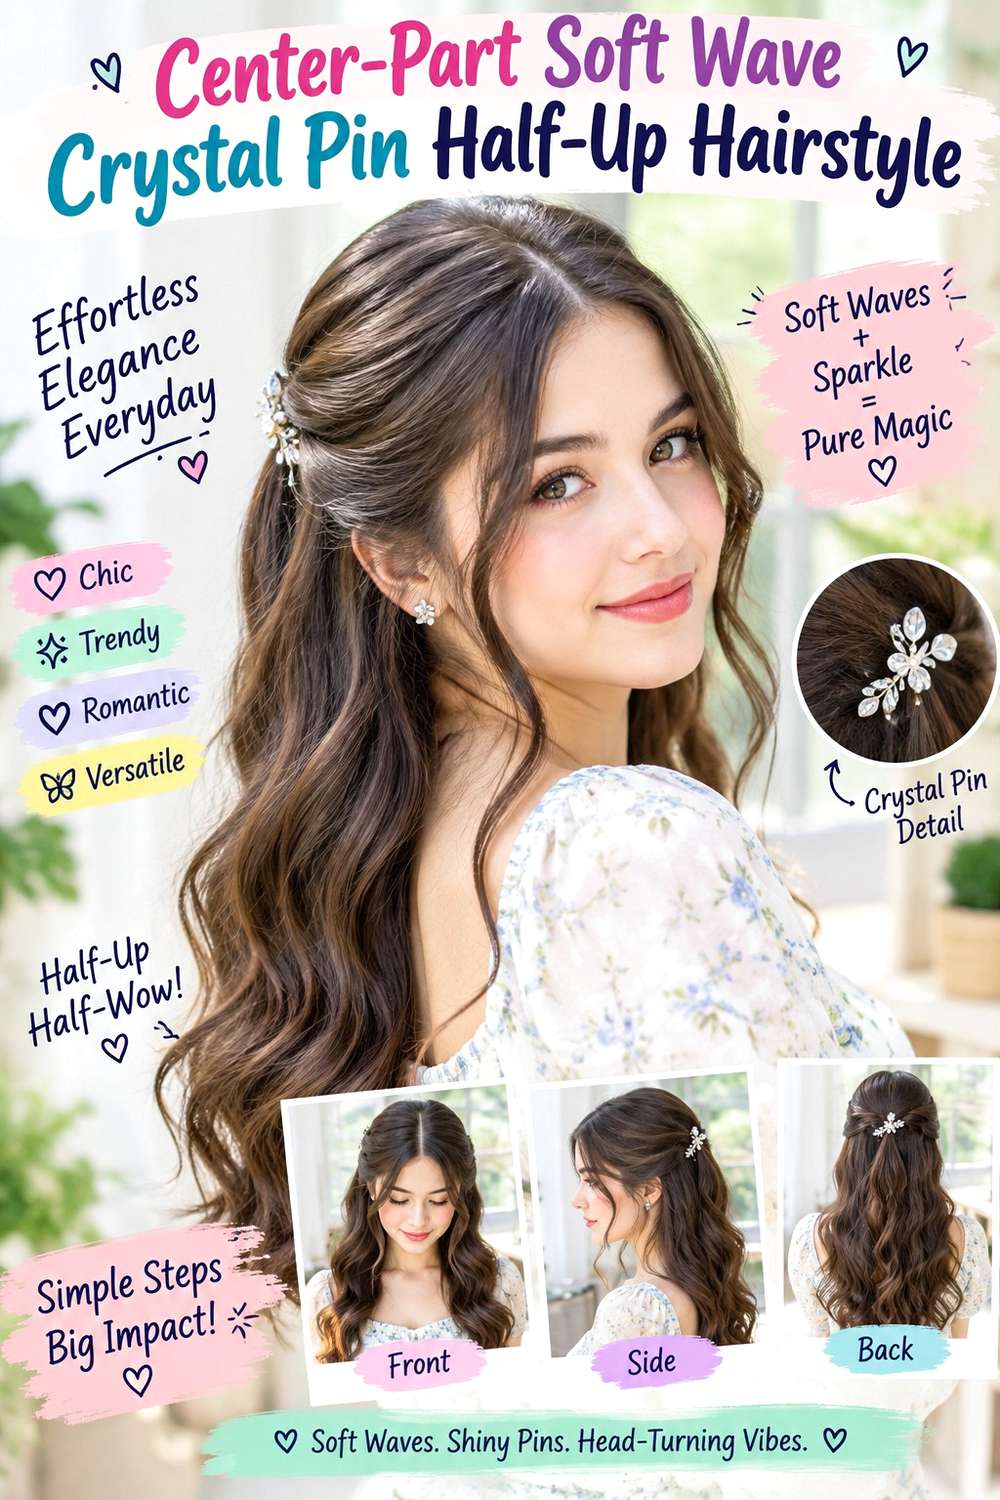
A clean center part gives this half-up style symmetry while soft waves keep the lower lengths moving. Gather a moderate section from above each temple and join it at the back of the crown, leaving the hairline smooth and a little volume behind the part. The waves can begin around the cheekbones and broaden through the lengths, with softer ends rather than tight curls. A single crystal hair pin placed across the secured section becomes the focal point without covering the whole crown.
For heat-styled waves, apply heat protectant before using a curling iron, then secure the gathered section with the crystal hair pin only after the bends have cooled. A full wave set is the longer wash-day task, especially on dense or long hair; the next-day refresh can focus on flattened front sections and a few loose bends.
If the style is created professionally, specify how wide you want the gathered section and exactly where the pin should sit. A narrow section leaves more hair loose, while a broader section creates a stronger half-up shape. The decorative pin should rest on a stable base instead of carrying excessive weight. If the style loosens, rebuild the anchor rather than pushing the pin tighter against the scalp.
Pro tip:
Gather equal sections from both temples before securing anything, then check the center point from behind. Once the base is balanced, slide the crystal pin across it without disturbing the waves below.
Make It Work for You:
For lower-density hair, collect a smaller crown section and leave more hair loose underneath. The half-up shape stays visible while the lower lengths retain more fullness and natural movement.
Watch Out For:
Avoid inserting the pin before the waves have cooled. Continued handling can distort the bends and shift the anchor, so finish the loose texture first and decorate the secured section last.
Side-Swept Crystal Barrette Half-Up Hairstyle
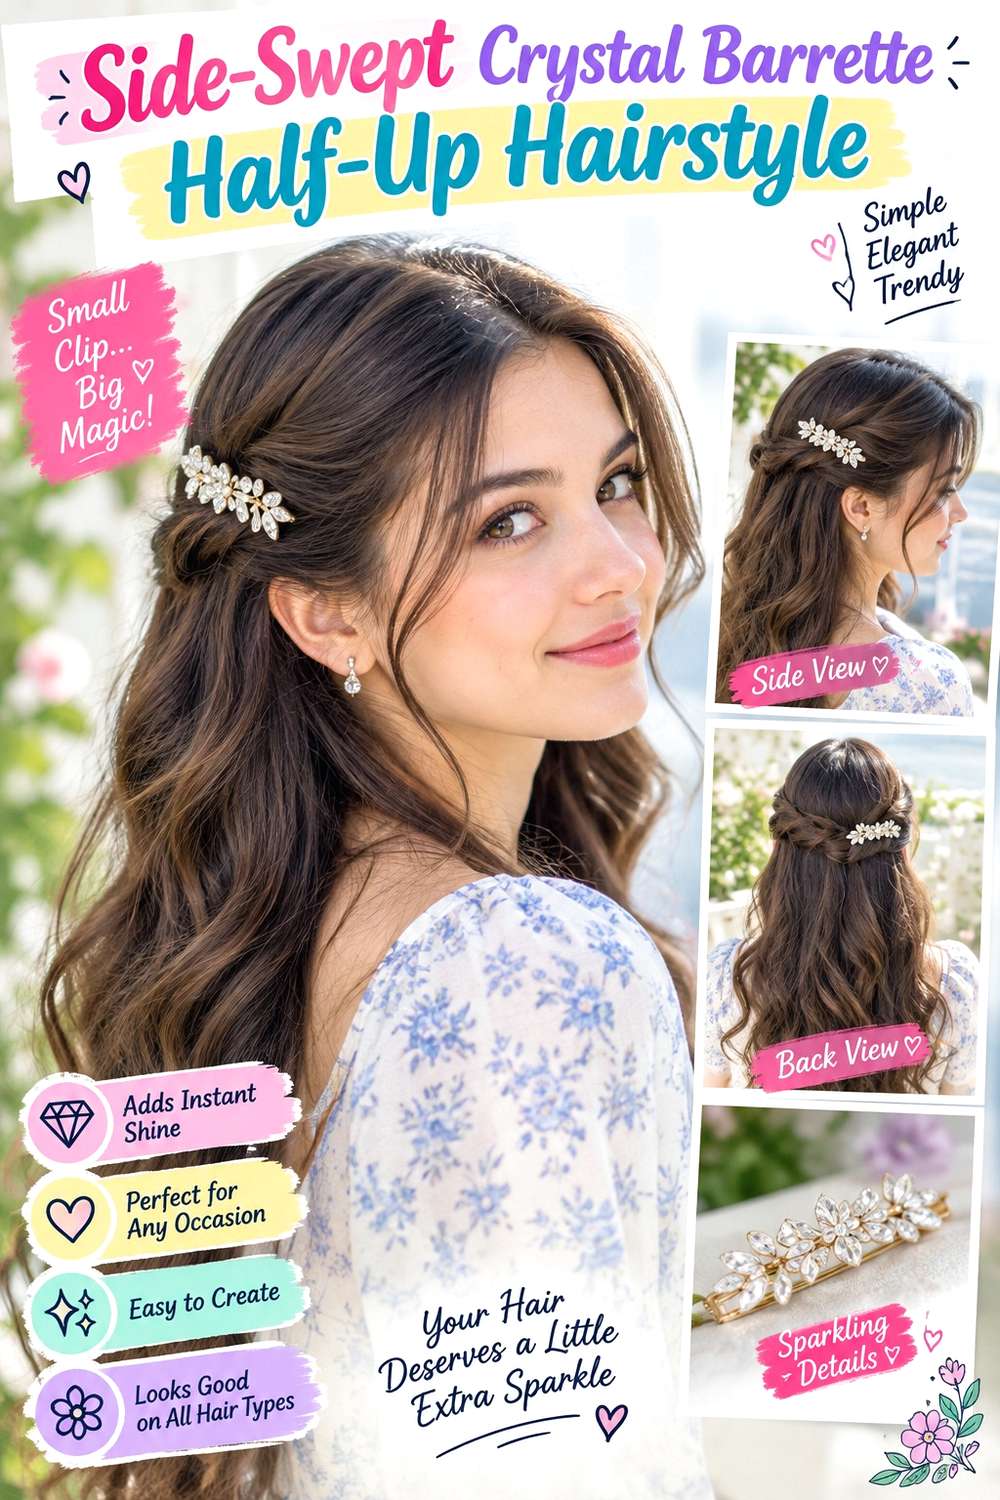
A deep side part creates asymmetry at the front while the half-up section stays centered or slightly offset at the back. Sweep the fuller side diagonally across the forehead, leave a small amount of lift at the root, and gather the upper side sections behind the crown. A horizontal crystal barrette works well across that anchor, while the loose lengths can remain softly waved or naturally textured.
Use texturizing spray on very smooth hair to create grip, a mini elastic to secure the half-up base, and the crystal barrette as the decorative finish. Once the loose hair is prepared, assembling the style is fairly quick. A complete wash-day routine takes longer if you also need to dry or shape the lengths. During a short refresh, reset the side part and smooth only the sections that have escaped.
For an event styling appointment, explain how deep you want the part, whether the barrette should be centered, and how much hair should remain forward around the face. Shorter layers do not need to be forced into the gathered section. The barrette should close around an already secure anchor rather than clamp a heavy amount of loose hair. If it slides during wear, rebuild the underlying section instead of tightening it repeatedly.
Pro tip:
Set the side part before gathering the back section. This keeps the fuller front sweep intact and prevents the half-up anchor from pulling the roots backward into an unintended center part.
Make It Work for You:
If your front layers are short, leave one balanced piece loose near the fuller side. The side-swept shape remains clear without stretching those layers uncomfortably toward the back anchor.
Watch Out For:
Do not rely on a decorative barrette to hold a thick section by itself. Secure the half-up base first; otherwise the accessory can tilt, slide, or pull unevenly as you move.
Twisted Crown Crystal Pin Half-Up Hairstyle

Two side twists create a soft crown line that naturally leads toward a crystal pin at the back. Take sections from above each ear, twist them away from the face, and join them just below the crown. Keep the twists broad enough to remain visible from the sides, while the lower hair stays loose in waves, curls, or a straight finish. A few face-framing pieces can remain forward if you prefer a softer outline.
Texturizing spray adds grip to slippery strands, a mini elastic secures the two twists together, and the crystal hair pin decorates the meeting point. Creating the twists is a short styling step on already prepared hair; wash-day drying or curl definition will take longer. If the twists loosen during an event, adjust the hidden anchor before touching the decorative pin.
When having this style created professionally, specify the twist width, the meeting point, and whether you want the crown smooth or slightly lifted. Thin twists look more delicate, while wider ones create a stronger half-up shape. The pin should sit across the secured junction without carrying the twists’ tension. For layered hair, allow shorter pieces to remain soft rather than forcing them backward. Comfort matters most around the temples, where twisting too tightly can create unnecessary pulling.
Pro tip:
Loosen each twist slightly after joining them but before adding the crystal pin. Working in that order lets you create softness evenly without risking movement or misalignment of the decorative piece.
Make It Work for You:
If your hair is very dense, use slightly larger side sections but keep the twist tension gentle. A broader twist distributes the volume more evenly and creates a stable base for the pin.
Watch Out For:
Avoid tightening the twists whenever the crystal pin moves. The accessory and structural anchor have separate jobs; fix the hidden connection first, then reposition the decoration without increasing temple tension.
Braided Back Crystal Pin Half-Up Hairstyle
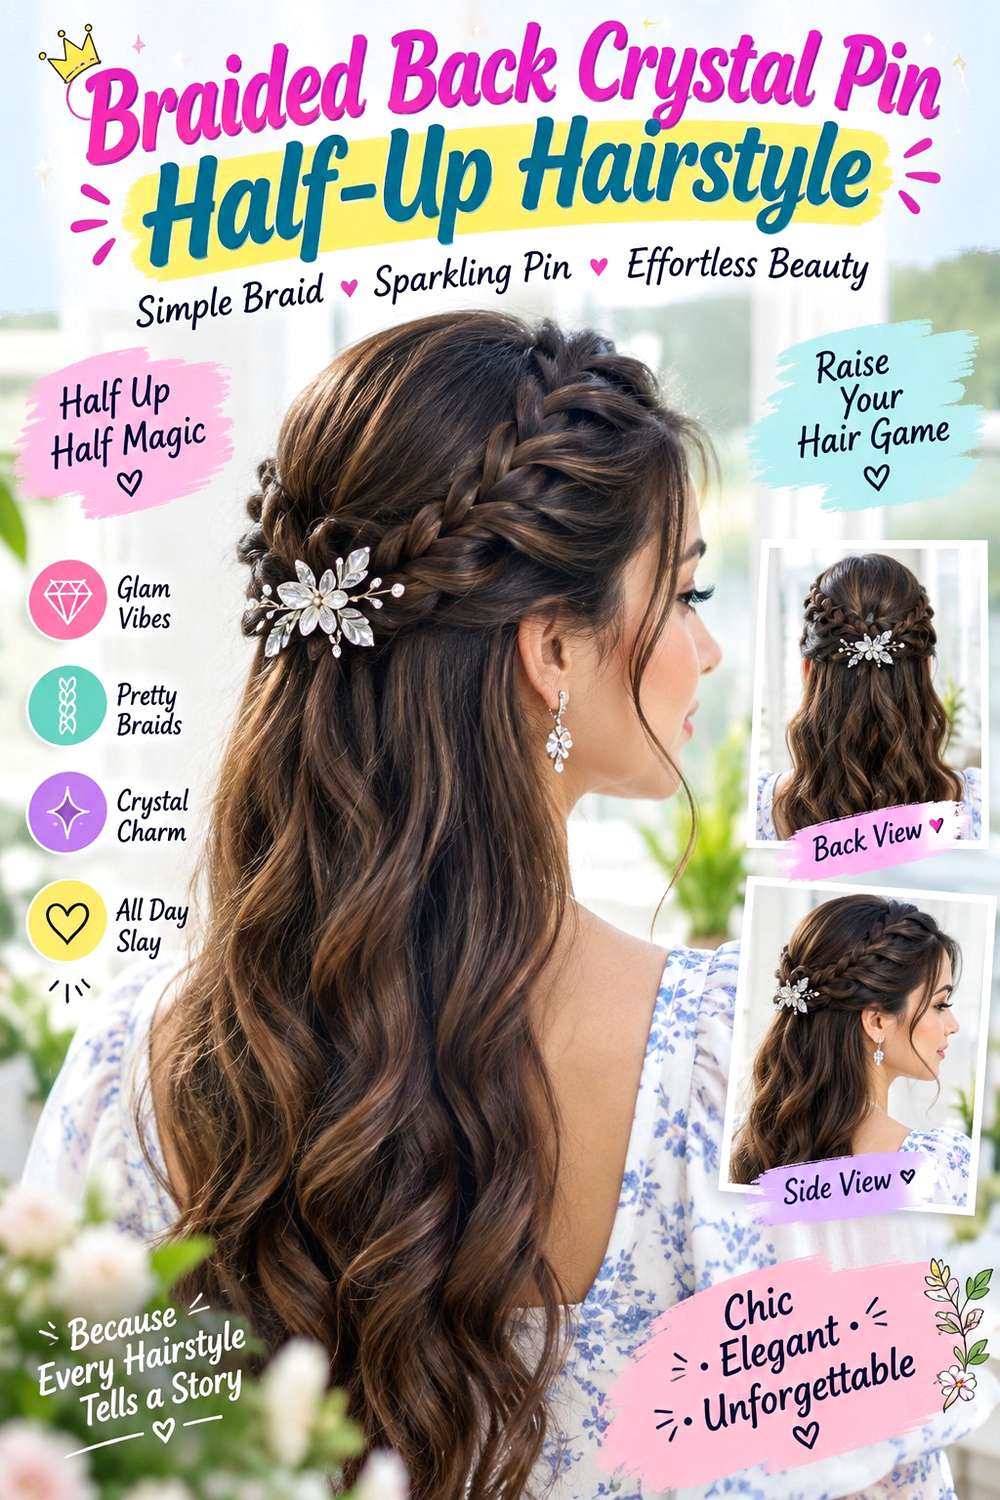
A braided half-up section creates texture at the back while giving a crystal pin a defined place to sit. Gather hair from both sides and form a single loose braid down the center for several crossings, leaving the remaining length free underneath. Keep the braid broad enough that its pattern is visible, and place the crystal pin horizontally across the point where the two side sections first meet.
Use light styling cream to control short flyaways, a clear elastic to secure the short braid, and a crystal pin for the decorative accent. Braiding the upper section is moderate work but usually quicker than styling the entire head into curls. If the loose hair is already prepared, a party-day refresh involves smoothing the crown and checking that the braid remains evenly shaped.
At an appointment, specify the braid width, where you want it to begin, and how many crossings should remain visible before the hair is secured. A very narrow braid can disappear beneath a large pin, while an oversized braid may dominate the half-up silhouette. The crystal piece should decorate the braid rather than function as its only closure. If the crown is layered, let short sections blend naturally or remain soft instead of increasing tension to capture every strand.
Pro tip:
Finish the braid and gently widen its outer loops before adding the crystal pin. Once the accessory is in place, avoid pulling the braid apart because that can rotate or loosen the decoration.
Make It Work for You:
For fine or lower-density hair, gather less from the sides and loosen the braid carefully after securing it. This keeps more fullness underneath while making the braided section appear broader.
Watch Out For:
Do not attach the pin across a loose braid crossing without another anchor. Movement can pull the braid apart. Secure the braided section first, then place the crystal piece over it.
Sleek Straight Crystal Pin Half-Up Hairstyle
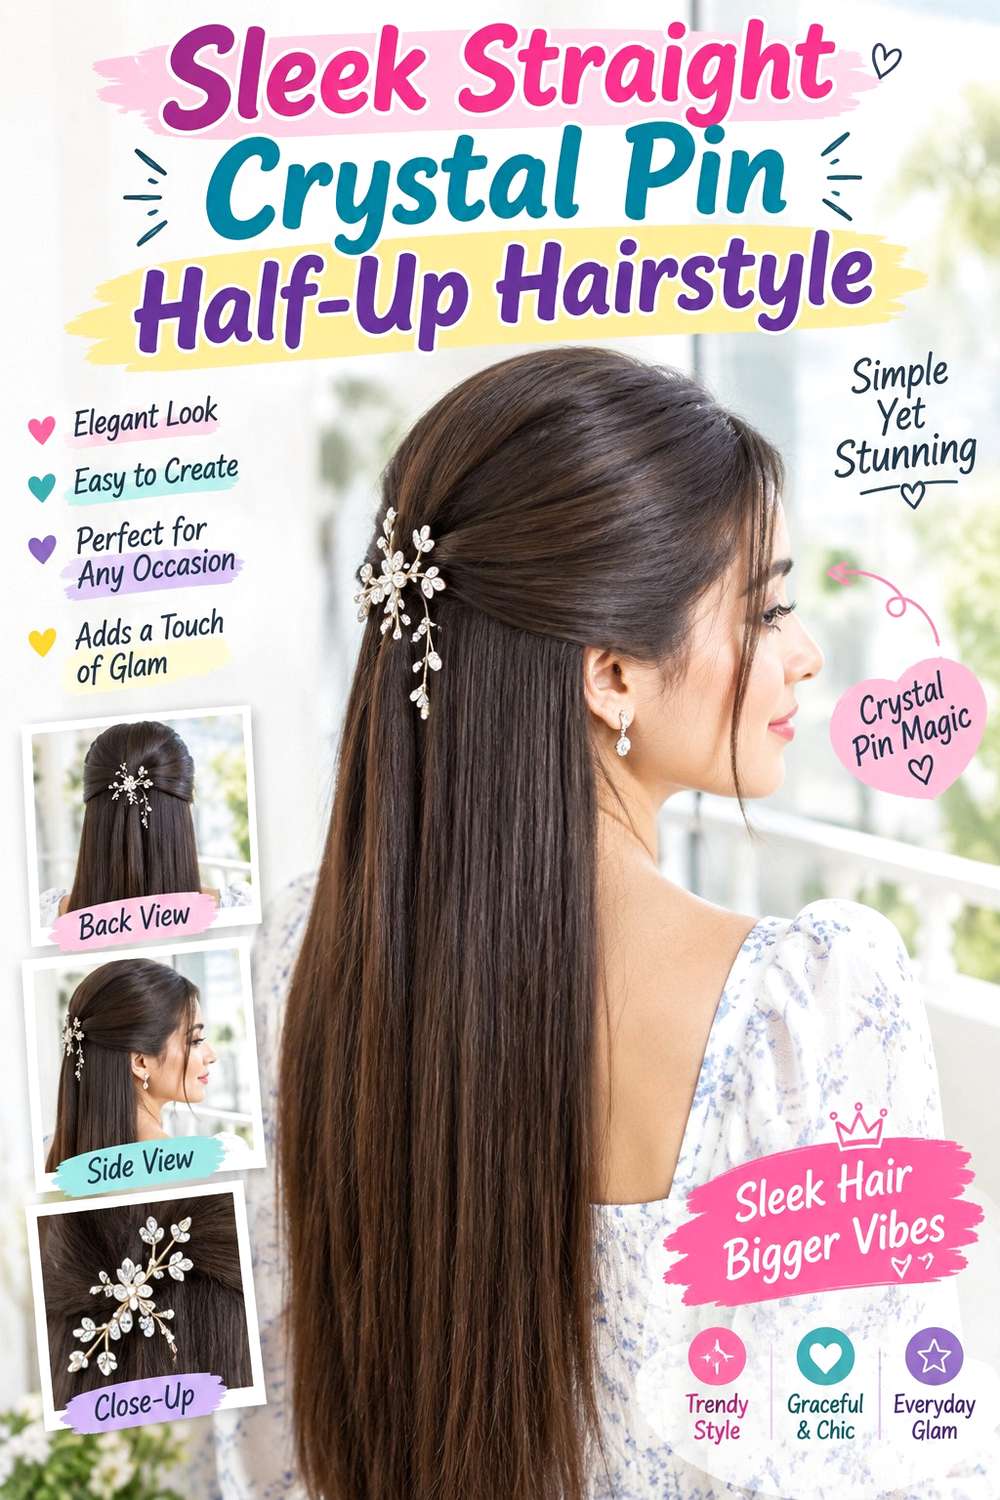
A sleek straight finish makes a crystal pin stand out because the surrounding shape is clean and uncluttered. Create a center or slight off-center part, smooth the top sections backward, and secure them at mid-crown without adding much height. The lower lengths should fall freely with a straight or barely curved perimeter, while the crystal pin sits across the compact half-up anchor.
Apply heat protectant before smoothing with a paddle brush during drying, then add the crystal hair pin after the base has been secured. If your natural texture already dries straight, the full styling session may be relatively simple; hair that needs more stretching will require a longer wash-day routine. Between washes, refresh the part, smooth surface flyaways, and check that the accessory remains level.
For professional styling, specify how much crown hair should be gathered and whether you want the sides completely sleek or slightly softer around the ears. Lower-density hair generally benefits from leaving more length loose, while dense hair may need a wider anchor to distribute weight. The decorative pin should not pull the gathered section downward. If the top starts sagging, rebuild the anchor rather than pushing the crystal piece more tightly into the hairstyle.
Pro tip:
Check the half-up section from both sides before adding the pin. A sleek surface makes uneven gathering easy to see, so correct the balance first and decorate only when the anchor looks level.
Make It Work for You:
If your hair naturally waves through the ends, keep that movement and smooth only the crown. The clean half-up top still highlights the crystal pin without requiring every length to be straightened.
Watch Out For:
Avoid gathering too much hair into a tiny anchor. The weight can pull the top flat and make the pin tilt. Broaden the secured section or leave more length loose.
Voluminous Blowout Crystal Pin Half-Up Hairstyle
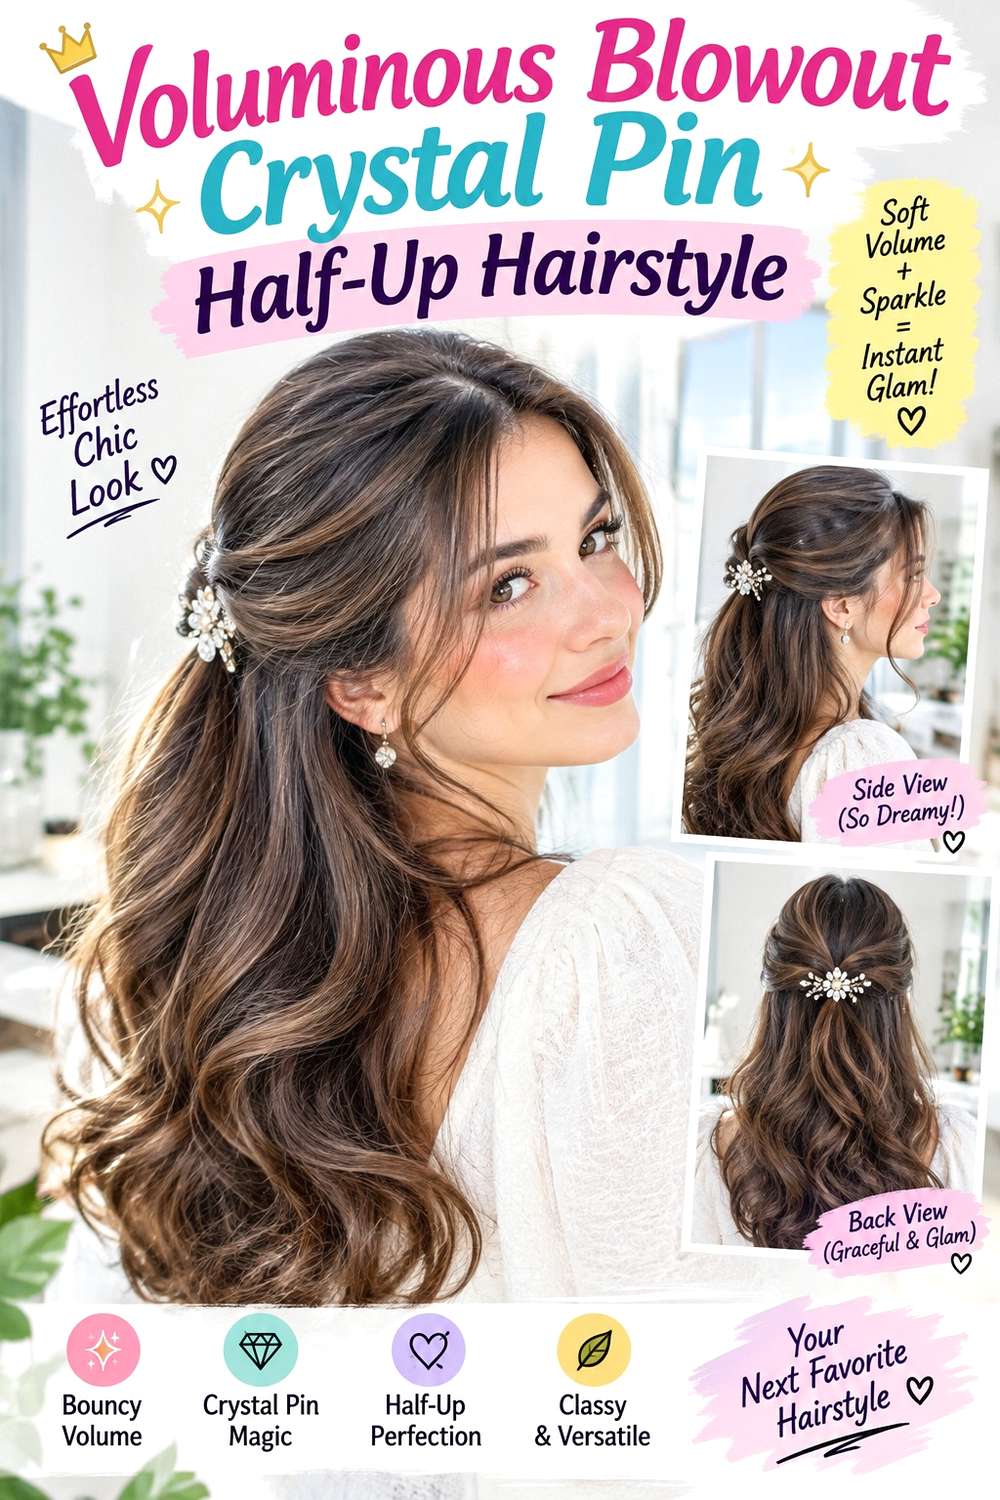
A bouncy blowout gives this half-up style height through the crown and broad movement through the lengths. Keep the front softly lifted, gather the upper side sections behind the highest crown point, and leave face-framing layers free to curve away from the cheeks. The crystal pin should sit just below the lifted area, where it can decorate the anchor without flattening the volume above it.
Apply heat protectant before shaping the hair with a round brush, then secure the half-up section with the crystal hair pin after the blowout has cooled. The complete wash-and-blowout process is the longer styling job, especially on long or dense hair. A quicker refresh can focus on re-dampening and lifting the crown plus reshaping a few face-framing bends.
If someone else is styling your hair, specify how high you want the crown, how much hair should be gathered, and whether the crystal pin should sit horizontally or at a slight angle. The accessory should not be inserted into the highest lifted section. Fine strands may need a smaller gathered area so the loose hair stays full, while dense hair can support a broader anchor. If volume falls, reset the roots instead of tightening the half-up section.
Pro tip:
Finish the crown lift first and let it cool, then secure the half-up section just beneath it. This keeps the crystal pin visible without pressing directly across the highest part of the blowout.
Make It Work for You:
For fine hair, gather only the upper side sections and leave most of the crown loose. You preserve more overall volume while still creating a clear half-up anchor for the crystal pin.
Watch Out For:
Do not place the decorative pin through the lifted roots themselves. That can collapse the crown and make the top uneven; anchor it slightly lower where the gathered sections naturally meet.
Curtain Bang Crystal Pin Half-Up Hairstyle
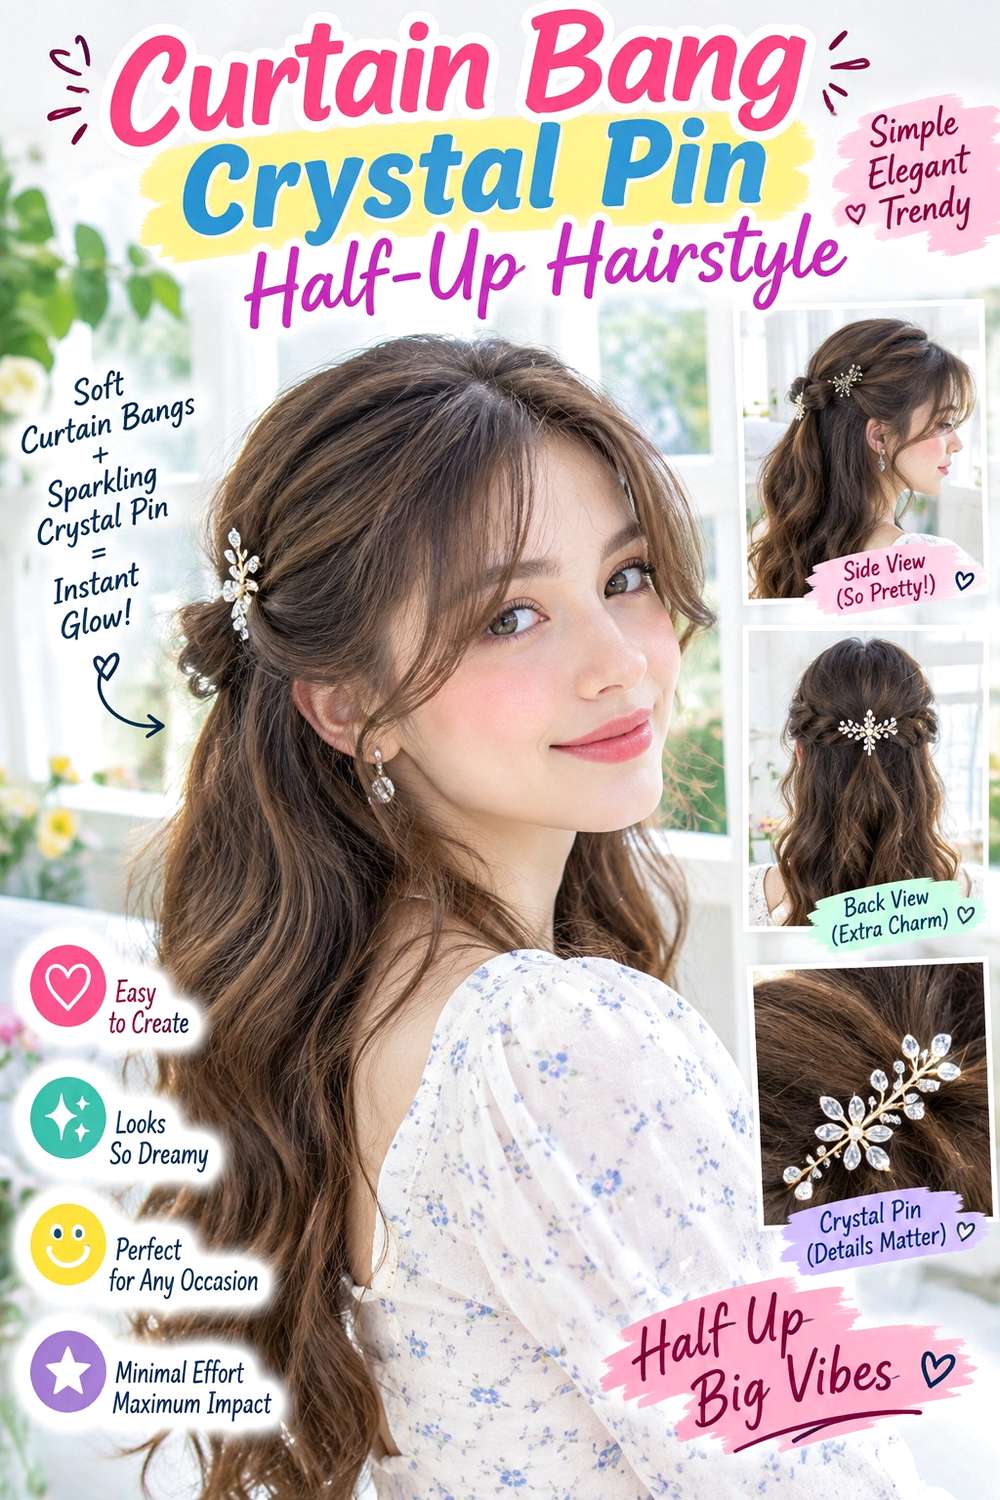
Curtain bangs keep movement around the face while the upper lengths are gathered behind them. Part the fringe near the center, let the shorter pieces open across the forehead, and curve the longer outer sections toward the cheekbones. Gather hair from behind those bangs into a compact half-up section at the crown, then place a crystal pin across the anchor so the fringe remains completely free.
Use heat protectant before shaping the bangs with a round brush, and finish the secured section with a crystal hair pin. The full styling effort depends on the loose lengths, but refreshing only the fringe and rebuilding the half-up anchor should be a short task between washes. Curly or strongly wavy bangs should be judged in their normal dry state rather than stretched to a fixed length.
For professional styling, clarify that the curtain fringe should stay outside the gathered section and show where the outer corners should fall. The pin belongs behind the moving fringe, not on top of it. If the bangs grow enough to close the center opening or enter the eyes, fringe maintenance is separate from maintaining the temporary half-up style. Avoid using extra tension at the crown to control a fringe that naturally wants to move forward.
Pro tip:
Shape and cool the curtain bangs before gathering the crown. Keeping the fringe completely separate during anchoring prevents the outer corners from being accidentally pulled backward or flattened by the crystal pin.
Make It Work for You:
If your bangs have strong curl or shrinkage, leave them in their natural finished pattern and gather hair from farther back. The open fringe can remain while the half-up structure stays secure.
Watch Out For:
Do not trap only the ends of curtain bangs beneath the pin. That creates an awkward bend and weakens the face frame. Keep the fringe fully forward or intentionally sweep it back.
Curly Crystal Cluster Half-Up Hairstyle

Defined curls give a crystal cluster plenty of texture to contrast against, but the decoration works best when concentrated around one secure half-up anchor. Gather the upper side curls toward the back without brushing them smooth, allowing the crown to retain natural volume. Leave a few curl groups around the temples if desired, then place two or three small crystal pins around the secured center rather than spreading them randomly across the hair.
Use curl gel to support definition, a mini elastic to build the half-up base, and crystal hair pins for the decorative cluster. Wash-day curl definition takes the most time; once the hair is dry, creating the half-up section should be quick. Between washes, refresh only flattened curls and check that each decorative pin remains attached to the secured area.
If the style is done professionally, specify how much of the upper hair should be gathered, whether you want a centered cluster, and how much crown volume should stay visible. The curls should not be stretched tightly just to create a flatter pinning surface. Dense hair can support a wider half-up section, while lower-density curls may look fuller with a smaller gathered area. Remove the pins individually rather than dragging them through curl groups after the event.
Pro tip:
Choose the anchor position while the curls are completely dry. Once the curl groups have settled, gather them gently and add the crystal cluster without breaking apart more definition than necessary.
Make It Work for You:
For tighter curls, use fewer but clearly spaced crystal pins around the center anchor. The accessories remain visible without requiring you to flatten or separate multiple curl groups for placement.
Watch Out For:
Avoid clipping decorative pins onto isolated curls that are not supported by the half-up base. Their weight can stretch those sections; keep the crystals attached to the secured gathering point.
Coily Crystal Crown Half-Up Hairstyle

A coily half-up shape can keep strong crown volume while a line of crystal pins follows the gathered section across the back. Separate the upper portion gently, secure it around mid-crown, and let the lower coils remain full. Instead of smoothing the surface flat, preserve visible coil texture and place the crystals along the edge of the secured section where they can catch light without interrupting the pattern.
Use lightweight leave-in conditioner for softness, a fabric-covered elastic for the structural anchor, and crystal hair pins for decoration. Wash-day preparation takes longer because the coils need to dry and settle before styling. The half-up arrangement itself should be much quicker, and later refreshes can focus on compressed areas around the crown rather than redefining everything.
For professional styling, describe the desired anchor height, gathered width, and how much natural volume you want left at the front and sides. Shrinkage should be considered in the finished dry shape rather than by stretching the hair to measure it. Dense coils may need a broad anchor to distribute weight comfortably. The crystal pins should decorate that base instead of compressing the texture. If one slips, reposition it in the secured section rather than tightening the entire hairstyle.
Pro tip:
Form the half-up base before deciding the crystal spacing. Once the coils settle around the anchor, place the pins where they remain visible instead of forcing the texture into a predetermined straight line.
Make It Work for You:
If you prefer more volume around the face, gather only the upper center and leave side coils free. The style still reads half-up while the crystal detail remains concentrated at the crown.
Watch Out For:
Do not flatten coily texture simply to give the crystals a smooth background. Follow the natural crown shape and use the secured anchor for grip instead of compressing surrounding sections.
Low-Twist Crystal Pin Half-Up Hairstyle
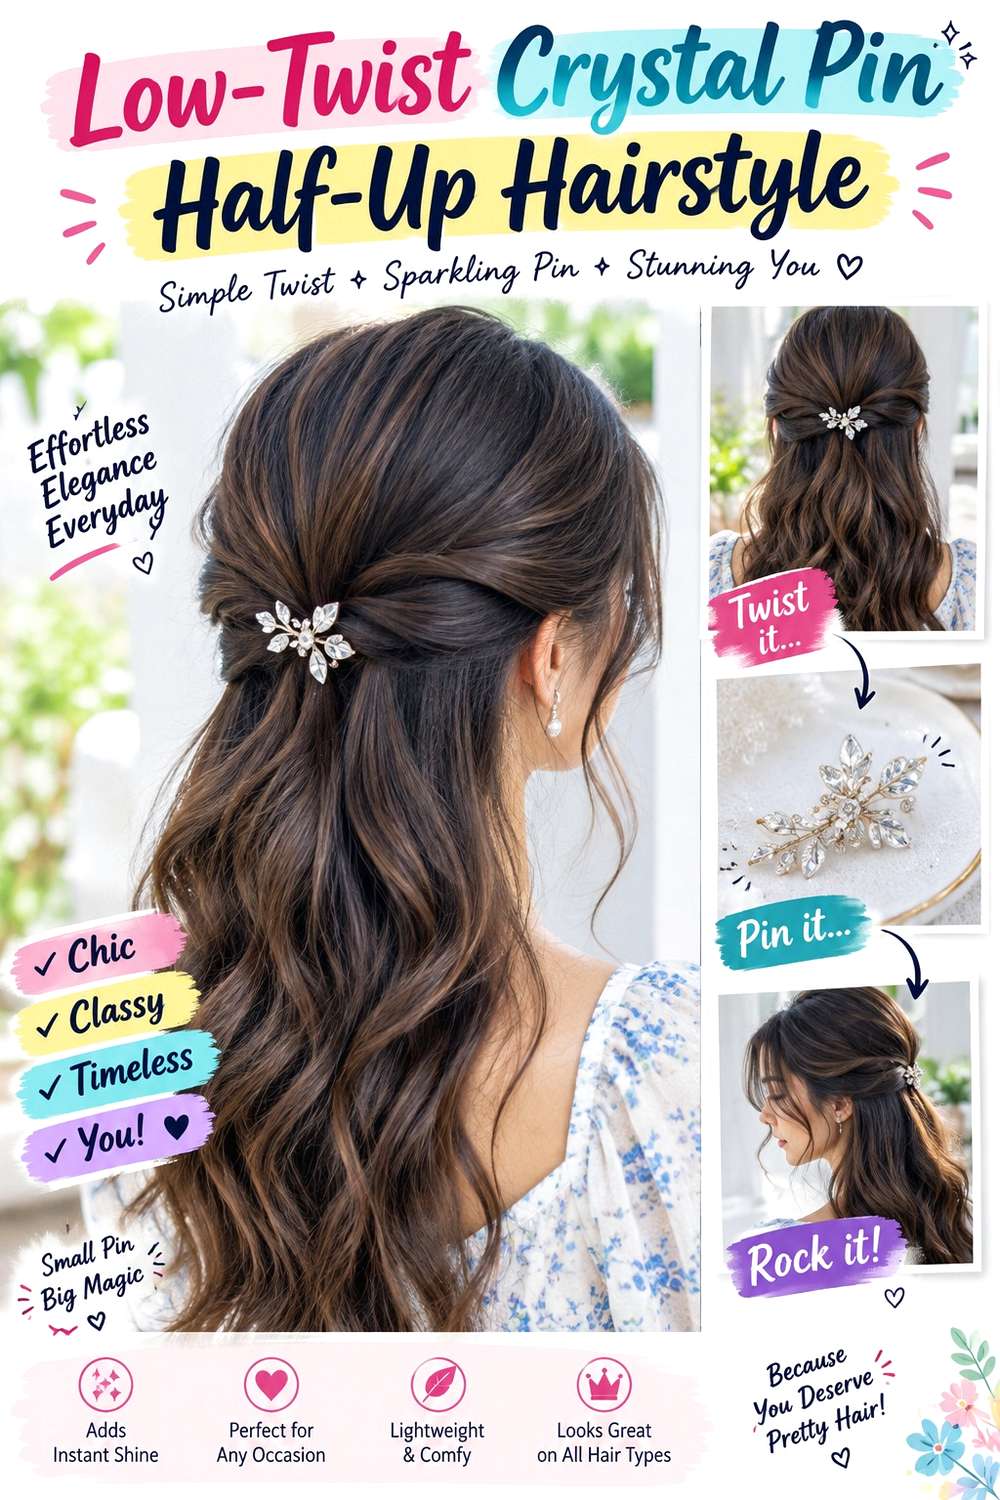
A low half-up twist sits closer to the back of the head than a high crown style, creating a relaxed shape that works especially well with long hair. Take sections from each side near the ears, twist them gently backward, and connect them just above the occipital area. Leave the crown relatively smooth and allow the loose lengths to fall in waves, curls, or a natural texture. A single crystal pin can lie across the low meeting point.
Use texturizing spray for grip, a mini elastic to secure the joined twists, and a crystal pin as the decorative finish. Once the base texture is ready, this style takes only a short amount of time. A full wash-day routine remains separate, depending on whether you want polished waves, air-dried texture, or another finish through the loose lengths.
At an event appointment, specify how low you want the anchor and how loosely the side twists should sit. A low placement should not drag downward or rest directly against the neckline. If your hair is dense, use slightly broader sections so the weight is distributed instead of concentrated in two narrow twists. The crystal pin should stay visible above the loose hair without acting as the sole structural support.
Pro tip:
Check the low anchor with your outfit before finishing. A high collar can rub against a very low pin, so move the gathered section slightly upward if necessary before adding the crystal piece.
Make It Work for You:
For shorter long layers around the face, leave those sections loose and begin each twist farther back. You keep the low half-up silhouette without pulling layers that cannot comfortably reach.
Watch Out For:
Avoid placing the anchor directly where a collar or scarf will repeatedly touch it. Friction can loosen the crystal pin, so keep a small gap between the accessory and clothing.
Crossed Crystal Pins Half-Up Hairstyle

Two crossed crystal pins create a clear X-shaped focal point at the center of a simple half-up style. Gather the upper side sections toward mid-crown and secure them first, keeping the crown smooth or slightly lifted. The loose hair can be straight, softly waved, or naturally textured. Insert the decorative pins diagonally across the anchor in opposite directions so they cross visibly without carrying the main weight of the style.
Use texturizing spray to give smooth hair grip, a mini elastic for the hidden base, and two crystal hair pins for the crossed finish. The half-up construction itself is quick once the loose lengths are prepared. If the hair is being curled or blow-dried first, that becomes the longer styling session, while the next-day refresh involves checking the base and restoring only flattened texture.
For professional styling, specify the width of the gathered section, the crossing angle, and whether the X should sit high at the crown or lower toward the back. Larger pins need enough stable hair underneath so their ends do not project awkwardly. Keep the structural elastic concealed beneath the crossed pieces. If either pin feels sharp, change its direction rather than pressing it more deeply toward the scalp.
Pro tip:
Insert the first crystal pin and check its angle before crossing the second over it. A deliberate X looks cleaner when both sides extend a similar distance beyond the center point.
Make It Work for You:
If your hair is fine, choose a smaller gathered section and keep the crossed pins compact. The decorative X remains visible without overwhelming the amount of hair supporting it.
Watch Out For:
Do not cross the pins so tightly that their ends press against the scalp. The visual overlap can be loose; structural security should come from the hidden half-up anchor underneath.
Mini-Braid Crystal Pin Half-Up Hairstyle

Two small braids running from the temples toward the back add detail without turning the entire half-up section into one large braid. Keep the crown between them mostly loose, join the mini braids at the center, and let the remaining hair fall naturally. A crystal pin placed over the joining point gives the style a finished focal point while the small braided lines remain visible from the sides.
Use light styling cream to control short pieces, clear elastics to secure the mini braids, and a crystal hair pin for the center accent. The braids take a little more time than simple twists but are still a manageable styling step on already prepared hair. If the lower lengths need waves or curls, that full styling session takes longer than refreshing the small braids later.
At a party or salon appointment, specify braid width, starting point, and how far back they should travel. Very narrow braids may disappear in dense hair, while overly thick ones can remove too much loose volume from the half-up effect. The crystal pin should cover the joining point without hiding both braids completely. Keep the tension comfortable around the temples, and allow short front pieces to remain loose rather than forcing them into tiny tight sections.
Pro tip:
Braid both sides before securing them together, then compare their thickness and height. Correct any obvious difference first so the crystal pin can sit over a balanced center connection.
Make It Work for You:
For layered hair, begin the mini braids slightly behind the shortest face-framing pieces. Those shorter sections can remain loose while the braid still creates a clean route toward the back.
Watch Out For:
Do not braid the temple sections tightly just to catch every short strand. Excess tension is unnecessary; leave escaping pieces soft and keep the decorative pin on the secure center anchor.
High-Crown Crystal Pin Half-Up Hairstyle
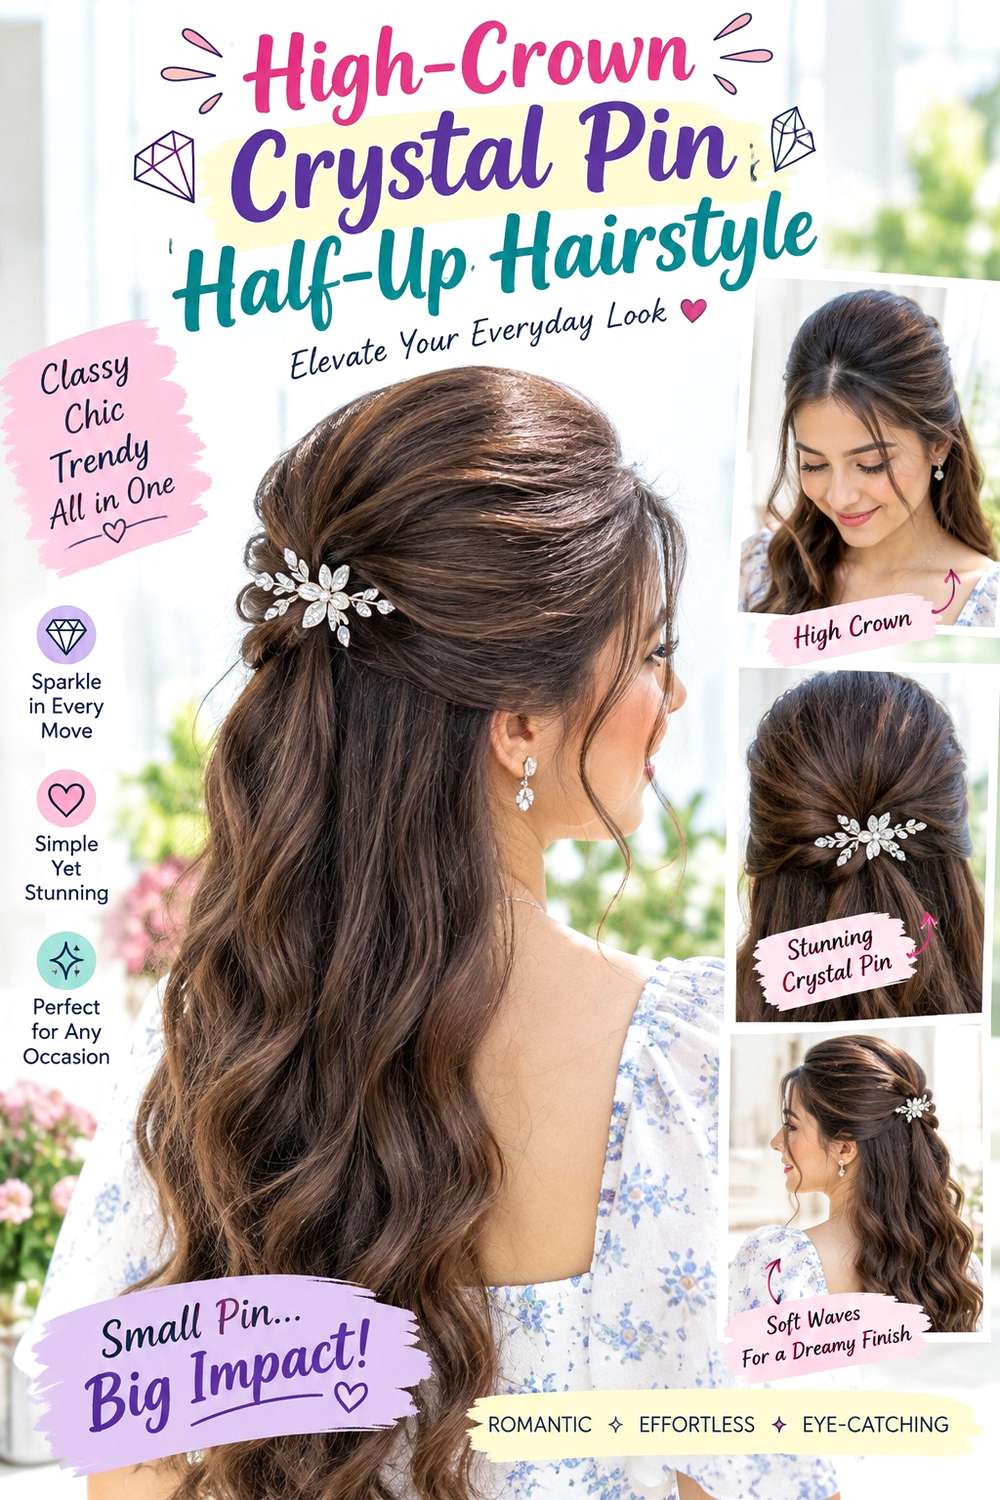
A high-crown half-up arrangement creates visible lift and a more pronounced separation between the gathered top and loose lengths. Take sections from the upper sides and crown, secure them near the highest back point of the head, and leave enough root volume in front so the style does not look pulled flat. The loose hair can fall in broad waves or a smooth blowout, while the crystal pin sits directly across the raised anchor.
Apply root-lift spray where extra height is needed, use heat protectant if the loose lengths are blow-dried with heat, and finish the gathered section with a crystal hair pin. A complete blowout or wave set takes the most time; the half-up gathering itself is quick. Between washes, refresh only the crown lift and the front pieces that have flattened.
If the style is created professionally, show exactly how high you want the anchor and how much hair should remain loose. Dense hair can become heavy when too large a section is pulled upward, so the gathered amount should remain comfortable. Lower-density hair often benefits from a smaller crown section. The crystal pin belongs across a stable anchor just behind the highest lift, not through unsupported roots. If the crown collapses, reset the volume rather than tightening the accessory.
Pro tip:
Lift the crown into its final shape before securing the back section, then add the crystal pin after checking the profile. This prevents the accessory from becoming the tool that creates tension-based height.
Make It Work for You:
If your hair is heavy, move the anchor slightly lower while keeping lift at the front. You still get a high-crown impression without concentrating too much weight at one elevated point.
Watch Out For:
Avoid gathering such a large crown section that the lower hair becomes sparse. Reduce the amount pulled upward and let root lift, rather than extra hair volume, create the height.
Conclusion
Crystal hair pin half up hairstyles can range from sleek and simple to braided, twisted, curly, or highly voluminous. A compact center anchor highlights one statement pin, while crossed pins, crystal clusters, and decorated braids spread the detail across a wider area. Straight finishes make the accessory look sharper, whereas waves, curls, and coils create more texture around it. Density should guide how much hair is gathered, and natural texture should influence how much smoothing or reshaping feels realistic. High crown styles need more attention to weight and volume, while low twists and simple barrettes are quicker to refresh. Whatever the finish, secure the half-up base first and treat the crystal pin as decoration rather than structural support.
Before Your Salon Visit
Choose one or two favorite references and point out the exact gathered width, crown height, braid or twist placement, loose face-framing pieces, and crystal-pin position you like. Discuss your natural texture, density, face shape, preferred volume, and how long you need the style to last. Because these are temporary half-up styles, focus on comfortable anchoring and a finish that works with your existing hair rather than requesting an unnecessary haircut solely for the accessory.
FAQs
How do I keep a crystal hair pin secure in a half-up style?
Build the half-up anchor first with an appropriate hidden support, then place the crystal pin across that stable section. The decorative piece should not carry all the hair’s weight. If it slips, rebuild or reposition the base instead of forcing the pin more tightly against the scalp.
Can crystal hair pins work with curly or coily half-up hairstyles?
Yes. Keep the natural curl or coil pattern visible and gather sections gently rather than flattening them into a smooth surface. Place the crystal pin on the secured half-up anchor, and let surrounding texture remain full. Judge placement after the hair has reached its normal dry shape.
How much hair should I gather for a half-up crystal pin style?
It depends on density and the silhouette you want. Lower-density hair often looks fuller when a smaller crown section is gathered, while dense hair can support a broader section if the anchor remains comfortable. The loose lower hair should still look balanced rather than noticeably depleted.
Do I need heat styling for a crystal pin half-up hairstyle?
No. Braids, twists, curls, coils, and naturally straight textures can all form the base without additional heat. Heat is useful only when you specifically want a blowout, polished wave, or straighter finish. When heat is used, apply heat protectant and avoid unnecessary repeated styling passes.