15 Vamp Romantic Hairstyle Ideas
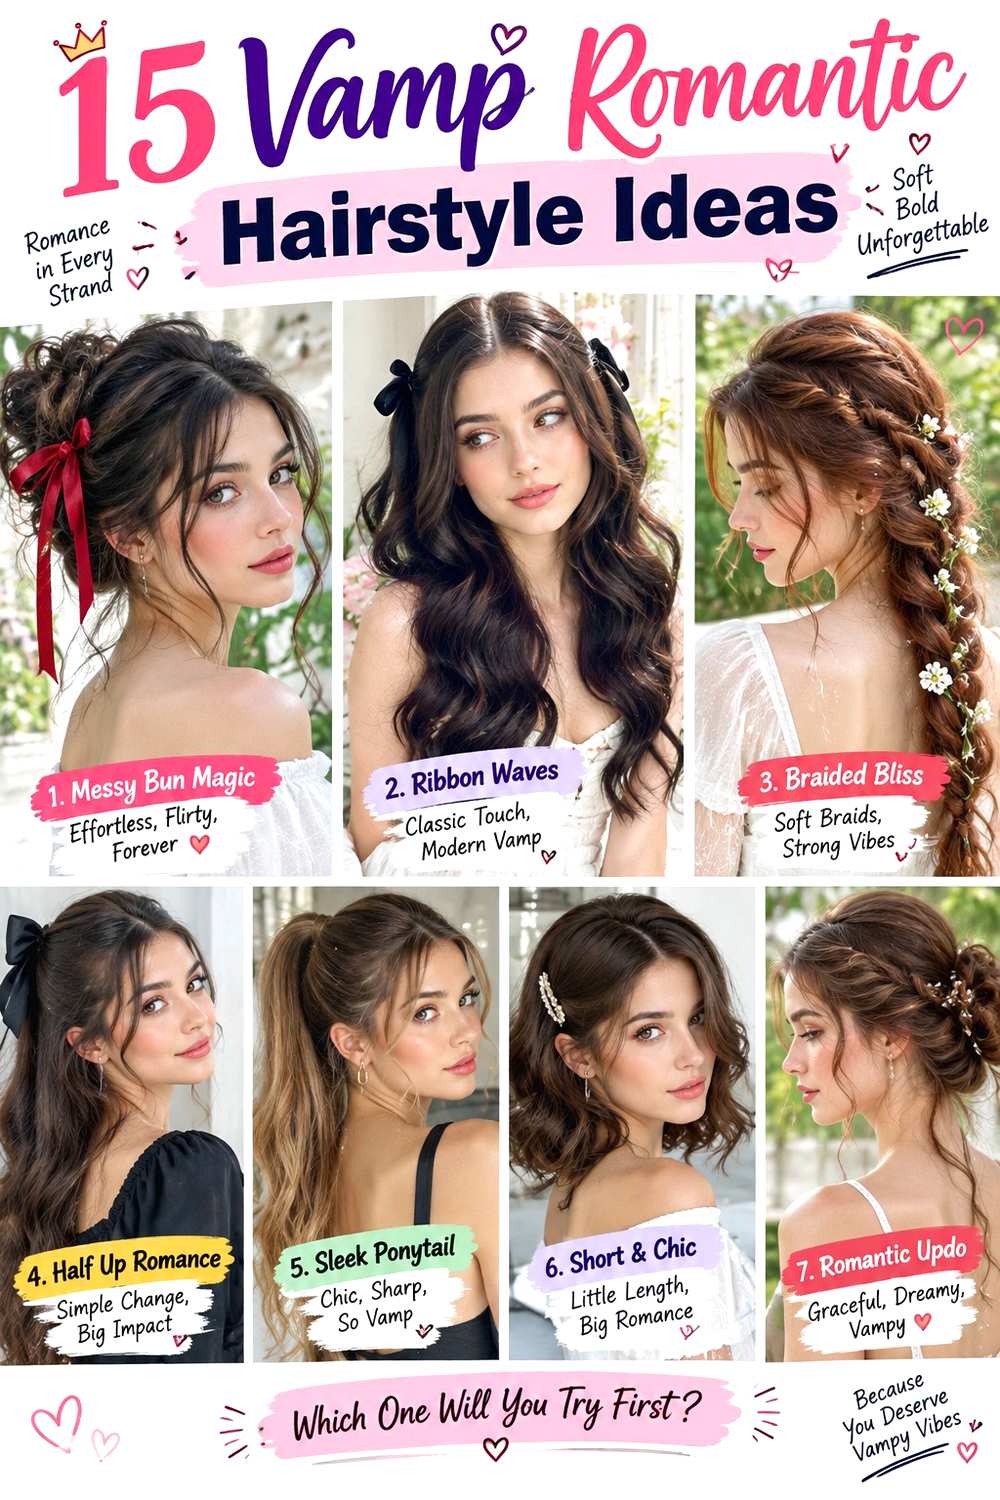
Vamp romantic hairstyles rely on contrast: controlled structure beside soft movement, glossy surfaces beside loose tendrils, and dark accessories against airy texture. The family includes side-parted waves, low buns, braided crowns, half-up twists, sculpted bobs, and curls with face-framing pieces. Length can range from cropped to very long, but the defining shape usually comes from where volume sits, how the front is framed, and whether the finish feels polished, undone, or deliberately dramatic.
Straight and wavy hair can show smooth bends and sleek sections clearly, while curly and coily textures create their own shadow, volume, and separation without needing to be straightened. Dense hair may support fuller braids or larger buns, whereas lower-density hair can keep the same mood with narrower sections, smaller accessories, and less teasing. Face framing can be moved from cheekbone to jaw level depending on the effect you prefer.
Styling effort varies widely. A ribboned ponytail may need only a short refresh, while a set of structured waves or a pinned chignon takes longer on wash day. Hold should feel secure rather than tight, and accessories need a stable anchor instead of carrying the whole style. The ideas below compare shape, texture, comfort, supplies, and realistic upkeep.
Quick List
- Velvet Side-Part Waves Hairstyle
- Midnight Ribbon Half-Up Hairstyle
- Soft Gothic Chignon Hairstyle
- Rose-Pinned Low Bun Hairstyle
- Sculpted Vampire Bob Hairstyle
- Lace-Braided Crown Hairstyle
- Glossy Cathedral Waves Hairstyle
- Romantic Tendril Ponytail Hairstyle
- Twisted Corset Half-Up Hairstyle
- Soft Noir Curly Halo Hairstyle
- Victorian Side Braid Hairstyle
- Tousled Mourning Veil Updo Hairstyle
- Crimson Bow Low Ponytail Hairstyle
- Sleek Deep-Side Part Hairstyle
- Moonlit Claw-Clip Twist Hairstyle
Velvet Side-Part Waves Hairstyle
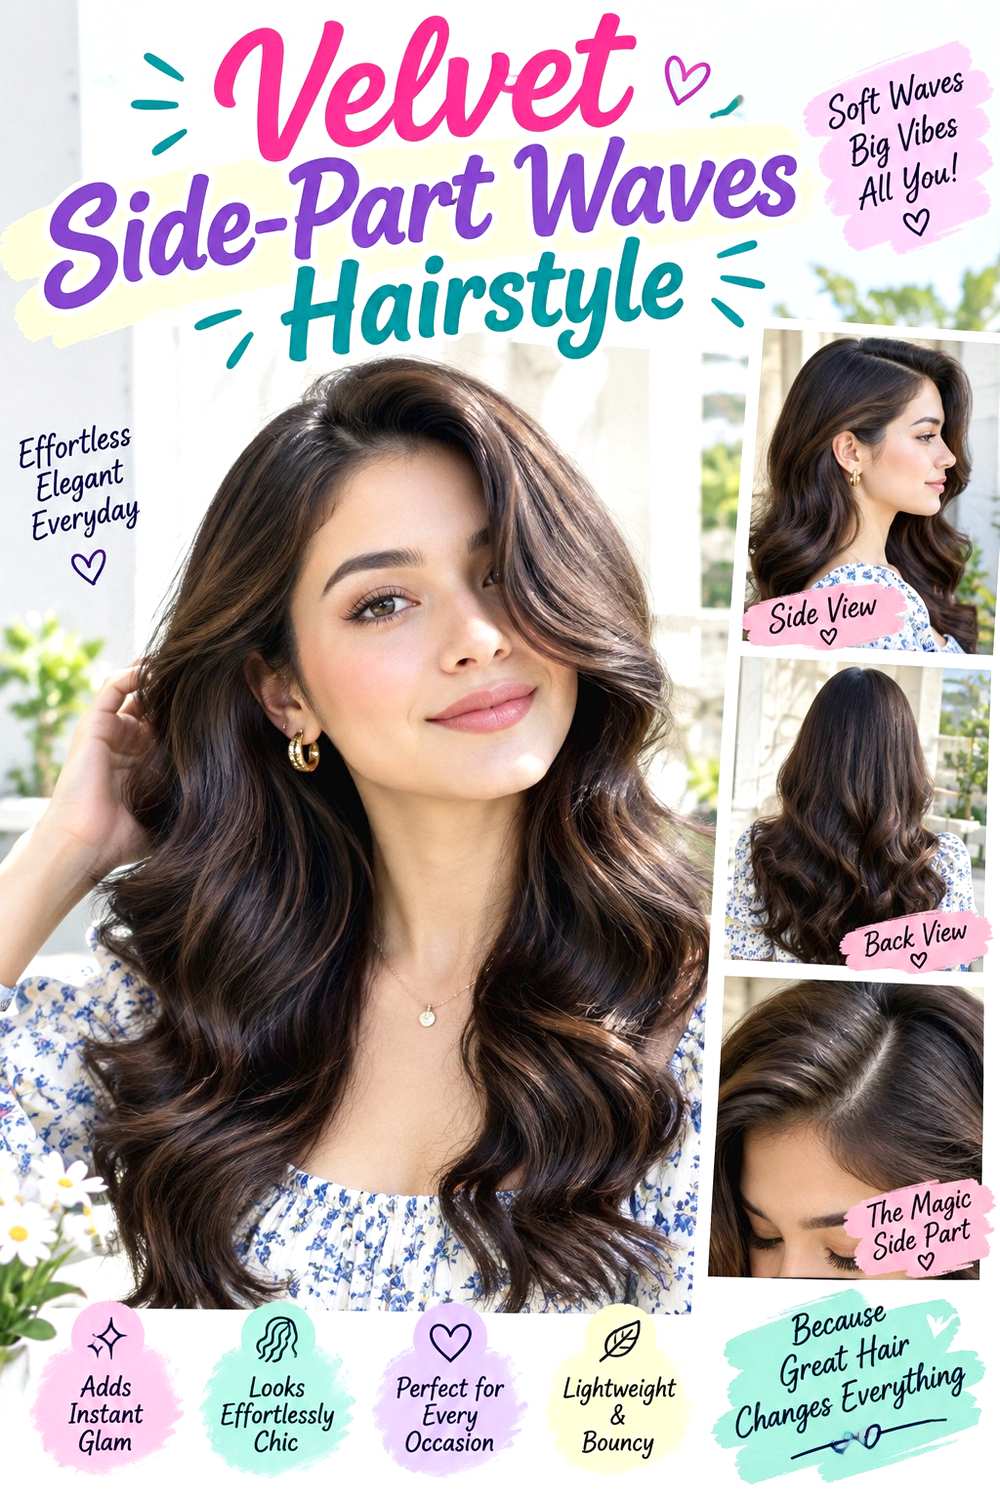
A deep side part gives long, dark-looking waves an immediate vamp-romantic shape without requiring a complicated updo. Keep the roots smooth, let the first broad bend begin around the temple or upper cheekbone, and carry larger S-shaped waves through the mid-lengths. The ends can curve softly rather than forming tight curls, while the lighter side may tuck behind the ear to expose more of the face. Shoulder-length hair can wear the same idea with fewer wave repeats.
Straight and wavy textures usually reach this finish with less reshaping, while curly or coily hair can adapt it by keeping their natural pattern and concentrating the side-swept volume instead of recreating identical bends. Use heat protectant before heat styling, a large-barrel curling iron for broad sections, and flexible hairspray to support movement without a rigid shell. Resetting two or three front waves between wears can be a short refresh; creating the full pattern from freshly washed hair takes longer, especially with dense or very long hair.
If a professional is styling it, specify how deep you want the part and where the first visible wave should begin. That placement controls whether the result feels sweeping and dramatic or softer around the face.
Pro tip:
After releasing each heated section, let the bend cool before brushing it open. This helps the broad wave keep its shape without needing extra hairspray.
Make It Work for You:
If your hair is naturally curly, keep the deep side part and dramatic sweep but define your own curl groups instead of flattening them into uniform waves.
Watch Out For:
Avoid curling every section in tiny pieces. Small, repeated curls can make the finish much busier; use broader sections to preserve the sweeping shape.
Midnight Ribbon Half-Up Hairstyle
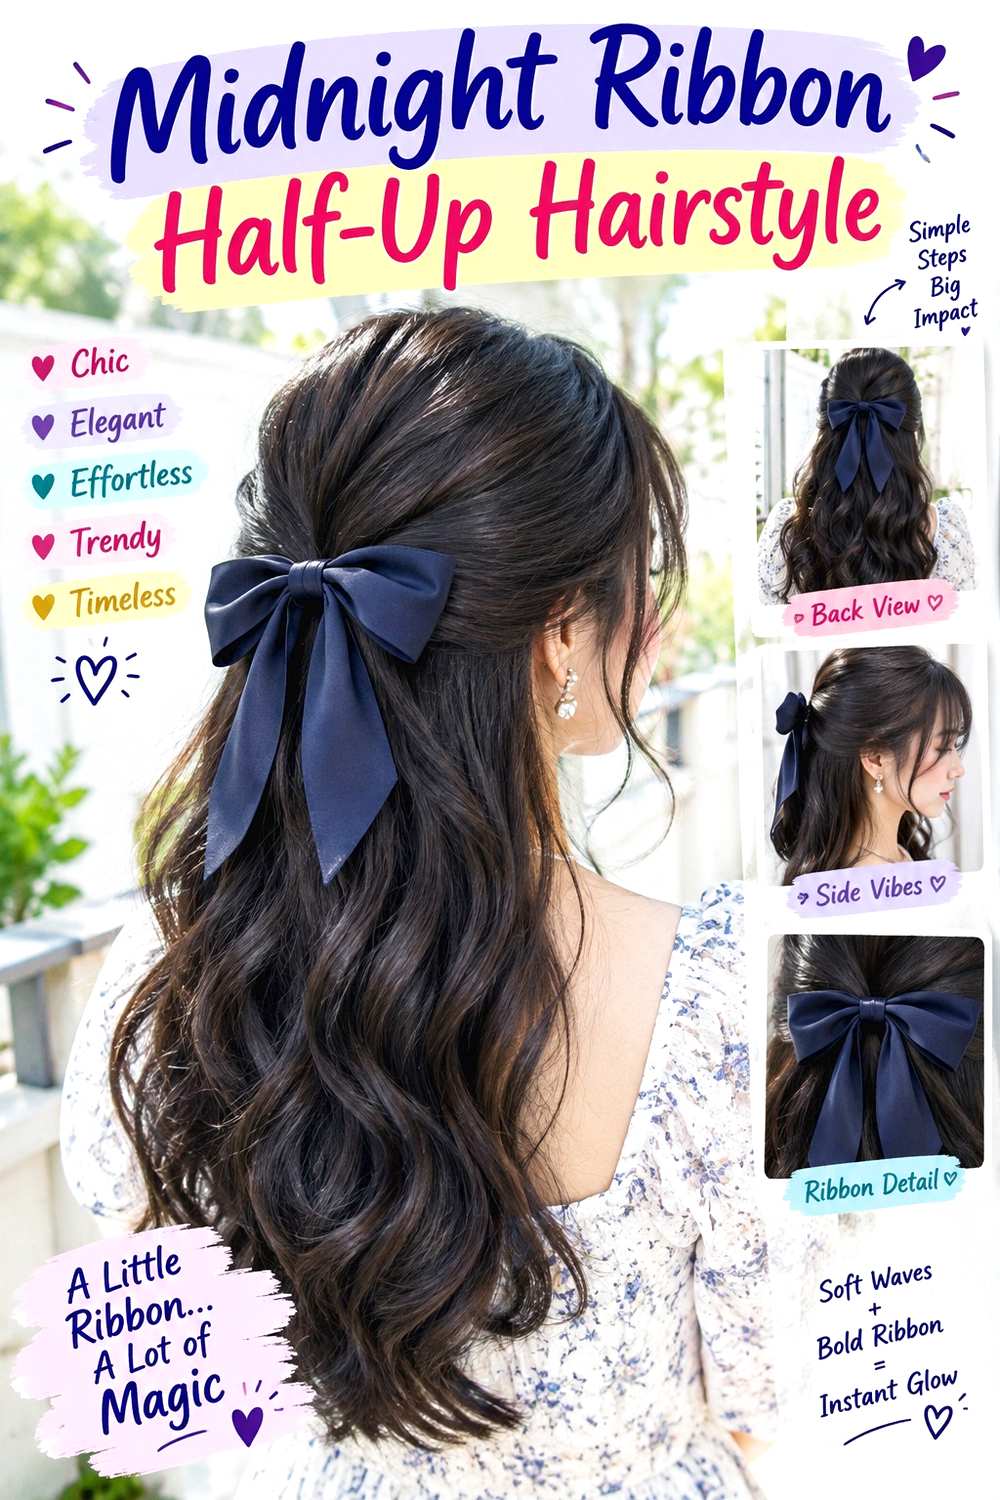
This half-up design keeps the upper section controlled while the lower lengths stay soft and mobile. Gather hair from above the ears toward the back of the head, keeping a little lift at the crown instead of pulling everything flat. The secured section can be twisted once before a narrow velvet ribbon is tied over the anchor, leaving the tails to fall down the back. Loose waves, curls, or straight lengths all work, and a few face-framing pieces can remain free near the temples or jaw.
The style is useful for medium to long hair and can be scaled to different densities by changing how much hair goes into the upper section. A fabric-covered elastic creates the main anchor, bobby pins can stabilize the twist, and the velvet ribbon supplies the visible romantic detail. A quick refresh may only involve tightening the hidden anchor and smoothing the top; rebuilding the style after a wash takes longer if you also need to dry and shape the loose lengths.
If someone else is styling your hair, explain whether you want the anchor high at the crown or lower near the occipital area, and how long you want the ribbon tails. That placement changes both the silhouette and how securely the accessory sits.
Pro tip:
Tie the decorative ribbon around an already secured base rather than asking the ribbon to hold the hairstyle. The hidden anchor gives it much better stability.
Make It Work for You:
For lower-density hair, gather a narrower upper section and choose a slimmer ribbon. You keep the half-up contrast without removing too much fullness from the loose lengths.
Watch Out For:
Do not keep tightening a slipping ribbon against the scalp. Rebuild the hidden anchor first; greater tension can become uncomfortable without actually improving accessory grip.
Soft Gothic Chignon Hairstyle
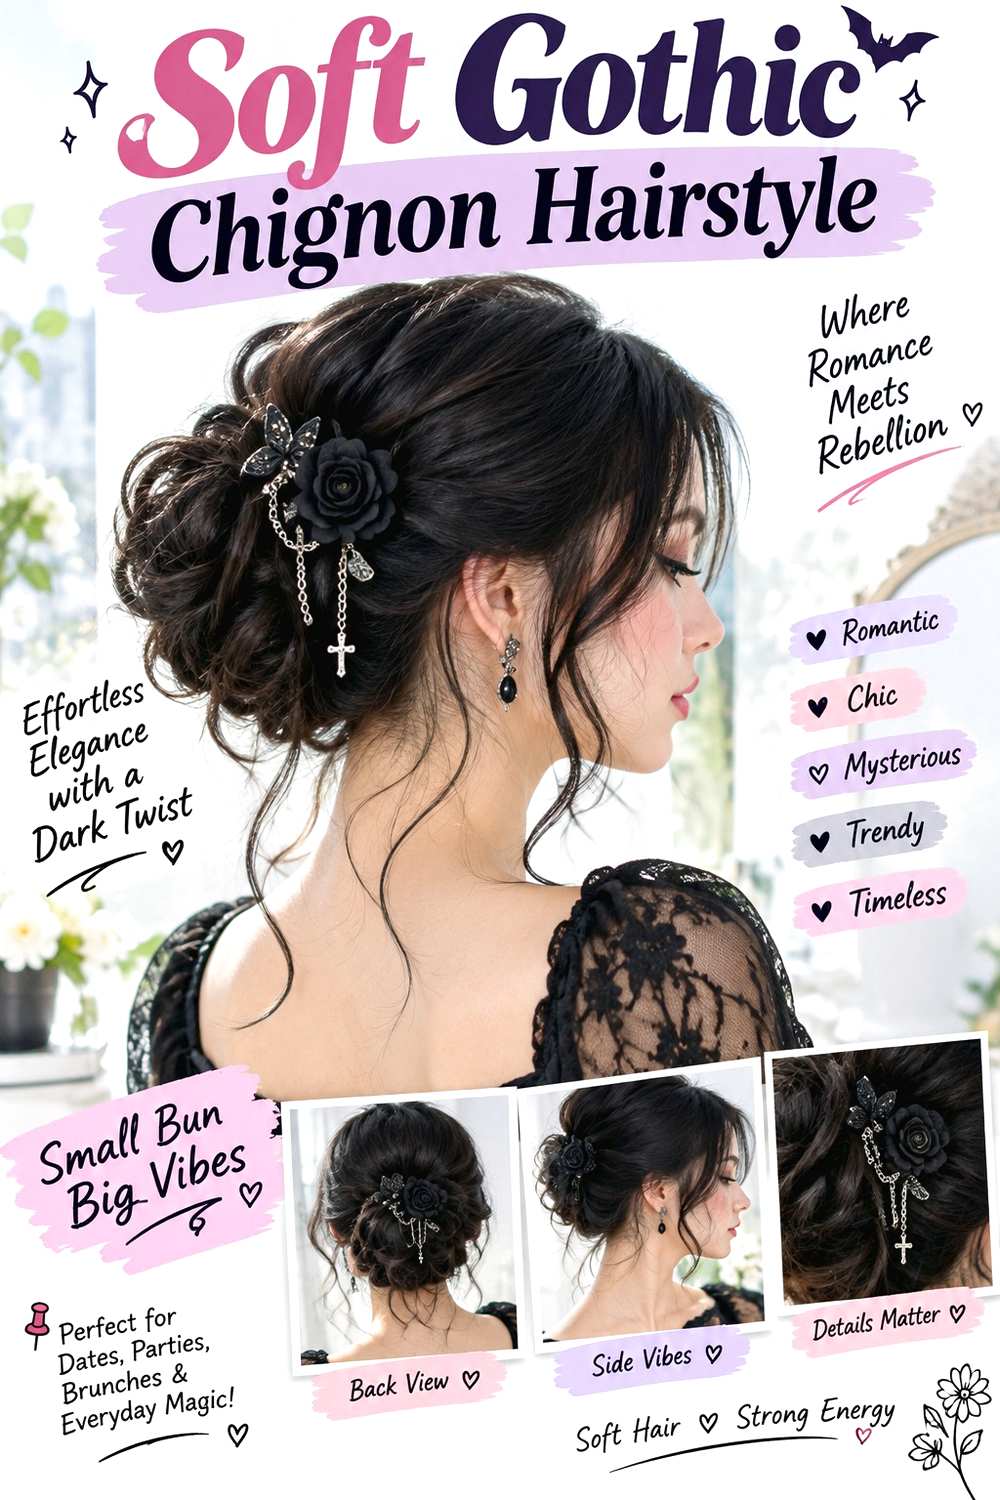
A low chignon creates a restrained vamp-romantic silhouette by placing the weight at the nape rather than high on the crown. Start with a clean center or soft side part, keep the sides smooth but not pasted flat, and gather the hair into a low base. Twist or fold the length into a compact bun, then leave one or two narrow pieces loose near the temples or in front of the ears. The contrast between the controlled back and softer front keeps the shape from feeling severe.
Medium to long hair is easiest to gather, while shorter layers can be pinned individually instead of being forced into the base. A fabric-covered elastic establishes the anchor, bobby pins secure the folded sections, and flexible hairspray controls flyaways while preserving some movement. A next-day refresh can be brief if the anchor remains comfortable; starting again from freshly washed hair takes longer because the roots and loose front pieces may need reshaping.
For professional styling, describe the bun size and exact height you want, especially if the style must sit below a hat, veil, or collar. Ask for comfortable tension around the temples and nape. Security should come from balanced anchoring, not from pulling the hair painfully tight.
Pro tip:
Cross two pins through the bun’s central anchor rather than pushing them only into the outer edge. That gives the folded shape a firmer internal base.
Make It Work for You:
If your hair is shorter, build a smaller chignon and pin escaped back sections upward individually. Keep the low placement and soft front pieces to preserve the mood.
Watch Out For:
Avoid pulling the temples tighter whenever the bun loosens. Re-anchor the bun itself; increasing front tension can cause discomfort without fixing the real problem.
Rose-Pinned Low Bun Hairstyle

A rose-pinned low bun puts the decorative detail at the back rather than around the face. Keep the front softly parted, guide both sides toward the nape, and form a rounded bun just above the neckline. One narrow side section can twist into the base for extra texture, while a single dark red or black rose pin sits slightly off-center instead of covering the whole bun. The ends should disappear neatly inside the shape, with a few optional wisps near the ears.
Medium and long hair can support the bun easily, and dense hair can form a larger version without needing excessive tension. A fabric-covered elastic creates a reliable base, U-pins hold the bun’s curved edges, and a rose hairpin supplies the focal accent. A quick refresh involves checking the anchor and replacing any loose pins; a full rebuild takes longer when the hair also needs washing, drying, or texture preparation.
If you are having the style done professionally, show the exact side where you want the rose to sit and explain whether it should be visible from the front. The accessory should attach to the secured bun, not carry its weight. This keeps the ornament decorative while the hidden structure handles the hold.
Pro tip:
Insert the rose pin into the secured edge of the bun at a slight angle. A firm internal anchor helps stop the flower from rotating downward.
Make It Work for You:
For very dense hair, make a flatter, wider bun instead of stacking all the length outward. The rose remains visible without creating excessive weight at the nape.
Watch Out For:
Do not use the decorative pin as the bun’s main fastener. If the base loosens, rebuild the hidden support before pushing the accessory in more tightly.
Sculpted Vampire Bob Hairstyle

A chin-to-jaw bob can carry the vamp-romantic mood through shape rather than accessories. Keep the perimeter compact, choose a deep side part, and direct the heavier front section into a smooth curve that passes close to the cheek before turning inward. The crown stays controlled rather than highly teased, while the ends form one deliberate line. A glossy surface makes the silhouette feel sculpted, but a little natural movement through the lower section prevents it from becoming helmet-like.
Straight hair reaches this finish quickly, while wavy hair may need more smoothing; curly or coily hair can keep natural texture and interpret the same idea through a strong side part and defined outline. Use heat protectant before hot tools, a flat iron for localized smoothing and end direction, and a small amount of smoothing serum through the finished lengths. Reworking the front curve can be a short morning refresh; creating the full polished finish after washing takes longer.
If this is also a haircut change, tell the stylist where you want the perimeter to sit when dry and how much weight to retain at the bottom. Reshape the cut when the front and lower edge no longer hold the intended compact line, rather than tying maintenance to one universal schedule.
Pro tip:
Shape the front section before polishing the back. That lets you judge the most visible curve first and avoid repeatedly passing heat over already finished lengths.
Make It Work for You:
If you wear natural curls, preserve the bob’s compact perimeter and deep part while defining curl groups individually. The silhouette stays dramatic without requiring a straight finish.
Watch Out For:
Avoid excessive product at the roots. A heavily coated crown can collapse the side-parted shape; keep smoothing product mainly on the mid-lengths and ends.
Lace-Braided Crown Hairstyle
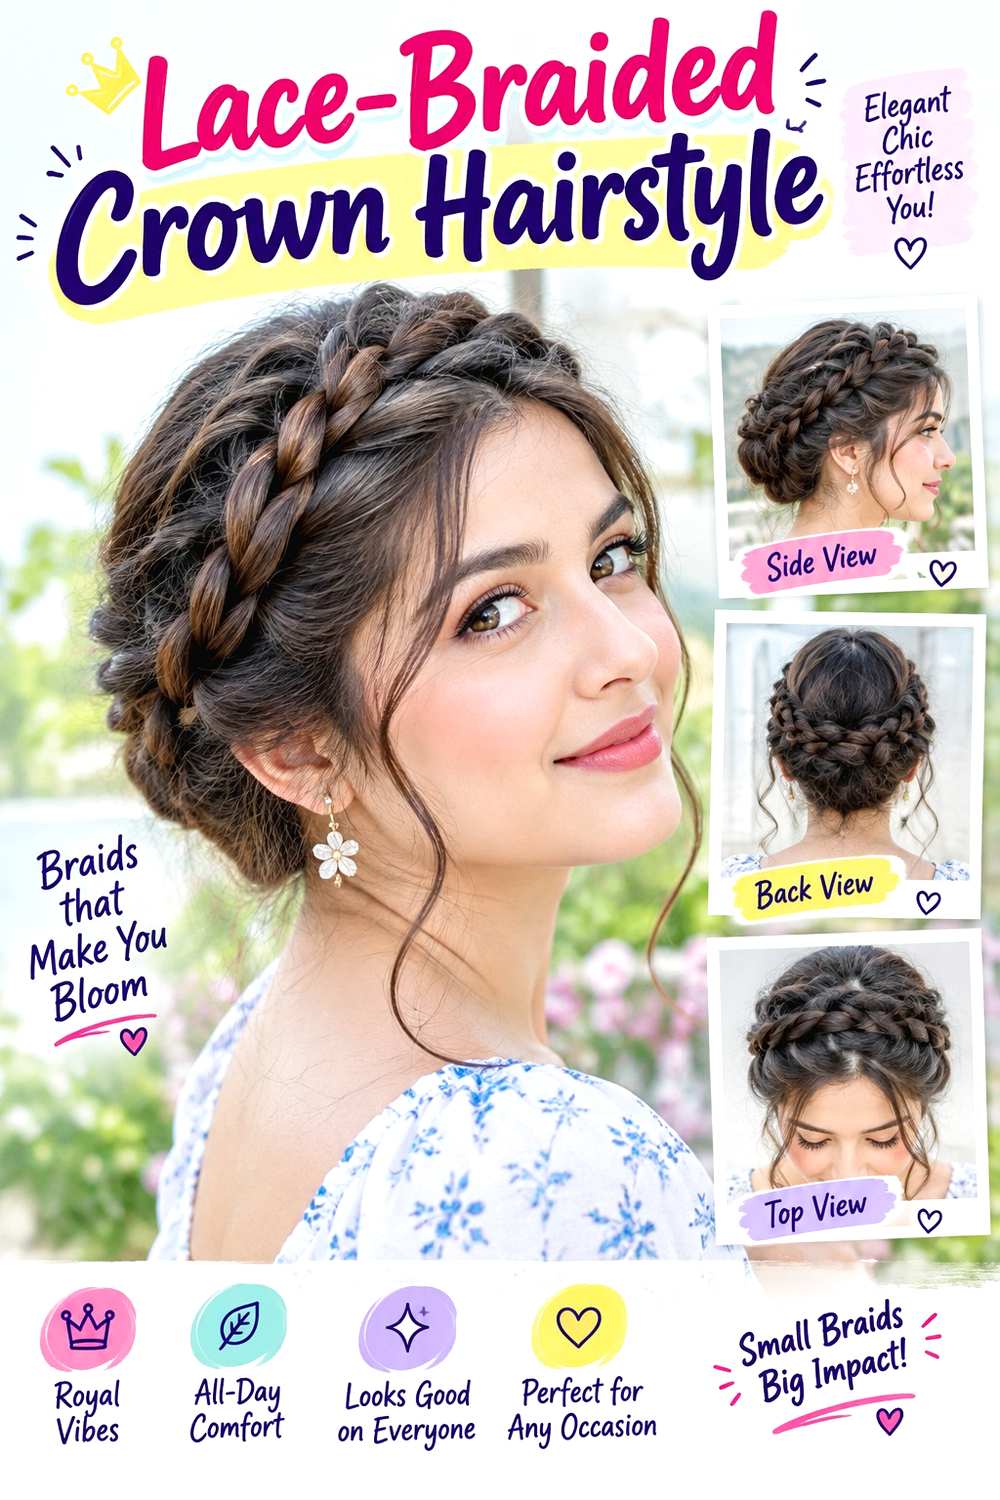
A braided crown brings the romantic side of the aesthetic forward while keeping the silhouette dark and controlled. Create two medium-width braids from the side sections, guide them around the back of the head, and overlap the ends so the join is hidden. Keep the crown slightly lifted rather than flat, and release a few narrow pieces around the temples or jaw. The remaining hair can be tucked into the crown or left loose below it, depending on length and the amount of softness you want.
Medium to long hair gives the braids enough reach, while shorter hair can use smaller side braids that meet farther back. Small clear elastics secure the braid ends, bobby pins anchor the overlap, and light texturizing spray adds grip when freshly washed hair feels slippery. Replacing one loose pin can be a quick refresh; recreating both braids and balancing their placement takes longer, especially on dense hair.
If a stylist is building the look, specify the braid width, where you want the crown to sit, and how much tension feels comfortable around the hairline. The braid should feel stable without pinching. A wider crown reads softer and fuller, while a narrow one creates a more delicate line across the head.
Pro tip:
Pin the crossed braid ends underneath the opposite braid instead of directly on top. Hiding that join makes the crown look continuous from side to side.
Make It Work for You:
For fine strands or lower density, loosen only the outer braid edges slightly after anchoring. This adds visual width without pulling apart the entire structure.
Watch Out For:
Do not keep tightening the hairline sections to stop slipping. Add grip at the anchor points instead; excessive tension can make an otherwise soft style uncomfortable.
Glossy Cathedral Waves Hairstyle

Long, symmetrical waves create a more formal vamp-romantic finish than the sweeping side-part version. Use a center part, keep the roots relatively flat, and let the first visible bend begin near the lower cheek or jaw. From there, broad waves should repeat through the lengths in a controlled pattern, with the ends following the same direction instead of breaking into tight curls. The visual weight sits below the face, which works especially well on hair from the shoulders to the waist.
Straight and wavy textures can usually be shaped into this pattern with fewer steps, while naturally curly hair can adapt the idea through larger defined curl groups and a balanced center part. Apply heat protectant before heat styling, use a wide-barrel curling iron to create broad bends, and finish with a paddle brush to merge individual curls into larger waves. Touching up the front two sections can be a brief refresh; setting and brushing the entire head after washing is a longer process, particularly on dense hair.
For professional styling, point to the exact height where you want the first wave to appear and explain whether the ends should remain curved or straighter. Those details determine whether the finish reads soft and flowing or more sculpted and formal.
Pro tip:
Curl neighboring sections in a consistent pattern, then brush only after they cool. This helps separate curls merge into the long, continuous wave lines that define the finish.
Make It Work for You:
For shoulder-length hair, begin the first bend slightly higher so there is room for at least one full wave before the ends, while keeping the center-parted balance.
Watch Out For:
Avoid brushing warm curls immediately. They can relax before the pattern sets; let each section cool first, then combine the shapes with controlled brushing.
Romantic Tendril Ponytail Hairstyle

A low-to-mid ponytail can feel vamp romantic when the front stays intentional and the base is clean rather than sporty. Use a center or soft side part, leave two narrow tendrils near the temples, and gather the remaining hair just above the nape. A small section wrapped around the base hides the fastening, while the ponytail itself can fall in loose waves, natural curls, or a straighter sheet. Keep slight lift at the crown so the profile does not collapse behind the part.
This style works best on hair long enough to gather comfortably, and it adapts easily across densities by changing the ponytail size rather than pulling tighter. A fabric-covered elastic provides the main anchor, one bobby pin secures the wrapped section, and flexible hairspray controls the front without freezing it. Re-smoothing the crown and redefining the tendrils can be a quick refresh; washing, drying, and setting the full ponytail texture takes longer.
If a stylist is creating it, specify the exact ponytail height and how long you want the front pieces to appear when dry. Ask for comfortable tension at the hairline. The base should feel stable without requiring a painfully tight pull, especially if you plan to wear the style for several hours.
Pro tip:
Secure the ponytail first, then adjust the crown by gently lifting small sections near the base. This preserves volume without loosening the entire anchor.
Make It Work for You:
If shorter layers escape around the nape, let a few pieces remain intentionally soft instead of tightening the ponytail higher and changing its low romantic placement.
Watch Out For:
Do not make the tendrils too thick by default. Heavy front sections can compete with the ponytail; start narrow and release more hair only if needed.
Twisted Corset Half-Up Hairstyle
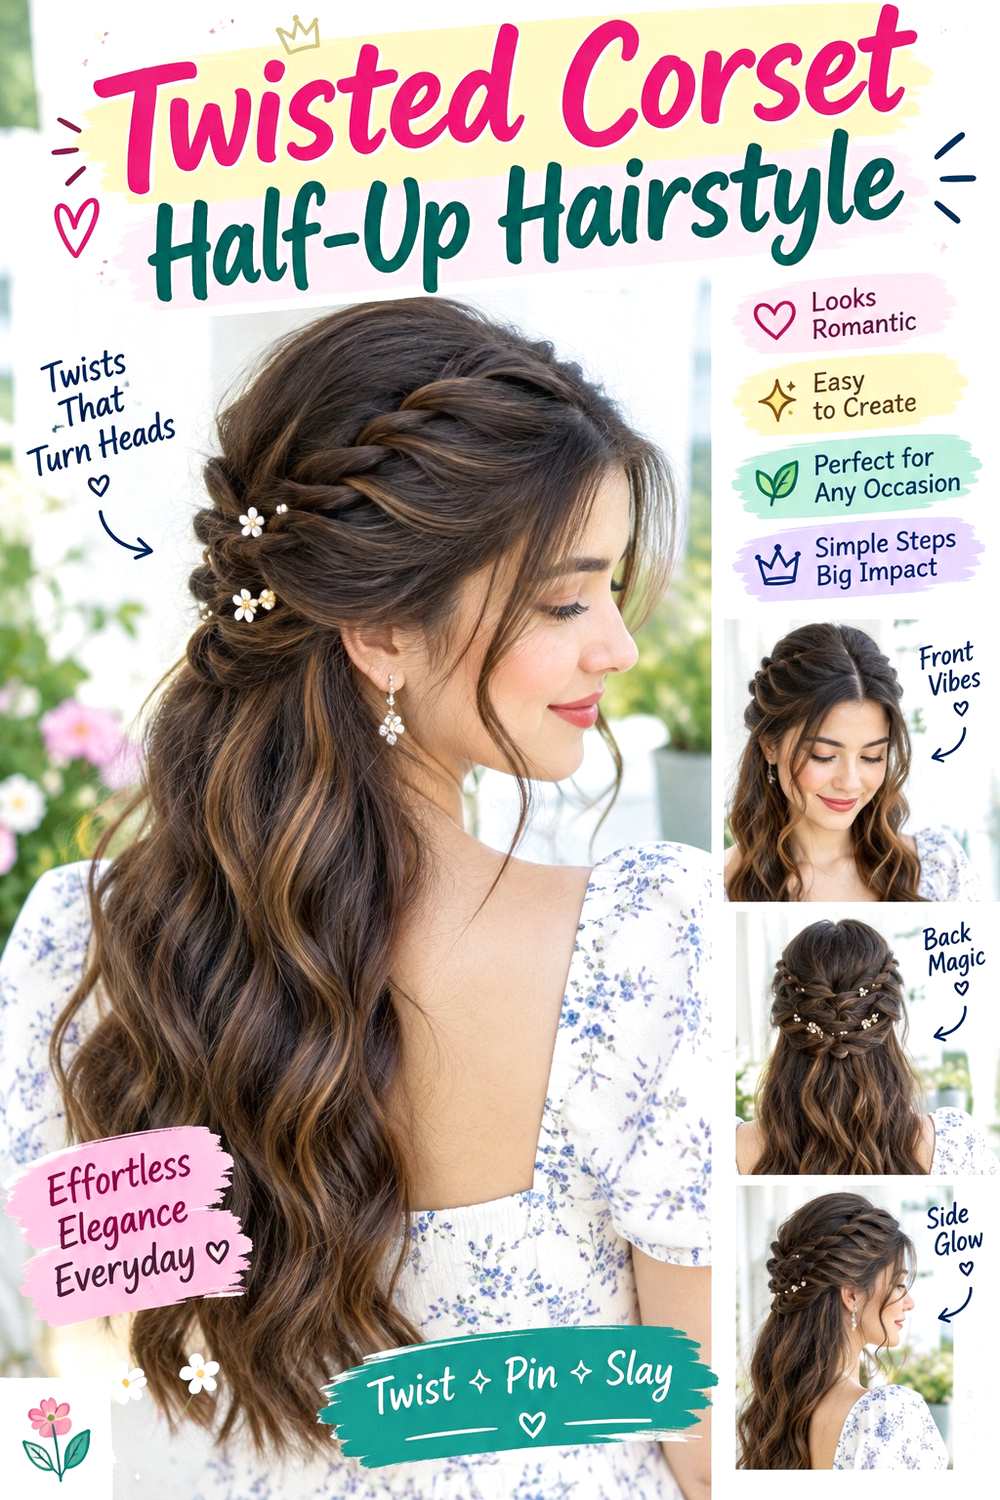
Paired twists can create a corset-like half-up pattern without turning the style into a full braid. Take small sections from each side above the ears, twist them toward the back, and secure them in two or three horizontal pairs down the center. A narrow satin ribbon can weave between the secured points, forming a subtle crossed detail while the lower lengths remain loose. Keep the crown softly lifted and allow the ends to fall in waves, curls, or their natural texture.
Medium to long hair gives enough room for repeated crossings, while lower-density hair can use only two paired twists so more length remains loose. Small clear elastics hold each connection, bobby pins stabilize any sections that shift, and a narrow satin ribbon supplies the visible lacing effect. Tightening one loose crossing can be a short refresh; rebuilding the full pattern after washing takes longer because the pairs need to remain balanced.
For professional styling, show how far down the back you want the crossed detail to travel and how much space should sit between each pair. Ask for comfortable side tension and a ribbon that is anchored to the secured sections rather than tied directly around loose hair. The structure should stay decorative without pulling at the temples.
Pro tip:
Thread the ribbon only after the twist anchors feel secure. This lets you adjust the crossed pattern without using the decorative ribbon to provide structural hold.
Make It Work for You:
For shorter or finer hair, use two wider twist pairs instead of several small ones. The corset effect remains visible while leaving more hair free below.
Watch Out For:
Avoid cinching the ribbon tighter when a twist slips. Re-secure that individual anchor first; extra ribbon tension can distort the pattern and pull the sides.
Soft Noir Curly Halo Hairstyle
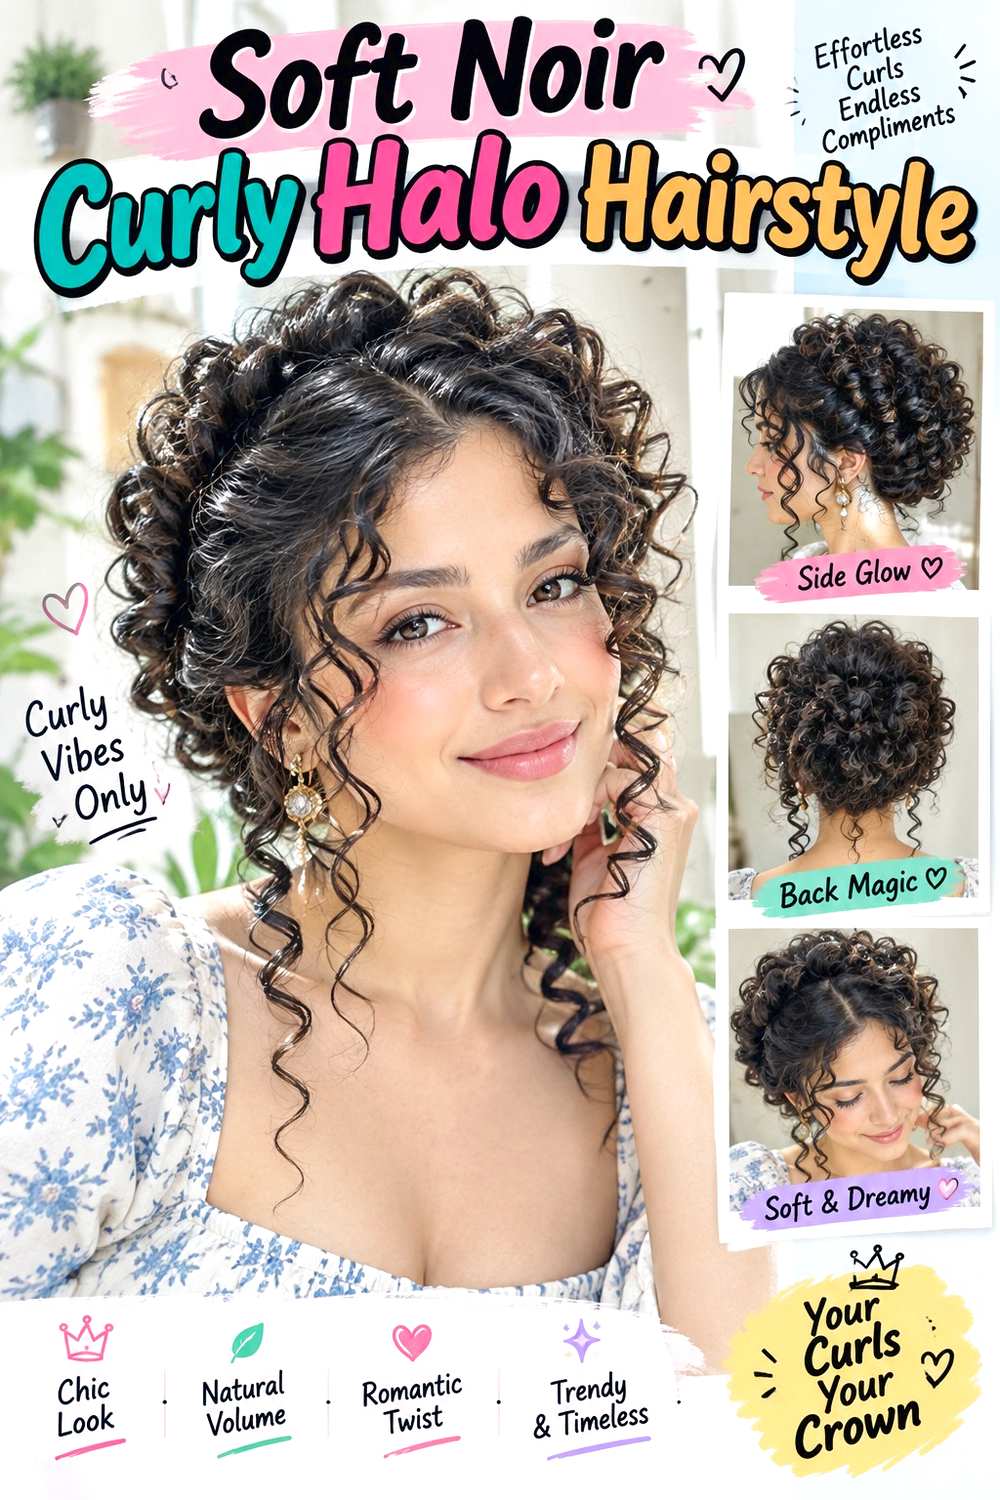
A rounded curly halo brings vamp romance through shadow, softness, and controlled volume rather than sleekness. Let the curls or coils expand around the sides and crown while keeping the overall outline balanced, with selected face-framing pieces finishing near the cheekbones or jaw. A center part creates an even halo, while a soft side part shifts more fullness to one side. The ends should stay grouped enough to show curl definition instead of dissolving into a fuzzy perimeter.
Curly and coily textures are the natural starting point for this idea, and density determines how large the halo becomes rather than whether the style can work. A lightweight leave-in conditioner adds slip and moisture, curl gel supports grouping and hold, and a diffuser helps dry the shape with less disruption. Refreshing a handful of outer curls between washes can be brief; full detangling, product application, and drying on wash day usually takes much longer.
If the shape also needs cutting, discuss the finished dry length, where the face frame should land, and where excess bulk tends to collect. Shrinkage differs across curl patterns, so the visible result matters more than a fixed wet measurement. Reshape when the halo loses the balance or face-framing placement you prefer.
Pro tip:
Diffuse the roots in the direction you want the finished volume to sit, then avoid repeatedly separating them while drying. This helps the halo keep a clearer outline.
Make It Work for You:
For lower-density curls, keep the perimeter moderately full and concentrate shorter shaping around the face and crown instead of removing large amounts of weight throughout.
Watch Out For:
Do not judge the face frame while the curls are stretched and wet. Check where those pieces settle dry before deciding they need to be shorter.
Victorian Side Braid Hairstyle
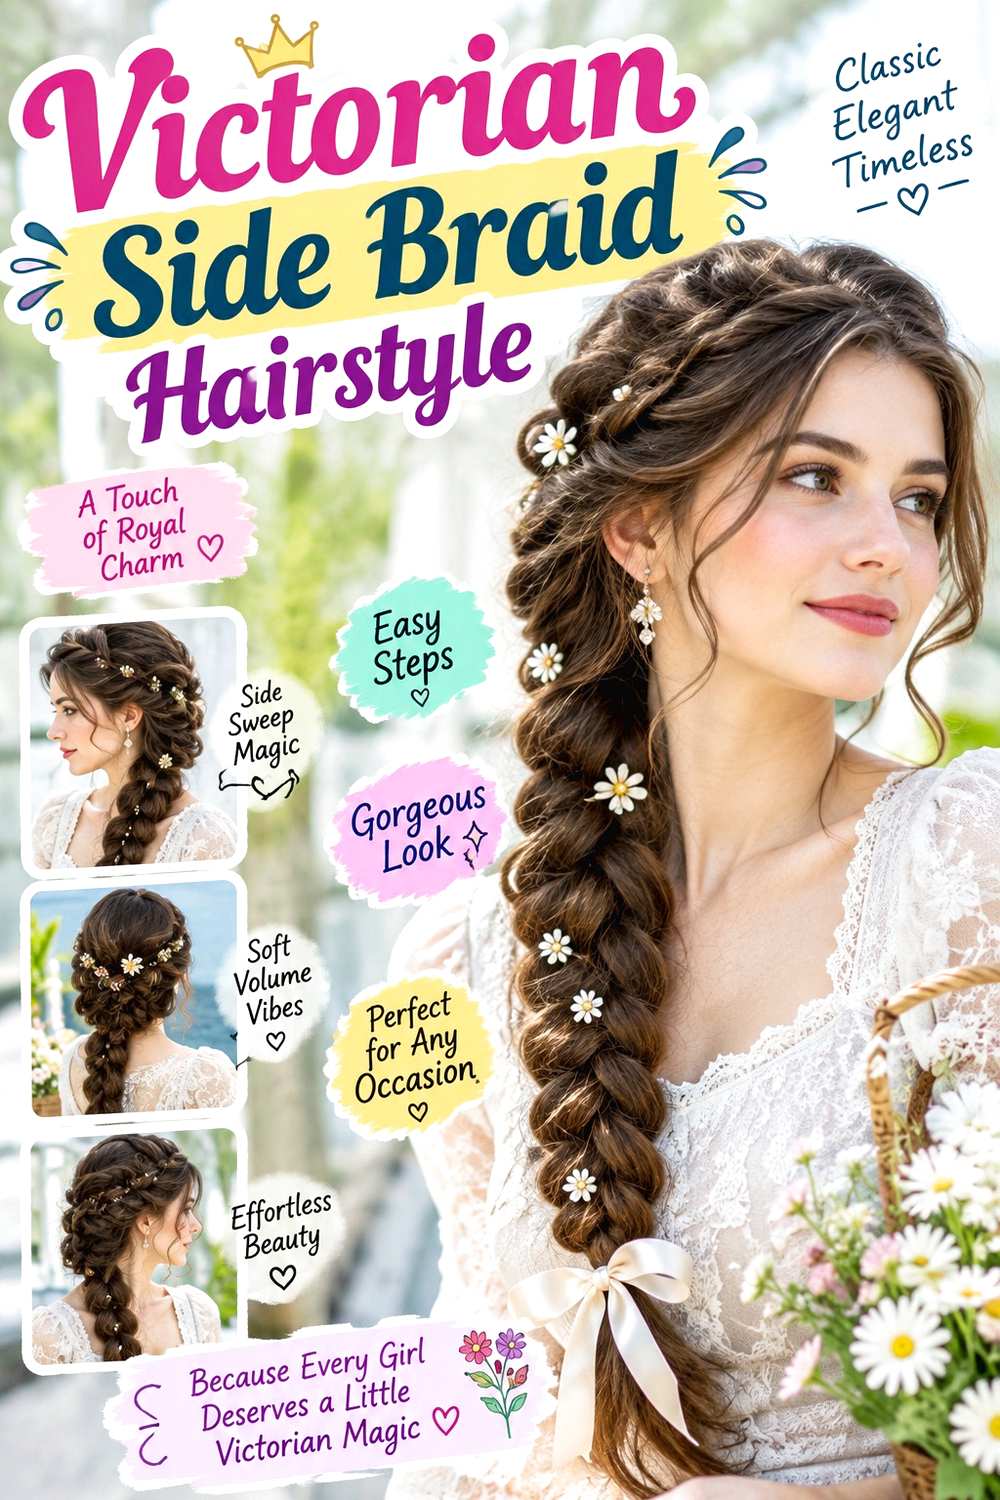
A side braid shifts the visual weight over one shoulder and leaves the opposite side of the neck more open, which suits the vamp-romantic balance of softness and drama. Start with a side part, guide the hair diagonally toward one shoulder, and form a medium-width braid that begins low rather than tightly at the scalp. Let a few narrow pieces remain free around the temple and ear, and loosen only the outer braid edges enough to create softness without losing the woven structure.
Medium to long hair works best, while dense hair can support a broader braid and lower-density hair may look more balanced with a narrower one. Light texturizing spray adds grip, a small clear elastic secures the end, and bobby pins can control short sections near the back if they escape. Replacing a pin or smoothing the front is a quick refresh; rebuilding the braid after a full wash and dry takes longer.
If a stylist is creating the look, explain which shoulder you want the braid to fall over, how wide you want it, and how much tension feels comfortable near the scalp. The braid should remain secure through movement without being pulled tight enough to flatten the crown or strain the hairline.
Pro tip:
Secure the braid first, then loosen only selected outer loops from the bottom upward. This gives controlled softness without weakening every crossing at once.
Make It Work for You:
If your hair is shorter, begin the braid closer to the nape and allow face-framing pieces to stay free. The side-swept placement still carries the idea.
Watch Out For:
Avoid pulling large loops out before the elastic is secure. The braid can collapse unevenly; anchor the end first, then adjust width in small increments.
Tousled Mourning Veil Updo Hairstyle
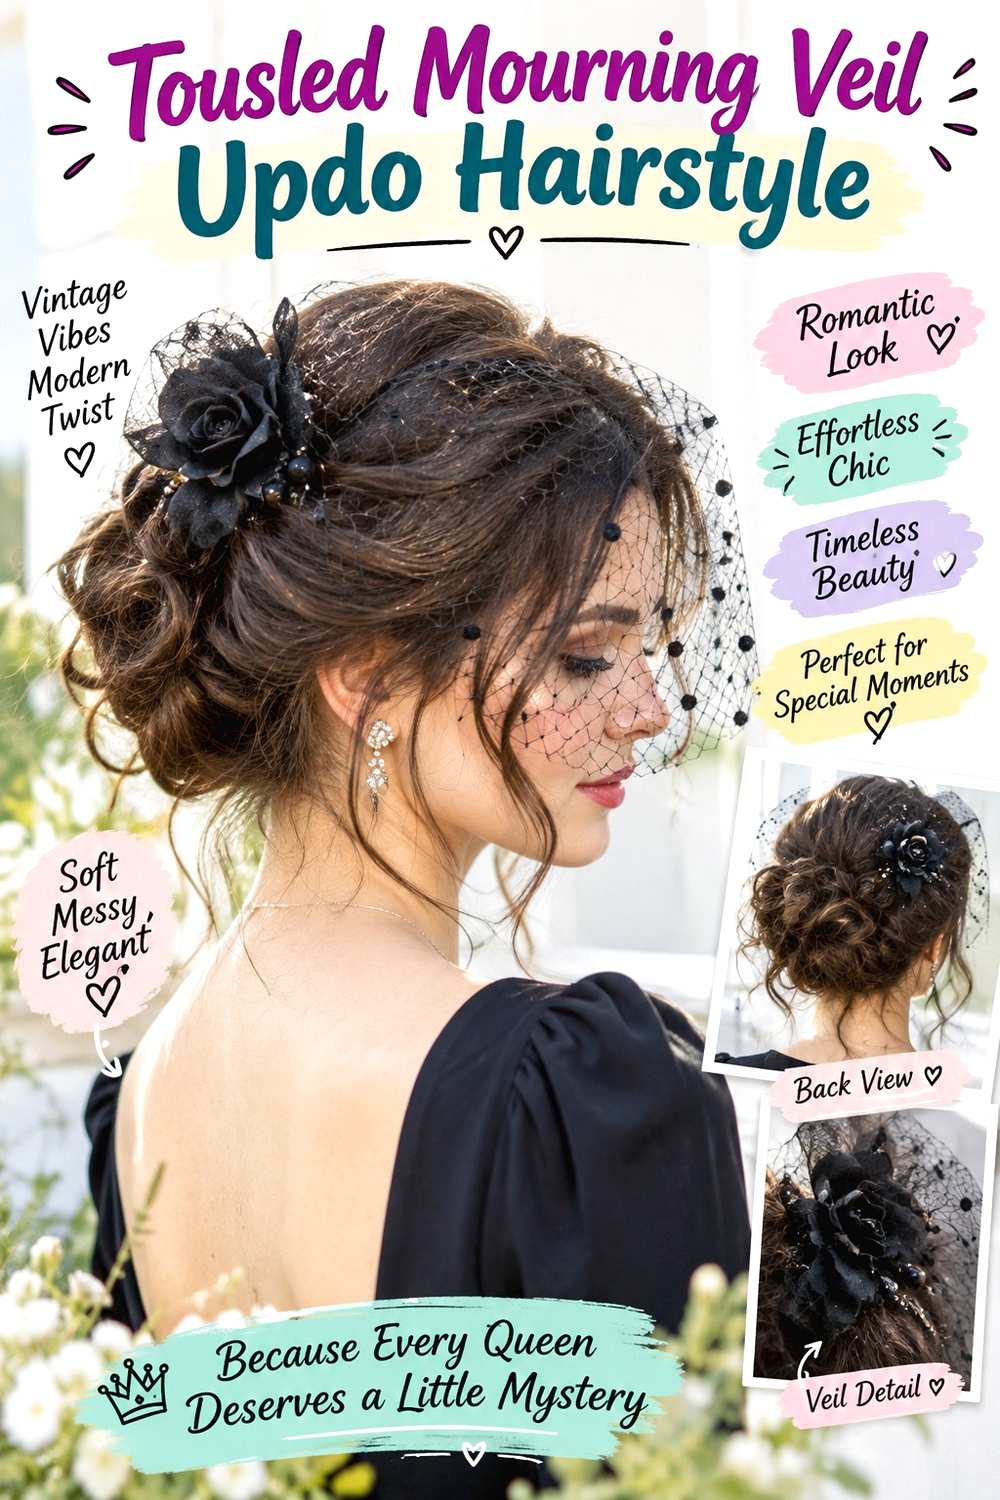
A small veil can work with a softly tousled updo when the hairstyle underneath carries the weight instead of the accessory. Gather the hair into a low, irregular bun at the nape, keeping gentle lift through the crown and leaving a few narrow face-framing pieces free. The veil can sit just above or slightly to one side of the bun so its edge falls behind the hairstyle rather than covering the whole shape. Soft texture at the sides keeps the result romantic instead of severe.
Medium to long hair provides enough length for a pinned base, while shorter layers can be incorporated with individual pins. A fabric-covered elastic forms the hidden anchor, bobby pins secure the bun, and a veil comb attaches the accessory to that stable area. Checking the comb and replacing one loose pin can be a quick event refresh; building the entire updo from freshly prepared hair takes longer.
If a professional is styling it, explain the veil’s size, where its edge should fall, and whether it must remain comfortable for several hours. Ask for the bun and veil to be anchored separately. That way, removing or repositioning the accessory does not dismantle the hairstyle, and security does not depend on painful scalp tension.
Pro tip:
Seat the veil comb into a firmly anchored section above the bun, then test gentle head movement. Adjust the comb before adding more tension elsewhere.
Make It Work for You:
For shorter hair, create a smaller pinned knot and place the veil closer to its anchor. The accessory still frames the updo without requiring extra length.
Watch Out For:
Do not push the veil comb deeper whenever it shifts. Rebuild the support beneath it; repeated pressure against the scalp can become uncomfortable during long wear.
Crimson Bow Low Ponytail Hairstyle
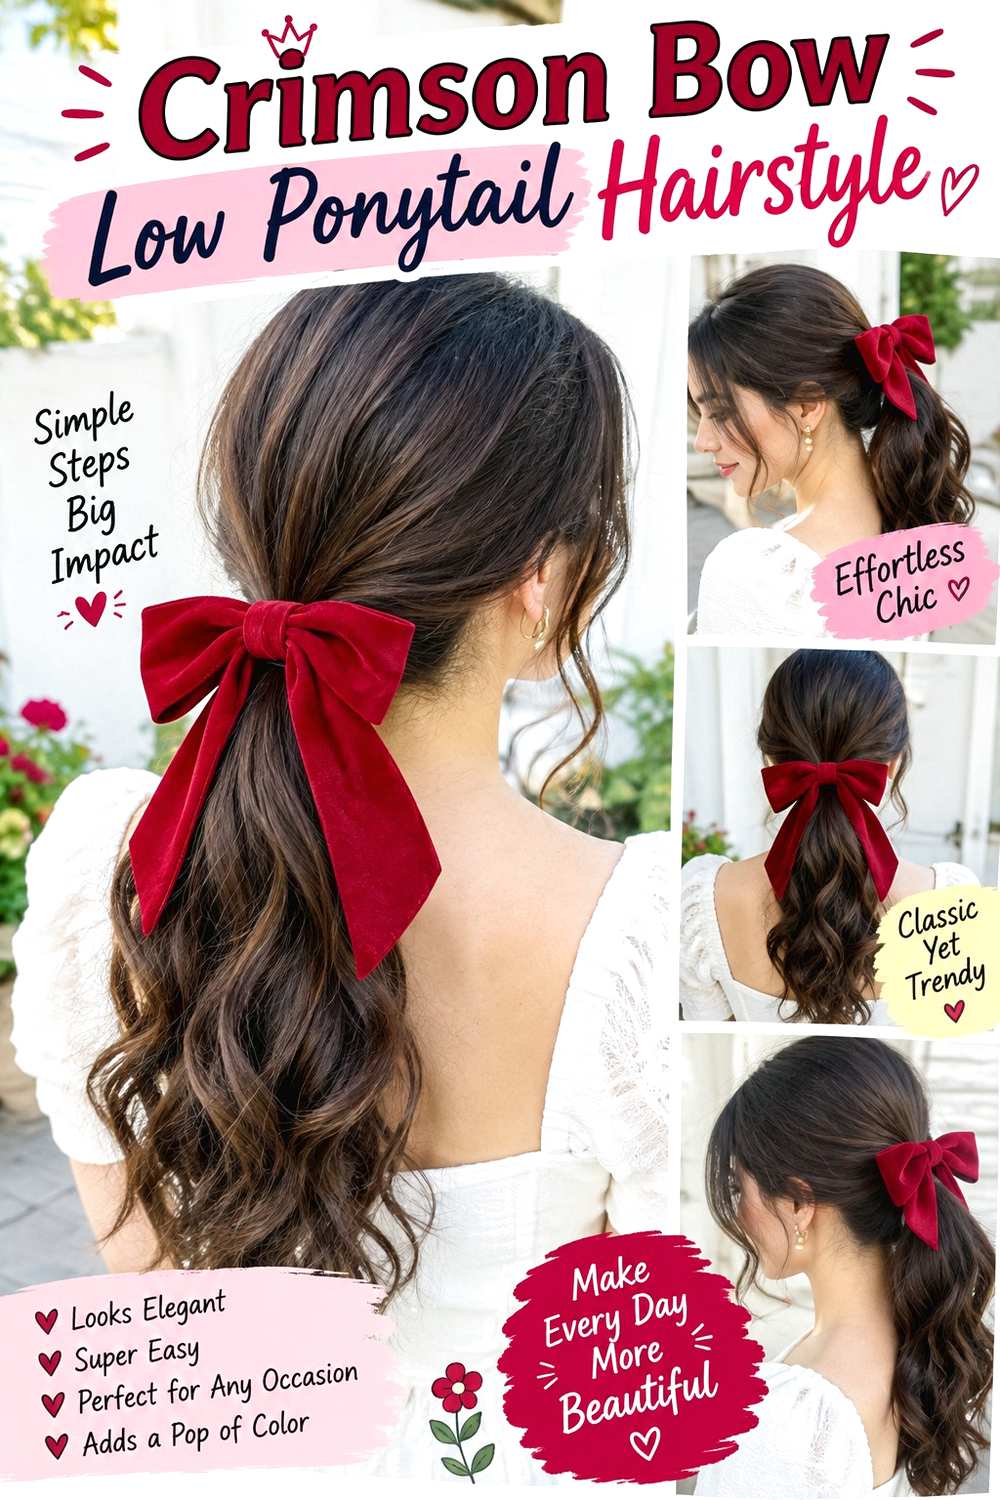
A crimson bow gives a low ponytail one concentrated point of color while the rest of the style stays simple and dark. Part the front in the center or slightly to one side, smooth the sides toward the nape, and secure the ponytail low enough that it falls down the back rather than projecting outward. The lengths can remain straight, softly waved, or naturally curly. Place the bow directly over the fastening, with tails that stop well above the ends so the accessory does not overwhelm the hair.
This idea works on medium to long hair and is easy to scale for different densities by changing the bow size. A fabric-covered elastic provides the real hold, light texturizing spray can add grip around a slippery base, and a bow barrette supplies the crimson accent. Re-clipping the bow or smoothing the crown is a short refresh; a full wash, dry, and texture reset takes longer.
If someone else is styling it, specify the ponytail height, bow scale, and whether you want the bow visible from the front. The barrette should attach to a secure base rather than clamp a large amount of loose hair. That keeps the accessory stable without requiring extra tension at the scalp.
Pro tip:
Clip the bow horizontally across the secured base after the ponytail feels stable. This keeps the loops level and prevents the accessory from carrying the ponytail’s weight.
Make It Work for You:
For lower-density hair, choose a smaller bow with shorter tails. The crimson accent stays clear without visually overpowering the size of the ponytail beneath it.
Watch Out For:
Avoid fastening the bow directly onto loose hair. It may slide or pull unevenly; attach it to the anchored ponytail base for better grip and comfort.
Sleek Deep-Side Part Hairstyle
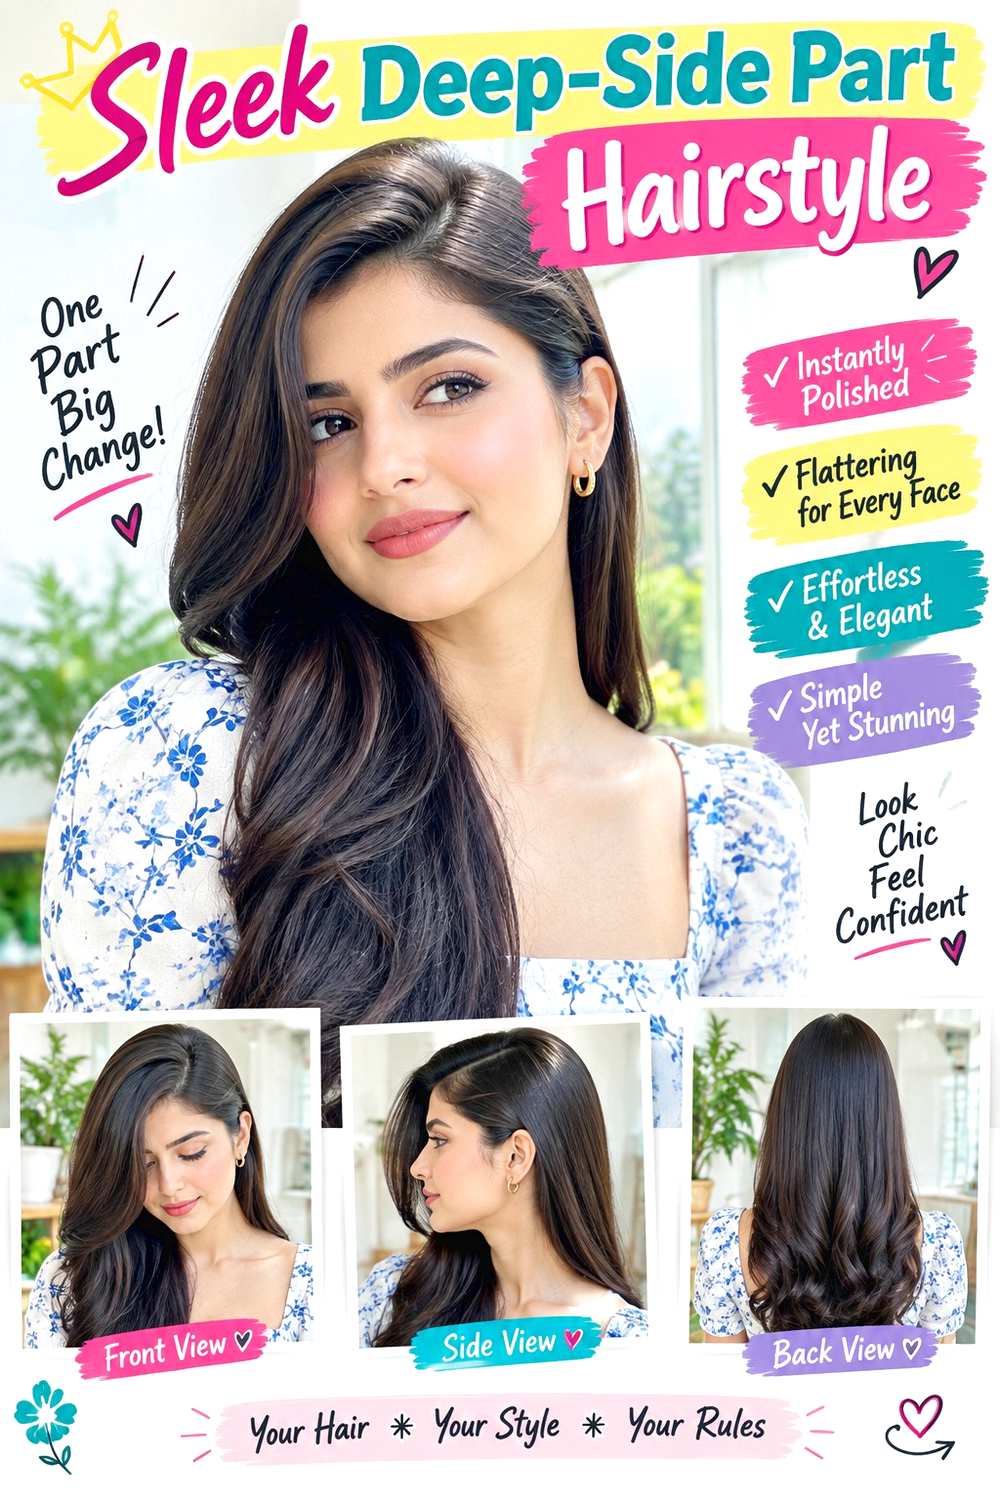
A sleek deep-side part creates drama through asymmetry rather than volume. Place the part well to one side, keep the root area smooth, and guide the heavier section across the forehead before it falls beside the face. The lighter side can tuck behind the ear, exposing the cheek and neck, while the lengths remain straight or carry only a slight bend near the ends. On medium to long hair, this creates a continuous dark-looking surface with one strong directional line.
Straight and gently wavy textures usually need the least reshaping, while curly or coily hair can preserve natural texture and interpret the idea through a defined side part and controlled root direction. Use heat protectant before heat styling, a flat iron for targeted smoothing, and a small amount of strong-hold gel near the part and tucked side. Resetting the front section can be a quick refresh; reproducing the entire sleek finish after washing takes longer.
If a stylist is creating it, show exactly where you want the part and how much forehead coverage you prefer from the sweeping section. Also specify whether the ends should remain straight or softly curved. The part depth and front direction carry the look, so they matter more than forcing every strand completely flat.
Pro tip:
Set the side part while the roots are still slightly damp, then direct the heavier section into place. Early root control reduces the need for repeated reshaping later.
Make It Work for You:
If you wear curls or coils, smooth only the part line and tucked side while leaving the lengths defined. The asymmetry stays intact without flattening your natural texture.
Watch Out For:
Avoid coating the whole head with strong-hold gel. Concentrate it where control is needed; too much product can make the loose lengths stiff and heavy.
Moonlit Claw-Clip Twist Hairstyle

A claw-clip twist gives the vamp-romantic theme a practical everyday version without needing a formal pinned updo. Gather medium or long hair at the back, twist the length upward, and fold the excess downward if necessary before securing the center with a large dark or metallic clip. Leave the crown slightly relaxed and release one or two face-framing pieces near the temples. The ends can fan softly above the clip or tuck inside for a cleaner silhouette.
Straight, wavy, curly, and coily textures can all use the structure, although clip size and tooth spacing need to match the amount of hair being held. Light texturizing spray adds grip when the hair feels slippery, and a large claw clip provides the main anchor. Reopening and resetting the twist can be a very quick refresh; a full wash-day routine is separate and depends on how you prepare the loose texture before gathering it.
If a professional is styling the look for an event, explain whether you want the clip visible as a feature or mostly hidden inside the twist. Ask for the anchor to sit comfortably against the head without pinching. A clip that matches the hair volume should hold securely without forcing every section into excessive tension.
Pro tip:
Twist the hair firmly enough to create a central ridge, then relax the crown only after clipping. This keeps the anchor secure while preserving softness above it.
Make It Work for You:
For very dense hair, choose a larger clip and fold the length in sections rather than forcing one thick roll under teeth that cannot close comfortably.
Watch Out For:
Do not accept pinching as a sign of good hold. Reposition the clip or reduce the captured section if the teeth press painfully against the scalp.
Conclusion
Vamp romantic hairstyle ideas can range from glossy, highly controlled waves to loose braids, textured curls, low buns, and practical clipped twists. Longer hair offers more room for elaborate weaving and folded shapes, while bobs and shorter lengths can create the same mood through parting, shine, and a strong outline. Dense hair may support larger braids or buns; lower-density hair can keep the proportions smaller and preserve fullness. Natural texture should guide how much smoothing, curl definition, or volume work is realistic. Also compare the front carefully: tendrils, a deep side part, or an open center can change the entire balance. Choose the version whose hold, finish, accessories, and refresh routine fit how you actually wear your hair.
Before Your Salon Visit
Choose one or two favorites and save clear references that show the front, sides, and back when possible. Tell your stylist about your natural texture, density, current length, face-framing preferences, and normal routine. Point to the exact parting, tendril length, braid width, bun placement, crown volume, accessory position, or finish you want. For temporary styles, focus on how the hair should be arranged and secured rather than assuming you need a new haircut. Mention how long you need the style to remain comfortable.
FAQs
Can short hair work with vamp romantic hairstyles?
Yes. A bob or crop can create the mood through a deep part, sculpted front, glossy finish, or compact accessory rather than long braids and buns. Choose details that suit your available length instead of adding tension or forcing short sections into an updo they cannot comfortably reach.
Do vamp romantic hairstyles require heat styling?
No. Waves can be heat-styled when desired, but curls, coils, braids, twists, ponytails, and clipped shapes can use natural texture instead. If you do use a hot tool, include heat protectant and keep the styling method appropriate for your hair’s starting condition and the finish you want.
How can I stop ribbons, bows, or veils from slipping?
Build a stable hairstyle first, then attach the decorative piece to that anchor. An elastic, pinned section, braid, or secure twist can provide grip so the accessory is not carrying the entire style. If something keeps slipping, repair the base instead of repeatedly tightening the decoration against your scalp.
How do I keep a dramatic updo comfortable for an event?
Ask for balanced anchoring and moderate tension from the beginning. A secure bun, braid, or twist should not depend on painful pulling at the temples or nape. Test gentle head movement after styling, and reposition any pin, comb, or clip that presses sharply before wearing the style for several hours.