13 Beaded Headband Hairstyles for a Statement Look

Beaded headbands make their strongest statement when the accessory and the hair shape support each other. A slim band can sit close to the hairline, while a wider jeweled piece can crown soft volume. The base may be straight, wavy, curly, braided, or pinned, but placement matters: too far forward can crowd the face, while too far back can encourage slipping. Face-framing pieces, a side or center part, and controlled crown volume can change the balance without requiring a haircut.
Straight and wavy textures can use sleek sections or broad bends to show off the beads, while curls and coils can keep their natural shape beneath the accessory. Fine strands may benefit from a lighter band and a fuller base; dense hair can support wider pieces if pressure stays comfortable. The key is to adapt grip, spacing, and placement rather than forcing every texture into the same finish.
Most beaded headband hairstyles are quicker to refresh than to build from a full wash day. A morning touch-up may mean smoothing the front, redefining a few curls, or tightening a hidden anchor, while a polished wave set or updo takes longer. Maintenance is mainly about grip, comfort, frizz control, and keeping beads from catching loose strands. Choose a version that fits your usual texture, density, and styling routine so the statement detail remains practical.
Quick List
- Center-Part Sleek Beaded Headband Hairstyle
- Soft Waves Crown Beaded Headband Hairstyle
- Low Bun Pearl-Beaded Headband Hairstyle
- High Ponytail Crystal-Beaded Headband Hairstyle
- Loose Curls Double Beaded Headband Hairstyle
- Side-Part Tucked Beaded Headband Hairstyle
- Half-Up Braided Beaded Headband Hairstyle
- Textured Bob Beaded Headband Hairstyle
- Natural Curls Wide Beaded Headband Hairstyle
- Low Ponytail Beaded Headband Hairstyle
- French Twist Beaded Headband Hairstyle
- Face-Framing Updo Beaded Headband Hairstyle
- Long Straight Hair Beaded Headband Hairstyle
Center-Part Sleek Beaded Headband Hairstyle
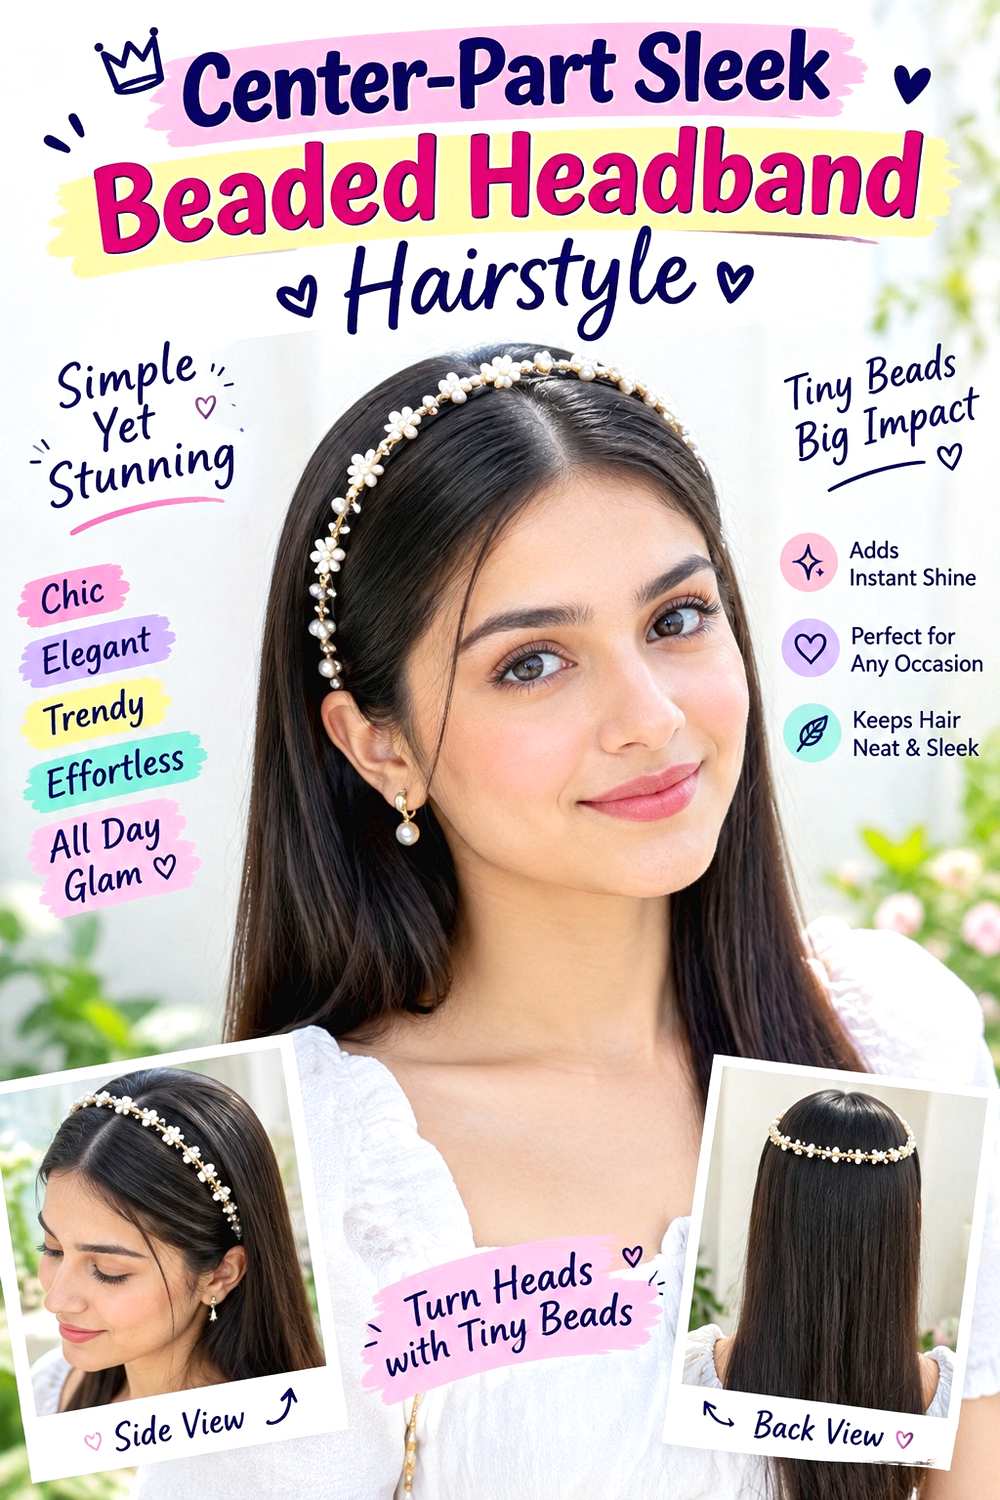
A center part gives a beaded headband a clean, symmetrical frame, especially when the hair stays smooth from roots to ends. Keep the band a little behind the hairline so the part remains visible, and let the lengths fall straight with a softly polished finish rather than stiffly flat. This works well on straight or gently wavy hair and can also be created on other textures when a smooth finish suits your routine. A medium-width band gives the beads presence without covering too much of the part.
For a full styling session, use heat protectant before smoothing with a flat iron, then finish with a light anti-frizz serum through the mid-lengths and ends. Between washes, the quick refresh is simpler: smooth only the front sections and reset the band if it has shifted. Keep product away from the roots if your hair loses volume easily. If you are having the style finished professionally, explain how much of the center part you want visible and where the band should sit relative to the temples.
The main upkeep issue is slipping. Reposition the band when it starts moving back instead of pressing it tighter, and check that the ends of the band are not catching fine hairs around the ears.
Pro tip:
Before placing the band, smooth the two front sections in the direction they naturally fall. This keeps the visible center part crisp and reduces the urge to keep pushing the accessory forward during wear.
Make It Work for You:
If your hair is fine or low-density, keep the lengths slightly fuller and avoid flattening the crown completely. A lighter headband can preserve the sleek effect without making the top look overly compressed.
Watch Out For:
A band placed directly on freshly coated roots may slide. Keep serum away from the attachment area, then settle the accessory on clean, dry hair where it can grip more reliably.
Soft Waves Crown Beaded Headband Hairstyle

Soft waves create a relaxed base for a beaded headband worn across the crown rather than directly at the hairline. The most flattering shape usually keeps the roots relatively calm, starts broad bends around the cheekbones or jaw, and leaves the ends soft instead of tightly curled. A center or slightly off-center part can remain visible in front of the band. This design suits medium to long hair and works especially well when you want movement without building a formal updo.
On wash day, apply heat protectant, shape loose bends with a large-barrel curling iron, and mist flexible hairspray after the waves cool. The full set takes longer than a next-day refresh, which may only require reshaping two or three flattened sections. Avoid brushing repeatedly once the band is in place, because moving hair underneath it can loosen the accessory. For professional styling, point out the exact wave starting point you prefer and ask for crown volume that supports the band without creating a bump directly behind it.
Maintenance is mostly about preserving movement and grip. If the waves become fuzzy, smooth individual sections rather than coating the whole head with more product, and lift the band off before combing so the beads do not snag.
Pro tip:
Let each wave cool before loosening it, especially around the sides of the head. A cooled bend usually keeps its shape better once the band is positioned and the hair begins moving.
Make It Work for You:
For shorter medium-length hair, start the wave slightly higher and keep the ends less curled. That preserves visible movement without making the headband and shortened lengths compete for space around the face.
Watch Out For:
Do not stack extra crown volume directly under the band. A pronounced ridge can make the accessory wobble; keep lift behind it and smooth the section where the band actually rests.
Low Bun Pearl-Beaded Headband Hairstyle

A pearl-beaded headband pairs naturally with a low bun because the accessory adds detail at the top while the gathered shape keeps the back neat. Position the band just behind the front hairline, then draw the lengths into a bun at the nape with either a clean center part or a softer side part. A few controlled face-framing pieces can reduce formality, but keep them deliberate so the pearls remain the focal point. The style can work on many textures as long as the bun can be secured comfortably.
Use a fabric-covered elastic to build the ponytail base, bobby pins to shape and anchor the bun, and flexible hairspray to control flyaways without making the surface rigid. A full version takes longer when the hair needs smoothing or curl definition first; a quick refresh usually means repinning the bun and settling the front. If a stylist is creating it, specify how low you want the bun and whether you prefer a compact knot or a wider, softer shape.
Check comfort as the day goes on. If the band and bun together create pressure, loosen the accessory rather than tightening the bun. Replace any pin that has shifted, and keep loose strands away from exposed bead settings that may catch them.
Pro tip:
Build the bun base first, then add the headband. Securing the back before the accessory helps you judge whether the pearls sit level without disturbing the bun every time you reposition them.
Make It Work for You:
If your hair is curly or coily, keep some natural texture through the bun instead of smoothing everything flat. The pearl detail still reads clearly while the gathered shape retains more of your texture.
Watch Out For:
A low bun that is pinned too tightly can create pressure before the headband is even added. Loosen the bun base slightly and secure its shape with pins rather than extra pulling.
High Ponytail Crystal-Beaded Headband Hairstyle

A high ponytail creates upward movement that can balance the sparkle of a crystal-beaded headband. Keep the front smooth or lightly textured, place the band behind the hairline, and anchor the ponytail around the upper back of the head rather than directly on the crown. The lengths can stay straight, wavy, or naturally curly, so the idea adapts well to different textures. Medium to dense hair can create a fuller tail, while lower-density hair may prefer a lighter headband and less tension at the base.
Build the ponytail with a snag-free elastic, use a light texturizing spray near the base for grip, and add a few bobby pins only if the headband needs hidden support. A wash-day version takes longer when the lengths need shaping; between washes, a fast refresh can focus on smoothing the front and tightening the ponytail base. For professional styling, ask for a ponytail height that feels secure without pulling at the temples, and show where you want the headband to meet the sides.
Do not use extra tension as the answer to slipping. If the crystals feel heavy, move the band slightly back and support it with discreet anchors rather than tightening the ponytail or forcing the band closer to the scalp.
Pro tip:
Angle the band so its ends sit comfortably behind the ears, then test the ponytail by turning your head. Small comfort adjustments are easier before the base is fully tightened.
Make It Work for You:
If your ponytail is short, keep the tail compact and let the headband carry more of the visual emphasis. You do not need extensions to preserve the high, lifted silhouette.
Watch Out For:
Do not anchor a heavy crystal band into the ponytail elastic itself. That can pull the accessory backward as the tail moves; support the band separately so each element stays balanced.
Loose Curls Double Beaded Headband Hairstyle

Two slim beaded headbands can create a layered statement without hiding loose curls. Space them evenly across the top of the head, leaving enough room between the bands for the curl pattern to remain visible. A center part or soft side part can sit in front, while curls begin naturally from the roots or gather more volume through the mid-lengths. This approach works especially well on curly hair or on longer hair that can hold a loose curl set without becoming overly bulky around the accessory.
For natural curls, use a lightweight leave-in conditioner for slip and moisture, curl gel for definition, and a diffuser to dry with less disturbance. A full wash-day set may take time depending on density and drying needs, but the next refresh can be limited to rewetting a few flattened curls and resetting the bands. If the style is done professionally, explain the spacing you want between the two bands and how much crown volume should remain visible between them.
Keep the bands from compressing the curl pattern too tightly. If one starts to sink into the hair, lift and reposition it instead of pushing it deeper. Check bead edges before wearing, because rough settings can catch individual curls and create unnecessary tangling during removal.
Pro tip:
Place the rear band first and the front band second. Working backward to forward makes the spacing easier to see and reduces the chance of dragging both accessories through finished curls.
Make It Work for You:
For very dense curls, widen the space between the two bands so more texture remains visible. The double-band idea still reads clearly without compressing the crown into a narrow strip.
Watch Out For:
Avoid forcing both bands into identical depth if your head shape or curl volume makes one sit differently. Match the visual spacing from the front rather than pressing either accessory uncomfortably.
Side-Part Tucked Beaded Headband Hairstyle

A deep side part gives a beaded headband an intentionally asymmetrical frame, especially when one side is tucked neatly behind the ear. Place the band just behind the front section so the part stays visible, then let the opposite side fall with a soft bend or smooth finish. The tucked side exposes more of the accessory and can work on bob, lob, or longer lengths. It suits straight and wavy textures particularly well, while curls can use the same placement with less surface smoothing.
For styling, apply heat protectant before using a round brush to shape the front, then add a light smoothing cream only to the ends and tucked section. A complete blow-dry takes longer than the daily refresh, which may involve re-forming the side part and retucking a few pieces. If you are having the style done professionally, specify how deep you want the part and whether the tucked side should lie close to the head or keep some volume above the ear.
The main maintenance concern is the tucked section working loose as you move. Reset it before it becomes messy rather than adding heavy product. Also check that the band does not press directly behind the ear, where repeated pressure can become uncomfortable during long wear.
Pro tip:
Set the tuck before placing the headband, then slide the accessory into position without disturbing the ear section. This keeps the asymmetry clean and makes the exposed side look intentional.
Make It Work for You:
If curls spring forward around the ear, leave a small curved section loose instead of forcing a flat tuck. The side part and visible headband can stay defined while preserving natural movement.
Watch Out For:
Do not keep retucking the same section with wet or sticky hands. Repeated handling can create frizz and loosen the band; reset the section once, then leave it undisturbed when possible.
Half-Up Braided Beaded Headband Hairstyle
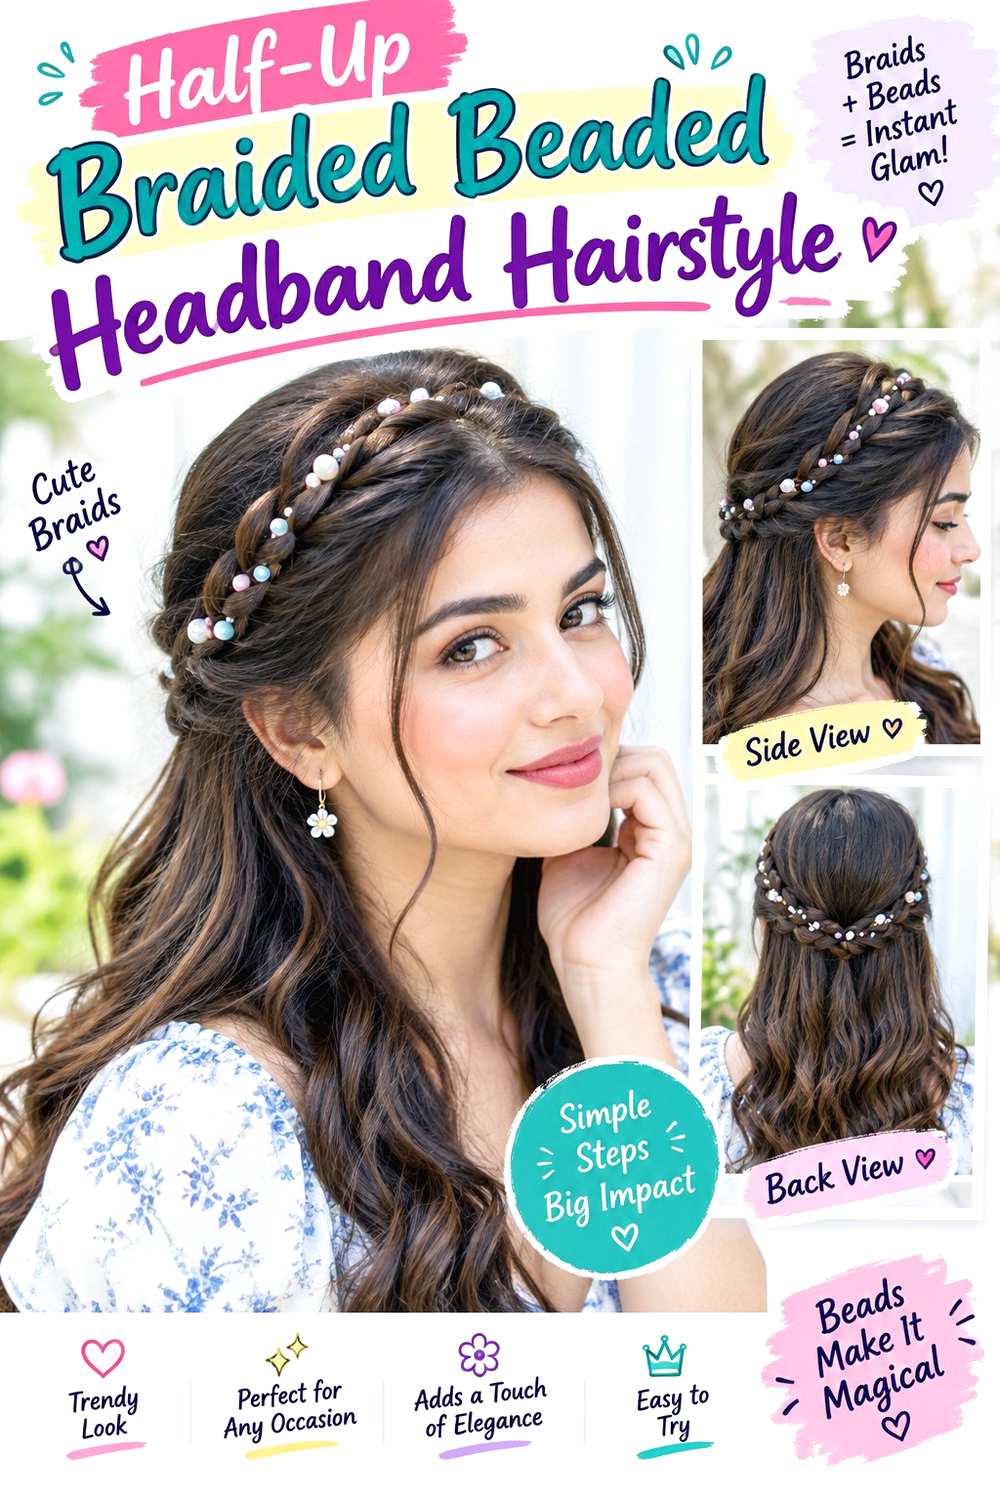
A half-up braid gives a beaded headband a secure-looking base while keeping most of the length loose. Start with a center or soft side part, place the band behind the front hairline, and gather small sections from each temple into a braid or braided join at the back. The loose lengths can be straight, wavy, or curly, while the braid adds detail beneath the accessory. This is useful for medium to long hair when you want control around the face without committing to a full updo.
Use a small clear elastic to secure the braid, a light texturizing spray to improve grip, and bobby pins only where the braided join needs support. A full wash-day style takes longer if the loose lengths need shaping; a quick refresh usually means tightening the braid and smoothing the front. For professional styling, describe the braid width you want and where it should meet at the back so it does not compete visually with the headband.
Avoid pulling the temple sections too tightly just to keep them neat. Comfortable tension matters more than a rigid finish. If the braid loosens, adjust its anchor rather than repeatedly tightening the front, and remove the headband before undoing the braid so beads do not snag separated strands.
Pro tip:
Finish the braid and test its tension before adding the headband. If you can move your eyebrows and turn comfortably, the front sections are less likely to feel strained later.
Make It Work for You:
For fine or sparse hair, make the braid narrower and leave more hair loose underneath. That keeps the half-up structure visible without taking too much density away from the lengths.
Watch Out For:
Do not position the headband directly over the braid’s temple sections if it crushes them. Shift the band slightly forward or back so the braid keeps its shape and the accessory stays level.
Textured Bob Beaded Headband Hairstyle

A textured bob makes a beaded headband feel graphic because the shorter perimeter keeps the accessory close to the face. Let the bob finish between the jaw and shoulders, keep the part visible in front of the band, and shape irregular bends through the mid-lengths while leaving the tips slightly straighter. The result has movement without becoming overly rounded. It suits straight or wavy hair naturally and can also work on curls when the finished bob length and shrinkage are considered.
Use heat protectant before creating a few bends with a flat iron, then work texture spray through the middle sections for separation. Full wash-day styling involves drying and shaping the whole bob; a quick refresh can target the flattened front and top pieces. If a stylist is creating the look, point to the bottom edge you want kept visually strong and explain how much movement you prefer above it rather than curling the perimeter.
Shorter hair can make a headband more likely to expose flyaways around the ears and nape. Smooth only those areas that need control. If the band slides, adjust its placement and grip instead of adding excessive product, which can collapse the bob’s airy movement and make the ends look separated.
Pro tip:
Alternate the direction of a few bends around the sides, but keep the very ends calmer. This creates separation through the bob without turning the lower edge into a round, uniform curl.
Make It Work for You:
If your bob is very blunt and dense, concentrate texture in the top and middle sections rather than the perimeter. You can keep the strong bottom line while still creating movement around the headband.
Watch Out For:
Too much texture spray can make short ends piece apart and look dry. Start lightly, then add only where the bob needs separation instead of coating every section equally.
Natural Curls Wide Beaded Headband Hairstyle

A wide beaded headband can sit beautifully over natural curls when it frames the texture instead of flattening it. Place the band behind the hairline and allow the curls to expand above, beside, and behind it, with the front either swept back or parted softly. The wider accessory creates a strong focal point, so keeping the curl shape visible around it prevents the hair from looking compressed. This works across curl patterns and densities, though the band should feel comfortable rather than tight.
Use a lightweight leave-in conditioner to keep the front flexible, curl gel to reinforce definition, and a diffuser when drying is needed without disturbing the pattern. Wash-day styling may take longer because the curls need full drying time; between washes, refresh only the sections that were pressed by sleep or by the band. For professional styling, explain how much volume you want in front of and behind the accessory, and ask that the finished placement respect your natural shrinkage.
A wide band can trap heat or create pressure if worn too tightly. If your scalp feels tender, remove or reposition it rather than tolerating discomfort. During removal, lift the band upward and away from the curls slowly so beadwork does not catch and stretch individual strands.
Pro tip:
Once the band is placed, lift curls gently around its back edge with your fingertips. Restoring that small amount of volume helps the accessory look integrated rather than pressed into the hair.
Make It Work for You:
If your curls shrink strongly, decide placement after the hair is fully dry. That lets you judge the true crown volume and keeps the band from sitting differently once the pattern contracts.
Watch Out For:
Do not choose security by pressure alone. If a wide band keeps sliding, change its resting point or anchoring method instead of wearing it tight enough to leave the scalp sore.
Low Ponytail Beaded Headband Hairstyle

A low ponytail keeps the silhouette simple so a beaded headband can provide the main statement. Use a center part for symmetry or a side part for softer balance, position the band just behind the front section, and gather the lengths at the nape. The ponytail can stay sleek, softly waved, or naturally textured, while a little crown volume prevents the shape from looking pulled flat. This option suits medium to long hair and is practical when you need a secure style that remains easy to redo.
Use a fabric-covered elastic to hold the ponytail, light texturizing spray for grip around the crown, and a small amount of smoothing serum on the loose lengths. A full wash-day version takes longer if you are shaping waves or curls first; a fast refresh is usually just resetting the part, crown, and elastic. If a stylist is helping, specify how low you want the ponytail and how much softness should remain around the ears and crown.
Watch the interaction between the band and ponytail tension. If both are tight, the style can become uncomfortable. Loosen one anchor point rather than adding pressure everywhere, and check the nape for escaped pieces before adjusting the headband so you do not disturb its placement unnecessarily.
Pro tip:
After securing the ponytail, pinch a little height into the crown before adding the band. That small adjustment prevents the accessory from flattening the entire top once it settles into place.
Make It Work for You:
For dense or coily hair, keep the ponytail’s natural fullness and use a wider gathering point at the nape. The headband can stay polished without forcing the lengths into a narrow tail.
Watch Out For:
Do not keep tightening the elastic each time the headband moves. Repeated tension affects comfort without fixing the accessory; reposition or anchor the band separately while leaving the ponytail stable.
French Twist Beaded Headband Hairstyle
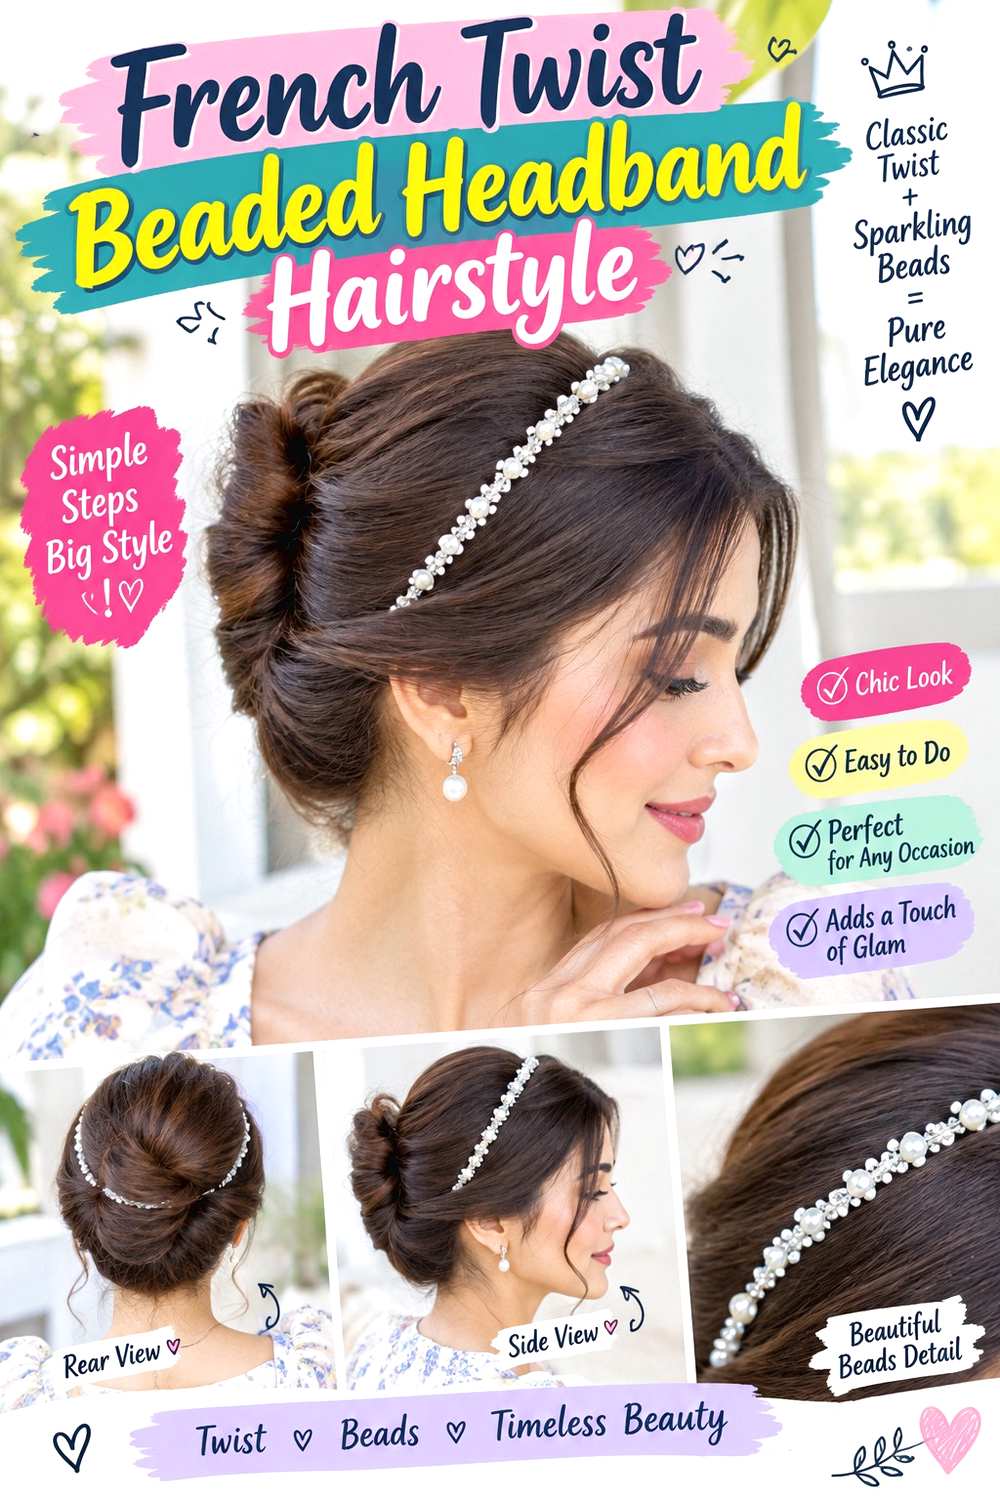
A French twist gives a beaded headband a refined vertical shape, with the accessory drawing attention forward while the twist keeps the back sculpted. Smooth or softly texture the front, set the band behind the hairline, then roll the lengths upward at the back with the ends tucked inside. A center part can make the result more modern, while a side sweep gives it a softer outline. Medium to long hair with enough length to roll securely is the easiest starting point.
Use bobby pins to anchor the twist, a light styling cream to control surface flyaways, and flexible hairspray for movable hold. The full style takes more time than a simple ponytail because the twist needs balanced tension and secure pinning. A quick refresh can mean replacing one loose pin and smoothing the front. For professional styling, explain the height and width you want through the twist and ask for comfortable tension at the nape and sides.
If the roll starts leaning, do not compensate by pushing the headband tighter. Rebuild the loose anchor at the back. Keep the band slightly separated from the pinned section so removing the accessory later does not disturb the twist or pull on hidden pins.
Pro tip:
Before inserting the final pins, turn your head from side to side. If the roll pulls at one point, redistribute the tension now so the headband does not add pressure later.
Make It Work for You:
If your hair is shorter, build a smaller twist and allow a few ends to tuck softly rather than forcing a tall roll. The headband still provides the statement detail at the front.
Watch Out For:
Do not let the band ends overlap the strongest pinning points. Pressure from the accessory can shift hidden pins; leave a small gap so the twist and headband stay independently secure.
Face-Framing Updo Beaded Headband Hairstyle
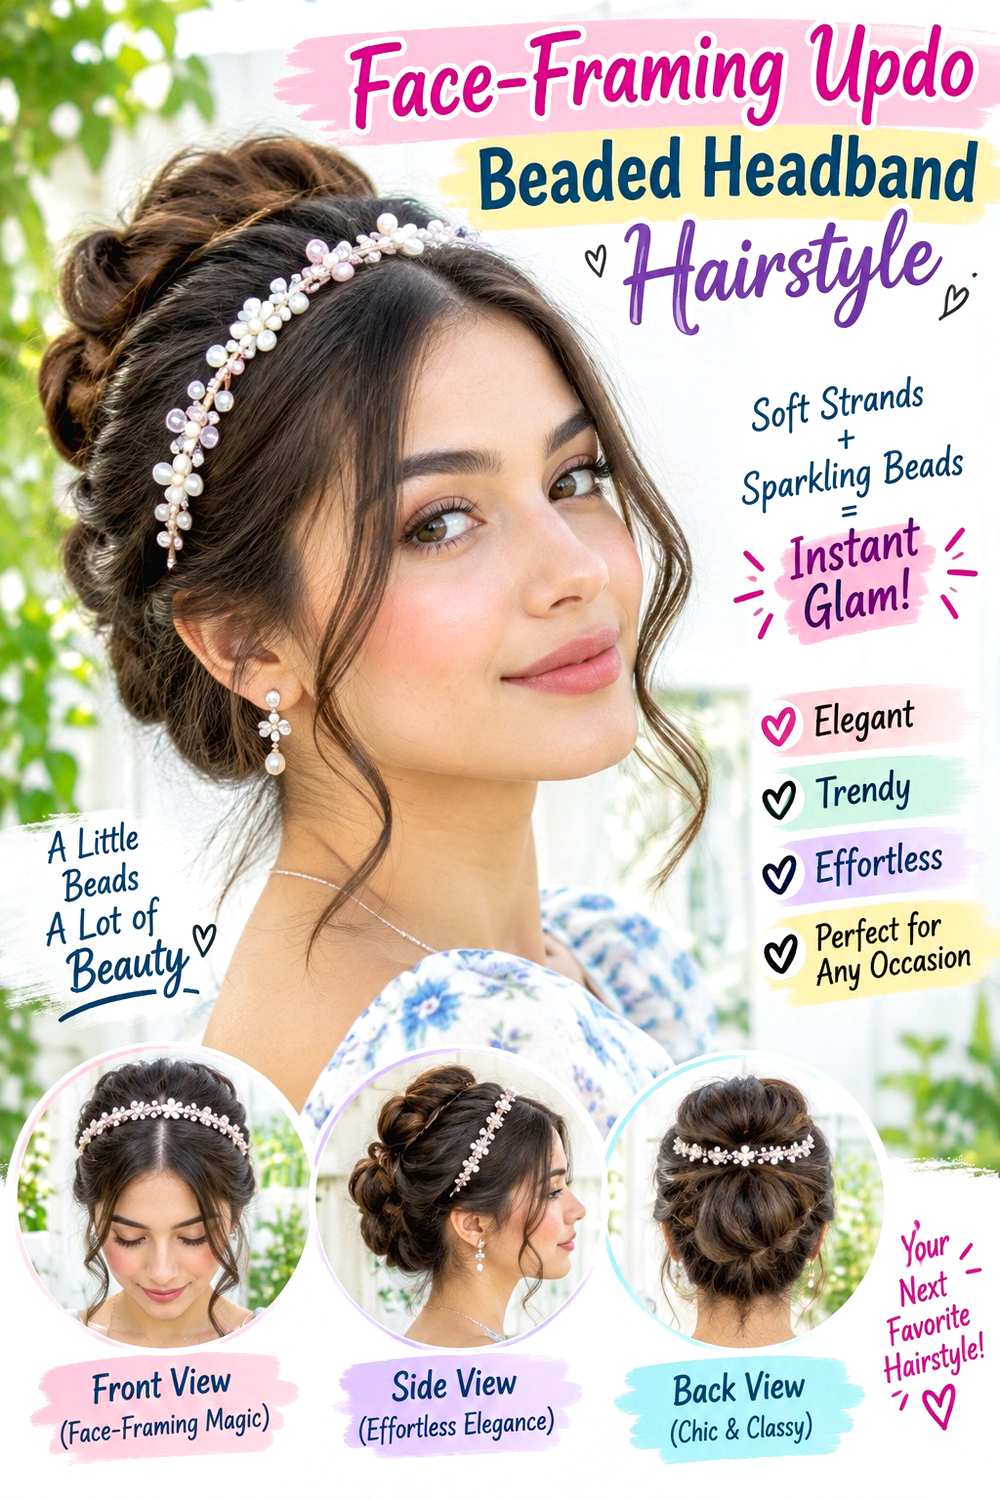
A softly pinned updo with face-framing pieces lets a beaded headband look decorative without making the whole style feel rigid. Set the band behind the hairline, leave two or more controlled front sections free, and gather the rest into a low or mid-height pinned shape. The loose pieces can skim the cheekbones, jaw, or longer, depending on your preferred frame. Wavy and curly textures make the softness easy to build, while straight hair can be bent only where extra movement is wanted.
Use a fabric-covered elastic for the base, bobby pins for the pinned sections, and flexible hairspray to keep the shape together without freezing the front pieces. The full updo takes longer because balance matters from every angle; a quick refresh is mainly replacing shifted pins and redefining one or two face-framing bends. For professional styling, show exactly how much hair you want left around the face and where the updo should sit so the headband does not crowd it.
Do not leave so many loose pieces that the accessory becomes tangled in them. Keep the sections nearest the band controlled, and check that pins are not pressing against the headband ends. If the style softens during wear, reinforce the base rather than pinning every loose strand flat.
Pro tip:
Choose the face-framing sections before building the updo, not afterward. Separating them early prevents accidental over-pinning and helps you keep their width and placement consistent on both sides.
Make It Work for You:
For naturally straight hair, keep the front pieces softly bent rather than tightly curled if you want easier upkeep. The movement remains visible without requiring repeated reshaping during the day.
Watch Out For:
Leaving very thin strands directly under beadwork can cause snagging. Move those pieces just in front of or behind the band so the decorative edge does not repeatedly catch them.
Long Straight Hair Beaded Headband Hairstyle

Long straight hair creates a clean backdrop for beadwork, especially when the headband sits over a visible part and the lengths remain fluid. Keep the roots smooth but not pasted down, place the band slightly behind the hairline, and let the ends fall with a slight natural curve rather than a rigid finish. A center part looks balanced, while a side part shifts more hair to one shoulder. The idea suits naturally straight or gently wavy hair and can be adapted to other textures when straightening fits your routine.
Apply heat protectant before using a flat iron where needed, then distribute a small amount of lightweight serum through the lower lengths for shine and frizz control. A full wash-day finish takes longer on very long or dense hair; a morning refresh can focus on the front and any bent sections. For professional styling, explain whether you want the bottom line to appear full and straight or softer, and show the exact headband position you prefer.
Because long hair moves against clothing, check for tangles near the band ends and behind the ears. Remove the accessory before brushing from roots to ends. If the headband keeps sliding on very smooth hair, improve its anchor instead of roughing the entire length.
Pro tip:
After placing the band, run your hands down the lengths once rather than repeatedly brushing them. This settles displaced strands while keeping the surface smooth and the accessory from shifting backward.
Make It Work for You:
If your hair is very fine, allow a little root lift behind the band instead of pressing everything flat. The straight finish remains clean while the overall silhouette keeps more body.
Watch Out For:
Do not straighten repeatedly just because the band created a small bend near the top. Reposition the accessory first; unnecessary extra passes add heat without solving the underlying placement problem.
Conclusion
Beaded headband hairstyles can feel polished, relaxed, or dramatic depending on what supports the accessory. Straight lengths and sleek ponytails keep the beads prominent, while waves and curls add movement around them. Low buns, French twists, and soft updos place more attention on structure; loose hair gives the band a lighter role. Density matters for both scale and grip, and natural texture should guide how much smoothing, curl definition, or volume control feels realistic. Parting and face-framing pieces can adjust the balance without changing your haircut. When choosing among these ideas, compare how securely the band sits, how much styling the base needs, and how comfortably you can maintain the finish for the time you plan to wear it.
Before Your Salon Visit
Before your salon visit or styling appointment, choose one or two favorites and save references that clearly show the headband placement and supporting hair shape. Explain your natural texture, density, face-framing preferences, usual length, and how much daily upkeep you want. Point out the exact part, curl or wave pattern, crown volume, loose-piece placement, bun or ponytail position, and finish you like. Because these are temporary accessory styles, focus the conversation on comfortable anchoring, realistic hold, and styling rather than requesting an unnecessary haircut.
FAQs
How do I keep a beaded headband from slipping?
Start with dry hair and place the band where it naturally rests without excessive pressure. A little texture at the anchor area can improve grip, but heavy serum near the roots may increase sliding. For heavier bands, discreet pins or a secure base style can help without tightening the accessory painfully.
Can I wear a beaded headband with curly or coily hair?
Yes. Let the curl pattern determine the placement instead of flattening it to fit the band. Position the accessory after the hair reaches its finished shape, especially when shrinkage is significant. Wider bands can work well with fuller curls, provided they sit comfortably and do not compress the crown.
Do beaded headband hairstyles require heat styling?
No. Heat is optional and depends on the finish you want. Natural curls, braids, buns, and textured ponytails can support a statement headband without heat. If you choose a straight or waved finish with hot tools, use heat protectant and keep touch-ups limited to the sections that actually need reshaping.
How can I prevent beads from catching my hair?
Check the accessory for rough edges or loose settings before wearing it, and keep very fine strands from sitting directly under exposed beadwork. When removing the band, lift it away slowly instead of dragging it backward through the hair. Undo nearby pins or braids only after the accessory is clear.