12 Collarbone Layer Hairstyle Ideas

Collarbone layer hairstyle ideas sit in the useful space between a traditional bob and long hair, with the perimeter landing close to the collarbones and shorter sections creating movement above it. Layers can begin around the cheekbones, jaw, or lower sides depending on how much visible separation you want. Fringe is optional, and the ends may stay fairly full, turn outward, follow natural waves, or form a softer broken perimeter.
Straight and wavy textures show gradual layer changes clearly, while curls need enough length to allow for shrinkage. Fine or lower-density hair often benefits from keeping more weight through the collarbone-level perimeter and concentrating shorter pieces near the face. Dense hair can support more internal movement, although removing weight only where it collects helps prevent excessive expansion. Face framing can also be adjusted without changing the overall medium length.
Styling effort depends on the finish. Natural waves or curls may need only targeted refreshing, while feathered layers and polished blowouts require more directional styling. Cut upkeep is separate from daily effort. A reshape becomes useful when the upper layers stop moving independently, the face frame grows below its intended landmark, or the perimeter loses its collarbone-level balance.
Quick List
- Soft Face-Framing Collarbone Layer Hairstyle
- Curtain Fringe Collarbone Layer Hairstyle
- Wavy Collarbone Layer Hairstyle
- Curly Collarbone Layer Hairstyle
- Feathered Collarbone Layer Hairstyle
- Center-Parted Collarbone Layer Hairstyle
- Side-Parted Collarbone Layer Hairstyle
- Wispy Fringe Collarbone Layer Hairstyle
- Fine-Hair Collarbone Layer Hairstyle
- Dense-Hair Collarbone Layer Hairstyle
- Tousled Collarbone Layer Hairstyle
- Airy Blowout Collarbone Layer Hairstyle
Soft Face-Framing Collarbone Layer Hairstyle

Face-framing pieces beginning around the cheekbones or jaw give this collarbone cut a gradual front-to-back transition. The shortest sections move away from the face before connecting into longer side layers, while the perimeter remains substantial around the collarbones. An open center or slightly off-center part keeps the forehead clear. Gentle bends through the front create movement without making every layer look sharply separated.
Straight and softly wavy textures show this progression particularly well. Fine hair can use a narrower face frame to preserve side density, while medium or dense hair may support a broader connection. Use heat protectant before heated styling, a round brush to direct the front outward, and flexible hairspray for light hold. Refreshing only the face frame may take a few minutes; styling the complete collarbone cut after washing takes longer.
At the salon, point to the exact dry landmark where you want the shortest front piece to finish. Then explain how gradually it should connect through the jaw into the collarbone perimeter. That detail prevents an abrupt shelf. Reshaping becomes useful when the front layers grow long enough to merge into the sides and stop creating visible movement around the face.
Pro tip:
Let the front layers cool while directed away from the face before loosening them. This helps the broad bend last without requiring a large amount of hairspray or a tightly curled finish.
Make It Work for You:
If you prefer less movement around the cheeks, begin the shortest face-framing piece near the jaw. The collarbone shape remains layered while placing most visible separation lower around the face.
Watch Out For:
Avoid cutting a thick section to one short front length. A gradual cheekbone-to-jaw-to-collarbone connection creates softer movement and prevents the face frame from looking disconnected from the perimeter.
Curtain Fringe Collarbone Layer Hairstyle
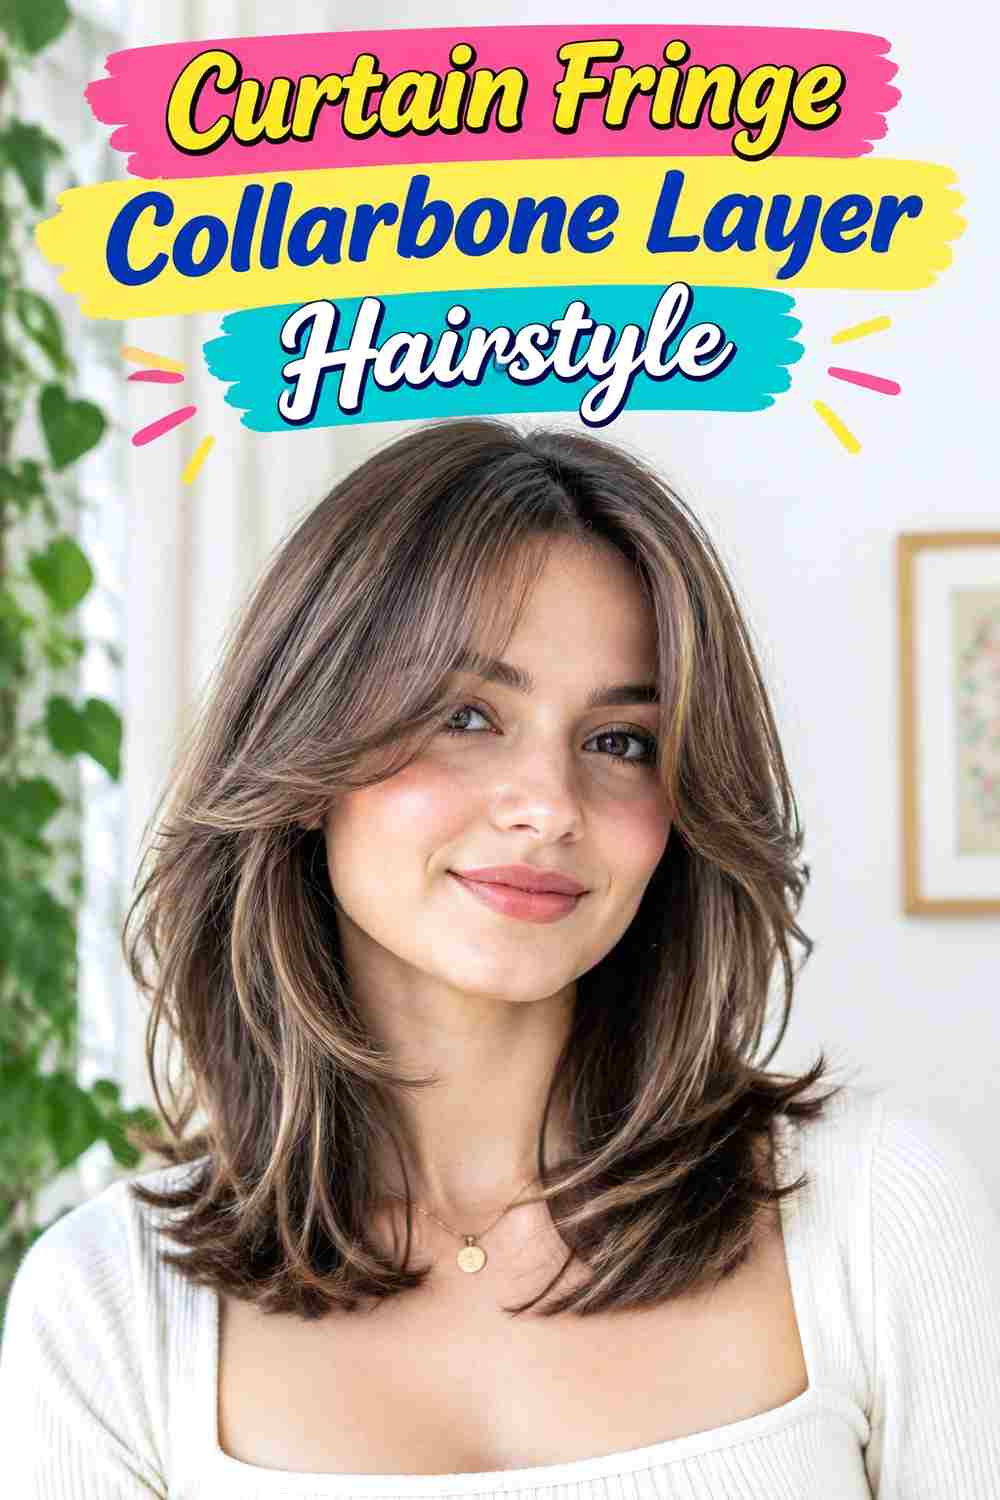
Curtain fringe creates the shortest level in this layered cut, with center pieces around the brows and longer outer corners sweeping toward the cheekbones. Those corners connect into jaw-level layers before reaching the collarbone perimeter. The center opening keeps the forehead partly visible, while broad bends through the sides repeat the fringe’s outward direction. Moderate crown lift prevents the front from appearing flat.
Straight and wavy textures can carry this structure easily. Loose curls can adapt it when extra fringe length is retained for shrinkage. Lower-density hair generally benefits from a narrower fringe section so the sides keep useful fullness. Use heat protectant before heated drying, a round brush to shape the curtain opening, and lightweight mousse for flexible support. A fringe refresh can be brief; styling every layer after washing requires more time.
At the salon, specify the dry center fringe length, outer-corner position, and where the first longer face-framing layer should sit. These landmarks create a smooth transition into the collarbone cut. Fringe upkeep may be needed before the main haircut because growth changes the center opening quickly. Reshape the longer layers once their movement begins merging into the perimeter.
Pro tip:
Dry the fringe forward first, then divide it and direct the outer corners away from the face. This settles the roots while creating a smoother connection into the longer face-framing layers.
Make It Work for You:
If you want less forehead coverage, keep the center pieces longer and the curtain opening wider. Preserve cheekbone-level outer corners so the fringe still connects clearly into the layered sides.
Watch Out For:
Do not make the fringe section unnecessarily deep. Taking too much hair forward can create a heavy curtain and remove density from the sides, especially when the perimeter is already layered.
Wavy Collarbone Layer Hairstyle

Broad waves give collarbone layers natural-looking separation without requiring each cutting level to be obvious. Shorter pieces can begin around the jaw, with intermediate layers moving through the shoulders before meeting the collarbone perimeter. A relaxed center or side part suits the fluid shape. The strongest bends sit through the mid-lengths, while some ends remain straighter or turn gently outward.
Naturally wavy hair can make this cut relatively manageable because existing texture reveals the layers. Straight hair can recreate the finish, although that adds styling time. Use heat protectant before thermal styling, a medium curling iron for broad bends, and flexible hairspray for light hold. A next-day refresh might involve only several flattened sections; creating the complete wave pattern from straight hair requires a longer session.
At the salon, discuss where your natural waves become strongest and identify the desired dry perimeter around the collarbones. Ask where the first layer should begin so it encourages movement without creating unwanted width. Reshaping becomes useful when growth drags the waves downward or makes the upper layers merge into a heavier lower shape.
Pro tip:
Alternate the direction of several mid-length waves while leaving some ends relaxed. The variation helps reveal the layered structure without turning the collarbone cut into a uniform, tightly arranged wave set.
Make It Work for You:
If your natural waves form unevenly, refine only the flatter sections. Matching every bend is unnecessary; varied movement can make gradual collarbone layers look more natural while reducing heat exposure.
Watch Out For:
Avoid beginning strong waves at every root if your hair already has side volume. Concentrating the clearest bends lower down keeps the layered silhouette flowing instead of making it excessively wide.
Curly Collarbone Layer Hairstyle

Curly texture gives collarbone layers a rounded, mobile silhouette with individual curl groups revealing the different lengths. Shorter curls can sit around the cheekbones or jaw, while longer sections fall toward the collarbones after shrinkage. Crown layers create controlled lift, and the perimeter stays full enough to balance the upper movement. A natural part works well because exact symmetry is unnecessary.
Curly and coily textures need careful dry assessment because different sections may contract by different amounts. Dense curls can benefit from purposeful bulk placement, while lower-density curls often need more perimeter weight retained. Use lightweight leave-in conditioner for pliability, curl gel for grouping, and a diffuser on gentle airflow to dry without flattening the pattern. Refreshing several front curls can be quick; a complete wash, definition, and dry takes considerably longer.
At the salon, discuss where the shortest face-framing curls and collarbone perimeter should rest when fully dry. Avoid relying only on wet or stretched measurements. Also identify where unwanted bulk tends to collect. Reshaping becomes useful when growth pulls crown volume downward or causes the lower curl groups to collect into a heavier level.
Pro tip:
Guide front curl groups slightly away from the face while damp, then allow them to dry before separating. This encourages directional framing while preserving definition and limiting unnecessary frizz.
Make It Work for You:
If your curls shrink substantially, retain additional cutting length throughout the front and perimeter. The finished hair can still reach the collarbones once dry without leaving the upper layers unexpectedly short.
Watch Out For:
Do not copy straight-hair layer measurements onto curls. A section cut to a fixed stretched landmark can finish much higher after recoil, so the natural dry position should guide adjustments.
Feathered Collarbone Layer Hairstyle

Feathered styling turns collarbone layers outward, creating visible movement from the cheekbones or jaw through the shoulders. The shortest front sections sweep away from the face, while longer layers form broader bends as they approach the perimeter. A center or soft side part keeps the front open, and moderate crown lift supports the outward direction without producing excessive height.
Straight and softly wavy textures display feathering clearly. Fine hair generally benefits from retaining more density through the collarbone edge, while dense hair can support additional internal movement. Use heat protectant before heated styling, a large round brush to direct layers outward, and flexible hairspray for movable hold. Refreshing the face frame may take several minutes; creating a full feathered blowout from wet hair requires a longer styling session.
At the salon, identify the shortest face-framing landmark and explain how much perimeter weight you want retained. Feathering should come from gradual layer placement rather than aggressive thinning. Reshape when the front sections grow too long to move around the face or the upper layers lose separation from the collarbone-level lengths.
Pro tip:
Use smaller brush sections around the face and broader sections through the lower lengths. This gives the front clearer feathering while keeping the collarbone layers flowing rather than overly curled.
Make It Work for You:
If your hair is fine, concentrate stronger feathering around the face and surface. Preserve more weight through the bottom so the collarbone perimeter remains substantial beneath the outward movement.
Watch Out For:
Avoid flipping every layer strongly backward. Repeated dramatic bends can make the cut look overly set; combine defined feathering near the face with softer movement through the lower sections.
Center-Parted Collarbone Layer Hairstyle

A center part distributes collarbone layers evenly on both sides, making the face frame the most visible feature. Shorter sections can begin around the cheekbones or jaw, then progress into shoulder and collarbone lengths. The surface remains connected, while gentle bends prevent the two sides from hanging as flat panels. Moderate root lift keeps the center part soft rather than severe.
Straight and wavy textures show the balanced progression clearly. Fine hair often needs restrained layering to maintain perimeter density, while dense hair can use more internal movement where weight collects. Use heat protectant before heated drying, a round brush for broad bends, and lightweight styling cream to smooth the ends. Refreshing the two front sections may take only a few minutes; a full wash-day blow-dry naturally requires longer.
At the salon, show where your natural center part falls and identify the shortest front landmark. One side may naturally contain more hair, so internal weight does not have to be identical for the visible shape to appear balanced. Reshape when the front grows too long or the lower layers become heavy enough to lose separation.
Pro tip:
Set the center part while the roots are damp, but keep the line relaxed. A softer division complements the layered movement and avoids making the front appear unnecessarily rigid or flat.
Make It Work for You:
If your natural part sits slightly off center, follow it rather than forcing exact symmetry. Similar face-framing movement on both sides can preserve balance while respecting your normal growth direction.
Watch Out For:
Avoid styling both sides into identical tight curls. The center part already creates symmetry; slightly varied broad bends make the layered haircut feel softer and allow individual sections to move naturally.
Side-Parted Collarbone Layer Hairstyle
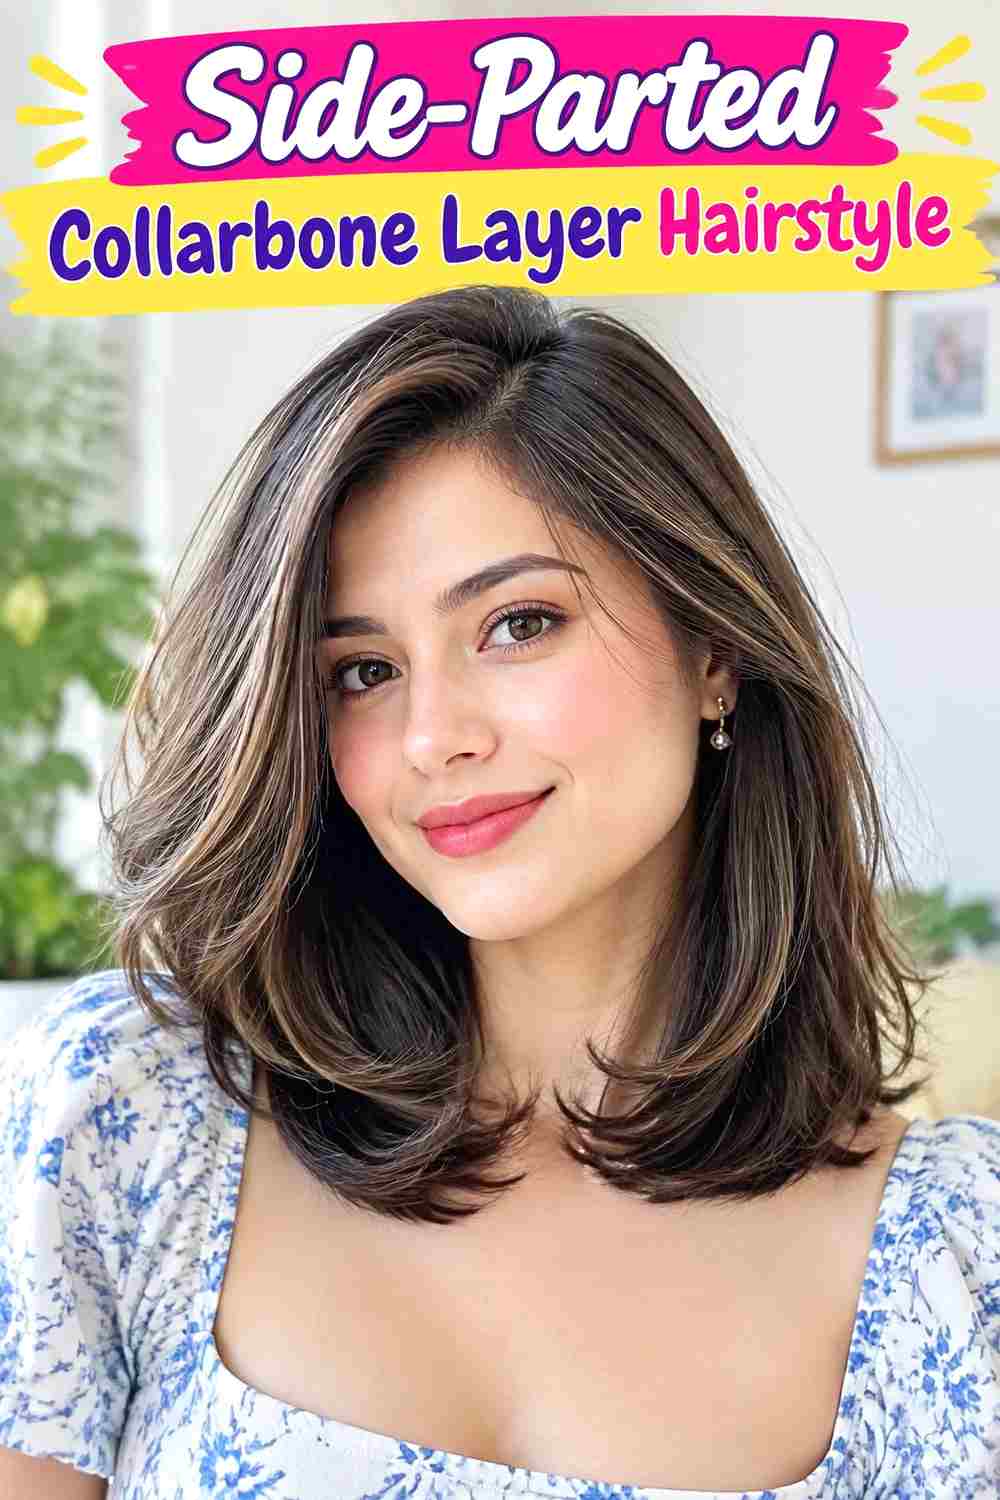
A side part gives collarbone layers directional movement and creates more volume on the heavier side. The front section can sweep from the cheekbone or jaw toward the shoulder, while the lighter side stays closer to the face or tucks behind the ear. Longer layers continue through the collarbone perimeter, with broad bends preventing the shape from becoming too formal.
Straight and wavy textures can hold the sweep easily, especially when the natural part already favors one side. Fine hair may gain useful root lift, while dense hair usually needs less added volume. Use heat protectant before heated drying, a round brush to direct the heavier front section, and flexible hairspray for light control. A part and face-frame refresh can be quick; complete wash-day styling takes longer.
At the salon, show where you normally place your part and mention whether you frequently tuck the lighter side. This affects front length and weight distribution. Specify where the shortest face-framing piece should finish when dry. Reshape when growth makes the heavier front collapse into the lower layers or the collarbone perimeter loses its intended balance.
Pro tip:
Establish the side part while the roots are damp, then dry the heavier front section backward and outward. Setting its direction early reduces the amount of finishing product needed later.
Make It Work for You:
If a deep side part resists your natural growth pattern, shift only slightly off center. You can retain directional volume while reducing the effort needed to reposition your roots every day.
Watch Out For:
Do not add equal volume to both sides. A side part relies on deliberate asymmetry, so keep the lighter side calmer while allowing the heavier section to provide the stronger sweep.
Wispy Fringe Collarbone Layer Hairstyle
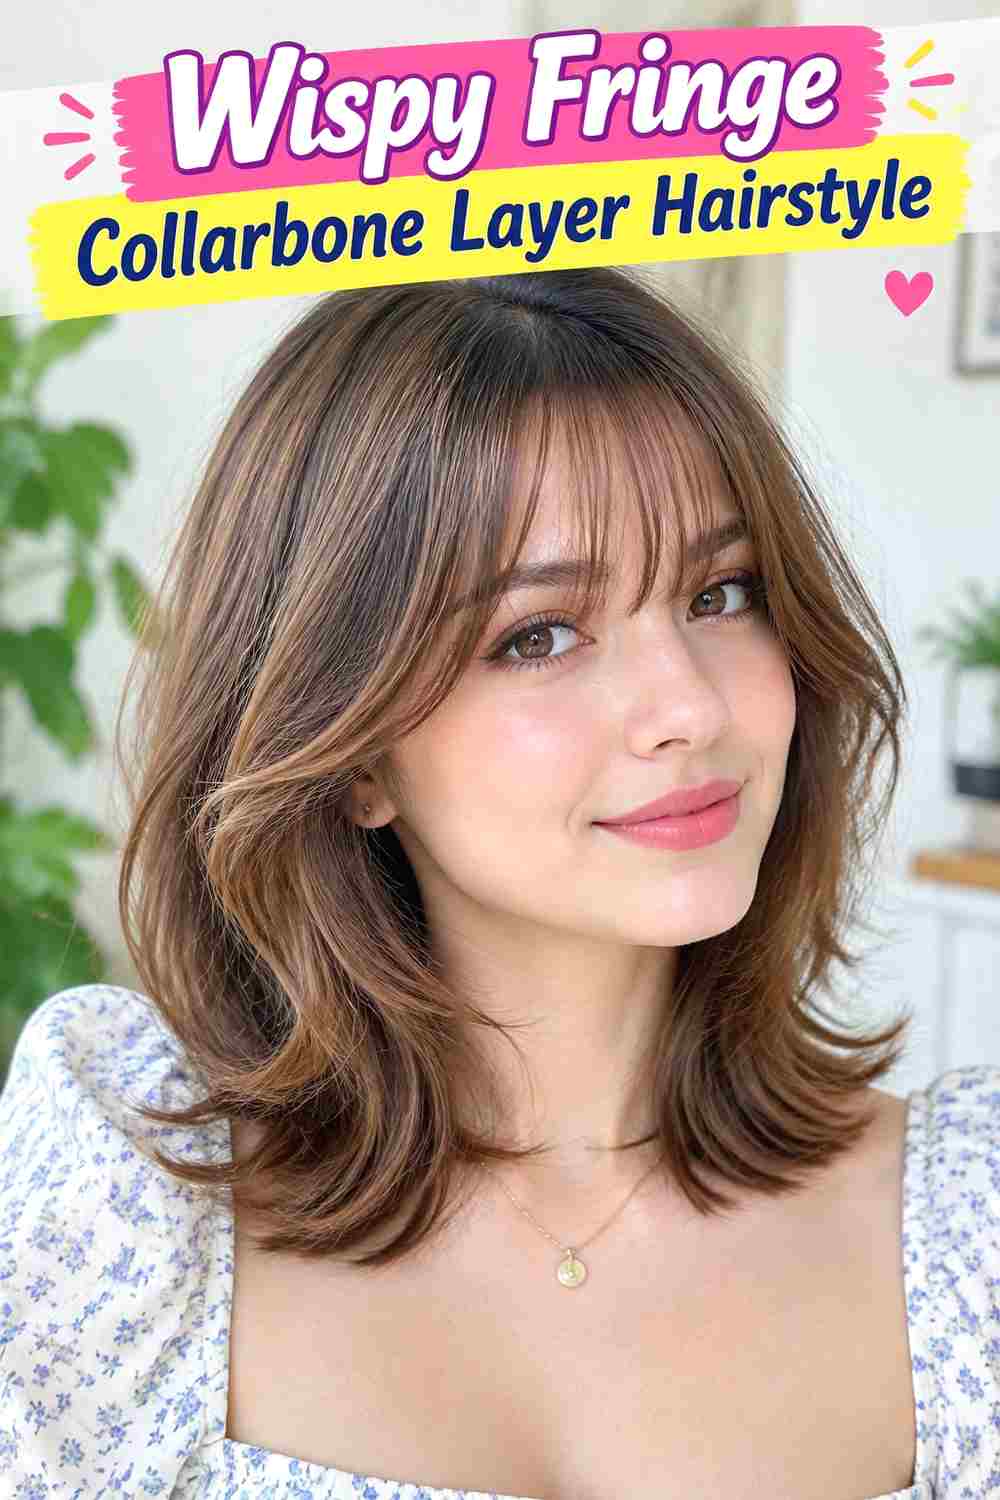
A light fringe adds forehead movement without competing with the longer collarbone layers. Center pieces can skim the brows, while separated outer strands extend toward the temples and connect into cheekbone- or jaw-level face framing. The lower perimeter stays relatively full, creating contrast with the airy front. Soft bends through the sides link the fringe to the longer layered shape.
Straight and wavy textures can show the separated fringe easily. Fine strands may naturally produce a wispy finish, while dense hair benefits from a deliberately narrow fringe section rather than heavy thinning. Use lightweight mousse for flexible support, heat protectant before heated drying, and a small round brush to shape the fringe. A front refresh can take only a few minutes; styling all collarbone layers after washing requires more time.
At the salon, specify the dry fringe length and section width, then show where the outer pieces should connect into the face frame. Keep the collarbone perimeter as a separate decision. Fringe maintenance may be needed sooner than the overall haircut once the center begins entering the eyes or loses its separation.
Pro tip:
Dry the fringe before the longer layers because the small sections lose moisture quickly. Once dry, use your fingertips to separate pieces instead of brushing them repeatedly into a heavier line.
Make It Work for You:
If your hair is lower density, use a shallow fringe section and preserve more hair through the temples. The light front remains visible without sacrificing useful fullness from the collarbone-length sides.
Watch Out For:
Avoid using rich styling cream directly on wispy fringe. Heavy product can join the separated strands into thicker pieces and remove the light gaps that define the intended finish.
Fine-Hair Collarbone Layer Hairstyle

Fine strands can carry collarbone layers successfully when the lower perimeter remains substantial. The shortest pieces can begin around the jaw, while only a few longer layers continue through the sides. Keeping the back comparatively full protects visible density. A center or subtle side part works well, and gentle bends provide separation without requiring extensive cutting through the ends.
Fine hair refers to individual strand diameter rather than total density, so layer depth should also reflect how much hair is present. Fine, high-density hair can support more movement than fine, low-density hair. Use lightweight mousse for root support, heat protectant before heated drying, and a round brush for soft bends. Refreshing the crown and face frame can be brief; a full blow-dry depends on overall density and length.
At the salon, explain whether your main concern is flatness, limited movement, or sparse ends. Ask to preserve the collarbone perimeter instead of automatically thinning fine hair. Identify the shortest layer you are comfortable with. Reshape when the front loses movement or the perimeter becomes uneven, rather than repeatedly shortening sections that already need more visible weight.
Pro tip:
Concentrate mousse near the roots and use only the remaining product through the lengths. Fine strands can look separated when overloaded, so lighter application helps preserve the fuller collarbone perimeter.
Make It Work for You:
If your fine hair is also low density, keep layers mostly around the face and leave the back fuller. Styling can provide additional movement without sacrificing coverage through the lower lengths.
Watch Out For:
Do not assume fine hair needs aggressive thinning to move. Strand thickness and density are separate factors, and unnecessary weight removal can leave the perimeter sparse without producing useful volume.
Dense-Hair Collarbone Layer Hairstyle

Dense hair can support several collarbone layers, but their placement determines whether the haircut moves or simply expands. Shorter sections can begin around the jaw, with longer internal layers releasing concentrated weight through the sides. The perimeter remains substantial at the collarbones, while surface sections stay long enough to maintain a connected silhouette. Broad bends show the layers without creating excessive width.
Straight and wavy dense hair can display the structure clearly, while curly density needs additional shrinkage consideration. The goal is purposeful bulk placement rather than maximum removal. Use lightweight smoothing cream for surface control, heat protectant before heated styling, and a large round brush for broad movement. Refreshing the front may be quick; fully drying and shaping dense collarbone hair is usually a longer wash-day task.
At the salon, point out where your hair becomes widest or feels heaviest and discuss internal adjustment in those areas. Keep perimeter weight and bulk removal as separate decisions. Reshape when new growth makes those zones heavy again or when upper layers stop moving independently from the lower lengths.
Pro tip:
Style dense hair in broad sections when you want flowing movement. Larger bends help the layers connect visually and reduce the need to shape every individual section with repeated heated-tool passes.
Make It Work for You:
If your dense hair is naturally wavy, let the existing pattern provide much of the separation. Internal layering can focus on bulk placement instead of making the cut dependent on frequent styling.
Watch Out For:
Avoid indiscriminate thinning from roots to ends. Random weight removal can produce expansion, short flyaways, or weak tips; target only the areas where density interferes with the intended shape.
Tousled Collarbone Layer Hairstyle

Irregular bends and separated layers give this collarbone cut a relaxed finish without removing its underlying structure. Shorter pieces can begin around the cheekbones or jaw, while longer sections move through the shoulders and perimeter. Some ends remain straight, others bend outward, and crown volume stays loose. A relaxed center or off-center part complements the deliberately varied movement.
Naturally wavy hair can achieve the finish with relatively little reshaping, while straight hair may need selected bends added. Fine hair benefits from retaining enough perimeter weight, and dense hair may need controlled internal movement. Use lightweight mousse for flexible support, heat protectant before thermal styling, and a medium curling iron for occasional bends. A morning refresh may involve only a few flattened sections; creating the full texture from straight, wet hair takes longer.
At the salon, identify the shortest face-framing or crown layer and the desired collarbone perimeter. Those landmarks keep the cut structured even when styling looks loose. Reshape when the upper layers merge into the lower lengths or the perimeter grows enough to change how the ends interact with the shoulders.
Pro tip:
Curl selected mid-length sections in alternating directions while leaving several pieces untouched. Combining styled and natural sections produces more convincing tousled movement than curling every layer with exactly the same technique.
Make It Work for You:
If your hair already dries with irregular waves, refine only sections that flatten or disrupt the silhouette. Existing variation can provide much of the texture while reducing unnecessary heat styling.
Watch Out For:
Tousled texture should not erase the haircut’s structure. Over-separating every layer can make the ends appear thin; preserve a clear perimeter and let irregular movement happen mainly above it.
Airy Blowout Collarbone Layer Hairstyle

A blowout makes collarbone layers especially visible by giving each level broad movement and controlled lift. Face-framing pieces sweep away from the cheeks or jaw, mid-length layers curve through the shoulders, and the perimeter remains full around the collarbones. Crown volume is light rather than exaggerated. A center part produces balanced movement, while a side part creates a stronger sweep on one side.
Straight and wavy textures are practical starting points, although density affects section size and drying time. Fine hair needs lightweight support, while dense hair can require more controlled sections. Use heat protectant before styling, a large round brush for broad curves, and flexible hairspray to preserve movement. Refreshing only the face frame and crown can take several minutes; a complete wash and layered blowout requires substantially more time.
At the salon, explain where the shortest layer should sit without styling as well as where you want it to appear during a blowout. Identify how much collarbone perimeter weight should remain. Reshape when growth makes it difficult to recreate the same movement or the upper layers lose their separation.
Pro tip:
Lift the roots gently, then rotate the brush away from the face through the mid-lengths. Separating root volume from end direction creates a softer blowout than curling each section tightly from roots to tips.
Make It Work for You:
If you prefer lower daily effort, reserve the full blowout for selected days and refresh only the front layers between washes. The collarbone cut can remain wearable with its natural texture elsewhere.
Watch Out For:
Repeated high-heat passes are unnecessary once a section has the correct direction. Use heat protectant, work deliberately, and let each bend cool rather than continually reheating the same layers.
Conclusion
Collarbone layer hairstyle ideas can range from subtle face framing to curls, waves, feathered movement, and fuller blowouts. Fine or lower-density hair often benefits from a stronger perimeter and fewer short layers, while dense hair can use targeted internal shaping to distribute bulk. Curtain or wispy fringe adds forehead coverage, whereas center and side parts keep the front more open. Waves soften the transitions between layers, curls require shrinkage allowance, and feathered finishes create clearer outward movement. Consider your natural texture, density, face shape, preferred fringe, parting, volume, and styling effort together. A practical collarbone cut should retain enough perimeter weight to look balanced while allowing its layers to move even when you choose a simpler daily finish.
Before Your Salon Visit
Choose one or two favorite references and save clear images showing the layers as well as the collarbone-level perimeter. Discuss your texture, density, face shape, preferred length, upkeep, and normal styling routine. Point to the exact fringe, shortest face-framing layer, parting, volume placement, and end finish you like. If a reference relies on a strong wave or blowout, separate that styling effect from the actual layer placement so your stylist can assess how the cut will behave naturally.
FAQs
Where should the shortest layers begin on a collarbone cut?
There is no single required starting point. Cheekbone layers create stronger face framing, while jaw-level layers produce a softer transition and preserve more weight. Your density, texture, preferred styling routine, and desired amount of front movement should help determine the most useful starting landmark.
Do collarbone layers work for fine or low-density hair?
Yes, but fine strands and low density are different characteristics. When overall density is limited, keeping a fuller collarbone perimeter and concentrating shorter layers around the face can preserve coverage. Fine but dense hair may support more internal layering without making the ends appear sparse.
How should collarbone layers be adjusted for curly hair?
Plan the layers according to their dry position because curls can shrink significantly from wet or stretched length. The amount varies across curl patterns and sections. Keeping extra cutting length and considering where bulk naturally collects can help maintain the intended collarbone perimeter and balanced volume.
Do collarbone layers require heat styling every day?
No. Natural waves, curls, and air-dried movement can reveal the layers without daily heat. A feathered or polished blowout requires more directional styling, but between washes you can often refresh only the face frame. When using heated tools, apply heat protectant and avoid unnecessary repeated passes.