14 Gothic Crown Braid Hairstyles for Halloween
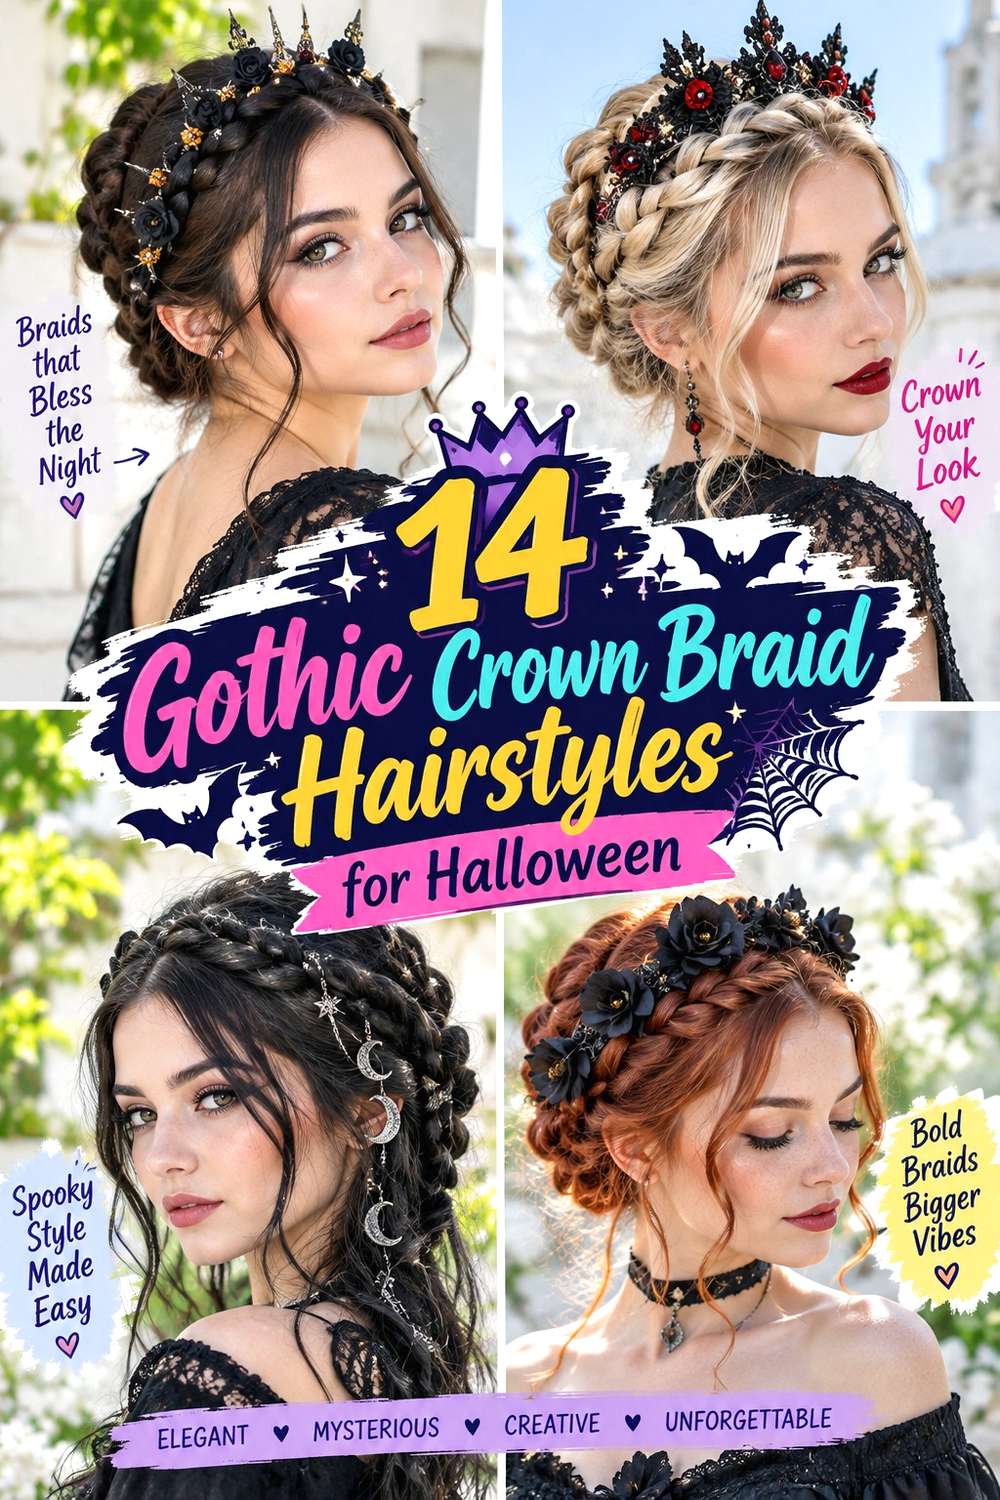
Gothic crown braid hairstyles create a dark, romantic frame by wrapping braided sections around the head like a halo. The defining feature is placement: the braid sits across the crown, temples, or back rather than hanging freely. Medium and long hair offer the easiest wrapping length, but shorter hair can use two braids that meet and pin together. Loose tendrils, center parts, side parts, and accessory placement can make the same basic structure feel softer, sharper, or more dramatic.
Straight, wavy, curly, and coily textures can all support a crown braid when section size and tension match the hair. Fine or lower-density hair may look fuller with moderately narrow braids that are loosened only a little, while dense hair can support wider sections if the weight is distributed comfortably. Curly and coily hair can keep visible texture inside the braid, and shrinkage should be considered before deciding where the crown will sit.
Most crown braids take longer to build than to refresh. A full styling session may involve detangling, parting, braiding, pinning, and accessory placement, while later maintenance usually means replacing a shifted pin or smoothing one loose section. Comfortable tension matters more than extreme tightness, especially for an evening style. Ribbons, chains, pins, and clips should decorate a secure braid rather than carry the structure.
Quick List
- Black Ribbon Halo Crown Braid Hairstyle
- Double Dutch Gothic Crown Braid Hairstyle
- Loose Romantic Gothic Crown Braid Hairstyle
- Side-Swept Gothic Crown Braid Hairstyle
- Silver Chain Gothic Crown Braid Hairstyle
- Velvet Bow Gothic Crown Braid Hairstyle
- Curly Texture Gothic Crown Braid Hairstyle
- Half-Up Gothic Crown Braid Hairstyle
- Pearl Pin Gothic Crown Braid Hairstyle
- Low Wrapped Gothic Crown Braid Hairstyle
- Fishtail Gothic Crown Braid Hairstyle
- Messy Tendril Gothic Crown Braid Hairstyle
- Twin Gothic Crown Braid Hairstyle
- Sleek Center-Part Gothic Crown Braid Hairstyle
Black Ribbon Halo Crown Braid Hairstyle
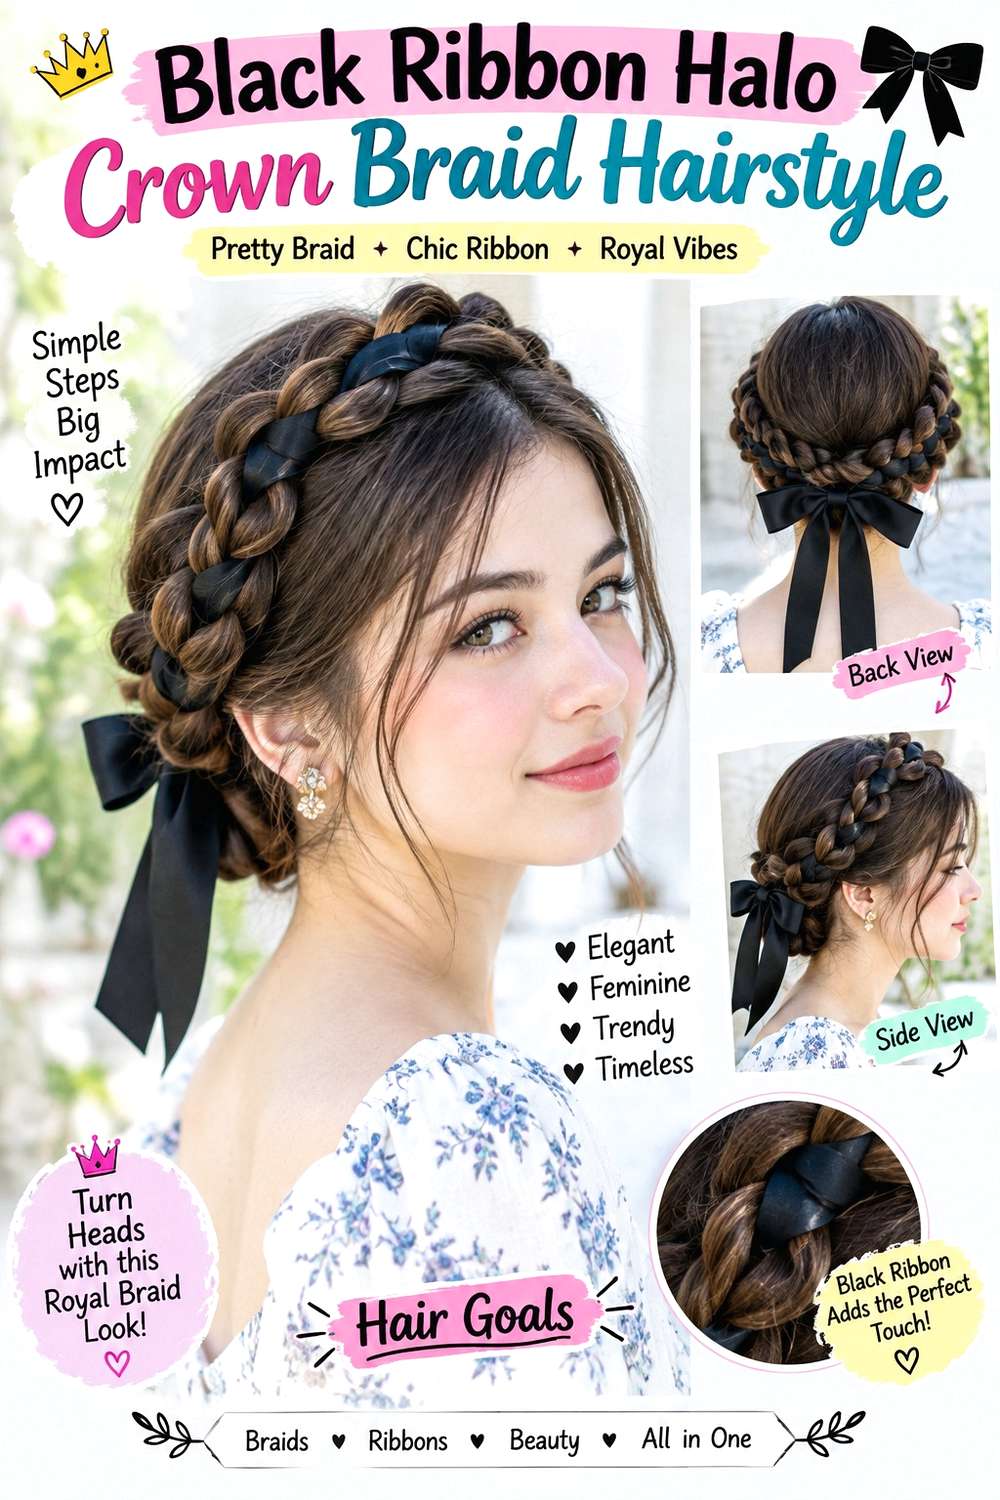
A black ribbon threaded beside a halo braid gives the crown shape a clear gothic accent without turning the braid itself into a complicated construction. Start the braid above one ear and guide it around the head, keeping the width broad enough to remain visible from the front and back. Let the ribbon follow the outer edge rather than disappear inside the weave. A few longer pieces can frame the cheekbones or jaw, while the rest of the hair stays gathered into the crown.
Use light texturizing spray for grip, bobby pins to secure the wrapped braid, and a narrow black ribbon as the decorative finish. Straight and wavy hair often braid easily with added texture, while curls and coils can keep their natural pattern inside the sections. The full style takes moderate time because wrapping and pinning require balance, but a quick refresh usually means replacing one loose pin or retightening the ribbon.
For professional styling, specify the braid width, whether you want it high across the crown or closer to the hairline, and how much tension feels comfortable. Secure the braid completely before threading or tying the ribbon. If the ribbon shifts during wear, adjust it separately instead of tightening the entire crown.
Pro tip:
Thread or tie the ribbon only after the halo is fully pinned. Working around a stable braid lets you adjust the black accent without loosening the sections that provide the actual support.
Make It Work for You:
If your hair is shorter, create two side braids that meet at the back and tie the ribbon over their join. You keep the halo effect without forcing limited length around the head.
Watch Out For:
Do not weave a thick ribbon through very small braid sections. The fabric can distort the pattern; use a narrower ribbon or larger braid loops so both elements stay clearly defined.
Double Dutch Gothic Crown Braid Hairstyle
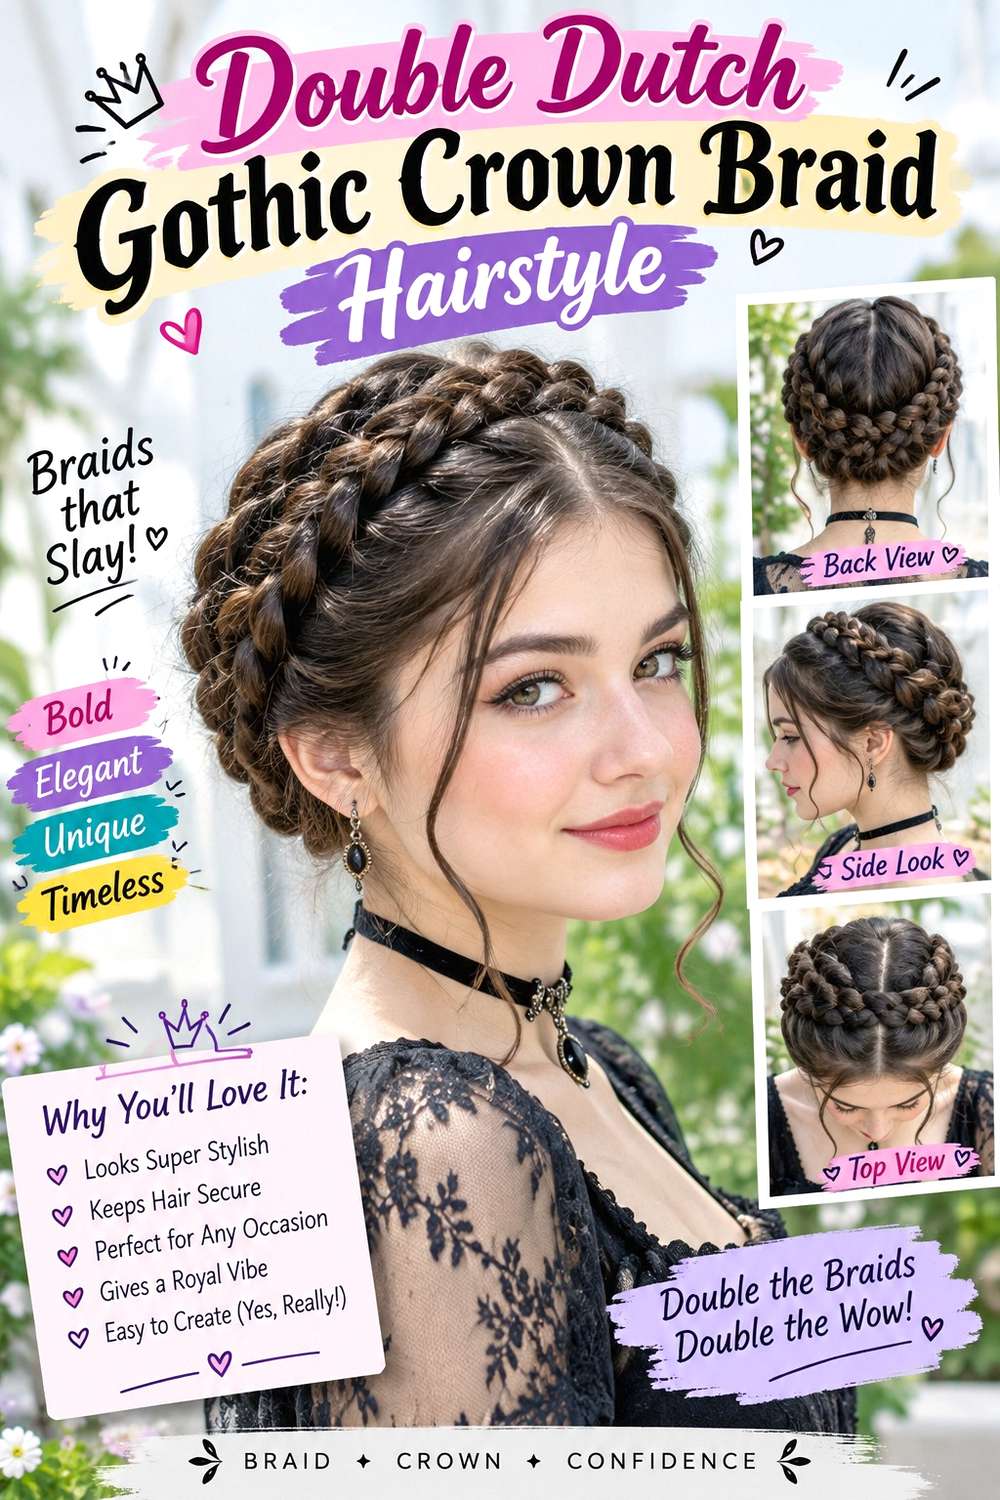
Two Dutch braids create a more structured gothic crown by giving the top of the head visible, raised texture. Part the hair through the center or slightly off-center, braid each side from the front toward the back, then curve the lengths upward and pin them into a connected crown. Keep the braids similar in width, but allow small differences in texture so the result does not look unnaturally rigid. The ends should tuck beneath the opposite braid rather than protrude.
Use light styling cream to control short pieces, small clear elastics to secure the braid ends, and bobby pins for the hidden wrap. Medium to long hair works most easily, while dense hair may need slightly wider sections to distribute weight. Curly or coily textures can remain visible within the Dutch pattern. Building both braids takes longer than a single halo, but maintenance is usually limited to checking the back join and replacing any shifted pin.
At a salon or styling appointment, explain where you want the two braids to meet and how raised you want the Dutch sections to appear. Comfortable scalp tension matters. If one side loosens, repair that braid independently rather than tightening both sides and changing the balance of the crown.
Pro tip:
Check both braid heights in a mirror before wrapping the ends. Correcting the base position early is much easier than trying to disguise uneven placement after the crown is pinned.
Make It Work for You:
If your hair is very dense, use slightly larger Dutch sections and a broader crown. Spreading the hair across more space can reduce bulk while keeping the raised braid pattern visible.
Watch Out For:
Avoid pulling one braid tighter simply to match the other. Adjust the outer loops or hidden pins instead, because mismatched tension can make the crown uncomfortable as the evening continues.
Loose Romantic Gothic Crown Braid Hairstyle
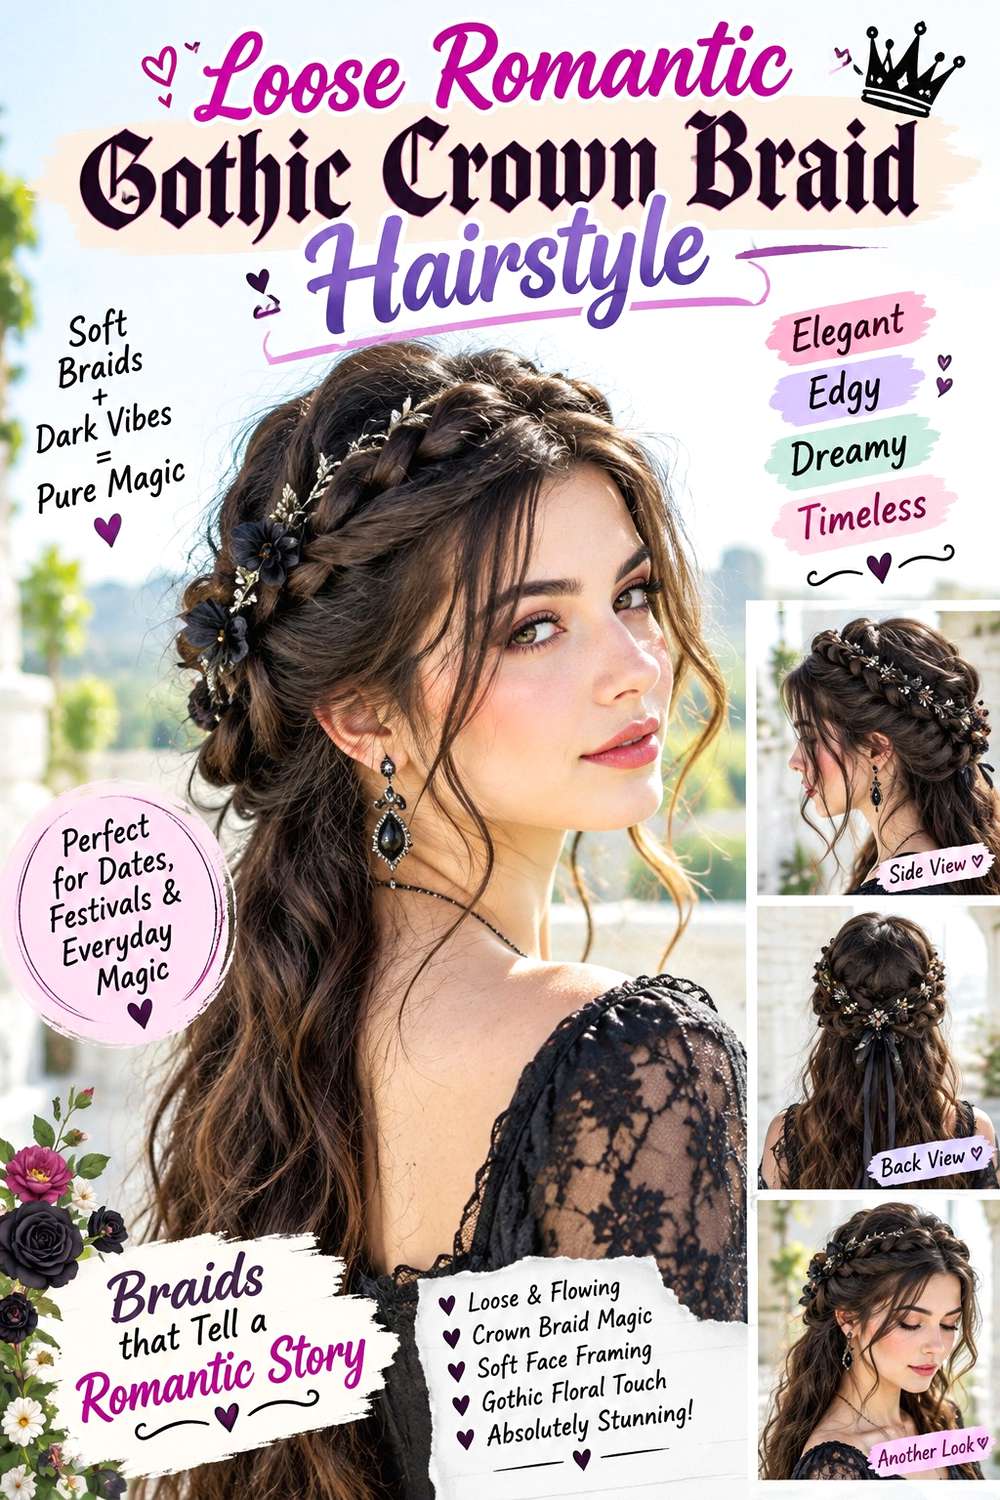
A looser crown braid creates a softer gothic mood by keeping the woven shape visible without pressing it tightly against the scalp. Build the braid around the upper sides and back, then gently widen selected sections after the ends are secured. Leave a few intentional tendrils around the temples and jaw, and allow slight crown softness rather than smoothing every strand flat. Medium and long hair give the easiest wrap, though two joined braids can recreate the shape on shorter lengths.
Use light texturizing spray for grip, a small clear elastic for the braid end, and bobby pins to anchor the crown. Wavy and curly textures naturally support the softer surface, while straight hair may benefit from the added grip before braiding. A full styling session takes moderate time, but a later refresh can focus on the loose front pieces and any pin that has shifted.
If a stylist is creating the look, describe how much of the braid you want widened and where the crown should sit relative to the ears. A very low crown can resemble a wrapped bun, while a higher placement reads more clearly as a halo. Maintain softness by adjusting individual sections; widening the whole pinned braid can weaken the structure and release shorter layers.
Pro tip:
Choose the face-framing pieces before you braid, then leave them untouched while building the crown. This prevents accidental over-pulling and keeps the loose front sections intentional rather than random.
Make It Work for You:
For fine or lower-density hair, loosen only the outermost braid loops instead of every section. Selective widening creates softness while helping the crown retain enough visible structure and fullness.
Watch Out For:
Do not keep tugging the braid wider after it has softened. Excessive loosening can release shorter layers and weaken hidden anchors, turning a controlled crown into an unstable, sagging shape.
Side-Swept Gothic Crown Braid Hairstyle
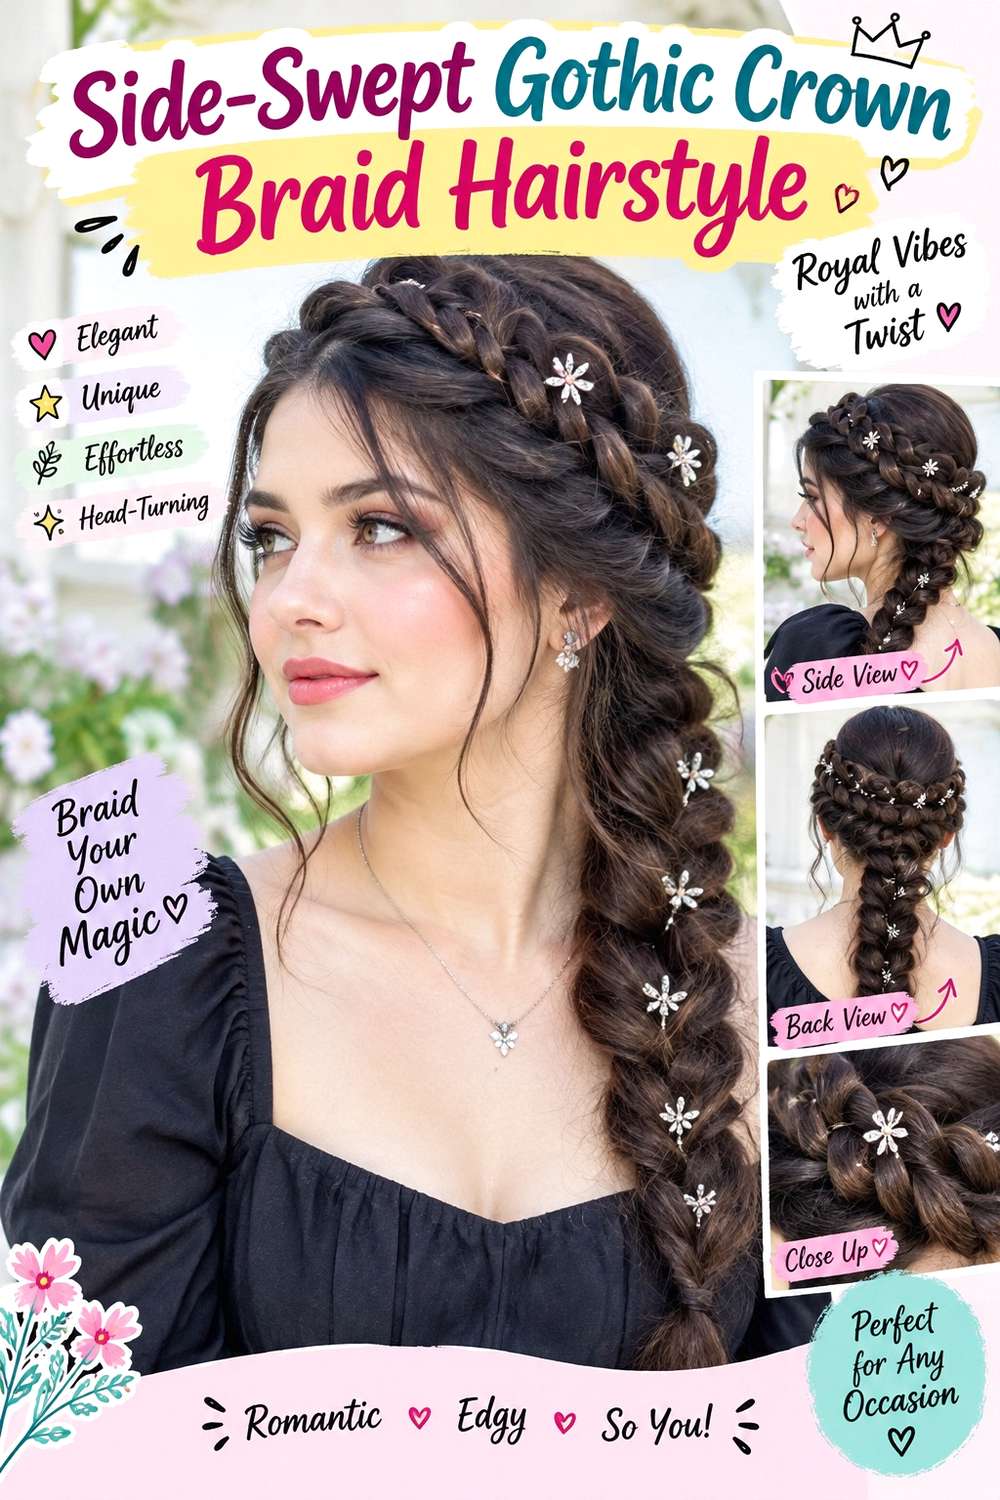
A side-swept crown braid creates intentional asymmetry by placing more braid detail and volume over one temple. Start with a deep side part, braid the heavier front section across the hairline, and guide it toward the opposite side before wrapping the remaining length around the back. Keep the lighter side smoother so the braid’s direction is easy to read. One or two face-framing pieces can remain loose on the open side if you prefer a softer finish.
Use light styling cream to keep the front braid neat, a small clear elastic for the end, and bobby pins to secure the wrapped section. Straight, wavy, curly, and coily textures can all use this placement, although shrinkage should be considered before deciding how far the braid will travel. The full style takes longer than a simple side braid, while a quick refresh may involve smoothing the front and reinforcing one anchor near the back.
For professional styling, specify how deep you want the side part and where the braid should cross the forehead or temple area. That placement determines how dramatic the asymmetry feels. If the front section begins pulling, loosen it and strengthen the hidden back anchors instead of increasing tension along the hairline.
Pro tip:
Set the deep side part before taking the first braid section. A clean starting point makes the asymmetry easier to control and prevents repeated combing near an already finished braid.
Make It Work for You:
If your hair is curly, let the front braid keep some texture instead of smoothing it flat. The side sweep can still look deliberate while preserving the natural pattern within the sections.
Watch Out For:
Watch the tension above the fuller temple. A braid that pulls too tightly there can feel uncomfortable quickly; loosen the front slightly and strengthen the back anchor instead.
Silver Chain Gothic Crown Braid Hairstyle
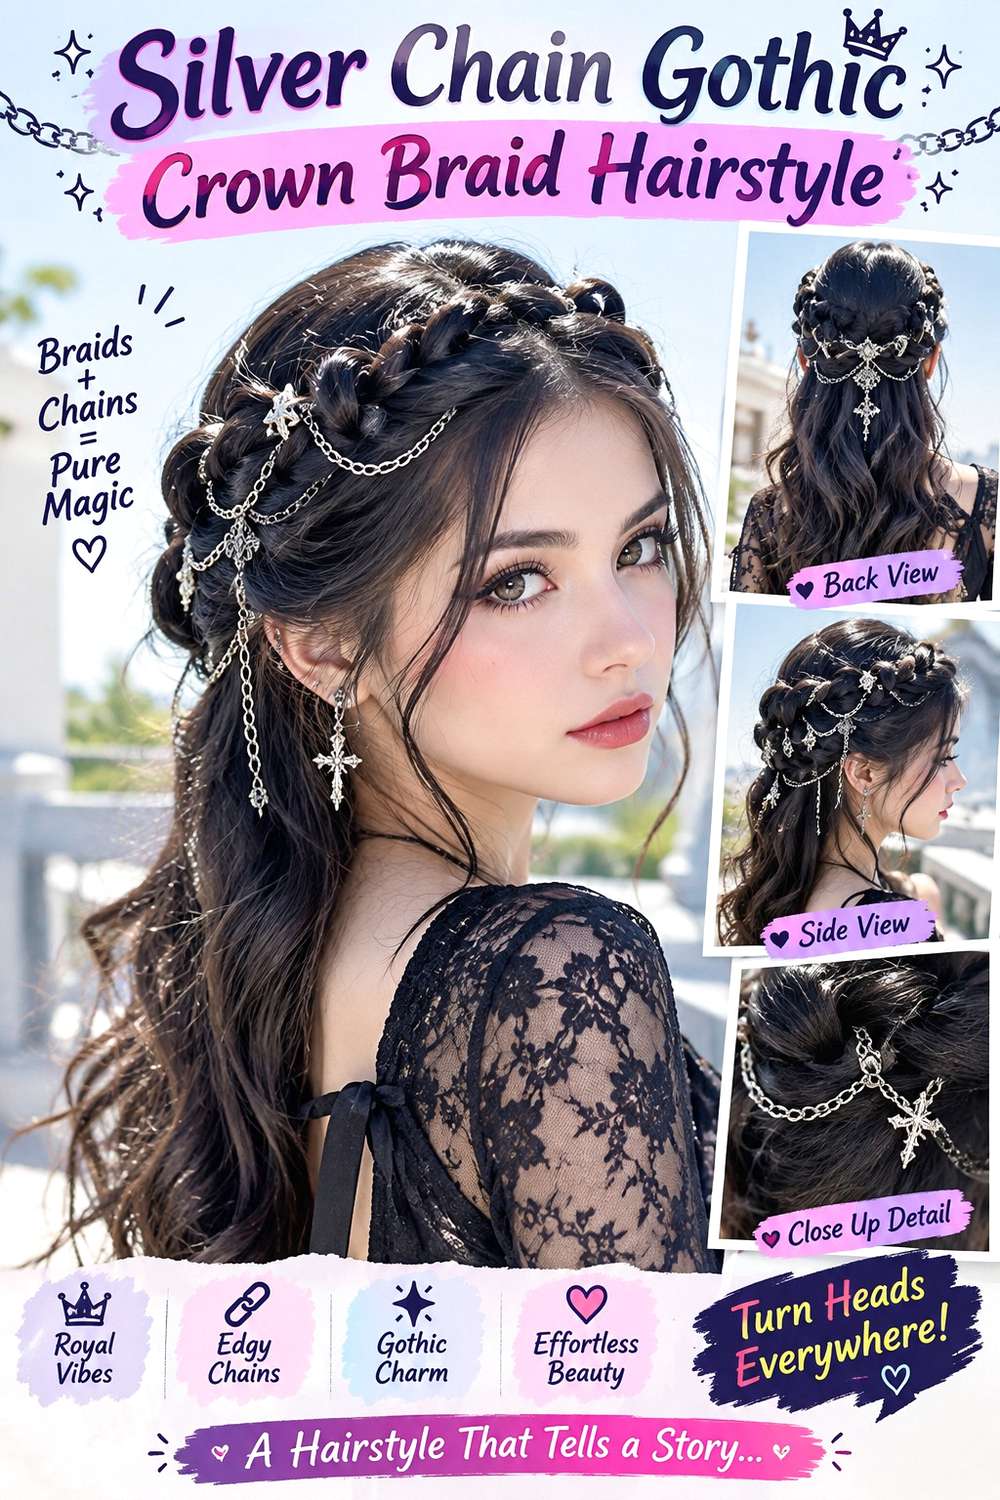
A fine silver chain can make a crown braid feel darker and more ornate while still leaving the braid as the main structure. Build a stable halo braid first, then lay the chain along one outer edge or weave it through a few broad sections. Keep the braid medium in width so both the texture and metallic detail remain visible. A clean center part or swept-back front works well when the chain already provides plenty of decoration.
Use texturizing spray for braid grip, bobby pins for the wrapped crown, and a lightweight hair-safe chain as the accent. Medium and long hair provide enough length for a continuous wrap, while shorter hair can use two joined side braids. The full style takes extra time because accessory placement needs care; the refresh should be simpler, focusing on the braid anchors and any chain section that has shifted.
If a stylist is creating the look, explain exactly where you want the chain to begin and end, and ask that it sit on secured braid sections rather than loose strands. The chain should never carry the braid’s weight. During removal, take the metallic accent out before undoing pins or opening the braid so individual strands do not wind around it.
Pro tip:
Test the chain against a finished braid section before placing it around the whole crown. This reveals whether the links catch hair and lets you replace a rough accessory early.
Make It Work for You:
For lower-density hair, choose a very fine chain and leave more braid visible between metallic sections. Lighter decoration keeps the crown from appearing visually crowded or weighed down.
Watch Out For:
Do not pin a chain directly into loose hair beside the braid. Anchor it to stable woven sections so normal head movement does not drag the metal through individual strands.
Velvet Bow Gothic Crown Braid Hairstyle
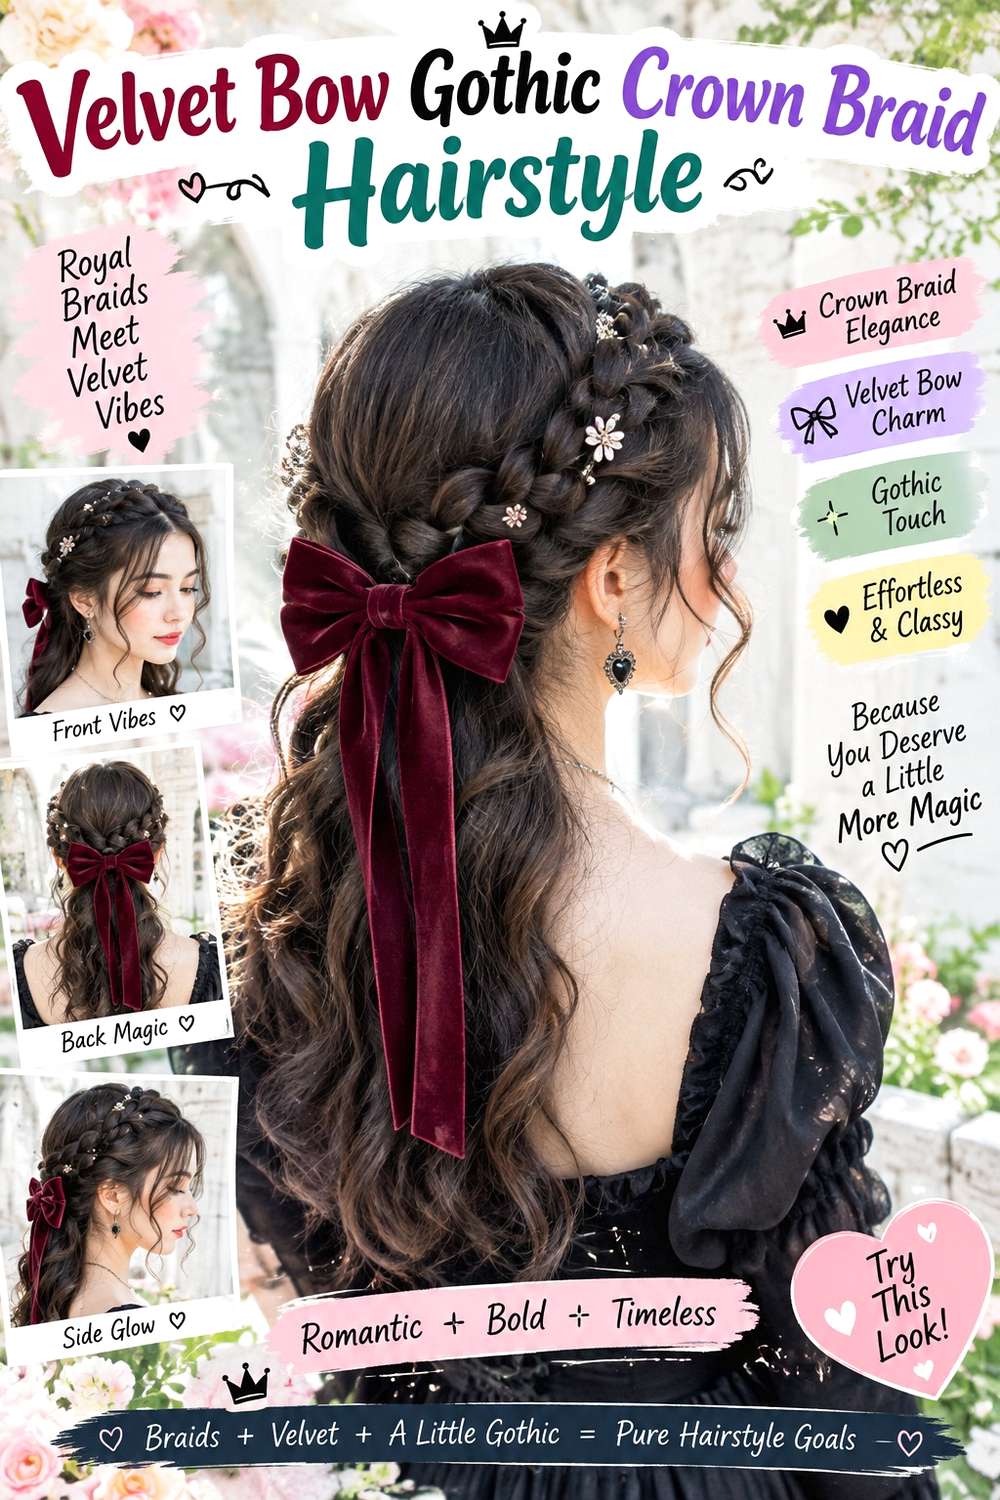
A velvet bow softens the severity of a gothic crown braid while keeping the overall mood dark and romantic. Form a crown braid that travels across the upper back of the head or wraps around the full halo, then secure a small bow where the braid ends meet. Keep the bow compact enough that the braided texture remains visible. A center part can make the front symmetrical, while loose cheekbone- or jaw-length pieces add movement around the face.
Use a small clear elastic to secure the braid end, bobby pins to anchor the crown, and a velvet bow for the finish. Wavy, straight, curly, and coily hair can all support the style; dense hair may need a wider braid, while lower-density hair may look fuller with a narrower crown that is only gently loosened. Styling takes moderate time, but refreshing is usually limited to tightening the hidden join and retieing the bow.
For professional styling, specify the bow position and whether you want the crown to sit high or closer to the back of the head. The bow should attach to a secure meeting point rather than hold the two braid ends together by itself. If it rotates during wear, adjust the bow separately and leave the structural pins undisturbed.
Pro tip:
Tie the bow after checking the crown from the back. Centering the accessory over the meeting point can hide the structural join while keeping the braid itself visible on both sides.
Make It Work for You:
If your crown braid is narrow, use a smaller velvet bow with short tails. Matching the accessory scale to the braid keeps the soft gothic detail from overpowering the woven texture.
Watch Out For:
Do not tighten the bow to fix a loose crown. Retieing fabric cannot replace structural support; secure the braid with hidden pins first, then adjust the bow only for appearance.
Curly Texture Gothic Crown Braid Hairstyle
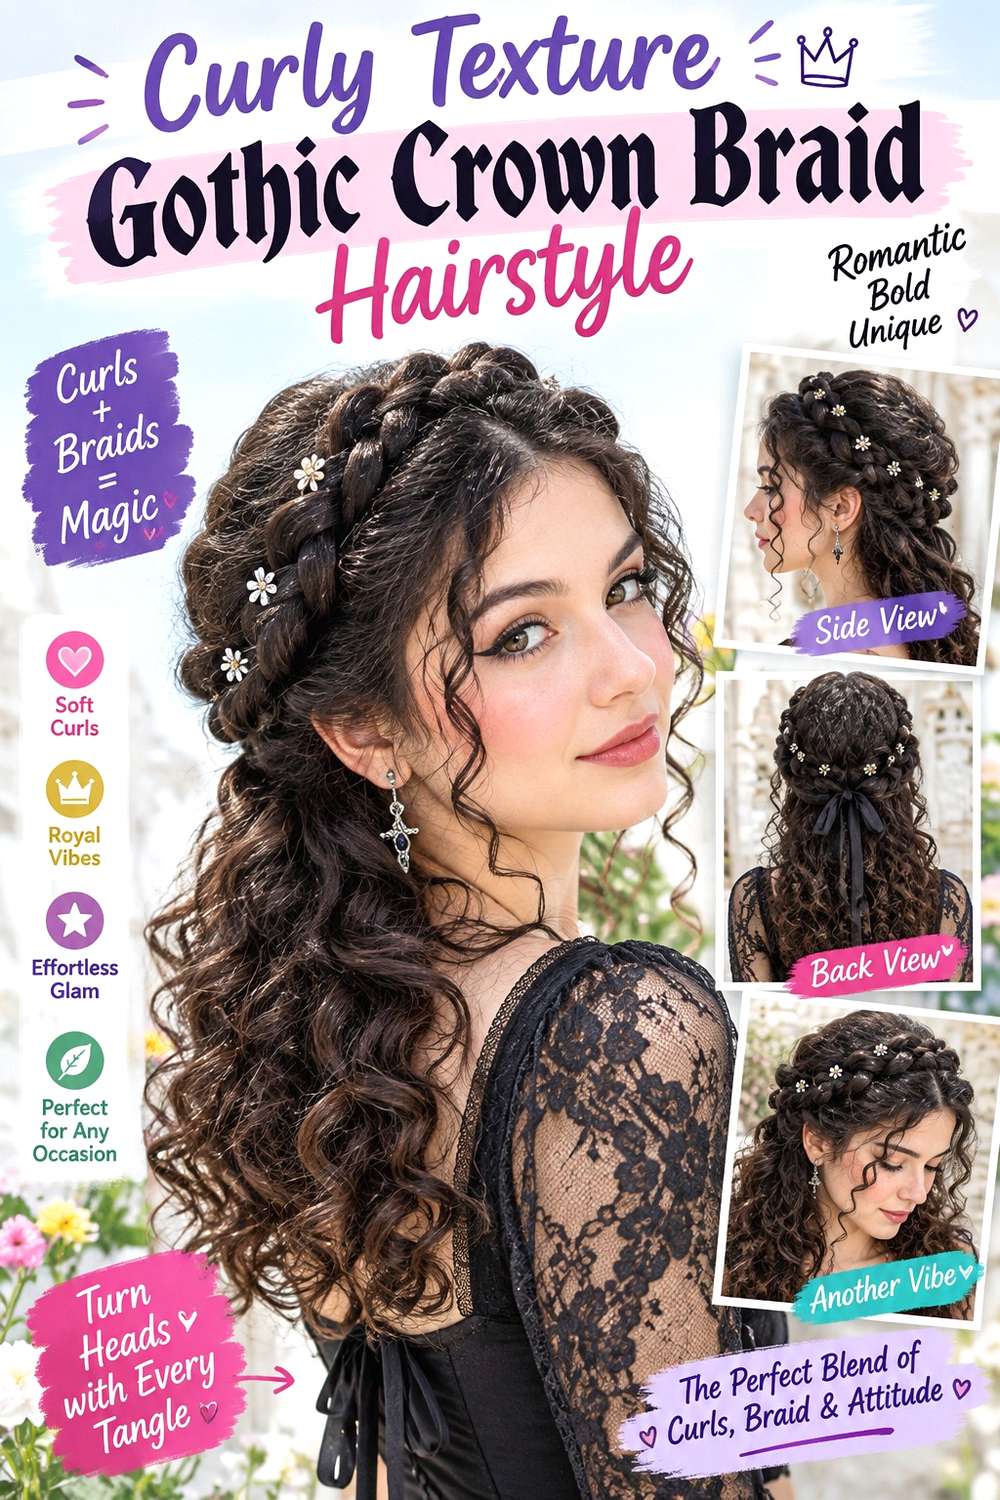
Natural curls can give a gothic crown braid extra dimension because the braid retains visible texture instead of becoming completely smooth. Let the curls reach their finished dry shape, then braid broad sections around the head while keeping enough softness that the curl pattern still shows. A few spirals can remain free at the temples or nape, and the crown may sit slightly higher if shrinkage shortens the available wrapping length. The goal is a secure halo that still looks like curly hair.
Use lightweight leave-in conditioner for flexibility, curl gel to reinforce definition, and bobby pins to anchor the wrapped braid. A full wash-day routine can take much longer than the braiding itself because the curls need to dry before placement is judged accurately. A later refresh is shorter: redefine one or two loose spirals and replace any pin that has shifted. Dense curls may need broader braid sections to distribute weight comfortably.
At a salon or styling appointment, explain the desired crown height and braid width after the hair is dry. Shrinkage makes wet measurements unreliable for placement. If the braid begins to feel tight as it settles, loosen the affected section and strengthen the hidden anchor elsewhere instead of pulling harder around the hairline.
Pro tip:
Leave a few well-defined curls out before braiding rather than pulling them from the finished crown. This preserves their pattern and prevents the main braid from loosening around the temples.
Make It Work for You:
If your curls are shorter after shrinkage, build two braids that meet rather than forcing one continuous wrap. The joined approach preserves the crown shape with less stretching and tension.
Watch Out For:
Do not brush dry curls smooth solely to make the braid neater. Excessive brushing can create unnecessary frizz; use controlled sections and allow natural texture to remain visible in the weave.
Half-Up Gothic Crown Braid Hairstyle
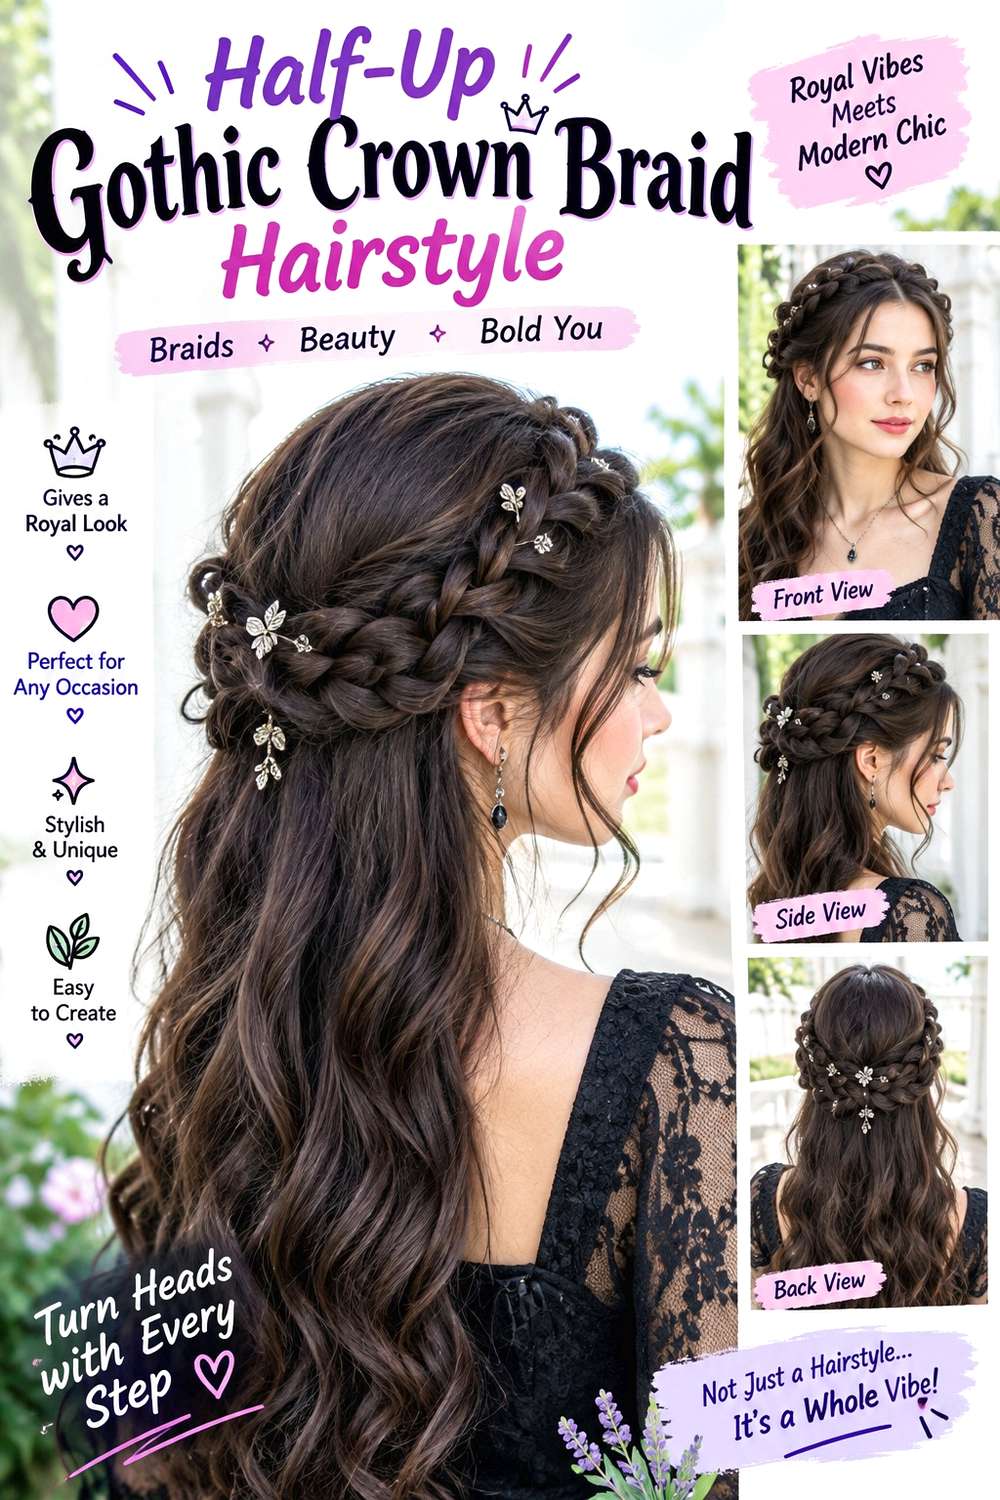
A half-up crown braid leaves the lower length loose while creating a braided band across the back and sides. Take sections from each temple, braid them backward, and pin the two braids together so they form a partial crown rather than wrapping all the hair. The loose section can stay straight, wavy, curly, or coily, which makes this one of the most flexible options. Keep a little crown lift above the braids so the upper section does not look pressed flat.
Use light texturizing spray for grip, small clear elastics to secure the braid ends, and bobby pins to hide the join. Medium hair can usually support this style because the braids do not need to travel around the whole head, while long hair gives more room for wider sections. A full style is moderately quick compared with a complete halo, and a refresh may only require tightening the back join.
For professional styling, explain how high you want the braided band and how much hair should remain loose underneath. Gathering too much can make lower-density hair look sparse, while gathering too little can make the crown detail disappear on dense hair. If one braid loosens, reinforce its anchor independently rather than tightening both sides around the temples.
Pro tip:
Anchor each side braid separately before joining them at the back. Independent support keeps the half-up crown stable even if one side softens while the loose lengths move.
Make It Work for You:
For shoulder-length hair, place the joined braids slightly higher and keep them narrow. Shorter sections then reach the back more comfortably while leaving enough length down for balance.
Watch Out For:
Do not gather such a large upper section that the loose hair underneath looks sparse. Reduce the braid sections and let the lower texture provide more of the overall silhouette.
Pearl Pin Gothic Crown Braid Hairstyle
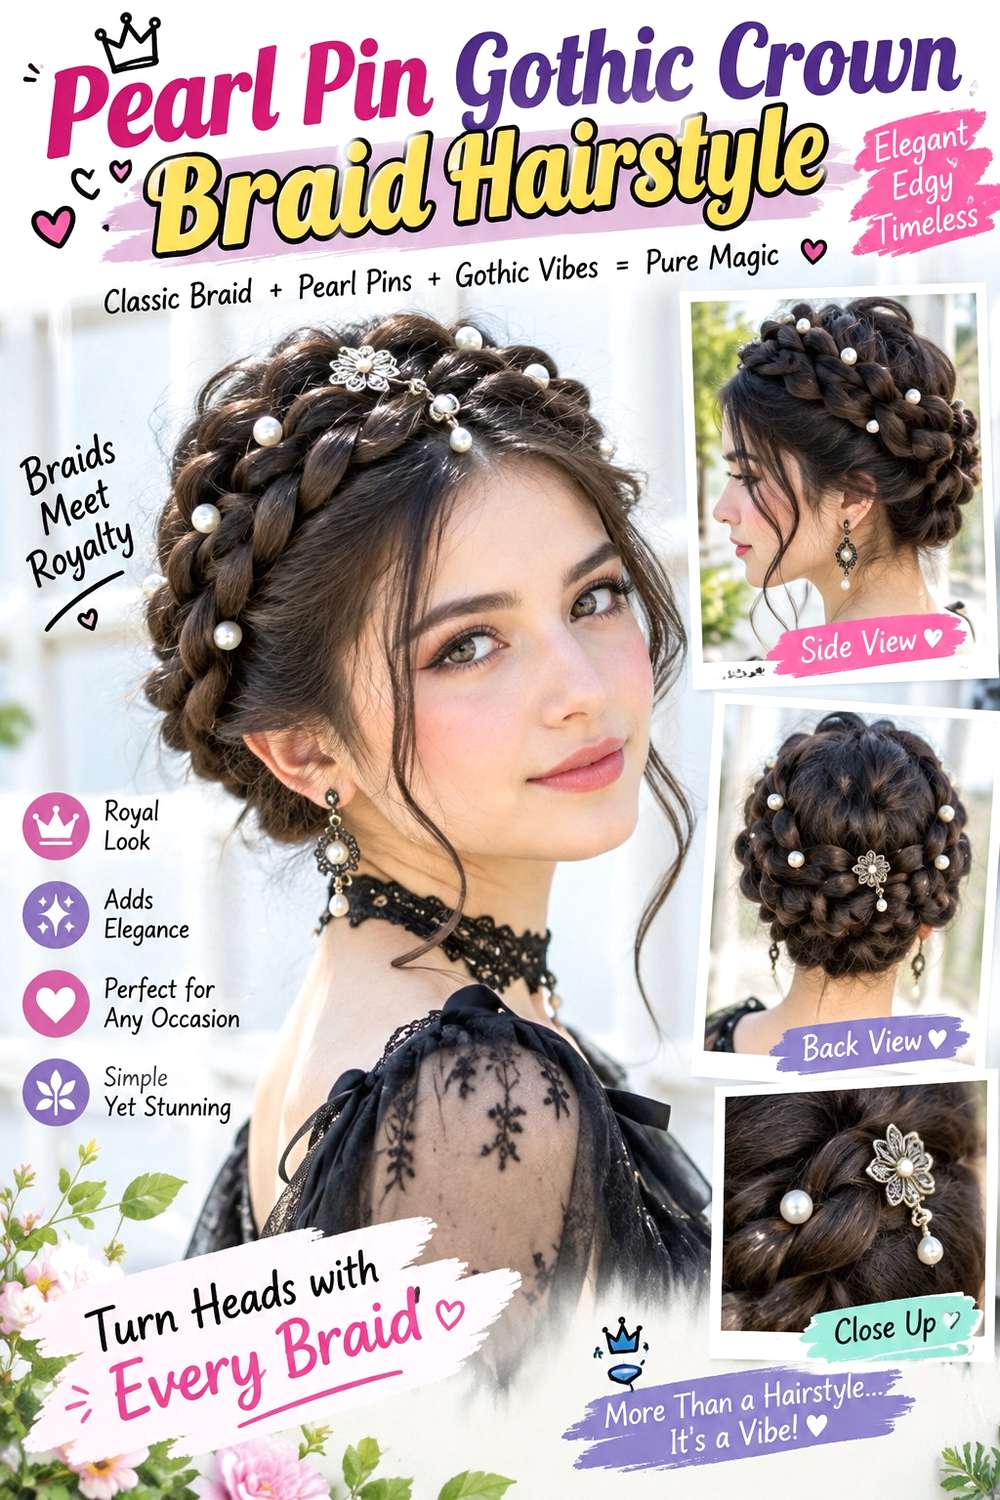
Pearl pins create an elegant contrast against a darker gothic crown braid when they are spaced deliberately instead of covering the weave. Build a secure braid around the crown, then place a few pearl-topped pins along one side or across the back join. Keep the front simple with a center part, side part, or a few longer tendrils so the accessories stay easy to see. The braid can remain neat or be loosened slightly for texture.
Use light styling cream to control short pieces, bobby pins for the structural crown, and pearl pins as decorative accents. Straight and wavy textures may produce a smoother braid, while curly and coily hair can keep more surface texture. The full style takes extra time because pin spacing needs to be checked from several angles, but the refresh is simple: replace only a decorative or structural pin that has moved.
For a stylist, specify whether you want the pearls concentrated at the back, around one temple, or evenly spaced across the crown. Decorative pins should enter stable braid sections without becoming the main anchors. Remove the pearls before undoing the braid. If one starts slipping during the evening, secure the underlying braid first rather than pushing the decorative pin deeper into loose hair.
Pro tip:
Space the pearl pins after viewing the crown from several angles. A few deliberate placements usually show the braid better than a dense row that hides the woven pattern.
Make It Work for You:
If your hair is fine, use smaller or fewer pearl pins and keep them concentrated near the back join. Less accessory weight can improve comfort while preserving visible braid texture.
Watch Out For:
Do not push a slipping pearl pin deeper into loose strands. Reinforce the braid underneath first, then reinsert the decorative pin into a stable woven section where it can sit securely.
Low Wrapped Gothic Crown Braid Hairstyle
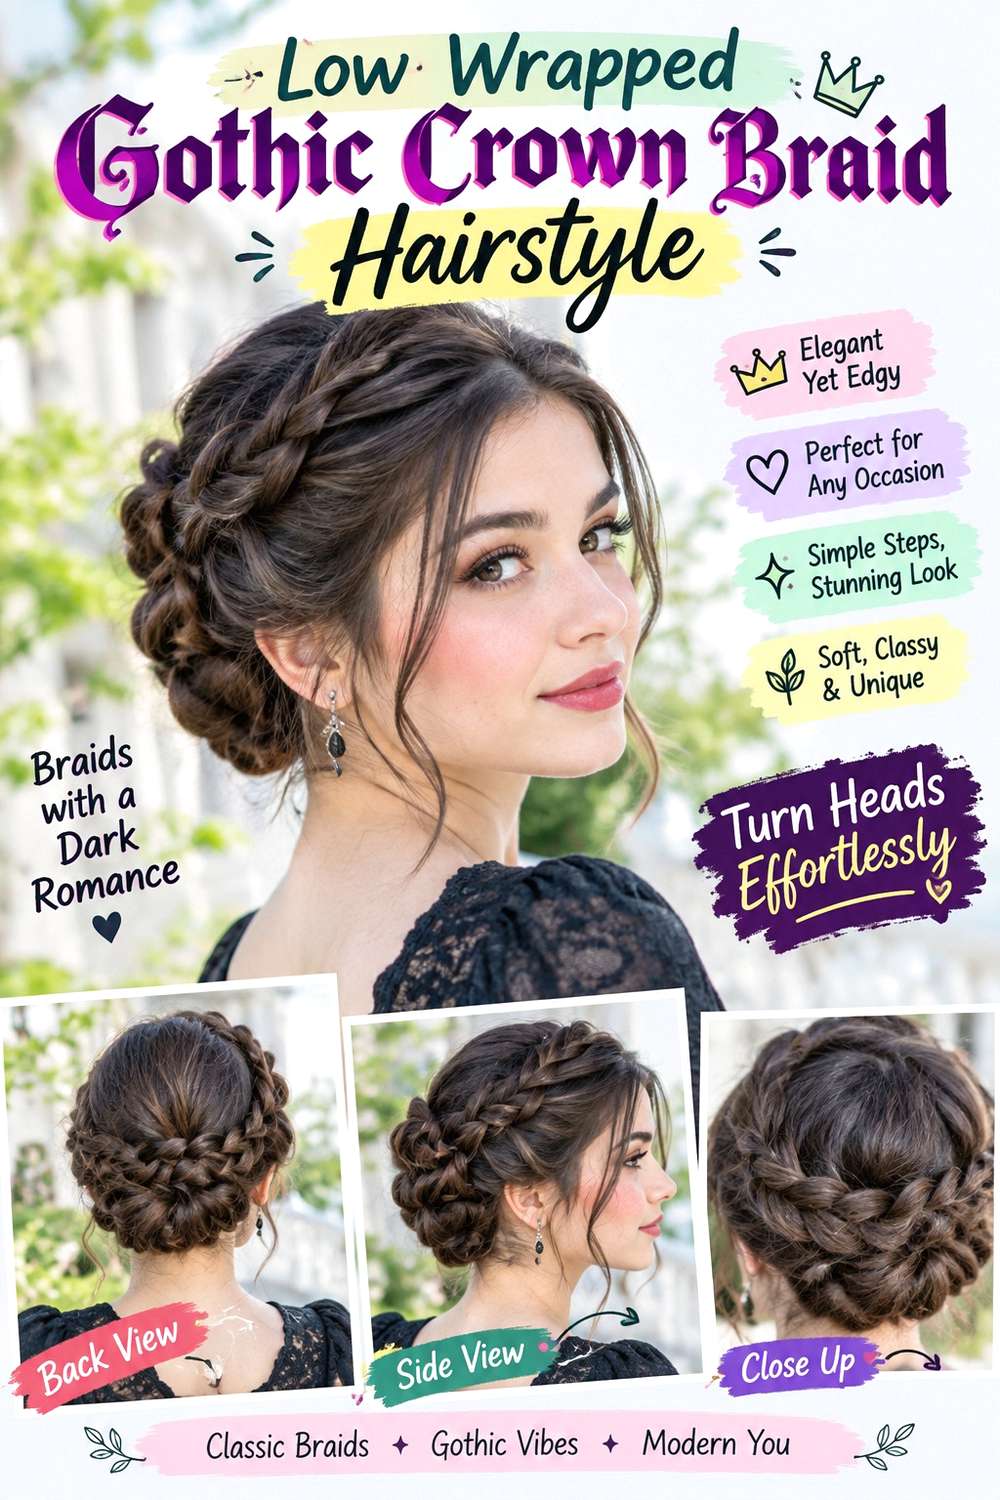
A low wrapped crown braid sits closer to the nape and back of the head, creating a darker, more understated halo than a braid placed high near the hairline. Begin near one ear, braid around the lower back, and pin the remaining length beneath the opposite side. Keep the front softly parted and allow a little volume above the braid so the head does not look flattened. Longer face-framing pieces can remain free if they do not interfere with the low wrap.
Use light texturizing spray for grip, a small clear elastic for the braid end, and bobby pins to anchor the nape section. Medium to long hair works well, though dense hair may need extra support because the weight sits lower. The complete style takes moderate time, while a quick refresh is usually limited to the nape pins and front pieces. Curly or wavy texture can remain visible within the braid for added softness.
At a salon or styling appointment, specify how low you want the crown and whether it must clear a costume collar or cape. This detail matters because repeated fabric contact can loosen the wrap. If the braid sags, support the lower edge with hidden pins rather than tightening the front sections around the scalp.
Pro tip:
Check the low crown while wearing your planned collar or cape. If fabric touches the braid every time you turn, move the wrap slightly higher before final pinning.
Make It Work for You:
If your hair is curly or coily, allow texture to show through the low wrap instead of smoothing the nape completely. The placement remains clear while the braid feels less compressed.
Watch Out For:
Avoid placing all supporting pins at one central point. Spread anchors along the low wrap so the braid’s weight is distributed and the nape does not feel pinched.
Fishtail Gothic Crown Braid Hairstyle
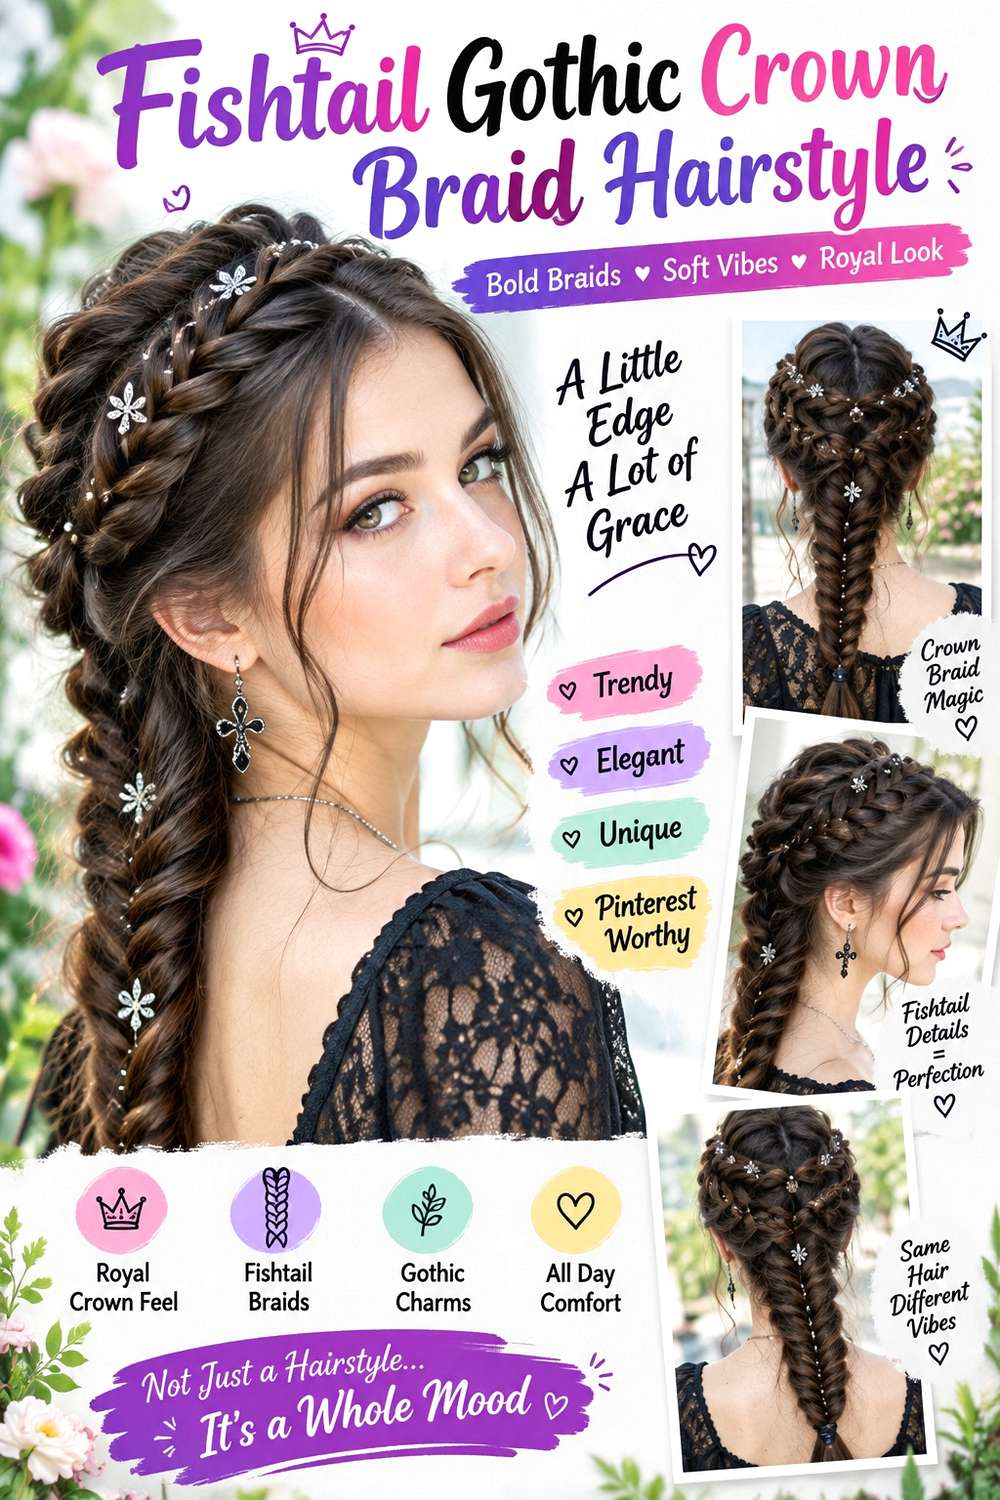
A fishtail crown braid gives the halo a finer, more intricate texture than a standard three-strand or Dutch braid. Create one or two fishtail sections, depending on your length, then curve them around the upper sides and back of the head. Keep the weave firm while building it, then widen only the outer edges slightly after the ends are secured. A center part can make the crown balanced, while a few soft tendrils prevent the detailed braid from feeling too severe.
Use light texturizing spray for grip, small clear elastics for the fishtail ends, and bobby pins for the wrapped anchors. Long hair makes a continuous fishtail easier, while medium hair can use two joined braids. Styling takes longer because the crossover sections are smaller, but maintenance is straightforward once pinned. A quick refresh usually means tightening an end or replacing one hidden pin.
For professional styling, discuss the finished braid width and whether you want a continuous halo or two braids meeting at the back. Excessive loosening can expose gaps, especially on layered or lower-density hair. If the crown softens during wear, adjust individual woven sections rather than pulling the entire braid wider and weakening its support.
Pro tip:
Build the fishtail firmly first and loosen it only after both ends are secure. This preserves the internal weave while letting you soften the visible outer edge in controlled steps.
Make It Work for You:
For dense hair, use slightly larger crossover pieces so the fishtail does not become unnecessarily time-consuming. The pattern remains recognizable while the finished crown feels less bulky.
Watch Out For:
Do not widen every fishtail loop equally. Over-loosening can reveal gaps and short layers; concentrate softness where the braid looks narrow and leave stable sections mostly untouched.
Messy Tendril Gothic Crown Braid Hairstyle
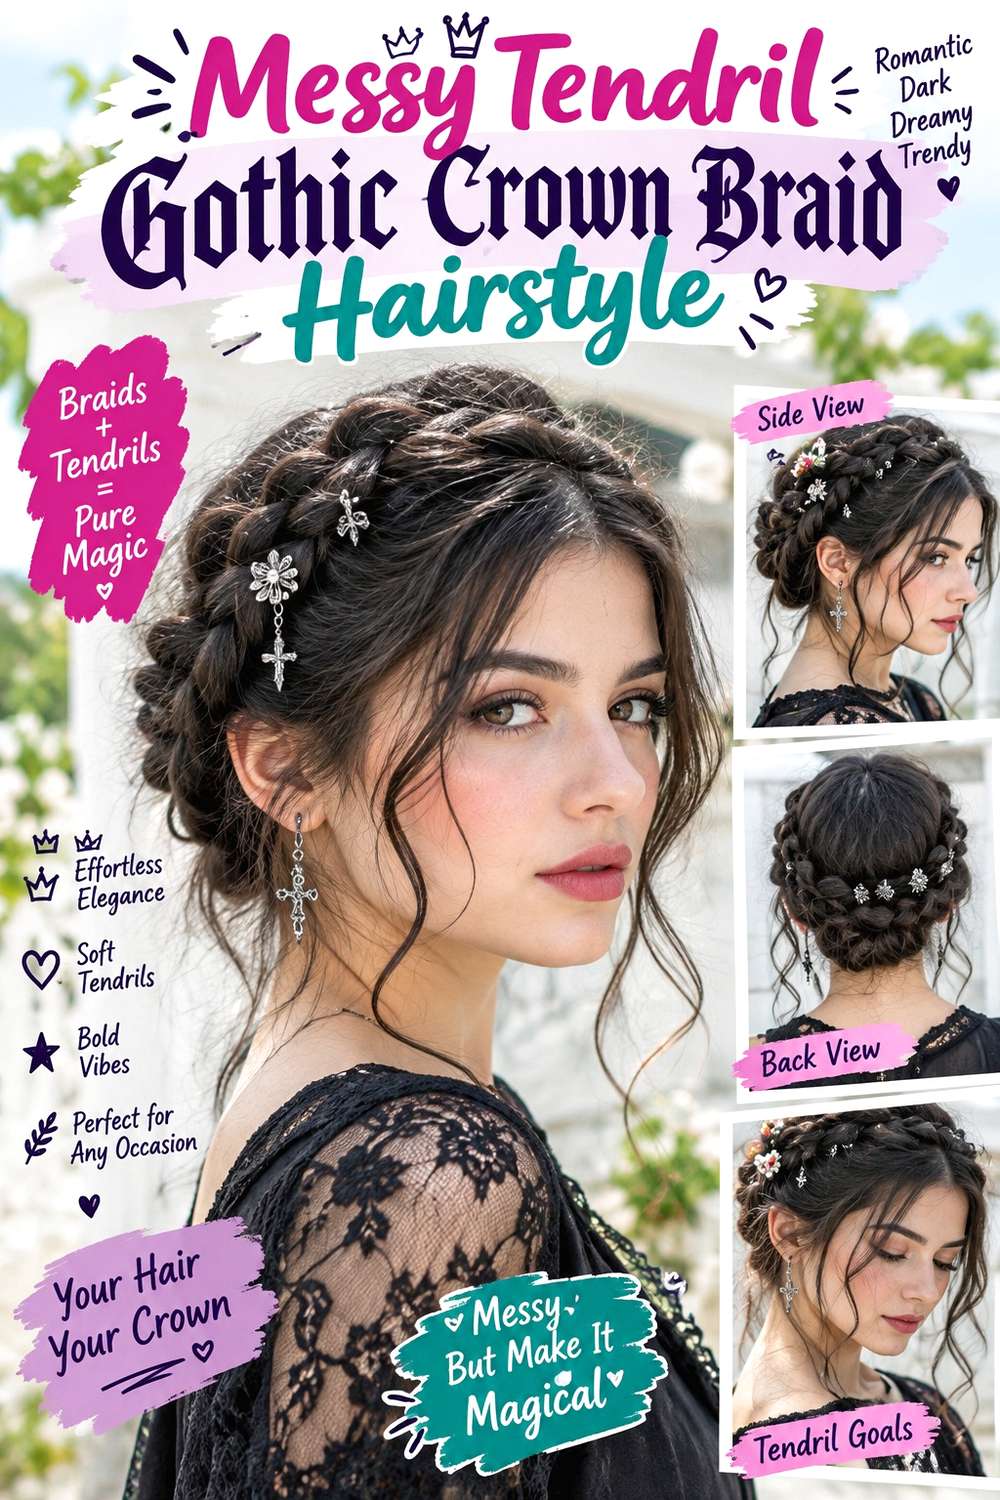
A crown braid with loose tendrils creates a deliberately undone gothic finish while keeping the main structure secure. Build a medium-width braid around the upper sides and back, then leave selected pieces free near the temples, ears, and nape. The loose sections should look intentional rather than random, with enough length to curve softly around the face. Keep the crown slightly relaxed, but preserve a clear braided outline so the style does not collapse into an ordinary messy updo.
Use light texturizing spray for braid grip, bobby pins to secure the crown, and flexible hairspray to control only the tendrils that need help holding their shape. Wavy and curly hair naturally support the softer surface, while straight hair may need more grip before braiding. The complete style takes moderate time, but the refresh can focus on just the front pieces and any loosened anchor.
At a salon or styling appointment, specify how many tendrils you want and where they should fall. Choosing them before the braid is built prevents random strands from being pulled out later. If wind or dancing creates extra flyaways, secure those new pieces instead of releasing more hair, which can gradually weaken the crown’s structure.
Pro tip:
Shape the tendrils after the crown is secure, working only on the pieces already left out. This keeps the braid stable and prevents the front from becoming progressively messier.
Make It Work for You:
For straight hair, keep the tendrils slightly longer and bend them softly rather than creating tiny curls. The relaxed movement suits the undone crown without demanding constant touch-ups.
Watch Out For:
Do not confuse random flyaways with intentional softness. If new pieces escape during wear, pin them back instead of pulling out more hair and weakening the braid’s silhouette.
Twin Gothic Crown Braid Hairstyle
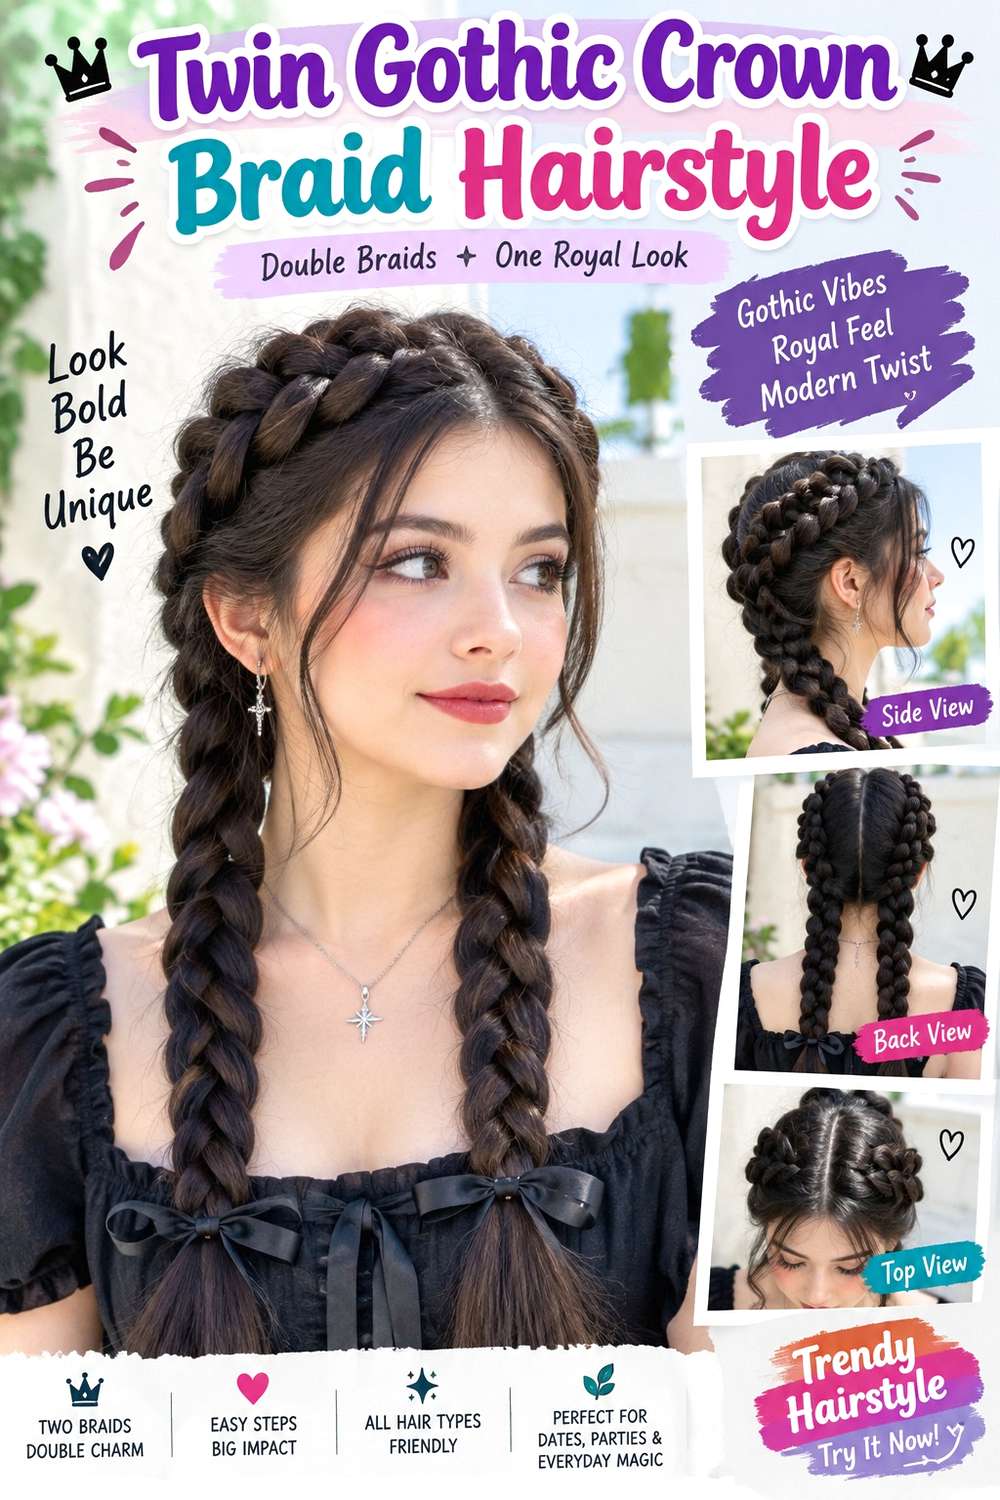
Twin crown braids create a layered halo by placing one braided band slightly in front of the other. Divide the hair so two braids can travel around the head in parallel, keeping enough space between them that both patterns remain visible. The front braid can sit closer to the hairline, while the second rests farther back toward the crown. Keep the remaining ends tucked cleanly beneath the opposite sections so the layered effect stays intentional.
Use light styling cream for section control, small clear elastics to secure each braid, and bobby pins to anchor both bands. Medium-long and long hair provide the easiest length for two complete wraps, while dense hair can support the layered structure if the tension is distributed comfortably. This is one of the longer styling options because each braid needs separate placement. A refresh should focus on the back joins rather than reworking the whole crown.
For professional styling, explain the distance you want between the two braided bands and whether the front one should be narrower or equal in width. If the two braids are pinned directly on top of each other, the layered detail disappears. Keep hidden anchors separate so one band can be adjusted without pulling the other out of position.
Pro tip:
Pin the rear braid first and use it as a placement guide for the front band. This makes the spacing easier to judge and keeps both crowns visibly separate.
Make It Work for You:
If your hair is lower-density, make the front braid narrower than the rear one. The layered effect stays clear while more hair remains available to give the second band substance.
Watch Out For:
Do not stack both braids directly over the same anchor line. The patterns can merge visually and create extra pressure; stagger the pins so each band has independent support.
Sleek Center-Part Gothic Crown Braid Hairstyle
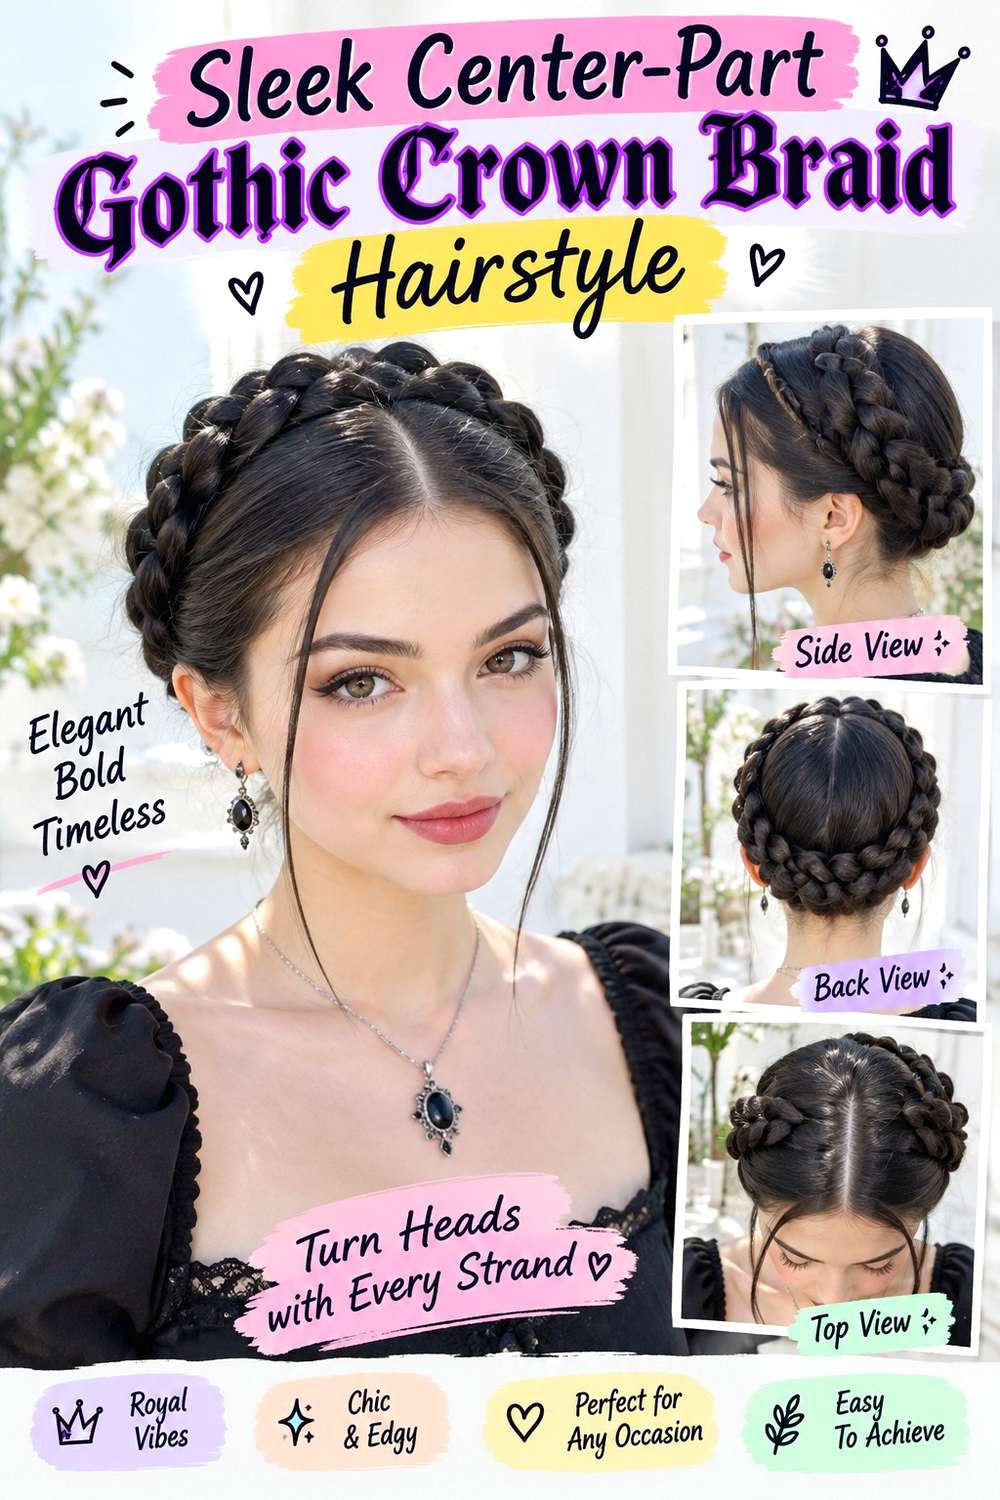
A sleek center part paired with a crown braid creates a sharper gothic look by contrasting a clean front with woven texture around the back. Part the hair precisely through the middle, keep the front sections smooth, and guide the braid around the crown without adding much loose volume at the temples. The braid can sit just behind the top of the ears and continue across the back, while the ends tuck beneath the opposite side for a finished halo.
Use lightweight smoothing cream through the front, a small clear elastic for the braid end, and bobby pins for the hidden anchors. Straight and wavy hair can create the contrast quickly, while curly or coily hair can keep natural texture in the braid and smooth only the front if desired. The full style takes moderate time, but a refresh usually means redefining the center part and checking the back pins.
At a salon or styling appointment, specify how close to the head you want the front sections and where the braided crown should begin behind the ears. Avoid excessive tension just to keep the center part clean. If flyaways appear, smooth the visible surface lightly instead of pulling the whole braid tighter or coating the roots with heavy product.
Pro tip:
Refine the center part before the braid begins, then leave it alone. Re-combing after the crown is pinned can lift the front sections and disturb the carefully hidden anchors.
Make It Work for You:
If your natural texture is curly, smooth only the front if you want contrast and leave the braid textured. This preserves more of your pattern while keeping the clean center-part effect.
Watch Out For:
Do not flatten the crown so tightly that the braid loses dimension. Keep the front controlled, but let the woven band retain enough height to remain visible from the side.
Conclusion
Gothic crown braid hairstyles can range from structured and sleek to loose, textured, and heavily accessorized. A single halo feels simpler, while double Dutch or twin crowns create more visible braid detail. Ribbons and pearl pins soften the finish; chains and metallic accents make it sharper. Straight and wavy hair may produce cleaner sections, while curls and coils can keep more natural texture and volume inside the braid. Density affects braid width, accessory scale, and how much weight feels comfortable around the head. Parting, tendrils, crown height, and nape placement also change the overall balance. Choose the version that works with your natural texture, available length, costume neckline, and the amount of maintenance you want during Halloween wear.
Before Your Salon Visit
Before your salon or styling appointment, choose one or two favorite crown braid references and save views that clearly show the placement you like. Discuss your texture, density, face shape, usable length, usual routine, and how long you need the style to last. Point out the exact braid width, crown height, parting, tendrils, accessory position, and degree of looseness you prefer. Because these are temporary Halloween styles, focus on comfortable tension, secure anchoring, and accessory safety rather than requesting a haircut.
FAQs
Can medium-length hair work for a gothic crown braid?
Yes. Medium hair can often form two side braids that meet and pin together instead of one continuous wrap. Keeping the braids moderately narrow also makes limited length easier to manage. Shorter layers may need discreet pins, but they do not have to be forced into an overly tight crown.
How do I keep a crown braid secure without making it too tight?
Use hidden pins or separate anchors at the areas that carry the most weight, rather than increasing tension across the whole scalp. Secure braid ends independently, then adjust the visible loops for shape. A crown should feel stable without pulling painfully at the temples, nape, or hairline.
Can curly or coily hair be used for a gothic crown braid?
Yes. Curly and coily textures can remain visible within the braid instead of being straightened first. Plan the placement after the hair reaches its finished dry shape so shrinkage is easier to judge. Broader sections and comfortable anchors can help distribute dense curl volume around the crown.
How should I use Halloween accessories in a crown braid?
Attach ribbons, chains, pearl pins, or themed clips only after the braid itself is secure. Decorative pieces should not provide the main structural hold. Check rough edges before wearing them, anchor accessories into stable woven sections, and remove all decoration before taking down the braid to reduce snagging.