14 Gold Shell Hair Accessory Hairstyles

Gold shell hair accessory hairstyles combine metallic warmth with sculptural details that can dress up buns, braids, ponytails, waves, and half-up styles without requiring a haircut. The shell motif may appear on a single comb, a row of cuffs, delicate chains, clustered pins, or a flexible vine. Shoulder-length hair can support compact twists and partial updos, while longer lengths provide more room for braids, wrapped buns, and draped accessories. Face-framing pieces, crown volume, parting, and loose texture can all change the mood while the gold shell detail remains the defining feature.
Straight, wavy, curly, and coily textures can all carry these accessories. Fine or slippery hair often benefits from a stable hidden anchor before heavier jewelry is added, while dense hair may need larger clips or several attachment points to distribute weight. Curl grouping and shrinkage can also affect where shell pieces sit, especially around braids and updos.
Styling effort varies from a quick side comb to a longer crown braid or chignon. Maintenance mainly involves checking grip, keeping metal from snagging loose strands, and removing accessories carefully. The hairstyle should stay secure without relying on the decorative shell piece to carry the whole structure.
Quick List
- Gold Shell Comb Low Bun Hairstyle
- Gold Shell Chain Braid Hairstyle
- Gold Shell Pin Half-Up Hairstyle
- Gold Shell Cuff Ponytail Hairstyle
- Gold Shell Barrette Side Sweep Hairstyle
- Gold Shell Vine Chignon Hairstyle
- Gold Shell Ring Accent Braid Hairstyle
- Gold Shell Halo Crown Braid Hairstyle
- Gold Shell Clip Curly Updo Hairstyle
- Gold Shell Chain Ponytail Hairstyle
- Gold Shell Comb Bob Hairstyle
- Gold Shell Pin French Twist Hairstyle
- Gold Shell Cuff Cornrow Hairstyle
- Gold Shell Cluster Wave Hairstyle
Gold Shell Comb Low Bun Hairstyle
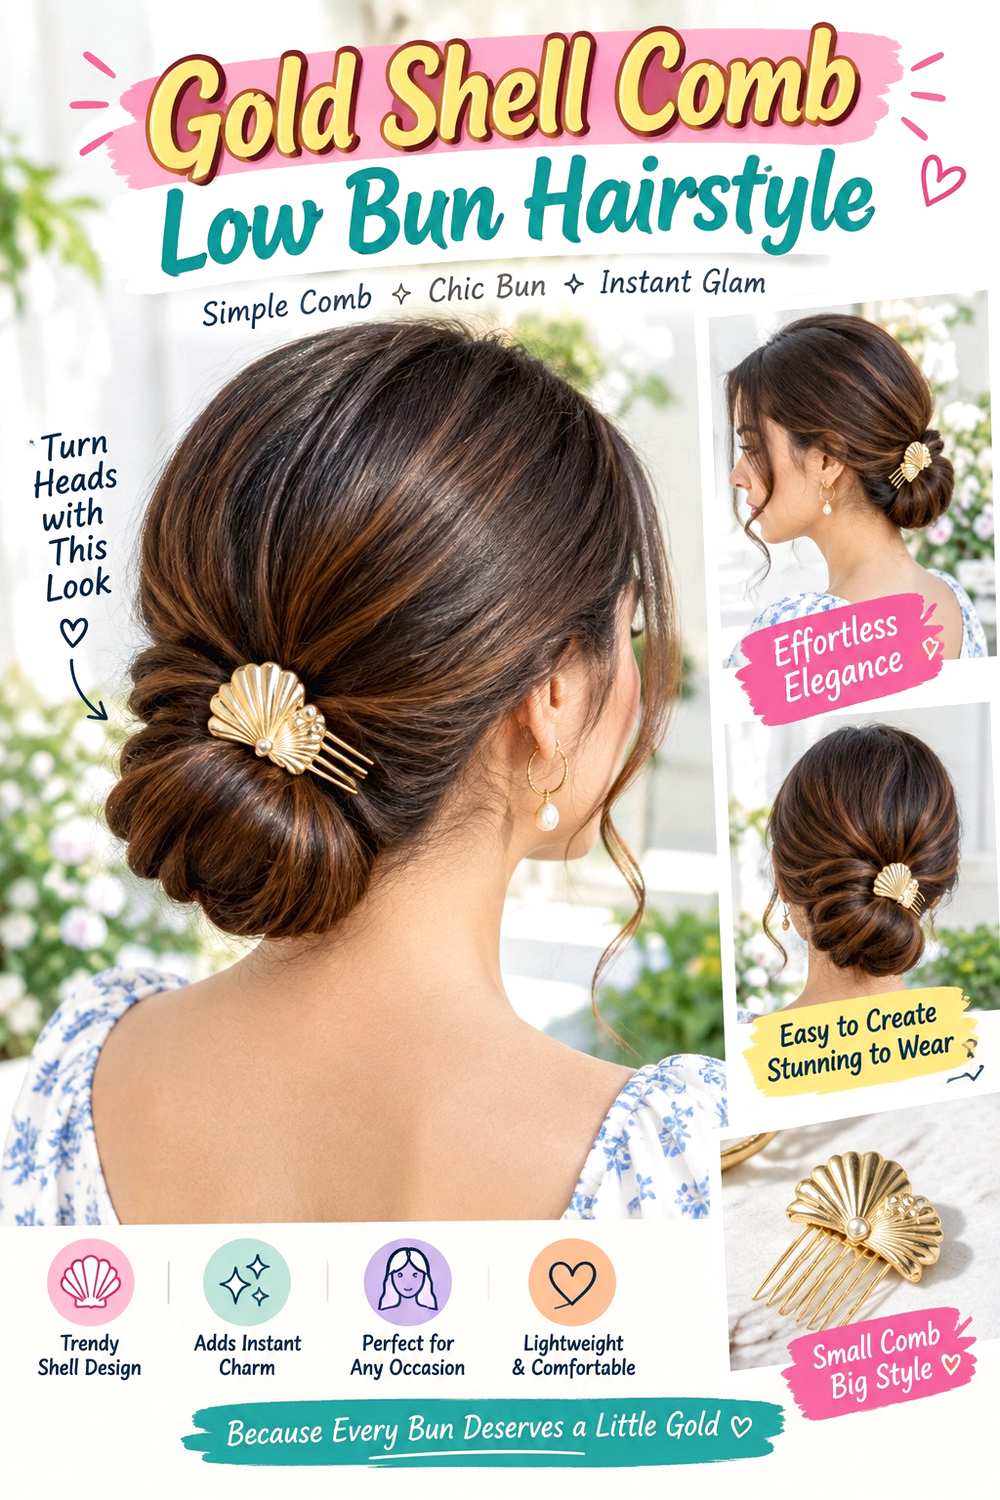
A gold shell comb looks especially balanced above a low bun because the curved accessory can follow the shape of the knot. Gather the hair at the nape, form a rounded or slightly horizontal bun, and keep the crown smooth or softly lifted. A middle part creates a symmetrical front, while a soft side part gives the style less formal structure. Medium to long hair provides enough length for the bun, and the shell comb should sit just above the secured base rather than floating on loose surface hair.
This design works on straight, wavy, curly, or coily textures as long as the bun is stable first. Use bobby pins to construct the bun, a gold shell hair comb for decoration, and light styling cream to smooth flyaways. A quick refresh may mean repositioning the comb and tidying the hairline; building the complete bun from wash-day hair takes longer.
Insert the comb at a shallow downward angle so its teeth enter a supported section. If the accessory feels heavy, move it closer to the bun rather than pressing it deeper. For professional styling, specify bun width, exact nape placement, crown volume, and whether the shells should sit centered or slightly to one side.
Pro tip:
Insert the comb after the bun is fully secure, aiming its teeth gently toward the bun base. That angle helps the decorative edge sit flat without relying on scalp pressure.
Make It Work for You:
If your hair is fine or lower in density, choose a lighter shell comb and keep the bun compact. The accessory remains visible without needing a large knot underneath.
Watch Out For:
A slipping comb usually needs a better anchor, not more pressure. Reposition it into stable hair near the bun instead of repeatedly pushing the teeth toward the scalp.
Gold Shell Chain Braid Hairstyle
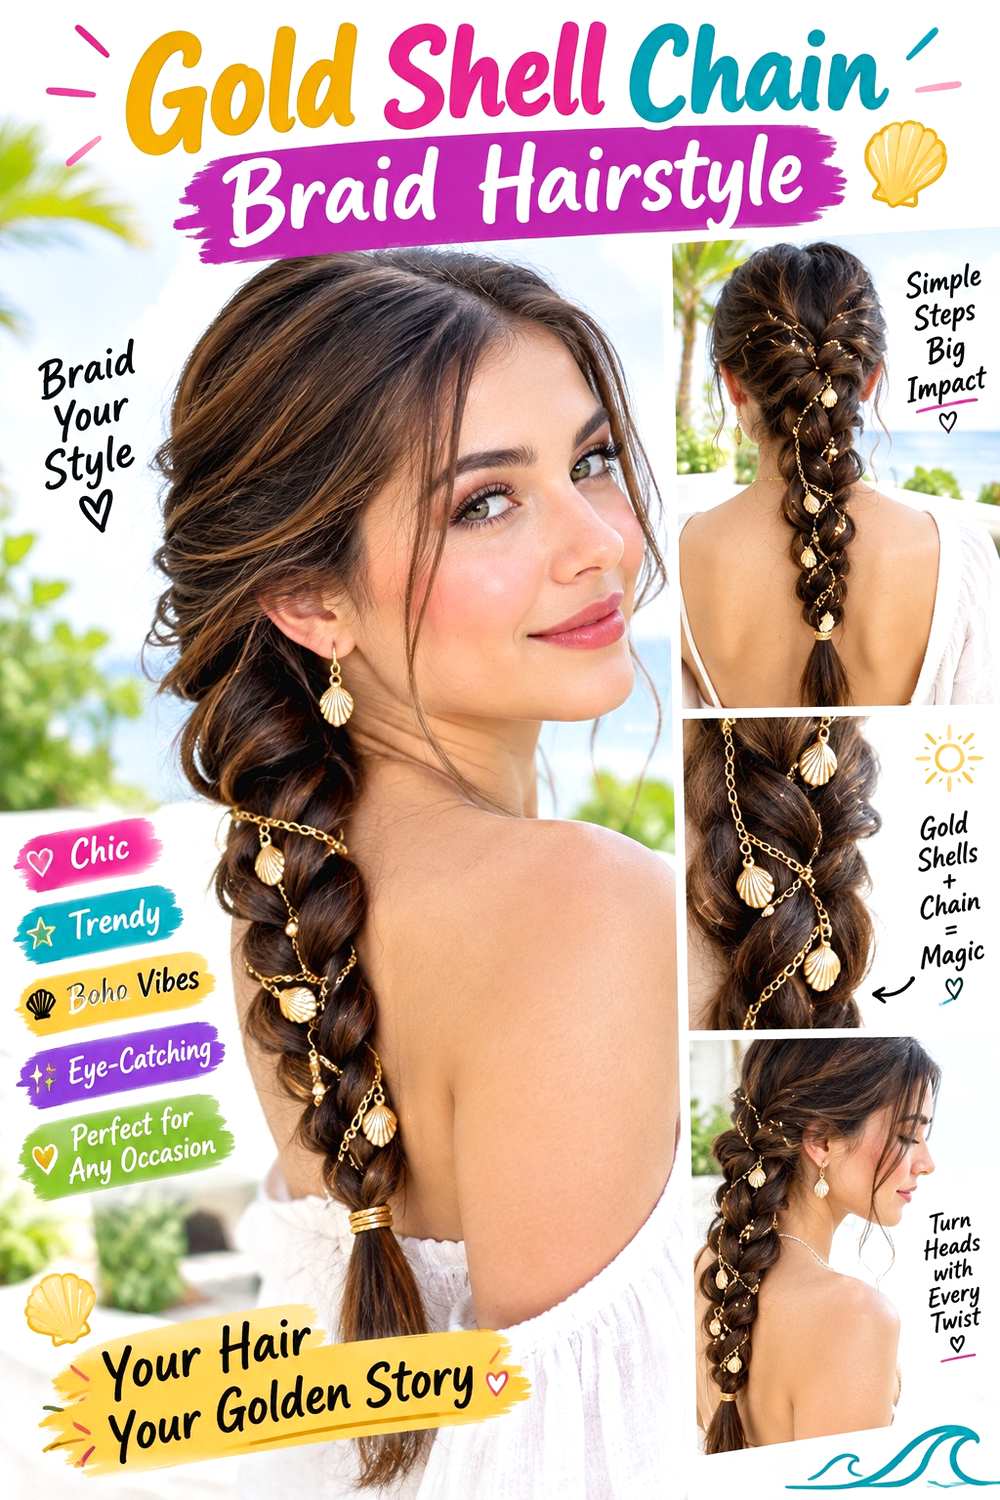
A fine chain decorated with tiny gold shells can travel beside a braid without hiding its woven pattern. Create one medium-width braid down the back or over one shoulder, then attach the chain along an outer edge at spaced points. The shells can sit flat against the braid or hang slightly between crossings for movement. Medium to long hair gives the detail room to repeat, while a center or side part and a few loose front pieces can soften the overall shape.
This idea works across straight, wavy, curly, and coily textures when the braid is secure enough to support the jewelry. Use a clear elastic to anchor the braid, a gold shell chain hair accessory for decoration, and light braid cream to control shorter pieces. A quick refresh may involve correcting one chain loop, whereas creating the full braid and placing each attachment point takes longer.
Keep a little slack between connections so the chain moves with the braid rather than pulling against it. At a salon or event appointment, explain the braid width, whether the chain should follow one side or cross through the center, and how much shell detail you want visible. During removal, detach the chain from the bottom upward before undoing the braid to reduce snagging.
Pro tip:
Begin the chain several braid crossings below the scalp. This gives the first attachment point a stable woven base and keeps moving metal away from sensitive roots.
Make It Work for You:
For shorter hair, decorate only the upper half of the braid with three or four shell details. The metallic pattern can still feel intentional without requiring extra length.
Watch Out For:
Do not stretch the chain tightly between connection points. Leave enough slack for normal head movement so the jewelry does not tug on the braid whenever you turn.
Gold Shell Pin Half-Up Hairstyle

Small gold shell pins can turn a simple half-up twist into a more detailed style without covering the loose hair. Take sections from both temples, bring them toward the crown, twist once, and secure the center before adding two or three shell pins around the join. The lower lengths can remain straight, wavy, curly, or coily, while narrow face-framing pieces stay loose. A center part creates balance, and a side part gives the shell cluster a softer asymmetric effect.
This design suits medium to long hair and works well when you want visible jewelry without committing to an updo. Use a mini snag-free elastic to stabilize the half-up section, gold shell hair pins for decoration, and light texturizing spray to give slippery hair extra grip. A quick refresh is usually limited to resetting the twist or one pin; full wash-day styling depends on the finish of the loose lengths.
Place the heaviest shell pin closest to the secured center so it sits near the strongest anchor. For professional styling, specify crown height, twist width, and whether the shells should form a neat curve or a small scattered cluster. The pins should decorate the secured section instead of pulling loose hair into position.
Pro tip:
Arrange the shell pins before inserting them so you can judge size and spacing. Planning first reduces repeated repositioning, which can loosen the finished half-up twist.
Make It Work for You:
For curls or coils, place the shell pins between visible texture groups rather than flattening them. The gold accents remain clear while the natural pattern keeps its volume.
Watch Out For:
Avoid placing several heavy pins into one thin section. Spread the shell details across the supported twist so their combined weight does not pull on a single point.
Gold Shell Cuff Ponytail Hairstyle

Gold shell cuffs create repeated decoration along a ponytail without requiring an intricate braid. Start with a low or mid-height ponytail, keeping the crown smooth or softly textured. Place one larger shell cuff over the base and smaller cuffs farther down a narrow accent section or around spaced divisions. Straight hair makes the metallic rhythm look graphic, while waves, curls, or coils give the gold details more movement. Medium to long hair provides enough length for several placements without crowding the style.
This option suits anyone who prefers an easy ponytail with a stronger accessory finish. Use a fabric-covered elastic for the real anchor, gold shell hair cuffs for decoration, and smoothing cream to control flyaways around the crown. A quick dry-hair refresh can take only a few minutes; full wash-day styling takes longer if you first reshape or define the ponytail texture.
The cuffs should sit around manageable sections rather than being squeezed over a thick bundle. If one does not close comfortably, move it to a narrower point or choose a larger size. For professional styling, specify ponytail height, cuff spacing, and whether the shells should line up centrally or alternate around the length. Remove each cuff before releasing the ponytail.
Pro tip:
Place the first decorative cuff slightly below the ponytail elastic instead of directly over it. This keeps the structural anchor separate and makes the shell detail easier to position.
Make It Work for You:
If your ponytail is fine, use fewer small cuffs with wider spacing. The gold shells remain visible without overwhelming the scale or weighing down the length.
Watch Out For:
Do not crimp a cuff tightly just to stop it slipping. A better-fitting size or narrower section is safer than forcing the metal around more hair.
Gold Shell Barrette Side Sweep Hairstyle
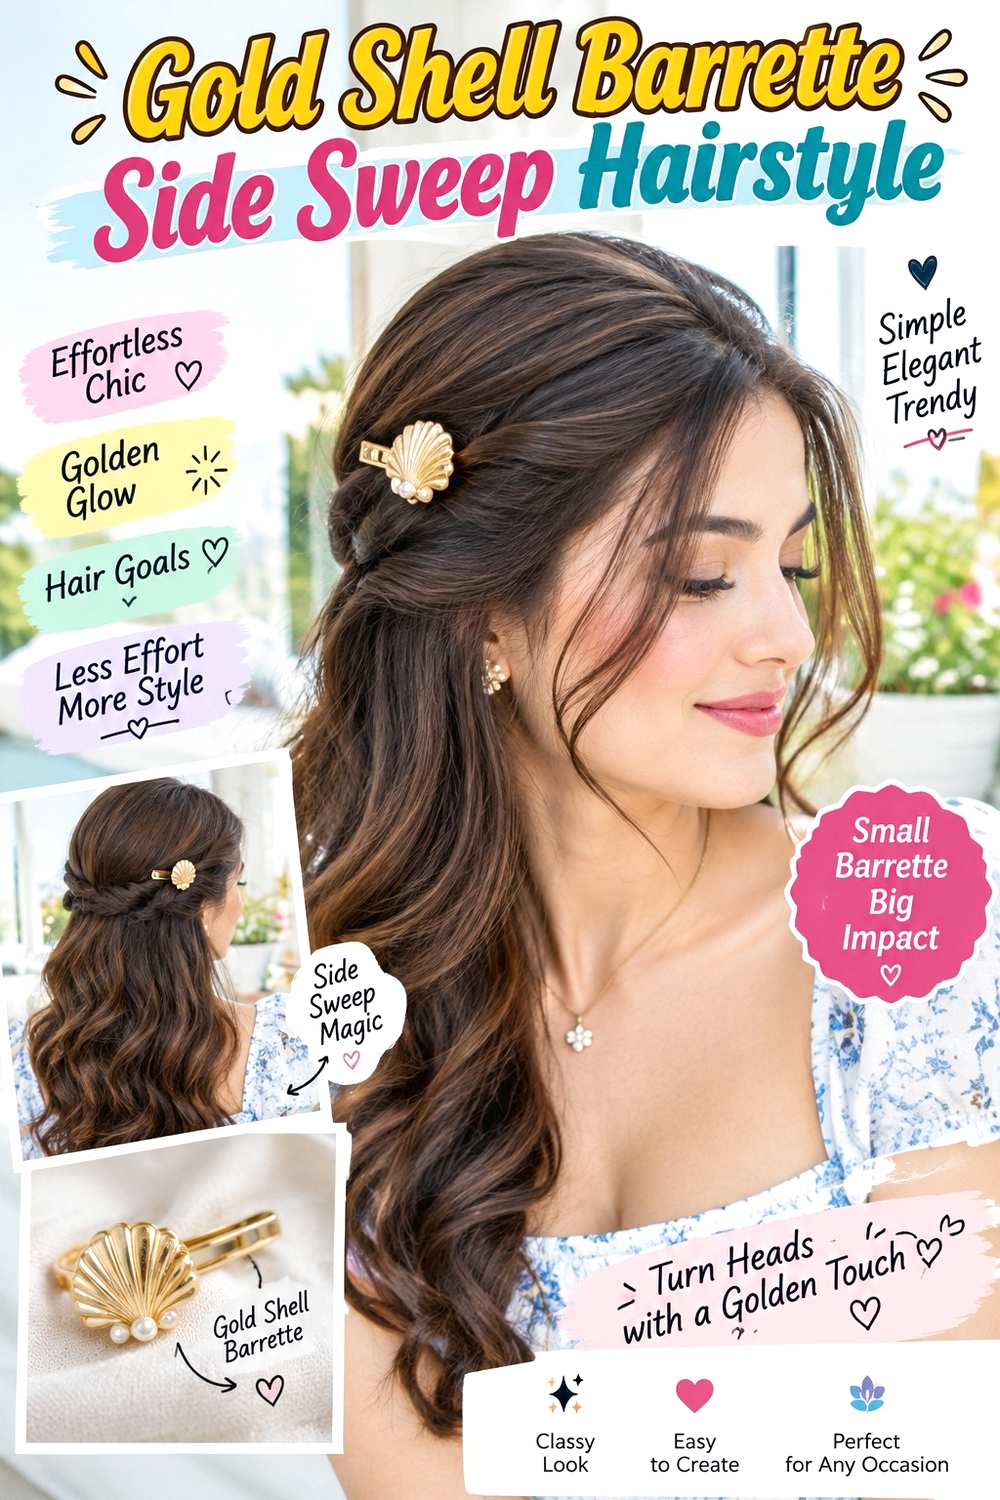
One sculptural gold shell barrette can create a strong focal point beside a deep side part. Sweep the lighter side behind the ear and secure it so the opposite side keeps more volume and movement. The barrette can sit directly above the ear or slightly behind it, depending on whether you want it visible from the front. A bob, lob, or long haircut can all use the placement, while waves and curls soften the contrast between the tucked side and fuller lengths.
This design is useful when you want an accessory-led look without a full updo. Use a gold shell barrette for the visible accent, light texturizing spray to improve grip, and a wide-tooth comb to arrange the loose lengths. A quick refresh may mean resetting the barrette and smoothing the tucked section; a full wave or curl set takes longer if you create the texture first.
Dense hair may be too thick for a decorative clasp to hold alone, so let the barrette cover only a manageable surface section. For professional styling, specify the part depth, degree of side volume, and exact barrette height. The accessory should sit securely without needing to close over the entire thickness of the hair.
Pro tip:
Test the shell barrette on the intended section before finishing the loose lengths. Knowing exactly how much hair the clasp can hold prevents last-minute tugging or repeated reopening.
Make It Work for You:
For fine hair, keep the swept section modest and choose a lighter barrette with a secure clasp. A smaller section often grips more reliably than a wide, slippery panel.
Watch Out For:
Never force a barrette closed over dense hair. Reduce the section and let the accessory decorate the surface rather than straining the clasp or catching strands.
Gold Shell Vine Chignon Hairstyle

A flexible vine decorated with small gold shells can trace the curve of a low chignon and create a soft metallic frame. Form the chignon at the nape, keeping it broad and close to the head, then attach the vine along the upper edge or around one side. A center part creates a balanced front, while a side part complements asymmetric shell placement. Medium to long hair gives enough length for a stable chignon and enough width for the vine to remain visible.
This option suits formal styling without requiring the hair to be completely sleek. Use bobby pins to secure the chignon, a flexible gold shell hair vine for decoration, and light styling cream to control surface frizz. A short refresh may involve correcting one vine attachment, while creating the complete chignon from the beginning takes longer.
Pre-shape the vine to follow the bun rather than forcing it flat after placement. If it feels heavy, reduce the number of attachment points that depend on loose hair and move them toward the secured base. For event styling, discuss chignon width, how low it should sit, and whether the shells should frame the entire upper curve or concentrate on one side. Remove the vine before dismantling the bun.
Pro tip:
Curve the flexible vine to match the chignon before pinning it. A pre-shaped accessory sits closer to the bun and requires less pressure at each attachment point.
Make It Work for You:
If your chignon is small, run the shell vine along only one side rather than wrapping the whole bun. The asymmetric placement keeps the accessory proportional.
Watch Out For:
Do not let the vine become the structure holding the chignon together. Secure the bun independently so removing the jewelry does not cause the hairstyle to collapse.
Gold Shell Ring Accent Braid Hairstyle
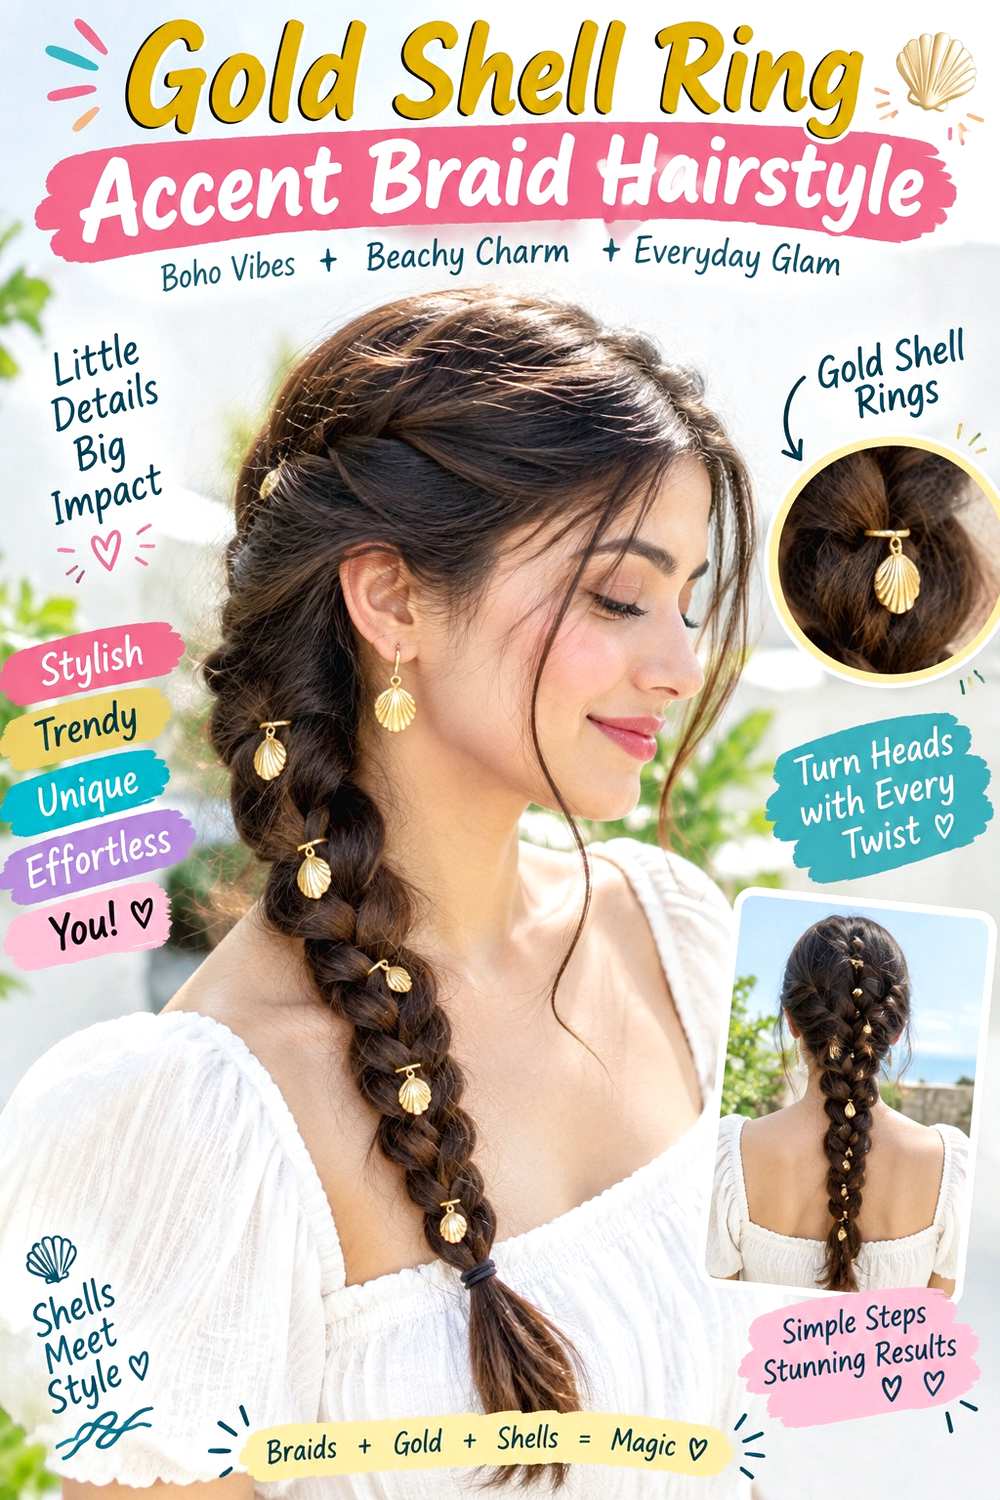
Gold shell rings can decorate one narrow accent braid while the rest of the hair stays loose. Create the braid near the temple, behind the ear, or within a half-up section, then attach shell rings every few crossings. The braid can finish near the shoulder or blend into the full length. Keeping the remaining hair straight, wavy, curly, or coily makes the jewelry look concentrated rather than scattered. Shorter cuts can also use the idea if enough hair reaches a small braid.
This style is practical when you want a quick accessory detail that does not require an elaborate updo. Use a clear elastic to secure the braid, gold shell hair rings for decoration, and light braid gel to control shorter strands. A brief refresh may involve closing one shifted ring, while creating the accent braid itself takes only a short styling session.
Choose rings that fit around the braid without squeezing it. For professional styling, identify the braid width, starting point, direction, and number of shells you want visible. On dense or coily hair, a slightly wider braid may keep the gold pieces easier to see. During removal, open every ring fully before undoing the braid so metal edges do not catch loose strands.
Pro tip:
Finish the braid before adding any shell rings. This lets you judge spacing clearly and avoids moving metal around while braid tension is still being adjusted.
Make It Work for You:
For dense curls or coils, create a slightly broader accent braid and choose larger shell rings. The jewelry remains visible without compressing the section unnaturally.
Watch Out For:
Do not force a small ring around a thick braid. If it catches or refuses to close comfortably, choose a larger piece rather than squeezing strands inside.
Gold Shell Halo Crown Braid Hairstyle
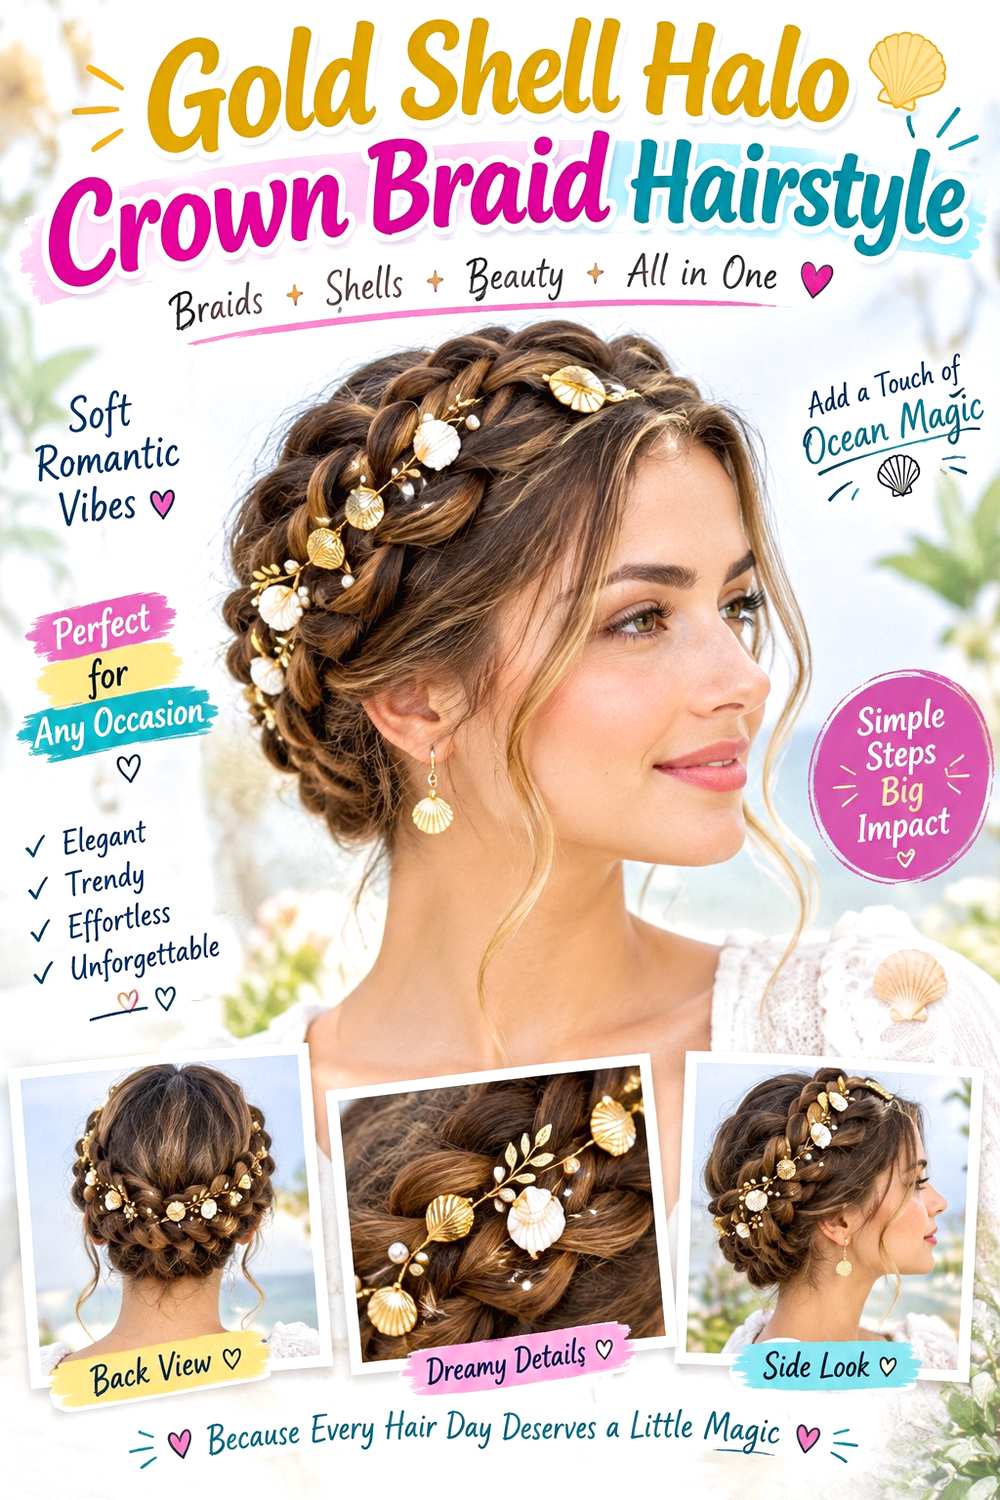
A gold shell halo can echo the circular line of a crown braid without hiding the woven texture beneath it. Form the braid around the head with comfortable tension, secure the tucked end, then position the shell accessory slightly inside or outside the upper edge. Small shells can repeat around the full crown or cover only the front and sides for a lighter effect. A few soft face-framing pieces can remain loose while the braid itself stays clearly defined.
This design works best on medium to long hair and can suit straight, wavy, curly, or coily textures. Use bobby pins to secure the crown braid, a gold shell halo hair accessory for decoration, and light styling cream to control flyaways. A quick refresh may involve resetting one section of the halo; building the complete braid requires more time because width, balance, and comfortable tension all matter.
Attach the halo at several light points instead of making one anchor carry the whole accessory. For professional styling, specify braid width, crown height, shell spacing, and how much loose hair should remain around the face. The halo should rest on the braid rather than press tightly against the scalp. Remove the jewelry before undoing the crown.
Pro tip:
Attach the shell halo at several evenly spaced points around the braid. Distributed support keeps it level and reduces the need to pull one anchor unusually tight.
Make It Work for You:
If a full halo feels too decorative, place shells only across the upper half of the crown. The braid remains the main feature with a lighter metallic outline.
Watch Out For:
Do not tighten the crown braid just to stop the accessory from moving. Improve the shell anchors separately so the braid can stay comfortable around the hairline.
Gold Shell Clip Curly Updo Hairstyle
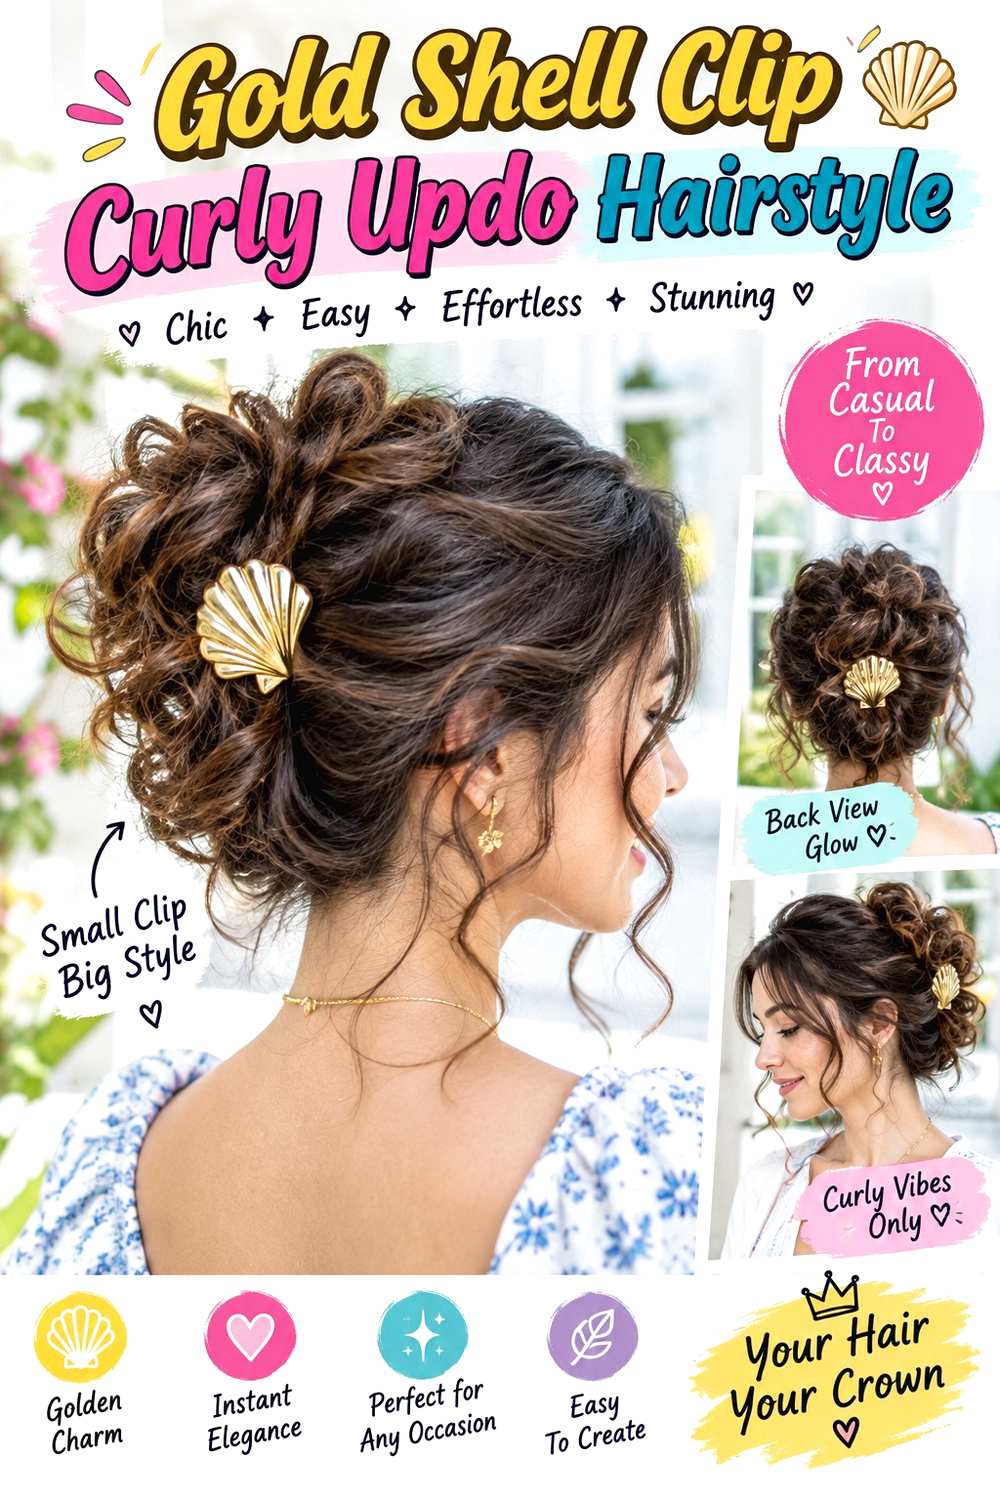
A curly updo can carry one or several gold shell clips while keeping visible curl definition. Gather the hair into a loose mid or low arrangement, secure the structural base, and leave several curls visible around the crown, sides, and nape. Place the shell clips between curl groups rather than flattening their centers. A few face-framing curls can remain free, and the part can stay soft so the accessory feels integrated with the texture.
This approach works especially well for naturally curly or coily hair. Use bobby pins to build the updo, gold shell clips for the decoration, and curl cream to maintain definition through the visible sections. A quick refresh can focus on reshaping outer curls and repositioning one clip; a full wash-day style takes longer because definition and drying happen before the updo is created.
Judge accessory placement on the finished dry shape because shrinkage changes where each curl sits. The shell clips should decorate stable areas rather than hold individual curls under tension. For professional styling, specify updo height, the number of loose curls, and whether the gold pieces should be clustered on one side or scattered evenly. Remove the clips before releasing the structural pins.
Pro tip:
Place shell clips into spaces between established curl groups after the updo is secure. This keeps the metal visible without crushing the curls that create the shape.
Make It Work for You:
For very dense curls, use fewer but larger shell clips. Stronger individual accents can remain visible through the texture without filling every section with metal.
Watch Out For:
Avoid adding clips while curls are still wet and shrinking. Wait until the shape is dry enough to judge placement so the accessories do not shift unexpectedly.
Gold Shell Chain Ponytail Hairstyle

A gold shell chain draped along one side of a ponytail creates movement without covering the entire length. Build a low or mid-height ponytail, attach one end of the chain near the secure base, and connect the other farther down so it forms a shallow curve. A center part makes the asymmetry more obvious, while a side part can echo the direction of the chain. Straight, wavy, curly, or coily ponytails can all carry the detail.
Medium to long hair provides enough length for the drape to move without reaching the ends. Use a fabric-covered elastic for the structural anchor, a gold shell chain for decoration, and bobby pins for the attachment points. A quick refresh usually involves checking the chain tension and smoothing the ponytail; full wash-day styling depends on the finish of the loose length.
Leave enough slack for comfortable head movement without allowing the chain to swing excessively. For professional styling, specify ponytail height, which side the chain should follow, and how deep you want the drape. Both ends should connect to stable areas around the base or secured sections, not loose surface hairs. Remove each connection before taking down the ponytail.
Pro tip:
Turn your head gently after attaching the shell chain and watch how it moves. Adjust the drape before leaving so normal movement does not tug either anchor point.
Make It Work for You:
For shorter ponytails, keep the chain close to the base and make one compact curve. The shell detail stays visible without requiring a long loose section.
Watch Out For:
Do not attach chain ends to individual surface strands. Use stable anchor points so movement from the jewelry does not transfer tension directly to loose hairs.
Gold Shell Comb Bob Hairstyle

A slim gold shell comb gives a bob a statement detail without overwhelming the shorter shape. Create a center or side part, tuck one section behind the ear, and insert the comb just above or slightly behind that area. The rest of the bob can stay sleek, softly bent, wavy, or naturally curly. Chin- to shoulder-length hair works especially well because the accessory sits close to the face and remains visible from the front and side.
This option suits anyone who wants minimal styling with one clear decorative feature. Use a slim gold shell hair comb for the accent, light texturizing spray to improve grip, and smoothing serum through the ends for a polished surface. A quick dry-hair refresh can take only a few minutes; creating a full heat-styled bend or wave takes longer if that is your chosen finish.
The comb should catch stable hair inside the tucked section rather than rest on loose surface strands. Fine hair may benefit from closely spaced teeth, while dense hair may need a wider comb or less hair placed inside it. For professional styling, specify the side, comb angle, and whether the bob should stay flat around the ear or retain some volume above the accessory.
Pro tip:
Insert the comb slightly backward first, then rotate it gently into the final position. This helps the teeth catch stable hair without pushing the accessory directly toward the scalp.
Make It Work for You:
If your bob is very short, choose a narrow lightweight comb and move it closer to the temple. Smaller scale keeps the shell detail proportional to the haircut.
Watch Out For:
A heavy comb can drag on short hair. Choose a lighter design with suitable teeth instead of pressing a slipping accessory deeper into the tucked section.
Gold Shell Pin French Twist Hairstyle

Long gold shell pins can add a clean decorative line to a French twist while the roll itself supplies the structure. Sweep the hair inward from one side, roll it vertically from the nape toward the crown, and establish a hidden anchor first. Insert one or two shell-tipped pins along the outer roll so the gold details remain visible. The crown can stay sleek or hold gentle lift, while the upper ends disappear inside the twist for a neat finish.
This style suits medium to long straight, wavy, or smoothed textured hair. Use bobby pins to secure the hidden seam, gold shell decorative pins for the visible accent, and flexible hairspray to control flyaways. A quick refresh can involve adjusting a decorative pin; recreating the entire twist requires more time because the vertical roll and anchor need to be rebuilt.
Insert decorative pins through stable sections at an angle that stays away from the scalp. For professional styling, explain where the twist should finish, how much crown height you want, and whether the shell pins should sit parallel, crossed, or offset. If the twist feels loose, rebuild its hidden anchor rather than pushing the decorative pieces deeper.
Pro tip:
Secure the French twist completely before adding the shell pins. Once the roll holds on its own, the jewelry can be positioned for appearance rather than forced into structural work.
Make It Work for You:
For shoulder-length hair, keep the twist compact and use shorter shell pins. The vertical metallic detail remains visible without extending beyond the smaller roll.
Watch Out For:
Never force a long decorative pin when you feel resistance near the scalp. Withdraw it and change the angle so the stem travels through the twist instead.
Gold Shell Cuff Cornrow Hairstyle
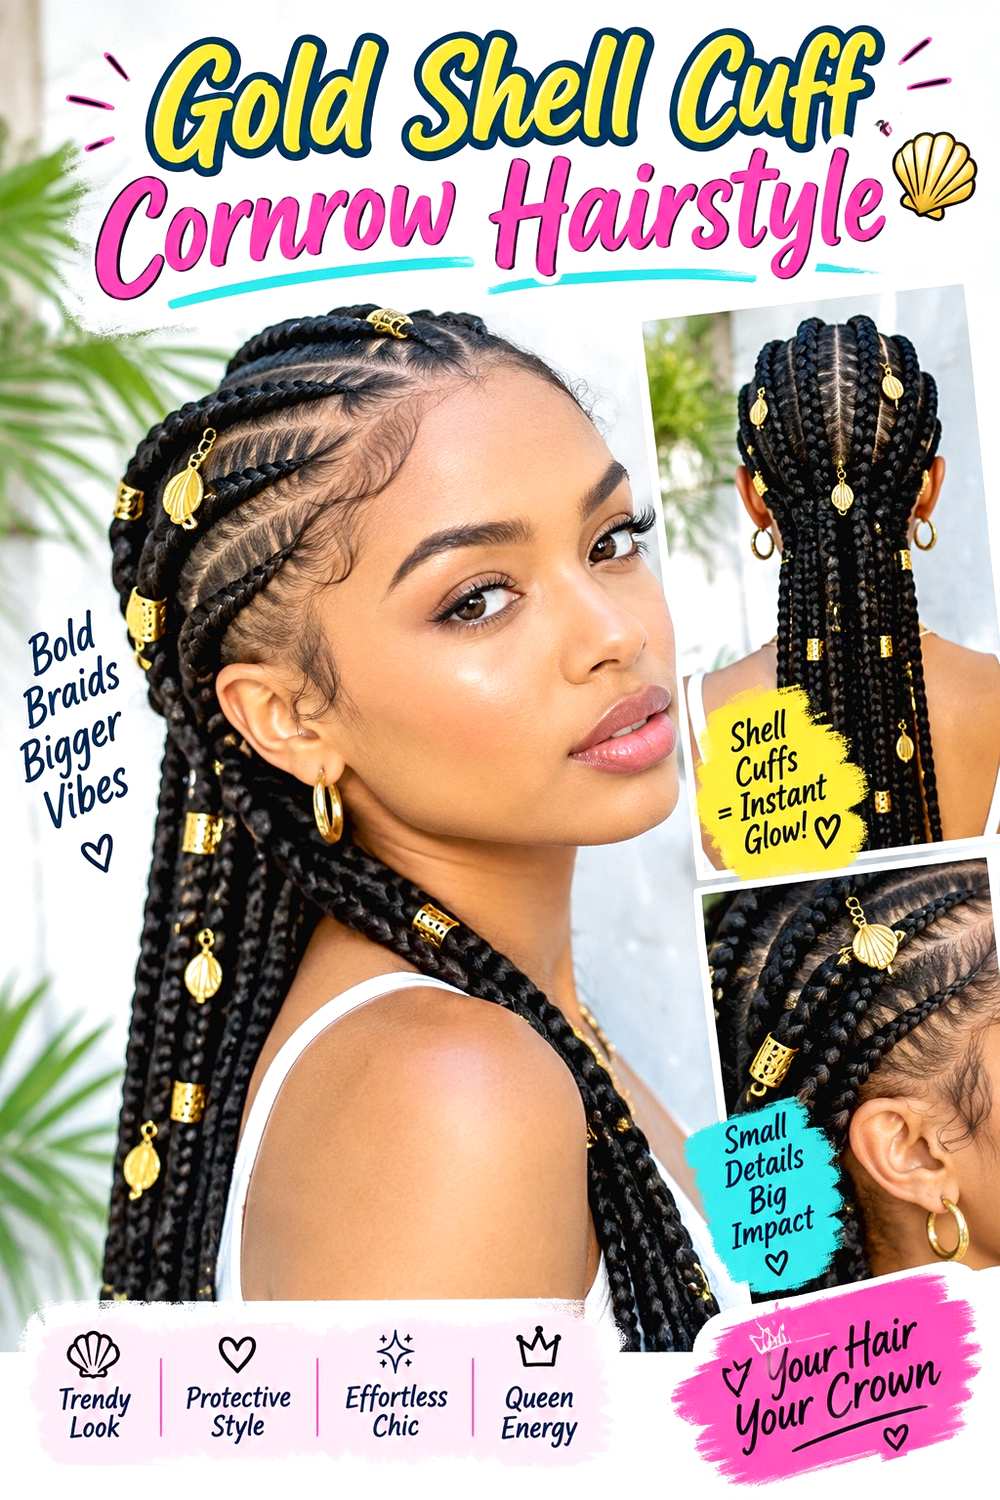
Gold shell cuffs can highlight selected cornrows or close-to-scalp braids without covering the pattern. Build the braid layout with comfortable tension first, then place cuffs at spaced intervals on one or two visible rows. A symmetrical center design can look balanced, while shell cuffs concentrated on one side create a stronger asymmetric statement. The remaining hair may continue into braids, curls, a ponytail, or a bun depending on the desired finish.
This option works best when the cuffs are added after the braided base has settled. Use gold shell hair cuffs for decoration, a rat-tail comb to create precise sections, and braid gel to keep the parting area neat. A quick refresh may involve repositioning one cuff or smoothing the perimeter; creating the full braided foundation takes considerably longer.
Each cuff should sit around the braid without squeezing it. If a shell piece will not close easily, move it to a narrower point rather than increasing tension. For professional styling, discuss braid width, comfortable tension, cuff spacing, and how many gold details should be visible from the front. Remove all cuffs carefully before taking down the braids so metal edges do not catch loosened strands.
Pro tip:
Add shell cuffs only after the braids are complete and comfortable. This prevents jewelry from interfering with tension adjustments or changing how a braid settles against the scalp.
Make It Work for You:
If you prefer a minimal finish, decorate only the two most visible braids near the part. A small number of shell cuffs can still create a clear statement.
Watch Out For:
Do not tighten braids simply to stop cuffs from moving. Choose a better-fitting accessory or different placement so comfort is maintained independently from decoration.
Gold Shell Cluster Wave Hairstyle
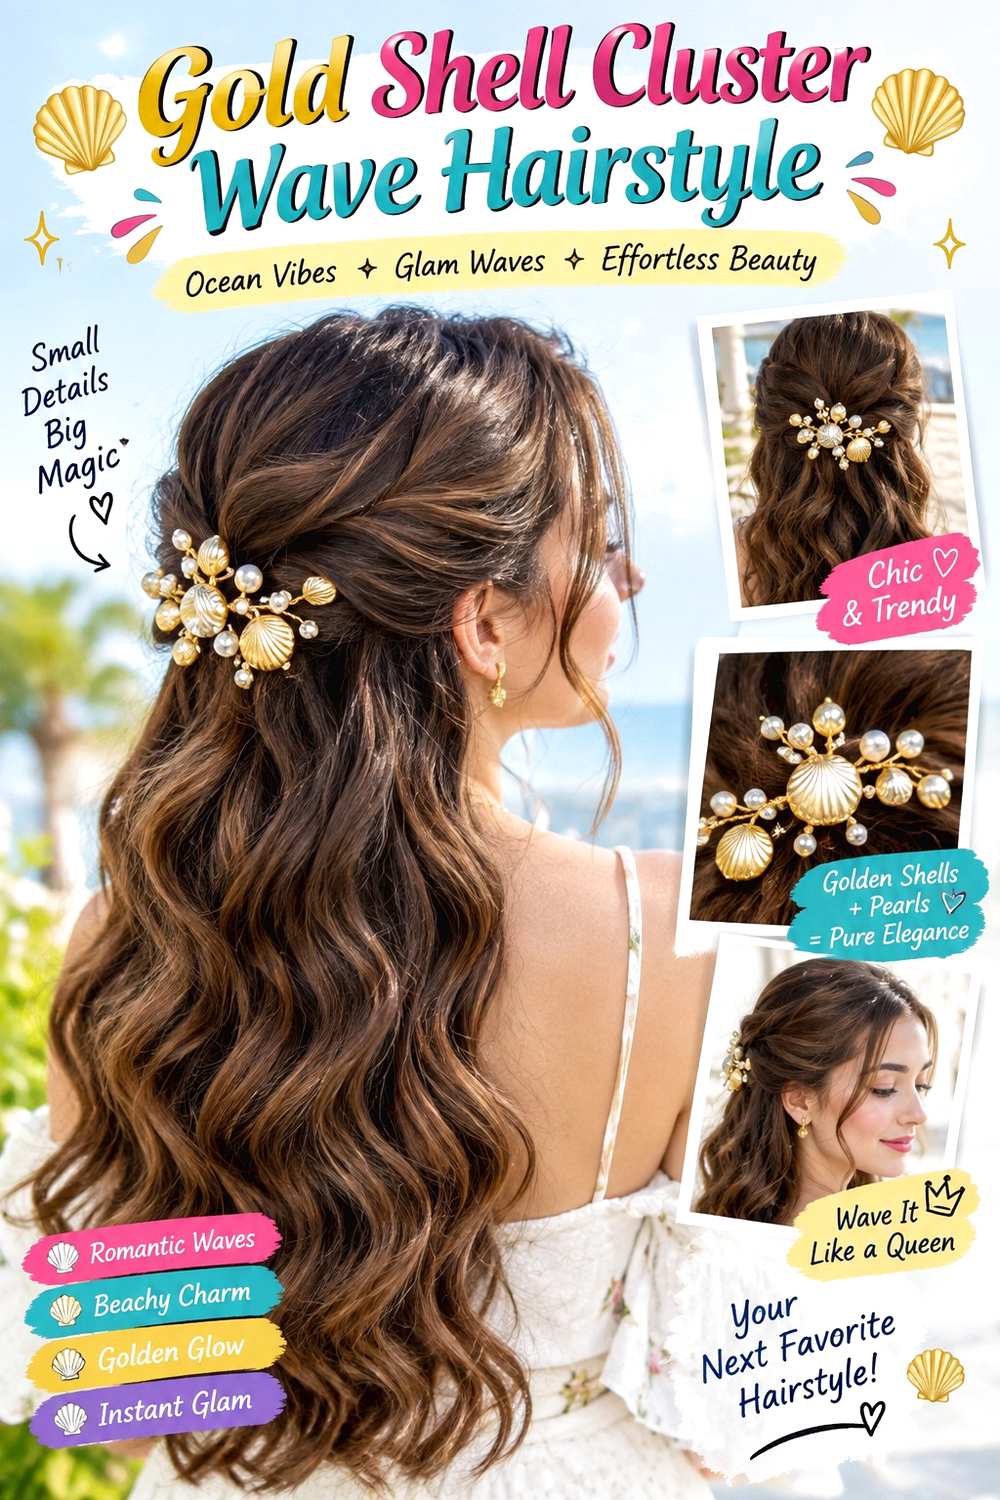
A cluster of small gold shell clips beside loose waves creates a strong decorative focal point without building an updo. Make a deep side part, tuck the lighter side behind the ear, and arrange three or four shell clips in a short diagonal line above the tuck. The opposite side can keep broad movement through the cheek and shoulders. A bob, lob, or long haircut can all carry the idea, with the cluster scaled to match the available length and volume.
This style suits naturally wavy hair or a deliberately shaped wave pattern. Use gold shell clips for the decoration, light texturizing spray to give the tucked section grip, and a wide-tooth comb to arrange the waves without breaking them apart. A quick refresh usually means resetting the clips and defining a few outer bends; a full wash-day wave set requires more time if the texture must be created first.
Place the largest shell nearest the ear and smaller pieces upward so the cluster has a clear visual direction. For professional styling, specify part depth, clip number, cluster angle, and how much hair should stay tucked. If your strands are fine, spread the clips over the secured area rather than stacking their weight on one thin section.
Pro tip:
Lay the shell clips in your intended order before inserting them. Starting with the largest near the ear helps create a cleaner graduated cluster and prevents random spacing.
Make It Work for You:
For short waves, use only two or three small shells and keep them close to the temple. The cluster remains visible without overpowering the reduced hair length.
Watch Out For:
Avoid placing several heavy clips on one thin surface section. Spread them across the tucked base so each accessory has enough hair to grip without concentrated pulling.
Conclusion
Gold shell hair accessory hairstyles can range from one slim comb beside a bob to braided halos, shell chains, cuffs, pins, and decorative vines. Buns and French twists give heavier pieces a stable base, while ponytails and braids offer clear anchor points for repeated details. Fine or slippery hair may need lighter accessories and smaller gathered sections, while dense hair often benefits from wider placement and distributed weight. Curly and coily textures can keep their natural shape by positioning shells between defined groups instead of flattening them. Consider length, density, parting, accessory scale, grip, and event duration before choosing. A polished result should feel secure and comfortable even before the decorative shell piece is added.
Before Your Salon Visit
Choose one or two favorite references and save clear front, side, and back views when possible. Tell your stylist about your texture, density, usual part, preferred length, and how long you need the style to stay comfortable. Point directly to the shell placement, chain drape, cuff spacing, braid width, bun height, loose pieces, or cluster angle you like. Because these are temporary accessory styles, focus on anchoring, weight, grip, and careful removal rather than assuming you need a haircut.
FAQs
How Do I Keep Gold Shell Hair Accessories From Slipping?
Build a secure hairstyle first, then attach the shell piece to a braid, bun, ponytail base, twist, or stable tucked section. Fine or slippery hair may benefit from light texture for extra grip. If an accessory moves, improve the anchor rather than tightening it painfully.
Can Gold Shell Accessories Work on Curly or Coily Hair?
Yes. Clips, cuffs, rings, chains, and vines can sit between curl or coil groups while leaving the natural texture visible. Plan placement on the finished dry shape because shrinkage can change where the jewelry sits and how much hair reaches each anchor.
How Can I Prevent Shell Jewelry From Snagging My Hair?
Check metal edges, clasps, connecting loops, and pin tips before styling. Remove decorative pieces before brushing or taking down the hairstyle. If a strand catches, stop and release it gently instead of pulling the accessory through the hair.
Are Gold Shell Accessories Suitable for Long Events?
They can be, provided their weight is distributed across stable anchor points and the hairstyle remains comfortable. Larger combs, vines, or chains should not create tenderness or pulling. If they do, use fewer pieces, choose lighter accessories, or reposition them closer to stronger anchors.