16 Hairstyles to Wear With Earmuffs

Hairstyles to wear with earmuffs need to leave comfortable space around the ears without losing their shape when the band goes on and off. Low ponytails, braids, buns, loose waves, curls, bobs, and half-up styles all work when bulky anchors stay away from the earmuff cups. Parting also matters: a center part gives a balanced front, while a soft side part can create movement without placing too much volume where the accessory needs to sit.
Straight, wavy, curly, and coily textures can all work well with earmuffs, but density and shrinkage change how much hair should sit beneath or around them. Fine or lower-density hair may benefit from lighter products and narrower gathered sections, while dense hair often feels better when weight is spread through broader, lower anchors. Face-framing pieces can remain visible as long as they do not bunch underneath the ear pads.
Full wash-day styling can take longer when you are setting waves, curls, or a polished blowout, while many low braids and ponytails need only a short refresh. For winter comfort, test the hairstyle with your actual earmuffs before leaving. A secure style should stay put without forcing the band to clamp over clips, knots, or thick sections.
Quick List
- Center-Part Loose Waves Earmuff Hairstyle
- Low Braided Ponytail Earmuff Hairstyle
- Sleek Low Bun Earmuff Hairstyle
- Curly Low Puff Earmuff Hairstyle
- Coily Crown Puff Earmuff Hairstyle
- Double Dutch Braids Earmuff Hairstyle
- Side Braid Earmuff Hairstyle
- Low French Twist Earmuff Hairstyle
- Textured Lob Earmuff Hairstyle
- Short Bob Tuck Earmuff Hairstyle
- Half-Up Low Twist Earmuff Hairstyle
- Face-Framing Low Ponytail Earmuff Hairstyle
- Soft Blowout Earmuff Hairstyle
- Mini Bubble Ponytail Earmuff Hairstyle
- Claw Clip Low Twist Earmuff Hairstyle
- Loose Natural Curls Earmuff Hairstyle
Center-Part Loose Waves Earmuff Hairstyle
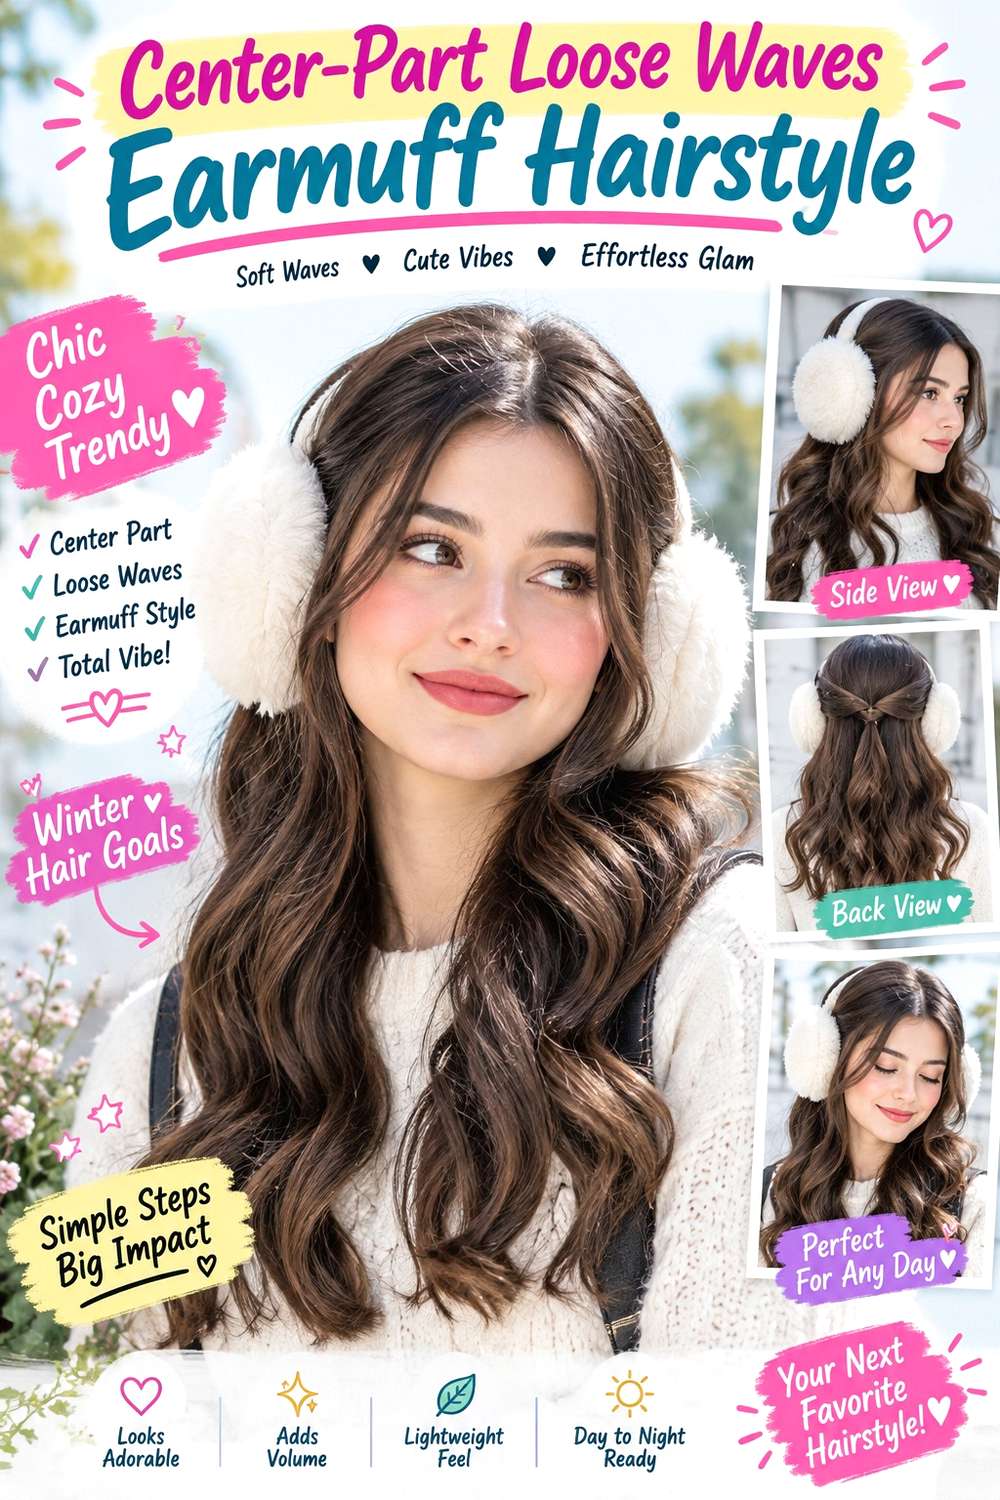
A center part with loose waves keeps the front balanced and lets the earmuff band sit over relatively smooth roots. Start the strongest bends below the cheekbones so the sides stay flatter where the ear pads need contact, then leave the ends softly curved instead of tightly curled. Shoulder-length and longer hair works well, while fine or lower-density hair usually looks fuller when the wave pattern stays broad rather than overly separated.
Apply heat protectant before styling, use a large-barrel curling iron for open bends, and finish with flexible hairspray so the movement can recover after the earmuffs come off. A full wash-day set takes longer because every section needs drying and shaping, while a quick refresh can focus on the face frame and any flattened pieces near the ears. If you are discussing the cut with a stylist, point to where you want the shortest face-framing piece to finish when dry, ideally clear of the earmuff cup if you dislike hair bunching there. Keep the roots lightly lifted above the band line rather than directly beneath it. After outdoor wear, reshape only the sections that lost their bend instead of recurling the whole head.
Pro tip:
Let the front waves cool before putting on the earmuffs, then slide the cups into position without dragging them downward. This helps preserve the bend nearest the temples.
Make It Work for You:
For naturally wavy hair, keep your existing lower texture and refine only the front sections. The earmuff-friendly smooth zone can stay limited to the roots and sides.
Watch Out For:
Avoid building your strongest curl directly over the ears. Compression from the cups can leave an obvious flat spot; place the most defined movement slightly lower instead.
Low Braided Ponytail Earmuff Hairstyle

A low braided ponytail keeps the crown and ear area smooth while giving the length enough structure to stay controlled in winter weather. Create a center or soft side part, gather the hair near the nape, then braid the ponytail from just below the elastic. Keep the braid moderately firm so it does not rub apart against a scarf, and leave only narrow face-framing pieces if they will not sit beneath the earmuff cups. Medium to long hair is the easiest starting point.
Use light texturizing spray for grip, a fabric-covered elastic for the ponytail base, and a small snag-free elastic to secure the braid end. Full styling is fairly quick, while a refresh usually means smoothing the front, retightening the end, and reshaping the braid after removing outerwear. If a stylist is creating the look, specify the ponytail height and braid width, especially if your coat collar sits high at the nape. The anchor should land between the collar and the lower edge of the earmuffs. Dense hair may need a broader braid rather than extra tension. If the weave loosens, correct the braid itself instead of pulling the entire ponytail tighter around the ears.
Pro tip:
Secure the low ponytail first, then put on the earmuffs briefly before braiding. This confirms the anchor sits below the cups and does not create hidden pressure.
Make It Work for You:
For dense hair, use a wider braid with even tension rather than pulling the ponytail tighter. The broader weave controls weight while keeping the ear area comfortable.
Watch Out For:
Do not let the braid begin directly beneath a thick scarf collar. Repeated rubbing can loosen the first passes, so move the anchor slightly higher if needed.
Sleek Low Bun Earmuff Hairstyle
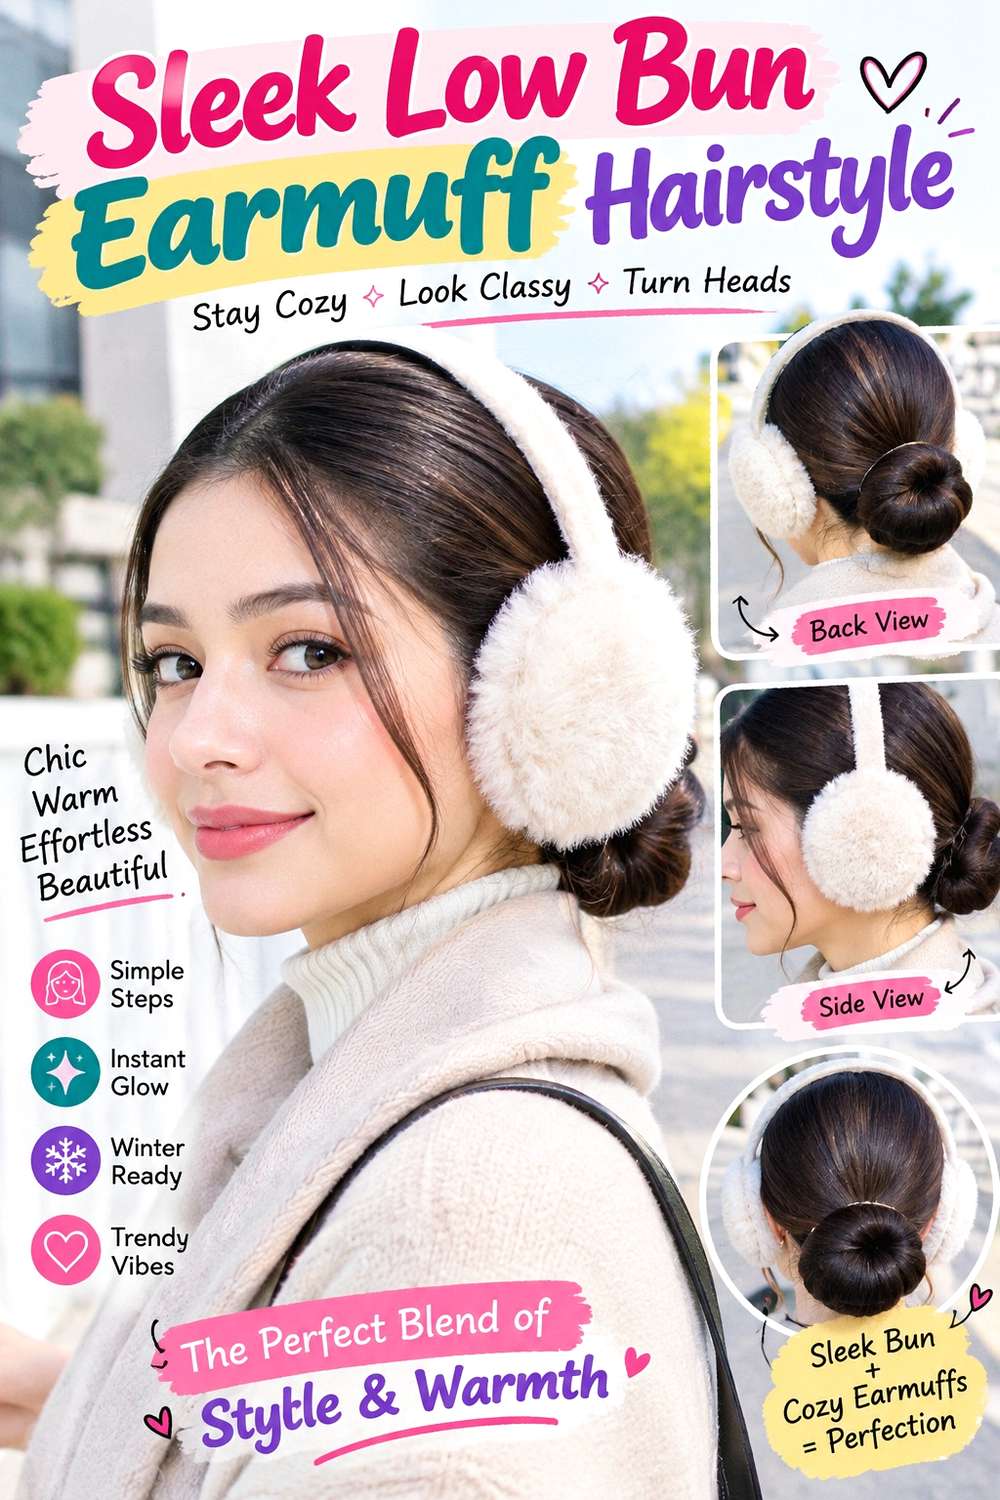
A sleek low bun keeps nearly all of the hair away from the ear pads, making it useful when your earmuffs have wide cups. Part the hair in the center or slightly off-center, direct both sides smoothly toward the nape, and form a compact bun that sits below the accessory line. Keep the crown controlled but not painfully tight, and place the bun high enough to clear a stiff coat collar. Medium to long hair works best, while dense hair may feel better in a slightly wider bun that spreads its weight.
Use lightweight smoothing cream for surface control, a fabric-covered elastic for the base, and bobby pins to secure the folded lengths. A full style is relatively quick on already dry hair, while a refresh after outdoor wear usually means smoothing flyaways and retucking one edge. If a stylist is preparing the look, explain exactly where your earmuff cups end and how high your winter collar sits so the bun can fit between them. The sides should stay flat enough for comfortable contact without being stretched. If one section loosens near the ear, pin that area locally rather than tightening the entire bun and increasing pressure beneath the earmuffs.
Pro tip:
Try the earmuffs on before final pinning and turn your head both ways. This reveals whether the bun or side sections press into the cups during normal movement.
Make It Work for You:
For shorter medium hair, keep the bun small and let a few nape pieces remain softly tucked. The low silhouette stays intact without forcing every strand backward.
Watch Out For:
Avoid placing bobby pins directly behind the ears where the cups press. Shift structural pins toward the center of the bun so the accessory remains comfortable.
Curly Low Puff Earmuff Hairstyle
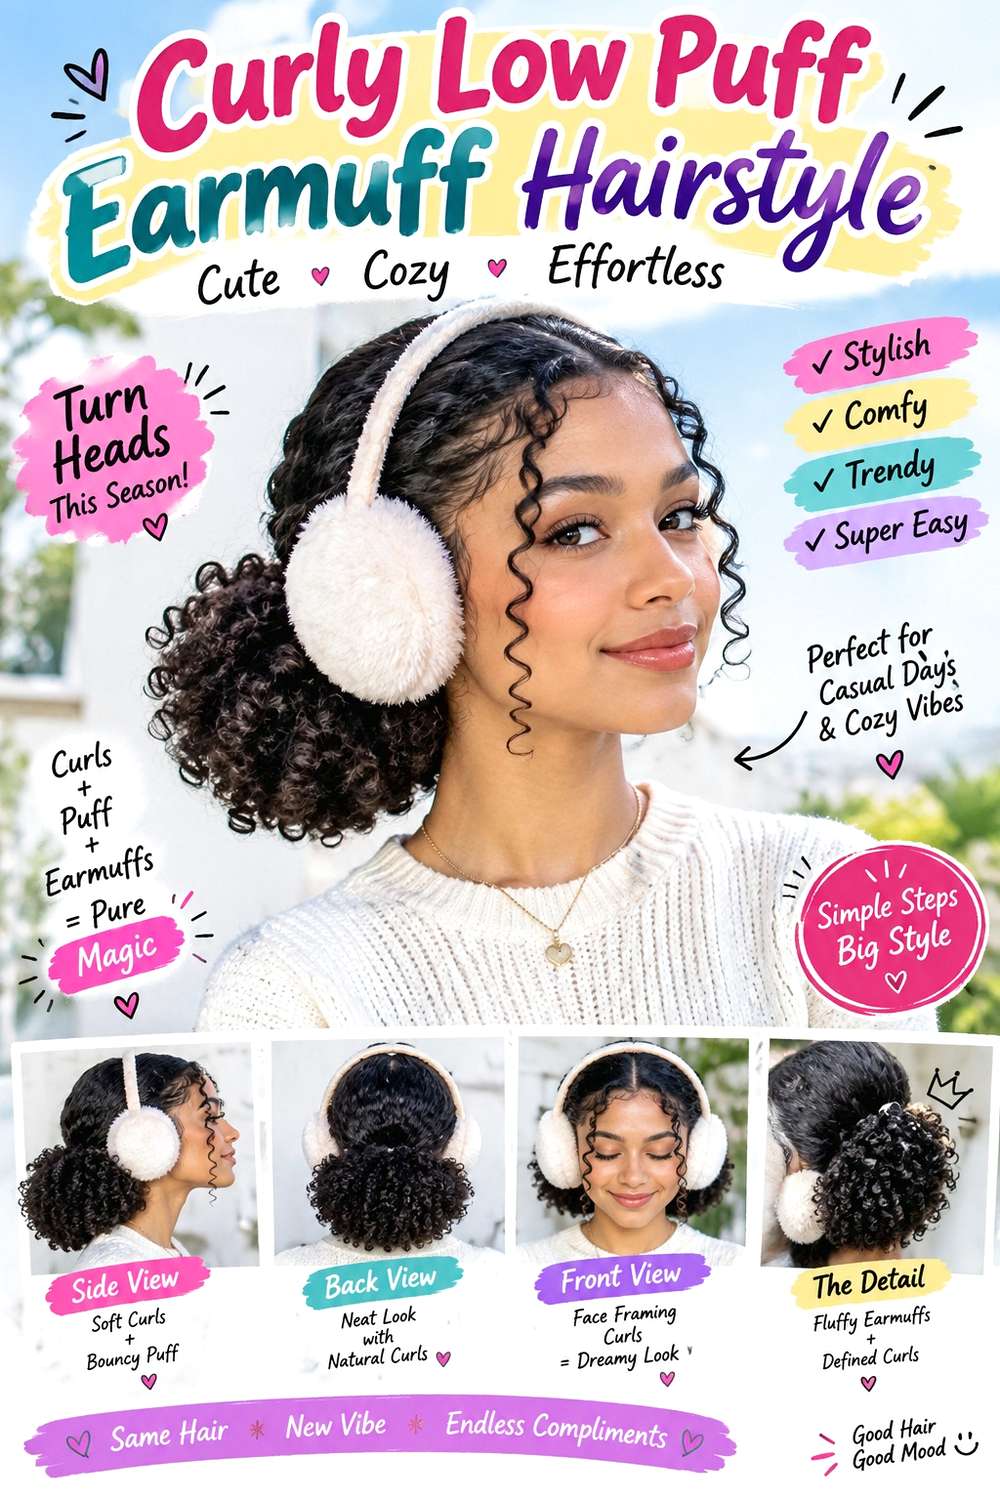
A low curly puff keeps defined texture visible while leaving the top and sides relatively clear for earmuffs. Gather the curls near the nape after they are fully dry, preserving complete curl groups rather than brushing everything smooth. Let the puff expand behind the head, but keep the side sections near the ears controlled enough that the cups can sit comfortably. Medium to long curly hair works well, and the finished height should be judged after shrinkage rather than from stretched length.
Use lightweight leave-in conditioner for softness, curl gel to support definition, and a soft hair tie for the low anchor. A full wash-day routine takes longer because the curls need to dry and settle, while a quick refresh can focus on compressed outer curls after the earmuffs come off. If a stylist is shaping or arranging the look, discuss the puff placement on dry hair and identify which face-framing curls you want left outside the gathered section. Keep the anchor above a bulky scarf but below the earmuff band line. If one side becomes flat, lift and redefine that area instead of tightening the tie, which can stretch the front and make the ear area less comfortable.
Pro tip:
After removing the earmuffs, lift flattened curls from underneath before adding any product. Often the shape returns with gentle separation and does not need a full refresh.
Make It Work for You:
For tighter curls, leave a little more space between the ear cups and puff base. This reduces compression while preserving the low gathered shape and definition.
Watch Out For:
Do not brush compressed curls to make them uniform again. That can create unnecessary frizz; redefine only the affected groups and leave the rest of the pattern intact.
Coily Crown Puff Earmuff Hairstyle

A crown puff can work with earmuffs when the accessory has a low band or behind-the-head construction that does not cross the puff itself. Gather the coils toward the upper back of the head, keep the sides controlled without flattening all texture, and let the puff stay rounded above the earmuff cups. Short-to-medium coily hair can form a compact puff, while longer hair creates more height. This option suits readers who want visible volume and do not need a fitted hat over the top.
Use moisturizing leave-in conditioner for softness, styling gel for targeted perimeter control, and a soft hair tie for the anchor. Wash-day styling takes longer, while a quick winter refresh may involve reshaping the puff and restoring any coils compressed by the earmuff band. If a stylist is creating the look, show the exact path of your earmuff band and specify how much space should remain around it. Shrinkage should be considered in the finished dry shape. Keep the gathered base comfortable rather than pulling tighter to clear the ears. If your earmuffs cross directly over the crown, choose a lower puff instead of forcing the accessory around the volume.
Pro tip:
Put the earmuffs on after the puff is fully shaped, then check the band path in a mirror. Reposition the puff only if the band actually crosses it.
Make It Work for You:
If your earmuffs have an over-the-head band, lower the puff toward the back instead. You can preserve the rounded shape while creating a clear path for the band.
Watch Out For:
Avoid squeezing the puff smaller just to fit one accessory. If the earmuff design conflicts with your volume, change the puff placement rather than increasing tension.
Double Dutch Braids Earmuff Hairstyle
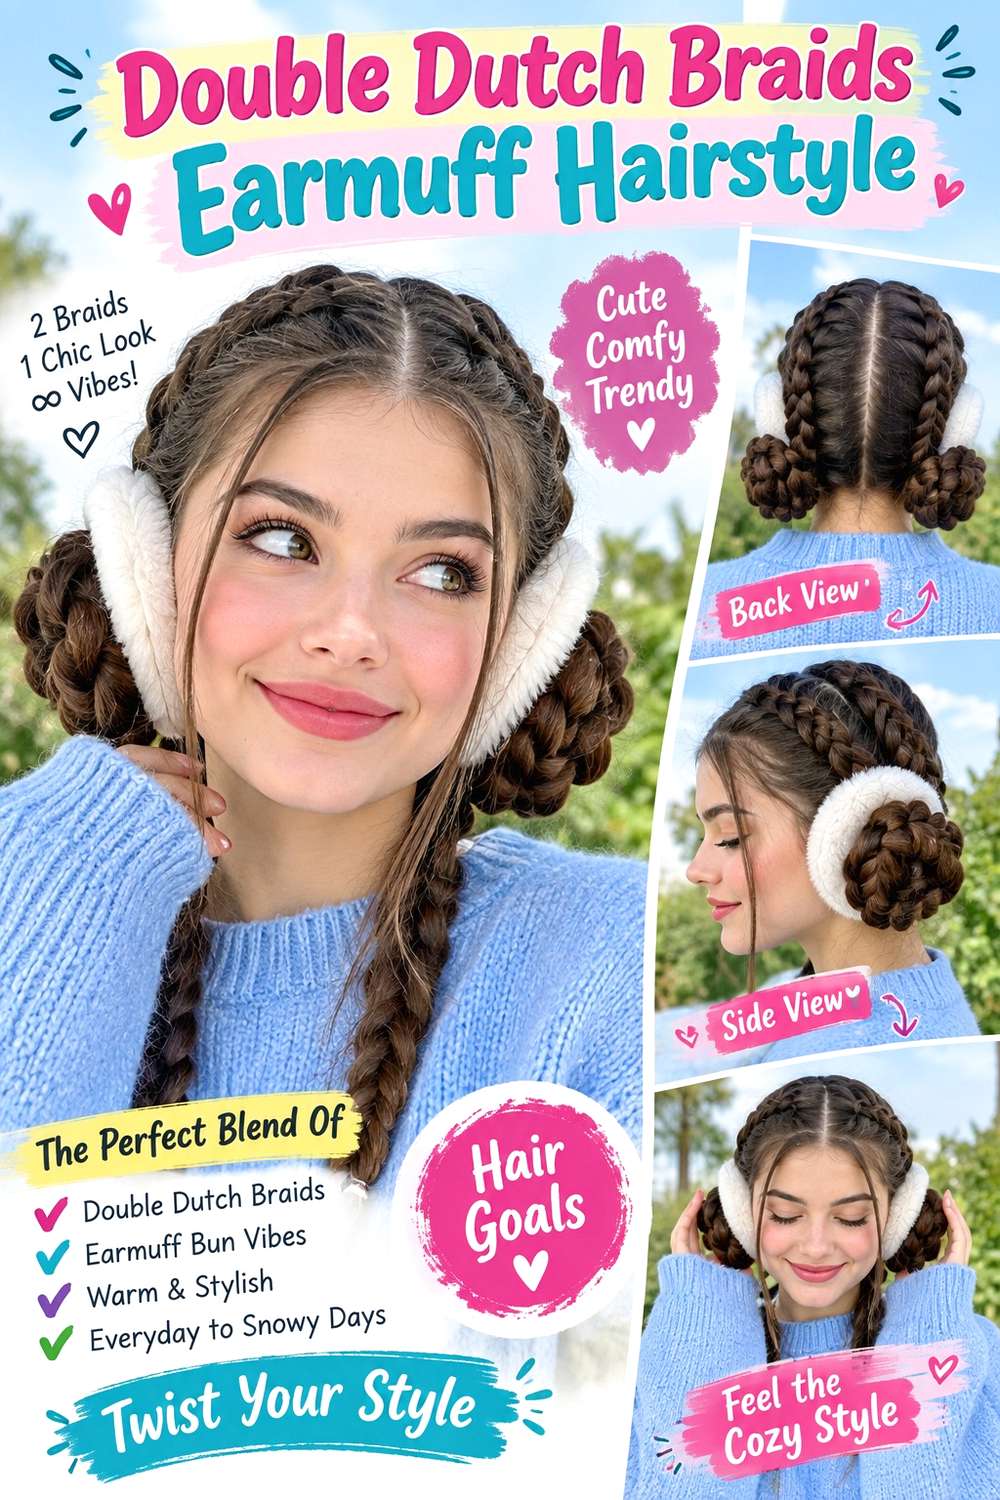
Double Dutch braids keep the hair close to the head and controlled in wind, but the braid placement should stay clear of the earmuff cups. Create a center part from the hairline to the nape, braid each side close to the scalp, and keep the woven sections flatter as they pass above the ears. The lengths can hang forward over a coat or rest behind the shoulders. Medium to long hair is easiest, while layered hair may need slightly smaller sections for a cleaner weave.
Use light texturizing spray for grip, two small snag-free elastics to secure the ends, and flexible hairspray for shorter flyaways. The full style takes longer than a basic ponytail because both braids need balancing, but it usually needs very little refreshing once secured. If a stylist is braiding your hair, specify comfortable tension and ask that the braid ridge stay above or behind the earmuff contact area rather than underneath it. Dense hair can support wider braids, but width should increase away from the ear cups. If a section loosens, repair that part of the braid instead of pulling the front tighter. The goal is a secure woven shape that remains comfortable under winter accessories.
Pro tip:
Keep the braid flatter above the ears and widen it only below the earmuff line. This preserves visible texture without creating a raised ridge under the cups.
Make It Work for You:
For shorter layers, use smaller braid sections near the temples and keep the weave firmer there. You can soften the lengths later without losing control around the ears.
Watch Out For:
Do not increase tension at the front simply because the earmuffs cover the area. Consistent braid tension is more comfortable and avoids concentrated pulling near the hairline.
Side Braid Earmuff Hairstyle
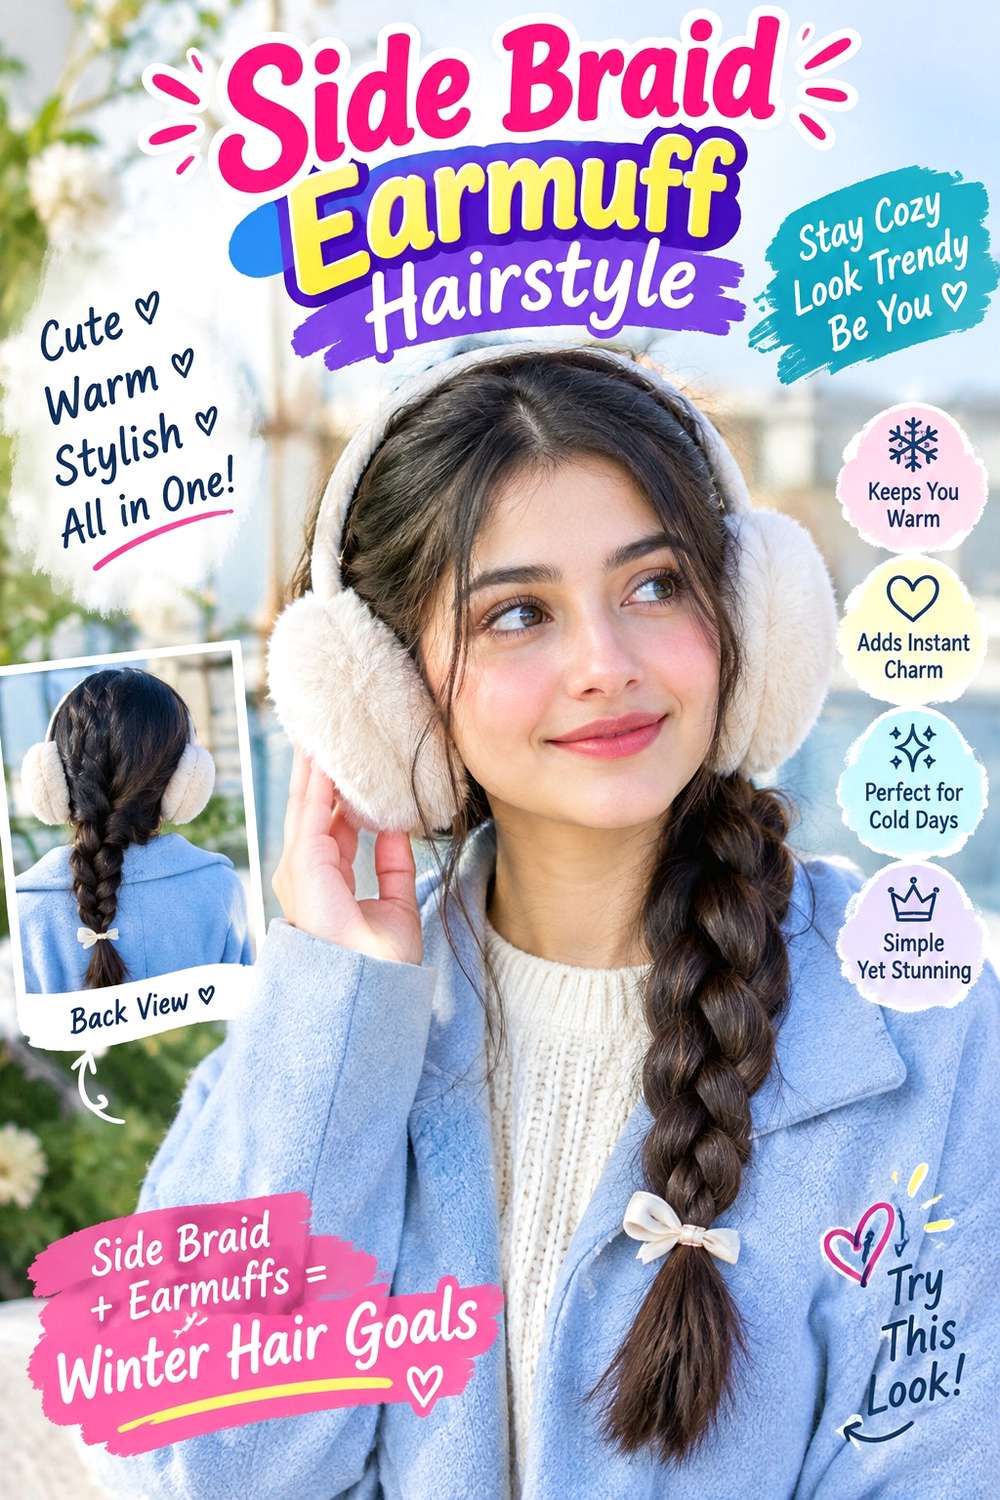
A side braid keeps most of the length forward where it stays visible while leaving the crown relatively flat for earmuffs. Use a shallow side part, sweep the hair over one shoulder, and begin the braid below the ear so the woven section does not sit under the cup. Keep the top smooth with a little natural lift, and loosen the braid only after the end is secure. Medium to long hair works best, while wavy or curly texture can add visible fullness without extra styling.
Use light texturizing spray for grip, a small clear elastic for the end, and flexible hairspray to control short flyaways. Full styling is quick, and a winter refresh may mean tightening the last few passes or smoothing the part after removing the earmuffs. If a stylist is creating it, specify which shoulder you want the braid to fall over and where the earmuff edge sits above the ear. The braid should begin beneath that contact point. Layered hair may need a slightly firmer weave, while dense hair can support a broader braid without extra tightness. If the upper section slips, fix the starting point instead of tightening the entire braid around the temple.
Pro tip:
Place the earmuffs before fully loosening the braid, then widen only the section that remains visible. This keeps the hidden starting point neat and stable.
Make It Work for You:
For fine hair, keep the braid compact and gently expand only a few center loops. The side-swept effect remains clear without making the weave look overly thin.
Watch Out For:
Avoid letting the braid start directly under the ear cup. The pressure can flatten the weave and tug at the temple; begin lower, beneath the accessory edge.
Low French Twist Earmuff Hairstyle
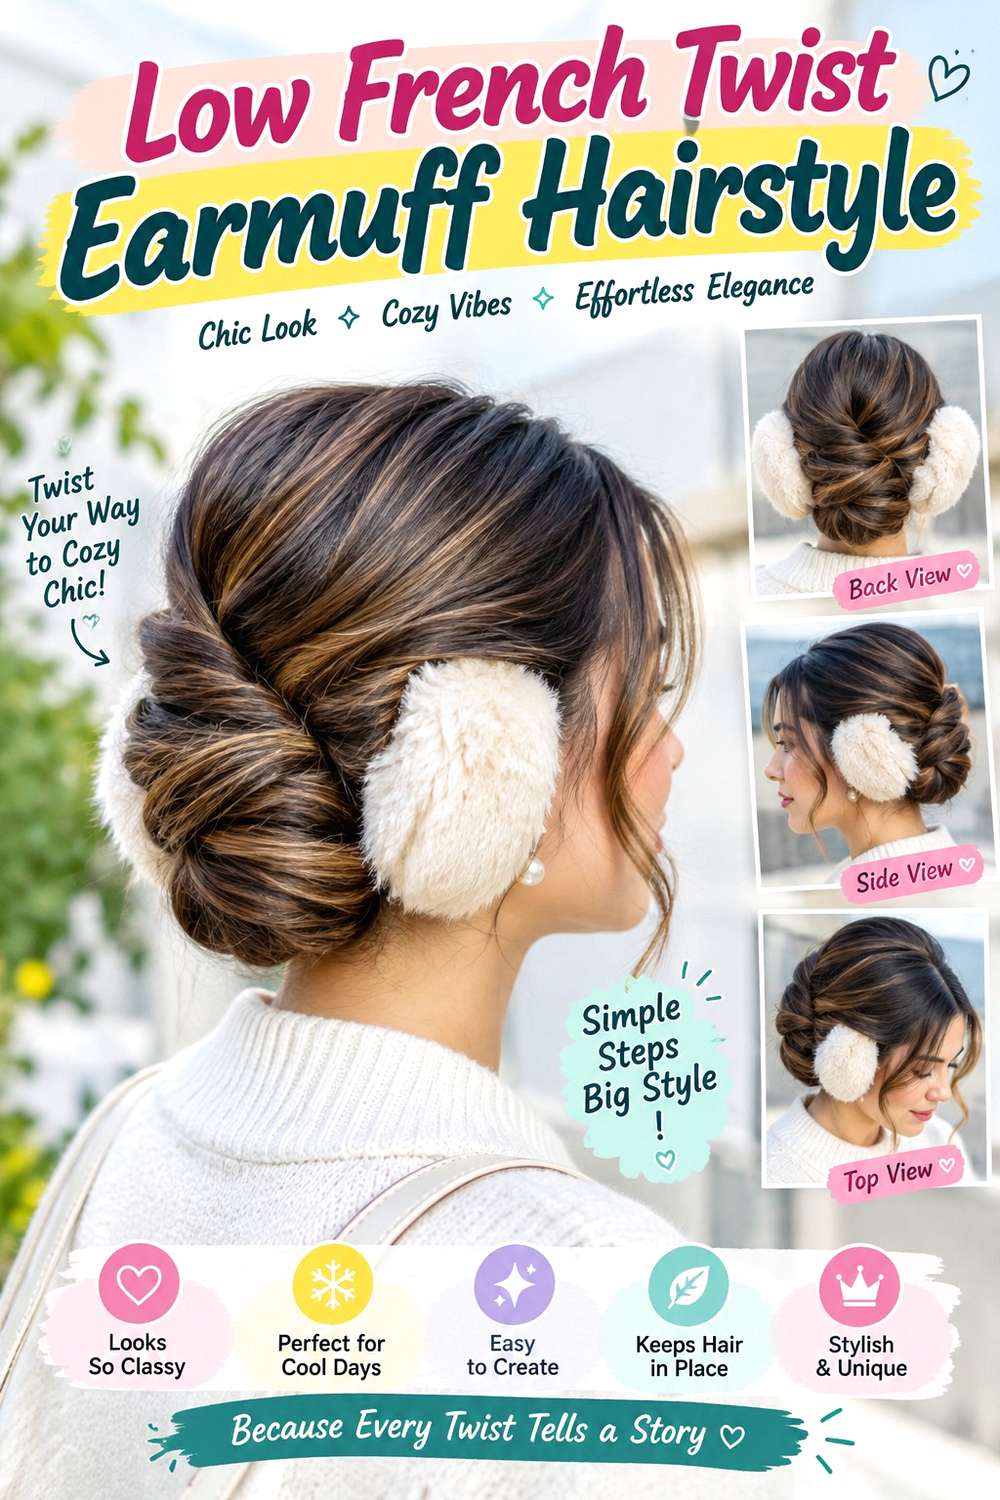
A low French twist gives a polished gathered shape while keeping the sides smooth enough for earmuff cups. Sweep the lengths inward from one side, roll them toward the center at the nape, and secure the seam low rather than building a tall vertical twist. Keep the front softly parted and the crown relatively flat so the earmuff band can sit without creating a ridge. Medium to long hair works best, and natural texture can provide useful grip inside the roll.
Use light texturizing spray through the lengths, bobby pins to secure the seam, and flexible hairspray for surface flyaways. Building the twist takes longer than a low ponytail, while a refresh may require only one extra pin after removing a coat or scarf. If a stylist is preparing it, specify how low and wide the twist should sit and show where the earmuff cups meet the back of the head. The internal pins should stay away from that pressure zone. Dense hair may need a broader, flatter roll instead of extra height. If the twist loosens, reinforce the seam where movement occurred rather than pushing more pins into the area directly behind the ears.
Pro tip:
Angle structural pins toward the center seam rather than outward behind the ears. This keeps the pressure points away from the cups while maintaining the low roll.
Make It Work for You:
For dense hair, build a wider, flatter twist at the nape instead of a tall roll. The lower profile leaves more room for earmuffs and winter outerwear.
Watch Out For:
Do not use the earmuff band to help hold the twist in place. The updo should remain secure independently so removing the accessory does not disturb the structure.
Textured Lob Earmuff Hairstyle

A textured lob keeps most of the hair below the earmuff cups, which helps the accessory sit against a relatively smooth side section. Use a center or shallow side part, create loose bends through the mid-lengths, and leave the tips straighter so the shoulder- or collarbone-length perimeter stays visible. Keep the strongest movement below cheek level rather than directly over the ears. Straight or naturally wavy textures suit the shape, while finer ends usually benefit from preserving a fuller bottom line.
Apply heat protectant before styling, use a medium curling iron for open bends, and finish with lightweight texturizing spray to separate the movement. A full wash-day set takes longer, while a quick refresh can focus on the top layer and any sections flattened by the earmuffs. If you are discussing the cut with a stylist, point to the exact perimeter landmark you want and explain that the sides need to tuck comfortably behind the ears. That detail can affect face-framing placement and how much weight stays around the temples. If the accessory leaves a bend near the ear, reshape only that section rather than restyling the entire lob. As the cut grows, refresh the perimeter when it no longer sits where intended.
Pro tip:
Tuck the side sections behind the ears before placing the cups, then release only the pieces you want visible. This reduces bunching beneath the earmuffs.
Make It Work for You:
For fine or sparse ends, keep the bottom edge fuller and place most texture through the mid-lengths. The lob retains shape even after winter accessory wear.
Watch Out For:
Avoid creating bulky bends exactly where the earmuff cups sit. Shift the strongest movement below that area so compression does not leave uneven dents near the sides.
Short Bob Tuck Earmuff Hairstyle
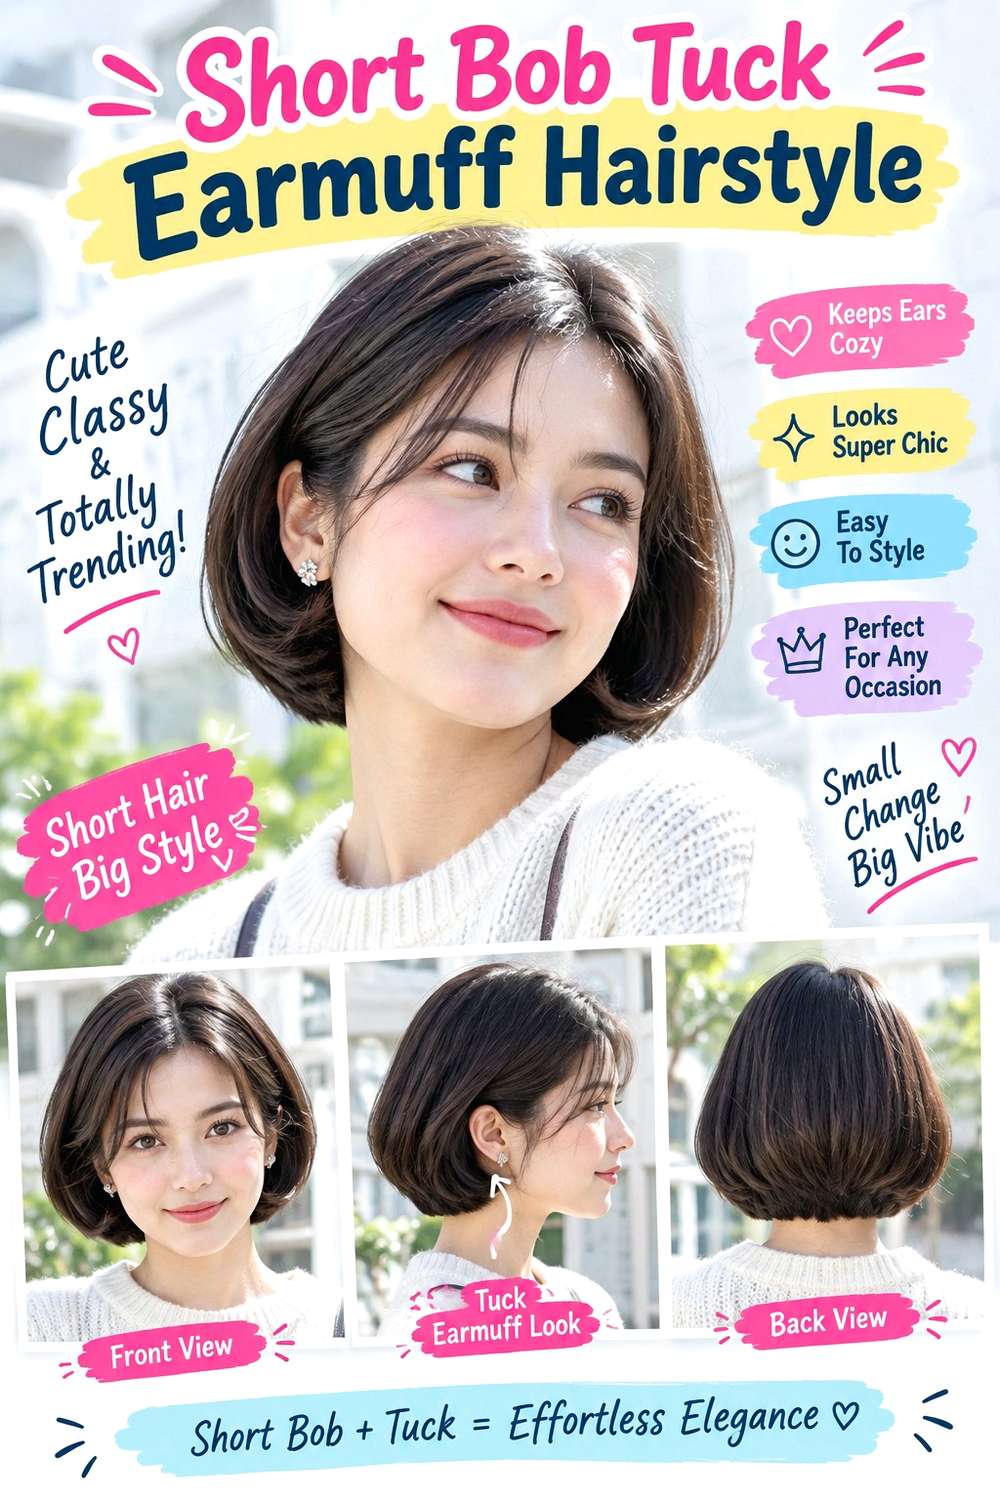
A tucked bob is one of the simplest short styles to pair with earmuffs because the sides can sit neatly behind the ears instead of bunching beneath the cups. Keep the perimeter around the jaw or chin, choose a center or shallow side part, and leave the ends mostly straight with a slight inward bend. A narrow front piece can stay loose if desired, but the main side sections should tuck smoothly. Straight and wavy textures both work, and a fuller bottom edge helps the compact shape remain clear.
Apply heat protectant before refining the bob, use a flat iron for controlled smoothing and a soft end bend, and finish with lightweight serum through the tips. Full wash-day styling takes longer, while a quick winter refresh may involve only the front and tucked sections after the earmuffs come off. If you are discussing the cut with a stylist, show where the finished perimeter should sit and whether you regularly tuck behind the ears. That information matters for the front blend and side weight. If the earmuffs create a crease, let the hair settle first, then reshape only the affected section. Trim or reshape when the perimeter stops behaving as intended rather than following a fixed calendar.
Pro tip:
Let the bob cool completely before tucking the sides and adding earmuffs. Freshly shaped hair can pick up a sharper crease when compressed too soon.
Make It Work for You:
For a naturally wavy bob, keep the wave pattern through the ends and smooth only the tucked side. The compact shape stays soft without full straightening.
Watch Out For:
Do not force a thick front section behind the ear if it bunches beneath the cup. Leave a narrower piece forward or reduce the tucked section instead.
Half-Up Low Twist Earmuff Hairstyle

A low half-up twist keeps the temples controlled while leaving most of the hair loose beneath the earmuffs. Take small sections from above the ears, direct them slightly downward, twist them toward the back, and secure the meeting point below the crown. Keep the anchor low enough that the earmuff band does not cross directly over it. The lower lengths can remain straight, wavy, curly, or naturally textured, making this useful for medium to long hair and many densities.
Use light texturizing spray for grip, bobby pins to secure the overlapping twists, and flexible hairspray for short flyaways. Full styling is quick unless you also reshape the loose lengths, while a refresh may involve retwisting one side after removing the earmuffs. If a stylist is arranging the look, show exactly where the accessory band sits and specify how much crown softness you want above the twist. The side sections should be narrow enough to fit comfortably beneath or behind the cups without creating a ridge. If the anchor loosens, repair the hidden pins rather than taking more hair from the lower section. This preserves fullness below and avoids building unnecessary bulk behind the head.
Pro tip:
Set the earmuff band in place before tightening the hidden pins. You can then confirm the low twist sits below the band rather than directly underneath it.
Make It Work for You:
For curly hair, twist complete curl groups and leave the lower curls untouched. This preserves definition while keeping the side sections controlled around the earmuff cups.
Watch Out For:
Avoid placing a hard pin head beneath the earmuff cup. Shift the anchor inward toward the back so the accessory does not press the metal against your scalp.
Face-Framing Low Ponytail Earmuff Hairstyle
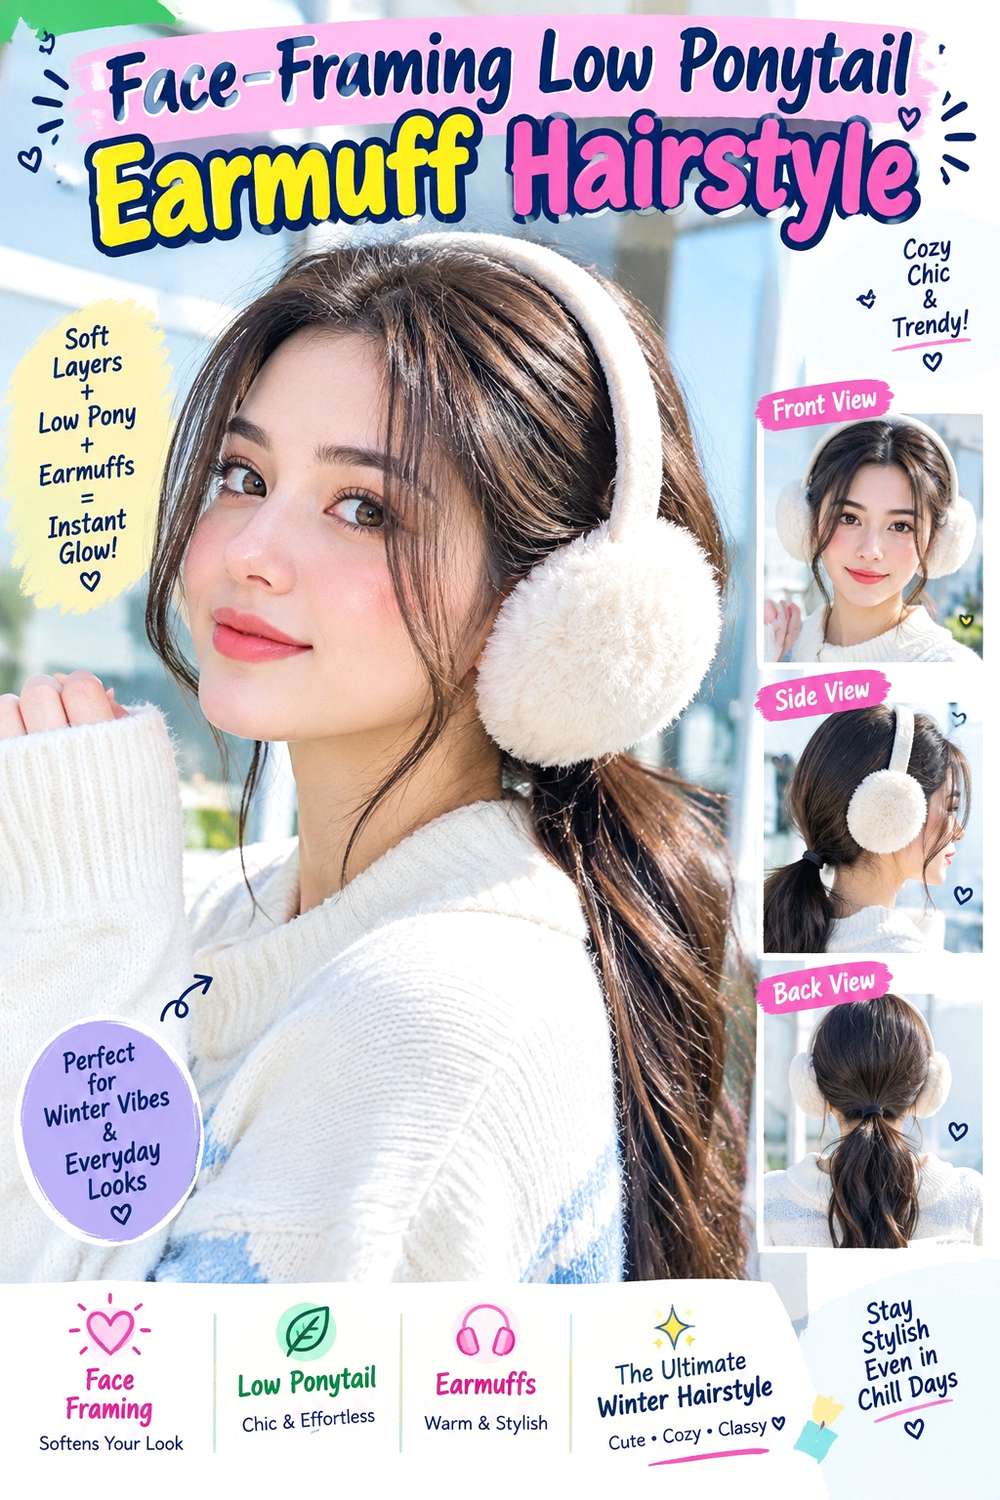
A low ponytail with narrow face-framing pieces keeps the main length controlled while leaving a little movement in front of the earmuffs. Use a center or soft side part, separate the front pieces first, and gather the remaining hair near the nape. The ponytail can stay straight, softly waved, or naturally textured. Medium to long hair works best, while the loose pieces should be thin enough that they do not bunch painfully beneath the cups if they shift backward.
Apply heat protectant before shaping the face frame, use a curling iron for one broad bend, and secure the ponytail with a fabric-covered elastic. A full style takes longer when the entire ponytail also needs shaping, while a quick refresh can focus on the front sections and the base. If a stylist is cutting your face frame, point to the exact finished landmark you want—cheekbone, jaw, or below—and mention that you wear earmuffs regularly. That helps avoid leaving too much bulk directly over the ears. Keep the ponytail anchor clear of a high scarf or collar. If wind disturbs the loose pieces, reshape those sections individually rather than loosening the whole ponytail.
Pro tip:
Choose the face-framing pieces before gathering the ponytail, then test whether they sit comfortably in front of the cups. Keep them there rather than tucking repeatedly.
Make It Work for You:
For curly hair, use naturally formed curl groups as the face frame and choose them after shrinkage. This preserves texture while keeping the earmuff area less crowded.
Watch Out For:
Do not leave wide sections loose around both ears. They can bunch beneath the cups and create pressure; use narrow pieces or direct the excess into the ponytail.
Soft Blowout Earmuff Hairstyle

A soft blowout can work with earmuffs when the strongest volume sits above the crown or below the ear line rather than directly beneath the cups. Use a center or soft side part, keep the side roots controlled, and build broad curves through the lengths with the ends turning gently away from the face. Medium to long hair shows the movement clearly. Fine strands usually need lighter product near the roots, while dense hair can carry more body through the lower half without making the sides bulky.
Apply heat protectant before drying, use a round brush to create lift and curved movement, and finish with flexible hairspray for hold. The full blowout is a longer wash-day style, while a refresh after earmuff wear may involve lifting the crown and reshaping the front. If a stylist is creating it, show exactly where the earmuff band and cups sit and ask for the side volume to remain smooth through that area. The strongest front sweep can begin above the cheekbone or below the cup edge. If the earmuffs flatten the sides, lift those sections gently rather than adding repeated layers of product. A looser, natural finish usually recovers more easily than a very stiff blowout.
Pro tip:
Keep the side roots smooth while directing lift toward the crown. This lets the earmuff cups sit flatter without sacrificing all the volume visible from the front.
Make It Work for You:
For dense hair, concentrate the blowout body through the lower lengths rather than the sides. The shape stays full while the earmuff contact area remains manageable.
Watch Out For:
Avoid repeatedly adding hairspray to flattened side sections. Product buildup can make the dents more obvious; lift and reshape first, then add only a light finishing layer.
Mini Bubble Ponytail Earmuff Hairstyle
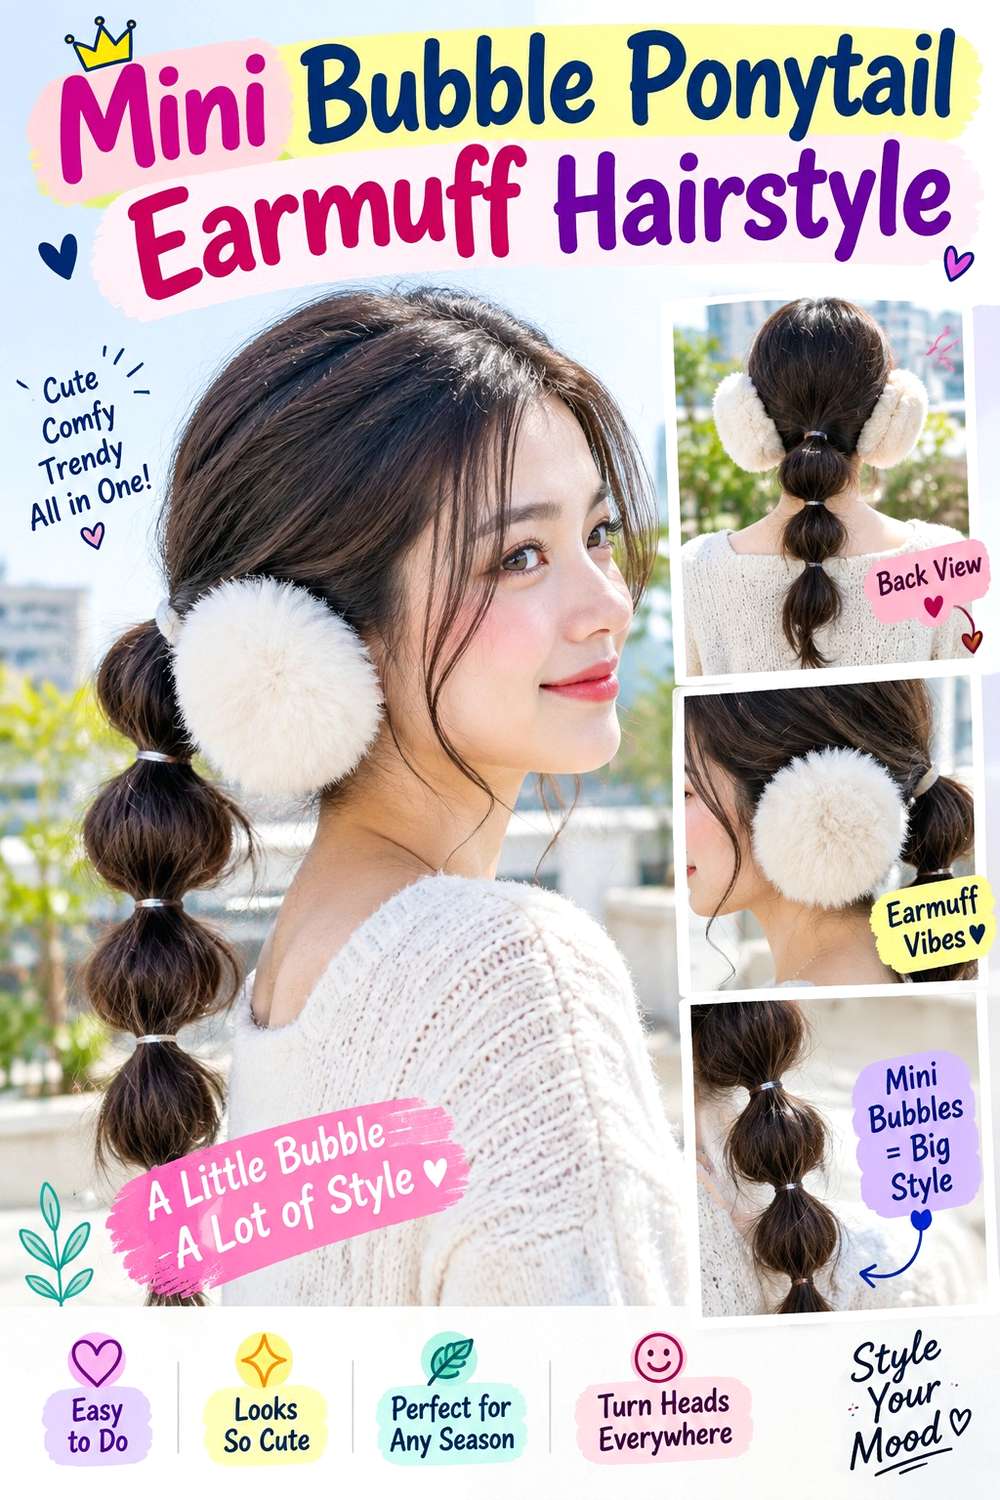
A mini bubble ponytail keeps the hair gathered without creating a large bun or clip behind the ears. Start with a low or mid-low ponytail, add one or two small elastics through the remaining length, and gently expand each section from both sides. Keep the crown smooth enough for the earmuff band and place the main anchor below the ear-cup line. Medium hair is especially practical because fewer bubbles keep the style compact, though longer hair can use additional sections if they stay clear of scarves.
Use lightweight mousse for manageable body, snag-free elastics for the divisions, and flexible hairspray for flyaways. Styling is fairly quick, while a refresh may only involve reshaping a flattened bubble after removing a coat. If a stylist is creating the look, specify the ponytail height and how many rounded sections should remain visible above your collar or scarf. The structural elastics should carry the shape, so do not rely on tight expansion for hold. If one bubble flattens, repair that section rather than tightening the main ponytail. Keep each division proportional to the available length so the lower sections do not disappear inside winter layers.
Pro tip:
Put on your earmuffs and scarf before expanding the bubbles fully. You can then shape only the sections that remain visible and avoid unnecessary friction.
Make It Work for You:
For shorter hair, create one larger bubble beneath the base instead of several small ones. The repeated shape remains recognizable without competing with winter collars.
Watch Out For:
Do not place the first bubble directly behind the earmuff cups. Move the ponytail lower so the rounded section begins where it can expand without pressure.
Claw Clip Low Twist Earmuff Hairstyle
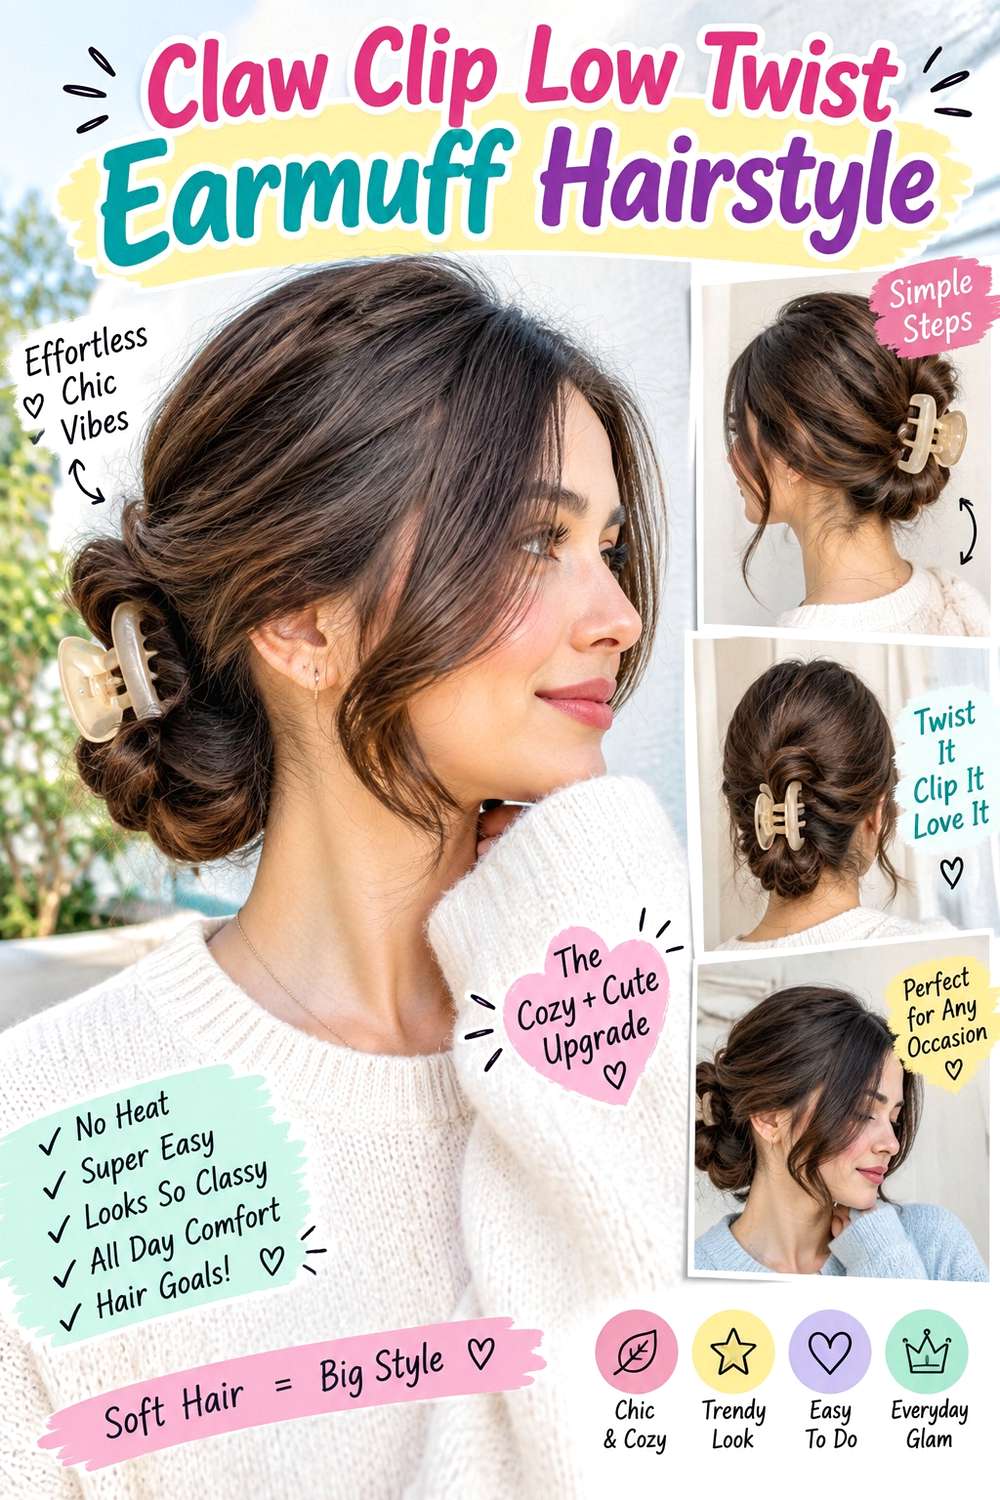
A low claw-clip twist works with earmuffs when the clip sits close to the nape instead of behind the ear cups. Gather the hair low, twist upward only once or twice, fold the remaining length back down, and secure the compact shape with a medium clip. Keep the crown relatively smooth and let a narrow front piece remain loose if desired. Medium to long hair works well, while thick hair needs a clip with enough capacity to close fully without forcing the teeth apart.
Use light texturizing spray for grip and a sturdy claw clip sized to the gathered section. Those two supplies are enough for a simple version. Full styling is quick, and a refresh after outdoor wear may mean only retwisting the base if the clip shifts. If a stylist is arranging the look, show where the earmuff cups and coat collar meet so the clip can sit in the clear space between them. The twist should feel secure without a hard ridge under the accessory band. If the clip becomes uncomfortable, move the anchor rather than twisting the hair more tightly. For dense hair, a broader low twist usually feels better than a narrow, highly compressed one.
Pro tip:
Check the clip from the side after putting on the earmuffs. If the cup touches the clip arm, lower the twist slightly before heading outside.
Make It Work for You:
For thick hair, choose a wider clip and fold the twist flatter against the nape. This keeps the anchor secure without building a hard lump behind the ears.
Watch Out For:
Avoid oversized clips that extend into the earmuff contact zone. Even a secure twist can become uncomfortable if the accessory arm presses beneath the cup.
Loose Natural Curls Earmuff Hairstyle
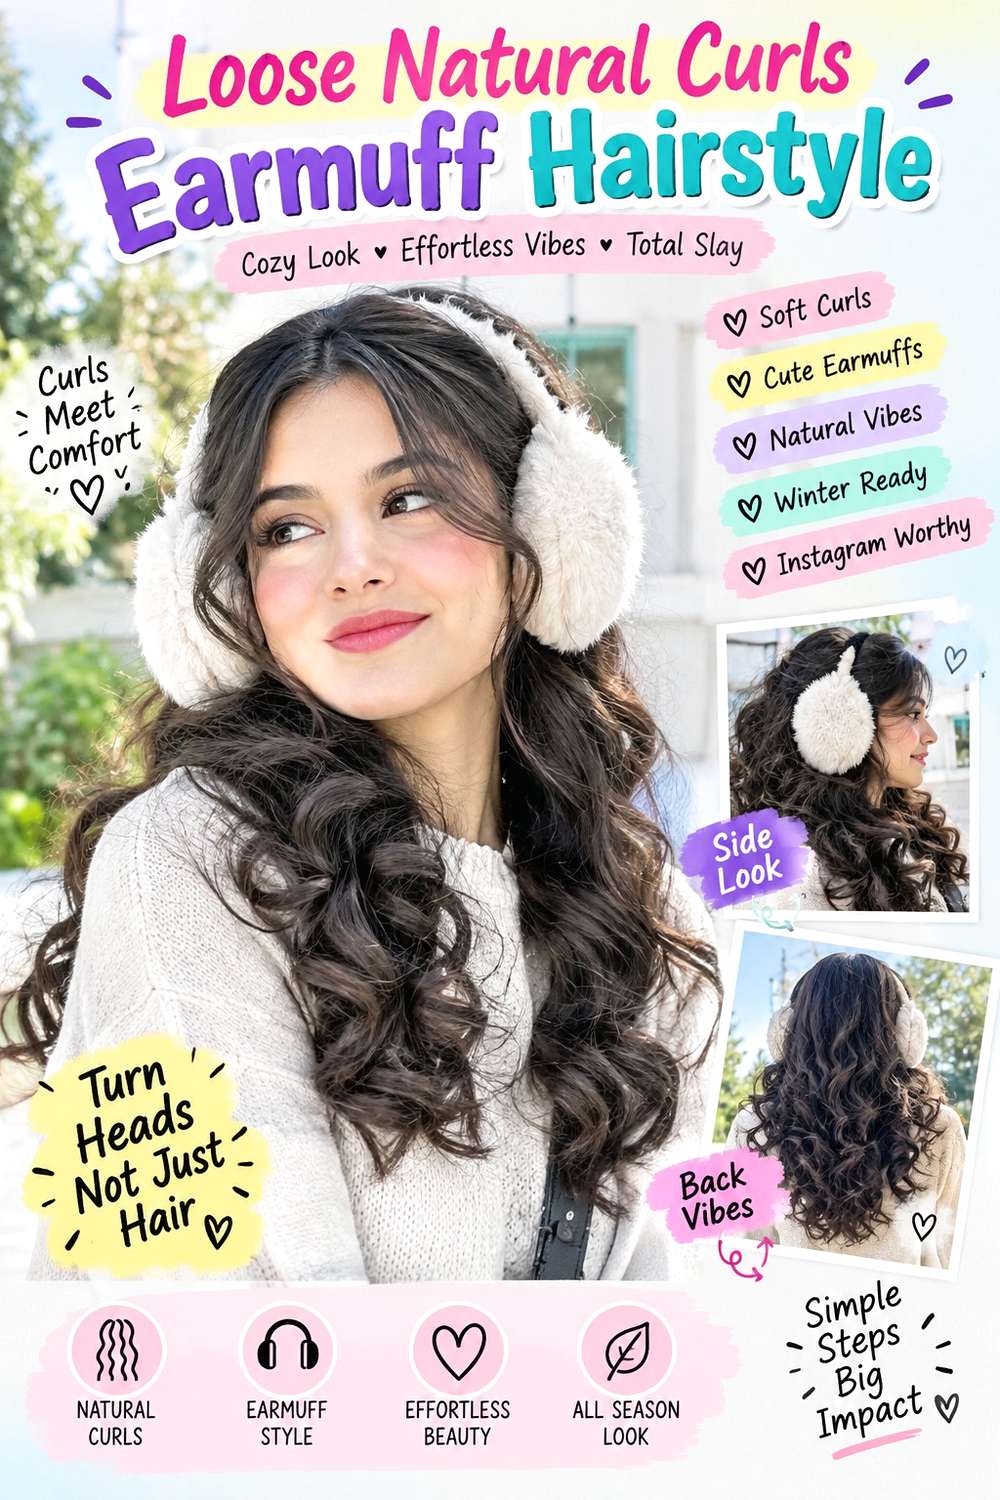
Loose natural curls can stay fully down with earmuffs when the side sections are arranged to avoid excessive compression around the ears. Let the curls dry in their usual pattern, choose the part that feels most natural, and position the earmuff cups beneath or around a small number of curl groups rather than crushing a wide section flat. Keep most volume above the temples or below the cups. Short, medium, and long curly hair can all work, with shrinkage determining the final relationship between the curls and accessory.
Use lightweight leave-in conditioner for softness, curl gel for definition, and a diffuser if that drying method suits your routine. A full wash-day set takes longer, while a quick refresh may involve redefining only the curls that were flattened by the earmuffs. If a stylist is shaping your curls, discuss the dry finished length around the ears and whether you prefer those sections to tuck back or remain forward. That placement affects how easily the accessory sits. After removing the earmuffs, lift compressed roots and reshape individual curl groups instead of brushing through the whole side. If the cups consistently crush too much texture, try a lower-profile earmuff shape or a gathered style.
Pro tip:
Separate a small pathway for each earmuff cup before placing it. Sliding the accessory into that space disturbs fewer curl groups than pressing straight through the volume.
Make It Work for You:
For dense curls, keep more volume above the temples and gently tuck only the sections closest to the ears. The hairstyle stays full without overcrowding the cups.
Watch Out For:
Do not repeatedly drag the earmuffs through the curls when removing them. Lift the band away from the head first so fewer strands catch or lose definition.
Conclusion
Hairstyles to wear with earmuffs work best when the shape respects the accessory instead of fighting it. Low braids, ponytails, buns, and twists keep bulky anchors away from the ear pads, while waves, curls, lobs, and bobs can stay loose if side volume remains controlled. Fine or lower-density hair may need lighter styling and smaller sections, whereas dense hair often benefits from broader, lower anchors. Curly and coily textures should be positioned after shrinkage is visible. A center part feels balanced, while a side part adds direction. Choose the finish by your routine: loose styles may need more winter touch-ups, while braided and gathered options usually stay controlled longer.
Before Your Salon Visit
Choose one or two favorite references and save views that show the front, side, and exact earmuff position. Discuss your natural texture, density, face shape, preferred length, upkeep, and winter routine, including hats, scarves, and collars. Point out the specific face-framing length, braid width, ponytail height, bun placement, crown volume, or finish you like. Because these are temporary winter styles, focus on comfortable anchoring and enough space around the ears rather than requesting a haircut solely to fit one pair of earmuffs.
FAQs
Can I wear earmuffs over a low bun or ponytail?
Yes, as long as the anchor sits away from the earmuff band and cups. A low ponytail or compact bun usually works best when placed near the nape rather than directly behind the ears. Test the full combination before leaving so pressure points are obvious.
How do I stop earmuffs from flattening my hair?
Keep the strongest volume above or below the earmuff line rather than directly underneath it. After removing the accessory, lift compressed roots gently with your fingers instead of adding more product everywhere. Loose waves and curls usually recover better when the side sections are not heavily coated.
Can curly or coily hair be worn with earmuffs without heat?
Yes. Curls and coils can be worn loose, in low puffs, half-up shapes, or braids without heat. Choose the earmuff position after the hair is fully dry so shrinkage and volume are visible, and avoid crushing several curl groups beneath the ear pads.
What should I avoid when styling hair with earmuffs?
Avoid hard clips, bulky knots, or thick braids directly under the earmuff cups or band. Also skip excessive tension around the temples and ears. The hairstyle should feel secure before the earmuffs go on, so the accessory does not become part of the structural hold.