14 Wet Look Pixie Hairstyle Ideas

A wet look pixie is defined more by its finish than by one exact haircut. Glossy, visibly grouped sections create the damp-looking effect, while a short pixie outline keeps the style close and controlled. The top may be long enough to sweep backward, curl, form sculpted waves, or fall into a fringe. Shorter sides can sit flat, while longer crown pieces introduce movement, height, or directional texture without losing the compact pixie silhouette.
Straight, wavy, curly, and coily textures can all interpret the finish differently. Fine strands may need lighter product application so they retain shape, while dense hair can require stronger section control. Longer fringe can soften the front or sweep sideways, and a lifted top can shift visual volume upward. The wet effect does not require every section to be plastered flat.
Most wet look pixie hairstyle ideas are quicker to refresh than to create from freshly washed hair. Product distribution, part placement, and drying direction affect the result, while the underlying haircut needs reshaping as the sides become bulky or the top loses its intended proportions. Styling upkeep and haircut upkeep should therefore be considered separately.
Quick List
- Slicked-Back Wet Look Pixie Hairstyle
- Deep Side-Part Wet Look Pixie Hairstyle
- Piecey Fringe Wet Look Pixie Hairstyle
- Curly Wet Look Pixie Hairstyle
- Side-Swept Wet Look Pixie Hairstyle
- Sculpted Wave Wet Look Pixie Hairstyle
- Textured Crown Wet Look Pixie Hairstyle
- Forward-Combed Wet Look Pixie Hairstyle
- Tucked-Side Wet Look Pixie Hairstyle
- Micro Fringe Wet Look Pixie Hairstyle
- Tousled Wet Look Pixie Hairstyle
- Finger-Wave Wet Look Pixie Hairstyle
- Lifted-Front Wet Look Pixie Hairstyle
- Glossy Defined Wet Look Pixie Hairstyle
Slicked-Back Wet Look Pixie Hairstyle
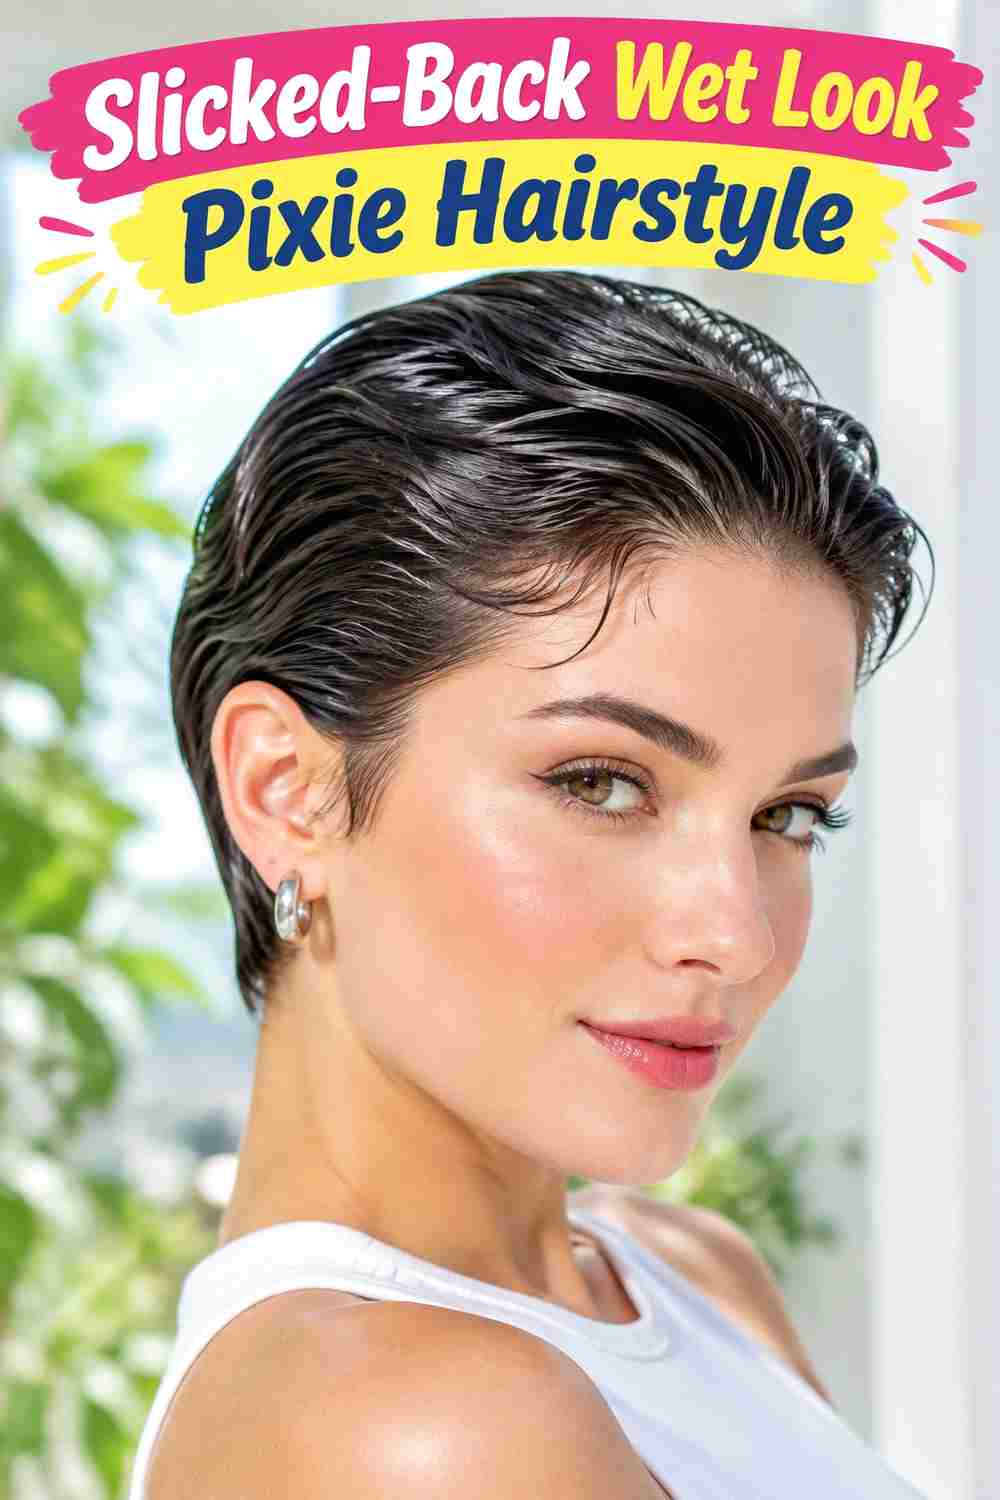
Combing the top backward exposes the forehead and makes the pixie’s overall silhouette particularly clear. The sides stay close to the head, while a slightly longer top travels from the hairline toward the crown in smooth, visible sections. Instead of creating height like a pompadour, the shape remains relatively flat with subtle separation through the ends. A fringe is unnecessary because the front becomes part of the backward sweep.
Straight and gently wavy textures can take this direction readily, while curls can use the same concept with more visible texture. Apply lightweight styling gel through damp hair for control, then use a wide-tooth comb to establish the backward direction. A gloss serum can be pressed lightly over the surface for additional sheen. A next-day refresh can be brief if the direction remains intact; starting again after washing takes longer because the entire top needs distributing and shaping.
The haircut should leave enough top length to travel backward without immediately springing forward. At the salon, explain how much length you need through the front compared with the close sides. Reshaping becomes useful when side growth disrupts the compact outline or the top becomes too long to hold its intended direction comfortably.
Pro tip:
Work backward from the front hairline in small sections rather than applying all the product at once. This gives you better control over separation and helps prevent an unnecessarily saturated surface.
Make It Work for You:
If fine hair collapses under product, use a smaller amount of gel and preserve slight root lift before smoothing the surface. The backward direction can remain clear without pressing every strand flat.
Watch Out For:
Too much serum over gel can make the finish look heavily coated rather than intentionally glossy. Add shine only after establishing the shape, concentrating it where the surface needs extra polish.
Deep Side-Part Wet Look Pixie Hairstyle

A deep side part creates an immediate directional contrast: one side stays sleek and compact while the longer top sweeps across toward the opposite temple. The fringe becomes part of that sweep, with the longest front pieces lying diagonally rather than straight down. Keeping the crown relatively smooth makes the sharp part and asymmetrical distribution the strongest details.
This arrangement works particularly well when the top has enough length to cross the head cleanly. Dense hair may require careful distribution so the heavier side does not form a bulky ridge. Styling gel provides control, a fine-tooth comb defines the part and surface direction, and a light shine spray can enhance the wet finish without requiring repeated product layers. A quick refresh can involve redefining only the part and front. Full styling after washing takes longer because the roots must be directed while damp.
Tell your stylist which side you normally part on and how much coverage you want across the forehead. The important haircut detail is retaining sufficient length on the heavier side while keeping the opposite side compact. When growth makes the short side puff outward or the sweeping section begins overwhelming the face, the proportions may need reshaping even if the style still holds.
Pro tip:
Draw the part before distributing the final layer of styling product. Once the sections are established, comb away from that line so the part remains crisp instead of becoming blurred by repeated repositioning.
Make It Work for You:
If you have a strong natural part, use it rather than forcing the opposite side. Preserve the dramatic contrast by keeping one section close and directing the longer top diagonally across.
Watch Out For:
Avoid repeatedly combing the heavier side after it begins setting. Excess manipulation can break the smooth surface into narrow lines, so make larger corrections while the product remains workable.
Piecey Fringe Wet Look Pixie Hairstyle

Separated fringe sections make the wet finish feel deliberately textured rather than uniformly slick. The top remains short and mobile, with narrow pieces directed toward the forehead and small gaps visible between them. Around the temples, slightly longer tips can angle outward or follow the face, while the sides and back remain closer to the head for a clear pixie outline.
This design can be useful for straight or wavy hair and for readers who prefer visible texture across the forehead. Styling gel establishes the damp-looking hold, while a tail comb can separate specific fringe pieces and a gloss serum adds controlled shine at the tips. Refreshing the fringe alone is usually a short task; resetting the entire head after washing requires more careful product distribution and section placement.
A piecey front depends on having enough length to create individual sections without turning the fringe into long bangs. Tell your stylist where you want the finished fringe to land—above the brows, near them, or higher—and how much forehead you want visible between pieces. As the fringe grows, its sections may become heavier and join together. The haircut can then need front refinement before the short sides necessarily require major changes.
Pro tip:
Separate the fringe with the pointed end of the comb only after establishing its general direction. Refining a few sections at the end produces clearer gaps than trying to isolate every strand initially.
Make It Work for You:
For lower-density hair, create fewer, slightly broader fringe sections instead of many tiny pieces. This preserves the separated wet effect while keeping the front from appearing unnecessarily sparse.
Watch Out For:
Do not coat each fringe piece with additional gel individually. That can make the tips stiff and heavy; distribute the main product first, then create separation by positioning the hair.
Curly Wet Look Pixie Hairstyle
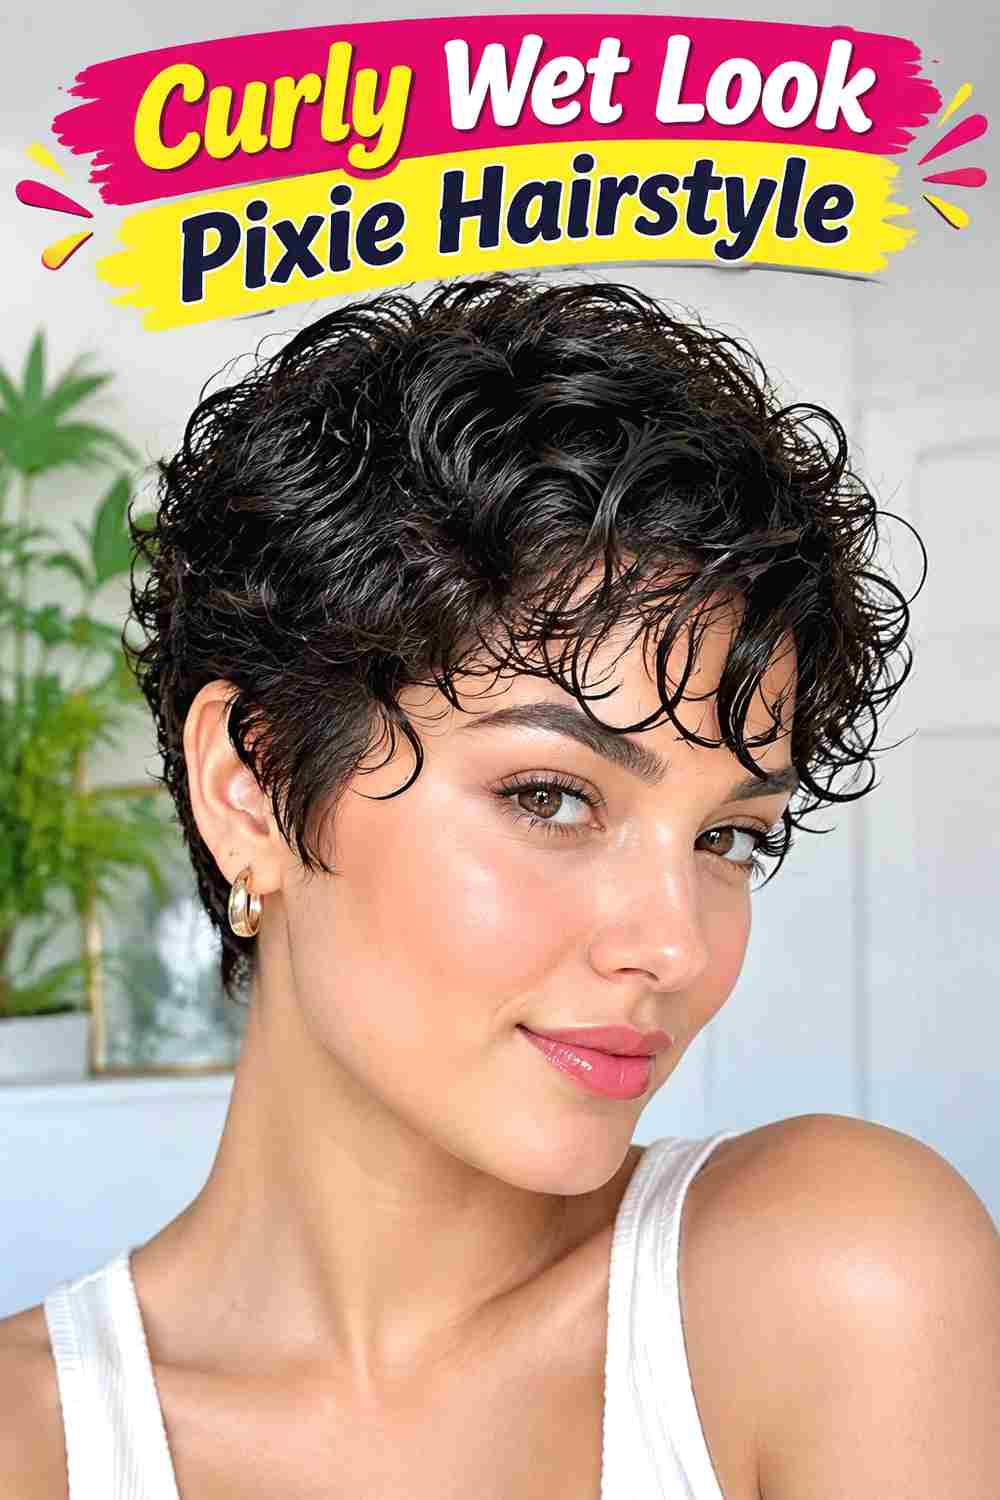
Defined curls give a wet look pixie more dimension than a completely slick finish. The sides can stay relatively close while the top holds small curl groups with visible curves and controlled shine. A few curls may fall toward the forehead, while others sit around the crown, creating movement without expanding far beyond the compact pixie silhouette.
Curly and coily textures can use their existing pattern rather than being straightened for the wet effect. A lightweight leave-in conditioner provides slip, curl gel supports definition and shine, and a diffuser can help set the shape without repeatedly disturbing the curl groups. A quick refresh may mean dampening and redefining only flattened curls. Full wash-day styling takes longer because product needs to be distributed throughout and the hair allowed to dry into its finished shape.
The haircut should account for shrinkage, especially across the top and front. At the salon, discuss where you want the curls to finish when dry instead of relying only on stretched length. Maintaining the pixie means watching both the side outline and top balance; as the sides expand or the crown becomes too heavy, the wet styling products alone cannot restore the original proportions.
Pro tip:
Apply gel while the curls are still evenly damp, then arrange the front before drying. Early placement helps determine which curl groups frame the forehead and which remain directed toward the crown.
Make It Work for You:
If your curls shrink strongly, retain extra length through the top and fringe area. You can keep the compact sides while allowing the finished curls enough room to form visible, glossy groups.
Watch Out For:
Avoid repeatedly pulling curls straight while applying product. Stretching every section can disguise the pattern you want to define, so distribute product gently and judge the final shape after shrinkage occurs.
Side-Swept Wet Look Pixie Hairstyle
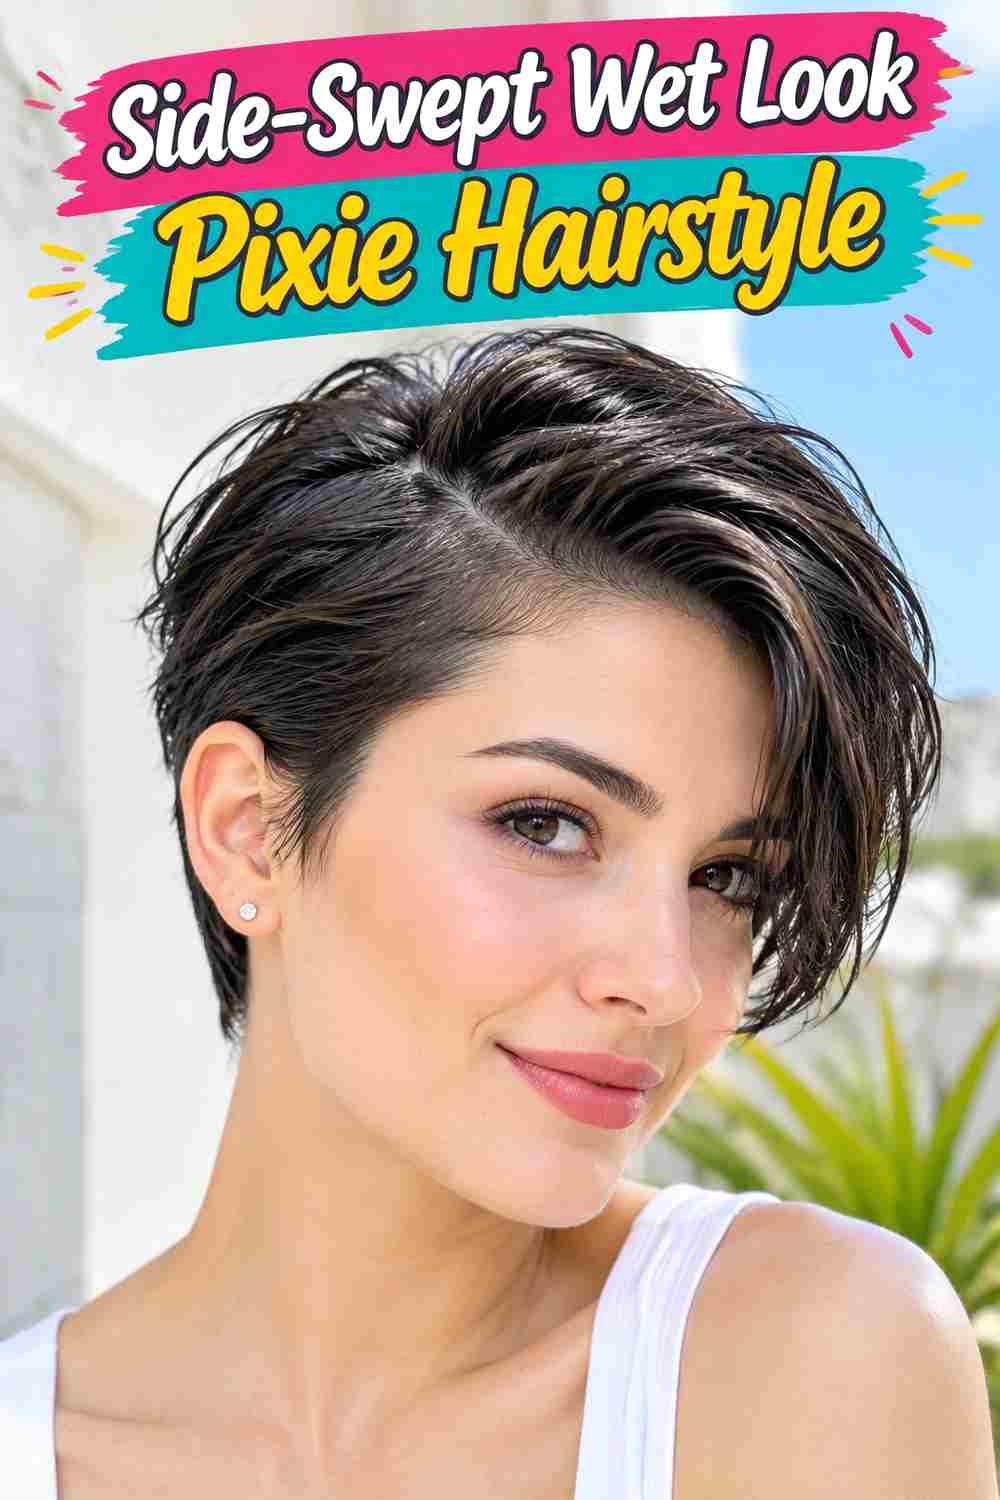
A broad side sweep offers more softness than a sharply divided side-part style. Longer top sections travel diagonally across the forehead, with the fringe ending near one temple instead of being separated into short pieces. The sides remain neat and close, while subtle movement through the top prevents the glossy finish from looking completely flat.
Straight, wavy, or relaxed curl patterns can support the directional sweep if there is enough length at the front. Styling cream provides flexible control, a wide-tooth comb establishes the main direction, and lightweight gel can reinforce the outer surface where more hold is needed. A morning refresh is often limited to dampening and redirecting the front. A complete reset after washing takes longer because the roots and fringe need to dry toward the chosen side.
When planning the cut, show how far across the forehead you want the top to travel. Ask to retain appropriate front length while keeping the sides short enough to contrast with the sweep. Fringe growth can eventually make the section drop lower over the face or feel too heavy at the temple. That is a useful signal for reshaping, separate from how often you choose to recreate the wet finish.
Pro tip:
Direct the roots sideways first, then curve the ends slightly toward the temple. Establishing direction in two stages helps the sweep follow the head rather than hanging straight across the forehead.
Make It Work for You:
If you prefer more forehead visible, begin the sweep farther back and direct the front diagonally upward before taking it sideways. The wet finish remains recognizable while the front feels more open.
Watch Out For:
A heavy layer of gel can pull a longer fringe downward. Use flexible product through most of the sweep and reserve stronger hold for sections that genuinely need help staying in position.
Sculpted Wave Wet Look Pixie Hairstyle
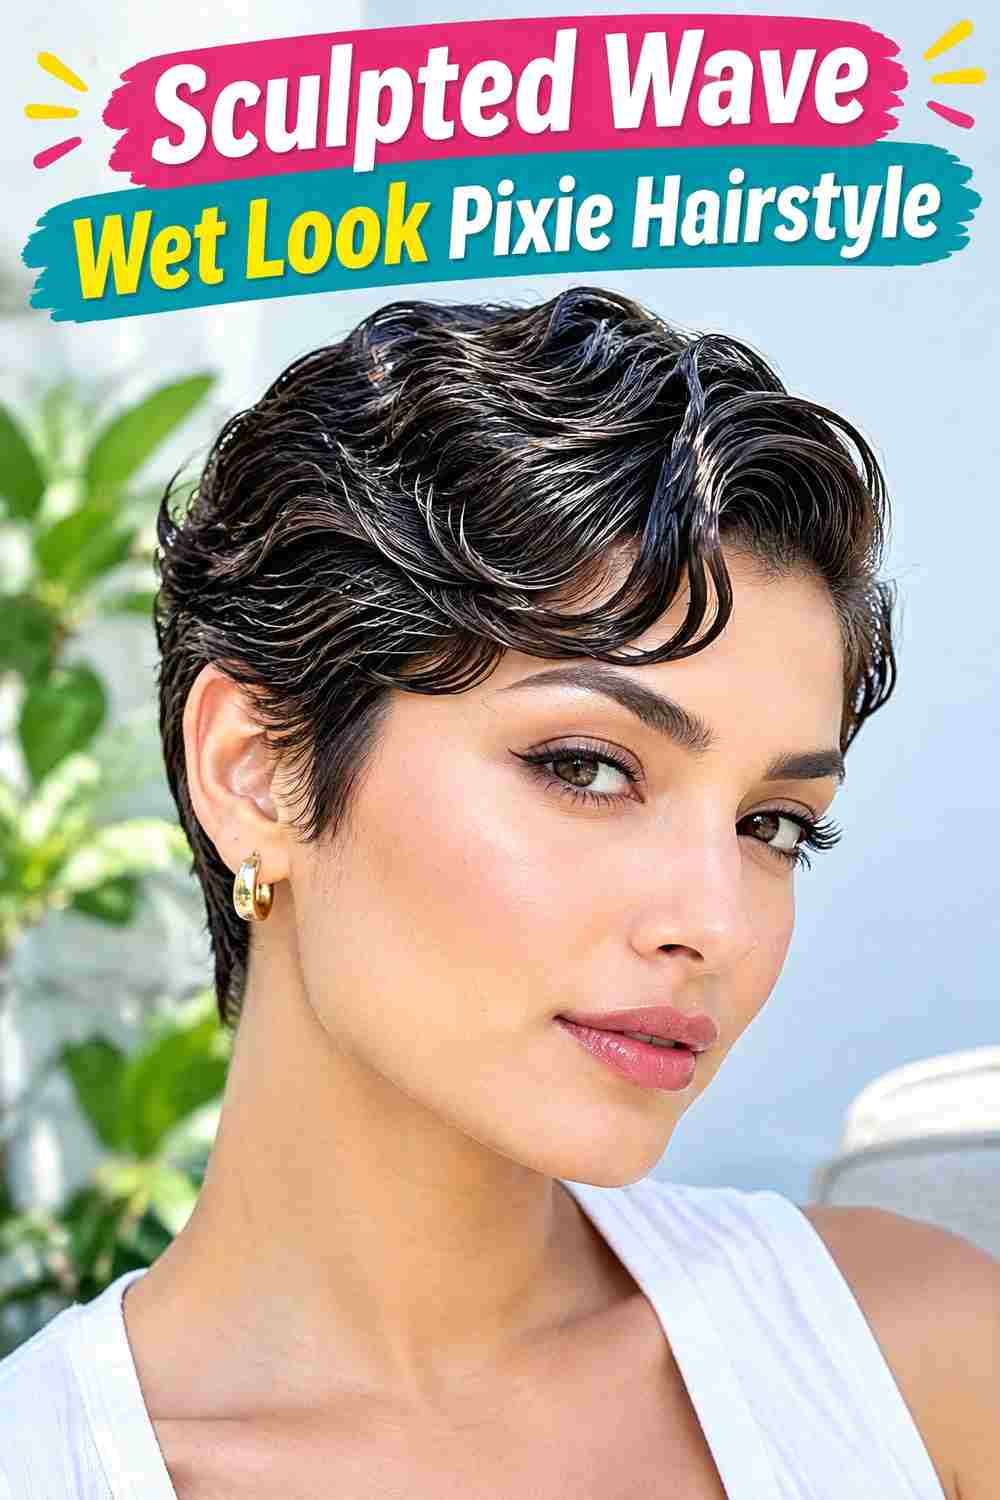
One or two deliberate waves across the longer top turn a wet pixie into a more structured shape. Rather than lying straight backward, the front curves in a visible S-like direction before settling toward the side or crown. Close sides keep attention on that surface movement, while a smooth finish makes each ridge and curve easier to see.
Hair with some natural bend can adapt readily, although straight hair can also be shaped while damp. Styling gel gives the wave structure, a fine-tooth comb helps guide its direction, and sectioning clips can temporarily hold the curves while they begin setting. A small correction can be quick once you know the placement, but creating the complete wave pattern from freshly washed hair requires more patience than a basic slick-back.
The top needs sufficient length for the curve to form without collapsing into short spikes. At the salon, show where you want the first visible bend to begin and how much top length you need to support it. The sides can remain compact so they do not compete with the sculpted surface. As the top grows, the wave may become broader and heavier, requiring either a styling adjustment or haircut reshaping.
Pro tip:
Shape the first curve near the front before working farther back. That initial direction controls the rest of the pattern, so refine it while the gel remains workable instead of correcting everything later.
Make It Work for You:
For naturally wavy hair, follow an existing bend rather than forcing a perfectly symmetrical wave. Keeping the glossy definition and controlled direction preserves the concept while working with your natural movement.
Watch Out For:
Using too many clips can leave dents where you did not intend them. Secure only the important curve points and remove the clips carefully once the surface has enough structure to hold.
Textured Crown Wet Look Pixie Hairstyle

Keeping the crown visibly separated prevents a wet pixie from becoming uniformly flat. The sides and front can sit relatively sleek while short top sections angle in slightly different directions, producing controlled height and texture. A short fringe may remain open or sweep gently sideways, allowing the crown to supply most of the shape.
Fine to medium-density hair can use this approach when some lift is preferred, while dense hair may need a haircut that prevents excessive bulk at the crown. Lightweight styling gel gives separation, a vent brush helps direct the roots during drying, and gloss serum can add shine to selected surface pieces afterward. A short refresh involves lifting and redefining only the top. Starting from wet hair takes longer because root direction needs to be established before the finish is refined.
At the salon, explain how much crown height you want and where the shortest upper layers should sit. Cutting them too short can create upright pieces that are difficult to control, while excessive length may collapse under wet-look products. When the crown begins falling flat despite sensible product amounts, the change may reflect grown-out proportions rather than a need for stronger styling product.
Pro tip:
Build the crown direction before adding the final shine. Lift the roots first and apply gloss mainly over the visible surface afterward so the product does not immediately pull down the height.
Make It Work for You:
For very dense hair, keep the wet finish more separated than lifted and ask your stylist to assess bulk placement. The crown can retain texture without creating unnecessary width around the upper sides.
Watch Out For:
Adding more gel whenever the crown drops can make the problem worse by increasing weight. Reset the roots first, then use only enough product to define the sections you want visible.
Forward-Combed Wet Look Pixie Hairstyle
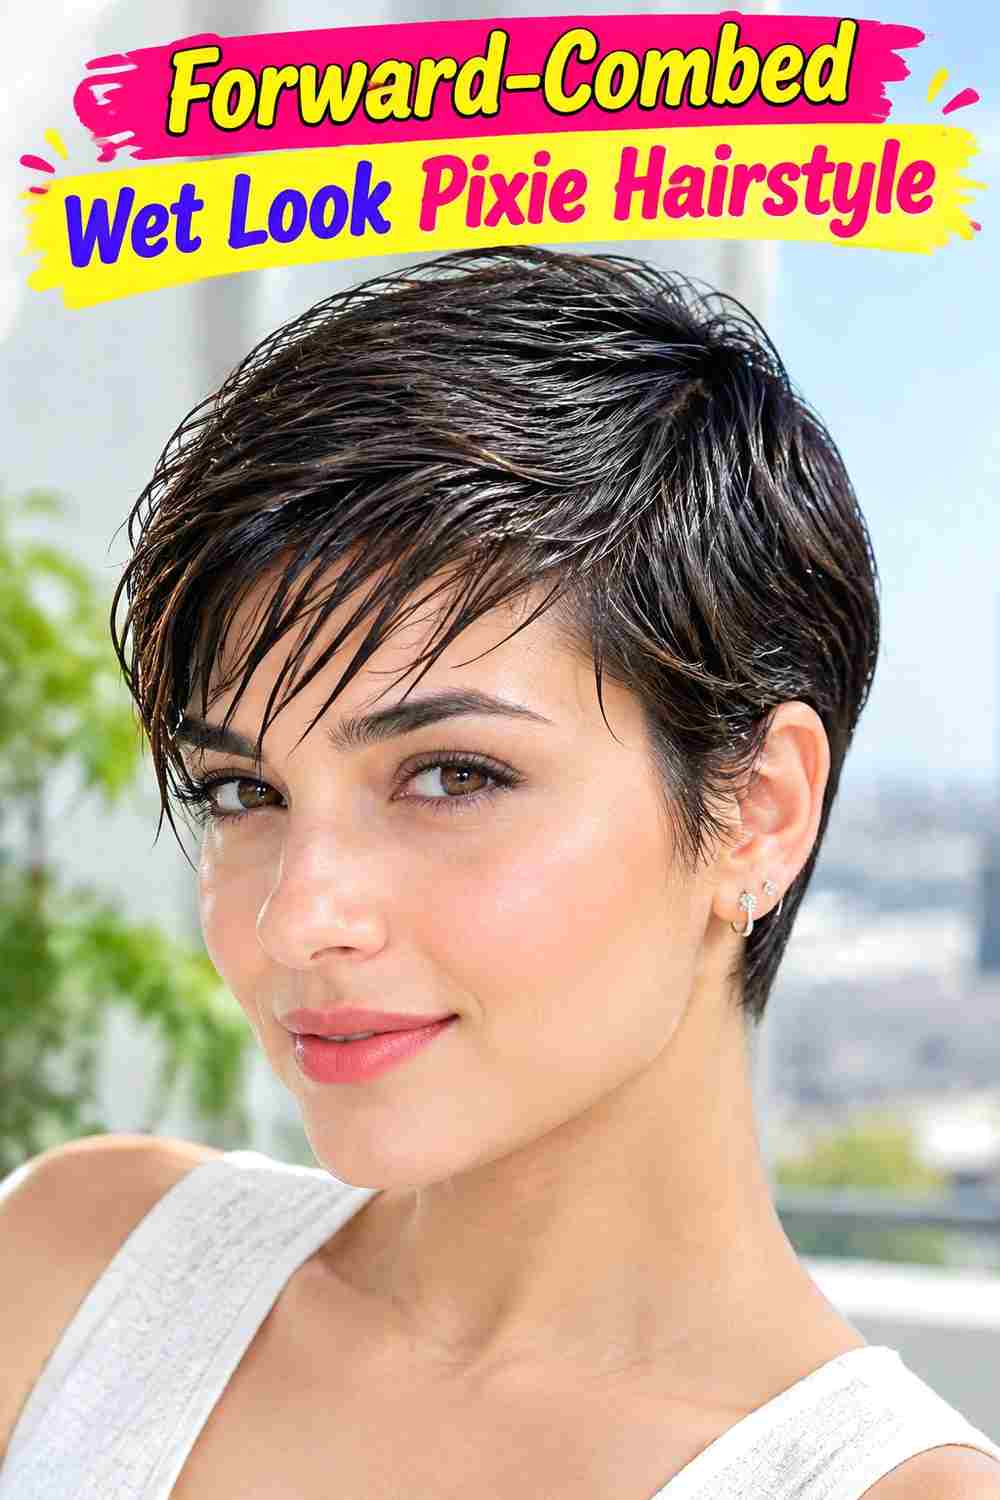
Directing the top toward the forehead gives a wet pixie a compact, graphic shape. Instead of exposing the hairline, the crown moves forward into a short fringe, with visible section lines reinforcing the glossy texture. The sides follow the head closely, and the fringe can finish in an irregular line rather than forming a perfectly blunt edge.
This direction can work well with straight, wavy, and softly curly textures, particularly when the top naturally prefers to fall forward. Styling gel supplies control, a wide-tooth comb establishes the main direction, and a small amount of shine cream can soften the appearance of dry-looking tips. Refreshing the front and crown can be relatively quick. Full wash-day styling takes longer, although working with a natural forward growth pattern can reduce the amount of redirection needed.
The salon detail to prioritize is finished fringe length. Explain where you want the longest front pieces to land and whether the edge should remain broken or more continuous. The top must also connect smoothly into the shorter back without creating unwanted bulk at the crown. Once growth pushes the fringe into the eyes or makes the top bunch above it, reshaping can restore the intended compact proportions.
Pro tip:
Comb the crown forward first, then separate several surface sections with your fingers. This maintains the strong forward direction while preventing the finished top from looking like one solid sheet of hair.
Make It Work for You:
If your hair has natural curls, let the front form short defined curl groups rather than forcing a straight fringe. Preserve the forward placement and close sides as the main identifying features.
Watch Out For:
Do not judge fringe length only while it is heavily coated and stretched forward. Product can temporarily change how it sits, so haircut decisions should consider the hair’s normal dry behavior too.
Tucked-Side Wet Look Pixie Hairstyle
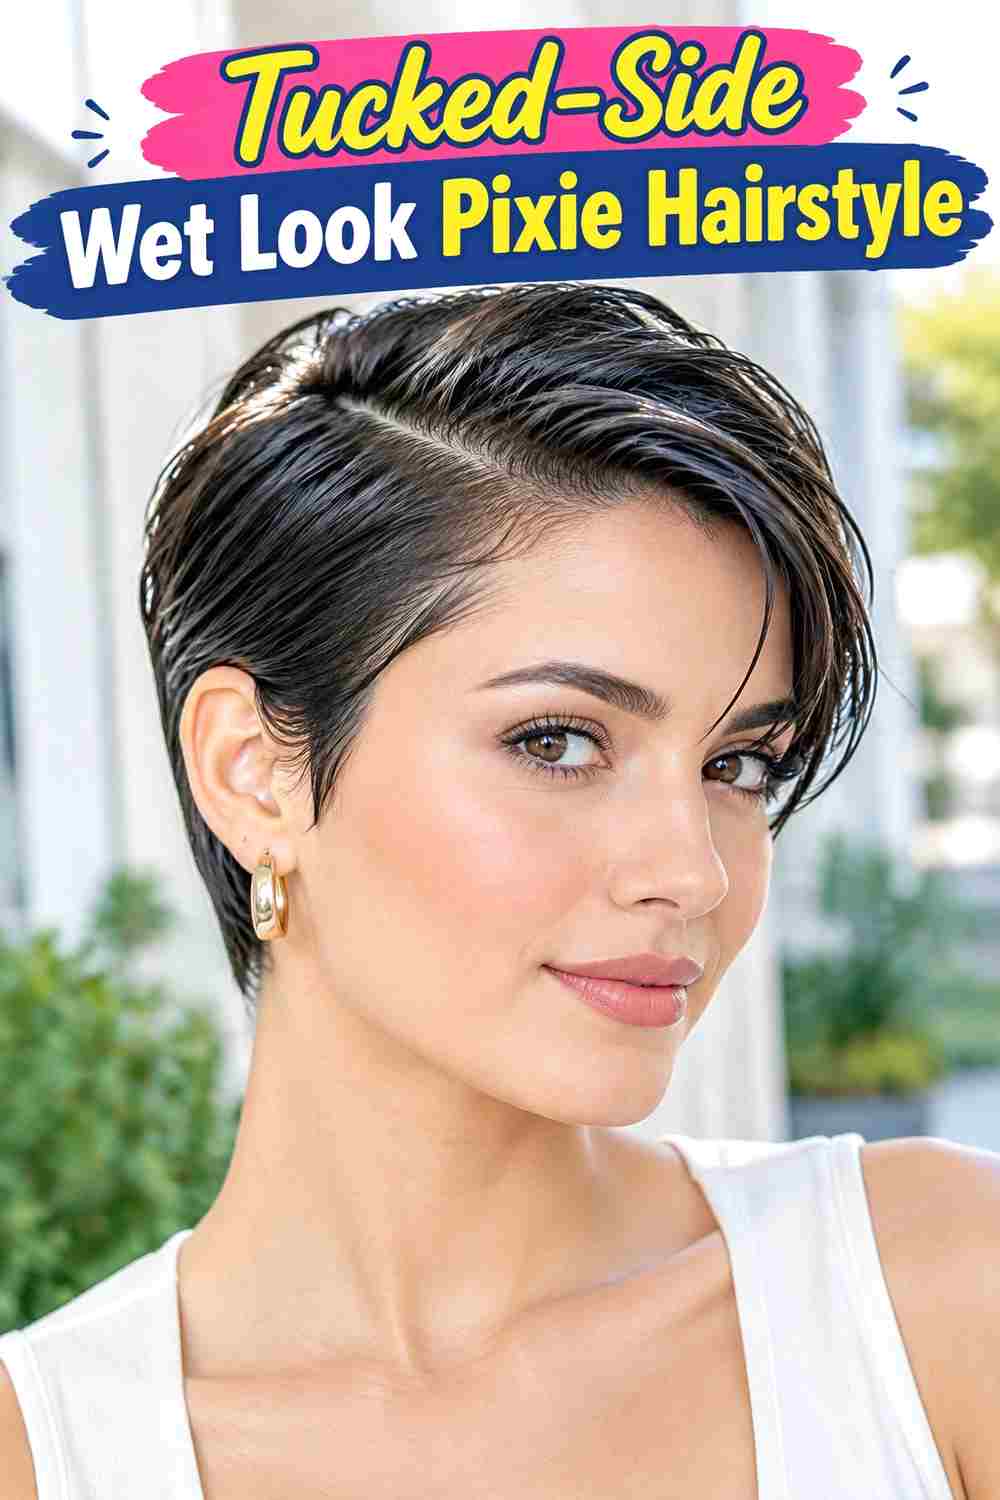
A defined tuck on one side creates a useful contrast between a sleek temple and a longer, mobile top. The front can sweep diagonally across the forehead before disappearing behind or above the ear area, while the opposite side retains more visible volume. Glossy separation keeps the style looking intentional instead of simply pushed aside.
This approach is particularly practical when the pixie has longer top and temple sections. Styling cream gives flexible control, a fine-tooth comb smooths the tucked side, and a strong bobby pin can provide discreet anchoring if the hair will not remain positioned on its own. A quick refresh can focus only on the tuck and front sweep. A complete wash-day style requires more time to establish root direction and let the controlled sections set.
At the salon, explain that you want enough temple length to sweep backward while keeping the area around the ear neat. If that section becomes too short, it may spring forward rather than tuck; if too long, it can create bulk. The cut can need attention when the side begins covering the ear more than desired or when the longer top overwhelms the tucked contrast.
Pro tip:
If you need a pin, place it beneath the longer surface section rather than directly on top. Concealing the anchor maintains the uninterrupted glossy line from the temple toward the back.
Make It Work for You:
For slippery straight hair, make the tuck slightly higher rather than pulling it tighter. A better anchor position can improve security without creating uncomfortable tension around the temple or ear.
Watch Out For:
Do not force a very short temple section behind the ear with excessive tension. Let shorter pieces follow their natural direction and use the longer hair above them to create the tucked impression.
Micro Fringe Wet Look Pixie Hairstyle

A short fringe creates a sharp front edge while leaving plenty of forehead visible. The micro fringe can sit well above the brows with slightly irregular tips, while the crown remains longer and moves forward or diagonally. Glossy definition highlights the contrast between the compact fringe, close sides, and more flexible top.
Straight and wavy textures can display the short front line clearly, while curly textures require careful allowance for shrinkage. Lightweight gel helps position the fringe, a small comb separates its tips, and gloss serum adds shine without requiring a heavy coating. Refreshing such a short front section can be quick, but it may need frequent attention because small changes in direction are highly visible. Full wash-day styling includes resetting the crown as well.
Micro fringe upkeep is separate from maintaining the rest of the pixie. At the salon, discuss the finished dry length and how much width you want across the forehead. If your hair has a strong growth pattern, the stylist should account for how the fringe naturally lifts or separates. As it grows, the micro effect softens quickly, so decide whether you prefer maintaining that short proportion or letting it transition into a longer piecey fringe.
Pro tip:
Set the fringe while it is damp before styling the crown. Because the section is short, its root direction matters more than trying to bend the tips after they have already dried.
Make It Work for You:
For curls or strong waves, choose the micro length according to where the front settles dry. A slightly longer starting point can preserve the short-fringe effect without underestimating natural shrinkage.
Watch Out For:
Avoid repeatedly trimming individual pieces whenever the fringe looks uneven after sleeping. Reset its direction first; product, moisture, and growth patterns can change the apparent line without requiring immediate cutting.
Tousled Wet Look Pixie Hairstyle
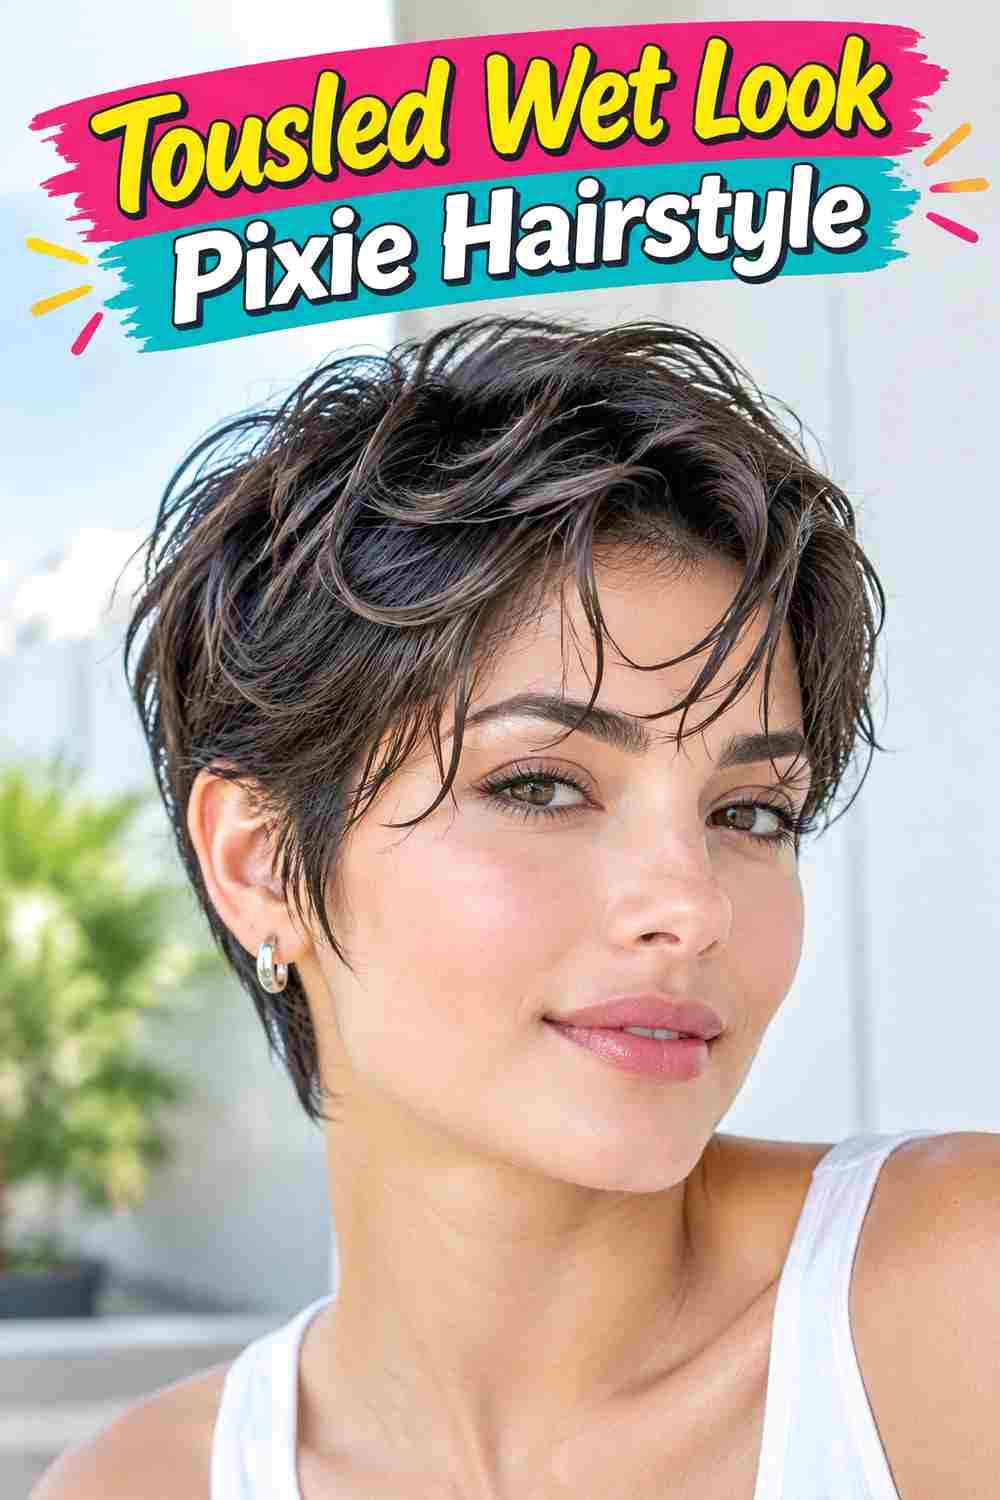
Irregular direction gives a wet pixie a less sculpted finish while preserving visible shine. Short sections can move forward near the fringe, upward around the crown, and slightly backward near the sides. The important detail is controlled separation: the hair looks deliberately grouped and mobile rather than smoothly combed into one direction.
Wavy and straight hair can produce this broken texture readily, while curls can interpret it through differently oriented curl groups. Styling cream adds flexibility, a small amount of gel reinforces selected sections, and a wide-tooth comb can establish the initial shape before fingers loosen it. A morning refresh may require only dampening and repositioning flattened areas. A full reset takes longer because the product needs even distribution before the deliberately irregular finish is created.
The haircut benefits from enough variation through the top to create movement while retaining close, clean sides. Tell your stylist which areas you prefer to wear lifted and which should lie flatter. As the upper sections grow, they can start collapsing together rather than staying separated. Reshaping may then restore the proportions more effectively than simply increasing product strength or repeatedly manipulating the hair.
Pro tip:
Create a general direction with the comb first, then use your fingertips to move only selected sections against it. The contrast produces controlled disorder without losing the pixie’s overall silhouette.
Make It Work for You:
If your routine needs to stay simple, keep most of the natural growth direction intact and tousle only the crown and fringe. Fewer manipulated areas can still provide the broken, glossy finish.
Watch Out For:
Randomly pulling every section in a different direction can create uncontrolled volume. Keep one dominant flow and disrupt only a few areas so the finish retains a readable shape.
Finger-Wave Wet Look Pixie Hairstyle
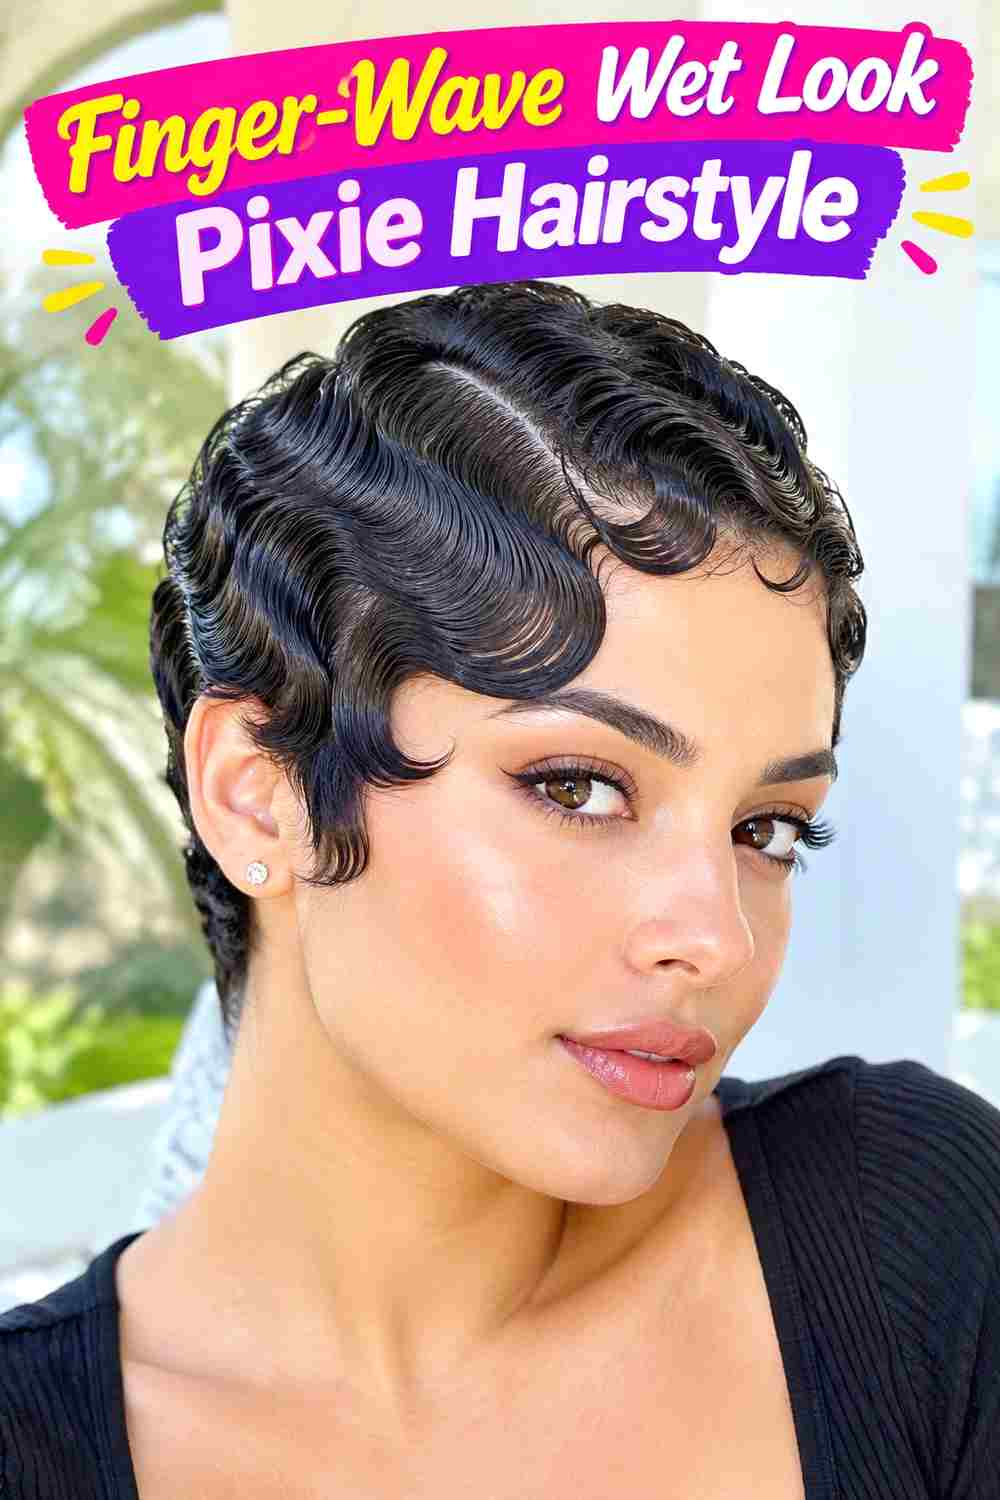
Close, defined finger waves create one of the most sculptural interpretations of a wet pixie. The hair follows the head in smooth S-shaped ridges, with the front curving across the hairline and the sides remaining flat and controlled. Longer top sections can hold broader waves, while shorter temple areas keep the overall silhouette compact.
This finish can be adapted to different textures, but styling time depends heavily on length, pattern, and familiarity with forming the waves. Strong-hold gel provides structure, a fine-tooth comb helps shape each ridge, and sectioning clips can hold important curves temporarily. Small touch-ups may be manageable once the pattern is established, but creating a complete set from damp hair is more deliberate than a basic slicked pixie.
The haircut needs enough workable length in the areas where visible waves are planned. Tell your stylist where you want the strongest ridges and how close you prefer the sides to remain. Comfortable styling matters too; the wave should come from product and placement rather than painful tension. As the pixie grows, broader sections may alter the wave proportions, requiring either a new pattern or a reshaping of the underlying cut.
Pro tip:
Work on one ridge at a time while the hair remains damp and workable. Press the curve into position before moving onward, because repeated corrections across the entire head can blur previously defined sections.
Make It Work for You:
If your natural texture forms tight curls, create larger grouped curves rather than trying to reproduce identical smooth waves everywhere. The close silhouette and repeated S-shaped direction can still define the idea.
Watch Out For:
Do not rely on increasingly firm pressure to make a wave hold. If a section keeps moving, reassess moisture, product distribution, and length instead of creating uncomfortable tension against the scalp.
Lifted-Front Wet Look Pixie Hairstyle

A raised front keeps the forehead open while adding height that a fully slicked-back pixie does not have. The hairline lifts first, then curves gently backward toward a lower crown, producing a small crest rather than an exaggerated quiff. Close sides sharpen the contrast, while visible glossy sections maintain the wet-look character.
Straight, wavy, and loosely curly hair can all use this structure if the front has enough length to bend backward. Apply heat protectant before heat styling, use a round brush to establish lift during drying, and finish with styling gel for glossy separation and hold. Refreshing only the raised front can be relatively quick. Building the shape from wet hair takes longer because the roots need drying in the opposite direction from a flat slick-back.
At the salon, explain how much front height you want and retain enough hairline length to curve backward comfortably. The crown can stay somewhat shorter so the shape descends rather than standing equally high everywhere. When the front becomes too long, it may collapse despite additional product. That change can signal that the cut needs balancing rather than stronger gel.
Pro tip:
Establish the root lift before applying the final gel. Once the front has its height, smooth product lightly over and between sections so shine does not come at the expense of volume.
Make It Work for You:
For fine hair, keep the crest modest and use fewer heavy products. A smaller amount of height with clear backward direction often holds better while preserving the defining open-forehead silhouette.
Watch Out For:
Do not extend maximum lift through the entire crown. Keeping the highest point near the front creates intentional progression; equal height from hairline to back can make the shape unnecessarily bulky.
Glossy Defined Wet Look Pixie Hairstyle

Precise section definition makes shine the central feature without requiring the pixie to lie completely flat. The top can follow its natural direction with small groups clearly visible from roots to tips, while the sides stay compact and smooth. A softly open forehead and restrained crown volume allow the reflective, separated finish to receive most of the attention.
This adaptable version can suit straight, wavy, curly, or coily hair because it does not demand one specific movement pattern. Lightweight styling gel provides definition, a wide-tooth comb organizes larger sections, and gloss serum adds targeted surface shine. A quick refresh can involve dampening only areas that have lost separation. Starting again after washing takes longer because even product distribution matters; dense hair usually requires more sectioning than lower-density hair.
The haircut underneath should still have a clear pixie balance. Ask your stylist how much top length will provide visible movement while keeping the sides and back close enough for contrast. As growth blurs that difference, styling products cannot fully recreate the compact outline. Reassess the cut when the sides become bulky, the neckline loses definition, or the top no longer falls into the intended groups.
Pro tip:
Add serum after the gel has established the direction, using a small amount over selected surface sections. Targeted shine creates dimension and avoids saturating every part of the pixie equally.
Make It Work for You:
For dense curls, define larger groups instead of separating many tiny sections. This maintains visible texture and gloss while reducing the amount of manipulation required to create an organized wet finish.
Watch Out For:
More shine product does not automatically create a better wet effect. Excess can collapse texture and attract buildup, so prioritize clean section definition first and add gloss only where it improves the finish.
Conclusion
Wet look pixie hairstyle ideas can range from flat and slicked back to curly, tousled, side-swept, or sculpted into deliberate waves. Longer top sections allow more fringe movement, height, and parting options, while close sides keep the short silhouette distinct. Fine or lower-density hair may benefit from lighter product application, whereas dense textures can require more careful sectioning and bulk management.
Choose according to your natural texture and routine as much as appearance. A forward fringe or simple slick-back may require fewer styling steps than finger waves or a lifted front. Consider shine level, volume placement, fringe upkeep, and how often you want the underlying pixie reshaped.
Before Your Salon Visit
Save one or two references that show both the haircut proportions and wet finish you prefer. Discuss your natural texture, density, growth direction, face shape, ideal top and fringe length, and normal styling routine. Point out whether you like close sides, a lifted crown, a deep part, sculpted waves, or visible piecey separation. Also explain how often you realistically want to style with product, because the haircut should remain workable when you are not wearing the wet finish.
FAQs
Does a wet look pixie require naturally straight hair?
No. Straight hair can create sleek directional lines, while waves, curls, and coils can produce glossy definition with more visible texture. The useful approach is to work with the existing pattern and choose product amounts that provide separation and hold without assuming the hair must first be straightened.
Can I create a wet look pixie without using heat?
Yes. Many versions can be shaped on damp hair with gel, styling cream, and deliberate comb or finger placement. Heat becomes useful when you want a finish that differs substantially from your natural root direction or texture, such as stronger lift. If heat is used, include suitable heat protection.
How do I keep a wet pixie from looking greasy?
Focus on controlled definition rather than simply adding shine. Distribute styling product evenly on damp hair, establish the shape, and add gloss sparingly afterward if needed. Heavy layers of serum or gel can collapse separation, particularly on fine strands, so begin with less and increase only where necessary.
How often should a wet look pixie be trimmed?
Use changes in the haircut’s shape rather than one fixed timetable. A reshaping may be useful when the sides begin expanding, the neckline loses its intended outline, the fringe interferes with your preferred placement, or the longer top becomes difficult to direct. Growth rate and desired pixie proportions vary.