18 Hairstyles to Wear With Beanies

Hairstyles to wear with beanies work best when the visible shape sits below the hat rather than depending on crown volume that will immediately be compressed. Loose waves, low ponytails, braids, curls, bobs, and low buns all give the beanie room to sit comfortably while leaving enough hair visible around the face, shoulders, or neckline. Face-framing pieces and fringe can also become part of the design because they remain visible below the hat edge.
Straight, wavy, curly, and coily textures can all work, but the placement needs to match density and natural movement. Fine or lower-density hair may benefit from fuller ends and loose sections rather than heavy separation, while dense hair can use braids, twists, or controlled low anchors to manage bulk. A beanie may flatten roots or disturb curl groups, so a hairstyle that still looks intentional after removal is useful.
Styling effort ranges from an air-dried texture with a quick front refresh to a full heat-shaped wave set. Low anchors should sit beneath the hat rather than underneath its tightest band, and uncomfortable pressure is a sign to reposition the style. Maintenance usually means restoring face-framing pieces, smoothing friction-related frizz, or rebuilding a low ponytail or braid after the hat comes off.
Quick List
- Center-Part Loose Wave Beanie Hairstyle
- Low Twin Braid Beanie Hairstyle
- Nape Ponytail Beanie Hairstyle
- Straight Face-Frame Beanie Hairstyle
- Side Fishtail Braid Beanie Hairstyle
- Low Bubble Pony Beanie Hairstyle
- Curly Lengths Beanie Hairstyle
- Coily Low Puff Beanie Hairstyle
- Two-Strand Twist Beanie Hairstyle
- Messy Low Bun Beanie Hairstyle
- Shoulder-Length Flip Beanie Hairstyle
- Piecey Fringe Beanie Hairstyle
- Curtain Fringe Beanie Hairstyle
- Sleek Long-Length Beanie Hairstyle
- Air-Dried Wave Beanie Hairstyle
- Double Low Pony Beanie Hairstyle
- Low Side Braid Beanie Hairstyle
- Textured Bob Beanie Hairstyle
Center-Part Loose Wave Beanie Hairstyle

A center part and loose waves make a practical pairing because the beanie can sit over relatively flat roots while the visible movement begins below the ears. Medium to long hair gives broad bends room to fall around the shoulders, and leaving the ends softly curved rather than tightly curled keeps the silhouette relaxed. Longer face-framing pieces can remain outside the hat on both sides. Straight and wavy hair can recreate the finish easily, while textured hair can keep more natural movement instead of being fully reshaped.
Apply heat protectant before using a large-barrel curling iron to create broad bends from around the jaw downward, then use flexible hairspray lightly on the visible lengths. A full wash-day set takes moderate effort depending on length and density, but a quick beanie-day refresh can focus on the two front pieces and outer layer. If the hat flattens the upper waves, resist restyling everything; restoring the visible lower bends is usually enough.
If you are having the style professionally finished, show where the beanie edge will sit and ask for the strongest movement to begin beneath that point. Keeping the crown relatively smooth prevents important volume from being hidden or compressed by the hat.
Pro tip:
Put the beanie on once before finalizing the front waves. This shows exactly where the hat ends so you can place the most visible bends below it.
Make It Work for You:
If your ends are lower in density, keep the waves broad and avoid separating them into many small pieces. Fuller grouping below the beanie preserves a more substantial silhouette.
Watch Out For:
Do not build significant crown lift before wearing the hat. The beanie will compress it, often leaving uneven roots when you remove the hat later.
Low Twin Braid Beanie Hairstyle

Two low braids sit naturally beneath a beanie because the anchors can be placed below and slightly behind the ears instead of under the hat band. A center part creates balanced sections, while the braid width can stay neat and compact or be gently loosened for more texture. Medium and long hair works best because enough length remains below the beanie to show the woven pattern. Straight, wavy, curly, and coily hair can all use the idea, with braid tightness adjusted for comfort and natural volume.
Use two fabric-covered elastics to secure the braid ends and a light texturizing spray through slippery lengths for grip before braiding. A full wash-day style can be simple because no heat is required; creating the braids themselves is relatively quick once the hair is dry. A short refresh involves retightening an end elastic or smoothing the visible front, rather than rebuilding both braids. If friction makes the outer braid fuzzy, adjust only the visible loops.
For professional styling, specify how low you want each braid to begin and how wide you want the woven sections. The anchors should clear the lower edge of the beanie so the hat does not press directly on the braid bases or make the ears uncomfortable.
Pro tip:
Position both braid starts while the beanie is on, then remove it to finish braiding. This helps the anchors land comfortably below the hat edge.
Make It Work for You:
For very dense hair, use slightly wider braids and moderate tension rather than tightly compressing each section. The style stays controlled without creating heavy pressure near the ears.
Watch Out For:
Avoid starting the braids too high behind the ears. A tight beanie can press the braid bases against the head and make an otherwise secure style uncomfortable.
Nape Ponytail Beanie Hairstyle

A ponytail placed directly at the nape keeps the anchor below most beanies and leaves a clean line through the back. The front can follow a center part, side part, or softly brushed-back direction, while the tail remains straight, wavy, curly, or naturally textured. Medium and long hair works especially well because the ponytail remains visible beneath the hat. Keeping the anchor low also reduces the chance of a bulky elastic creating a bump under the beanie.
Use a fabric-covered elastic to secure the ponytail and a light smoothing cream on the upper surface if flyaways need control. A full wash-day style depends on the finish you want in the tail, but building the ponytail itself is quick. A beanie-day refresh may involve resetting the front part and retightening the low base after removing the hat. If the ponytail begins sagging, rebuild the elastic rather than tying it tighter while it is already pulling unevenly.
At a salon or blow-dry appointment, show the exact point where you normally wear your beanie and ask for the ponytail to sit beneath that level. If you want face-framing pieces outside the hat, specify their finished length and placement before the base is secured.
Pro tip:
Check the ponytail base with the beanie on before leaving home. If you feel a pressure point, move the elastic slightly lower rather than tolerating it.
Make It Work for You:
For curly or coily hair, keep the ponytail texture natural and smooth only as much of the front as you prefer. The low placement remains practical without straightening.
Watch Out For:
Do not position the elastic at the exact spot where the beanie band presses. Moving the anchor slightly lower usually improves comfort and prevents an obvious bump.
Straight Face-Frame Beanie Hairstyle
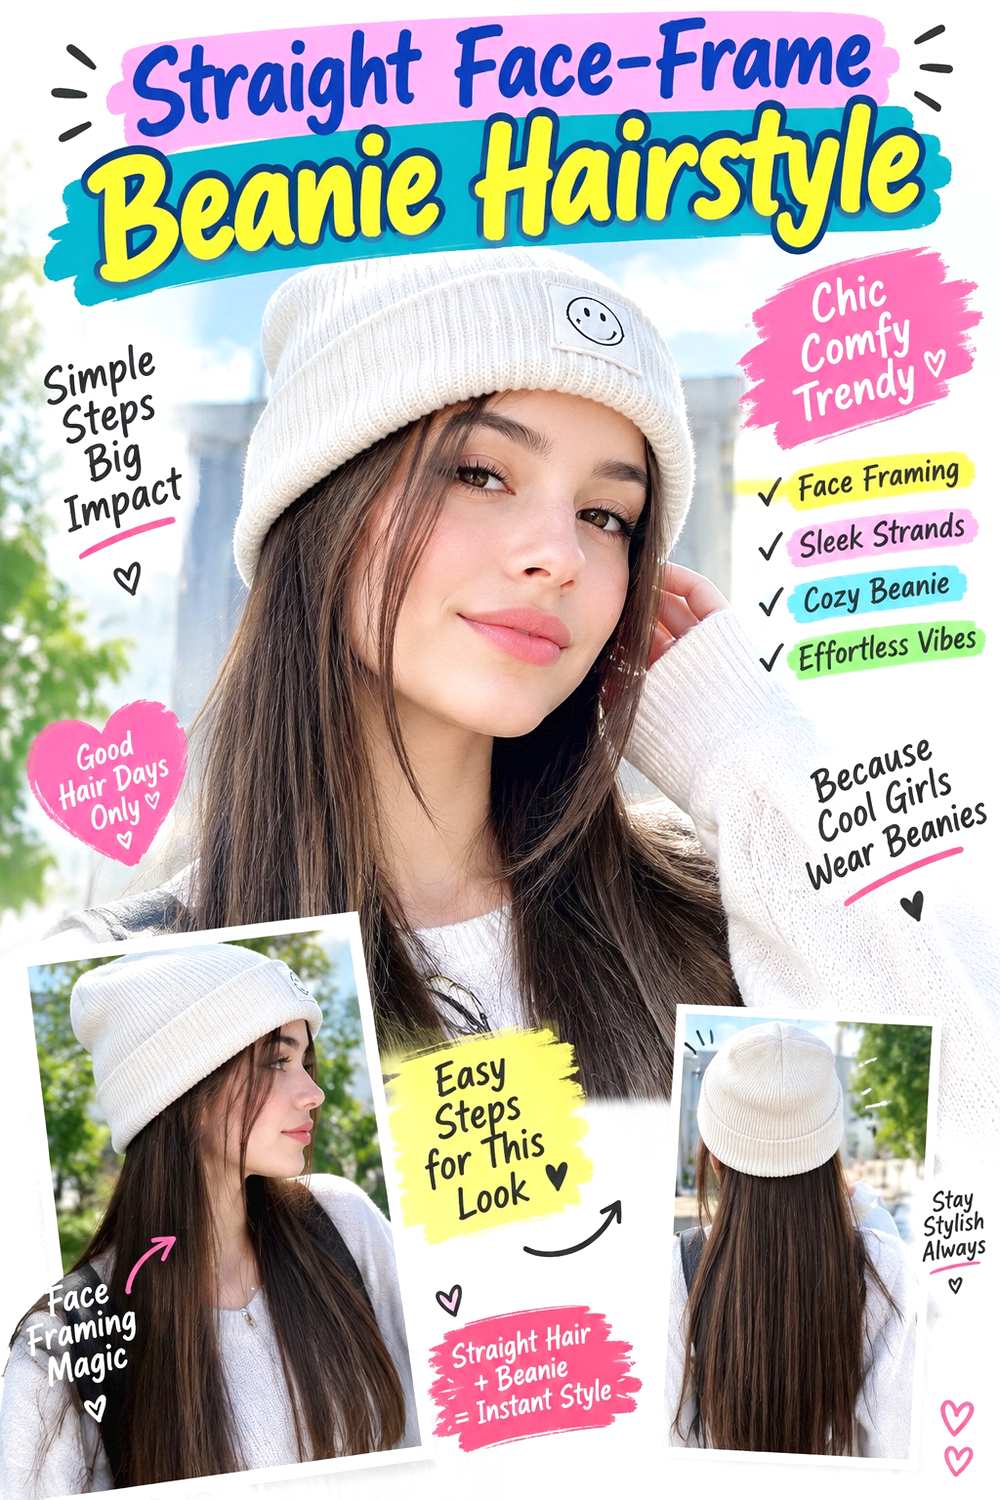
Straight lengths with visible face-framing pieces create a clean shape that survives being covered at the crown. The hair can fall from shoulder length to long, with a middle or off-center part and the shortest front pieces landing around the cheekbones, jaw, or chin. Keeping the back relatively straight makes the visible outline simple, while the front layers provide enough movement to prevent the beanie from dominating the style. This works naturally for straight hair and can be adapted selectively for other textures.
Apply heat protectant before using a flat iron to smooth only the sections that need refinement, then use a small amount of lightweight serum through the ends to reduce surface frizz. A full wash-day straight finish can take substantial time on dense or naturally curly hair, whereas a quick refresh should focus on the pieces visible below the hat. Avoid repeatedly passing heat over sections flattened by the beanie if they can simply be brushed back into place.
For a professional style, show exactly where the face-framing pieces should fall outside the beanie. If you are considering a cut, discuss the shortest front layer in its finished dry position so it remains visible without constantly slipping under the hat edge.
Pro tip:
Pull the front layers forward before putting on the beanie, then adjust them after the hat is settled. This prevents the edge from trapping them awkwardly underneath.
Make It Work for You:
If your hair is naturally wavy, smooth only the face frame and leave gentle movement through the back. The visible front stays controlled without requiring full-head straightening.
Watch Out For:
Do not repeatedly straighten hat-flattened roots throughout the day. Concentrate heat only where reshaping is necessary, and let the covered crown remain comparatively simple.
Side Fishtail Braid Beanie Hairstyle

A side fishtail braid keeps most of the hair controlled while leaving the woven pattern visible over one shoulder. The braid begins low, usually below one ear, so its anchor does not interfere with the beanie. A side or center part can work, and a few face-framing pieces may remain loose on the opposite side. Medium to very long hair shows the fishtail pattern best. Fine or lower-density hair often benefits from a moderately loosened braid, while dense hair can support a wider, more substantial plait.
Use light texturizing spray for grip and a small fabric-covered elastic to secure the end. Full wash-day styling does not require heat unless you want a particular texture before braiding; the braid itself takes longer than a simple three-strand version, depending on length and experience. A quick refresh can focus on a loosened outer section or the front pieces. If the hat creates friction near the braid start, rebuild only that upper section.
For professional styling, specify the side you want the braid to fall over and how low the weaving should begin. Also discuss braid width and comfortable tension. The start should sit below the beanie edge so the hat does not press a thick woven section against the scalp.
Pro tip:
Begin the fishtail with the beanie’s lower edge in mind, then let the braid fall forward over the shoulder. This keeps its most detailed section visible.
Make It Work for You:
For lower-density hair, gently widen the finished braid after securing it. Keep the base stable while loosening only the visible outer edges for a fuller effect.
Watch Out For:
Do not loosen the braid aggressively near its starting point. Too much movement there can weaken the anchor and make the beanie’s friction pull the plait apart.
Low Bubble Pony Beanie Hairstyle
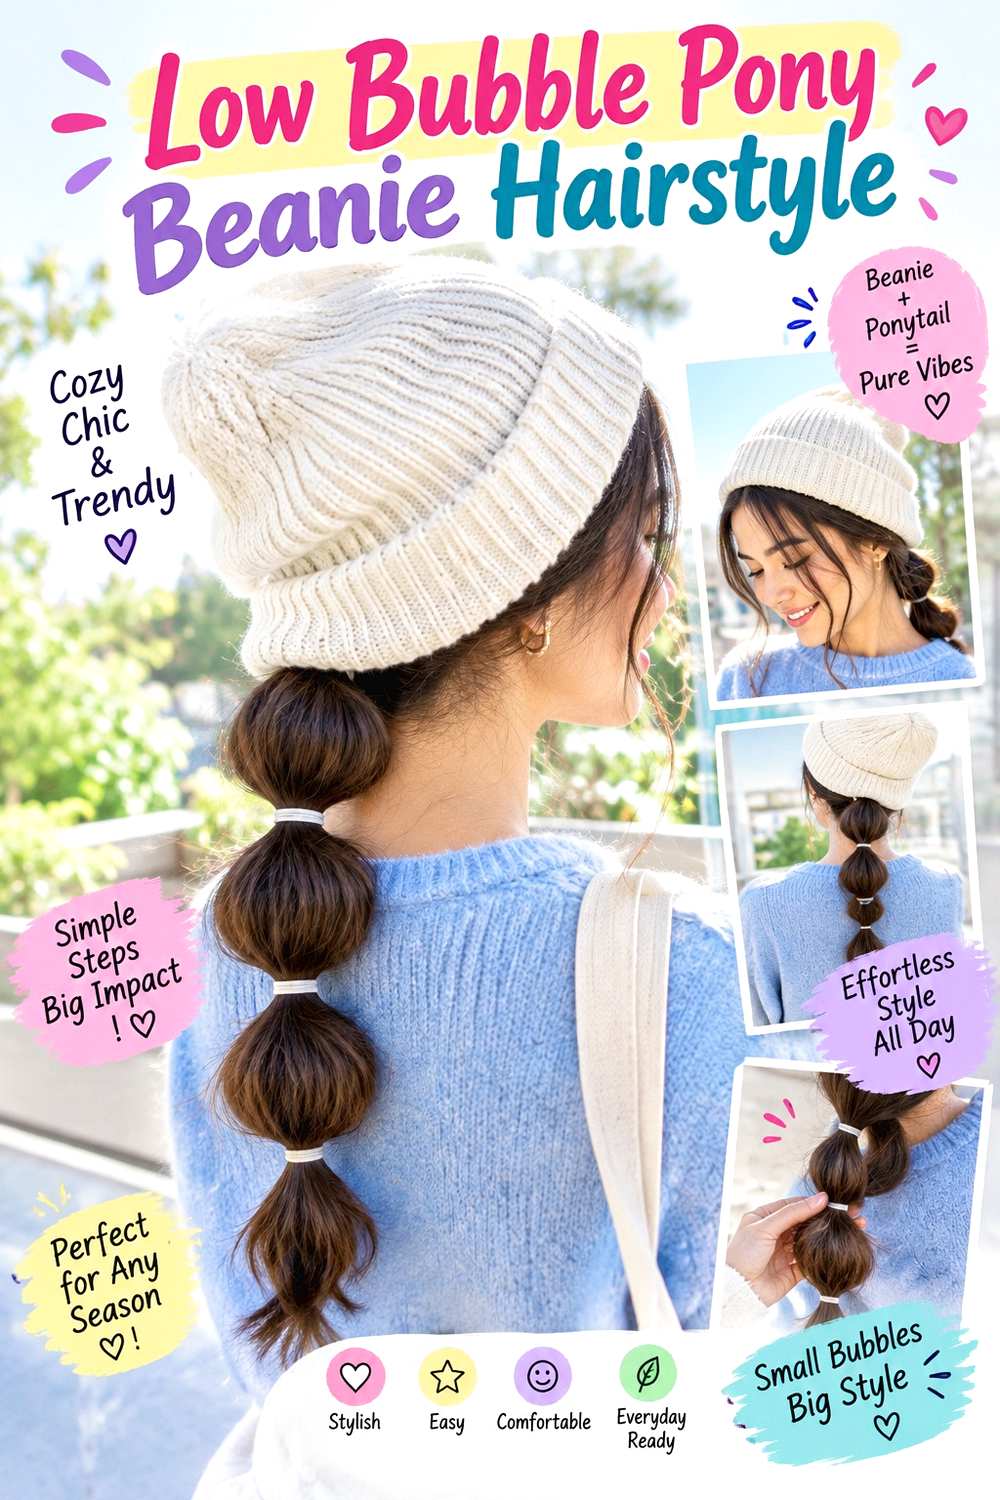
A low bubble ponytail adds visible structure below the beanie without requiring volume at the crown. Start with a ponytail at the nape, then add evenly spaced anchors down the length and gently expand each section between them. Medium to long hair works best, with very long lengths allowing more bubbles. Straight, wavy, curly, and coily hair can all use the design, although natural texture will make each rounded section look slightly different. A center or soft side part keeps the upper shape simple beneath the hat.
Use fabric-covered elastics to create the ponytail and bubble anchors, plus light texturizing spray if smooth hair needs extra grip. The full style takes moderate effort because spacing and fullness need to stay balanced, while a quick refresh can focus on just one flattened bubble or the front part. If the beanie loosens the main base, rebuild that first instead of tightening each lower elastic.
For salon styling, specify how low the ponytail should sit and how many visible bubbles you want based on your actual length. Ask for the first bubble to begin below the beanie edge so the hat does not compress the section that gives the style its distinctive shape.
Pro tip:
Put on the beanie before expanding the first bubble. This shows how much length remains visible and helps you place the rounded sections where they matter.
Make It Work for You:
For medium-length hair, use fewer and broader bubbles rather than squeezing several small sections into the tail. The design stays clear and proportionate below the hat.
Watch Out For:
Avoid positioning the first lower elastic directly under the beanie edge. Pressure there can flatten the bubble and create an uncomfortable ridge against the head.
Curly Lengths Beanie Hairstyle

Defined curls below a beanie create plenty of visible movement while the covered crown stays relatively uncomplicated. Let curls fall around the shoulders, with a middle, side, or natural part and a few front curl groups intentionally left outside the hat. The most important detail is preserving definition around the beanie edge, where friction can separate curls or create frizz. Medium and long curly hair gives the visible lengths room to expand, but shorter curls can work with a looser-fitting beanie that does not compress the entire shape.
Use lightweight leave-in conditioner for softness, curl gel to support grouping, and a diffuser for controlled drying. A full wash day takes longer because definition and drying happen together, while a quick refresh should target only flattened outer curls and the front groups. Avoid brushing dry curls after taking the beanie off; reshape individual sections instead.
For professional styling, explain that the hair will be worn under a beanie and show where the hat edge usually sits. Ask for the visible curl groups around the face to be arranged below that line rather than building important volume at the crown. If discussing a cut, use finished dry curl length as the reference.
Pro tip:
Let curls dry fully before putting on the beanie. Covering damp curls can flatten their pattern and leave the visible sections drying in unintended directions.
Make It Work for You:
If your curls are short, leave several defined front groups outside the hat and choose a higher beanie position. This keeps texture visible without excessive compression.
Watch Out For:
Do not rake through curls after removing the beanie to restore volume. Separate only the areas that need attention so definition is not replaced by frizz.
Coily Low Puff Beanie Hairstyle

A low puff keeps coily texture visible beneath the back of a beanie while avoiding a bulky crown anchor. The hair is gathered near the nape with the puff expanding below the hat edge, while the front may stay softly directed backward, center-parted, or naturally arranged. A few coils can remain visible around the face. Medium and longer coily hair gives the puff enough room to sit below the beanie, while shorter lengths may work better with a smaller gathered shape.
Use lightweight leave-in conditioner to maintain softness, curl gel to support visible coil groups, and a fabric-covered elastic to establish the low puff. Full wash-day styling takes longer because defining and drying happen before gathering, while a quick refresh can focus on the outer coils and hairline. If the puff shifts after hat removal, reset the elastic rather than repeatedly tightening it against the nape.
For professional styling, show exactly how low you want the puff and where your beanie normally ends. Ask for comfortable tension and enough room between the hat edge and the puff anchor. If the base sits too high, the beanie can press directly on it and flatten the upper portion of the texture.
Pro tip:
Arrange the visible coils around the puff before putting on the hat, then make only small adjustments afterward. This reduces unnecessary handling near the beanie edge.
Make It Work for You:
For shorter coils, keep the puff compact and slightly lower while leaving more front texture visible. The hairstyle remains recognizable without forcing limited length into a large anchor.
Watch Out For:
Do not keep tightening the puff when the beanie shifts it. Reposition the hat or base separately so the hairline and nape are not placed under excess tension.
Two-Strand Twist Beanie Hairstyle

Two-strand twists can sit comfortably under a beanie because they create controlled texture without requiring a large anchor. Wear several medium twists loose, or divide the hair into two larger low twists that fall over the shoulders. A center or side part can remain visible at the front, and a few shorter pieces may stay loose if desired. Medium to long textured hair works particularly well, while the width of each twist can be adjusted to density and how much bulk you want beneath the hat.
Use lightweight leave-in conditioner for softness and curl cream to keep the two sections smooth and grouped while twisting. A full wash-day style takes longer because the twists are created after detangling and product application, but they can simplify later mornings. A quick refresh usually involves retwisting a fuzzy front section or smoothing the ends rather than starting over. Beanie friction is most noticeable along the outer surface, so handle only those areas.
For salon or professional styling, specify twist width, where you want the front part, and whether larger twists should begin below the ears. Comfortable tension near the hairline is important, and thicker anchor points should not sit directly beneath the tightest part of the hat.
Pro tip:
Keep the twists closest to the hairline slightly smaller and flatter. This gives the beanie a smoother surface to sit on while preserving fuller twists below.
Make It Work for You:
If your hair is very dense, use fewer, larger twists through the back and narrower ones near the edges. This controls bulk without sacrificing visible texture.
Watch Out For:
Avoid placing thick twist bases exactly behind the ears where the hat band presses. Shift the sections slightly lower or farther back for better comfort.
Messy Low Bun Beanie Hairstyle

A low bun is useful when you want the hair off the shoulders without putting a bulky knot under the beanie. Place the bun at the nape or slightly to one side, keeping it below the hat edge and allowing a few face-framing pieces to remain loose. The front can be center-parted, side-parted, or softly brushed back. Medium and long hair works best because enough length can fold into the bun without forcing the anchor upward.
Use a fabric-covered elastic to establish the base, bobby pins to secure the folded sections, and light texturizing spray if the hair is very slippery. Full styling is quicker than a detailed updo because the surface can remain relaxed; a short refresh usually means retucking one end or resetting the loose front pieces. If the beanie presses the bun, move it lower rather than flattening the knot aggressively.
For professional styling, show where the lower edge of your beanie sits and ask for the bun to clear that line. Specify how wide and flat you want the knot, since a broad low bun often sits more comfortably than a compact, protruding one beneath the back edge of the hat.
Pro tip:
Test the beanie after pinning the bun but before loosening the surface. Moving the base later can undo the soft texture you have already arranged.
Make It Work for You:
For dense hair, build a wider, flatter low bun instead of a tight ball. This distributes weight and reduces the chance of the beanie catching on it.
Watch Out For:
Do not rely on the hat to hold a loose bun in place. Secure the structure independently so removing the beanie does not make the hairstyle collapse.
Shoulder-Length Flip Beanie Hairstyle

A shoulder-length cut with softly flipped ends keeps its main styling detail visible even when the crown is hidden. The hair can follow a center or off-center part, stay relatively smooth through the mid-lengths, and turn gently outward at selected ends near the shoulders. The flip should be controlled rather than identical around the whole perimeter. Straight and wavy hair can achieve the finish readily, while fine strands often benefit from a restrained flip that preserves a substantial bottom edge.
Apply heat protectant before using a round brush to direct the ends outward, then use flexible hairspray lightly along the perimeter. A full wash-day blow-dry takes moderate effort, but a quick refresh can focus only on ends that have turned inward while wearing the hat. Because the beanie covers much of the upper styling, there is little reason to spend extra time creating crown volume that will disappear.
If you are having the style professionally finished, ask for the outward movement to begin near the shoulders, not directly below the beanie. If discussing the haircut itself, show how much perimeter weight you want retained so the flipped ends look intentional rather than thin and feathered.
Pro tip:
Put the beanie on before making final end adjustments. The visible length below the hat determines which flipped sections contribute most to the silhouette.
Make It Work for You:
For dense hair, flip mainly the outer and front ends while leaving more interior pieces neutral. This keeps the shoulder-level shape from becoming excessively wide.
Watch Out For:
Avoid curling every end sharply outward. A rigid, uniform flip can look overly set; gentle variation keeps the visible perimeter softer beneath the beanie.
Piecey Fringe Beanie Hairstyle
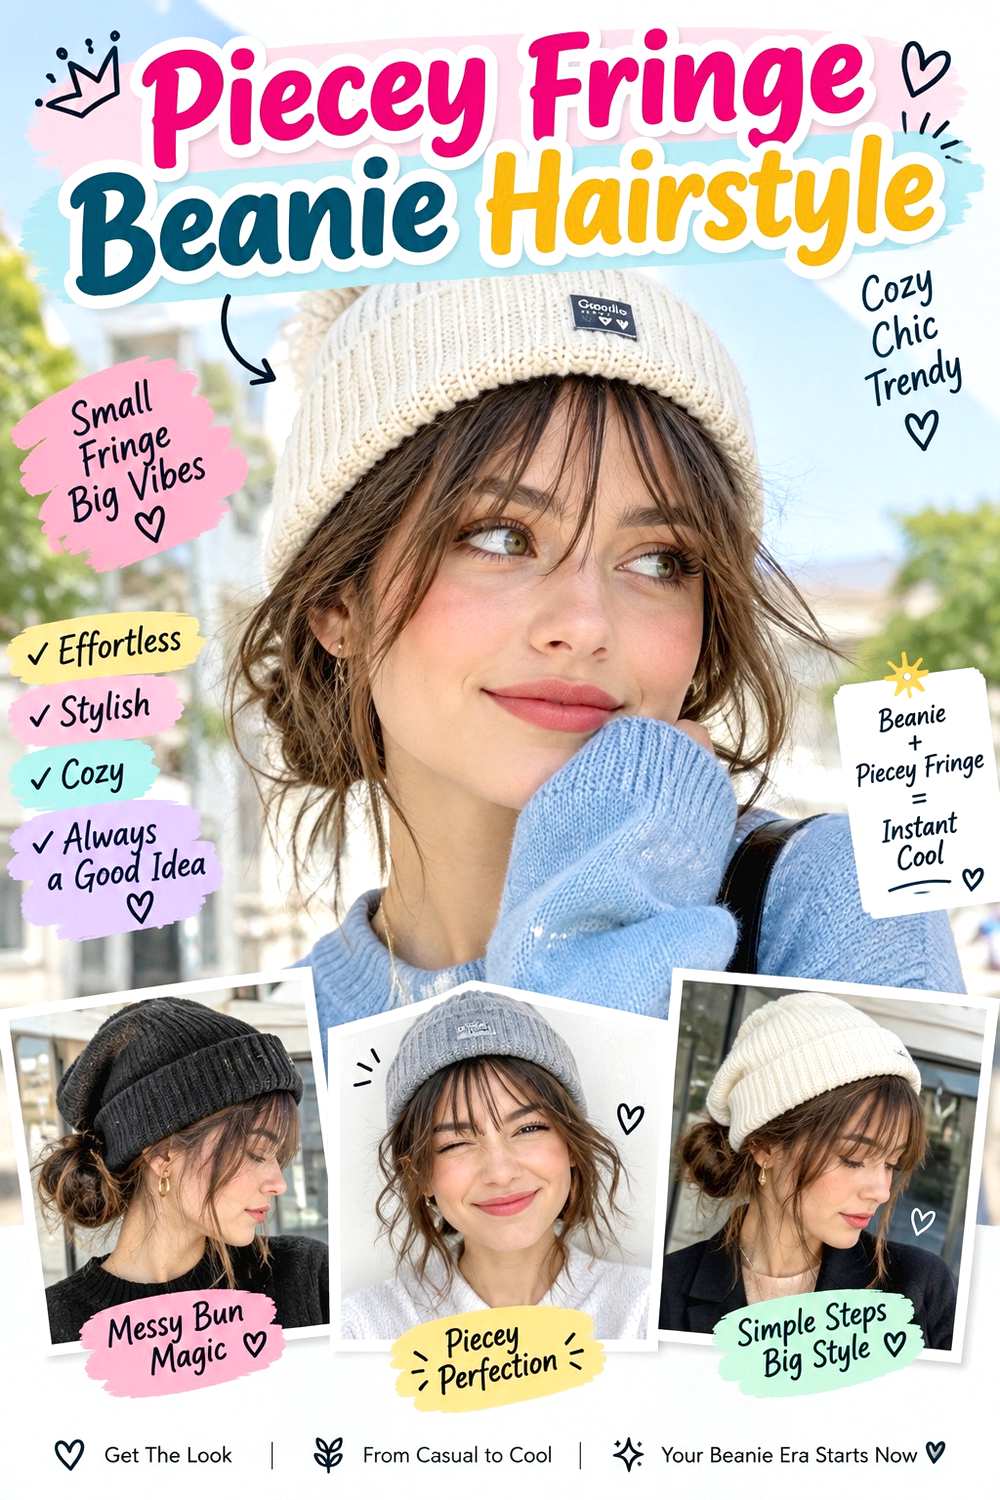
A piecey fringe turns the beanie edge into a frame instead of hiding the entire front of the hairstyle. The fringe can skim the brows in lightly separated sections, with longer outer corners blending toward the temples. The remaining hair may be straight, softly waved, or gathered low, making this idea adaptable from short bobs to long lengths. The beanie should sit far enough back that it does not push the fringe directly into the eyes or compress it into one solid section.
Use a small round brush to redirect the fringe during drying, then apply a small amount of flexible hairspray if the separated pieces need hold. Full wash-day styling depends on what you do with the remaining length, while a fringe-only refresh can be very quick. If the hat creates gaps or flattening, dampen and redirect the fringe rather than piling on product. Fringe upkeep becomes useful when the center begins entering the eyes even before the rest of the cut needs attention.
At the salon, show the beanie position you usually wear and discuss the fringe at its finished dry length. Ask for longer outer corners so the front remains connected to the side sections when the hat is on.
Pro tip:
Set the beanie slightly behind the fringe after the front is fully dry. This keeps the hat from pressing damp strands into an unwanted direction.
Make It Work for You:
If your fringe naturally waves or curls, leave extra finished length and allow some movement. The piecey effect can remain visible without forcing every section straight.
Watch Out For:
Do not keep cutting the fringe shorter because the beanie pushes it toward your eyes. Adjust the hat position first and assess the dry fringe independently.
Curtain Fringe Beanie Hairstyle
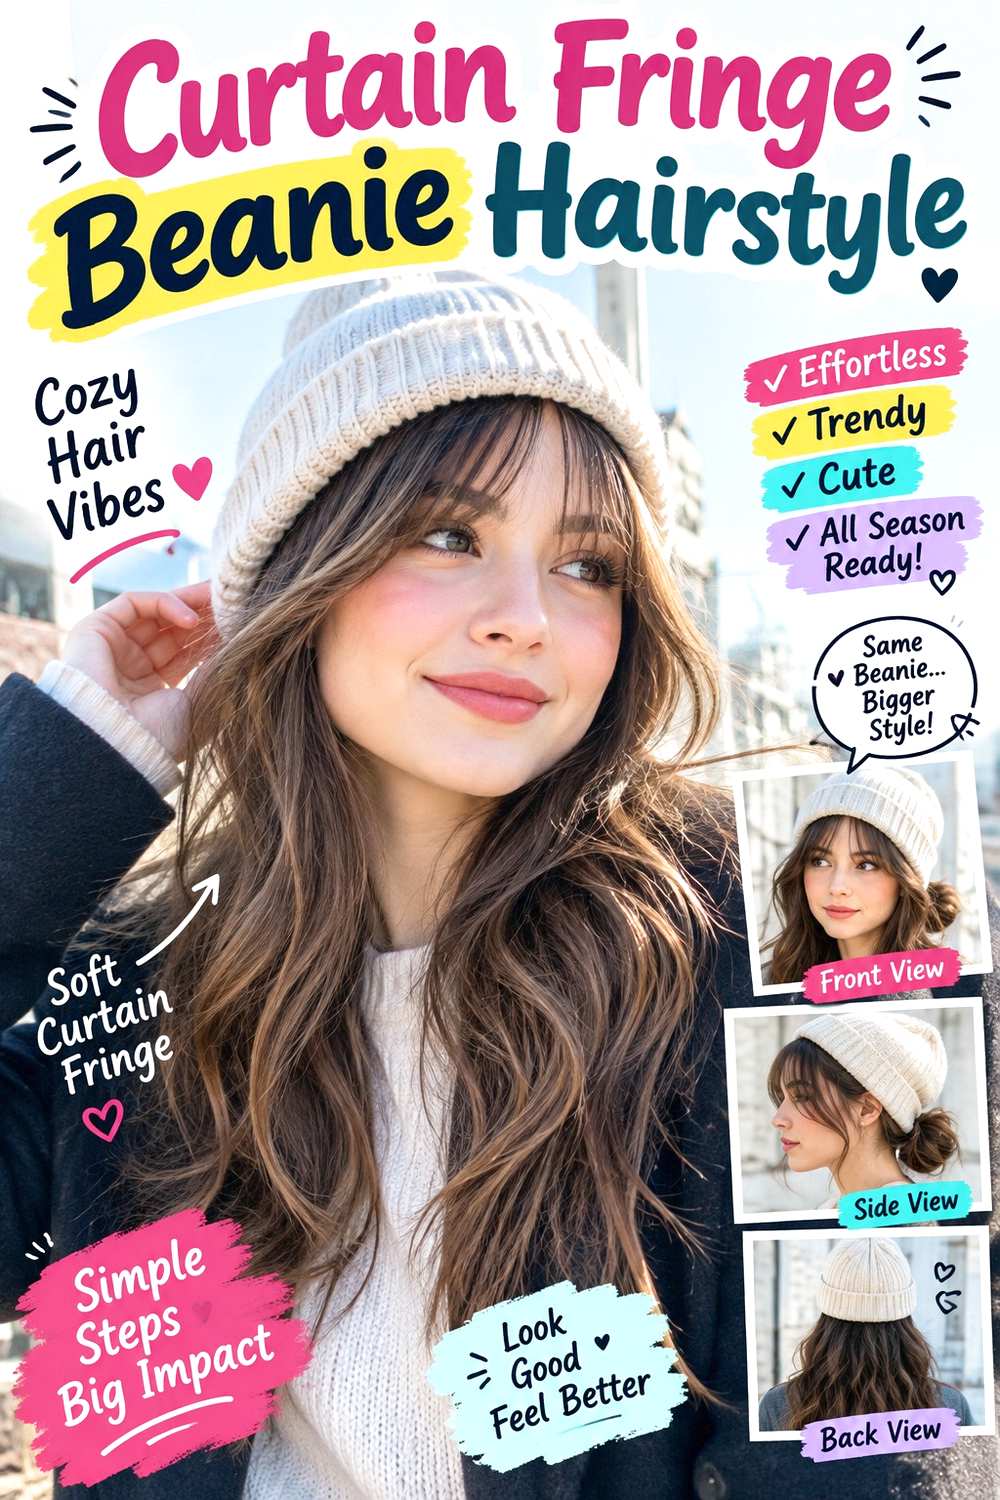
A center-opening curtain fringe works well with a beanie because the two sides can remain visible below the front edge while the crown stays covered. The shorter center pieces may sit around the brows, with longer outer corners sweeping toward the cheekbones. Medium and long hair can stay loose, waved, or gathered low behind the shoulders. The key is keeping the hat slightly behind the fringe opening so it does not collapse the outward direction you created.
Use a small round brush to direct the fringe away from the center, then use lightweight mousse sparingly near the front roots if extra support is needed. A full wash-day style depends on the rest of the hair, but a quick fringe refresh can take only a few minutes. If the beanie flattens the outer corners, redirect those sections rather than restyling the hidden crown. Trim upkeep becomes useful when the center no longer opens comfortably or the outer sections stop blending.
For salon styling, show where you want the fringe to split and how far the outer corners should fall when dry. Mention that you regularly wear beanies so the finished lengths remain workable below the hat edge instead of disappearing underneath it.
Pro tip:
Put the beanie on from the back toward the front rather than dragging it across the fringe. This helps preserve the center opening and outward direction.
Make It Work for You:
For curly curtain fringe, keep more finished length through the middle and sides. Natural bend can frame the hat beautifully without requiring a straight, symmetrical opening.
Watch Out For:
Do not position the hat edge directly over the fringe roots if you want lift there. Move the beanie slightly back so the front can retain movement.
Sleek Long-Length Beanie Hairstyle

Long, smooth lengths create a simple vertical line below a beanie and require very little styling at the crown. A center or soft side part can remain visible at the front, while the hair falls over both shoulders or stays behind one side. The ends may remain straight or turn inward slightly, and long face-framing pieces can sit outside the hat. This version works most easily when straightness is close to the natural texture; reaching the same finish from curls or coils involves more styling commitment.
Apply heat protectant before using a flat iron only where smoothing is needed, then use lightweight serum through the mid-lengths and ends to reduce friction-related frizz. A full wash-day straightening session may take substantial time on dense or textured hair, while a quick refresh should concentrate on the visible lengths. Avoid repeatedly smoothing the crown simply because the beanie has flattened it.
For professional styling, explain whether you want the lengths worn forward over the shoulders or down the back, since that affects how the front sections are arranged. If face framing is involved, point to the exact dry length you want visible outside the beanie rather than cutting around an assumed hat position.
Pro tip:
Smooth the visible lengths downward before putting on the hat, then avoid repeatedly pulling them from underneath. Less friction helps the surface stay cleaner.
Make It Work for You:
If your natural texture is wavy, keep a gentle bend instead of chasing pin-straight lengths. The long silhouette still looks controlled with less heat styling.
Watch Out For:
Do not repeatedly straighten the hidden crown after hat removal. Focus on visible sections and let minor root compression remain unless you are finished wearing the beanie.
Air-Dried Wave Beanie Hairstyle
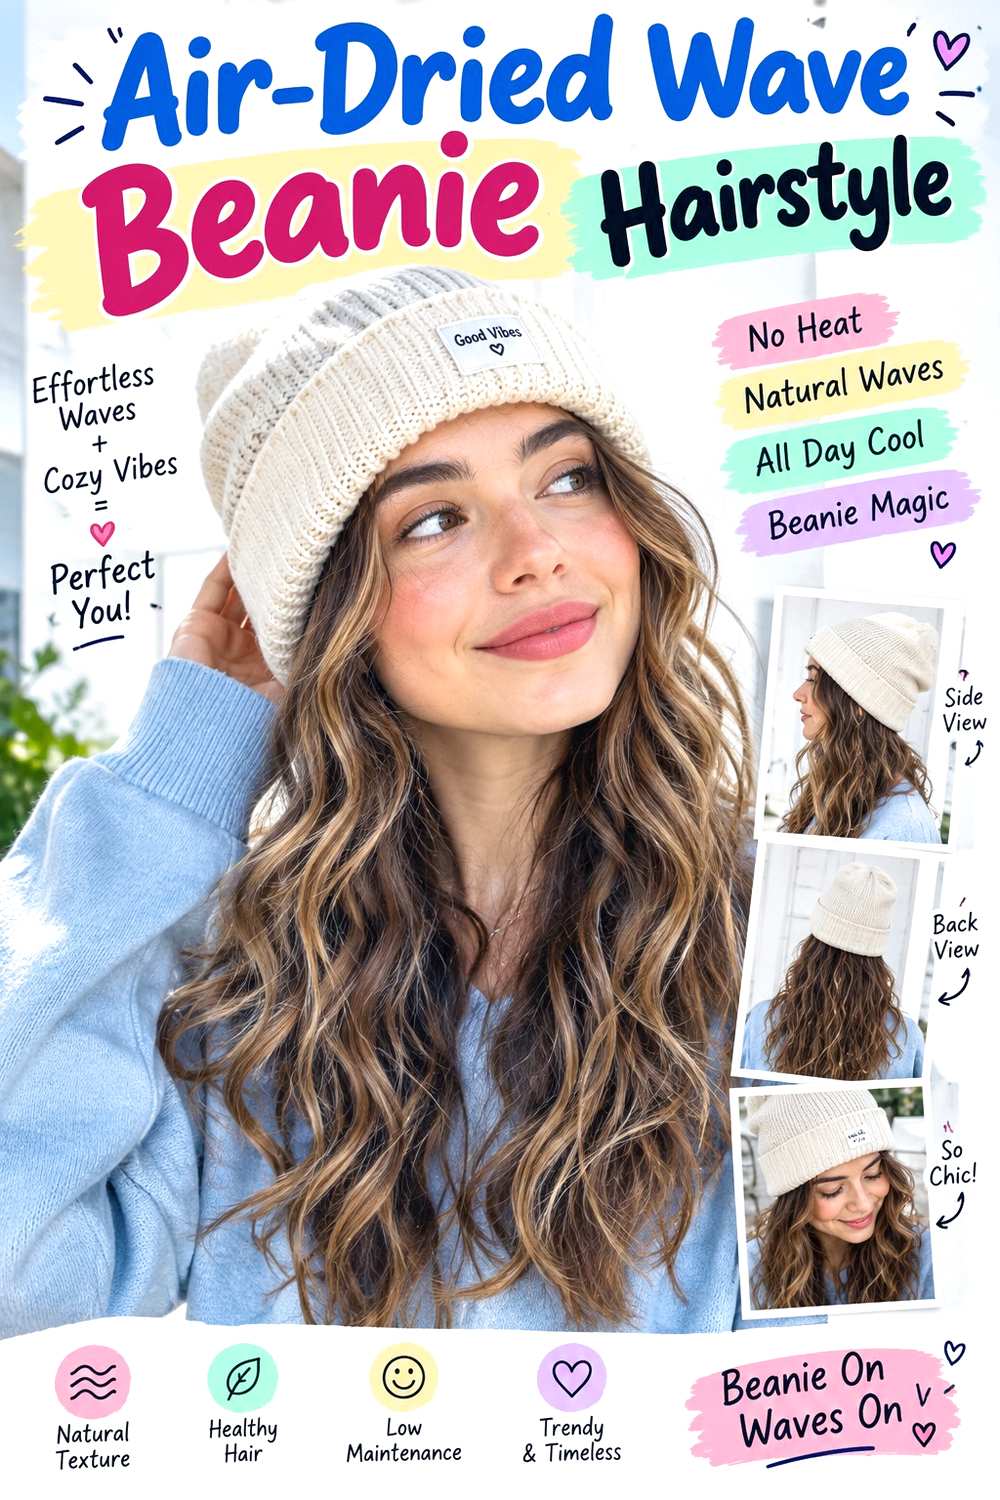
Air-dried waves suit casual beanie wear because the texture does not depend on carefully constructed crown volume. A natural or slightly offset part can remain visible at the front, with irregular bends beginning wherever the hair naturally changes direction. Shoulder-length through long hair works well, and the ends can stay softly grouped instead of being separated into many small pieces. The beanie covers some variation at the roots, leaving the visible lower texture as the main feature.
Apply lightweight leave-in conditioner for softness and lightweight mousse for support, then arrange the front sections while damp and allow the hair to dry with minimal handling. A full wash day requires more waiting than active styling, while a quick refresh can involve dampening only flattened outer pieces after the beanie comes off. If the hair repeatedly dries overly wide or heavy at the bottom, the haircut may need adjustment rather than more product.
For salon styling, explain that you wear your hair air-dried under hats and show how your natural wave behaves. Ask for enough perimeter weight to keep the visible lower section coherent, with layers placed only where they help the wave pattern move rather than creating unnecessary frizz.
Pro tip:
Let the hair dry completely before covering it. Wearing a beanie over damp waves can press them into uneven shapes that remain once the hat comes off.
Make It Work for You:
If your waves are loose and easily stretched, use less product and keep the hat fit comfortable. Heavy product plus pressure can make the visible lengths fall flat.
Watch Out For:
Do not aggressively separate every flattened wave after removing the hat. Refresh specific outer sections instead so the overall pattern remains soft rather than fuzzy.
Double Low Pony Beanie Hairstyle

Two low ponytails create a playful shape while keeping both anchors safely below the beanie. A center part divides the hair evenly, and each ponytail sits beneath or slightly behind the ears. The tails can remain straight, softly waved, curly, or coily, with face-framing pieces left outside the hat if desired. Medium and long hair works best because enough length remains visible. Lower-density hair can use looser, fuller tails, while dense hair benefits from secure but comfortable elastics.
Use two fabric-covered elastics for the anchors and light texturizing spray if smooth hair needs extra grip. A full wash-day style is straightforward because the structure does not require heat, although you can style the tails separately if desired. A quick refresh means resetting one ponytail that has shifted or tidying the center part. If the hat pushes one anchor downward, reposition it instead of tightening both sides.
For professional styling, show how close to the ears you want the ponytails and where the beanie edge sits. Ask for symmetrical placement only as far as comfort allows; natural growth patterns may make a small difference between sides preferable to excessive tension.
Pro tip:
Mark the ponytail positions with the beanie on, then remove it to secure both sections. This keeps the anchors clear of the hat’s pressure points.
Make It Work for You:
For curly or coily hair, keep the tails full and natural rather than smoothing them into identical shapes. The balanced low placement is enough to define the style.
Watch Out For:
Avoid placing both elastics high behind the ears. The beanie can press them against the head, making a lighthearted style unexpectedly uncomfortable after longer wear.
Low Side Braid Beanie Hairstyle
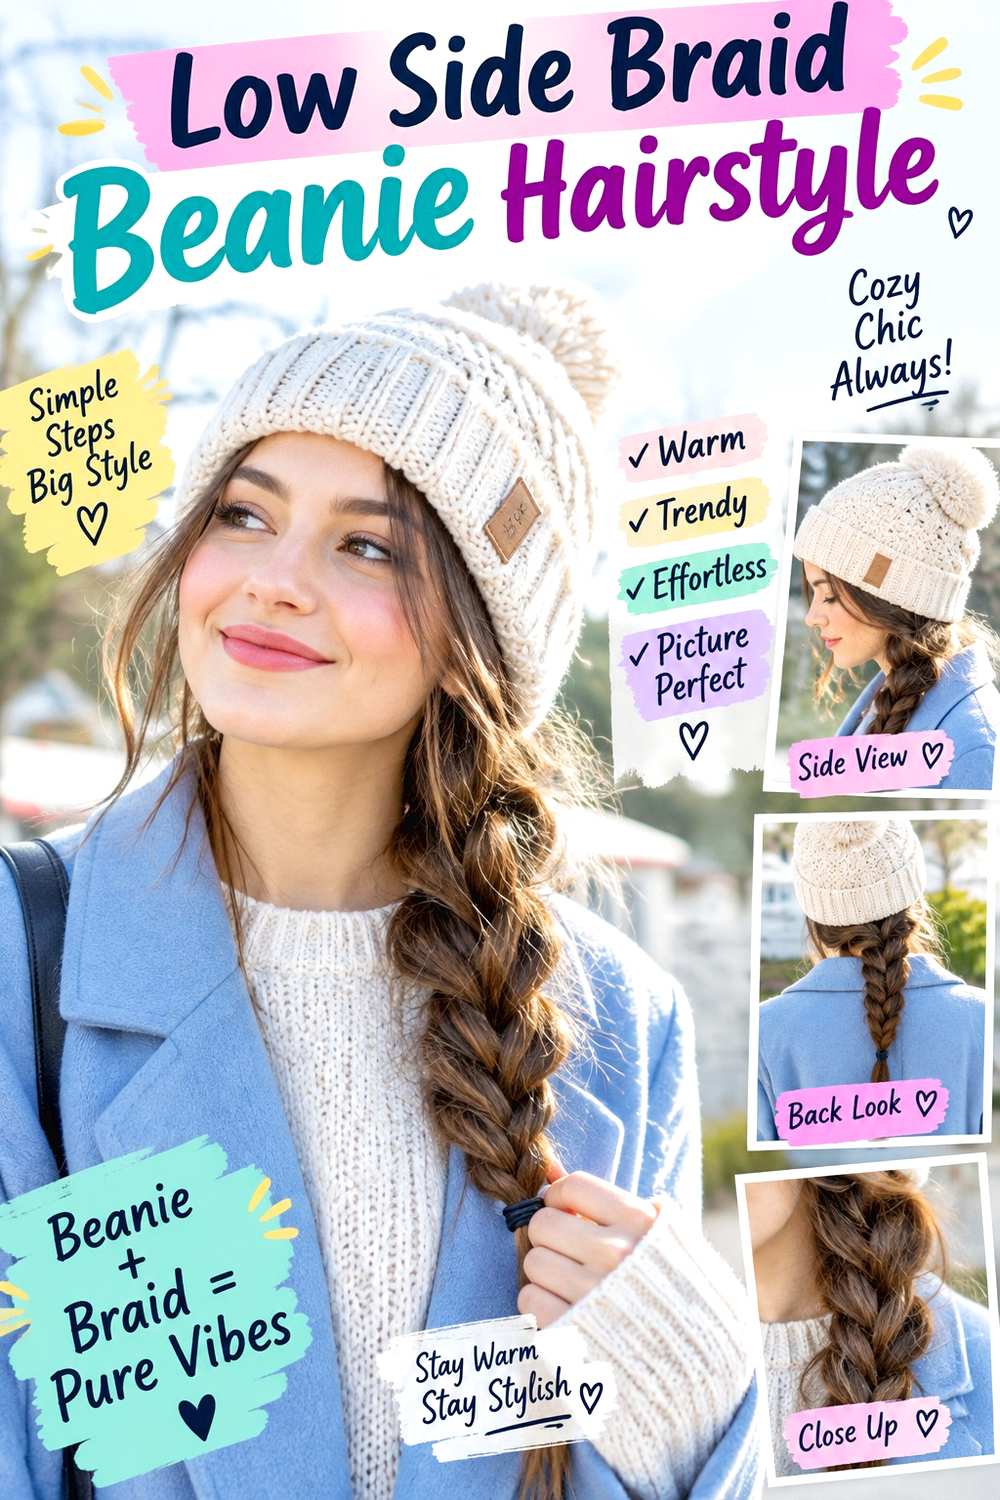
A single low braid directed over one shoulder gives the beanie a clean back while keeping most of the styling visible from the front. Start the braid at or below the nape and angle it gently toward one side rather than pulling sharply across the scalp. A center or soft side part works, and face-framing pieces can remain loose on one or both sides. Medium and long hair supports the braid best, while straight, wavy, curly, and coily textures create different levels of softness through the weave.
Use light texturizing spray for grip and a fabric-covered elastic to secure the end. Full wash-day styling can remain simple because no heat is necessary; the braid itself is quick once the hair is prepared. A short refresh usually means retightening the bottom or loosening a few visible sections evenly. If the beanie creates friction at the upper braid, repair that small area instead of rebuilding the entire length.
For salon styling, specify which shoulder you want the braid to fall over, how wide the braid should be, and where it should begin. The starting point should remain below the beanie edge, with comfortable tension across the opposite side of the nape.
Pro tip:
Begin the braid in its final over-the-shoulder direction. Redirecting a finished braid later can twist the base and create pressure where the beanie rests.
Make It Work for You:
For fine or lower-density hair, gently widen only the visible braid loops after securing the end. This creates fullness while keeping the nape anchor stable.
Watch Out For:
Do not pull hair tightly across the nape to force a dramatic side position. Start closer to the chosen shoulder so the braid remains comfortable under the hat.
Textured Bob Beanie Hairstyle

A textured bob keeps almost the entire styling detail visible below a beanie, especially when the cut sits between the chin and shoulders. An off-center or middle part can frame the front, while shallow bends, natural waves, or curls create movement through the sides. The ends should retain enough weight to keep the bob outline recognizable. Because the beanie covers the crown, the strongest texture can begin around the cheekbones or jaw rather than at the roots.
If using heat, apply heat protectant before a flat iron creates loose bends, then use light texturizing spray through the mid-lengths for separation. A full wash-day style is relatively quick because of the shorter length, while a quick refresh can focus on one front bend and any ends flattened by the hat. If the crown sits flat after removing the beanie, changing the part slightly can restore some movement without reheating the cut.
For salon styling, show where you want the bob to finish and how much texture you normally wear beneath a beanie. Ask for the shortest layers to remain below the hat edge when possible and for the perimeter to retain enough weight that friction does not leave the ends looking overly wispy.
Pro tip:
Arrange the bob around your face after the beanie is fully in place. Short sections shift easily, so final positioning matters more than perfect crown styling beforehand.
Make It Work for You:
If your bob is curly, preserve established curl groups below the hat and keep the beanie slightly higher. This leaves more natural texture visible around the sides.
Watch Out For:
Avoid over-layering a fine or lower-density bob just to create hat-friendly texture. Too little perimeter weight can make the visible ends appear sparse after friction.
Conclusion
Hairstyles to wear with beanies work best when their main detail remains below or outside the hat. Loose waves and straight lengths are simple options, while low braids, ponytails, bubbles, twists, puffs, and buns control more hair without creating bulky crown anchors. Short bobs can use visible end texture, and fringe can turn the beanie edge into part of the framing. Density matters: fine or lower-density hair often benefits from fuller grouping, while dense hair can use broader braids or low anchors to manage bulk. Natural curls, coils, and waves do not need to be straightened for a polished result. Choose the style according to your texture, hat fit, visible length, and how much refreshing you want after taking the beanie off.
Before Your Salon Visit
Choose one or two favorites and save references showing how the hair looks with the beanie actually on. Discuss your natural texture, density, face shape, preferred length, and normal styling routine. Point out the exact fringe, face-framing pieces, braid width, ponytail height, volume, or end finish you like. Because most of these are temporary styles, focus on placement and comfortable hold rather than requesting a haircut unnecessarily. If you wear beanies often, mention where the edge normally sits against your hair.
FAQs
How Do I Stop a Beanie From Flattening My Hairstyle?
Keep the important volume and texture below the hat edge rather than building it at the crown. Low braids, loose lengths, curls, or a nape ponytail are easier to preserve. After removing the beanie, refresh visible roots or front pieces selectively instead of restyling the entire head.
Which Hairstyles Work Best With Tight-Fitting Beanies?
Low-profile styles usually feel more comfortable. Loose straight hair, low braids, nape ponytails, and low puffs keep bulky anchors away from the hat band. Avoid placing thick elastics, buns, braid starts, or accessories exactly where the beanie presses against the scalp, especially for longer wear.
Can Curly or Coily Hair Be Worn Under a Beanie Without Straightening?
Yes. Curls and coils can remain natural in loose lengths, twists, low puffs, braids, or ponytails. Let the hair dry fully before covering it and minimize repeated handling afterward. If the hat flattens a section, refresh that area rather than brushing through the entire texture.
Are Bangs Practical With a Beanie?
They can be, especially piecey or curtain fringe worn outside the hat edge. The beanie should sit far enough back that it does not push the fringe into the eyes or flatten its roots completely. Fringe length, natural growth direction, and shrinkage all affect how easily the front stays in place.