12 Halloween Crown Braid Hairstyles
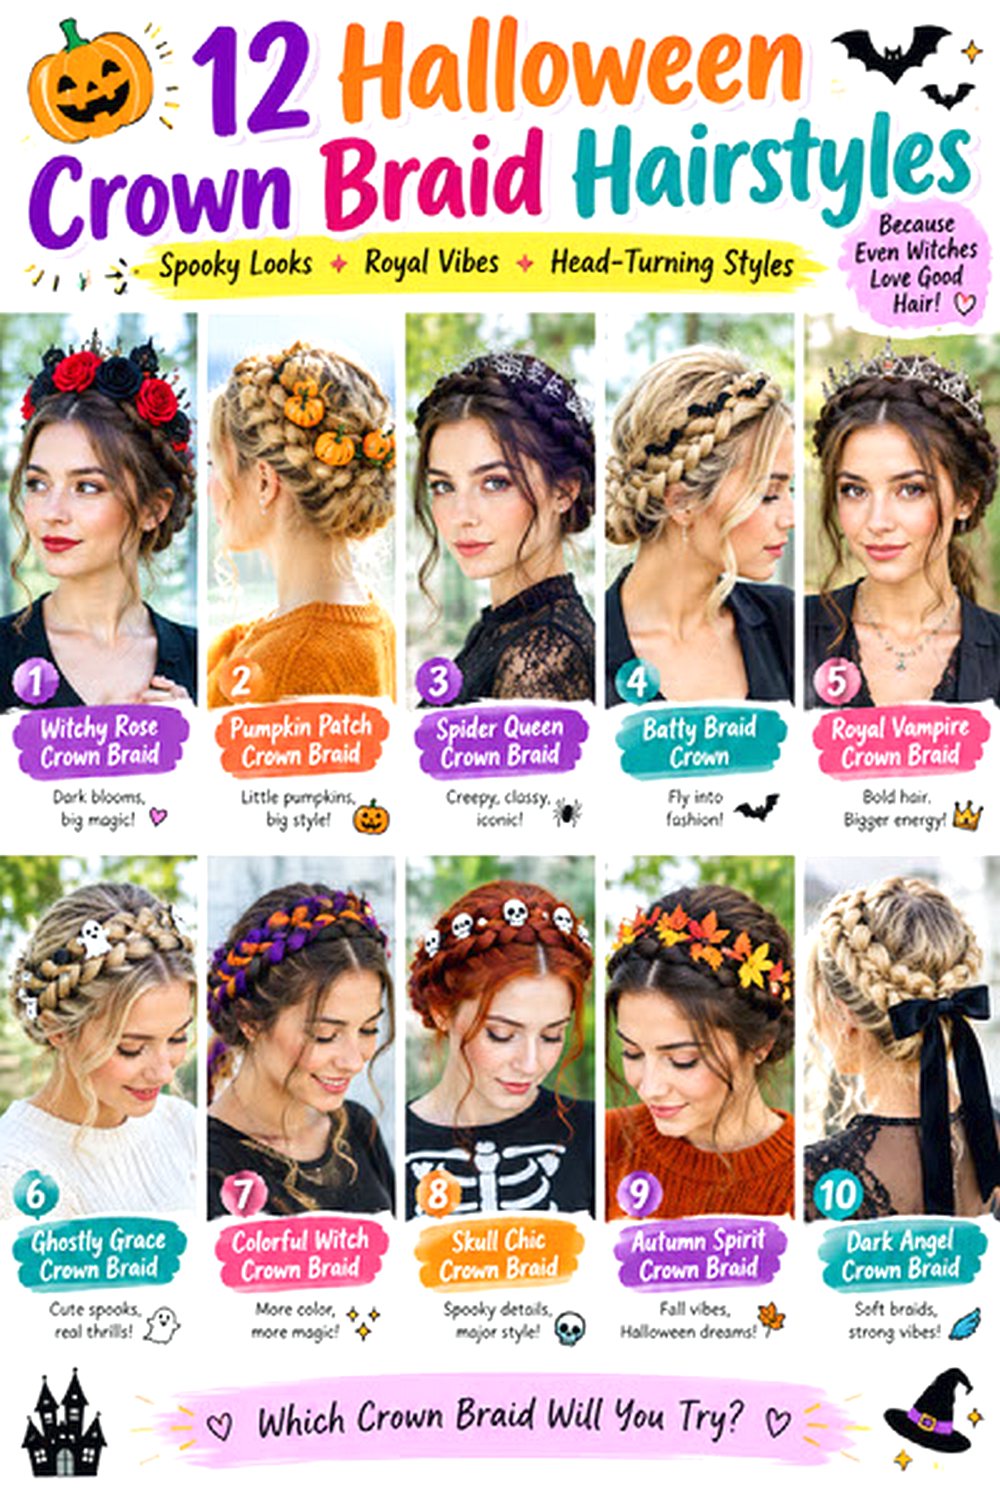
Halloween crown braid hairstyles combine the wrapped shape of a halo braid with details that make the finish feel darker, softer, or more playful for fall. The braid may circle the entire head, sit across the front like a headband, or form part of a half-up hairstyle. Loose waves, wispy fringe, crimped lengths, ribbons, metallic clips, and small themed accessories can change the mood without altering the basic braided structure.
Medium and long hair provide the easiest length for wrapping a complete crown, although shorter hair can work with two braids pinned together or added texture for grip. Fine hair often benefits from gently widening the braid, while thick hair may need smaller sections and stronger pins to keep the crown secure. Straight hair usually needs texture spray for hold, whereas wavy and curly hair can provide natural grip.
Most versions take moderate styling time rather than being a quick everyday braid. Clean sectioning and secure pinning matter more than perfection. Before choosing one, consider your hair length, density, natural texture, costume, accessories, and how many hours you need the style to stay comfortable.
Quick List
- Gothic Ribbon Crown Braid
- Spider Charm Crown Braid
- Witchy Crown Braid With Loose Waves
- Double Halloween Crown Braid
- Messy Haunted Crown Braid
- Moonlit Crown Braid With Silver Clips
- Crown Braid With Orange Velvet Ribbon
- Ghostly Pearl Crown Braid
- Crown Braid With Crimped Lengths
- Half-Up Halloween Crown Braid
- Crown Braid With Wispy Bangs
- Braided Crown Updo With Gothic Pins
Gothic Ribbon Crown Braid
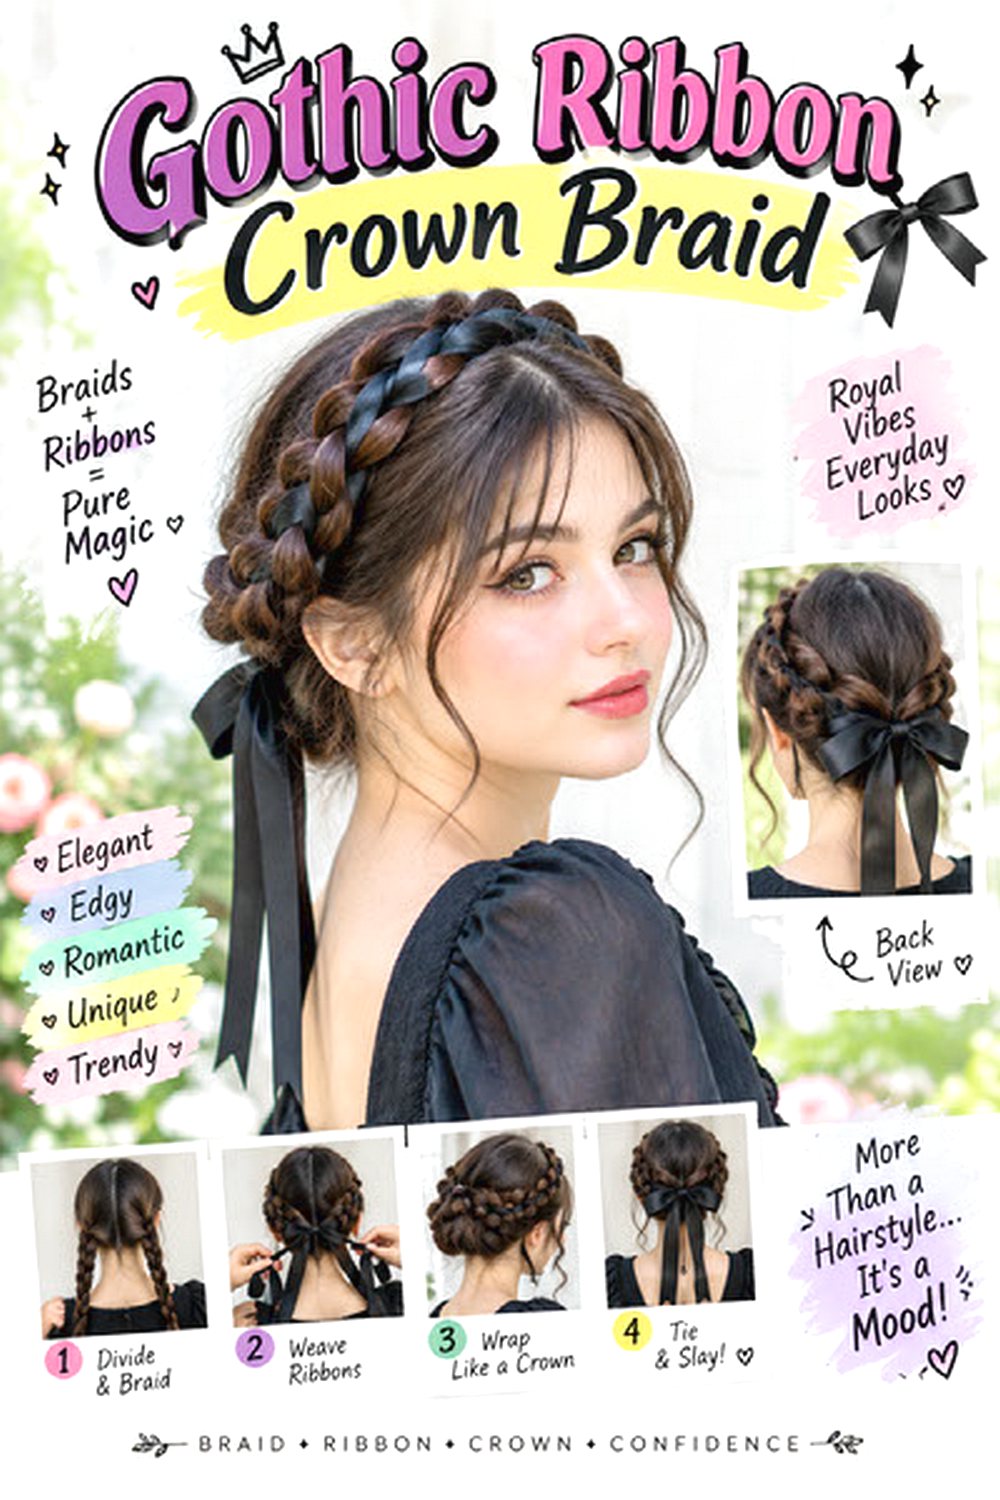
A narrow ribbon woven through a crown braid gives the hairstyle a Gothic Halloween detail without making the braid difficult to recognize. The best shape is a broad halo sitting slightly behind the hairline, with the woven ribbon appearing at regular intervals through the plait. Medium to long hair works most easily, and fine hair can look fuller when the braid is gently loosened after pinning. Thick hair may need two smaller braids joined at the back rather than one heavy continuous section. Use texturizing spray for grip, snag-free elastics to secure the ends, and sturdy bobby pins that match your hair. Styling takes moderate time because the ribbon must stay untwisted while you braid. Refreshing is usually limited to repinning loose sections. At the salon, ask for face-framing layers long enough to leave out intentionally without creating many short pieces around the braid base.
Pro tip: Attach the ribbon to the starting elastic before braiding so it stays anchored instead of sliding through the finished crown.
Spider Charm Crown Braid

Small spider charms turn a classic crown braid into a clear Halloween style while keeping the hair itself wearable. Place the accessories asymmetrically along one side of the braid rather than covering the entire crown, which makes the detail easier to see and prevents the hairstyle from feeling overloaded. Medium-density and thick hair provide enough braid surface for clips, while fine hair can gain width by gently pulling the outer loops after the braid is secured. Straight hair benefits from a little texture first; natural waves usually have enough grip already. Use dry texturizing spray, firm bobby pins, and lightweight spider clips that will not drag the braid downward. Styling time is moderate, but adding the charms only takes a few minutes once the crown is finished. Check pins before leaving for an event. At the salon, ask to keep enough density around the temples if you frequently wear braided styles, since excessive thinning there can make the crown look sparse.
Pro tip: Clip each spider into a section already supported by a pin so the accessory does not gradually pull the braid away from the scalp.
Witchy Crown Braid With Loose Waves
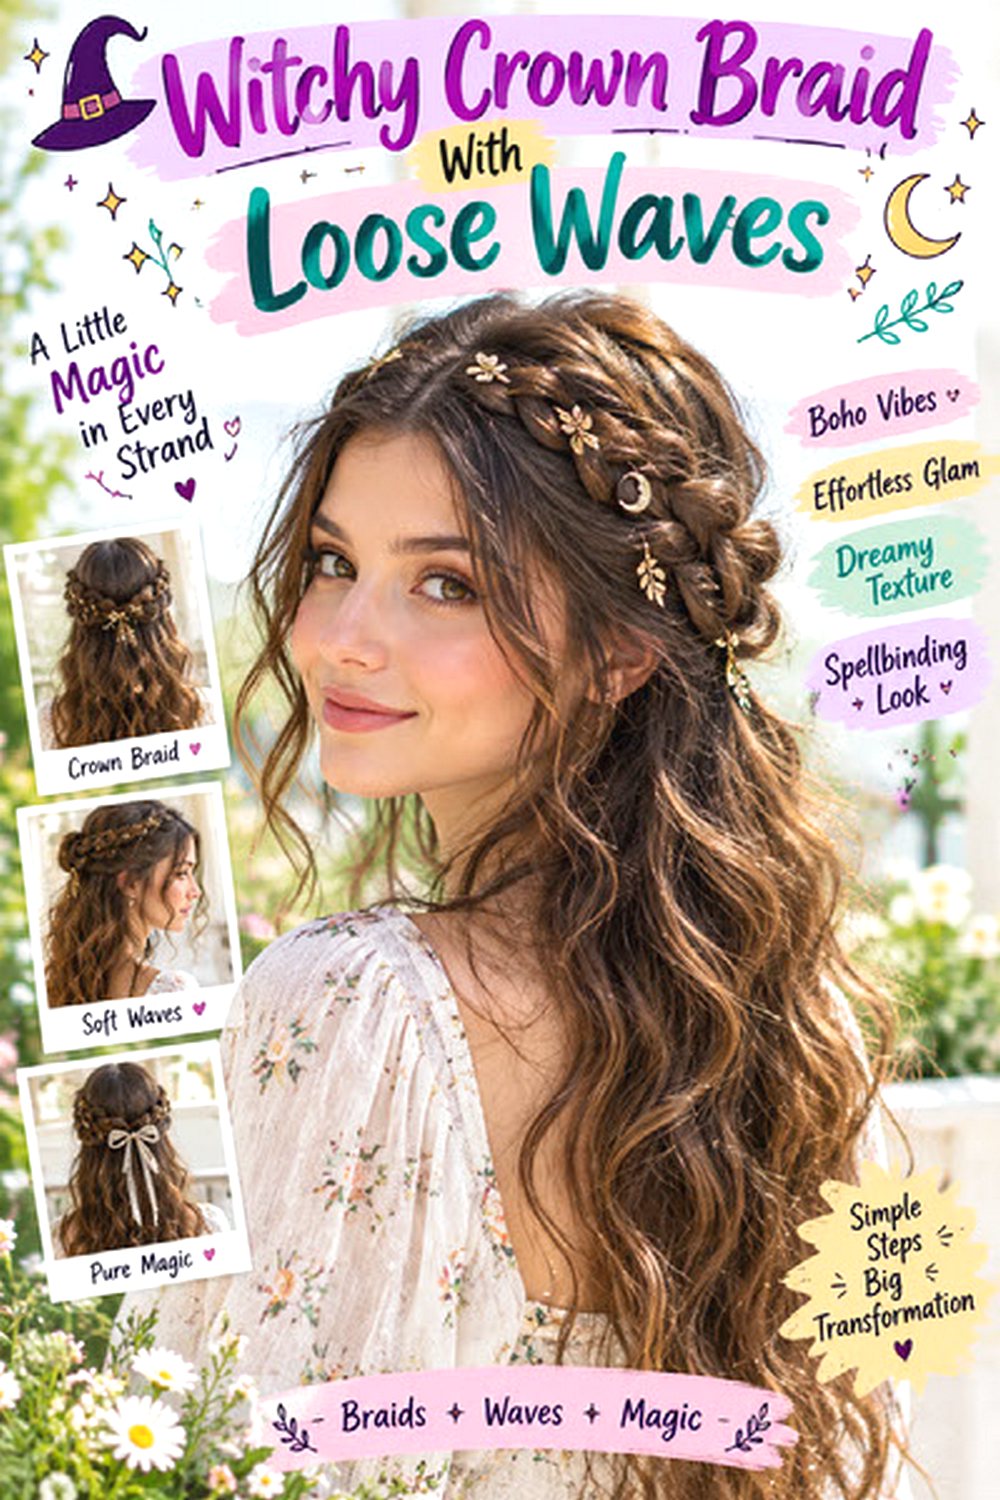
Leaving most of the length loose gives a crown braid a softer, more relaxed shape that pairs well with witch-inspired Halloween styling. Two front sections can be braided backward and joined across the back of the head while the remaining hair falls in loose waves. This works particularly well on medium and long hair because the braid has enough length to reach across the crown without taking too much hair from the lower section. Fine hair benefits from keeping the braids relatively narrow so the loose lengths still look full. Use heat protectant, a medium curling iron, and flexible hairspray to create waves that move instead of feeling stiff. Styling takes moderate time, although naturally wavy hair can shorten the process considerably. Refresh only the visible front waves if they relax. At the salon, ask for long face-framing layers that begin around the jaw or below so they blend into the loose hair instead of constantly escaping from the braided sections.
Pro tip: Curl the loose hair before forming the crown so you do not have to work a hot tool close to the finished braid.
Double Halloween Crown Braid
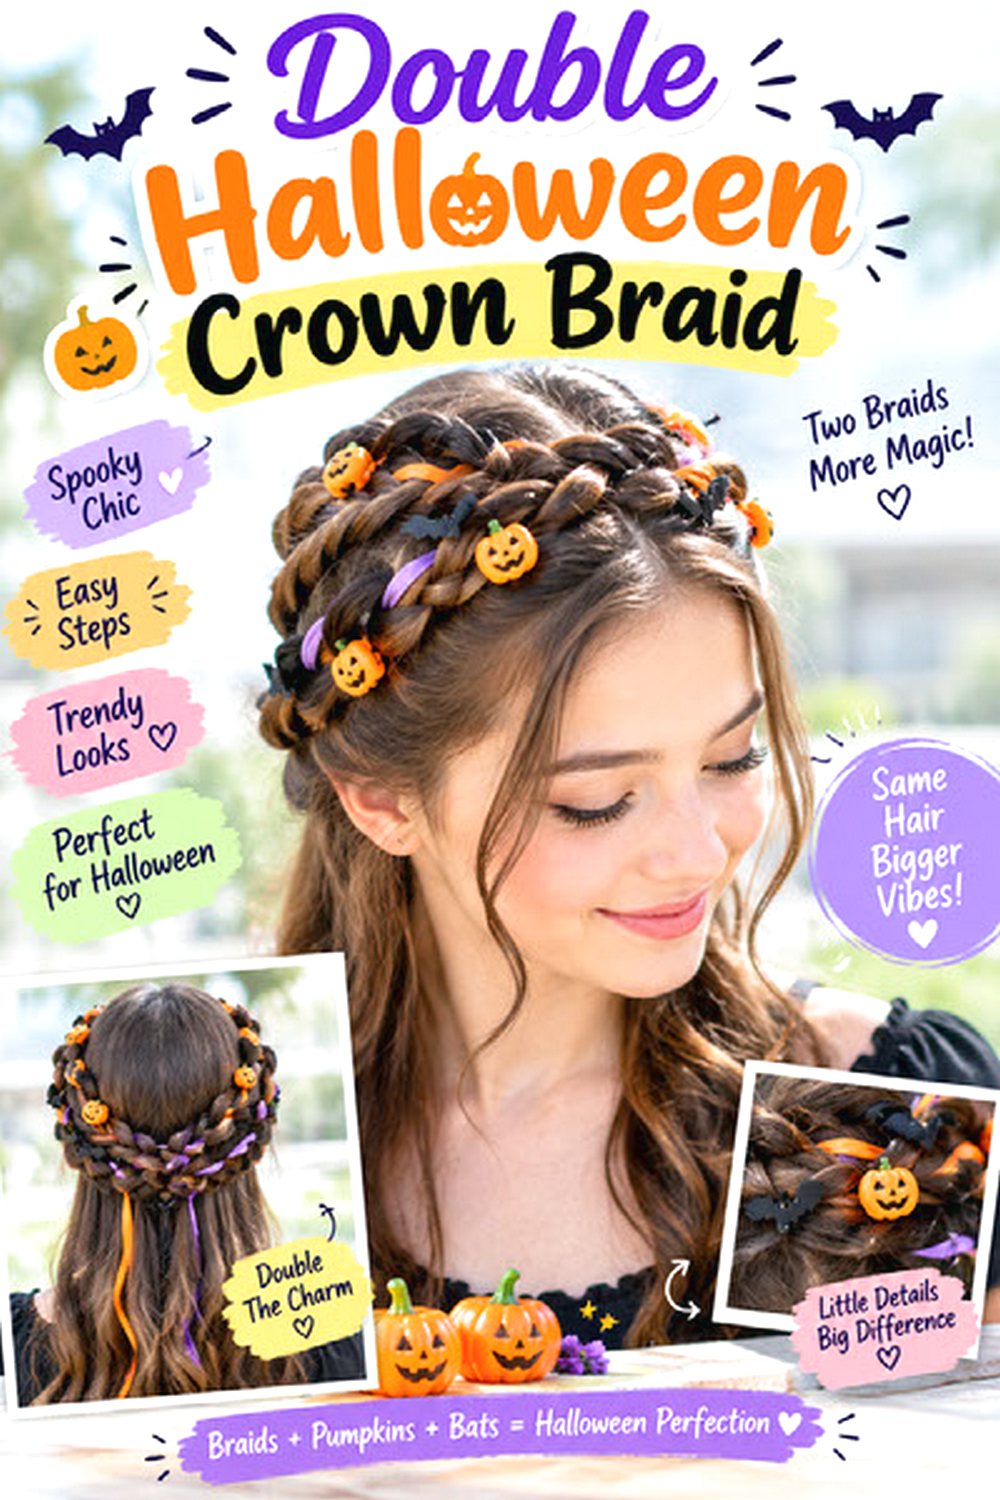
Two narrow braids wrapped around the head create more structure than a single crown and make the hairstyle feel detailed even without many accessories. The first braid can sit closer to the hairline while the second follows just behind it, leaving a small space between the two rows. Long medium-density hair is ideal because there is enough length to create both braids without making either one too thin. Thick hair can support broader sections, while fine hair may look fuller if each braid is gently expanded. Apply lightweight mousse for control, use clear elastics on the ends, and secure the wrapped sections with strong hairpins. This style takes more time than a basic crown because both rows need clean placement and balanced tension. Maintenance during the evening is minimal once it is securely pinned. At the salon, ask to preserve enough length around the sides and back for braiding rather than adding very short disconnected layers.
Pro tip: Pin the lower crown first and build the second braid above it; this gives you a stable guide for keeping the spacing even.
Messy Haunted Crown Braid

A deliberately loosened crown braid suits Halloween when you want the hairstyle to feel less polished and more atmospheric. The braid should still have a secure structure underneath, but selected loops can be widened and a few pieces released around the temples, ears, and nape. Wavy hair naturally supports this finish, while very straight hair usually needs extra grip so the loosened sections do not collapse completely. Fine hair can gain useful volume from the expanded braid, whereas thick hair should be loosened selectively to avoid creating an oversized crown. Use texturizing spray, matte styling powder, and firm bobby pins. The style takes moderate time but does not require perfectly neat sectioning, which can make it more forgiving for home styling. Check the nape during the evening because that area tends to loosen first. At the salon, ask for soft face-framing layers while keeping enough longer hair near the temples to support the braid.
Pro tip: Loosen the braid only after it is completely pinned; pulling it apart too early can make the crown difficult to position securely.
Moonlit Crown Braid With Silver Clips

Silver moon, star, or celestial clips give a crown braid a cooler Halloween finish than ribbons or floral accessories. A smooth braid works best because the metallic details stand out clearly against an even woven surface. Straight and softly wavy hair are easy to control for this version, though curly hair can also work when the braid is formed with slightly larger sections. Fine hair benefits from a wider, gently expanded braid, while dense hair may need extra pins around the back to support the weight. Use smoothing cream, a boar-bristle brush, and secure U-shaped pins before adding the decorative clips. Styling time is moderate because the surface needs to stay neat, but the final accessories are quick to place. A light touch-up of flyaways may be needed during humid weather. At the salon, ask for minimal short layers around the crown if braided updos are something you wear regularly, since those pieces can stick out through the smooth finish.
Pro tip: Place the largest silver clip slightly off-center and use smaller pieces around it; equal-size clips spaced perfectly apart can look too rigid.
Crown Braid With Orange Velvet Ribbon
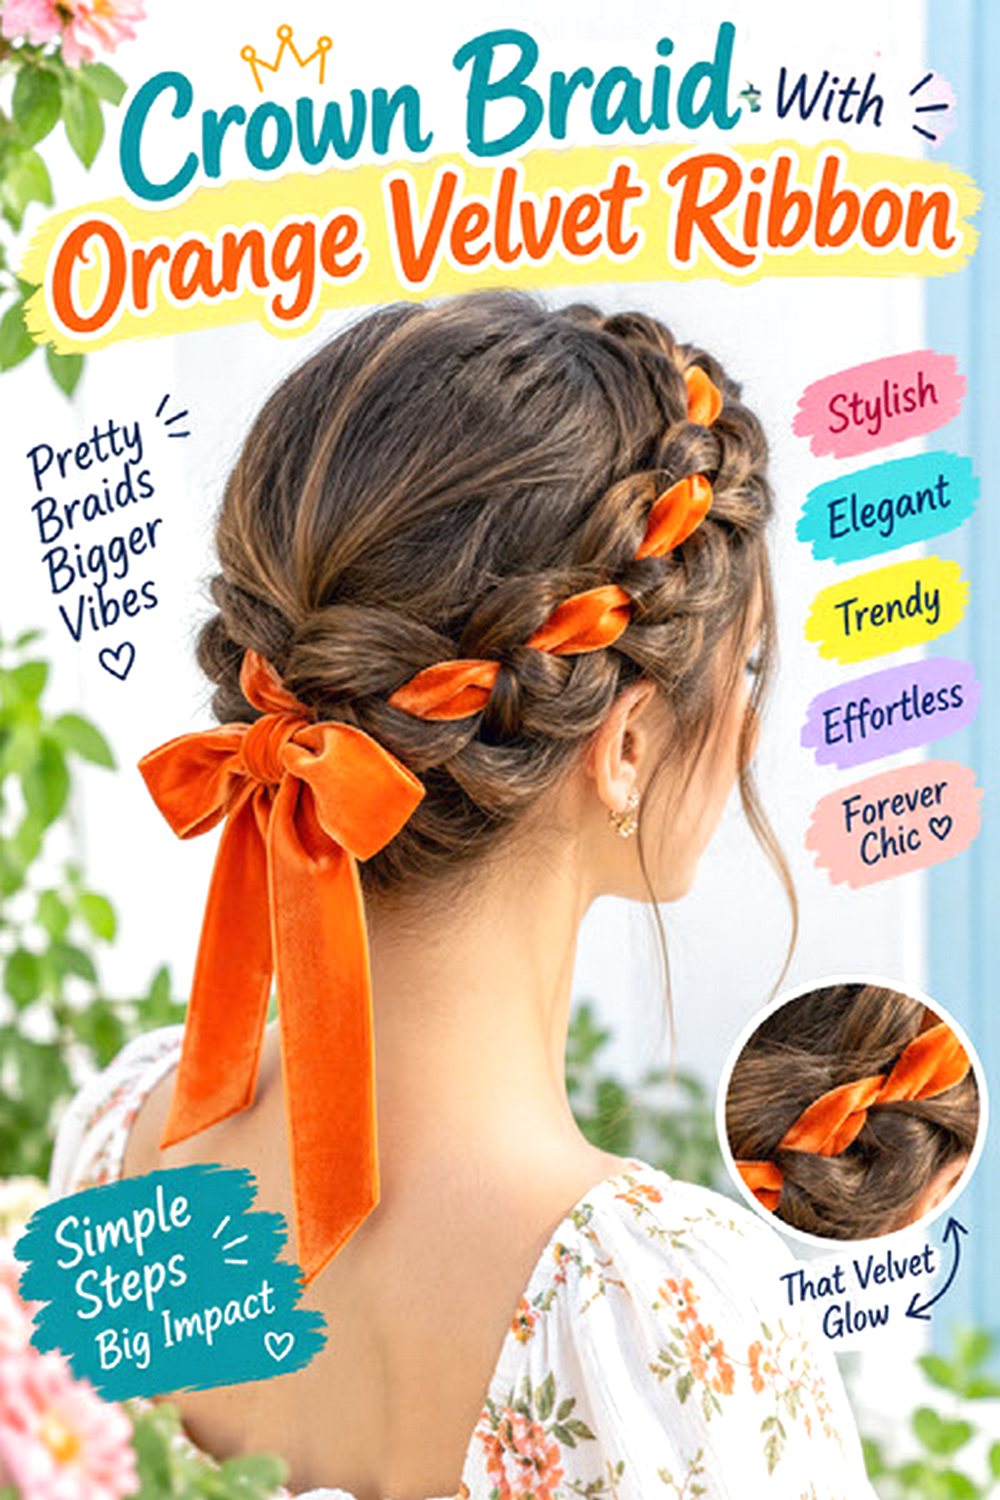
An orange velvet ribbon adds Halloween color without requiring hair dye or elaborate accessories. The ribbon can be woven directly through the braid or wrapped along the outside edge after the crown is pinned. Velvet has more grip than satin, which helps it stay in place, but it also adds thickness, so the braid should not be pulled too tight. Medium and long hair provide the easiest base, and both straight and wavy textures work well. Fine hair can use a narrow ribbon so the accessory does not overwhelm the braid. Use texturizing spray, clear elastics, and bobby pins in addition to the ribbon. Styling takes moderate time, especially if the ribbon is woven from the beginning, but it usually holds securely once finished. At the salon, ask to keep the perimeter of long hair reasonably full if you frequently braid it; heavily thinned ends can create a noticeably skinny finishing section.
Pro tip: Choose ribbon narrower than the braid itself so the woven hair remains visible instead of disappearing under the velvet.
Ghostly Pearl Crown Braid

Pearls create a softer Halloween crown that can work for ghost, woodland, historical, or fantasy-inspired costumes. A gently expanded braid gives enough surface area for pearl pins to sit between the woven sections, while a few loose tendrils prevent the hairstyle from looking too formal. Medium-density hair is particularly easy to work with, though fine hair can be widened with careful pancaking. Thick hair may look better with fewer pearls so the accessories do not compete with the braid’s natural volume. Use lightweight mousse, hairpins, and small pearl pins rather than heavy decorative combs. Styling takes moderate time, but the pearl placement should happen only after the crown is fully secured. A quick check before photos is usually all the maintenance needed. At the salon, ask for face-framing pieces that can either be tucked into an updo or intentionally left loose, rather than very short layers that offer no styling choice.
Pro tip: Insert pearl pins diagonally into the braid instead of straight down; the angled placement gives them better grip and hides more of the metal stem.
Crown Braid With Crimped Lengths
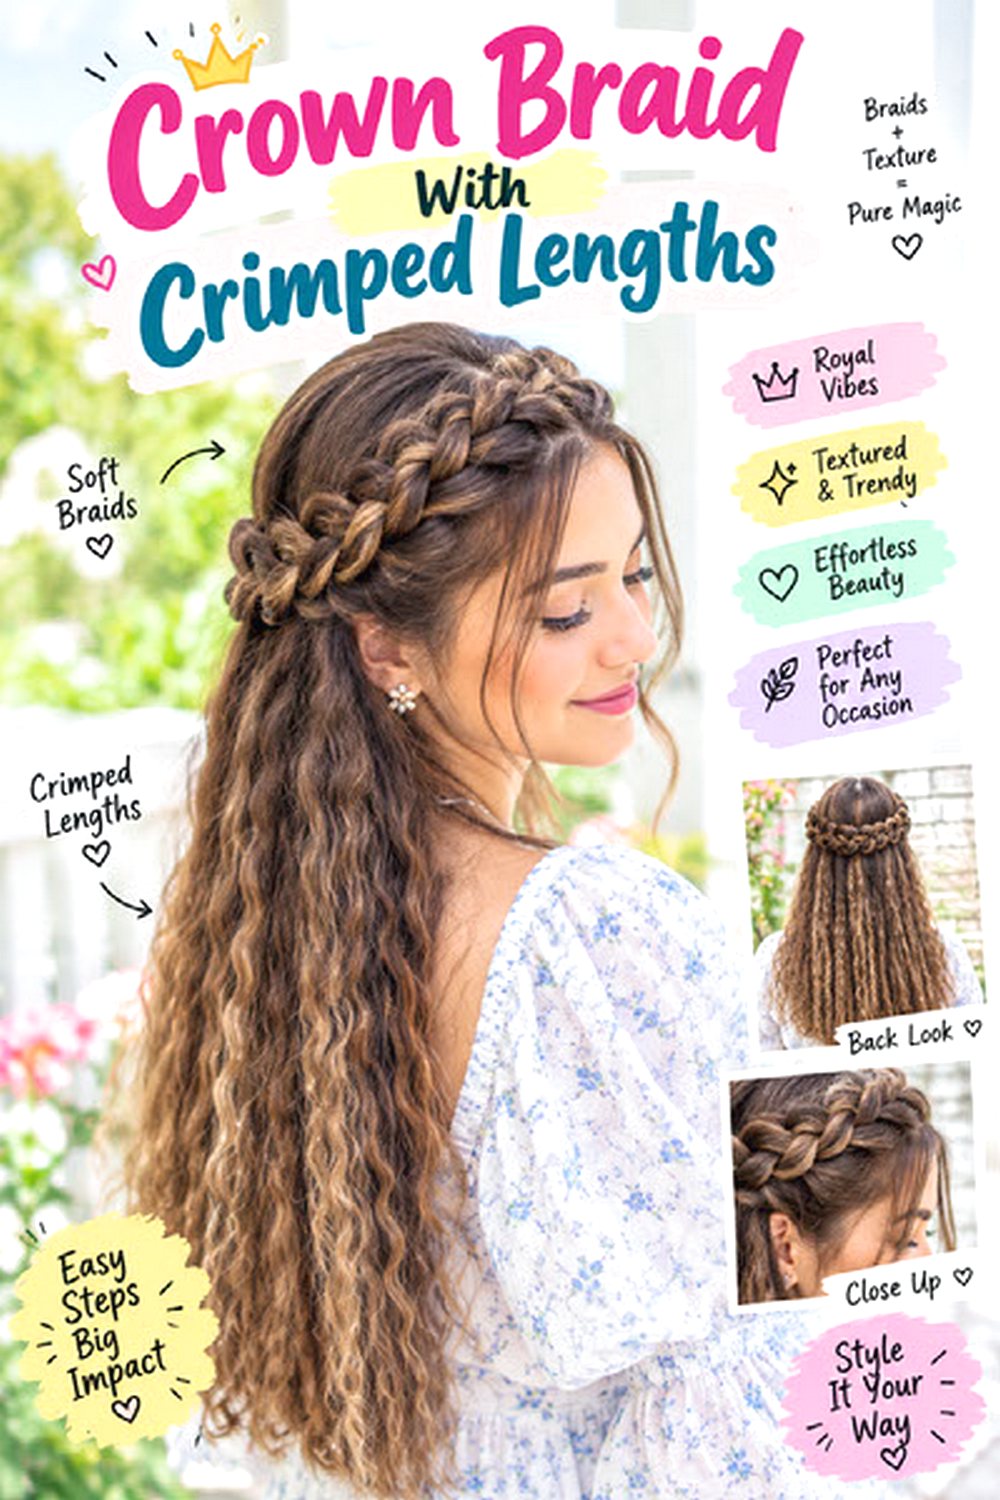
Crimped lengths create a strong texture contrast against a smoother crown braid, making this version especially useful when you want noticeable Halloween hair without a complicated updo. The braid can run from temple to temple like a headband while the remaining hair stays loose and finely crimped. Long and medium hair show the repeating texture best. Fine hair gains considerable body from crimping, while very thick hair may need larger sections or softer texture to avoid excessive width. Apply heat protectant before using a crimping iron, add a small amount of texturizing spray for braid grip, and finish flyaways with flexible hairspray. Styling takes more time because both braiding and heat texture are involved, but the crimp usually holds well for hours. At the salon, ask for long layers rather than many short ones if you want the crimped lower section to retain a full, controlled outline.
Pro tip: Keep the first inch near the roots smoother and begin the crimp lower down; this prevents unnecessary bulk directly beneath the crown braid.
Half-Up Halloween Crown Braid

A half-up crown braid is one of the more practical choices when you want the appearance of a halo without pinning every strand into an updo. Sections from each temple are braided backward and joined across the back, leaving the rest of the hair loose. This arrangement works on medium-length hair as well as longer cuts and is particularly useful when full crown braids feel too heavy. Fine hair can keep most of its density in the lower lengths, while thick hair benefits from having part of the volume controlled at the crown. Use volumizing spray near the roots, small elastics for the braids, and a few hidden bobby pins at the join. Styling is relatively quick compared with a complete crown and easy to refresh if the loose hair flattens. At the salon, ask for front layers that reach far enough back to enter the braid securely, especially if your hair is heavily layered.
Pro tip: Cross the two braid ends over each other before pinning instead of simply placing them side by side; the join will look more continuous from the back.
Crown Braid With Wispy Bangs

Wispy bangs change the balance of a crown braid by adding softness across the forehead instead of pulling every front section away from the face. The fringe can skim the brows with small spaces between pieces while the braid begins just behind it, creating a defined separation between bangs and crown. Fine and medium-density hair work especially well because the fringe can stay light without becoming bulky. Thick hair may need some weight removed inside the bang section. Use lightweight mousse, a small round brush, and flexible hairspray to shape the fringe before starting the braid. Styling takes moderate time, but the bangs are the part most likely to need refreshing during the evening, particularly in humid weather. At the salon, specify the fringe density and exact brow length you want, and make sure the side pieces blend gradually toward the temples instead of ending abruptly beside the crown.
Pro tip: Style the bangs completely before braiding; trying to blow-dry them afterward can disturb the pinned crown and create unnecessary flyaways.
Braided Crown Updo With Gothic Pins
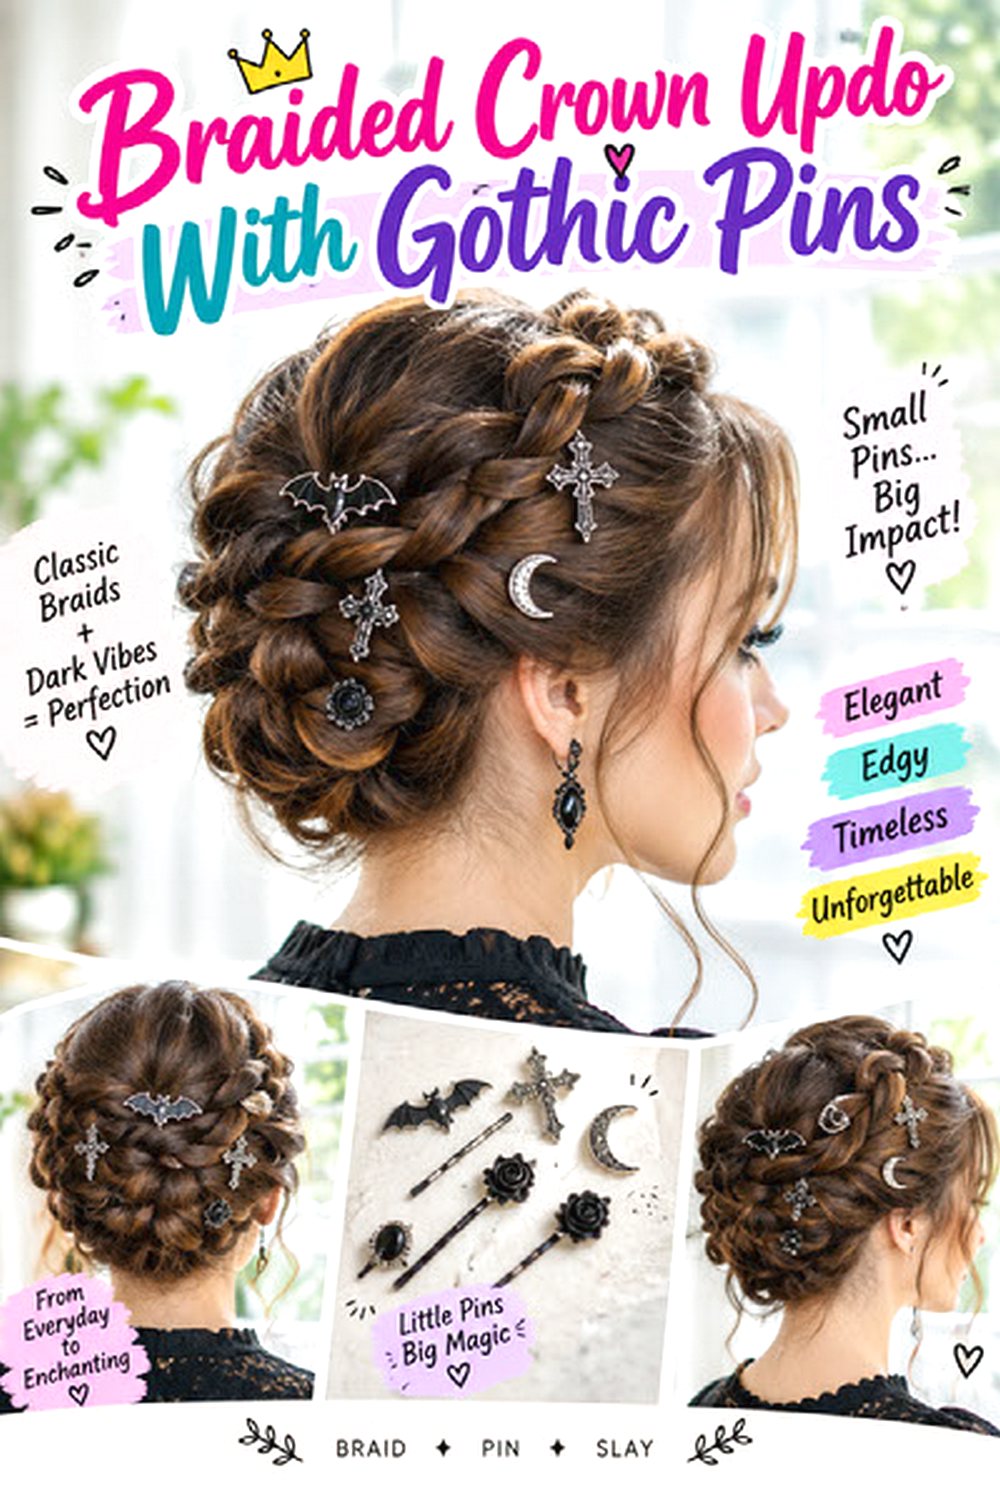
A full braided crown updo keeps every length tucked away and uses dark metallic pins as visible decorative details rather than hiding all the hardware. The braid can circle the head before the remaining ends are folded underneath at the nape, creating a continuous shape with a slightly sculpted finish. Medium to thick long hair works particularly well because there is enough density to form a substantial crown. Fine hair can add grip and body with prep products, but very silky hair should avoid heavy accessories. Use texturizing spray, U-shaped pins for structural support, and lightweight Gothic pins as the visible finish. This is one of the more time-intensive options, so allow extra time for balanced placement and secure anchoring. Once finished, maintenance is low unless pins begin to shift. At the salon, ask to keep crown and temple layers long enough to stay inside an updo, with bulk removal focused internally rather than creating short flyaways.
Pro tip: Build the entire updo with plain structural pins first, then add decorative Gothic pins only where they can be seen; ornaments should not carry the hairstyle’s weight.
Choosing Halloween Crown Braid Hairstyles
Halloween crown braid hairstyles can be adjusted through braid width, placement, texture, accessories, fringe, and the amount of loose hair left around the face. A full halo gives the strongest crown shape, while a half-up braid is lighter and often easier to manage. Fine hair may benefit from expanded braid loops and texture spray, whereas thick hair usually needs firmer pinning and careful weight distribution. Straight hair can be prepped for grip, while natural waves and curls already provide useful texture. Accessories such as ribbon, pearls, silver clips, or Gothic pins can change the mood without changing the haircut. The best version depends on your hair length, density, face shape, natural texture, costume, maintenance preference, and how much styling time you want to spend before your event.
CTA
Choose one or two favorite ideas and save clear photo references that show both the front and back of the braid. Discuss your face shape, natural texture, density, preferred length, maintenance needs, and normal styling routine with your stylist. Point out the exact details you like, including braid width, crown placement, fringe length, loose face-framing pieces, root volume, ribbon position, or accessory finish. If you are wearing the hairstyle for a Halloween event, also mention how long it needs to stay secure and whether you will be adding a hat, veil, hood, or costume accessory over it.
FAQs
Can medium-length hair work for a Halloween crown braid?
Yes. Two braids joined around the head or a half-up crown are often easier than trying to wrap one continuous braid with limited length.
How can fine hair make a crown braid look fuller?
Apply a light texturizing product before braiding, then gently widen the outer braid loops after securing the style. Avoid pulling so far that the structure becomes loose.
Do crown braids work on curly hair?
Yes. Natural curls can provide excellent grip and texture. Keep shrinkage in mind when deciding which face-framing pieces or bangs will remain outside the braid.
How do I keep a crown braid secure through a Halloween party?
Anchor the braid with several structural pins rather than relying on decorative clips. Cross pins at heavier areas, especially the nape and braid ends, and add accessories only after the crown is stable.