12 New Year’s Eve Glam Waves

New Year’s Eve glam waves are defined by deliberate movement rather than one exact curl pattern. Strong versions combine a clear parting, controlled roots, face-framing bends, and polished movement through the mid-lengths and ends. Some stay close at the crown before opening into wide curves; others use more lift, a deep side sweep, or a tucked section. Compared with casual beach waves, the bends usually look more connected and the overall silhouette more planned.
Medium and long hair offer the most room for broad patterns, but shoulder-length cuts can carry a compact version too. Straight, wavy, curly, and coily textures can all interpret the idea, though the route to the finish will differ. Sparse ends may benefit from a fuller perimeter, while dense hair may need volume directed carefully. Face-framing can begin at the cheekbone, jaw, or lower to suit the proportion you prefer.
Effort ranges from a quick front-section refresh to a full wash-day set. Heat-styled versions need heat protectant, cooling time, and restrained handling if you want the bends to last; natural texture can also be incorporated rather than erased. Maintenance is mostly about restoring flattened pieces, controlling frizz, and keeping the chosen part and wave direction intact. For salon styling, save references that show the exact bend size, root volume, end finish, and side placement you want.
Quick List
- Side-Part Hollywood Ribbon Waves Hairstyle
- Center-Part Sculpted S-Waves Hairstyle
- Deep-Side Glossy Waterfall Waves Hairstyle
- Old-Hollywood Tucked Glam Waves Hairstyle
- Brushed-Out Long Luxe Waves Hairstyle
- Shoulder-Length Party Glam Waves Hairstyle
- Soft Root-Lift Champagne Waves Hairstyle
- Face-Framing Midnight Glam Waves Hairstyle
- Defined Ends Red-Carpet Waves Hairstyle
- Voluminous Crown Celebration Waves Hairstyle
- Sleek-Root Cascading Glam Waves Hairstyle
- Textured Sparkle-Clip Glam Waves Hairstyle
Side-Part Hollywood Ribbon Waves Hairstyle
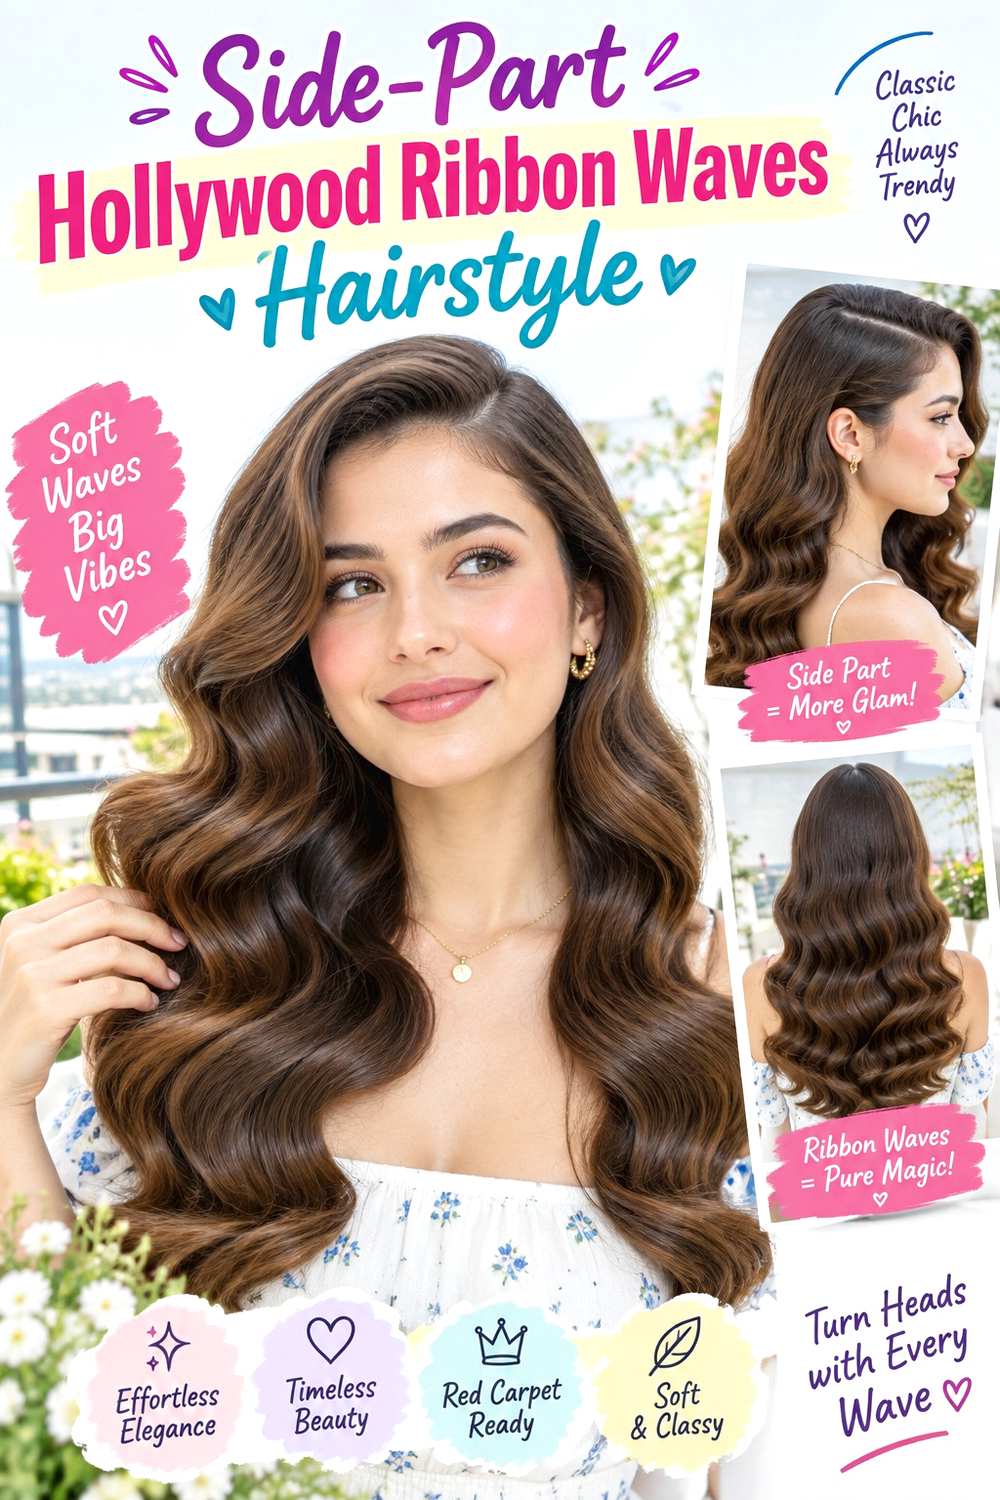
A deep side part gives these waves the evening shape, with smooth roots leading into broad, ribbon-like bends from around the cheekbones downward. The front section sweeps away from the face, while the opposite side stays closer to the head so the silhouette does not become equally wide on both sides. Keep the ends curved rather than tightly curled. The result suits medium to long hair especially well, and it can work on straight, wavy, or stretched textured hair when the starting finish supports a polished wave pattern.
For a full set, apply heat protectant before shaping sections with a 1¼-inch curling iron, then use flexible hairspray only after the bends have cooled. A complete wash-day style can take noticeably longer on very long or dense hair; between washes, a short refresh usually means reshaping only the front and any flattened outer pieces. To maintain the glossy pattern, avoid repeatedly separating the waves, and smooth small areas of frizz with your hands instead.
If you book a stylist for the event, point out how deep you want the part and ask for the front wave to begin near the cheekbone rather than at the root. That single placement choice keeps the shape sculpted instead of overly puffy around the face.
Pro tip:
After shaping the front sweep, hold its curve in your palm until it cools. Releasing it later helps the ribbon bend stay broader instead of springing into a tighter curl.
Make It Work for You:
If your hair is shorter, begin the main bend slightly higher and keep the ends softly connected. You can preserve the side-part drama without needing several long waves down the back.
Watch Out For:
Do not curl every section in alternating directions. For a flowing Hollywood pattern, keep the visible waves coordinated; random direction changes can break the continuous ribbon effect.
Center-Part Sculpted S-Waves Hairstyle
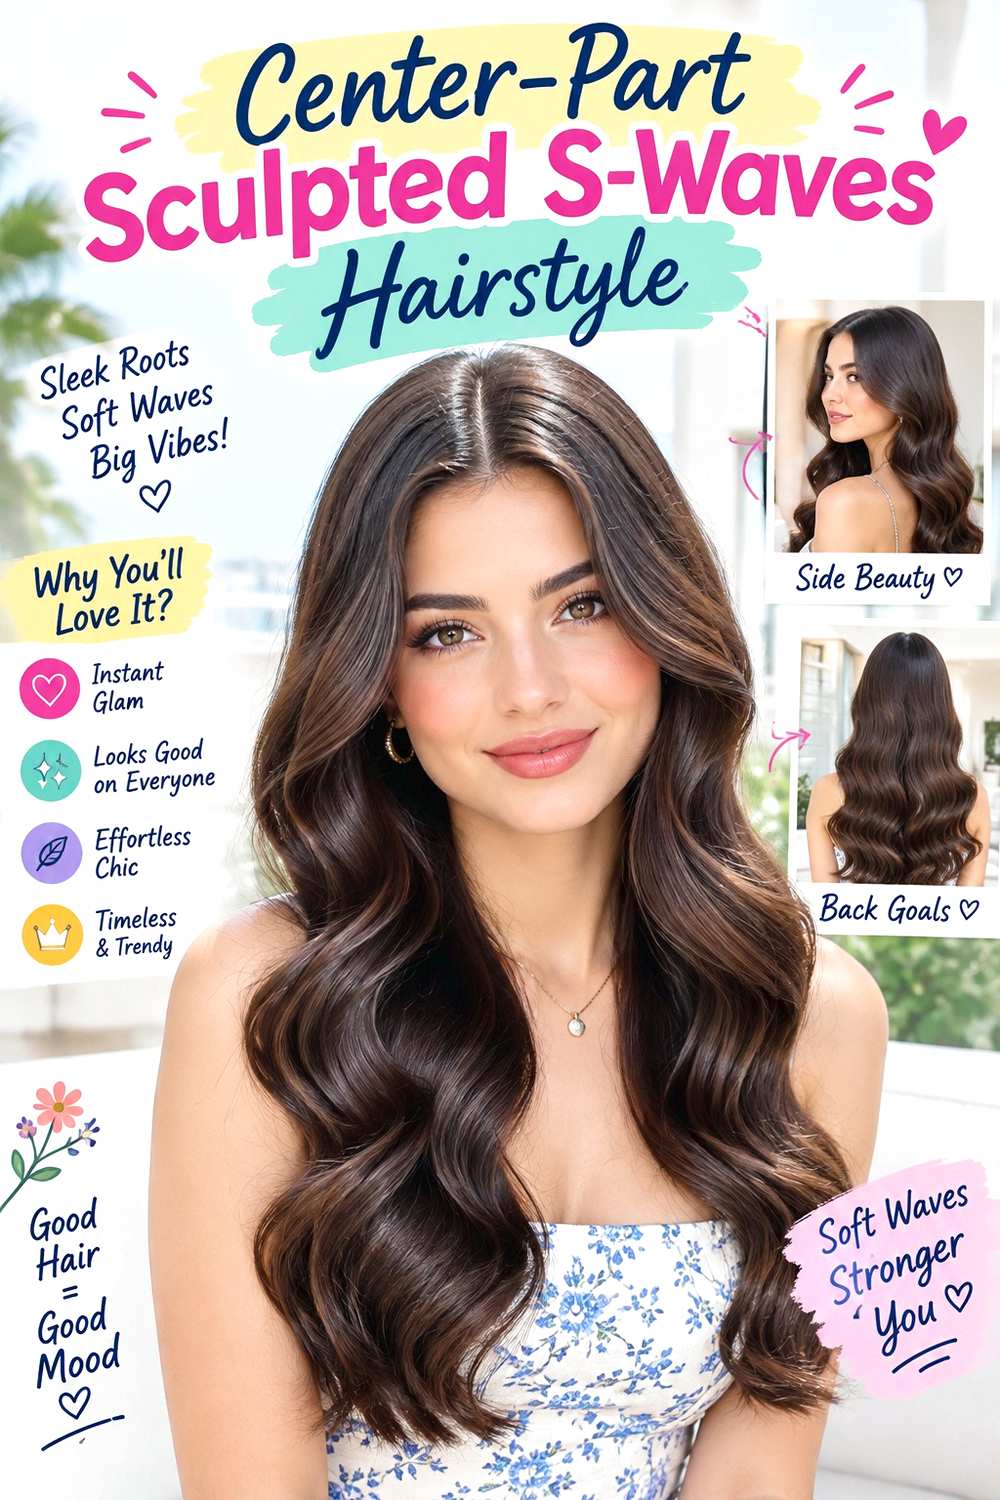
A center part makes the symmetry of sculpted S-waves the main feature. The roots stay relatively flat, then the hair forms alternating curves through the mid-lengths with a controlled, continuous rhythm on both sides. Face-framing pieces follow the same bend rather than breaking into separate curls, and the ends finish with a soft sweep. Medium to long lengths show the pattern most clearly. Hair with enough length to hold two or more visible bends will usually make this design easier to read.
Use heat protectant first, shape deliberate sections with a waving iron, and finish with flexible hairspray once the pattern has cooled. Full styling takes more concentration than a loose beach wave because the curves need to line up; the exact time depends on length, density, and how quickly your hair takes shape. A next-day refresh can be brief if you only rebuild sections that lost their S-pattern. Limit unnecessary handling to reduce frizz and preserve definition.
For professional styling, show where you want the first inward curve to sit, such as beside the cheekbone or just below it. Ask that both sides mirror that landmark without forcing identical volume if your natural growth pattern differs. The placement matters more than making every section perfectly uniform.
Pro tip:
Shape the two front sections first and compare their curve height before moving backward. Matching those visible landmarks early makes later adjustments much easier.
Make It Work for You:
If your natural texture holds a strong wave, refine only the sections that need more alignment and keep some existing movement. The S-shape can remain polished without flattening all texture first.
Watch Out For:
Avoid squeezing the bends too close together. Small, crowded curves can make the finish read as crimped; use wider spacing so each S remains clearly visible.
Deep-Side Glossy Waterfall Waves Hairstyle

Here the waves fall in long, overlapping sections from a deep side part, creating a softer waterfall effect than a tightly sculpted Hollywood set. The heavier side carries most of the movement, with broad bends starting below the temple and continuing through the lengths. The lighter side can sit closer behind the ear, leaving the face more open. Long hair makes the cascading placement especially visible, while medium lengths can keep the same idea with fewer bends and a slightly fuller finish at the ends.
A smoothing serum helps reduce flyaways before styling, heat protectant shields hair during shaping, and a large-barrel curling iron creates the elongated curves. A full wash-day set can take moderate to substantial effort depending on density and length; a quick party-night refresh may involve only the top layer and front sweep. If humidity or movement loosens the shape, press the bends back into place with your hands rather than repeatedly reworking every section.
When working with a stylist, specify that you want the waves to stack and flow in one direction instead of separating into individual curls. Also point to the preferred ear-tuck side. That balance controls where the volume sits and helps the heavier side look intentional rather than bulky.
Pro tip:
Let the heavier side fall over the shoulder before finalizing the shape. Styling it in its actual resting position reveals where a bend needs more lift or separation.
Make It Work for You:
For very dense hair, keep the wave broad and concentrate definition on the outer layers. This preserves the cascading effect without forcing every interior section into an identical pattern.
Watch Out For:
Do not overload the heavy side with smoothing product. Too much can collapse the upper movement; keep the roots light and control flyaways only where they show.
Old-Hollywood Tucked Glam Waves Hairstyle
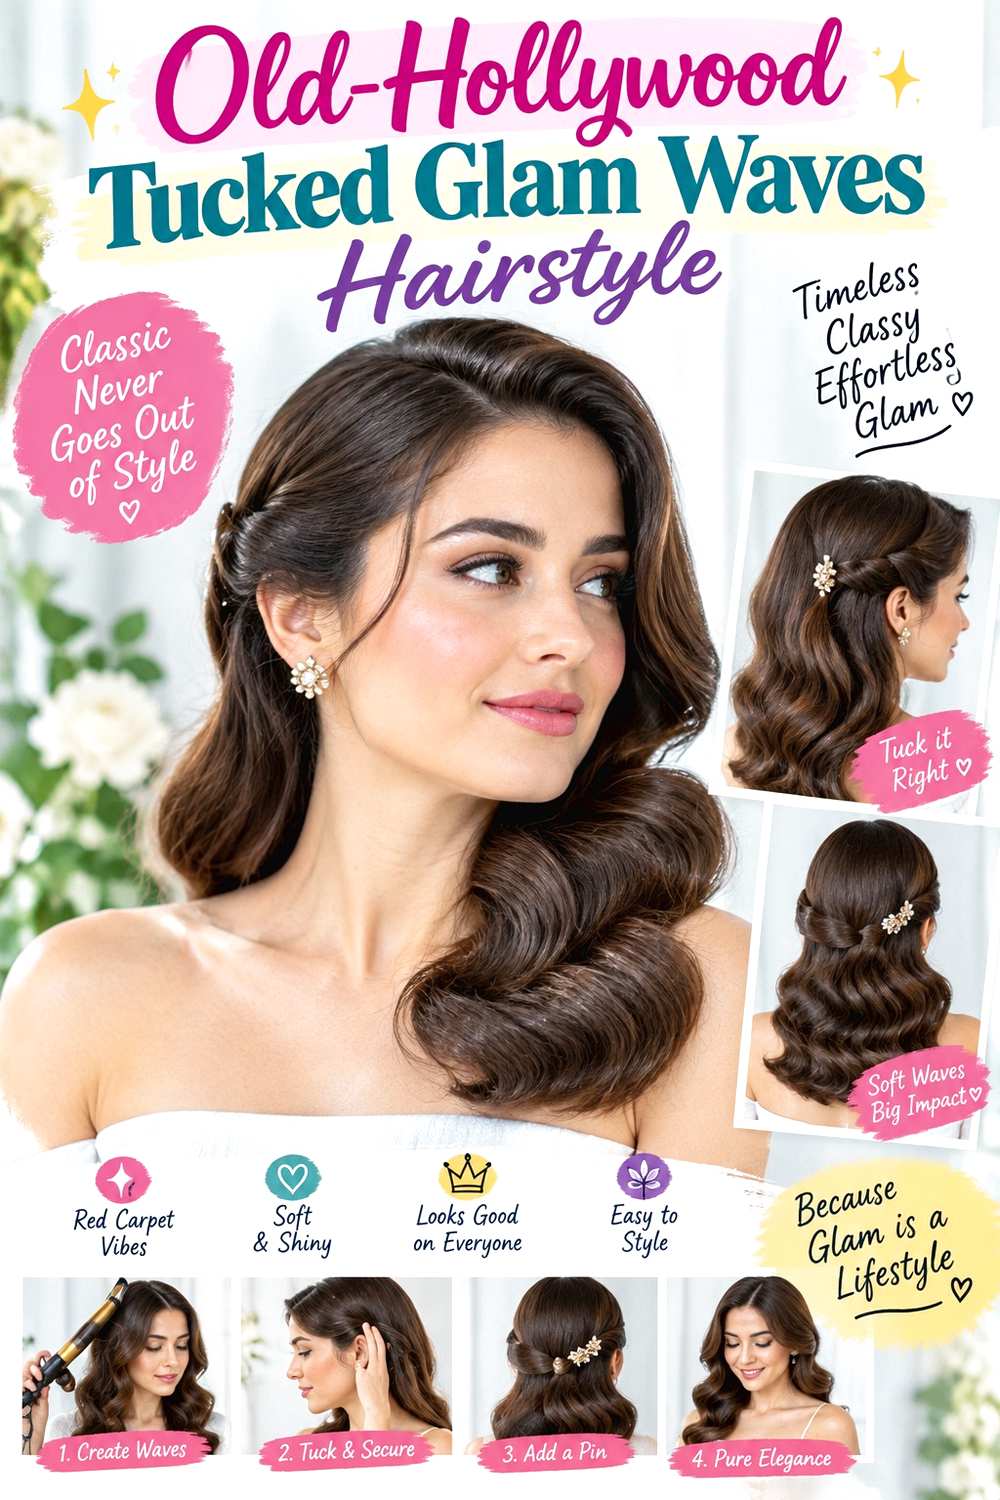
One tucked side gives classic glamour a cleaner, more graphic outline. The visible side carries a deep, polished wave from the temple through the mid-lengths, while the opposite side is directed behind the ear with less volume. The ends can curve inward or continue in one broad sweep, depending on length. This works especially well on bob-to-long hair that can hold a defined bend, and it is useful when you want earrings or a neckline to stay visible without turning the style into an updo.
Apply heat protectant, form the main wave with a medium-barrel curling iron, and use flexible hairspray to support the tucked area and outer curve. A full set after washing takes longer than maintaining it later; on the event day, a short refresh can focus on the temple wave and the section behind the ear. If the tuck starts to puff or loosen, redirect that section close to the head rather than adding more curl.
If a stylist is creating the finish, show exactly how much hair you want tucked and where you want the exposed wave to crest. Ask for comfortable hold around the ear without tight pulling. That detail keeps the asymmetry elegant and wearable through a long evening.
Pro tip:
Set the tuck only after the main wave is finished. That lets you balance the exposed curve against the flatter side instead of guessing the final asymmetry.
Make It Work for You:
If your hair is too short for a deep ear tuck, direct just the temple section backward and leave the lower length free. The open-side effect can still read clearly.
Watch Out For:
A very tight tuck can become uncomfortable and distort the wave near the ear. Loosen the section slightly while keeping its direction close to the head.
Brushed-Out Long Luxe Waves Hairstyle

These long waves are intentionally softened after setting, so the hair reads as one plush sheet rather than a collection of separate curls. A center or gentle off-center part works well, with lift kept modest at the roots and the largest movement beginning around the jaw or collarbone. The ends remain full and curved, which helps very long hair avoid looking wispy. Straight, wavy, and stretched textured hair can all support the finish, although very dense lengths may need more time to set and cool evenly.
Use heat protectant before a large-barrel curling iron, then pass a paddle brush through the cooled sections until the bends merge into a broad, glossy pattern. Full wash-day styling is a longer process on waist-length or dense hair because every section needs shaping; a quick refresh is usually limited to the front layer and flattened ends. To preserve movement, avoid overworking the hair once the waves have blended.
For a salon appointment, ask the stylist to keep the wave size large and the ends substantial rather than curling them into small ringlets. Show where you want the first strong bend to begin. That starting point determines whether the style feels elongated and luxurious or much curlier and more compact.
Pro tip:
Wait until every heated section is fully cool before softening the set. Early brushing can stretch the bends before they have settled, especially on long, heavy lengths.
Make It Work for You:
If your ends are sparse, keep the lowest wave larger and less separated. A fuller visual line at the bottom preserves the plush effect better than many small pieces.
Watch Out For:
Do not keep brushing after the waves have merged. Excess passes can erase the pattern and create surface frizz; stop once the bends flow together smoothly.
Shoulder-Length Party Glam Waves Hairstyle
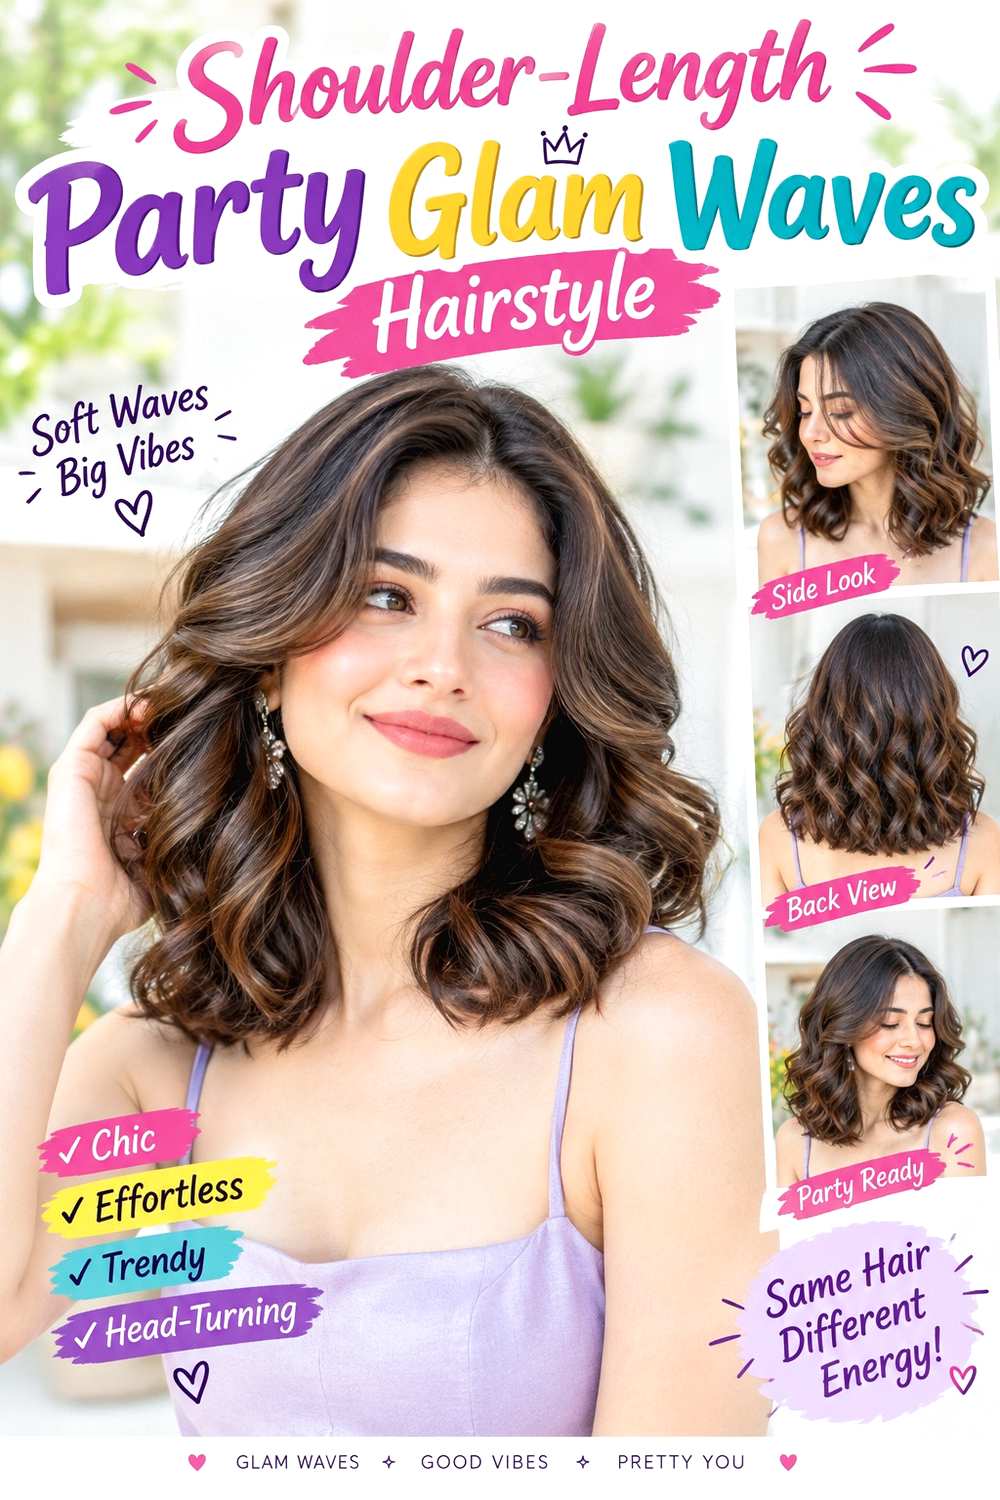
Shoulder-length hair can carry glam waves without needing extra length, but the bend placement has to be compact enough to remain visible. An off-center part, gentle root lift, and one or two polished curves through each side create shape without crowding the neckline. The ends can flick slightly outward or tuck under in alternating sections, giving the perimeter movement while keeping it substantial. This design works well for bobs and lobs, including finer densities that benefit from preserving a fuller-looking bottom edge.
Start with heat protectant, use a one-inch curling iron for controlled bends, and finish with flexible hairspray so the shorter sections stay together without becoming rigid. A full style on freshly washed hair is usually faster than the same technique on long hair, though density and starting texture still matter. A quick refresh can focus on the face frame and any end that has flipped in the wrong direction. Frizz control is easiest when the waves are handled minimally after cooling.
If you are having it styled professionally, specify whether you want the ends mostly tucked, mostly kicked out, or balanced between both. Also show where the shortest front bend should sit. On shoulder length, a small change in end direction can noticeably alter the whole silhouette.
Pro tip:
Check the ends from the side as well as the front. On shoulder length, one sharply flipped section can change the silhouette more than it would on long hair.
Make It Work for You:
If your bob is very blunt, keep the bends shallow and focus movement around the face. You can add party polish without making the strong bottom edge disappear.
Watch Out For:
Avoid starting every curl right at the root. Too much upper volume can make shorter hair look rounder than intended; leave some smooth space before the first bend.
Soft Root-Lift Champagne Waves Hairstyle

The defining feature here is gentle lift at the crown paired with loose, polished waves through the lengths. Instead of pushing volume out at the sides, the roots rise slightly upward and then settle into broad bends beginning around the cheekbones or jaw. A center or soft side part both work, and the ends stay relaxed rather than tightly curled. The shape can flatter medium and long hair, especially when you want celebratory volume without a heavily sculpted finish. Finer strands may need lighter product amounts, while dense hair benefits from controlled sectioning.
Use a root-lift spray only near the crown, apply heat protectant through the sections being shaped, and create the bends with a large-barrel curling iron. Full styling after washing involves building the root direction before setting the lengths, so it takes longer than a next-day refresh. For a fast touch-up, restore lift only where it has flattened and reshape the front wave. Keep heavier products away from the roots so the crown does not collapse.
At a salon, explain how high you want the crown to sit and where that lift should fade into the waves. Ask for height rather than side width. That distinction helps the profile feel airy while keeping the face-framing area controlled.
Pro tip:
Build crown lift while the roots are still being directed, then leave that area alone. Constant touching after styling can separate the root support and reduce height.
Make It Work for You:
For fine strands, use less root product and keep the lower waves broad. The idea depends on light height at the top, not a heavily coated or stiff crown.
Watch Out For:
Do not confuse crown lift with backcombed bulk at the temples. If the shape spreads sideways, redirect the upper sections upward and keep the sides calmer.
Face-Framing Midnight Glam Waves Hairstyle
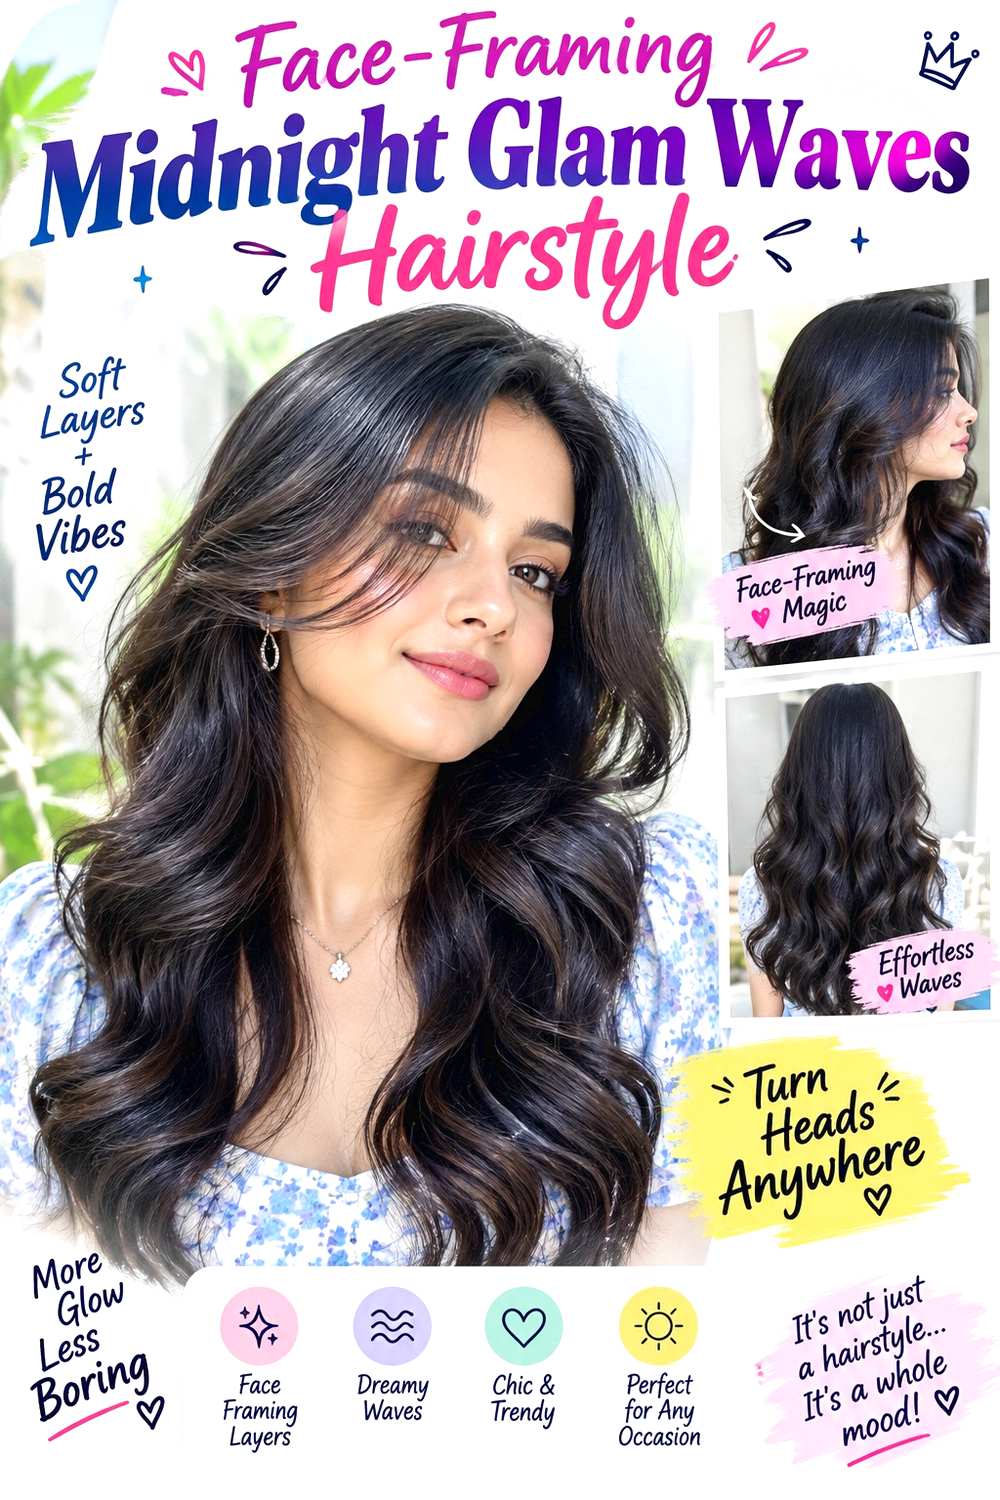
Face-framing waves make the front pieces the focal point while the rest of the hair stays looser and less uniform. A middle or slightly off-center part opens the front, with the first bends turning away from the face around the cheekbones and blending into larger waves below the shoulders. The back can remain softer, so the style moves naturally instead of forming one solid pattern. It suits readers who want a polished front for photos but prefer a less structured feel through the rest of their hair.
Apply heat protectant, use a 1¼-inch curling iron to shape the front and selected outer sections, and mist flexible hairspray mainly over the finished face frame. A complete wash-day set still takes time on long or dense hair, but this design is easier to refresh because the front carries most of the visual work. Between washes, reshape only the pieces that have fallen toward the face, then leave the softer back alone. That limits frizz and keeps movement natural.
For salon styling, identify the exact point where you want the front wave to turn away—cheekbone, jaw, or lower. Also explain how much separation you want between front pieces. That landmark matters because it controls how open or enclosed the face-framing shape appears.
Pro tip:
Shape the front pieces while looking straight ahead, not with your head tilted. This makes it easier to judge where the outward bend actually frames your features.
Make It Work for You:
If you wear natural curls, keep the front curl groups intact and encourage their outward direction rather than forcing identical waves. Preserve the open face-framing effect through placement.
Watch Out For:
Do not over-curl the back to match the front. The contrast is intentional; too much uniform definition removes the softer movement that makes this design feel relaxed.
Defined Ends Red-Carpet Waves Hairstyle
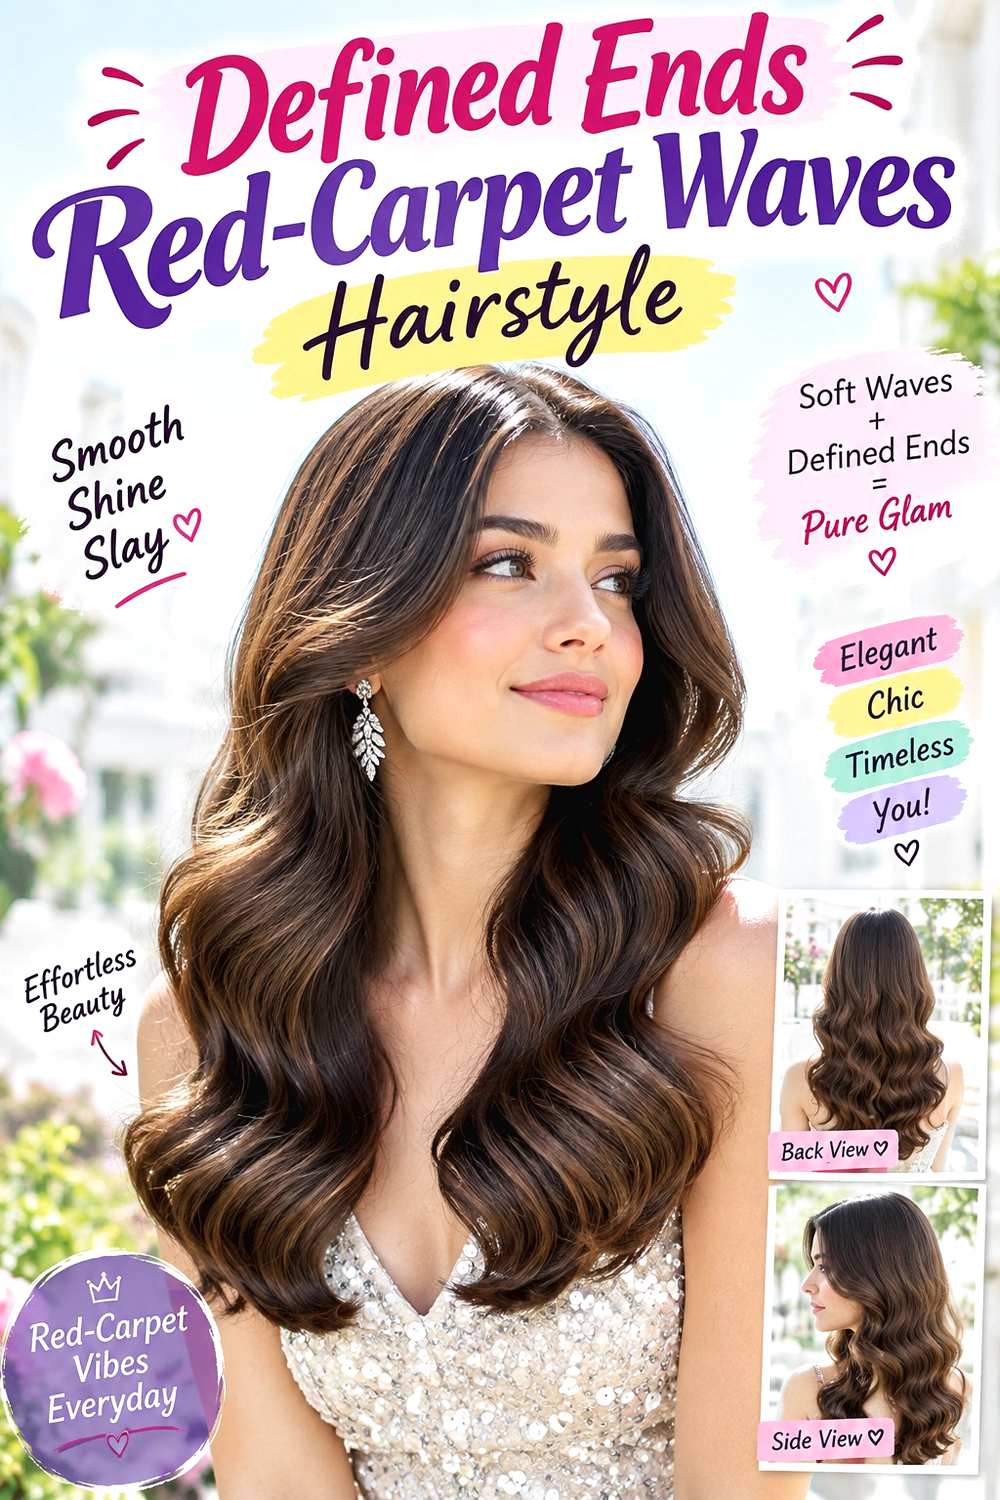
Defined ends give these polished waves a deliberate finish from roots to tips. The top stays smooth with a center or side part, the mid-lengths carry medium-size bends, and the final few inches curve in a consistent direction instead of fading into straight tips. That detail is especially effective on medium to long hair with enough density at the perimeter to show a clean ending. If your ends are naturally lighter in density, keeping the wave slightly looser can preserve a fuller appearance.
Use heat protectant before a medium-barrel curling iron, then apply a small amount of flexible hairspray after the sections cool to keep the final curve intact. Full wash-day styling requires shaping the entire length, so effort increases with density and length. A quick refresh can target only the ends that have lost their direction. If frizz appears, smooth the surface lightly rather than tightening the curl, which can make the bottom look shorter and busier.
When a stylist is doing the set, be specific about the end finish: all turned under, all directed away, or softly alternating. Ask that the mid-length wave flow into that ending rather than stopping above it. This keeps the result cohesive from the first bend through the perimeter.
Pro tip:
Finish the last few inches while holding the hair in its final resting direction. That helps the end curve connect visually with the mid-length wave above it.
Make It Work for You:
If your hair is shoulder length, use a gentler end curve so the perimeter does not bounce too high. The defined finish can remain clear without sacrificing visible length.
Watch Out For:
Avoid twisting the tips into tight coils. The goal is a controlled ending to the wave; overly curled ends can make the bottom look busy and disconnected.
Voluminous Crown Celebration Waves Hairstyle

This option concentrates drama at the crown, then lets the waves widen gradually through the lower lengths. The part can be shallow or slightly off-center so the top does not split too flat, while the front stays softly lifted rather than sharply swept. Large bends begin lower, around the jaw or collarbone, and the ends remain buoyant. Medium to long hair shows the contrast best. Dense hair can support the scale well, while finer strands may prefer a smaller amount of lift so the roots stay touchable.
Work root-lift mousse into the crown, use heat protectant on the lengths, and shape broad sections with a large-barrel curling iron. The full version takes extra effort because the root direction and lower waves are built separately; a quick refresh can be limited to the crown and the most visible front pieces. Avoid layering more product onto flattened roots during the night, since buildup can make the lift drop faster. Instead, gently reposition the crown with your fingers.
For a professional appointment, describe the volume as upward at the crown rather than outward around the temples. Show the highest point you want from the side view. That placement keeps the profile festive while preventing the top from becoming an exaggerated bump.
Pro tip:
View the crown from the side before finalizing it. A small adjustment to the highest point can improve the profile without adding more overall volume.
Make It Work for You:
If your hair is dense, keep the crown lift moderate and let the lower lengths carry more scale. This maintains the vertical emphasis without building an oversized top section.
Watch Out For:
Do not keep adding product when the crown starts to settle. Buildup can weigh it down further; reshape the root direction first and reassess the height.
Sleek-Root Cascading Glam Waves Hairstyle
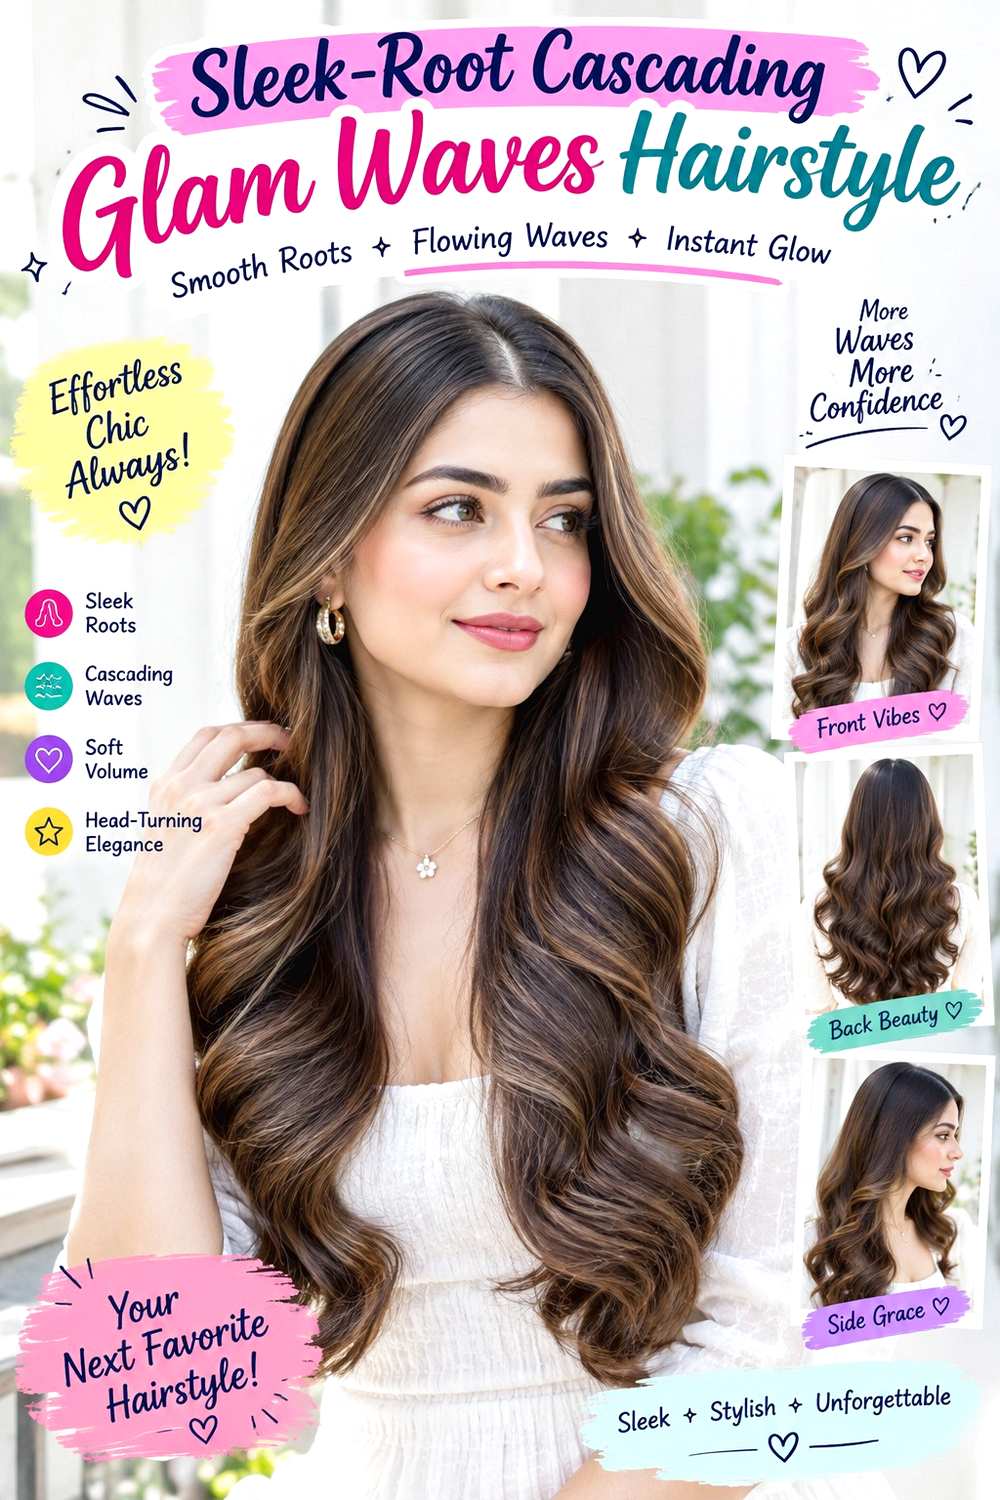
Smooth, close-set roots create a striking contrast with cascading waves that begin lower on the head. A clean center part works well, with the top staying controlled to around ear level before broad bends open through the mid-lengths and ends. Face-framing remains subtle, so the main interest comes from the shift between sleekness and movement. Medium to long hair gives enough space for that transition. Naturally wavy or curly hair can wear the design too, but reaching a sleek root finish may require more styling than keeping some natural texture.
Use a smoothing cream sparingly near the upper lengths, apply heat protectant where heat will be used, and form the lower waves with a large-barrel curling iron. A full wash-day style can be a longer process when the roots need substantial smoothing; a quick refresh should focus only on flyaways and flattened lower bends. Avoid repeatedly passing heat over the top just to chase perfect smoothness. Controlled surface frizz is better addressed with a small amount of existing product.
If you book a stylist, specify exactly where the sleek section should end and the first obvious wave should begin. That transition point is the signature detail. Keeping it consistent on both sides makes the contrast look deliberate rather than unfinished.
Pro tip:
Mark the transition point mentally before you begin shaping the lower lengths. Keeping the first bends near the same level makes the sleek-to-wavy contrast look intentional.
Make It Work for You:
If you prefer less heat, keep some natural texture at the roots and make the lower waves the stronger feature. The contrast can stay clear without a glass-flat top.
Watch Out For:
Avoid flattening the roots so aggressively that the style loses movement at the scalp. Aim for controlled smoothness, not tension or a pasted-down finish.
Textured Sparkle-Clip Glam Waves Hairstyle

A sparkle clip changes the balance of loose glam waves by creating one clear anchor point near the temple or just above the ear. The waves themselves stay soft and touchable, with an off-center part, medium bends through the mid-lengths, and slightly straighter tips for a modern finish. One side remains open around the face while the clipped side sits closer to the head. This works across medium and long lengths, and it is useful when you want visible decoration without committing to a full updo.
Use heat protectant before shaping selected sections with a medium-barrel curling iron, then secure the decorative side with a grip-backed sparkle clip. Full styling takes as long as the wave set requires for your length and density, but a quick refresh can focus on the front bend and the hair beneath the accessory. If the clip starts sliding, reset the supporting section rather than clamping it tighter against the scalp. Comfortable security matters more than pressure.
For salon styling, show the exact clip position and how much hair should sit underneath it. Ask whether the exposed side should be flat, softly lifted, or tucked. That anchor placement affects both comfort and the visible balance of the waves, so decide it before the final finish.
Pro tip:
Choose the clip position before shaping the nearest front wave. That way the bend can lead naturally into the accessory instead of being crushed underneath it.
Make It Work for You:
For slippery hair, gather a slightly wider supporting section under the clip while keeping the visible surface soft. More stable anchoring preserves the asymmetry without uncomfortable pressure.
Watch Out For:
Do not let the decorative clip carry the entire hairstyle. If the base keeps sliding, rebuild the supporting section rather than clamping the accessory tighter.
Conclusion
New Year’s Eve glam waves can look dramatically different depending on where the volume sits and how the ends finish. Long hair supports broad cascading bends, while shoulder-length cuts often suit tighter, more compact placement. A deep side part creates asymmetry; a center part emphasizes balance. Dense hair may carry larger movement comfortably, whereas finer or lower-density ends often benefit from a fuller-looking perimeter and lighter product use. Natural texture can remain part of the finish, especially when the goal is softness rather than glassy uniformity. Choose between lifted roots, sleek roots, defined ends, or looser brushed movement based on how much styling time you want to spend. The best reference is the one that matches both your preferred silhouette and your realistic event-night routine.
Before Your Salon Visit
Choose one or two favorite references before your appointment and save images that clearly show the part, wave size, root volume, and end direction you like. Tell your stylist about your natural texture, density, face-framing preference, current length, and how much upkeep or heat styling fits your routine. Because these are temporary party styles, focus the conversation on placement and finish rather than assuming you need a haircut. Point out the exact tuck, crown height, wave starting point, or accessory position you want repeated.
FAQs
Can glam waves work on fine or lower-density hair?
Yes. Broader bends and a fuller-looking bottom edge can help the style keep visual weight, while very heavy product may make the roots fall flat. Keep the wave scale proportional to your length and density, and concentrate definition where it shows most rather than forcing every section into a strong curl.
Do New Year’s Eve glam waves require heat?
No. Heat can create a more controlled, repeatable bend, but rollers, overnight setting methods, or existing natural texture can also produce a polished wave shape. The finish may differ, so choose the method around your hair’s starting texture, available time, and how exact you want the pattern to look.
How can I keep glam waves from falling flat during the party?
Build the shape before the event, let styled sections cool fully, and avoid repeatedly touching or separating them. If one area drops, refresh that section instead of restyling the whole head. Root volume, wave size, density, weather, and hair length can all affect how long the shape holds.
What should I ask for if I book a salon appointment?
Bring one or two references and point to the exact parting, first bend, root height, face-framing direction, and end finish you prefer. Mention whether you want one side tucked or an accessory anchored. Also explain your natural texture and comfort with product or heat so the stylist can adapt the finish.