14 Soft Collarbone Lob Hairstyles

A soft collarbone lob sits close to the collarbone, giving you more movement than a short bob without the weight of longer hair. The defining shape is a gently controlled outline: some versions keep the bottom edge full, while others use cheekbone, jaw, or chin-length layers to create swing. Fringe can be absent, wispy, curtain-shaped, or swept to one side. The finish usually favors broad bends, loose waves, rounded ends, or natural curl rather than sharp, rigid lines.
Straight, wavy, curly, and coily textures can all work with this length, but the cut should respect density and shrinkage. Fine strands may benefit from a stronger perimeter so the ends do not look too light, while dense hair may need carefully placed internal weight removal. Face framing can start higher or lower depending on how much movement you want around the cheeks and jaw, and a center or side part can change where the volume sits.
Styling effort ranges from a brief dry-hair refresh to a full wash-day blowout or curl set. Soft collarbone lob hairstyles also need realistic maintenance: fringe may require more frequent reshaping than the main length, and the outline should be refreshed when the ends stop sitting cleanly. The best option is the one that matches your natural texture, preferred finish, and regular routine.
Quick List
- Soft Center-Part Wave Hairstyle
- Wispy Curtain Fringe Lob Hairstyle
- Side-Part Swoop Lob Hairstyle
- Blunt-Edge Soft Bend Hairstyle
- Cheekbone Face-Frame Lob Hairstyle
- Air-Dried Wavy Lob Hairstyle
- Rounded Blowout Lob Hairstyle
- Tucked-Behind-Ear Lob Hairstyle
- Loose S-Wave Collarbone Hairstyle
- Soft Shag-Layer Lob Hairstyle
- Curly Collarbone Lob Hairstyle
- Fine-Hair Fuller-Ends Lob Hairstyle
- Dense-Hair Internal-Layer Lob Hairstyle
- Sleek Soft-Flip Lob Hairstyle
Soft Center-Part Wave Hairstyle

A center part gives this collarbone lob a balanced outline, while broad bends beginning around the cheekbones keep the shape soft rather than overly curled. The shortest face-framing pieces can sit near the jaw and blend into a mostly full perimeter at the collarbone. Roots stay relatively smooth, the mid-lengths carry the movement, and the ends are left softly turned instead of tightly spiraled. That combination works especially well for straight to wavy hair and for anyone who wants polish without a heavy fringe.
For a full styling day, apply heat protectant before shaping the mid-lengths with a curling iron, then use flexible hairspray to keep the bends movable. A between-wash refresh is usually quicker: reshape only the sections that have fallen flat and leave the rest alone. Fine or lower-density hair may need fewer layers so the bottom edge keeps substance; denser hair can carry more internal movement if the sides feel bulky.
At the salon, point to where you want the front layer to begin and ask to preserve enough weight through the collarbone line. The cut itself can grow out softly, but reshape it when the face frame no longer connects cleanly or the ends lose their intended swing.
Pro tip: Wrap the front sections away from the face, then let them cool before loosening them so the cheekbone bend keeps its shape without becoming stiff.
Make It Work for You: If your hair is naturally curly, keep the center part and collarbone outline but let the bends follow your curl pattern; ask for the face frame to be judged at its dry length.
Watch Out For: Curling every section in the same tight direction can make the lob look rigid. Alternate the interior bends while keeping the front pieces directed away from the face.
Wispy Curtain Fringe Lob Hairstyle
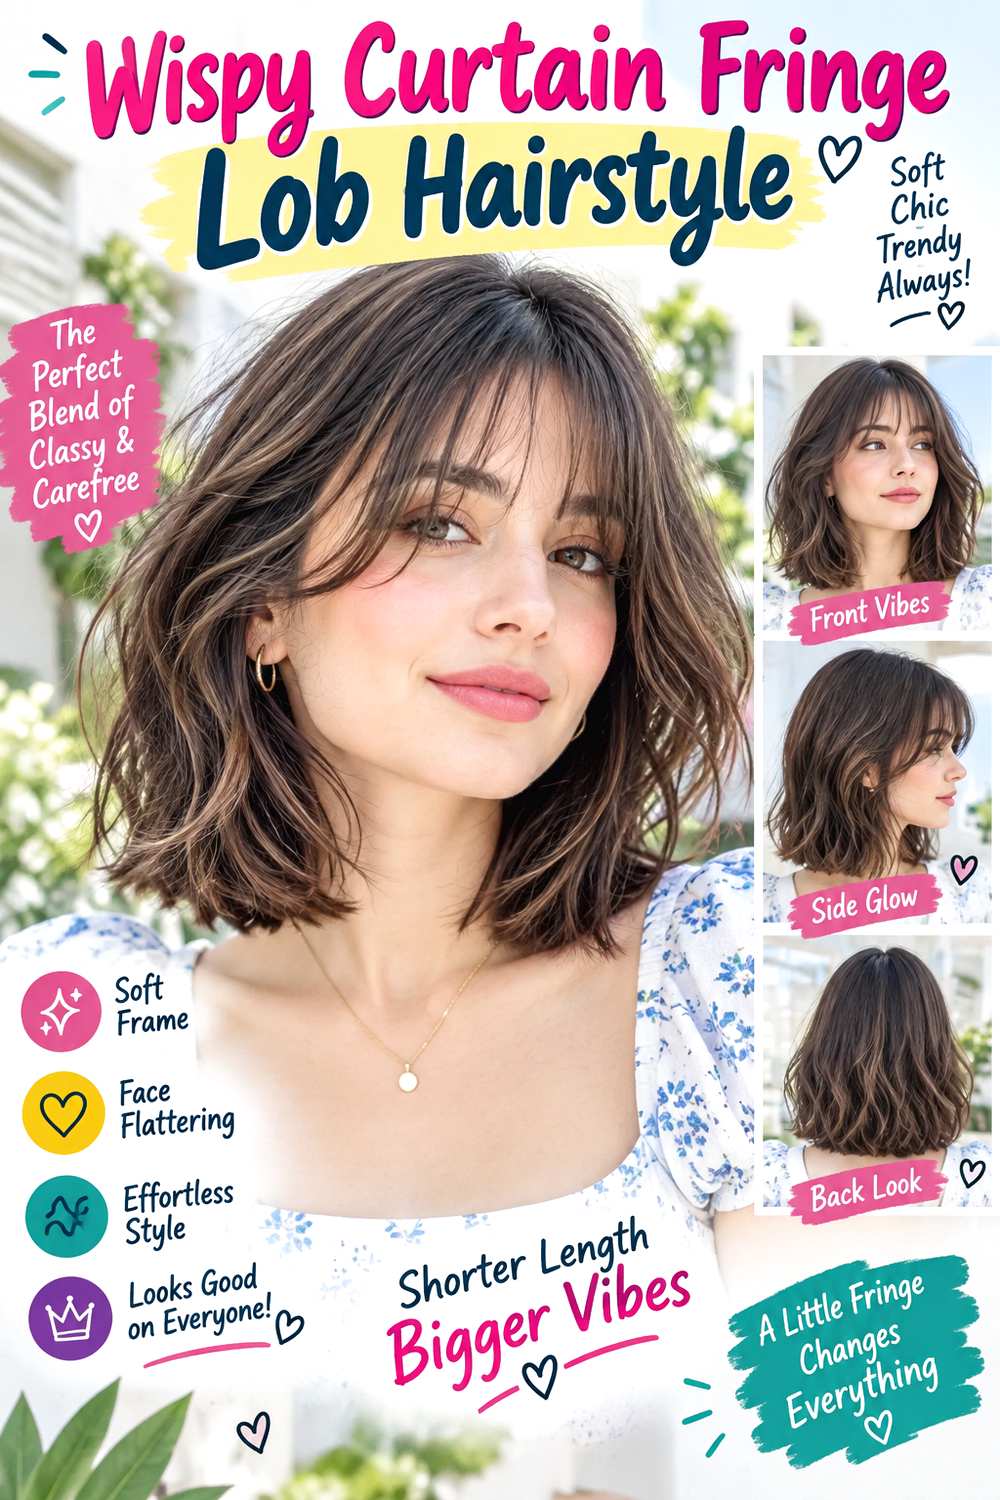
The main feature here is a wispy curtain fringe that opens through the center and lengthens toward the temples. The middle can skim the brows when dry, while the outer corners blend into cheekbone-length pieces and then into the collarbone lob. Light layers through the front add movement, but the lower edge stays full so the cut does not become feathery. A soft center part and loose bends help the fringe connect naturally with the rest of the shape.
This option suits straight, wavy, or softly curly textures when you are comfortable giving the fringe regular attention. On wash day, heat protectant helps prepare the front before a round brush directs the fringe outward; lightweight mousse can support root lift without making the ends sticky. A quick morning refresh may involve only re-dampening and redirecting the fringe, while a full dry takes longer depending on density and natural texture.
Ask your stylist to discuss the finished dry fringe length, its width, and how long the outer corners should remain. That matters because growth direction and shrinkage can change where the center lands. Trim or reshape the fringe when it begins dropping into the eyes or stops splitting cleanly, rather than assuming the whole lob needs cutting at the same time.
Pro tip: Dry the fringe from side to side first, then settle it into the center opening; this helps loosen a stubborn growth direction before you shape the outer sweep.
Make It Work for You: For sparse front density, ask for a narrower fringe section and longer outer corners. You can keep the curtain effect without borrowing so much hair that the sides appear thin.
Watch Out For: Cutting the center too short while wet can create an unexpectedly high fringe after drying. Judge the finished length with your normal texture and shrinkage in mind.
Side-Part Swoop Lob Hairstyle
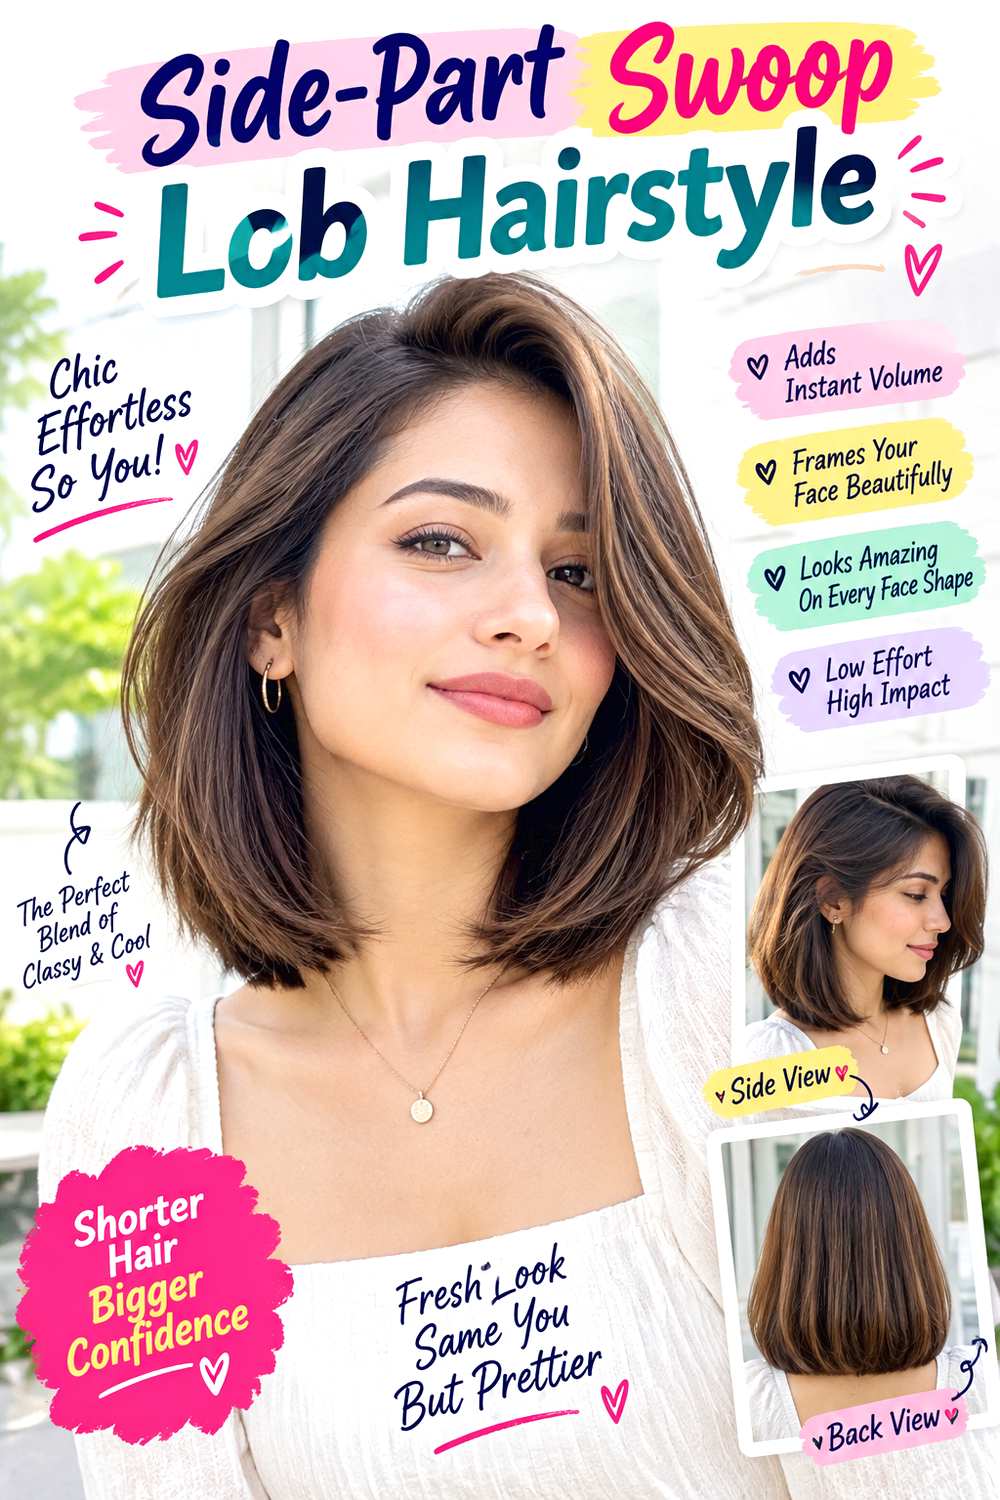
A deep side part shifts the volume to one side, creating a soft swoop across the forehead without committing to a separate fringe. The lob still lands around the collarbone, with longer face-framing pieces beginning near the chin so the front can sweep across and tuck back if needed. Gentle layers through the upper lengths stop the heavy side from looking blocky, while the ends remain softly beveled and substantial.
This shape can be useful for straight, wavy, or loose-curly hair, especially if you already prefer an off-center part. For a polished finish, use heat protectant before working with a round brush, then add a small amount of root-lift spray along the heavier side to support the swoop. A quick refresh can focus only on the part and front section; a complete wash-day blow-dry takes more time and depends on density.
At the salon, explain where you normally place your side part and ask for the front layer to remain long enough to stay connected to the lob when tucked. If the heavier side starts collapsing, try changing drying direction before asking for more layers. The cut needs reshaping when the front loses its sweep or the bottom edge stops sitting evenly around the collarbone.
Pro tip: Dry the heavy side briefly in the opposite direction from where it will sit, then flip it back; the change in root direction creates lift without extra teasing.
Make It Work for You: If your hair is dense, keep the side-swept shape but ask whether discreet internal weight removal below the cheekbone would prevent one side from spreading too widely.
Watch Out For: Making the part extremely deep can leave the lighter side looking bare or unstable. Move it slightly inward until both sides keep enough coverage and balance.
Blunt-Edge Soft Bend Hairstyle

The appeal of this lob comes from contrast: a clean, fuller bottom edge at the collarbone with only a soft bend through the mid-lengths. There is little visible layering at the perimeter, so the ends read as dense and deliberate rather than wispy. A center or slightly off-center part keeps the silhouette simple, and the front can stay nearly one length or include a subtle chin-level frame. The bend should look broad, with straighter tips preserving the blunt effect.
Fine strands or lower-density ends can benefit from this weight-conscious shape, though thicker hair can wear it too if bulk is managed inside rather than stripped from the edge. For heat styling, apply heat protectant and use a flat iron to create a shallow bend through the middle; finish with a light smoothing serum over the ends. A quick refresh means touching only creased or flattened sections, while a full wash-day finish takes longer.
At the salon, be specific that you want the bottom line to remain visually full and that any internal movement should not hollow out the perimeter. As the cut grows, the main cue for reshaping is the edge beginning to look uneven or heavy rather than the calendar alone.
Pro tip: Place the bend a little above the collarbone rather than directly on it, so the ends can fall straighter and keep the stronger bottom line visible.
Make It Work for You: If you have natural waves, preserve the blunt perimeter but let the mid-length bend follow your pattern; a few longer face-framing pieces can add movement without thinning the base.
Watch Out For: Over-layering the lower half can turn the intended solid edge into stringy ends. Keep most movement above the perimeter and reassess before removing more weight.
Cheekbone Face-Frame Lob Hairstyle
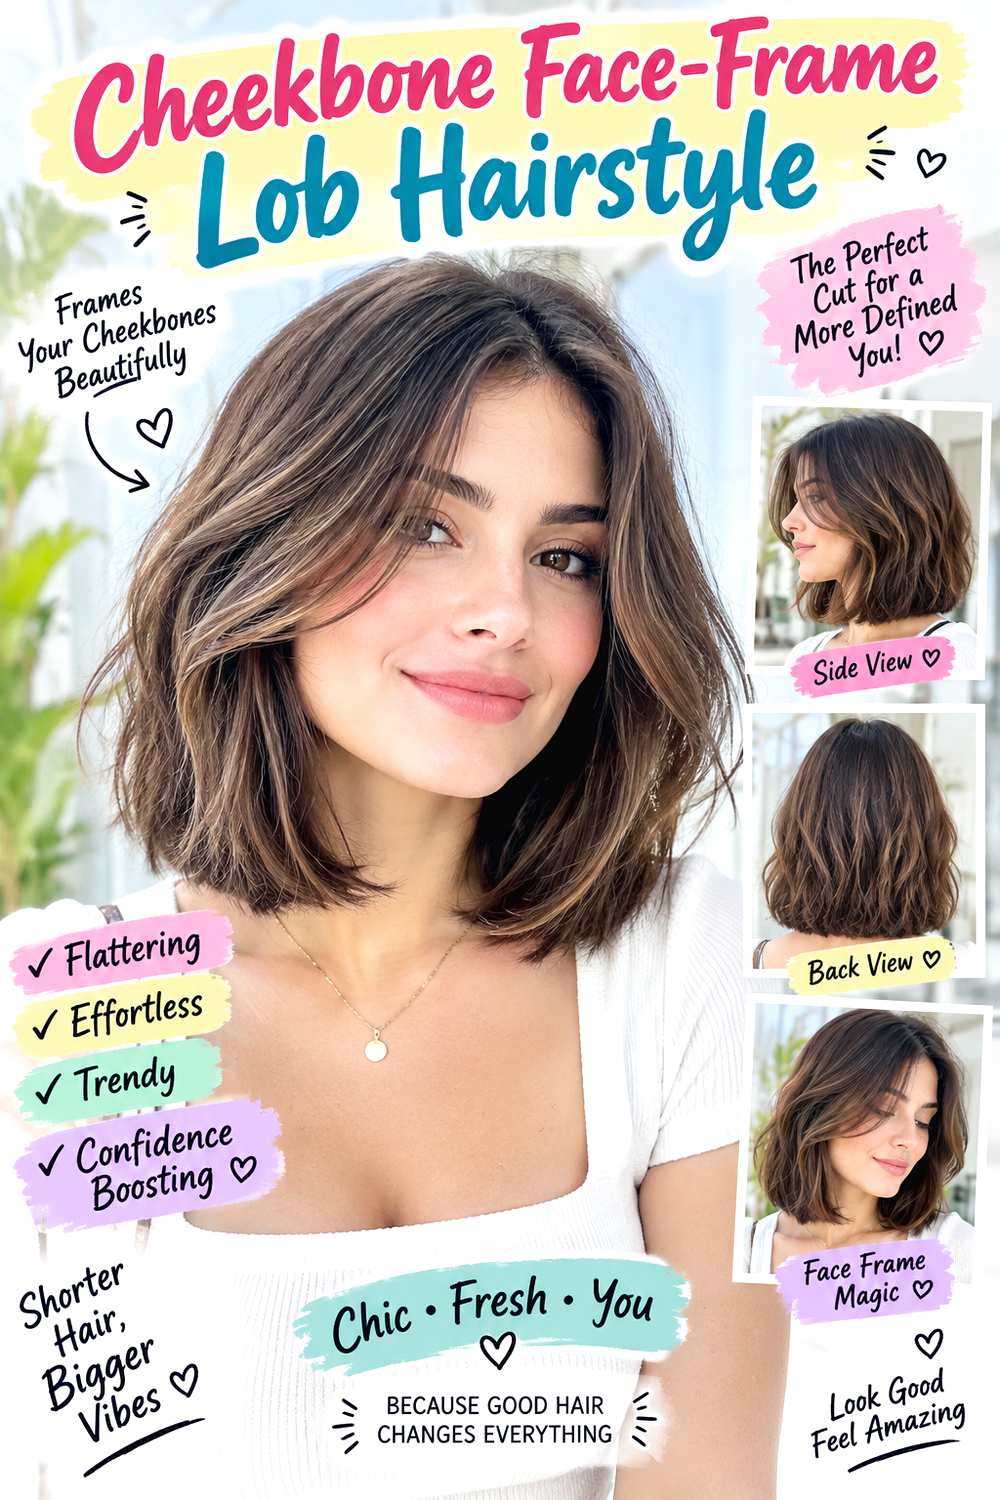
Cheekbone-level face framing gives this collarbone lob its identity. The shortest front pieces begin around the cheekbones, then step gradually through the jaw and chin before meeting the longer body of the cut. The rest can stay lightly layered, with soft waves starting near the front frame and a fuller collarbone perimeter underneath. A center part makes the framing symmetrical, while a small offset can make one side fall more casually.
Straight and wavy textures show the graduated front clearly, and curly hair can use the same concept if the shortest pieces are planned for dry shrinkage. On styling days, apply heat protectant, use a curling iron to bend the front away from the face, and mist flexible hairspray mainly through the shaped sections. A quick refresh may take only a few minutes on the frame; resetting the entire lob after washing is a longer job.
When you visit the salon, point to the exact spot where you want the shortest front piece to finish. Ask how that point will connect to the collarbone length without creating a thin gap at the temples. Reshaping becomes useful when those front pieces grow past the intended landmark and stop giving the cut its stepped movement.
Pro tip: Style the shortest cheekbone pieces first and let them cool in their intended direction; they act as the visual guide for how softly the remaining front layers should bend.
Make It Work for You: For a lower-maintenance routine, start the face frame closer to the jaw instead of the cheekbone. You keep the layered front effect while gaining more length for air-drying and tucking.
Watch Out For: Taking too much hair into the shortest layer can make the front feel disconnected from the back. Keep the section controlled and preserve density beside the temples.
Air-Dried Wavy Lob Hairstyle
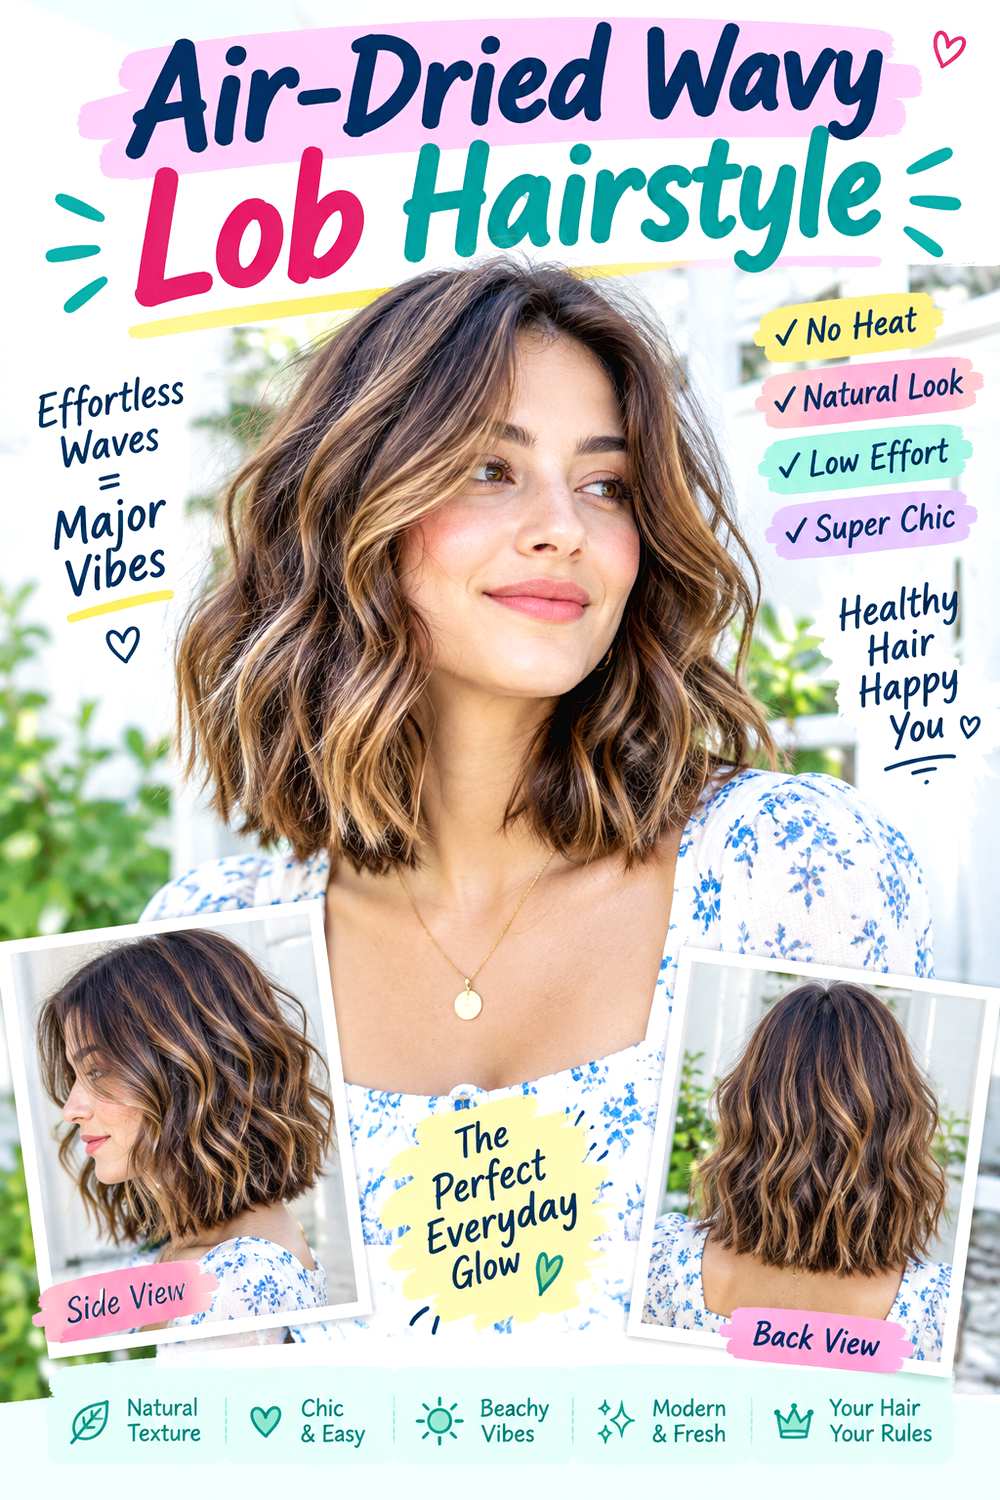
Natural-looking movement is the focus of this collarbone lob, with a soft part, loose wave groups, and ends that do not all turn in the same direction. Long layers can begin around the chin or lower so the wave pattern has room to form without making the perimeter too light. The roots remain relaxed, volume sits mostly through the sides and mid-lengths, and a few front pieces can fall around the cheekbones or jaw.
This is a practical choice for naturally wavy hair or anyone who prefers to work with texture instead of creating a uniform heat-styled finish. After washing, use a lightweight leave-in conditioner for slip, curl gel for definition, and a diffuser to dry with less disturbance. The full wash-day process takes longer than a simple refresh; between washes, reactivating only flattened sections with a little water may be enough.
At the salon, explain where your waves tighten, flatten, or expand when dry and ask for the layer starting point to support that pattern. If your ends are sparse, keep the lower edge stronger and place movement higher. Maintenance is less about perfect symmetry and more about reshaping when the waves start stacking heavily at the bottom or the front no longer frames as intended.
Pro tip: Stop touching the wave groups once they begin drying. Separating them too early can create fuzz before the gel has formed enough hold to support definition.
Make It Work for You: If your waves are very loose, keep the same airy outline but use fewer layers and a slightly stronger perimeter so the collarbone length does not collapse into thin ends.
Watch Out For: Heavy leave-in near the roots can flatten the crown and stretch the wave. Concentrate conditioning through the mid-lengths and ends, then adjust the amount gradually.
Rounded Blowout Lob Hairstyle
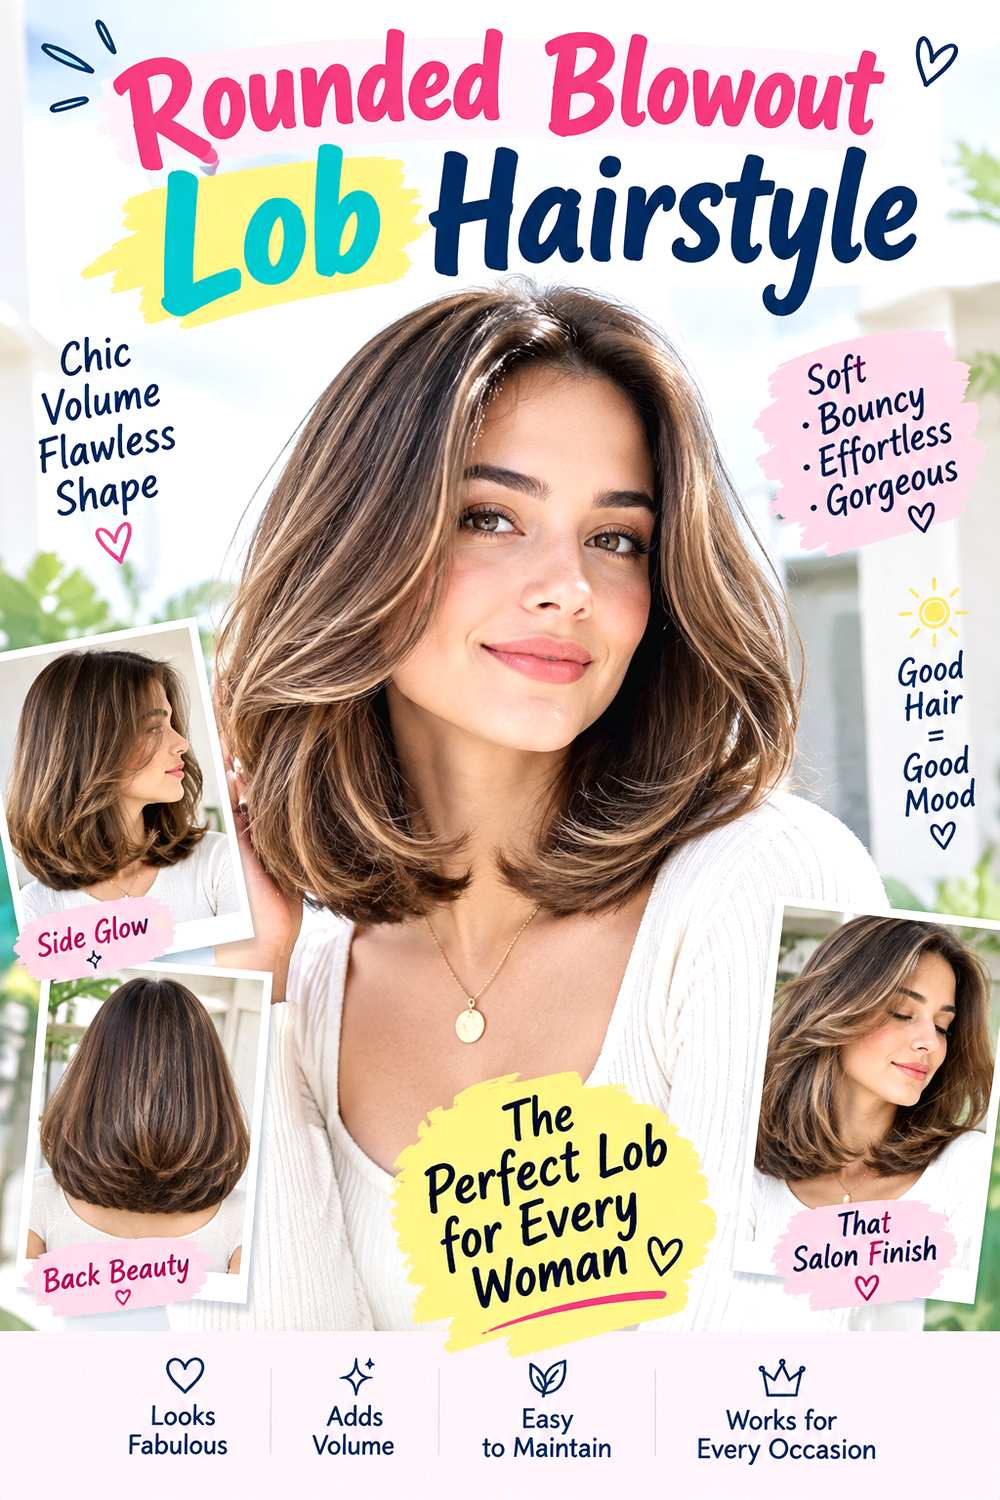
A rounded blowout changes the collarbone lob by adding lift at the roots, a smooth curve through the body, and softly tucked or turned ends. The shape can include long layers beginning around the jaw so the front rolls away from the face without creating obvious steps. A center or soft side part both work, but the defining feature is controlled fullness at the crown and mid-lengths rather than flat roots with curled tips.
Straight to wavy hair may reach this finish more quickly, while curlier textures can wear it with a longer styling commitment if they enjoy blowouts. Use root-lift spray near the crown, heat protectant through the lengths, and a round brush to create the rounded bend as you dry. A full wash-day blowout is the main effort; later refreshes can focus on the crown and front rather than repeating every section.
At the salon, ask for enough perimeter weight that the ends still look full after the layers are shaped. Mention where you want the shortest front layer to begin, because a high starting point creates more movement around the face. Refresh the cut when the layers stop rolling together or the ends become difficult to turn under cleanly.
Pro tip: Lift the crown sections upward as they dry instead of pulling them straight down; this supports root height while keeping the side volume from becoming too wide.
Make It Work for You: If you prefer less heat, keep the rounded cut but reserve the full blowout for selected days. On routine washes, let your natural texture set the finish and shape only the front.
Watch Out For: Curling only the ends can create a bubble-like bottom with flat roots. Build the curve through the mid-lengths so the rounded silhouette reads as one continuous shape.
Tucked-Behind-Ear Lob Hairstyle

One side tucked behind the ear gives a simple collarbone lob a clear point of asymmetry without changing the actual cut. The untucked side can carry a soft cheekbone or jaw-length face frame, while the tucked side stays cleaner and closer to the head. Long layers and a subtle side or off-center part help the hair move across the forehead, and loose bends through the mid-lengths keep the overall finish relaxed.
This design works across many textures, but it is especially useful when you want a polished shape that can shift between open and tucked styling. For a heat-shaped version, use heat protectant, a curling iron for broad bends, and a light texturizing spray near the tucked side for grip. A quick refresh can involve only rebuilding the front bend and retucking; a full wash-day set takes longer.
At the salon, ask that the front around the ear stay long enough to tuck securely without leaving a short piece that springs forward. If your hair is dense, the stylist can assess whether some internal bulk near the side needs reducing while keeping the perimeter intact. Reshape the cut when the front no longer sits neatly behind the ear or the collarbone line loses balance.
Pro tip: Tuck the side while the bend is still slightly warm, then let it cool behind the ear; the temporary placement can help that section settle flatter.
Make It Work for You: If your hair slips out easily, keep the tuck shallower and leave a little more length around the ear. The style still reads asymmetrical without forcing a tight hold.
Watch Out For: Removing too much weight near the tucked side can expose a thin-looking edge. Ask for control inside the shape while preserving enough density along the visible perimeter.
Loose S-Wave Collarbone Hairstyle
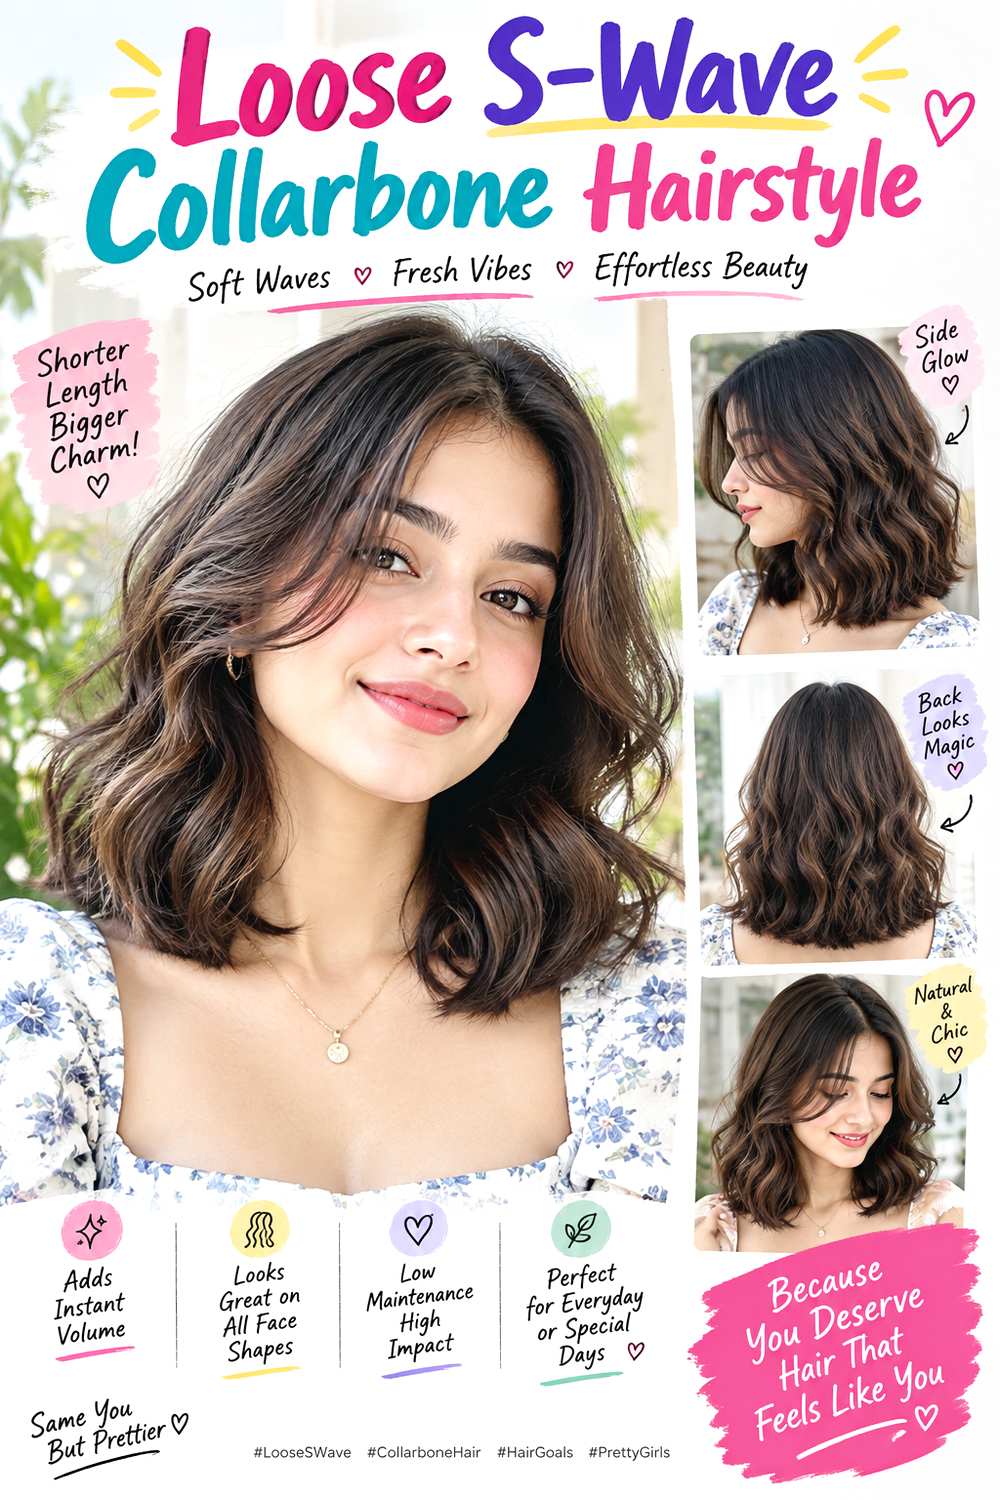
Loose S-waves give the collarbone lob a more sculpted pattern than casual bends, but the result should still move. The waves begin below the cheekbones, alternate inward and outward through the mid-lengths, and finish with comparatively straight tips. A middle part keeps the wave placement balanced, while long face-framing pieces can start near the jaw so they flow into the first curve rather than forming a separate fringe.
This finish is easiest to see on straight to wavy hair, though other textures can wear it when the styling effort fits the routine. Apply heat protectant before using a flat iron to press gentle S-shaped bends, then mist flexible hairspray from a distance for light hold. Refresh only the flattened surface pieces between washes; creating the full pattern section by section is the longer styling session.
At the salon, ask for a collarbone perimeter with enough weight to keep the straighter tips from appearing sparse. If you want layers, explain that the first visible movement should sit below the face rather than high at the crown. Maintenance is guided by shape: once the ends become uneven or the lower layers stop falling into a clean line, the cut is ready for reassessment.
Pro tip: Make each S bend wider than the one you would use on shorter hair; broad curves suit the collarbone length and prevent the pattern from looking tightly crimped.
Make It Work for You: For naturally curly hair, keep the S-wave idea as a special finish rather than a daily requirement. Preserve a curl-friendly cut so wash days do not depend on reshaping every strand.
Watch Out For: Repeatedly pressing the same section can flatten movement and increase heat exposure. Form the bend with controlled passes, then leave it alone until it cools.
Soft Shag-Layer Lob Hairstyle

A soft shag-layer lob uses more visible layering than a classic collarbone cut, but it stops short of a heavily razored or extremely wispy shape. Shorter pieces can begin around the cheekbones or jaw, with additional movement through the crown and sides before the length settles at the collarbone. An airy center part, separated front pieces, and slightly piecey ends give the cut looseness without requiring a full fringe.
Wavy and curly textures can make the layered movement easy to see, while straight hair may need some styling to keep the layers from lying flat. Lightweight mousse can support lift, heat protectant prepares the hair if you reshape with a curling iron, and the iron can add bends to selected layers rather than every strand. A quick refresh targets the crown and front; a complete wash-day style will take longer.
At the salon, discuss how high the crown layers should start and how much weight you want to retain around the bottom. Lower density hair may need a gentler version so the collarbone edge stays present. As the cut grows, reassess when the upper layers stop lifting and begin merging into a heavy middle instead of automatically shortening everything again.
Pro tip: Bend only a few top and face-framing layers during a refresh, leaving the underneath sections softer. That contrast keeps the shag movement visible without making the whole lob overly curled.
Make It Work for You: If your ends are sparse, keep the shag influence mostly through the crown and front, then retain a fuller lower perimeter. You still get movement without sacrificing the collarbone outline.
Watch Out For: Removing too much weight everywhere can make the shape collapse instead of look airy. Ask for targeted layering, then assess how the hair falls before taking more out.
Curly Collarbone Lob Hairstyle
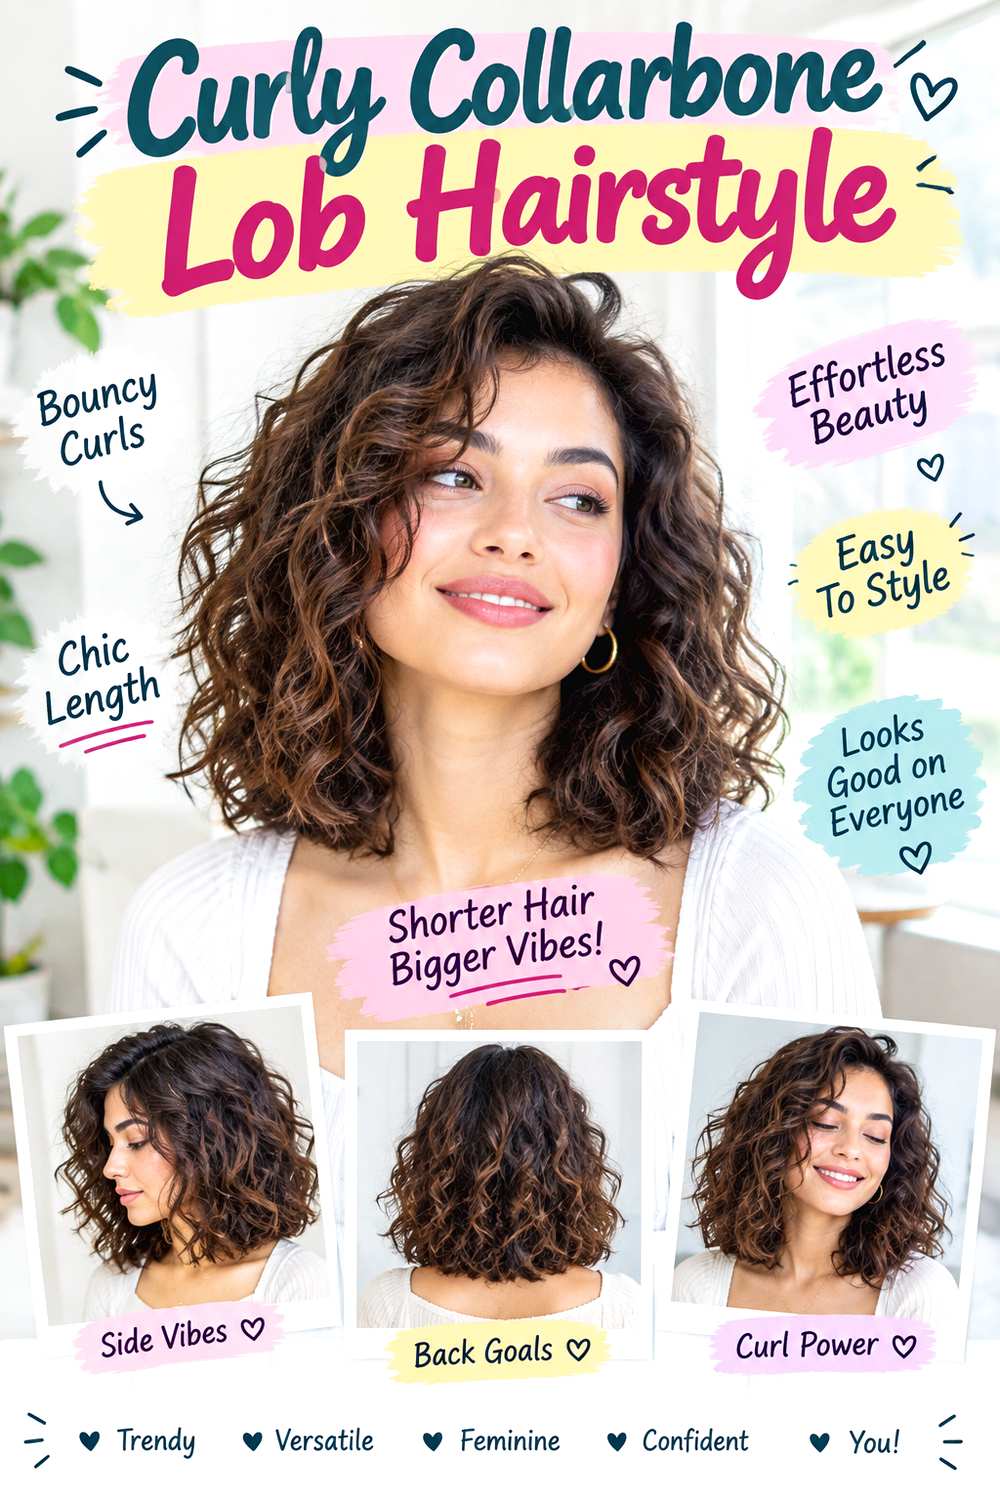
Defined curls at collarbone length create a rounded lob with spring through the sides and a softly weighted lower edge. The exact finished length should be judged with the curls dry because shrinkage can move the shape noticeably upward. Face-framing curls may finish around the cheekbones or jaw, while longer layers help the silhouette avoid stacking all its weight at one level. A natural part or gentle side part can be chosen according to how the curl groups settle.
Curly and coily textures can wear this design without straightening. Use a lightweight leave-in conditioner to add slip, curl gel to support grouping, and a diffuser for controlled drying. A full wash-day routine takes more time than a refresh; between washes, re-wet only curls that have stretched or frizzed instead of resetting the whole head.
At the salon, describe the collarbone as your desired dry-length reference and discuss how much shrinkage your own pattern shows. Ask where the shortest face-framing curl should finish when dry, not at a fixed wet measurement. Dense curls may need thoughtful internal weight management, while lower-density hair may benefit from keeping the perimeter stronger. Reshape when the sides become bulky or the curl groups no longer fall into the intended rounded outline.
Pro tip: Diffuse the roots before repeatedly lifting the ends toward the scalp; setting the base first can help you build volume without disturbing every curl group at once.
Make It Work for You: If your curls shrink strongly, keep extra cutting length and let the stylist refine the silhouette after seeing the dry spring. The goal is collarbone placement, not a universal wet measurement.
Watch Out For: Brushing the curls apart after they have dried can turn defined groups into unwanted fluff. Separate only where you need volume, using gentle fingers rather than repeated raking.
Fine-Hair Fuller-Ends Lob Hairstyle

For fine strands or lower-density ends, the key feature is a fuller collarbone perimeter with restrained layering. Most of the length stays close to one level, while a small face frame can begin near the chin to prevent the front from feeling heavy. A center or slightly off-center part keeps the shape clean, and one broad bend through the mid-lengths adds movement without breaking the bottom edge into many thin pieces.
Straight and lightly wavy hair can make this outline easy to maintain, though any texture can use the density-preserving principle. Apply lightweight mousse near the roots for support, heat protectant through the lengths, and use a round brush to create a soft curve while drying. A morning refresh can focus on the part and ends; rebuilding the full shape after washing takes longer and varies with length and experience.
At the salon, clearly ask to keep the bottom edge substantial and limit how much hair is removed from the lower third. Fine does not automatically mean sparse, so the stylist should assess your actual density before adjusting layers. Recut when the perimeter becomes uneven or the chin-length front pieces stop blending smoothly, rather than chasing frequent trims simply because the strands are fine.
Pro tip: Keep mousse concentrated near the roots and use only the residue through the ends; too much product on the lower length can separate the perimeter and make it look lighter.
Make It Work for You: If your hair is fine but very dense, you can add a few longer interior layers for movement while preserving the same strong bottom edge around the collarbone.
Watch Out For: Asking for heavy thinning just because the strands are fine can weaken the outline unnecessarily. Base weight removal on density and bulk, not strand thickness alone.
Dense-Hair Internal-Layer Lob Hairstyle

Dense hair can make a collarbone lob spread outward if too much weight collects through the sides, so this version keeps a visible full perimeter while controlling bulk inside the shape. Long internal layers can begin below the chin, with the outer surface left smooth enough to show a soft, continuous outline. A relaxed center part and broad waves from the mid-lengths give movement without adding excessive width at the roots.
Straight, wavy, and curly dense hair can all use this principle, but the exact weight placement should follow the natural texture. For a heat-styled finish, use heat protectant, a large-barrel curling iron for wide bends, and a light smoothing cream over the surface. A quick refresh targets only expanded or flattened sections; fully drying and reshaping dense hair after washing is usually the larger time commitment.
At the salon, explain where the cut tends to become widest and ask whether controlled internal weight removal there would help while preserving the collarbone edge. Avoid treating aggressive thinning as the default solution. The lob needs reassessment when the lower sides begin to form a bulky shelf, the internal layers stop moving, or the perimeter becomes difficult to sit cleanly.
Pro tip: Direct the first bend slightly downward rather than outward at the widest part of the head; this keeps movement visible without building extra side volume where you already have density.
Make It Work for You: If your dense hair is curly, keep the internal weight control but place it according to dry curl behavior. Removing bulk too high can change the rounded balance unexpectedly.
Watch Out For: Over-thinning the interior can create short pieces that swell or frizz under a smoother surface. Remove weight selectively and check the silhouette before taking out more.
Sleek Soft-Flip Lob Hairstyle
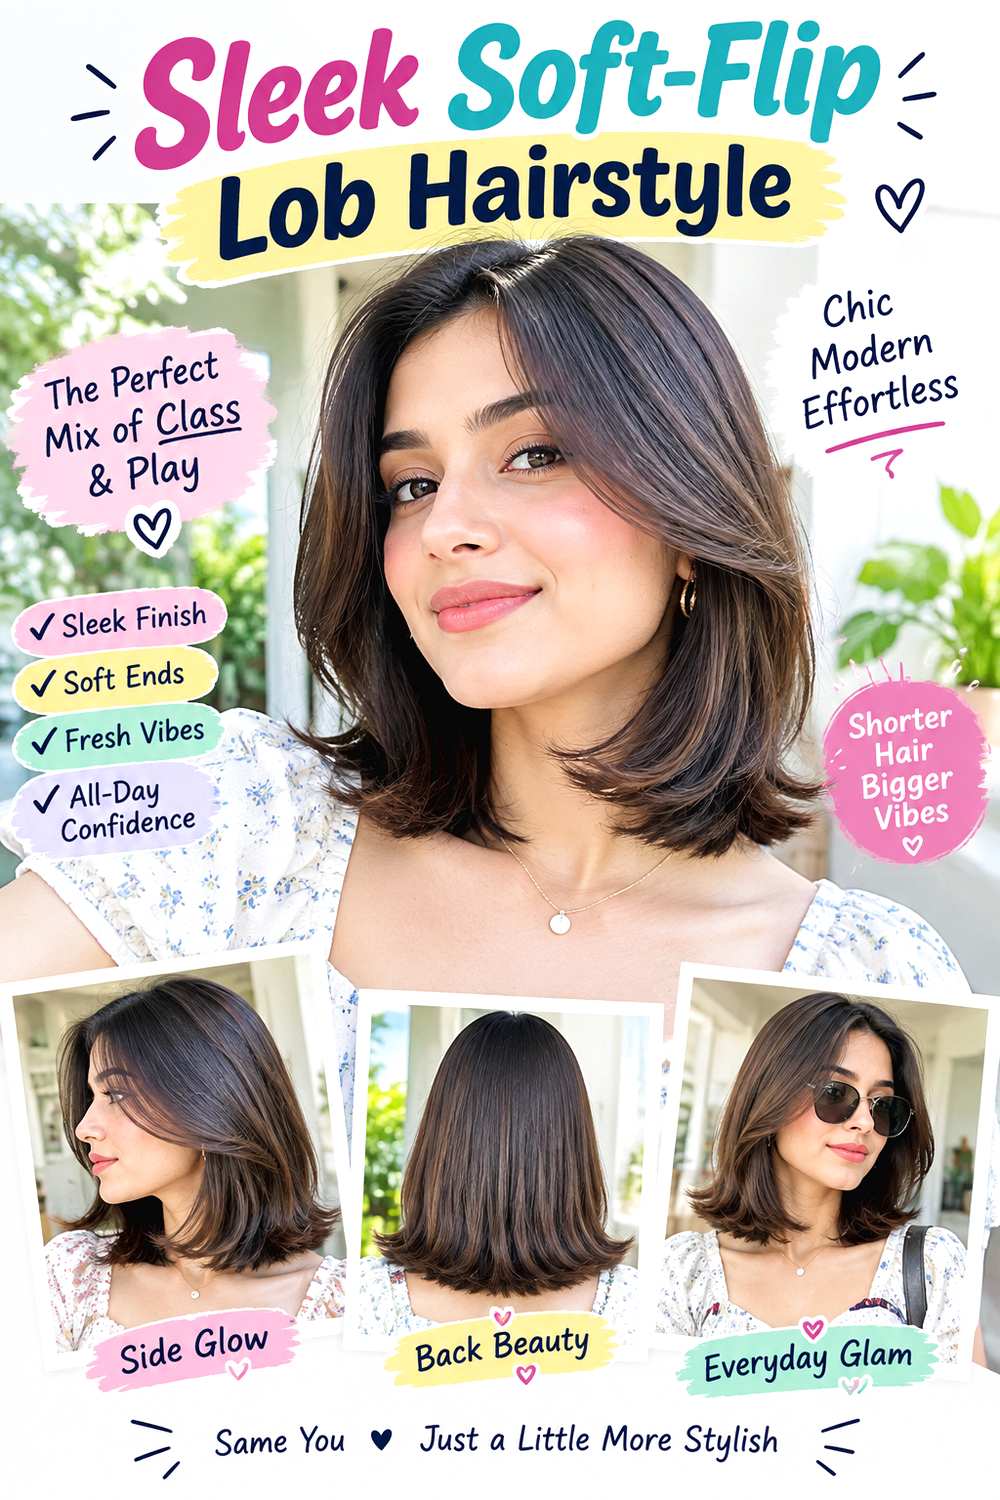
A sleek finish with a soft outward flip at the ends gives the collarbone lob a cleaner, more graphic direction without becoming sharply rigid. The roots and mid-lengths stay smooth, the part can sit in the center or slightly to one side, and the bottom inch or two turns gently away from the neck. Layers are minimal so the flipped perimeter reads clearly, while a chin-length front section can add a small amount of movement around the face.
Straight and wavy hair may reach this finish with less reshaping, while curlier textures can still wear it when a sleeker styling day suits the routine. Apply heat protectant, use a flat iron to smooth the lengths and curve the tips outward, then finish with a small amount of anti-frizz serum. A quick refresh focuses on bent or tucked-under ends; a full wash-day sleek finish takes longer.
At the salon, ask for a clean collarbone line and enough density at the bottom to make the flip visible. Explain whether you want the front nearly one length or slightly shorter at the chin. Reassess the cut when the perimeter becomes uneven, because an irregular edge is more noticeable with a sleek surface and deliberate end direction.
Pro tip: Start the outward turn only near the final section of the length; flipping too high can create excessive width instead of the small, controlled kick that defines this idea.
Make It Work for You: If you prefer your natural waves most days, keep the clean collarbone cut and save the sleek flip for selected occasions. The haircut does not need to demand constant straightening.
Watch Out For: Pressing the ends into a sharp angle can make the finish look stiff. Use a gentle wrist curve so the tips turn outward in a soft, continuous line.
Conclusion
Soft collarbone lob hairstyles can be tailored through small but meaningful choices. A fuller perimeter gives fine or lower-density ends more presence, while longer layers or controlled internal weight removal can help dense hair move more freely. Curtain fringe and cheekbone framing place attention toward the front; a side part shifts volume, while a center part feels more balanced. Natural waves and curls reduce the need to manufacture texture, whereas rounded blowouts, S-waves, and sleek flips ask for more styling time. The best choice depends on how your hair behaves dry, how much shrinkage or bulk you manage, and how often you want to restyle. Save the shape whose length, finish, and upkeep fit your normal routine rather than choosing by appearance alone.
Before Your Salon Visit
Before your appointment, choose one or two favorite references and point out the exact details you want to borrow. Discuss your natural texture, density, face shape, preferred collarbone length, and how much daily styling you realistically do. Be specific about fringe length, where face-framing layers should begin, how full you want the perimeter, and where you prefer volume. If you like the finish more than the cut itself, say that too so styling and cutting decisions stay separate.
FAQs
Are Soft Collarbone Lobs Good for Fine or Lower-Density Hair?
They can be, especially when the bottom edge stays relatively full. Fine strands and low density are not the same thing, so ask your stylist to assess both. Minimal or carefully placed layers can preserve substance through the ends while still allowing a small face frame or gentle bend.
How Should a Collarbone Lob Be Adjusted for Curly Hair?
Plan the desired length according to how the curls sit dry, not by a universal wet measurement. Shrinkage varies widely. The stylist can also place layers where your curl groups need movement while keeping enough weight at the perimeter to avoid an overly round or unexpectedly short result.
Do I Need Heat to Style a Soft Collarbone Lob?
No. Natural waves, curls, and air-dried texture can suit the soft lob shape well. Heat is mainly useful when you want a different finish, such as a rounded blowout, polished S-wave, or sleek flip. If you do use heat, protect the hair and avoid unnecessary repeated passes.
How Often Does a Collarbone Lob Need Salon Maintenance?
There is no single schedule that suits every growth rate or shape. Consider a reshaping visit when the perimeter becomes uneven, layers stop connecting, or fringe falls past its intended point. Bangs may need attention sooner than the main length, while a simpler, fuller lob can often grow out more quietly.