17 Supernatural Scarlet Hair Color Ideas

Scarlet hair color sits between true red and deeper crimson, with enough brightness to look vivid without leaning fully orange. On medium or long hair, it can read as an all-over statement, while bobs, layered cuts, fringes, and face-framing pieces make placement more obvious. Straight finishes show clean panels and gradients clearly; waves, curls, and coils break the color into moving ribbons, which can make dimensional placements look richer.
The result depends heavily on the starting color, density, and existing chemical history. Dark bases may need more lift for a luminous scarlet, while lighter hair can show intensity with less contrast work. Fine or lower-density hair often benefits from strategic panels rather than excessive lightening everywhere. Curly and coily hair can showcase scarlet beautifully, but placement should account for shrinkage and where curls naturally group when dry.
Maintenance is mostly about fading, regrowth, and preserving condition. Color-safe cleansing, cooler rinsing, reduced heat, and sensible wash frequency can help vivid red last longer, though no routine prevents fading completely. Some ideas below grow out softly; others need sharper root or fringe touch-ups to preserve their design.
Quick List
- All-Over Supernatural Scarlet Hairstyle
- Shadow-Root Scarlet Melt Hairstyle
- Black-to-Scarlet Ombre Hairstyle
- Scarlet Money Piece Hairstyle
- Scarlet Underlayer Peekaboo Hairstyle
- Crimson Scarlet Balayage Hairstyle
- Scarlet Face-Frame Ribbon Hairstyle
- Scarlet Dip-Dyed Ends Hairstyle
- Scarlet Halo Highlight Hairstyle
- Cherry-Scarlet Gradient Hairstyle
- Scarlet Panel Bob Hairstyle
- Scarlet Curly Dimension Hairstyle
- Scarlet Copper Blend Hairstyle
- Scarlet Rosewood Melt Hairstyle
- Scarlet Burgundy Rooted Hairstyle
- Scarlet Micro-Highlight Hairstyle
- Scarlet Split-Dye Hairstyle
All-Over Supernatural Scarlet Hairstyle

An all-over scarlet finish creates the most continuous version of the color, running from roots through the ends without dark panels breaking the surface. On a blunt bob, the shade reads dense and graphic; on layered medium or long hair, movement exposes subtle differences in brightness as the strands overlap. A center part gives the color a balanced field, while a side part can make the root area feel more dimensional.
This placement is most straightforward on hair that is already light enough to support vivid red, although darker starting colors may need professional lightening first. Density matters less than condition: compromised ends can absorb or release color unevenly, so the salon plan should consider previous chemical work. Use a color-safe shampoo and moisturizing conditioner to cleanse gently and keep the lengths flexible. If you heat style, add a heat protectant spray rather than relying on low temperature alone.
A quick refresh between washes may only involve restyling the front, while restoring faded scarlet is a separate color service. At the salon, ask how bright you want the finished red at the root versus the ends. Regrowth will be obvious on contrasting natural colors, so schedule touch-ups according to how much root contrast you are comfortable seeing.
Pro tip:
Ask to view the scarlet in neutral lighting before finalizing the tone. Bright indoor lights can make vivid red appear warmer or more intense than daylight.
Make It Work for You:
If your hair is very dark, consider keeping slightly deeper roots while brightening the lengths. You still get an all-over red impression with less pressure to make every area equally luminous.
Watch Out For:
Avoid judging fade only at the roots. Scarlet often loses intensity faster through more porous ends, so compare the whole length before deciding what needs refreshing.
Shadow-Root Scarlet Melt Hairstyle
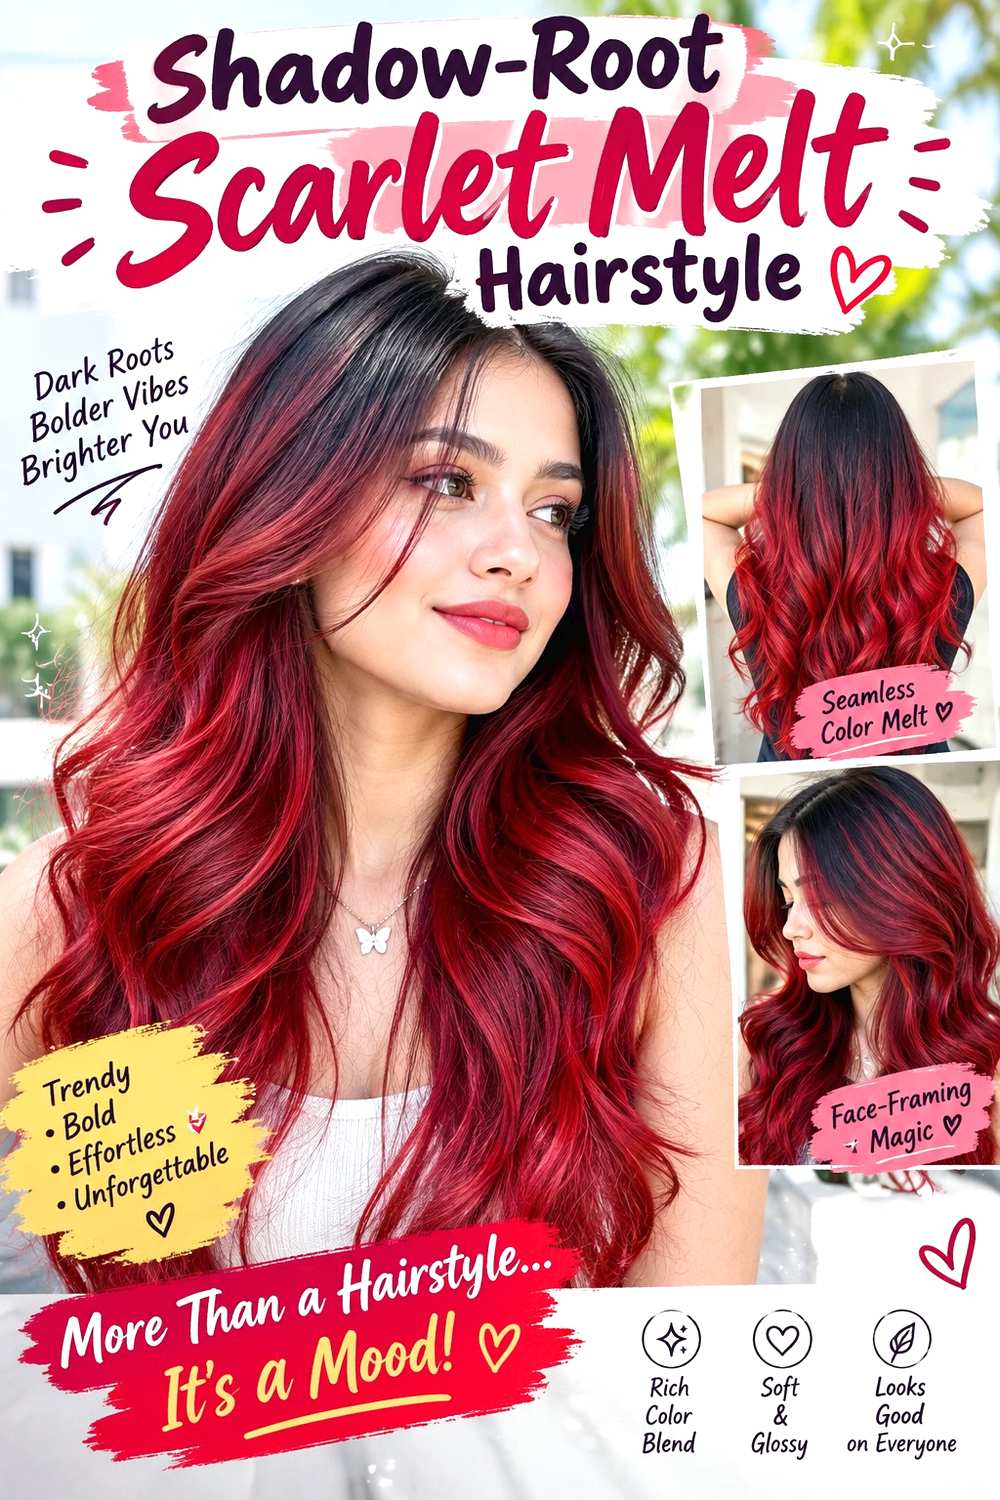
A shadow root softens vivid scarlet by keeping the color deeper at the scalp and melting it into brighter red through the mid-lengths. The transition can begin just below the root or extend farther down for stronger contrast. On shoulder-length layers, waves reveal the blend especially well, while straighter hair shows how smooth the gradient is. A center part keeps the root shadow even on both sides.
This approach can suit readers who like vivid color but do not want every millimeter of regrowth to show immediately. The deeper root can coordinate with naturally dark hair, although the scarlet lengths may still require lightening depending on the starting level. A sulfate-free color-safe shampoo and rich conditioner help reduce unnecessary fading, while a wide-tooth comb limits rough handling when the hair is wet.
A quick styling refresh does not restore pigment; color fading and root growth are separate maintenance issues. Ask your colorist exactly how many centimeters of visible depth you want at the root and where the brighter scarlet should begin. That placement determines whether the effect looks softly melted or distinctly two-toned. Revisit the color when the transition loses clarity, rather than treating every small amount of natural regrowth as an emergency.
Pro tip:
Photograph the root-to-scarlet transition when it is freshly finished. That reference makes it easier to explain how much depth you want preserved at future appointments.
Make It Work for You:
If you wear a fringe, keep the shadow root slightly shorter through that front section so more scarlet remains visible around the eyes while the crown stays deeper.
Watch Out For:
Do not let the shadow zone creep farther down at every appointment without discussion. Too much added depth can gradually turn a soft melt into an ombré.
Black-to-Scarlet Ombre Hairstyle

Black-to-scarlet ombré keeps the upper section dark and pushes the brightest red toward the lower half of the hair. The strongest transition usually sits between the jaw and shoulders, creating a dramatic finish without placing vivid color directly at the scalp. Long layers show several red levels at once, while a blunt lob makes the darker top and scarlet ends look more graphic.
This design can work well for naturally dark hair because the root area remains close to the starting color, but the lower section may still need substantial lightening for a clear scarlet result. Existing dye history matters, especially if the ends have been repeatedly colored. Use a color-safe shampoo, hydrating mask, and wide-tooth comb to support the more processed lower lengths without overhandling them.
Daily styling can be simple because the color placement supplies most of the impact. A full wash-day reset may take longer if you want waves that show the gradient clearly. At the salon, point to the exact height where you want black to begin changing into red and how gradual that blend should be. Maintenance centers on fading at the ends rather than root regrowth, so refresh the scarlet when it starts looking noticeably dull.
Pro tip:
Wear the hair both straight and waved before deciding whether the transition feels balanced. Movement can make a sharp boundary look softer than it appears when smooth.
Make It Work for You:
If your ends are fragile, place the brightest scarlet slightly higher and keep the tips deeper. You preserve the black-to-red story without demanding maximum lift from the oldest hair.
Watch Out For:
Avoid repeatedly lightening the same ends simply because scarlet faded. Ask whether pigment refresh alone can restore brightness before adding more chemical processing.
Scarlet Money Piece Hairstyle

Scarlet money pieces concentrate the color around the face instead of spreading it through the whole head. Two bright front panels can begin at the roots and run through the ends, while the rest of the hair stays natural, brunette, black, or another contrasting shade. On a bob, the placement looks bold; on longer layers, the red moves through the cheekbone and jaw area as the front pieces swing forward.
This option can suit someone who wants visible scarlet without committing to a full-head color service. The front sections may need lightening depending on the starting shade, and finer hair often works better with narrower panels so the face frame does not consume too much density. Use a color-safe shampoo and lightweight conditioner, plus heat protectant spray if you regularly smooth or curl the front.
A quick morning refresh often focuses only on the two colored sections, while pigment maintenance is separate. Ask your colorist how wide each money piece should be and whether it should begin directly at the part or slightly underneath. That decision changes how much scarlet shows when the hair is tucked back. Regrowth is concentrated at the front, so touch it up when the contrast at the roots becomes too visible for your preference.
Pro tip:
Choose the width while wearing your usual part. A money piece planned on a temporary part can look much broader or narrower once you style normally.
Make It Work for You:
For a fringe-heavy cut, split the scarlet into smaller front sections rather than one solid block. The color stays visible without turning the entire fringe red.
Watch Out For:
Do not assume both sides must be identical if your part is asymmetric. Balance the visible amount of scarlet from the front rather than measuring equal widths.
Scarlet Underlayer Peekaboo Hairstyle

A scarlet underlayer hides most of the vivid color beneath a darker or more natural top section, then reveals flashes of red when the hair moves, lifts, or is tucked behind the ears. The placement can sit through the nape, underneath the sides, or both. On layered medium hair, the red appears in narrow ribbons; on a blunt cut, it forms a cleaner block along the lower edge.
This design suits someone who wants a dramatic color that can still look restrained when the hair lies flat. Darker starting hair may need selective lightening underneath for a bright result, while the untouched surface preserves more of the natural base. Use a color-safe shampoo and moisturizing conditioner, and detangle with a wide-tooth comb to avoid rough handling around processed sections.
A quick styling refresh can expose more or less scarlet simply by changing the part or tucking the sides. Color maintenance is separate and depends on how quickly the hidden red fades. At the salon, specify exactly how high the underlayer should rise behind the ears and at the nape. Too much height can turn a peekaboo effect into a half-and-half color, while a very low placement may disappear unless the hair is lifted.
Pro tip:
Before coloring, lift the top layer and mark how much undersection you actually want visible in a ponytail or tuck. That prevents an unexpectedly large hidden panel.
Make It Work for You:
If you rarely wear your hair up, raise a few scarlet sections closer to the temples. The peekaboo effect remains subtle but becomes visible during ordinary movement.
Watch Out For:
Avoid placing all the vivid color too low at the nape. On dense hair, the top layer may cover it completely unless the placement rises enough.
Crimson Scarlet Balayage Hairstyle
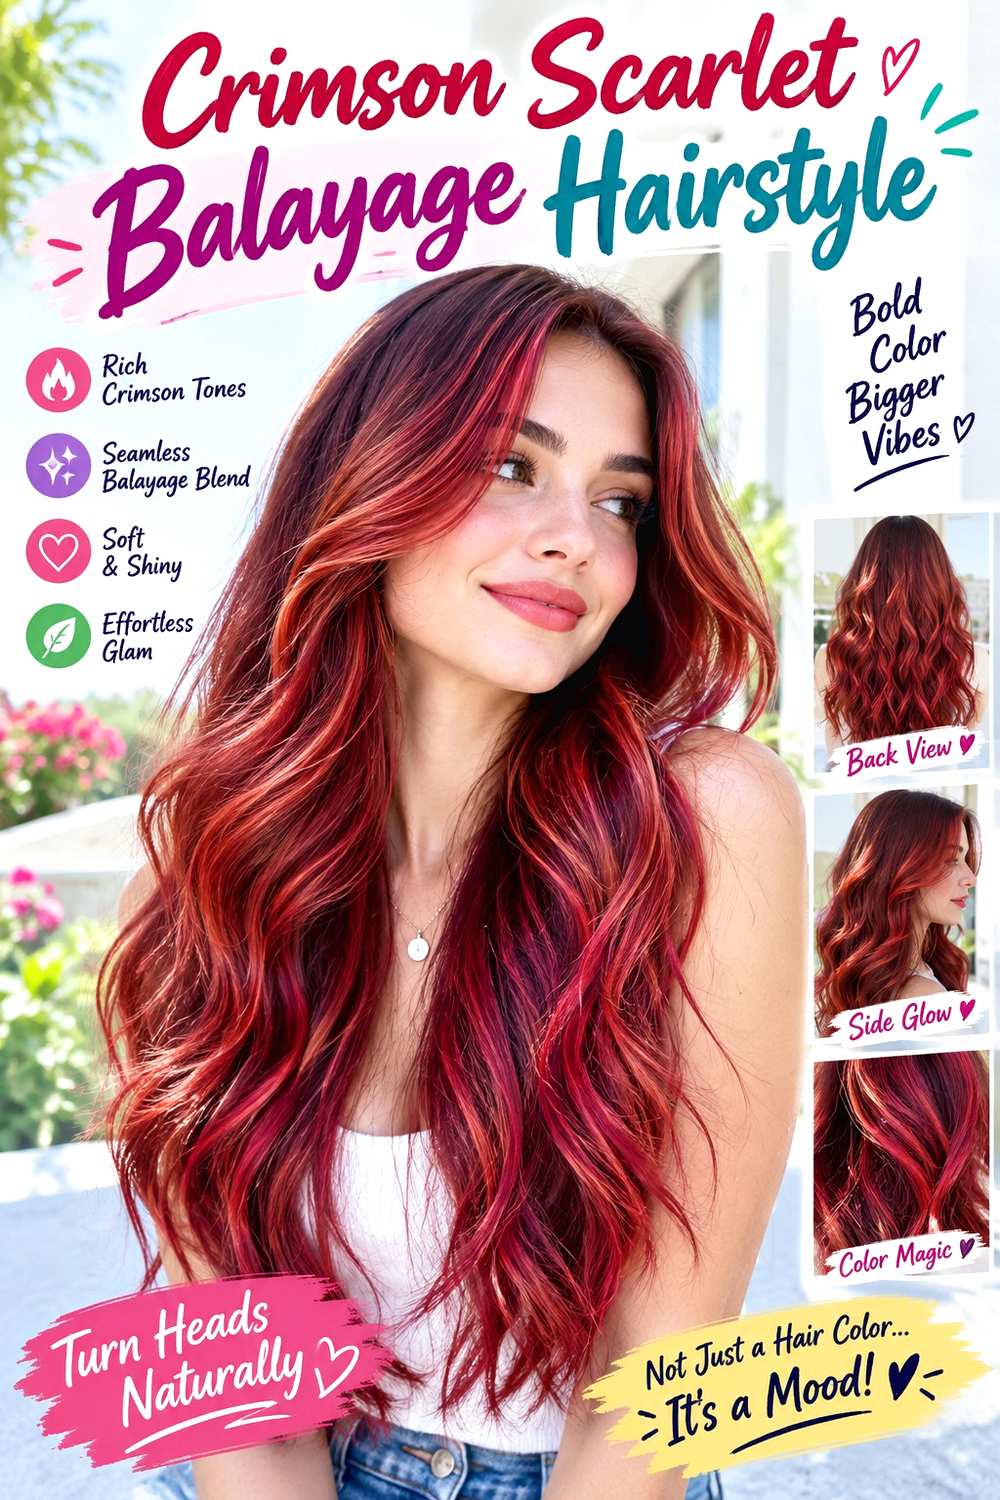
Crimson-scarlet balayage spreads red through selected mid-lengths and ends rather than creating one solid block of color. Deeper crimson can sit closer to the base, while brighter scarlet appears on surface ribbons and around the face. Waves make the painted sections separate visually, but straight hair can show a softer, blended transition. On layered cuts, the brightest pieces can follow the movement of the layers instead of forming horizontal bands.
This placement can suit readers who want dimension and a softer grow-out than root-to-end scarlet. The amount of lightening needed depends on the starting shade and previous color history, so the salon should assess condition before choosing how bright the red can safely become. Use a color-safe shampoo, nourishing mask, and heat protectant spray if you regularly style the highlighted lengths.
A quick refresh between washes may simply mean reshaping the face frame, while faded pigment requires a color appointment or professionally recommended refresh plan. Ask your colorist where the brightest scarlet ribbons should begin—cheekbone, jaw, or lower—and how much natural depth should remain between them. When the contrast starts looking muddy rather than dimensional, it may be time to refresh the red placement rather than adding more pieces everywhere.
Pro tip:
Ask for the brightest ribbons where your haircut naturally moves most. Strategic placement around visible layers can create more impact than simply adding a greater number of highlights.
Make It Work for You:
If you prefer a lower-contrast color, keep the crimson and scarlet closer in depth. The balayage remains dimensional while the transition between individual ribbons feels softer.
Watch Out For:
Do not keep adding brighter pieces every time the red softens. Too many new sections can erase the darker spaces that make balayage look dimensional.
Scarlet Face-Frame Ribbon Hairstyle
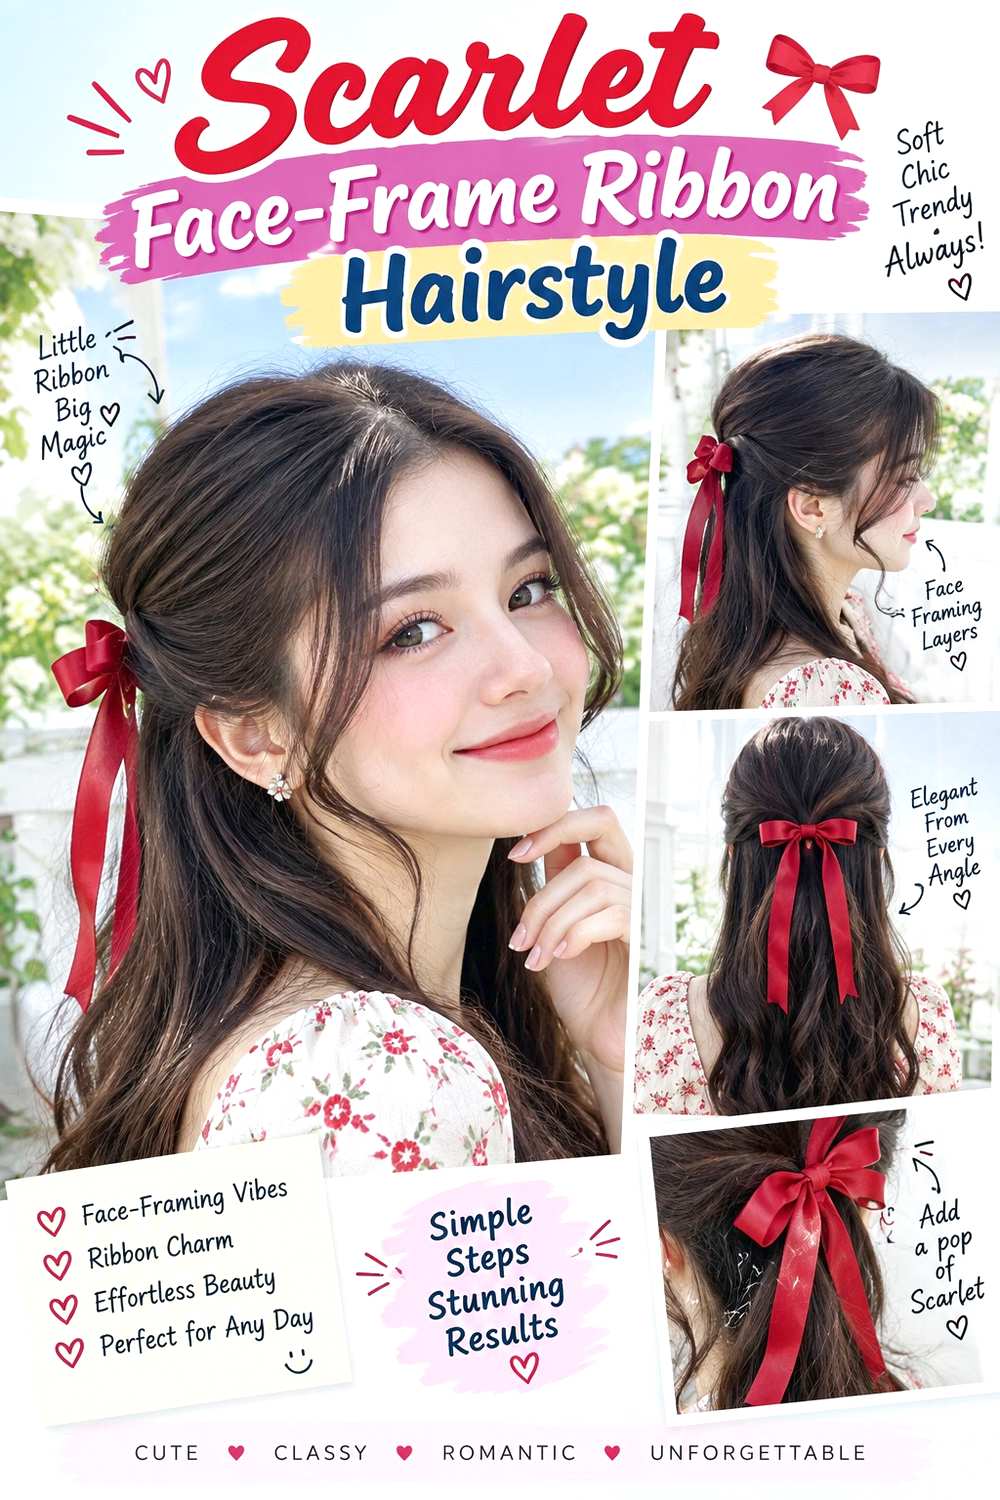
Scarlet face-frame ribbons are narrower and softer than a full money piece, placing several slim red sections around the front rather than two solid panels. The brightest strands can begin near the temples and continue through cheekbone or jaw-length layers, with the rest of the hair kept darker. A side part creates an uneven sweep of color, while a center part produces balanced scarlet accents on both sides.
This idea works well for readers who want visible movement without making the entire front section red. Fine or lower-density hair can use very narrow ribbons, while dense hair can support slightly broader sections without losing depth. The starting color determines how much lightening may be needed. A color-safe shampoo and lightweight mask support the processed pieces, and heat protectant spray is useful if you regularly shape the face frame.
A quick styling refresh may involve only directing the colored pieces forward so they remain visible. Faded scarlet, however, needs pigment maintenance rather than extra heat or product. At the salon, show where each ribbon should begin and how much dark hair should remain between them. That spacing is what keeps the result dimensional. Refresh when the red loses clarity or when root growth interrupts the intended framing pattern.
Pro tip:
Style the front as you normally wear it before choosing ribbon placement. The sections should be visible in your everyday part, not only when hair is pushed back.
Make It Work for You:
For dense curls, make the ribbons slightly broader and place them on complete curl groups. This keeps the scarlet visible without breaking natural clumps into frizzy fragments.
Watch Out For:
Avoid making every front ribbon equally bright and wide. Slight variation can preserve depth, while identical blocks may merge into one oversized money piece.
Scarlet Dip-Dyed Ends Hairstyle

Scarlet dip-dyed ends keep the root and mid-lengths in the base color, then switch into vivid red near the perimeter. The transition can be sharp for a graphic effect or slightly feathered so the scarlet climbs unevenly through the ends. A blunt lob makes the red edge especially clear, while layers create staggered flashes of color. Straight styling emphasizes the boundary; waves break it into smaller moving sections.
This placement can suit someone who wants scarlet away from the scalp and prefers root maintenance to stay minimal. The ends may need lightening first, especially on dark or previously colored hair, so condition matters before adding another process. Use a color-safe shampoo, hydrating mask, and wide-tooth comb to support the most processed area.
Daily styling can stay simple, though a polished straight finish makes a sharp dip line easiest to see. A quick refresh is styling only; restoring faded ends is a separate color step. At the salon, decide exactly how many inches of scarlet you want and whether the line should look crisp or diffused. As hair grows, the colored section moves farther from the original placement, so trim and refresh decisions should follow the desired proportion rather than a fixed calendar.
Pro tip:
Bring a reference showing the exact height of the red boundary. Saying only “scarlet ends” leaves too much room for different interpretations of how far upward it should travel.
Make It Work for You:
If you plan regular trims, start the scarlet section slightly higher than the minimum you want visible. Small trims then remove length without immediately erasing the whole effect.
Watch Out For:
Do not ignore dry-looking tips because the color is dramatic. If the perimeter becomes fragile, discuss trimming or gentler maintenance instead of repeatedly processing damaged ends.
Scarlet Halo Highlight Hairstyle
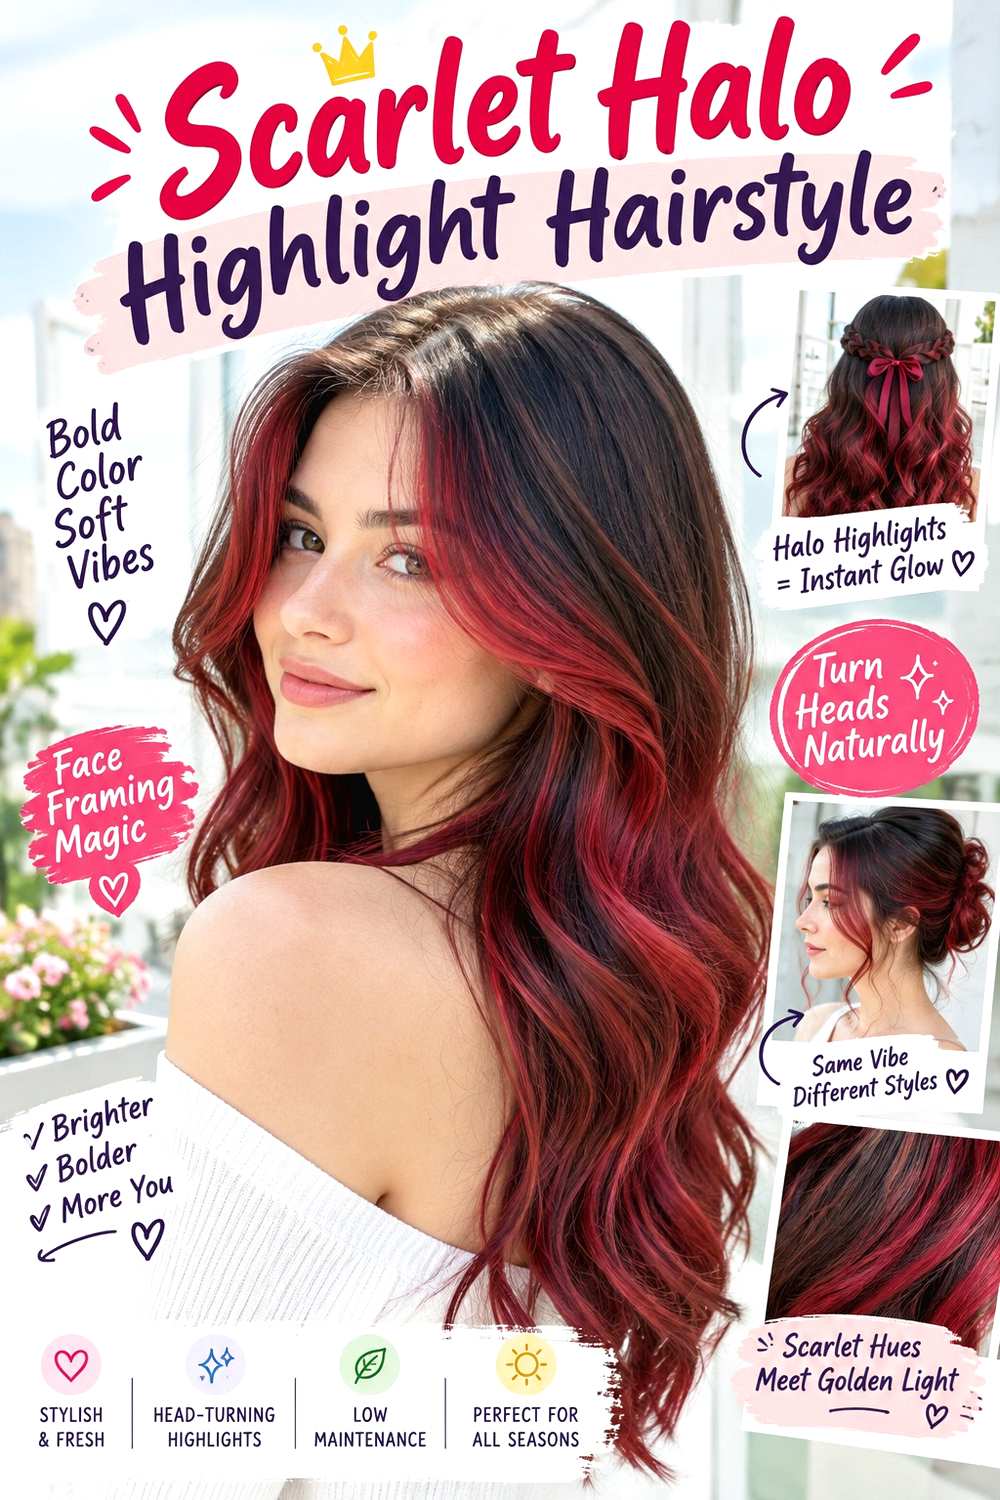
A scarlet halo places vivid red around the outer contour of the hair, especially near the hairline, temples, and lower perimeter, while the interior stays deeper. When the hair moves, the brighter edge traces the silhouette instead of appearing as isolated streaks. On a rounded bob it creates a graphic border; on longer layered hair, the red can flicker around the face and ends as the layers separate.
This placement can suit readers who want strong visibility from the front without coloring every strand. It is especially useful when a darker interior creates the contrast needed for the scarlet outline. Starting color and previous dye determine whether the outer sections need lightening. Use a color-safe shampoo and moisturizing conditioner, plus heat protectant spray if you regularly smooth the visible perimeter.
A quick refresh can involve restyling the outer layers so the halo remains exposed, but fading needs actual color maintenance. At the salon, define how wide the scarlet band should be around the face and whether it continues fully around the nape. That width controls how bold the outline looks. Regrowth will show most clearly at the hairline, so refresh according to your tolerance for that contrast rather than trying to maintain an invisible root at all times.
Pro tip:
Check the halo placement with hair both tucked and loose. The brightest edge should still make sense when your everyday styling exposes different parts of the hairline.
Make It Work for You:
If you have a full fringe, continue a narrower scarlet edge through its outer corners instead of coloring the entire fringe. This connects the halo without dominating the front.
Watch Out For:
Avoid making the halo equally wide everywhere by default. A broad nape section and narrow temple sections may create better balance depending on your cut.
Cherry-Scarlet Gradient Hairstyle
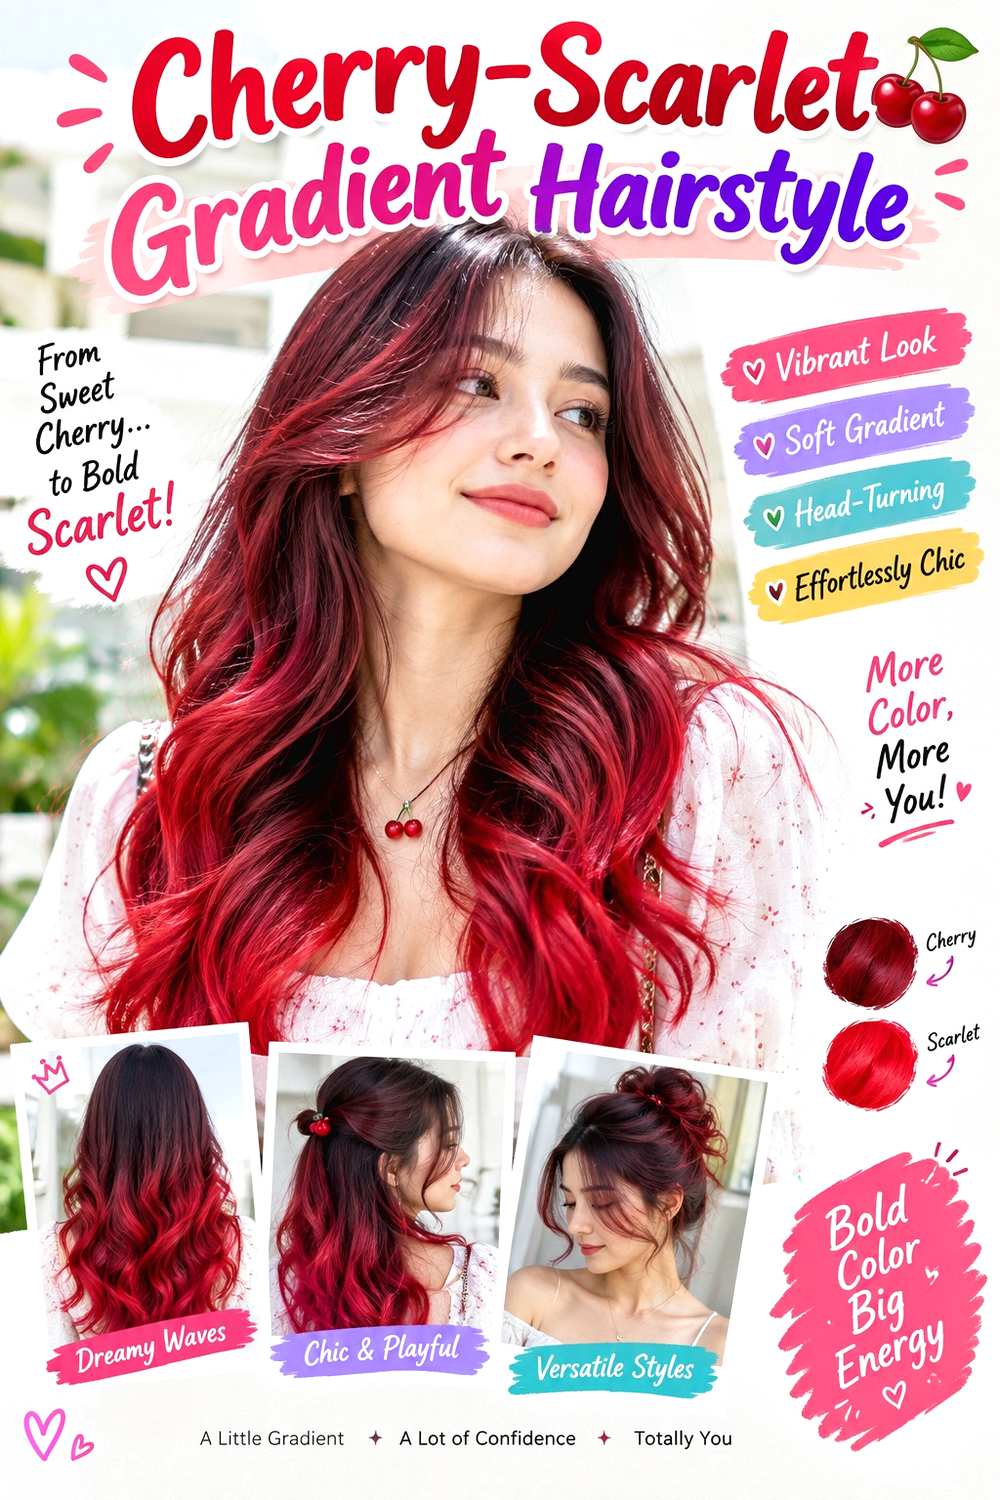
A cherry-to-scarlet gradient starts with a deeper red near the roots and becomes brighter through the mid-lengths and ends. Unlike a black-root ombré, the whole design stays within the red family, so the contrast feels smoother. On long layers, the brighter ends move around the shoulders; on a lob, the gradient reads as a clean shift from rich cherry at the crown to luminous scarlet at the perimeter.
This idea can suit readers who want vivid red with more depth than one flat tone. Hair that already carries warm red pigment may transition more easily, while dark, cool, or heavily colored starting hair may need a more involved professional plan. Use a color-safe shampoo, hydrating conditioner, and heat protectant spray if you style the brighter ends with heat.
A morning refresh can be quick because the gradient does not depend on a specific curl pattern. Restoring faded color is a separate service. At the salon, explain how deep you want the root red and where the brighter scarlet should become dominant. That transition point is the defining feature. Refresh when the two tones stop reading as distinct levels of red or when natural regrowth interrupts the intended cherry root effect.
Pro tip:
Ask to keep a visible midpoint where cherry transitions into scarlet. Without that intermediate zone, the design can read as two separate blocks instead of a gradient.
Make It Work for You:
If your natural base is already reddish brown, preserve more depth near the scalp and concentrate the scarlet below. The grow-out can feel softer while the lengths stay vivid.
Watch Out For:
Do not refresh only the brightest ends if the cherry middle has also faded. An uneven red spectrum can break the smooth gradient you are trying to maintain.
Scarlet Panel Bob Hairstyle

A scarlet panel bob uses one or two clearly defined blocks of red instead of scattered highlights. A wide panel can sit near one temple, behind the ear, or through the lower back section, creating a graphic contrast against black, brunette, or another deep base. On a blunt chin- or shoulder-length bob, the clean perimeter makes the placement especially visible, while a side part can reveal or partially hide the panel.
This design suits someone who wants a deliberate color statement without processing the entire head. Fine hair often needs a narrower panel so enough base color remains visible, while dense hair can carry a broader block. The red section may require lightening depending on the starting color. Use a color-safe shampoo and lightweight conditioner, plus heat protectant spray if you frequently straighten the bob to emphasize the panel.
A quick styling refresh can change how much scarlet shows simply by shifting the part or tucking one side. Pigment fading needs separate maintenance. At the salon, define the panel width and exact starting point before color is applied. Those boundaries matter more than the cutting method. Refresh when the red loses saturation or when regrowth changes the clean block enough that the intended contrast no longer reads clearly.
Pro tip:
Choose the panel while the bob is sitting in its usual part. A perfectly placed block can disappear or double in width when the part shifts.
Make It Work for You:
If your bob has heavy fringe, place the panel behind the temple instead of inside the fringe. The scarlet still flashes through movement without taking over the entire front.
Watch Out For:
Avoid placing a broad panel where the bob naturally flips underneath. The color may hide against the neck, so shift it toward a more visible surface section.
Scarlet Curly Dimension Hairstyle
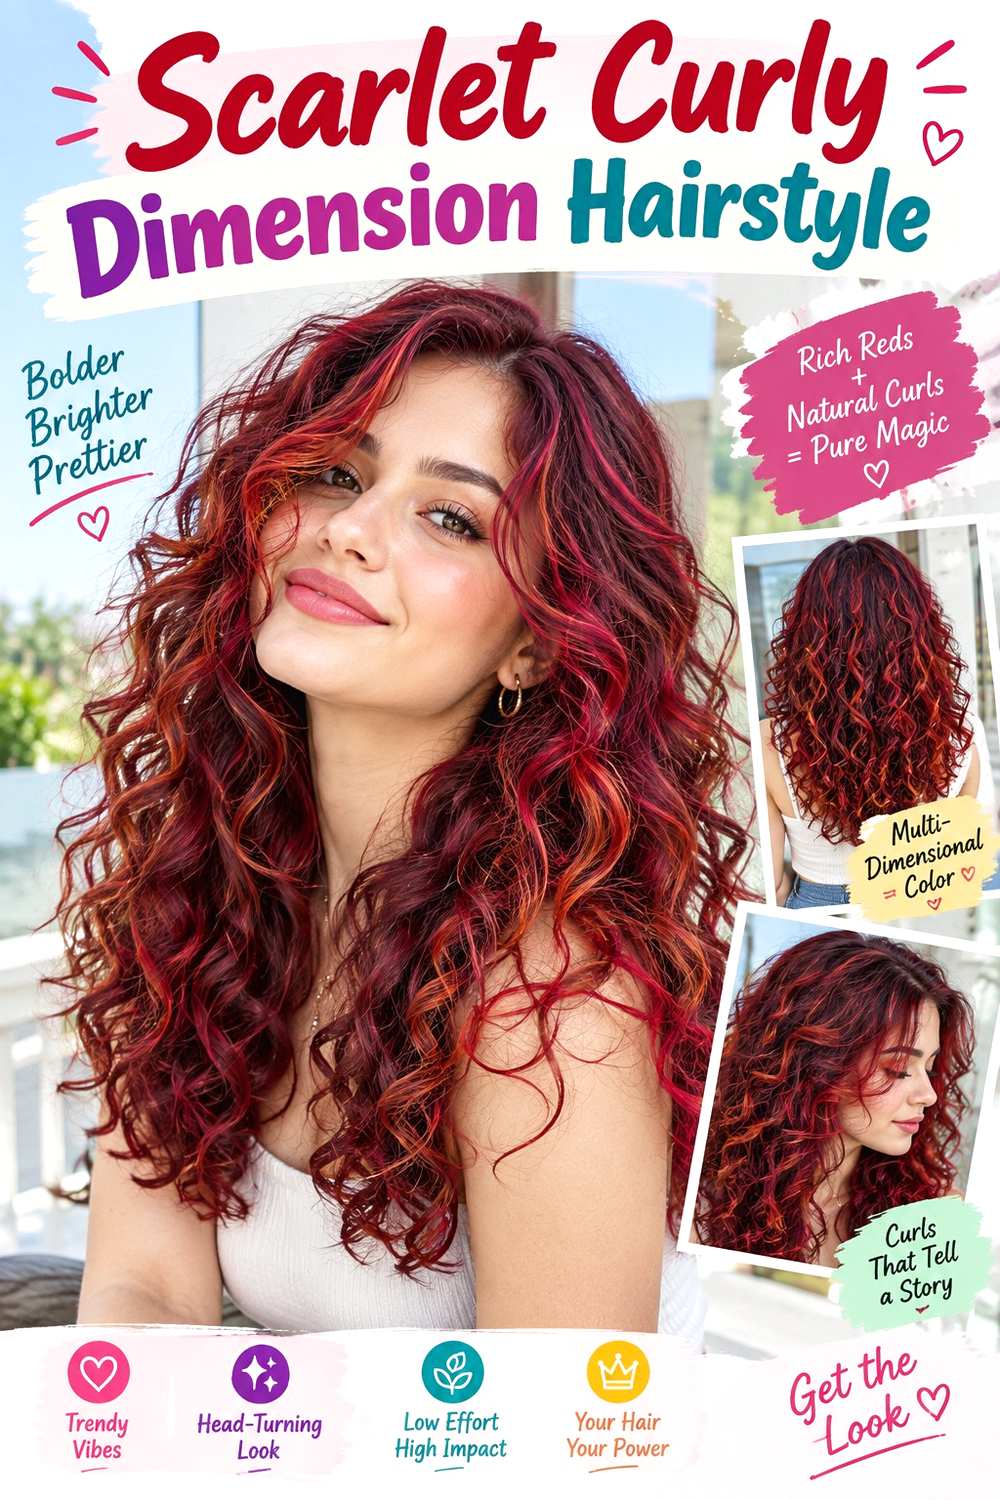
Scarlet curly dimension uses several red depths across natural curls so the color follows movement instead of flattening it into one tone. Brighter scarlet can sit on selected outer curls and around the face, while deeper red remains through the interior. On shoulder-length curls, the contrast appears as scattered ribbons; on tighter coils, smaller placements can create flashes of color as the pattern expands and contracts.
This approach is useful for curly or coily hair because placement can be planned around the way sections sit when dry. Shrinkage, density, and previous chemical history all affect how much color is visible and how much lightening is appropriate. Use a sulfate-free color-safe shampoo, rich conditioner, and curl gel to support both pigment retention and curl grouping without assuming the texture needs heat.
A refresh between washes can focus on reactivating definition in the brighter sections, while faded scarlet requires separate color maintenance. At the salon, ask the colorist to assess where the curls naturally fall before deciding which pieces should be brightest. That dry-position planning helps prevent highlights from disappearing underneath. Refresh when the contrast becomes too muted, and avoid adding more lightened sections simply to compensate for normal fading.
Pro tip:
Have the brightest curls identified while the hair is dry and naturally arranged. Their real resting position is more useful for placement than stretched length alone.
Make It Work for You:
For tighter coils with strong shrinkage, place some scarlet closer to the outer surface and ends. This keeps the color visible even when the finished shape contracts upward.
Watch Out For:
Do not separate every colored curl into tiny strands for visibility. Over-separation can create frizz; preserve larger curl groups and let the scarlet move within them.
Scarlet Copper Blend Hairstyle

A scarlet-copper blend warms vivid red with copper through selected sections, creating a fiery result that is less uniform than pure scarlet. The copper can sit around the face and through the ends, while deeper scarlet stays closer to the crown or interior. Waves show the two tones in separate ribbons, whereas straight hair produces a smoother transition. On layered cuts, the warmer pieces can follow the shortest visible layers for extra movement.
This combination can suit readers whose starting hair already carries warm undertones, although any lightening or color correction should still be planned around condition and previous dye. The exact balance between red and copper matters: too much copper can shift the overall result away from scarlet. Use a color-safe shampoo, moisturizing mask, and heat protectant spray if you style with hot tools.
A quick refresh may only involve reshaping the front pieces, but faded pigment needs color maintenance rather than additional styling. At the salon, specify whether scarlet or copper should dominate and where the second tone should be most visible. That hierarchy keeps the blend intentional. Refresh when the two colors lose separation or when the warmer sections begin reading as one flat orange-red rather than a layered mix.
Pro tip:
Decide which tone should dominate before the appointment. Calling both shades equal priorities can lead to a result that looks generally warm rather than distinctly scarlet with copper dimension.
Make It Work for You:
If your complexion preference leans toward deeper reds, keep copper concentrated at the ends and away from the fringe. Scarlet can remain the main color around the face.
Watch Out For:
Avoid letting repeated warm refreshes push every section toward orange. Compare the balance over time and restore deeper scarlet where the copper starts taking over.
Scarlet Rosewood Melt Hairstyle
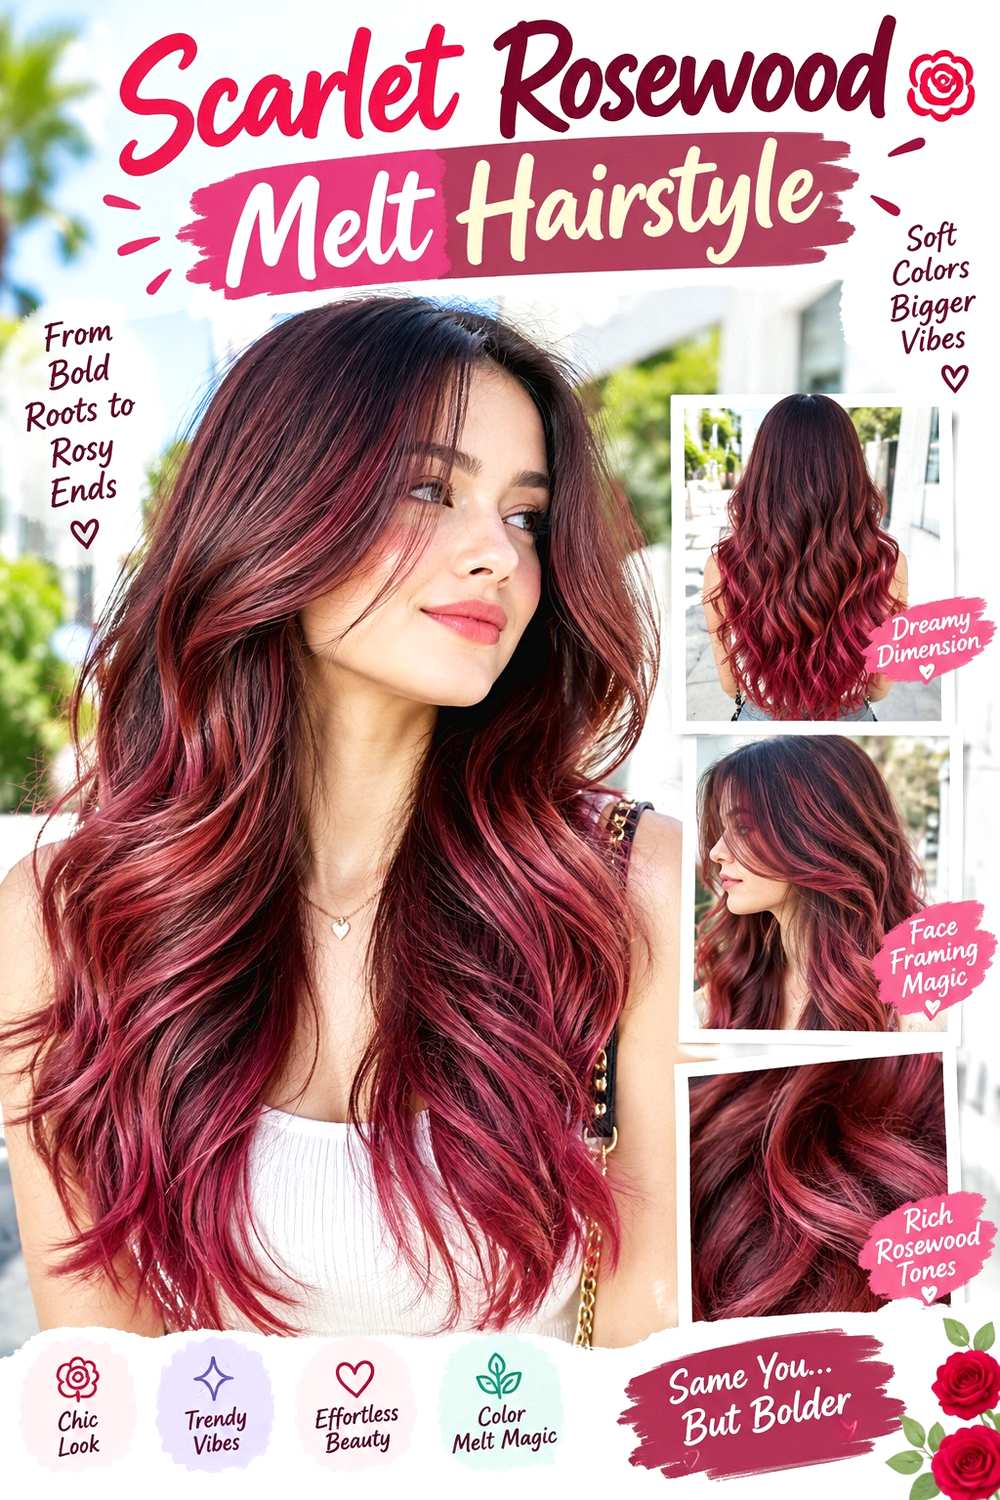
A scarlet-rosewood melt softens bright red with a muted, deeper rose-brown base, creating a supernatural color that feels less neon than pure scarlet. Rosewood can sit through the roots and interior, while scarlet appears through the mid-lengths, face frame, and ends. On medium waves, the tones blend gradually; on straight hair, the transition reads more clearly from the crown downward.
This placement can suit readers who want vivid red without making every section equally bright. A deeper starting color may coordinate naturally with the rosewood area, while the scarlet pieces could still need selective lightening. Existing color history affects how cleanly the tones can separate. Use a color-safe shampoo and nourishing conditioner, plus heat protectant spray if you use heat to show the blend with waves or a smooth finish.
A quick styling refresh does not restore faded scarlet, so keep pigment maintenance separate from daily effort. At the salon, explain how much muted rosewood you want to remain visible and where the brighter red should take over. That ratio determines whether the result feels subtle or high contrast. Refresh when the scarlet loses its brightness or when the root area grows enough to change the intended rosewood-to-red transition.
Pro tip:
Keep the transition visible in at least one face-framing section. Seeing both rosewood and scarlet together makes the melt easier to read from the front.
Make It Work for You:
If you want a quieter result, extend rosewood farther through the interior and reserve scarlet for the surface and ends. Movement will reveal brightness without making it constant.
Watch Out For:
Do not confuse fading with a successful muted blend. If scarlet loses too much saturation, the result can become uniformly dull rather than intentionally rosewood-toned.
Scarlet Burgundy Rooted Hairstyle
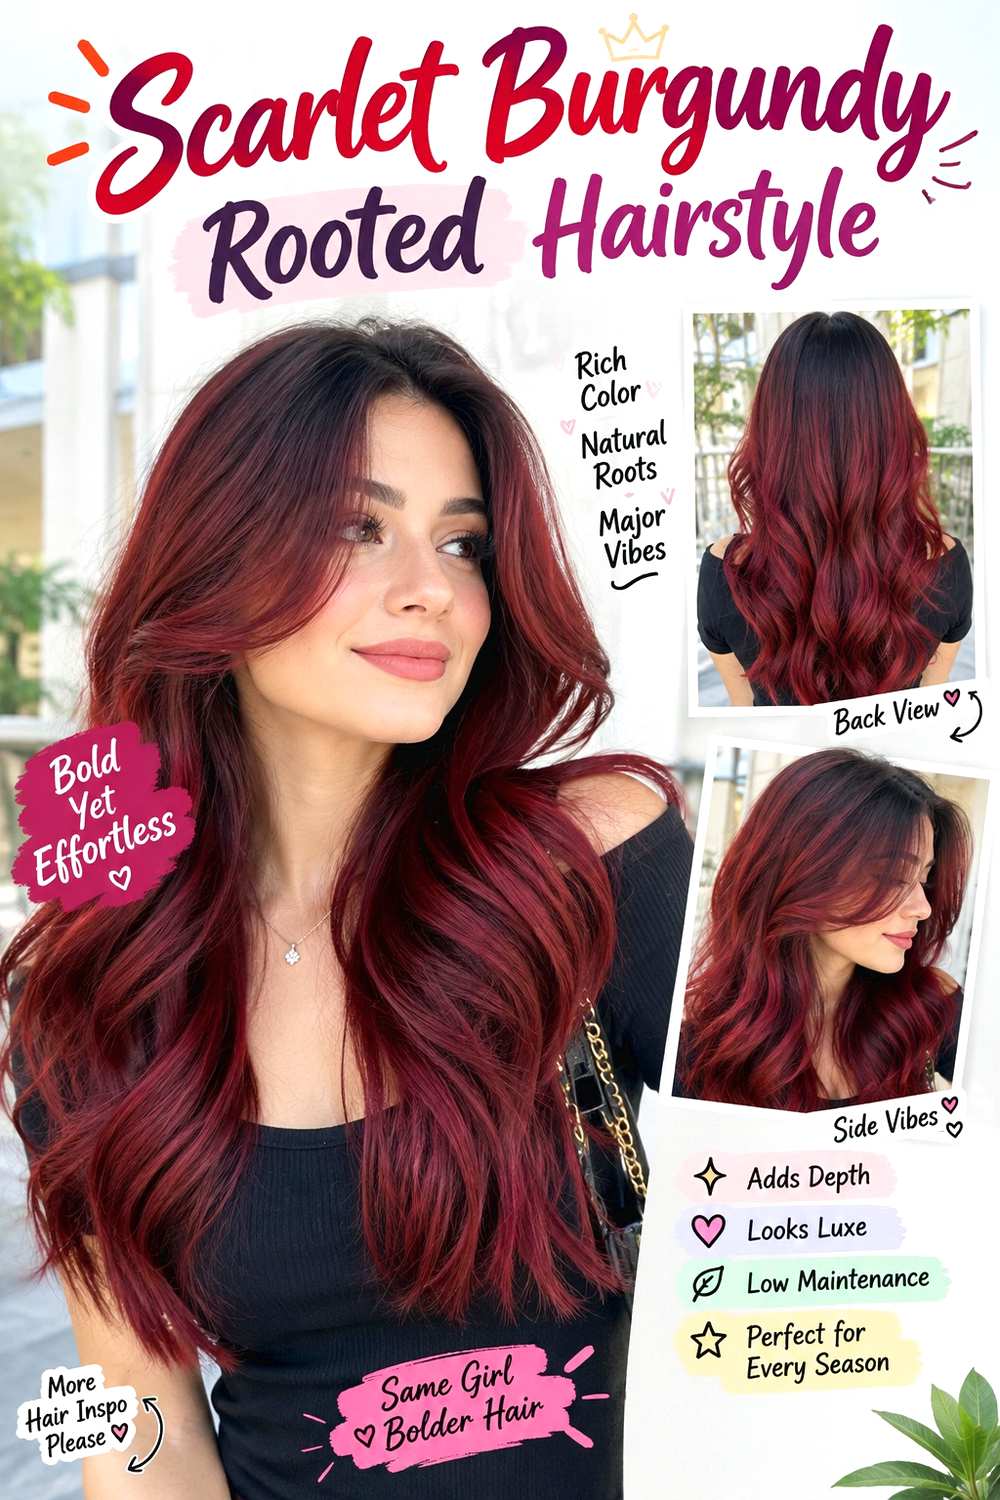
Scarlet with burgundy roots creates a darker red foundation rather than using black or natural brown at the scalp. The burgundy can extend a few centimeters from the roots before blending into brighter scarlet through the lengths. On a center part, the depth looks balanced and deliberate; on waves, the transition breaks into soft red ribbons. Longer face-framing layers can carry the brighter shade forward around the cheeks.
This idea can suit readers who like vivid red but prefer a root area that feels deeper and less luminous. Starting color influences how much preparation is needed, and previously colored dark hair may require a more careful salon plan before scarlet can appear clearly. Use a color-safe shampoo, moisturizing conditioner, and heat protectant spray if you routinely smooth or wave the lengths.
A brief refresh between washes may involve restyling only, while root growth and pigment fade need separate color attention. At the salon, specify how deep the burgundy should be and how far it should extend before the scarlet begins. Too long a root zone can dominate the look. Refresh when natural regrowth disrupts the burgundy band or when the brighter lengths lose enough saturation that the two reds stop looking intentionally layered.
Pro tip:
Match the burgundy root depth to the amount of contrast you enjoy between appointments. A very dark root band will become more noticeable as natural growth appears.
Make It Work for You:
If you wear your hair mostly up, carry a little burgundy into the nape so the root story remains intentional when the lower hairline becomes visible.
Watch Out For:
Avoid extending burgundy farther down each time roots are refreshed. Track the original transition point so the scarlet lengths do not gradually disappear.
Scarlet Micro-Highlight Hairstyle

Scarlet micro-highlights distribute very fine red strands through a darker base, creating a shimmer of color instead of large visible panels. The brightest pieces can sit around the part, temples, and upper layers, while the interior stays mostly dark. Straight hair shows the fine spacing clearly, and waves blend the scarlet into softer movement. On layered medium or long hair, the red catches along several different lengths without overwhelming the base.
This option can suit someone who wants a quieter supernatural effect or prefers to keep most of the natural shade visible. Fine strands need careful placement so repeated lightening does not concentrate unnecessarily in the same small areas. The amount of lift required depends on the starting color. Use a color-safe shampoo and lightweight conditioner, plus heat protectant spray if you heat-style the highlighted surface.
A quick refresh focuses on styling rather than pigment. When the red fades, the small sections may become less visible rather than simply looking lighter. At the salon, specify whether the micro-highlights should be evenly distributed or concentrated around the face and part. That choice changes how noticeable they are. Refresh when the scarlet shimmer becomes too subtle for your preference, not merely because a small amount of root growth appears.
Pro tip:
Ask to keep some fine scarlet pieces near the part where light naturally catches them. A few visible surface strands can make the whole placement read more clearly.
Make It Work for You:
If your base is very dark, concentrate micro-highlights around the face and upper layers. Fewer strategically visible strands can give contrast without spreading lightening through every section.
Watch Out For:
Do not turn faded micro-highlights into progressively thicker streaks at each visit. Preserve the fine scale if the delicate shimmer is what you originally liked.
Scarlet Split-Dye Hairstyle

A scarlet split-dye design places vivid red on one side of the part and a contrasting dark shade on the other, creating the sharpest two-color idea in the group. A precise center part gives the cleanest division, while a slightly off-center split produces a more irregular effect. Blunt bobs make the contrast graphic from root to end, and longer waves let the two colors cross visually as the hair moves.
This placement suits someone comfortable with obvious regrowth and strong contrast. Each side may need a different color process depending on the starting shade, previous dye, and condition, so professional planning is especially useful. Use a color-safe shampoo and moisturizing conditioner, and add heat protectant spray if straightening or curling is part of your routine.
Daily styling can be quick because the color line supplies the main impact. A full wash-day style takes longer if you want the part perfectly crisp. At the salon, decide whether the dividing line should follow the exact center from forehead to nape or only the visible top part. Maintenance is more noticeable than with blended placements: refresh when root growth or scarlet fading makes the deliberate split look uneven rather than waiting for both sides to change at the same rate.
Pro tip:
Use your normal part as the dividing line and photograph it from above. A clean reference helps maintain the boundary when roots grow or the part shifts.
Make It Work for You:
If a full half-and-half split feels too strong, keep one scarlet side slightly narrower near the crown. The contrast stays obvious while allowing more of the darker base to remain.
Watch Out For:
Avoid washing the two sides carelessly immediately after fresh color if transfer is a concern. Follow your colorist’s aftercare directions and use towels you do not mind staining.
Conclusion
Scarlet hair color can be all-over and luminous, rooted in burgundy or black, softened with rosewood, or concentrated into panels, ribbons, ends, and hidden layers. Blunt cuts make graphic placement obvious, while layers, curls, and waves break red into moving sections. Fine or lower-density hair may suit narrower accents, whereas dense hair can carry broader panels without losing depth. Fringe and face-framing pieces deserve special planning because they make regrowth and fading easier to notice. Natural texture should guide placement rather than being flattened for the sake of color. When comparing these supernatural scarlet hair color ideas, consider your starting shade, chemical history, maintenance tolerance, and normal styling routine as carefully as the finished brightness.
Before Your Salon Visit
Choose one or two favorite references and save images that clearly show the scarlet placement you want. Discuss your starting color, previous chemical services, texture, density, face shape, preferred length, and realistic upkeep routine. Point to the exact root depth, face-frame width, panel position, gradient, fringe color, or brightness you like. Ask how the plan may need to change for your hair condition, and separate color maintenance from the haircut or styling shown in the reference.
FAQs
Does scarlet hair color work on naturally dark hair?
Yes, but the finished brightness depends on the starting color and previous dye history. Dark hair may need professional lightening before vivid scarlet can show clearly. A deeper scarlet, rooted blend, underlayer, or ombré can sometimes preserve more natural depth while still making the red visible.
How quickly does vivid scarlet hair color fade?
Vivid red can fade noticeably, but the rate varies with starting condition, washing habits, heat use, products, and the exact color service. Color-safe cleansing, cooler rinsing, and reduced unnecessary heat can help. Ask your colorist how they recommend refreshing pigment between full appointments for your specific result.
Can curly or coily hair wear scarlet color placements?
Yes. Scarlet can follow individual curl groups, face-framing sections, underlayers, or dimensional ribbons without requiring the hair to be straightened. Placement should account for shrinkage and where curls sit when dry. A stylist can assess which sections will remain visible in the finished natural texture.
Do I need to bleach my hair for supernatural scarlet color?
Not always. Whether lightening is needed depends on your natural shade, existing color, hair condition, and how bright you want the scarlet to appear. Dark or previously dyed hair may require more preparation. A professional assessment is safer than assuming one lightening process will suit every starting point.