17 Twisted Half Up Fall Hairstyles for a Soft Autumn Look
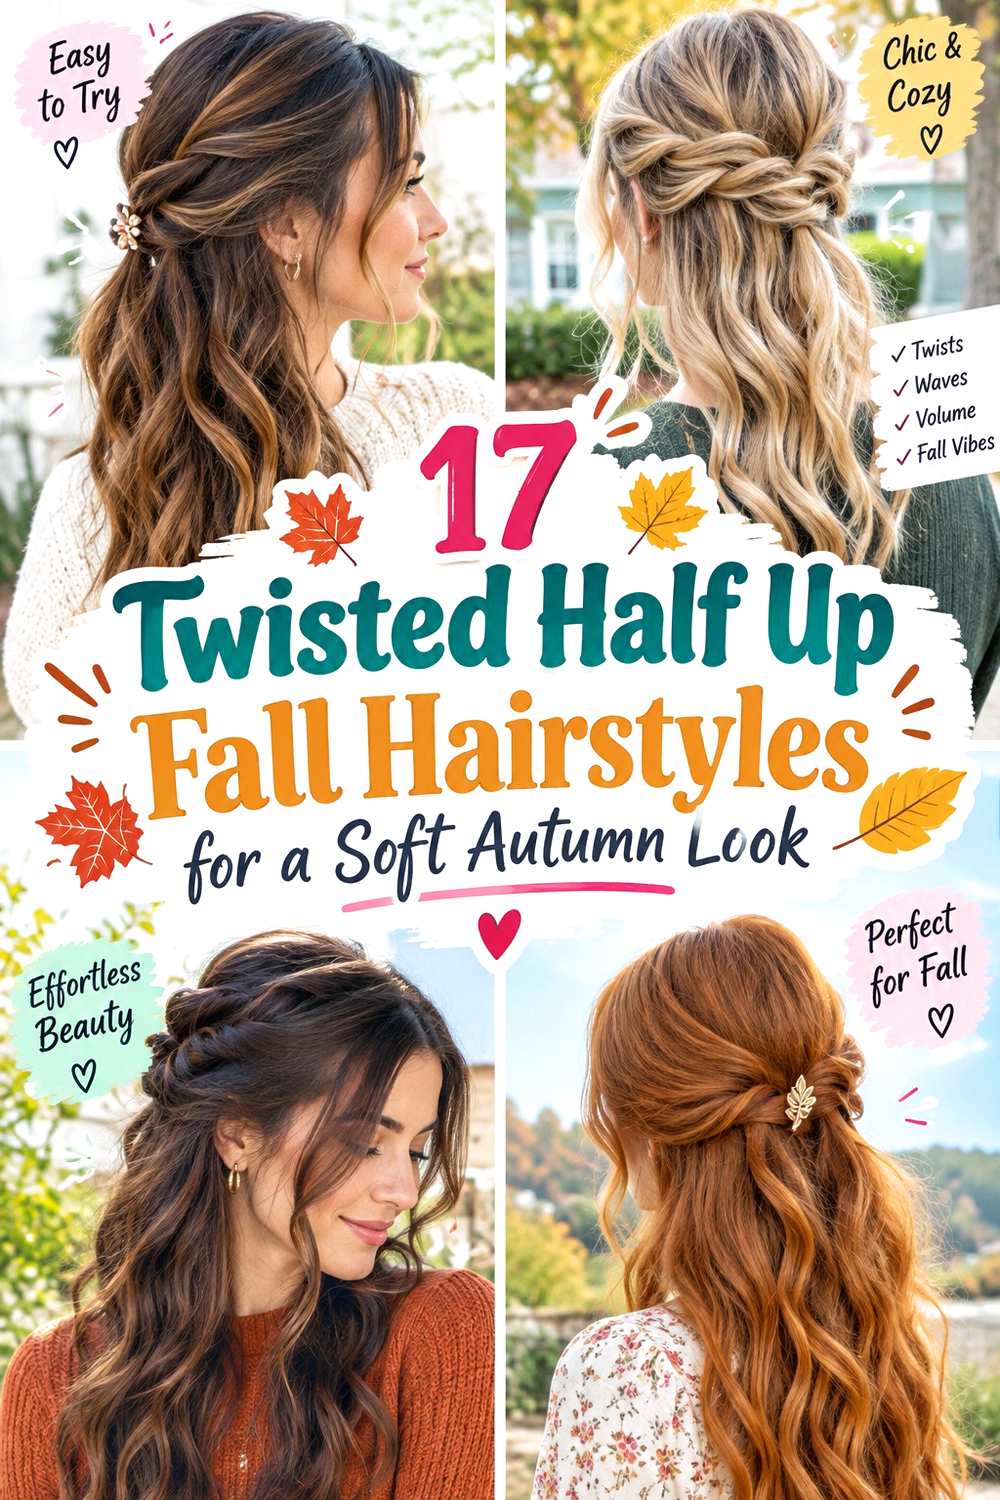
Twisted half up hairstyles combine a secure upper section with loose lengths, making them useful when you want softness without leaving every front piece around your face. The defining shape comes from twists that travel from the temples or sides toward a center-back anchor. Below them, the hair can stay straight, wavy, curly, or coily, with movement concentrated through the shoulders and ends rather than heavy volume at the crown.
Different textures and densities change how much hair should go into each twist. Fine strands often look fuller when the side sections stay narrow, while dense hair can support wider twists without removing too much movement from the lower lengths. Curly and coily hair can keep its natural pattern, and face-framing pieces may finish near the cheekbone, jaw, or chin. Shorter cuts simply need lower anchors and smaller sections.
A quick refresh usually means tightening the center connection or reshaping visible front pieces. A full wash-day style takes longer when waves, curls, or a smooth finish are being created first. Fall scarves and coat collars rarely interfere with these styles because most of the length remains loose, but the center anchor still needs to be secure enough to resist slipping.
Quick List
- Soft Rope Twist Waves Hairstyle
- Center-Back Double Twist Hairstyle
- Side-Swept Twisted Half Up Hairstyle
- Twisted Half Up Knot Hairstyle
- Curly Crown Twist Hairstyle
- Coily Side Twist Half Up Hairstyle
- Curtain Bangs Twisted Half Up Hairstyle
- Face-Framing Layer Twist Hairstyle
- Fine-Hair Mini Twist Hairstyle
- Dense-Hair Wide Twist Hairstyle
- Short Lob Half Up Twist Hairstyle
- Long Hair Cascading Twist Hairstyle
- Twisted Half Up Mini Bun Hairstyle
- Double Rope Twist Half Up Hairstyle
- Loose Wave Crossed Twist Hairstyle
- Textured Wavy Half Up Twist Hairstyle
- Scarf-Tied Twisted Half Up Hairstyle
Soft Rope Twist Waves Hairstyle
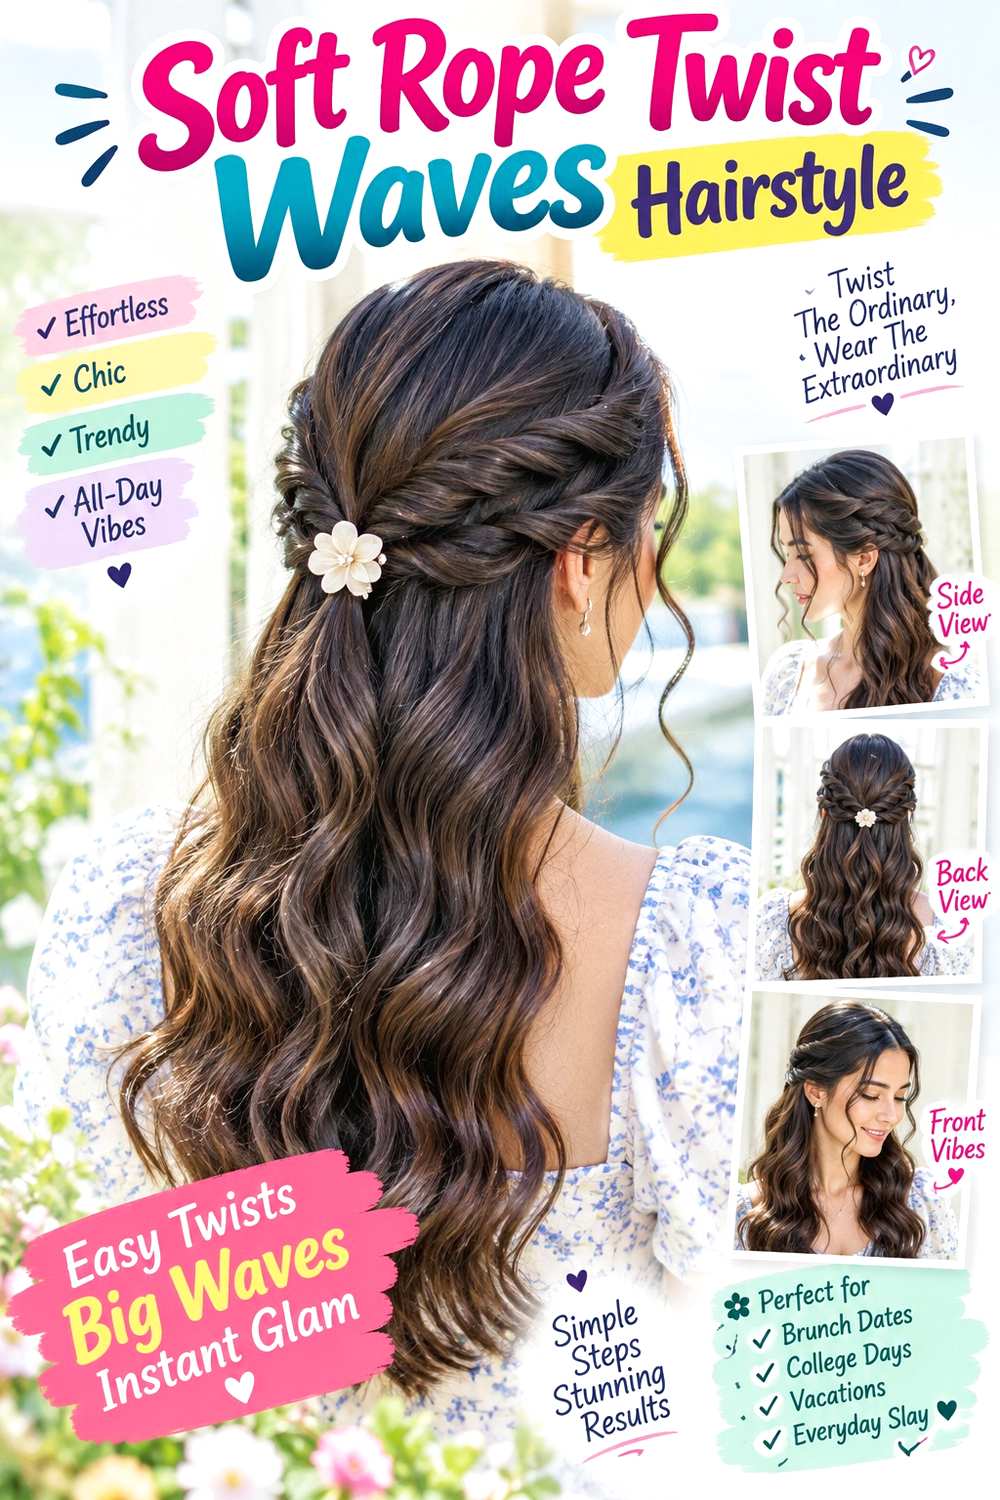
Two soft rope twists meeting above loose waves create an easy half-up shape without building much height at the crown. Start with a center or slightly off-center part, take a section above each ear, and twist it backward while keeping the surface relaxed. Join the sections at the center back and let broad waves begin around the cheekbones or jaw. Straighter tips can keep the lower length light and moving rather than overly curled.
Shoulder-length and longer hair gives the twists enough reach, while straight and wavy textures usually make the wave finish quicker to create. Apply heat protectant before using a large-barrel curling iron, then secure the twists with a small grip clip. A short refresh between washes usually means tightening the clip and reshaping the front bend; a full wave set takes longer depending on length and density. If the twists begin slipping, rebuild their connection rather than twisting the sides more tightly.
For salon or occasion styling, explain how wide you want each rope twist and where you want the center anchor to sit. A position just below the crown keeps the twists visible while leaving enough loose hair for movement.
Pro tip:
Twist each side away from the face and hold the tension until both sections meet at the back. Loosen only the outer edge afterward so the rope pattern remains visible.
Make It Work for You:
For fine hair, take narrower side sections and leave more density through the loose waves. Broad bends below the shoulders can add movement without separating the ends too much.
Watch Out For:
Pulling the twists apart before securing their center can make them unravel quickly. Fasten both sides first, then soften only the visible outer surface with your fingertips.
Center-Back Double Twist Hairstyle

A center-back double twist creates a clean symmetrical shape by bringing two separate side sections together without crossing them. Start with a centered part, take equal pieces from above the temples, and roll each section backward until they meet behind the head. Secure them just below the crown while leaving the remaining length smooth, softly bent, or naturally textured. The result feels balanced from the front and keeps both sides equally open around the face.
Medium to long hair works especially well because the side sections need enough length to reach the middle comfortably. A light texturizing spray gives smooth hair grip, while a small grip clip holds the meeting point without requiring several pins. A quick refresh usually means retightening one side and resetting the clip. Wash-day effort remains low when you keep your natural texture, but it becomes longer if you also create a full wave or straight finish.
If one twist looks noticeably thicker, compare the starting section before tightening either side. For salon or event styling, specify the width of the temple sections and the exact center-back height. Keeping the anchor horizontal rather than tilted helps the symmetry remain clear when viewed from behind.
Pro tip:
Use the top of each ear as a guide when taking the side sections. Matching those starting points helps both twists reach the center at the same height.
Make It Work for You:
For layered hair, take slightly smaller sections so short pieces are easier to contain. Let the shortest front layers remain loose instead of forcing them into the twist.
Watch Out For:
Unequal starting sections can make the finished style look crooked even when the clip is centered. Rebalance the hair before fastening rather than compensating with tighter twisting.
Side-Swept Twisted Half Up Hairstyle

A deeper side part gives this half-up design a directional shape, with the fuller front section sweeping backward into a twist. Take more hair from the heavier side and a narrower section from the opposite temple, then twist both toward an off-center anchor. Keep some lift near the part without creating a large crown bump. The lower hair can remain softly waved, while one jaw-length piece on the fuller side adds movement beside the face.
Medium and long hair works well, especially when the front already falls naturally to one side. Use heat protectant before shaping the loose length with a curling iron, and secure the twists with bobby pins placed at the meeting point. A quick refresh focuses on the fuller front section and any loosened pin; a full wash-day set takes longer if the hair must be dried and curled first.
If the swept section starts falling across the eyes, shift the anchor slightly higher or farther back rather than pulling the twist tighter at the temple. For salon styling, explain how deep you want the part and which side should carry more visual weight. The stylist can then balance the twist widths without making both sides artificially identical.
Pro tip:
Direct the fuller side toward the upper back of the head before twisting. That diagonal path keeps the sweep soft while preventing it from dropping forward over the forehead.
Make It Work for You:
For fine hair, keep the side part moderate rather than extremely deep. You can preserve the asymmetric effect while leaving enough density on the smaller side.
Watch Out For:
Twisting the fuller section too tightly can flatten the front and remove the side-swept effect. Maintain gentle tension and secure farther back instead of pulling harder.
Twisted Half Up Knot Hairstyle
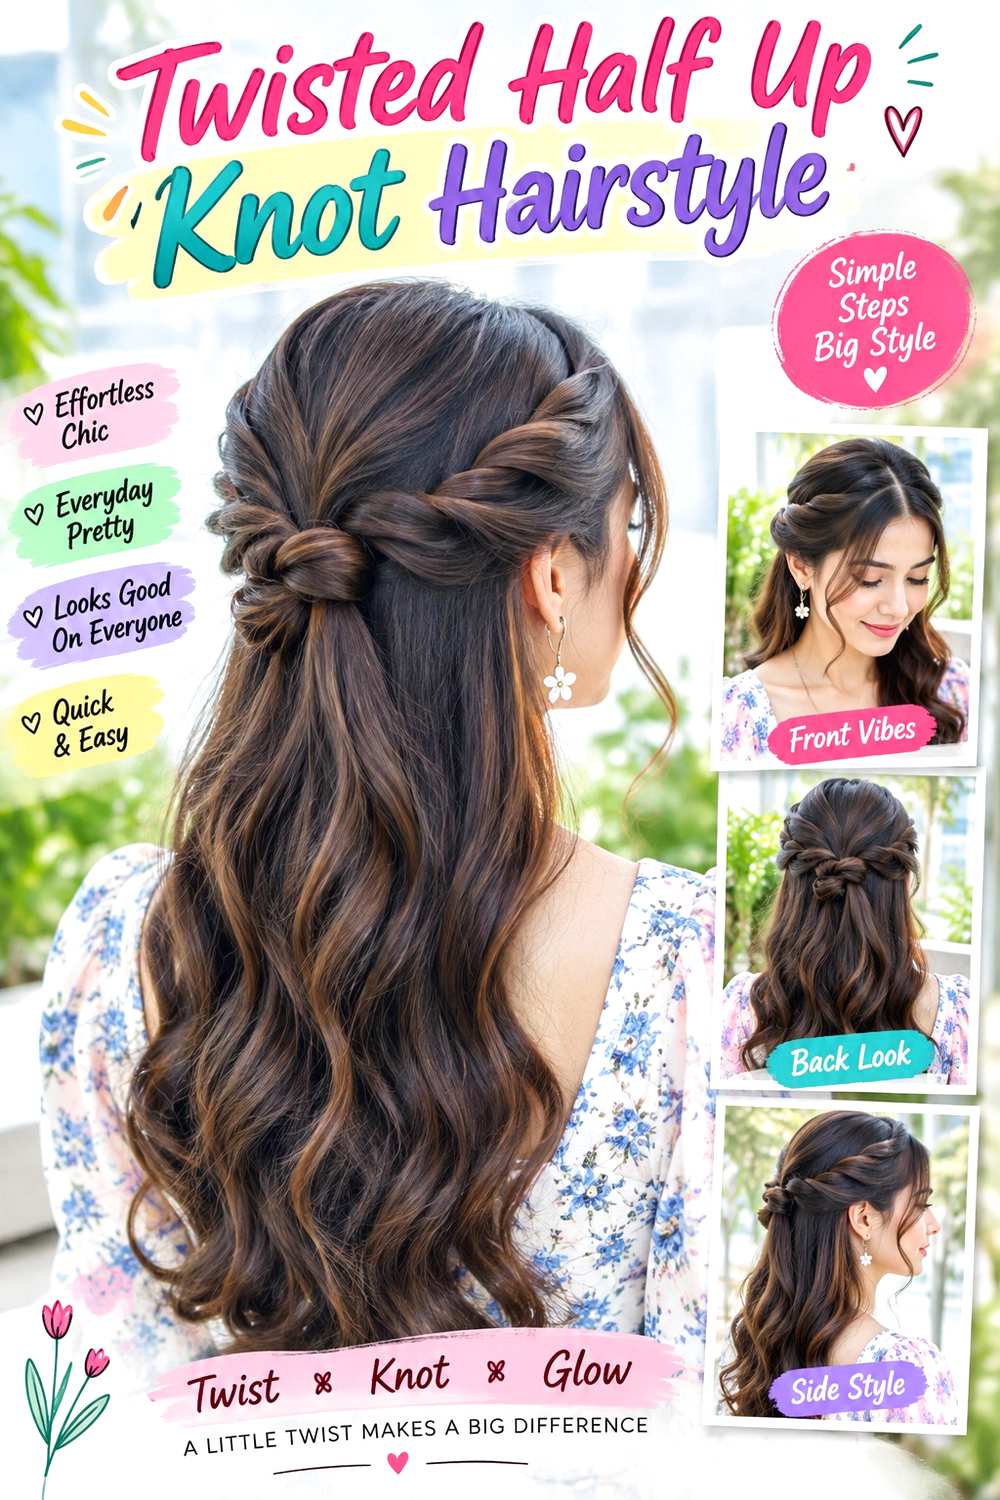
A small knot at the center back gives the usual half-up twist a more defined focal point. Take one section from each side above the ears, twist both backward, then cross or loop them together before securing the connection. Keep the knot compact so it does not turn into a full bun. The loose lengths should remain the dominant part of the style, with soft waves or natural texture falling below the shoulder line.
Medium to long hair is easiest because each twist needs enough length to form the center knot without pulling. A light texturizing spray adds grip, while bobby pins secure the crossed center from underneath. A quick refresh may involve tightening the knot or replacing one hidden pin; a full wash-day version takes longer only if you also change the natural texture of the loose hair.
The knot should stay stable independently instead of relying on several visibly crossed pins. If it begins sliding down, rebuild the center connection before loosening the sides again. For salon or occasion styling, specify how small you want the knot and how low it should sit. A compact connection just below the crown usually leaves the twist pattern visible while keeping plenty of movement underneath.
Pro tip:
Form the knot while the side twists are still firm, then loosen their outer edges afterward. This keeps the center tidy instead of letting the connection collapse during shaping.
Make It Work for You:
For shorter medium-length hair, make a simple crossed knot rather than a full loop. The center detail stays visible without requiring extra length that the sides cannot provide.
Watch Out For:
An oversized center knot can swallow the side twists and start resembling a bun. Keep the connection small so the half-up structure remains the defining feature.
Curly Crown Twist Hairstyle
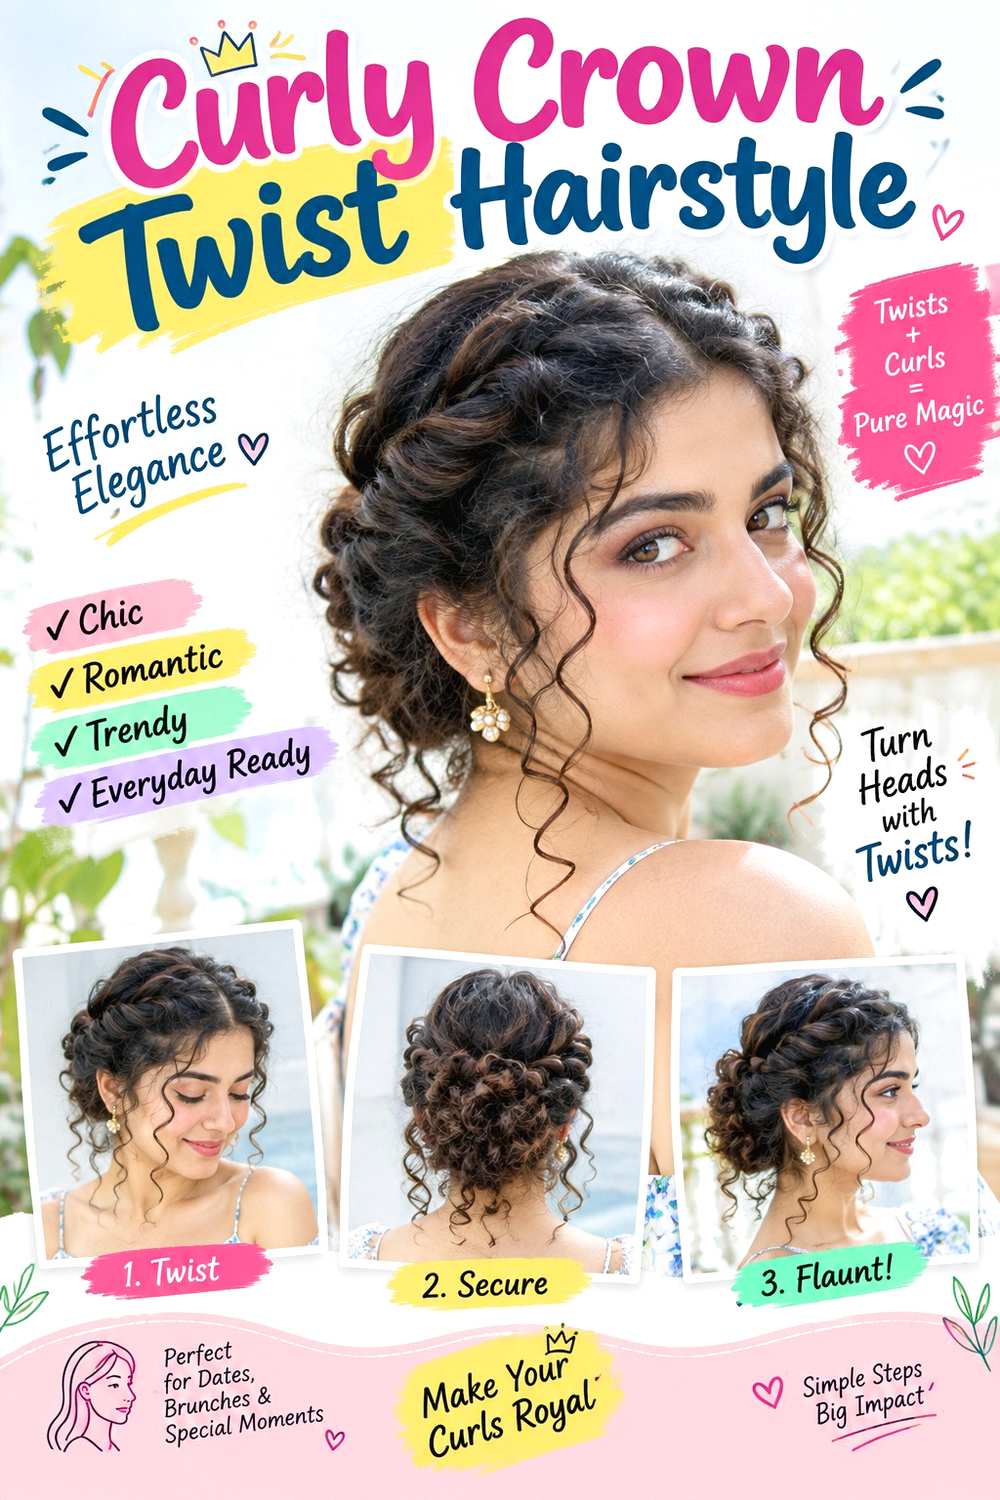
Natural curls can create a soft crown twist without losing their pattern through the loose lengths. Leave a few selected curls around the face, then take a section above each ear and gently twist it toward the center back. Keep the crown softly textured instead of pulling every curl flat. The anchor should sit below the highest point of the head, allowing the remaining curls to fall freely across the shoulders with their usual spring and volume.
Medium to long curly hair works best when the side sections reach the center without excessive stretching. Use a lightweight leave-in conditioner for softness, curl gel to support visible definition, and bobby pins to secure the twists discreetly. A short refresh may involve dampening one flattened front curl and tightening a pin; a full wash-day routine takes longer depending on density, shrinkage, and drying method.
Avoid brushing through dry curls simply to make the twists smoother. For salon styling, identify which front curls you want left loose and where they should finish when dry. Also explain how much crown texture you want visible, because a softly controlled curl surface looks different from a fully smoothed twist and requires different placement rather than more tension.
Pro tip:
Choose your face-framing curls before twisting the sides. Leaving them out from the beginning protects their definition and avoids pulling neighboring curl groups apart afterward.
Make It Work for You:
For dense curls, use slightly wider side sections but keep the center anchor modest. This controls the front while leaving enough curl volume through the lower lengths.
Watch Out For:
Stretching the side curls too tightly can distort the pattern and create uncomfortable tension. Twist only as far as the hair reaches naturally, then secure the center.
Coily Side Twist Half Up Hairstyle

Two defined side twists can keep the front controlled while allowing coily texture to remain full through the back. Start with a center or natural part and take sections above the ears, following the direction the hair already prefers to move. Twist each side toward the center back with comfortable tension, then secure them while leaving the lower coils loose. Small defined sections around the temples can remain visible so the front does not feel overly pulled back.
Coily hair with enough length to reach the center can use this arrangement without being straightened or stretched solely for styling. A moisturizing leave-in conditioner supports softness, curl gel helps keep the exposed coils defined, and bobby pins anchor the twists. A quick refresh may involve retwisting one side and reshaping a few visible coils; a full wash-day routine takes longer according to density, shrinkage, detangling, and drying needs.
If the twist shortens considerably as it settles, work with that normal shrinkage rather than forcing extra length. For salon or event styling, specify how wide the side sections should be and exactly where the anchor needs to sit. Comfortable perimeter tension matters more than getting the twists to meet at an artificially high point.
Pro tip:
Twist each side while the hair is pliable but not heavily stretched. Let the finished section settle into its normal shrinkage before deciding where the center anchor should sit.
Make It Work for You:
For strong shrinkage, choose a slightly lower meeting point so the side sections reach comfortably. The half-up shape remains clear without pulling the coils beyond their natural length.
Watch Out For:
Do not tighten the twists repeatedly because the center shifts upward. Reset the anchor lower instead, keeping the hairline and temple area comfortable throughout the style.
Curtain Bangs Twisted Half Up Hairstyle
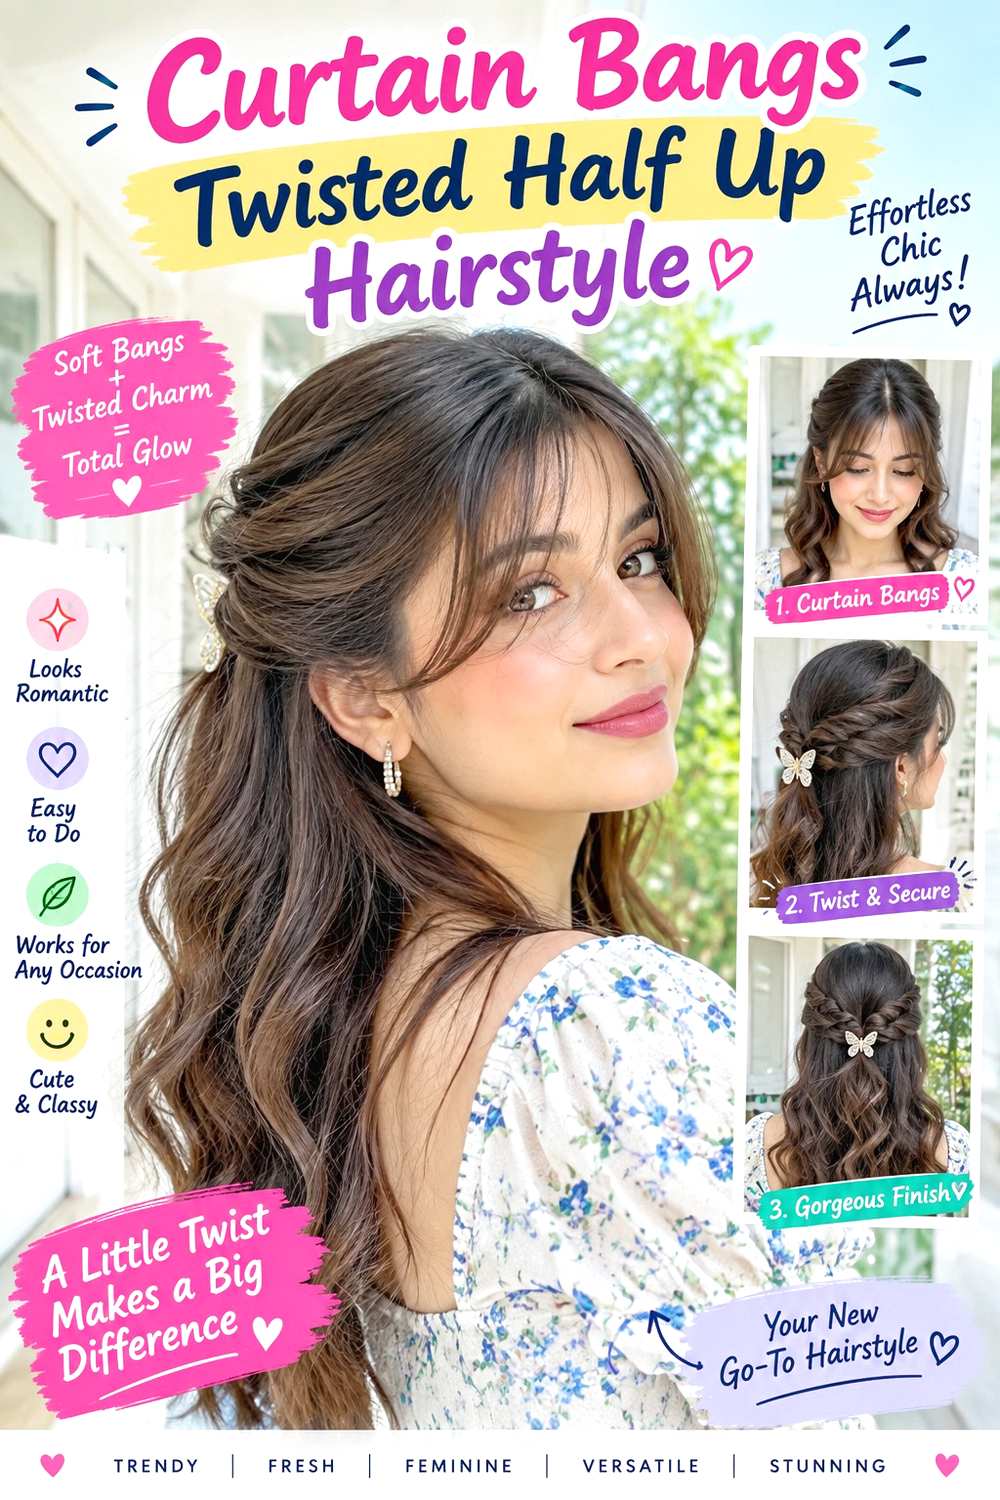
Curtain bangs give a twisted half-up style a softer front because the fringe stays separate from the side sections. Keep the center of the bangs open, with shorter pieces around the brows or upper cheekbones and longer outer corners blending toward the temples. Take hair from behind those outer corners, twist it backward, and secure both sides below the crown. Loose lengths can stay straight or softly waved, keeping the front and back connected through gentle movement.
Straight and wavy hair makes the fringe easy to redirect, while textured bangs can retain natural bend. Apply heat protectant before warm styling, use a small round brush to shape the fringe away from the face, and secure the twists with a small grip clip. A quick refresh often means restyling only the bangs and resetting the clip; a full wash-day routine takes longer depending on the loose length.
Fringe upkeep is separate from maintaining the half-up style. When the center starts falling into the eyes or the outer corners stop blending, the bangs may need reshaping. At the salon, specify the exact dry finished length through the middle and sides, and explain that the twist starts behind the fringe rather than incorporating it.
Pro tip:
Separate the entire fringe before taking the twist sections. This keeps the longer outer corners from disappearing into the back and preserves the intended curtain shape.
Make It Work for You:
For naturally wavy bangs, keep some bend instead of forcing them completely smooth. The open center and longer sides can still frame the face clearly.
Watch Out For:
Taking hair from inside the fringe section can leave the bangs uneven and make one twist thicker. Start each side behind the established outer bang corner.
Face-Framing Layer Twist Hairstyle

Face-framing layers can stay loose while the longer side sections form the twist, creating a soft outline around the cheeks and jaw. Begin with a center or slightly off-center part, separate the shortest front layers, then take hair from just behind them and roll it backward toward a center anchor. Keep the twists narrow enough that the loose lower length remains full. Gentle bends through the front layers can visually connect them with the hair falling behind the shoulders.
Straight and wavy textures show this layered movement clearly, while curly hair needs the front length judged in its usual dry state. Apply heat protectant before shaping the visible layers with a round brush, then use bobby pins to secure the twists. A quick refresh focuses on the front pieces and center connection; a full blow-dry takes longer according to density and length.
As the front layers grow, they may stop sitting where intended even though the twist still holds. At the salon, point to the exact landmark where you want the shortest face-framing section to finish—cheekbone, jaw, or chin—and explain how much hair you normally leave loose when wearing half-up styles.
Pro tip:
Separate the face-framing layers before you start twisting. Doing this early keeps the front balanced and prevents you from pulling pieces out of an already secure anchor.
Make It Work for You:
For curly hair, choose the shortest front layer according to its dry curl position. The twist can stay identical while the framing respects your natural shrinkage.
Watch Out For:
Pulling too many side layers free can make the twist look thin and disconnected. Keep the framing intentional and leave enough hair to form a visible side roll.
Fine-Hair Mini Twist Hairstyle
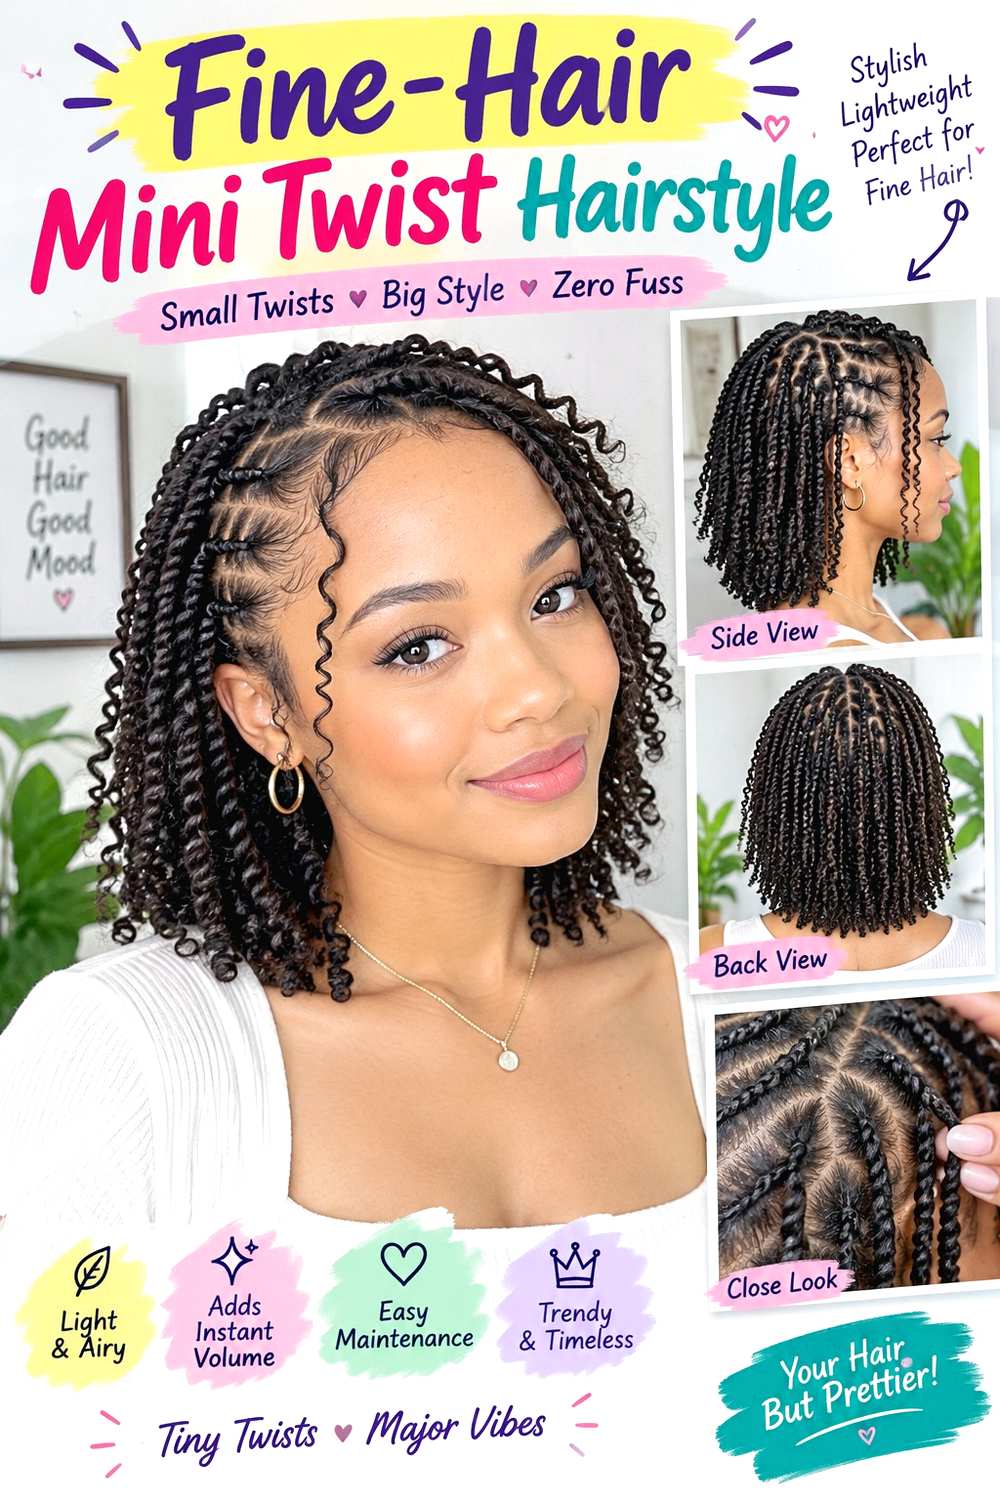
Fine strands can suit a small half-up twist particularly well because the style does not require taking a large section away from the loose lengths. Start with narrow pieces above the temples, twist each backward once or twice, and join them with a small anchor at the center. Keep the crown close to its natural height and let most of the hair remain down. A soft bend through the ends can add movement without making the lower edge overly separated.
Fine hair can still be low, medium, or high density, so adjust the twist width according to how much hair you actually have. Lightweight mousse can add grip and support, while a small grip clip secures the center without dominating the style. A quick refresh normally means tightening the clip or smoothing a loose side section. Full wash-day styling is longer only when you also create additional texture.
If the twists appear sparse, reduce their width rather than pulling them outward for size. For salon or occasion styling, specify that you want narrow side sections and a small center anchor. Keeping more hair loose beneath the twist preserves useful visual density through the ends and makes the half-up shape feel balanced.
Pro tip:
Take less hair for the first twist than you think you need. You can add a little more, but oversized side sections quickly reduce fullness through the loose lengths.
Make It Work for You:
If your fine strands are very dense, use slightly wider twists while keeping the center clip small. This creates more visible detail without sacrificing the lower perimeter.
Watch Out For:
Over-loosening the twists can expose gaps between fine strands. Keep their centers compact and soften only the outer edge after the anchor is completely secure.
Dense-Hair Wide Twist Hairstyle
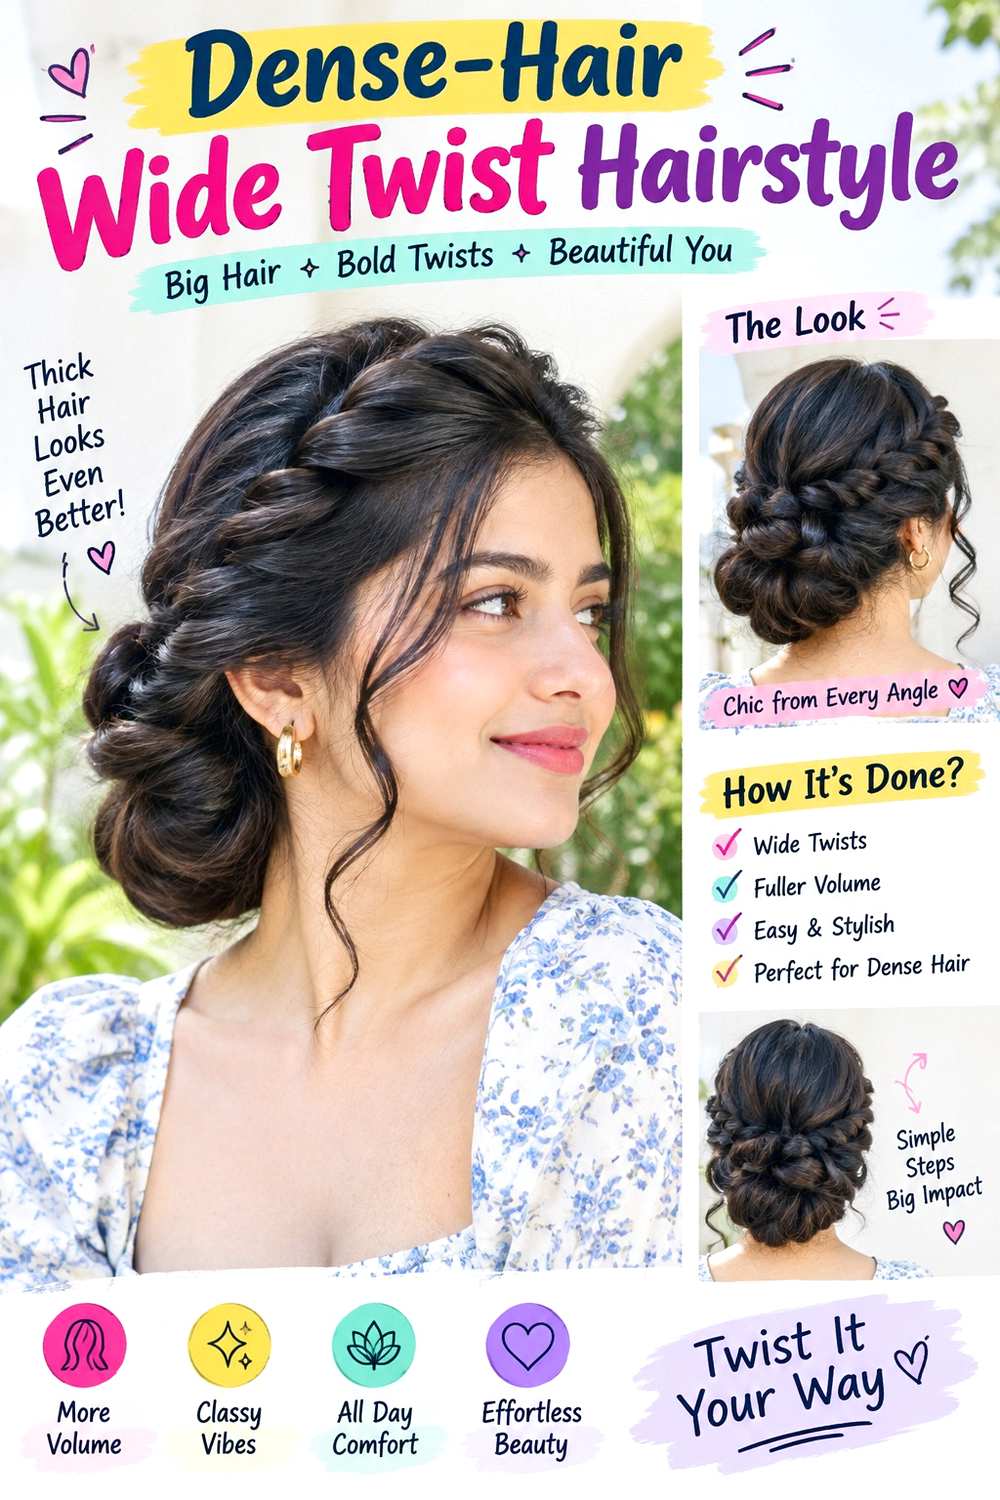
Dense hair can support wider side twists that remain visible even when plenty of length is left down. Take substantial sections from above both ears and roll them backward with moderate tension, spreading the hair into a broad twist rather than compressing it into a narrow rope. Join the sections below the crown so their weight is distributed across the back. Keep the loose lengths full and natural, with movement starting below the shoulders if you want a softer finish.
Medium to long dense hair works especially well because the side sections have enough volume to form a strong shape. A light styling cream helps control shorter surface pieces, while bobby pins crossed beneath the meeting point create a secure anchor. A quick refresh usually means tightening one pin or smoothing the outer twist; a full wash-day style depends on your drying and texture routine.
If the twist feels heavy, use a lower center anchor instead of increasing tension at the temples. For salon or event styling, explain the width you want across each side and how much hair should remain loose. If bulk becomes uncomfortable, the placement should be adjusted rather than automatically thinning the entire haircut.
Pro tip:
Spread each section with your fingers as you twist it backward. A broad, flat twist distributes dense hair more comfortably than a very tight rope-style section.
Make It Work for You:
For shorter dense hair, lower the meeting point and use less hair above the ears. This preserves the wide appearance while allowing the sections to reach comfortably.
Watch Out For:
Pulling dense side sections too tightly can make the style uncomfortable quickly. Lower the anchor or reduce section size instead of adding more tension around the temples.
Short Lob Half Up Twist Hairstyle

A shoulder-skimming lob can still hold a twisted half-up shape when the side sections remain small and the anchor sits low. Take hair from just above the ears, twist each section backward, and fasten them around the upper nape or lower back of the head. Keep the rest of the lob loose so the blunt or softly layered perimeter remains visible. Short front pieces can stay free instead of being stretched toward the anchor.
Straight, wavy, and loosely curly lobs work well because enough length remains to show below the twist. A light texturizing spray provides grip, and bobby pins hold the meeting point without requiring a large accessory. A quick refresh takes only a few minutes because the twists are small; wash-day effort depends on how you normally style the lob’s perimeter.
If the side sections repeatedly slip free, lower the anchor before taking larger pieces. For salon styling, show exactly where your shortest side layer ends and explain that you enjoy half-up twists. The stylist can assess whether the layer placement reaches the desired anchor while preserving the bottom edge you want when the hair is worn fully down.
Pro tip:
Begin the twists slightly behind the temples instead of at the hairline. Those sections usually have enough length to reach a low anchor without pulling shorter front pieces backward.
Make It Work for You:
For a blunt lob, keep the lower hair mostly untouched so the strong perimeter remains visible. Small twists provide detail without removing too much weight from the ends.
Watch Out For:
A high anchor can make short side layers spring loose throughout the day. Move the connection lower rather than securing every escaping piece with tighter tension.
Long Hair Cascading Twist Hairstyle

Long hair makes it possible to keep the half-up twists compact while allowing the loose length to become the main feature. Take moderate side sections from above the ears, roll them backward, and secure them below the crown. Let the remaining hair cascade down the back with broad bends beginning through the mid-lengths rather than at the roots. The ends can stay softly separated, while the crown remains relatively smooth so the twist line is easy to see.
Straight and wavy hair can create this finish efficiently, while naturally curly hair can keep its pattern instead of adding waves. If using heat, apply heat protectant before shaping the loose lengths with a large-barrel curling iron, then secure the twists with bobby pins. A short refresh may mean recoiling only the front pieces and tightening the center anchor; a full wash-day set takes considerably longer on very long or dense hair.
Avoid putting too much length into the twists, because the sides can become heavy and drag downward. For salon or occasion styling, specify where you want the wave pattern to begin and how much hair should remain loose. The side sections should support the design without stealing the movement from the lower length.
Pro tip:
Use only the upper side sections for the twists and leave the hair behind the ears down. This keeps the long lengths full while still creating a clear half-up shape.
Make It Work for You:
For very dense long hair, use wider but shallower side sections. You gain visible twist width without pulling a large amount of weight into the center anchor.
Watch Out For:
Taking sections from too far down the sides can make the twists heavy and cause sagging. Keep the gathering area closer to the upper ear and temple.
Twisted Half Up Mini Bun Hairstyle

A small center bun gives the twisted half-up shape a more defined back detail without gathering all the hair. Twist one section from each side toward the center, join them into a small ponytail, then wrap that short tail into a mini bun. Keep the bun compact and leave most of the length loose below it. A center or side part works, while narrow face-framing sections can remain outside the twists for a softer outline.
Medium to long hair gives the mini bun enough length to wrap without making the lower section look sparse. A small fabric-covered elastic creates the center ponytail, while bobby pins hold the wrapped bun. A quick refresh usually means retucking the bun end or tightening one side twist; a full wash-day style remains simple unless you also change the loose texture.
If the bun becomes too large, reduce the amount of hair taken from each side rather than wrapping it more tightly. For salon or event styling, explain the exact bun size and center-back height you prefer. The mini bun should function as a decorative connection between the twists, not dominate the loose lower hair.
Pro tip:
Build a small center ponytail first and check its size before wrapping it. If the section already looks heavy, remove some hair before forming the mini bun.
Make It Work for You:
For fine hair, keep the bun tiny and leave most density down. A compact wrapped center can still be visible without sacrificing fullness through the lower lengths.
Watch Out For:
An oversized mini bun can pull the twists downward and hide their shape. Reduce the side sections so the twists and loose hair remain equally important.
Double Rope Twist Half Up Hairstyle
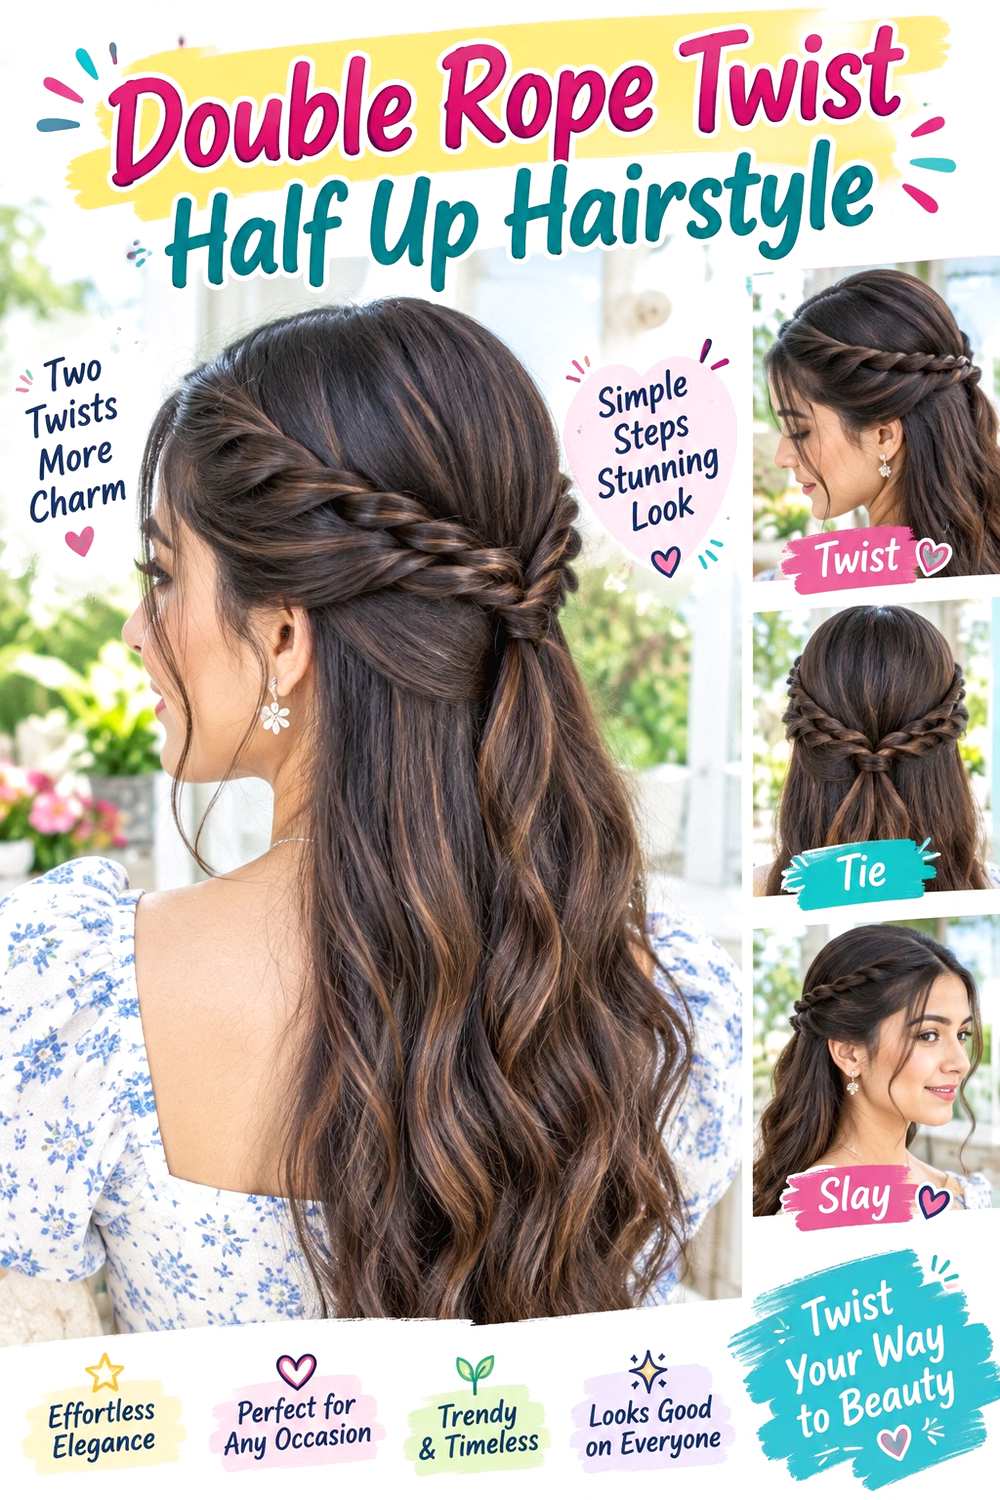
Double rope twists create extra definition by using two smaller twists on each side instead of one broad section. Divide the hair above each ear into an upper and lower piece, twist each backward separately, then bring all four sections together at the center. Keep the ropes narrow and visible rather than merging them into one thick roll. The lower hair can stay smooth or softly waved, with most volume below the shoulder line.
Medium and long hair works best because the four side pieces need enough length to reach the center comfortably. A light styling cream helps control flyaways, and a small grip clip secures all four twists without needing multiple visible fasteners. A quick refresh usually means retwisting one loosened rope and resetting the clip; full wash-day styling depends on the finish you choose for the loose lengths.
If the ropes start blending together, separate their paths slightly as they move backward. For salon or occasion styling, specify that you want two distinct twists on each side and where they should meet. Narrow sections and even spacing are more important than excessive tension.
Pro tip:
Twist the upper pair first and let them sit slightly above the lower pair. That small separation keeps all four ropes visible when they reach the center anchor.
Make It Work for You:
For finer hair, make the lower twists slightly narrower than the upper ones. This preserves density through the loose lengths while keeping the layered rope effect.
Watch Out For:
Taking four large sections can remove too much hair from the lower style. Keep each rope modest so the loose portion still has enough weight and movement.
Loose Wave Crossed Twist Hairstyle
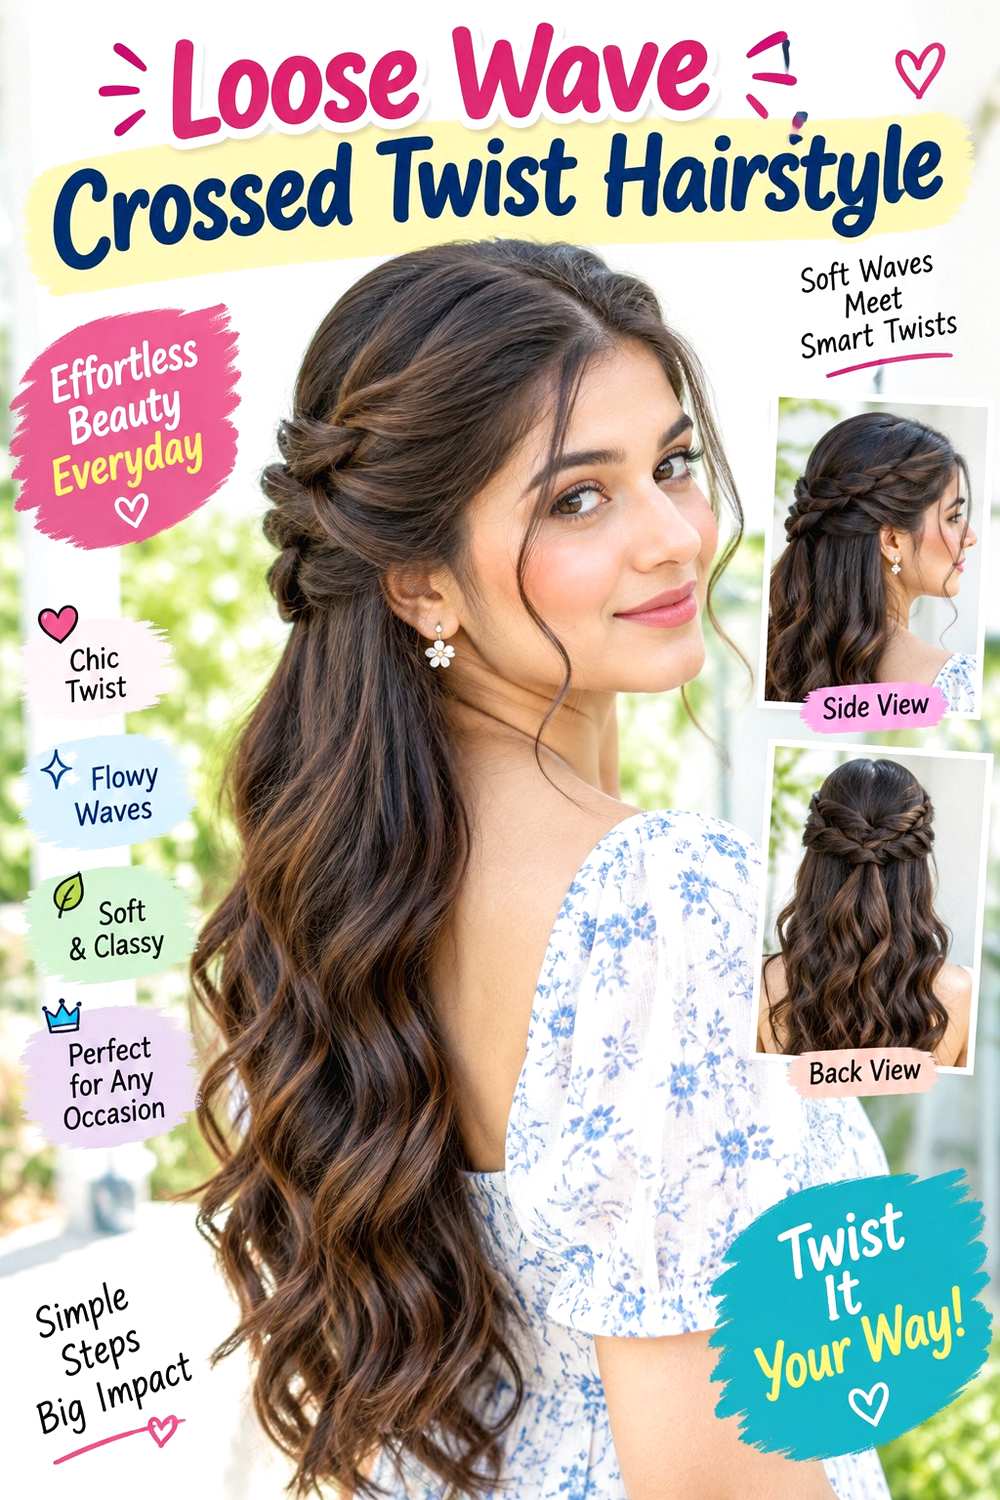
Crossing the two side twists before securing them creates a soft woven detail at the center back. Start with a center or relaxed side part, take moderate sections above each ear, and twist them backward. Lay one twist over the other at the meeting point, then pin the overlap underneath so the crossing remains visible. Broad waves through the loose hair can begin around the jaw or shoulders, leaving the crown quieter and the ends flexible.
Shoulder-length and longer hair works best, particularly straight or wavy textures that hold a soft bend. Apply heat protectant before using a large-barrel curling iron, then secure the crossed twists with bobby pins hidden below the overlap. A quick refresh involves tightening the crossing and reshaping one or two visible waves; a complete wash-day set takes longer depending on density and length.
If one twist constantly slides over the other, pin the lower section first before placing the top twist across it. For salon or event styling, specify which side should cross over and how wide the woven center should appear. A narrow overlap keeps the design subtle and prevents the anchor from becoming bulky.
Pro tip:
Secure the lower twist first, then place the second one across it. This gives the top section a stable base and makes the crossed pattern easier to control.
Make It Work for You:
For fine hair, keep the crossed area compact and use broad waves below it. The combination adds movement without pulling too much density away from the loose length.
Watch Out For:
Crossing very thick twists can create a bulky center that droops. Reduce the section width or flatten the twists slightly before securing the overlap.
Textured Wavy Half Up Twist Hairstyle
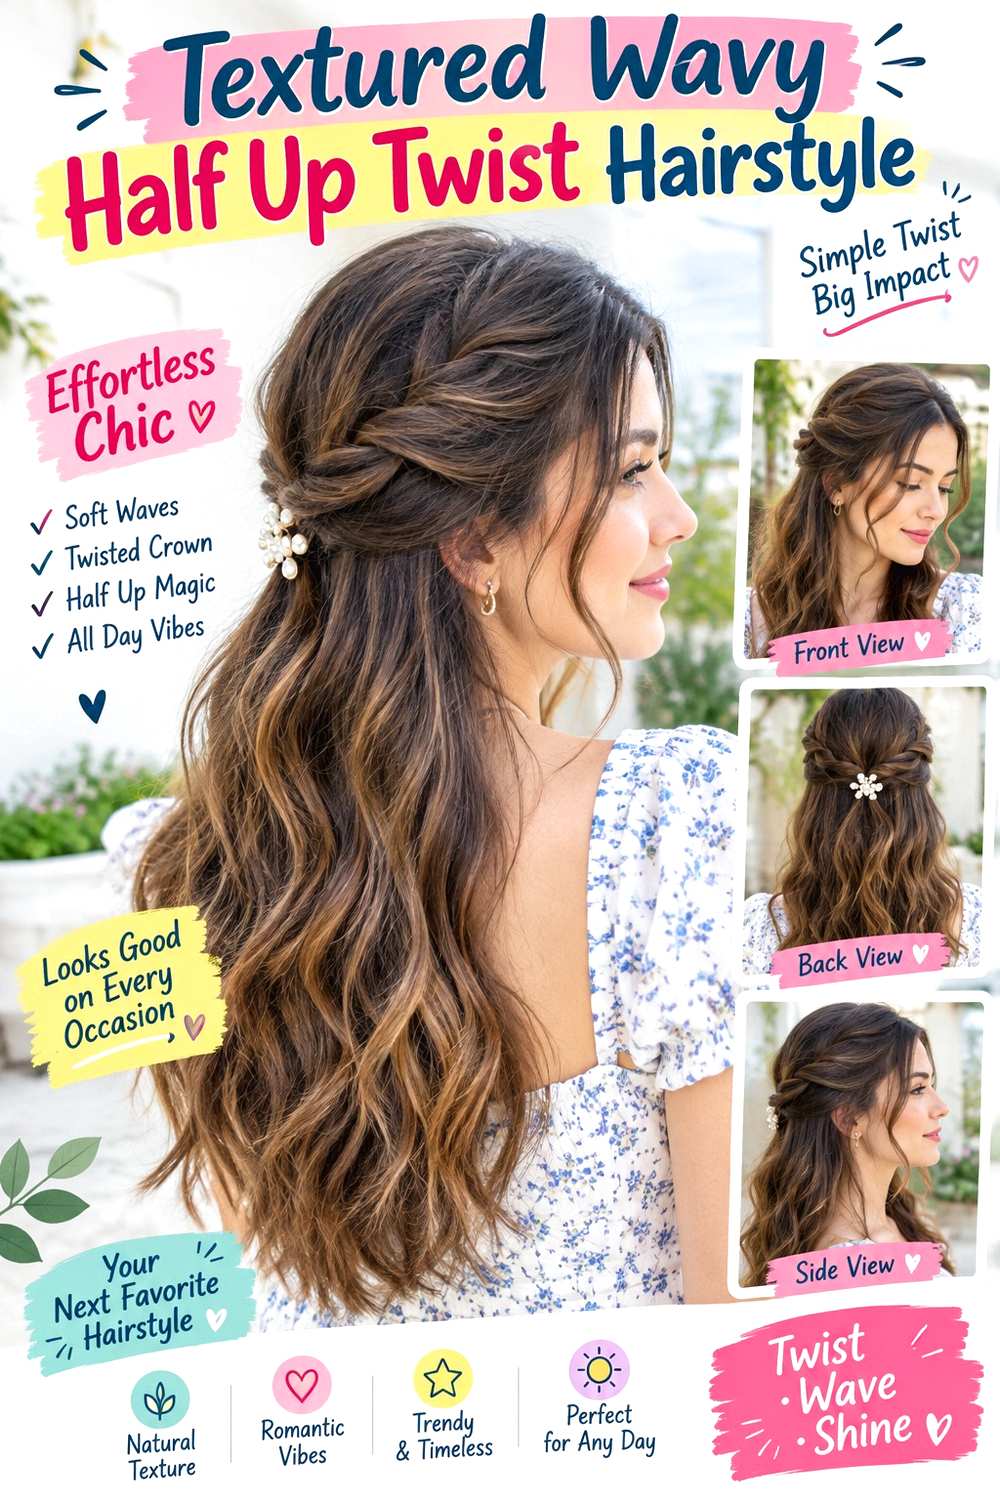
Naturally wavy hair can create a relaxed half-up twist with little reshaping because the visible bends already provide movement. Keep your usual part, take sections above the ears, and twist them toward the center back without stretching the surface smooth. Let the lower waves remain irregular and airy, with the strongest texture through the mid-lengths and ends. A few shorter pieces can stay around the cheekbones or jaw if they naturally fall forward.
Medium to long wavy hair suits this approach, especially when you want a simple between-wash style. Lightweight mousse can support the existing wave pattern, while a small grip clip secures the twists at the back. A quick refresh may involve dampening flattened front sections and resetting the clip; a full wash-day routine takes longer depending on density and whether you air-dry or use another drying method.
Avoid brushing out the waves before forming the twists unless you specifically want a smoother finish. For salon shaping, identify where the shortest face-framing pieces should finish and how much weight you want retained through the ends. The cut should still work when worn down rather than existing only to support this half-up arrangement.
Pro tip:
Form the twists while preserving the natural direction of the waves. Stretching the side sections completely smooth can make them look disconnected from the textured lower length.
Make It Work for You:
For loose waves that flatten easily, use narrower side sections and keep more hair down. The lower texture then provides most of the volume without stressing the anchor.
Watch Out For:
Brushing aggressively before twisting can create puffiness and erase the wave groups. Detangle earlier in your routine, then shape the half-up sections with your hands.
Scarf-Tied Twisted Half Up Hairstyle
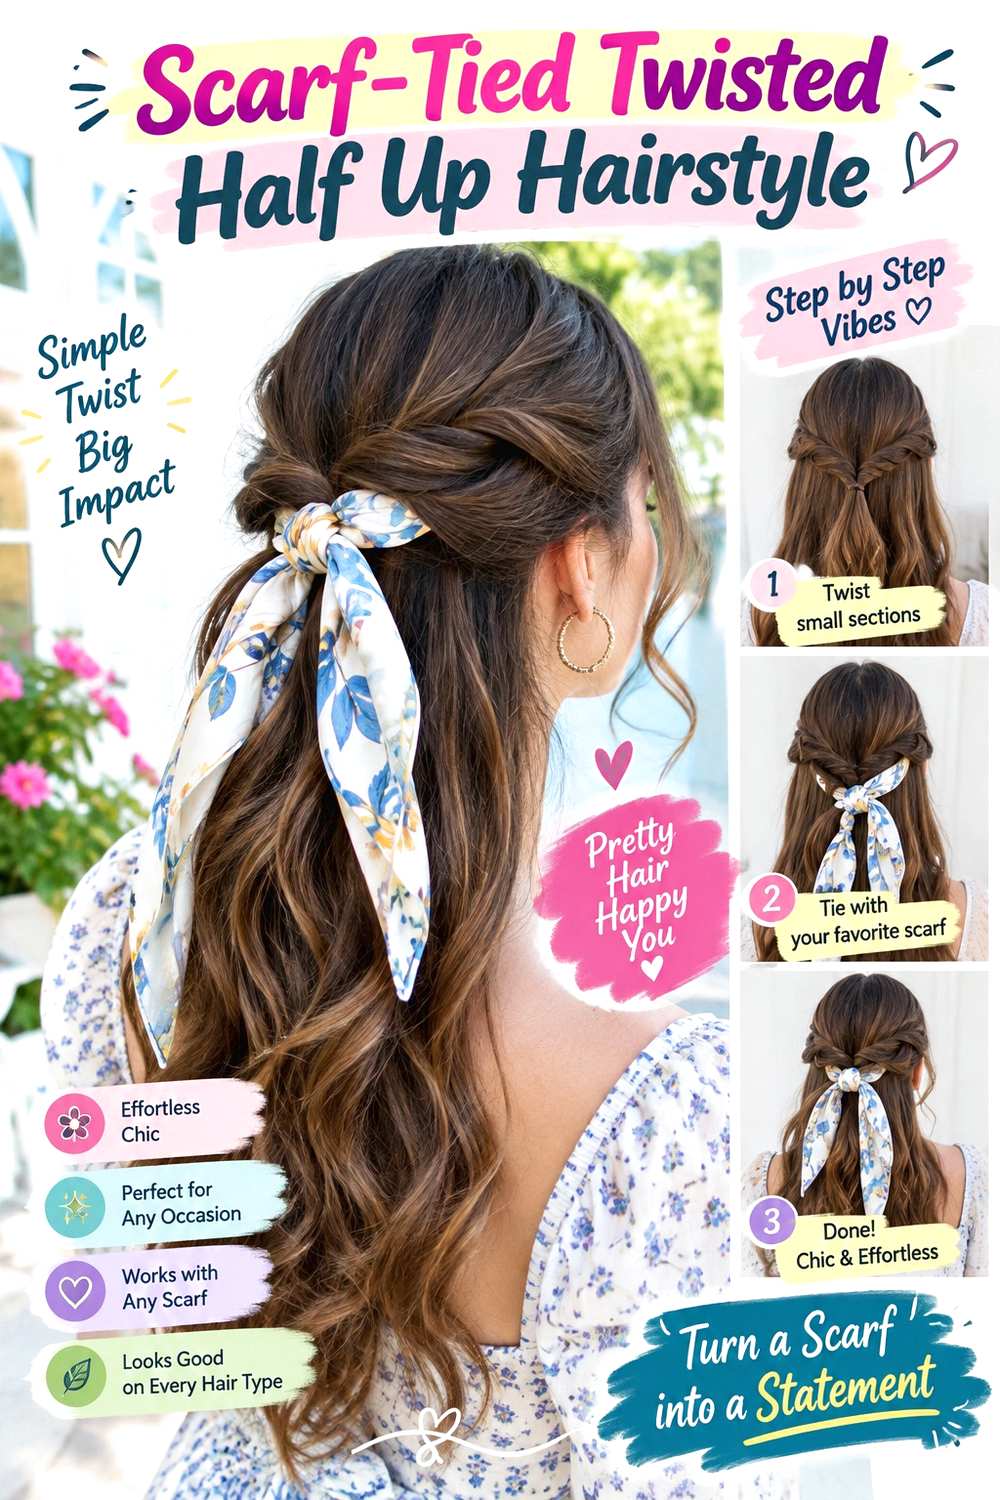
A narrow scarf can cover the center connection of a twisted half-up style while adding a visible fall accessory. Start with two side twists and secure them at the back, then tie the scarf around the anchor so the knot sits directly over or just below the meeting point. Keep the tails short enough that they do not overwhelm the loose length. Soft waves, natural curls, or straight hair can all remain visible below the scarf.
Medium to long hair gives enough loose length to balance the accessory. A small fabric-covered elastic creates a stable center anchor, and a narrow hair scarf provides the decorative tie. A quick refresh usually means retightening the scarf while leaving the twists intact; full wash-day effort depends entirely on how you style the loose hair beforehand.
The scarf should decorate the hairstyle rather than act as the only thing holding the twists together. If it slides, fix the hidden hair anchor first. For salon or event styling, specify whether you want the scarf knot visible from behind or slightly to one side, and how long you want the tails to fall in relation to your shoulder length.
Pro tip:
Secure the twists completely before adding the scarf. Once the center feels stable, tie the fabric around the anchor without pulling hard enough to distort the side sections.
Make It Work for You:
For fine hair, choose a narrow scarf with shorter tails so the accessory does not overpower the twists. Keep most of your density loose beneath the center tie.
Watch Out For:
Relying on the scarf to hold loose twists can make the entire style slide downward. Build a secure hidden anchor first, then treat the fabric as decoration.
Conclusion
Twisted half up hairstyles can feel soft and autumn-ready without requiring the same texture or level of effort from everyone. Narrow twists preserve fullness in fine hair, while dense hair can support wider sections and lower anchors. Short lobs benefit from compact twists, whereas long hair leaves room for cascading waves or a small center bun. Curtain bangs and face-framing layers shift attention forward, while curls and coils can keep their natural pattern and shrinkage. Center parts create balance, side parts add asymmetry, and accessories introduce extra detail without changing the underlying structure. Choose the version that works with your natural texture, preferred loose length, maintenance routine, and the amount of styling you realistically want to repeat.
Before Your Salon Visit
Choose one or two favorite references and save views that clearly show the twists, center anchor, loose length, and front framing. Discuss your natural texture, density, face shape, preferred length, upkeep, and normal styling routine. Point out the exact twist width, fringe length, layer starting point, anchor height, wave pattern, or finish you like. Because most half-up twists are temporary styles, focus on comfortable placement and secure anchoring rather than requesting a haircut solely for the updo.
FAQs
How do I keep a twisted half up hairstyle from slipping?
Use side sections that are large enough to hold but not so heavy that they drag the anchor downward. Secure the center before loosening the twists, and rebuild the connection if it starts sliding. Adding more tension at the temples usually does less than improving the anchor itself.
Can twisted half up hairstyles work on short hair?
Yes, especially on lobs and shoulder-skimming cuts. Use smaller side sections and place the anchor lower so shorter layers can reach comfortably. Leave pieces that cannot reach as intentional face framing instead of pulling them tightly backward or relying on numerous visible pins.
Do curly or coily textures need to be straightened for a half-up twist?
No. Curly and coily hair can keep its natural pattern through both the twists and loose lengths. Work with normal shrinkage, keep tension comfortable, and choose the anchor height according to where the side sections naturally reach rather than stretching them solely to imitate a straighter reference.
How much hair should I use for each side twist?
Use enough hair for the twist to stay visible, but leave most of the density in the loose lower section. Fine hair usually benefits from narrower sections, while dense hair can support wider ones. If the lower length starts looking noticeably thin, reduce the amount gathered into each twist.