20 Jeweled Hair Pin Hairstyle Ideas
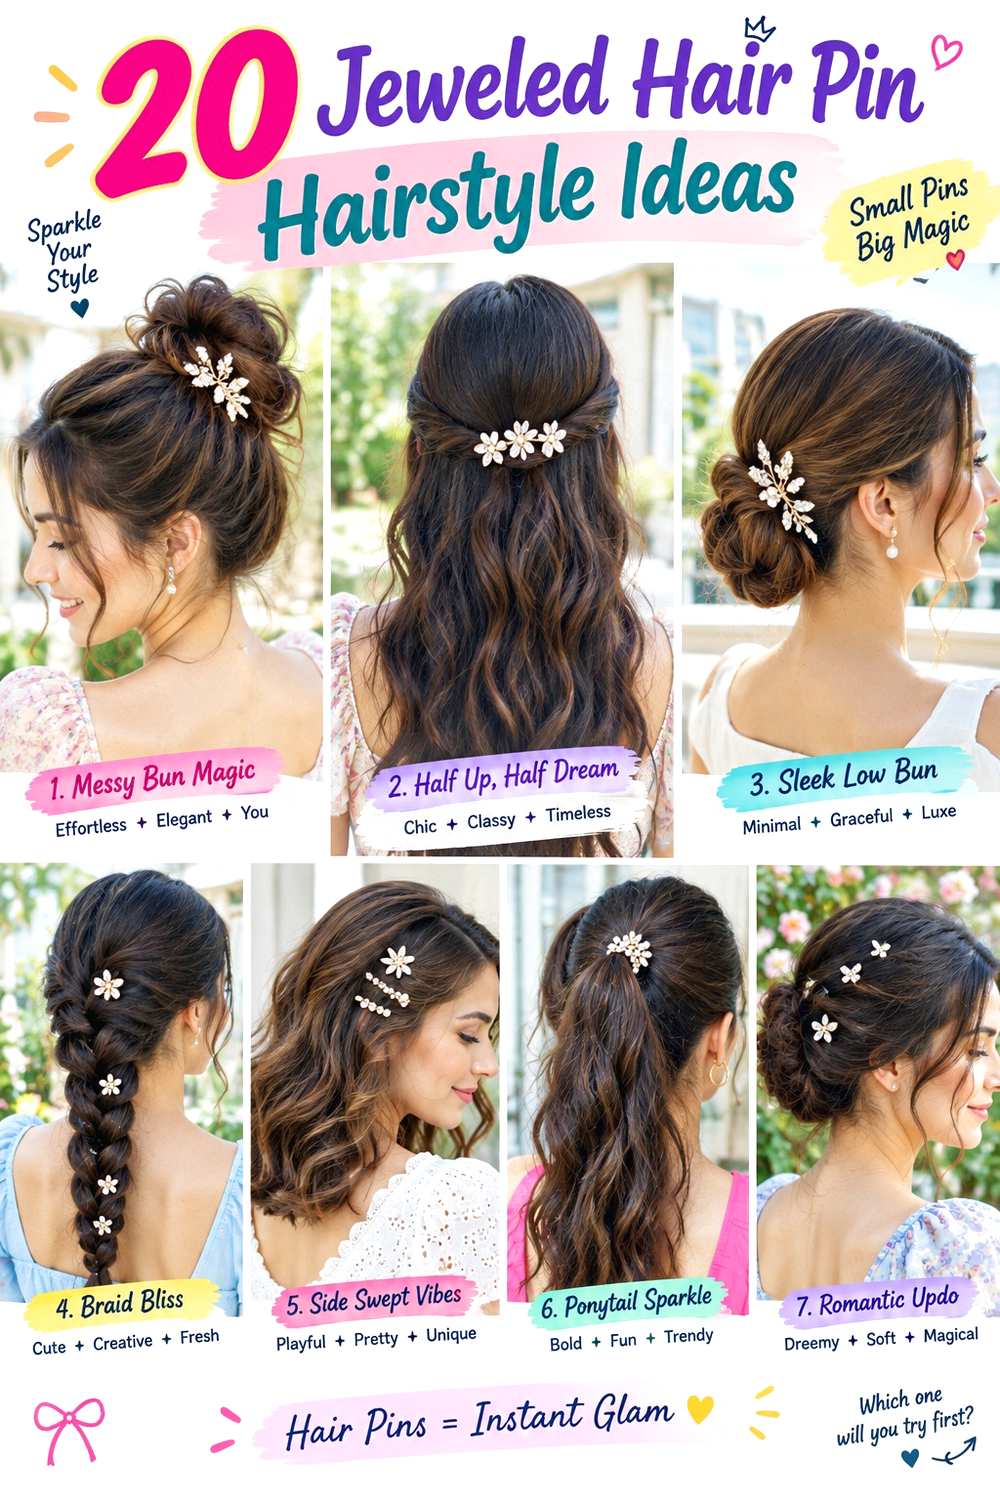
Jeweled hair pin hairstyle ideas work best when the accessory has a clear role: it can mark a side part, decorate a twist, sit along a braid, or add sparkle beside a bun without carrying the entire hairstyle. Pin size and placement matter as much as the stones themselves. A narrow crystal bar gives a clean line, while a pearl cluster, leaf spray, or floral gem creates a broader focal point against waves, curls, coils, or smoother hair.
Length and density affect how easily the pin can anchor. Short bobs usually need a smaller accessory and a stable section near the temple, while long or dense hair may require hidden structural pins underneath before the jeweled piece goes in. Curly and coily textures benefit from preserving their natural volume instead of flattening large areas just to expose the decoration. Decorative accessories should support the finished shape, not replace the secure foundation beneath it.
Styling effort ranges from slipping a pin into second-day waves to building a full braided crown or formal updo. A quick refresh may only involve restoring the section around the accessory, while wash-day styling can take much longer. Careful placement and removal also reduce snagging, especially with pearls, rhinestones, branches, or raised settings.
Quick List
- Side-Swept Pearl Cluster Jeweled Hair Pin Hairstyle
- Low Chignon Crystal Bar Jeweled Hair Pin Hairstyle
- Half-Up Floral Gem Jeweled Hair Pin Hairstyle
- Loose Waves Starburst Jeweled Hair Pin Hairstyle
- French Twist Emerald Jeweled Hair Pin Hairstyle
- Curly Bob Side Clip Jeweled Hair Pin Hairstyle
- Braided Crown Sapphire Jeweled Hair Pin Hairstyle
- Low Ponytail Pearl Row Jeweled Hair Pin Hairstyle
- High Bun Rhinestone Arc Jeweled Hair Pin Hairstyle
- Natural Coils Gold Gem Jeweled Hair Pin Hairstyle
- Side Braid Moonstone Jeweled Hair Pin Hairstyle
- Sleek Bob Minimal Crystal Jeweled Hair Pin Hairstyle
- Messy Bun Ruby Cluster Jeweled Hair Pin Hairstyle
- Finger Waves Vintage Jeweled Hair Pin Hairstyle
- Twisted Half-Up Amethyst Jeweled Hair Pin Hairstyle
- Curly Ponytail Opal Jeweled Hair Pin Hairstyle
- Low Knot Leaf Vine Jeweled Hair Pin Hairstyle
- Box Braids Crystal Accent Jeweled Hair Pin Hairstyle
- Bridal Updo Pearl Spray Jeweled Hair Pin Hairstyle
- Tucked Waves Teardrop Jeweled Hair Pin Hairstyle
Side-Swept Pearl Cluster Jeweled Hair Pin Hairstyle

A pearl cluster looks especially clear when it sits on the lighter side of a side-swept hairstyle. Create a deep or moderate side part, direct most of the length over one shoulder, and keep the opposite temple relatively smooth. The pearl pin can sit just above the ear, where it catches the smaller section without interrupting the movement of the heavier side. Loose waves through the mid-lengths keep the style soft, while straighter ends make the pearl detail feel less formal.
Medium and long straight or wavy hair is easiest to sweep, though loose curls can use the same arrangement. Apply heat protectant before shaping waves with a curling iron, then use a hidden bobby pin to stabilize the small side section before adding the pearl cluster. A quick refresh may only require resetting the front sweep and the accessory area; a full wash-day finish takes longer because drying and waving the complete length come first.
For professional styling, show exactly how much hair should sit behind the ear and where you want the pearl cluster angled. The jeweled pin should decorate a secure section rather than hold all the swept hair by itself. If it slips, reinforce the hidden anchor instead of pushing the pearl piece deeper.
Pro tip:
Cross one hidden bobby pin beneath the pearl cluster at the temple before adding the decorative piece. That gives the ornament something stable to grip.
Make It Work for You:
For dense curls, keep the swept side fuller and secure only a narrow temple section beneath the pearls. This preserves texture while still giving the accessory a clear placement.
Watch Out For:
Do not slide raised pearls repeatedly through finished hair. Lift the pin out completely before repositioning it so the settings do not snag or roughen sections.
Low Chignon Crystal Bar Jeweled Hair Pin Hairstyle
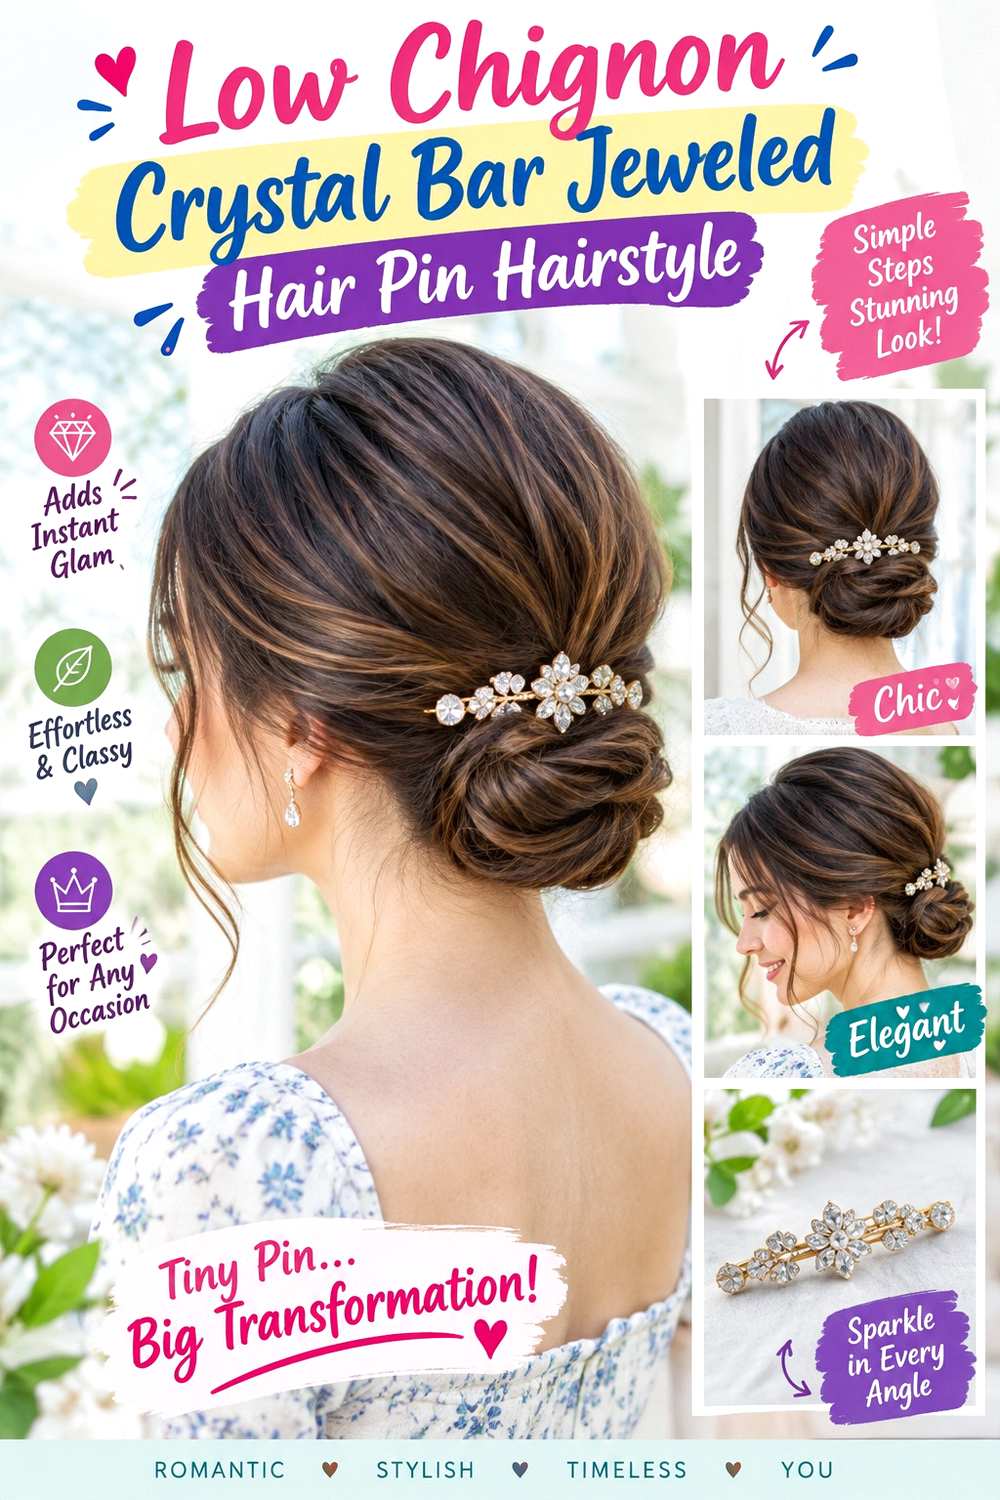
A crystal bar gives a low chignon a clean horizontal or diagonal accent without making the bun look crowded. Gather the hair at the nape, twist or fold it into a compact chignon, and keep the crown smooth with a little natural lift. Place the crystal bar directly above the bun or along one side of the twist, depending on where you want the strongest line. Small face-framing pieces can remain free, while the back stays controlled.
Medium and long hair works best because enough length is needed to build the chignon securely. Use a fabric-covered elastic for the base, bobby pins to hold the folded shape, and the crystal bar only as the decorative finishing piece. Rebuilding a chignon on dry hair can be a moderate refresh, while a full wash, dry, and polished finish requires more time according to density and texture.
If a stylist is creating the look, specify the chignon height and the direction of the crystal bar. A horizontal bar emphasizes width, while a diagonal placement follows the twist. The decorative piece should not replace structural pins inside the bun. When the chignon loosens, repair the foundation first. Pushing the jeweled bar farther into an unstable bun may snag hair without making the style truly secure.
Pro tip:
Finish pinning the chignon completely before inserting the crystal bar. Add the decoration last so you can choose the cleanest visible line without weakening the bun.
Make It Work for You:
For very dense hair, build a wider chignon and place the bar along one side instead of directly across the middle. The accessory remains visible without competing with bulk.
Watch Out For:
Avoid inserting the bar through the main elastic. It can create pressure or catch when removed; anchor it into hair beside the structural base instead.
Half-Up Floral Gem Jeweled Hair Pin Hairstyle
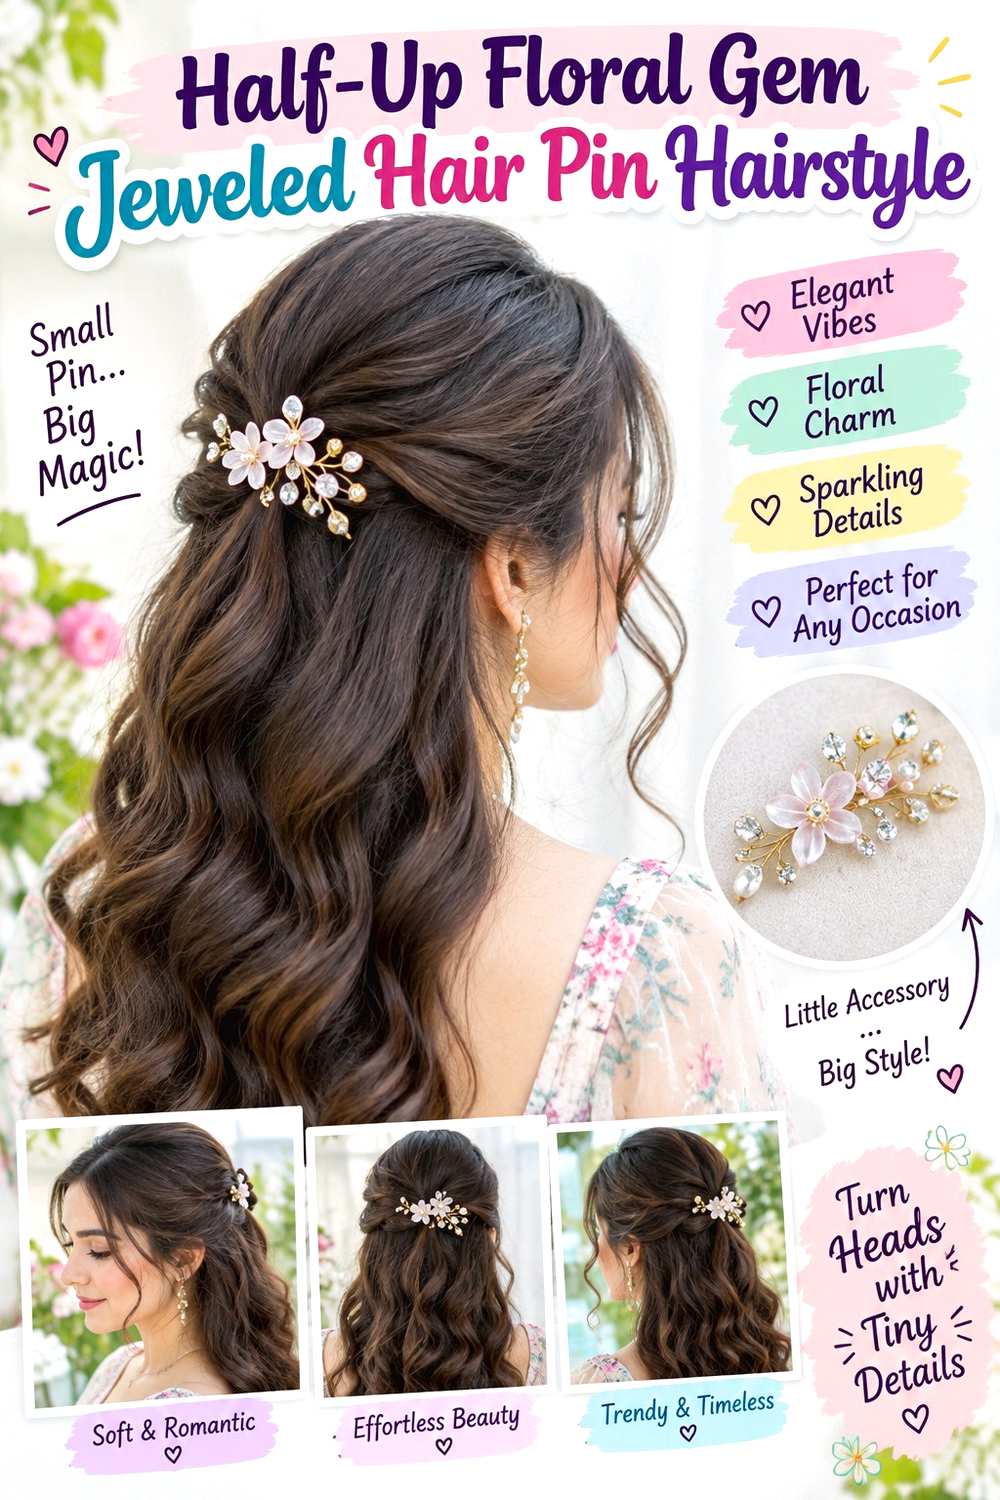
A floral gem pin fits naturally at the meeting point of a half-up style because the accessory can cover the small anchor without carrying the entire hairstyle. Gather a modest section from each temple toward the back crown, leaving the remaining length loose. Keep the crown softly lifted, and position the floral piece directly over or slightly beside the half-up join. Waves, curls, or straight lengths can all work beneath it.
This approach suits medium and long hair and is especially useful when you want decoration without a full updo. A small snag-free elastic secures the half-up section, light texturizing spray provides grip on slippery hair, and the floral gem pin adds the visible detail. Refreshing the style between washes is usually quick because the lower lengths can remain untouched; a full wash-day finish takes longer if you also curl or blow-dry everything.
For salon styling, specify how wide the half-up section should be and where you want the shortest front pieces to fall. Taking too much hair backward can reduce side volume and make the accessory appear oversized. The gem pin should sit over a stable anchor rather than clamp loose sections together by itself. If the flower tilts, adjust the underlying elastic or hidden support before changing the ornament’s angle.
Pro tip:
Secure the half-up section first, then place the floral pin slightly above the elastic so the petals cover the anchor without bearing the section’s weight.
Make It Work for You:
For fine or lower-density hair, gather narrower temple sections and preserve more loose length. A smaller half-up base keeps the floral gem proportional and maintains fullness below.
Watch Out For:
Do not make the decorative pin the only fastener. Floral settings can be heavier than they look, so a hidden elastic or pin should provide the structural hold.
Loose Waves Starburst Jeweled Hair Pin Hairstyle
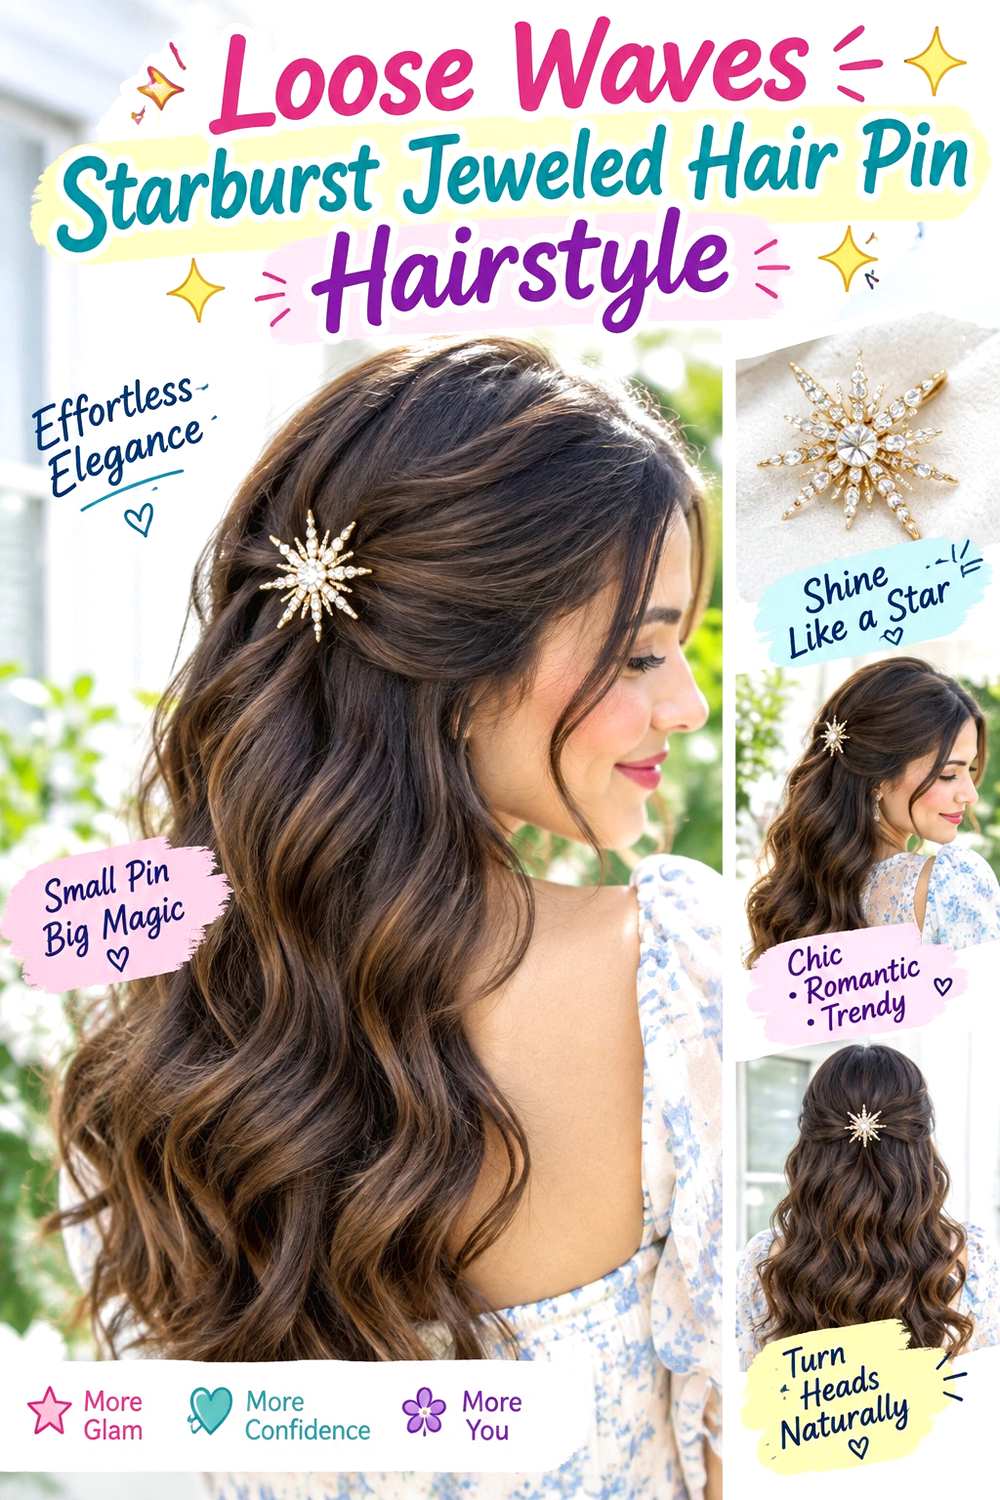
A starburst jeweled pin adds a concentrated sparkle point to loose waves, especially when it sits above one ear rather than in the middle of the crown. Create a center or soft side part, form broad bends below the cheekbones, and leave the ends relaxed. Tuck one side back and place the starburst where the tucked section meets the fuller waves, letting the opposite side stay loose around the face.
Medium and long straight or wavy hair can reach this finish easily, while loose curls can keep more of their natural movement. Use heat protectant before a curling iron, then add a light texturizing spray near the accessory area so the pin has grip. A short refresh can focus only on the front waves and tuck; a complete wash-day set takes longer because all the lengths must be dried and shaped.
If a stylist is preparing the look, show the exact height where you want the starburst to sit and how much hair should be tucked behind the ear. The accessory should lie flat enough that its points do not catch neighboring strands. If the waves soften during wear, reset only the visible front sections rather than reheating the whole head. When removing the starburst, lift it outward carefully instead of dragging it through the waves.
Pro tip:
Mist texturizing spray onto the hidden tuck, not directly onto the jeweled surface. The extra grip helps the pin stay while keeping the stones clean.
Make It Work for You:
For shorter shoulder-length hair, place the starburst closer to the temple and keep the waves broad. The concentrated detail balances the reduced length without overwhelming it.
Watch Out For:
Avoid placing pointed starburst edges where loose strands constantly brush across them. Shift the pin slightly upward or backward to reduce catching during movement.
French Twist Emerald Jeweled Hair Pin Hairstyle
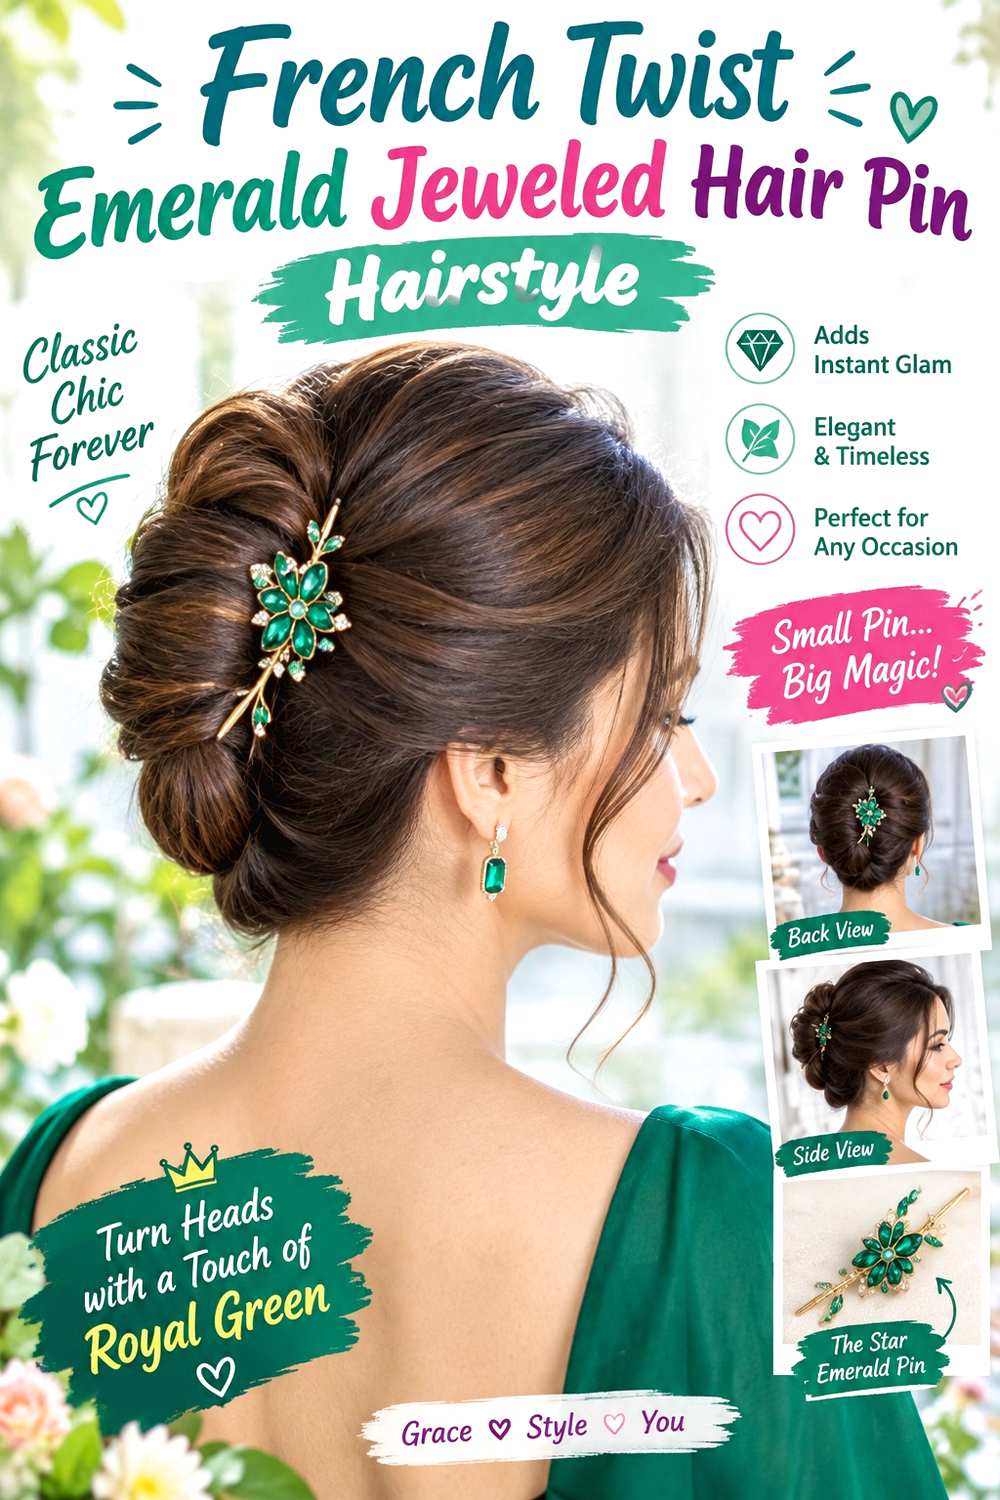
An emerald jeweled pin can trace the folded edge of a French twist and create a strong color accent against a smooth updo. Sweep the hair backward, roll the length inward vertically, and secure the twist from the inside so the outer surface remains clean. Position the emerald piece along the upper fold or near the lower side, depending on whether you want the jewel to follow the twist or mark its base.
Medium and long hair with enough length to roll works best, though density affects how wide the finished twist becomes. Use bobby pins to build the internal anchor, flexible hairspray to control flyaways, and the emerald jeweled pin only after the twist is fully secure. Touch-ups during an event can be brief once the foundation is stable; preparing the style from freshly washed hair takes longer because drying and texture preparation come first.
At a salon appointment, specify how tall you want the twist and exactly where the jewel should sit in relation to the fold. The decorative pin should not be pushed into the central support system if that makes removal difficult. If the twist loosens, reinforce its hidden pins first. An emerald accessory may look substantial, but it should remain an accent rather than the structural piece keeping the roll together.
Pro tip:
Insert the emerald pin parallel to the twist’s outer fold rather than straight through the center. That placement highlights the shape while avoiding the main structural pins.
Make It Work for You:
For dense hair, allow a slightly wider twist and position the emerald detail near the upper edge. This keeps the jewel visible instead of burying it inside bulk.
Watch Out For:
Do not force a decorative pin through multiple internal anchors. If you meet resistance, reposition it beside the support structure to avoid snagging or bending the accessory.
Curly Bob Side Clip Jeweled Hair Pin Hairstyle
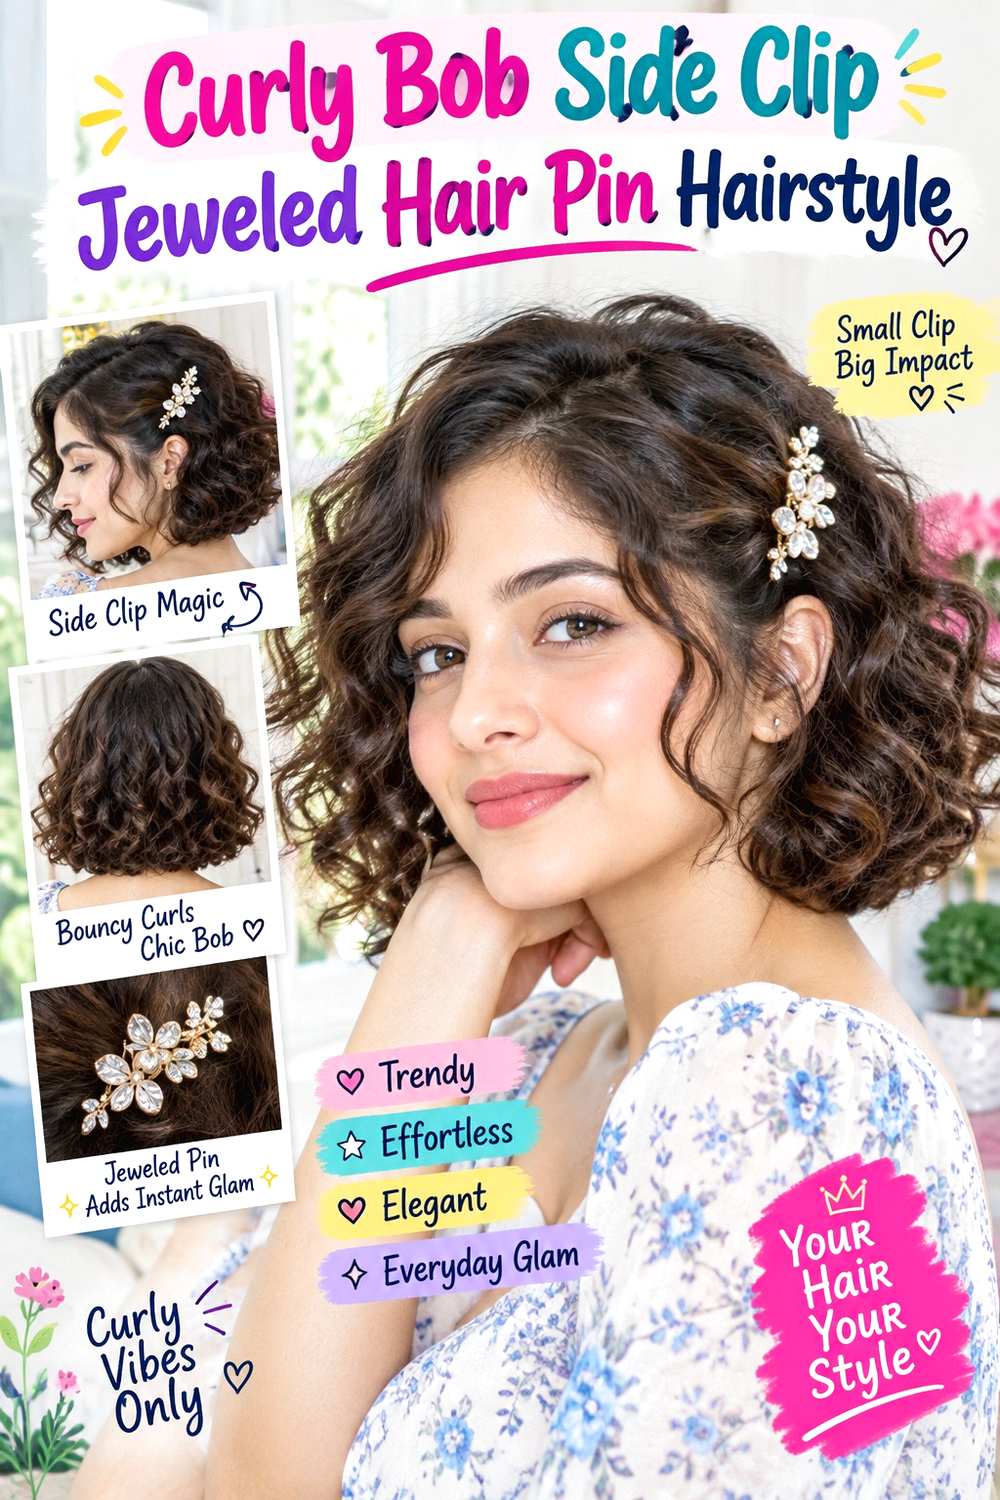
A jeweled side clip can give a curly bob structure without flattening the whole silhouette. Keep the curls around jaw to neck length, choose a center or soft side part, and tuck only one small section near the temple. Place the jeweled pin just above the ear so the remaining curls stay rounded and springy. The opposite side should retain its natural volume to keep the short shape balanced.
Naturally curly and coily bobs can use this placement with little manipulation. Apply lightweight leave-in conditioner to keep curls flexible, use curl gel to redefine the temple section, and add the jeweled pin only after the hair is dry. A next-day refresh may involve dampening a few curls around the clip; full wash-day styling takes longer because the entire bob needs setting and drying before the accessory goes in.
If a stylist is arranging the look, specify how much texture should remain visible around the ear and where the pin should sit relative to the part. Because curl shrinkage changes the finished length, judge placement on settled curls rather than stretched sections. The accessory should anchor a small tuck, not pull a large mass of curls flat. If the clip begins sliding, reinforce its base with a hidden pin or move it slightly closer to the stable temple area.
Pro tip:
Choose the curl group you want tucked before inserting the jeweled clip. Securing a defined section prevents neighboring curls from becoming trapped under the accessory.
Make It Work for You:
For very short curls, place a smaller jeweled pin closer to the temple and leave more texture visible above it. The accessory stays proportional to the compact shape.
Watch Out For:
Do not flatten the entire side just to expose the jewel. Secure only the necessary section and preserve volume around the lower edge of the bob.
Braided Crown Sapphire Jeweled Hair Pin Hairstyle
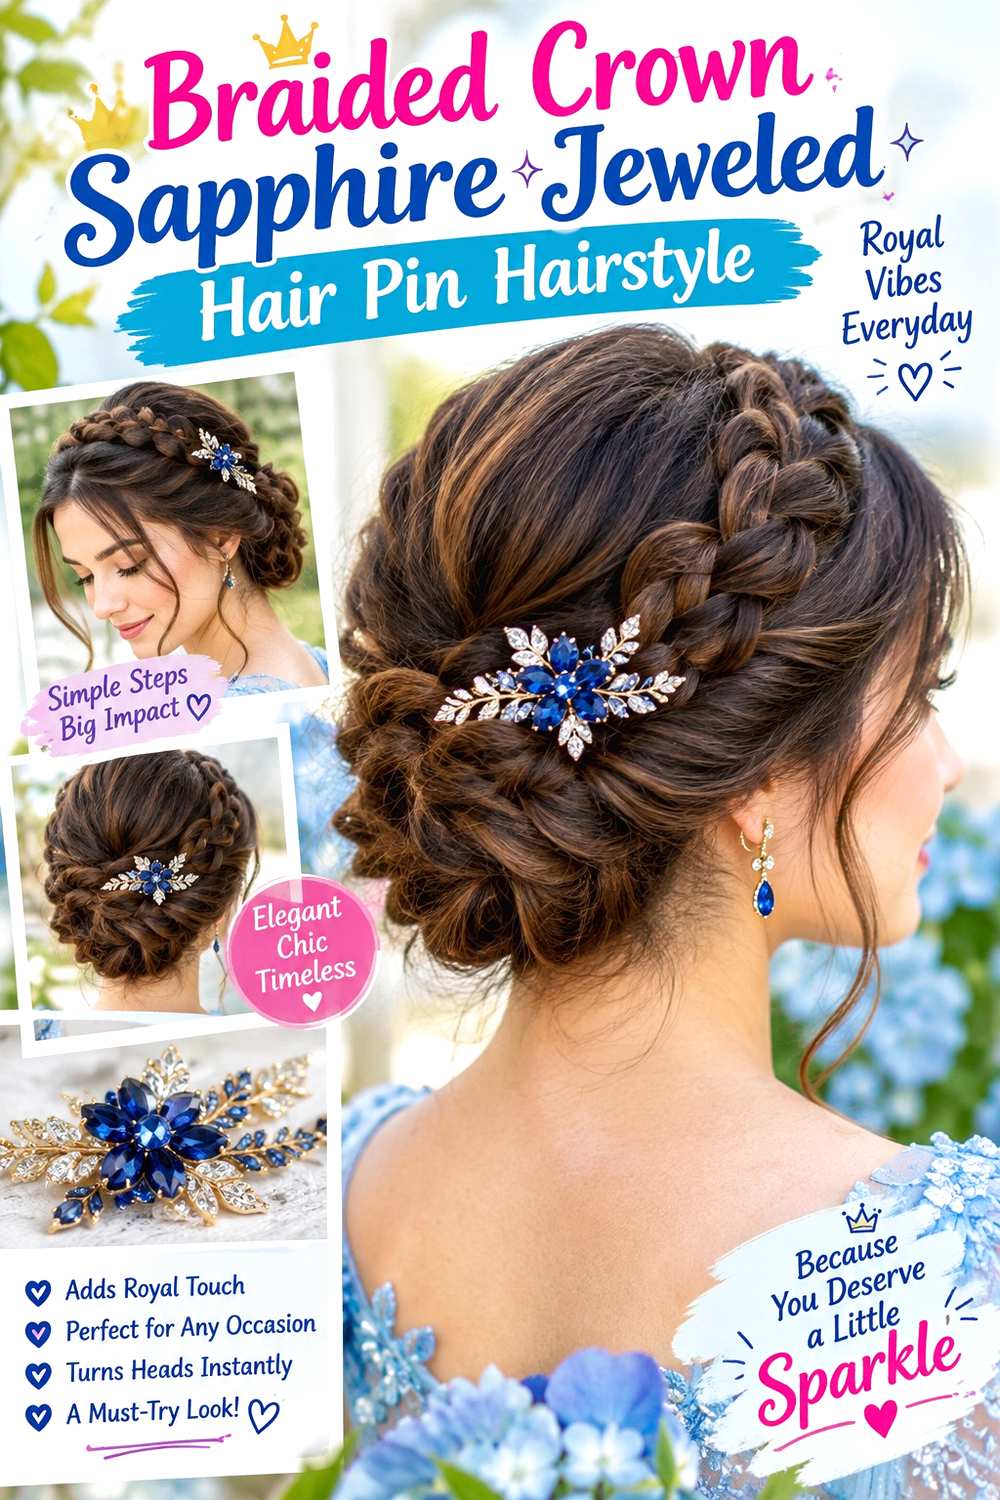
A sapphire pin adds a focused accent to a braided crown without hiding the braid pattern. Form a braid around or across the upper head, keeping the width consistent and the tension comfortable. Place the sapphire detail near the point where the braid ends or overlaps, so it looks intentional while disguising a small join. Leave a few soft pieces around the temples if you prefer a less formal finish.
Medium and long hair works best because enough length is needed to build the crown securely. Use a small snag-free elastic to secure the braid end, bobby pins to anchor the braid against the head, and the sapphire jeweled pin as the final visible decoration. A dry-hair rebuild can be moderate work; starting after a full wash takes longer because detangling and drying must happen before braiding.
If a stylist is creating the look, specify the braid width, crown height, and the exact overlap point you want decorated. Comfortable tension matters more than making the braid extremely tight. The jeweled pin should cover or accent the join, not become the only thing holding it. If the crown loosens, reinforce hidden bobby pins underneath before touching the sapphire piece. This keeps the accessory from carrying weight it was not designed to support.
Pro tip:
Anchor the braid overlap with hidden pins first, then place the sapphire jewel slightly above the join so it decorates the area without taking structural tension.
Make It Work for You:
For layered hair, make the crown braid slightly wider so shorter pieces stay contained. The sapphire pin can still mark the join without trapping loose ends.
Watch Out For:
Avoid pushing the jewel into a tightly woven braid repeatedly. Reposition it carefully beside the braid stitches so the accessory does not stretch or distort them.
Low Ponytail Pearl Row Jeweled Hair Pin Hairstyle
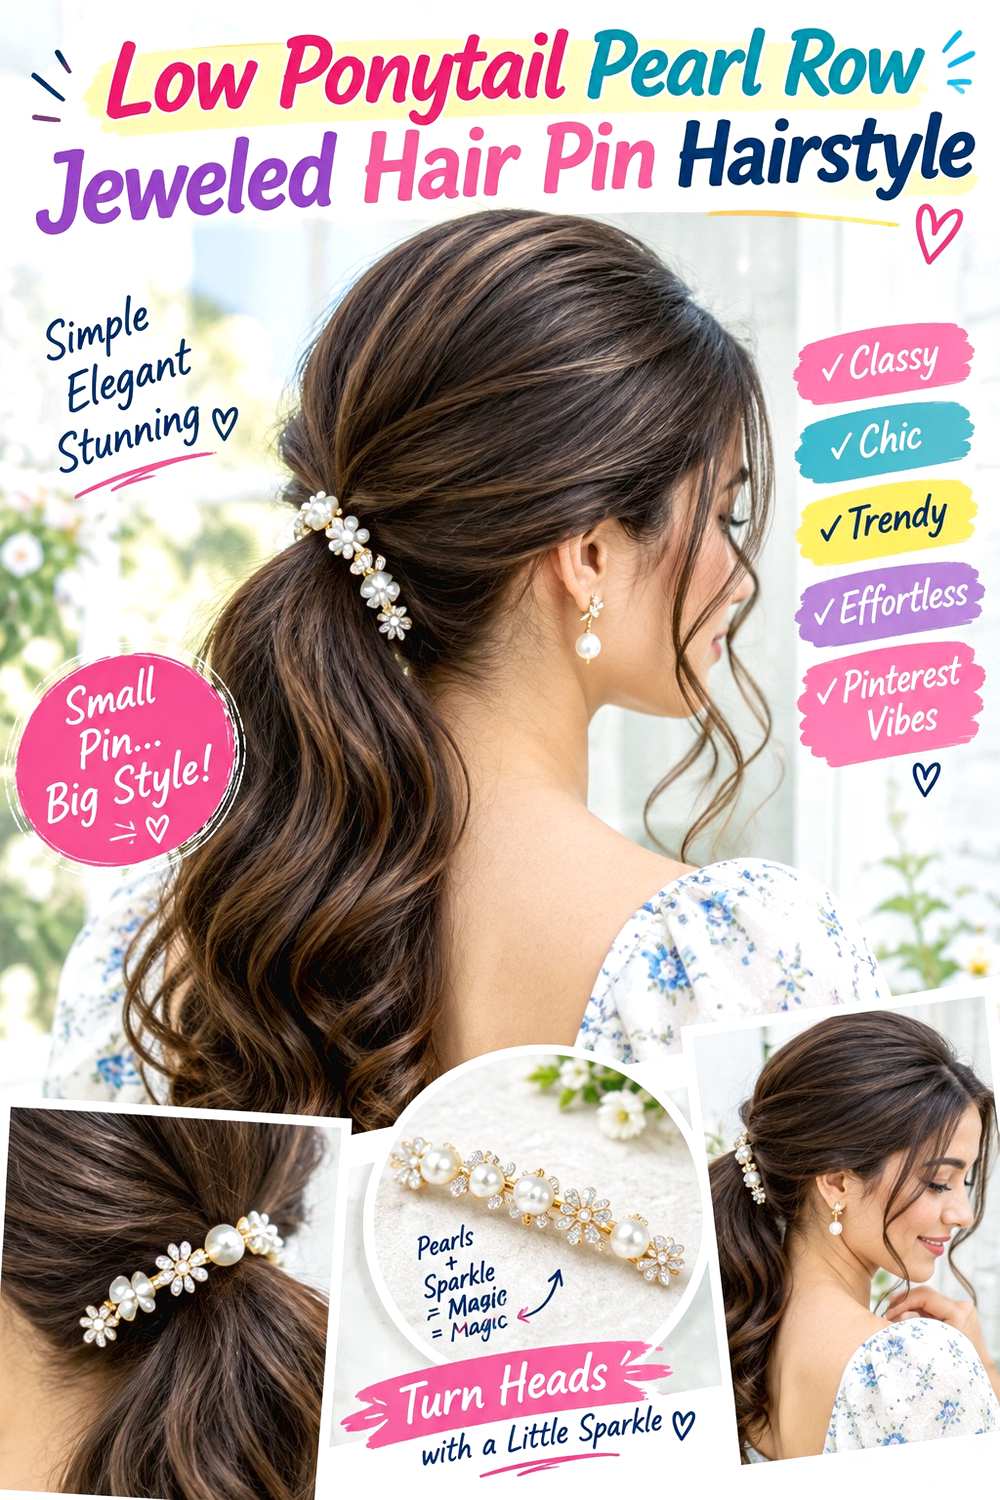
A row of pearls can sit neatly above a low ponytail and create a polished focal point without covering the length. Choose a center or side part, smooth the hair toward the nape, and secure the ponytail low enough that the pearl row has space directly above or slightly beside the elastic. The ponytail itself can stay straight, wavy, or curly, depending on the finish you prefer.
Medium and long hair across many textures can use this design. A fabric-covered elastic provides the ponytail’s real support, light smoothing cream controls surface flyaways, and the pearl row is added as decoration after the base is stable. Rebuilding a low ponytail between washes is generally quick; a full wash-day version takes longer when the lengths also need drying, smoothing, or curl definition.
For professional styling, show the ponytail height and whether you want the pearl row horizontal or angled along one side. Keeping a small gap between the elastic and accessory often prevents crowding. The pearl pin should not pierce or sit through the elastic itself. If the ponytail loosens, redo the elastic rather than pressing the decorative piece deeper. Pearls can catch loose strands, so remove the row outward and upward instead of sliding it through the hair.
Pro tip:
Place the pearl row after the ponytail is tightened to its final comfort level. This prevents later base adjustments from knocking the decorative piece out of position.
Make It Work for You:
For curly hair, keep the ponytail texture full and smooth only the crown. The pearl line still looks polished without requiring the lengths to be straightened.
Watch Out For:
Do not anchor the pearl row through the ponytail elastic. It can make removal awkward and place unnecessary pressure on the accessory and gathered hair.
High Bun Rhinestone Arc Jeweled Hair Pin Hairstyle

A rhinestone arc works well beneath or beside a high bun because its curved shape can follow the bun’s base. Gather the hair near the crown, build a rounded bun, and leave the front clean or release a few soft pieces at the temples. Place the rhinestone arc along the lower edge of the bun or slightly to one side so it traces the silhouette instead of disappearing into it.
Medium and long hair that can gather comfortably high is best suited to this arrangement. Use a fabric-covered elastic for the main base, bobby pins to shape the bun, and the rhinestone arc as the decorative final step. A between-wash rebuild can be fairly quick when the hair is already prepared; full wash-day styling takes longer because detangling, drying, and gathering all happen first.
If a stylist is setting the look, specify the bun height and whether you want the rhinestone curve visible from the front, side, or back. That determines its best placement. The ornament should never carry the bun’s weight. If the bun tilts or loosens, correct the elastic and internal pins before adjusting the jewels. A secure bun allows the rhinestone piece to sit lightly instead of being forced into the hairstyle for support.
Pro tip:
Hold the rhinestone arc against the finished bun before inserting it. Check its curve from the intended viewing angle, then anchor it where the shape follows naturally.
Make It Work for You:
For dense or coily hair, build a broader high bun rather than a very tight knot. The wider base gives the rhinestone arc more visible space.
Watch Out For:
Avoid pushing the decorative arc through several structural pins. If it catches, move it slightly outward so the accessory remains easy to remove without snagging.
Natural Coils Gold Gem Jeweled Hair Pin Hairstyle
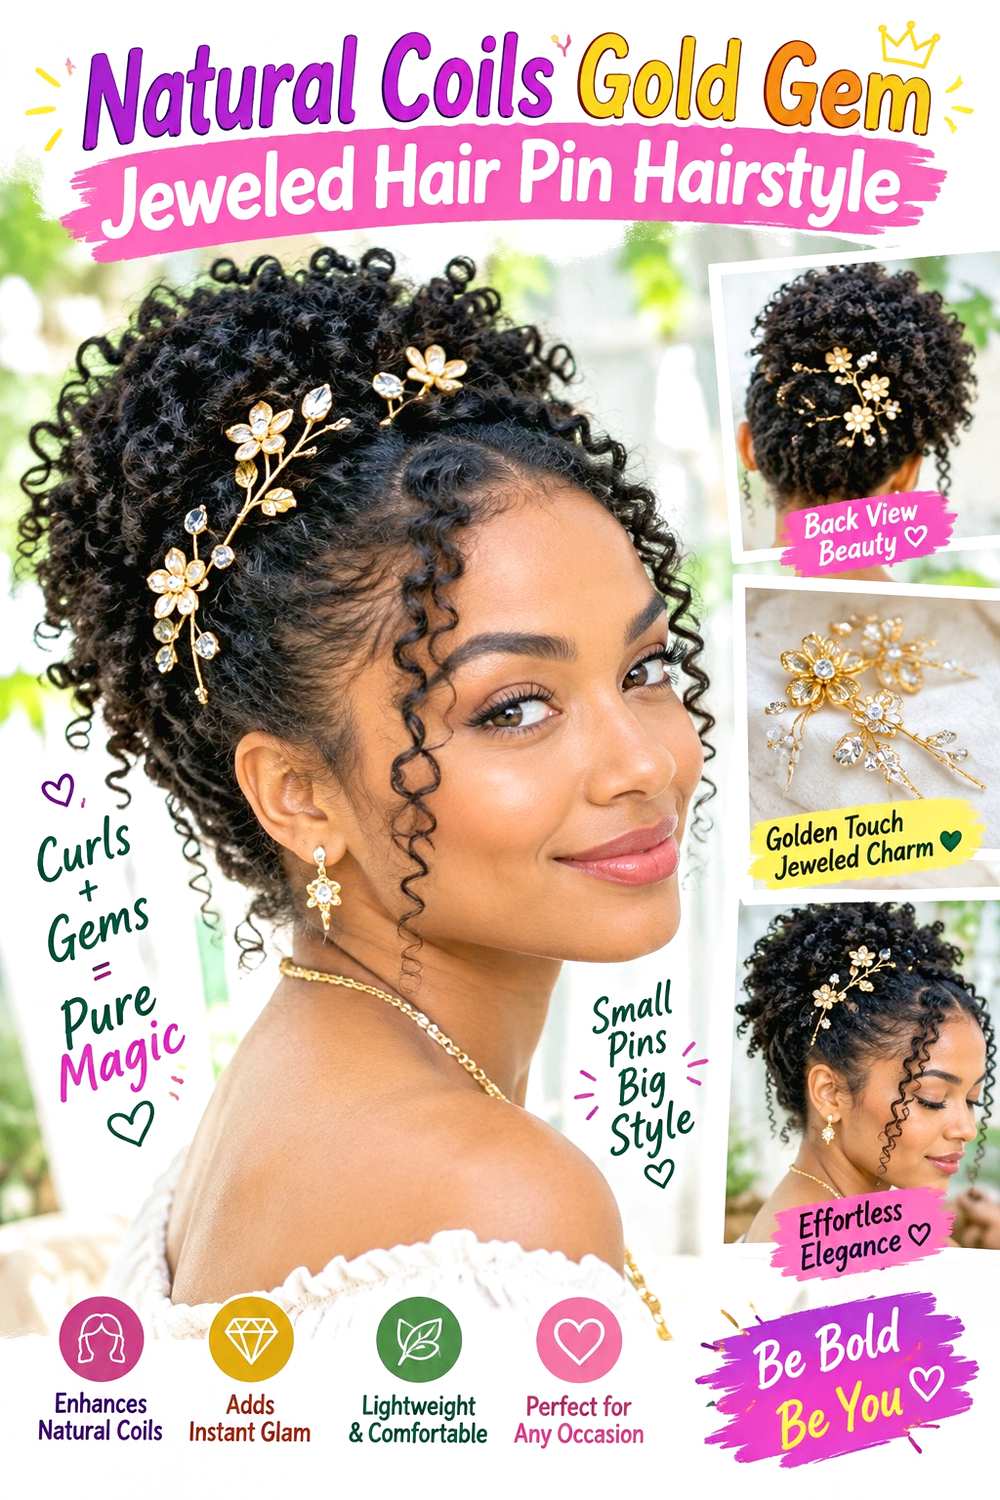
A gold gem pin can stand out clearly against natural coils when it holds only a small side section rather than compressing the entire texture. Let the coils form their natural rounded shape, then choose one temple area to tuck or gently twist back. Place the gold gem above the ear or slightly higher, leaving the crown and opposite side full. Short front coils can remain free for softer framing.
This design works particularly well on short to medium coily hair because it does not require gathering the whole head. Use lightweight leave-in conditioner to keep the coils pliable, curl gel to redefine the small side section, and the gold gem pin once the hair is dry. A morning refresh can focus only on coils flattened near the accessory; full wash-day styling is longer because detangling, setting, and drying establish the overall shape.
If a stylist is preparing the look, explain exactly how much side texture you want pinned away and where you want the widest volume to remain. Shrinkage should be judged on the finished dry shape rather than stretched length. The jewel should secure or decorate a narrow controlled section, not pull dense coils flat across the scalp. If it slips, add a discreet hidden anchor instead of tightening the pinned section.
Pro tip:
Twist a narrow temple section once before adding the gold pin. The small twist creates a stable ridge for the accessory without flattening surrounding coils.
Make It Work for You:
For longer coils, place the gem slightly higher and leave more side volume below it. The accessory stays visible while the natural silhouette remains broad and balanced.
Watch Out For:
Do not force a small jeweled pin through a thick mass of coils. Reduce the section size or add a hidden anchor so removal stays gentle.
Side Braid Moonstone Jeweled Hair Pin Hairstyle

A moonstone pin can mark the beginning or end of a side braid without interrupting the woven texture. Sweep the hair over one shoulder, begin a loose braid near the nape or behind the ear, and let the braid fall forward. Position the jeweled pin just above the braid start or at a small twist feeding into it. Keep the opposite side smooth enough that the side placement remains clear.
Medium and long hair works best because the braid needs enough length to fall visibly over the shoulder. Use a snag-free elastic to secure the braid end, light styling cream for flyaways, and the moonstone jeweled pin as the accent. Rebraiding dry hair is a moderate refresh; a full wash-day version takes longer because detangling and drying need to happen first, especially on dense textures.
For salon styling, specify the braid width and where you want it to begin relative to the ear. Also show whether the moonstone should sit flat against the side or angle into the braid. The pin should decorate a stable section rather than replace the braid’s own anchor. If loose pieces appear, correct the braid or add a hidden pin instead of tightening the decorative piece, which may distort the surrounding hair.
Pro tip:
Place the moonstone pin just above the first visible braid crossing. That position links the jewel to the braid while keeping it away from the working tension.
Make It Work for You:
For layered hair, begin the braid slightly lower and keep it wider so shorter pieces stay inside. The moonstone can still decorate the transition above it.
Watch Out For:
Avoid clipping the jewel directly over a thick braid crossing. Excess bulk can make it sit crooked; choose a flatter section beside the braid instead.
Sleek Bob Minimal Crystal Jeweled Hair Pin Hairstyle
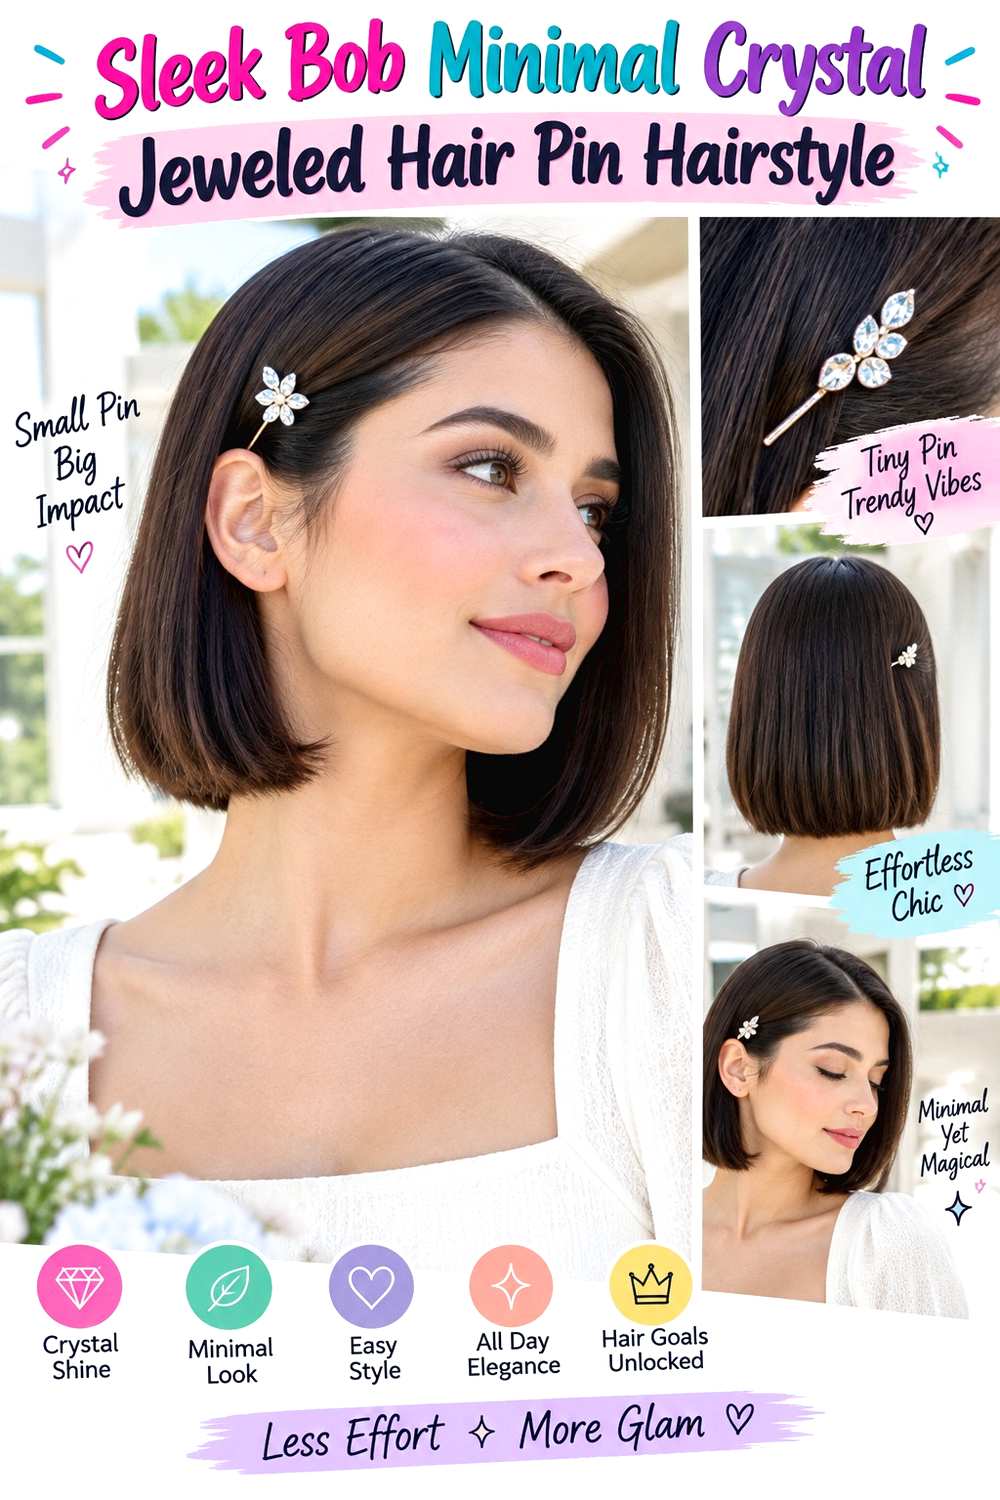
A minimal crystal pin gives a sleek bob a small point of light without overpowering its compact outline. Keep the bob around jaw or chin length, choose a center or side part, and tuck one front section behind the ear. Place the crystal pin parallel to the hairline or slightly angled above the ear. The ends can stay straight or softly beveled, while the opposite side remains loose for balance.
Straight and gently wavy bobs reach this finish most easily. Apply heat protectant before using a flat iron for targeted smoothing, then add a small amount of smoothing serum through the ends before placing the crystal pin. A quick dry-hair refresh usually focuses on the front and perimeter; complete wash-day styling takes longer because the bob must be dried and shaped from the roots through the ends.
If a stylist is preparing the look, explain whether you want a blunt-looking bottom edge or softer movement and show exactly how much hair should sit behind the ear. The accessory should suit the scale of the cut rather than cover a large portion of it. If the pin slips on smooth hair, add discreet texture or a hidden anchor instead of clamping a thicker section, which can distort the bob’s side shape.
Pro tip:
Angle the crystal pin in the same direction as the tucked section. Following the hair’s natural line helps the accessory sit flatter and look more intentional.
Make It Work for You:
For a wavy bob, smooth only the temple section under the pin and let the remaining lengths keep their bend. The crystal detail stays crisp without removing texture.
Watch Out For:
Do not choose an oversized heavy pin for a very short bob. Too much weight can drag the tuck downward and dominate the compact silhouette.
Messy Bun Ruby Cluster Jeweled Hair Pin Hairstyle

A ruby cluster adds a rich focal point to a messy bun when it sits at one side instead of disappearing into the center. Gather the hair at the crown or upper back, loop or twist it into a loose bun, and allow selected ends to remain irregular. Position the ruby cluster near the lower side of the bun where it can catch light without interfering with the softer pieces around the face.
Medium and long hair across straight, wavy, curly, and coily textures can use this approach. A fabric-covered elastic creates the real bun base, bobby pins hold loose sections, and the ruby jeweled cluster is inserted only after the shape feels secure. Rebuilding the bun between washes can be quick; preparing it from clean hair takes longer when drying or texturizing is needed first.
For professional styling, show the bun height and how undone you want the visible ends. Also indicate whether the ruby cluster should be visible from the front or mainly from the side. The ornament should not be pushed into the elastic as a support piece. If the bun starts leaning, correct the base and internal pins before touching the jewels. Controlled looseness gives the style character, but discomfort or obvious slipping means the foundation needs rebuilding.
Pro tip:
Hold the ruby cluster against two possible spots before inserting it. Choose the side with less loose texture so the jewel has a clean background.
Make It Work for You:
For dense hair, create a wider bun with several pinned loops instead of one tight twist. The ruby cluster can sit between loops without carrying their weight.
Watch Out For:
Do not keep tightening the decorative pin when the bun shifts. A moving bun needs a stronger structural base, not more pressure from the jeweled piece.
Finger Waves Vintage Jeweled Hair Pin Hairstyle
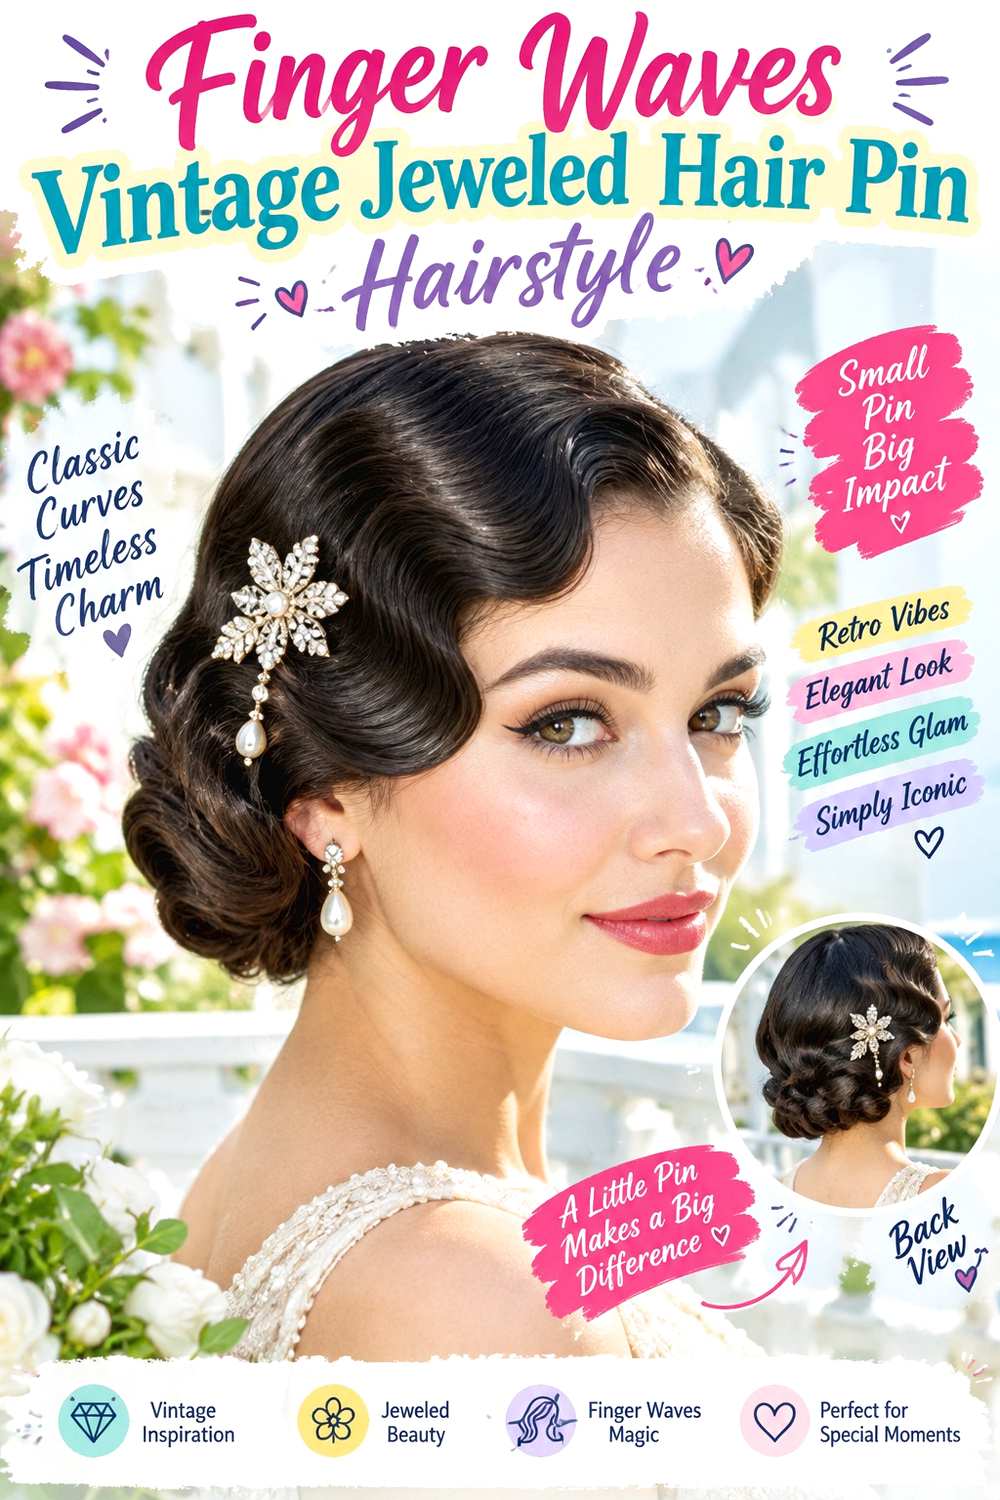
A vintage jeweled pin pairs naturally with finger waves because both features depend on deliberate placement. Create smooth S-shaped bends along the front and sides, keeping the wave ridges visible rather than brushing them into loose curls. Place the jeweled pin above one ear where a wave curves inward, allowing the accessory to follow the existing line instead of interrupting it.
Short to medium hair is especially suited to this arrangement, though longer lengths can be gathered at the back. Use styling gel to shape the wet wave pattern, wave clips to hold the bends while they set, and the vintage jeweled pin only after the hair is fully dry. A small dry-hair touch-up may be quick, but creating finger waves from the beginning is a more involved styling session because the pattern needs careful placement and setting.
If a stylist is creating the look, show the wave depth and exactly where you want the decorative pin in relation to the ear. The jewel should sit on a stable, dry section rather than being pressed into damp gel. Once the wave pattern is set, avoid repeatedly moving the accessory because dragging it can break the smooth ridge. If the pin feels heavy, add hidden support underneath instead of clamping more hair.
Pro tip:
Place the jeweled pin in the hollow just behind a finished wave ridge. The accessory follows the pattern while leaving the most visible curve uninterrupted.
Make It Work for You:
For longer hair, keep the finger waves concentrated around the front and gather the back into a low bun. The vintage jeweled detail can remain beside the ear.
Watch Out For:
Do not insert the jeweled pin while the gelled waves are still damp. Wait until the pattern has set so the accessory does not dent the surface.
Twisted Half-Up Amethyst Jeweled Hair Pin Hairstyle
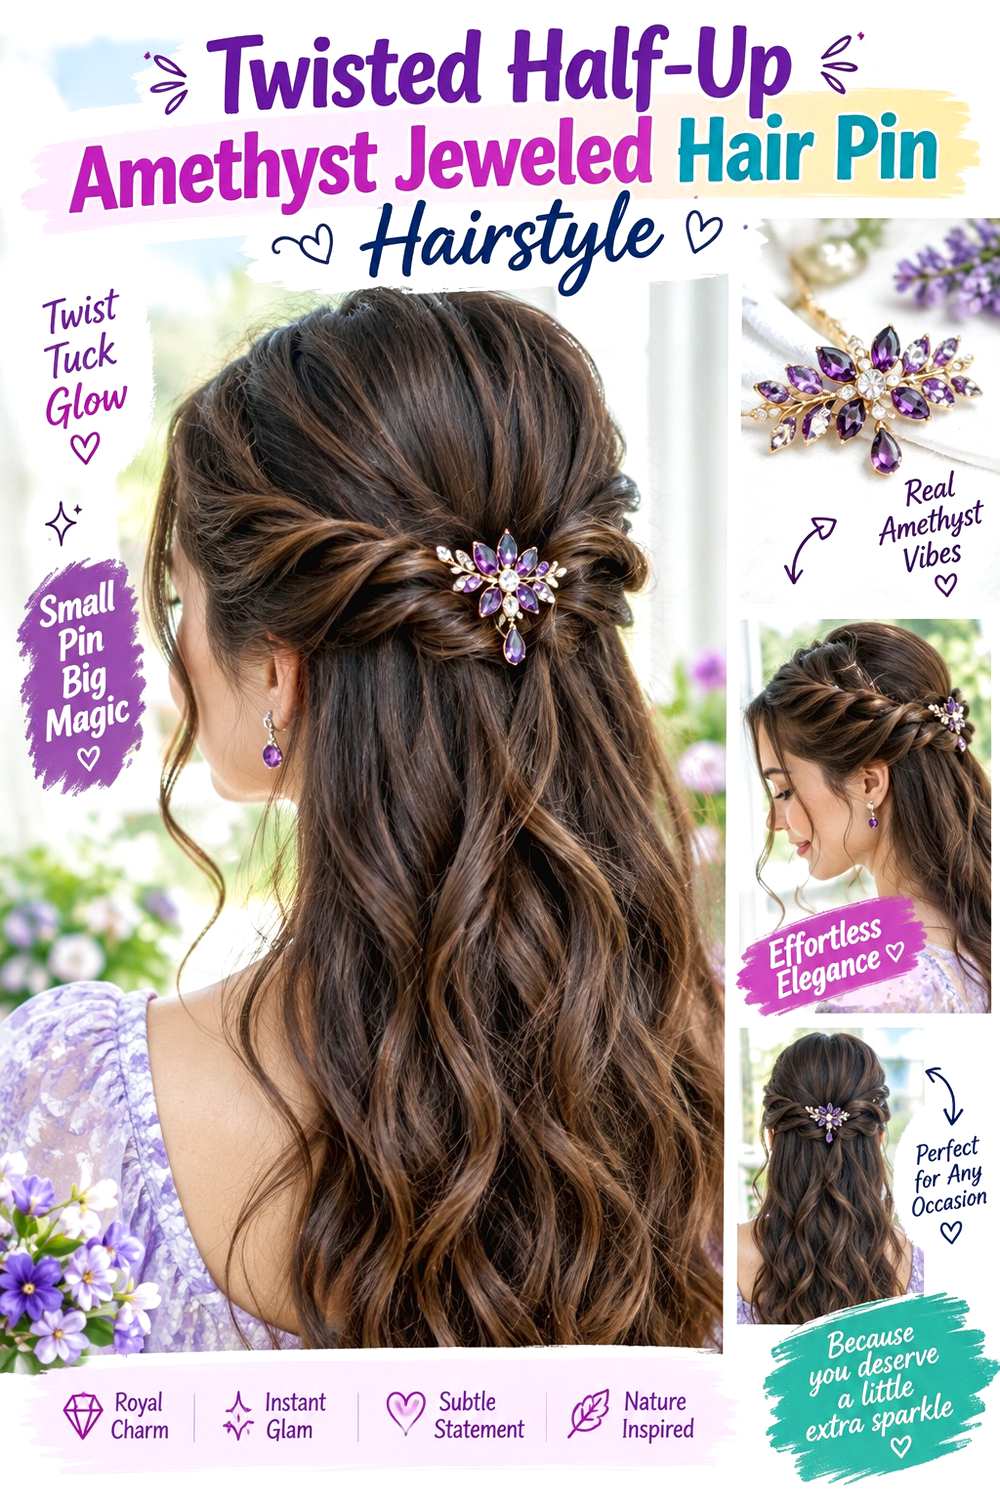
An amethyst pin looks especially effective where two side twists meet in a half-up style. Take a modest section from each temple, twist both backward, and secure them together near the back crown. Leave the remaining length loose in waves, curls, or a straighter finish. The jeweled piece can sit directly over the meeting point, with the purple stone creating a concentrated accent against the softer texture.
Medium and long hair works best because the side sections need enough length to reach the back comfortably. Use a small clear elastic to secure the twists, light texturizing spray for grip, and the amethyst jeweled pin as the visible finishing piece. A between-wash refresh may only involve redoing the two twists; a full wash-day style takes longer if the loose lengths are also curled or fully dried.
At a salon or styling appointment, specify how high you want the twists to travel and how much crown volume should remain above them. Twisting too much hair backward can flatten the sides and reduce fullness. The amethyst accessory should cover the anchor without being responsible for it. If the twists loosen, redo the elastic or hidden support before adjusting the jewel. That separation keeps the ornament comfortable and prevents repeated pulling on the side sections.
Pro tip:
Secure both twists together first, then place the amethyst pin slightly above the elastic. This hides the anchor while keeping the decorative piece free of structural tension.
Make It Work for You:
For fine hair, use narrower twists and leave more length loose below. The amethyst focal point remains clear while the lower hairstyle keeps a fuller appearance.
Watch Out For:
Avoid twisting the temple sections too tightly just to support the jewel. Stable hidden anchoring works better and prevents the sides from looking overly stretched.
Curly Ponytail Opal Jeweled Hair Pin Hairstyle

An opal pin can sit beside a curly ponytail base and add detail without competing with the volume of the curls. Gather the hair at mid-height or just above the nape, leaving the ponytail full and springy. Keep the crown softly controlled, then place the opal jewel slightly above or beside the elastic rather than directly through it. A few face-framing curls can stay loose near the temples.
Medium and long curly hair is ideal because the gathered lengths can keep their natural texture. Use a fabric-covered elastic to secure the ponytail, curl cream to refresh visible curls, and the opal jeweled pin as the final accent. A next-day refresh can be short when only the ponytail and front pieces need reshaping; a full wash-day version takes longer because the entire curl pattern must be set and dried.
For salon styling, specify the ponytail height and whether you want the opal visible from the front, side, or mainly from behind. The accessory should sit on a small stable section beside the base instead of carrying the ponytail. If the curls lose volume, fluff the ponytail itself rather than moving the jeweled pin outward. When removing the pin, separate any nearby curl groups first so the setting does not catch their ends.
Pro tip:
Anchor the opal pin just above the elastic on the side with less ponytail volume. That keeps the jewel visible instead of burying it in curls.
Make It Work for You:
For very dense curls, use a wider ponytail base and place the opal farther to the side. The decoration remains readable without compressing the gathered texture.
Watch Out For:
Do not force the jeweled pin through the ponytail elastic. It can snag during removal and adds no useful structural support to the gathered hair.
Low Knot Leaf Vine Jeweled Hair Pin Hairstyle
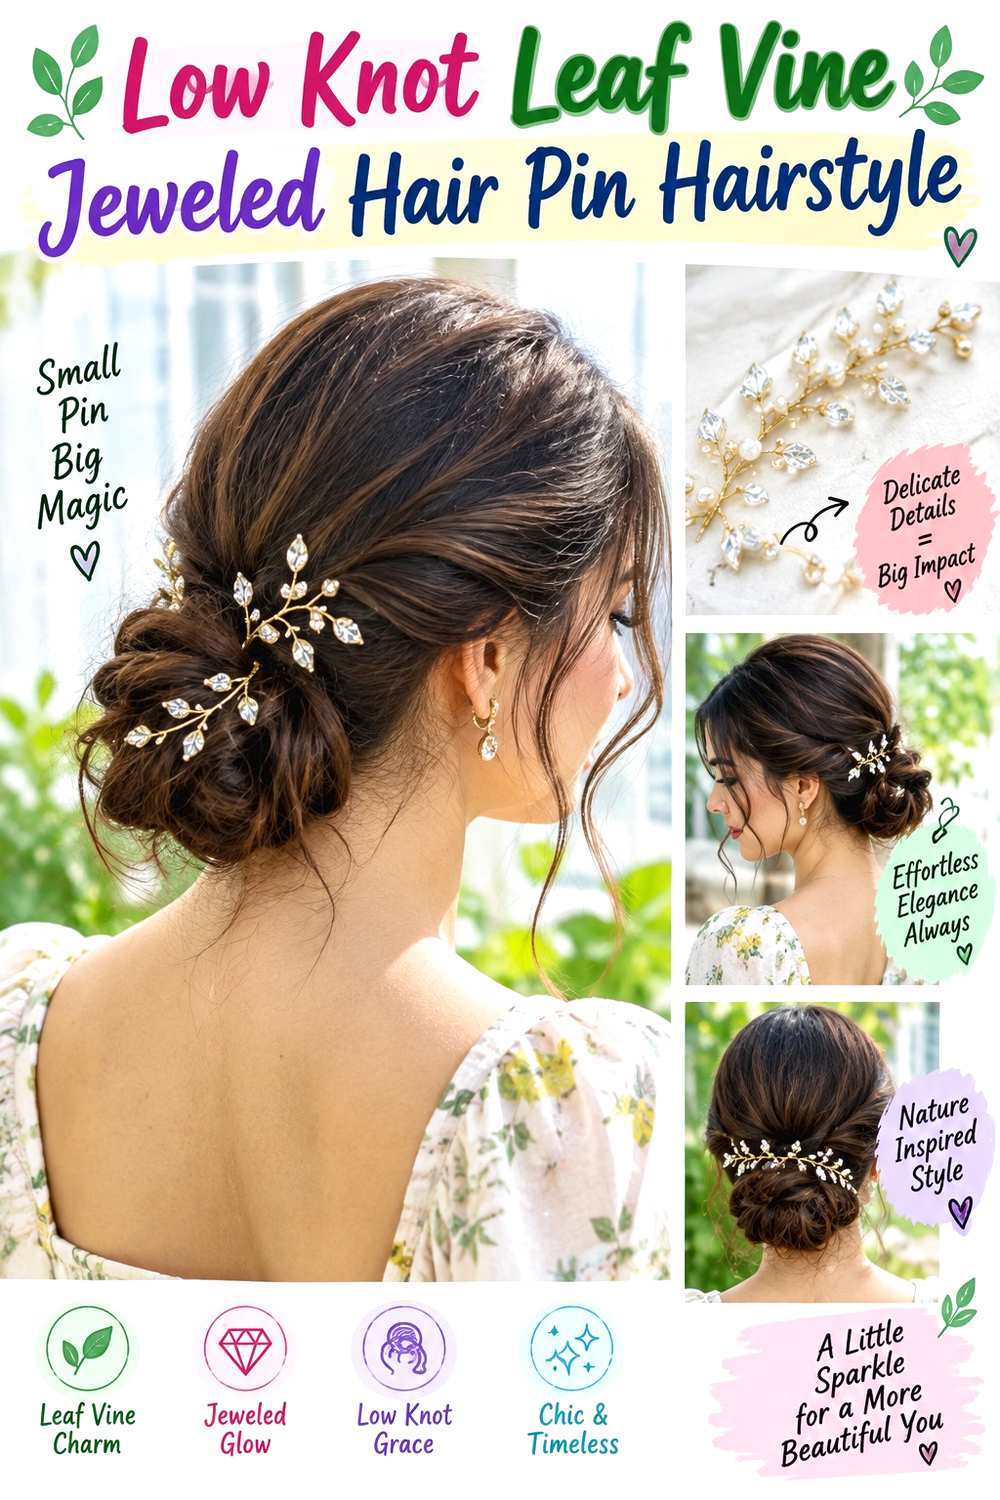
A leaf-vine pin naturally follows the curve of a low knot, making it useful when you want decoration that looks integrated rather than separate. Gather the hair at the nape, form a loose knot or folded loop, and secure it so the outer edge remains visible. Position the leaf-vine piece along one side of the knot or diagonally upward from the base, allowing the branches to trace the hairstyle’s direction.
Medium and long hair is easiest to knot, and straight, wavy, curly, or coily textures can all adapt with different amounts of smoothing. Use a fabric-covered elastic for the base, bobby pins to secure the knot, and the leaf-vine jeweled pin only after the structure is complete. Refreshing a dry-hair knot can be moderate effort; wash-day preparation takes longer depending on detangling and drying.
For professional styling, specify whether you want the knot compact or softly spread and show the direction the vine should follow. Because branch-style accessories can catch hair, they need a clear placement route rather than repeated pushing and pulling. The jeweled piece should decorate the finished knot, not hold its weight. If one side loosens, rebuild the hidden support before reinserting the vine carefully.
Pro tip:
Lay the leaf vine over the finished knot first and check its direction before inserting it. Choose the angle that follows the outer curve most naturally.
Make It Work for You:
For shorter medium-length hair, build a smaller folded knot and let the vine extend slightly above it. The accessory can create length without forcing a larger bun.
Watch Out For:
Avoid dragging branch-shaped decorations sideways through the knot. Lift them outward during removal so leaves and prongs do not catch hidden strands or pins.
Box Braids Crystal Accent Jeweled Hair Pin Hairstyle
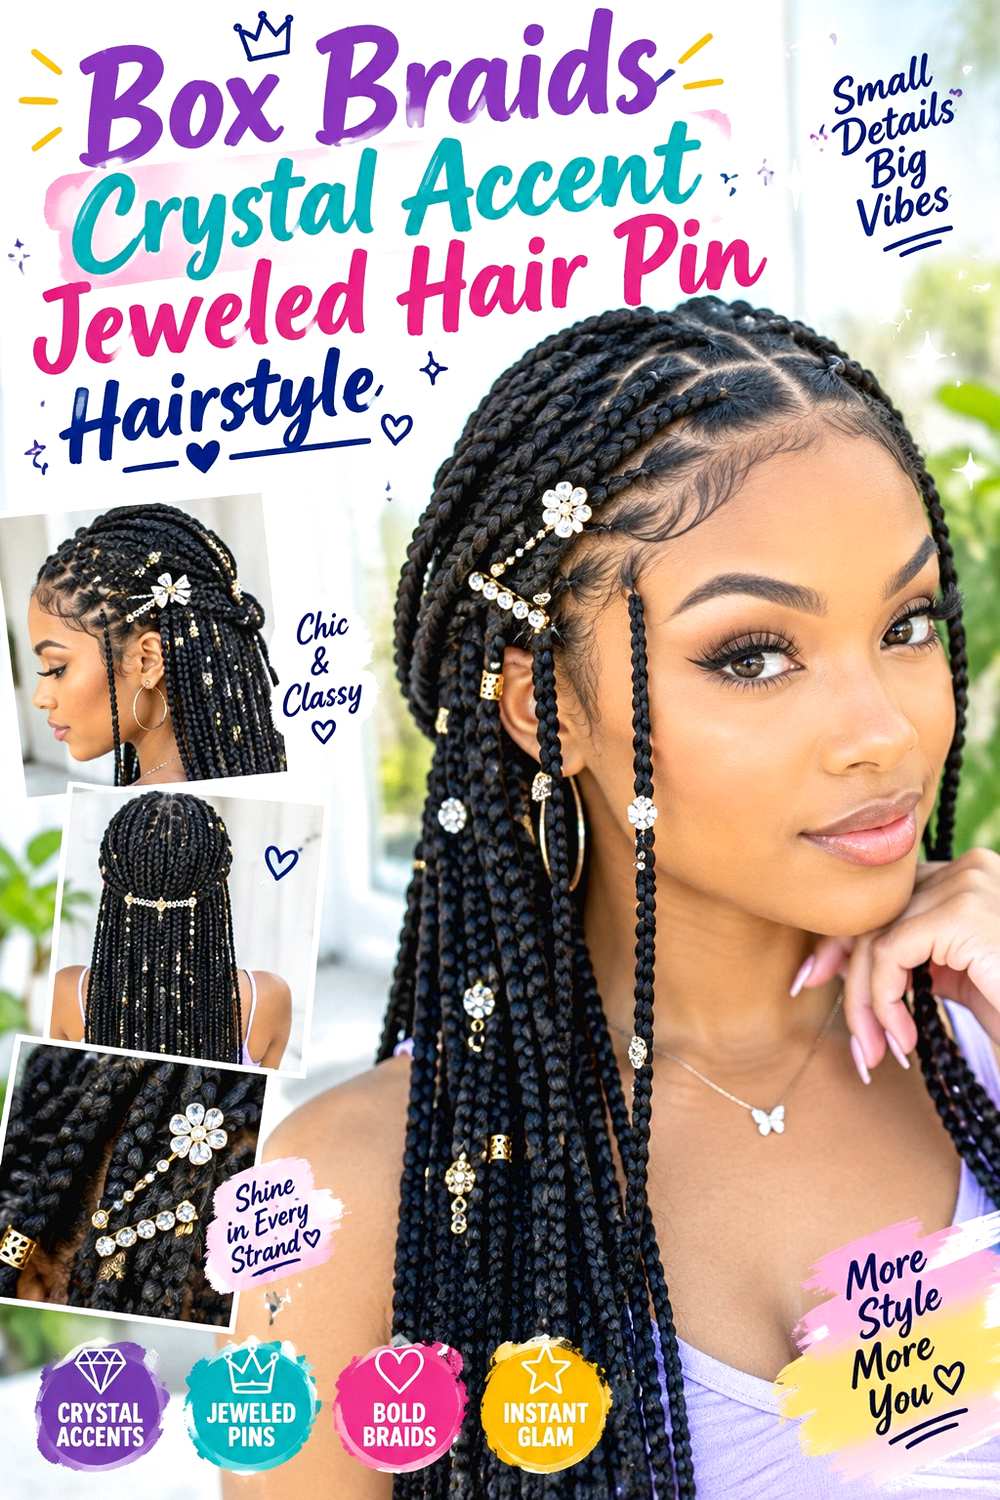
Crystal accents can sit along box braids without changing the braid installation itself. Choose one side near the temple or a small group of braids behind the ear, then place the jeweled pin across or beside that section. The remaining braids can stay down, sweep over one shoulder, or gather loosely at the back. Keeping the crystal placement concentrated prevents the decoration from disappearing among many braid lines.
This option works with medium and long box braids that feel comfortable at the roots. Use a soft scarf tie to move surrounding braids out of the way while positioning, a large bobby pin for hidden support if needed, and the crystal accent as the visible finishing piece. Daily styling is generally quick because the braid structure is already established; wash care and installation are separate, longer processes.
If a stylist is placing the accessory, specify which braid rows should remain visible around the jewel and ensure the pin does not pull on individual braid bases. A decorative piece should attach to a stable group rather than clamp one braid tightly. As the roots grow out, placement may need to shift because the braids move more freely. Adjust the accessory location instead of tightening it closer to the scalp.
Pro tip:
Anchor the crystal accent across two or more stable braids rather than one braid alone. Spreading the contact helps keep the decoration balanced without concentrated pulling.
Make It Work for You:
For thicker box braids, choose a broader crystal piece and position it beside the temple rather than across several bulky sections. The ornament will sit flatter.
Watch Out For:
Do not use the jeweled pin to tighten loose braid roots. Move the accessory independently and keep the installation comfortable rather than adding tension near the scalp.
Bridal Updo Pearl Spray Jeweled Hair Pin Hairstyle
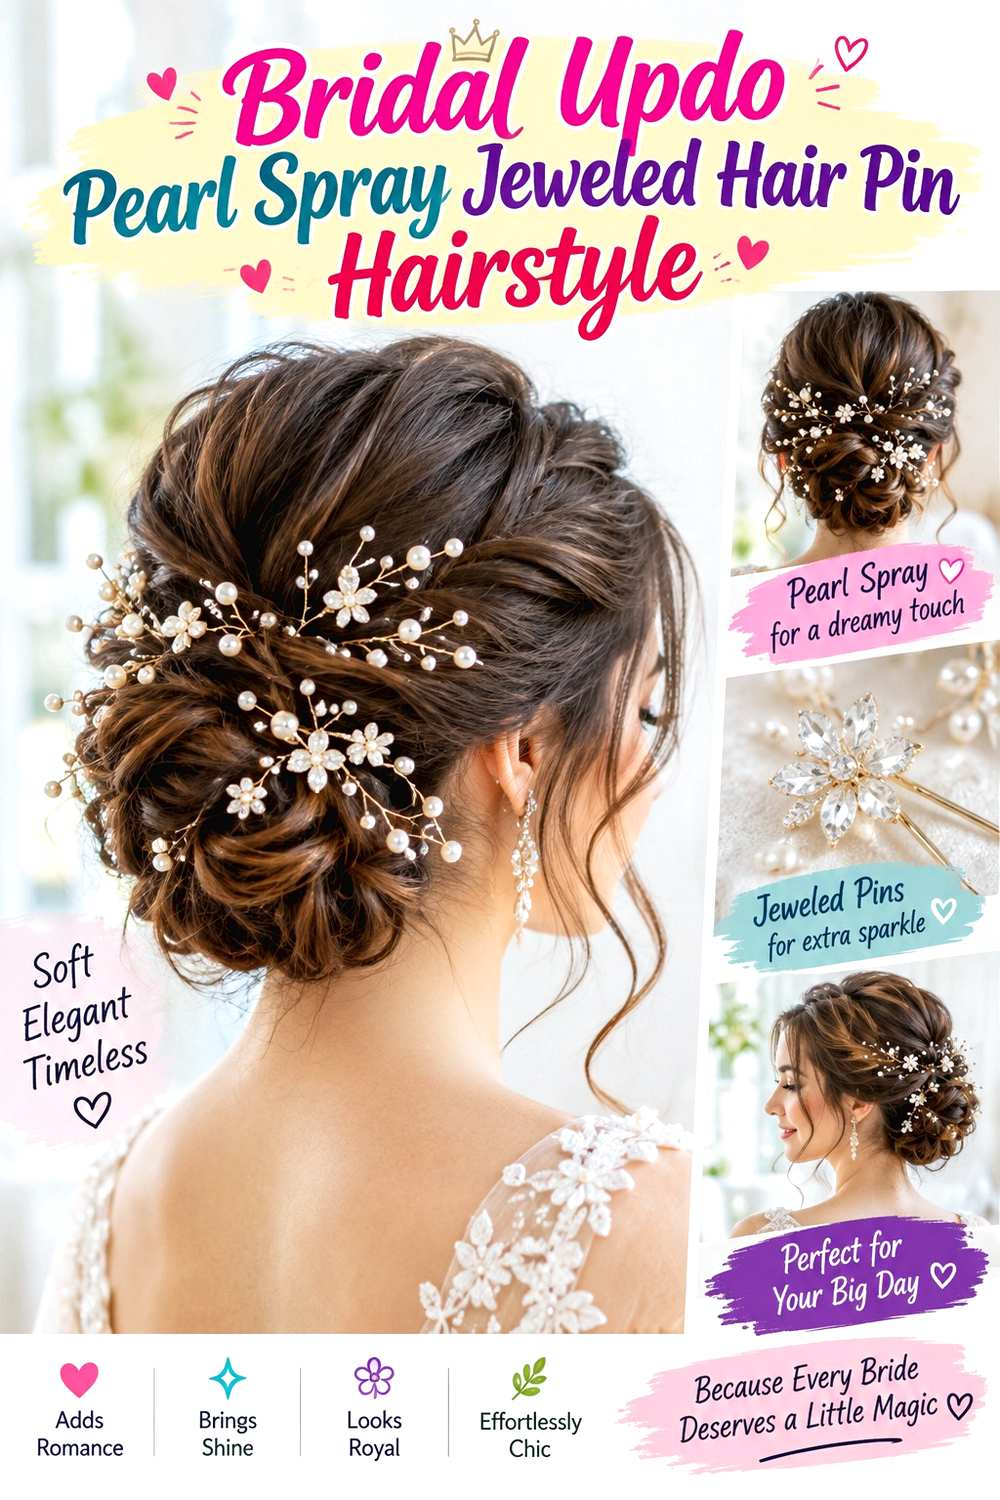
A pearl spray creates a soft branching detail in a bridal updo and works best when it follows the shape rather than sitting randomly on top. Build a low or mid-height updo with pinned loops, twists, or a chignon base, then place the pearl spray along one side where it can trace the curve. Leave face-framing pieces only if they suit the intended finish and will stay comfortable throughout the event.
Medium and long hair usually gives the most flexibility for this kind of pinned style. Use bobby pins for the updo structure, flexible hairspray for controlled hold, and the pearl spray solely as the visible accessory. Small event-day touch-ups may be quick once the base is stable; the full hairstyle takes longer because drying, shaping, and detailed pinning all happen before the decoration is added.
For salon styling, show the exact updo height, the amount of loose texture you want, and where the pearl spray should begin and end. If a veil or other accessory is involved, its anchor needs separate planning so pieces do not compete. The pearl spray should never become the main structural support. If the updo shifts, repair hidden pins underneath before moving the decorative branches.
Pro tip:
Test the pearl spray placement from several angles before inserting it. Bridal accessories are viewed from the front, side, and back, so the curve should remain visible.
Make It Work for You:
For shorter hair, build a lower compact updo and place a smaller pearl spray along one side. The decoration can add visual length without forcing more volume.
Watch Out For:
Do not overlap the pearl spray with a veil anchor unless the placement is planned. Separate attachment points make both accessories easier to secure and remove.
Tucked Waves Teardrop Jeweled Hair Pin Hairstyle
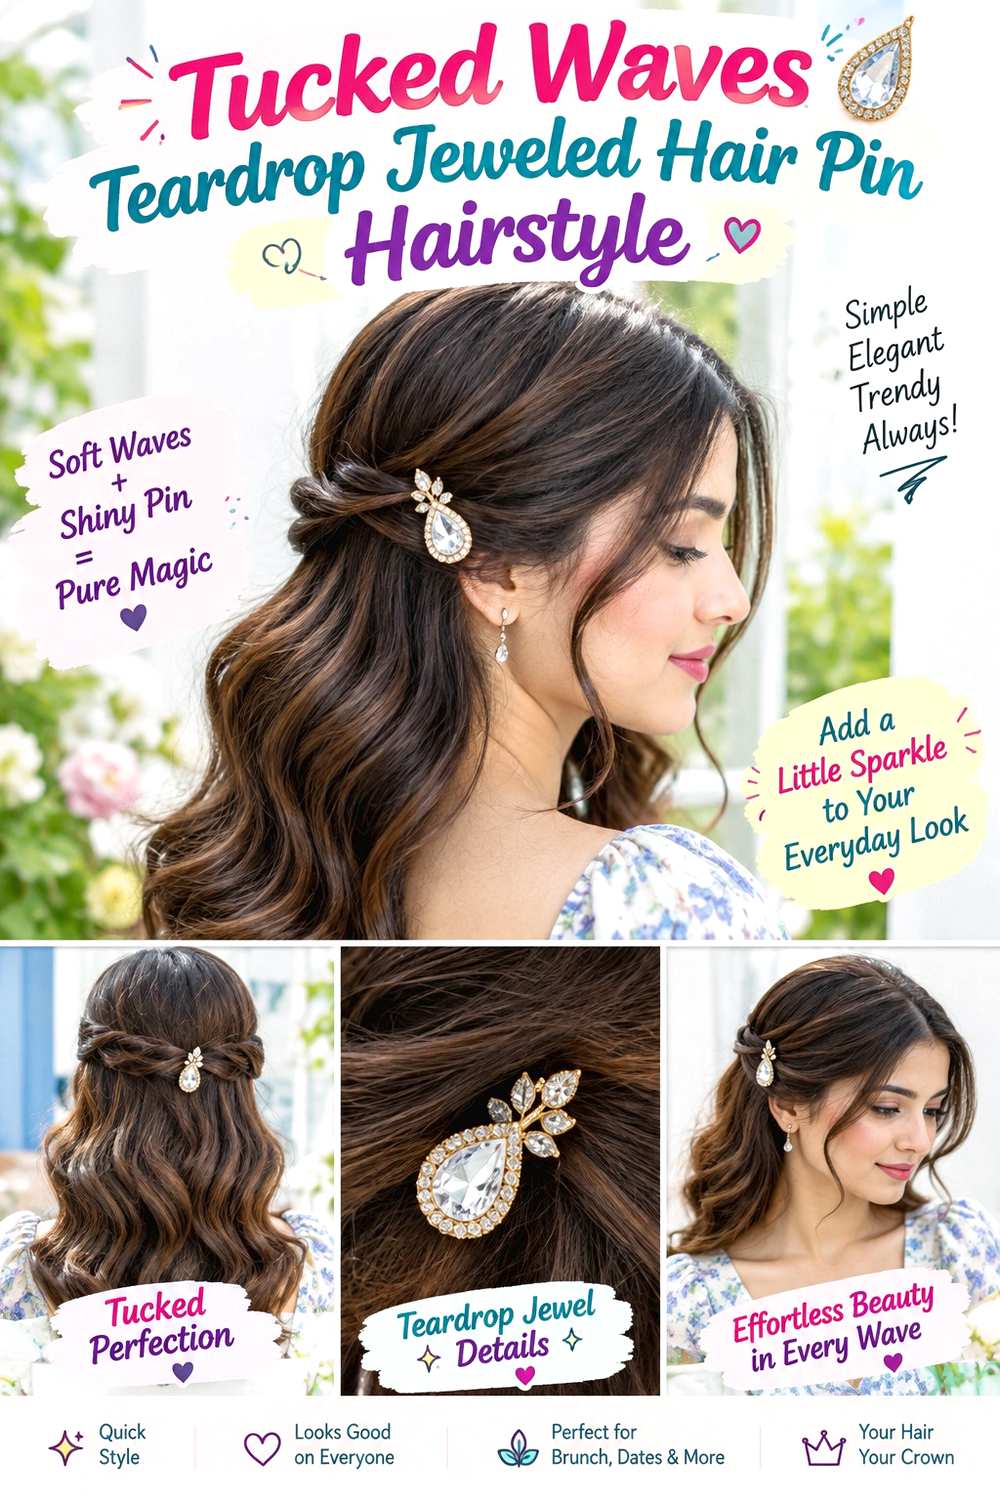
A teardrop jeweled pin suits tucked waves because its narrow shape can sit vertically or diagonally above the ear without crowding the hairstyle. Create loose waves through the mid-lengths, tuck one side behind the ear, and position the teardrop where the front section transitions into the tucked area. Keep the opposite side loose with visible movement, and leave the ends soft rather than tightly curled.
Medium and long straight or wavy hair works well, while naturally loose curls can use the same placement with less heat styling. Apply heat protectant before shaping bends with a curling iron, then use light texturizing spray on the hidden tuck before adding the jeweled pin. A next-day refresh may only involve resetting the front wave and accessory; full wash-day styling takes longer because the entire length needs drying and shaping first.
For salon styling, specify how much hair you want behind the ear and whether the teardrop should point upward, downward, or follow the hairline diagonally. Its orientation changes the visual line around the face. The pin should sit on a stable tucked section instead of clamping a large amount of hair. If it slides, reinforce the tuck underneath rather than forcing the jeweled piece closer to the scalp.
Pro tip:
Match the teardrop angle to the direction of the tucked hair. Following that line helps the accessory sit flatter and makes the placement look deliberate.
Make It Work for You:
For shoulder-length waves, place the teardrop slightly higher above the ear and keep the bends broad. The accessory stays proportional while the shorter ends retain movement.
Watch Out For:
Avoid trapping loose wave ends in the jeweled setting. Separate the tuck cleanly before inserting the pin so nearby strands can move without catching.
Conclusion
Jeweled hair pin hairstyle ideas can look very different depending on accessory size, placement, texture, and the strength of the hairstyle beneath them. Small crystal or teardrop pins work naturally with bobs and tucked waves, while larger pearl sprays, vines, and clusters suit buns, twists, braids, and formal updos. Loose curls and coils usually benefit from preserving volume around the jewel rather than flattening large sections. Straighter styles can use cleaner lines and more visible pin angles. Consider your length, density, parting, and normal styling effort before choosing a placement. Most importantly, let elastics, bobby pins, braids, or twists provide the real hold so the jeweled accessory remains decorative, comfortable, and easier to remove.
Before Your Salon Visit
Choose one or two favorite references and point to the exact jeweled detail you like: pin size, stone shape, placement, angle, and how much hair sits around it. Discuss your natural texture, density, preferred length, face-framing pieces, volume, and usual styling routine. For updos or braids, explain the height, tension, and anchor position you want. Since jeweled pins are temporary accessories, focus on secure placement and comfortable support rather than requesting an unnecessary haircut.
FAQs
How do I keep a jeweled hair pin from slipping?
Give the decorative pin a stable section to grip instead of relying on smooth loose hair. A hidden bobby pin, small elastic, twist, braid, or lightly textured section can create support. If the ornament still moves, adjust the anchor rather than pushing the jewel harder against the scalp.
Can jeweled hair pins work with curly or coily hair?
Yes. Secure only the section needed for the accessory and leave surrounding curls or coils free to keep their natural volume. For dense textures, a hidden anchor may work better than forcing a small decorative pin through too much hair. Judge placement after shrinkage has settled.
Do jeweled pins damage hair?
They should not need to when they are smooth, properly placed, and removed carefully, but raised settings, sharp edges, or tight clamping can catch strands. Check the accessory before use, avoid forcing it through resistance, and lift it out rather than dragging it through styled hair.
Can a jeweled hair pin hold an updo by itself?
Usually, a decorative pin is better treated as an accent rather than the only structural support. Build the bun, twist, braid, or chignon with appropriate elastics and bobby pins first. Once the foundation feels stable, add the jeweled piece where it can decorate the shape without carrying its weight.