16 Crystal Clip Half-Up Hairstyles
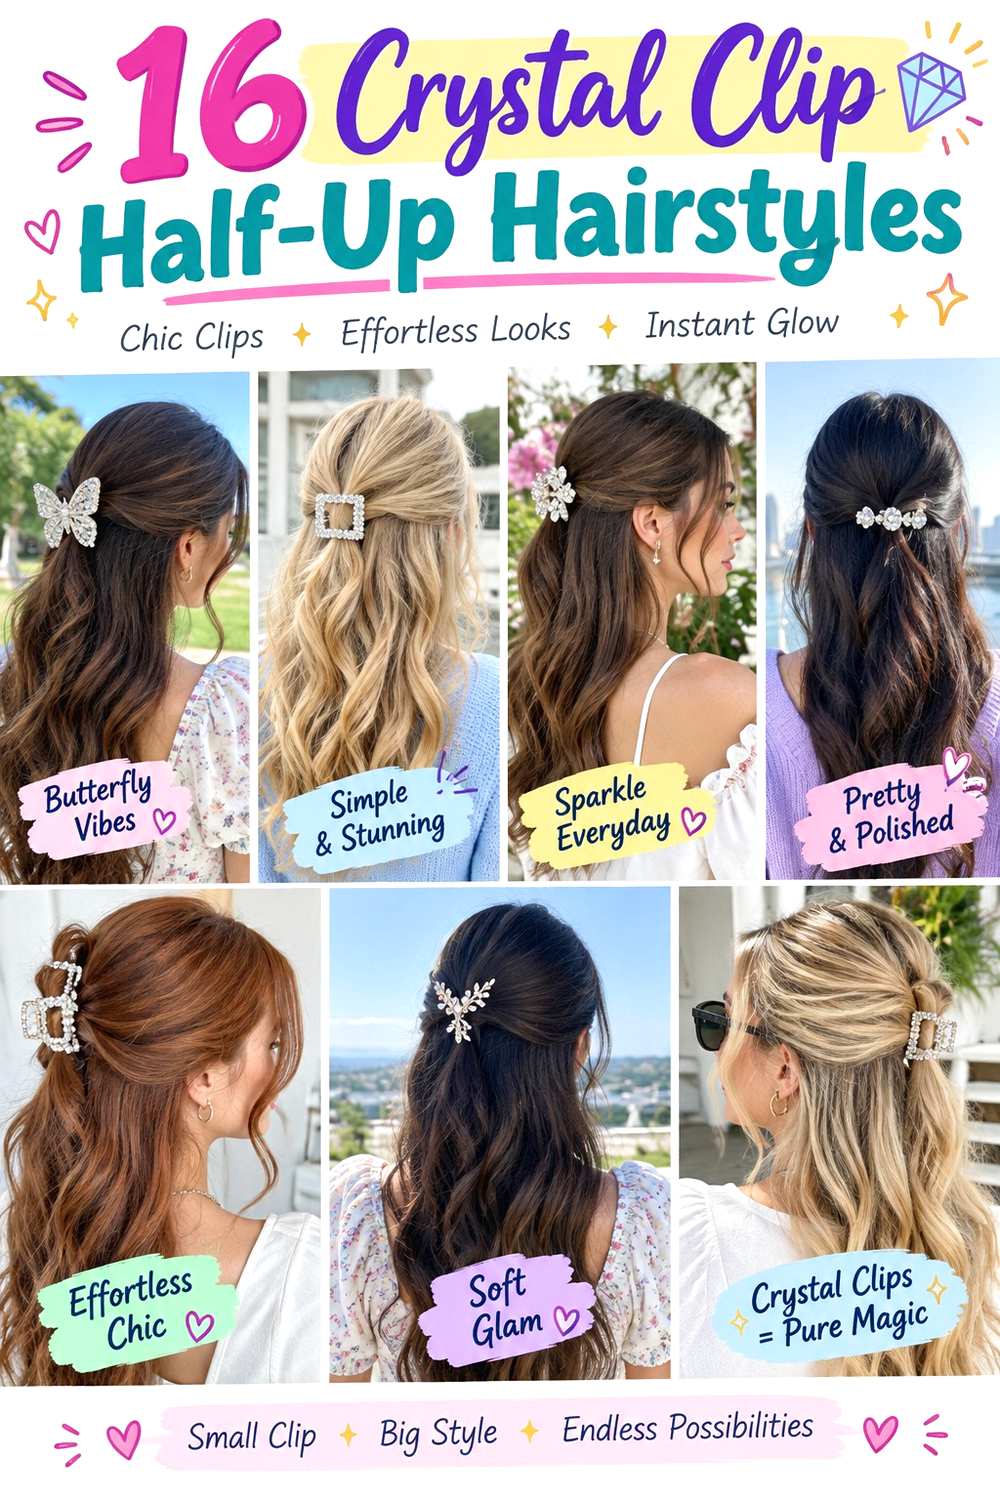
Crystal clip half-up hairstyles combine an anchored upper section with loose hair underneath, using the clip as both decoration and support. The defining shape can be a smooth half pony, crossed twists, narrow braids, or softly lifted crown sections. Length matters because the loose lower hair creates much of the silhouette, while layers, fringe, parting, texture, and volume change how much structure appears around the face. The crystal detail is usually strongest when it sits on a stable base rather than gripping a large bundle of loose hair by itself.
Medium and long hair offer plenty of room for half-up shapes, but bobs and lobs can also work when the gathered section is smaller. Straight, wavy, curly, and coily textures can all support the idea. Lower-density hair often benefits from a lighter clip and narrower section, while dense hair may need a firmer hidden anchor. Face-framing layers can stay loose, and crown volume can be kept subtle or increased according to preference.
Styling effort ranges from a short dry-hair refresh to a longer wash-day routine if you also want defined waves, curls, or a polished surface. Maintenance is mainly about grip, comfortable tension, frizz control, and resetting the anchor when it loosens. The clip should decorate a secure structure, not compensate for one.
Quick List
- Center-Back Crystal Clip Twist Half-Up Hairstyle
- Soft Wave Crystal Clip Half-Up Hairstyle
- Sleek Crystal Barrette Half-Up Hairstyle
- Curly Crown Crystal Clip Half-Up Hairstyle
- Braided Crystal Clip Half-Up Hairstyle
- Double Twist Crystal Clip Half-Up Hairstyle
- Side-Part Crystal Clip Half-Up Hairstyle
- Mini Bouffant Crystal Clip Half-Up Hairstyle
- Low Crystal Clip Half-Up Hairstyle
- High Crown Crystal Clip Half-Up Hairstyle
- Short Bob Crystal Clip Half-Up Hairstyle
- Long Layered Crystal Clip Half-Up Hairstyle
- Coily Crystal Clip Half-Up Hairstyle
- Rope Twist Crystal Clip Half-Up Hairstyle
- Triple Crystal Clip Half-Up Hairstyle
- Asymmetrical Crystal Clip Half-Up Hairstyle
Center-Back Crystal Clip Twist Half-Up Hairstyle
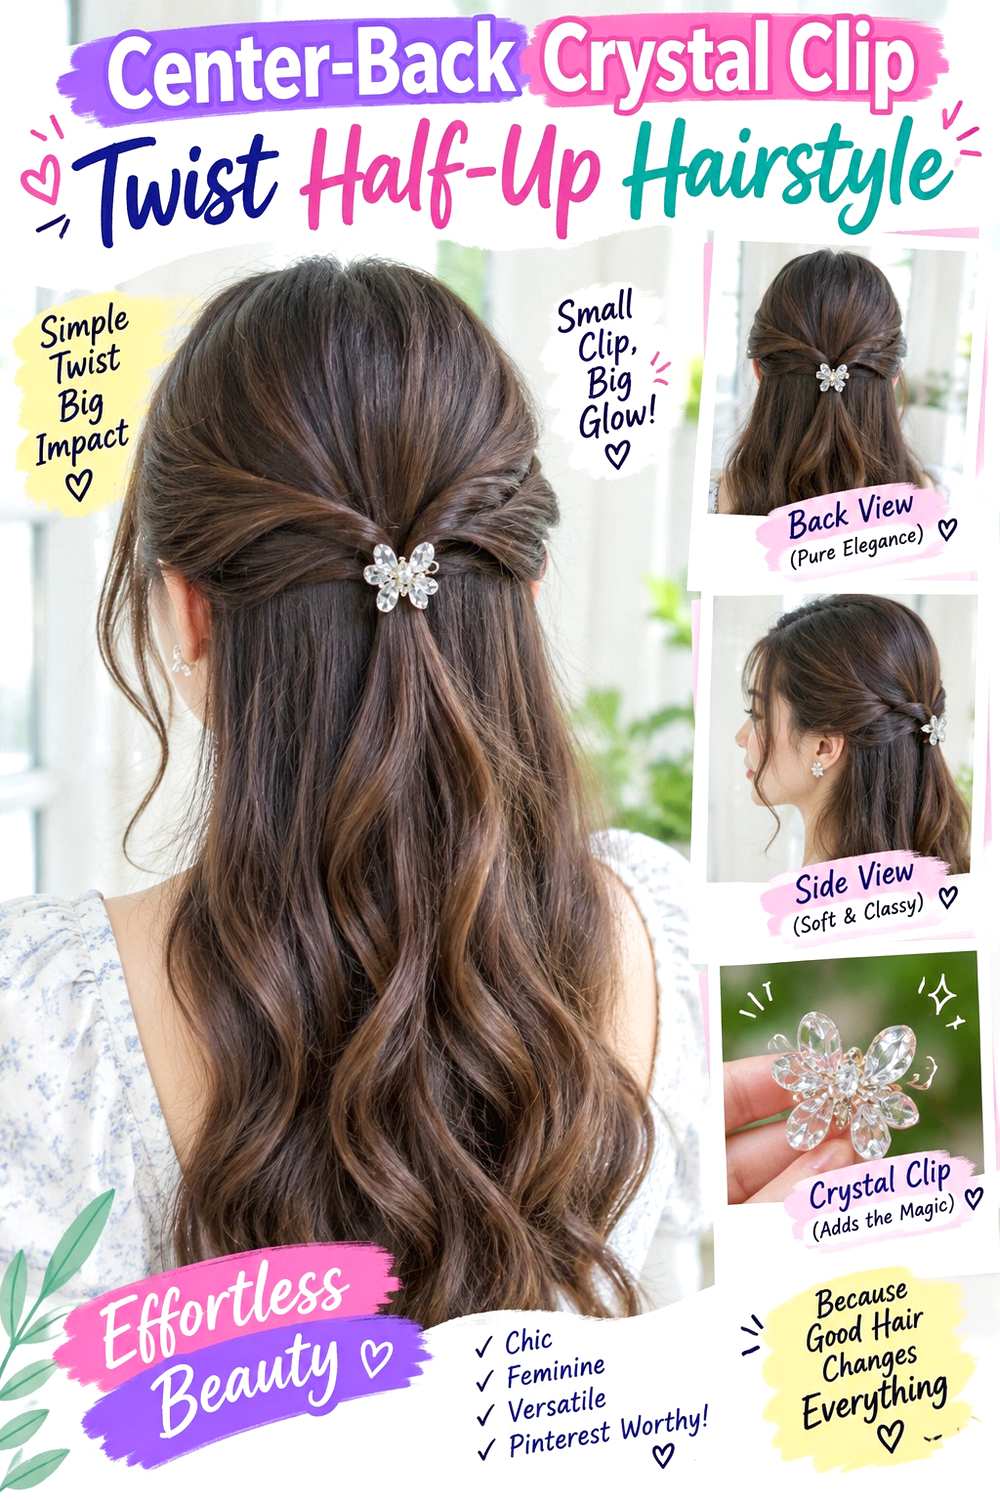
Two soft side sections meet at the center back, twist once, and tuck beneath a crystal clip, leaving the lower length loose. A middle part gives the arrangement an even frame, while an off-center part makes one side slightly fuller. Keep the twist narrow enough that the clip remains visible, and let existing fringe or shorter face-framing layers fall naturally. The lower hair can stay straight, wavy, curly, or coily; the accessory does not require a particular finish.
This version works well when you want a quick half-up shape without braiding. A light texturizing spray can add grip to slippery sections, and two hidden bobby pins can support the crossed twist before the crystal clip is attached. That three-part setup matters because a decorative clip should not carry the entire weight of dense hair. A dry-hair refresh may take only a few minutes if the base is still secure, while full wash-day styling takes longer because the loose lengths need their drying routine first.
If the twist starts to sag, rebuild the hidden anchor rather than closing the clip more tightly. At a salon or styling appointment, show how wide you want the gathered section and where the clip should sit—high crown, center back, or closer to the nape.
Pro tip:
Cross the two twists before pinning, then attach the clip over that overlap. The hidden crossing gives the accessory a flatter, more dependable surface.
Make It Work for You:
If your hair is very dense, gather narrower side sections and leave more hair loose below. The twist remains visible without asking the clip to hold excessive weight.
Watch Out For:
Avoid fastening the clip directly onto a bulky twist. If the jaws do not close easily, reduce the section instead of forcing the hardware shut.
Soft Wave Crystal Clip Half-Up Hairstyle

Broad waves through the loose lengths make the crystal clip feel integrated rather than added at the last second. Gather the upper side sections just below the crown, leaving the front soft and the ends moving freely. A center part creates a balanced frame, while a soft side part shifts more volume toward one temple. Keep the half-up section flat so the wave pattern below remains the main source of movement.
This design suits medium to long hair. For heat-styled waves, use heat protectant before shaping, a curling iron to create broad bends from around cheek level downward, and the crystal clip to secure the gathered section. A quick next-day refresh may involve reshaping only a few front bends and resetting the clip, while a full wash-day set takes longer because the loose hair needs to be dried and waved. If your natural texture already has movement, you can preserve it instead of recreating the wave pattern with heat.
At a salon appointment, point out where you want the first visible bend to begin and how much crown volume you prefer. Also ask that the clip sit on a stable gathered section rather than pinching a thick bundle of hair.
Pro tip:
Let heat-shaped waves cool before gathering the upper section. Moving warm bends immediately can stretch them out and leave the back flatter than the loose lengths.
Make It Work for You:
If your hair already has natural waves, define the existing pattern and gather only the crown section. You can keep the soft movement without adding unnecessary heat.
Watch Out For:
Do not clamp a heavy section just because the clip looks large. Too much hair can pull the waves flat and make the accessory tilt downward.
Sleek Crystal Barrette Half-Up Hairstyle
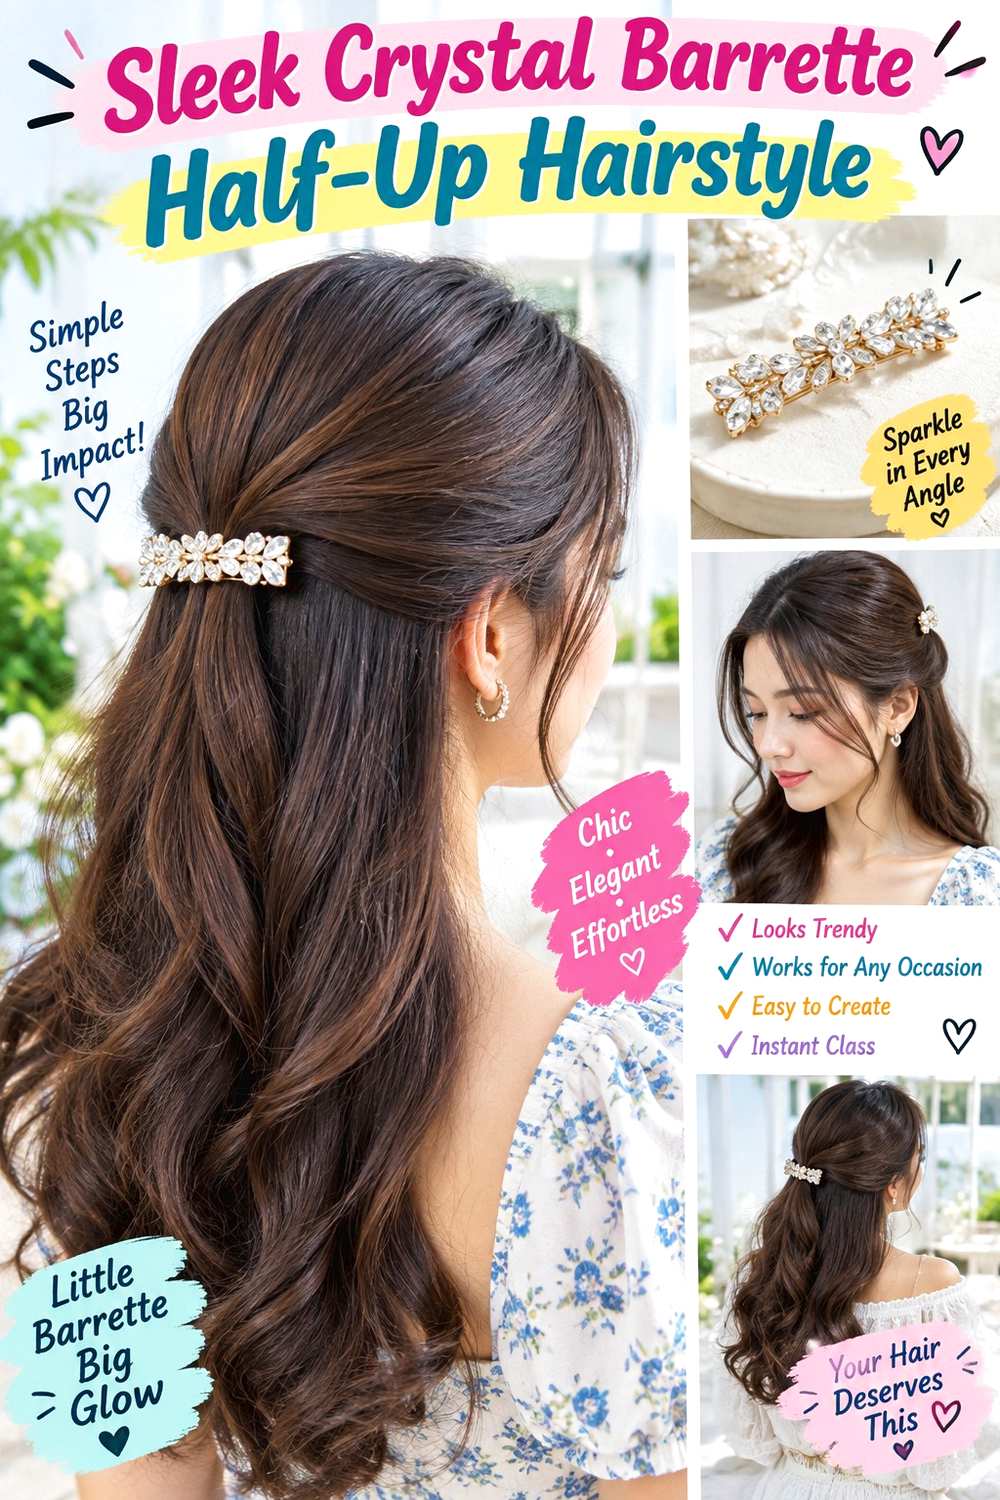
A smooth half-up section lets a slim crystal barrette become the strongest detail. Draw the upper hair back from the temples with a clean center or side part, keeping the surface close to the head and the lower lengths straight or naturally smooth. The gathered section should stay narrow enough that the barrette closes without forcing, while shorter fringe or face-framing pieces can remain free.
This option suits readers who prefer a neat finish with little crown lift. Use lightweight smoothing cream to control surface flyaways, a small hidden elastic to hold the half-up section, and the crystal barrette as the decorative cover. The hidden elastic matters because many decorative barrettes are better at finishing than carrying substantial weight. A quick refresh can mean smoothing the top and repositioning the barrette; a full wash-day style takes longer if the lower hair also needs its usual drying routine.
At a styling appointment, specify the width of the gathered section and whether the barrette should sit directly at the crown or lower toward the back. That placement changes both the profile and the amount of loose hair below, so decide whether you prefer a compact shape or a longer curtain of hair underneath.
Pro tip:
Secure the hidden elastic first, then slide the barrette over it without catching extra scalp hair. This keeps the sleek surface smooth and the closure comfortable.
Make It Work for You:
For dense hair, make a smaller internal half pony and let the surrounding upper hair lie over it before adding the barrette. The outline stays sleek without overfilling the clasp.
Watch Out For:
Watch for product buildup near the barrette base. Too much smoothing cream can reduce grip, so use less at the anchor and concentrate it on visible flyaways.
Curly Crown Crystal Clip Half-Up Hairstyle
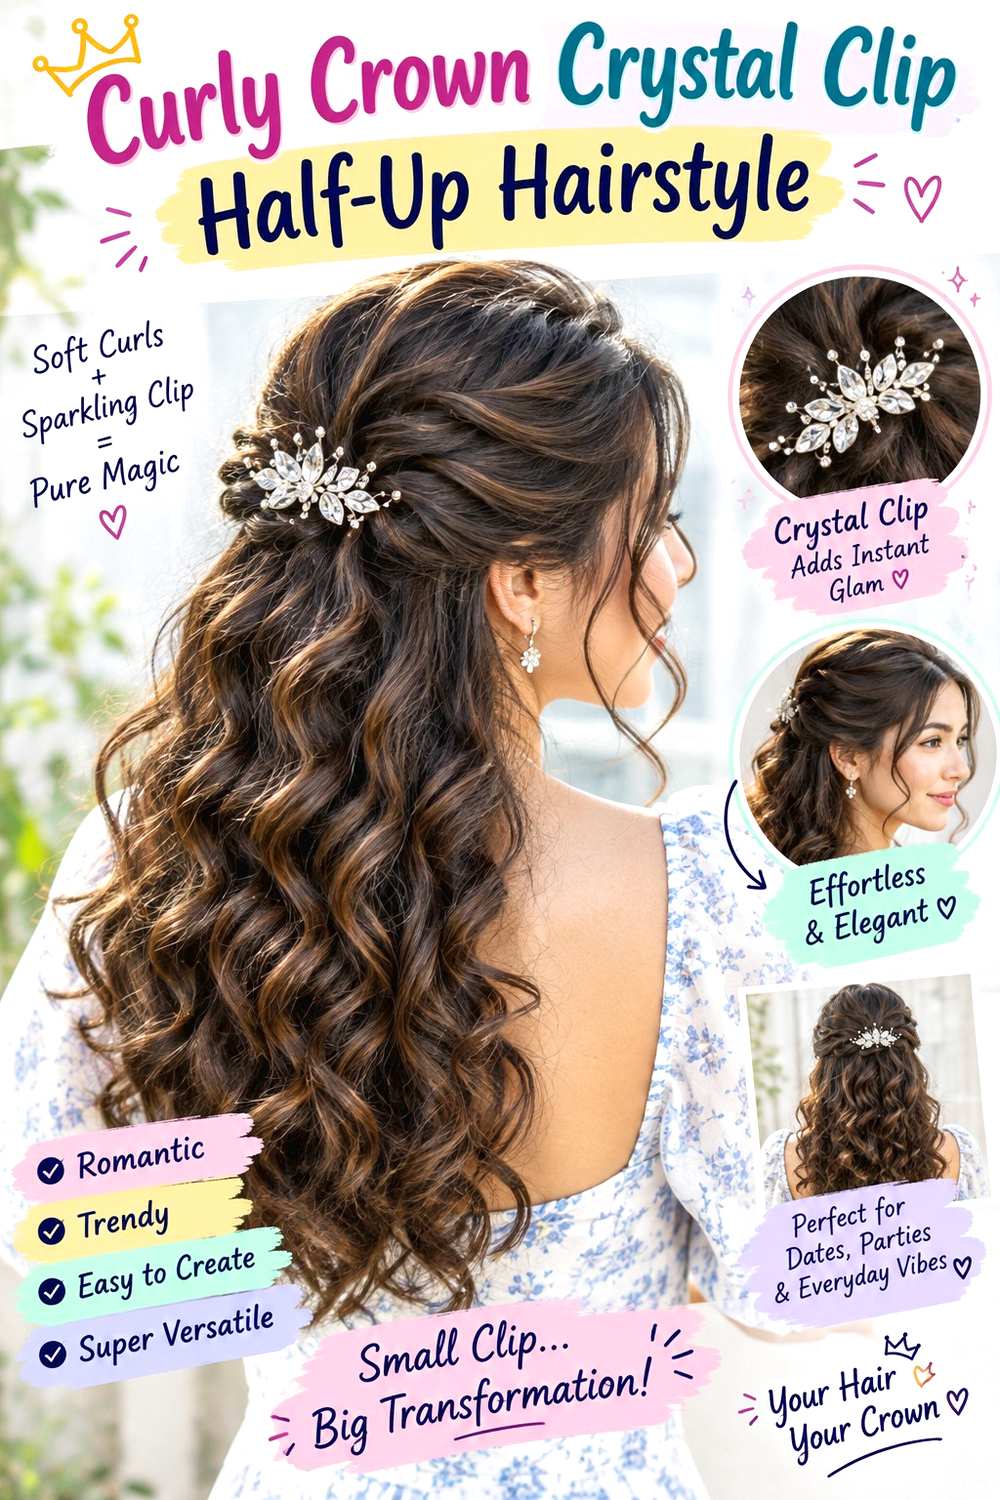
A lifted curly crown keeps natural texture visible while the crystal clip marks the meeting point of the upper sections. Gather hair from above the ears toward the back crown, preserving curl groups rather than brushing everything into a smooth sheet. A middle or side part can remain visible, and shorter curls around the hairline may stay loose. The lower section should keep its natural spring so the contrast comes from placement, not from changing the texture.
This version works across different curl patterns, but the gathered amount should reflect density and shrinkage. Use a lightweight curl gel to define the sections being gathered, a small fabric-covered elastic to create a dependable base, and the crystal clip to cover that anchor. A short refresh may mean rewetting or redefining a few front curls and resetting the clip; a full wash-day version takes longer because the curls need to dry into their normal shape before final placement is judged. If the crown feels tight after drying, rebuild it with more slack.
At a salon or styling appointment, show how much crown height you want and where the clip should sit once the curls are dry. That helps preserve the intended volume instead of flattening the upper texture.
Pro tip:
Place the anchor after the curls have reached their usual dry volume. This helps you judge crown height accurately instead of flattening texture that later expands.
Make It Work for You:
For lower-density curls, gather a smaller crown section and choose a lighter clip. More curls stay loose below, preserving movement while the accessory still has a stable base.
Watch Out For:
Do not rake through dry curls just to create a smoother half-up section. Separate with your fingers and keep curl groups intact to limit unnecessary frizz.
Braided Crystal Clip Half-Up Hairstyle
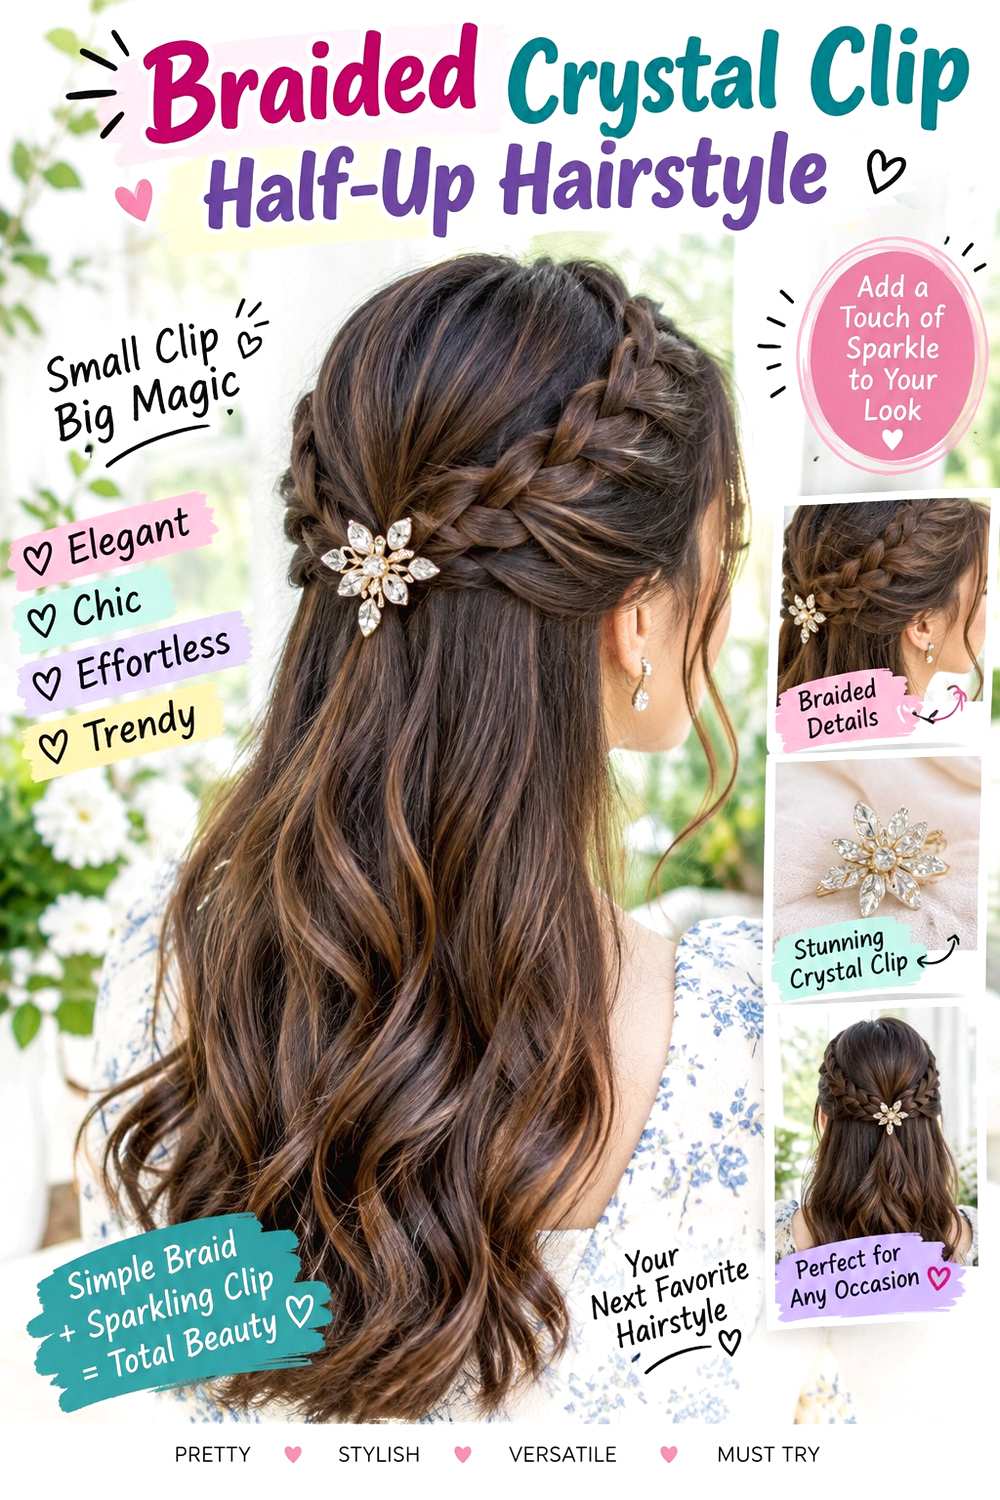
Two narrow braids from the temple area can create a secure frame for a crystal clip without gathering a large amount of hair. Bring the braids toward the center back, let them meet just below the crown, and place the clip over their joined ends. A center part gives the braids equal visual weight, while an off-center part can keep the front softer. Leave the lower lengths loose in their natural texture, with fringe or short layers outside the braid when needed.
This style suits medium and long hair and can also work on a lob when the side sections comfortably reach the back. Use two mini elastics to secure the braids, light texturizing spray for grip, and the crystal clip as the finishing anchor. A quick refresh usually means smoothing a fuzzy braid edge or replacing one elastic; a full wash-day version takes longer because the loose hair may need its usual drying and styling first. If a braid starts slipping, rebuild that side rather than tightening the clip onto more hair.
At a styling appointment, specify braid width and the exact meeting point. Narrow braids create a delicate frame, while wider braids show more texture and may require a larger, stronger clip.
Pro tip:
Angle each braid slightly upward as it approaches the center so the meeting point sits neatly beneath the clip instead of sagging below it.
Make It Work for You:
If your hair is short around the temples, begin the braids farther back and keep them compact. The crystal detail stays centered without stretching shorter pieces across the head.
Watch Out For:
Avoid widening both braids after the clip is attached. Pulling on the edges can loosen the hidden elastics and make the accessory rotate.
Double Twist Crystal Clip Half-Up Hairstyle
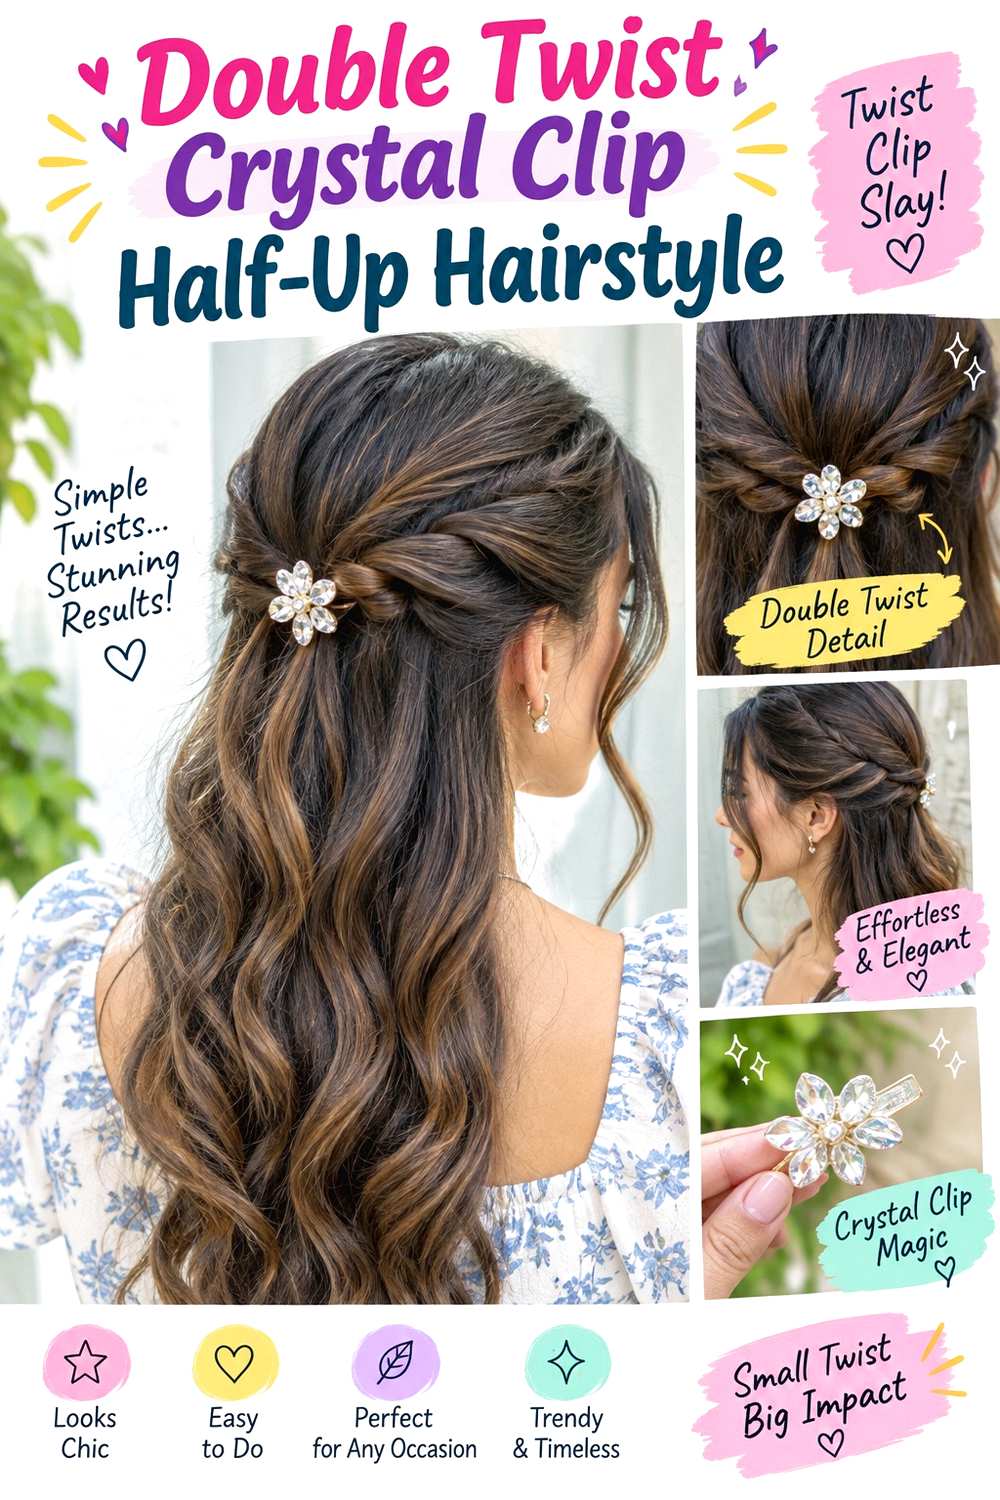
Double twists create a softer alternative to braids while still giving the crystal clip something stable to sit over. Take one section from each temple, divide each into two pieces, twist them toward the back, and join them at the center. Keep the twists visible rather than pulling them completely flat, and let the loose hair fall naturally below. A slight side part can add asymmetry at the front without changing the balanced back placement.
The design works well on medium and long hair, especially when the texture has enough grip to keep the twists from unraveling. Use a light styling cream to control flyaways, a small elastic to join the twists, and the crystal clip to conceal the anchor. A quick refresh may only require retwisting one loose section and replacing the clip; a full wash-day style takes longer if the lengths also need drying and texture definition. Avoid making the twists tighter simply to keep the clip from sliding.
At a salon or styling appointment, point out how thick you want each twist and how high the center anchor should sit. A higher meeting point creates more crown exposure, while a lower one leaves a broader section of loose hair above the nape.
Pro tip:
Twist both sides in the same directional logic toward the center, then compare their thickness before joining them. Balanced ropes make the clip sit more evenly.
Make It Work for You:
For fine or lower-density hair, take shallower temple sections and keep the twists airy. You preserve loose volume while still creating enough structure beneath the crystal clip.
Watch Out For:
Do not keep retwisting one side tighter to match the other. If the shapes differ, rebuild the looser section with a similar amount of hair.
Side-Part Crystal Clip Half-Up Hairstyle

A deep side part shifts the balance of a half-up style and gives the crystal clip a slightly off-center relationship to the front. Sweep the fuller side back with a soft curve, gather a smaller section from the opposite temple, and join them at the rear crown. Keep the lower lengths loose and allow a fringe or shorter front layer to follow the part naturally. The clip can stay centered at the back even though the front shape is asymmetrical.
This approach suits straight, wavy, curly, and coily hair because the key feature is the parting rather than a specific finish. Use light texturizing spray for grip, a small hidden elastic for the joined section, and the crystal clip as the visible cover. A quick refresh may involve resetting the part and smoothing the fuller side; full wash-day styling takes longer if you are also defining or reshaping the loose texture. If one side repeatedly slips, reduce the amount of hair gathered instead of clamping the clip more tightly.
At a salon or styling appointment, show where you want the deep part to begin and how much hair should remain around the heavier temple. Those choices control the front balance more than the clip itself.
Pro tip:
Follow the natural direction of the deep part when sweeping the fuller side back. Fighting that growth pattern can create bumps and make the anchor less stable.
Make It Work for You:
If your front layers are short, leave them around the heavier side rather than forcing them into the anchor. The asymmetrical shape still reads clearly from the front.
Watch Out For:
Do not overload the fuller side with product to keep it flat. Excess slip can weaken the anchor; use only enough control to smooth visible flyaways.
Mini Bouffant Crystal Clip Half-Up Hairstyle

A small amount of crown lift gives the crystal clip a more formal profile without turning the style into a high-volume updo. Gather the upper back section with gentle height, smooth only the outer surface, and secure it just below the lifted area so the clip sits horizontally. Keep the sides softer and the loose lengths free, with a center or side part according to preference. The goal is controlled height at the crown rather than width around the temples.
This version can suit medium to long hair when there is enough length to anchor the raised section comfortably. Use root-lift spray to support the crown, a small hidden elastic for the half-up base, and the crystal clip to finish the shape. A quick refresh may involve lifting the crown with your fingers and resetting the clip; a full wash-day style takes longer because the root volume must be rebuilt from the beginning. Too much product can make the crown stiff and harder to reshape.
At a salon or styling appointment, specify how high you want the crown and where the lift should begin. Keeping the volume behind the top of the head, rather than at the sides, preserves the intended profile.
Pro tip:
Create crown height before securing the half-up base, then smooth only the outer surface. Pressing down after clipping can collapse the lift you just built.
Make It Work for You:
If your hair is fine, keep the bouffant compact and place the lift slightly behind the top of the head. This adds shape without making the ends look sparse.
Watch Out For:
Avoid building crown height by pulling the side sections extremely tight. That flattens the temples and can make the raised area look disconnected from the rest.
Low Crystal Clip Half-Up Hairstyle
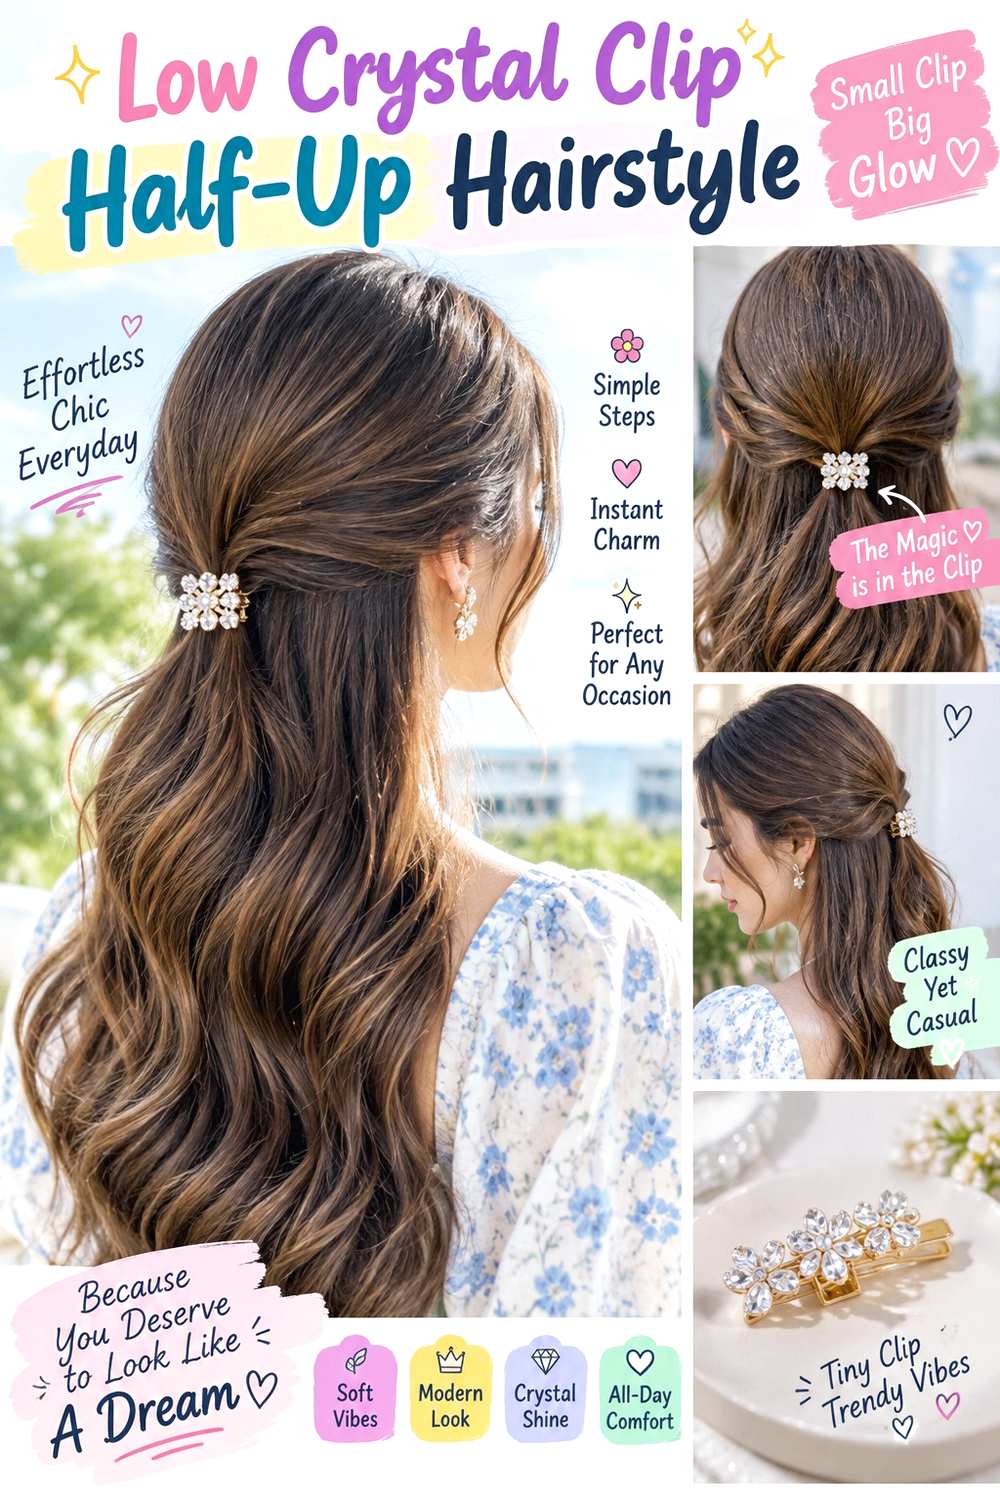
A low half-up placement sits closer to the nape and leaves more of the crown untouched. Gather narrow side sections behind the ears, bring them together low at the back, and secure them with a crystal clip while the upper crown remains natural. The lower position works well with center or side parts and lets face-framing layers stay loose. Because the clip sits lower, the overall shape feels softer and less structured than a traditional rear-crown half-up style.
This design works on medium and long hair and can be useful when high anchors feel uncomfortable. Use a small fabric-covered elastic to form a hidden base, light texturizing spray for grip, and the crystal clip as the decorative finish. A quick refresh usually means tightening the hidden base or repositioning the clip; full wash-day styling takes longer if the loose lengths also need their normal drying routine. If the clip slips downward, reduce the gathered section instead of pulling more hair into it.
At a styling appointment, show exactly how close to the nape you want the anchor and how much side hair should be included. That determines whether the finished shape feels relaxed or more contained.
Pro tip:
Gather the side sections behind the ears before moving them toward the nape. This keeps the low anchor neat without dragging the front hair backward.
Make It Work for You:
If you have a short lob, place the clip a little higher than the nape and use smaller side sections. The low effect remains without stretching the shortest pieces.
Watch Out For:
Do not let the clip rest directly against the neck if it catches collars. Raise the anchor slightly so normal movement does not repeatedly push the accessory upward.
High Crown Crystal Clip Half-Up Hairstyle
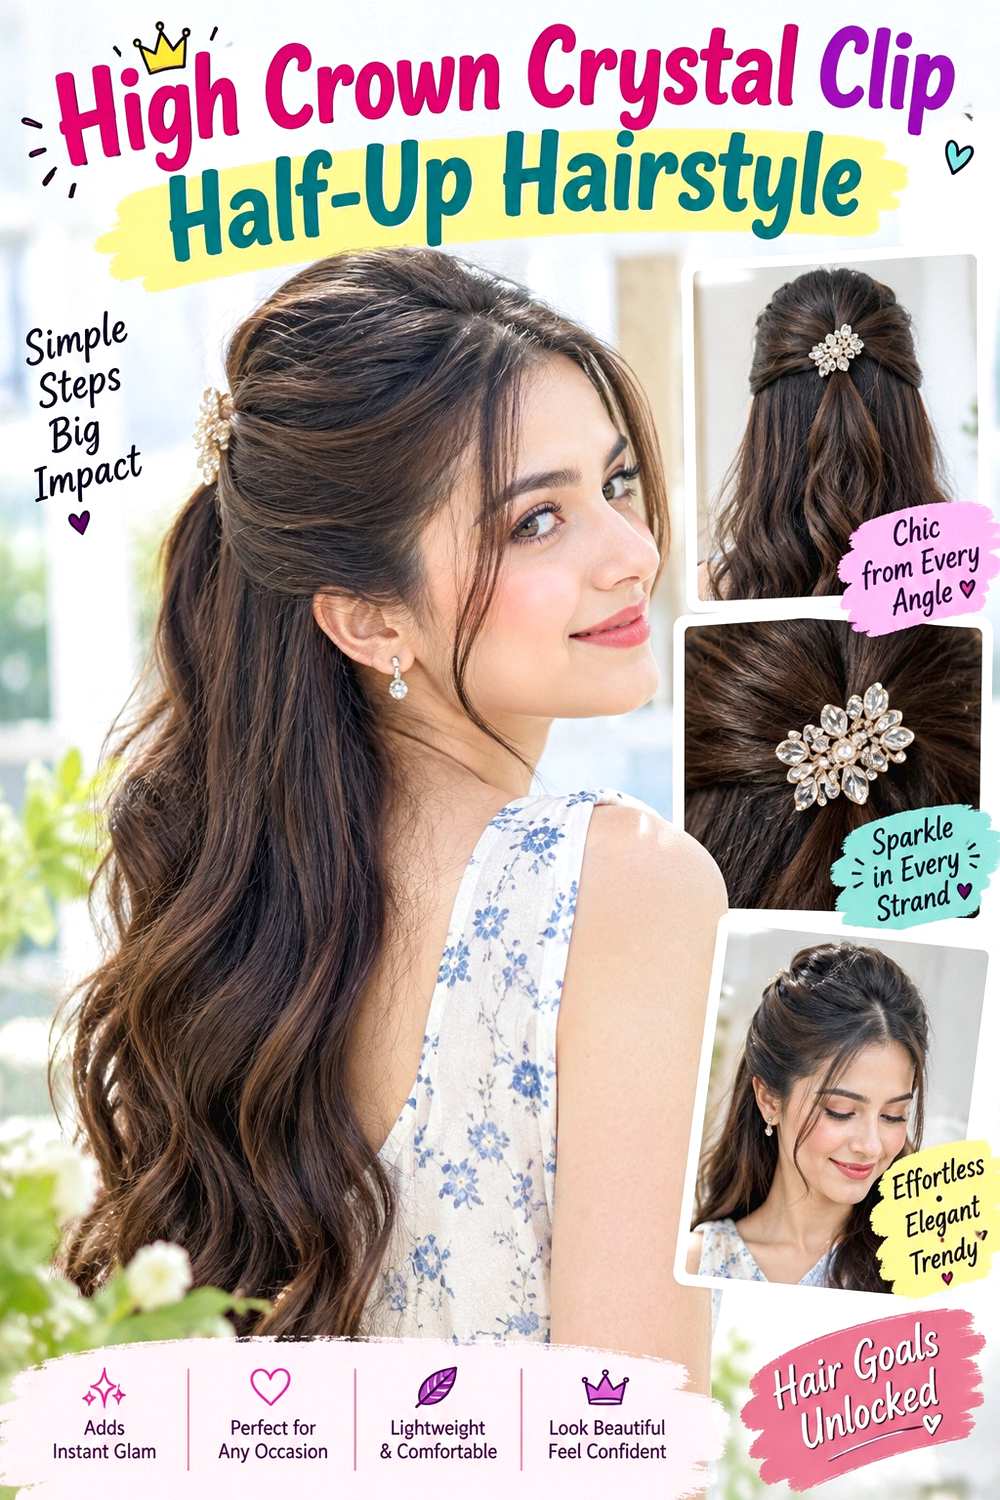
A high crown anchor creates a more lifted half-up silhouette and places the crystal clip where it can be seen from several angles. Gather the upper side sections slightly above the usual rear-crown point, leaving the lower hair loose and allowing the top to rise naturally before it meets the clip. A center part keeps the front balanced, while an off-center part can soften the height. Avoid pulling every short front piece backward if it changes the face-framing shape.
Medium and long hair offer the easiest balance between the high anchor and loose lower length. Use a light root-lift mousse for support, a small hidden elastic for security, and the crystal clip to cover the base. A quick refresh may mean restoring a little crown height and reseating the clip; a full wash-day version takes longer because the root lift needs to be recreated. If the style feels tight at the temples, lower the anchor slightly instead of adding more tension.
At a salon or styling appointment, identify the exact height you want and whether the clip should sit flat or follow the curve of the head. The higher the anchor, the more important comfortable tension becomes.
Pro tip:
Secure the high anchor with your head upright, not tilted forward. This helps you judge real tension and prevents the style from tightening when you move normally.
Make It Work for You:
For curly or coily hair, preserve some height within the gathered section instead of smoothing it flat. The elevated placement can stay defined while natural texture remains visible.
Watch Out For:
Watch for pulling at the temples when the anchor sits high. If you feel tension, lower the section slightly rather than tightening the hidden base further.
Short Bob Crystal Clip Half-Up Hairstyle
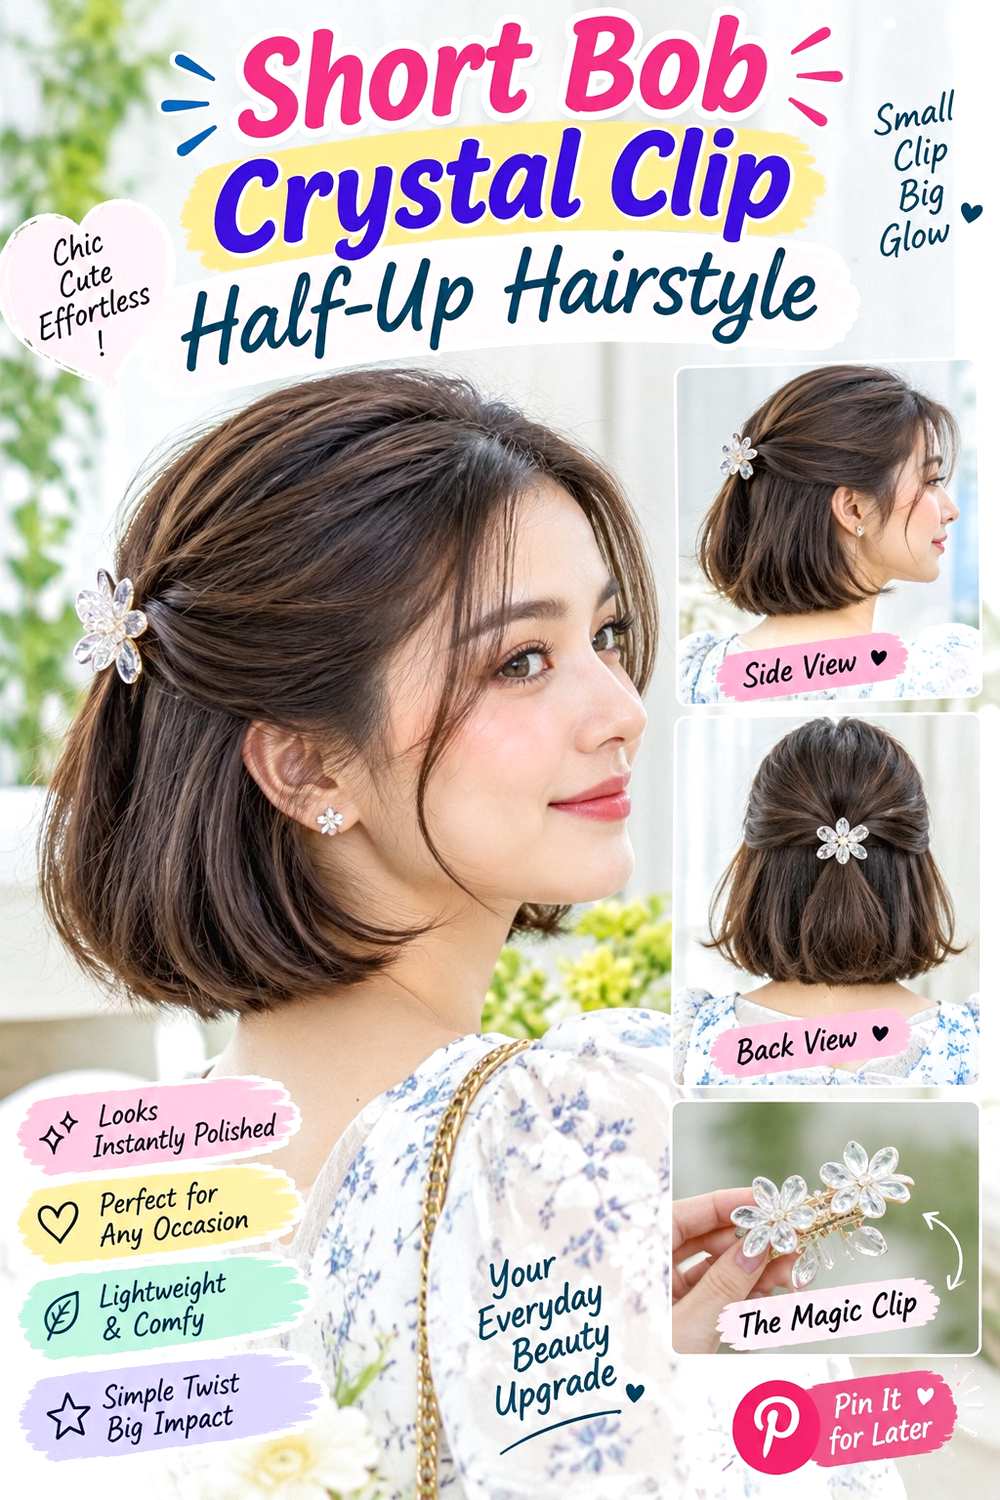
A bob or lob can support a crystal clip half-up style when the gathered section stays compact and close to the rear crown. Take small pieces from above the ears, bring them back only as far as they comfortably reach, and fasten them over a hidden base. Leave shorter fringe and face-framing layers free rather than forcing them backward. The loose bottom edge of the cut remains visible, which helps the hairstyle keep its original bob shape.
This version works best when the clip is light enough for the shorter anchor. Use a mini elastic to join the reachable sections, light texturizing spray to improve grip, and a small crystal clip to cover the elastic. A quick refresh may take only a few minutes because the section is compact; full wash-day styling takes longer if the bob also needs its usual drying or texture routine. If short strands keep escaping, move the anchor higher or closer rather than tightening the clip.
At a salon or styling appointment, point out the shortest pieces you want included and the exact meeting point at the back. Those two details are more useful than asking for a generic half-up placement that may not suit the cut.
Pro tip:
Work with the pieces that naturally reach the rear crown and ignore the ones that do not. A compact anchor looks cleaner than a stretched, unstable section.
Make It Work for You:
If your bob is very short, gather only the upper temple pieces and use a smaller clip. The half-up idea stays recognizable without disturbing the bottom outline.
Watch Out For:
Do not pin every escaping short layer into place. Too many forced pieces can distort the cut; leave intentional face-framing strands loose instead.
Long Layered Crystal Clip Half-Up Hairstyle
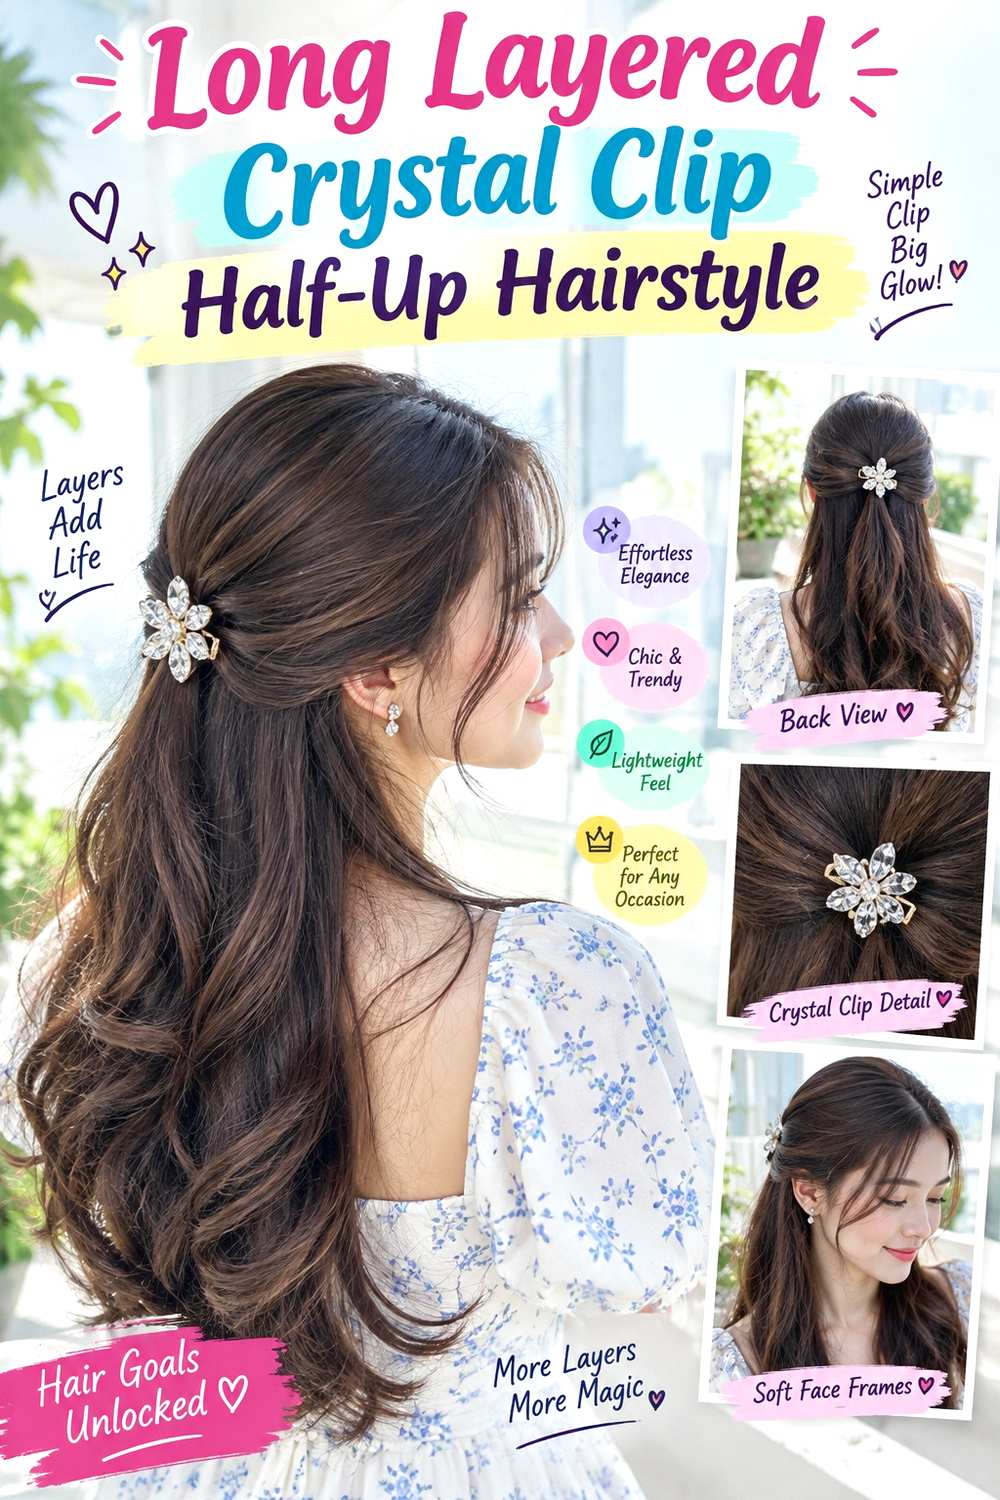
Long layers create movement below a crystal clip, but the upper section should stay controlled so the accessory does not disappear into too much hair. Gather sections from the temples and upper sides, keeping shorter face-framing layers free if they fall naturally around the front. Secure the half-up base at the rear crown and let the longer layers spread beneath it. A center part emphasizes symmetry, while a side part lets one front section sweep more softly.
This option suits long hair with visible layering because the loose lengths can show movement without requiring the clip to hold the full density. Use a small fabric-covered elastic for the anchor, lightweight smoothing cream to control flyaways, and the crystal clip to finish the base. A quick refresh may involve smoothing the upper section and resetting the accessory; a full wash-day version takes longer because long hair requires more drying and styling time. If the clip feels overloaded, reduce the amount of hair gathered rather than choosing extra tension.
At a salon appointment, identify where the face-framing layers begin and how much of them should remain loose. Keeping those shorter pieces intentional prevents the half-up section from looking uneven as the layers move.
Pro tip:
Separate the shortest face-framing layers before gathering the half-up section. Doing this first prevents them from being trapped unevenly beneath the accessory.
Make It Work for You:
If your long hair is very dense, keep the gathered section shallow and let most layers remain loose. The clip stays secure while the lower movement remains visible.
Watch Out For:
Avoid sweeping every layer into the back anchor. The clip can become overloaded, and shorter pieces may slip out quickly as the head moves.
Coily Crystal Clip Half-Up Hairstyle
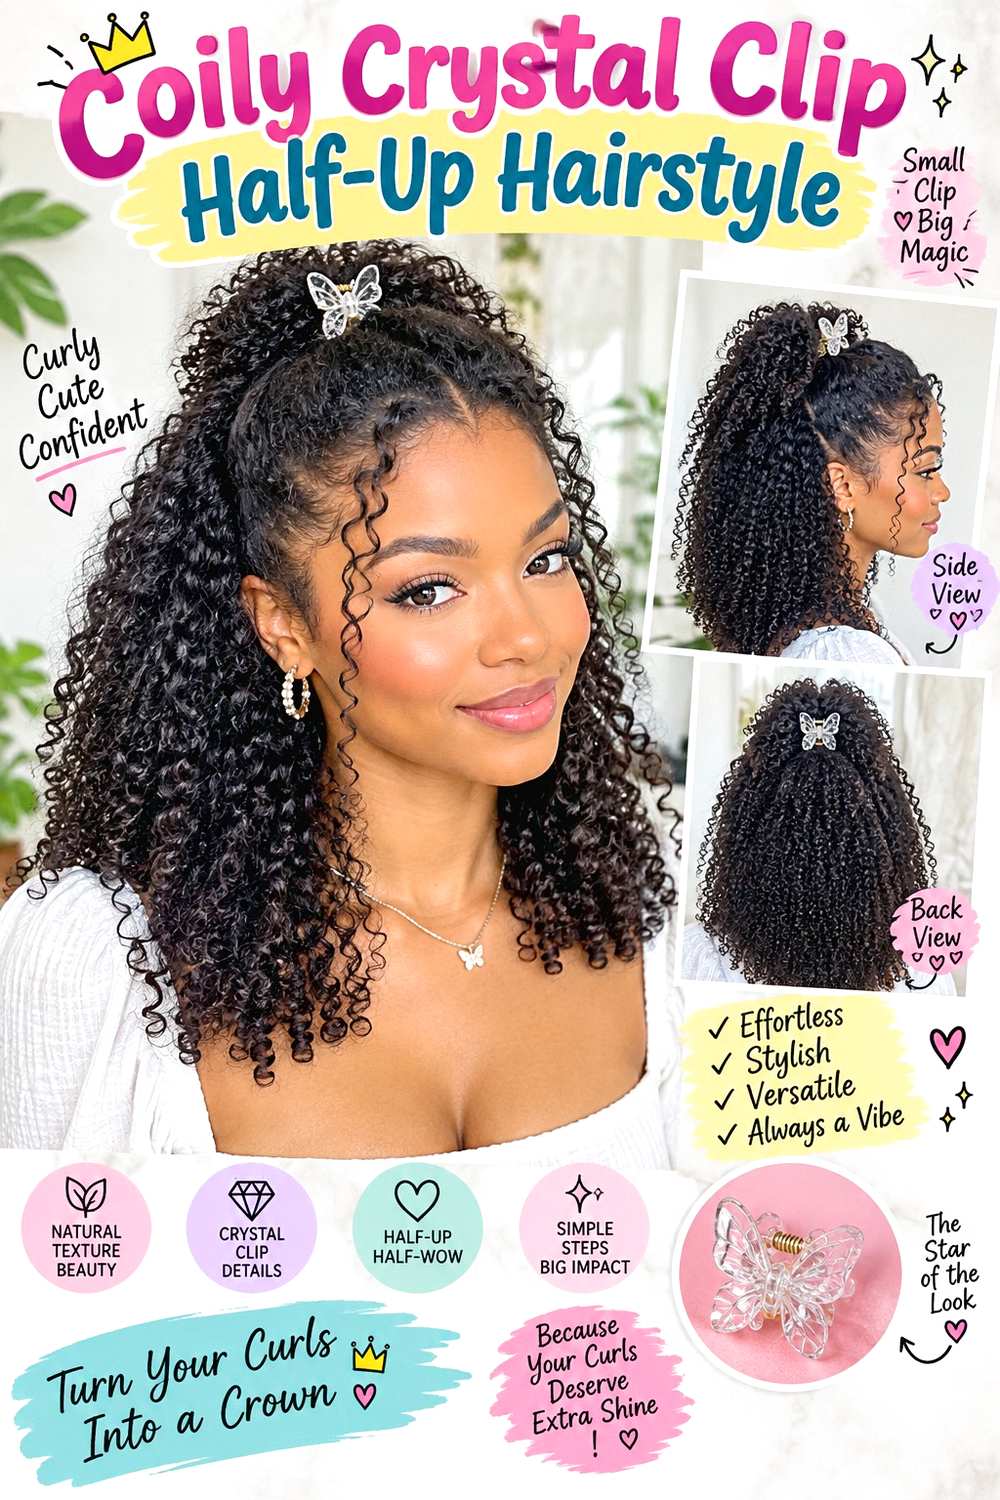
A crystal clip can sit beautifully within a coily half-up shape when the upper section is anchored without compressing the natural volume. Gather hair from the sides toward the back crown, allowing the top to keep some height and leaving shorter coils around the hairline free if preferred. The lower section can remain fully expanded, defined in smaller groups, or stretched according to the wearer’s normal routine. The defining feature is the contrast between the secured upper section and the loose texture below.
This style can work across different coil patterns, but the clip size should match both density and the amount of hair being gathered. Use a moisturizing leave-in conditioner for pliability, a fabric-covered elastic for a stable hidden base, and the crystal clip as the decorative cover. A quick refresh may involve reshaping the outer coils and resetting the clip; full wash-day styling takes longer because shrinkage and final volume should be assessed after drying. If the anchor feels tighter as the hair contracts, rebuild it with more slack.
At a styling appointment, explain how much crown volume you want to keep and where the clip should sit on the finished dry shape. That prevents the upper section from being flattened unnecessarily.
Pro tip:
Check the anchor again after the hair is fully dry. Shrinkage can change both volume and tension, so final comfort matters more than the damp placement.
Make It Work for You:
For very dense coils, divide the gathered area into a smaller hidden base and leave more texture free around it. The clip can decorate without compressing the crown.
Watch Out For:
Do not assume a larger clip should hold more hair comfortably. Heavy hardware or overfilled jaws can pull; reduce the section and protect natural volume.
Rope Twist Crystal Clip Half-Up Hairstyle
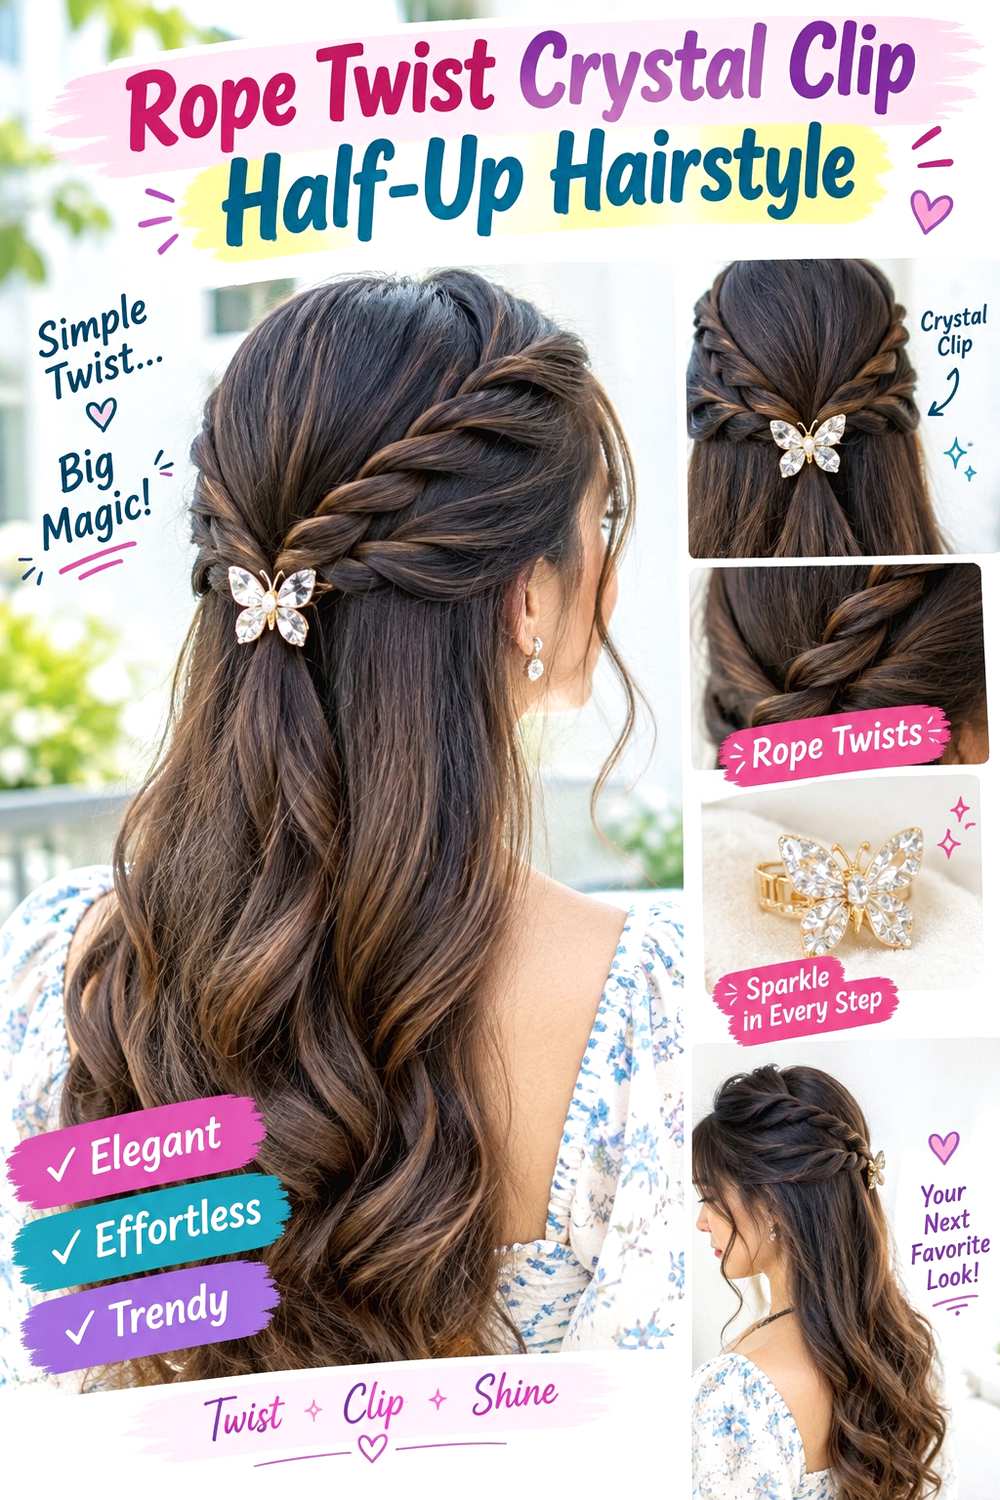
Rope twists give the half-up section a clean, rounded texture that pairs well with a narrow crystal clip. Take one section from each side, split each into two strands, twist the strands individually, then wrap them around each other toward the back. Join both ropes just below the crown and place the clip over the meeting point. Keep the twists thick enough to read clearly, while leaving fringe and shorter face-framing pieces outside if they do not reach comfortably.
This style suits medium to long hair and works particularly well when you want more texture than a smooth half pony but less detail than braids. Use light styling cream to keep the rope surfaces neat, a mini elastic to join the twists, and the crystal clip to conceal the anchor. A quick refresh may require retwisting only one side; a full wash-day version takes longer if the loose lengths also need drying or definition. If a rope repeatedly loosens, make the section slightly smaller rather than pulling it tighter at the scalp.
At a styling appointment, specify the thickness of each rope twist and the exact rear-crown meeting point. Matching those dimensions gives the clip a balanced base.
Pro tip:
Keep slight tension through each rope while forming it, then relax the section once it is anchored. This preserves definition without pulling tightly at the roots.
Make It Work for You:
For wavy or curly hair, allow a little natural texture to remain on the rope surface instead of smoothing every strand. The twist still reads clearly and feels softer.
Watch Out For:
Do not twist both sections in opposite structural directions unless planned. One rope may unravel as you join them, making the clip base unstable.
Triple Crystal Clip Half-Up Hairstyle

Three small crystal clips can create a stepped half-up design when each accessory has a separate, stable section to grip. Gather a narrow top section first, then add two slightly lower side sections so the clips form a short vertical or triangular arrangement at the back. Keep the lower lengths loose and avoid stacking too much hair beneath any single clip. A middle part can make the placement feel symmetrical, while a soft side part adds a more relaxed front.
This design works best on medium and long hair because there is enough space to separate the anchor points. Use three small crystal clips for the visible detail, light texturizing spray for grip, and two mini elastics where extra hidden support is needed. A quick refresh may involve reseating one clip without disturbing the others; a full wash-day style takes longer because each section has to be balanced from the beginning. If one clip slides repeatedly, reduce that section or add hidden support rather than clamping harder.
At a styling appointment, show whether you want the clips in a vertical line or shallow triangle and how far apart they should sit. Consistent spacing keeps the design intentional without requiring tight tension.
Pro tip:
Attach the middle or upper anchor first, then place the remaining clips relative to it. One fixed reference makes the spacing much easier to control.
Make It Work for You:
If your hair is fine, use three very small clips and shallow sections rather than three heavy barrettes. The stepped pattern stays visible without weighing down the crown.
Watch Out For:
Do not let neighboring clips share the same overloaded section of hair. Separate the anchors so one slipping accessory does not pull the others out of position.
Asymmetrical Crystal Clip Half-Up Hairstyle
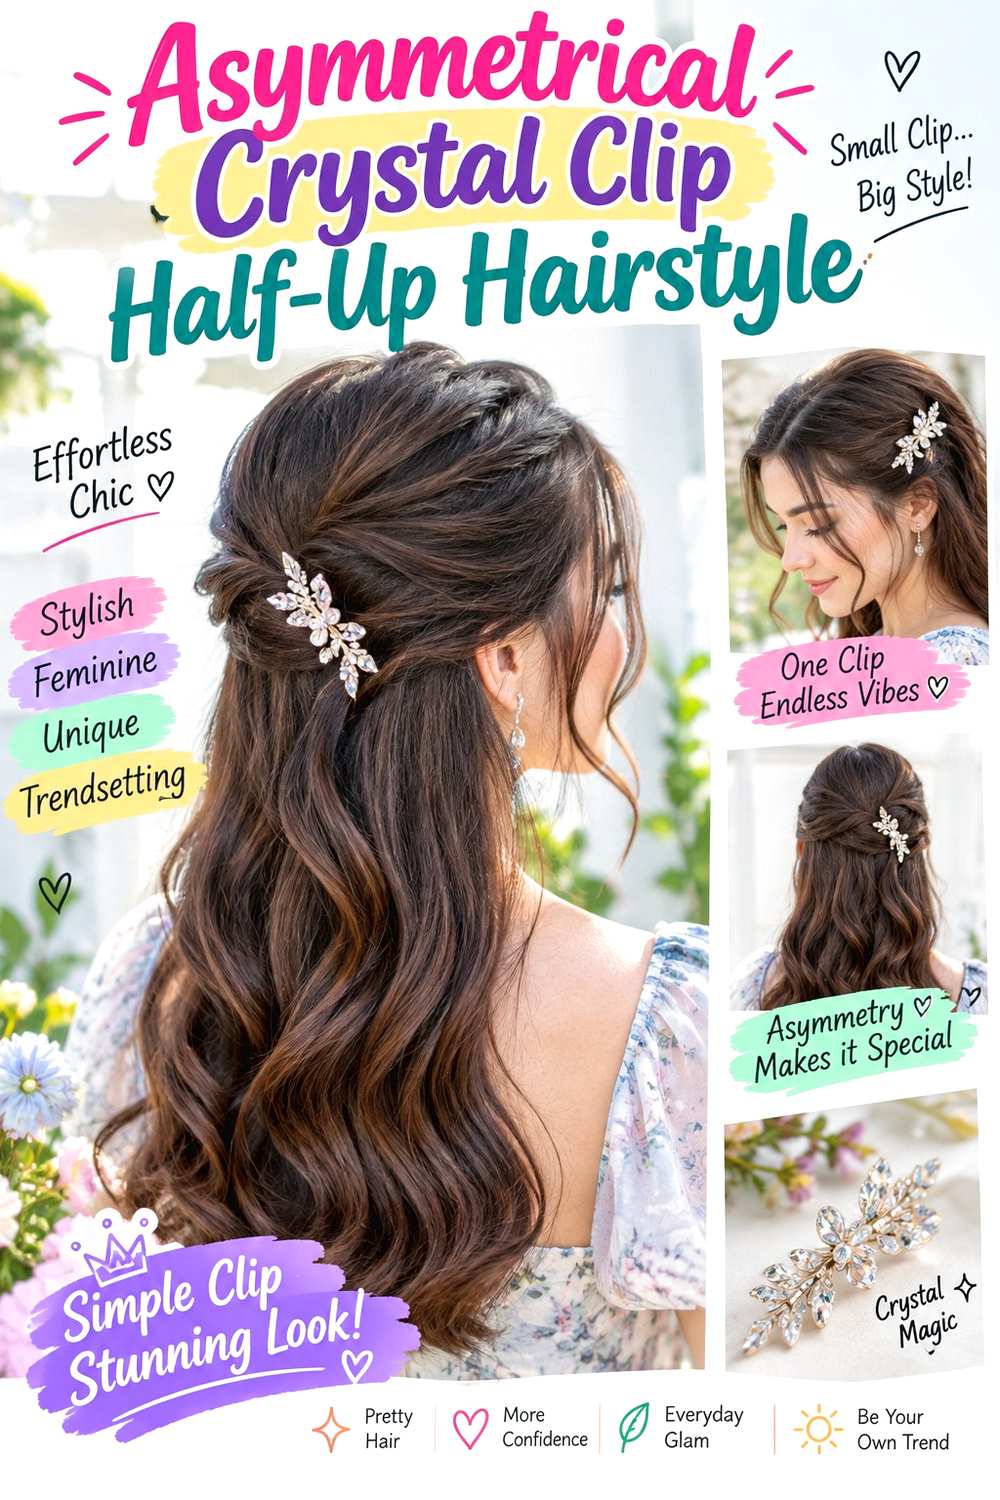
An asymmetrical half-up arrangement places the crystal clip slightly to one side rather than directly in the center. Sweep a larger section from one temple across the back, meet it with a smaller section from the opposite side, and secure the overlap behind one side of the crown. Let the lower hair fall naturally, with a side part supporting the directional movement. Shorter pieces can remain around the face so the front does not look over-pulled.
This version works on medium and long hair and can be especially useful when you want the accessory visible in a three-quarter view. Use light texturizing spray for grip, two hidden bobby pins to stabilize the crossed sections, and the crystal clip to cover the anchor. A quick refresh usually means smoothing the sweep and resetting the accessory; full wash-day styling takes longer if the loose lengths also need their normal texture routine. If the clip starts rotating, rebuild the crossed base rather than tightening it against the scalp.
At a salon or styling appointment, specify which side should carry the clip and where the sweep should begin. Those placement details determine whether the asymmetry looks deliberate and balanced.
Pro tip:
Build the crossed base first and check it from the side where the clip will show most. Adjust the sweep before adding the decorative hardware.
Make It Work for You:
If you prefer less side volume, begin the sweep closer to the temple and keep the opposite section narrow. The off-center clip remains the defining feature.
Watch Out For:
Do not pull the longer sweep tightly across the back to reach the clip. Move the anchor closer instead, preserving comfort and the soft directional shape.
Conclusion
Crystal clip half-up hairstyles can look smooth, braided, twisted, lifted, or naturally textured while keeping the lower hair loose. Shorter cuts usually need a compact anchor, whereas long or dense hair may need a hidden elastic or pins beneath the accessory. Layers and fringe can remain free when that better suits the haircut, and crown volume can range from sleek to softly raised. Straight, wavy, curly, and coily textures all work when the clip size and gathered section are matched thoughtfully. A centered placement feels balanced, while side and asymmetrical anchors create more direction. Choose the version that fits your natural texture, preferred parting, daily effort, and comfort. Secure structure matters more than forcing a decorative clip to hold too much hair.
Before Your Salon Visit
Choose one or two favorites before your salon or styling appointment and save clear references from the front, side, and back when possible. Discuss your texture, density, face shape, preferred length, upkeep, and normal styling routine. Point to the exact half-up placement, amount of crown volume, face-framing pieces, twist or braid detail, and crystal-clip position you like. Because these are temporary styles, focus on secure anchoring, comfortable tension, and accessory scale rather than requesting a haircut unless you already want one.
FAQs
Do Crystal Clip Half-Up Hairstyles Work on Fine Hair?
Yes. Fine strands can work well when the gathered section is small and the clip is lightweight. A hidden elastic or pins can provide support so the accessory does not need to grip tightly. Keeping more hair loose below can also preserve movement and prevent the half-up section from looking overly sparse.
How Do I Keep a Crystal Clip From Sliding Out?
Build a stable base first instead of asking the clip to hold loose hair by itself. A small elastic, crossed pins, or a textured section can improve grip. If the clip still slides, reduce the amount of hair inside it or choose a lighter accessory with a closure better suited to your density.
Can I Wear a Crystal Clip Half-Up Style on Curly or Coily Hair?
Yes. Keep the natural texture visible and anchor the upper section after considering shrinkage and final dry volume. Avoid compressing the crown more than necessary. A smaller gathered section and dependable hidden base can secure the accessory while leaving curls or coils free around the sides and lower length.
Do These Half-Up Styles Require Heat Styling?
No. The half-up structure and crystal accessory do not require heat. Straight, wavy, curly, and coily hair can all be styled in their natural state. If you separately choose a heat-shaped wave or smooth finish, use heat protectant and treat that as an optional styling step rather than a requirement.