18 Face Hugging Layers Hairstyle Ideas

Face hugging layers are shorter sections placed around the front so they follow the cheekbones, jaw, and neck before connecting into the longer hair. Unlike dramatic disconnected layers, they usually stay close to the facial outline and create a gradual frame. The overall length can range from shoulder level to long hair, while the shortest pieces may begin around the cheekbones or jaw. Curtain or wispy fringe can extend the framing upward, and subtle bends help the layers sit close without looking rigid.
Straight and softly wavy textures show the progression clearly. Curly hair creates a more dimensional interpretation and requires careful allowance for shrinkage. Fine or lower-density hair usually benefits from a narrow face-framing section and more perimeter weight, while dense hair can support broader layering and targeted bulk adjustment. The exact starting point can be moved higher or lower to change coverage.
Styling effort depends on texture and finish. A quick front refresh may take only minutes, while a complete blowout takes longer. Cut maintenance becomes useful when the shortest pieces grow below their intended landmark or stop blending smoothly into the longer lengths.
Quick List
- Cheekbone Face Hugging Layers Hairstyle
- Jawline Face Hugging Layers Hairstyle
- Curtain Fringe Face Hugging Layers Hairstyle
- Wispy Fringe Face Hugging Layers Hairstyle
- Center-Parted Face Hugging Layers Hairstyle
- Side-Parted Face Hugging Layers Hairstyle
- Long Hair Face Hugging Layers Hairstyle
- Shoulder-Length Face Hugging Layers Hairstyle
- Collarbone Face Hugging Layers Hairstyle
- Wavy Face Hugging Layers Hairstyle
- Curly Face Hugging Layers Hairstyle
- Fine-Hair Face Hugging Layers Hairstyle
- Dense-Hair Face Hugging Layers Hairstyle
- Feathered Face Hugging Layers Hairstyle
- Soft Bend Face Hugging Layers Hairstyle
- Air-Dried Face Hugging Layers Hairstyle
- Rounded Face Hugging Layers Hairstyle
- Airy Blowout Face Hugging Layers Hairstyle
Cheekbone Face Hugging Layers Hairstyle
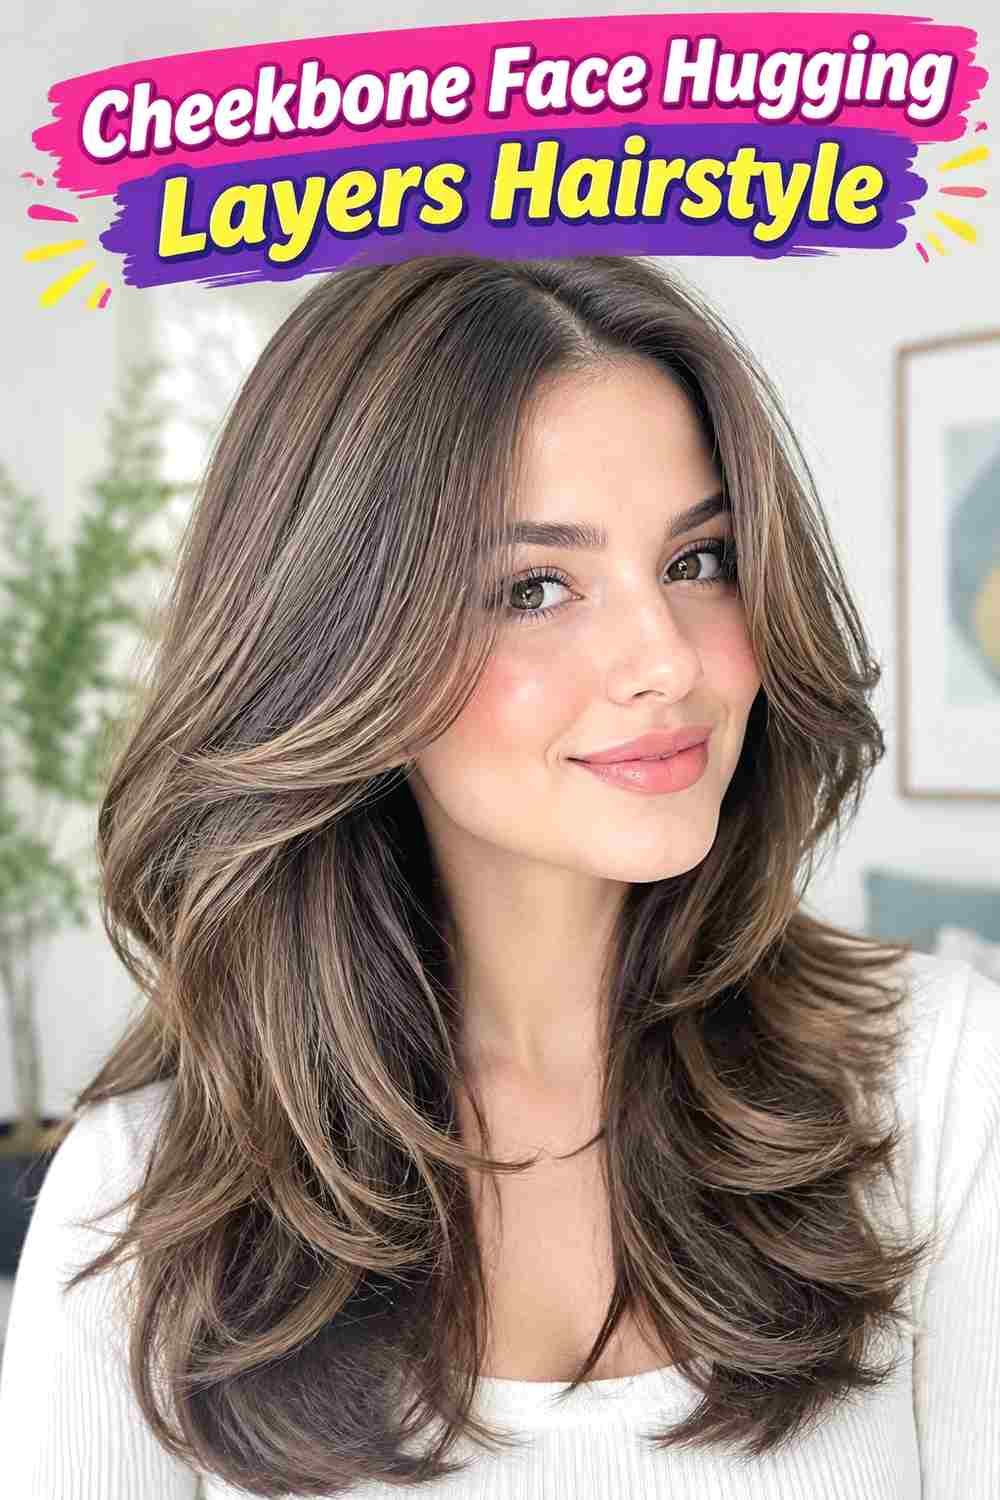
The shortest sections begin close to the cheekbones, creating a noticeable frame without requiring full bangs. From there, each layer gradually lengthens past the jaw and into the main perimeter. A center or slightly off-center part lets the pieces fall on both sides, while gentle inward bends keep them close to the face. The back can remain relatively long and simple, making the front progression the main feature.
Straight and softly wavy textures display these cheekbone landmarks clearly. Fine or lower-density hair benefits from keeping the layered section narrow, while dense hair can support a wider transition. Use heat protectant before heated styling, a medium round brush to guide the front, and flexible hairspray for light control. Refreshing only the face frame can take several minutes; styling the complete length after washing takes longer.
At the salon, point directly to the cheekbone position where you want the shortest dry piece to finish. Ask for a gradual connection into the jaw and longer perimeter rather than a sudden step. Reshape when those shortest sections grow toward the jaw and stop providing distinct cheek-level framing.
Pro tip:
Direct the shortest pieces slightly forward before curving them toward the cheeks. This gives them enough movement to frame the face without making the ends sit tightly against the skin.
Make It Work for You:
If you want less cheek exposure, start the shortest layer just below the cheekbone. The frame remains visible while providing slightly more coverage through the middle of the face.
Watch Out For:
Avoid cutting a thick section to one cheekbone length. A gradual transition protects side density and prevents the front from forming a shelf against the longer hair behind it.
Jawline Face Hugging Layers Hairstyle

Starting the shortest layer around the jaw creates a lower, softer frame that preserves more front length. The pieces follow the jaw before connecting into shoulder-length or longer hair, with subtle internal layering helping them sit close rather than flare outward. A center, off-center, or gentle side part can work because the front remains long enough to move in different directions.
This placement is practical for straight and wavy textures and for anyone who prefers less layering around the cheeks. Fine hair can retain a substantial perimeter, while dense hair may need more internal adjustment behind the front. Use heat protectant before heated drying, a round brush for a broad inward bend, and lightweight styling cream for end control. Refreshing the front can be quick; a complete wash-day style takes longer.
At the salon, specify the dry jawline landmark and explain whether you want the layer to sit in front of the jaw or sweep slightly behind it. Ask for a smooth transition into the perimeter. Reshape when growth moves the front below the neck and reduces the visible difference between framing and overall length.
Pro tip:
Use only a broad bend through the final few inches. A tight inward curl can make jaw-level pieces look much shorter, while a gentle curve keeps their intended length visible.
Make It Work for You:
If you often tuck your hair behind your ears, retain enough length through the jaw layer to do so comfortably. The frame can remain visible when released without limiting everyday styling.
Watch Out For:
Do not remove too much weight from jaw-level pieces. They need enough substance to follow the facial outline; excessive thinning can make the ends separate into weak, flyaway sections.
Curtain Fringe Face Hugging Layers Hairstyle

Curtain fringe extends the face-hugging effect from the forehead through the cheekbones and jaw. Shorter center pieces can sit around the brows, then lengthen toward the temples before blending into cheekbone-level layers. The next sections follow the jaw and neck, creating a continuous frame rather than a separate fringe sitting above longer hair.
Straight and wavy textures show the gradual transition particularly well. Loose curls can adapt it with extra cutting length for shrinkage. Lower-density hair generally benefits from a narrower fringe and face-frame section. Use heat protectant before heated drying, a round brush to open the curtain pieces, and flexible hairspray for gentle control. Refreshing the fringe and front may take minutes; styling the full haircut takes longer.
At the salon, specify the dry center fringe length, outer-corner position, and cheekbone starting point. Ask for each section to connect gradually. Fringe maintenance may be useful before the rest of the layers need reshaping because small amounts of growth quickly change forehead coverage.
Pro tip:
Dry the fringe forward before dividing it, then guide each half outward and slightly down. This creates a soft opening while keeping the longer corners connected to the cheekbone layers.
Make It Work for You:
If frequent fringe maintenance does not suit your routine, keep the center longer and the outer corners tuckable. The front still frames continuously while giving you more grow-out flexibility.
Watch Out For:
Avoid taking an excessively deep fringe section from the crown. Removing too much hair from the sides can weaken the density needed for the cheekbone and jaw-level framing layers.
Wispy Fringe Face Hugging Layers Hairstyle
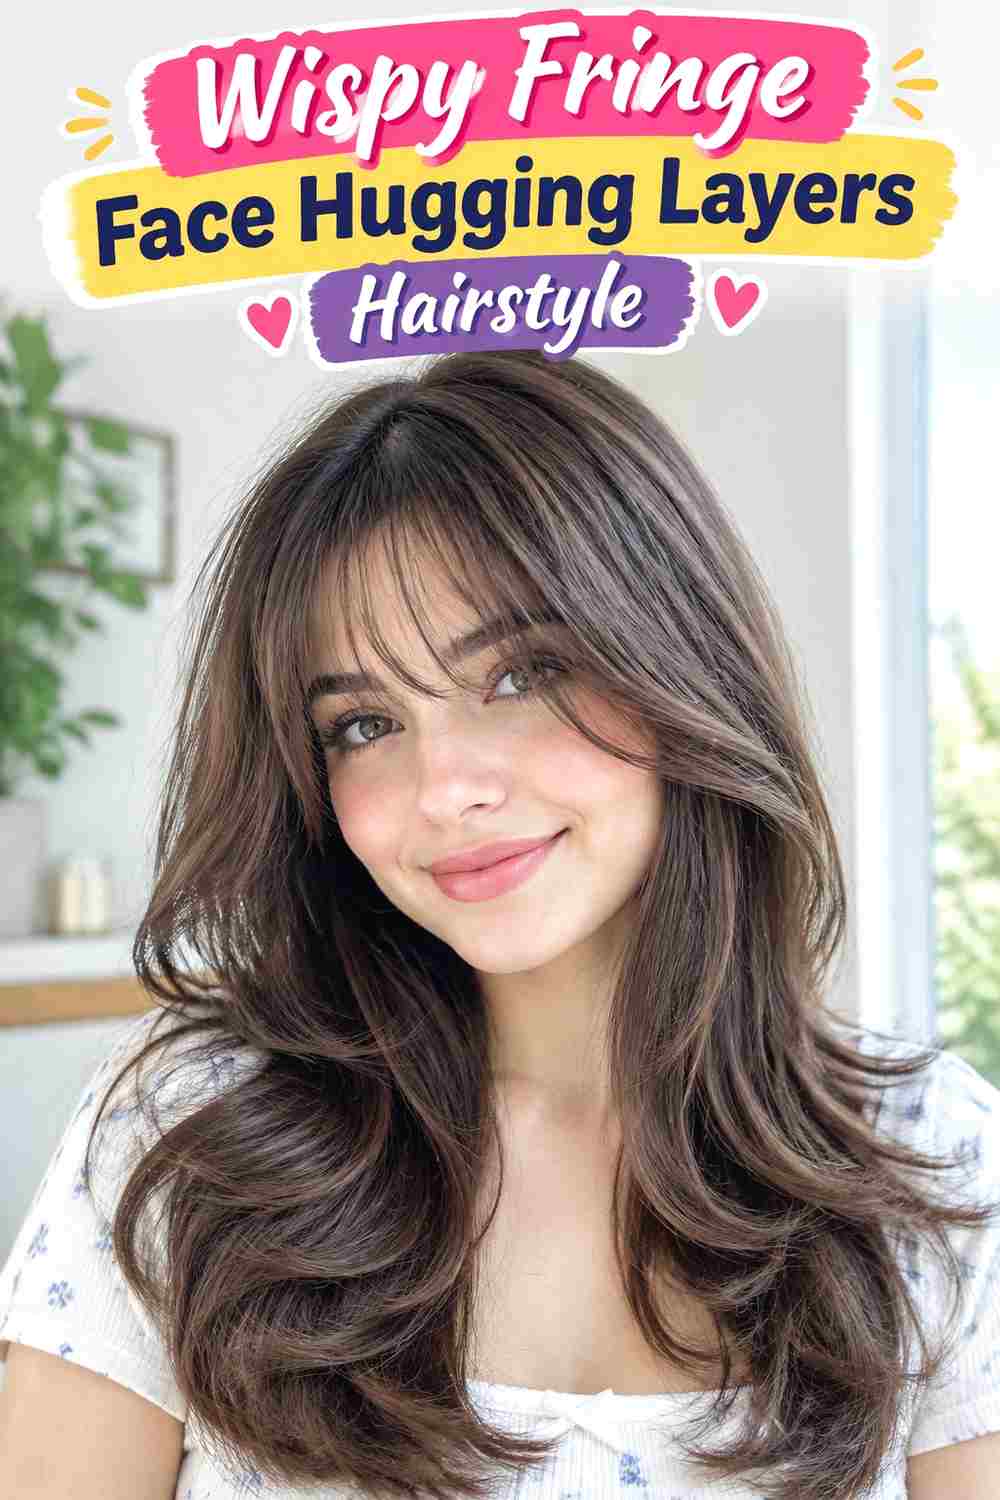
A light, separated fringe gives the upper face delicate coverage before longer layers trace the cheeks and jaw. Fine center pieces can skim the brows with visible spaces between them, while longer temple strands connect into cheekbone-level sections. The remaining layers continue downward in gradual steps, keeping the frame connected to the overall length rather than concentrating everything around the forehead.
Straight and softly wavy hair can show the wispy separation clearly. Dense hair requires a shallow fringe section, while fine or lower-density hair needs careful preservation of temple fullness. Use lightweight mousse for flexible fringe support, heat protectant before heated drying, and a small round brush for gentle direction. A fringe-only refresh can take minutes; shaping all the face-hugging layers requires more time.
At the salon, identify the dry fringe length and how much forehead you want visible. Also specify the first cheekbone layer so the corners have a clear connection. Maintain the fringe when it enters the eyes, while the longer layers can grow further before requiring reshaping.
Pro tip:
Dry the wispy fringe before styling the longer frame. Once settled, you can judge how much movement the temple and cheekbone pieces need without making the entire front overly curved.
Make It Work for You:
For low-density hair, keep the fringe narrow and let longer temple pieces provide most of the transition. This preserves useful side coverage while maintaining a light forehead effect.
Watch Out For:
Avoid repeatedly thinning the fringe to keep it wispy. Excessive weight removal can create large gaps and fragile-looking ends that no longer connect smoothly with the fuller side layers.
Center-Parted Face Hugging Layers Hairstyle

A center part distributes the framing layers evenly on both sides, creating a balanced progression from the cheekbones or jaw into the longer lengths. The shortest pieces can bend gently inward, while the next layers sit close to the lower face and neck. The back remains fuller and less layered, which keeps attention on the front without creating excessive volume through the entire haircut.
Straight and wavy textures can show the balanced progression clearly. Fine hair generally benefits from restrained front layering, while dense hair can support a broader section. Use heat protectant before thermal styling, a medium round brush for smooth bends, and lightweight styling cream to control the ends. Refreshing the two front sections can take only minutes; styling the full length takes longer.
At the salon, show where your natural center part falls and identify the dry landmark for the shortest layer. Natural density may differ between sides, so internal weight does not have to be perfectly identical. Reshape when the front layers become too long to maintain their close facial placement.
Pro tip:
Set the center part while the roots are damp, then style each side according to its natural density. Matching the visible curve matters more than forcing identical tension on both sides.
Make It Work for You:
If your natural part sits slightly off center, follow it. Similar layer landmarks can still create balanced framing without requiring daily effort to force your roots into perfect symmetry.
Watch Out For:
Avoid creating matching tight curls beside both cheeks. The center part already provides balance, so broad bends keep the frame softer and allow the layer progression to remain visible.
Side-Parted Face Hugging Layers Hairstyle

A side part creates an asymmetric frame, with more hair sweeping across one side before following the cheek and jaw. The heavier front section can begin around the cheekbone, while the lighter side sits closer to the face or tucks behind the ear. Longer layers connect both sides into the main perimeter, keeping the haircut cohesive despite the unequal volume.
Straight and wavy textures can hold this directional movement easily. Fine hair may gain useful root lift from the shifted part, while dense hair often needs less added volume. Use heat protectant before heated drying, a round brush to establish the front sweep, and flexible hairspray for light control. Refreshing the part and front can be quick; restyling all the layers takes longer.
At the salon, show your usual side part and mention whether you regularly tuck the lighter side. Specify the shortest dry layer on the heavier side and how it should connect around the jaw. Reshape when growth makes the sweep heavy or causes the framing pieces to lose their intended landmarks.
Pro tip:
Dry the heavier front section backward before letting it settle across the part. Establishing root direction first creates a smoother sweep that can still fall close around the cheek.
Make It Work for You:
If a deep part fights your natural growth pattern, shift only slightly away from center. You can retain asymmetric framing while reducing the amount of daily root manipulation required.
Watch Out For:
Do not create equal root lift on both sides. The side part works through directional imbalance, so let the heavier section carry more volume while the opposite side remains calmer.
Long Hair Face Hugging Layers Hairstyle

Long hair creates strong contrast between shorter facial layers and the uninterrupted length through the back. The first pieces can start around the cheekbones or jaw, then progress through the neck and collarbones before blending into a chest-length or longer perimeter. The front stays mobile while the lower hair retains weight, preventing the entire haircut from becoming heavily layered.
Straight and wavy textures display the length progression clearly. Fine or lower-density hair usually benefits from keeping the face-frame section narrow, while dense hair can support more layers through the front. Use heat protectant before heated styling, a large round brush for broad bends, and flexible hairspray for movable control. Refreshing the face frame can take minutes; styling very long lengths completely takes considerably more time.
At the salon, identify the shortest front landmark and explain how gradually you want it connected into the long perimeter. Avoid removing unnecessary length from the back. Reshape when the front layers grow enough to merge into the longer sections and lose their framing effect.
Pro tip:
Use a smaller bend around the cheekbones and progressively broader movement through the longer layers. Changing the scale helps the short and long sections connect without looking uniformly curled.
Make It Work for You:
If you prefer to keep maximum length, concentrate nearly all visible layering in front of the shoulders. The back can remain comparatively simple while the face still gains clear framing.
Watch Out For:
Avoid extending short layers too far around the head unless you want an overall layered cut. Keeping the strongest progression near the front preserves the contrast that defines this version.
Shoulder-Length Face Hugging Layers Hairstyle

A shoulder-length perimeter gives the facial layers less distance to travel, creating a compact and connected frame. Shorter pieces can begin near the cheekbones, continue through the jaw, and meet the main length around the shoulders. Soft inward bends keep the front close, while the perimeter can remain fuller and straighter for contrast. A center or relaxed side part works well.
Straight and softly wavy textures can show each length change clearly. Fine hair benefits from retaining a substantial shoulder-level edge, while dense hair may need internal weight adjustment. Use heat protectant before heated drying, a medium round brush for controlled curves, and lightweight smoothing cream for surface control. Refreshing the front takes only several minutes; a full blow-dry after washing requires longer.
At the salon, specify the dry shoulder perimeter and exact starting point of the face frame. Ask for enough lower weight that the cut does not become overly feathered. Reshape when shoulder contact starts flipping the perimeter unpredictably or the shorter front pieces lose their distinct placement.
Pro tip:
Check how your perimeter naturally reacts to shoulder contact before styling. If the ends already turn outward, keep the face frame gently inward to create controlled directional contrast.
Make It Work for You:
If your shoulders repeatedly push the ends outward, move the perimeter slightly above or below the strongest contact point while preserving the same face-hugging layer progression.
Watch Out For:
Avoid thinning the shoulder-level perimeter excessively. The front already contains multiple lengths, so keeping more lower weight prevents the overall haircut from becoming visually sparse or overly feathered.
Collarbone Face Hugging Layers Hairstyle

Collarbone length provides enough space for cheekbone and jaw layers to blend gradually without requiring very long hair. The shortest front pieces can sit near the lower cheek, with subsequent layers tracing the jaw and neck before reaching the collarbone perimeter. A gentle inward curve emphasizes the close framing, while restrained crown volume keeps the silhouette smooth.
Straight and wavy textures suit the connected shape well. Fine hair usually needs fewer front layers, while dense hair can support more internal shaping behind them. Use heat protectant before heated styling, a medium round brush to form broad curves, and flexible hairspray for soft hold. Refreshing the front may take minutes; creating the full polished finish after washing takes longer.
At the salon, identify both the dry collarbone perimeter and the shortest face-framing landmark. Ask how the layers will connect while preserving enough lower weight. Reshape when growth changes shoulder contact or causes the front progression to merge into a less distinct outline.
Pro tip:
Shape the jaw and neck layers first, then assess the cheekbone pieces. Building the curve from below makes it easier to keep the shortest sections connected rather than overly dramatic.
Make It Work for You:
If you want lower-maintenance framing, begin closer to the jaw and keep the next layers long. The collarbone perimeter still provides enough distance for a visible, gradual progression.
Watch Out For:
Do not place every layer at evenly spaced intervals. Natural-looking framing needs a gradual transition based on how the hair falls, not a visible staircase of identical length changes.
Wavy Face Hugging Layers Hairstyle

Natural waves give face-hugging layers soft changes of direction that can follow the cheeks and jaw without looking precisely sculpted. Shorter front sections may curve inward at one point and outward at another, while longer waves connect them into the overall length. A natural center or off-center part allows the pattern to settle without forcing perfect symmetry.
Naturally wavy hair can make this version relatively low effort because existing bends supply much of the movement. Straight hair can recreate the effect with additional styling. Use lightweight mousse for flexible wave support, heat protectant before thermal refinement, and a medium curling iron for selected flat sections. Refreshing only flattened front waves may take minutes; creating the full pattern on straighter hair takes longer.
At the salon, show where your waves naturally bend and identify the shortest dry front layer. Ask for enough weight that the wave groups remain connected. Reshape when growth pulls the upper movement downward or makes the front layers too heavy to sit close around the face.
Pro tip:
Refine only the front waves that flatten or move awkwardly. Leaving successful natural bends untouched creates useful variation and reduces the heat needed to make the framing look intentional.
Make It Work for You:
If your waves expand near the cheeks, begin the shortest layer slightly lower. You can retain close framing while shifting the strongest fullness toward the jaw rather than the mid-face.
Watch Out For:
Avoid making every front wave identical with a curling iron. Natural variation helps the layers blend; uniform curls can turn soft face framing into a more rigid, styled pattern.
Curly Face Hugging Layers Hairstyle
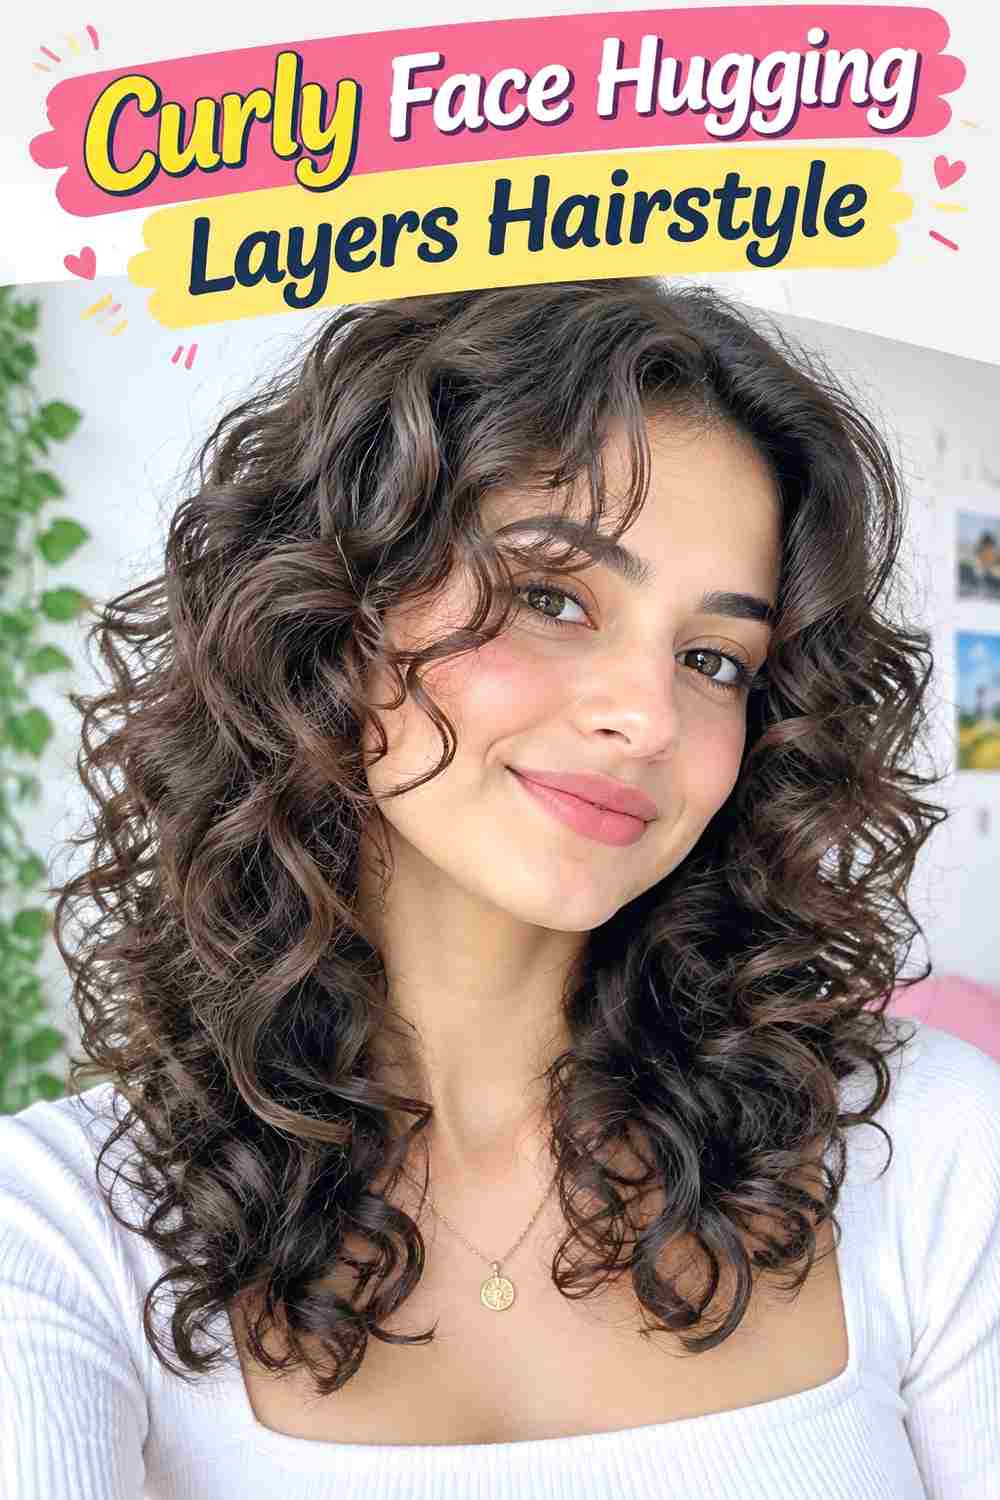
Curly face framing uses shorter curl groups around the front while allowing each section to follow its natural spring and direction. The first curls can finish near the cheekbones or jaw when dry, with progressively longer groups continuing toward the shoulders or longer perimeter. A natural part keeps the frame flexible, and varied curl endpoints prevent the front from forming a rigid outline.
Curly and coily textures require careful shrinkage allowance because stretched measurements can differ substantially from the finished position. Dense curls may need targeted bulk placement, while lower-density curls benefit from retaining coverage. Use lightweight leave-in conditioner for pliability, curl gel for grouping, and a diffuser on cool or low airflow for drying. Refreshing several front curls can be quick; a full wash, definition, and dry takes considerably longer.
At the salon, specify where each important front layer should sit when completely dry. Point out where bulk naturally gathers rather than requesting general thinning. Reshape when the shortest curls grow below their intended landmarks or upper volume shifts downward.
Pro tip:
Arrange the front curl groups while damp and allow them to dry before separating. You can then divide only selected curls to adjust volume without losing the close framing around the face.
Make It Work for You:
If your curls have strong shrinkage, retain additional cutting length around the cheekbones and jaw. The dry result can still hug the face without making the shortest sections unexpectedly high.
Watch Out For:
Do not pull curls straight to judge face-framing length. Recoil changes their resting position, so dry placement and individual shrinkage patterns should guide the final shape.
Fine-Hair Face Hugging Layers Hairstyle

Fine strands can create clear face framing without extensive layering when the shortest sections are placed deliberately. A narrow cheekbone- or jaw-level section can blend into longer sides while the perimeter stays relatively substantial. Keeping most layers near the front preserves more weight through the back. A center or side part can adjust root lift and change how much framing falls on each side.
Fine hair describes strand diameter rather than total density. Fine, high-density hair can support broader layering than fine hair with low density. Use lightweight mousse for gentle root support, heat protectant before heated drying, and a medium round brush for front movement. Refreshing the frame can take only minutes; full styling time depends on overall length and density.
At the salon, explain whether your concern is flatness, low density, or both. Ask to preserve useful perimeter weight and keep the front section appropriately narrow. Reshape when the layers lose their visible difference or the ends become uneven rather than repeatedly adding more short pieces.
Pro tip:
Use mousse mainly near the roots and through the middle of the front sections. Keeping the tips light prevents fine strands from joining into narrow pieces that reduce visible fullness.
Make It Work for You:
If your fine hair is also low density, start the shortest layer near the jaw rather than high on the cheek. The longer framing preserves more side coverage while adding movement.
Watch Out For:
Fine strands do not automatically require heavy texturizing. Excessive weight removal can expose gaps around the face and make the layered ends look sparse instead of softly connected.
Dense-Hair Face Hugging Layers Hairstyle

Dense hair can support a broader face frame with several visible length changes from the cheekbones through the jaw and neck. Longer surface sections keep the progression connected, while targeted internal shaping prevents excessive bulk behind the shorter pieces. The perimeter can remain substantial, creating contrast with the mobile front. Either a center or side part can distribute the density differently.
Straight and wavy dense hair can show the layered structure clearly. Curly density requires extra consideration for shrinkage and expansion. Use heat protectant before heated styling, a large round brush for broad front curves, and lightweight smoothing cream for surface control. Refreshing several visible layers can be quick, while completely drying and styling dense hair takes longer.
At the salon, point out where your hair becomes widest or heaviest around the sides. Ask for targeted weight adjustment there rather than uniform thinning. Identify the shortest front landmark separately. Reshape when new growth restores unwanted bulk or the face-framing pieces become too long to move independently.
Pro tip:
Use broad brush sections through dense front layers. Larger curves help the pieces fall together around the face instead of creating excessive width through many small, individually styled bends.
Make It Work for You:
If your dense hair already has natural wave, let those bends create part of the framing. Cutting can focus on weight distribution, reducing the need for a complete heat-styled finish.
Watch Out For:
Avoid indiscriminate thinning from roots through ends. Random short pieces can expand and create flyaways; adjust density specifically where bulk prevents the layers from sitting close to the face.
Feathered Face Hugging Layers Hairstyle

Feathered movement directs the front layers gently away from the face before they settle back toward the sides. The shortest sections can begin around the cheekbones, with longer pieces progressing past the jaw and neck. Rather than a strong flip, each layer uses a soft outward sweep that reveals the next length beneath it. The perimeter remains fuller to anchor the lighter front.
Straight and wavy textures display feathered separation particularly well. Fine hair needs restrained feathering, while dense hair can support a broader front section. Use heat protectant before heated styling, a round brush to direct each layer outward, and flexible hairspray for movable hold. Refreshing the visible front pieces may take minutes; styling the entire layered length after washing takes longer.
At the salon, identify the shortest layer and explain how gradually you want the front to feather into the sides. Ask for movement without excessively thinned tips. Reshape when the upper pieces grow enough to merge into the longer sections and lose their layered direction.
Pro tip:
Direct the layers outward only near the end of drying. Setting their basic shape first prevents the feathering from sweeping too far backward and disappearing from the facial frame.
Make It Work for You:
For lower-density hair, concentrate feathering around a narrow front section and keep the sides fuller. You retain visible movement without removing too much weight from the overall silhouette.
Watch Out For:
Do not confuse feathering with aggressive thinning. Gradual lengths and controlled direction create the effect; excessively wispy ends can weaken the close, connected frame around the face.
Soft Bend Face Hugging Layers Hairstyle

Broad bends make the face-framing layers visible without creating full curls or a polished blowout. Cheekbone or jaw-level pieces change direction gently as they follow the face, while longer sections carry progressively wider bends. The rest of the hair can remain comparatively straight, making the layered front stand out. A center or off-center part works depending on natural root direction.
Straight hair is an especially practical base because a small bend creates noticeable movement. Softly wavy hair can use its natural pattern and refine only flatter sections. Use heat protectant before thermal styling, a large-barrel curling iron for loose bends, and flexible hairspray for light hold. A front-only refresh may take several minutes; styling the entire haircut is optional and takes longer.
At the salon, identify the shortest layer and make clear that you want a haircut that also works straight. The bends are styling, while the layer progression supplies the structure. Reshape when the front becomes too long to create visible movement easily.
Pro tip:
Wrap only the middle portion of each front section around the iron and leave the ends relaxed. This produces a gentle directional change rather than turning the framing pieces into defined curls.
Make It Work for You:
If your hair already bends near the jaw, use that natural movement as part of the frame. Style only the pieces that fall completely straight or move in an awkward direction.
Watch Out For:
Avoid using a small barrel or holding each section too long. Tight curls shorten the apparent layers and can hide the gradual cheek-to-jaw progression that defines the face frame.
Air-Dried Face Hugging Layers Hairstyle

An air-dried finish lets natural bends determine how the front layers sit around the cheeks and jaw. The shortest pieces are placed where the hair can fall comfortably without requiring a round brush, while longer sections blend into the perimeter. A natural part suits the low-effort approach, and slight differences between the two sides can become part of the relaxed shape.
Wavy and softly curly textures are particularly practical for air-drying, although straight hair with natural bends can also work. Use lightweight leave-in conditioner for softness, a wide-tooth comb for damp distribution, and flexible styling gel for gentle grouping. Active styling time is short, but actual drying can take much longer depending on length and density. Refresh only flattened front sections between washes.
At the salon, explain that air-drying is part of your normal routine and show where your hair naturally bends around the face. Ask for layers that support those patterns. Reshape when growth makes the front too heavy or moves the shortest sections below their useful framing position.
Pro tip:
Arrange the front layers while the hair is evenly damp, then reduce touching. Repeated handling during drying can disrupt natural groups and create frizz instead of soft, close movement.
Make It Work for You:
If one side dries farther away from the face, gently reposition that section while damp. Small directional adjustments can improve the frame without adding a complete blow-dry to your routine.
Watch Out For:
Avoid using heavy product to force every layer into position. Too much cream or gel can stretch natural movement and join the front pieces together, reducing visible separation.
Rounded Face Hugging Layers Hairstyle

A rounded finish directs the face-framing layers inward so they follow the cheeks, jaw, and neck in one smooth progression. The shortest piece can begin around the lower cheekbone, with longer layers curving toward the jaw and shoulders. The ends stay connected rather than feathered, and moderate root lift prevents the close-fitting front from appearing flat.
Straight and softly wavy hair can show the rounded structure clearly. Fine hair usually benefits from preserving more lower weight, while dense hair may need targeted internal adjustment behind the frame. Use heat protectant before heated drying, a medium round brush for broad inward curves, and lightweight smoothing cream for surface control. Refreshing the front can take several minutes; creating the complete rounded finish after washing takes longer.
At the salon, identify the shortest dry layer and explain where you want the curve to sit closest to the face. Ask for connected layers rather than obvious steps. Reshape when growth pulls the curve downward or makes the shorter pieces merge into the overall length.
Pro tip:
Keep the brush rotation broad and gentle, especially around the cheeks. A small, tight roll can make the layers look shorter and much more rounded than the intended soft curve.
Make It Work for You:
If your hair naturally turns outward, keep the front layers slightly longer and use a broader inward bend. Extra length gives the sections more weight to settle close to the face.
Watch Out For:
Avoid creating maximum volume directly beside the cheeks while also turning the layers inward. Keep root lift moderate so the rounded frame stays close instead of becoming excessively wide.
Airy Blowout Face Hugging Layers Hairstyle
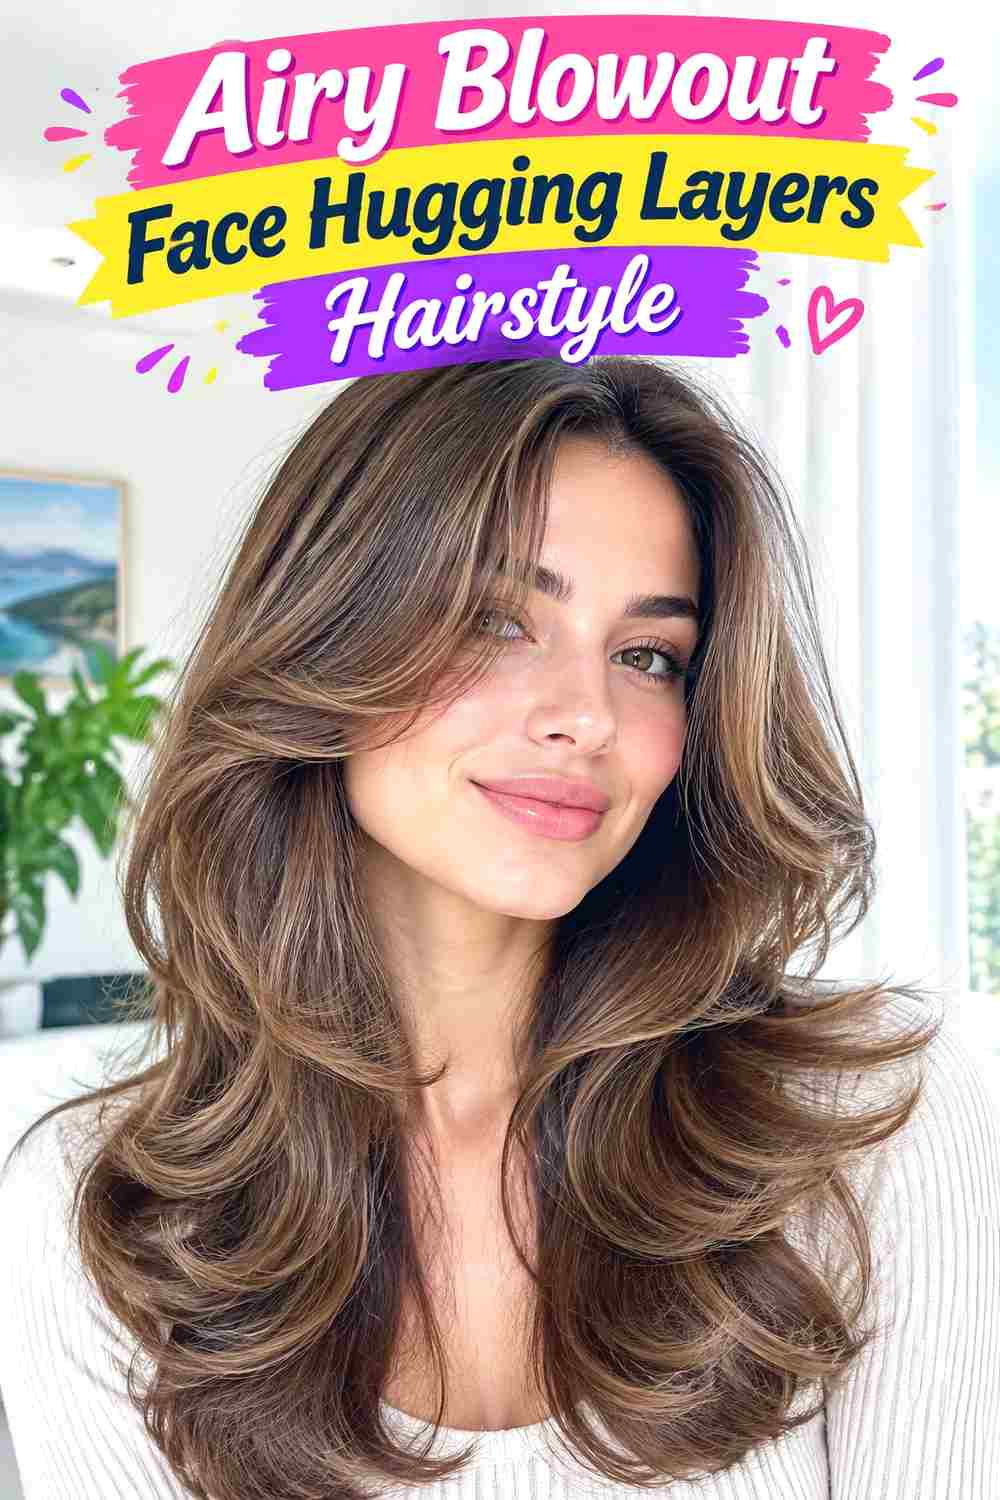
An airy blowout gives face-hugging layers more lift while preserving their gradual connection around the cheeks and jaw. The shortest front pieces sweep away slightly before curving back toward the sides, while longer layers form broad overlapping bends. Root volume stays moderate, and the perimeter remains fuller so the movement does not become overly feathered. A center or side part can shift the upper volume.
Straight and wavy textures are practical starting points for this finish. Fine hair benefits from lightweight support, while dense hair requires more drying time and sectioning. Use heat protectant before styling, a round brush for broad curves, and flexible hairspray for movable hold. Refreshing only the front and crown may take several minutes; a complete blowout after washing is a longer styling session.
At the salon, identify the shortest face-framing layer and preferred perimeter while discussing how the haircut should sit without a blowout. Reshape when growth makes the front difficult to lift or causes the layer progression to lose definition.
Pro tip:
Allow each face-framing section to cool in its broad curve before loosening it. Cooling helps maintain movement without requiring repeated heat passes or enough hairspray to make the layers stiff.
Make It Work for You:
If full blowouts do not fit your routine, style only the front layers and leave the back closer to its natural texture. The face frame can provide most of the visible polish.
Watch Out For:
Avoid rolling every section into a tight curl. Strong uniform bends can overwhelm the close facial frame; use broad movement so the individual layer lengths remain visible and connected.
Conclusion
Face hugging layers hairstyle ideas can begin around the cheekbones or jaw and work with shoulder, collarbone, or much longer lengths. Fine or lower-density hair often benefits from a narrower layered section and fuller perimeter, while dense hair can use targeted internal weight adjustment. Curtain and wispy fringe extend the frame toward the forehead, whereas center and side parts change how volume is distributed. Waves and curls create natural movement, while straight hair can emphasize the precise layer progression. Rounded bends sit closer to the face; feathered or blowout finishes create more outward movement. Consider natural texture, face shape, density, fringe, parting, upkeep, and daily styling effort together so the framing remains practical as well as visually connected.
Before Your Salon Visit
Choose one or two favorites and save references showing the front layers clearly, preferably from more than one angle. Discuss your natural texture, density, face shape, preferred length, upkeep, and normal styling routine. Point out the exact fringe, shortest layer, cheekbone or jaw placement, volume, and finish you like. Also explain whether you usually air-dry, tuck your hair, wear a center or side part, or style with heat, because those habits affect how face-hugging pieces should be placed.
FAQs
Where should face hugging layers start?
They can begin around the cheekbones, jaw, or lower depending on the amount of framing and coverage you prefer. The most useful starting point also depends on texture, shrinkage, density, and everyday styling. Bring a reference showing the exact dry landmark you want.
Can fine or low-density hair have face hugging layers?
Yes, but keeping the layered section narrow can help preserve fullness when overall density is limited. Fine strands and low density are different characteristics, so layer depth should reflect both. A fuller perimeter can balance shorter pieces around the front.
How should face hugging layers be cut on curly hair?
Their finished dry position matters more than stretched length. Curl shrinkage can move cheekbone or jaw layers considerably higher after drying, so leave appropriate allowance and assess natural curl groups. Targeted shaping is usually more useful than thinning all the front sections uniformly.
Do face hugging layers need daily heat styling?
No. Natural waves, curls, and air-dried bends can help the layers follow the face without heat. Straight hair may need more styling for a pronounced rounded or blowout finish. When using heated tools, apply heat protectant and refresh only the sections that need reshaping.