18 Milano Curls Braids Hairstyles

Milano curls braids combine a structured braided base with visible loose curls that soften the overall outline. In this guide, the name refers to braid designs where curls appear through the length, around the face, or mainly toward the ends. Length can range from a compact bob to the waist, while braid size, parting, curl placement, and overall volume change how each option moves. Unlike fully braided styles, the loose sections create more separation and bounce.
The design can be adjusted for different textures and densities because the important decisions involve section size, braid weight, tension, and how much loose hair is included. Smaller braids create finer detail, while larger braids make the pattern easier to see from a distance. Face-framing curls can begin around the cheekbones or lower if you prefer less volume near the front. Curly and coily hair may also need careful consideration of shrinkage when choosing the finished length.
Daily upkeep is usually lighter than installation. A short refresh may involve separating curls and smoothing visible frizz, while wash-day drying takes longer and depends on braid length and density. Protecting loose curls at night also matters because they can tangle sooner than the braided sections.
Quick List
- Center-Part Long Milano Curls Braids Hairstyle
- Side-Part Shoulder-Length Milano Curls Braids Hairstyle
- Jumbo Knotless Milano Curls Braids Hairstyle
- Small Knotless Milano Curls Braids Hairstyle
- Half-Up Half-Down Milano Curls Braids Hairstyle
- High Ponytail Milano Curls Braids Hairstyle
- Low Ponytail Milano Curls Braids Hairstyle
- Side-Swept Milano Curls Braids Hairstyle
- Bob-Length Milano Curls Braids Hairstyle
- Layered Long Milano Curls Braids Hairstyle
- Face-Framing Milano Curls Braids Hairstyle
- Deep Side-Part Milano Curls Braids Hairstyle
- Crown-Braided Milano Curls Braids Hairstyle
- Low Bun Milano Curls Braids Hairstyle
- High Bun Milano Curls Braids Hairstyle
- Medium Box Milano Curls Braids Hairstyle
- Short Lob Milano Curls Braids Hairstyle
- Curly-Ends Milano Curls Braids Hairstyle
Center-Part Long Milano Curls Braids Hairstyle
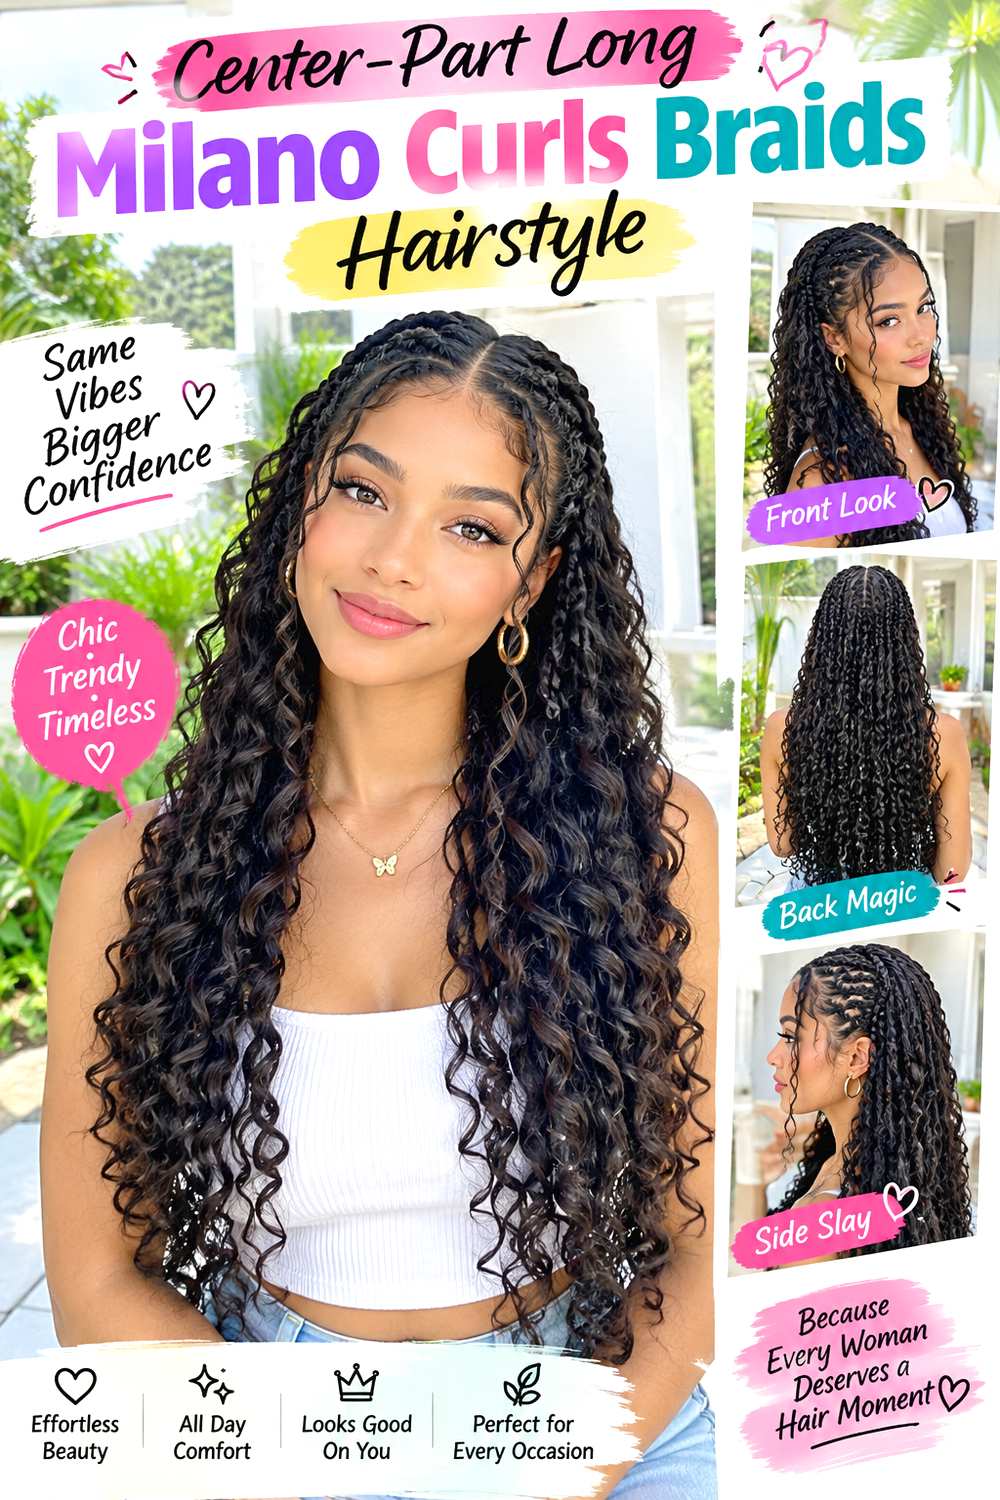
A clean center part gives long braids a balanced fall on both sides, while scattered curls interrupt the straight braided lines from around chest level through the ends. Waist-length placement creates plenty of movement, so keeping the crown relatively flat helps the loose sections remain the main source of volume. Longer face-framing curls can begin near the jaw rather than high at the temples if you want the front to feel open.
This length suits someone comfortable managing extra hair during sleep, washing, and exercise. Ask your braider to keep the front sections comfortable and to agree on the finished length before installation, since braid weight increases as the style gets longer. Braiding mousse can smooth surface fuzz, a lightweight curl refresher can revive loose pieces without heavily coating them, and a satin bonnet can reduce overnight friction. A morning refresh may take only several minutes, while washing and fully drying waist-length braids will take considerably longer depending on density.
Separate any curls that begin clumping together, and trim only obvious synthetic frizz if the material allows it rather than repeatedly pulling at the loose sections. Refresh the visible part as needed so buildup does not become the focus.
Pro tip: When gathering the braids for sleep, divide the long lengths into two loose sections before covering them so the curls are less likely to compress into one tangled bundle.
Make It Work for You: If you prefer less weight, keep the center part and scattered curl placement but stop the braids around mid-back. You retain the long silhouette without carrying the fullest possible length.
Watch Out For: Avoid forcing an extremely sharp center part if your natural growth direction resists it. A slightly softened line can sit more comfortably while preserving the balanced effect.
Side-Part Shoulder-Length Milano Curls Braids Hairstyle
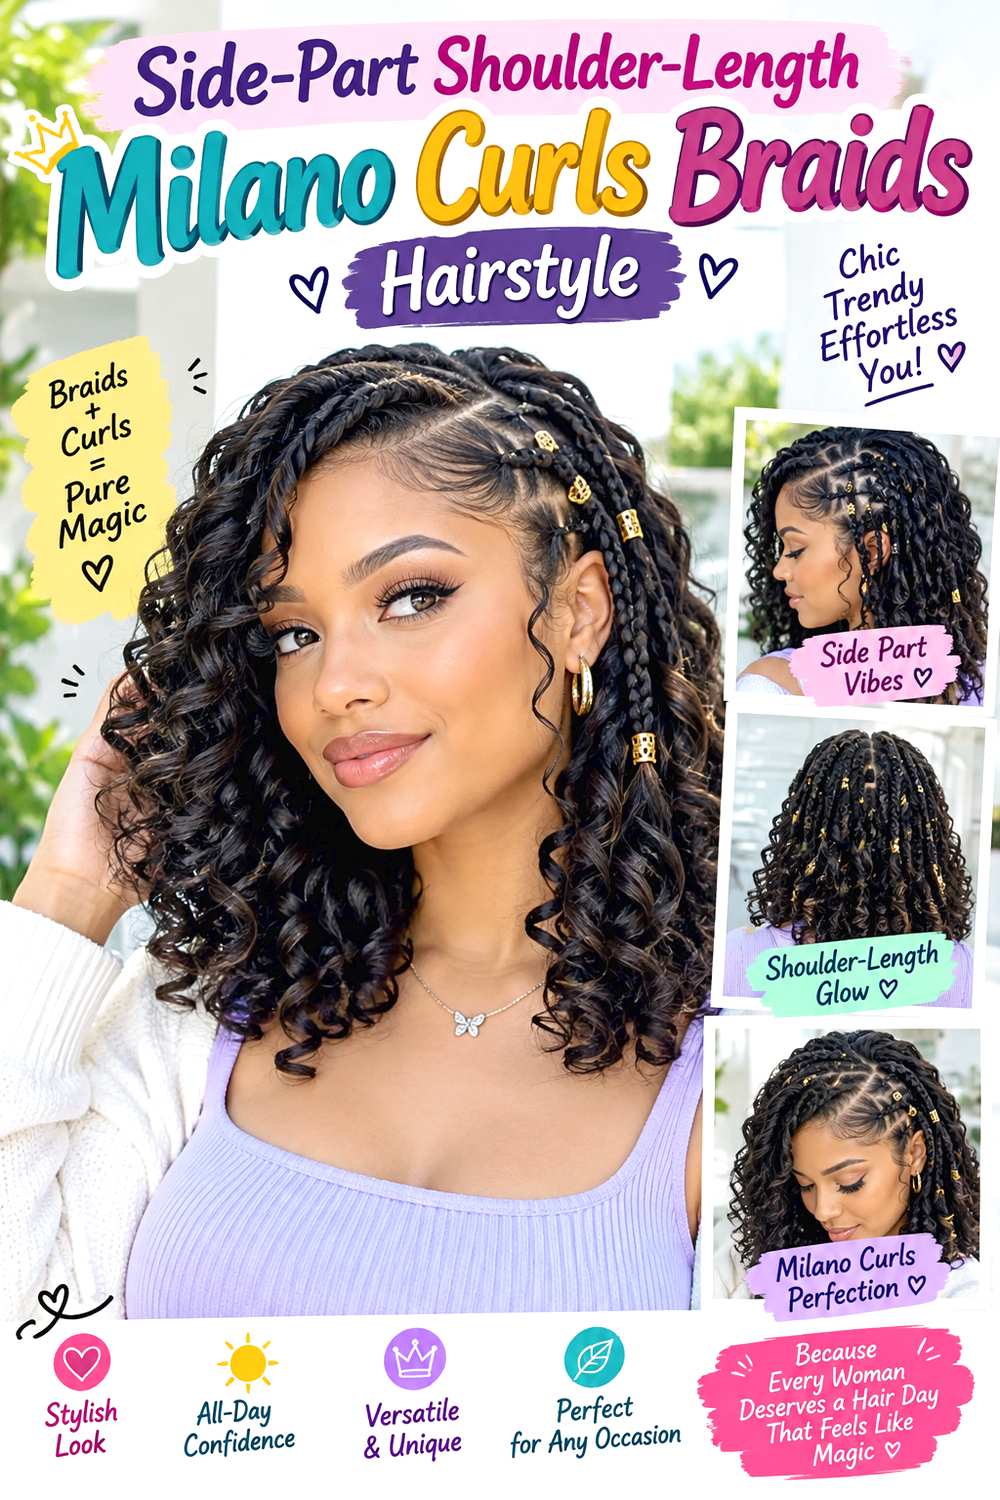
Shoulder-length braids create a lighter outline, and an off-center side part shifts more fullness toward one side without requiring an exaggerated sweep. Loose curls can begin around ear or jaw level, then collect around the shoulders so the ends look airy rather than forming one heavy line. Keeping a few shorter curled pieces near the front adds movement without turning the entire perimeter into different lengths.
This option is practical for readers who want a braided style that feels easier to gather, sleep in, and keep away from collars. Medium density can support the rounded shape well, while very dense installations may need fewer loose curl sections to prevent the sides from becoming overly wide. Ask your braider where the shoulder-length perimeter should finish when the hair is resting naturally, because curls can visually shorten the final outline. Use a foaming braid mousse to neaten the braided sections, a curl cream in a light amount to define dry loose pieces, and a satin scarf to limit friction around the front.
Quick morning reshaping is usually brief, but a full cleanse and drying session requires more time. Watch the ends closely because repeated rubbing against clothing can create fuzz faster than it would on longer braids.
Pro tip: After refreshing, direct the fuller side backward for a few minutes before letting it fall naturally. This helps the side part keep shape without pulling the roots tightly.
Make It Work for You: For sparse-looking ends, reduce the number of loose curls and keep the braid lengths closer together. The shoulder outline stays full while the side part still supplies movement.
Watch Out For: Do not place every loose curl directly at shoulder level. Concentrating them on one horizontal line can create bulk; stagger their starting points for a softer transition.
Jumbo Knotless Milano Curls Braids Hairstyle

Jumbo knotless braids make the braided pattern bold, with fewer sections and broad lines running from the scalp into generous curls. A middle or softly offset part works well because the large braid size already creates visual impact. Leaving curls through the lower half instead of only at the tips breaks up the heavier braid shape and gives the ends more movement.
The larger sections can shorten installation time compared with very small braids, but section size does not justify uncomfortable tension. Tell your braider you want a secure base that remains comfortable when the braids move, especially around the hairline. Jumbo braids also suit people who prefer a style with fewer individual braids to separate during maintenance. A lightweight leave-in spray can add moisture without saturating the base, braid mousse can settle surface frizz, and a large satin bonnet can protect the curls without crushing them.
A quick refresh mainly involves smoothing a few visible sections and separating tangled curls. Full washing and drying take longer because thicker braids can hold moisture internally. Keep the scalp accessible through the larger parts, and pay attention to any braid that begins pulling as the style shifts or grows out. Repositioning is better than tolerating discomfort.
Pro tip: When tying the braids back, support the jumbo lengths with both hands before securing them. That reduces sudden pulling at the front sections and keeps the curled pieces from snagging.
Make It Work for You: If your scalp is sensitive to weight, request slightly shorter jumbo braids with the same generous curl placement. The bold scale remains visible while the total length feels easier to manage.
Watch Out For: Avoid making every jumbo section identical if that causes awkward gaps near the hairline. Let your braider adjust section shape while maintaining a consistent overall braid scale.
Small Knotless Milano Curls Braids Hairstyle

Small knotless braids create a fine, detailed base that allows loose curls to appear almost woven through the hairstyle. A center part keeps the pattern orderly, while narrow braids around the hairline can frame the face without creating a thick border. Curls can start at several different levels—from around the jaw to below the shoulders—so the long shape moves rather than ending in one dense curly section.
The main trade-off is time. Smaller braids generally mean a longer installation and more individual pieces to monitor, although they can be versatile for ponytails and half-up arrangements once finished. Ask your braider to keep the hairline sections proportionate and comfortably tensioned rather than making them tiny simply to match the rest. A light braid spray can refresh the base, curl mousse can encourage definition through the loose lengths, and a satin bonnet can help limit nightly friction.
Daily touch-ups may be short if you preserve the curls overnight. Wash-day care is more involved because many small braids need thorough rinsing and complete drying. As the roots grow, the parting pattern becomes softer, so decide whether you prefer that relaxed stage or want earlier removal. Loose curls may need more frequent detangling than the braids themselves.
Pro tip: Separate tangled curls in small sections, starting near the ends and moving upward. Working carefully prevents one snag from tightening several nearby braids at the same time.
Make It Work for You: If a very small installation feels too time-consuming, choose small-to-medium braids around the back and preserve finer sections near the front where the detail is most noticeable.
Watch Out For: Do not assume smaller automatically means lighter. Too many long braids can still add weight, so balance braid count, length, and added hair with comfortable root tension.
Half-Up Half-Down Milano Curls Braids Hairstyle
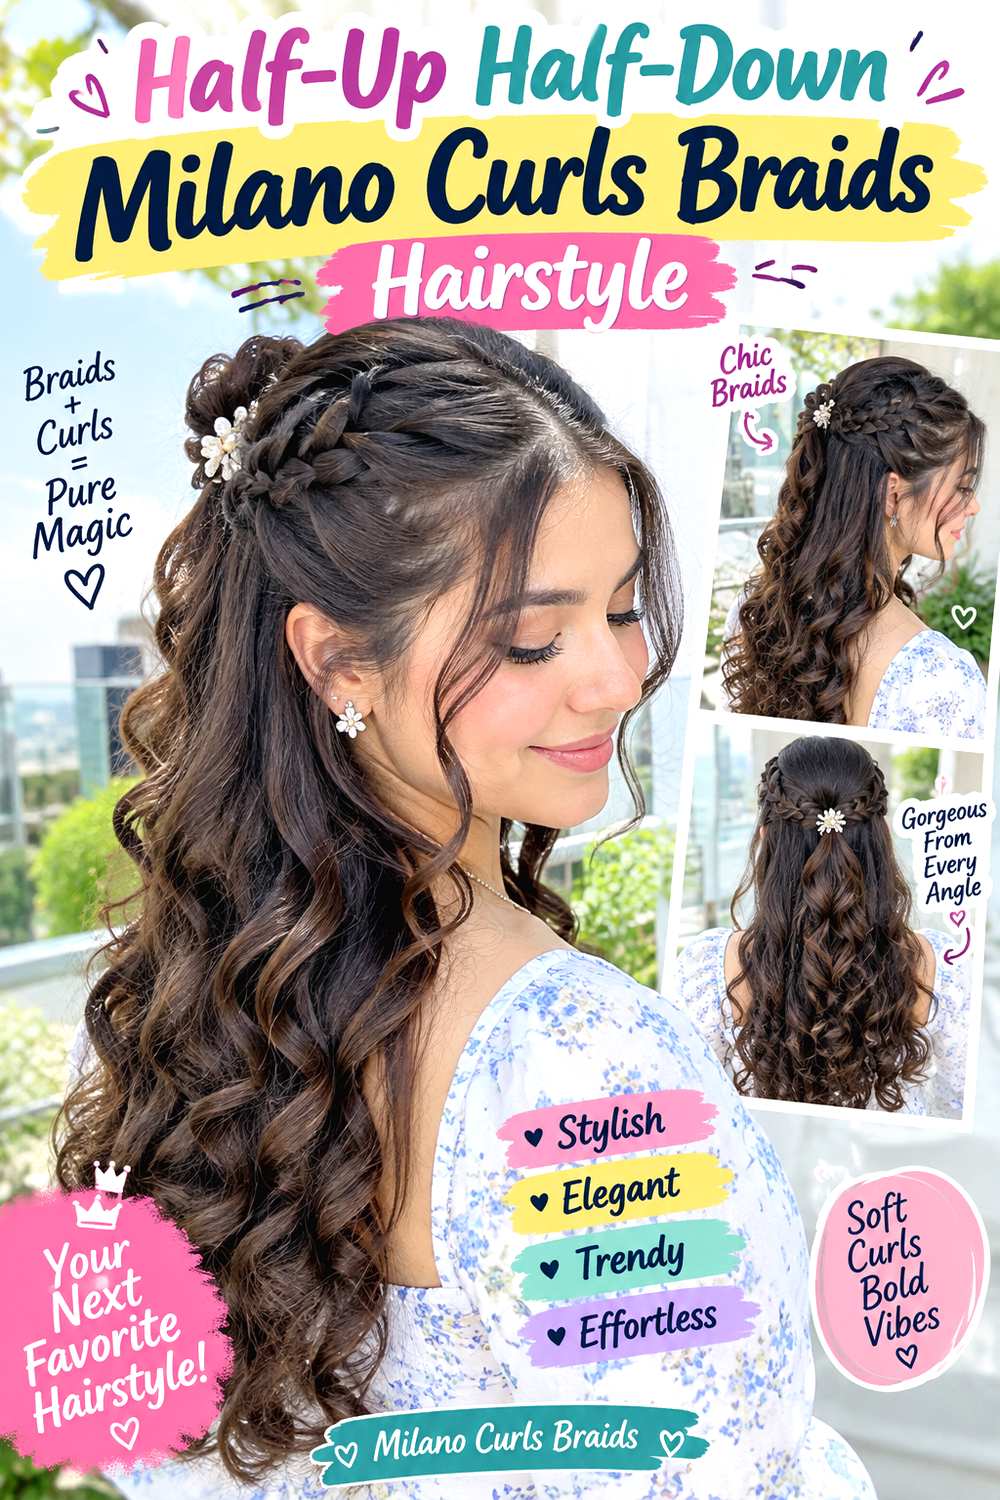
A half-up arrangement changes the silhouette without hiding the curls. The upper braids are gathered near the crown while the lower section remains loose, allowing curled strands to spread across the back and shoulders. A center part can disappear into the gathered section, or a soft side part can remain visible at the front. Leaving two curled pieces near the face keeps the transition from the lifted crown to the loose lengths gentle.
This works especially well when the underlying braids are medium or small enough to gather comfortably. Dense or very long installations can make the upper section heavy, so use a smaller portion rather than pulling half the total weight upward. Ask your braider to plan a comfortable crown direction if you already know you will wear the style half-up often. A fabric-covered elastic can hold the gathered braids, braid mousse can smooth visible flyaways, and a curl refresher can restore definition to the loose pieces.
A morning change from fully down to half-up can take only a few minutes, while wash-day drying still depends on the original braid length and density. Release the gathered section before sleep so one group of roots is not held in the same direction continuously.
Pro tip: Build the half-up section from braids just above the ears toward the crown instead of grabbing randomly. A deliberate boundary keeps the loose lower section balanced on both sides.
Make It Work for You: If your braids are very long or dense, gather only the top quarter. You still get visible crown lift while reducing the weight pulling upward from the scalp.
Watch Out For: Avoid tightening the elastic repeatedly when the top section slips. Rebuild the gathered section with less weight instead of increasing pressure at the roots.
High Ponytail Milano Curls Braids Hairstyle
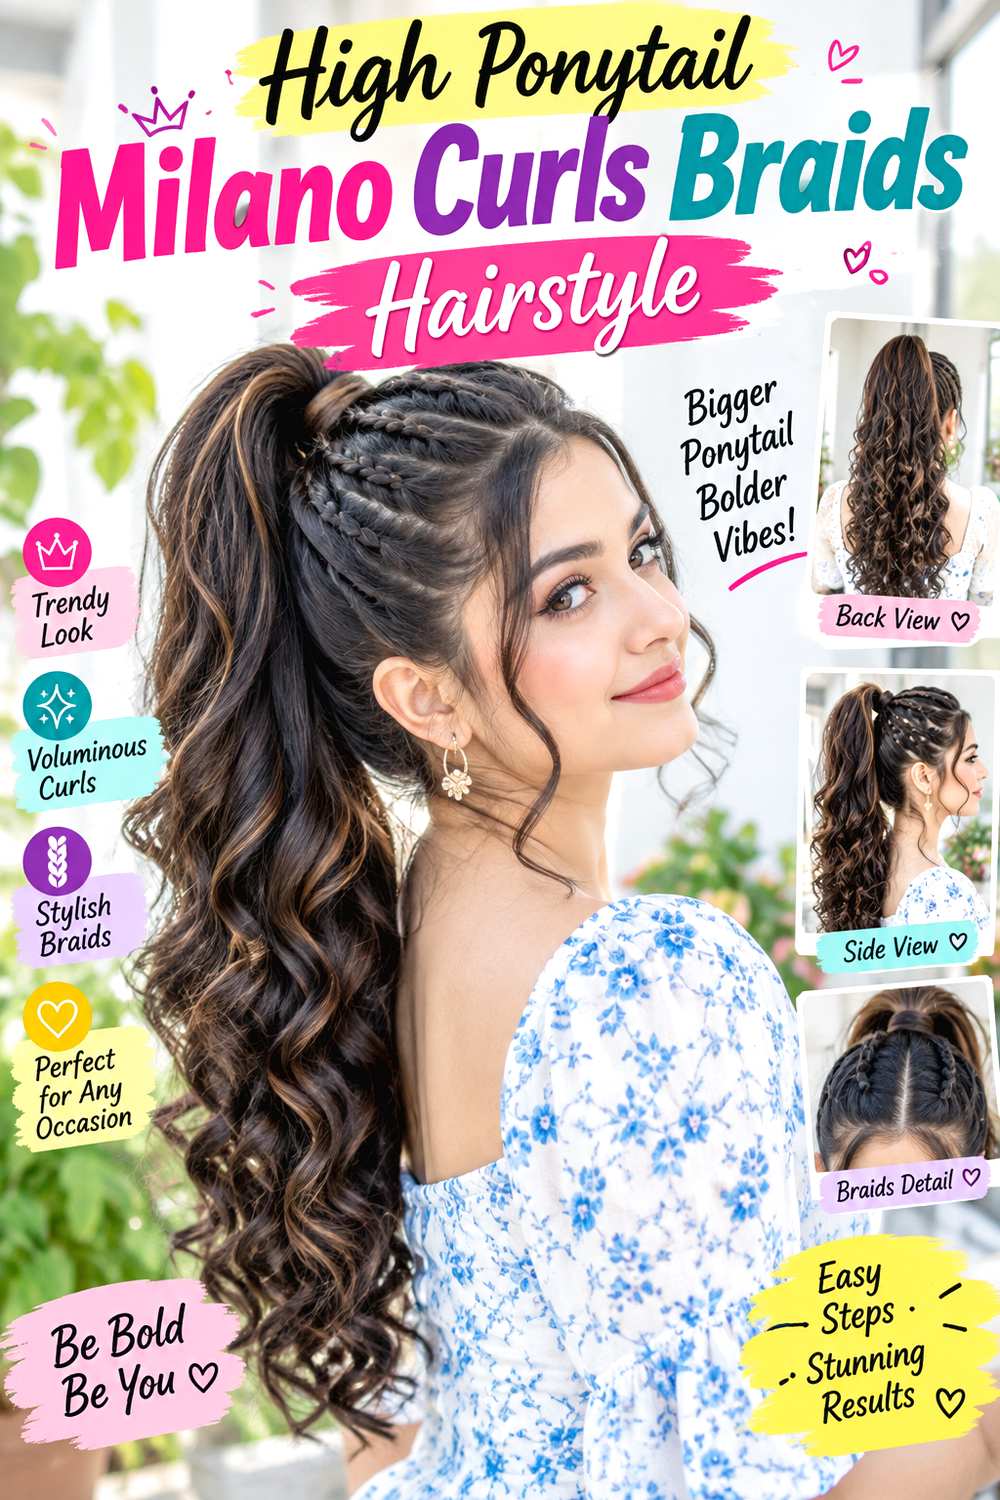
A high ponytail gathers the braids above the crown so the curled sections fall from a higher point and create a cascading shape. The front can stay smoothly directed backward, or a narrow center part can remain visible before the braids join the ponytail. Loose curls through the lengths prevent the gathered style from looking like one solid bundle, while a few optional face-framing curls can soften the hairline.
Comfort matters more than maximum height. Very long or jumbo braids may become too heavy for prolonged high placement, so this variation is easier with medium or smaller braids and a manageable overall length. Tell your braider that high ponytails are part of your routine; comfortable front tension and braid direction can affect how easily the base lifts later. Use a wide fabric-covered elastic for support, braid mousse for a neat surface, and a lightweight curl spray for the loose lengths.
Converting already-installed braids into the ponytail can be a quick styling change, whereas cleansing and drying the full installation remain the longer task. Wear the ponytail for limited periods if you notice pulling, and release it before sleeping. Refresh curls after taking the style down because compression can temporarily flatten their shape.
Pro tip: Lean slightly forward while collecting the braids, then stand upright before securing them. This helps you judge the true ponytail position before committing to the final tension.
Make It Work for You: For heavier installations, place the ponytail just behind the crown rather than directly on top. It keeps the lifted effect while reducing the steep upward pull.
Watch Out For: Do not use pain as a sign that the ponytail is secure. If the hairline feels strained, lower the placement or gather fewer braids immediately.
Low Ponytail Milano Curls Braids Hairstyle
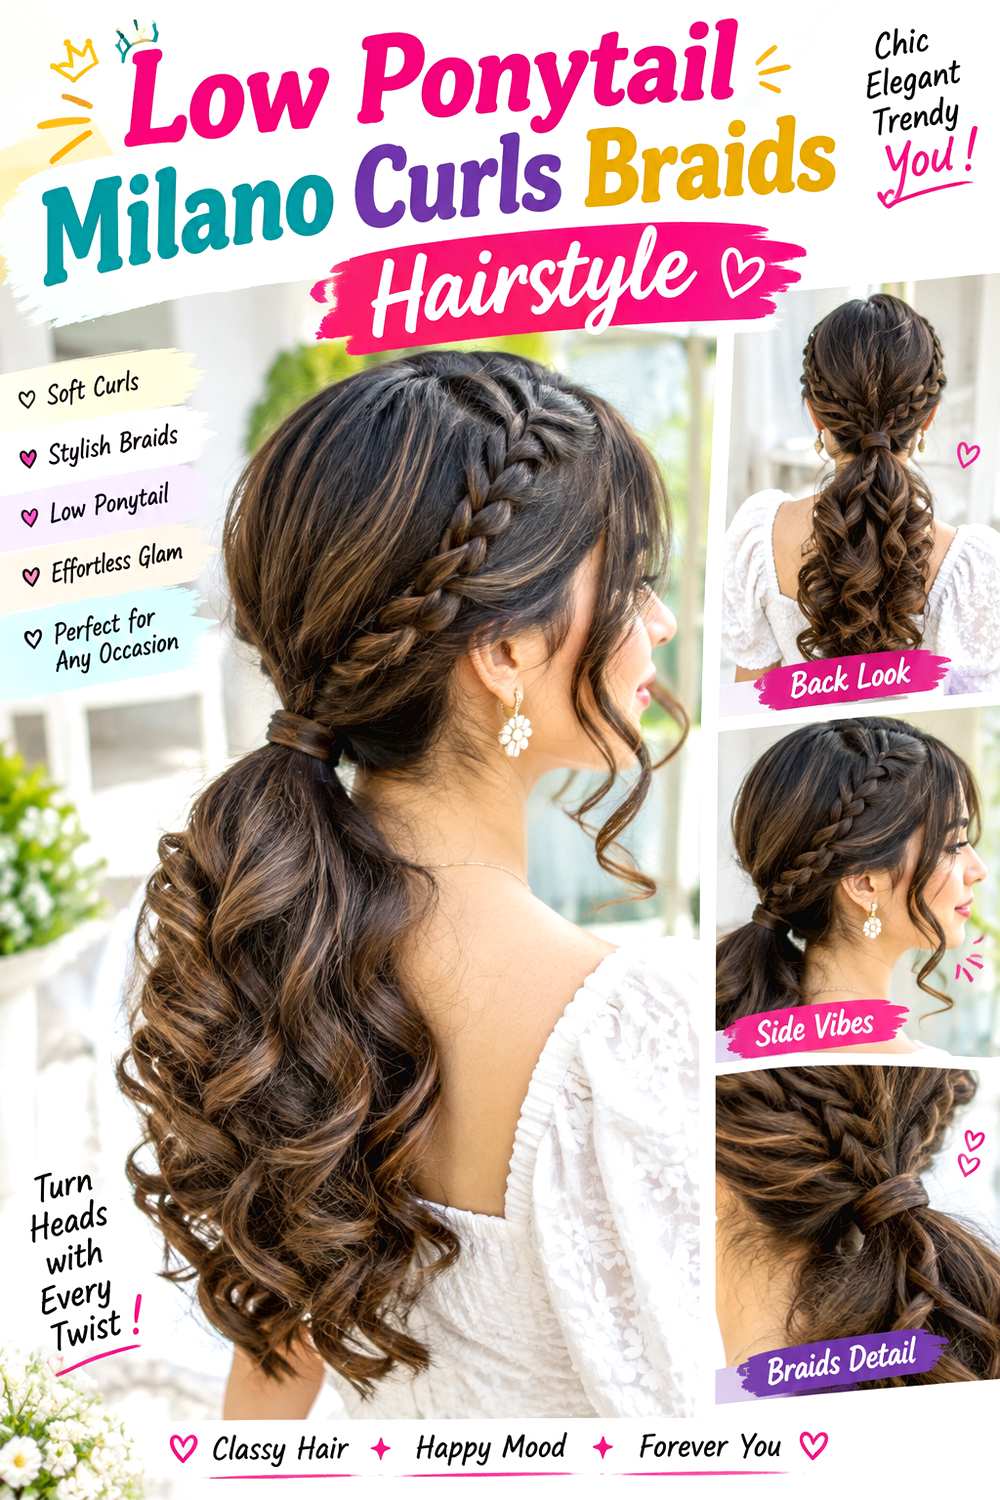
A low ponytail keeps most of the braid length directed downward, making it one of the calmer ways to gather Milano curls braids. The base can sit at the nape, with a center part for symmetry or a side part for extra front movement. Loose curls remain visible through the ponytail and at the ends, so the finished shape still has softness even though the roots are controlled.
This placement is useful for longer or denser installations because it usually asks less of the roots than a high ponytail. It can also fit more easily beneath some hats or outerwear, although the exact base position matters. Ask your braider to keep the nape sections comfortable and avoid an oversized buildup of added hair there if low styles are a priority. A fabric-covered elastic can secure the ponytail, light braid mousse can smooth the top, and curl foam can reshape flattened loose pieces.
A daily low ponytail takes only a short time once the braids are installed. Full wash-day care remains slower, and the nape should be dried thoroughly rather than left damp inside a gathered bundle. Release the ponytail at night, especially if the elastic sits against the same roots every day. Shift its exact placement occasionally if one area starts feeling stressed.
Pro tip: Before securing the ponytail, pull the side braids straight back rather than downward. That keeps the front smooth without forcing the nape braids to carry all the tension.
Make It Work for You: If you want more face framing, leave one or two curled sections outside the ponytail near each temple. Keep them long enough to blend naturally with the overall length.
Watch Out For: Avoid wrapping the elastic around the base more times than necessary. Excess pressure can flatten curls near the nape and make the gathered section uncomfortable.
Side-Swept Milano Curls Braids Hairstyle
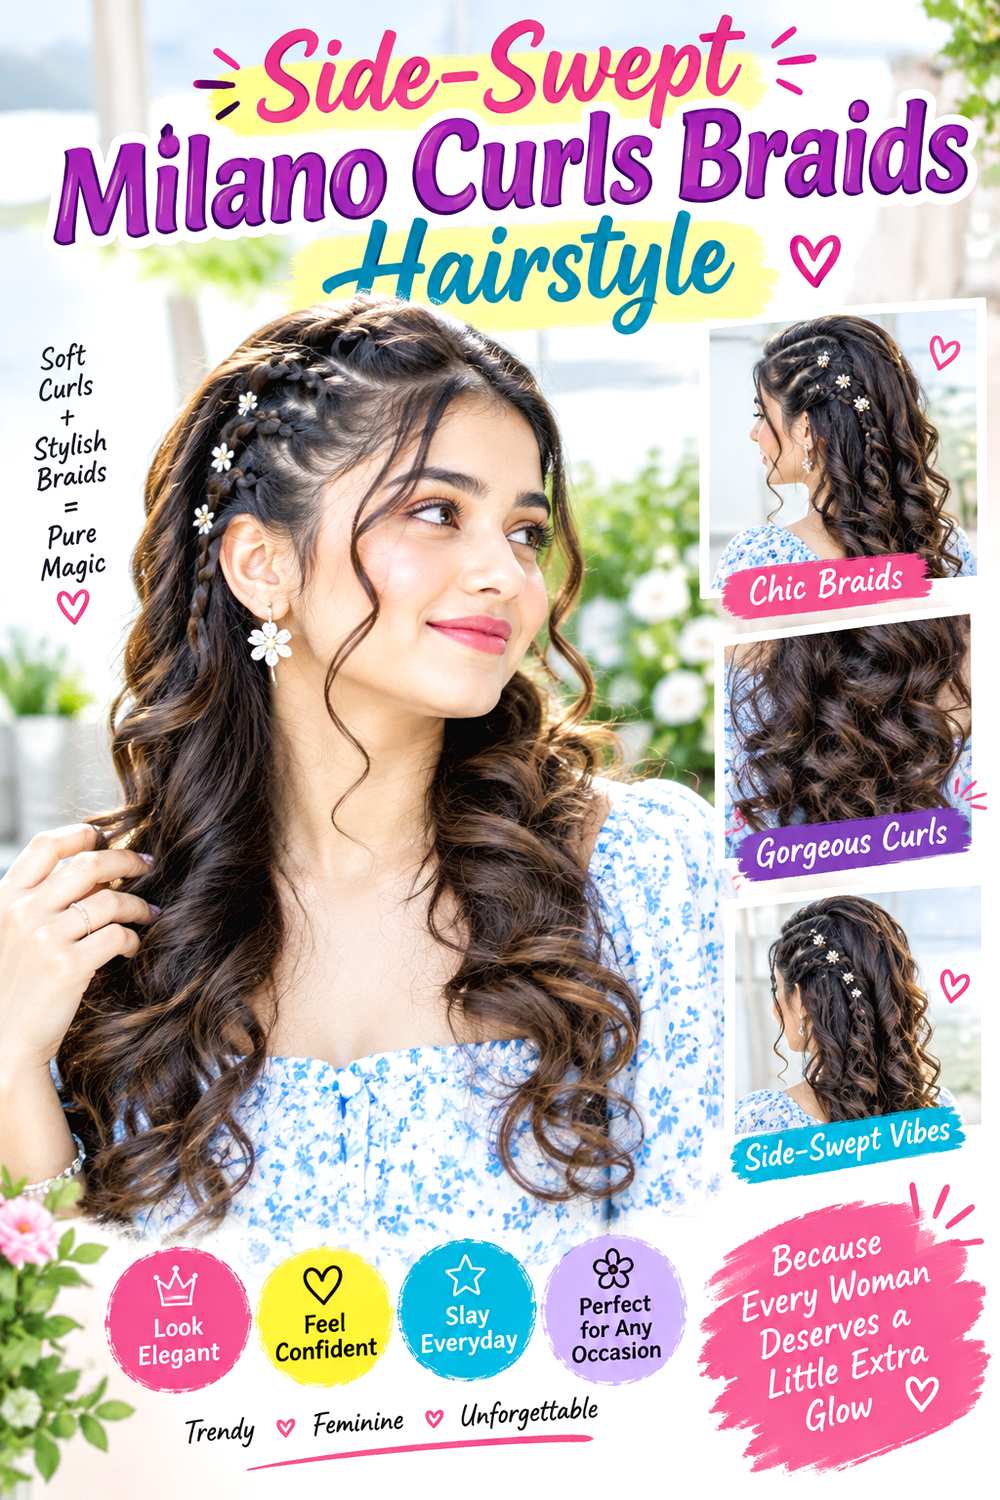
Side-swept braids place most of the visible length over one shoulder, creating an intentionally uneven silhouette without changing the underlying installation. A moderate side part supports the direction, while curls through the mid-lengths and ends spread across the fuller side. The opposite side can remain close to the head, giving the loose curls more contrast and making the sweep easy to see.
This arrangement is useful for events or photographs because it changes the presentation of long braids quickly. It can work with many densities, but extremely heavy braids may slip back toward the center unless the base is arranged securely. Ask your braider for an installation that remains flexible enough to move across the head without painful resistance. A light texturizing spray can add grip where braids tend to slide, a few bobby pins can anchor the hidden side, and curl mousse can redefine the exposed curls.
Creating the sweep from an existing installation may take only several minutes. A full wash and dry is still a separate, longer task. Remove the pins before sleeping and return the braids to a relaxed position so the roots are not held sideways overnight. Check the hidden side periodically because concentrated pressure there can be easy to overlook.
Pro tip: Anchor the sweep just behind the ear rather than at the very front hairline. The pin stays less visible and supports the direction without pulling delicate front sections.
Make It Work for You: With shorter braids, create a softer diagonal sweep instead of forcing every piece over one shoulder. The asymmetry remains clear while the shorter lengths stay naturally in place.
Watch Out For: Do not rely on extra-tight pins when the braids keep sliding. Add a little grip at the anchor area and use fewer braids in the sweep.
Bob-Length Milano Curls Braids Hairstyle
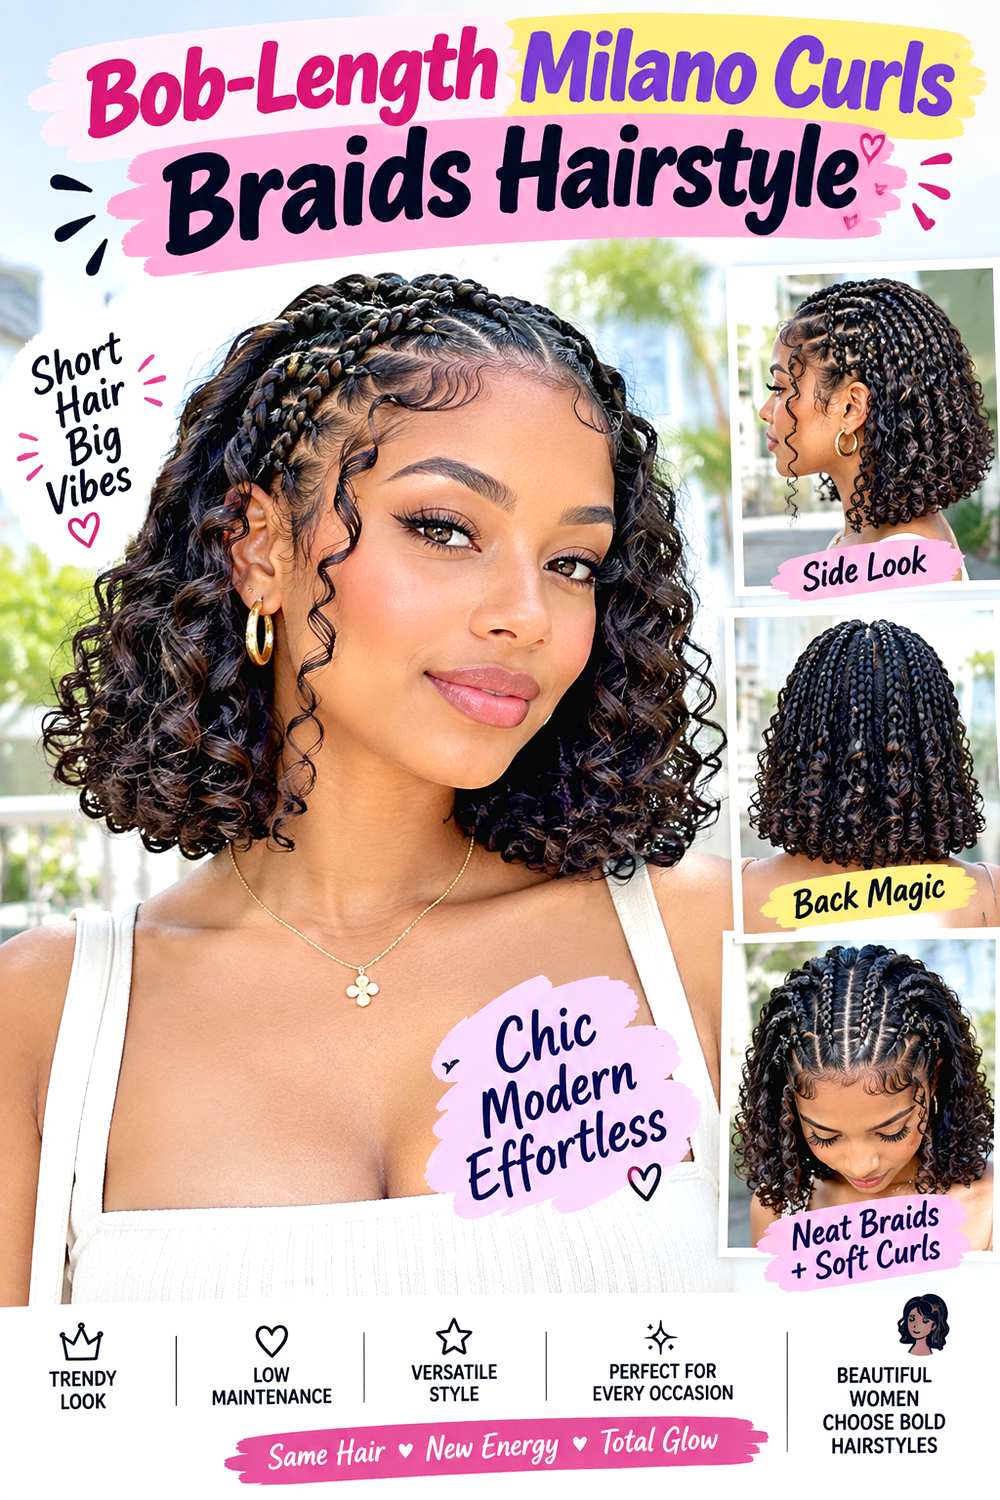
Bob-length Milano curls braids keep the structure close to the head and neck, with ends finishing around the chin or jaw-to-neck area. Loose curls can begin near the cheekbones and continue through the bottom third, giving the compact outline movement without overwhelming it. A center part emphasizes balance, while slightly longer front braids can create subtle framing without needing a haircut underneath.
Shorter length reduces overall weight and makes the curls easy to see, but the placement of the bottom edge matters. Ask your braider to confirm the finished resting length on both sides before completing the installation, especially if the curls will shrink visually after they are released. This scale can suit people who want a protective style that stays clear of the shoulders. Braiding mousse helps keep the small silhouette neat, a light curl cream can define loose pieces, and a satin scarf limits friction around the sides.
Morning maintenance is usually brief because there is less length to separate. A full cleanse may also dry faster than very long braids, although density still affects timing. Pay special attention to curled ends that touch the jaw or collar because repeated contact can make them fuzzy. Reshape only the loose pieces that actually need it instead of coating the full style each day.
Pro tip: After refreshing the curls, arrange the lowest pieces individually while they settle. A few deliberate placements keep the bob outline visible instead of letting all the ends bunch together.
Make It Work for You: If chin length feels too short, extend the braids to the upper neck while keeping the same compact curl placement. The bob-like proportion remains without exposing as much neckline.
Watch Out For: Avoid finishing every curl at exactly the same point. A rigid curly shelf can form; slight staggering keeps the short perimeter soft while preserving the defined length.
Layered Long Milano Curls Braids Hairstyle
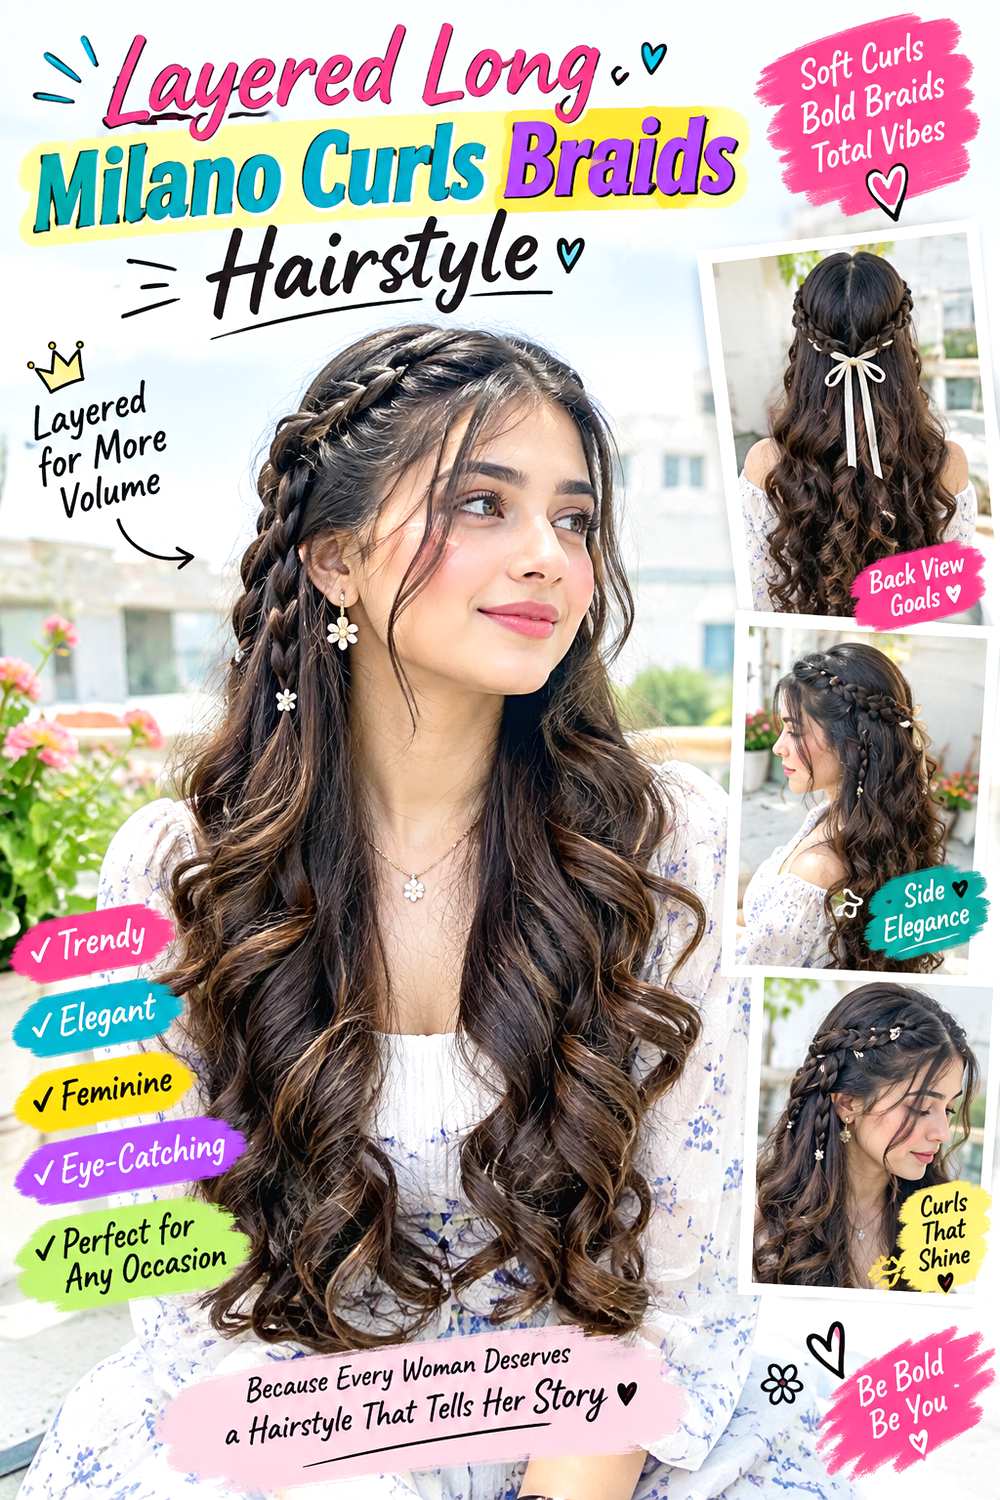
Layering can be created through braid and curl lengths rather than by cutting the natural hair. Here, shorter front and upper pieces blend into longer braids through the back, with loose curls appearing at several levels. The longest sections can reach mid-back or lower, while the front begins around collarbone level. That staggered arrangement gives the style more vertical movement than one uniform curtain of braids.
This variation works well for someone who likes long hair but wants less visual weight around the face. Dense installations need thoughtful placement so shorter pieces do not create excessive width at the upper sides. Explain to your braider exactly where the shortest visible braid-and-curl section should finish and how gradually you want the lengths to change. Curl mousse can support definition, a lightweight braid spray can freshen the braided areas, and a satin bonnet can protect the mixed lengths overnight.
A quick refresh involves separating the shorter curls first because they are most visible from the front. Wash-day care remains a longer process, especially with a full mid-back installation. Keep track of which shorter pieces are intentional; as the style develops frizz, an uneven outline can otherwise look accidental. When removing the braids, remember that the layered effect belongs to the temporary installation unless you separately choose a haircut.
Pro tip: Refresh shorter front curls before the long back pieces. Their placement controls the layered impression, so correcting them first often means the rest needs much less handling.
Make It Work for You: For lower density, keep fewer short sections and concentrate them around the face. The style still appears layered without removing too much visual fullness from the long perimeter.
Watch Out For: Do not ask for random short braids throughout the head. Decide where each visible length change should sit so the layered shape reads as deliberate.
Face-Framing Milano Curls Braids Hairstyle
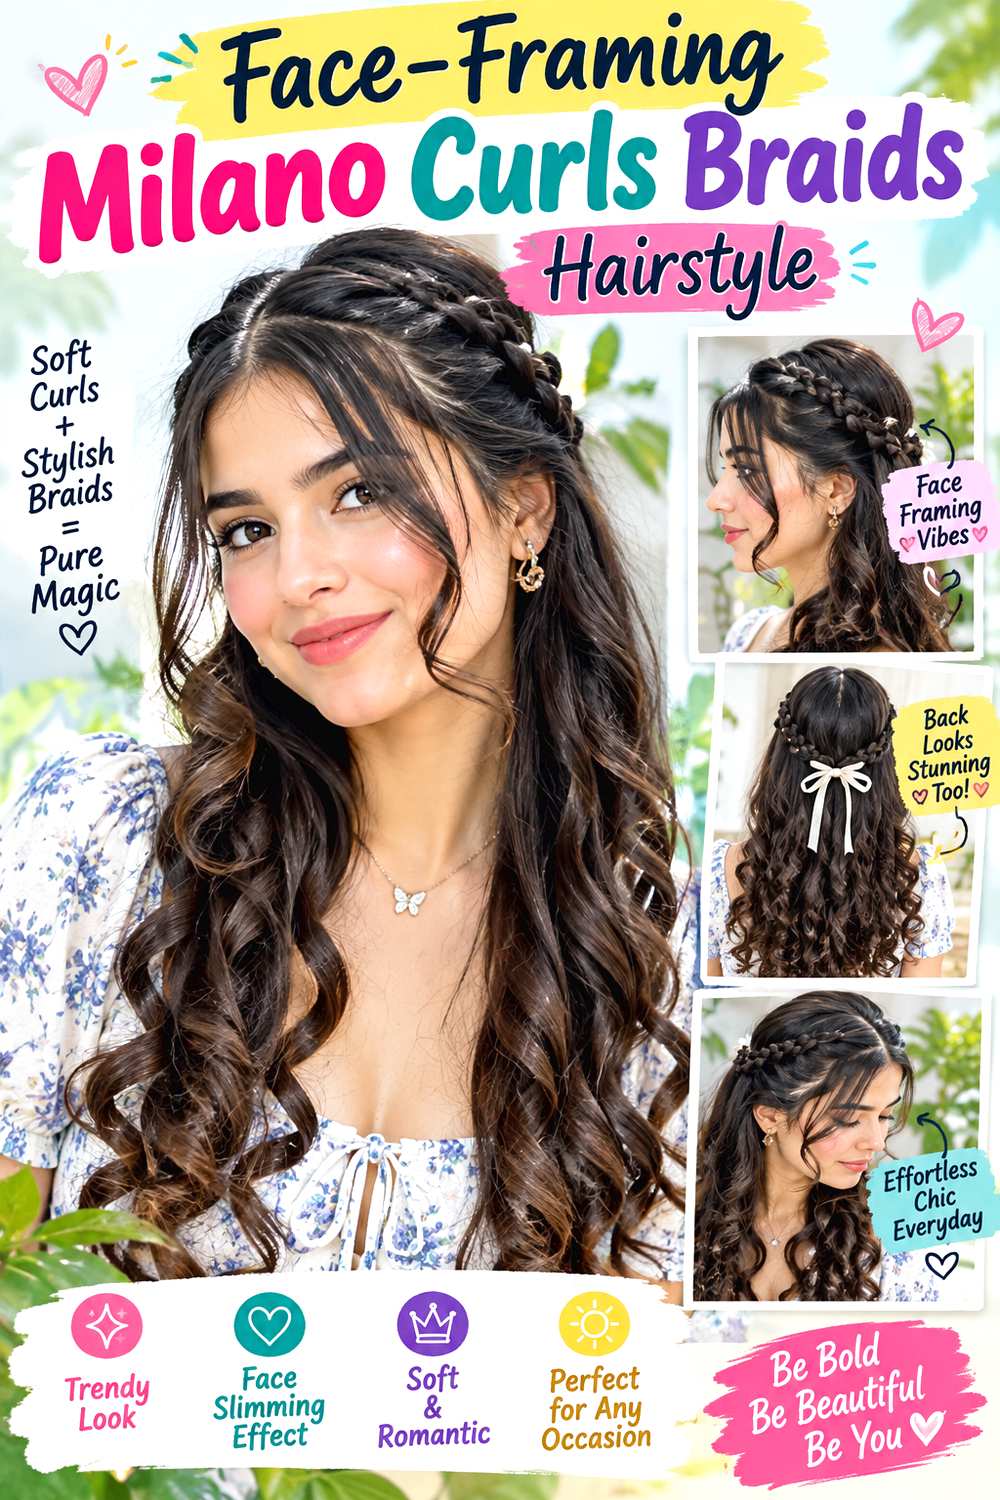
Face-framing curls make the front the main feature while the rest of the braids remain relatively uniform. A center or softly offset part can release one or two curled sections on each side, starting around the cheekbones, jaw, or chin depending on how much front movement you want. The back stays longer and calmer, which keeps the style from becoming overly wide.
This option is useful if you like a clear braided shape but want curls visible even when the hair is pulled behind the shoulders. The front pieces should remain comfortable and proportionate because overly small, heavily weighted braids at the hairline can create unnecessary tension. Ask your braider to show where the face-framing curls will begin when finished rather than choosing the point only by braid length. A lightweight curl foam can define the front pieces, braid mousse can neaten the roots, and a satin scarf can protect the hairline at night.
A morning refresh can focus almost entirely on the few curls around the face, often making it quicker than reworking a curl-heavy installation. Washing is a separate task and requires complete drying. As the roots grow out, the front pieces may shift direction; gently reposition them rather than repeatedly tightening the base. Replace or reshape a loose curl when it stops blending with the surrounding pattern.
Pro tip: Let the face-framing curls fall naturally before deciding where to separate them. Over-dividing a single curl can create frizz exactly where the style is most visible.
Make It Work for You: If you prefer less volume beside the cheeks, begin the loose front curls near the jaw or chin. You keep the framing effect while moving fullness lower.
Watch Out For: Avoid making the front curls much shorter than the surrounding braids without checking the finished result. Too large a length jump can interrupt the intended blend.
Deep Side-Part Milano Curls Braids Hairstyle

A deep side part moves the visual center of the hairstyle away from the middle, creating stronger asymmetry than a standard side part. Longer braids can fall across the forehead-side area before opening into curls through the lower lengths. Keeping the curl pattern more generous on the fuller side reinforces the direction, while the lighter side stays relatively close to the head.
This arrangement can be useful if you enjoy changing where volume sits around the face, but the part should follow a position your roots can tolerate comfortably. Do not force a dramatic direction if it requires constant pulling. Ask your braider where the deep part will begin and how the front sections will lie when the braids are released, since section orientation influences the finished sweep. Use braid mousse for a polished part, a lightweight curl refresher for loose pieces, and a satin scarf to help the front lie smoothly overnight.
Refreshing the part and front curls can be a short between-wash job. Full cleansing and drying take longer based on length and braid density. As new growth appears, the part may become softer and less defined; that is a normal visual change rather than a reason to keep tightening the roots. Reposition the fuller side periodically if continuous sideways wear starts to feel uncomfortable.
Pro tip: Set the direction after refreshing by laying the fuller side where you want it before tying your scarf. Gentle overnight positioning can reduce the need for tight daytime control.
Make It Work for You: If your natural part resists a very deep placement, use a moderate side part and increase the sweep with curl placement instead. The asymmetry remains visible without fighting growth direction.
Watch Out For: Do not load the fuller side with too many additional curls. Excess width can hide the part entirely; balance strong direction with enough open space near the roots.
Crown-Braided Milano Curls Braids Hairstyle
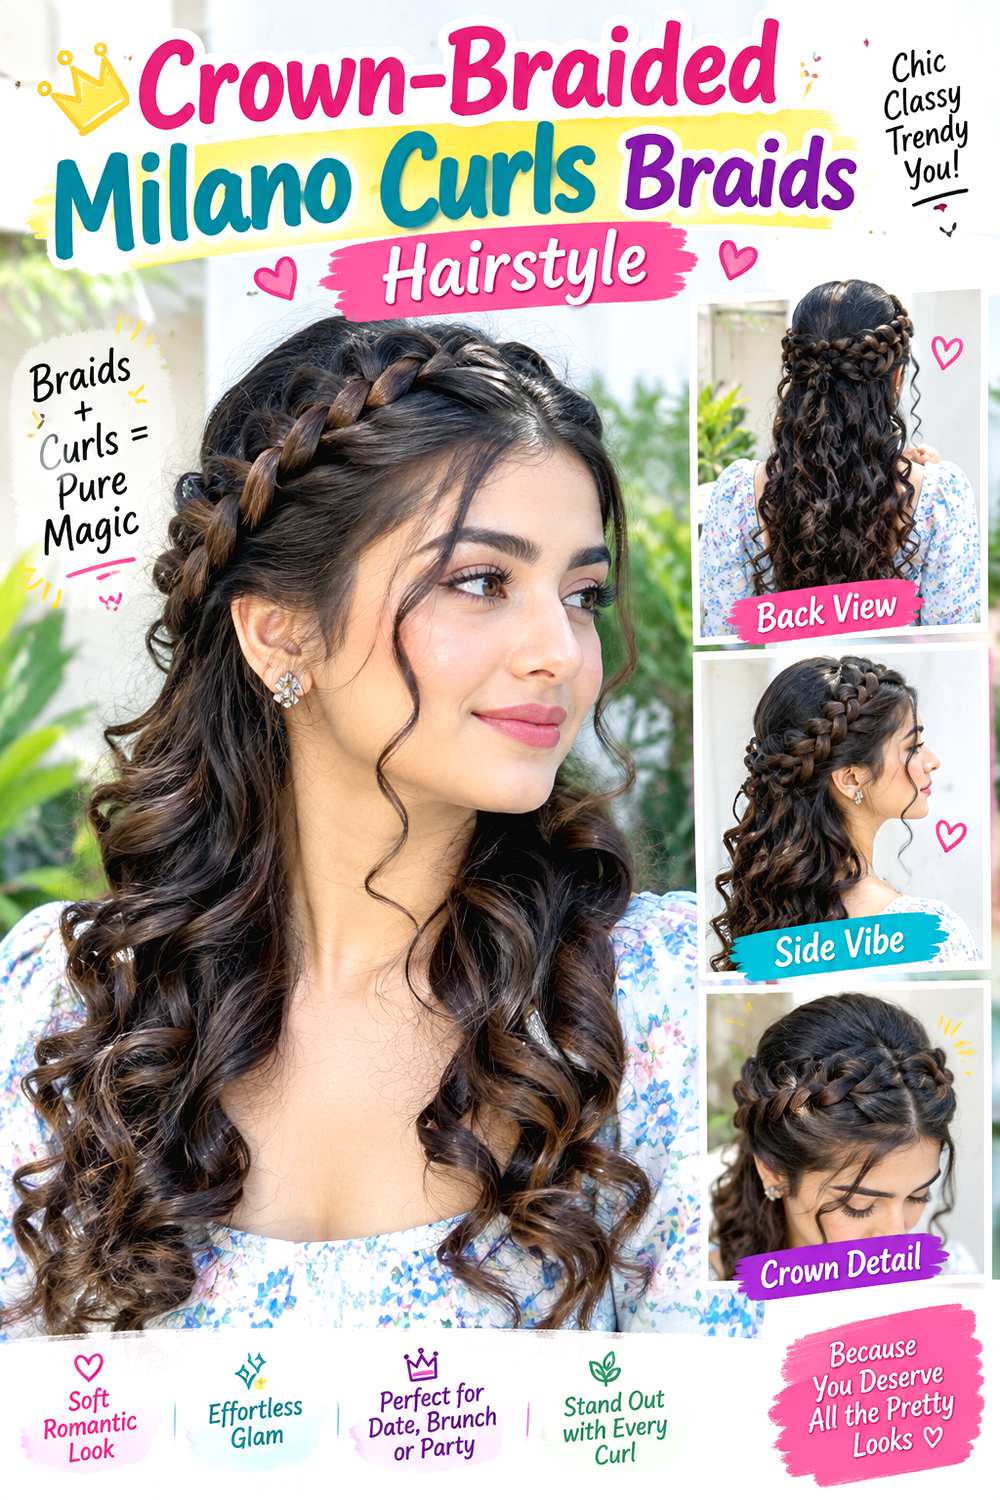
A crown-braided arrangement uses selected braids around the upper head to form a halo-like band while the remaining lengths and curls stay down. The crown can sit just behind the hairline rather than directly on it, which leaves space for a center part or a few loose front curls. Below the braided band, long curled sections provide movement and contrast with the controlled top.
This is a styling variation for an existing braided base, not a reason to cut the underlying hair. Medium or small braids are often easier to wrap smoothly because several pieces can be combined without creating an oversized ridge. Ask your braider to keep the original installation flexible around the crown if you plan to wear wrapped styles regularly. Bobby pins can secure the crown, braid mousse can smooth the wrapped surface, and curl foam can refresh the lengths left down.
Forming the crown may take several minutes once you know which braids fit the path. A full wash-day routine is longer and should include thorough drying before wrapping anything closely against the scalp. Remove the pinned crown before sleep unless the arrangement remains completely loose and comfortable. If pins repeatedly press one spot, move the anchor slightly rather than adding more pressure.
Pro tip: Build the crown with a few neighboring braids at a time and pin each section before adding the next. Smaller controlled anchors keep the band flatter and easier to adjust.
Make It Work for You: With jumbo braids, create a partial crown from two or three sections instead of a full wrap. You preserve the halo effect without stacking excessive thickness around the head.
Watch Out For: Avoid crossing pins directly where they press into the scalp. Secure them through the braided structure, and reposition any anchor that causes discomfort instead of forcing it deeper.
Low Bun Milano Curls Braids Hairstyle

A low bun gathers the braids at the nape while leaving selected curls visible around the bun or near the face. The part can remain centered for a balanced finish or shift slightly to one side for softer asymmetry. Rather than hiding every end, allowing a few curled lengths to sit outside the bun keeps the defining curl-and-braid contrast visible.
This arrangement is useful for occasions when you want the hair secured without lifting all its weight to the crown. Very long or dense braids can create a large bun, so the most comfortable shape may use only part of the length wrapped around the base. Ask your braider to consider nape comfort and flexible braid direction if low updos will be frequent. A fabric-covered elastic can establish the base, bobby pins can secure wrapped sections, and flexible hairspray can control small flyaways without making the curls rigid.
Turning an existing installation into a low bun is a relatively quick styling step, while washing and fully drying the braids is a much longer process. Take the bun down at night to prevent repeated pressure at the nape. Check tucked curls after release, since some may need gentle reshaping before wearing the braids loose again.
Pro tip: Form the bun loosely first, then pin only the sections that need support. This lets you judge size and balance before creating unnecessary tension at the nape.
Make It Work for You: For very long braids, leave part of the curled length in a low ponytail beneath a smaller bun. The shape stays controlled without forcing every strand into one coil.
Watch Out For: Do not keep adding pins when the bun feels heavy. Reduce the amount wrapped into the bun or place it slightly higher so the weight is better distributed.
High Bun Milano Curls Braids Hairstyle

A high bun concentrates the braids near the top of the head, with loose curled ends either tucked selectively or allowed to spill around the bun. Leaving two narrow curls near the front can connect the compact updo to the original Milano curl texture. The bun should look full without requiring every braid to be wrapped tightly against the scalp.
The style is easiest with an installation light enough to lift comfortably. Waist-length jumbo braids can create substantial weight, so a high bun may be better for shorter or medium-size braids. Tell your braider that high updos are important to you and ask for comfortable tension and a braid direction that can move upward without strain. A wide fabric-covered elastic can support the base, bobby pins can control the outer wrap, and light braid mousse can smooth visible fuzz.
Creating the bun may take only several minutes after the braids are installed, but it should not become an all-day choice if the roots start aching. Full wash-day care remains separate and slower. Take the bun down before sleeping so the scalp can relax and the curls are not crushed overnight. After release, shake the lengths gently and reshape only the curls that lost definition.
Pro tip: Gather the bun slightly behind the highest point of the head rather than directly above the forehead. The position can feel more balanced while still reading as a high updo.
Make It Work for You: If your installation feels too heavy for a full bun, make a half-up high bun and leave the lower braids down. You retain height with less lifted weight.
Watch Out For: Avoid tightening the bun simply to make it look smaller. A compact shape should come from controlled wrapping, not excessive pressure on the hairline or crown.
Medium Box Milano Curls Braids Hairstyle
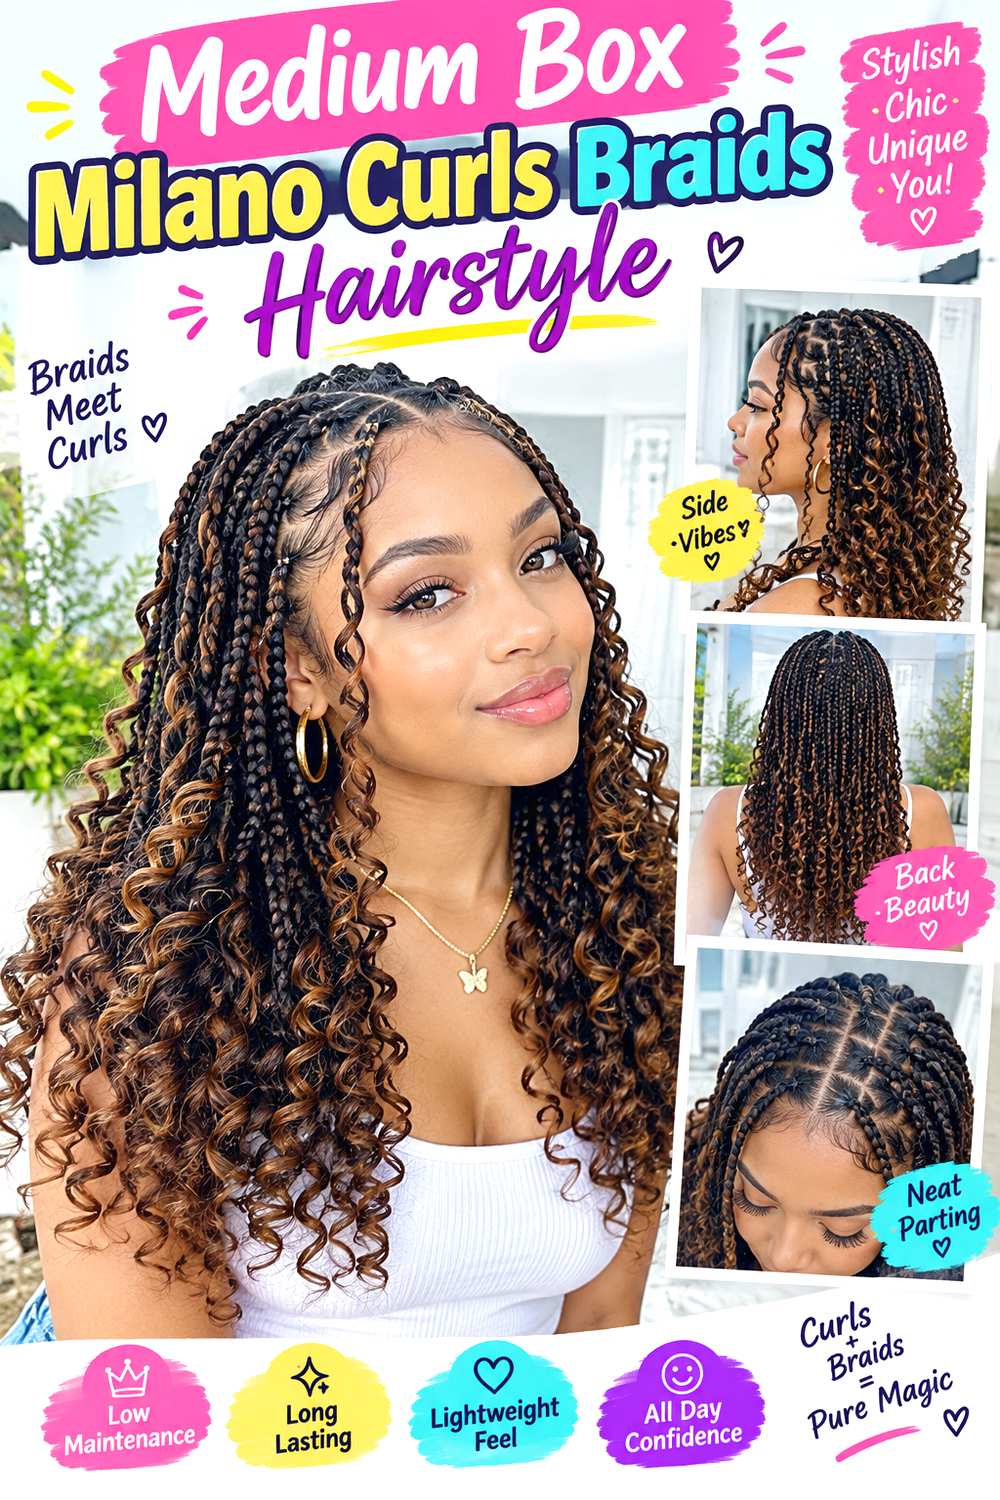
Medium box sections create a clear geometric base without the installation becoming as bold as jumbo braids or as intricate as very small ones. The braids can fall to mid-back, with loose curls distributed through the lower half and a few beginning near the jaw. A center part highlights the section pattern, while softly separated ends keep the shape from looking too rigid.
This size offers a useful middle ground for readers who want visible braids with enough flexibility for ponytails, buns, and side sweeps. Density still matters: more sections and greater length increase total weight even when each braid is moderate in size. Ask your braider to keep the boxes proportionate around the hairline rather than forcing the same section size everywhere. Braiding mousse can neaten the base, a lightweight curl spray can refresh loose strands, and a satin bonnet can reduce friction during sleep.
A quick refresh often means addressing only the front and most exposed curls. Full washing takes longer because the braided sections need thorough rinsing and drying. As the roots grow, the box pattern will become less crisp; decide whether you enjoy that softer stage rather than repeatedly trying to mimic fresh-install tension. Keep curled pieces separated enough to move, but avoid constant handling that creates frizz.
Pro tip: Refresh curls in alternating sections rather than wetting every loose piece together. This helps maintain separation and prevents the lower half from drying as one large tangled mass.
Make It Work for You: If you want a lighter result, keep the medium box scale but shorten the braids to shoulder or chest length. The geometric sectioning remains visible with less total weight.
Watch Out For: Do not judge section size only from the back. Ask for slightly adjusted boxes near the temples and edges when needed so the hairline is not overloaded.
Short Lob Milano Curls Braids Hairstyle

A lob-length version finishes around the shoulders or just below them, sitting between a compact bob and a long braid installation. The front can be slightly longer than the back for a gentle elongated outline, while curls begin around the jaw and become fuller toward the ends. A center part keeps the shape clean, though a soft side part can add movement without changing the length.
This is a manageable option for someone who likes visible curl detail but does not want waist-length hair. Because the braids rest near collars and shoulders, the ends experience more rubbing than longer sections that fall past clothing edges. Ask your braider to confirm whether you want the finished perimeter above, directly on, or below the shoulders; a small length difference changes how often the curls contact clothing. Use braid mousse to smooth the base, curl foam to reshape loose ends, and a satin scarf to reduce overnight friction.
A morning refresh is usually short because the style has limited length, while wash-day drying still varies with density. Check the underside near the nape for fuzz and tangles, where movement against clothing is greatest. The lob silhouette should remain recognizable as the roots grow, even if the parting becomes less crisp.
Pro tip: When wearing jackets or high collars, bring the curled ends forward instead of trapping them beneath the fabric. Less rubbing can help the lower shape remain cleaner between refreshes.
Make It Work for You: If your neck and shoulders feel crowded by curls, finish the braids slightly above the shoulder line. You keep the lob proportion while reducing constant contact with clothing.
Watch Out For: Avoid choosing the final length while the braids are stretched straight if curls will change the visual endpoint. Discuss the intended finished outline with the curls in mind.
Curly-Ends Milano Curls Braids Hairstyle
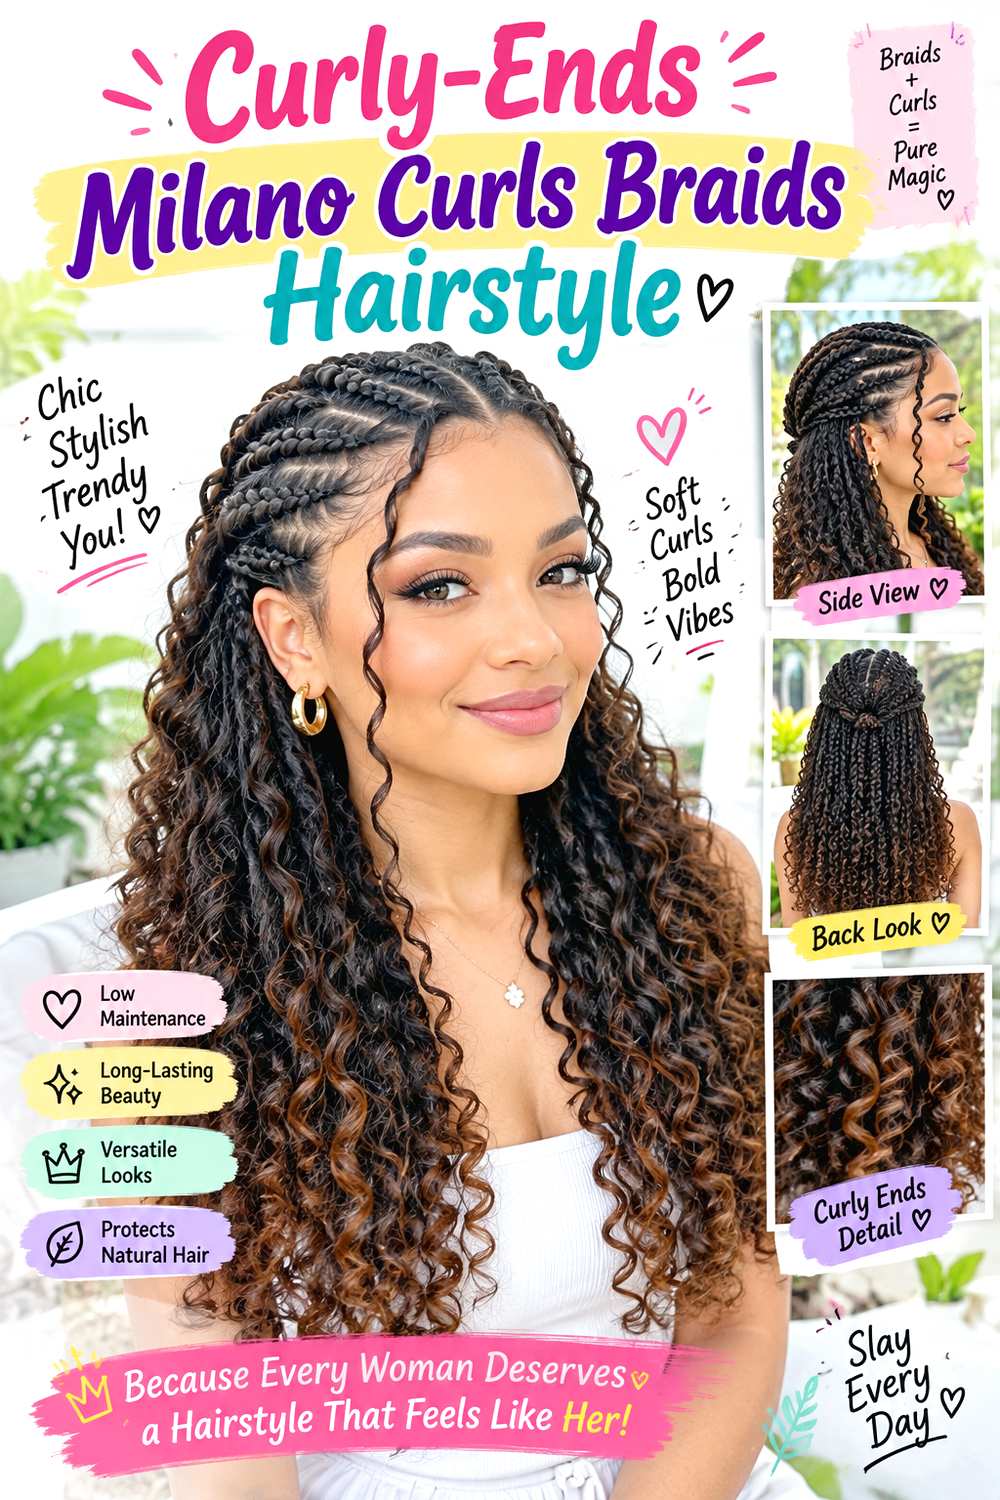
Curly ends concentrate the loose texture at the bottom rather than scattering curls from the roots downward. Most of each braid remains intact through the upper and middle lengths, then transitions into a fuller curled section near the lower third. A middle part gives the long braided lines a clean starting point, while the gathered curls create visible bounce and width near the ends.
This design suits someone who wants the braided base to stay dominant while still getting a noticeable curl finish. It can also make daily root maintenance simpler because there are fewer loose strands higher in the style. Ask your braider where you want the braid-to-curl transition to begin; starting at chest level produces a different balance from keeping curls only at the last several inches. Curl mousse can define the ends, lightweight braid spray can freshen the braided lengths, and a satin bonnet can protect the lower curls overnight.
A quick refresh focuses almost entirely on the ends and can be relatively brief. A full wash requires more patience because both the braids and denser curl section need complete drying. Keep the bottom separated into several loose groups during sleep so the curls do not knot together. When frizz increases, refresh selectively instead of repeatedly coating every end.
Pro tip: After applying a small amount of mousse, separate the curl section into several clusters and let each settle individually. Defined groups maintain movement better than one compressed bundle.
Make It Work for You: For shorter braids, begin the curls a little higher so there is enough loose texture to notice. Keep most of each braid intact to preserve the defining contrast.
Watch Out For: Do not make the braid-to-curl transition identical on every strand. Slight variation prevents a hard horizontal line and lets the curly finish blend more naturally.
Conclusion
Milano curls braids hairstyles can feel very different depending on where the curls begin, how large the braids are, and where the finished length sits. A short bob or lob keeps weight controlled, while mid-back and waist-length options create more movement but require extra drying and nighttime management. Small braids offer detail; jumbo braids create a stronger pattern with fewer sections. Center parts feel balanced, while deep side parts and swept styles shift volume deliberately. Updos add another styling option without requiring a new haircut. Choose according to your natural hair, density, comfort with tension, preferred curl volume, and daily routine rather than selecting length or fullness from appearance alone.
Before Your Salon Visit
Choose one or two favorites and save references that clearly show the braid size, curl placement, parting, and finished length you want. Explain your natural texture, density, scalp comfort, usual routine, and how long you realistically want to spend maintaining the loose curls. Point out the exact features you like, such as jaw-level framing, a low-volume crown, fuller curly ends, or a particular braid width. For updo ideas, discuss comfortable tension and where you expect to gather the braids.
FAQs
How Do I Keep Milano Curls Braids From Tangling?
Protect the loose sections during sleep and separate developing tangles gently rather than pulling through a large group at once. Concentrate on the curled pieces because they usually have more opportunities to catch than the braided lengths. The amount of maintenance will depend on curl placement, length, and daily friction.
Can Milano Curls Braids Work With Dense Hair?
Yes, but the total braid count, added hair, section size, and finished length should be planned together. Dense hair does not automatically require tiny sections or aggressive bulk reduction. Ask your braider to balance the desired fullness with comfortable tension and enough room for the loose curls to move.
Do Milano Curls Braids Require Heat Styling?
Not necessarily. The curl method depends on the hair or extension material being used and the finish you want. If heat is part of the chosen method, follow the material’s safe handling requirements and use suitable protection. Many daily refreshes can focus on reshaping and separation rather than repeated heat.
How Long Should I Keep the Same Milano Curls Braids Installed?
There is no single schedule that suits every scalp, braid size, or routine. Removal may make sense when significant new growth affects stability, buildup becomes difficult to manage, loose curls are heavily tangled, or sections begin pulling uncomfortably. Prioritize scalp comfort and the condition of your own hair over stretching the style longer.