19 Milano Curls Braid Hairstyles
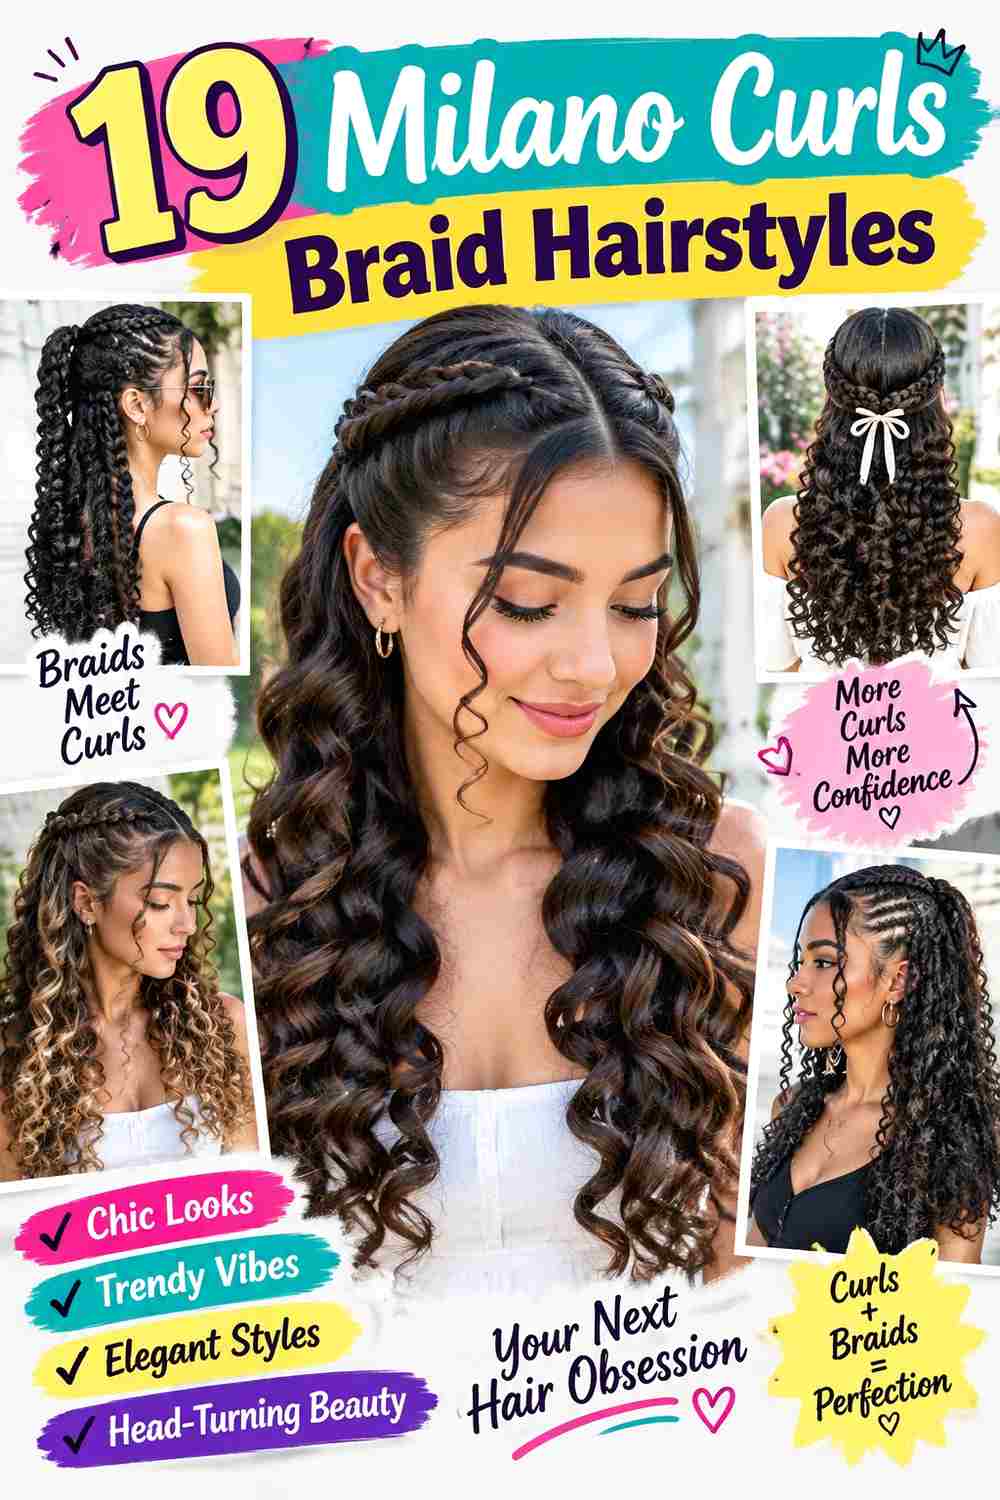
Milano curls braid hairstyles combine defined braids with loose curled sections, creating a finish that balances structure and movement. The exact appearance can shift considerably: curls may fall mainly at the ends, appear between braids, frame the face, or become the dominant feature through the lengths. Braid size, parting, overall length, and the amount of loose texture determine whether the result feels compact and controlled or full and flowing.
The design can be adjusted for different hair densities, preferred lengths, and styling routines. Smaller braids create more individual movement, while larger sections make the braid pattern easier to see. Loose curls need enough space to keep their shape rather than becoming tangled among tightly packed braids. Face-framing pieces can also be positioned higher or lower depending on where you prefer softness around the forehead, cheeks, or jaw.
Installation is the larger time commitment, while everyday styling can be much simpler. Curl definition may need periodic refreshing, and updos require secure anchors without uncomfortable pulling. Before choosing a version, compare braid width, curl placement, total length, parting, weight, and how often you expect to restyle it.
Quick List
- Center Part Milano Curls Braid Hairstyle
- Side Part Milano Curls Braid Hairstyle
- Shoulder Length Milano Curls Braid Hairstyle
- Waist Length Milano Curls Braid Hairstyle
- Small Milano Curls Braid Hairstyle
- Jumbo Milano Curls Braid Hairstyle
- Boho Milano Curls Braid Hairstyle
- Face Framing Milano Curls Braid Hairstyle
- Half Up Milano Curls Braid Hairstyle
- High Ponytail Milano Curls Braid Hairstyle
- Low Ponytail Milano Curls Braid Hairstyle
- Top Knot Milano Curls Braid Hairstyle
- Low Bun Milano Curls Braid Hairstyle
- Crown Milano Curls Braid Hairstyle
- Side Swept Milano Curls Braid Hairstyle
- Layered Milano Curls Braid Hairstyle
- Curly Ends Milano Curls Braid Hairstyle
- Scattered Curls Milano Curls Braid Hairstyle
- Pinned Back Milano Curls Braid Hairstyle
Center Part Milano Curls Braid Hairstyle
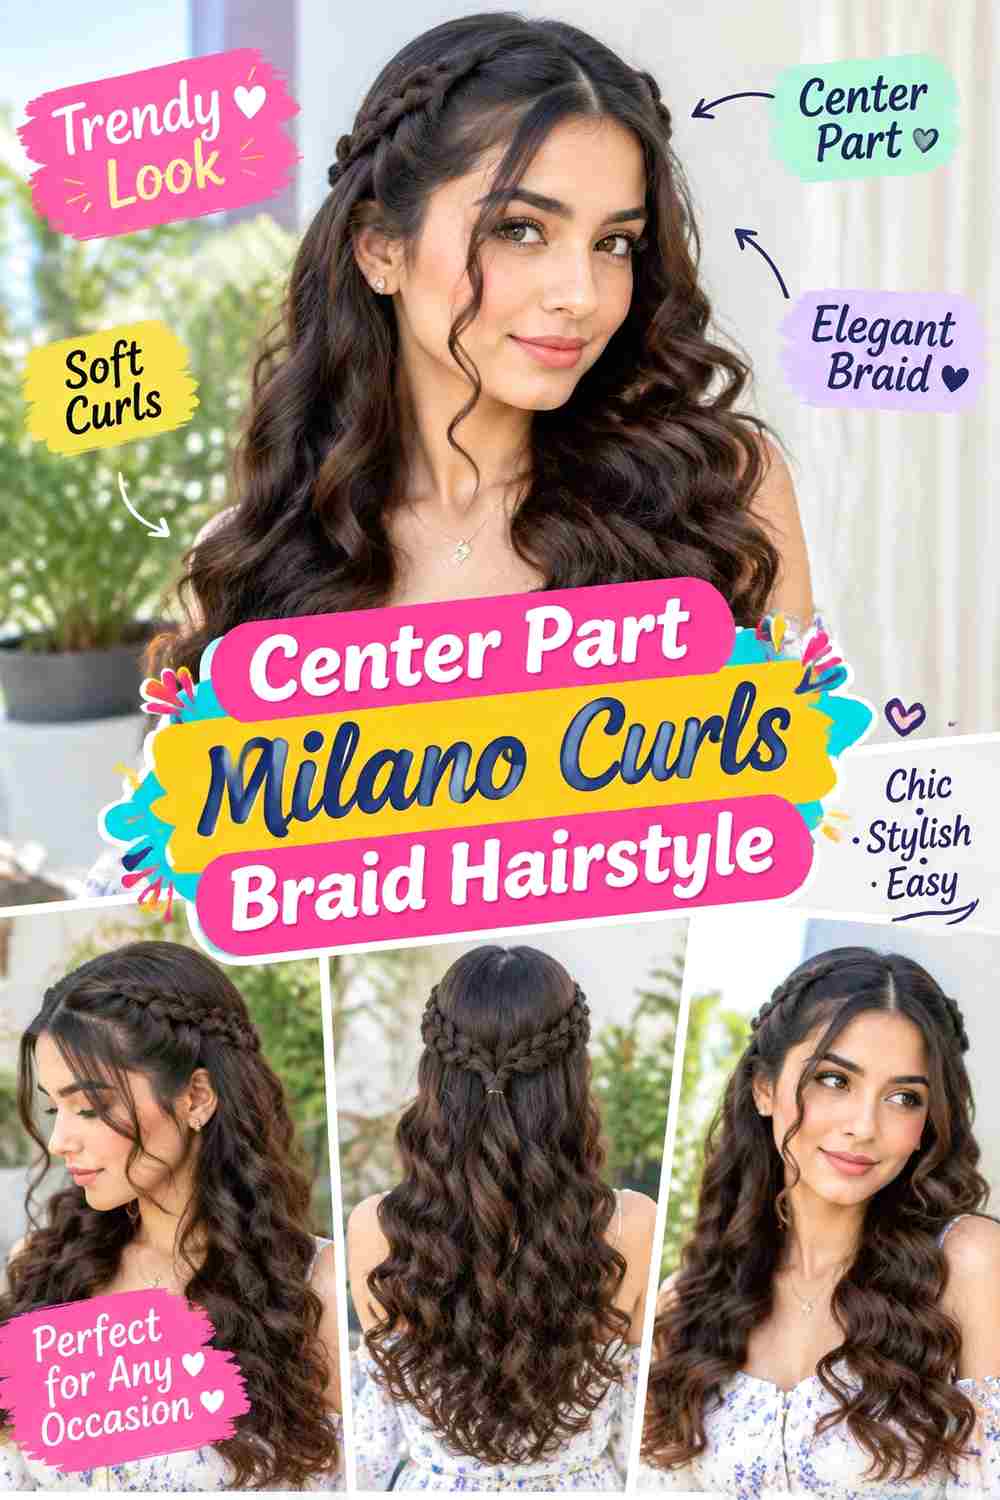
A clean center part gives the braids a balanced starting point, while loose curls interrupt the structured lengths with softer movement. Medium-width braids can fall evenly on both sides, with curled pieces appearing between them from around cheek or shoulder level downward. Keeping the roots neat and the curl distribution reasonably balanced makes the central division especially visible.
This arrangement is useful when you regularly switch between wearing your hair forward and behind your shoulders. Density affects how many braids and loose curls feel comfortable, so discuss section size rather than aiming for maximum fullness automatically. For daily care, lightweight braid mousse, a satin scarf, and curl refresher spray can help settle surface fuzz, reduce friction overnight, and revive loose pieces without saturating the entire style.
Installation is the major time commitment; a morning reset should usually focus only on curls or braids disturbed during sleep. Ask your braider to keep the center line straight and choose braid sections that create comfortable tension around both sides of the part. Refresh curls when they lose separation rather than repeatedly manipulating every loose strand. If the roots become uncomfortable, loosening the styling arrangement matters more than forcing the braids into a tighter position.
Pro tip:
Before tying the braids back, leave the first sections on either side of the center part free. This preserves the balanced front and prevents a simple ponytail from hiding the defining parting.
Make It Work for You:
For lower-density hair, choose moderate braid spacing and fewer loose curl pieces around the front. The center part remains clear while the overall design avoids depending on excessive added fullness.
Watch Out For:
Do not pull both sides tightly away from the center line every day. Repeated tension can make the roots uncomfortable; use looser positioning and let the front braids fall naturally when possible.
Side Part Milano Curls Braid Hairstyle
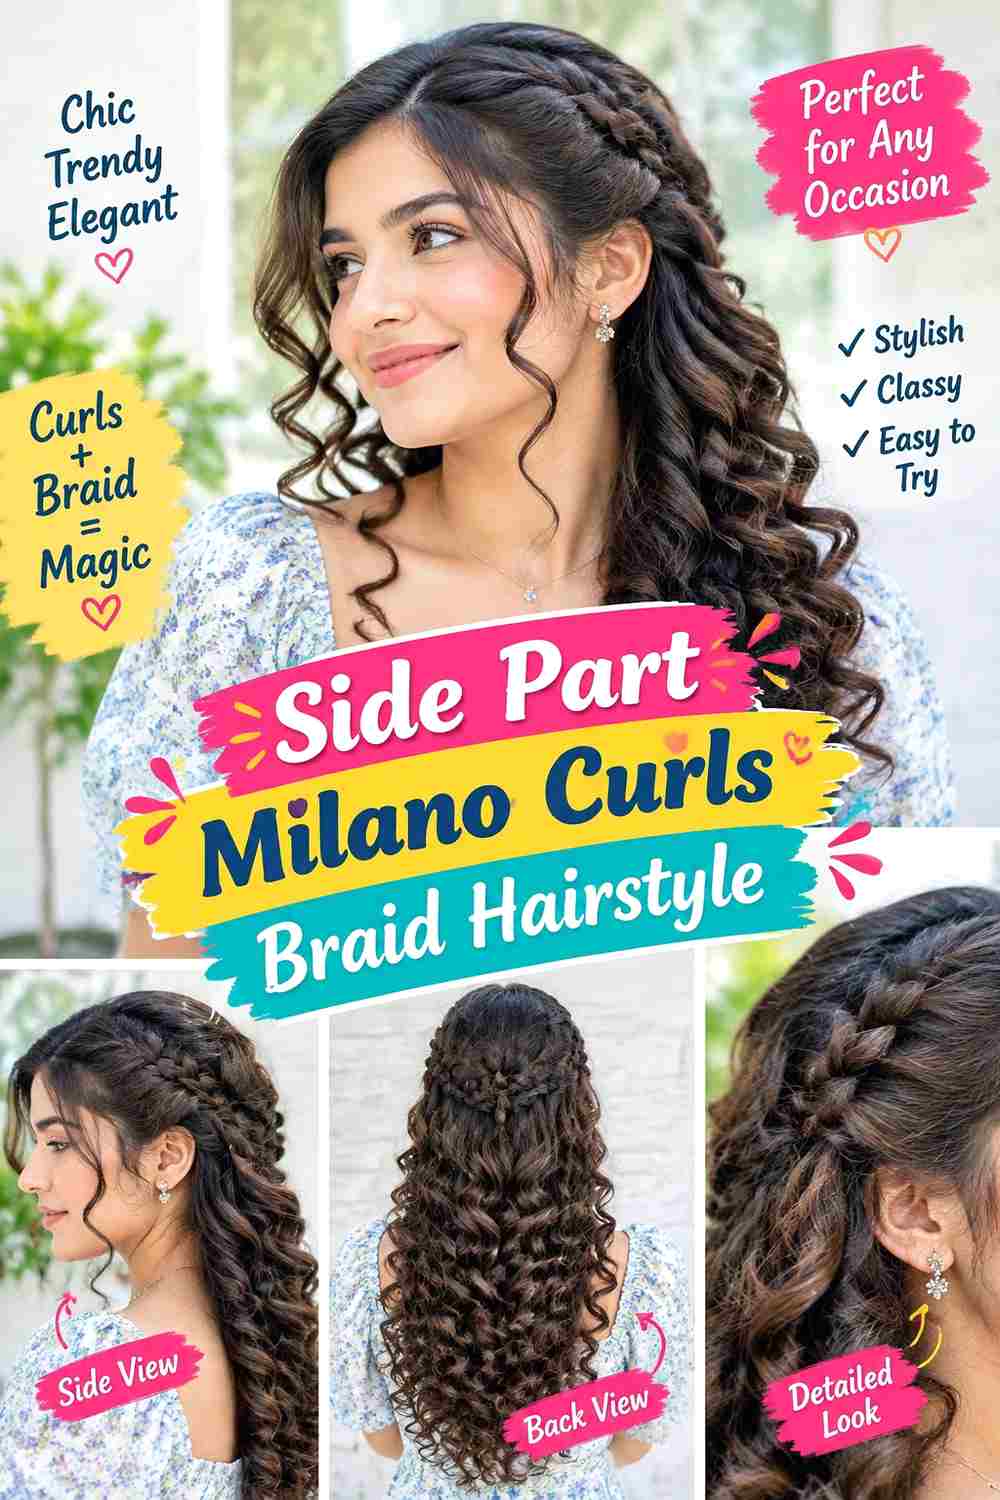
Moving the part to one side changes the entire balance of Milano curls. More braids sweep across one side of the forehead, while the opposite side appears cleaner and less full. Loose curls can begin near the cheek on the heavier side and continue through the lengths, creating movement without covering the part completely. Medium braids make the directional effect easy to see.
A side part works well when you prefer an asymmetrical front or regularly wear your braids over one shoulder. The best placement should respect how comfortably the sections sit at the scalp rather than forcing an extreme division. Braid mousse, curl refresher spray, and a wide satin bonnet are useful for smoothing light frizz, restoring curl shape, and reducing overnight rubbing.
Daily styling can be brief if the part remains intact; usually the loose curls need more attention than the braids. Installation takes much longer, and changing a fixed braided part later is not as simple as moving loose hair. Show your braider exactly how deep you want the division and which side should carry more visual weight. If you frequently alternate sides, ask about a sectioning pattern that offers more flexibility instead of committing to a very rigid sweep.
Pro tip:
When wearing the heavier side forward, separate two or three curls from the braid mass with your fingers. This keeps the loose texture visible instead of allowing it to disappear beneath the larger sweep.
Make It Work for You:
If you dislike substantial hair across your forehead, place the side part closer to center. You still gain asymmetry and directional movement without concentrating too much weight over one side of the face.
Watch Out For:
Avoid repeatedly forcing a deeply parted installation toward the opposite side. The root sections may resist and feel uncomfortable; work with the established sectioning or choose a more flexible part from the start.
Shoulder Length Milano Curls Braid Hairstyle
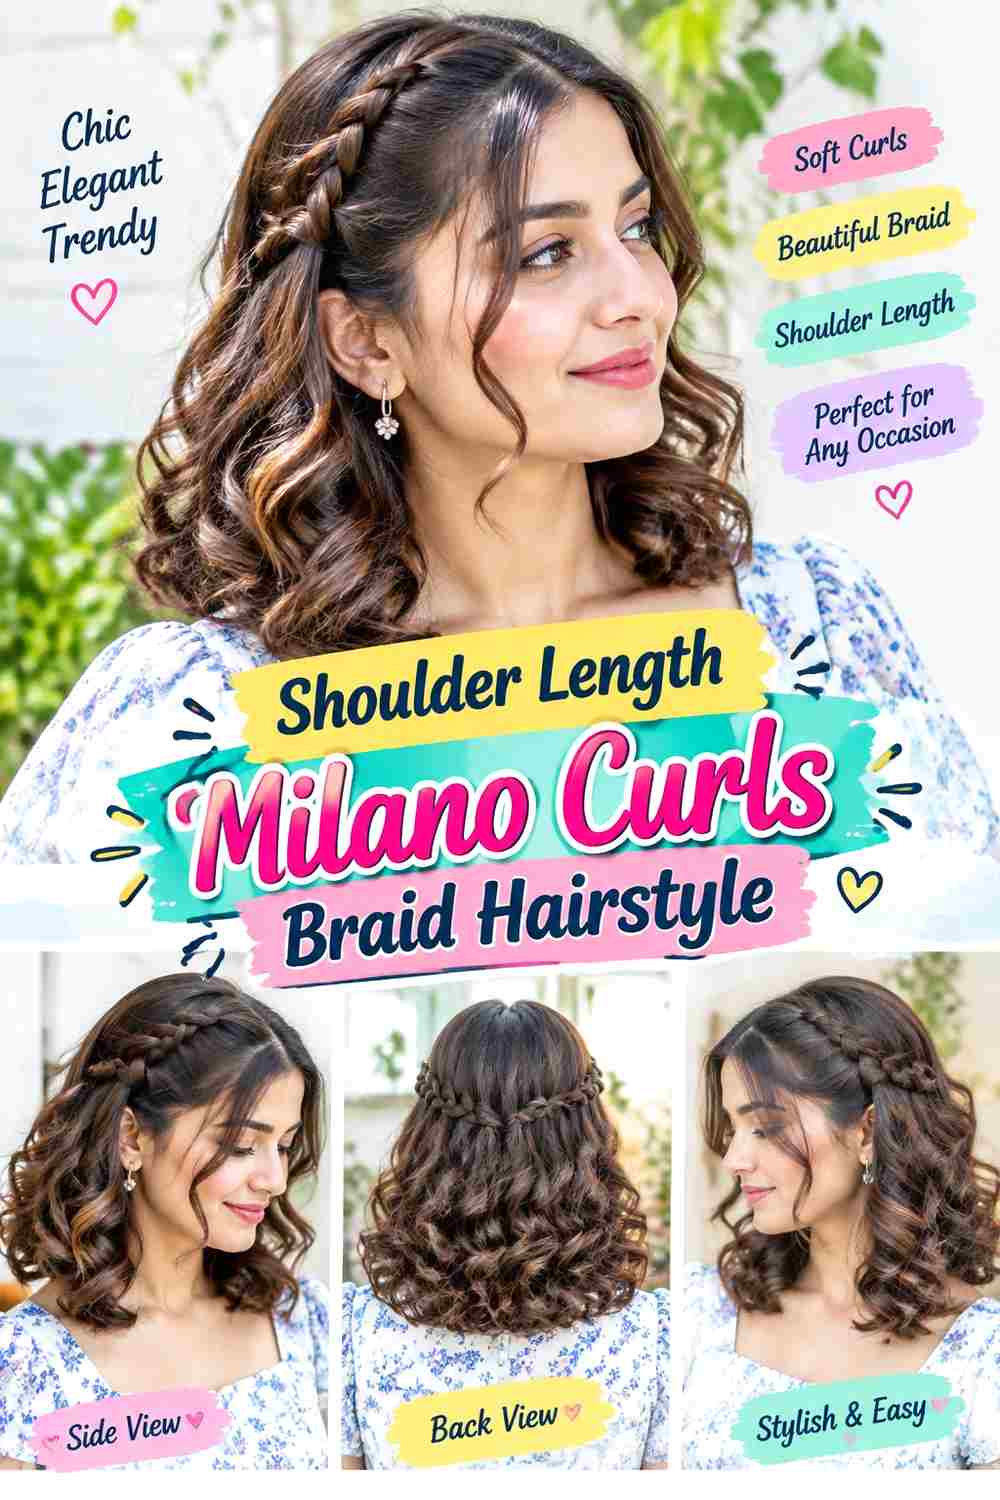
Stopping the braids around the shoulders creates a lighter-looking version with plenty of visible movement near the ends. The shorter length allows curls to sit around the neck and shoulders rather than forming a long curtain down the back. Medium braids with curled ends or scattered loose pieces keep the silhouette open, and either a center or soft side part can work.
This length can suit readers who want Milano curls without managing very long braids during sleep, exercise, or everyday dressing. Curl placement matters because a high concentration around the shoulders can become bulky. Ask for enough separation to let individual curls move. Light braid mousse, curl refresher spray, and a satin scarf can manage surface fuzz, revive dry-looking curl definition, and reduce overnight friction.
Installation remains more involved than a daily refresh, but the shorter finished length can be quicker to gather and arrange. Most mornings may require only separating compressed curls with your fingers. Tell your braider where you want the finished braids and curls to land, especially because curled sections can appear shorter than straight ones. Maintenance should prioritize keeping the ends separated rather than repeatedly brushing through them and disturbing their pattern.
Pro tip:
After sleeping, gently separate curls where they bunch against the shoulders. Work from the ends upward with your fingers so you restore movement without unnecessarily disturbing the nearby braided sections.
Make It Work for You:
If you prefer less volume around the neck, keep more sections braided through their ends and use fewer loose curls. You preserve the Milano texture while creating a narrower shoulder-level silhouette.
Watch Out For:
Do not choose finished length based only on stretched curl pieces. Curl contraction changes where the style appears to end, so confirm the desired visual length rather than relying on one straight measurement.
Waist Length Milano Curls Braid Hairstyle
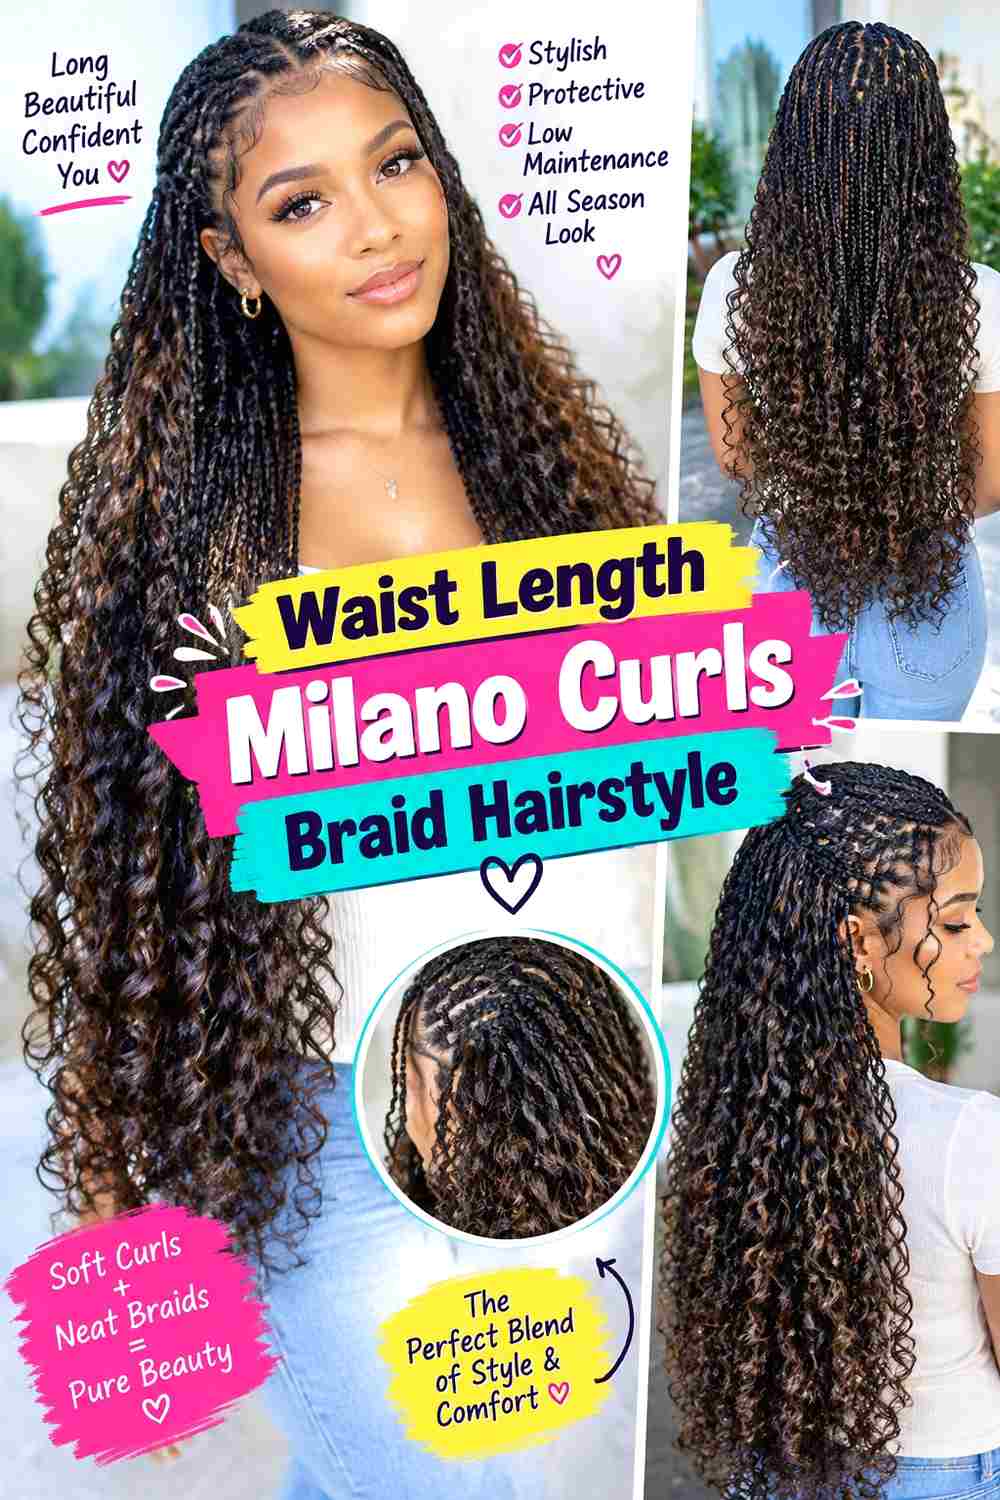
Long braids extending toward the waist give Milano curls a flowing silhouette with plenty of room for loose texture. Curls can begin around the chest and continue downward, or appear intermittently between braided lengths. Keeping the root area more controlled allows the lower movement to stand out. A center part creates balance, while a side part can make the long sections sweep dramatically across one shoulder.
Length adds styling possibilities but also increases weight and the amount of hair that must be managed during sleep and daily activities. Discuss braid width, added-hair quantity, and comfortable tension before installation rather than judging fullness only by appearance. Light braid mousse, a large satin bonnet, and curl refresher spray can control minor fuzz, contain the long style overnight, and revive individual loose sections.
Installation can be lengthy, while everyday refreshing should be much shorter. Gather the braids loosely rather than repeatedly restyling every curl. Tell your braider the finished length you actually want and discuss how much curl should remain loose below that point. If tangling develops, concentrate on separating affected curls gently instead of combing through the entire style. Long length is most practical when its weight remains comfortable at the scalp.
Pro tip:
For sleep, loosely gather the length before placing it inside a roomy satin bonnet. Keeping the braids contained without folding the curls tightly helps reduce overnight tangling and crushed ends.
Make It Work for You:
If waist-length fullness feels heavy, use medium or slightly smaller braids with a controlled amount of added hair. The long silhouette remains intact while reducing unnecessary bulk through the lengths.
Watch Out For:
Do not assume tighter roots are needed to support extra length. Excessive tension is not better security; comfortable sectioning and an appropriate amount of added hair matter more for a wearable installation.
Small Milano Curls Braid Hairstyle
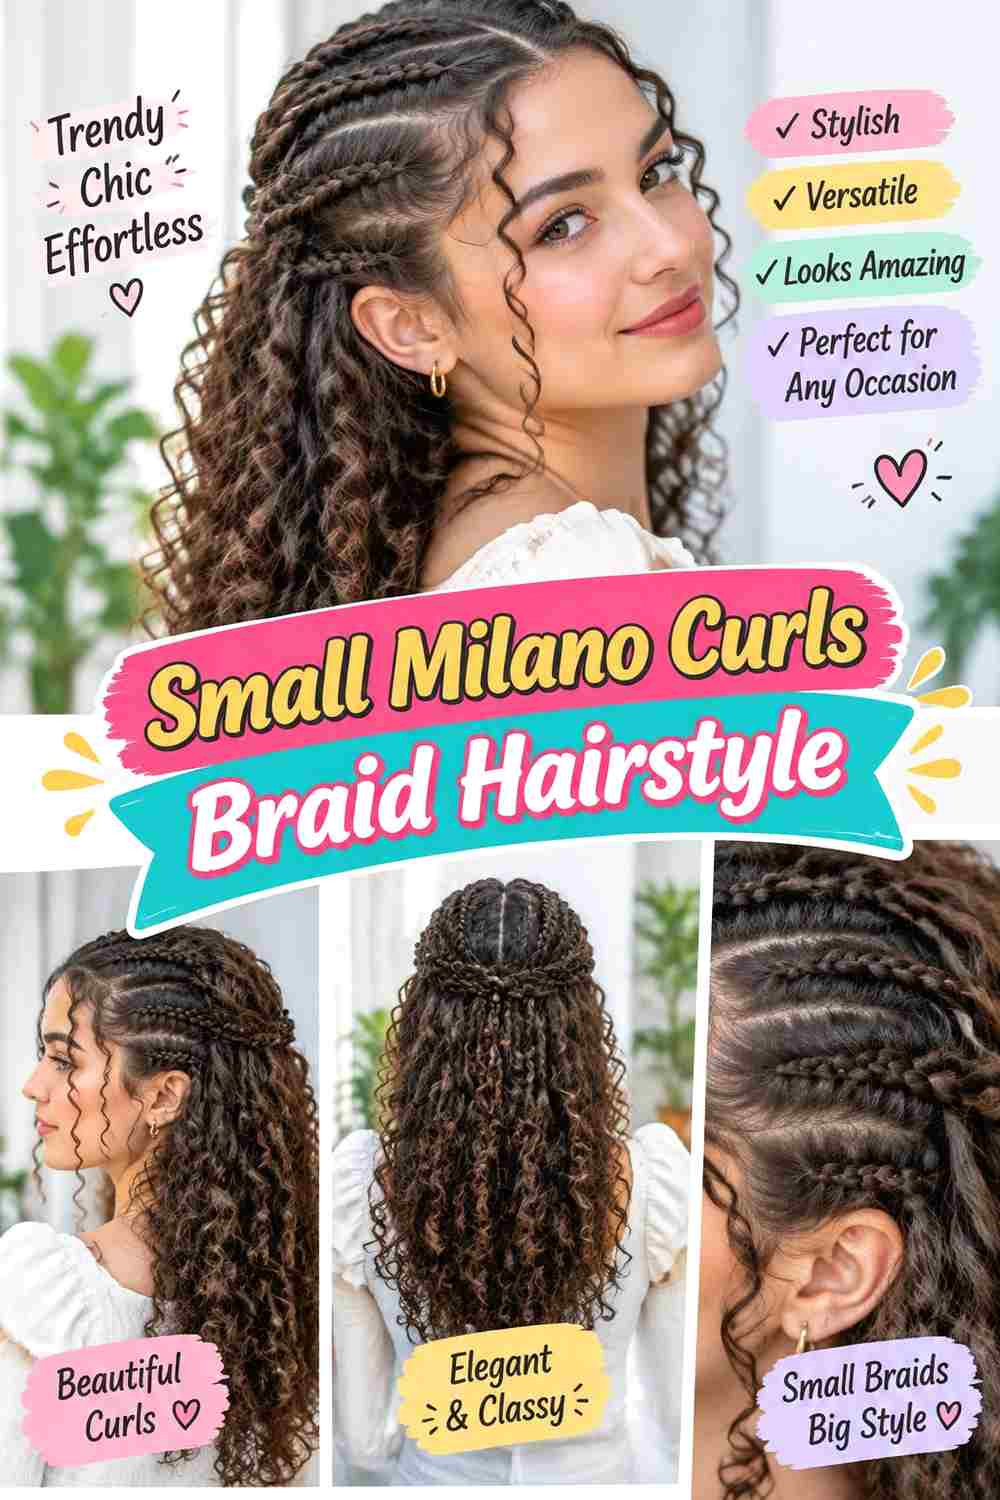
Narrow braids create detailed movement and allow loose curls to appear frequently between the braided sections. Because there are more individual pieces, the style can look especially fluid when worn down. Keeping the curl size moderately defined prevents the loose texture from disappearing among the small braids. A center part or flexible front sectioning can provide a clean contrast to the detailed lengths.
Smaller braids can offer versatile styling, but they also require a more involved installation and more individual sections to monitor during upkeep. The total amount of added hair should remain comfortable rather than becoming heavy simply because the braids are narrow. Use braid mousse, curl refresher spray, and a satin bonnet to settle light frizz, restore selected curls, and protect the numerous sections overnight.
A daily refresh can still be short: focus on visible curls and the front rather than handling every braid. Installation, however, is likely to take substantially longer than a jumbo version. Ask your braider about the intended braid width and comfortable root section size before starting. As the style ages, avoid constantly twisting fuzzy loose pieces into the braids, since that can change the intended balance between fine braid detail and visible curls.
Pro tip:
Divide the hair into a few loose groups before bedtime instead of leaving every small braid completely free. Containing the lengths gently can reduce tangling while preserving movement for the next day.
Make It Work for You:
If you want small braids but less overall fullness, reduce the quantity of loose curl pieces rather than making the roots excessively sparse. The detailed braid pattern remains the main feature.
Watch Out For:
Very small braids combined with excessive added hair can create unnecessary weight. Discuss the full installation, not just braid diameter, so section size, length, and added volume remain comfortable together.
Jumbo Milano Curls Braid Hairstyle
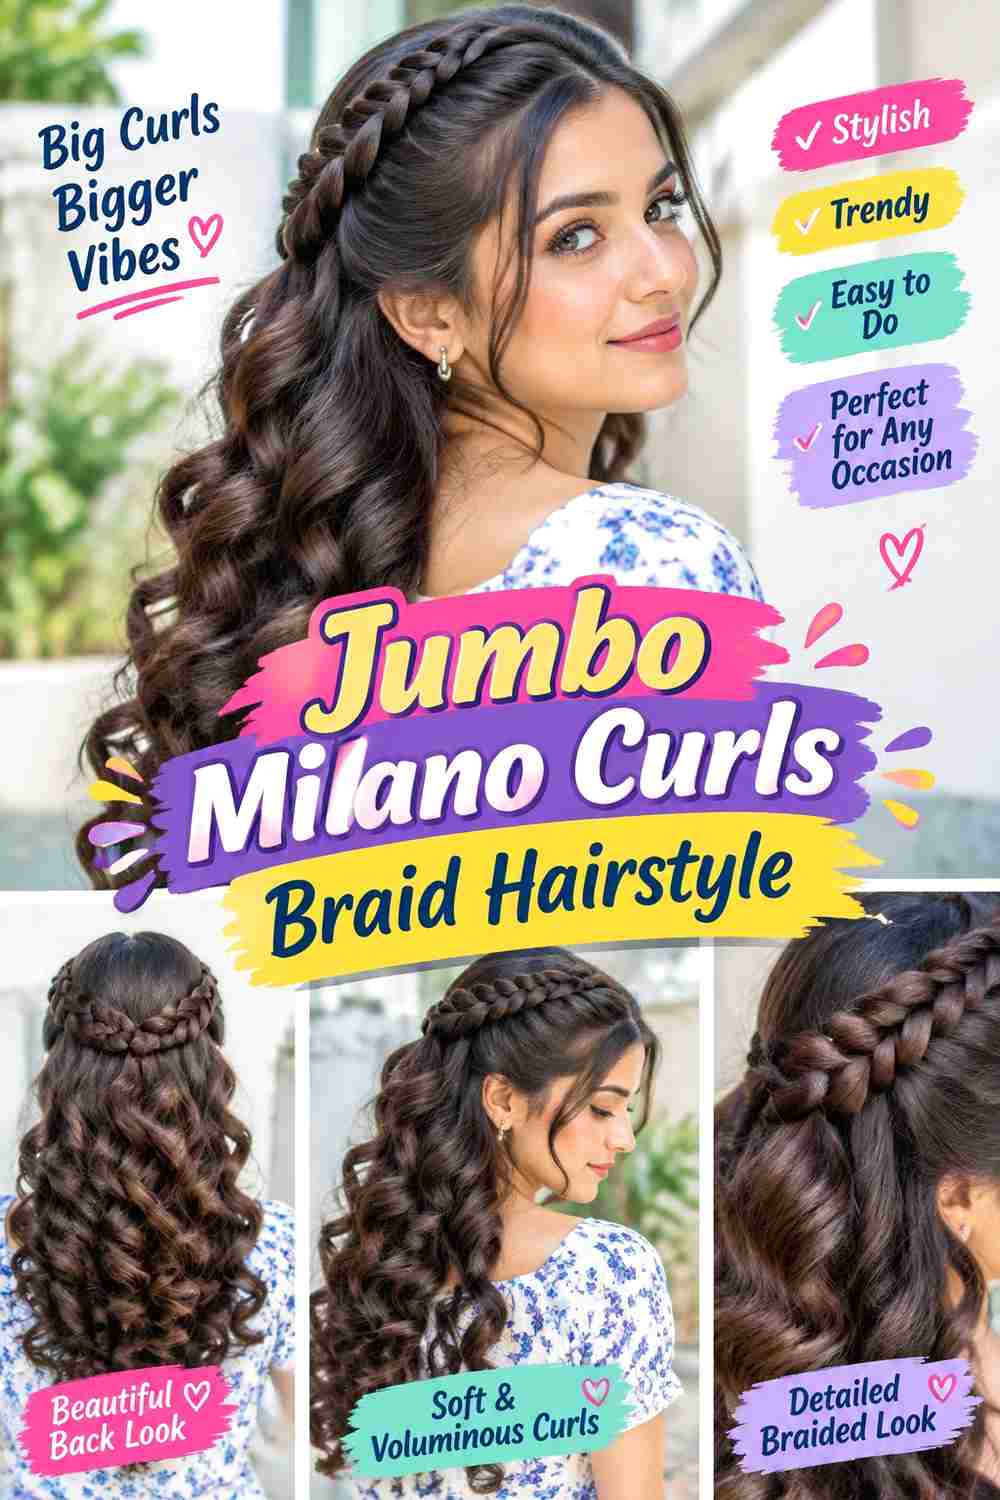
Thicker braids make the braided structure immediately visible and create stronger contrast with loose curls. Each braid occupies more space, so fewer sections are needed across the head. Large curled ends or strategically placed loose spirals keep the design from looking overly solid. A middle or side part can both work, but clean root sectioning becomes particularly noticeable with this scale.
Jumbo braids are useful if you prefer bold sections and do not need the styling flexibility of many tiny braids. The roots still need comfortable tension, especially because each braid can carry more added hair. Light braid mousse, curl refresher spray, and a satin scarf can smooth the braided surfaces, reactivate loose curls, and reduce friction around the roots and edges overnight.
Installation may be shorter than with numerous small braids, though timing depends on length and complexity. Daily refreshing should focus on maintaining the curls and keeping the larger braid surfaces tidy. Ask your braider about braid width and how much hair will be incorporated into each root section. Jumbo sections should feel secure without being painfully tight. If the style begins to loosen, avoid repeatedly tightening it into high updos, which can increase pulling at individual anchor points.
Pro tip:
Place loose curls where they can be seen between the larger braids rather than clustering all of them underneath. Strategic spacing keeps both textures visible and prevents the braids from covering the softer detail.
Make It Work for You:
For a lighter result, keep the jumbo braid width but choose a shorter finished length or less added hair per section. You retain the bold scale without depending on excessive weight.
Watch Out For:
Do not mistake tightness for neatness at the roots. Large braids can already carry noticeable weight, so ask for comfortable tension and speak up if individual sections pull or feel painful.
Boho Milano Curls Braid Hairstyle
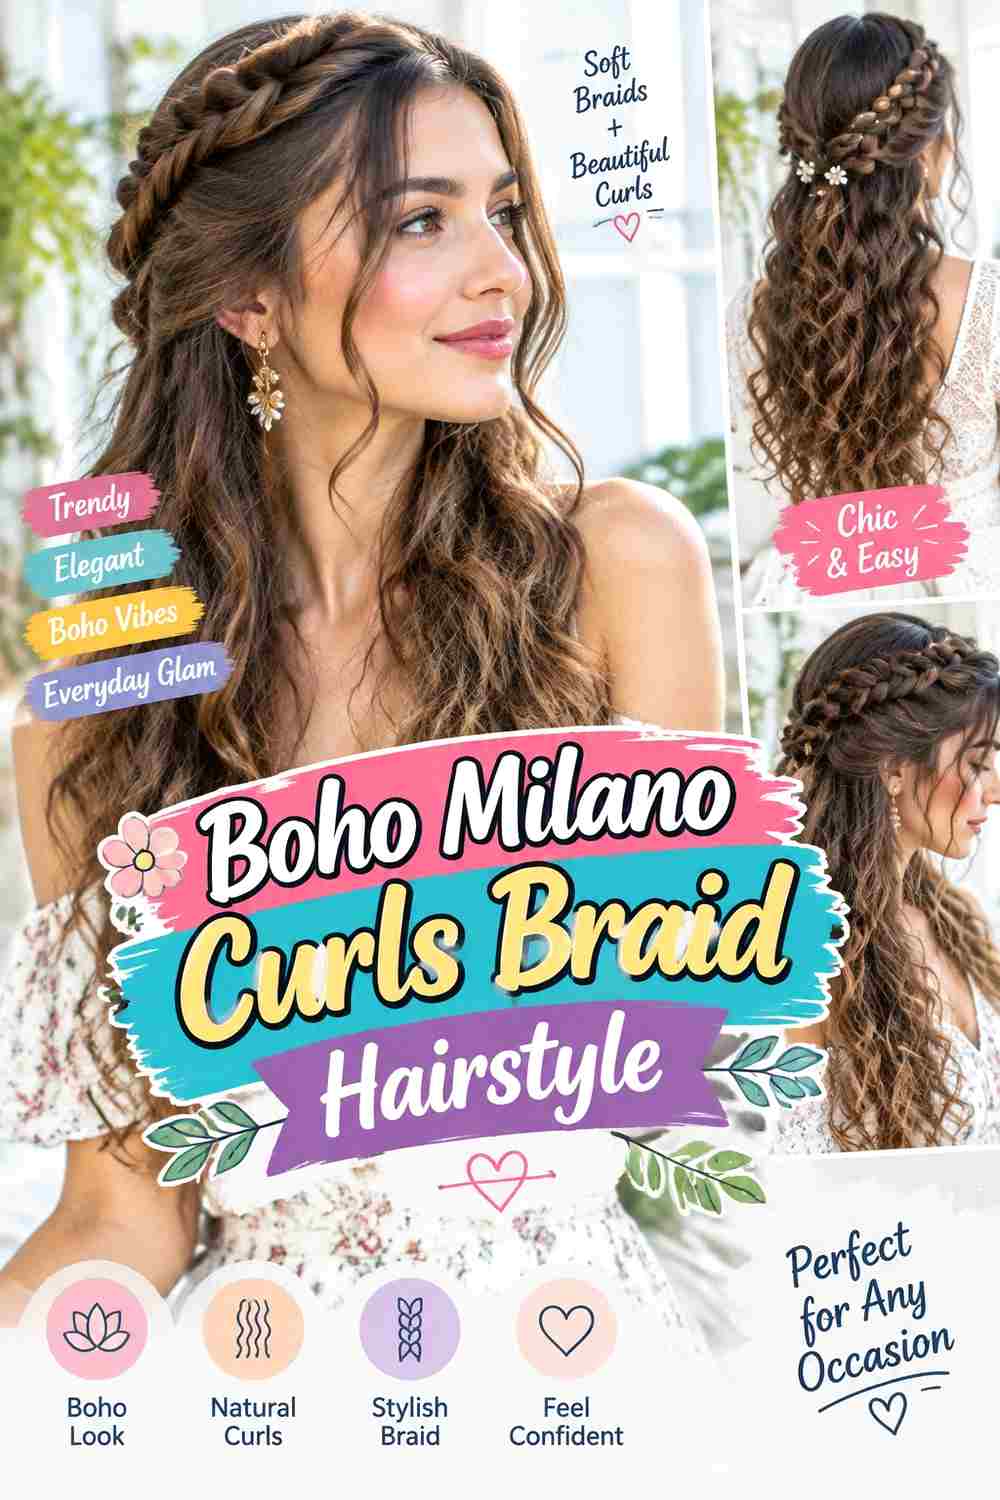
A higher proportion of loose curls gives this variation a relaxed, textured silhouette. Braids provide the framework from the roots downward, while curled pieces appear frequently through the middle lengths and ends. Rather than keeping every spiral identical, a mixture of visible curl positions creates softer movement. The roots can remain neatly sectioned so the abundant loose texture does not overwhelm the structure.
This approach works best for someone comfortable giving the curls more maintenance than a mostly braided style requires. More loose pieces mean more opportunities for tangling, flattening, and frizz. A curl refresher spray, light braid mousse, and satin bonnet can restore selected curls, tidy the braided areas, and reduce friction during sleep without requiring a complete daily reset.
Installation is detailed because curl placement should be planned rather than added randomly. Morning care can remain manageable if you refresh only pieces that have visibly lost their shape. Ask your braider how frequently the curls will appear and whether you want more around the face, mid-lengths, or ends. As the style ages, separate tangles gently with your fingers. Trying to brush all the loose hair together can merge the curls and make the textured design harder to maintain.
Pro tip:
Refresh the most visible curls first—usually those around the face and upper surface. Once those regain definition, you may find the overall style looks refreshed without manipulating every loose section.
Make It Work for You:
If frequent curl maintenance does not fit your routine, reduce the number of loose pieces through the back. Keep extra curls near the face and surface where they provide the greatest visible effect.
Watch Out For:
Too many loose curls packed closely together can tangle faster than spaced sections. Ask for intentional distribution so each curl has room to move instead of forming one dense loose-hair layer.
Face Framing Milano Curls Braid Hairstyle
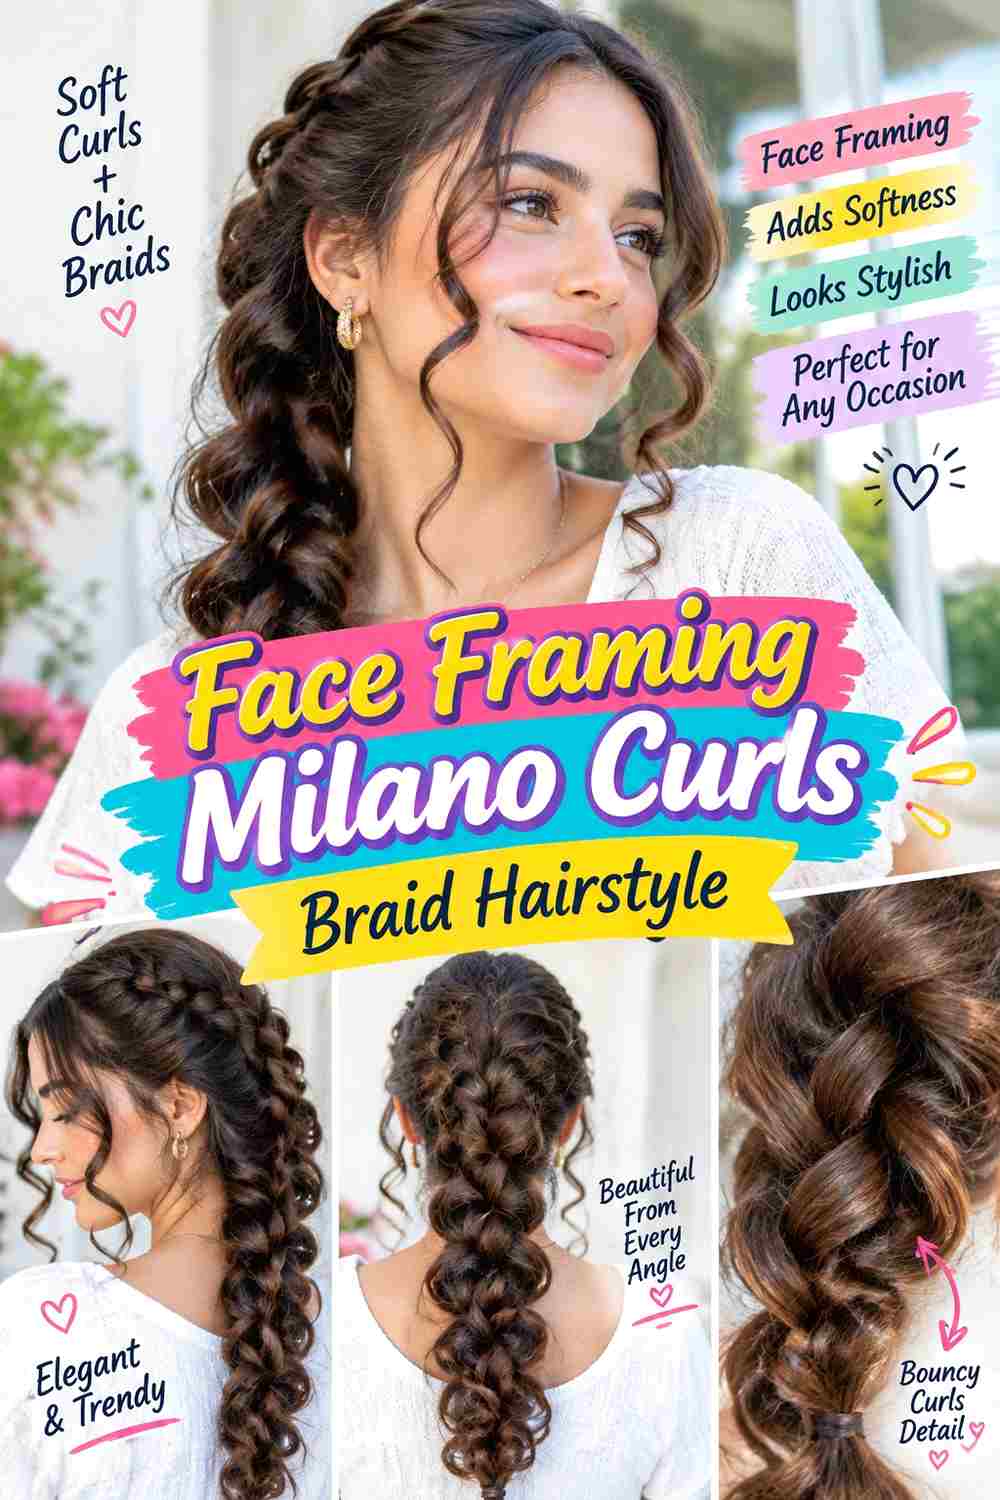
Loose curls concentrated around the front create a clear frame while the rest of the style remains more heavily braided. Two or more curled pieces can begin near the temples or just below them, with longer sections falling beside the cheeks and jaw. The back can use medium braids with fewer loose pieces, allowing the front texture to become the main feature.
This placement is practical if you like visible curls but do not want to maintain them throughout the entire head. The exact front length should match your preferred framing and account for how much the curl contracts. Curl refresher spray, braid mousse, and a satin scarf can revive the front spirals, tidy the braid surface, and protect the hairline area from overnight rubbing.
The morning routine can be short because the front pieces are easy to reach; installation still requires careful placement. Ask your braider where each face-framing curl should begin and approximately where it should sit when curled, rather than choosing only a stretched length. If a front curl loses definition, refresh that section independently. Avoid constantly pulling the framing pieces into tight ponytails, since repeated tension defeats their soft placement and may make the front roots uncomfortable.
Pro tip:
When refreshing a front curl, work on that piece separately and let it settle before arranging the surrounding braids. This prevents neighboring sections from stretching the curl while it is still taking shape.
Make It Work for You:
If you prefer less hair around your face, use just two longer curled sections beginning below the temples. They provide visible framing while leaving more of the forehead and cheek area open.
Watch Out For:
Do not choose very short front curls without accounting for contraction. A section that looks long while stretched may spring much higher when released, changing the framing position you originally wanted.
Half Up Milano Curls Braid Hairstyle
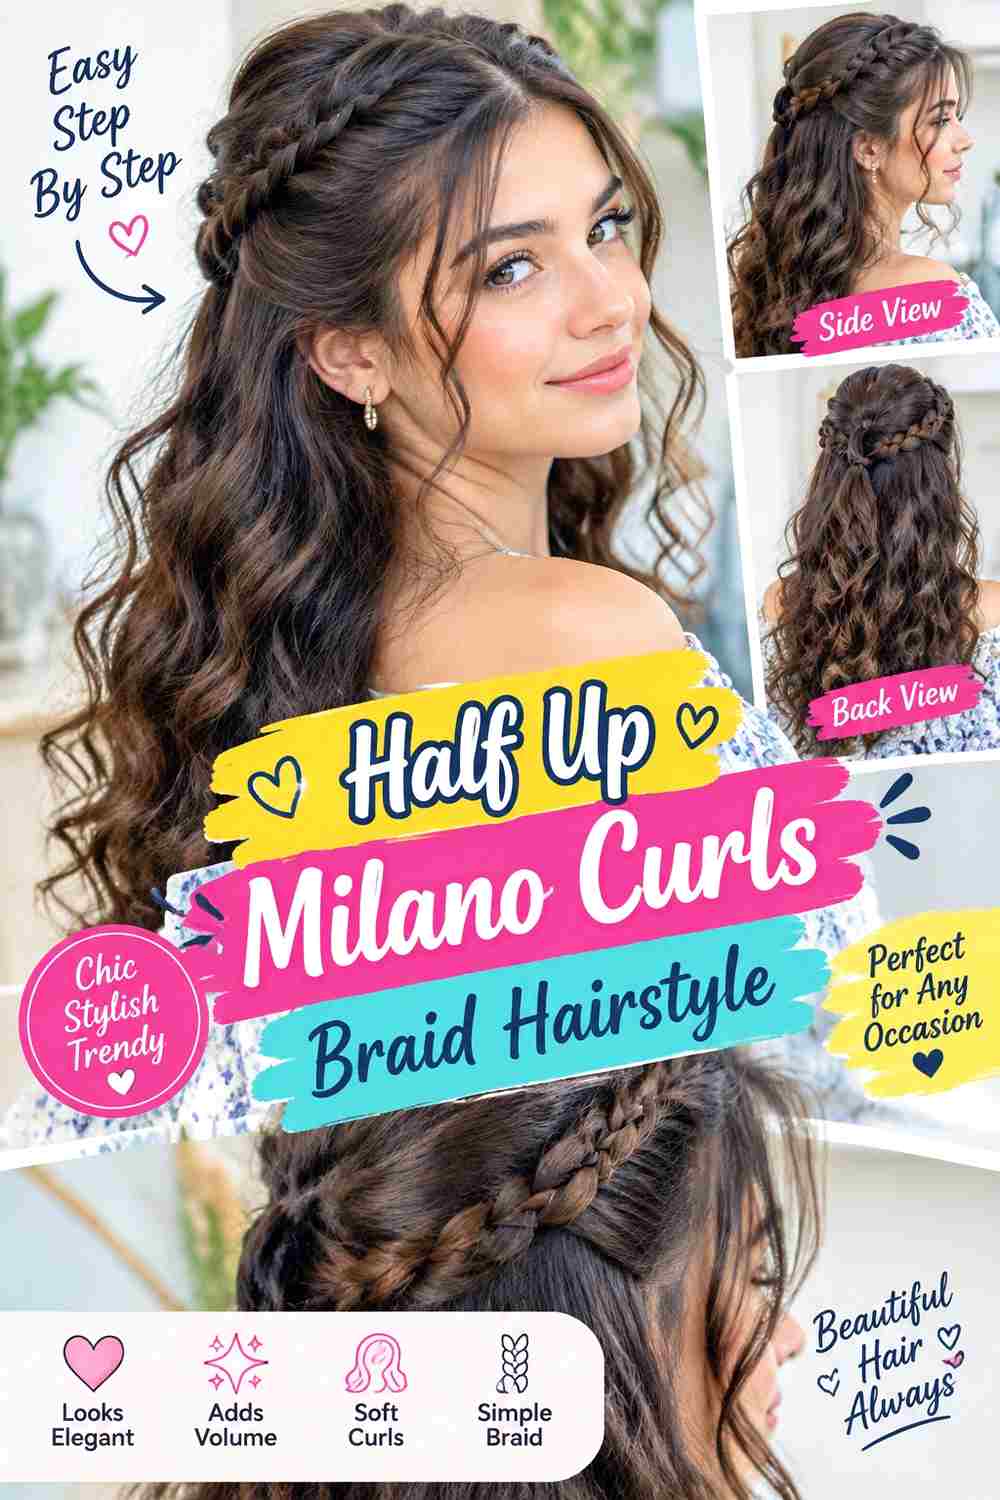
Gathering the upper braids while leaving the lower lengths loose shows both the root pattern and the curls. The half-up section can sit around the crown rather than directly on top of the head, creating gentle height without collecting the entire style. Loose curls remain visible through the lower half and around selected front sections, while the gathered braids give the face a more open frame.
This arrangement is useful when you want an occasional updo without committing the full weight of the braids to one anchor. Medium and longer installations provide enough length for an easy gather. A fabric-covered elastic, curl refresher spray, and braid mousse can secure the upper section comfortably, restore visible curls, and smooth minor surface fuzz.
Once the base installation is complete, changing into a half-up style should be a relatively quick task. The larger time commitment remains installation and curl maintenance. Ask your braider to keep front and crown sections comfortable enough to move upward without strong pulling. Position the elastic around a manageable amount of hair rather than gathering half the style too tightly. If the roots feel strained, lower the gathered section or reduce the number of braids included.
Pro tip:
Build the half-up section from braids around the crown rather than pulling strongly from the temples. This gives the style height while keeping the front roots from carrying most of the tension.
Make It Work for You:
With very long or full braids, gather a smaller top section. The half-up silhouette remains clear, but the anchor carries less weight and more curls stay loose through the back.
Watch Out For:
Avoid using a very thin elastic around a large bundle of braids. It can concentrate pressure and snag loose curls; choose a fabric-covered option and secure only as firmly as needed.
High Ponytail Milano Curls Braid Hairstyle
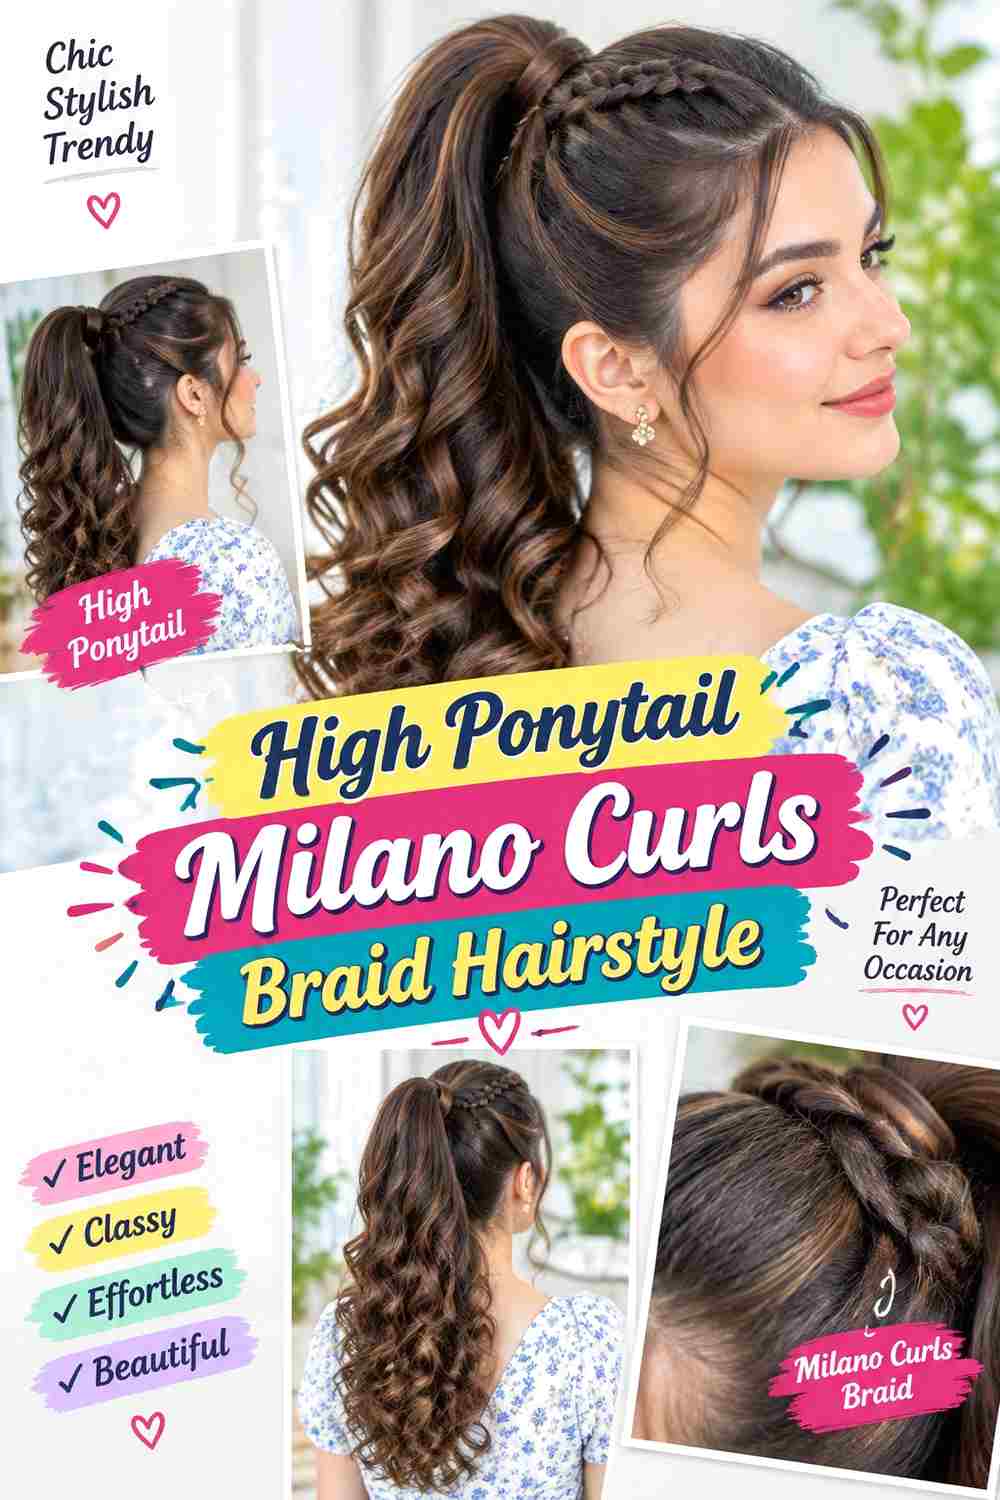
A high ponytail lifts the braided lengths toward the crown and allows curls to fall around the gathered base. The result shows more of the neckline while creating concentrated movement behind and above the head. Leaving a couple of curled pieces near the front can soften the transition, while the remaining braids form a full cascading ponytail.
This arrangement works most comfortably when the installation is not excessively heavy. Longer or jumbo braids can place substantial weight on a high anchor, so consider the ponytail an occasional arrangement if prolonged wear creates pulling. A wide fabric-covered elastic, braid mousse, and curl refresher spray can hold the bundle, smooth visible braid surfaces, and revive curls that become compressed during gathering.
Creating the ponytail itself can be quick once the braids are installed, but arranging a large bundle may take a few attempts. Ask your braider about comfortable root tension if high styling is part of your routine. Gather the braids without dragging the hairline sections upward more tightly than necessary. When you release the ponytail, separate compressed curls with your fingers rather than brushing through them. If the style feels heavy or painful, lower it instead of adding another tight elastic.
Pro tip:
Tip your head slightly forward while gathering the braids so their weight moves toward the intended anchor naturally. Then secure the ponytail without repeatedly tightening it against the scalp.
Make It Work for You:
For waist-length or very full braids, position the ponytail slightly below the crown. You still gain height and cascading curls while reducing the leverage created by an extremely high anchor.
Watch Out For:
A ponytail that feels secure should not need to feel painful. If the hairline or crown pulls strongly, loosen or lower the bundle rather than assuming extra tension will improve hold.
Low Ponytail Milano Curls Braid Hairstyle
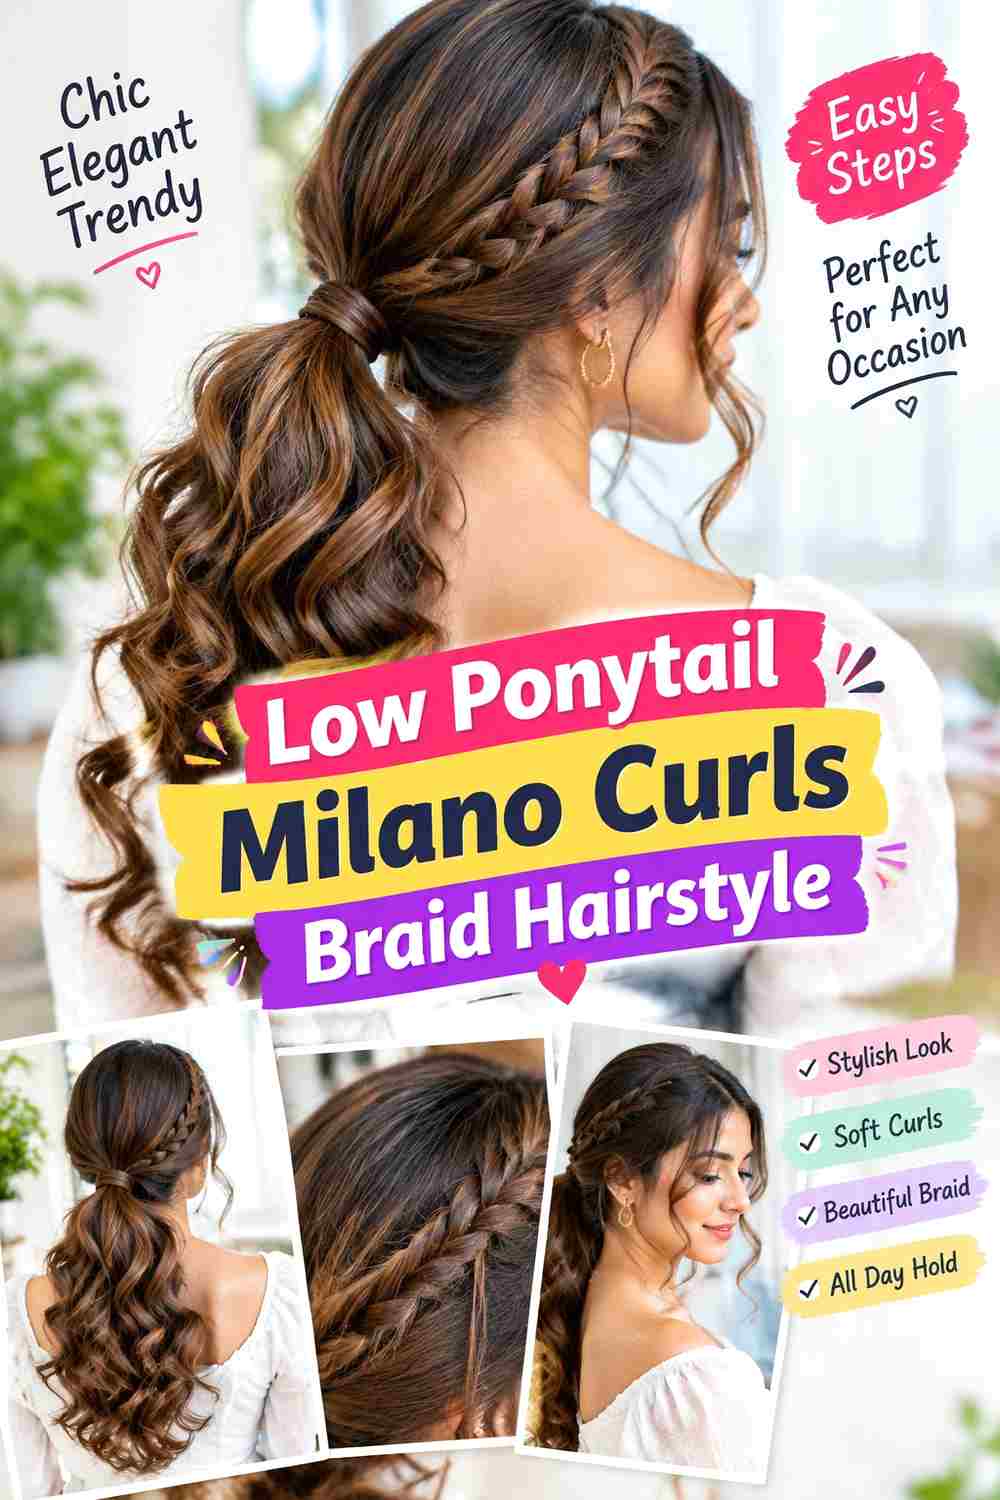
A low ponytail keeps the braids close to their natural downward direction, making it a practical alternative to higher gathered styles. The anchor sits near the nape, while curled sections continue through the ponytail and can also remain loose around the front. A center part produces a balanced front, whereas a side part adds a softer sweep before the lengths meet at the back.
This placement can be easier for long or full braids because it does not lift their entire weight high on the head. It also works well when you need the front controlled while retaining visible curls. A fabric-covered elastic, braid mousse, and curl refresher spray can secure the nape gently, smooth surface fuzz, and restore loose spirals after they have been gathered.
Daily styling is usually brief once the installation is complete. Keep the ponytail loose enough to avoid unnecessary pulling, especially around the temples. Tell your braider if low gathered styles are part of your regular routine so root sections can be arranged with comfortable movement in mind. When the curls flatten inside the ponytail, release them and refresh only the affected pieces. Repeatedly tightening the anchor throughout the day is unnecessary if the base remains stable.
Pro tip:
Place the elastic slightly away from the scalp rather than cinching the ponytail hard against the nape. A little room lets the braids settle naturally and keeps the front from feeling over-pulled.
Make It Work for You:
If you prefer more facial softness, leave two curled sections outside the ponytail and position them around the cheeks or jaw. The rest remains controlled without losing the Milano curl detail.
Watch Out For:
Do not trap loose curls unevenly inside the elastic. They can snag when you remove it; separate the curls from the main bundle first or make sure they lie smoothly before securing.
Top Knot Milano Curls Braid Hairstyle
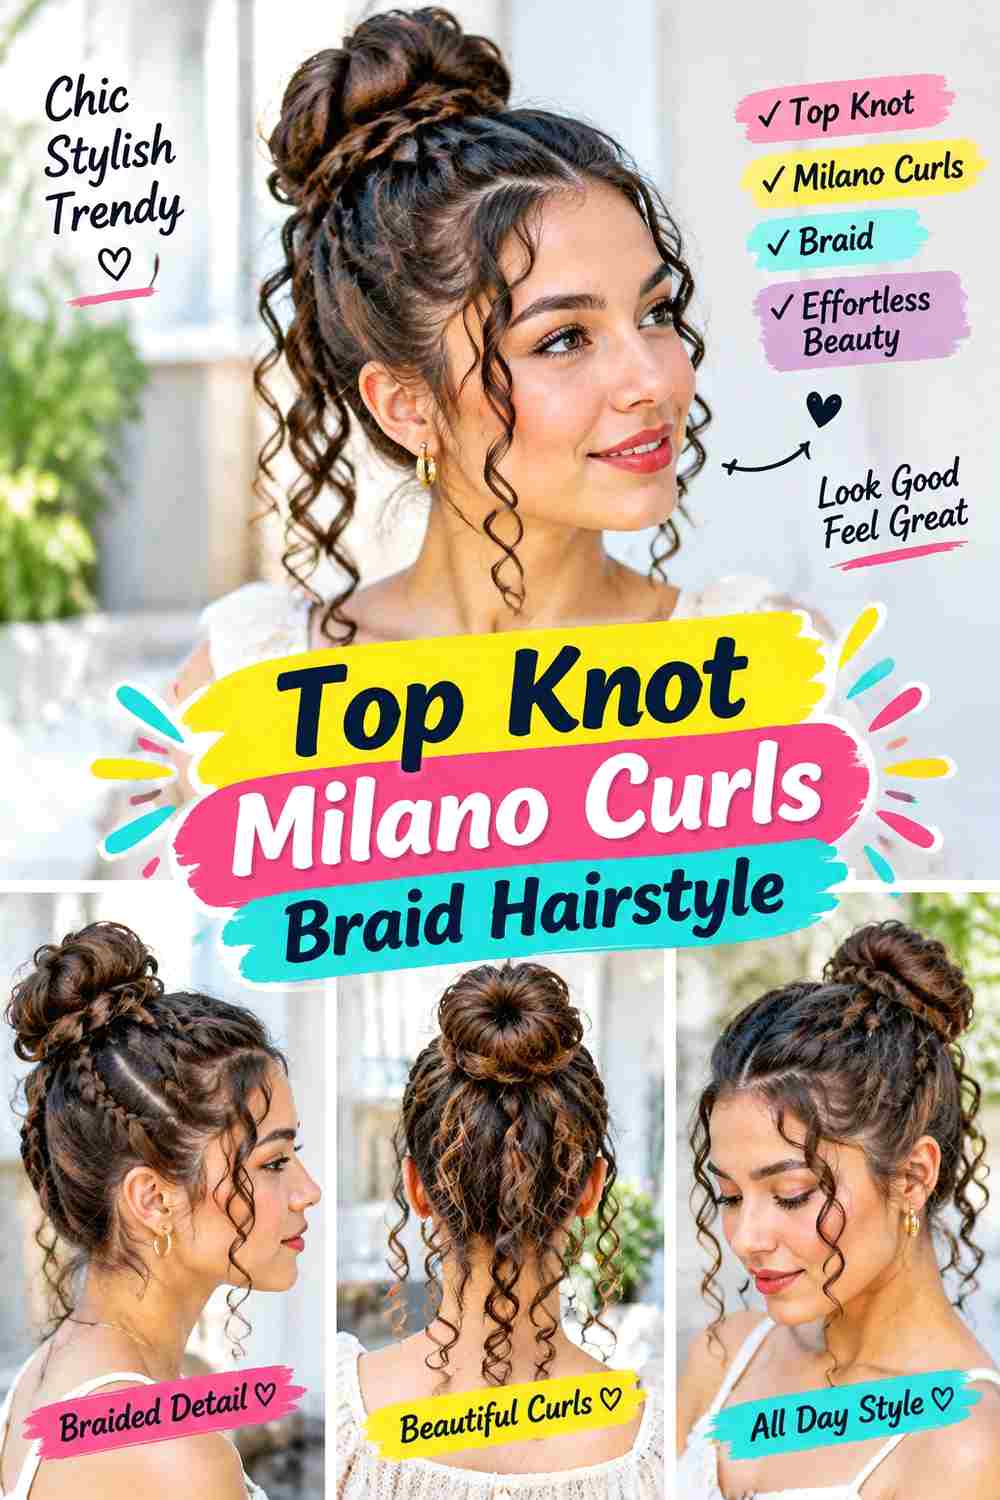
Wrapping the braids into a high knot moves most of the length off the shoulders while leaving selected curls free for texture. The knot can sit near the crown with curled ends peeking around its outer edge, while one or two loose pieces remain at the front. Keeping the bun broad rather than tightly twisted helps distribute the braided volume more evenly.
A top knot is most practical as a restyle of an existing installation rather than a reason to increase root tension. Very long or heavy braids create a larger bun and may feel uncomfortable if worn high for extended periods. Use large bobby pins, a fabric-covered elastic, and curl refresher spray to create the anchor, secure loose sections, and redefine visible curls after arranging them.
The updo itself can be completed relatively quickly, although long lengths may need careful wrapping. Installation remains the larger commitment. Tell your braider if high buns are important to you so braid size and overall weight can be considered beforehand. Secure the knot at several points instead of depending on one painfully tight base. If it starts leaning, redistribute the braids rather than adding excessive pressure to one side.
Pro tip:
Build a stable ponytail base first, then wrap the braids loosely around it and pin at several points. Multiple anchors help spread the bun’s weight instead of making one spot carry everything.
Make It Work for You:
If a full top knot feels too heavy, gather only the upper half into a smaller bun and leave the remaining Milano curls down. You keep the high focal point with less weight.
Watch Out For:
Do not twist the entire braid bundle extremely tightly before wrapping it. A rigid rope can increase pulling at the base; use a looser wrap and additional pins for controlled support.
Low Bun Milano Curls Braid Hairstyle
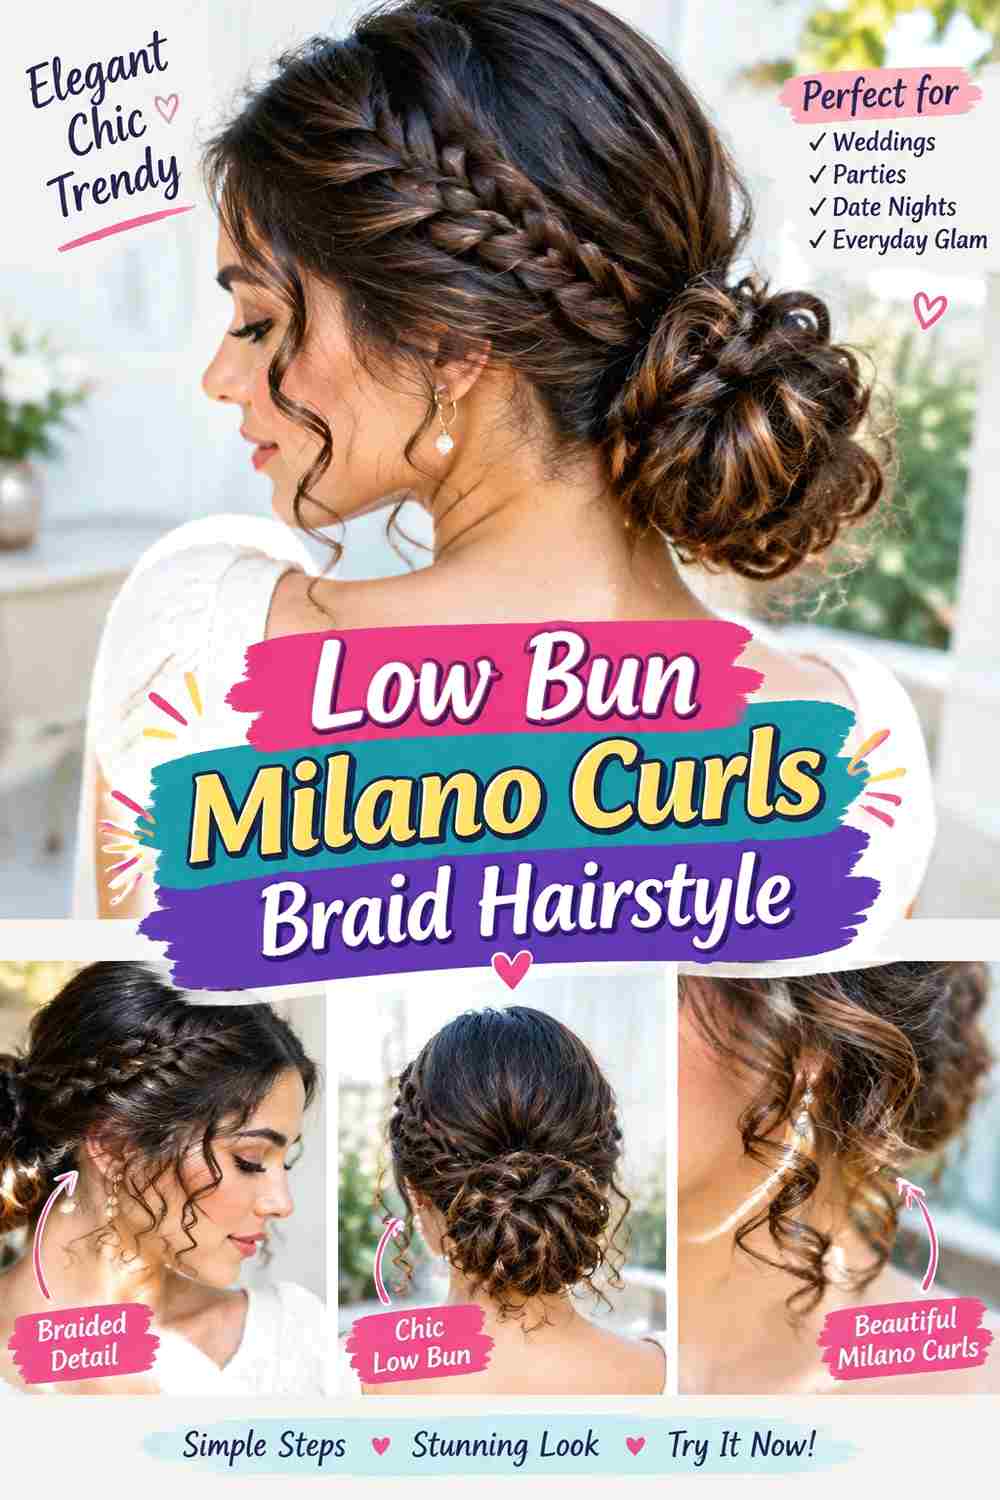
A low bun gathers the braided lengths at the nape while allowing selected curls to soften the sides and front. The bun can be broad and slightly textured rather than perfectly compact, with curled ends tucked selectively instead of hidden completely. A center part makes the front symmetrical, while a side part adds an angled sweep before the hair reaches the bun.
This option can be useful for longer braids when you want the lengths contained without lifting their weight toward the crown. It can also work for dressier settings because the anchor remains relatively discreet. A fabric-covered elastic, large bobby pins, and curl refresher spray can create a gentle base, secure the wrapped braids, and redefine any curls left outside.
Once the braids are installed, forming the bun should take far less time than the original installation. Ask your braider for comfortable root tension and enough movement at the nape if low updos are important to you. Wrap the lengths without forcing every braid into a tiny knot. A broad bun usually distributes the volume more comfortably. When removing it, release the pins individually so loose curls are not accidentally pulled through the braided bundle.
Pro tip:
Anchor the bun slightly above the lowest hairline rather than directly against it. That placement gives pins more room to grip the braided base and can prevent the bun from rubbing the neck.
Make It Work for You:
For a smaller bun, leave several curled lengths outside and gather only the more heavily braided sections. The nape stays controlled while loose texture provides movement around the finished shape.
Watch Out For:
Avoid securing the whole bun with only one tight elastic. The weight may sag or pull at a narrow point; distribute support with a gentle base and several well-placed pins.
Crown Milano Curls Braid Hairstyle
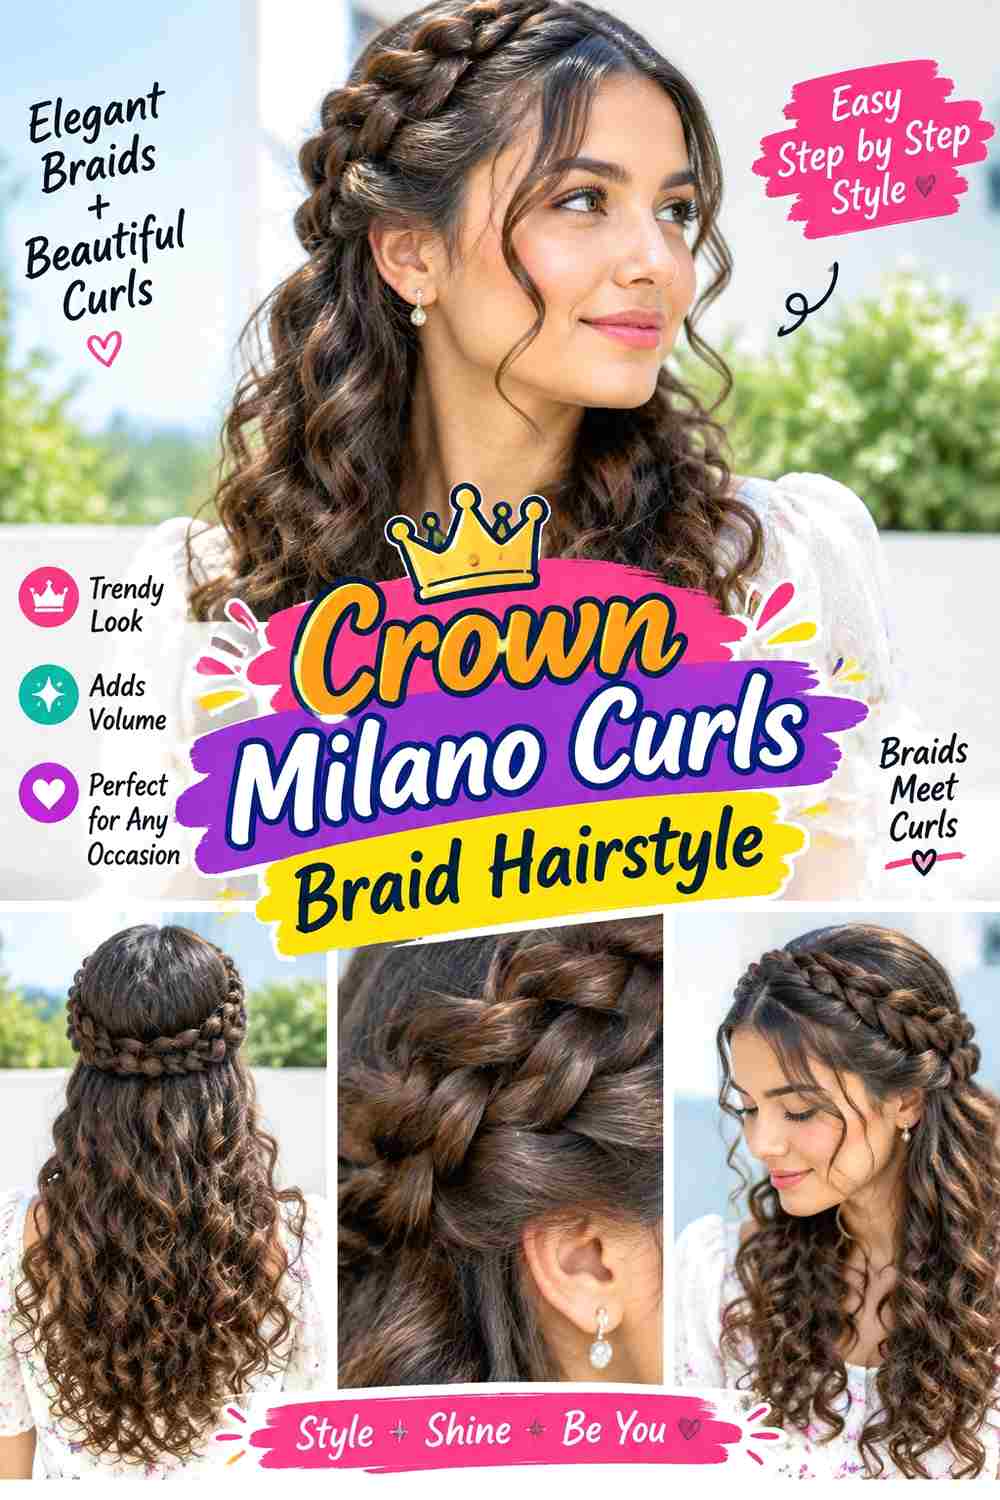
Bringing selected braids around the upper head creates a crown-like frame while the remaining curls and braids fall freely behind it. The wrapped section can travel from one side above the ear toward the opposite side, sitting slightly behind the hairline. Loose curls near the temples keep the front soft, and longer curled sections through the back preserve the Milano texture.
This arrangement is best treated as a temporary restyle rather than requiring a different haircut or permanent change. Medium-width braids are often easier to curve around the head than very thick sections. A few large bobby pins, braid mousse, and curl refresher spray can anchor the crown, tidy visible braid surfaces, and revive the curls that remain loose.
Creating the crown takes longer than a basic ponytail because placement should feel balanced and comfortable, but it is still much quicker than installation. Tell your braider if you plan to create wrapped styles so the braid width supports easy movement. Anchor the braid at several points without pulling it tightly across the scalp. If the crown slips, add support beneath the wrapped section rather than increasing tension at the starting point.
Pro tip:
Cross two pins beneath a thicker section of the wrapped braid where they remain hidden. A stable internal anchor can hold the crown more effectively than tightening the entire braid against the scalp.
Make It Work for You:
If your braids are jumbo-sized, wrap only one or two sections as a partial crown. The placement stays visible while avoiding an overly bulky band across the upper part of the head.
Watch Out For:
Do not place pins directly where they press uncomfortably against the scalp. Reposition the anchor through a thicker braid section; secure styling should feel stable without sharp pressure or pain.
Side Swept Milano Curls Braid Hairstyle
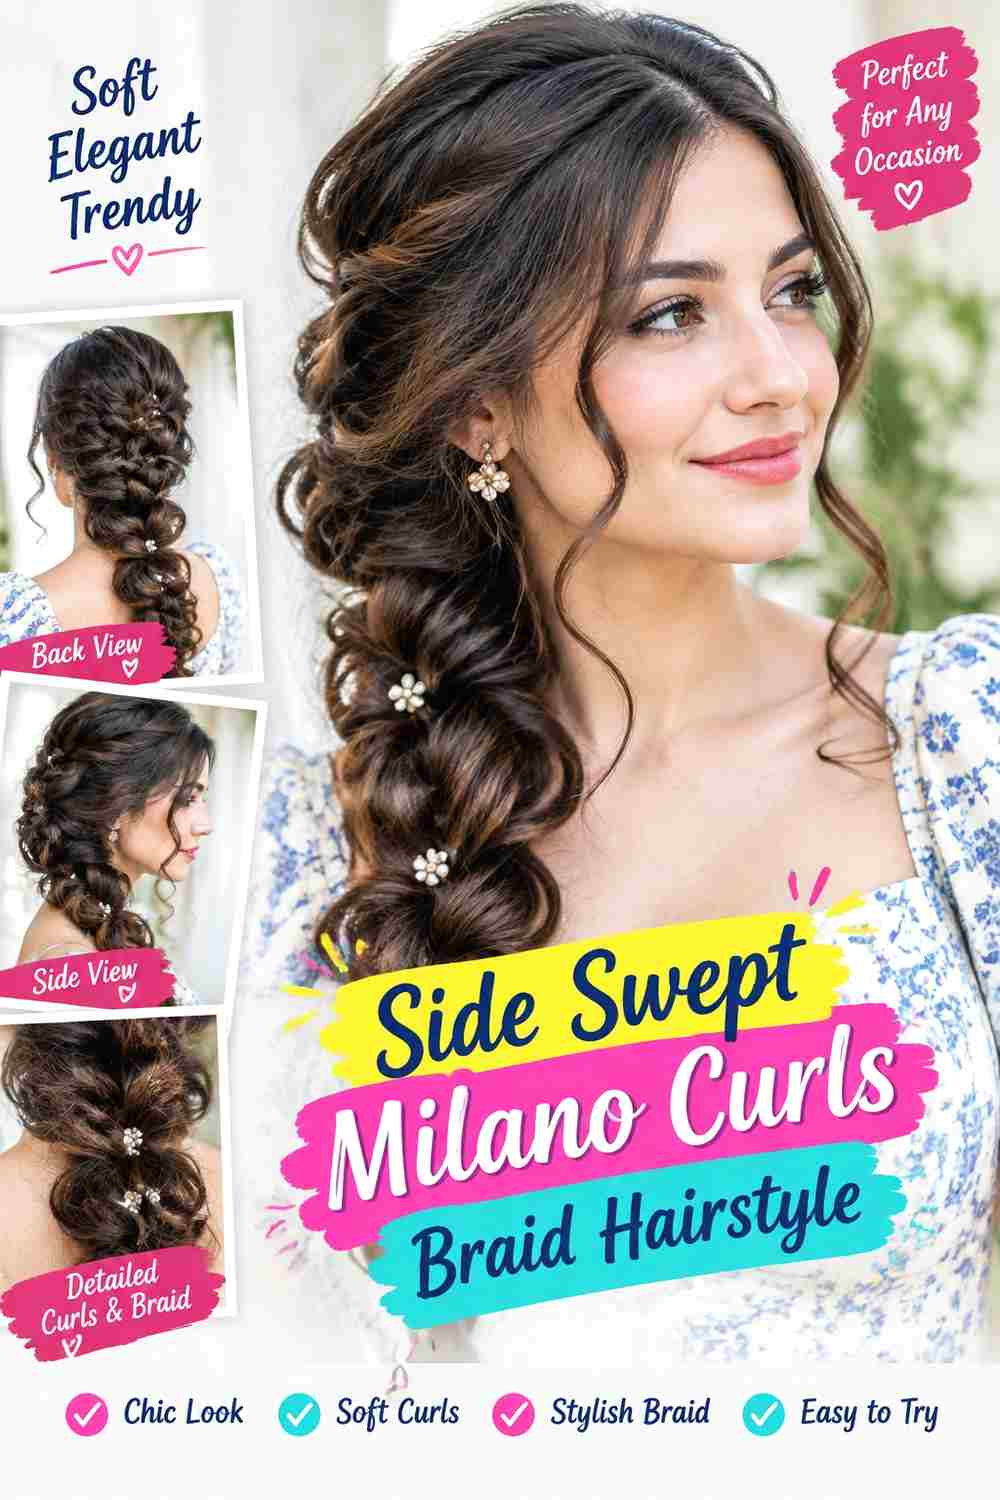
Moving most of the length over one shoulder creates an asymmetrical silhouette without changing the original braid installation. The opposite side can remain relatively clean, while braids and loose curls cascade together across the chest. A side part strengthens the direction, but a center-part installation can also be swept temporarily for a softer change.
This is useful when you want a quick restyle that keeps the curls visible. Longer lengths show the sweep most clearly, though very heavy braids may need a discreet anchor to stop them sliding backward. A large bobby pin, curl refresher spray, and braid mousse can secure a hidden section near the back, redefine prominent curls, and smooth any surface fuzz disturbed during repositioning.
The transformation can take only a short refresh once the base style is installed. Gather the braids gently rather than pulling the opposite side extremely tight. If side-swept wear will be frequent, tell your braider which direction you prefer so the root placement remains comfortable. Refresh the curls facing forward and leave less-visible sections alone unless needed. When the sweep slips, improve the hidden anchor instead of tightening the entire mass across the scalp.
Pro tip:
Pin one or two braids discreetly behind the opposite ear before moving the remaining lengths forward. That small anchor helps maintain the sweep without forcing every root section toward the same side.
Make It Work for You:
With very full braids, sweep only the front and upper sections over one shoulder while leaving some length behind. You get directional movement without concentrating the entire installation on one side.
Watch Out For:
Avoid repeatedly dragging the braids across the scalp to maintain the sweep. If they keep returning to center, use a gentle hidden anchor rather than creating more tension at the roots.
Layered Milano Curls Braid Hairstyle
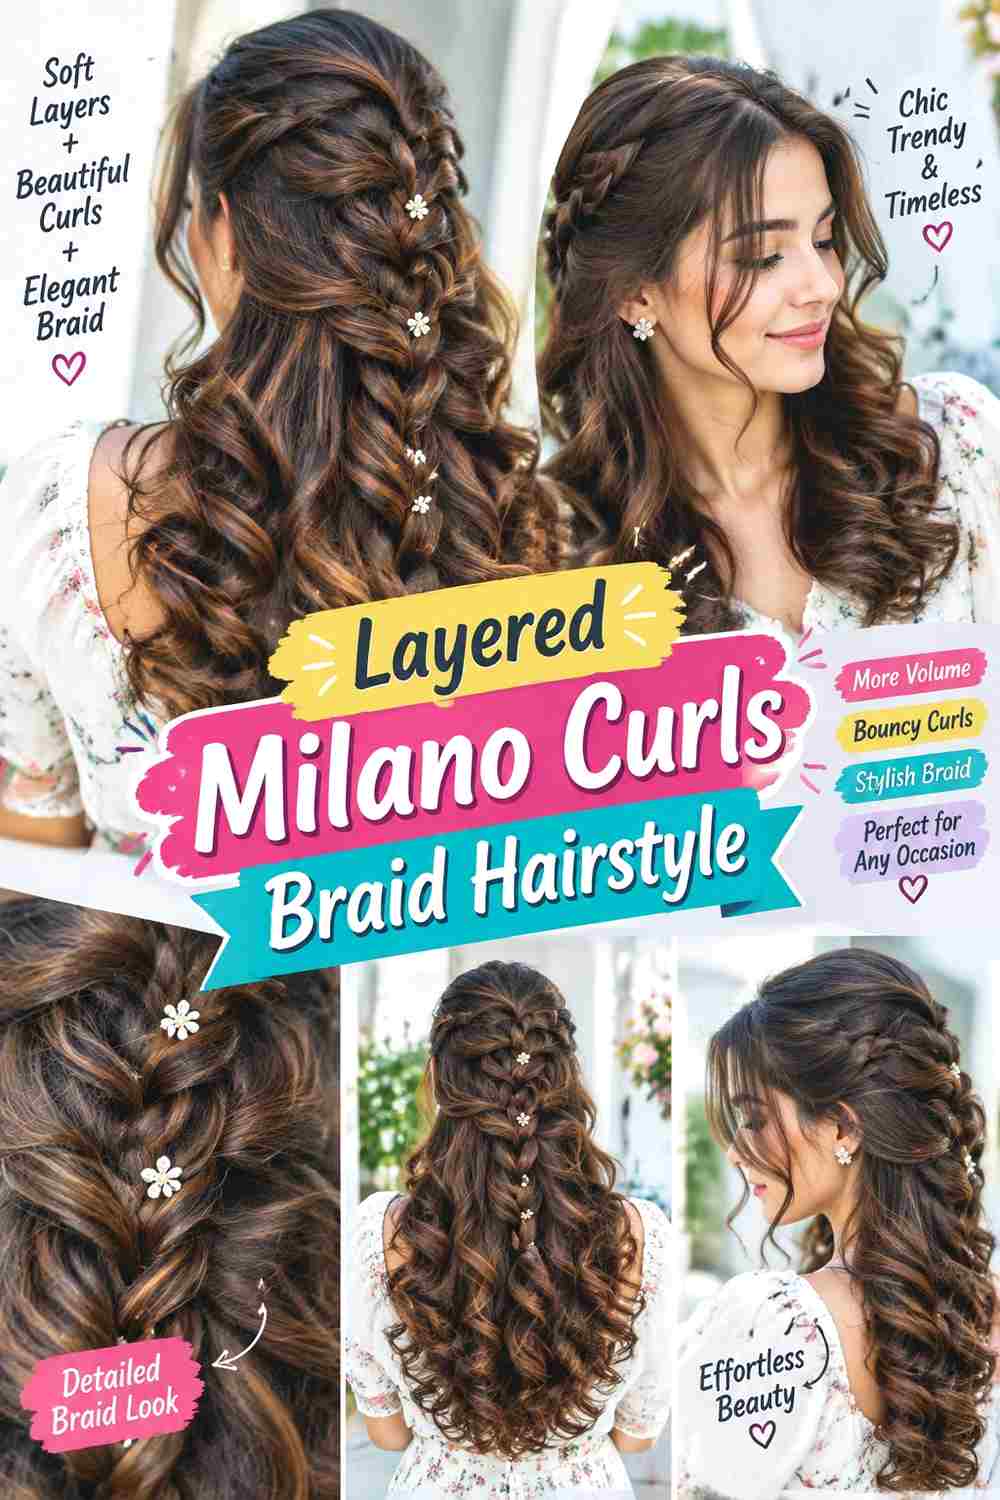
Different finished lengths can create a tiered effect without requiring the loose curls to end at one uniform point. Shorter curled sections may sit around the shoulders, medium pieces around the chest, and longer braids continue below them. The variation creates visible movement through the outline while the braided roots keep the overall style organized.
This design suits readers who enjoy fullness through several levels rather than concentrating every curl at the bottom. The placement should be planned carefully so shorter pieces appear intentional rather than uneven. Curl refresher spray, light braid mousse, and a satin bonnet can redefine the more exposed short curls, settle fuzz through the braids, and protect the varied lengths during sleep.
Installation requires more planning than a single-length version because the finished placement of each curl matters. Daily refreshing can remain short when you focus on the upper and front layers most visible from the outside. Tell your braider where you want the shortest curled pieces to finish and how gradually the longer sections should descend. Do not assume every curl will contract equally. As the style ages, separate overlapping curls carefully so the different levels remain visible instead of merging into one tangled mass.
Pro tip:
Refresh the shortest outer curls individually before working on the longer pieces underneath. Crisp upper sections make the tiered silhouette visible and reduce the need to manipulate the entire installation each morning.
Make It Work for You:
If you prefer a quieter outline, use only two main length levels rather than several. You retain the layered movement while making the curl placement simpler to maintain and easier to gather.
Watch Out For:
Randomly shortening many loose sections can make the outline appear accidental. Plan the finished curl positions in broad levels and remember that curl contraction affects where each section visually lands.
Curly Ends Milano Curls Braid Hairstyle
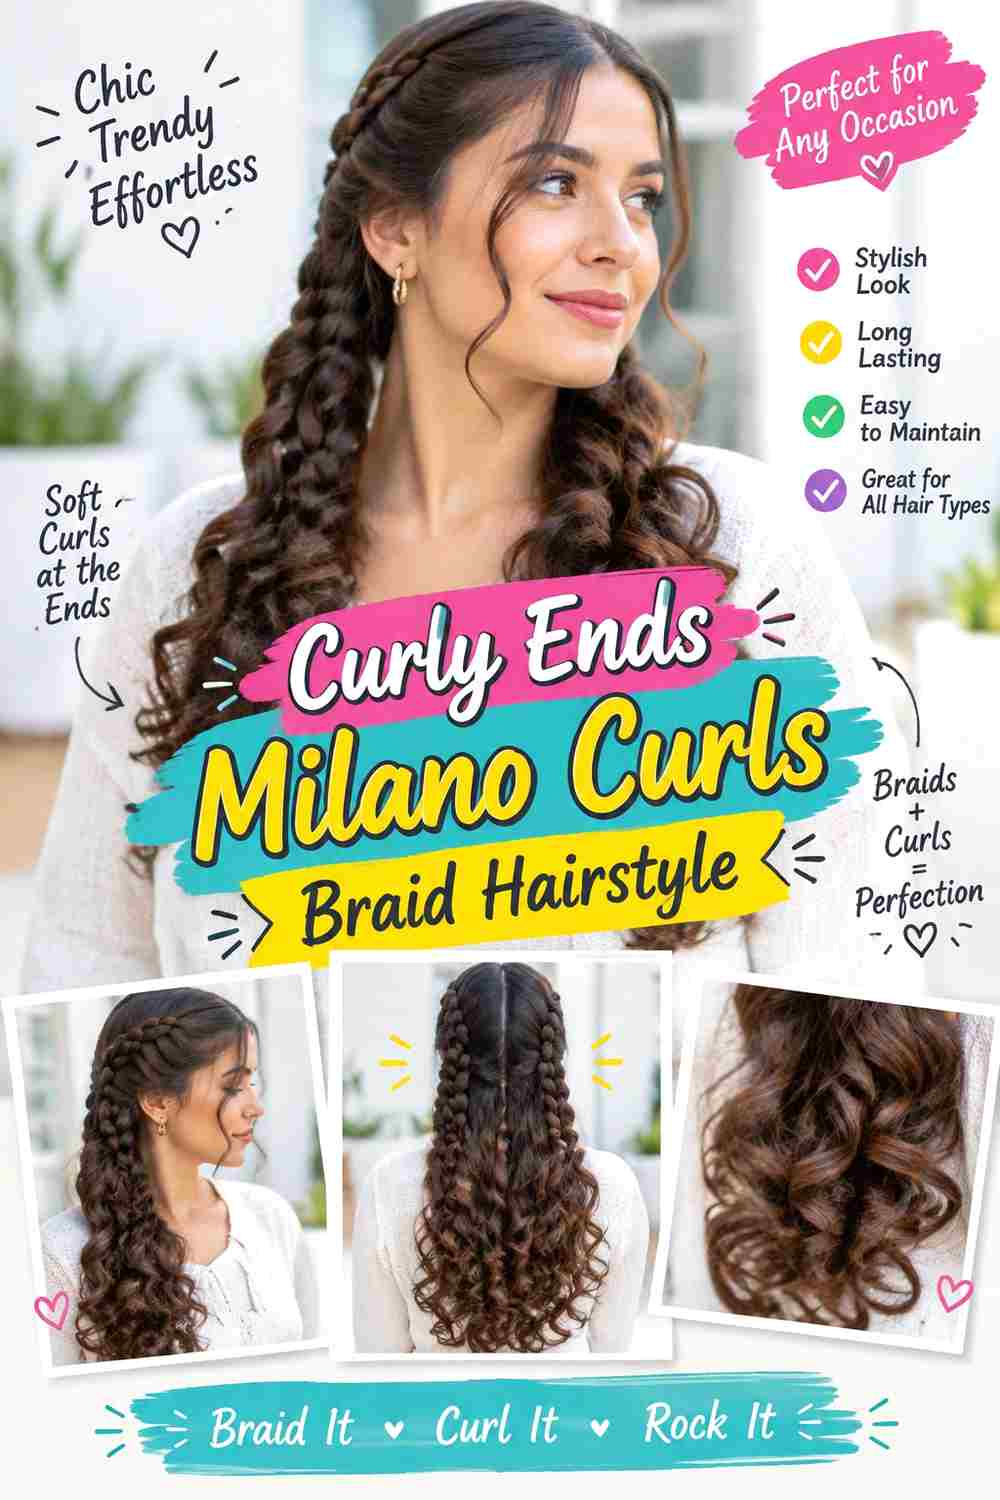
Keeping most of each length braided before transitioning into curls creates one of the clearest contrasts in this family. The upper and middle sections remain structured, while defined curls collect mainly toward the bottom. The transition can begin around the chest on long braids or closer to the shoulders on a shorter version, producing movement without filling the entire style with loose strands.
This placement is practical if you want curl detail with less loose hair to maintain. It also leaves the root and middle lengths easy to gather into ponytails or buns. A curl refresher spray, braid mousse, and satin bonnet can reactivate the ends, tidy the braided portions, and prevent the loose lower sections from rubbing excessively overnight.
Installation is still a substantial process, but daily maintenance can be more focused than with heavily scattered curls. Refresh only the ends that have flattened or tangled. Tell your braider exactly where you want the braided section to transition into curl and how much loose length you prefer. If the ends begin knotting together, separate them gently by hand rather than brushing across several curls at once. Maintaining a clear braid-to-curl transition is what keeps this version distinctive.
Pro tip:
At night, loosely group the braided lengths while allowing the curled ends enough room inside your bonnet. Avoid folding the curls tightly under the braids, which can leave their shape compressed.
Make It Work for You:
For a shorter style, begin the curl transition slightly higher so enough loose length remains visible. Keep the majority braided to preserve the defining structured-to-curled contrast rather than creating an all-over curly effect.
Watch Out For:
Do not refresh every curl with a large amount of product. Overloading the loose ends can make them clump heavily; target only sections that need help and keep the application light.
Scattered Curls Milano Curls Braid Hairstyle
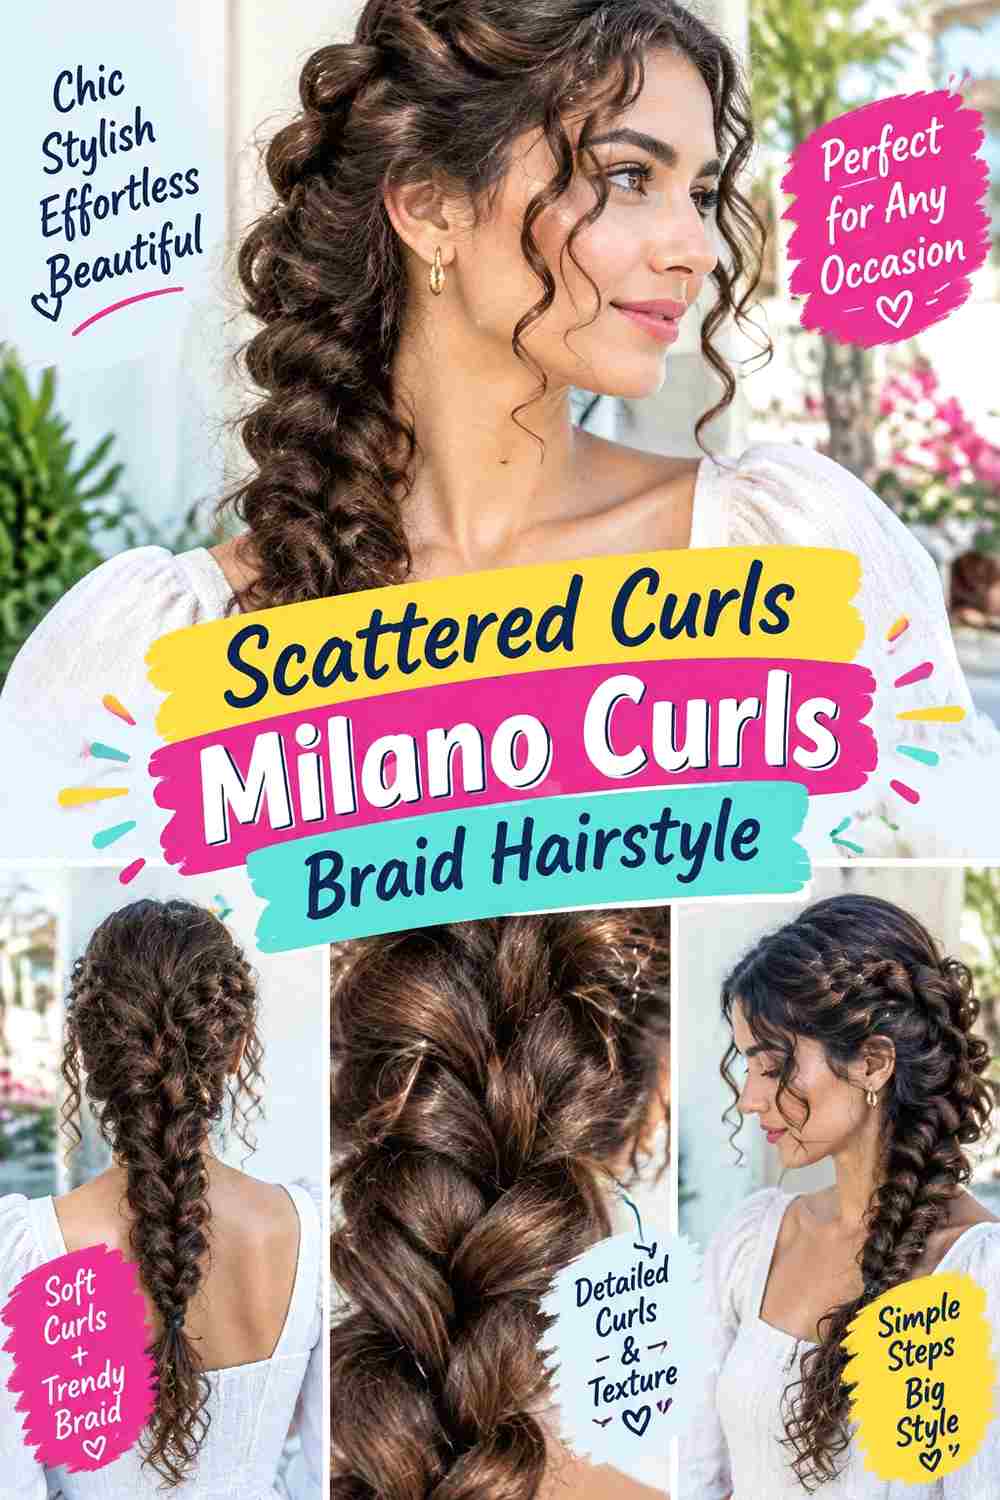
Instead of concentrating curls around the face or ends, this design distributes them at varied points throughout the braided lengths. Some loose pieces begin higher, others emerge through the middle, and additional curls soften the bottom. The irregular placement gives the silhouette movement from several levels while a clean braided root area keeps the overall design grounded.
Scattered curls suit someone who wants visible texture from multiple angles, but they demand more detangling awareness than a curl-at-the-ends version. Enough spacing between loose pieces helps prevent them from merging. Use curl refresher spray, braid mousse, and a satin bonnet to restore selected spirals, tidy braided sections, and reduce friction through the mixed texture overnight.
Installation requires deliberate curl distribution even though the finished placement appears relaxed. A daily refresh should not mean resetting every piece; concentrate on the curls visible around the face and surface. Ask your braider how densely the loose sections will be placed and where they will begin. More is not automatically better, particularly on very long hair. When two curls tangle together, separate the ends gently first and move upward rather than pulling from the roots or disturbing nearby braids.
Pro tip:
Before bed, check the back for loose curls trapped around neighboring braids. Gently freeing those sections before covering the hair can prevent small tangles from tightening further while you sleep.
Make It Work for You:
If you want simpler maintenance, keep scattered curls mainly on the surface and around the front. The style still appears richly textured while fewer hidden loose pieces need separating through the back.
Watch Out For:
Placing loose curls too densely can erase the visual contrast with the braids. Leave enough structured sections visible so the eye can distinguish both textures instead of seeing one continuous loose mass.
Pinned Back Milano Curls Braid Hairstyle
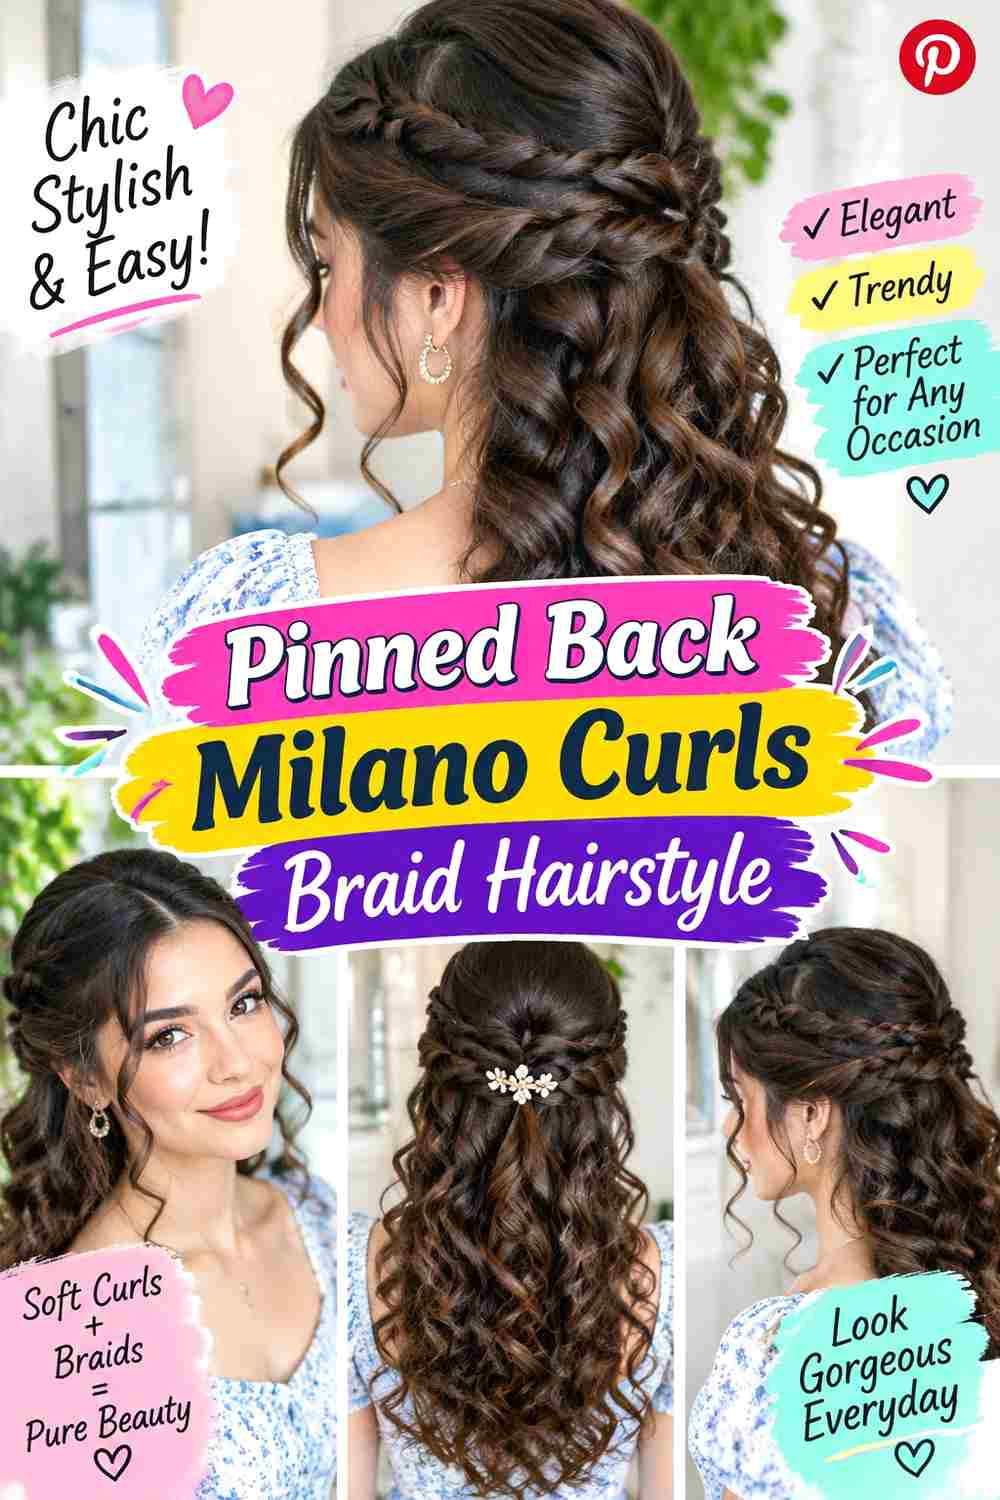
Pinning the front sections behind the ears or toward the back creates an open front while leaving most Milano curls loose. The anchor can sit just behind each ear or meet at the back of the head, depending on how much hair you want removed from the face. Loose curls continue through the sides and lengths, preserving softness around the more controlled front.
This is a useful temporary arrangement for work, events, or days when face-framing curls feel distracting. It works with center and side parts and does not require changing the underlying installation. Large bobby pins, curl refresher spray, and braid mousse can secure the front sections, redefine curls that remain visible, and smooth the braids before pinning.
The restyle itself is quick compared with installation. Select only enough braids to clear the face rather than pulling a large portion backward. If you expect to wear the style pinned frequently, ask your braider for comfortable movement around the temples. Slide pins through stable braided sections instead of catching delicate loose curls in the anchor. When removing them, open and release each pin carefully. If the front feels tight, reduce the amount gathered rather than pushing the pins closer to the scalp.
Pro tip:
Cross two pins underneath a small braided section behind the ear, then let nearby curls fall over the anchor. This gives discreet support while keeping the visible front soft rather than tightly slicked.
Make It Work for You:
If you want more framing, pin only the braids directly beside the temples and leave one curl free on each side. You gain an open front without removing all movement around the face.
Watch Out For:
Do not push pins through loose curls simply because they are nearby. The curls can snag during removal; anchor through stable braided sections and arrange the loose texture over or around them afterward.
Conclusion
Milano curls braid hairstyles can move from compact shoulder length to flowing waist length, and the curl placement changes the maintenance as much as the braid size does. Curly ends keep most of the length structured, while boho and scattered versions create more loose texture to refresh. Small braids provide detailed movement; jumbo braids make the braid pattern more prominent. Center and side parts change the front balance without requiring an updo, while ponytails, buns, crowns, and pinned sections offer temporary restyling. Consider total weight, comfortable tension, curl upkeep, sleeping routine, and how often you actually wear your hair up. The best reference is one whose braid width, length, curl distribution, and everyday effort match your normal routine.
Before Your Salon Visit
Choose one or two favorites and save references that clearly show the roots, lengths, and curl placement. Discuss your hair density, preferred braid width, total length, comfortable tension, usual part, and realistic maintenance routine. Point out exactly where you want loose curls to begin, how much curl you prefer, and whether you regularly wear ponytails or buns. If you like the braid size from one reference but the curl distribution from another, explain those preferences separately so the final placement can be planned clearly.
FAQs
How can I keep the loose curls from tangling quickly?
Reduce unnecessary handling, protect the style during sleep, and separate developing tangles gently from the ends upward. Styles with many scattered curls naturally require more attention than versions with curls mainly at the ends. Avoid repeatedly brushing several loose sections together, since that can disturb their definition and increase tangling.
Are small or jumbo braids easier to maintain with Milano curls?
Each has a different trade-off. Small braids create more individual sections and can take longer to install, while jumbo braids carry more hair in each section. Curl quantity also matters. Choose braid width based on comfortable weight, desired movement, styling flexibility, and the amount of loose texture you want to manage.
Can Milano curls braids be worn in ponytails and buns?
Yes, provided the installation has enough comfortable movement and the gathered style does not create painful tension. Low arrangements generally keep the braids closer to their natural direction. High ponytails and top knots may feel heavier, particularly with long or full installations, so loosen or lower them when needed.
How often should the curls be refreshed?
Refresh them according to condition rather than following a rigid daily schedule. A curl that remains separated and defined may need nothing, while a flattened or fuzzy piece can be addressed individually. Targeted refreshing uses less product and manipulation than repeatedly resetting every loose curl in the installation.