13 Pixie Cut Baddie Hairstyle Ideas

A pixie cut baddie look is less about one fixed haircut and more about combining a short silhouette with deliberate details. Clean parting, controlled edges, defined texture, sculpted fringe, and a polished finish can all create that effect. The crown may stay sleek or carry noticeable lift, while the sides can be closely tapered, softly layered, or long enough to tuck. Fringe ranges from tiny micro bangs to a long side swoop, so the front can change the mood without changing the entire cut.
Texture and density should guide the shape. Fine strands may need more weight left through the crown instead of excessive thinning, while dense hair can benefit from targeted internal weight removal where the sides become bulky. Curly and coily pixies need enough length for curl grouping and shrinkage, especially through the fringe and top. Ear exposure, sideburn length, and nape softness can also be adjusted without treating any face shape as requiring one specific solution.
Styling effort varies from a brief finger refresh to a more deliberate smooth set or curl routine. Short cuts expose growth quickly around the ears, fringe, and neckline, but styling effort and haircut upkeep are separate. A polished pixie may need frequent morning shaping even when the cut still fits well, while a textured version may refresh quickly but need reshaping once its crown or taper loses definition.
Quick List
- Sleek Deep-Side-Part Pixie Cut Baddie Hairstyle
- Finger-Wave Pixie Cut Baddie Hairstyle
- Curly-Top Tapered Pixie Cut Baddie Hairstyle
- Sculpted-Sideburn Pixie Cut Baddie Hairstyle
- Wet-Look Textured Pixie Cut Baddie Hairstyle
- Micro-Fringe Pixie Cut Baddie Hairstyle
- Swooped-Bang Pixie Cut Baddie Hairstyle
- Coily Defined Pixie Cut Baddie Hairstyle
- Fine-Hair Lifted Pixie Cut Baddie Hairstyle
- Dense-Hair Weight-Balanced Pixie Cut Baddie Hairstyle
- Ear-Tucked Long-Top Pixie Cut Baddie Hairstyle
- Soft-Spiked Pixie Cut Baddie Hairstyle
- Grown-Out Bixie-Inspired Pixie Cut Baddie Hairstyle
Sleek Deep-Side-Part Pixie Cut Baddie Hairstyle

A deep side part gives a short pixie strong direction without needing extreme volume. The heavier front section stays long enough to sweep diagonally across the forehead, while the opposite side sits closer around the temple and ear. Crown layers remain fairly long and smooth, and the nape tapers neatly instead of ending in a bulky shelf. Straight and softly wavy textures usually reach this finish with less work, although the haircut itself can be worn with natural texture on less polished days.
Apply heat protectant before guiding the longer front with a small flat iron, then use lightweight styling cream through the sweep and side sections to control flyaways. A quick refresh may only involve resetting the part and smoothing the front; styling the whole cut after washing takes longer if your natural texture differs strongly from the intended finish. At the salon, establish your usual part before the front is shortened and specify how much ear exposure you want. Keeping enough length on the heavier side prevents the sweep from falling into the eyes. Reshaping becomes useful when the side section grows bulky, the nape loses its clean taper, or the front no longer holds a defined diagonal.
Pro tip:
Set the deep part while the roots are still damp, then let the front dry in that direction. Establishing the base early reduces repeated smoothing later.
Make It Work for You:
If your hair is naturally wavy, leave a soft bend through the longer front instead of flattening it completely. The clean part and controlled sides can provide enough polish.
Watch Out For:
A part that is too deep can overload one side and expose the opposite temple more than intended. Shift it slightly before removing additional hair.
Finger-Wave Pixie Cut Baddie Hairstyle
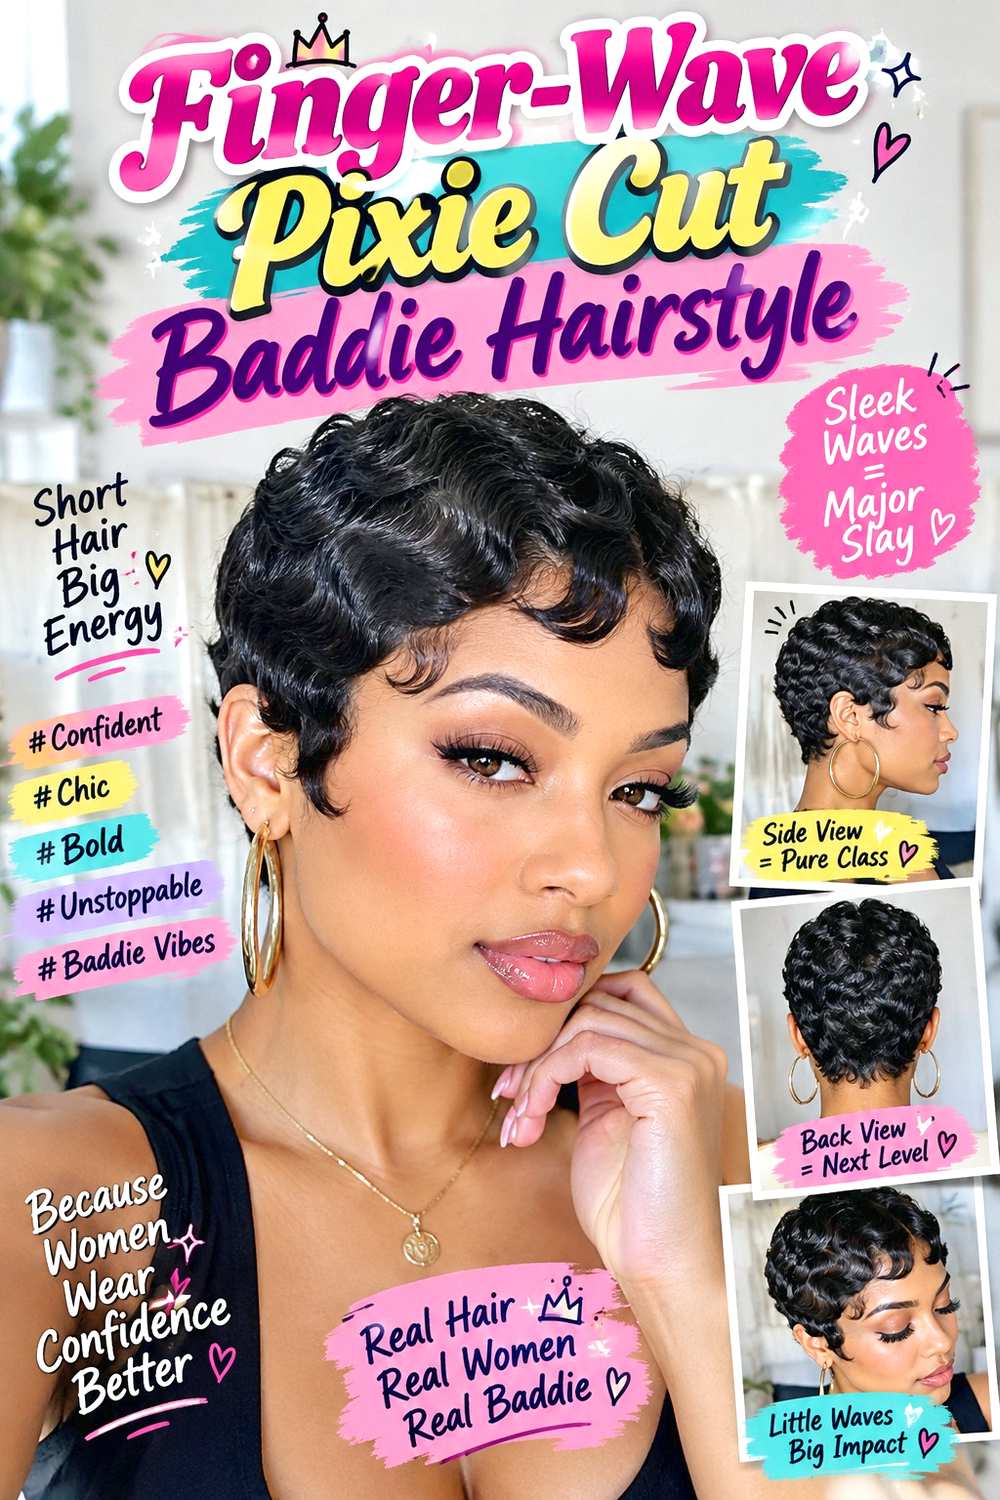
Sculpted S-shaped waves make this pixie feel polished while keeping the overall length very short. The sides and crown retain enough hair to form visible curves, and the fringe blends into the first wave rather than hanging as a separate bang. Around the ears, the outline stays neat and close, while the nape can taper softly against the head. This approach works especially well when the hair can be molded into defined waves, but the exact wave size should reflect texture and available length rather than forcing every section into the same pattern.
Use styling gel for controlled hold and a fine-tooth comb to guide the waves into alternating curves while the hair is damp. Finish with lightweight hairspray once the pattern is set and dry. A quick refresh can involve reworking one flattened front curve; recreating the full molded pattern after washing is the longer process and requires more precision. At the salon, ask for enough length through the top and sides to support the wave pattern you want, especially near the temples where an overly short section may not curve cleanly. Maintenance becomes noticeable when side growth blurs the ear outline or the crown becomes too long to sit close. The haircut should support molding without requiring uncomfortable tension.
Pro tip:
Build the first front curve carefully because it sets the direction for the remaining waves. Smaller adjustments there are easier than correcting the whole pattern later.
Make It Work for You:
If your hair forms tighter natural bends, use smaller wave sections instead of stretching them excessively. The sculpted finish can stay defined while respecting your natural texture.
Watch Out For:
Using too much gel can make the waves look stiff and flaky rather than polished. Start lightly and add only where the curves need stronger control.
Curly-Top Tapered Pixie Cut Baddie Hairstyle

A fuller curly top paired with tapered sides creates clear contrast without requiring a dramatic undercut. The crown retains enough length for curls to group and spring, while the hair around the ears becomes gradually shorter and closer to the head. A few front curls can form a soft fringe, with their dry length sitting above or near the brows. The nape stays compact so the upper texture remains the strongest feature. This shape works best when curl shrinkage is considered separately through the front, crown, and sides.
Apply lightweight leave-in conditioner for slip, add curl gel for definition, and use a diffuser on a cool setting when you want controlled drying. A brief refresh may involve reactivating only flattened crown curls with damp hands; a complete wash-day routine takes longer. At the salon, discuss how high you want the taper around the ears and where the front curls should finish when completely dry. The crown needs enough length to retain grouping rather than becoming fluffy from being cut too short. Reshape the cut when the taper begins hiding the ear line, the crown loses separation, or the fringe starts sitting lower than you prefer.
Pro tip:
Refresh only curls that actually flattened overnight instead of rewetting the whole top. Targeted reactivation keeps the crown defined without disturbing sections that still look good.
Make It Work for You:
For tighter curls, preserve extra length through the fringe and crown. The cut can remain compact at the sides while leaving enough room for spring.
Watch Out For:
Cutting the top too short can prevent curls from grouping cleanly. Keep enough length for the pattern to form before deciding more bulk needs removal.
Sculpted-Sideburn Pixie Cut Baddie Hairstyle
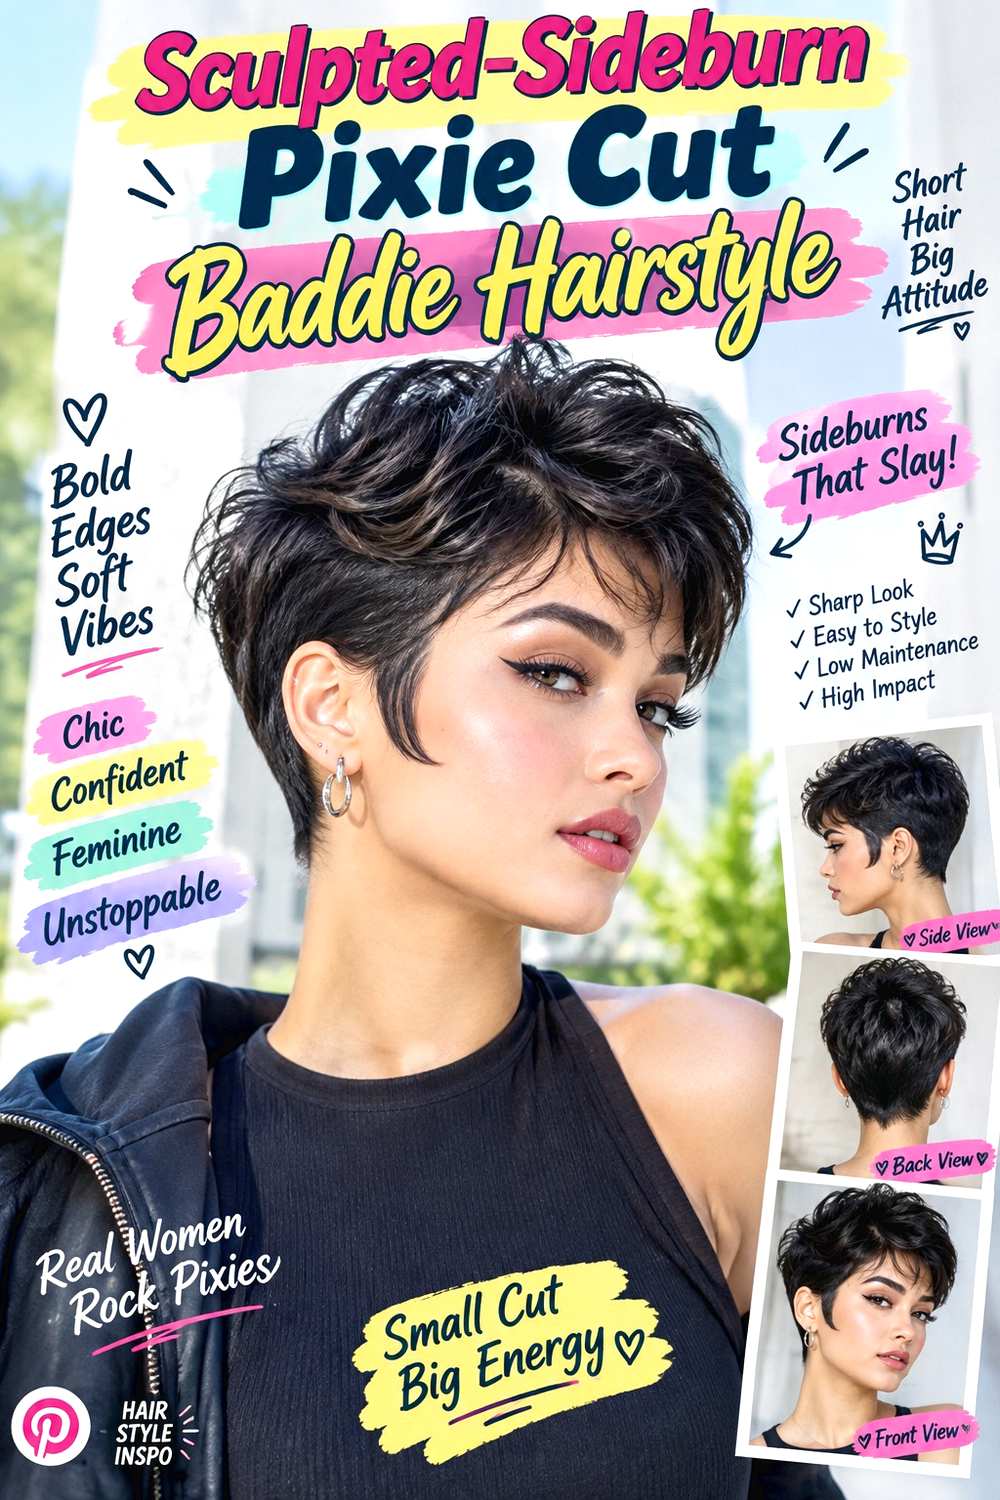
Deliberately shaped sideburn pieces give this pixie a strong frame around the temples without relying on heavy bangs. The crown stays smooth or lightly textured, while the sides taper neatly around the ears. Narrow sideburn sections extend toward the middle or lower ear and can finish in a soft point or rounded tip. The nape remains compact, and the front may sit short or sweep slightly to one side. This design suits readers who want a precise detail around the face while keeping the rest of the cut relatively simple.
Apply heat protectant before refining the sideburn pieces with a small flat iron, then use lightweight styling cream to smooth them and control the crown. A quick refresh can focus on those front details; a full wash-day style takes longer only if the entire surface needs smoothing. At the salon, point to the exact finished sideburn length and width you prefer, because making them too thick changes the amount of exposed ear and temple. Ask that the crown connect softly into the sides rather than dropping into an abrupt step. Maintenance becomes useful when the sideburn pieces lose their shape, the ear outline becomes overgrown, or the nape starts looking heavier than the carefully framed front.
Pro tip:
Style the sideburns after the crown is settled so you can judge their scale against the finished top. Keep them narrow enough to read as deliberate accents.
Make It Work for You:
If your hair naturally curls at the temples, keep the sideburn pieces slightly longer and let them bend. The framing detail can stay visible without forcing them straight.
Watch Out For:
Making the sideburns too wide can visually close the ear area and compete with the crown. Keep their width controlled and their outline intentional.
Wet-Look Textured Pixie Cut Baddie Hairstyle
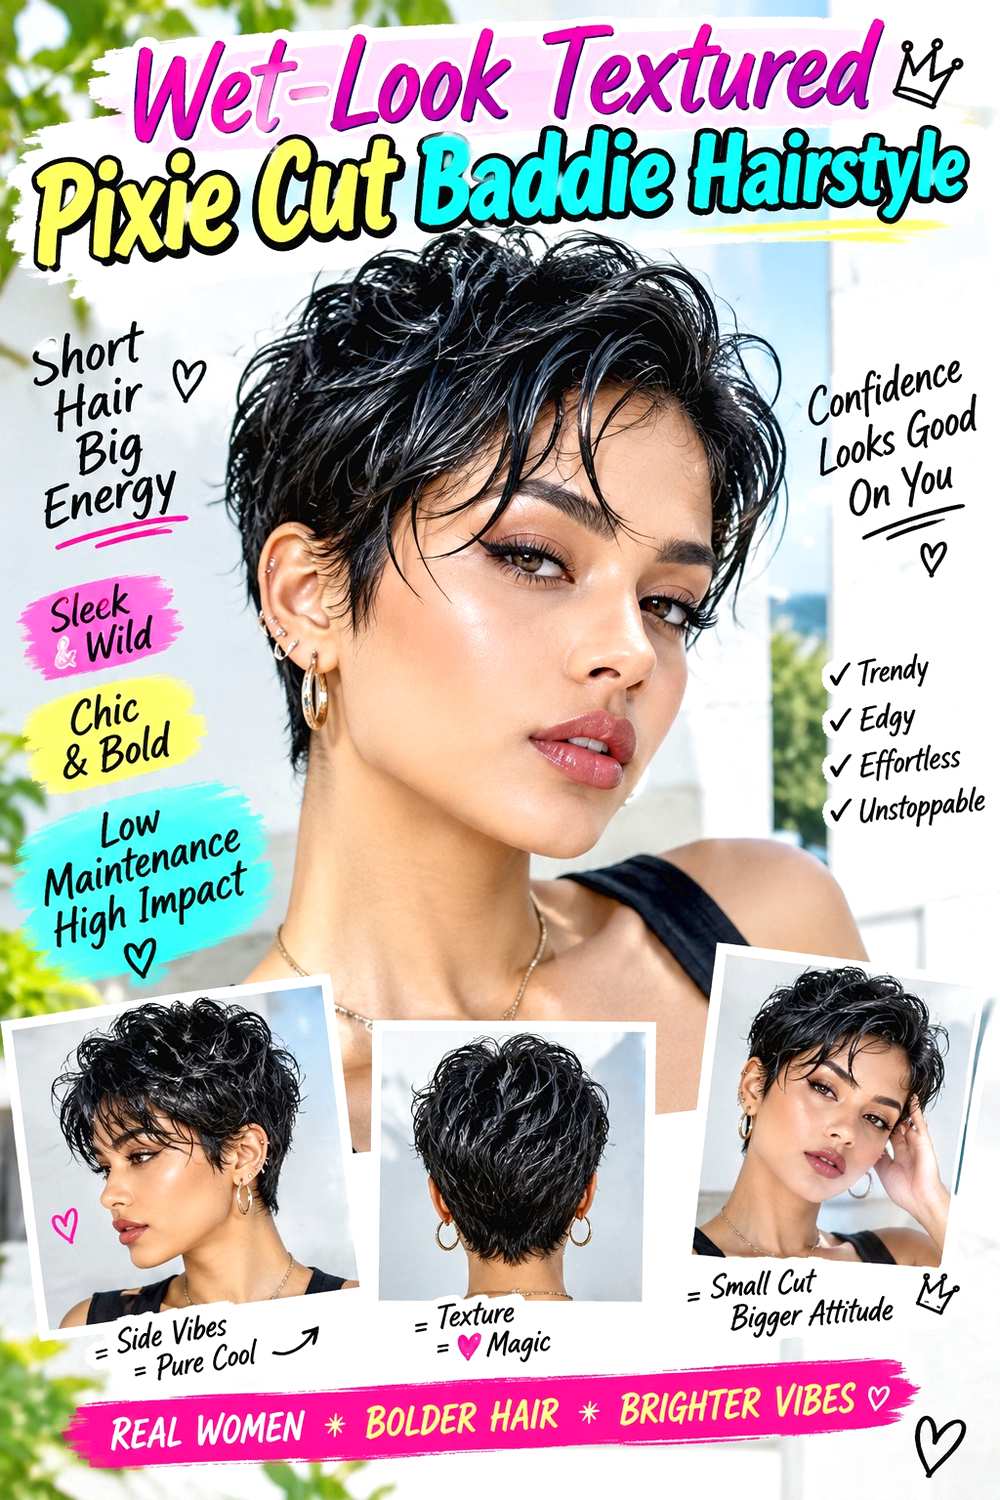
A wet-look finish emphasizes separation, parting, and the direction of every short layer. The top stays longer than the closely controlled sides, with the front combed backward, diagonally, or into a shallow side part. Rather than forming a solid slick cap, individual sections remain visible through the crown so the haircut still has texture. The ears and nape stay neat, making the glossy surface the focal point. Straight, wavy, curly, and coily textures can interpret this finish differently without needing the same cutting method.
Use styling gel for controlled definition and a wide-tooth comb to establish the main direction, then add lightweight styling cream to selected ends if they need softer separation. A quick refresh can mean reactivating only the front with damp hands; a full wash-day version takes longer because the product needs to be distributed evenly without overloading the roots. At the salon, ask for enough top length to create visible direction and specify whether you want the ear area closely tapered or softly covered. Reshape when the sides begin expanding, the crown loses its distinct layers, or the nape grows beyond the compact outline. The wet effect is a styling choice, so the haircut should still work when worn dry.
Pro tip:
Apply the strongest hold near the roots and use less through the ends. That keeps the direction controlled while allowing the surface pieces to remain visibly separated.
Make It Work for You:
For curly or coily hair, preserve natural bends instead of combing them completely flat. Defined glossy curl groups can create the same controlled wet-look effect.
Watch Out For:
Too much gel can make short layers merge into one hard surface. Use enough for direction, then stop before the crown loses its visible separation.
Micro-Fringe Pixie Cut Baddie Hairstyle

A micro fringe creates a sharp focal point while leaving the rest of the pixie textured and mobile. The bangs finish clearly above the brows, with a straight, softly broken, or slightly curved edge. Crown layers stay longer and can move forward or upward, while the sides taper around the ears and the nape remains neat. Because short fringe growth changes the proportion quickly, this version suits readers comfortable with a more noticeable front detail and regular attention to its finished length.
Apply heat protectant before refining the fringe with a small flat iron, then use texturizing spray through the crown to create separation without making the bangs fuzzy. A quick refresh can focus only on the front and top; full wash-day styling takes longer if the sides and crown need reshaping. At the salon, agree on the exact dry micro-fringe length before cutting and decide whether the outer corners should stay slightly longer to soften the temples. Also specify how closely you want the sides tapered, since an extremely short fringe paired with extremely tight sides creates a much sharper result. Maintain the bangs when growth changes their intended proportion, and reshape the overall cut when the crown becomes heavy or the ear outline disappears.
Pro tip:
Separate only a few micro-fringe pieces after styling. Small variations in spacing create texture without making the short front look jagged or overly product-heavy.
Make It Work for You:
If you want easier grow-out, leave the outer fringe corners a little longer. The short center remains distinctive while the sides can blend more naturally.
Watch Out For:
Cutting the fringe extra short to delay maintenance can leave little styling flexibility. Choose the finished length you want rather than compensating for future growth.
Swooped-Bang Pixie Cut Baddie Hairstyle

A long, curved bang gives this pixie a dramatic front while the sides and back stay compact. The top retains enough length to sweep from a deep side part across the forehead and curve toward the temple. Beneath it, the opposite side can sit close around the ear, while the nape remains softly tapered. The crown stays relatively smooth so the swoop looks intentional instead of competing with high texture. Straight and wavy hair can reach the finish readily, while curly textures can adapt it with a softer curved front.
Apply heat protectant before shaping the bang with a round brush, then use flexible hairspray to support the curve without turning it rigid. A quick refresh may involve only reworking the front section; a full wash-day blow-dry takes longer depending on density and natural pattern. At the salon, establish the deep part first and ask for enough top length that the bang can cross the forehead without falling directly into the eyes. Specify how short the opposite side should be so the contrast feels balanced. Maintenance becomes useful when the bang loses its sweep, the heavy side starts collapsing, or the shorter side grows enough to hide its clean outline.
Pro tip:
Let the swooped bang cool in its curved position before loosening it. Cooling first helps the bend last without needing excessive hairspray or repeated reshaping.
Make It Work for You:
If your hair is naturally wavy, make the swoop broader and less rigid. The natural bend can support the shape while reducing the amount of daily heat.
Watch Out For:
A bang that is too heavy can collapse across the forehead. Keep the section controlled and avoid loading the roots with rich styling products.
Coily Defined Pixie Cut Baddie Hairstyle

Defined coils give a short pixie a sculpted surface without requiring a sleek finish. The crown stays long enough for individual coil groups to form, while the sides taper gradually around the ears and the nape sits close. The front can include several shorter coils that act as a fringe without creating a solid horizontal line. Volume stays concentrated through the top rather than spreading equally at the temples. This version should be planned around the hair’s dry pattern because shrinkage can vary across the crown, fringe, and sides.
Use lightweight leave-in conditioner for moisture, curl gel for grouping, and a diffuser on a cool setting when you want faster drying with controlled definition. A short refresh can involve reactivating only compressed coils with damp hands; a full wash-day routine takes longer. At the salon, discuss the desired dry crown height and how much ear exposure you want, then establish the fringe length in its natural coil pattern. Avoid blanket thinning simply to make the shape smaller; targeted bulk adjustment is more useful if one area becomes too wide. Maintenance becomes noticeable when the taper loses definition or crown coils grow long enough to drop rather than lift.
Pro tip:
Shape the front coil groups while damp, then leave them alone until mostly dry. Less touching helps preserve definition and keeps the fringe from becoming fuzzy.
Make It Work for You:
For strong shrinkage, preserve extra length through the fringe and crown. The finished cut can stay compact without making the top shorter than you intended.
Watch Out For:
Taking the sides too high can disconnect them from a fuller coily crown. Keep enough transitional length so the taper looks deliberate rather than abrupt.
Fine-Hair Lifted Pixie Cut Baddie Hairstyle

Fine strands can create a strong pixie shape when the crown keeps enough weight to lift instead of being thinned excessively. The top stays slightly longer, with soft layers directed upward and forward, while the sides sit closer around the ears. A light fringe can sweep sideways or break into a few separated pieces, and the nape remains compact. Fine hair can still be high density, so the exact amount of layering should depend on how much hair is present rather than strand thickness alone.
Apply root-lift spray sparingly at the crown, use heat protectant before shaping the top with a small round brush, and let the sides stay comparatively smooth. A quick refresh can focus on changing root direction; a full blow-dry takes longer depending on density and natural texture. At the salon, ask to preserve enough crown length for lift and avoid aggressive texturizing through the ends. Specify where the side taper should sit so it supports the top without exposing more scalp than you prefer. Reshape the cut when the crown becomes too long to lift easily or the side outline loses definition. Styling direction may solve flatness before additional layers are needed.
Pro tip:
Dry the crown briefly opposite its final direction, then place it back. The root change creates lift without requiring extra-short layers or large amounts of product.
Make It Work for You:
If your fine strands are high density, you can support more internal movement through the crown. Keep the visible perimeter around the temples and nape controlled.
Watch Out For:
Over-texturizing fine ends can make the top look sparse instead of lifted. Preserve enough solid hair for the crown to hold a connected, substantial shape.
Dense-Hair Weight-Balanced Pixie Cut Baddie Hairstyle

Dense hair can make a pixie look beautifully substantial, but the cut needs strategic weight placement so the sides do not expand and the crown does not turn bulky. The top stays long enough for movement, while internal layers redistribute volume through the crown and upper sides. The ear area tapers more closely, and the nape remains compact. A side-swept or short textured fringe can soften the front. The goal is controlled structure, not simply removing the maximum amount of hair.
Apply heat protectant before shaping with a small round brush, then use lightweight styling cream through the mids and ends to control expansion without flattening the roots. A quick refresh can focus on the crown and ear area; washing and fully styling dense hair takes longer. At the salon, show where the dry cut becomes widest and ask for targeted internal weight removal there while preserving the outer perimeter. Discuss how close you want the sides, because a high tight taper can create a stronger contrast than expected. Maintenance becomes useful when bulk gathers behind the ears, crown layers stop separating, or the nape spreads beyond its intended line.
Pro tip:
Let dense hair cool and settle before deciding more weight needs removing. Freshly lifted short layers can relax considerably once the style has fully dried.
Make It Work for You:
If your dense hair is wavy, preserve some natural bend through the crown instead of smoothing everything flat. Controlled sides can provide enough structure for the finish.
Watch Out For:
Blanket thinning can create short internal hairs that push outward. Reduce bulk only where the dry silhouette actually feels heavy or excessively wide.
Ear-Tucked Long-Top Pixie Cut Baddie Hairstyle

A longer top and temple area gives this pixie more styling flexibility while still keeping the back short. The front can sweep diagonally or fall in soft separated pieces, and the side sections stay long enough to tuck behind one or both ears. The crown carries gentle movement rather than standing upright, while the nape is trimmed close for contrast. Straight, wavy, and loose-curly textures can all work with this design, especially for readers who like changing between tucked and untucked finishes.
Apply heat protectant before shaping the front with a round brush, then use lightweight styling cream on the temple pieces and nape for control. A quick refresh can involve resetting the part and tuck; a full wash-day blow-dry takes longer depending on texture. At the salon, explain that ear-tucking matters and show exactly where the temple sections need to reach when dry. Avoid placing the shortest layers directly over the ears because those pieces can repeatedly pop forward. Reshape the cut once the sides stop tucking securely, the long top becomes too heavy, or the nape loses its compact finish. If you prefer less heat, the longer top can follow its natural texture while the ear placement keeps the shape neat.
Pro tip:
Style the front before tucking the sides so you can see which pieces should remain loose. This prevents pulling the entire face frame behind the ears.
Make It Work for You:
For curly hair, leave extra temple length and tuck only once those sections are mostly dry. This reduces stretching and keeps the front texture softer.
Watch Out For:
Very short layers above the ears can spring out throughout the day. Keep the tuck zone long enough to sit securely without constant adjustment.
Soft-Spiked Pixie Cut Baddie Hairstyle

Soft spikes create upward movement through the crown without the stiff, separated points of a heavily gelled finish. The sides stay short and controlled, while the top uses several slightly longer layers that can be directed upward, diagonally, or forward. A short fringe may blend into the first textured pieces, and the nape remains close so the crown carries most of the visual energy. Straight and wavy textures can form the shape readily, while fine or medium-density hair may appreciate the added root direction.
Apply heat protectant before lifting the crown with a small round brush, then use lightweight styling paste to pinch only selected ends into soft points. A quick refresh can involve reactivating a few flattened crown sections with your fingers; a full wash-day style takes longer if the hair naturally lies very flat. At the salon, ask where the shortest crown layer should sit and keep enough length that the pieces bend rather than sticking vertically. Specify how close you want the sides because a very tight taper makes the upper texture look more dramatic. Reshape when crown layers become too long to hold lift or the side growth makes the silhouette too rounded.
Pro tip:
Pinch styling paste onto just the last part of selected crown pieces. Leaving the roots lighter keeps the spikes flexible and prevents the top from looking stiff.
Make It Work for You:
For fine hair, use fewer defined spikes and keep more crown weight between them. You still gain lift without making the upper shape look thin.
Watch Out For:
Using paste through every strand can make short hair clump into rigid points. Define selected sections and leave softer pieces between them for balance.
Grown-Out Bixie-Inspired Pixie Cut Baddie Hairstyle

A grown-out pixie can keep a polished baddie finish while moving toward a bixie-like length around the ears and nape. The crown reaches farther over the sides, the front can sweep near the brows, and longer temple pieces may tuck behind the ears. The nape extends softly instead of staying tightly cropped, but the overall silhouette remains shorter than a traditional bob. A center, side, or off-center part can work depending on the growth pattern. This version suits readers who want more styling flexibility without losing short-cut structure.
Use lightweight mousse through the crown for movement, apply heat protectant before refining the front with a round brush, and leave the nape softer rather than heavily set. A quick refresh can focus on the fringe and root direction; a complete blow-dry takes longer depending on density. At the salon, explain which sections you are intentionally growing and ask for weight redistribution rather than automatically shortening every area. Keeping the temples and nape longer can support progression toward a bixie while crown shaping prevents the cut from becoming bulky. Maintenance becomes useful when the top collapses, side growth loses direction, or the nape widens beyond the shape you want.
Pro tip:
Refresh crown lift before deciding grown-out sections need shortening. Restoring movement at the roots can make extra length feel intentional while preserving your progress.
Make It Work for You:
If you are growing toward a bob, keep the temple and nape sections while trimming only excess crown bulk. This maintains length without losing all short-cut definition.
Watch Out For:
Letting every section grow untouched can create bulky sides before the perimeter catches up. Small reshaping adjustments can preserve length while keeping the silhouette deliberate.
Conclusion
Pixie cut baddie hairstyles can be sleek, curly, coily, sculpted, spiked, or softly grown out, but the most distinctive versions use clear placement rather than excessive styling. A deep side part creates direction, while finger waves and wet finishes emphasize surface control. Defined curls add natural movement, and micro fringe or sideburn details make the perimeter more graphic. Fine hair often benefits from preserved crown weight, while dense hair may need targeted internal bulk reduction. Ear exposure, fringe length, side taper, and crown volume all affect maintenance. Choose the version that works with your natural texture and normal routine rather than relying on a finish you would need to recreate completely every morning.
Before Your Salon Visit
Choose one or two favorites and save references that clearly show the front, sides, crown, ears, and nape. Discuss your natural texture, density, face shape preferences, usual part, fringe length, styling routine, and upkeep tolerance. Point to the exact side taper, crown volume, sideburn shape, curl placement, or polished finish you like. If the haircut in one reference works but you prefer the fringe or texture from another, explain those details separately so your stylist can plan the shape around your priorities.
FAQs
Can curly or coily hair wear a pixie cut baddie style?
Yes. Defined curls or coils can supply much of the shape without needing a sleek finish. The important part is planning crown, fringe, and side lengths around dry shrinkage. Keeping enough length for curl grouping usually creates a cleaner result than cutting every section extremely short.
How much daily styling does a polished pixie usually need?
It depends on how closely the desired finish matches your natural texture. A finger-wave or sleek side-swept version may need regular resetting, while curls or a textured crown may only need selective refreshing. Styling time and haircut maintenance are separate, so a well-shaped pixie can still require daily finishing.
How do I keep a pixie from looking too flat at the crown?
Start with root direction before assuming more layers are necessary. Drying the crown opposite its finished direction can add lift, while heavy product at the roots can collapse it. Fine strands especially benefit from preserving enough top length and weight rather than excessive thinning.
How do I know when my pixie needs reshaping?
Useful signs include fringe falling into the eyes, side growth hiding the ear outline, crown layers merging into a heavy shape, or the nape losing its intended taper. Sharper cuts show growth sooner, while longer textured or bixie-inspired versions usually tolerate more length before their proportions change.