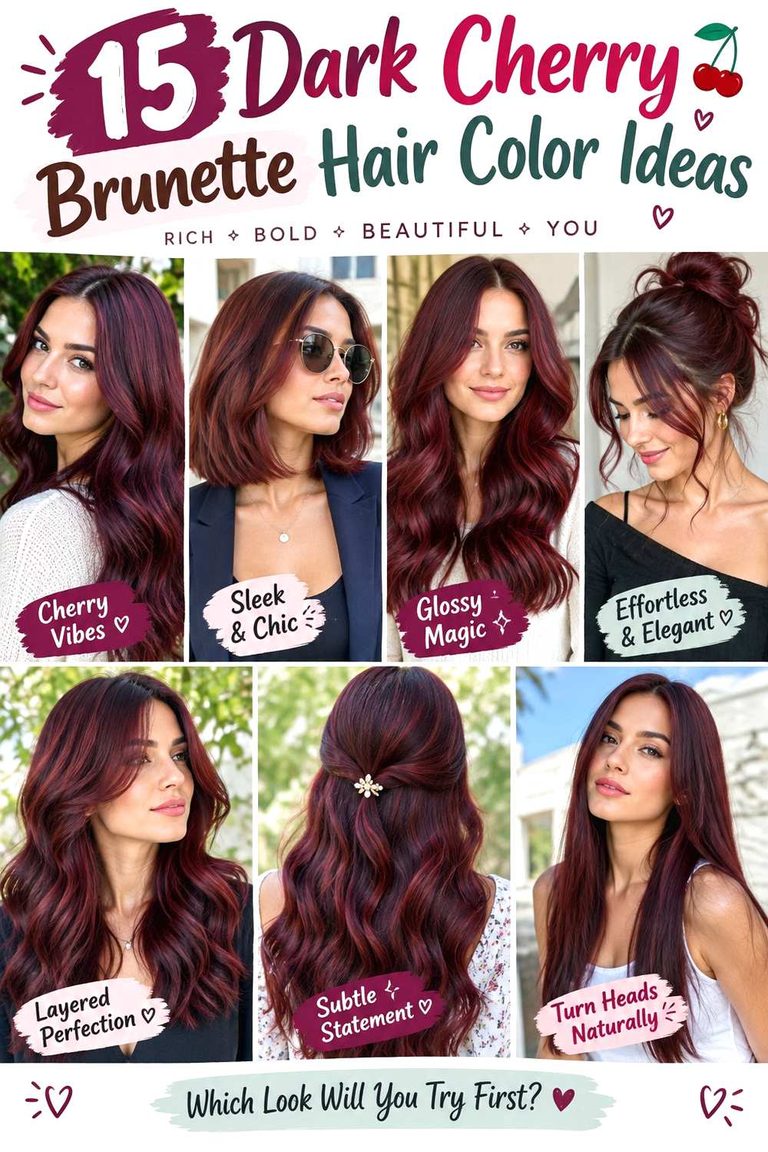
17 Supernatural Scarlet Hair Color Ideas
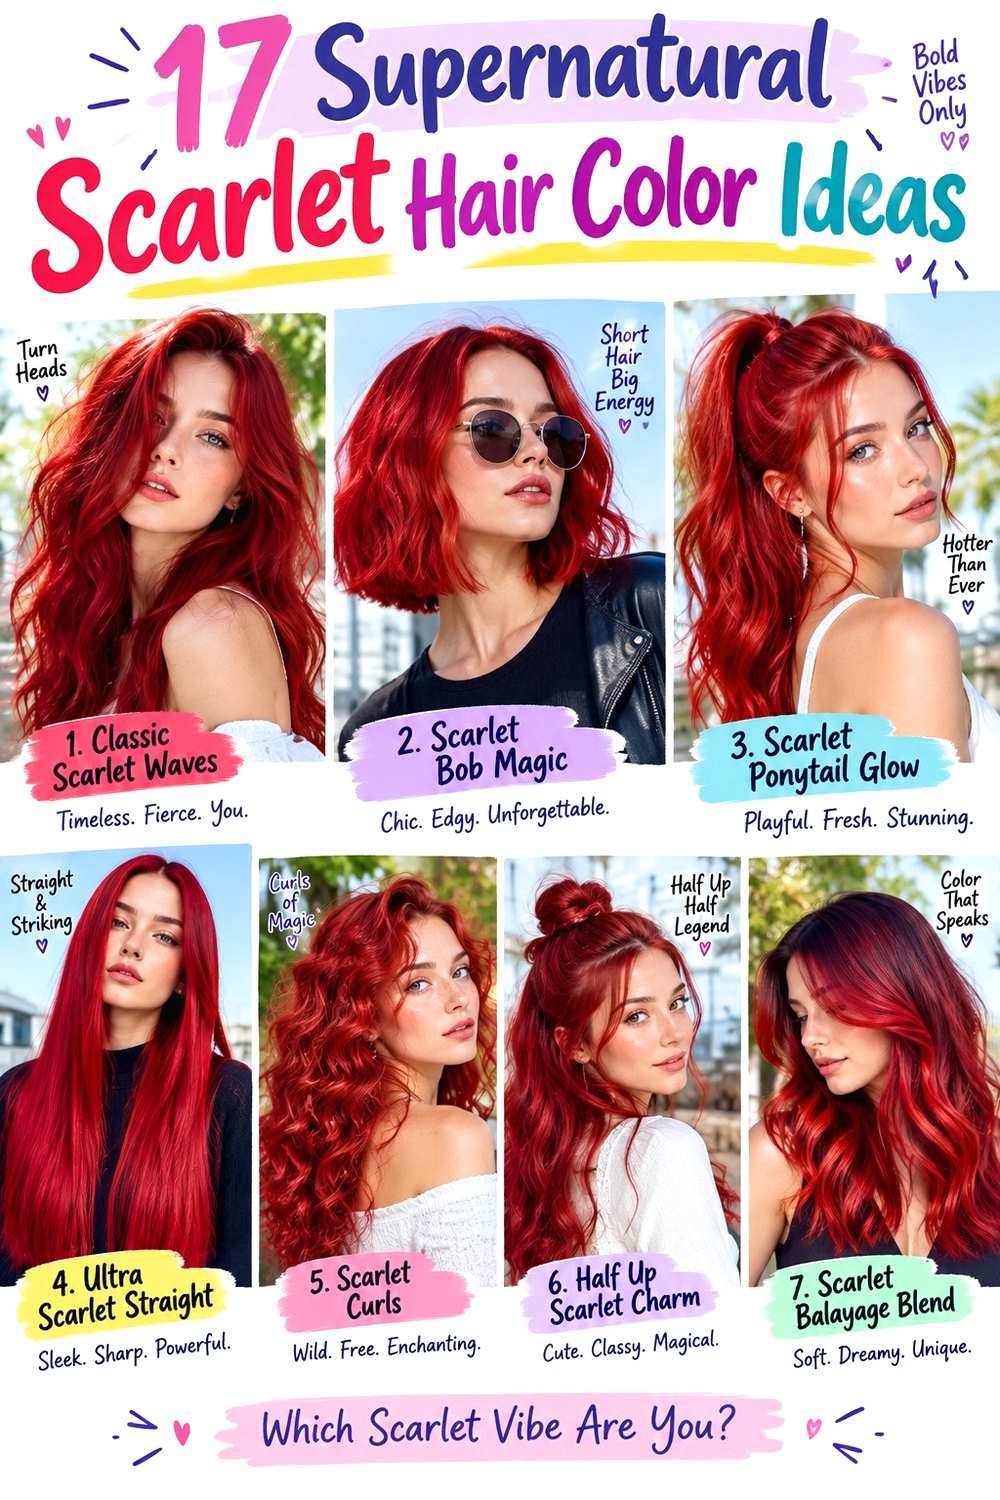
Scarlet hair sits between bright red, ruby, crimson, and deeper cherry tones, but placement changes its character as much as the shade itself. These scarlet hair color ideas range from saturated all-over finishes to narrow face-framing panels, shadow roots, hidden underlayers, and softer blends. Long layers can break the color into moving ribbons, while a bob or lob creates a more solid block of red. Bangs bring scarlet close to the eyes, and waves or curls reveal lighter and darker sections as the hair moves.
Texture and density influence how each placement reads. Straight hair can show clean transitions clearly, while waves and curls break color into smaller flashes. Dense hair offers room for hidden panels and layered dimension; lower-density hair may benefit from broader, less fragmented placement. Starting color also matters because achieving a bright scarlet on dark hair can require substantially more preparation than shifting an already-light base.
Maintenance varies just as widely. Vivid reds commonly need thoughtful wash-day care and periodic color refreshing, while rooted or blended designs can make visible regrowth less abrupt. Compare each option by placement, contrast, fade pattern, styling routine, and how often you realistically want to revisit the salon.
Quick List
- Vivid Scarlet Glass Bob Hairstirstyle
- Deep Scarlet Shadow Root Hairstyle
- Scarlet Money Piece Waves Hairstyle
- Scarlet To Crimson Melt Hairstyle
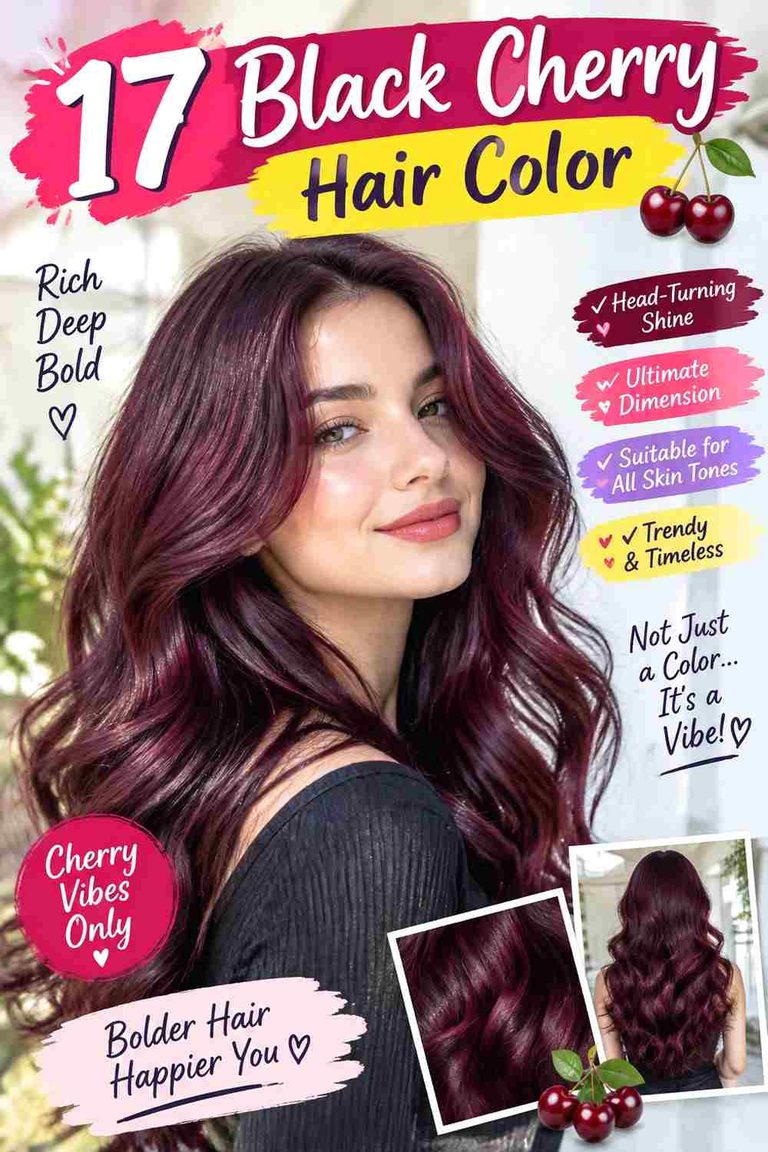
- Black Cherry Scarlet Balayage Hairstyle
- Scarlet Copper Ribbon Hairstyle
- Scarlet Peekaboo Layers Hairstyle
- Ruby Scarlet Curly Halo Hairstyle
- Scarlet Ombré Long Layers Hairstyle
- Scarlet Wolf Cut Hairstyle
- Scarlet Curtain Bangs Hairstyle
- Dark Scarlet Blunt Lob Hairstyle
- Scarlet Underlayer Shag Hairstyle
- Scarlet Braided Dimension Hairstyle
- Scarlet Pixie Crop Hairstyle
- Scarlet Dip-Dye Ends Hairstyle
- Soft Scarlet Brown Blend Hairstyle
Vivid Scarlet Glass Bob Hairstirstyle

A chin-to-jaw-length bob turns scarlet into one continuous field of color, especially when the bottom edge stays compact and the surface is smooth. A center or slightly off-center part keeps the silhouette simple, while minimal visible layering lets the intense red carry the design. Straight hair displays the solid saturation most clearly, although softly wavy hair can give the same shade more movement. If you prefer fullness through the ends, ask the stylist to preserve enough perimeter weight instead of removing unnecessary bulk around the bottom.
This option suits anyone comfortable with noticeable color and regular fade management. A color-safe shampoo helps reduce unnecessary stripping, a moisturizing conditioner keeps the lengths pliable, and a heat protectant is important when you choose a heat-styled polished finish. A quick between-wash refresh may involve little more than resetting the part and smoothing the surface; a complete wash and styled finish takes longer depending on density and natural texture. Discuss with the colorist how saturated you want the scarlet from roots through ends and how that goal relates to your starting shade. Refresh when the red loses the brightness or evenness you want rather than relying on a rigid schedule.
Pro tip:
When drying the front, direct it from both sides before settling the final part. This can help the roots lie smoothly without forcing the bob completely flat.
Make It Work for You:
If your natural texture is wavy, keep the strong bob outline but allow some bend through the mid-lengths. The scarlet will appear more dimensional without changing the defining solid-color effect.
Watch Out For:
Avoid repeatedly applying heavy smoothing products near the roots. Too much coating can make the compact bob appear flatter; concentrate richer moisture mainly through the mid-lengths and ends.
Deep Scarlet Shadow Root Hairstyle

A deeper root flowing into clear scarlet lengths creates contrast without dividing the hair into obvious stripes. The darkest area can stay close to the scalp before gradually opening into red around the upper lengths, making this particularly effective on shoulder-length or longer hair. Loose bends reveal the transition, while straighter styling makes the gradient look more graphic. Face-framing layers beginning near the jaw can expose brighter sections around the front without requiring a completely light root area.
A shadowed placement can be useful when you like scarlet but prefer a less abrupt visual line as the roots grow. Starting color determines how much preparation the brighter lengths may need, so bring references showing both the root depth and the scarlet intensity. A gentle color-safe shampoo supports wash-day care, a color-depositing conditioner can help maintain compatible red tones between appointments, and a wide-tooth comb reduces rough handling when detangling. A quick refresh is mostly about arranging the front and reviving the lengths, whereas a full wash-day routine takes longer with dense or long hair. Ask specifically how far you want the shadow root to extend; too much dark area changes the balance from rooted scarlet to mostly brunette.
Pro tip:
Photograph the color in indirect daylight before a refresh appointment. It gives you a useful record of how the root transition and scarlet lengths have faded together.
Make It Work for You:
For lower-density hair, choose a softer root transition rather than many narrow contrasting sections. Broad color placement can preserve a fuller visual impression through the lengths.
Watch Out For:
Do not judge the root depth under only warm indoor lighting. Scarlet and deep red can shift visually, so compare your reference and current color in neutral daylight too.
Scarlet Money Piece Waves Hairstyle
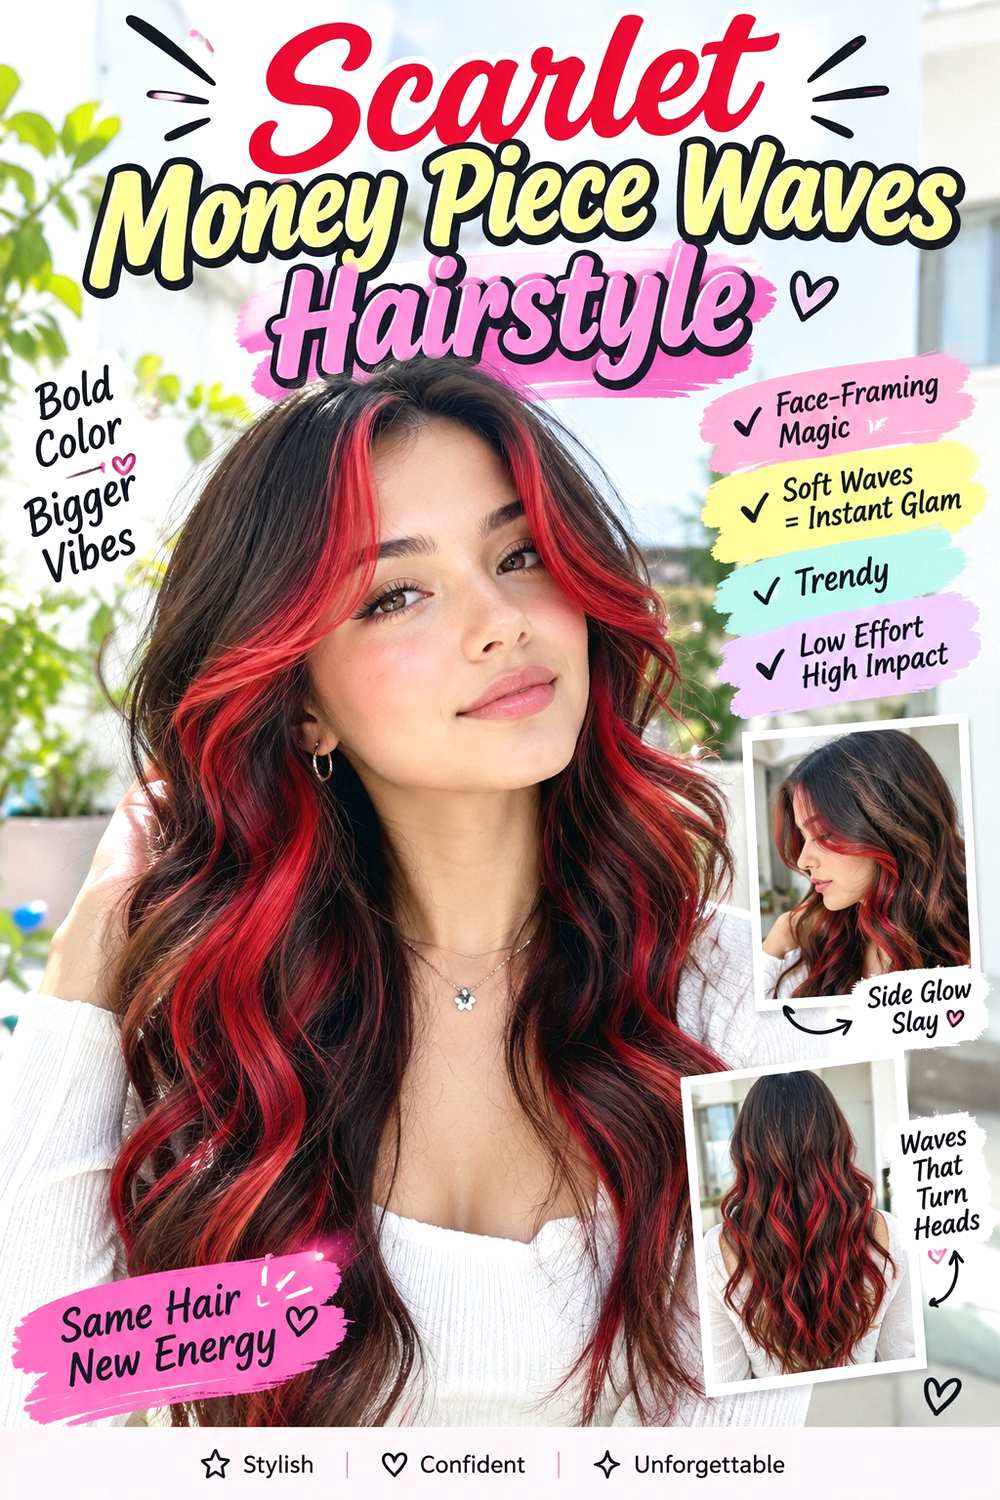
Two brighter scarlet panels around the face can create a strong focal point while the remaining hair stays deeper red, brunette, or another compatible base. On collarbone-length and longer hair, broad waves starting below the cheekbones repeatedly reveal those front sections. A center part gives both panels similar prominence, while an off-center part makes one side more dominant. Keeping the face-framing pieces long enough to tuck behind the ears can make the contrast easier to manage during everyday styling.
This placement works well when you want visible scarlet without coloring every section equally. The amount of contrast depends heavily on the existing base, so ask the colorist to show where each front panel begins and how wide it will appear when the hair falls naturally. Color-safe shampoo helps protect the overall tone, a lightweight conditioner keeps the bright front pieces flexible, and heat protectant should be used when forming waves with heat. Between washes, rearranging the part and reshaping only the front can be a short refresh; setting the whole head takes considerably longer. The brightest pieces may appear faded sooner because they sit prominently around the face, so plan maintenance around how much softness or contrast you are comfortable seeing.
Pro tip:
Before styling, separate the two scarlet panels from the rest of the hair. Shaping them deliberately keeps their placement visible instead of letting them disappear inside larger waves.
Make It Work for You:
If bold front panels feel too strong, ask for narrower scarlet sections that still frame the face. You retain the money-piece effect while reducing the difference from your base.
Watch Out For:
Very wide panels can dominate the entire front view unexpectedly. Agree on their width while your hair is parted the way you normally wear it.
Scarlet To Crimson Melt Hairstyle
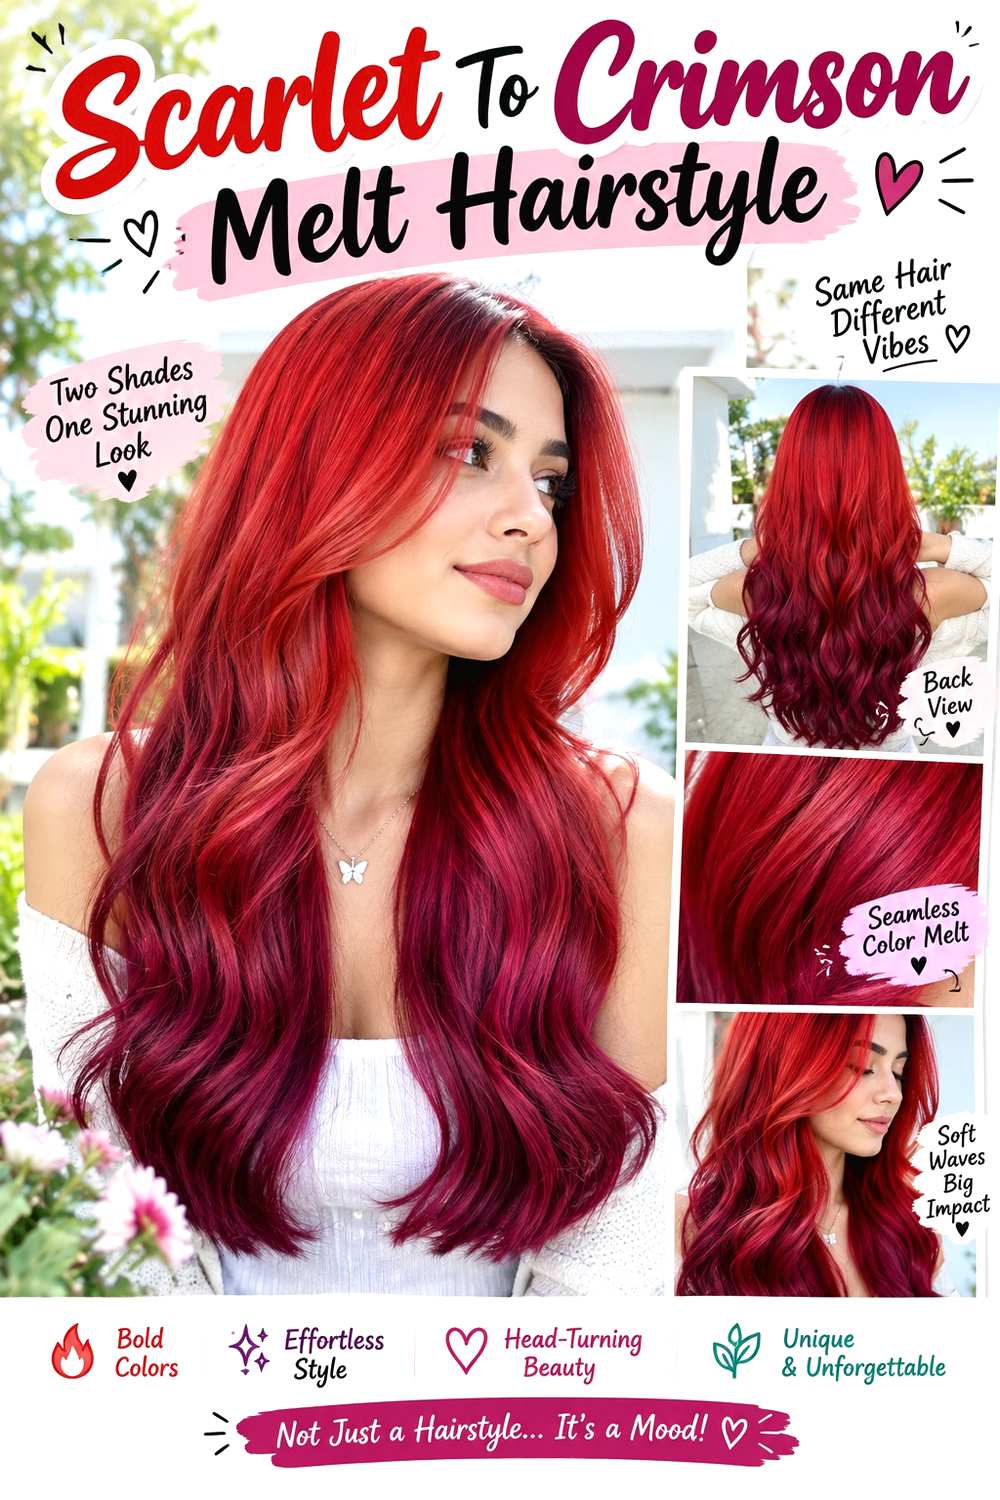
A tonal melt uses brighter scarlet through one area and deeper crimson through another without creating a hard boundary. On medium or long hair, the transition can begin around the mid-lengths, with darker red near the root and more luminous scarlet toward the lower sections, or the relationship can be reversed. Broad waves make the neighboring reds easy to distinguish, while straight styling creates a smoother gradient. Long face-framing pieces can carry the lighter tone upward without requiring uniform brightness around the entire head.
Because the design depends on related reds rather than extreme light-dark contrast, it can suit readers who want dimension that still reads as one color family. Ask your colorist to define where the visible transition should begin and which tone you want nearest your face; your starting color will affect how closely the finished shades can match a reference. A color-safe cleansing cream supports gentle washing, a red-depositing mask can reinforce compatible tones, and a microfiber towel reduces rough rubbing after washing. A brief refresh may only require reorganizing the waves, while full wash-day styling depends on length and texture. Watch the balance as the color fades: if scarlet and crimson begin looking too similar, a professional tonal refresh can restore separation.
Pro tip:
Save references that show the transition in daylight as well as indoors. The distinction between scarlet and crimson can look much smaller under warm artificial light.
Make It Work for You:
On curly hair, ask for a slightly broader transition zone so both red tones appear across several curl groups instead of forming one narrow horizontal band.
Watch Out For:
Avoid requesting several nearly identical reds without discussing contrast. If their depth is too similar, the planned melt may read as a single flat shade after a few washes.
Black Cherry Scarlet Balayage Hairstyle

A black-cherry base with scarlet-painted ribbons creates depth at the roots and flashes of brighter red through the moving lengths. On hair below the shoulders, the scarlet can concentrate around the face and outer surface while darker sections remain underneath. Loose waves reveal the contrast particularly well because every bend exposes a different part of the painted placement. Keeping the ends moderately full prevents dimensional color from being visually broken into too many thin sections.
This design can suit naturally dark starting colors when you prefer visible depth, although the achievable brightness of the scarlet depends on the existing color and previous chemical history. Ask your colorist where the brightest ribbons will sit rather than simply requesting “balayage,” since placement determines how much scarlet appears from the front. A color-safe shampoo helps slow unnecessary fading, a nourishing hair mask supports the treated lengths, and heat protectant is useful if you regularly define the ribbons with heated styling. A quick refresh can focus on rearranging a few front bends; a complete wave set takes longer. As the bright pieces soften, the darker background may become more dominant, so refresh according to the contrast you want to preserve rather than an arbitrary calendar date.
Pro tip:
Ask to see the placement with your hair resting over both shoulders. This helps you judge whether enough scarlet remains visible from the front when the hair moves.
Make It Work for You:
For straighter hair, request broader ribbons with enough spacing to stay visible on a smooth surface. Tiny scattered pieces may blend together more readily without waves separating them.
Watch Out For:
Too many bright ribbons can erase the black-cherry depth that defines the idea. Keep intentional darker areas between scarlet sections so the contrast remains readable.
Scarlet Copper Ribbon Hairstyle
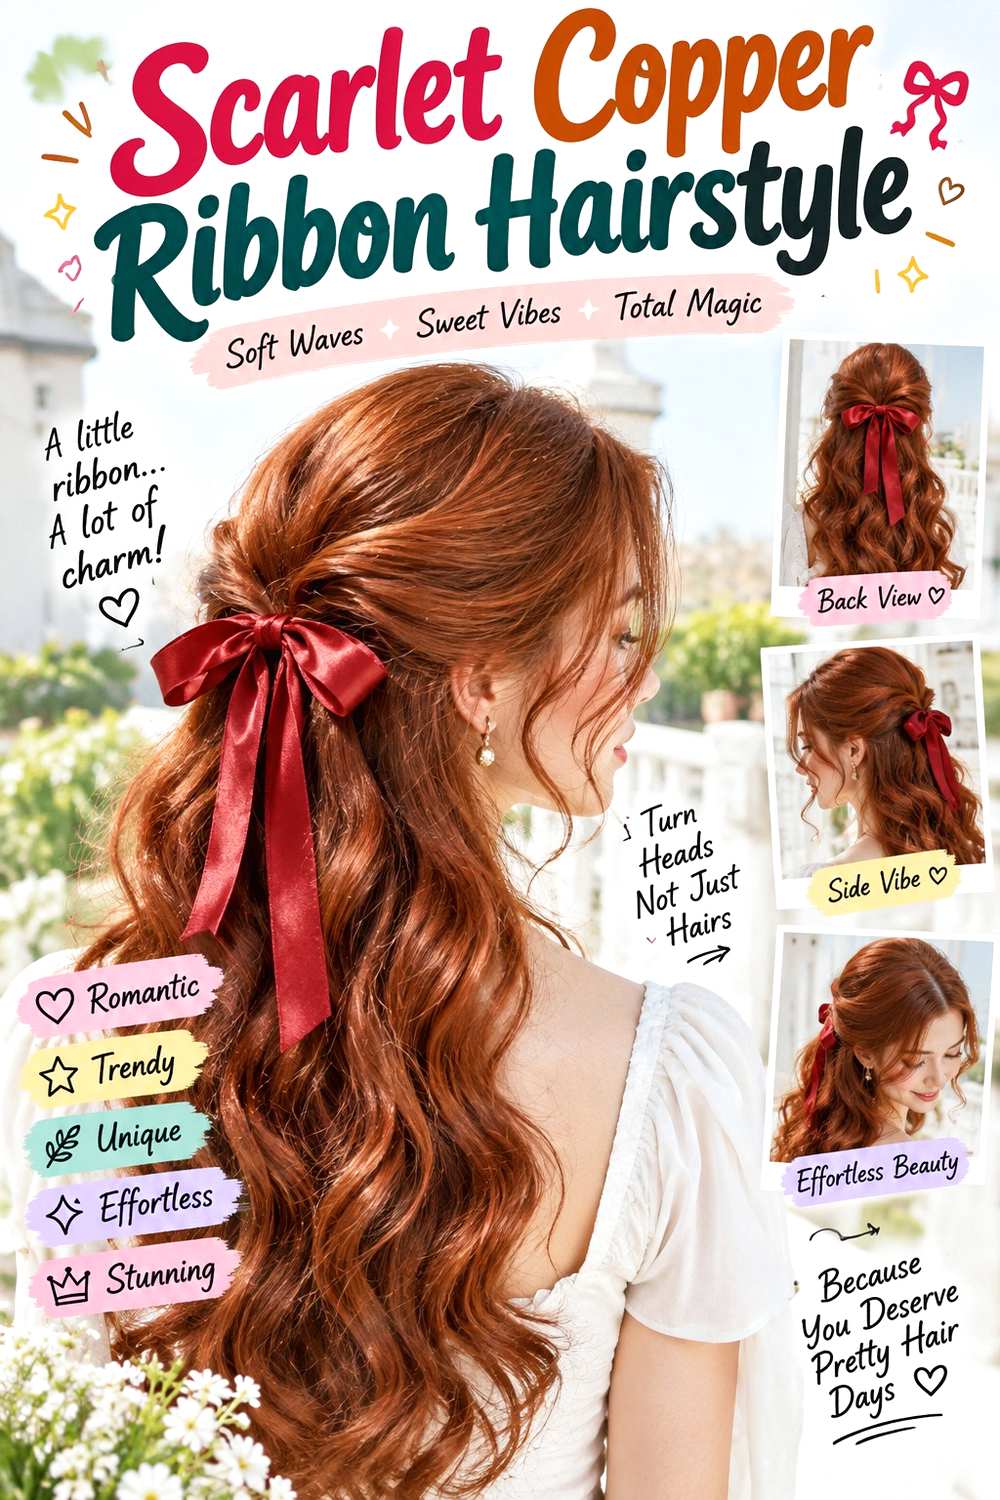
Scarlet mixed with copper ribbons produces a warmer, multi-tonal red that changes as the hair turns. Rather than blending both colors everywhere, keep identifiable copper sections running beside richer scarlet through the mid-lengths and ends. Long layers beginning around the collarbone can expose the color underneath when the hair moves, while a middle or soft side part determines which ribbon falls nearest the face. Waves add separation, but the contrast can still show on straight hair if the sections are broad enough.
This combination works especially well for someone who prefers a warmer red family instead of blue-based ruby tones. Your existing color influences whether scarlet and copper can reach the desired brightness at the same appointment, so discuss the target depth before deciding on placement. Color-safe shampoo helps maintain both tones, a lightweight hydrating conditioner keeps the lengths manageable, and a UV-protective hair mist can be useful when the hair receives substantial sun exposure. A daily refresh may require only reorganizing the part; a full wash and styled finish takes longer. At the salon, point out whether you want copper to function as a small accent or nearly equal partner, because that proportion changes the overall result significantly.
Pro tip:
Place your saved scarlet and copper references side by side before your appointment. Comparing them together makes it easier to explain the exact warm-to-red balance you prefer.
Make It Work for You:
If you prefer less warmth around your face, keep the nearest sections primarily scarlet and concentrate copper through the lower lengths, preserving dimension without making the front appear predominantly copper.
Watch Out For:
Do not rely on shade names alone. One person’s “copper” may be much brighter or browner than another’s, so use visible reference colors to communicate the difference.
Scarlet Peekaboo Layers Hairstyle

Hidden scarlet panels beneath a darker top layer create color that appears mainly when the hair moves, lifts, or is tucked behind the ears. Medium to long cuts give enough surface hair to conceal much of the brighter underlayer when worn down. A half-up arrangement exposes far more scarlet, while loose layers can reveal small flashes near the ends. Keeping the upper color relatively solid makes the concealed red easier to recognize when it appears.
Peekaboo placement suits someone who wants a changeable result rather than scarlet dominating every angle. Density matters because very sparse upper sections may reveal the underlayer constantly instead of hiding it, while very dense hair can cover too much of the color unless its placement is planned carefully. Use a color-safe shampoo for gentle cleansing, a leave-in conditioner for slip through the treated lengths, and a wide-tooth comb for controlled detangling. A quick refresh simply changes how much hair is tucked or lifted; full wash-day care takes longer depending on density. Ask the colorist exactly how high the hidden panel should begin and how much scarlet you want visible with your usual part, ponytail, or half-up style.
Pro tip:
Bring a reference with the hair worn both down and lifted. Hidden color can look dramatically different between those positions, so both views help define your preferred visibility.
Make It Work for You:
On shorter hair, keep the scarlet underlayer closer to the nape and side sections where enough top hair can cover it while still allowing deliberate flashes.
Watch Out For:
Placing the panel too near the surface can remove the peekaboo effect. If concealment matters, discuss how your normal part and movement expose the upper layers.
Ruby Scarlet Curly Halo Hairstyle
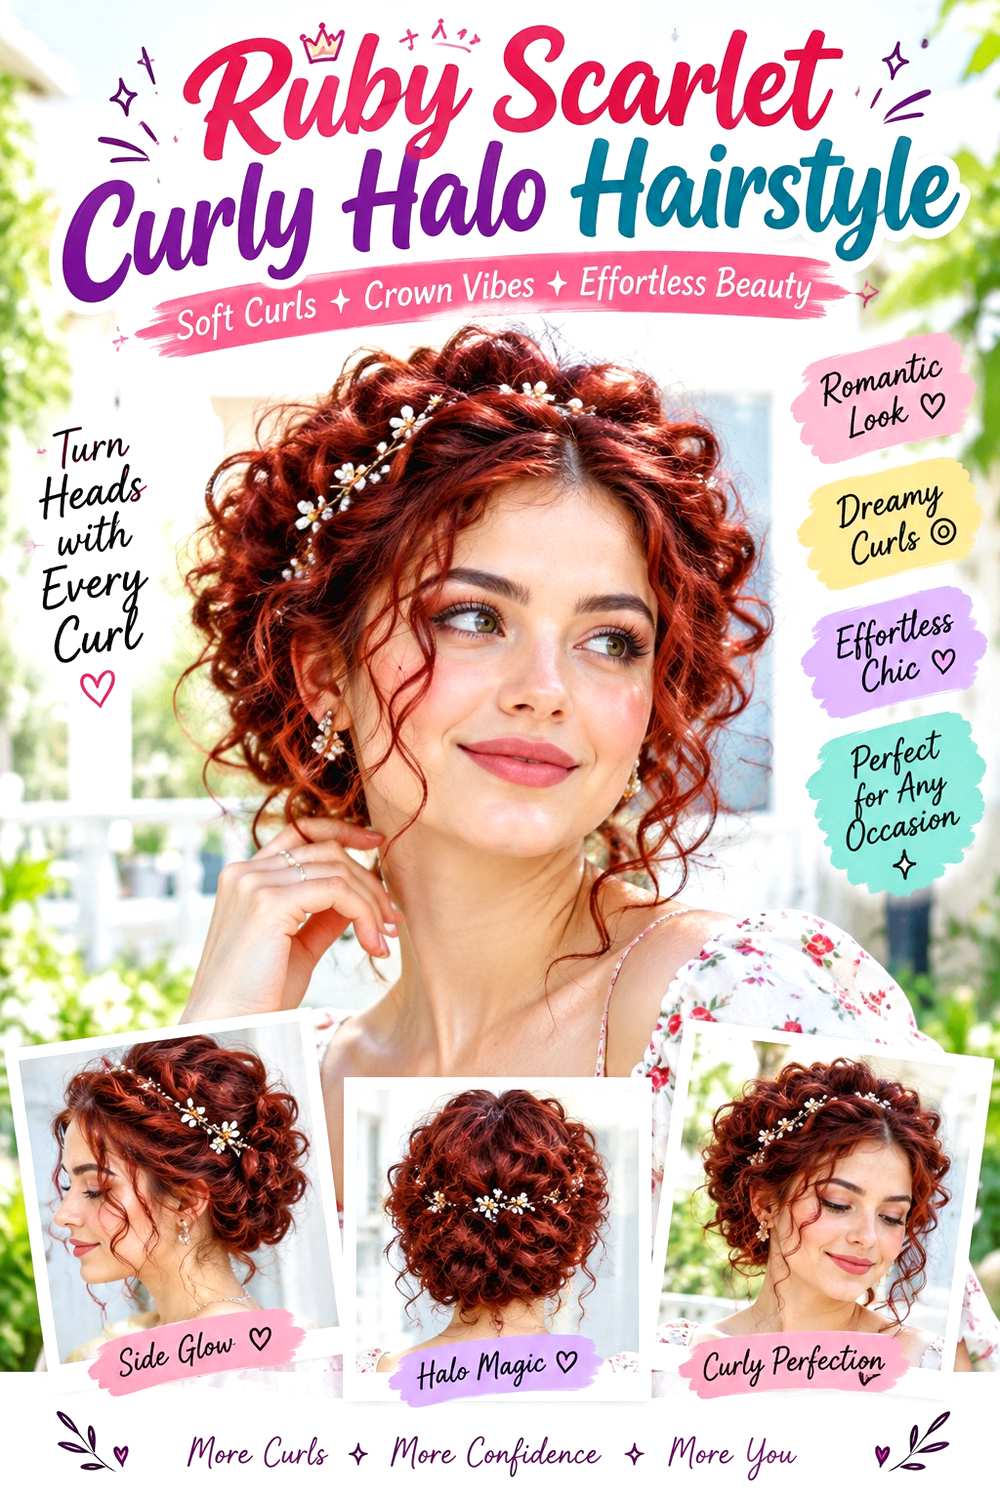
Scarlet across naturally curly or coily hair creates changing highlights and shadows because each curl catches light from a different direction. A ruby-leaning scarlet can appear deepest near compact roots and brighter along outer curl surfaces, even when the placement is broadly consistent. A rounded shoulder-length shape keeps the color distributed around the head, while face-framing curls can bring brighter red closer to the cheeks. Finished length should be judged with shrinkage in mind rather than from stretched or wet hair alone.
This option can work across densities, but both color placement and shape should respect the way individual curl groups sit when dry. Ask the colorist where you want the strongest scarlet visibility and explain your usual styling method before changing the shape. A moisturizing color-safe cleanser limits harsh washing, a curl gel encourages grouping, and a diffuser can help dry the curls with less disturbance when used appropriately. A small refresh between washes might involve redefining selected curls; full wash-day detangling, conditioning, styling, and drying can take much longer. Monitor dryness, fading, and curl behavior separately rather than assuming one causes the other. Professional color planning is especially important when substantial lightening would be required from the starting shade.
Pro tip:
Evaluate the finished scarlet after the curls are fully dry. Curl grouping and shrinkage can change which colored sections sit on the surface and which disappear underneath.
Make It Work for You:
If you prefer less uniform color, concentrate brighter scarlet on selected outer curl groups while keeping related deeper red underneath, preserving the rounded halo with added dimension.
Watch Out For:
Do not choose fringe or layer length from stretched hair alone. Ask how each section settles dry so shrinkage does not move the finished shape far above your preferred point.
Scarlet Ombré Long Layers Hairstyle

A darker upper section that gradually becomes scarlet toward the ends gives long hair a clear vertical color story. The transition can begin below the shoulders so the root and upper lengths stay comparatively restrained, while the bottom third becomes the brightest area. Long layers help reveal multiple levels of the gradient without interrupting the overall length. Broad waves make the shift obvious, whereas straight hair shows the blend as a smoother continuous fade.
Ombré is useful when you want dramatic scarlet lengths without placing the brightest color directly against the scalp. Starting shade still affects how light or vivid the lower sections can become, so discuss both the transition point and the desired end tone with your colorist. A color-safe shampoo reduces unnecessary color stripping, a rich conditioner supports the older ends, and heat protectant should accompany heated wave styling. Restyling only the front and ends can be a short between-wash task; washing, drying, and reshaping very long hair is a larger commitment. As the ends fade, evaluate whether you prefer the softer result or want the scarlet restored. Salon maintenance can focus on the gradient rather than automatically recoloring every darker upper section.
Pro tip:
Tie your hair loosely at different heights before the appointment to visualize the transition point. A scarlet blend starting at the shoulders feels very different from one starting near the chin.
Make It Work for You:
For medium-length hair, begin the transition somewhat higher so there is enough space to see both the darker base and scarlet ends instead of compressing the gradient.
Watch Out For:
A narrow, abrupt transition can resemble a horizontal color band. Ask for enough blending space to create a gradual shift that still leaves the ends clearly scarlet.
Scarlet Wolf Cut Hairstyle

A layered wolf cut breaks scarlet into many moving surfaces, giving the color a more irregular appearance than a solid blunt shape. Shorter crown layers create lift, face-framing pieces can begin around the cheekbones or jaw, and longer back sections preserve length. A separated fringe or open front adds another place for scarlet to catch light. Slightly tousled waves emphasize the stepped layers, while straighter texture makes the different lengths easier to see.
This pairing suits readers who genuinely want both layered movement and high-impact red, because the haircut and color each need their own upkeep. Dense hair may require controlled weight adjustment, while lower-density hair usually benefits from avoiding excessive removal through the ends. A lightweight color-safe shampoo maintains cleansing without unnecessary stripping, a flexible styling mousse supports piece separation, and heat protectant belongs in the routine when heat is used to shape the texture. A quick refresh can mean redefining only the crown and front; complete wash-day styling is more involved. At the salon, point to the exact layer starting point you like and discuss where scarlet should appear strongest. As the cut grows, reshaping may be needed even when the color still looks satisfactory.
Pro tip:
Refresh the shortest crown pieces separately from the long back sections. Giving those layers directional lift restores the wolf-cut silhouette without restyling every inch of hair.
Make It Work for You:
If your ends are naturally sparse, keep more length and weight through the lower perimeter while concentrating the strongest layers near the face and upper crown.
Watch Out For:
Do not combine extreme layering with unnecessary thinning by default. Too much removal can make the lower scarlet sections appear wispy instead of preserving the intended long outline.
Scarlet Curtain Bangs Hairstyle

Curtain bangs place scarlet prominently around the eyes and cheekbones, so even a familiar red becomes more noticeable. The center can finish around the brows or slightly longer, while the outer corners extend toward the cheekbones and blend into face-framing lengths. A middle part creates the clearest curtain shape, although a slightly off-center split can work if that follows your natural growth pattern. On longer hair, keeping the rest softly layered lets the front remain the main feature.
Fringe upkeep is separate from color upkeep. Growth direction, shrinkage, and natural texture affect where the bangs sit once dry, so discuss their finished length rather than relying on a wet measurement. A color-safe shampoo supports the scarlet tone, a small round brush can help redirect the fringe during drying, and heat protectant is needed when heat is part of that shaping process. Refreshing only the bangs can be quick; washing and styling all the hair takes longer. Ask the colorist whether the fringe should match the brightest scarlet exactly or blend into deeper surrounding red. Trim or reshape when the center begins falling beyond your preferred point, regardless of whether the overall haircut still feels manageable.
Pro tip:
Reset the fringe shortly after it becomes damp rather than waiting until it dries in the wrong direction. Early redirection makes the center split easier to control.
Make It Work for You:
For curly hair, keep the outer curtain sections longer and judge the center dry. This preserves the parted shape while allowing for shrinkage instead of forcing a straight-bang proportion.
Watch Out For:
Avoid cutting the center much shorter simply to create separation. A dramatic length jump can disconnect the bangs from the longer outer corners instead of producing a smooth curtain.
Dark Scarlet Blunt Lob Hairstyle
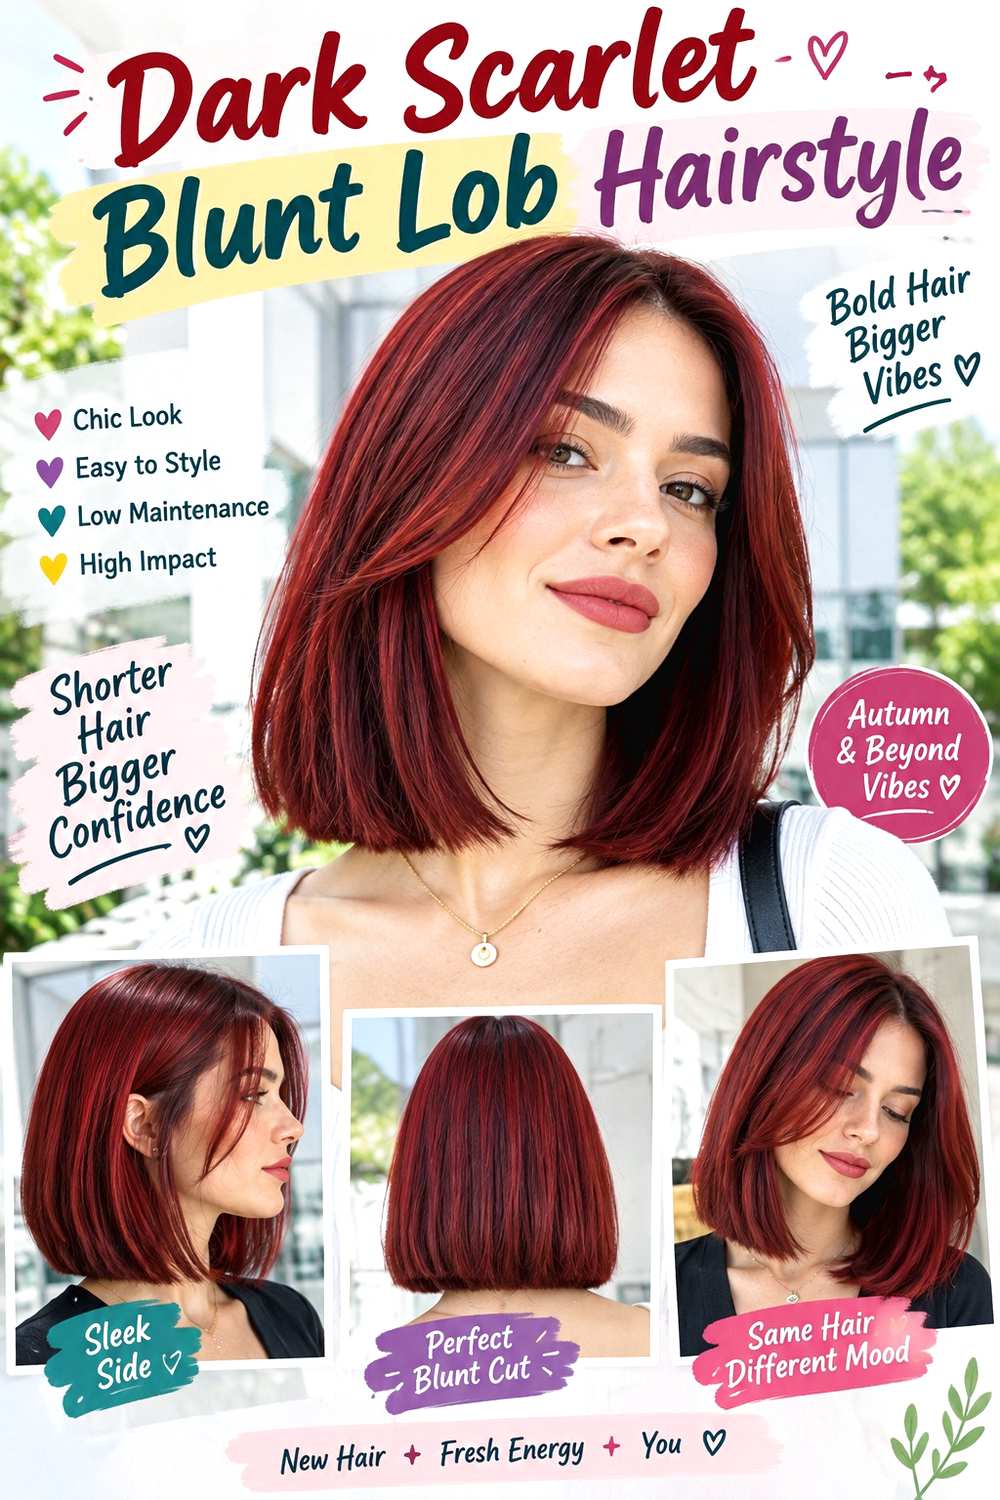
A blunt lob gives dark scarlet a dense, polished canvas between the jaw and shoulders. The bottom line stays relatively strong, with minimal visible layering so the red reads as a broad uninterrupted surface. A center part creates symmetry, while a deep side part shifts more volume to one side and changes how the color reflects light. Slight bends through the mid-lengths can soften the outline without removing the solid appearance of the ends.
Dark scarlet can be a practical direction for someone who wants red to remain rich rather than extremely bright, although the result still depends on the starting base. Tell the colorist whether you prefer the shade to lean ruby, cherry, or a more neutral deep red instead of relying on “dark scarlet” alone. A color-safe shampoo helps protect the tone, a smoothing conditioner supports the blunt lengths, and a microfiber towel reduces rough friction after washing. Between washes, a quick refresh may involve adjusting the part and ends; a complete smooth finish requires more time if your natural texture differs strongly from the target. Ask the stylist to preserve the bottom-edge weight you like, and refresh the cut when that clear lob line starts losing its shape.
Pro tip:
Check your reference against a white or neutral background. Dark scarlet can look nearly brown or black in shadow, so a neutral setting makes the red undertone easier to identify.
Make It Work for You:
If you want more natural movement, add a few long face-framing pieces while keeping the back perimeter blunt. The lob stays visually substantial without becoming completely one-length.
Watch Out For:
Do not choose the darkest reference solely from an underexposed photo. Ask for a shade that remains visibly scarlet in the lighting conditions where you usually see your hair.
Scarlet Underlayer Shag Hairstyle
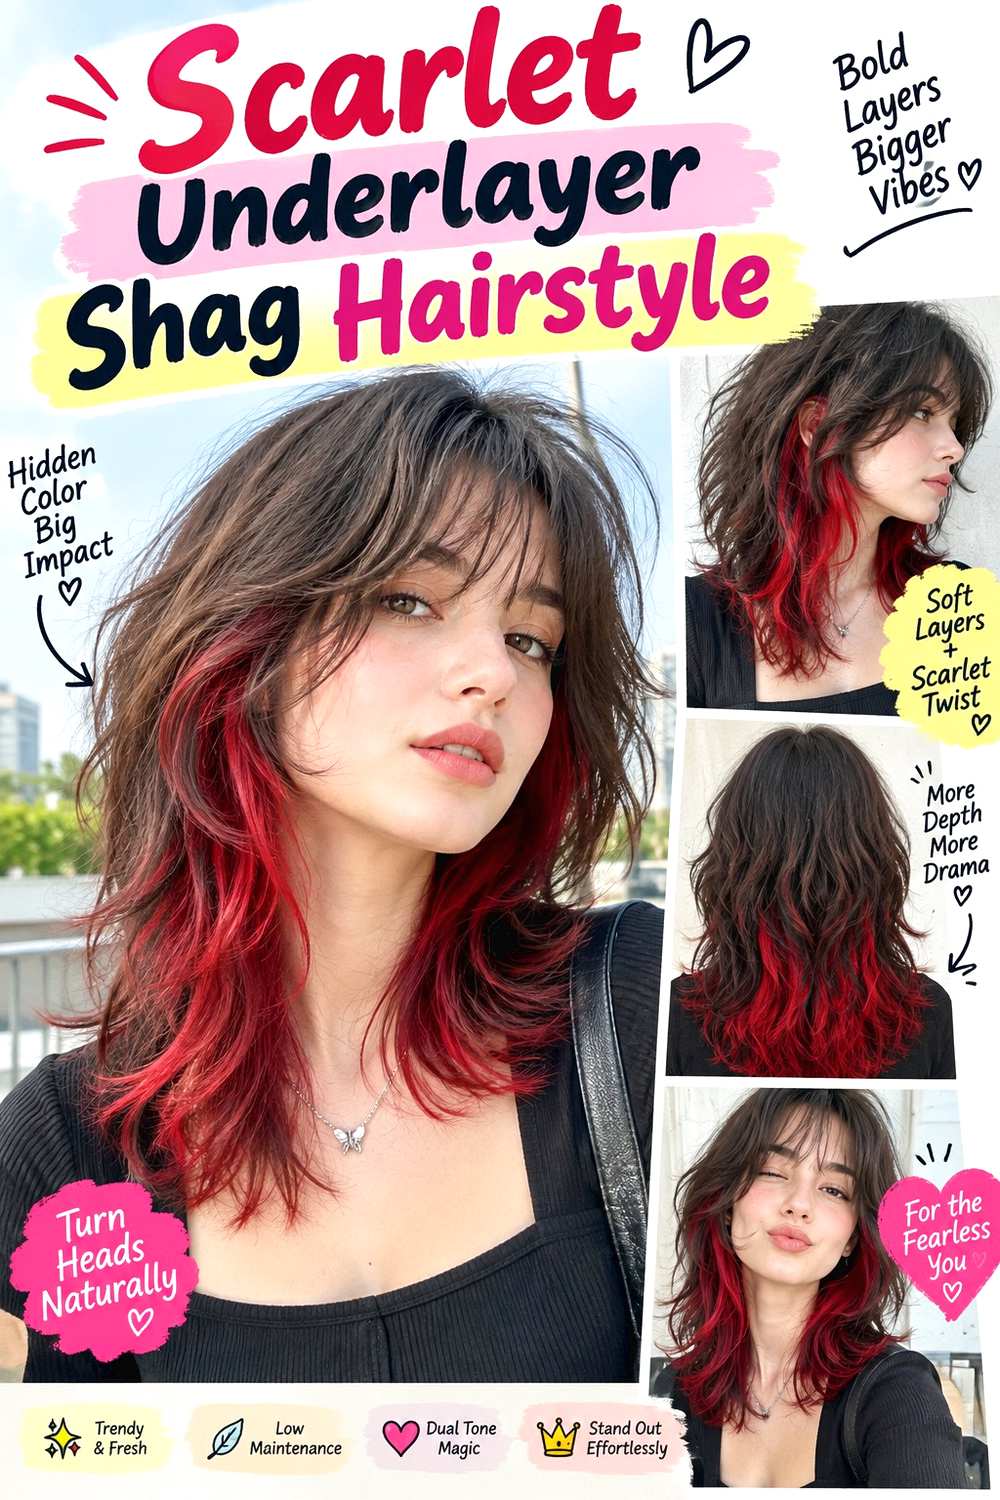
A shag already exposes different lengths, making a scarlet underlayer more visible than it would be beneath a compact one-length cut. The upper layers can remain darker while red appears through the lower sides, nape, and ends as shorter pieces move away from the head. A wispy or parted fringe keeps the front airy, and shoulder-length or longer hair provides room for both the layered silhouette and hidden-color contrast.
This idea suits someone who likes color that changes with movement rather than sitting in fixed vertical ribbons. Because a shag can remove considerable weight, lower-density hair usually needs careful layer placement so the ends do not become unnecessarily sparse. A gentle color-safe cleanser supports the red areas, a lightweight leave-in conditioner helps separate layers without heavy coating, and a texturizing spray can increase definition through the finished shape. Touching up the front and crown is generally quicker than a complete wash-day reset. At the salon, specify how much scarlet you want showing when the hair rests naturally, not only when it is lifted. The cut may need reshaping as crown layers grow, while the underlayer color follows its own fade and regrowth cycle.
Pro tip:
Ask to view the color with the upper layers shaken into their natural resting position. This reveals how much scarlet will actually show during ordinary movement.
Make It Work for You:
For finer or lower-density hair, keep the shag layers longer and concentrate scarlet underneath near the sides and nape, preserving more visual weight through the outer ends.
Watch Out For:
Overloading the upper layers with styling product can hide the underlayer by making pieces clump together. Use only enough texture support to keep separation and movement.
Scarlet Braided Dimension Hairstyle

Braiding scarlet hair can turn subtle tonal differences into visible lines, especially when deeper red and brighter scarlet sections cross over one another. A loose three-strand braid, paired braids, or a low braided ponytail can all emphasize dimension without changing the underlying haircut. The effect is strongest when colored sections are wide enough to remain recognizable after weaving. Face-framing pieces can stay loose if you prefer softness around the front, provided the braid itself remains comfortably anchored.
This is primarily a styling idea, so it does not require a new haircut. Medium to long hair generally offers more room for the color pattern to repeat, while shorter layers may need careful placement so they do not escape immediately. A fabric-covered elastic secures the base with less snagging, light texturizing spray can add grip, and flexible hairspray can control flyaways without making the braid rigid. A quick braid refresh can take only a short time once the base is secure; a full wash, dry, and restyle is a larger task. Tell the stylist or colorist that you often braid your hair and discuss where brighter scarlet sections should sit so they remain visible when crossed.
Pro tip:
Before braiding tightly, make one loose test braid and check the color pattern. You can shift your sectioning slightly if the brightest scarlet disappears inside the weave.
Make It Work for You:
If shorter layers escape easily, use a wider, looser braid beginning lower on the head. This keeps the dimensional effect while reducing pressure on pieces that cannot reach the anchor.
Watch Out For:
Do not tighten the braid simply to stop every flyaway. Excess tension can become uncomfortable; secure the base properly and allow shorter pieces to remain softly released.
Scarlet Pixie Crop Hairstyle
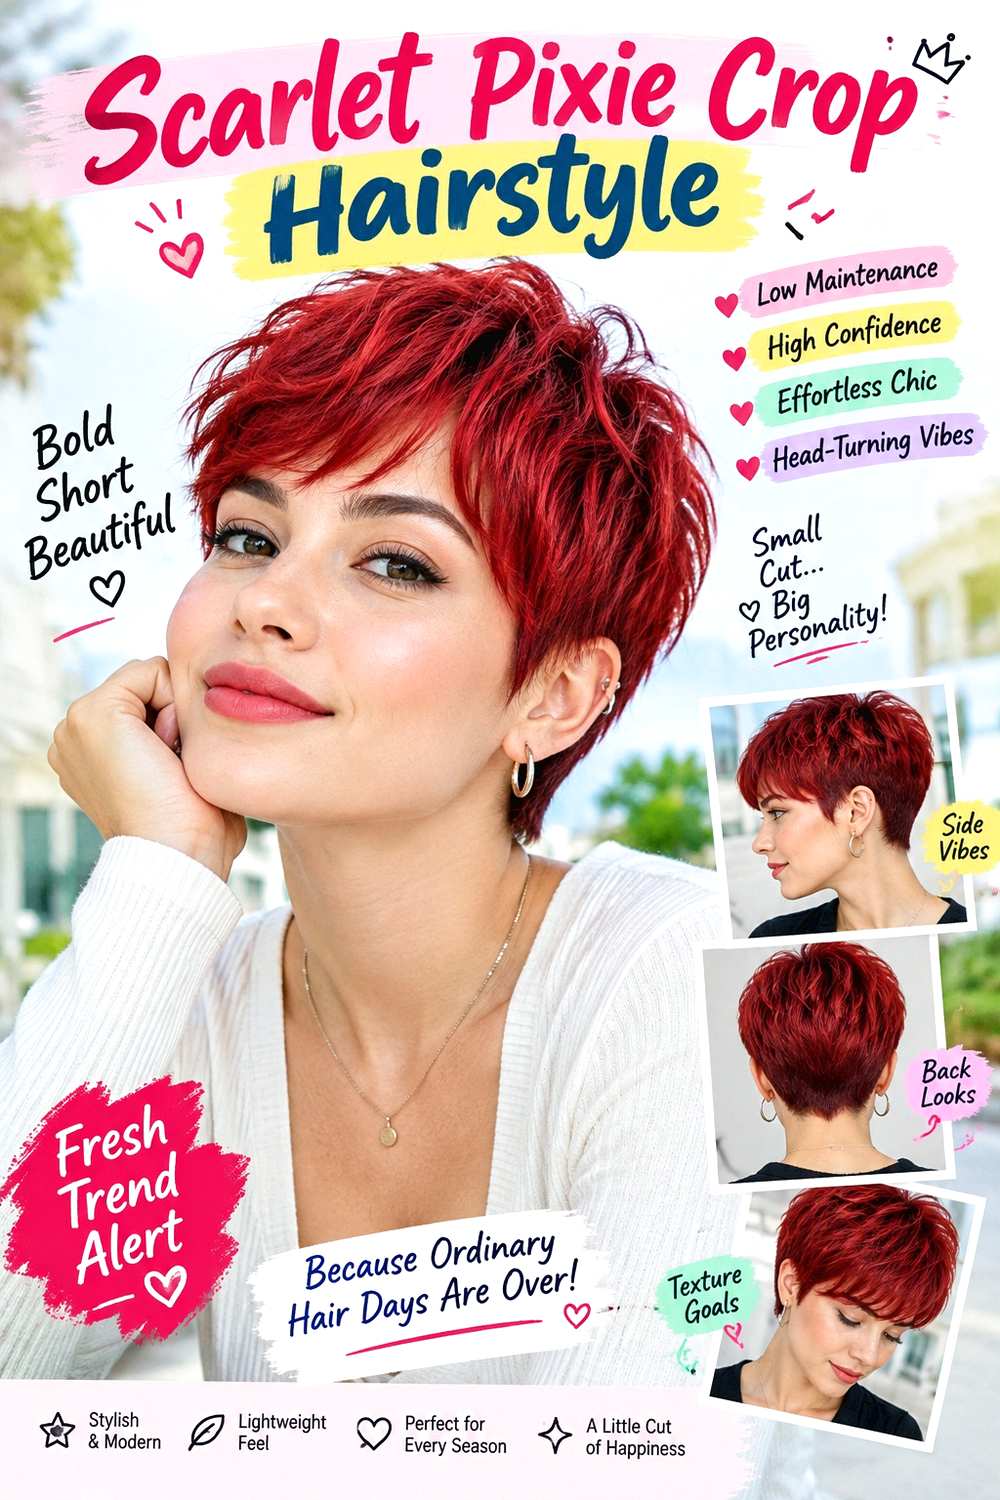
A scarlet pixie concentrates vivid color into a small, highly visible shape. Short sides and back can support a longer top that sweeps forward, sideways, or upward, while a cropped fringe can keep the outline compact. Because the hair is short, the root area contributes strongly to the overall appearance; even a modest amount of new growth can change the balance between natural color and scarlet. Piece separation on top adds dimension without needing multiple shades.
This option is practical for someone comfortable maintaining both a short shape and noticeable color. A color-safe shampoo supports the red tone, a lightweight styling paste defines selected pieces, and a small vent brush can redirect the longer top without overcomplicating daily styling. A morning refresh is usually brief, especially when the cut already follows your natural growth pattern; a full wash-day routine is still short compared with long hair, though texture and density matter. Ask the stylist exactly how long you want the top and fringe left, and ask the colorist whether the roots should be equally bright or intentionally deeper. Shape upkeep and color refreshes may not fall on the same schedule, so judge each independently.
Pro tip:
Use styling paste on fingertips rather than spreading it heavily over the whole top. Pinching a few sections apart preserves movement and keeps short scarlet hair from looking coated.
Make It Work for You:
If you prefer fewer styling steps, keep the top slightly longer in the direction your hair naturally falls. Scarlet remains prominent while the crop requires less daily redirection.
Watch Out For:
A very short crop makes regrowth highly visible. If that contrast bothers you, discuss a deliberately deeper root rather than assuming every refresh must remain completely uniform.
Scarlet Dip-Dye Ends Hairstyle
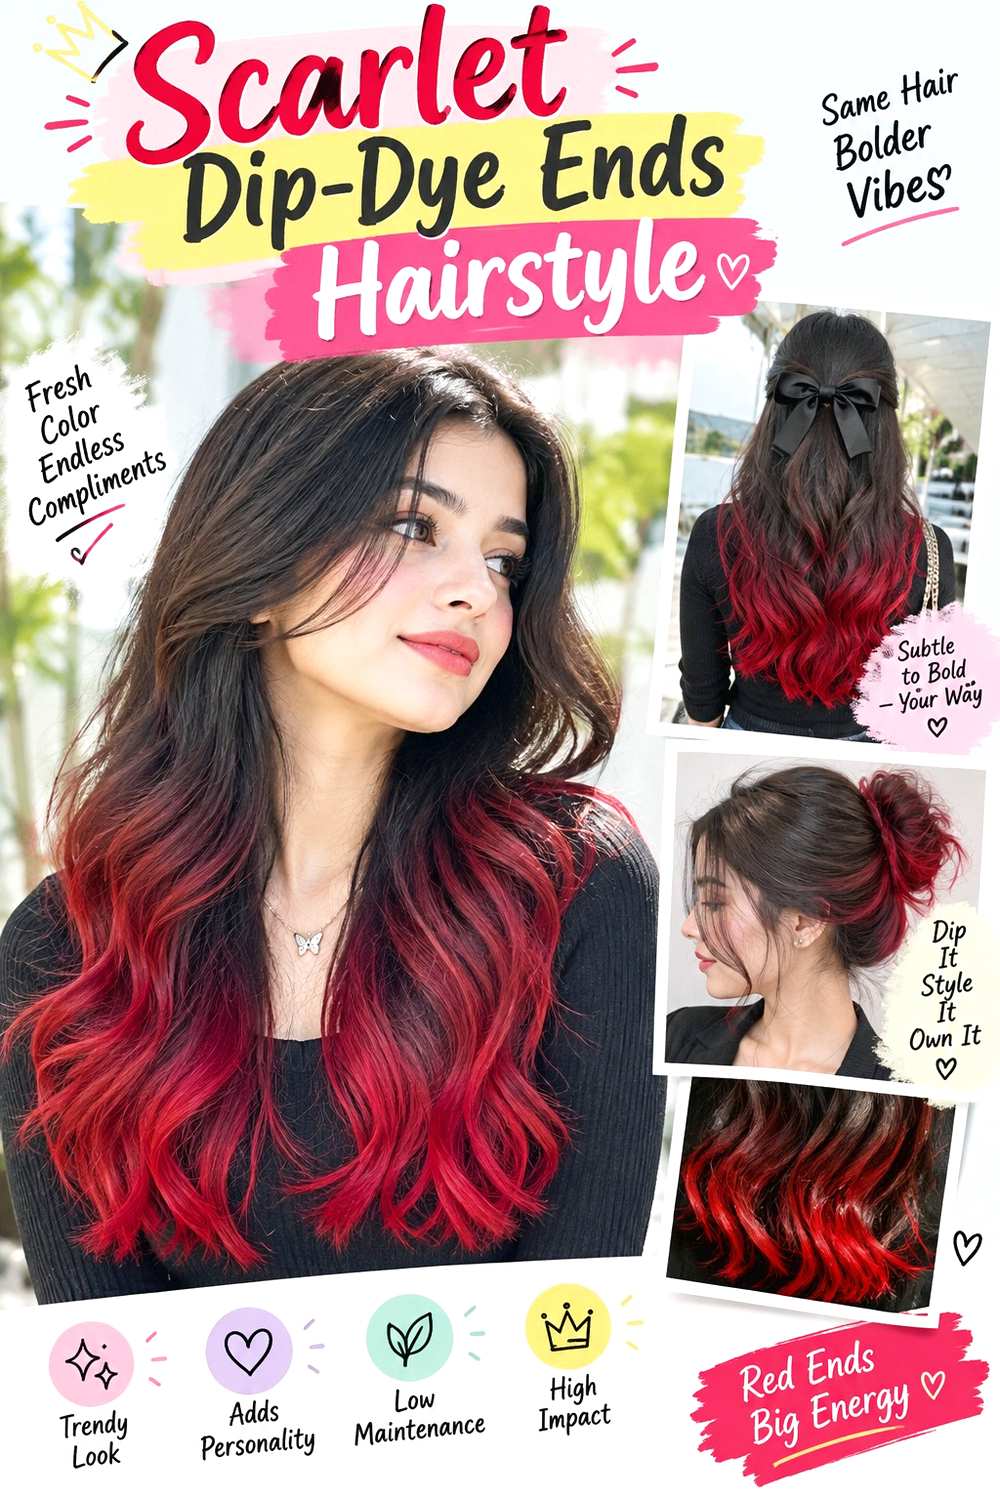
Dip-dyed scarlet places the strongest color only at the ends, creating a deliberate boundary between the base and the bright lower section. On long hair, the red may occupy several inches and become especially visible in waves or ponytails. A straight perimeter creates a graphic band, while layered ends break the boundary into staggered flashes. The placement can begin evenly across the head or rise slightly around the front for a softer face-framing connection.
This approach can appeal to someone who wants concentrated red away from the scalp, but the condition and starting shade of the ends matter because they are typically the oldest part of the hair. Discuss with a professional how bright those ends can safely and realistically become from your current base. A color-safe shampoo limits unnecessary stripping, a nourishing mask supports the lower lengths, and a wide-tooth comb helps detangle without rough pulling. Refreshing the appearance between washes can be as simple as smoothing or regrouping the ends, while full wash-day styling depends mainly on overall length and texture. Ask where the scarlet boundary should fall when the hair is worn naturally, since cutting length later can remove a noticeable portion of the colored area.
Pro tip:
Mark the preferred color starting point on a saved photo before your appointment. “Just the ends” can mean two inches or half the length, producing very different results.
Make It Work for You:
If a sharp boundary feels too graphic, let a few scarlet sections rise slightly higher through the front while keeping most of the color concentrated along the ends.
Watch Out For:
Avoid planning an extremely bright end color without considering previous processing. The oldest lengths may need a more conservative approach based on their actual condition and color history.
Soft Scarlet Brown Blend Hairstyle
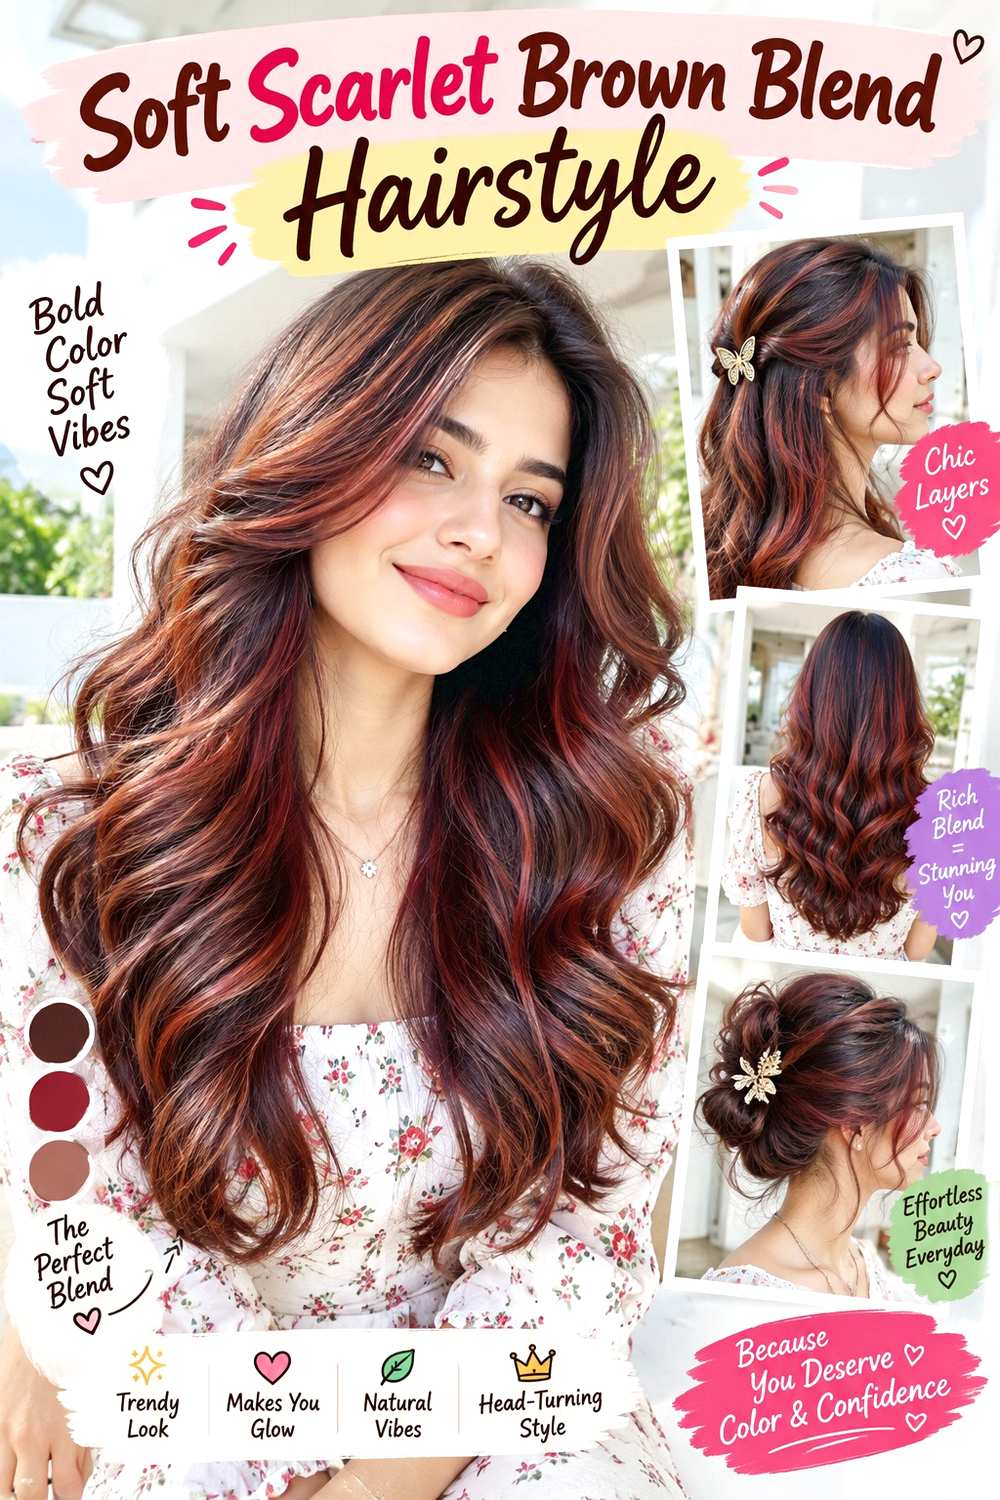
A scarlet-brown blend offers the most muted interpretation in this group, combining visible red with enough brown depth to keep the overall result subdued. Instead of separate panels, the tones can be distributed in broad blended sections from roots through ends. Shoulder-length or longer hair gives the subtle variation room to show, especially in soft waves. A few long face-framing pieces can catch more scarlet near the front without turning the entire design bright red.
This direction can suit someone who likes red but prefers less contrast than vivid scarlet or black-and-red combinations. Because “scarlet brown” can range from clearly red to mostly brunette, bring references that show your preferred balance in neutral light. A color-safe shampoo supports the blended tone, a hydrating conditioner keeps the lengths manageable, and a shine serum used sparingly can make the red reflection easier to see on the finished surface. A small between-wash refresh may only require rearranging the front; complete styling depends on your natural texture and desired finish. Ask the colorist how much visible scarlet you want around the face compared with the back. As the color softens, decide whether you enjoy the browner fade or want the red component restored.
Pro tip:
When choosing references, look at the mid-lengths rather than only the brightest highlights. That area usually gives a clearer sense of the blend’s overall red-to-brown balance.
Make It Work for You:
If you want a brighter effect without changing the entire base, concentrate slightly stronger scarlet around the face and upper surface while keeping the underneath sections softer and browner.
Watch Out For:
Do not assume every reddish brown will read as scarlet. If visible red matters, point to the exact level of red reflection you want under neutral daylight.
Conclusion
Scarlet hair color ideas can range from one saturated block of red to far softer blends, so the best comparison starts with placement rather than shade names alone. Blunt bobs and lobs make scarlet look dense and continuous, while long layers, shags, curls, and waves break it into moving pieces. Shadow roots, ombré transitions, hidden panels, and brown blends can make regrowth or fading less visually abrupt than an even bright-red application. Bangs and money pieces place more color near the face, while underlayers and dip-dyed ends keep it farther away. Consider your natural texture, density, current color, preferred parting, styling effort, and tolerance for upkeep before deciding how vivid or precise you want the finished result.
Before Your Salon Visit
Choose one or two favorites and save references that show the color in clear, preferably neutral lighting. Explain your current texture, density, preferred length, typical part, and realistic styling routine. Point to the exact scarlet intensity, root depth, face-framing placement, transition point, layer position, or finish you want to borrow from each reference. Also discuss your existing color history and how much upkeep you are comfortable with, since the achievable brightness and maintenance plan depend strongly on your starting point.
FAQs
Can dark hair become bright scarlet without lightening?
Sometimes a subtle red shift is possible on a dark starting shade, but very bright scarlet may require additional preparation. Existing artificial color also changes what is practical. A professional can assess your current base and explain realistic brightness, contrast, and maintenance options without relying on a universal formula.
How quickly does scarlet hair color fade?
The visible change varies with the starting color, coloring method, washing routine, heat exposure, sun exposure, and desired intensity. Reds can lose brightness noticeably, so gentle color-safe care may help. Plan a refresh based on how the tone actually changes rather than assuming one fixed timetable suits everyone.
Can curly hair wear scarlet color without straightening?
Yes. Scarlet can be placed and displayed on curly or coily hair without requiring a straight finish. Curl grouping actually creates varied light and shadow across the red. Discuss shrinkage, dry shape, color placement, and your usual styling routine so the finished design works with the texture you normally wear.
What should I show my colorist for a scarlet shade?
Bring clear references showing the brightness, depth, root treatment, and placement you like, ideally in neutral or daylight conditions. If you like the roots from one image and the ends from another, say so directly. Also explain your current color history, because the same reference may require different preparation on different starting bases.