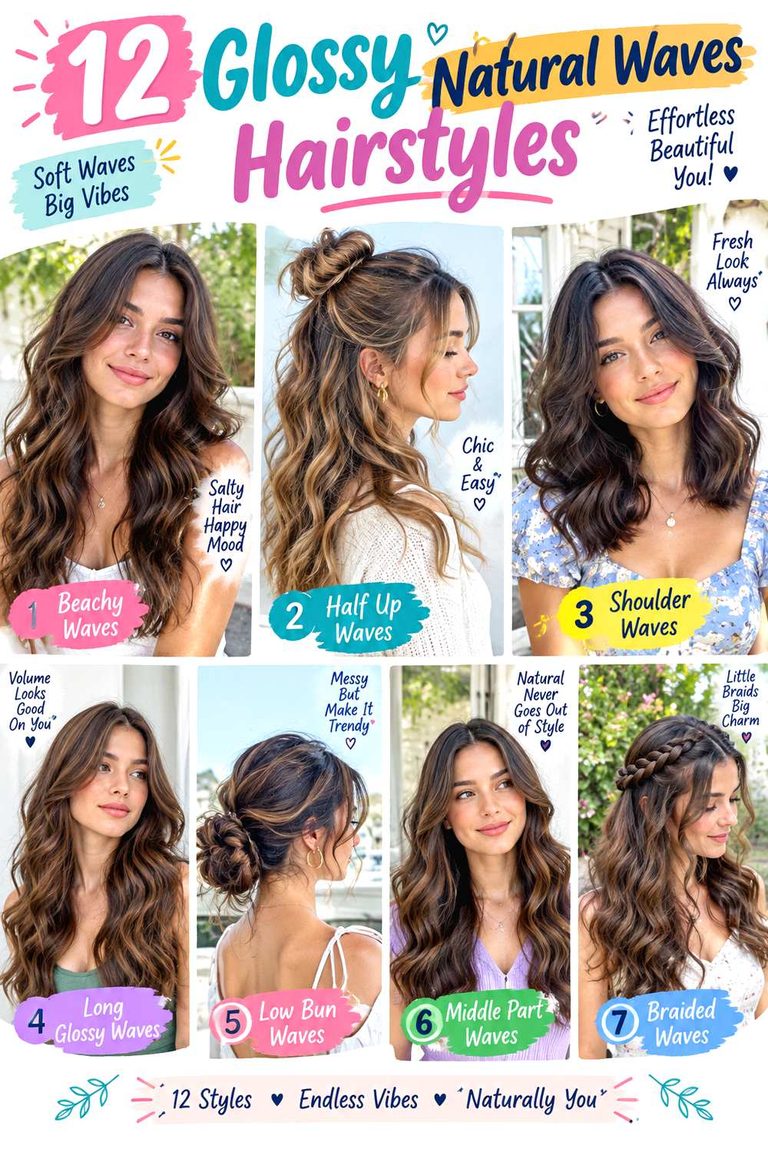
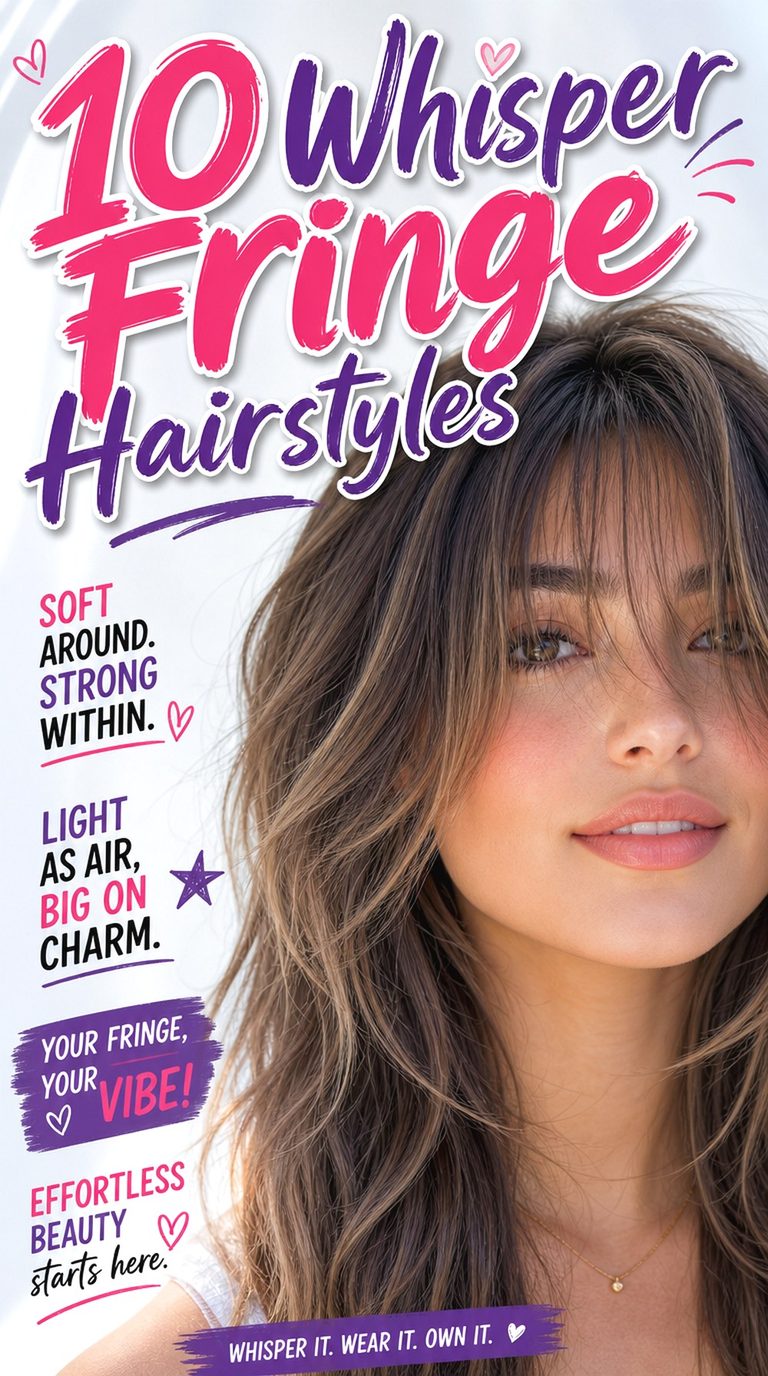
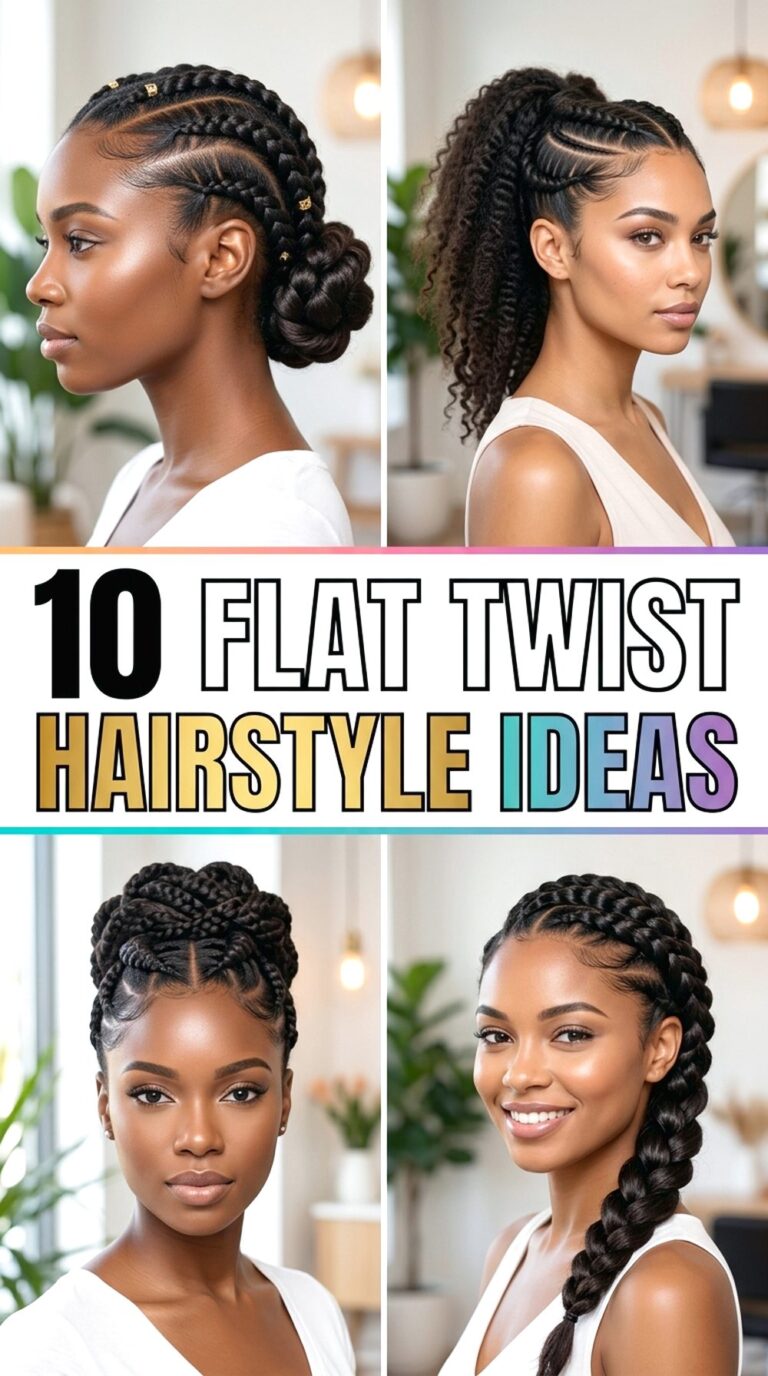
15 Dark Glamour Wave Hairstyle Ideas

Dark glamour wave hairstyle ideas rely on deliberate shape, controlled shine, and strong movement rather than one specific curl pattern. Here, “dark glamour” describes the polished mood of the styling, not a required hair color. Broad Hollywood bends, sculpted S-curves, swept sides, sleek roots, and defined ends can all fit the family. Medium and long hair give large waves more room to develop, while shoulder-length cuts can use tighter spacing and stronger perimeter definition.
Straight, wavy, curly, and coily textures can all interpret these shapes, although the styling route will differ. Dense hair may need wave placement that controls width, while fine strands or lower-density ends often benefit from lighter product amounts and a fuller-looking bottom line. Face framing can start near the cheekbone, jaw, or lower, and the part can be moved to change where volume sits without treating any face shape as a rule.
Styling effort depends on how far the intended finish sits from your natural texture. A short refresh might involve only the front wave and outer layer, while a full wash-day set can take considerably longer on dense or very long hair. Heat styling requires heat protectant, and polished waves generally last better when sections are allowed to cool before being loosened. Maintenance is mostly about restoring flattened bends, limiting frizz, and preserving the intended part, root volume, and end direction.
Quick List
- Midnight Side-Part Hollywood Waves Hairstyle
- Sleek-Crown Black-Tie Waves Hairstyle
- Deep Side-Sweep Velvet Waves Hairstyle
- Center-Part Sculpted S-Waves Hairstyle
- Brushed-Out Noir Waves Hairstyle
- Wet-Gloss Rooted Glam Waves Hairstyle
- Shoulder-Length Dark Ribbon Waves Hairstyle
- Face-Framing Shadow Waves Hairstyle
- Defined-End Evening Waves Hairstyle
- Voluminous Crown Midnight Waves Hairstyle
- One-Side Tucked Noir Waves Hairstyle
- Long Cascading Obsidian Waves Hairstyle
- Soft Fringe Dark Glam Waves Hairstyle
- Asymmetrical Red-Carpet Waves Hairstyle
- Textured Gothic Glam Waves Hairstyle
Midnight Side-Part Hollywood Waves Hairstyle
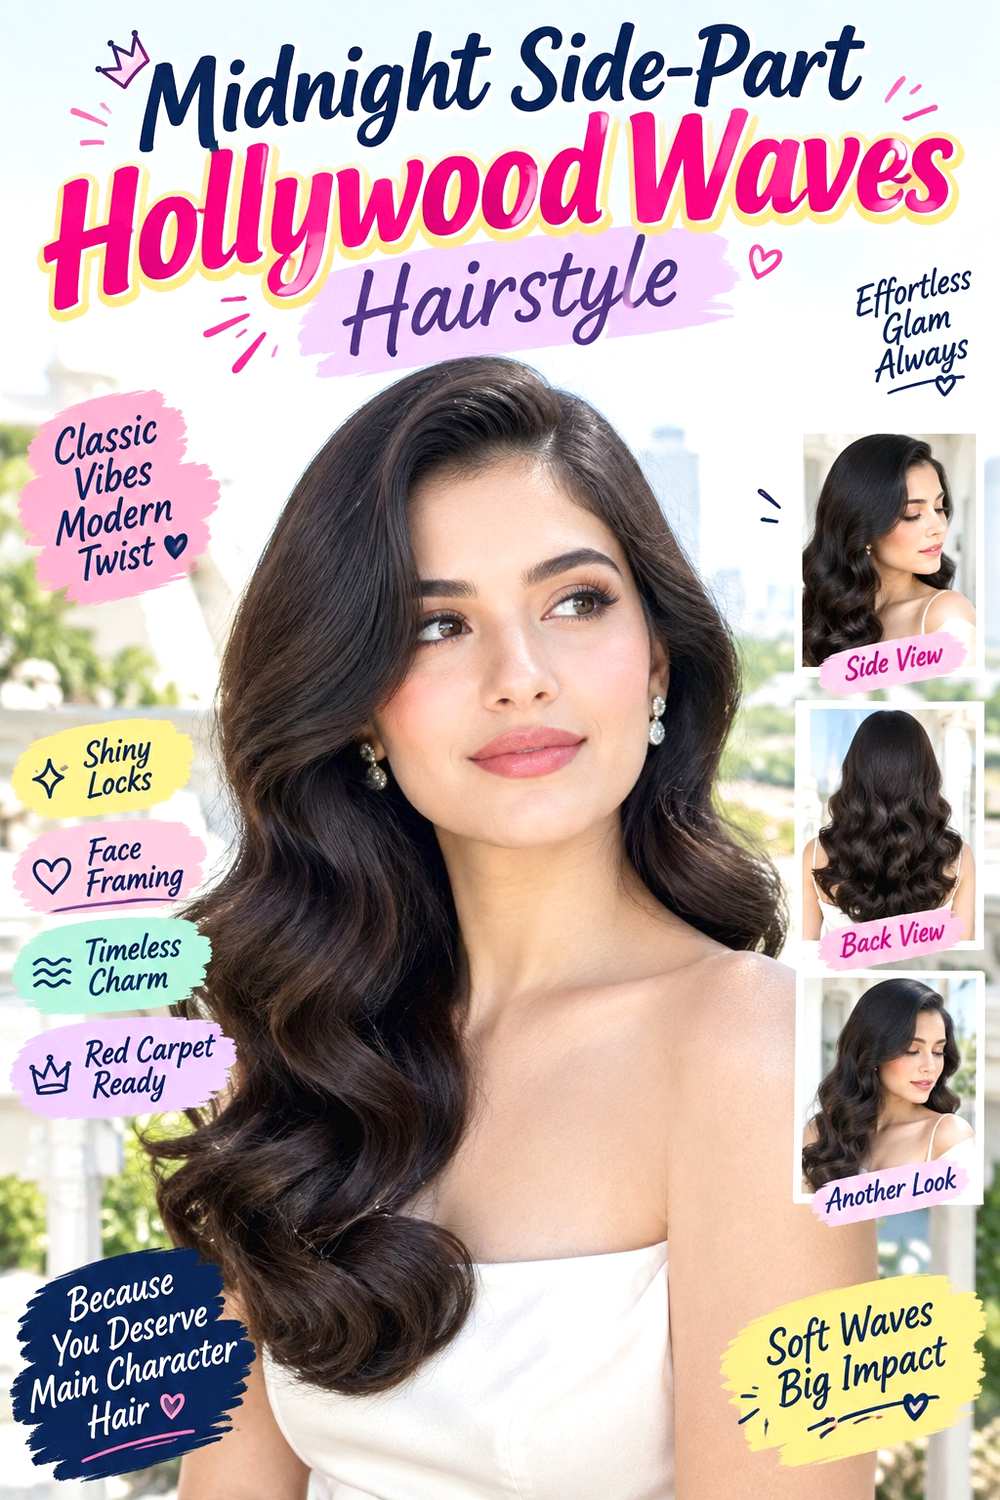
A deep side part sets up the classic drama here, with one full front section sweeping away from the face before joining broad, synchronized waves below the cheekbones. Medium to long hair gives the pattern room to repeat, while the roots stay relatively controlled so most of the volume sits through the mid-lengths. The ends should curve with the pattern rather than breaking into tight ringlets. Straight and wavy hair can reach this finish directly, while other textures can either be stretched first or keep more natural texture for a softer interpretation.
Apply heat protectant before using a large-barrel curling iron to build the bends, then finish cooled sections with flexible hairspray for hold without a stiff shell. A full wash-day set takes longer on very long or dense hair because each section needs shaping and cooling; a quick refresh can focus on the front sweep and flattened outer waves. Limit repeated brushing once the pattern is established to reduce frizz.
For salon styling, point to where you want the first major bend to crest—usually around the cheekbone or jaw—and how deep the side part should be. That placement controls whether the front feels sculpted, voluminous, or too heavy around the face.
Pro tip:
Let the front sweep cool while supported in its curved position. Releasing it only after it sets helps preserve a broader, more polished bend.
Make It Work for You:
If your ends are lower in density, keep the lowest wave large and softly connected. This preserves a fuller bottom edge instead of separating the tips into thin curls.
Watch Out For:
Avoid alternating every visible section in random directions. Coordinated wave direction is what creates the continuous Hollywood ribbon effect rather than a loose curl set.
Sleek-Crown Black-Tie Waves Hairstyle

The defining contrast is a smooth crown followed by broad waves that begin around ear or jaw level. A precise center or soft off-center part keeps the upper shape clean, while the mid-lengths expand into polished bends and the ends remain controlled. Medium and long hair shows the sleek-to-wavy transition most clearly. This can suit dense hair particularly well because the flatter roots prevent excessive width, while finer hair may prefer a little lift rather than an extremely close finish.
Use a light smoothing cream through the upper lengths, heat protectant before shaping, and a large-barrel curling iron for the lower bends. A full styling session can take longer when the starting texture needs significant smoothing, whereas a quick refresh should target flyaways near the part and only the waves that have flattened. Avoid repeatedly reheating the roots just to make them perfectly smooth; small surface irregularities are usually less disruptive than excessive heat.
At a salon, show exactly where the sleek area should transition into the first obvious wave. Ask for the upper section to lie controlled rather than tightly plastered to the head. That transition point is important because starting the waves too high can erase the sleek-crown contrast, while starting too low may leave the lengths visually flat.
Pro tip:
Decide the transition line before shaping the lower lengths. Keeping the first bends at a similar height on both sides makes the sleek crown feel intentional.
Make It Work for You:
For naturally curly or coily hair, keep more texture at the roots if you prefer less manipulation. Concentrate the strongest wave definition below the ears.
Watch Out For:
Do not overload the crown with smoothing product. Too much can separate the roots and make them look oily rather than deliberately sleek and controlled.
Deep Side-Sweep Velvet Waves Hairstyle
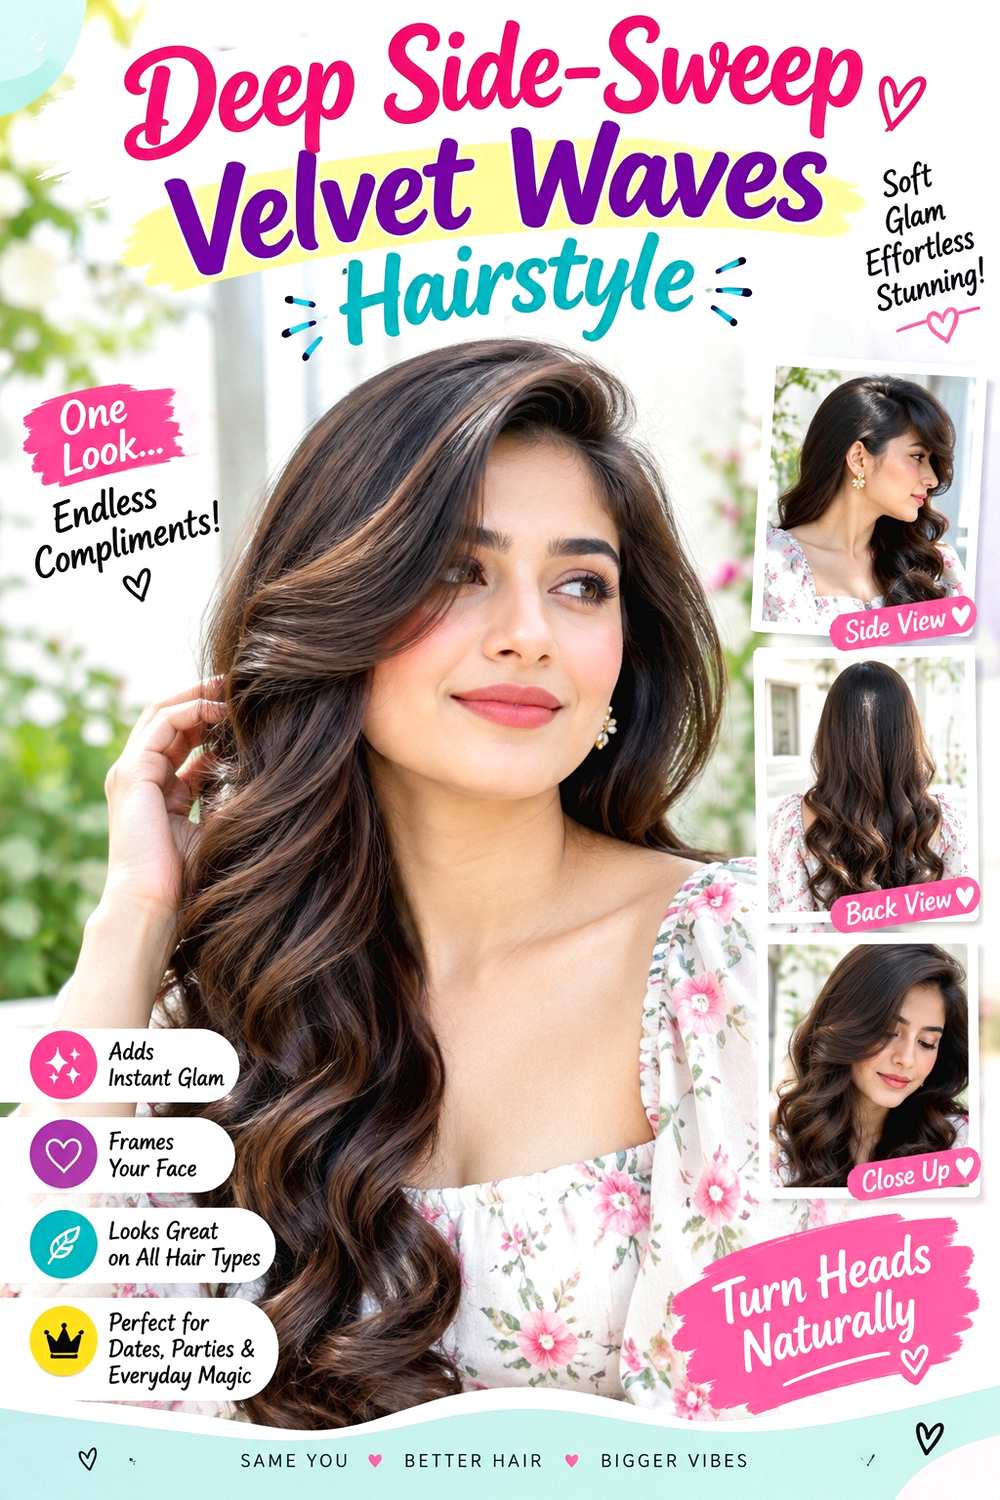
A sweeping front section gives these waves their signature silhouette. The part sits deep to one side, and the heavier section travels across the forehead before lifting away from the face around the temple. From there, wide bends cascade through the lengths with a soft, plush finish rather than sharp, sculpted ridges. Medium to long hair works especially well because the sweep needs enough length to merge naturally into the lower waves. Dense hair can support the fullness, while finer strands benefit from keeping the wave size broad.
Apply heat protectant before shaping the lengths with a large-barrel curling iron, then use flexible hairspray lightly over the finished sweep to support its direction. Full wash-day styling takes moderate to substantial effort depending on length and starting texture; between washes, a short refresh usually means rebuilding the front section and one or two outer waves. If the sweep separates, redirect it from the root rather than coating it with more hold product.
For professional styling, show how far across the forehead you want the front section to travel and where it should lift away from the face. That landmark matters more than simply asking for a “deep side part,” because the sweep determines how the style frames the forehead and cheekbone.
Pro tip:
Style the front sweep in the exact direction it will rest before shaping the lower waves. This prevents the roots from fighting the finished placement.
Make It Work for You:
If your hair is shoulder length, make the sweep the main feature and use fewer, broader lower bends. The silhouette stays dramatic without needing long cascading sections.
Watch Out For:
Avoid pressing the front sweep too flat against the forehead. Give it a little root lift so the section moves naturally instead of appearing stuck in place.
Center-Part Sculpted S-Waves Hairstyle
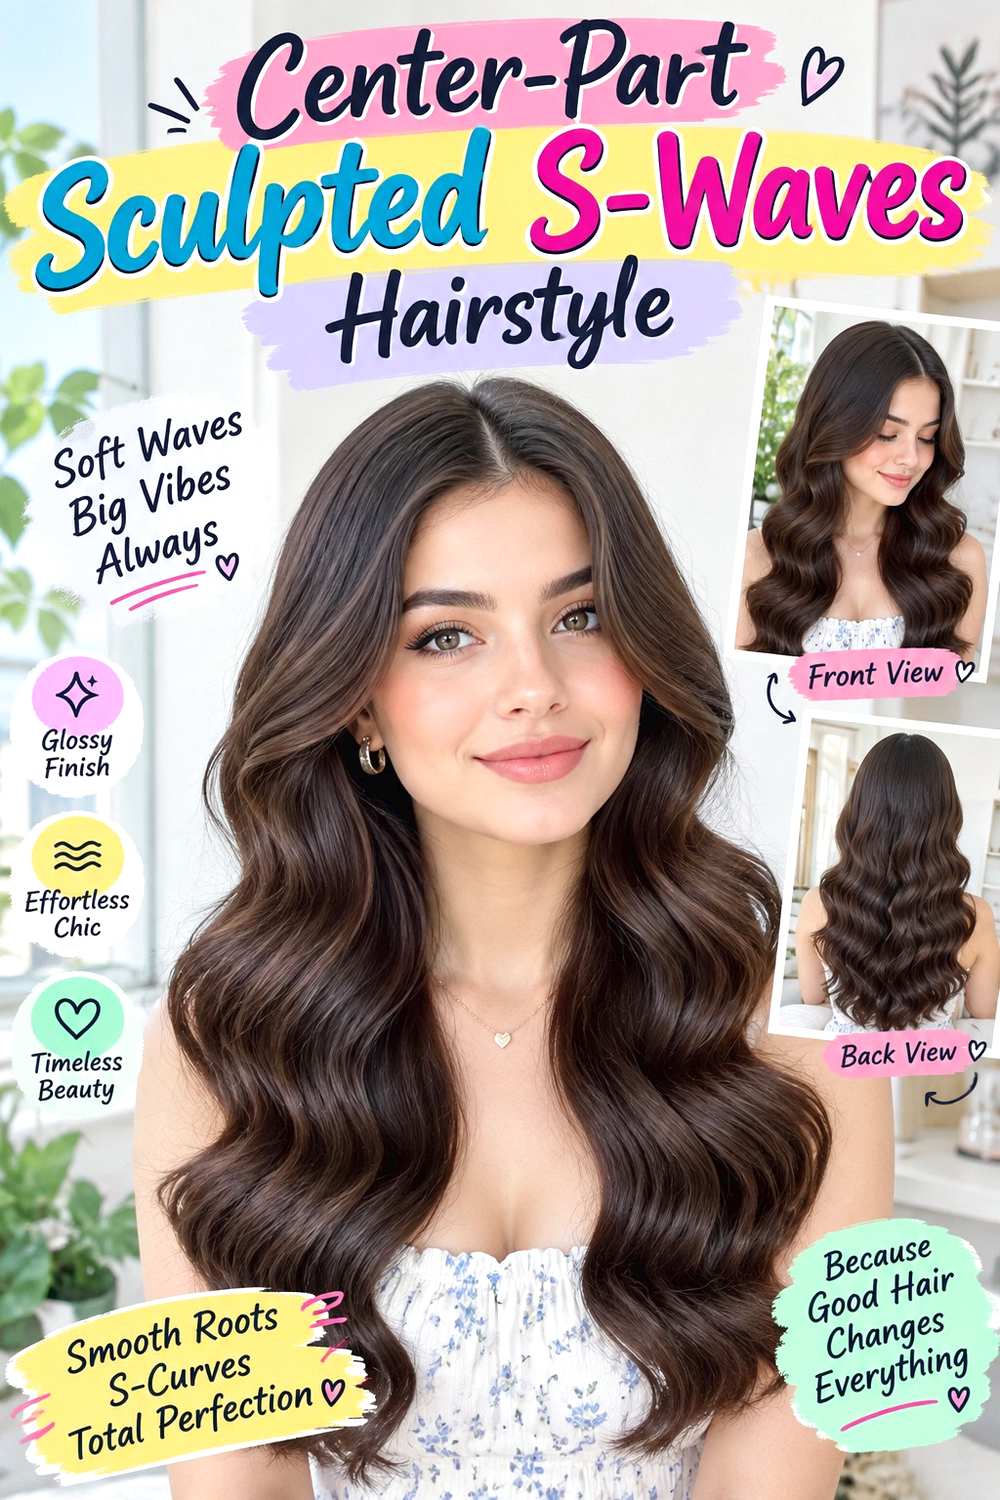
A center part makes the repeating S-shape the focus, with smooth roots flowing into deliberate curves that mirror one another on both sides. The first bend can sit beside the cheekbones before reversing direction through the mid-lengths, and the ends should continue the pattern instead of breaking into separate curls. Medium to long hair gives enough space for several visible S-curves. Straight or softly wavy starting textures make precise alignment easier, while curls can be adapted with less rigid symmetry.
Use heat protectant before a waving iron creates the structured bends, then apply flexible hairspray after the pattern has cooled to help the shape last. This is a more exacting full set than loose glam waves because the curves need to line up visually; a quick refresh can focus on whichever front section has lost its S-pattern. Frizz control is best handled with minimal touching once the waves are arranged rather than frequent brushing.
At a salon, point to the height of the first inward and outward curves instead of asking only for “S-waves.” The front landmarks determine the whole rhythm of the style. Also mention whether you want flatter roots or slight lift at the part so the symmetry matches your preferred proportions.
Pro tip:
Shape the two front sections first and compare their curve heights before moving backward. Small corrections are easier before the rest of the pattern is completed.
Make It Work for You:
If your natural wave pattern is already strong, refine only the visible front and outer layers. Some organic variation can remain underneath while the S-shape stays clear.
Watch Out For:
Do not crowd the bends too closely together. Small, compressed curves can read as crimping; wider spacing keeps each S-shape distinct and polished.
Brushed-Out Noir Waves Hairstyle

These waves begin as a defined set but are softened until the hair reads as one continuous, plush surface. A middle or soft side part works well, with moderate root volume and broad movement beginning around the jaw or collarbone. Long hair shows the brushed pattern beautifully, although medium lengths can create a compact version with fewer bends. The ends should remain substantial and softly curved rather than feathered apart. Fine strands often benefit from broad waves, while dense hair may need more time for the entire set to cool evenly.
Apply heat protectant before using a large-barrel curling iron, then use a paddle brush only after the sections have fully cooled to merge the curls into waves. A full wash-day set is time-consuming on long or dense hair because every section needs shaping and cooling; a quick refresh should involve only the front layer and any flattened ends. Once the pattern has blended, stop brushing before the shape becomes overly loose or frizzy.
At a salon, show where you want the first strong bend to begin and emphasize that the finish should be brushed into a connected wave rather than left as individual curls. Also ask to preserve weight at the ends if a full lower silhouette is important to you.
Pro tip:
Brush in long, controlled passes after the set is completely cool. Pause once the separate curls merge into one flowing pattern instead of continuing automatically.
Make It Work for You:
If your hair is fine, use larger sections and keep the ends lightly grouped. This can maintain visible density while still creating the softened brushed-out finish.
Watch Out For:
Avoid brushing while the sections are still warm. Early loosening can stretch the bends before they have set, leaving the lower lengths noticeably flatter.
Wet-Gloss Rooted Glam Waves Hairstyle

Glossy, close-set roots create the strongest feature here, while the lower lengths open into controlled waves. A center or side part can work, but the first several inches stay sleek before the movement begins around the ears or jaw. The finish should look deliberately polished rather than saturated, with the lower waves still touchable and dimensional. Medium and long hair provides enough room for the contrast. Dense hair can benefit from the controlled upper shape, while fine strands need only a small amount of shine product to avoid collapse.
Apply heat protectant before forming the lower movement with a large-barrel curling iron, then use a light shine serum sparingly over the upper surface to create gloss. A full styling session takes longer if the roots require substantial smoothing; a quick refresh can address flyaways and reshape only the outer bends. Avoid layering more serum during the night, because buildup can flatten the top and make sections separate.
For salon styling, specify exactly where the glossy root finish should end and the visible waves should begin. Ask for shine without a stiff or heavily coated surface. The transition needs to stay clear: if the gloss extends too far down, the waves can lose volume and look weighed down.
Pro tip:
Apply shine product in very small amounts and concentrate it on the visible upper surface. You can add more, but removing excess without restyling is difficult.
Make It Work for You:
For fine strands, keep the roots smooth rather than heavily glossy and let the lower waves provide dimension. This preserves the contrast without sacrificing too much lift.
Watch Out For:
Do not mistake more product for more polish. Excess serum can break the hair into coated sections; use restraint and preserve a clean, continuous surface.
Shoulder-Length Dark Ribbon Waves Hairstyle
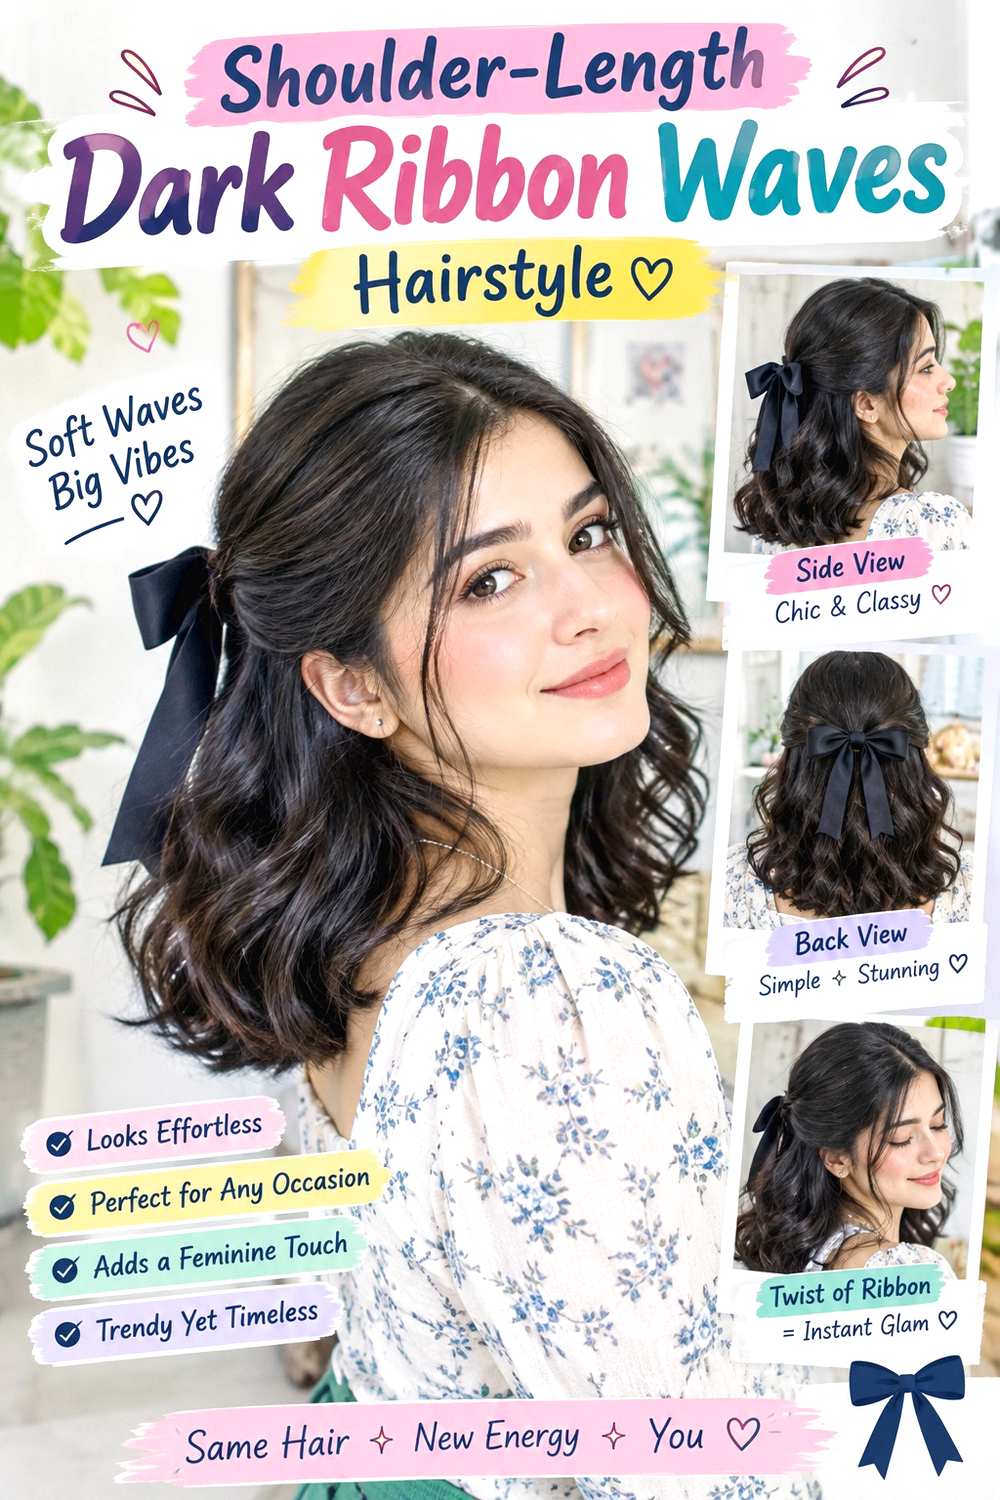
Shoulder-length hair needs wave placement that fits within a smaller vertical space, so this version uses one or two broad ribbon-like bends on each side. An off-center part gives the roots slight asymmetry, with the first curve beginning around the cheekbone and the ends following the wave instead of flipping randomly at the shoulders. The perimeter remains visually substantial, making the style useful for bobs and lobs that should still look full. Fine and dense hair can both wear it, with wave depth adjusted to the amount of natural volume.
Use heat protectant before a one-inch curling iron creates compact, controlled bends, then finish with flexible hairspray to help the shorter pattern stay connected. A complete style is generally faster than the same technique on long hair, although density and starting texture still affect timing. A quick refresh may involve only the front bend and any end that has turned in the wrong direction. Handle the perimeter lightly to limit frizz.
For salon styling, point to whether you want the bottom edge to remain blunt-looking or softly broken by movement. Also specify the first wave height. On shoulder-length hair, moving that bend only a few inches can noticeably change the silhouette and the apparent fullness at the ends.
Pro tip:
Check the perimeter from the side as well as the front. One sharply flipped end can disrupt a short wave pattern more noticeably than on long hair.
Make It Work for You:
For a very blunt lob, keep the bends shallow and concentrate movement around the face. This preserves the strong bottom line while adding dark-glamour polish.
Watch Out For:
Avoid beginning every curl directly at the root. Too much upper movement can make shoulder-length hair look rounder than intended instead of elongated and controlled.
Face-Framing Shadow Waves Hairstyle
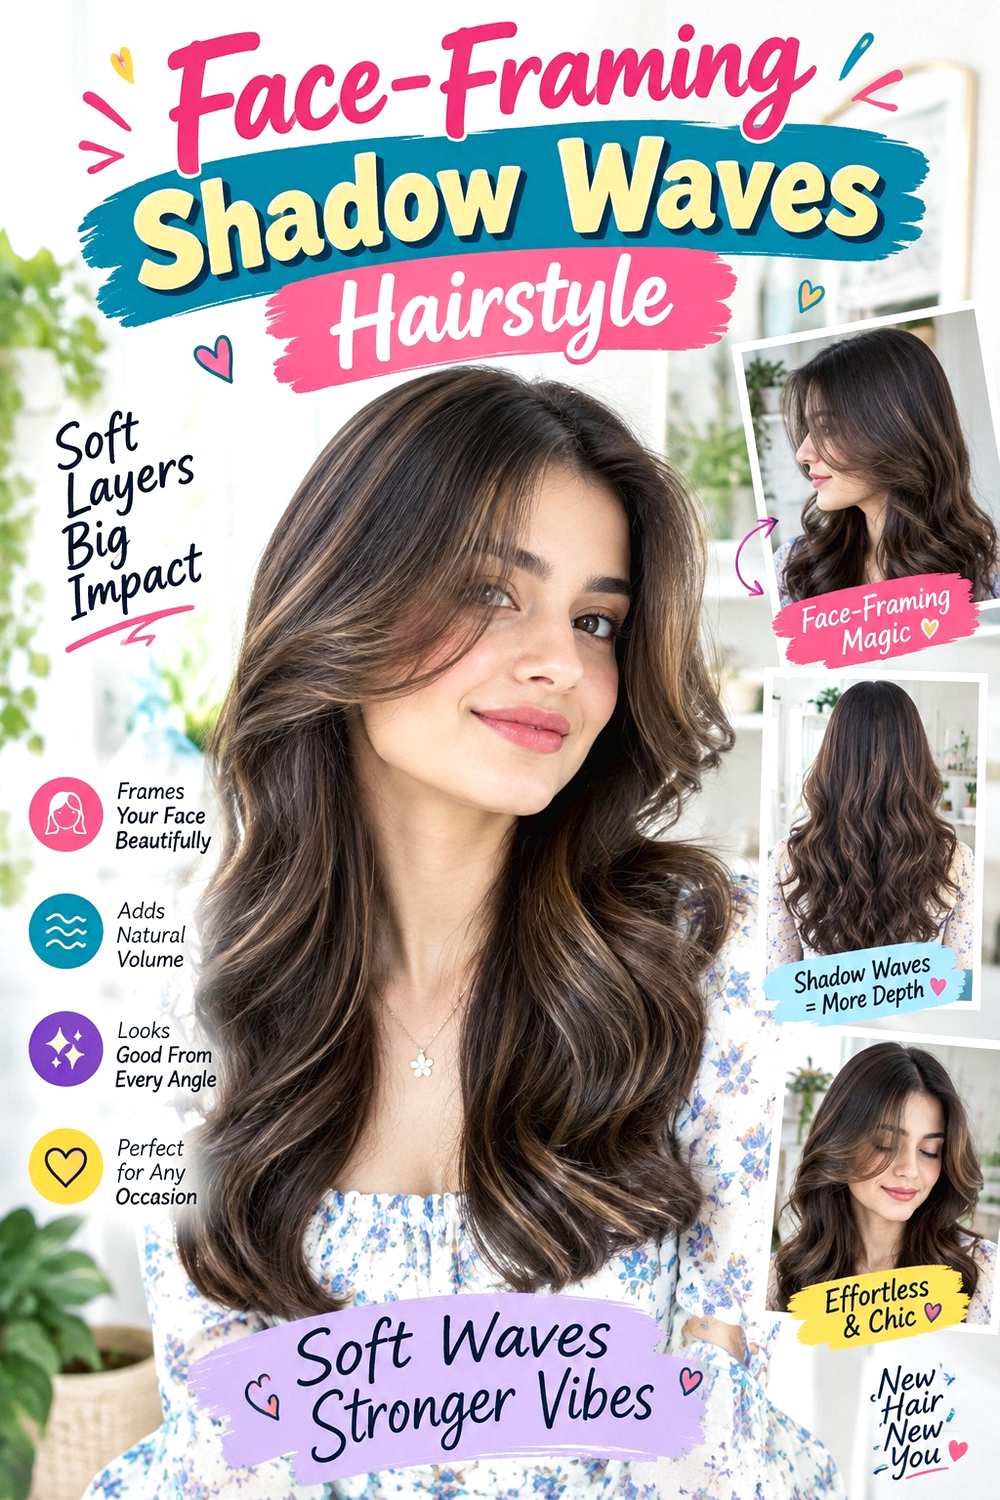
The front sections do most of the visual work in this design. A middle or slightly off-center part opens the face, and the first bends turn outward around the cheekbones before flowing into broader waves through the lower lengths. The back stays softer and less rigidly matched, creating a contrast between polished framing and relaxed movement. Medium and long hair works particularly well because the front wave can blend gradually into the length. This is useful for readers who want a strong photo-ready front without setting every section identically.
Apply heat protectant before using a large-barrel curling iron on the front and selected outer pieces, then mist flexible hairspray mainly over the completed face frame. A full wash-day style is moderate in effort because the back can remain looser; a quick refresh is usually limited to the two front sections. If frizz appears, avoid repeatedly curling the same piece and instead preserve the existing bend as much as possible.
For salon styling, show the exact point where the front wave should turn away from the face—cheekbone, jaw, or lower. Also specify how much separation you want between the face-framing sections. That landmark changes whether the front feels open and sculpted or softer and closer to the cheeks.
Pro tip:
Shape the front while looking straight ahead rather than tilting your head. This gives a more accurate view of where the outward bend actually frames the face.
Make It Work for You:
For natural curls, keep established curl groups and redirect only the front pieces outward. The defining open frame can remain without making the entire texture uniform.
Watch Out For:
Do not over-style the back to match the front exactly. The softer contrast is intentional; too much uniformity can remove the shadowy, dimensional movement.
Defined-End Evening Waves Hairstyle
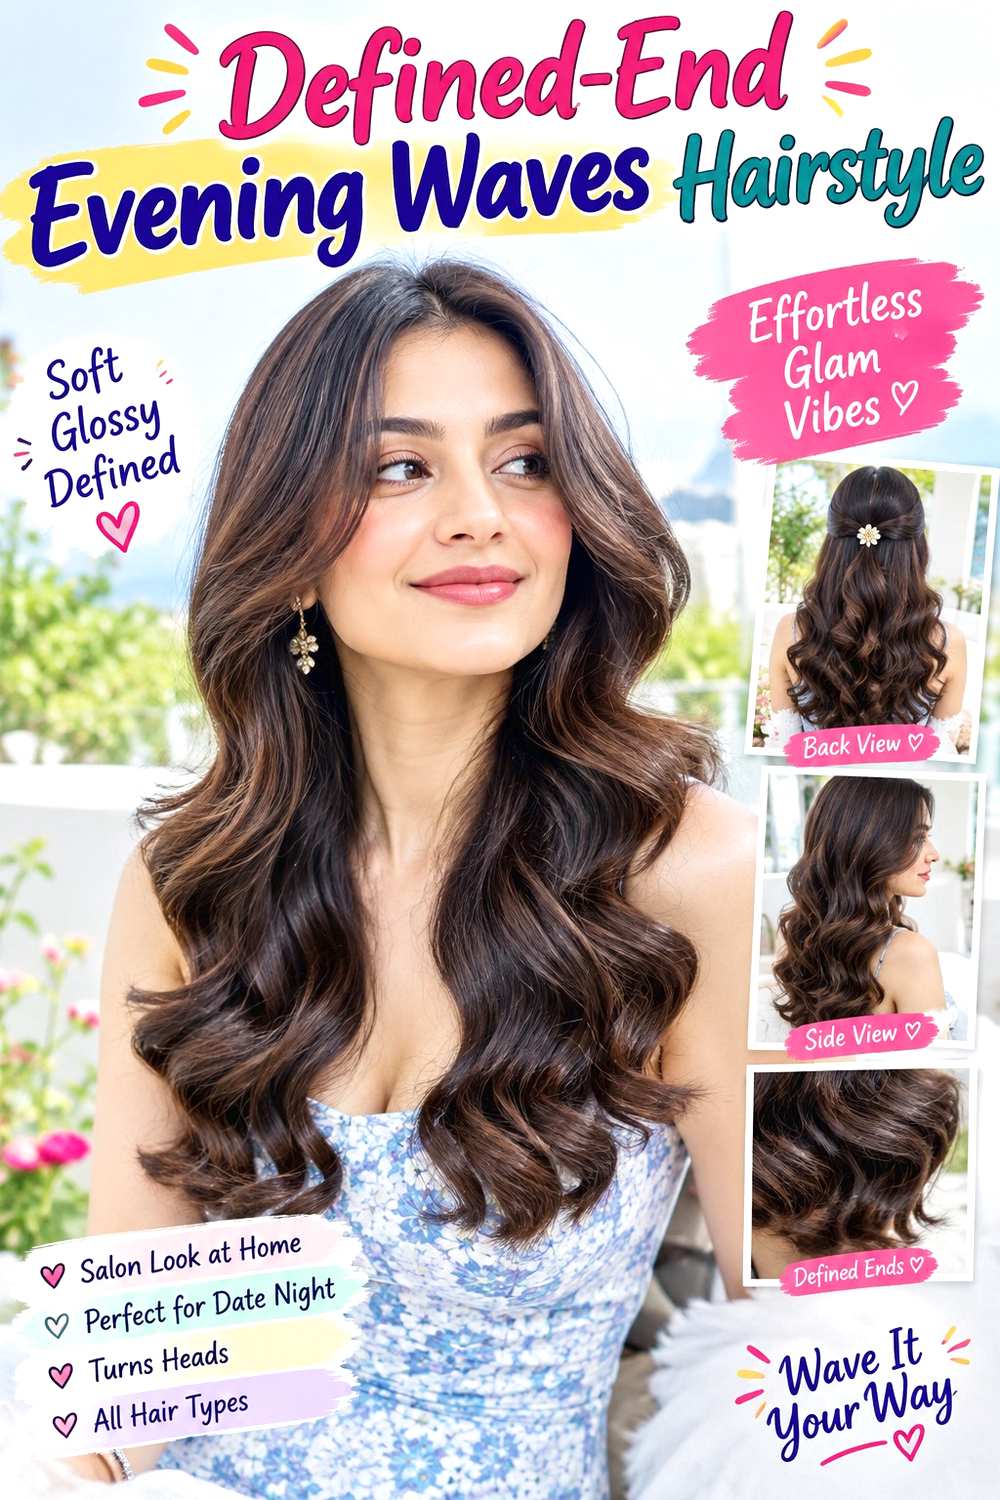
Defined ends give this wave set a particularly deliberate finish. The roots remain smooth or lightly lifted, the mid-lengths form medium-size bends, and the final few inches curve in a consistent direction instead of fading into straight tips. A center or side part can both work, making the end treatment the main feature. Medium to long hair with a reasonably full perimeter shows the effect most clearly, while lower-density ends often benefit from a slightly broader, less separated final curve.
Apply heat protectant before using a medium-barrel curling iron, then add flexible hairspray after the hair cools to support the lower shape. Full styling requires working through the entire length, so the effort grows with density and length. A quick refresh can target only ends that have lost their direction. If surface frizz develops, avoid making the curls tighter in response, because that can shrink the apparent length and create a busy finish.
For salon styling, specify exactly how you want the ends directed: all gently under, consistently away, or softly coordinated with the last wave. Ask for the mid-length movement to flow into that ending instead of stopping above it. The connection between the last bend and the perimeter is what makes the finish look intentional.
Pro tip:
Shape the final few inches while holding the hair in its natural resting position. This helps the end curve connect smoothly with the wave directly above it.
Make It Work for You:
If your ends are sparse, keep the last bend wider and less separated. A fuller visual bottom line often suits this design better than many tiny pieces.
Watch Out For:
Do not twist the tips into tight coils. The goal is a controlled conclusion to the wave, not a separate ringlet attached to each section.
Voluminous Crown Midnight Waves Hairstyle

The volume sits upward at the crown rather than spreading around the temples, creating a taller profile over broad lower waves. A shallow side or off-center part prevents the roots from splitting too flat, while the front lifts gently before blending into movement around the jaw or collarbone. Medium and long hair shows the contrast best. Dense hair can support the scale easily, while fine strands may need a smaller amount of crown lift so the top remains flexible and connected to the lengths.
Apply root-lift spray near the crown, heat protectant through the sections being shaped, and use a large-barrel curling iron for the lower waves. Full styling takes extra effort because root direction and wave pattern are built separately. A quick refresh can focus on the crown and the most visible front bend rather than resetting every section. Avoid piling additional product onto roots that begin to settle, as buildup may make them drop faster.
For salon styling, describe the desired height from the side view and ask for lift at the crown rather than width at the temples. Also show where the first major lower wave should begin. Those two points keep the profile tall and dramatic without turning the upper shape into a large rounded bump.
Pro tip:
Check crown height from the side before finalizing the waves. Small changes to the highest point can improve the profile without adding more overall volume.
Make It Work for You:
For dense hair, keep the crown lift controlled and let the lower lengths carry more volume. This prevents the top from becoming disproportionately large.
Watch Out For:
Do not confuse crown height with side width. If the temples begin expanding, redirect the upper sections upward and keep the hair beside the face calmer.
One-Side Tucked Noir Waves Hairstyle
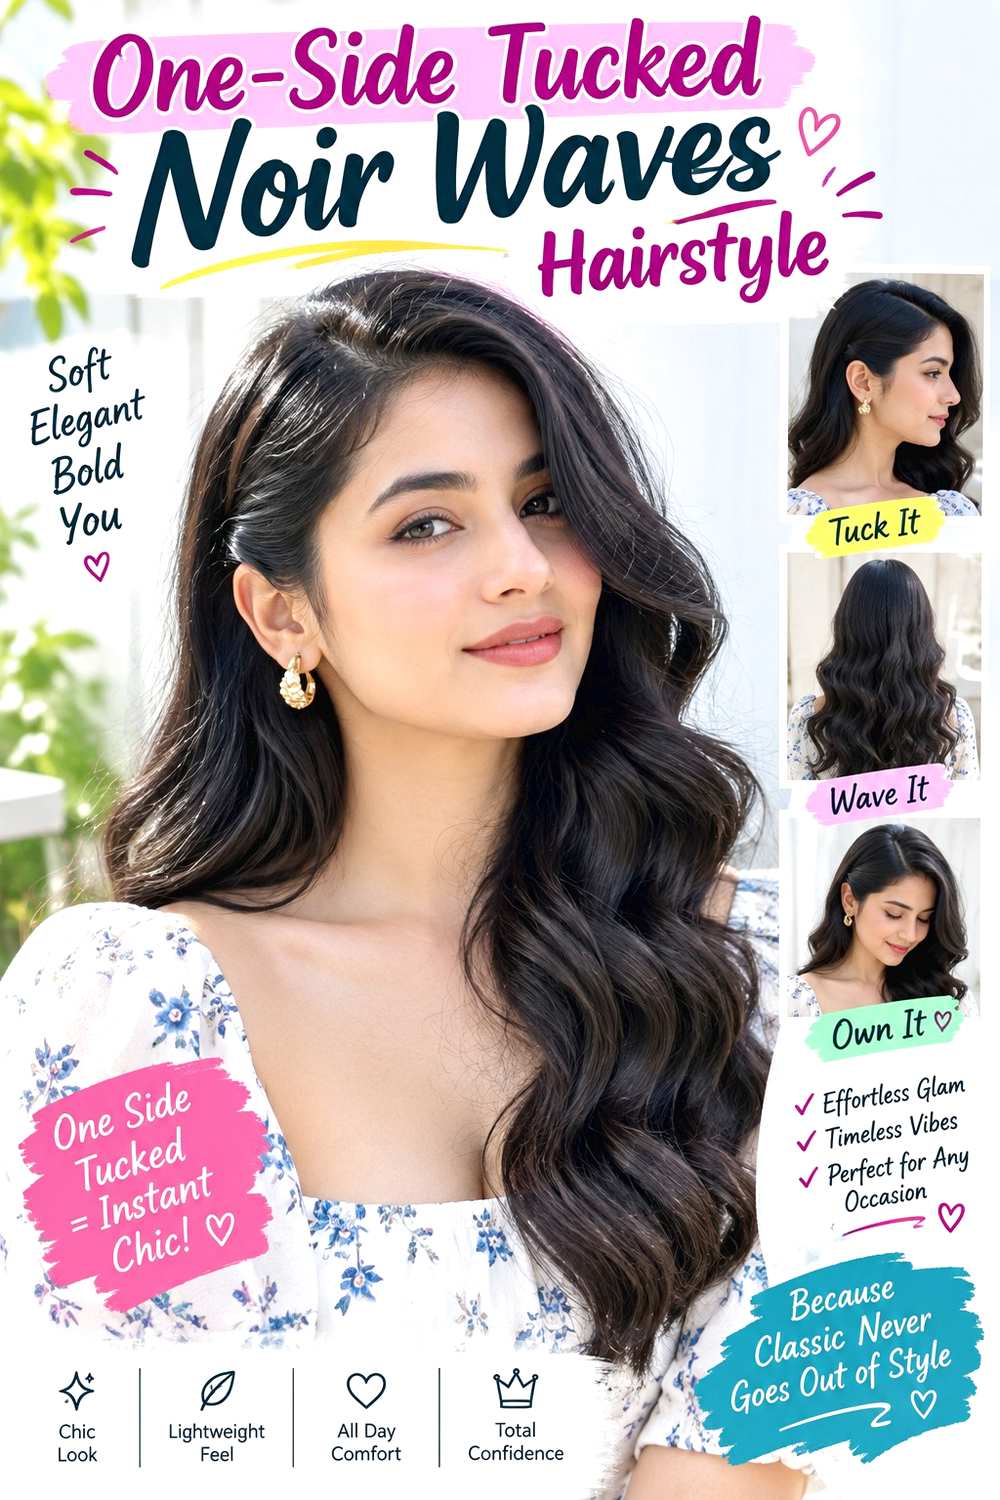
One tucked side creates a sharp asymmetry while leaving the opposite side full and fluid. A deep side part directs the lighter section behind the ear, where it stays close to the head, while broad waves travel through the exposed side and down the back. The first bend can begin around the temple or cheekbone, and the ends stay softly curved. Shoulder-length through long hair can wear this design, and it works especially well when you want an earring, neckline, or strong side profile to remain visible.
Apply heat protectant before shaping the waves with a large-barrel curling iron, then use flexible hairspray lightly over the tucked section and visible outer bends. A full set takes moderate effort; a quick refresh can focus on the front wave and the tucked side. If the tuck starts to loosen, redirect that section close to the head instead of repeatedly tightening or adding more product.
For salon styling, show exactly how much hair should sit behind the ear and where the exposed front wave should crest. Ask for comfortable hold at the tuck rather than strong tension. The difference between the flatter side and fuller side should feel deliberate while still allowing natural movement.
Pro tip:
Finish the fuller wave side before securing the tuck. Seeing its final volume helps you judge how flat the opposite side should be for balanced asymmetry.
Make It Work for You:
If your hair is shorter, tuck only the temple section and leave the lower side free. The open profile still reads clearly without needing extra length.
Watch Out For:
Avoid pulling the tucked section painfully tight. A secure direction is enough; excessive tension can distort the wave near the ear and reduce comfort.
Long Cascading Obsidian Waves Hairstyle

Very long hair suits elongated waves that begin lower and travel in broad, uninterrupted sections toward the ends. A center or subtle side part keeps the roots relatively calm, while the first major bend starts around the jaw or collarbone. The movement becomes more visible farther down the length, and the ends stay softly curved so the entire tail of hair remains connected. Dense long hair can carry large waves well, while fine strands often look fuller with fewer, wider bends rather than many separated curls.
Apply heat protectant before shaping with a large-barrel curling iron, then use flexible hairspray lightly over the cooled lengths for movable hold. Full wash-day styling can take substantial effort simply because of the length and number of sections involved. A quick refresh should focus on the front, outer layer, and any flattened ends instead of reheating every strand. Handle the lower lengths gently to minimize frizz and unnecessary tangling.
For salon styling, point to where you want the first strong bend and how much root volume you prefer. Ask for the waves to lengthen visually rather than spring upward. Preserving sufficient weight at the bottom also matters because excessive separation can make very long ends appear thinner than intended.
Pro tip:
Style the longest sections in their natural hanging direction. This helps the bends settle vertically instead of twisting around one another once the hair falls down the back.
Make It Work for You:
For very dense hair, concentrate the clearest definition on the outer layers and keep interior movement broader. The cascade stays visible without becoming excessively bulky.
Watch Out For:
Do not make every long section small and tightly curled. The accumulated volume can become wide and busy instead of creating an elongated cascading effect.
Soft Fringe Dark Glam Waves Hairstyle
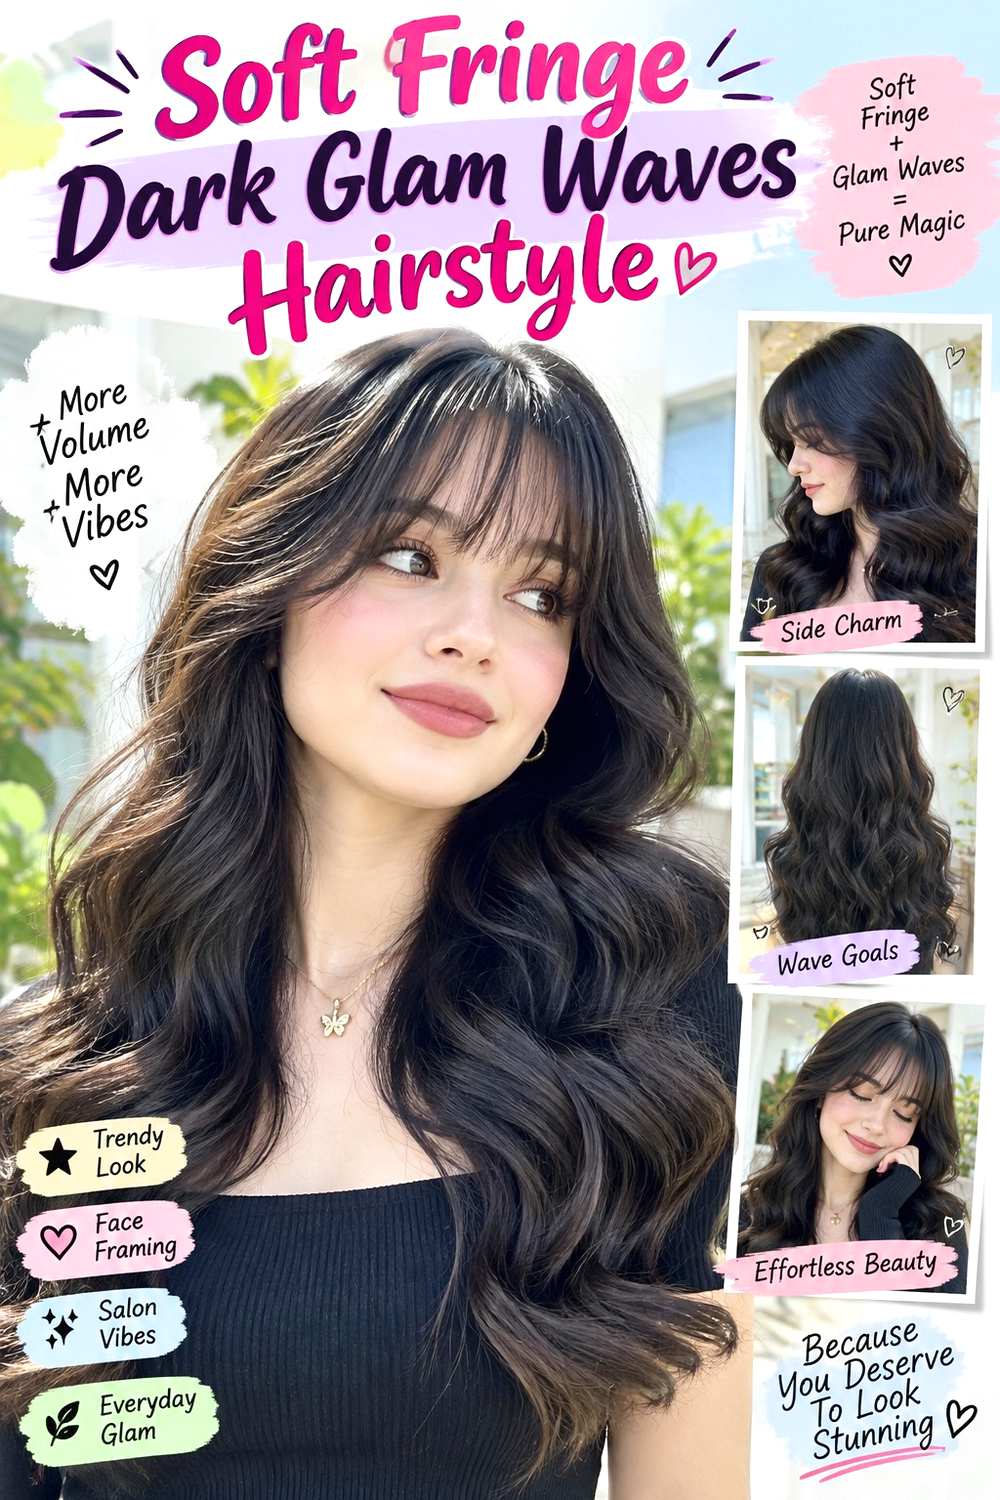
A soft fringe changes the front balance by adding movement across the forehead before the longer waves begin. The fringe can skim the brows with lightly separated tips and slightly longer outer corners, while the rest of the hair follows a center or gentle off-center part behind it. Broad waves begin around the cheekbones or jaw and continue through medium or long lengths. Straight, wavy, and textured hair can all adapt the idea, but fringe behavior depends heavily on growth direction and natural shrinkage.
Use heat protectant before shaping the longer sections with a large-barrel curling iron, then use a small round brush to redirect the fringe during drying and flexible hairspray to support the finished wave pattern. A full wash-day style takes longer because the fringe and lengths need different handling. A quick refresh can focus on the fringe and two front waves. Trim upkeep depends on when the fringe enters the eyes or loses its intended separation rather than one fixed schedule.
At a salon, discuss the fringe at its finished dry length and show how long you want the outer corners to remain. For curly or wavy hair, ask the stylist to account for how the front naturally springs up before deciding the final length.
Pro tip:
Refresh the fringe before reshaping the longer waves. Once the front sits correctly, you can judge whether the surrounding bends need more or less volume.
Make It Work for You:
If your fringe naturally curls, keep more finished length and allow the outer corners to blend softly. This preserves the fringe idea without ignoring shrinkage.
Watch Out For:
Do not cut or style the fringe as though every section shrinks equally. Assess how it sits dry, especially around stronger growth patterns or curls.
Asymmetrical Red-Carpet Waves Hairstyle
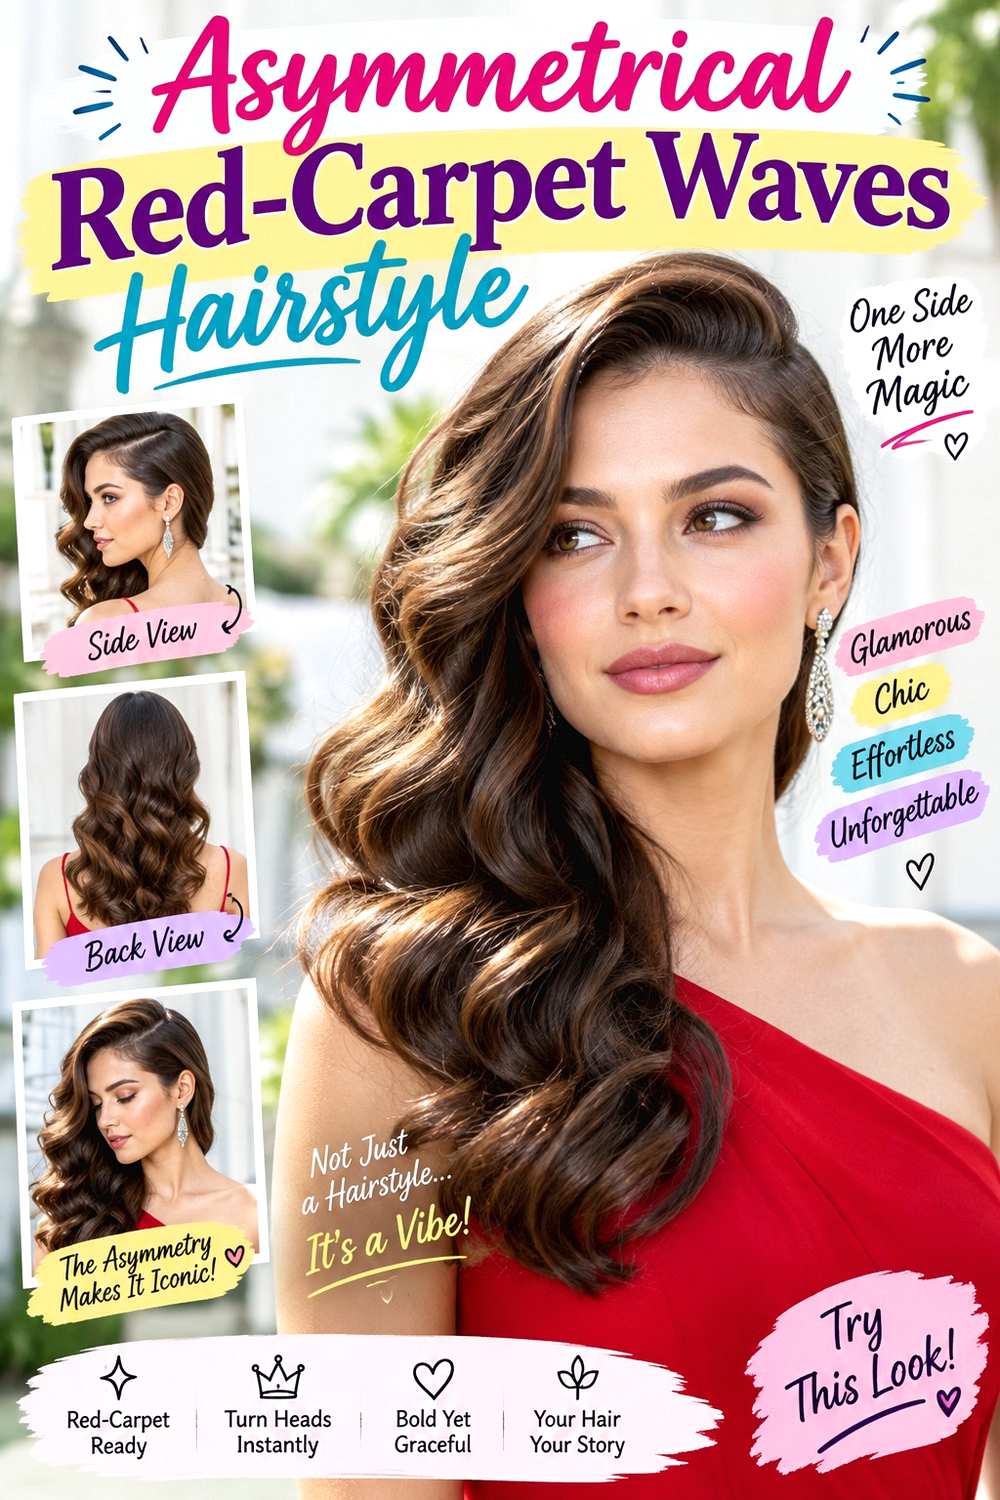
This design pushes most of the visible movement to one side, creating a dramatic off-center silhouette without requiring a full tuck. A deep part directs the heavier section across one shoulder, while the lighter side follows the head more closely and joins the back. Waves begin around the cheekbone and become broader through the mid-lengths, with the ends coordinated rather than tightly curled. Medium and long hair shows the asymmetry most clearly, and dense hair can support the fuller side particularly well.
Apply heat protectant before using a large-barrel curling iron to build the waves, then finish with flexible hairspray once the sections cool. Full styling takes moderate effort because the two sides need different volume treatment; a quick refresh can concentrate on the front sweep and the outer waves resting over the shoulder. If the heavy side begins collapsing, rebuild only its upper bend instead of increasing hold over the whole style.
At a salon, identify which shoulder should carry the majority of the hair and how close the opposite side should sit to the head. Also show where the first visible wave should crest. Those details create the asymmetry more effectively than simply making one side curlier than the other.
Pro tip:
Arrange the heavy side over the intended shoulder before finalizing the bends. Styling it in its resting position reveals where extra lift or separation is actually needed.
Make It Work for You:
For finer hair, keep fewer sections on the heavy side and make the bends broad. This creates visual sweep without exposing sparse separation near the ends.
Watch Out For:
Do not make the lighter side completely flat while the other side is very large. Preserve a little movement so the asymmetry still feels connected.
Textured Gothic Glam Waves Hairstyle
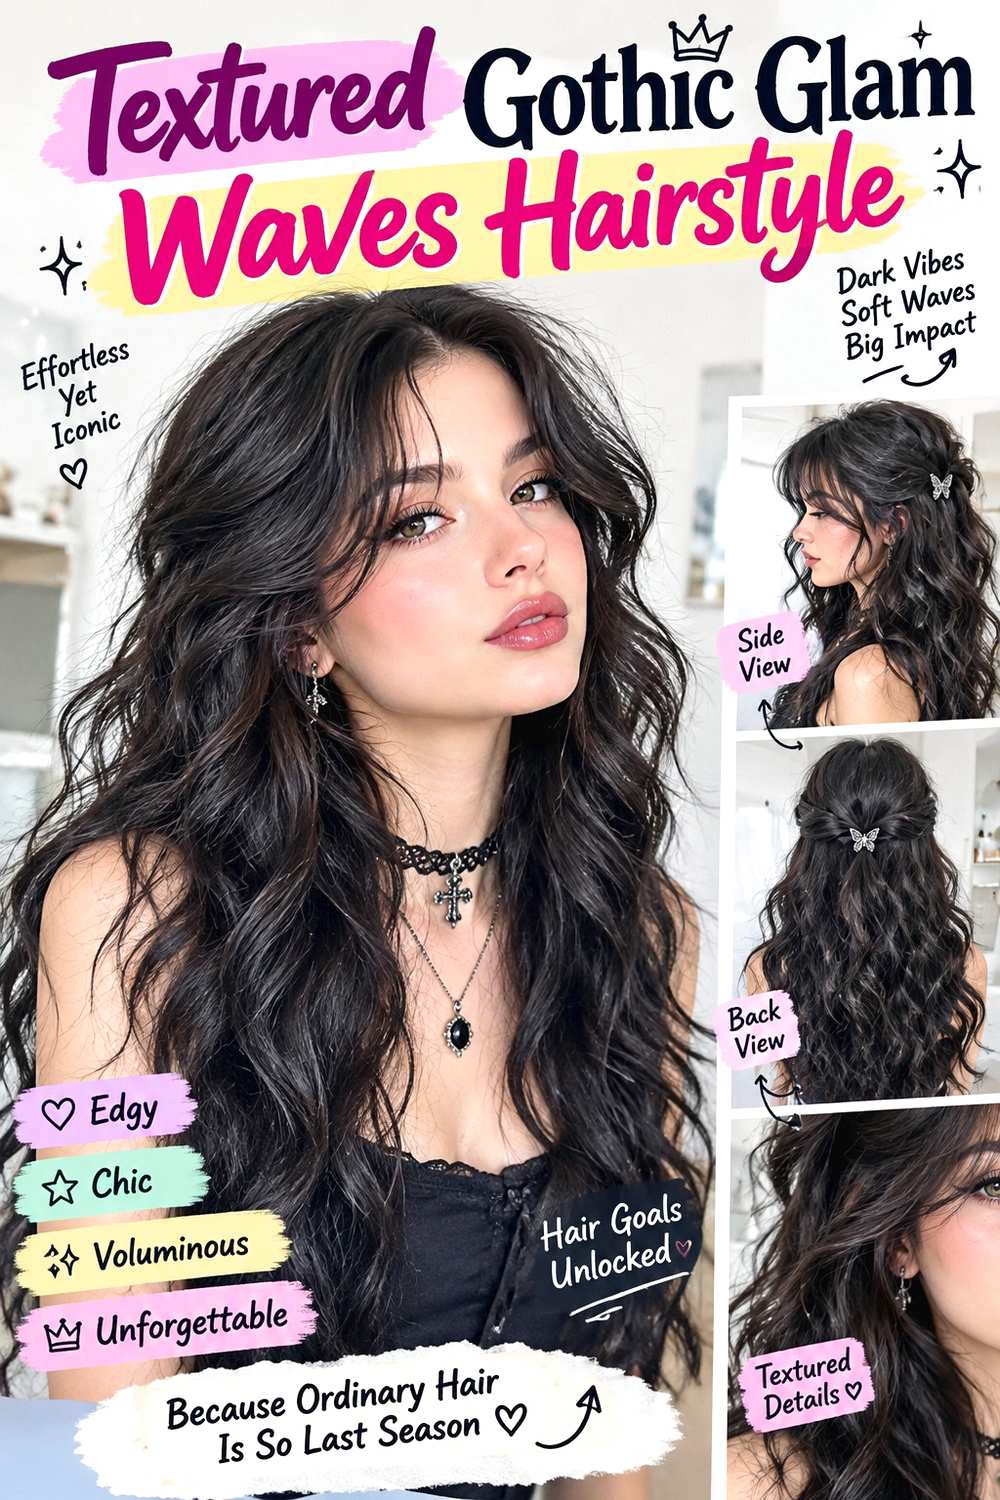
This version keeps the dark-glamour mood polished but allows more visible texture between the waves. A center or deep side part can work, with moderate root volume, broad bends through the mid-lengths, and slightly separated ends that stop short of becoming beachy. Natural waves, curls, or coils can remain part of the finish instead of being fully smoothed away. Medium and long hair gives the texture space to develop, while dense hair can use larger wave groups to avoid excessive width.
Use lightweight leave-in conditioner to support softness, curl gel to organize natural texture, and a diffuser to dry and encourage defined movement without flattening the pattern. A full wash-day style takes longer because definition is built while drying, whereas a quick refresh can focus on a few outer sections that have become frizzy or stretched. Avoid repeatedly separating dry groups, which can make the finish less controlled.
For salon styling, show the level of polish you want rather than asking for perfectly uniform waves. Point to where you want the most volume—crown, sides, or lower lengths—and how much face-framing texture should remain. The goal is structured movement with visible natural character, not forced symmetry.
Pro tip:
Define the front and outer sections most carefully, then leave some variation underneath. The visible shape stays polished while the overall texture retains depth and movement.
Make It Work for You:
For tighter curls or coils, keep stronger natural grouping and create the glam effect through parting, placement, and surface definition rather than stretching every section.
Watch Out For:
Do not keep separating curl or wave groups to create more volume. Too much disturbance can turn controlled texture into frizz and weaken the intended silhouette.
Conclusion
Dark glamour wave hairstyle ideas can range from precise S-curves and sleek-root contrasts to brushed softness, fringe, crown lift, and textured natural movement. Long hair gives broad waves room to cascade, while shoulder-length cuts benefit from tighter placement and stronger end definition. Fine or lower-density hair often looks fuller with wider bends and restrained product; dense hair can use controlled roots or larger sections to manage width. Center parts emphasize balance, while deep side parts create stronger asymmetry. The best finish also depends on routine: a sculpted wave set asks for more styling than a textured interpretation or targeted face-frame refresh. Choose the combination of parting, volume, end shape, texture, and maintenance that fits your natural hair and realistic styling effort.
Before Your Salon Visit
Choose one or two favorite references and save clear front, side, and back views if possible. Tell your stylist about your natural texture, density, preferred length, face shape, and realistic styling routine. Point to the exact parting, first wave height, crown volume, fringe length, tuck placement, or end finish you want. If you like the front from one reference and the wave size from another, say so directly. Discuss how much upkeep and heat styling you are comfortable doing before settling on the final finish.
FAQs
Can Dark Glamour Waves Work on Fine or Lower-Density Hair?
Yes. Broad bends, restrained product, and a fuller-looking perimeter can help preserve visible density. Avoid assuming more curls automatically create more volume; too many small sections may separate the ends. Concentrating strong definition around the face and outer layer can often give enough shape without overworking the whole head.
Do Dark Glamour Waves Require Heat Styling?
No. Heat tools can create more uniform, controlled bends, but rollers, setting methods, and existing natural texture can also produce a polished wave effect. If you do use heated tools, apply heat protectant and avoid repeatedly reheating the same sections simply to chase perfect symmetry.
How Can I Make Glam Waves Last Longer Through an Evening?
Let shaped sections cool fully before loosening them, minimize repeated touching, and refresh only the areas that actually fall flat. The front wave and outer layer usually affect the visible silhouette most. Hold also varies with natural texture, density, length, humidity, and the size of the bends.
What Should I Ask for at a Salon for Dark Glamour Waves?
Describe the exact part, wave size, first bend position, root volume, and end direction you want. If the style includes a tuck or fringe, point to its finished placement too. Showing those specific landmarks is more useful than asking only for “glam waves,” because several very different silhouettes fit that description.