18 Glossy Blowout Hairstyles for Fall 2026
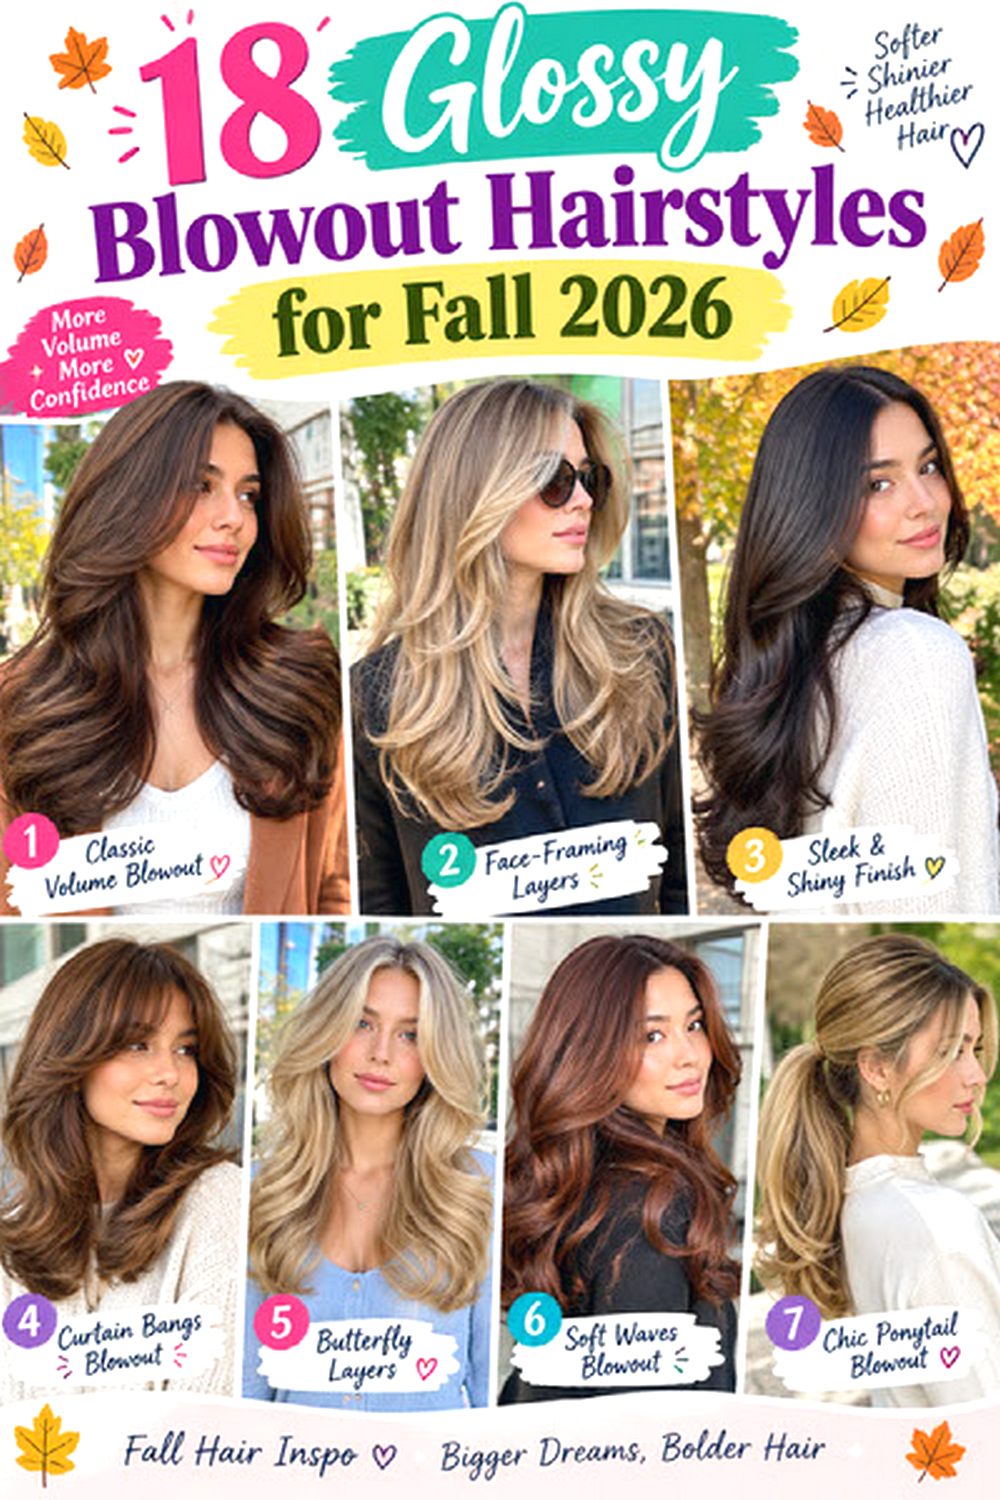
Glossy blowouts combine a smooth, light-reflective finish with controlled movement through the roots, layers, and ends. Some versions are softly rounded, while others have flipped tips, face-framing bends, or fuller crown volume. The defining detail is not simply straight hair; a good blowout keeps enough body to prevent the shape from looking flat while smoothing frizz and rough texture. Length can range from a polished bob to long layered hair, and bangs or fringe can change how the style frames the face.
These glossy blowout hairstyles for Fall 2026 can be adapted for fine, medium, and thick density. Fine hair often needs lightweight volume and restrained layering, while thick hair benefits from strategic bulk removal and longer layers. Straight hair usually needs less drying time, while wavy hair can create natural movement with careful tension and a round brush.
Daily effort ranges from moderate to high depending on texture and length. Before choosing a version, consider heat use, humidity, trim frequency, root volume, face-framing placement, and how often you realistically want to refresh the finish.
Quick List
- Classic Glossy Blowout with Long Layers hairstyle
- Center-Parted Glossy Blowout hairstyle
- Side-Parted Glossy Blowout with Volume hairstyle
- Glossy Blowout with Curtain Bangs hairstyle
- Shoulder-Length Glossy Blowout hairstyle
- Glossy Blowout Bob with Rounded Ends hairstyle
- Glossy Blowout Lob with Soft Bend hairstyle
- Glossy Blowout with Face-Framing Layers hairstyle
- Glossy Blowout for Fine Hair hairstyle
- Glossy Blowout for Thick Hair hairstyle
- Glossy Blowout with Flipped Ends hairstyle
- Glossy Blowout with Soft C-Shaped Layers hairstyle
- Glossy Blowout with Wispy Bangs hairstyle
- Long Glossy Blowout with Bouncy Ends hairstyle
- Glossy Blowout with Root Lift hairstyle
- Glossy Blowout for Naturally Wavy Hair hairstyle
- Glossy Blowout with Deep Side Sweep hairstyle
- Polished Glossy Blowout with Blunt Ends hairstyle
Classic Glossy Blowout with Long Layers hairstyle

Long layers give a glossy blowout enough movement to feel light while still keeping the overall length full. The shortest layers can begin around the chin or collarbone and gradually blend into the lower sections, creating visible bends instead of choppy steps. Medium and thick hair usually carries this shape well, while fine hair should keep the layering restrained so the ends do not become sparse. Straight and wavy textures are easiest to smooth with controlled heat. Use heat protectant, a large round brush, and a lightweight shine serum applied mainly through the lower lengths. Styling takes moderate to longer time because each section needs tension and cooling to hold its shape. A trim every several weeks helps prevent dry ends from interrupting the glossy finish. At the salon, ask for connected long layers with a strong perimeter and specify exactly where you want the shortest front layer to begin.
Pro tip:
Let each section cool around the round brush or a roller before releasing it; cooling sets the bend and keeps the blowout bouncy longer.
Center-Parted Glossy Blowout hairstyle
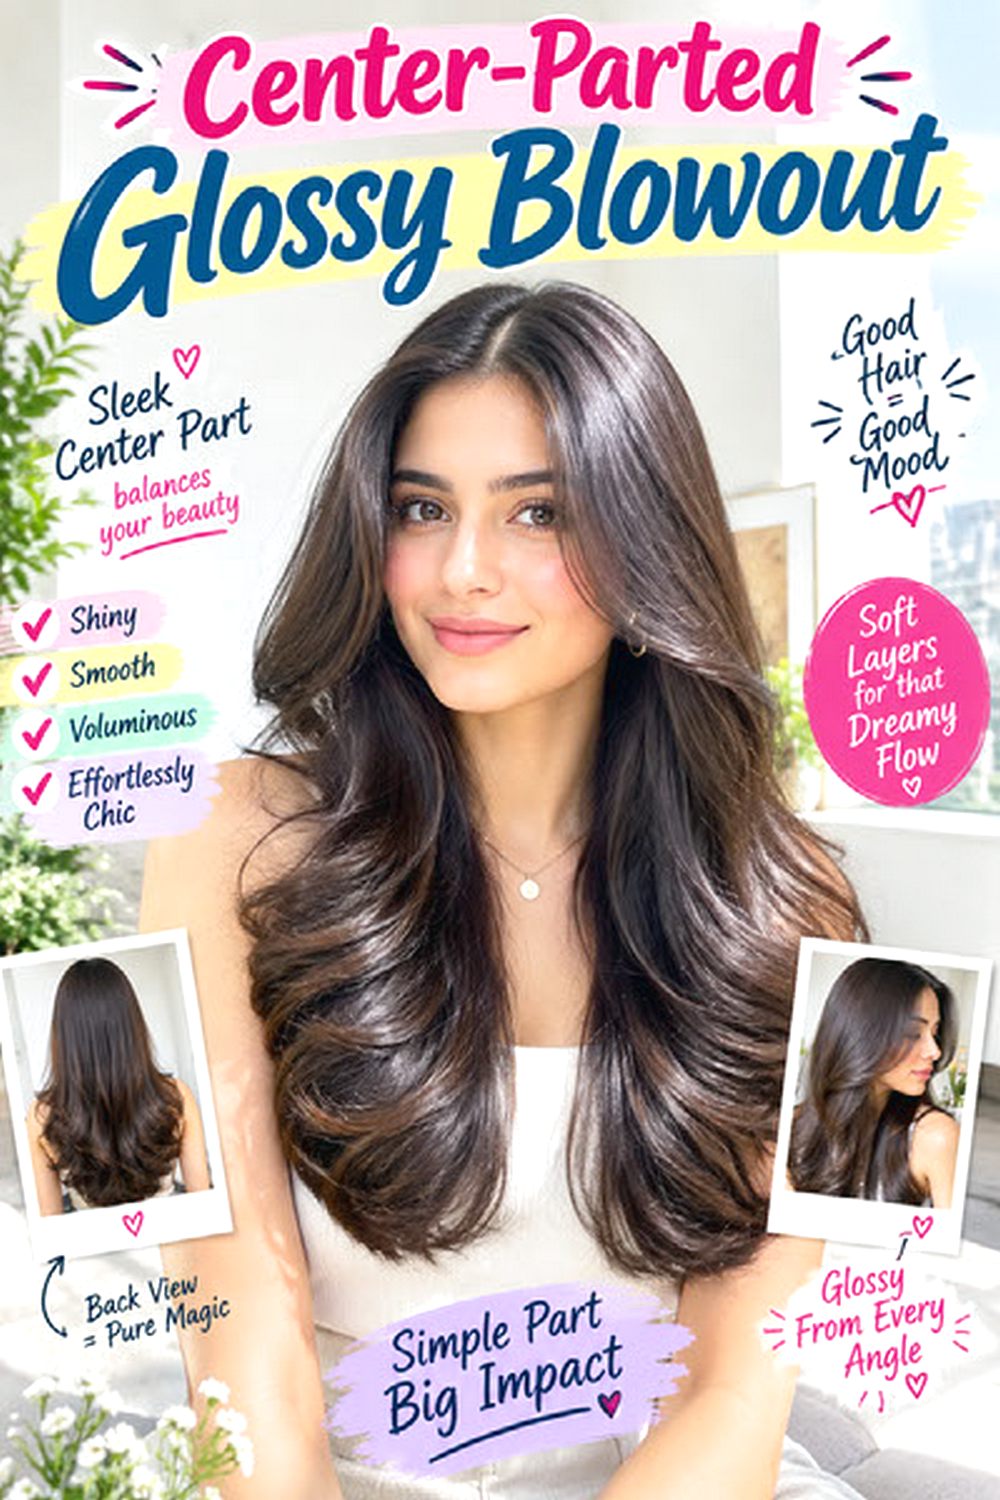
A center part makes a glossy blowout look balanced from both sides, so symmetry and smooth root direction matter more than exaggerated volume. The hair can stay relatively sleek near the crown, with movement beginning around the cheekbones or mid-lengths. Medium and long hair show this shape clearly, and fine hair benefits from a little hidden root lift so the center part does not look flat. Thick hair may need internal weight removed to keep the sides from becoming too broad. Use smoothing cream, heat protectant, and a medium-to-large round brush. Styling is moderate and easier when the natural part already falls near the middle. Humidity can disturb the polished root area, so use anti-frizz product sparingly around the surface. At the salon, ask for balanced face-framing on both sides and check the cut while the hair is parted centrally to make sure one side does not sit noticeably heavier.
Pro tip:
Dry the roots on each side of the center part in their final direction first; crossing them back and forth can create unwanted lift or separation.
Side-Parted Glossy Blowout with Volume hairstyle
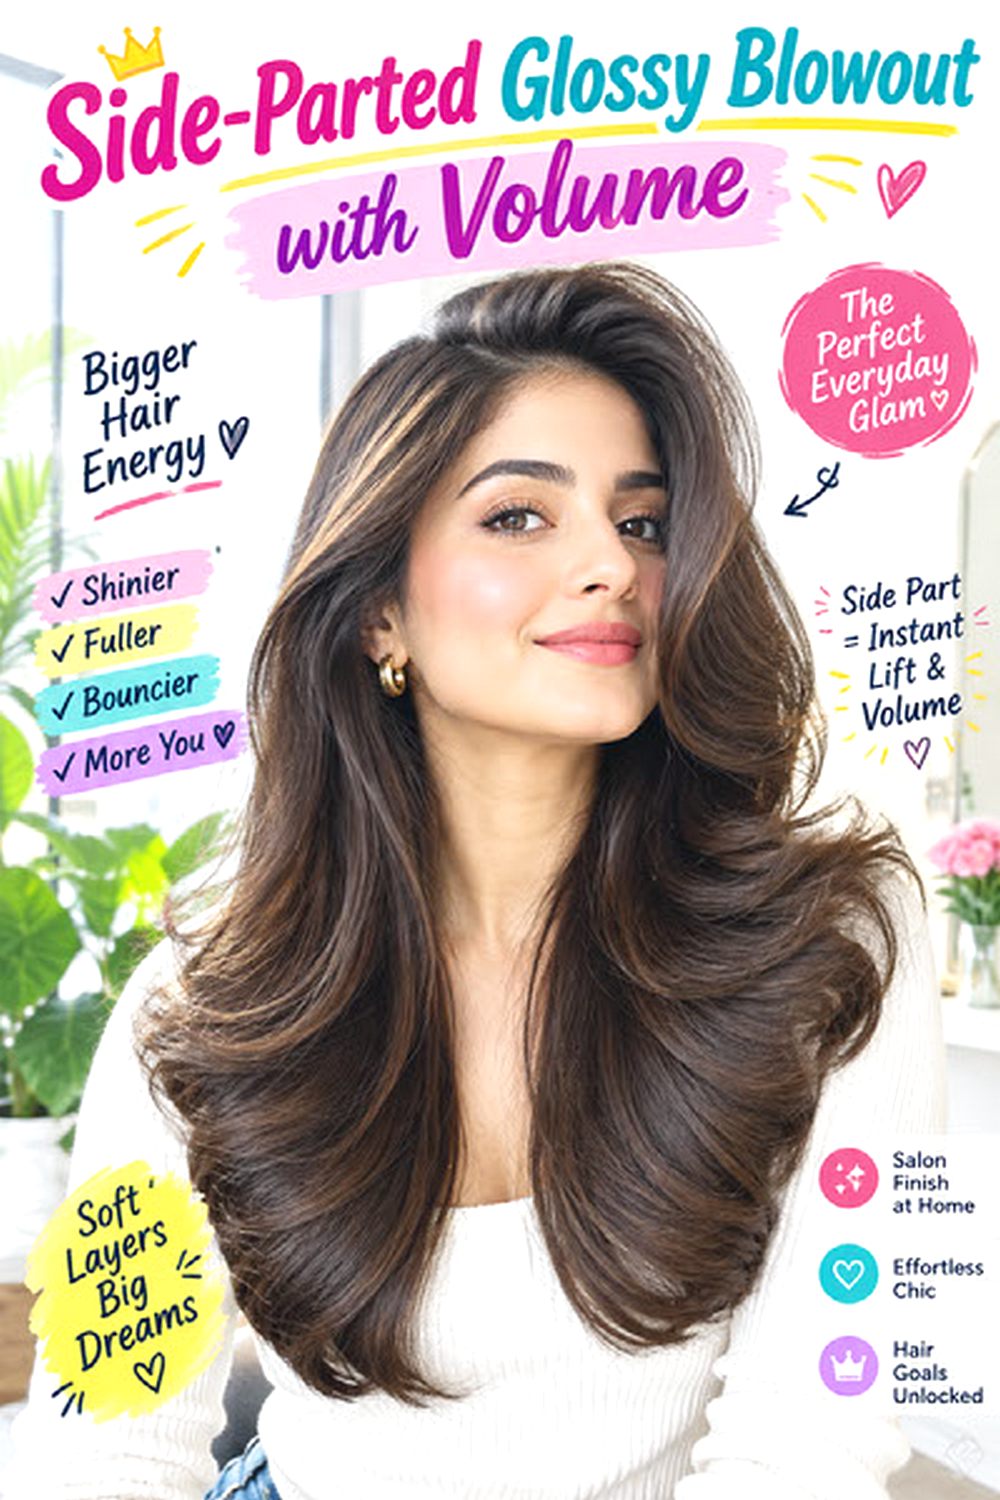
A side part creates more visible height on one side, making it useful when you want a fuller, sweeping blowout rather than a symmetrical shape. The front section should lift away from the scalp and curve across the temple before blending into the longer layers. Medium to thick hair naturally supports the volume, while fine hair can create the effect with light root product instead of heavy teasing. Straight and wavy textures both work, although wavy hair may need stronger brush tension for a smoother finish. Use volumizing mousse, a large round brush, and flexible hairspray to support the sweep. Styling takes moderate time, especially if the front section needs to be set in a roller while cooling. At the salon, show your preferred part position and ask for front layers that flow from the cheekbone or jaw rather than stopping abruptly around the ear.
Pro tip:
Set the heavier side in a large roller away from the face while it cools; this keeps the sweep lifted without creating a stiff bump.
Glossy Blowout with Curtain Bangs hairstyle

Curtain bangs bring more movement to the front of a glossy blowout by creating a center split that opens around the cheekbones. The fringe should blend gradually into longer face-framing layers instead of looking separate from the haircut. Straight and wavy hair are easiest to shape with a round brush, while curly hair may need extra bang length to account for shrinkage. Fine hair usually benefits from a lighter fringe so too much density is not removed from the sides. Use heat protectant, a medium round brush, and light-hold hairspray for the bangs, then finish the lengths with a small amount of serum. Styling takes moderate time because the fringe needs attention even when the rest of the blowout is already smooth. At the salon, specify the shortest bang point and where the outer curtain pieces should meet the face frame.
Pro tip:
Blow-dry the bangs forward first, then roll them away from the face as they cool to create a controlled split rather than a wide gap.
Shoulder-Length Glossy Blowout hairstyle
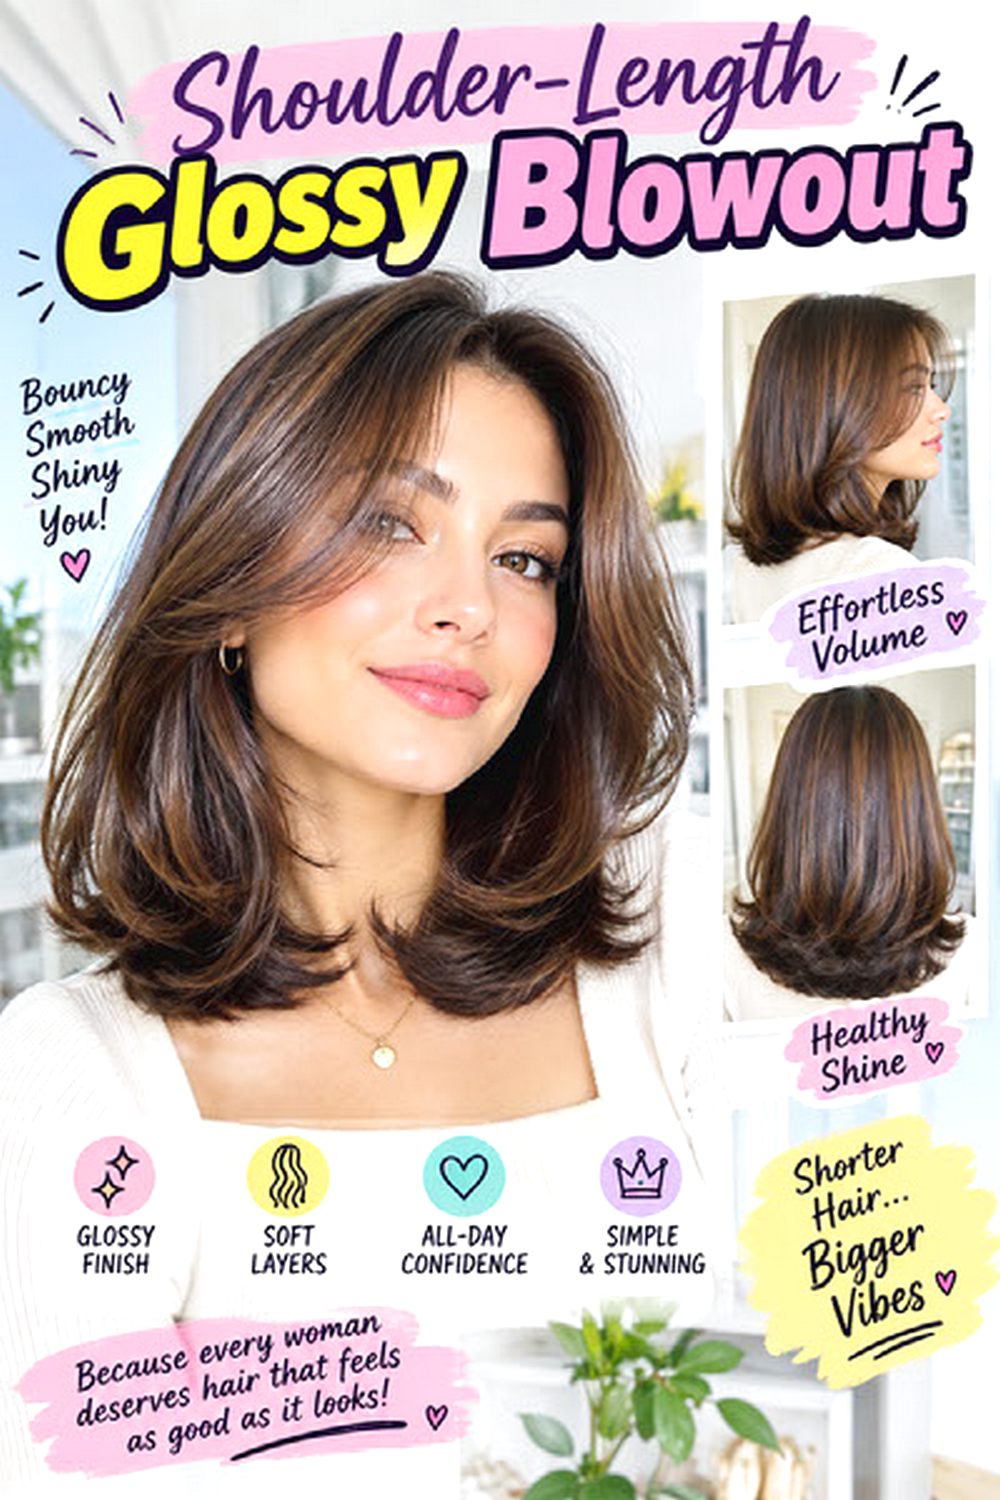
Shoulder-length hair gives a blowout a compact shape while still leaving enough length for visible movement. The ends can curve inward slightly or stay softly rounded rather than flipping unpredictably against the shoulders. Fine hair often looks fuller at this length because the perimeter remains substantial, while thick hair may need internal weight removal so the shape does not become triangular. Straight and wavy textures are practical choices for regular blow-drying. Use leave-in conditioner, heat protectant, and a medium round brush to control the ends. Styling is moderate but usually faster than working through very long hair. Friction from coats and scarves can roughen the lower sections, so a light serum helps reduce static and dryness. At the salon, ask for a strong shoulder-length perimeter with subtle internal movement and clarify whether you want the ends tucked, straight, or softly rounded.
Pro tip:
Dry the last few inches with the brush slightly under the hair instead of rolling tightly; this creates a smoother bend that is less likely to bounce above the shoulders.
Glossy Blowout Bob with Rounded Ends hairstyle

A rounded bob blowout focuses on controlled curvature through the ends rather than large waves or dramatic root height. Chin- to jaw-length hair works especially well because the rounded finish follows the haircut’s perimeter. Fine hair can look dense and polished when the baseline stays blunt, while thick hair may need subtle internal removal so the bottom does not become too heavy. Straight hair requires the least work, and softly wavy texture can be smoothed with a round brush. Use heat protectant, a small-to-medium round brush, and lightweight smoothing serum. Styling is moderate because each short section needs careful direction to avoid uneven bends. Regular trims matter more on a bob because dry or irregular ends are immediately visible. At the salon, request a clean perimeter with minimal exterior layering and enough internal softness to help the ends curve naturally rather than flare outward.
Pro tip:
Use a smaller round brush at the back than at the sides; it gives short nape sections enough control without creating an overly curled-under finish.
Glossy Blowout Lob with Soft Bend hairstyle
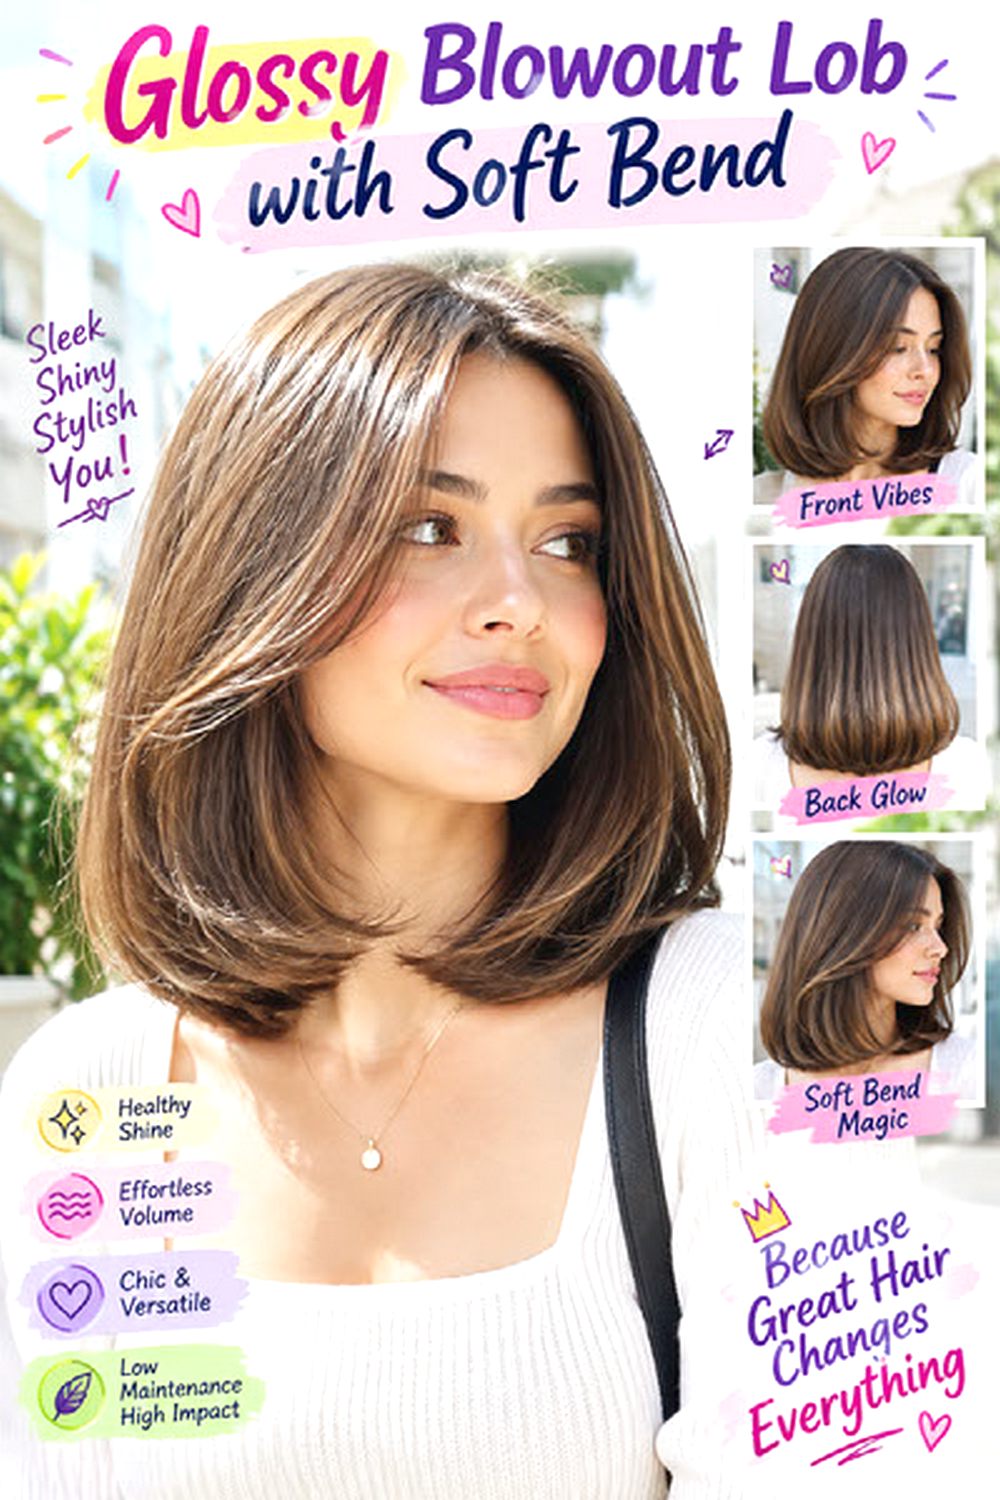
A glossy lob looks current when the movement stays soft instead of turning into tight curls. The length usually sits near the collarbone, with a broad bend through the mid-lengths and straighter-looking ends. Fine to medium hair benefits from the fuller perimeter, while thick hair often needs internal shaping to keep the sides manageable. Straight and wavy textures can both create the finish, although natural wave may need smoothing around the crown first. Apply heat protectant, use a medium round brush, and finish with a light anti-frizz serum. Styling takes moderate time but is easier to refresh than a heavily layered blowout because the movement is broad and simple. Trim timing matters once the ends begin to split or lose their clean line. At the salon, ask for a strong lob perimeter with minimal layering and subtle face-framing if you want movement without sacrificing density.
Pro tip:
Release the brush before the final inch of hair is fully curled under; straighter tips keep the lob looking softer and less pageboy-like.
Glossy Blowout with Face-Framing Layers hairstyle
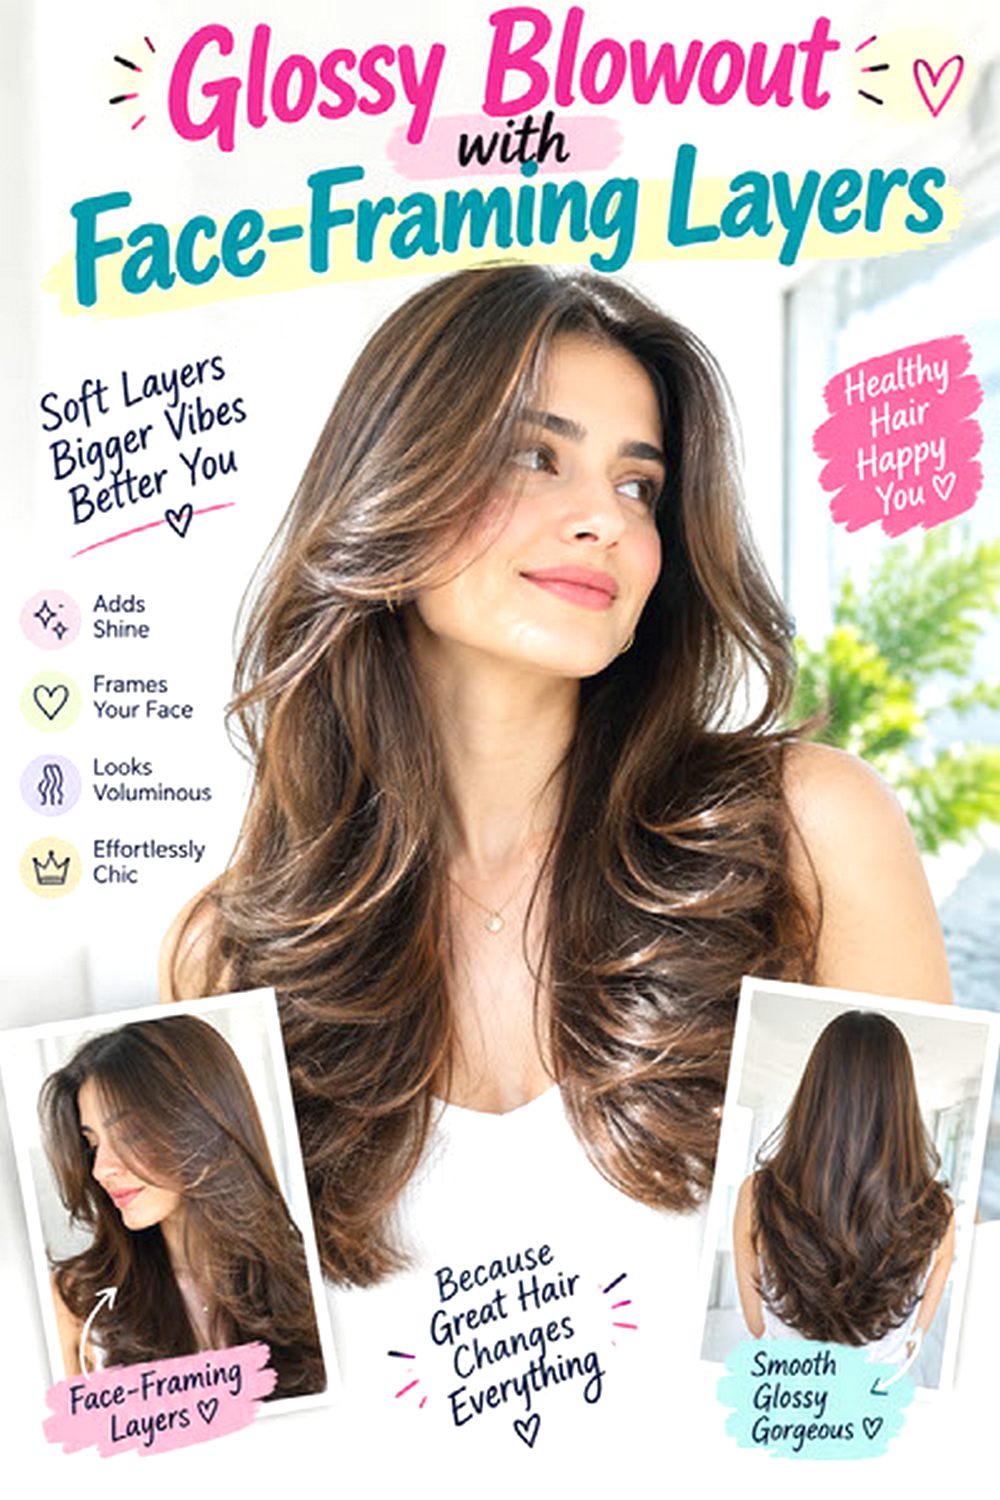
Face-framing layers make a glossy blowout more noticeable from the front because the shortest pieces curve around the cheekbones, jaw, or collarbone before blending into the longer hair. The exact starting point should match the amount of framing you want rather than following one fixed rule. Fine hair often does best with fewer front layers so the sides stay full, while medium and thick hair can handle a more graduated shape. Straight and wavy textures show the curve especially well. Use heat protectant, a medium round brush for the front, and a lightweight finishing spray for flexible hold. Styling takes moderate time because the face frame needs separate attention from the back lengths. Salon maintenance is important when the front pieces grow past their intended position. Ask your stylist to show where each face-framing section begins and how it connects to the main layers.
Pro tip:
Blow-dry the front layers away from the face in one direction instead of alternating curls; a consistent sweep makes the frame look cleaner.
Glossy Blowout for Fine Hair hairstyle
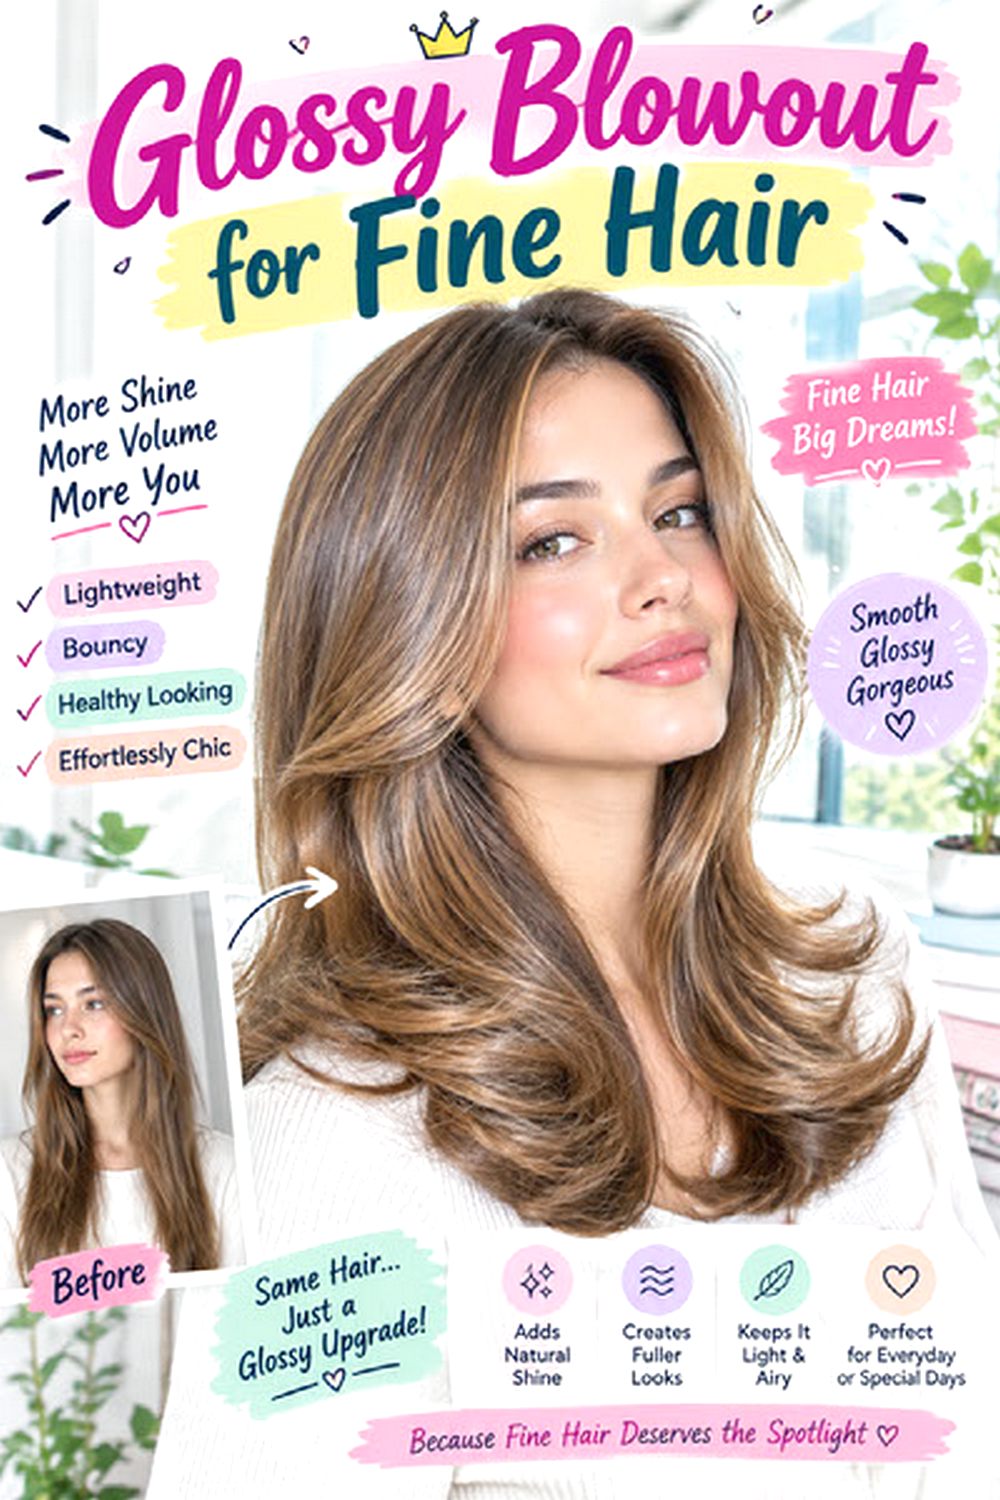
Fine hair needs a glossy blowout that adds lift without coating the strands in heavy smoothing products. Keep the haircut relatively full through the perimeter, with only subtle long layers where movement is needed. A little root height helps the style feel dimensional, but excessive backcombing can separate fine strands and reduce the smooth finish. Straight and lightly wavy hair usually respond quickly to blow-drying. Use volumizing spray at the roots, heat protectant through the lengths, and a medium round brush for controlled lift. Styling is quick to moderate because smaller sections dry fast. Avoid rich oils near the crown, and use only a tiny amount of serum on the tips if needed. Regular trims keep the ends from looking wispy. At the salon, request minimal thinning and restrained layering, especially through the bottom third of the haircut where fine hair needs the most visible density.
Pro tip:
Apply shine product to your palms first and touch only the ends; coating the roots can collapse volume within minutes.
Glossy Blowout for Thick Hair hairstyle
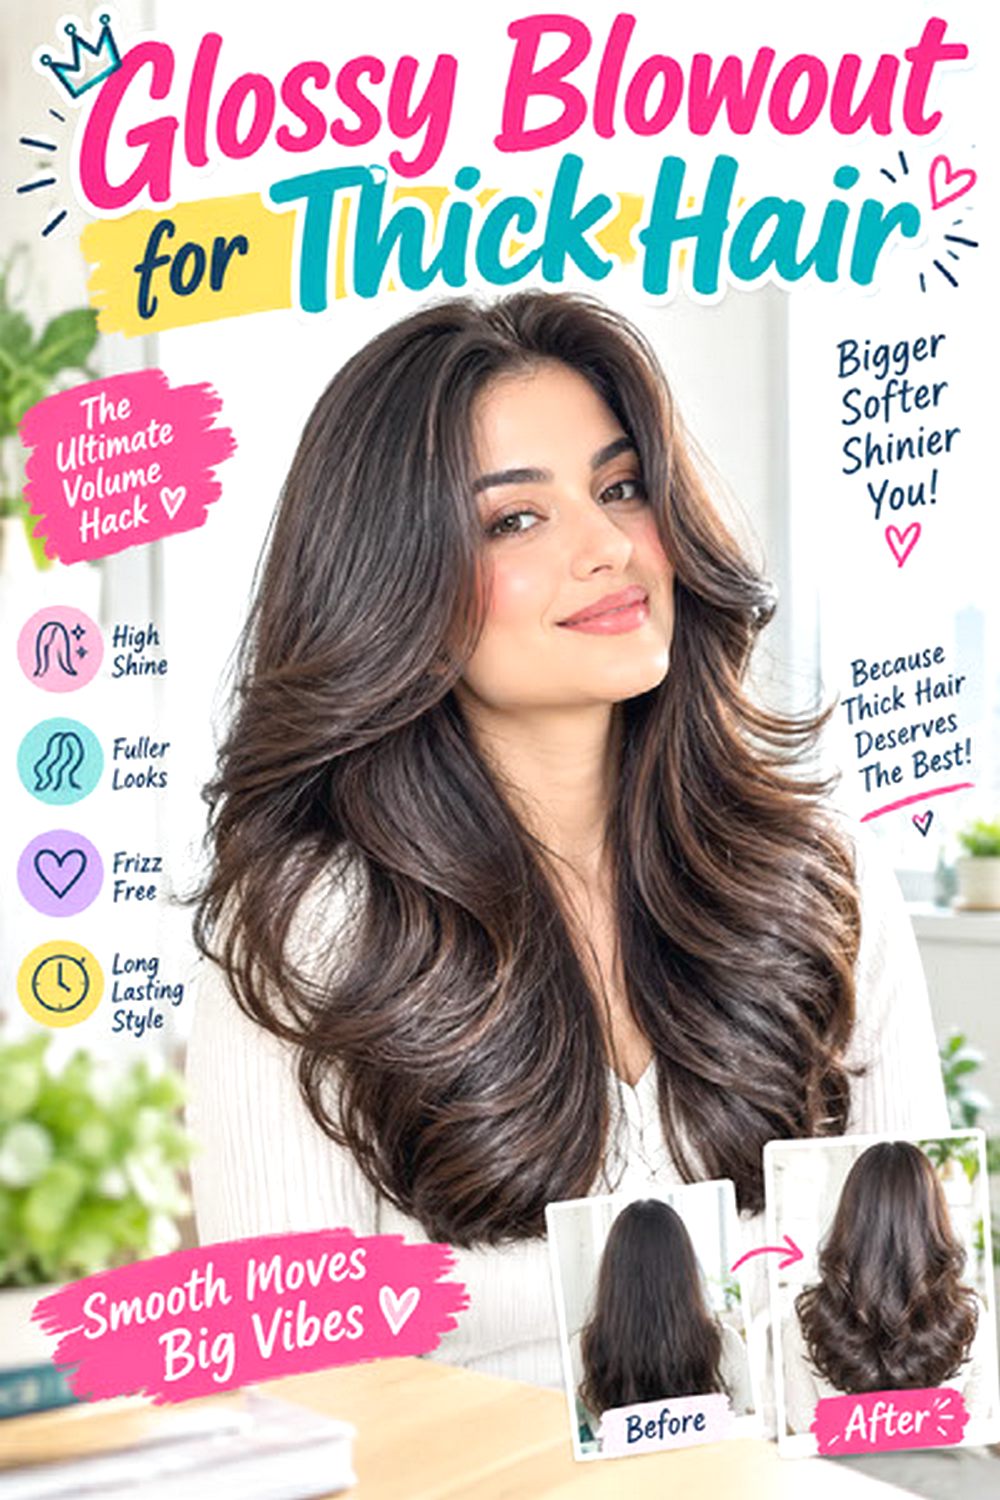
Thick hair creates natural body in a blowout, so the main challenge is controlling bulk without flattening the movement. Long, connected layers can remove heaviness while preserving enough weight for a glossy surface. Coarse or wavy thick hair may need more brush tension and sectioning, while straighter thick hair usually smooths more quickly. Use a heat-protective smoothing cream, a large round brush, and anti-frizz serum on the outer layer. Styling takes longer because dense hair must be dried thoroughly in smaller sections; leaving moisture near the roots can encourage frizz later. Salon shaping makes a major difference in daily effort. Internal weight removal can reduce bulk, but over-thinning may create short pieces that expand in humidity. Ask the stylist to remove weight inside the haircut while keeping the perimeter and top surface strong enough to remain smooth.
Pro tip:
Dry thick hair to about eighty percent before round-brushing; starting too wet increases styling time and makes each section harder to control.
Glossy Blowout with Flipped Ends hairstyle
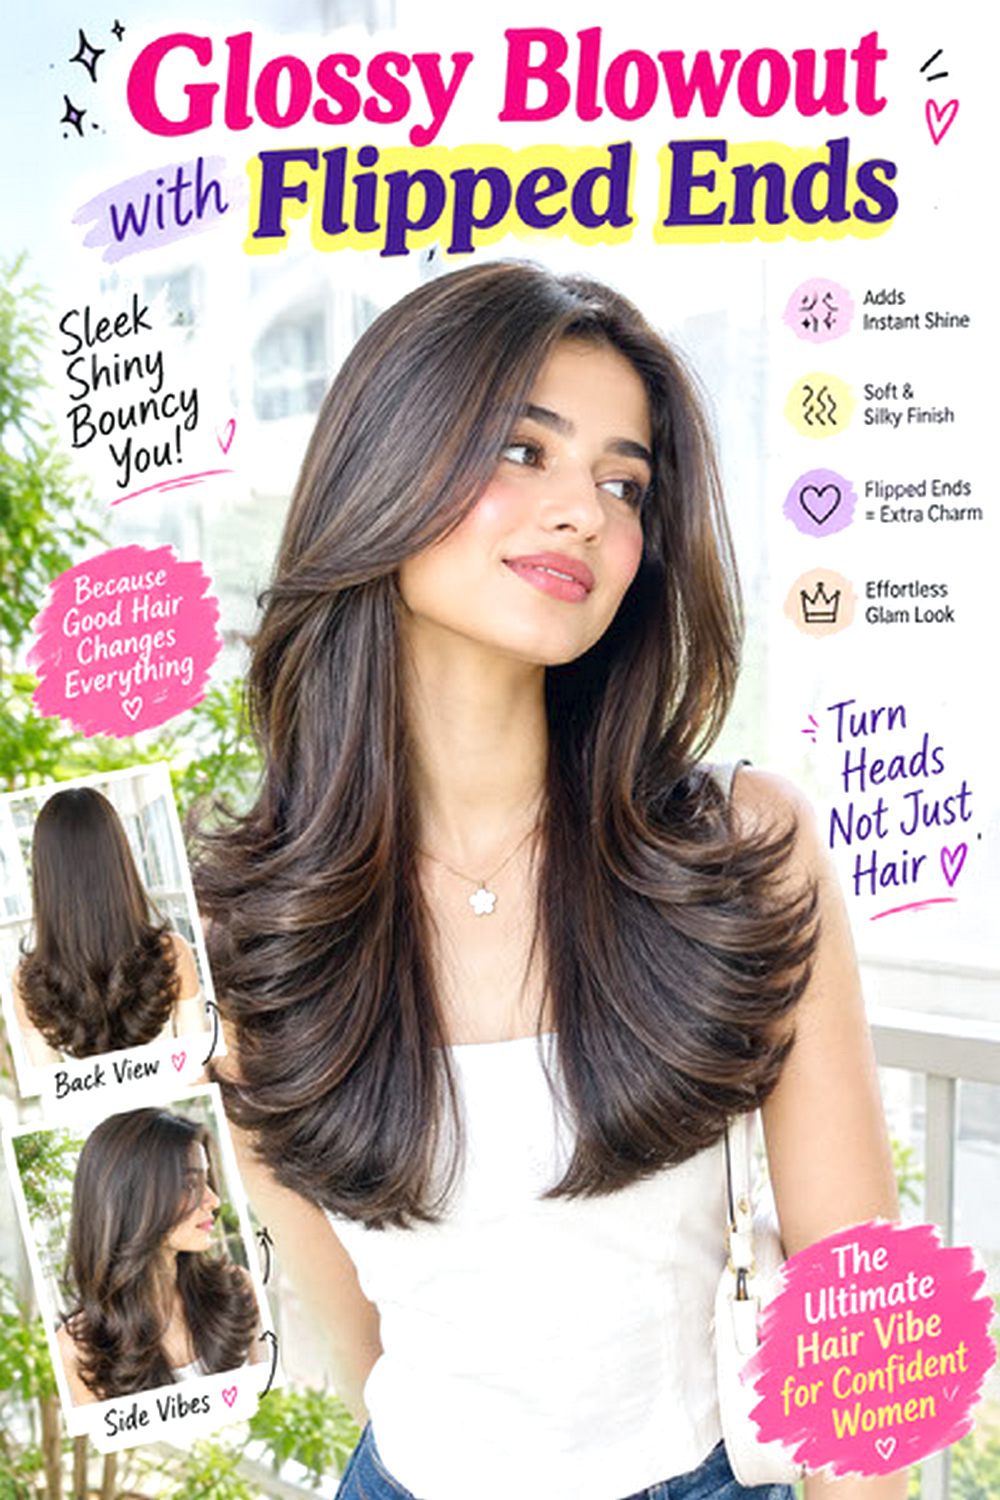
Flipped ends give a glossy blowout a sharper finish by directing the final few inches outward rather than under. Shoulder-length and medium hair show the flip most clearly because the perimeter sits where the movement can be seen from the front and sides. Fine hair benefits from a strong baseline so the ends look substantial, while thick hair may need some internal weight control to prevent the flip from becoming too wide. Straight and wavy textures are easy to shape with heat. Use heat protectant, a medium round brush, and flexible hairspray focused on the tips. Styling takes moderate time because the ends need to be directed consistently around the whole haircut. Humidity can soften the flip, so a quick brush refresh may be needed. At the salon, ask for a clean perimeter and layers long enough to support outward movement without creating disconnected short pieces.
Pro tip:
Start turning the brush outward only in the last two or three inches; flipping too early can make the entire lower half puff away from the neck.
Glossy Blowout with Soft C-Shaped Layers hairstyle
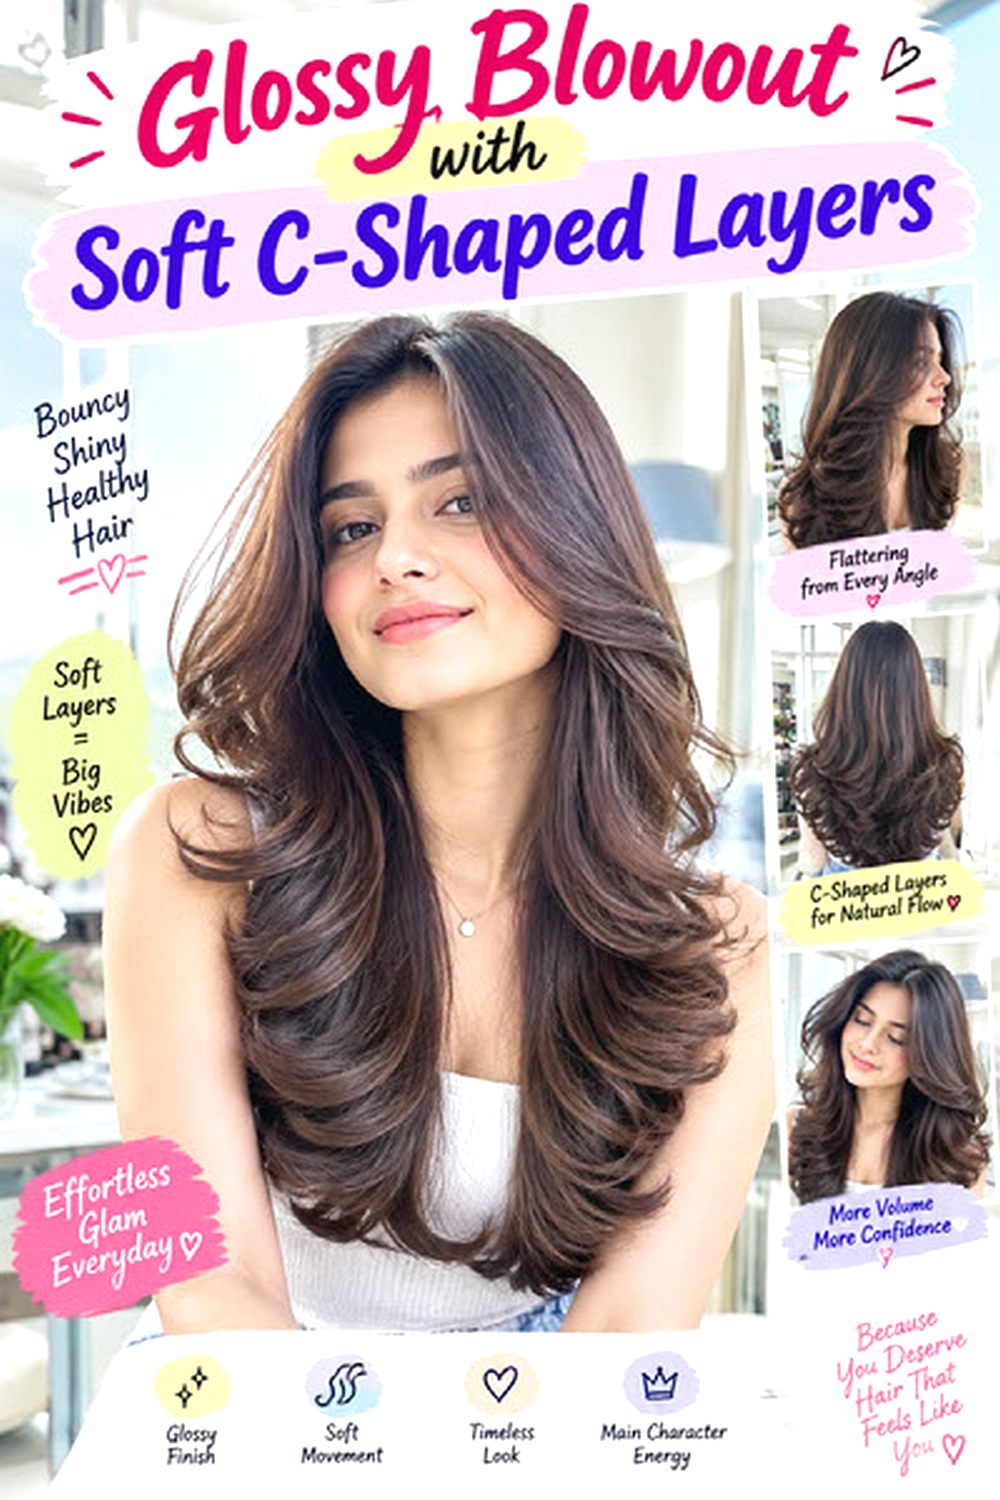
C-shaped layers curve inward and away in broad arcs, creating a blowout with visible structure but no tight curls. The layers work best when they are long enough to bend around the cheekbones, jaw, and shoulders in connected sections. Medium and thick hair can support multiple layers, while fine hair should keep the shape more restrained to preserve end fullness. Straight and wavy textures show the curved lines clearly. Use heat protectant, a large round brush, and velcro rollers to set key sections while they cool. Styling takes moderate to longer time because each layer needs to be directed intentionally. The haircut also needs regular reshaping once the curves grow too low to frame the face properly. At the salon, ask for long connected layers with a clear C-shaped face frame rather than short, heavily feathered pieces that lose their polished outline.
Pro tip:
Roll the front sections backward and the lower side layers slightly inward; using different directions helps the C-shape stack naturally around the face.
Glossy Blowout with Wispy Bangs hairstyle
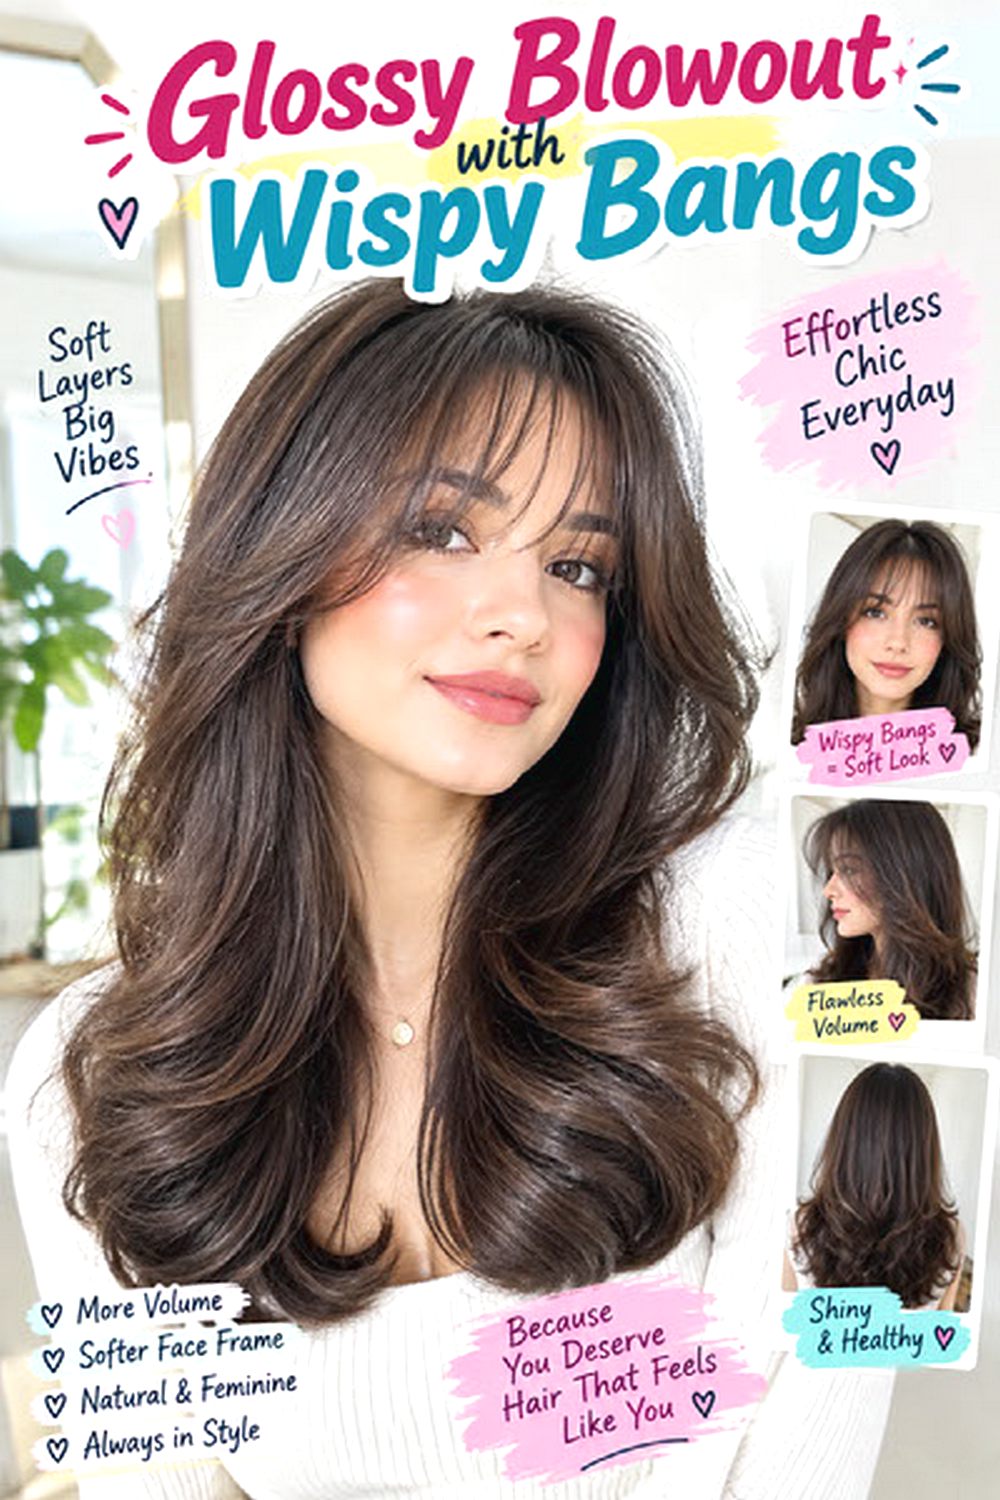
Wispy bangs add a light fringe across the forehead without taking as much density away from the main blowout as a heavy bang section. The fringe should separate softly and blend into longer side pieces rather than forming a thick straight line. Fine and medium hair often carry this effect easily, while thick hair may need the fringe carefully reduced so it remains airy. Straight and softly wavy textures are simplest to style. Use a small round brush, heat protectant, and flexible hairspray for the bangs, then smooth the longer hair with a larger brush. Styling is moderate because bangs usually need refreshing more often than the rest of the blowout. Fringe trims may also be required between full haircuts. At the salon, specify the desired bang density and where the longest side pieces should connect to the face-framing layers.
Pro tip:
Dry wispy bangs from side to side before finishing them downward; this reduces stubborn splits without creating excessive volume.
Long Glossy Blowout with Bouncy Ends hairstyle
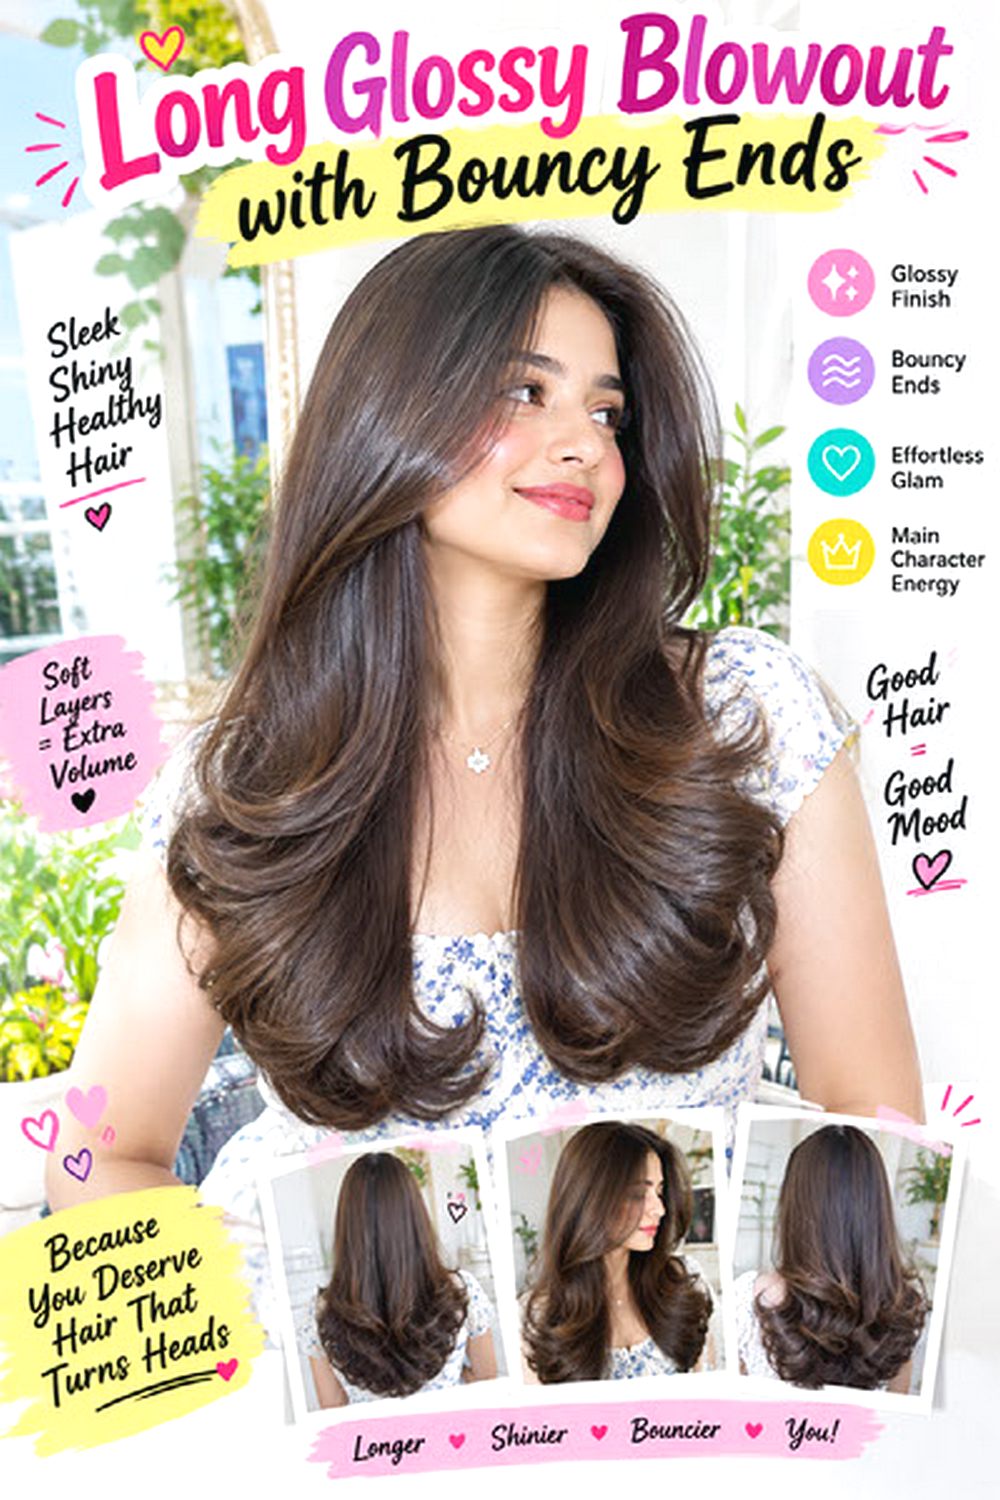
Long hair can look heavy in a blowout if all the movement sits at the roots, so bouncy ends help distribute volume through the lower half. The top stays relatively smooth while the last several inches curve in broad, soft shapes. Medium and thick hair naturally creates a substantial finish, while fine long hair needs careful layering so the ends do not become thin. Straight and wavy textures are practical, although very long hair requires extra drying time. Use heat protectant, a large ceramic round brush, and oversized rollers for the ends after each section is dried. Styling takes longer because of the length, but the shape can last when allowed to cool fully. Keep split ends trimmed so the lower section reflects light evenly. At the salon, ask to maintain strong perimeter weight and use long layers mainly for movement rather than aggressively removing density.
Pro tip:
Set only the lower third in rollers if you want bounce without building unnecessary volume around the crown.
Glossy Blowout with Root Lift hairstyle
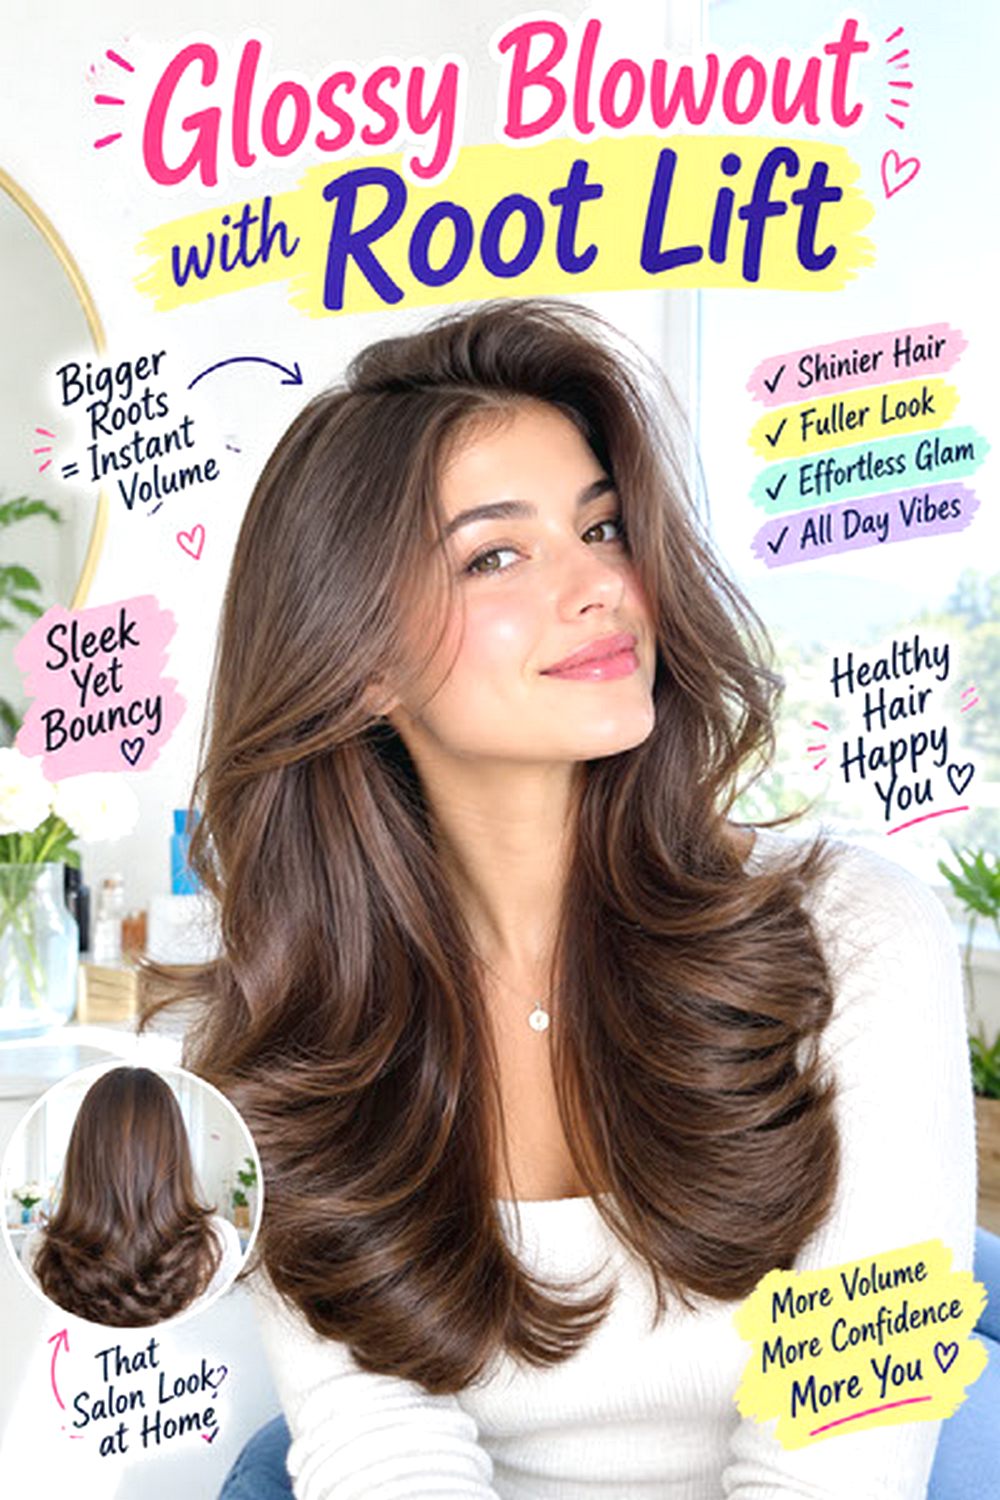
Root lift gives a glossy blowout height without requiring big curls throughout the length. The crown and front sections are dried upward from the scalp, while the mid-lengths stay smooth and the ends retain a gentle bend. Fine and medium hair benefit most from this approach because it creates fullness where the hair can otherwise fall flat. Thick hair can use less lift and concentrate more on controlling the sides. Use root-lifting spray, a vent brush for initial drying, and a large round brush to shape the crown. Styling takes moderate time but is easy to refresh with a few targeted sections the next day. Heavy conditioner near the roots can reduce lift, so keep richer products on the lower lengths. At the salon, request layers that support crown movement without becoming so short that they stick up or separate from the polished surface.
Pro tip:
Dry crown roots in the opposite direction from where they will finally sit, then flip them back after cooling for lift without heavy teasing.
Glossy Blowout for Naturally Wavy Hair hairstyle
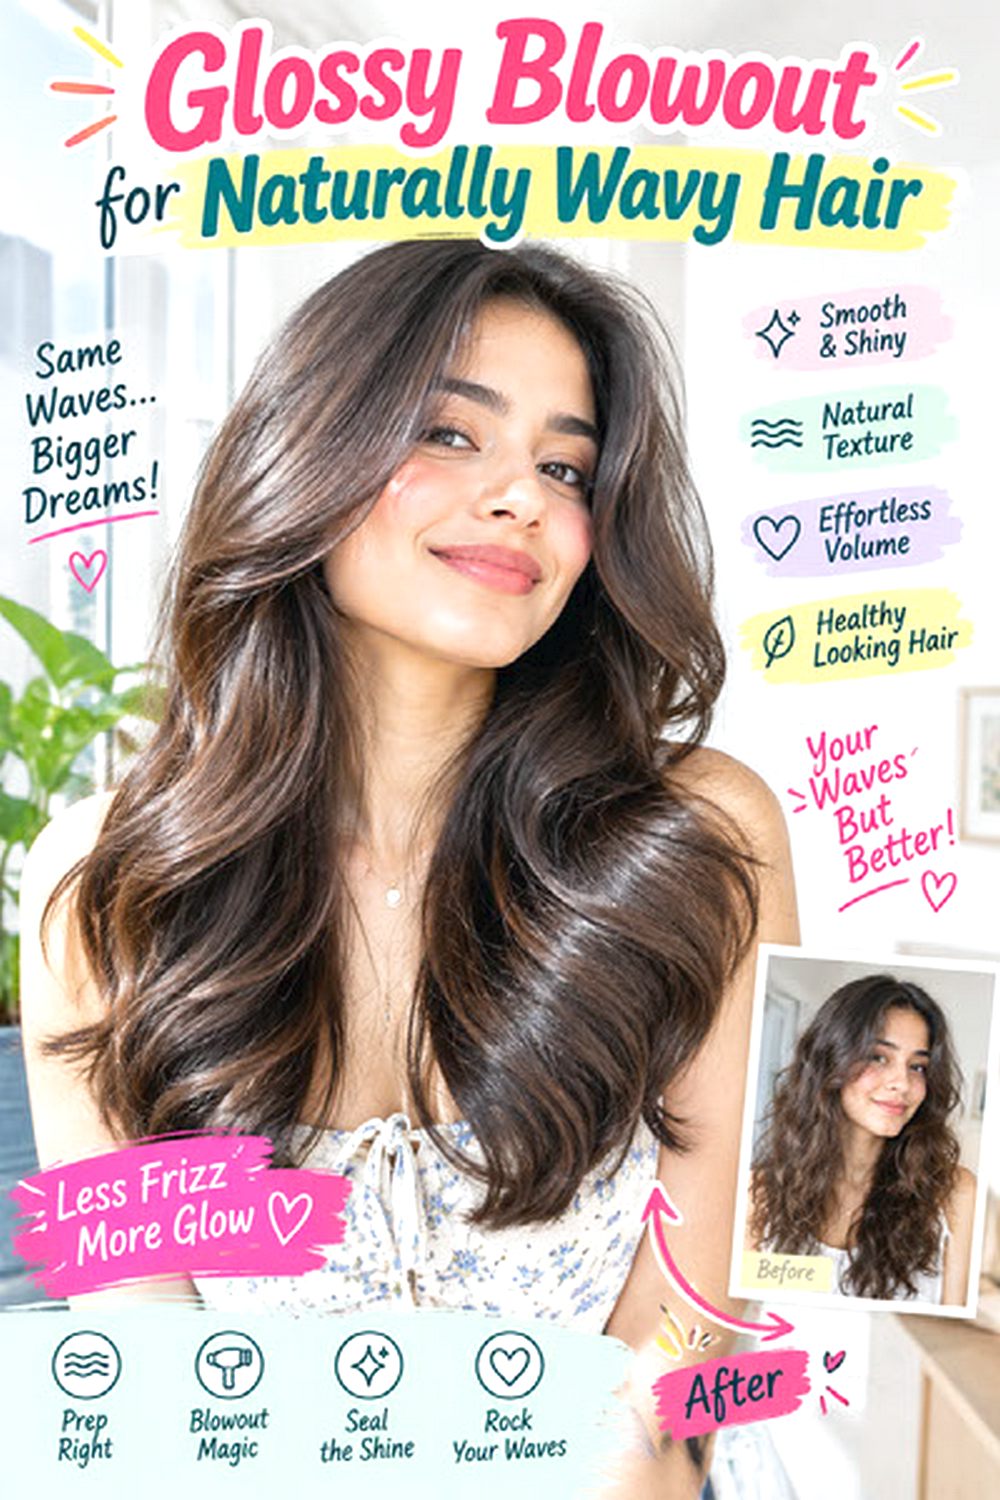
Naturally wavy hair already has movement, so a glossy blowout can focus on smoothing the surface while preserving some of that natural body. Instead of stretching every section completely straight, use moderate brush tension and allow broad bends to remain through the mid-lengths. Medium and thick wavy hair often creates a full finish easily, while fine waves benefit from lightweight products that do not collapse the pattern. Use leave-in conditioner, heat protectant, and a large round brush; a diffuser can be useful during the rough-dry stage if you want to maintain more texture. Styling takes moderate time and may be faster than building movement into naturally straight hair. Humidity is the main maintenance concern, so anti-frizz cream can help around the outer layer. At the salon, ask for layers that work with the natural wave pattern when air-dried as well as when blown smooth.
Pro tip:
Do not over-stretch the roots while drying; leaving a little natural wave near the crown helps the blowout keep body and reduces frizz from repeated brushing.
Glossy Blowout with Deep Side Sweep hairstyle
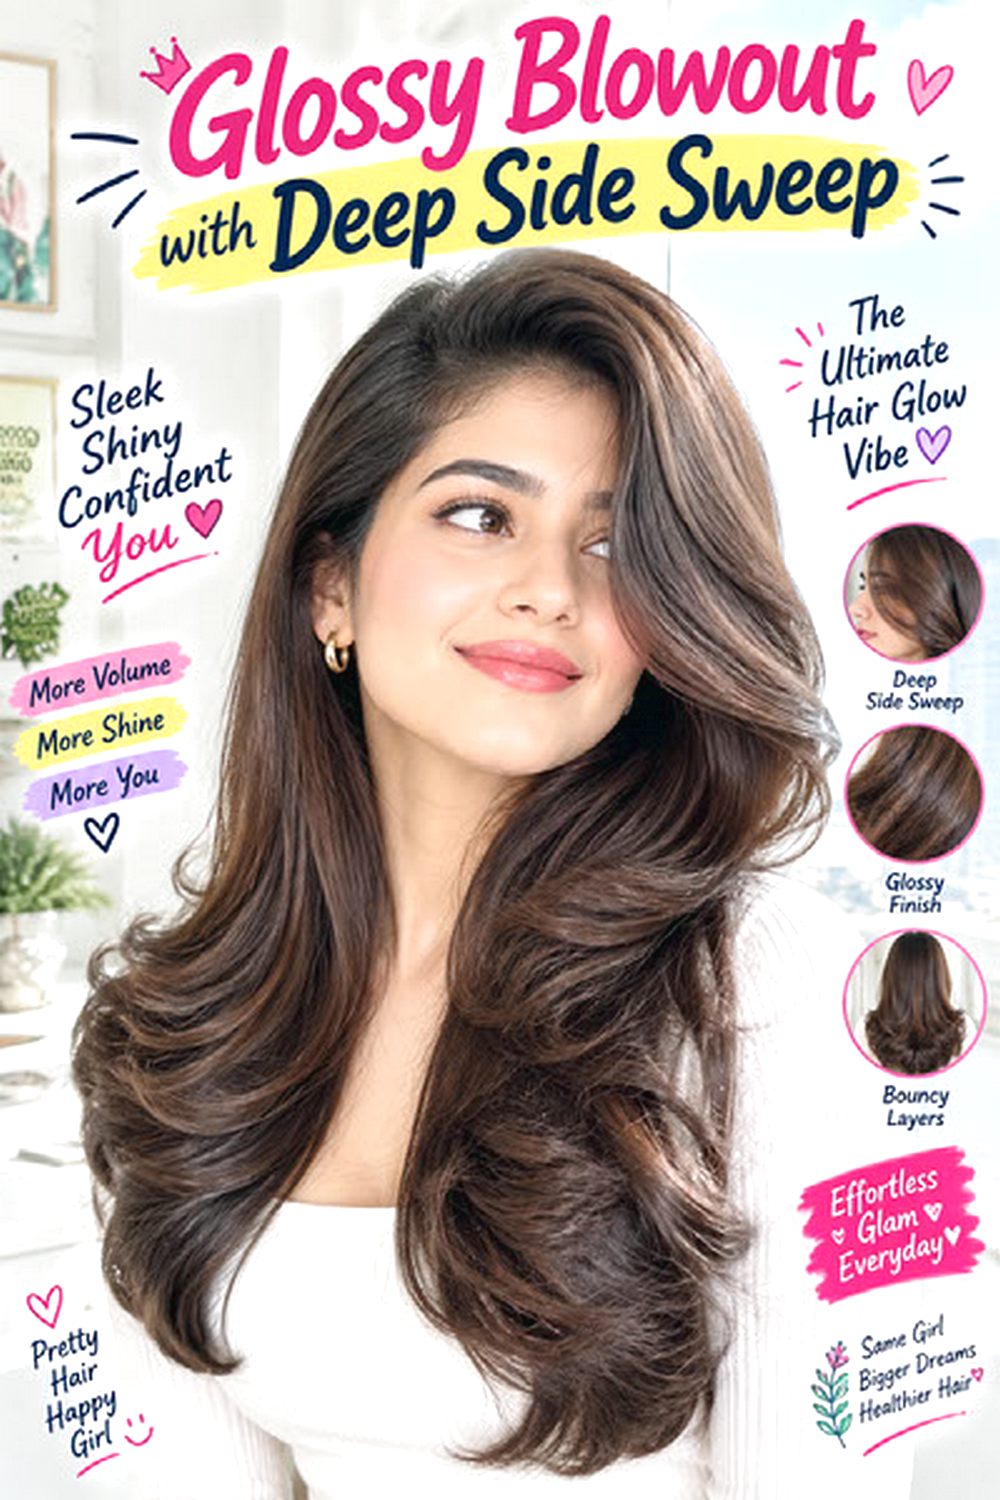
A deep side sweep creates an asymmetric blowout with a strong front curve and more visual volume on one side. Long and medium hair show the effect best because the swept section has enough length to blend into the rest of the style. Fine hair can use subtle root lift under the heavier side, while thick hair may need internal weight removed so the sweep does not become bulky. Straight and wavy textures both work, but the front section needs enough control to hold its direction. Use volumizing mousse, a large round brush, and flexible hairspray. Styling takes moderate time because the heavy side should cool in position before being released. Different face shapes can adjust the depth of the part and height of the sweep. At the salon, ask for front layers that follow your preferred side part and remain long enough to flow smoothly into the main length.
Pro tip:
Set the front sweep backward on a large roller rather than directly sideways; this creates lift at the root and a softer curve over the temple.
Polished Glossy Blowout with Blunt Ends hairstyle
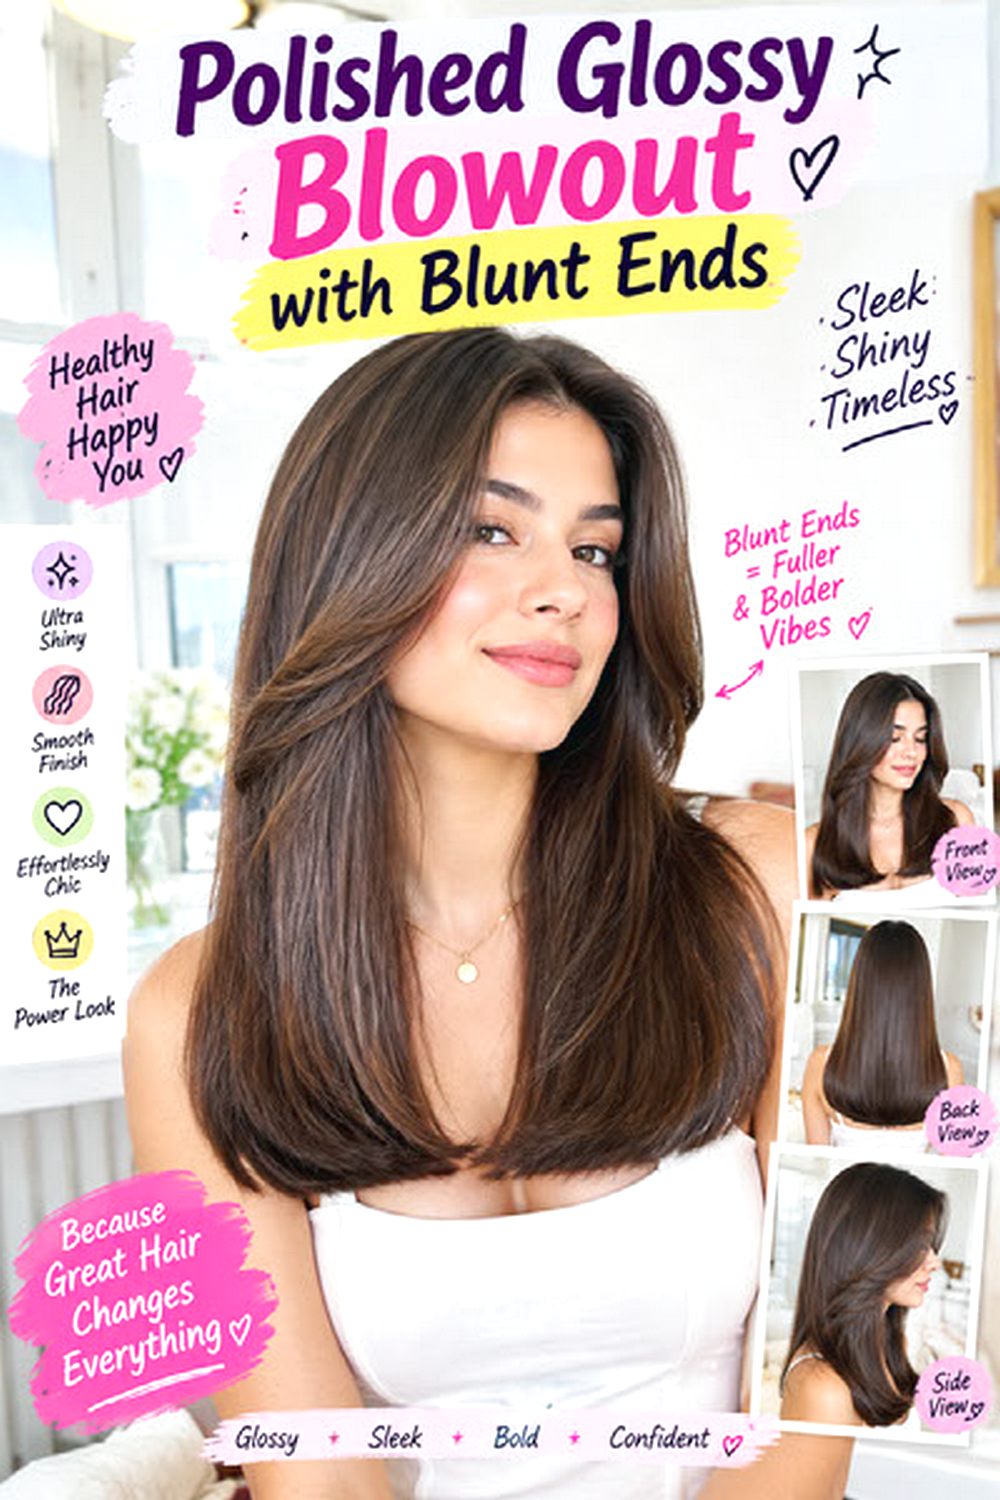
Blunt ends give a glossy blowout a strong, clean perimeter, making the shine and condition of the hair especially noticeable. The shape works well from shoulder length to long hair, with minimal layering and just enough movement to prevent the finish from looking rigid. Fine hair benefits from the dense-looking baseline, while medium and thick hair may need hidden internal weight removal to keep the shape manageable. Straight hair reaches the finish quickly, and wavy hair can be smoothed with controlled brush tension. Use heat protectant, a paddle brush for the initial dry, and a large round brush for a slight end bend. Styling takes moderate time, but maintenance is simple when the cut remains precise. Split ends can disrupt the clean line quickly, so trims matter. At the salon, request a clearly defined blunt perimeter and discuss whether any internal debulking can be done without visibly thinning the ends.
Pro tip:
Keep the brush almost straight through the final inches and add only a slight curve; too much rolling can hide the sharp perimeter that makes blunt ends stand out.
Choosing Glossy Blowout Hairstyles for Fall 2026
The best glossy blowout hairstyles for Fall 2026 depend on how you want to balance shine, volume, layers, fringe, length, and daily styling effort. Fine hair often benefits from a fuller perimeter and lightweight root lift, while thick hair usually needs strategic internal shaping to reduce drying time and excess bulk. Curtain bangs and face-framing layers create more movement near the face, whereas blunt ends and smoother parts give a cleaner finish. Straight hair generally requires less work, while wavy or textured hair may need more tension, heat protection, and humidity control. Parting also changes the result: center parts feel balanced, while deep side parts create stronger lift. Choose a version that works with your face shape, natural texture, density, maintenance preference, heat routine, and realistic styling time.
Choose one or two favorite ideas and save clear photo references showing the front, sides, and back. Discuss your face shape, natural texture, density, preferred length, maintenance level, and usual styling routine with your stylist. Point out the exact layers, fringe, parting, root volume, end shape, and level of gloss you like. Clear details help your stylist build a haircut that supports the blowout instead of requiring unnecessary heat or complicated daily styling.
FAQs
How do I keep a glossy blowout shiny without making it greasy?
Use lightweight shine products mainly through the mid-lengths and ends. Keep heavy oils away from the roots, especially on fine hair.
Are glossy blowouts suitable for fine hair?
Yes. Fine hair usually benefits from restrained layering, a strong perimeter, and lightweight root volume. Avoid heavy creams that can flatten the style.
How often should I trim hair for a polished blowout?
Trim timing depends on the haircut and condition, but regular shaping helps keep split ends and uneven layers from disrupting the smooth finish.
Can naturally wavy hair wear a glossy blowout without becoming completely straight?
Yes. Use moderate brush tension and smooth the surface while allowing broad natural bends to remain through the lengths.