16 Embellished Bobby Pin Hairstyles for an Easy Glam Look
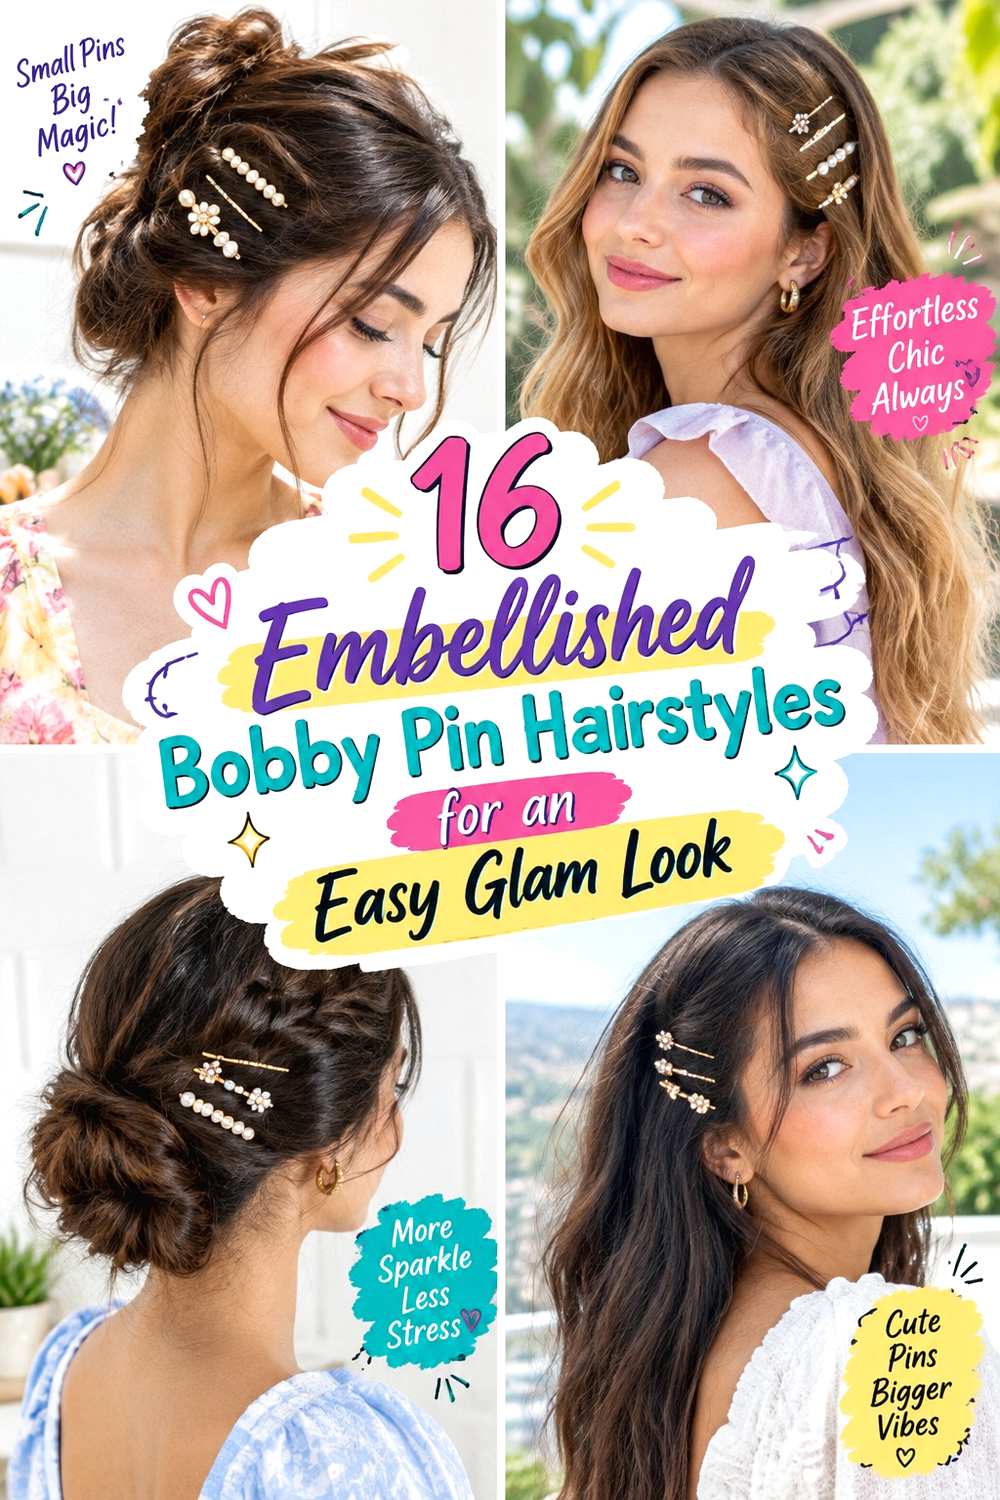
Embellished bobby pin hairstyles add decoration and control at the same time, but the most polished versions use the pins as part of a planned shape rather than scattering them randomly. Crystal, pearl, gold, silver, and celestial pins can define a side sweep, outline a braid, secure a half-up twist, or add sparkle around a bun. Short bobs can support small temple arrangements, while medium and long hair offer more room for rows, crossed patterns, twists, and updos.
Straight, wavy, curly, and coily textures can all work with decorative pins. Slippery hair may need a more stable section before the embellished pieces are added, while dense hair can require several anchor points instead of one heavily loaded pin. On curls and coils, placement between visible texture groups can preserve definition better than flattening the pattern.
A simple side arrangement can be refreshed in minutes, while a waved, braided, or pinned updo takes longer from wash day. Comfort matters as much as appearance: decorative pins should sit securely without scraping the scalp, pulling individual strands, or carrying the full weight of a larger hairstyle.
Quick List
- Crystal Side Sweep Bobby Pin Hairstyle
- Pearl Grid Bobby Pin Hairstyle
- Stacked Gold Bobby Pin Hairstyle
- Silver Star Bobby Pin Hairstyle
- Rhinestone Wave Tuck Bobby Pin Hairstyle
- Crossed Bobby Pin Low Bun Hairstyle
- Jeweled Half-Up Twist Bobby Pin Hairstyle
- Celestial Cluster Bobby Pin Hairstyle
- Minimal Pearl Row Bobby Pin Hairstyle
- Curly Side Accent Bobby Pin Hairstyle
- Coily Crown Accent Bobby Pin Hairstyle
- Crystal French Twist Bobby Pin Hairstyle
- Braided Bobby Pin Accent Hairstyle
- Sleek Center-Part Bobby Pin Hairstyle
- Short Bob Bobby Pin Accent Hairstyle
- Scattered Gem Updo Bobby Pin Hairstyle
Crystal Side Sweep Bobby Pin Hairstyle
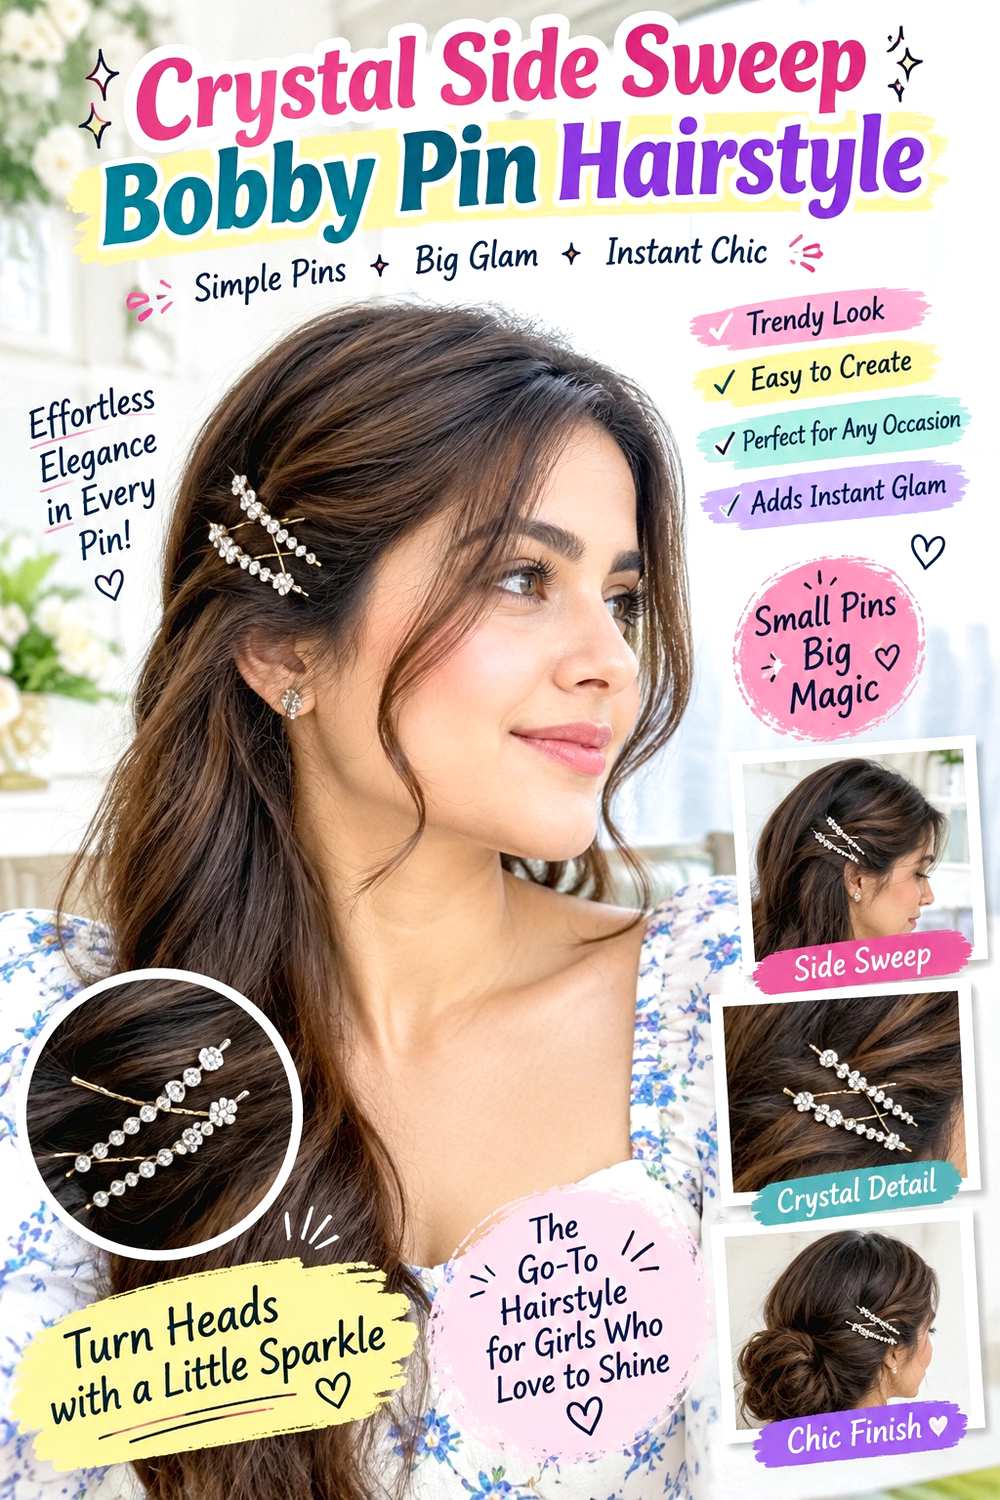
A deep side part gives this arrangement a clear direction before the sparkle is added. Sweep the lighter side close to the head, tuck it behind the ear, and place three crystal bobby pins in a short diagonal row above the tuck. The opposite side can stay straight, softly waved, or naturally textured, creating contrast between the controlled side and fuller length. Shoulder-length and longer hair gives the sweep more weight, although the same placement works on a bob with fewer pins.
This design suits fine through dense hair as long as the pinned section is not thicker than the pins can comfortably hold. Use crystal bobby pins for the visible detail, light texturizing spray to add grip, and a tail comb to define the part cleanly. A quick dry-hair refresh can take only a few minutes; a complete wash-day style takes longer if the loose side needs reshaping first. If the pins start sliding, reduce the amount of hair inside them rather than crossing more metal over the same section.
For event styling, specify the depth of the side part, how close the sweep should sit to the temple, and whether the crystal row should point upward, backward, or horizontally.
Pro tip:
Insert the lowest pin first and use it as the guide for the other two. Building upward keeps the spacing controlled and reduces repeated repositioning near the hairline.
Make It Work for You:
If your hair is very fine, gather a smaller side section and keep the crystals closer together. The decorative row will still look deliberate without relying on excessive tension.
Watch Out For:
Do not push pins directly toward the scalp when they resist. Remove them and change the angle so the smooth side rests comfortably against the head.
Pearl Grid Bobby Pin Hairstyle
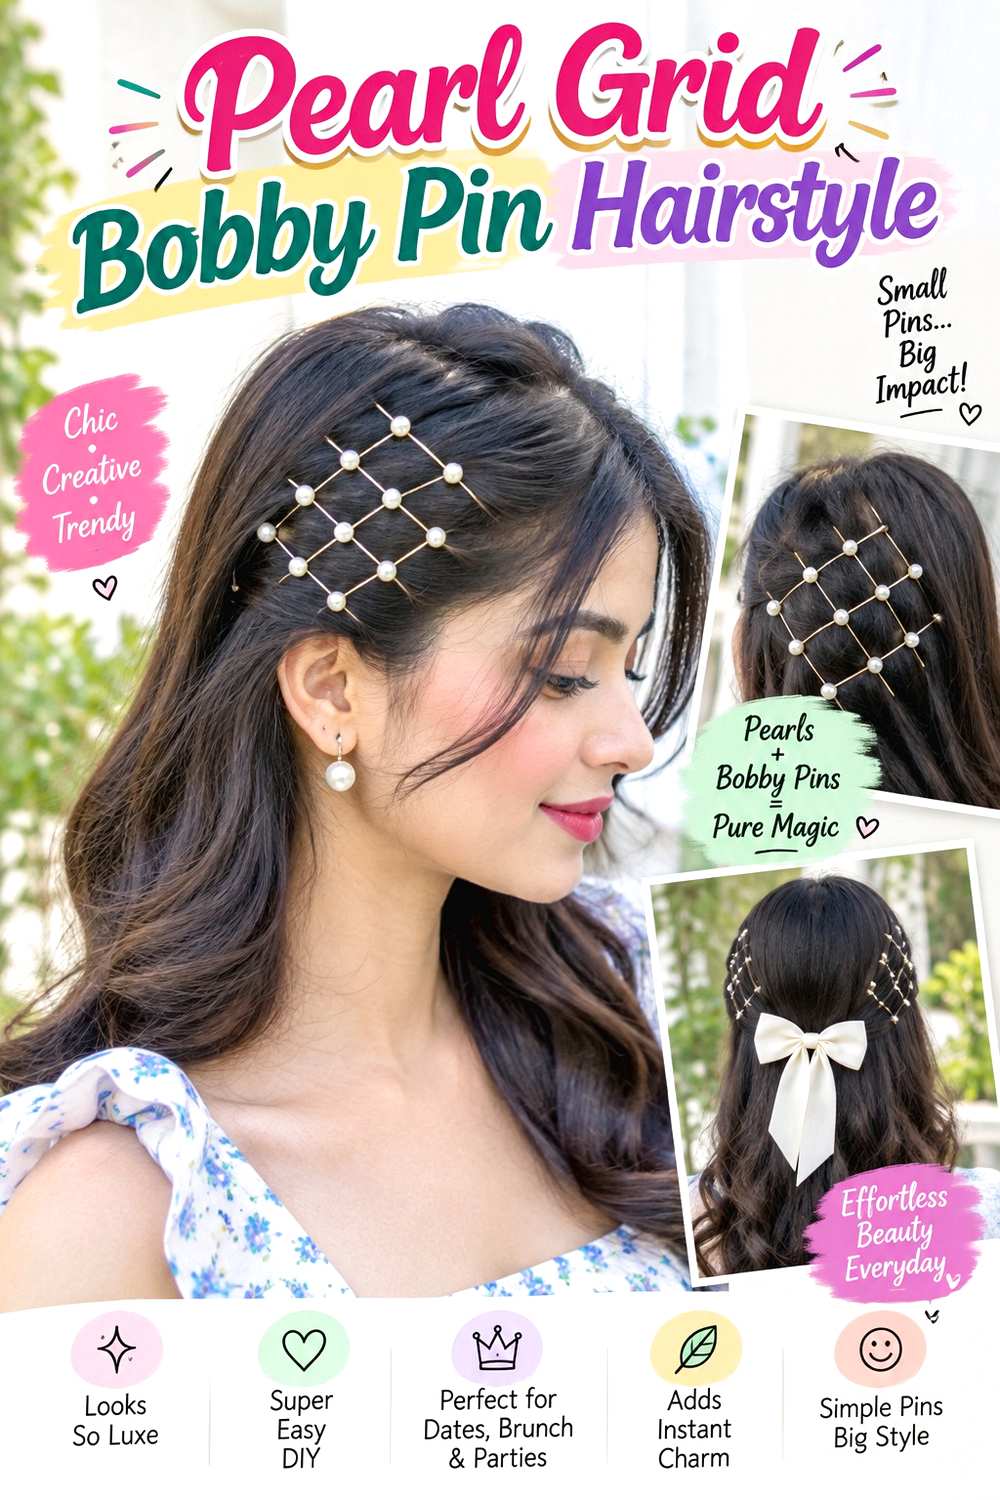
A pearl grid turns functional pinning into a geometric detail. Create a clean side part, smooth one temple area, and place two pearl bobby pins diagonally in one direction. Add two more across them to form a loose diamond or lattice shape rather than a dense block. The rest of the hair can stay loose, sit in a low ponytail, or fall into soft waves. Keeping the grid between the temple and upper ear makes the placement visible without covering too much hair.
This option works particularly well on straight or gently wavy hair where the pin lines stay easy to read, but curls can carry a wider version on a stable side section. Use pearl bobby pins for the design, smoothing cream to control small flyaways, and light texturizing spray beneath the pinned area for grip. A refresh is usually quick because only the grid needs resetting; creating polished loose lengths from wash-day hair takes longer.
The pins should overlap visually without all pressing into one exact scalp point. If the section is dense, secure a small portion first and let some pearls sit decoratively across the surface. For professional styling, show the desired grid size, angle, and whether you want the pearl pattern centered at the temple or placed farther behind the ear.
Pro tip:
Build the grid from the outside edges toward the center. This makes it easier to preserve equal spacing and prevents the crossing point from becoming crowded with too much metal.
Make It Work for You:
For curly hair, enlarge the grid slightly and place it across a flatter side section. Wider spacing keeps the pearl pattern visible without compressing neighboring curls.
Watch Out For:
Avoid stacking every pin directly on the same crossing point. Too much pressure in one spot can feel uncomfortable, so offset the overlaps while preserving the grid illusion.
Stacked Gold Bobby Pin Hairstyle
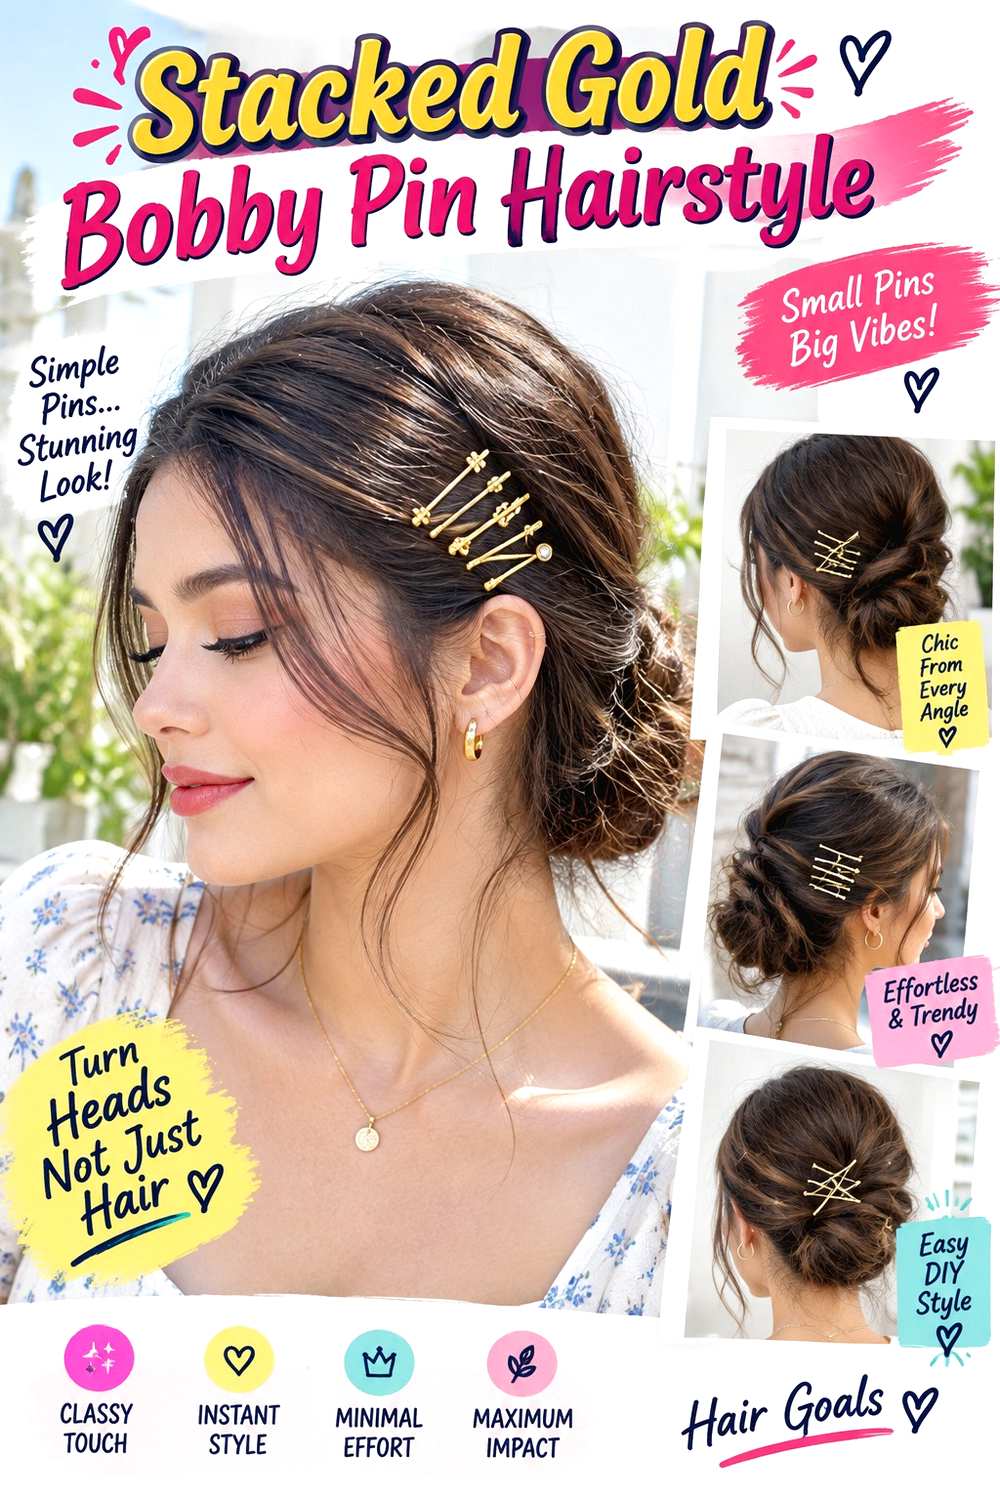
Three or four gold embellished pins stacked in parallel create a strong linear accent without requiring an updo. Make a side part or sweep the front straight back, then place the pins horizontally above one ear with a small amount of space between each. The lengths can remain sleek, wavy, curly, or gathered into a low ponytail. Keeping the gold stack straight gives the style a modern graphic finish, while a slight upward angle adds more movement.
This design suits short through long hair and is especially practical when you want a fast decorative detail. Use gold bobby pins for the visible stack, texturizing spray to improve grip, and smoothing serum to keep the surrounding surface polished. A dry-hair refresh usually takes only minutes because the accessory area is small. Full styling takes longer only when the loose hair needs washing, drying, or reshaping.
Dense hair should not be forced into one pin stack. Secure only a manageable side section and let the rest fall naturally behind it. For an event stylist, explain whether the gold lines should sit tightly grouped or more widely spaced and exactly where the stack should begin relative to the ear. The straightness of the arrangement matters more than using extra pins.
Pro tip:
Place the middle pin first, then add one above and one below it. Using a central guide makes parallel spacing easier than trying to build the stack from one edge.
Make It Work for You:
If your hair is slippery, twist the side section once behind the ear before adding the gold pins. The hidden twist provides grip while the surface still looks clean.
Watch Out For:
Do not keep adding pins when the section slides. Too much metal can weigh the area down; reduce the hair inside each pin and rebuild the anchor instead.
Silver Star Bobby Pin Hairstyle
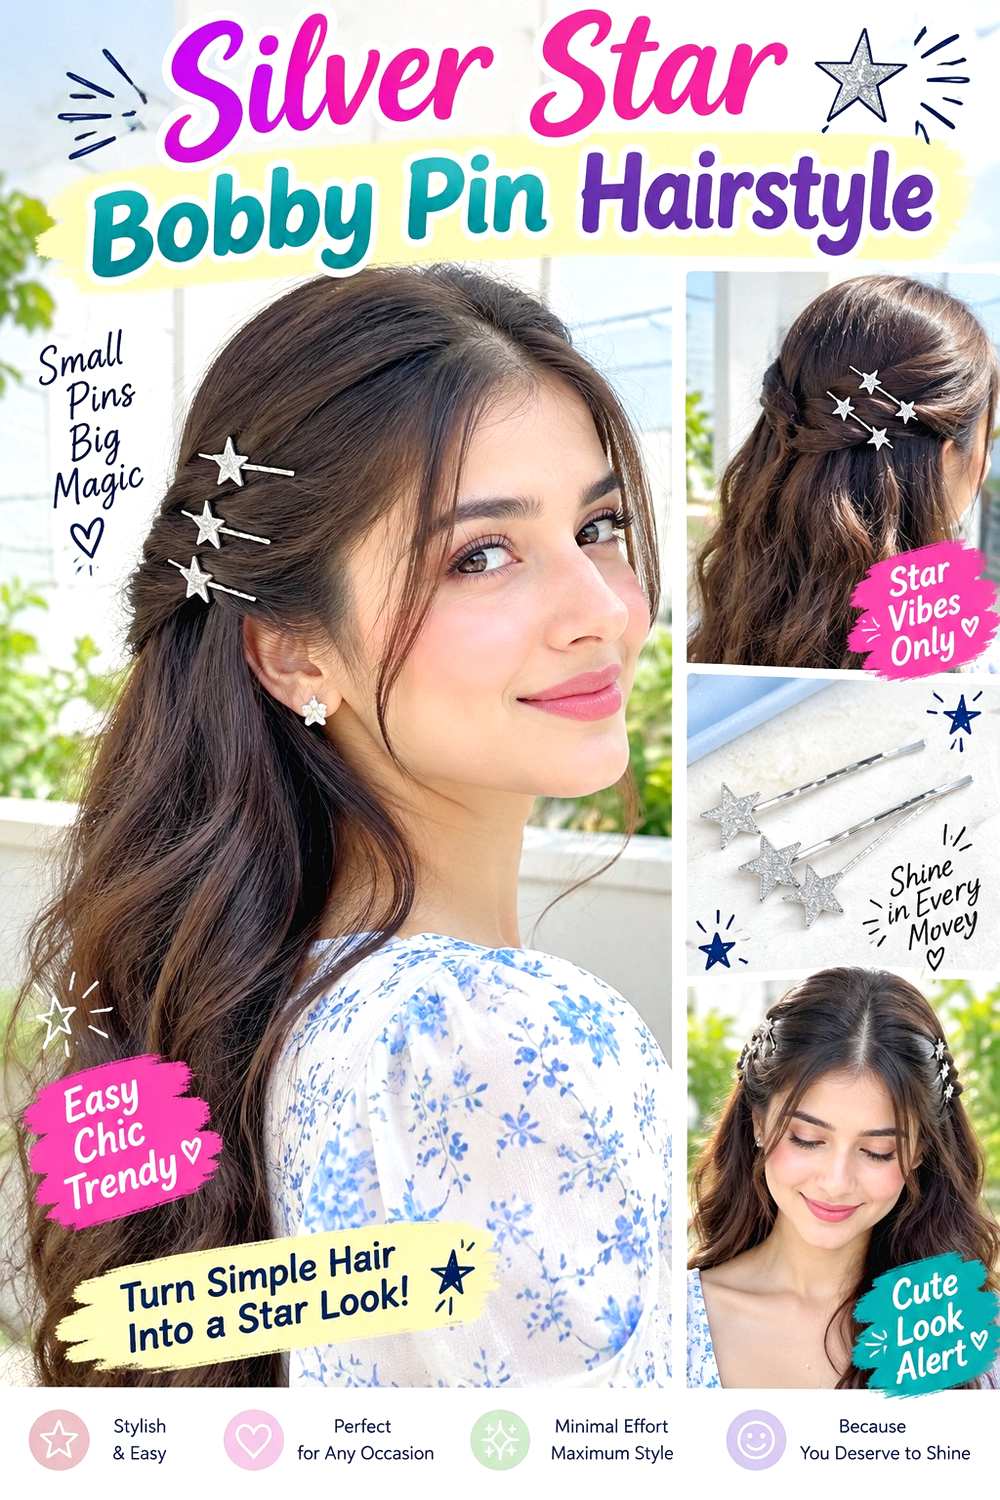
Silver star pins can create a small constellation around a half-up section or one temple. For a balanced version, take a narrow section from each side, join them at the back, and place three star bobby pins around the secured point at different angles. A more asymmetric version can cluster the stars above one ear. The lower lengths remain loose, so natural waves, curls, straight hair, or coils provide movement beneath the metallic detail.
This idea suits medium and long hair when used half-up, while short hair can carry the star cluster at the side. Use silver star bobby pins for decoration, a mini snag-free elastic to stabilize the half-up base, and light texturizing spray to help the pins grip. A quick refresh can focus only on the stars and crown section; a full wash-day finish depends on how much work the loose lengths need.
Place the largest or heaviest star closest to the secure center, then use smaller pieces outward. For event styling, specify whether you want a neat arc, triangular cluster, or scattered constellation and how much crown lift should remain. Decorative stars should attach to a stable section rather than pulling loose surface hair into shape.
Pro tip:
Arrange the star pins on a flat surface before inserting them. Planning the size order and angles first helps the final constellation look deliberate instead of randomly scattered.
Make It Work for You:
For a bob, use two or three stars near the temple instead of a full half-up arrangement. The smaller cluster keeps the accessory proportional to the shorter length.
Watch Out For:
Avoid placing several heavy star pins into one thin section. Spread them across the supported base so no single point has to carry all the accessory weight.
Rhinestone Wave Tuck Bobby Pin Hairstyle
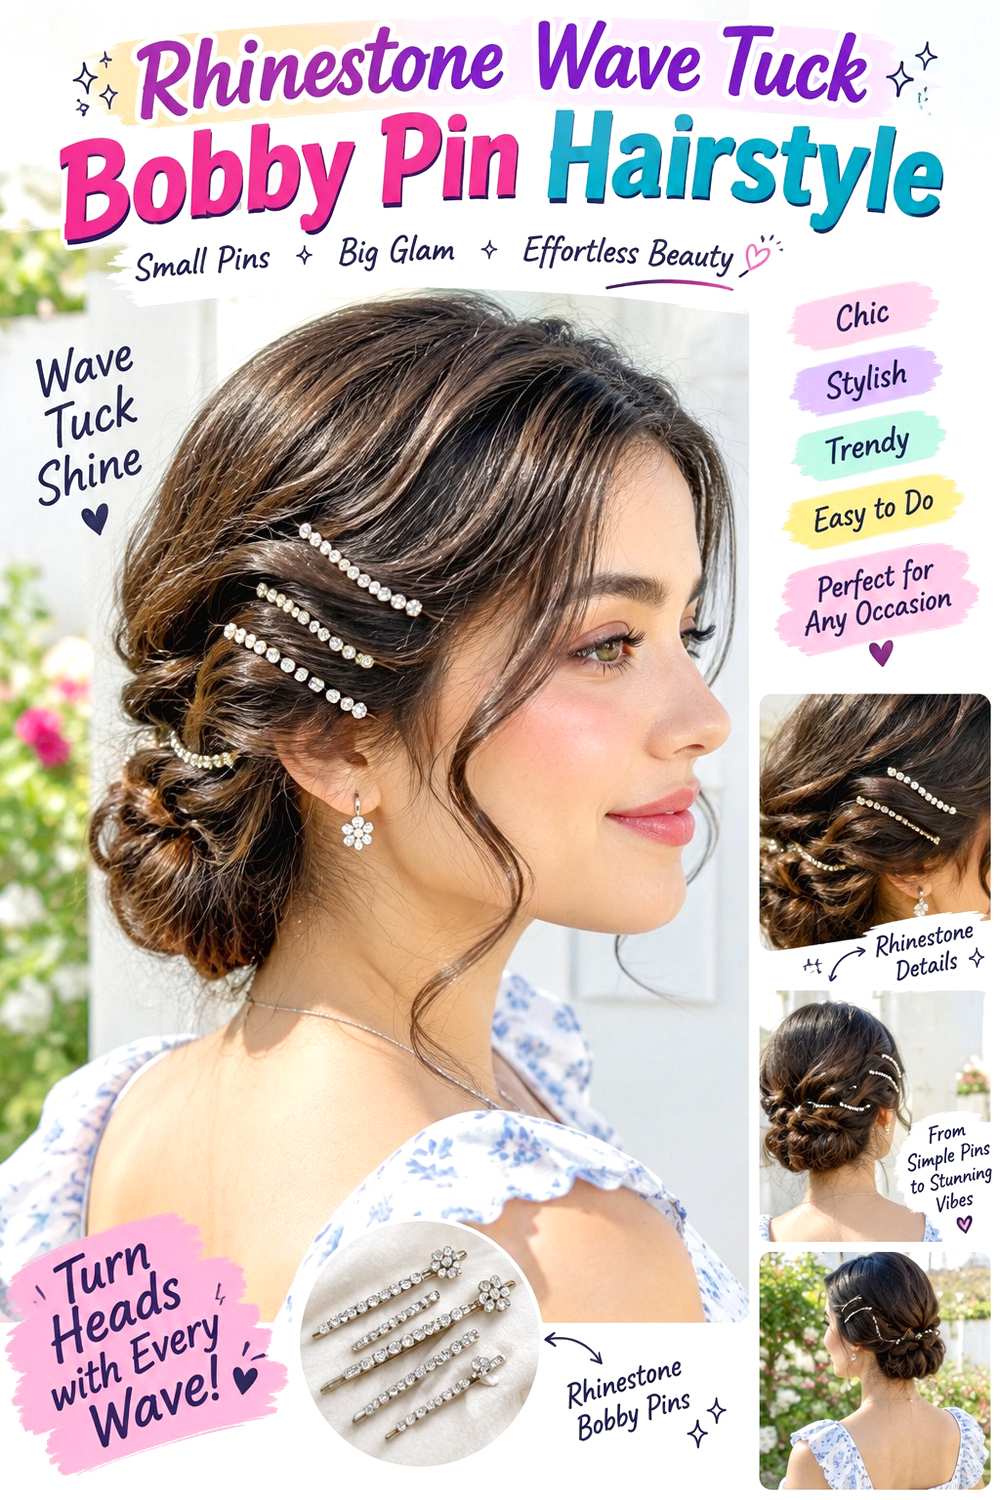
Broad waves and a rhinestone tuck create an easy contrast between movement and structure. Make a deep side part, shape the hair into loose bends, then tuck the smaller side behind the ear and secure it with two or three rhinestone bobby pins. Place the pins close enough to read as a set but not directly on top of one another. The heavier side can fall across the cheek and shoulder, giving the hairstyle a polished but not overly rigid finish.
This approach works best on medium to long hair, though a wavy lob can use the same temple placement. Use heat protectant to reduce heat exposure, a large-barrel curling iron to create the broad bends, and rhinestone bobby pins to secure the tuck. A full wave set can take considerably longer than a morning refresh, which may involve reshaping only the front bend and resetting the pins. If your natural texture already forms waves, skip the extra heat and focus on placement.
For professional styling, specify the wave size, part depth, and where the rhinestones should begin above the ear. The pins need to secure only the tucked section, not the heavy side of the entire hairstyle. Let heat-styled waves cool before arranging them around the accessory.
Pro tip:
Allow the front wave to cool before inserting the pins on the opposite side. Adjusting the tuck too early can disturb the shape while the hair is still setting.
Make It Work for You:
If you prefer minimal heat, work with your natural waves and use the rhinestone tuck as the polished detail. Define only the pieces that need extra direction.
Watch Out For:
Do not force a rhinestone pin over a thick section behind the ear. Use a narrower tuck so the pin closes securely without scraping or pulling nearby strands.
Crossed Bobby Pin Low Bun Hairstyle
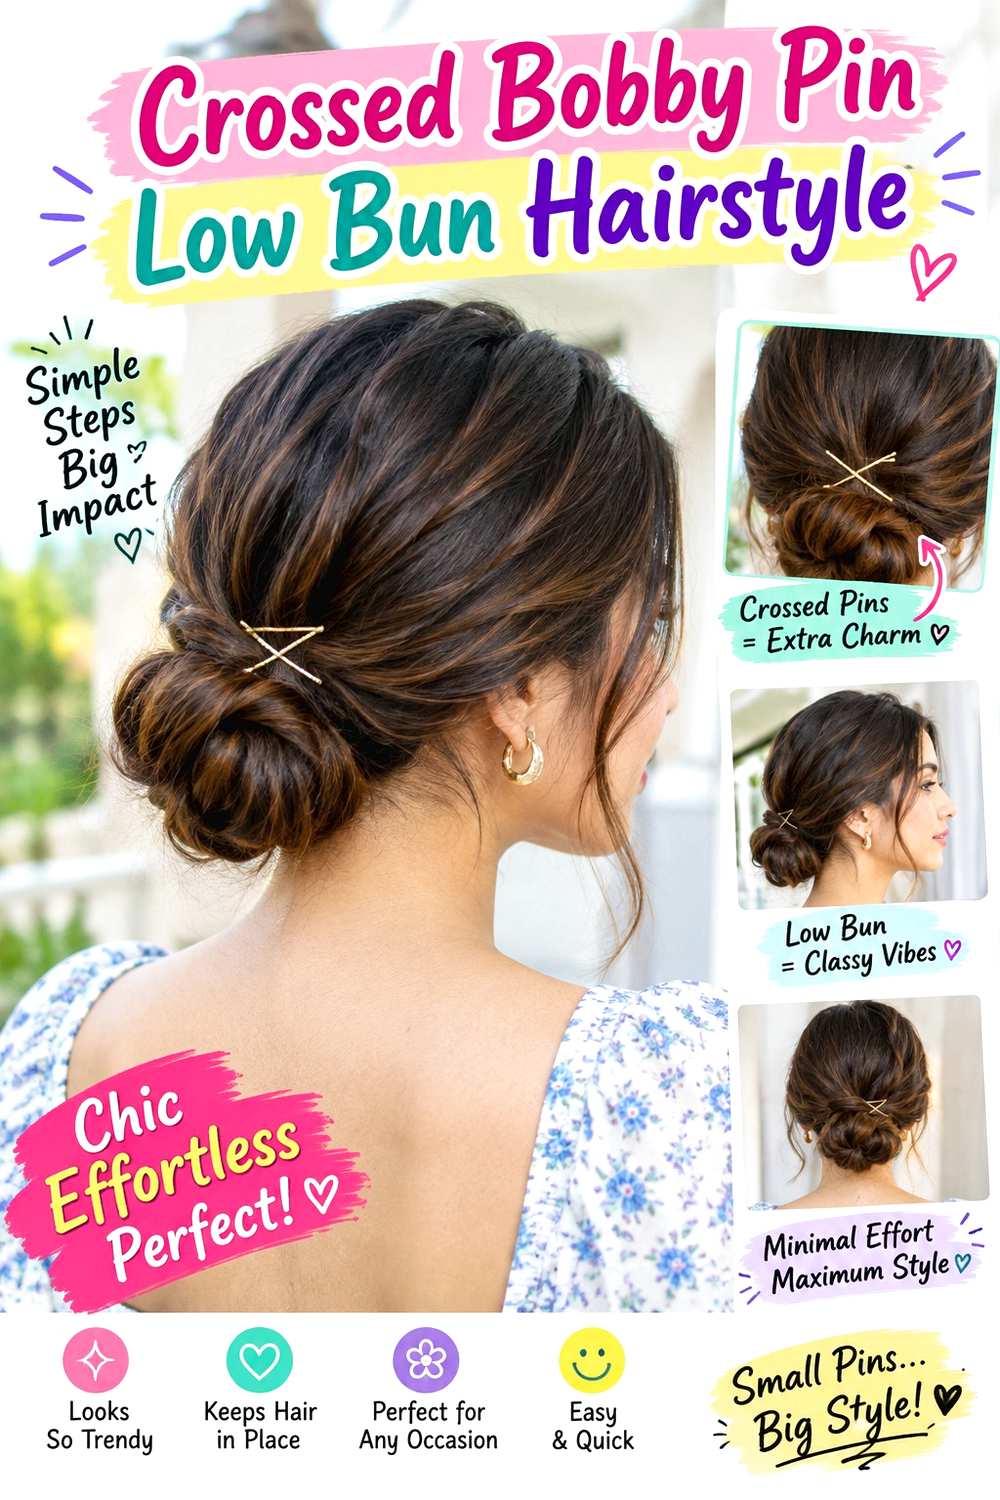
A low bun becomes more graphic when embellished pins cross over one side of the base. Gather the hair at the nape, form a compact rounded bun, and secure it independently. Then place two jeweled bobby pins in an X above the left or right edge, with the crossing point visible. A center part creates a balanced front, while a side part works well when the crossed detail sits opposite the heavier side. The bun can be smooth or retain some natural texture.
Medium to long hair provides enough length for a secure low bun, and the X works on fine through dense hair because the decorative pins do not have to hold the whole knot. Use standard bobby pins to establish the bun, embellished bobby pins for the visible cross, and light-hold gel to smooth the perimeter. A quick refresh can involve resetting only the decorative pair; rebuilding the entire bun from wash-day hair takes longer.
For event styling, specify the bun width, exact nape height, and whether the jeweled X should sit directly above the bun or slightly to one side. The decorative pins should enter supported hair around the bun, not be pushed into the scalp simply to keep the crossing point aligned.
Pro tip:
Secure the first decorative pin completely before crossing the second over it. A stable base line makes the X cleaner and reduces the need to shift both pieces repeatedly.
Make It Work for You:
For dense hair, keep the bun broad and let the embellished pins decorate only its upper edge. Hidden structure can carry the weight while the jeweled X stays visible.
Watch Out For:
Do not use the crossed pins as the main bun anchor. If removing them makes the knot loosen, rebuild the hidden support before adding the decorative X again.
Jeweled Half-Up Twist Bobby Pin Hairstyle
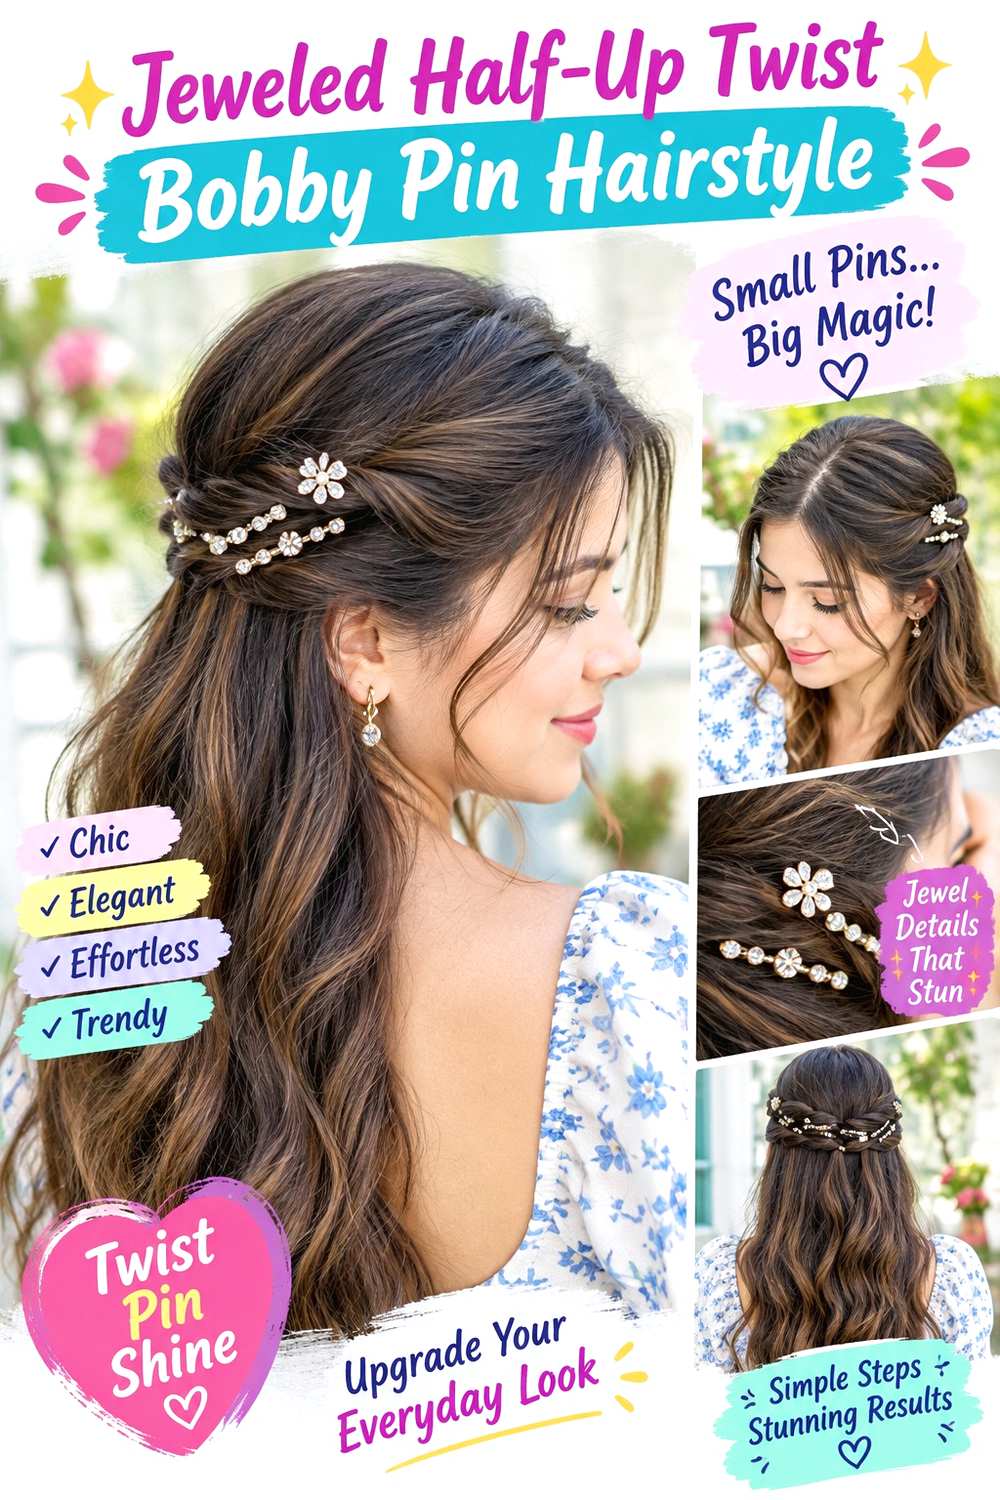
A soft half-up twist gives jeweled bobby pins a stable area without taking the whole length off the shoulders. Bring a section from each temple toward the back, twist them inward, and overlap them at mid-crown. Place three jeweled pins diagonally across the join so they follow the direction of the twist rather than cutting straight across it. The loose lengths can remain straight, wavy, curly, or coily, and narrow face-framing pieces can stay outside the gathered section.
This style suits medium to long hair and works particularly well when you want an accessory visible from behind. Use jeweled bobby pins for the decoration, light texturizing spray to give the twist grip, and smoothing cream to control flyaways around the crown. A quick refresh may take only a few minutes; a full wash-day version depends on the styling needed for the loose hair.
If the twist starts slipping, reduce the section size rather than pushing additional jeweled pins into the same spot. For professional styling, explain where the twist should meet, how much crown height you want, and whether the decorated line should angle upward or downward. The pins should reinforce the joined sections while remaining comfortable against the head.
Pro tip:
Twist each side only once or twice before joining them. Over-twisting can create bulky ropes that make the jeweled pins sit unevenly instead of following a smooth line.
Make It Work for You:
For fine hair, gather a narrower half-up section and leave more length down. The smaller twist can grip better while the embellished pins still create a visible focal point.
Watch Out For:
Do not pull the twist tighter when the crown starts flattening. Rebuild the anchor with less tension so the style keeps softness without sacrificing security.
Celestial Cluster Bobby Pin Hairstyle
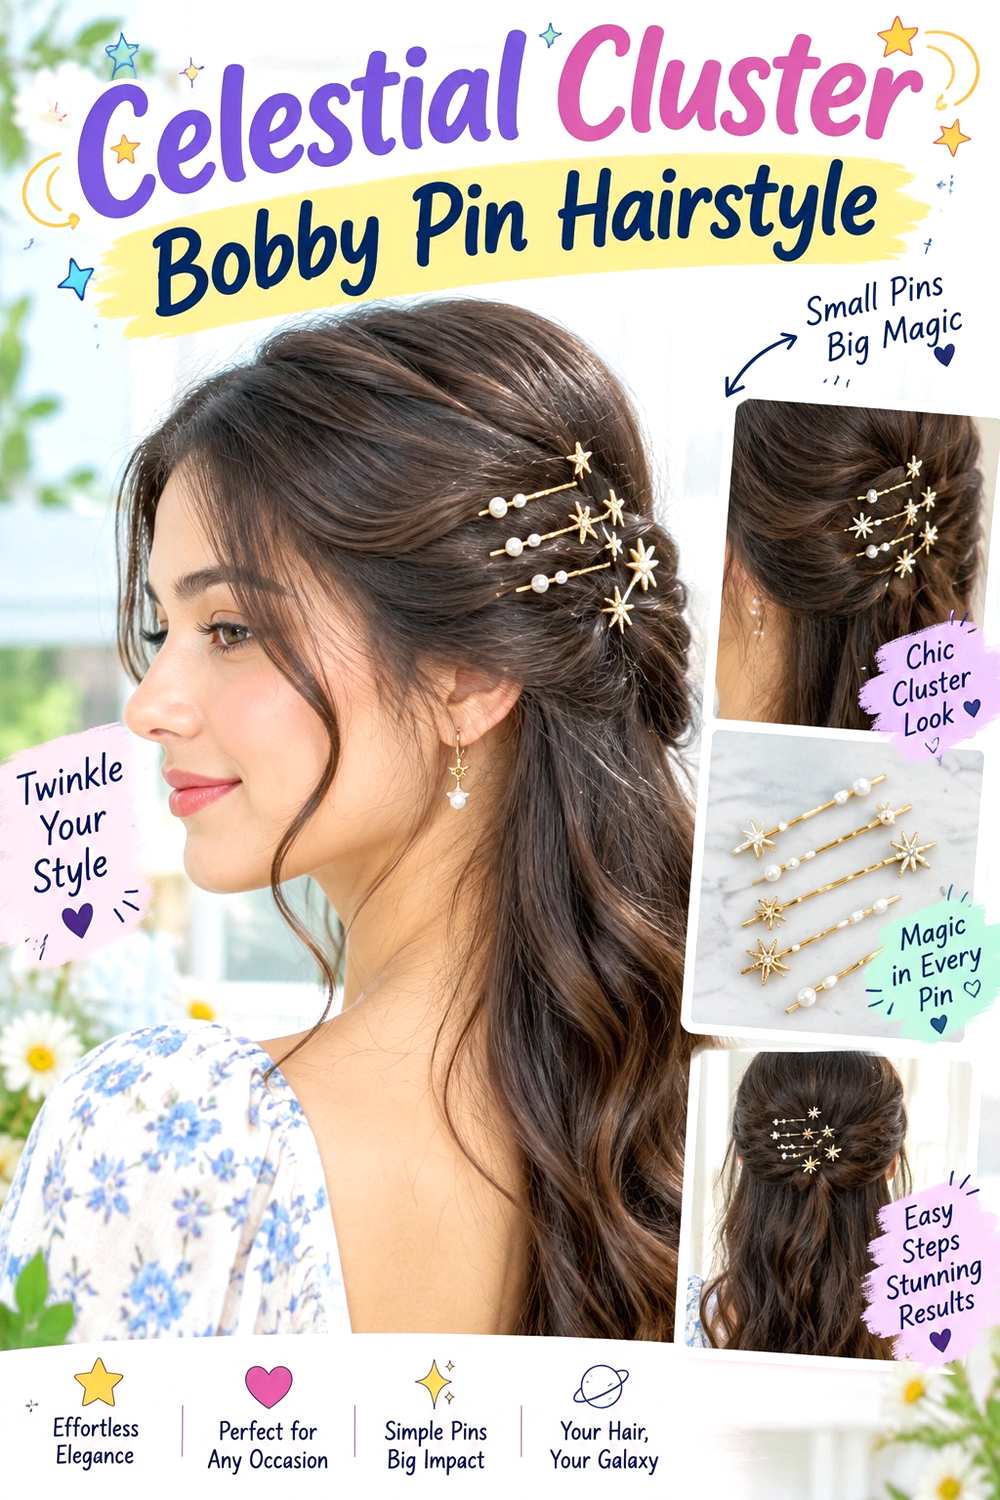
A celestial cluster mixes moon, star, and crystal-tipped bobby pins in one concentrated area. Create a side part and smooth one section above the ear, then arrange four or five pins in a loose fan so the decorated ends point outward at different angles. Keeping the rest of the hair simple makes the cluster easier to read. Straight lengths give it a sharper finish, while curls and waves create a softer contrast around the metallic shapes.
This option suits bob through long lengths because the decoration stays near the side of the head. Use celestial bobby pins for the visible cluster, light styling cream to control the surface, and texturizing spray underneath for additional grip. A dry-hair refresh can be very quick, while wash-day effort depends on whether you create a sleek, waved, or curly finish first. If one pin slips, reposition that piece instead of tightening the entire section.
For professional styling, show the approximate cluster size and whether you want the stars and moons close to the temple or extending farther toward the crown. Each pin should catch a stable amount of hair without all converging on one scalp point. Leaving small gaps between decorations makes the arrangement look intentional rather than crowded.
Pro tip:
Place the largest celestial piece first and build the smaller pins around it. One clear focal point makes the fan easier to balance and keeps the arrangement from looking random.
Make It Work for You:
If your hair is curly, widen the cluster and place the pins between larger curl groups. The shapes stay visible without flattening the surrounding texture.
Watch Out For:
Avoid pointing every pin toward the same tiny anchor point. Spread their stems across a broader section so the cluster does not create concentrated pressure near the temple.
Minimal Pearl Row Bobby Pin Hairstyle
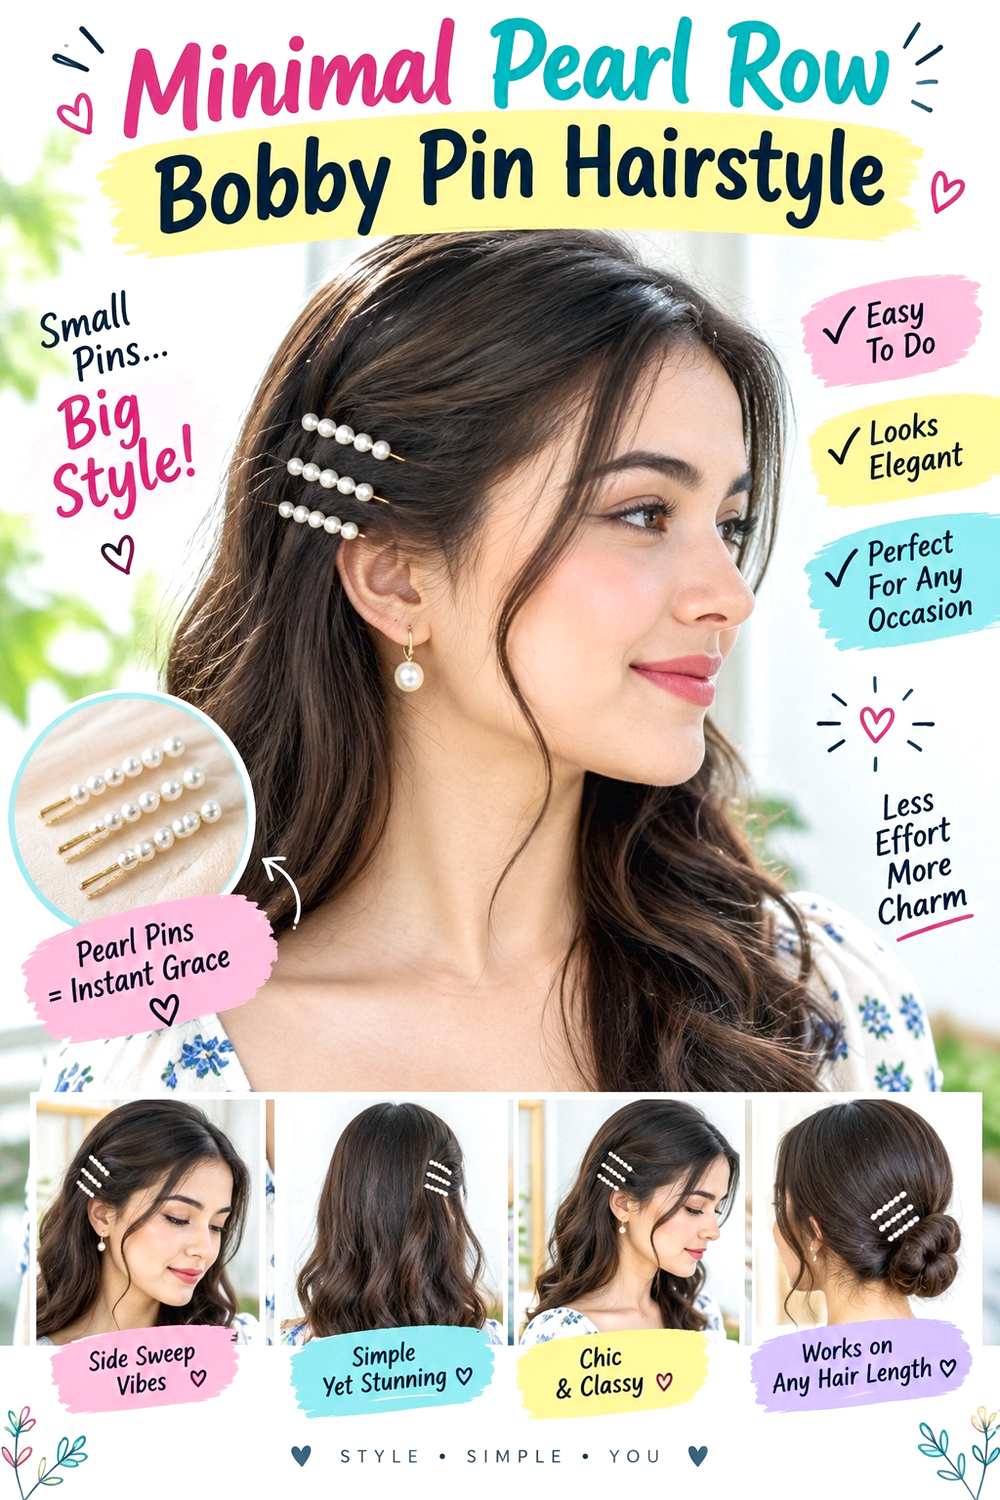
A single pearl row is one of the simplest ways to make bobby pins feel deliberate. Create a center or soft side part, tuck one section behind the ear, and place three pearl pins in a straight horizontal line. The spacing should be consistent, with enough room for each pearl detail to remain distinct. The rest of the hair can stay sleek, naturally textured, or gathered into a low ponytail. On a bob, the pearl row becomes an especially clear side feature.
The design works for fine through dense hair, but the pinned section should remain modest so each accessory grips securely. Use pearl bobby pins for the row, a tail comb to refine the part, and light texturizing spray to help the section hold. A quick refresh may take only minutes because there is no complicated base style. A full wash-day routine is separate and depends entirely on the finish you choose for the remaining hair.
For an event stylist, specify where the first pearl should begin relative to the ear and whether you want the row perfectly horizontal or slightly angled upward. On very dense hair, hidden support may manage the bulk while the pearls sit on a smaller surface section. Remove each pin individually instead of sliding the whole row out together.
Pro tip:
Insert the center pearl pin first, then match the others to its height. Working from the middle helps keep the row straight when viewing the style from the side.
Make It Work for You:
For very short hair, use two pearl pins instead of three. Keeping the spacing clean matters more than filling the whole side with decorative pieces.
Watch Out For:
Do not place the pearl row too close to the ear if the pins press when you move. Shift the line slightly higher or farther back for comfort.
Curly Side Accent Bobby Pin Hairstyle
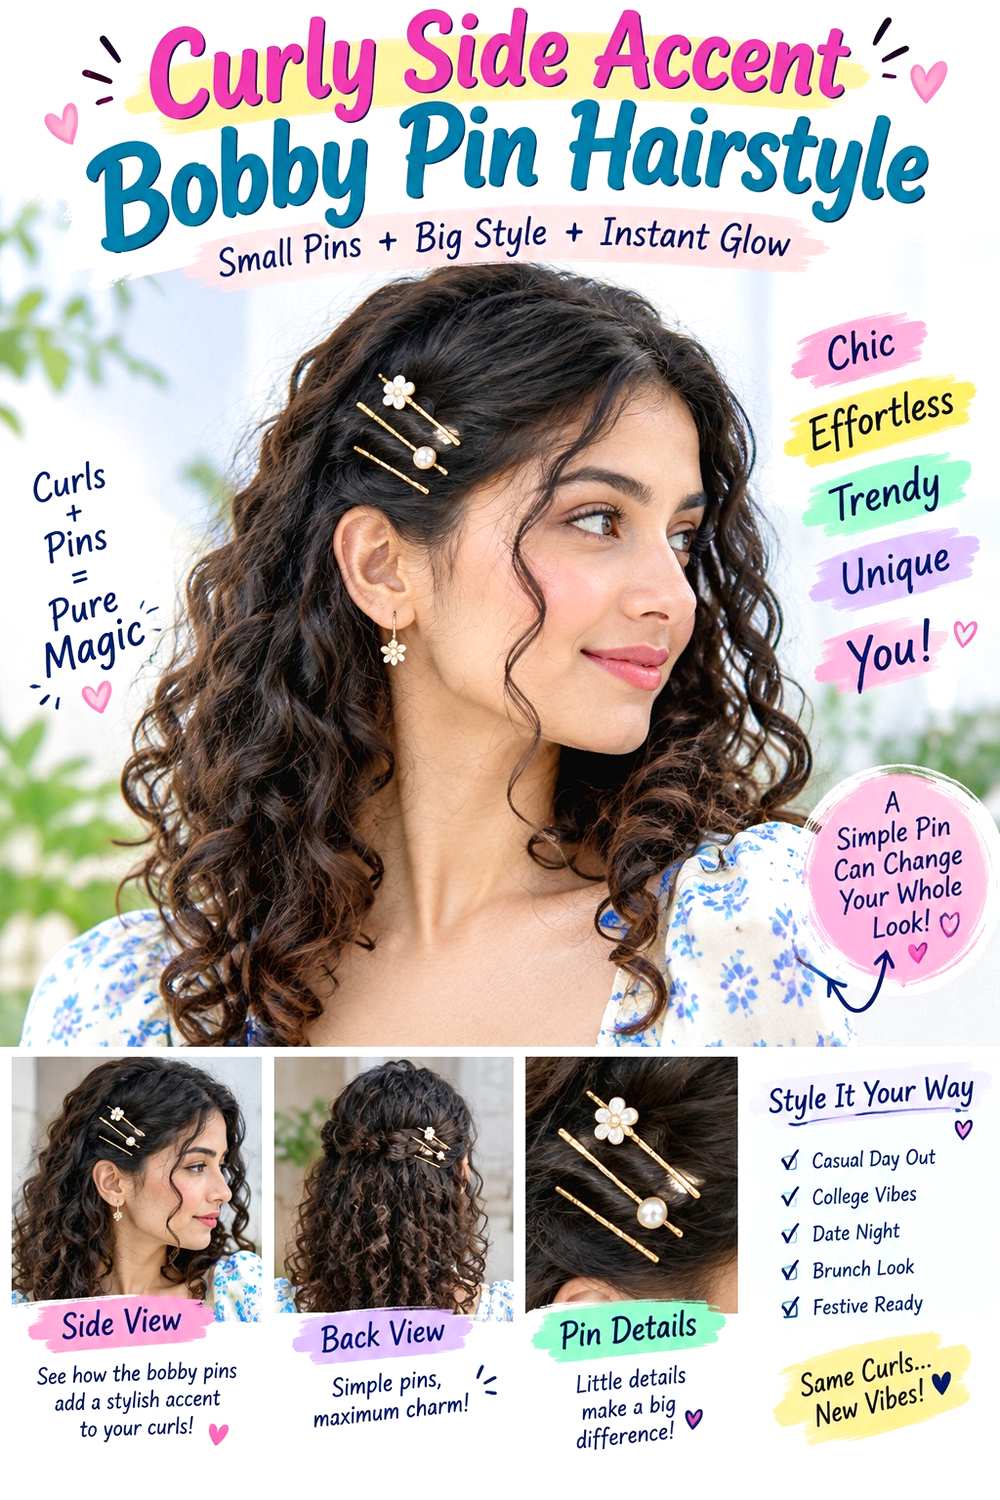
Curly hair can use embellished bobby pins without flattening the entire side. Keep the curls defined, choose one area above the ear where several groups naturally separate, and slide two or three decorative pins between those groups. The pins can form a diagonal row or a loose fan while the rest of the curls remain full. A side part increases the contrast, but a center part also works when the accessories sit slightly farther back.
This approach is useful for medium to long curls when you want a temporary accent rather than a smooth tucked section. Use embellished bobby pins for the decoration, curl cream to support definition, and lightweight gel to control frizz around the accessory area. A between-wash refresh can be brief because only selected outer curls need reshaping; a full wash-day style takes longer depending on density, curl pattern, and drying method.
Plan the pins on the dry finished shape because curl shrinkage changes where the accessory will appear. For professional styling, show how much volume should remain around the ear and whether the decorated section should expose the temple or sit inside the curl mass. The pins should catch stable sections between curls, not pierce or flatten the centers of defined groups.
Pro tip:
Place the pins only after your curls have dried into their final shape. This lets you use natural gaps between curl groups instead of creating new separations that may look forced.
Make It Work for You:
For tighter curls, use slightly larger embellished ends and wider spacing. Bigger decorative details remain visible within the texture without requiring you to flatten more hair.
Watch Out For:
Do not repeatedly drag pins through a curl to reposition them. Remove the accessory fully, release any caught strands, and reinsert it between neighboring curl groups.
Coily Crown Accent Bobby Pin Hairstyle
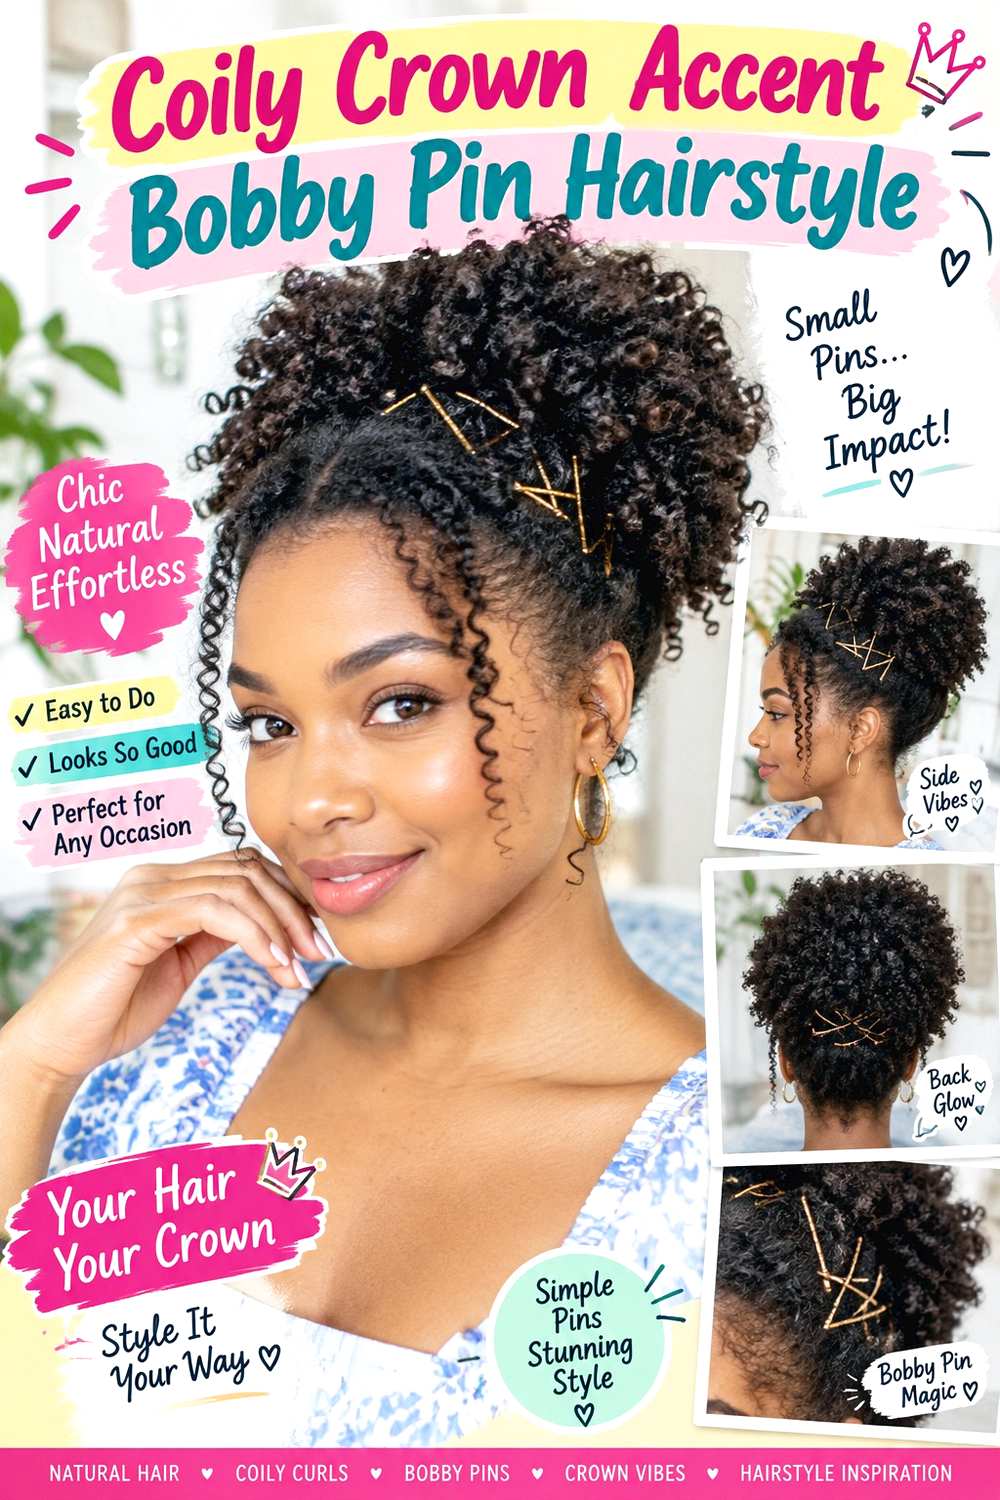
A crown accent places embellished bobby pins where they can be seen without stretching coily texture flat. Style the hair in its usual defined or softly stretched state, then choose a small area near one side of the crown. Create a controlled separation between coil groups and insert three decorative pins in a short arc that follows the head. The surrounding coils stay full, while the metallic or jeweled ends form a visible curved detail rather than a rigid straight line.
This design suits coily hair when you want sparkle but prefer to preserve volume and shrinkage. Use embellished bobby pins for the accent, moisturizing leave-in conditioner to keep the coils flexible, and soft-hold gel to refine the immediate perimeter. A quick refresh can focus on a few outer coils and pin placement; full wash-day styling takes longer because detangling, defining, and drying happen first.
Judge the accessory location after shrinkage rather than measuring placement on stretched hair. For event styling, specify whether the arc should begin near the temple or farther back at the crown and how many coil groups should remain visible around it. The pins should anchor between stable sections, with decorated ends resting above the texture rather than compressing the shape.
Pro tip:
Mark the area you want decorated after the hair is fully dry. Coils can shift substantially during shrinkage, so final-shape placement gives the most predictable result.
Make It Work for You:
If your hair is very dense, use fewer pins with larger embellished ends. Stronger accents remain visible through the volume without requiring a crowded metal arrangement.
Watch Out For:
Avoid pushing a pin deeper simply because its decoration disappears into the coils. Reposition it closer to the surface rather than increasing scalp pressure.
Crystal French Twist Bobby Pin Hairstyle
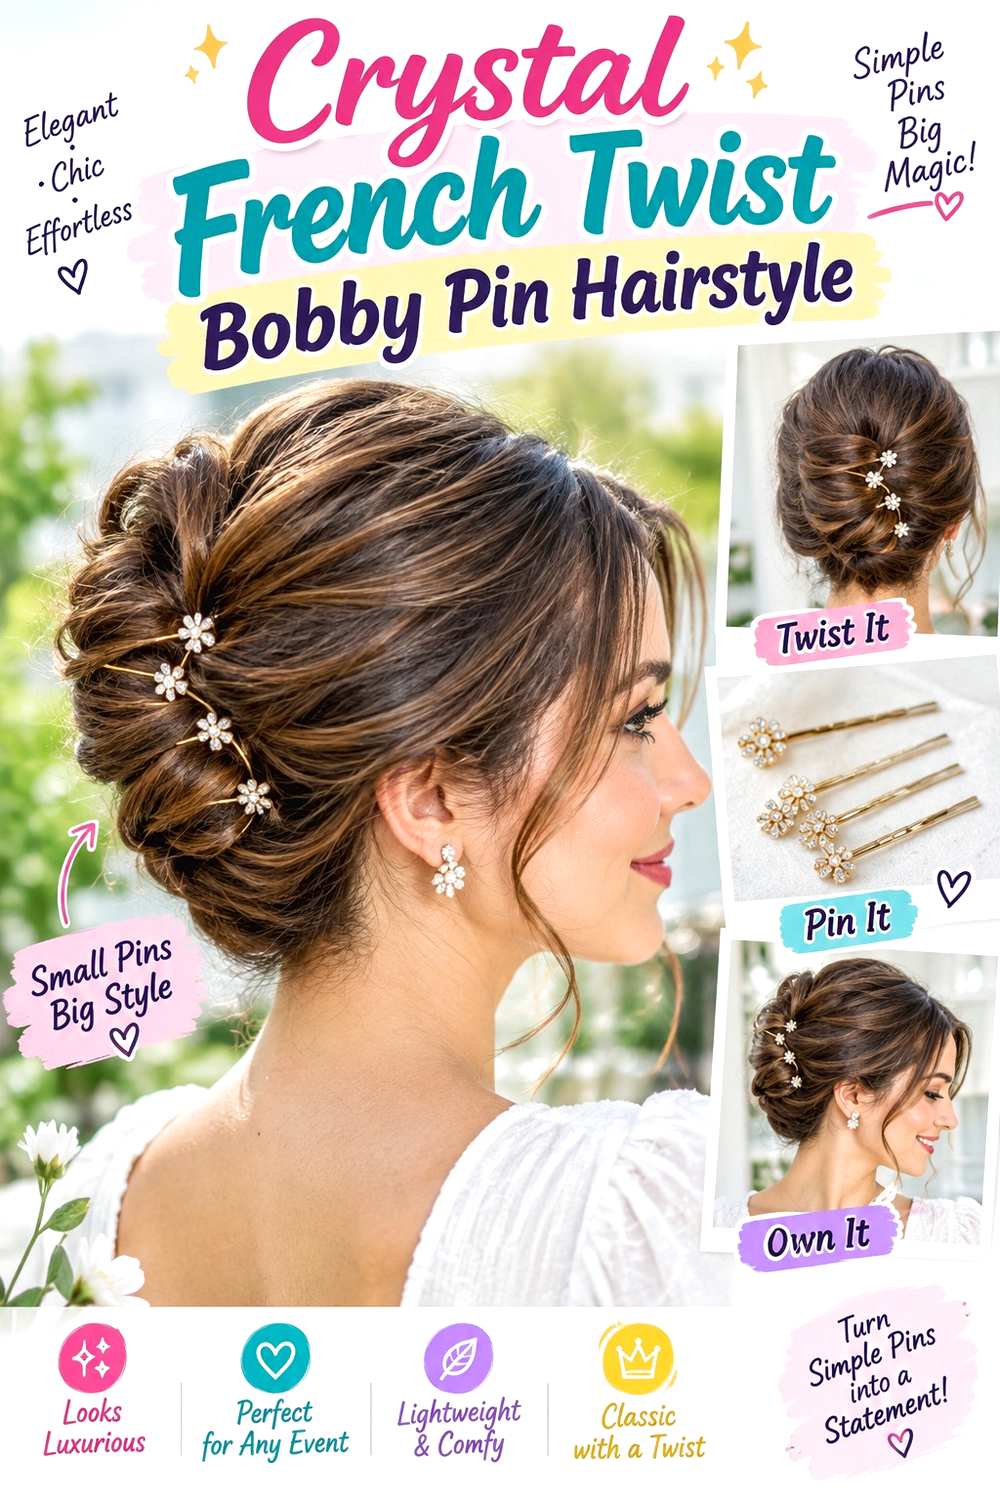
A French twist gives crystal bobby pins a structured vertical line to follow. Sweep the hair toward one side, roll it inward from the nape, and secure the hidden seam before adding three crystal pins along the visible edge. The pins can run parallel with the roll or step upward diagonally toward the crown. Medium to long hair works best because the vertical ridge needs enough length to form cleanly, while the front can stay center-parted, side-parted, or softly swept back.
This style suits straight, wavy, or smoothed textured hair for work, dinner, or formal events. Use standard bobby pins to secure the hidden twist, crystal bobby pins for decoration, and flexible hairspray to control flyaways. A quick refresh may involve resetting one crystal pin, while recreating the French twist takes longer because the roll and internal anchor need to be rebuilt.
For professional styling, specify where the twist should finish, how much crown volume you want, and whether the crystals should follow the seam or the rounded outer edge. Decorative pins should enter supported hair at a shallow angle rather than being pushed directly toward the scalp. If the twist loosens, rebuild its hidden structure instead of asking the crystal pins to hold more weight.
Pro tip:
Finish the French twist completely before placing the crystals. Once the structure is secure, you can adjust decorative spacing without disturbing the vertical roll underneath.
Make It Work for You:
For shoulder-length hair, keep the twist compact and use only two crystal pins. A shorter vertical line can look cleaner than forcing three decorations onto a small roll.
Watch Out For:
Never push a decorative pin farther when you feel scalp resistance. Withdraw it and change the angle so the stem travels through the outer twist instead.
Braided Bobby Pin Accent Hairstyle
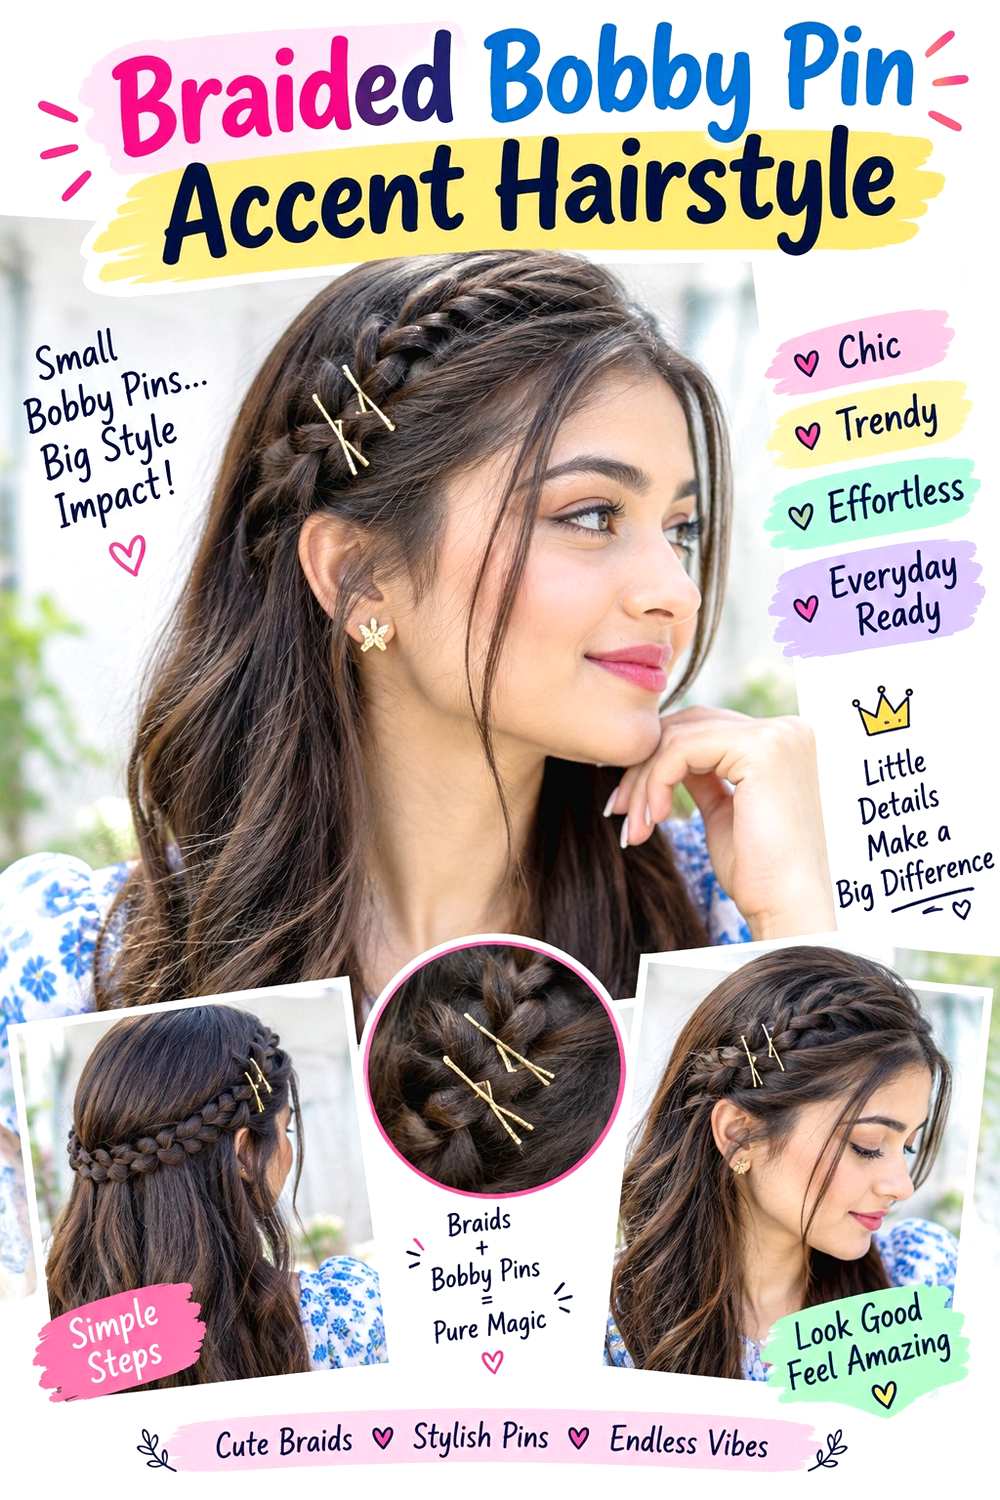
A narrow braid and a row of embellished pins create detail without requiring a full braided updo. Make one accent braid near the temple or behind the ear, secure it into the loose hair, then place two or three decorated bobby pins alongside the braid rather than through every crossing. The pins can point toward the braid in a repeated diagonal pattern, creating a metallic frame. The remaining hair stays loose, making this practical for shoulder-length through long cuts.
Straight, wavy, curly, and coily hair can all use the idea, although braid width should match the scale of the decoration. Use embellished bobby pins for the visible accents, a clear elastic to secure the braid, and braid cream to keep smaller sections controlled. A quick refresh may only require resetting one pin or smoothing the braid edge; full styling takes longer if the loose hair also needs shaping.
For event styling, specify the braid starting point, width, direction, and how close the pins should sit beside it. On dense or highly textured hair, a slightly wider braid can keep the embellishments visible. The pins should grip neighboring stable sections rather than pierce the braid repeatedly, which helps preserve the woven pattern and simplifies removal.
Pro tip:
Finish and secure the braid before adding any decorative pins. This lets you use the braid as a visual guide without changing its tension each time you adjust the accessories.
Make It Work for You:
For shorter hair, keep the braid close to the temple and use two embellished pins beside it. The detail remains clear without needing the braid to travel far.
Watch Out For:
Do not insert every pin directly through the braid itself. Repeated metal can distort the woven pattern, so anchor beside it and let the decorations visually frame the section.
Sleek Center-Part Bobby Pin Hairstyle
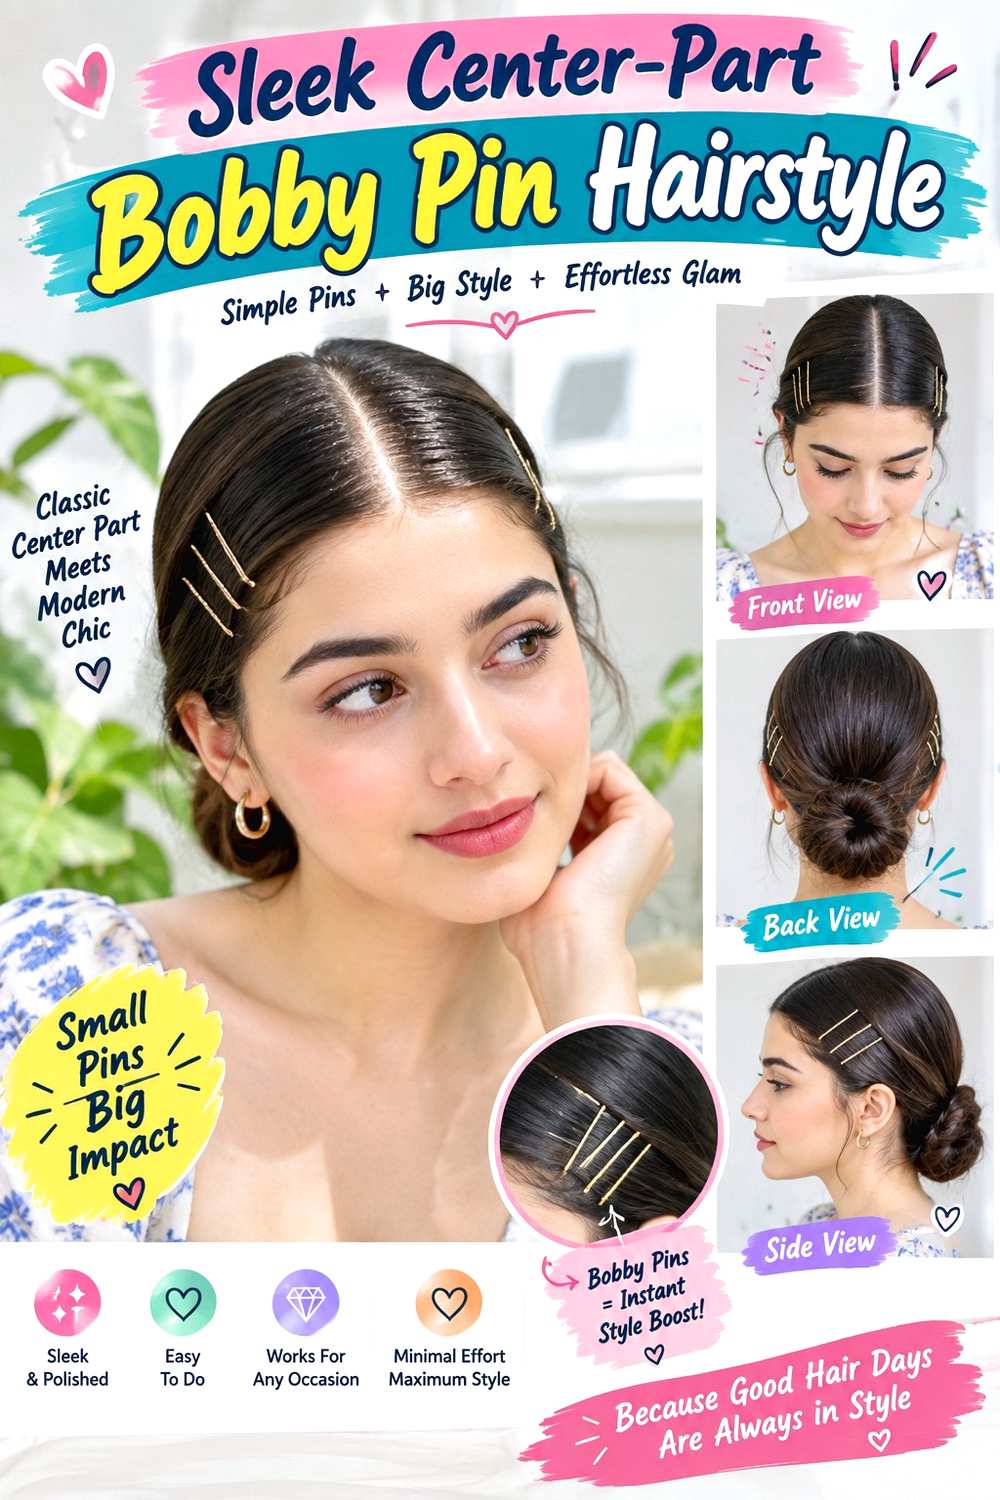
A sharp center part paired with symmetrical embellished pins creates a clean, polished finish. Divide the hair evenly, smooth both sides toward the ears, and place matching pin pairs above each temple. The pins can sit horizontally for a graphic effect or angle slightly backward to follow the head. The lengths may remain straight, form a low ponytail, or fall in controlled waves. Keeping the accessory placement mirrored is what distinguishes this style from a casual side cluster.
This option suits bob through long hair and works best when you enjoy a balanced front. Use matching embellished bobby pins for the decoration, a tail comb to define the part, and smoothing gel to control the hairline. A quick refresh can take only a few minutes because the structure is simple; a complete wash-day sleek finish takes longer depending on natural texture and length.
If your growth pattern naturally pushes one side differently, aim for visual balance rather than painful tension. For salon styling, specify where the center part should finish, how close the pins should sit to the temples, and whether the pairs should be perfectly parallel or gently angled. Each side should use a similar amount of hair so one pin set does not appear noticeably heavier.
Pro tip:
Place one pin on each side first, check the symmetry from the front, then add the second pair. Correcting placement early is easier than moving four finished pins.
Make It Work for You:
If your natural part sits slightly off center, keep that comfortable line and mirror the pins around it. The effect can still feel balanced without forcing resistant roots.
Watch Out For:
Do not flatten the sides with excessive tension just to create symmetry. Smooth each section in its natural direction and adjust pin placement until the front appears balanced.
Short Bob Bobby Pin Accent Hairstyle
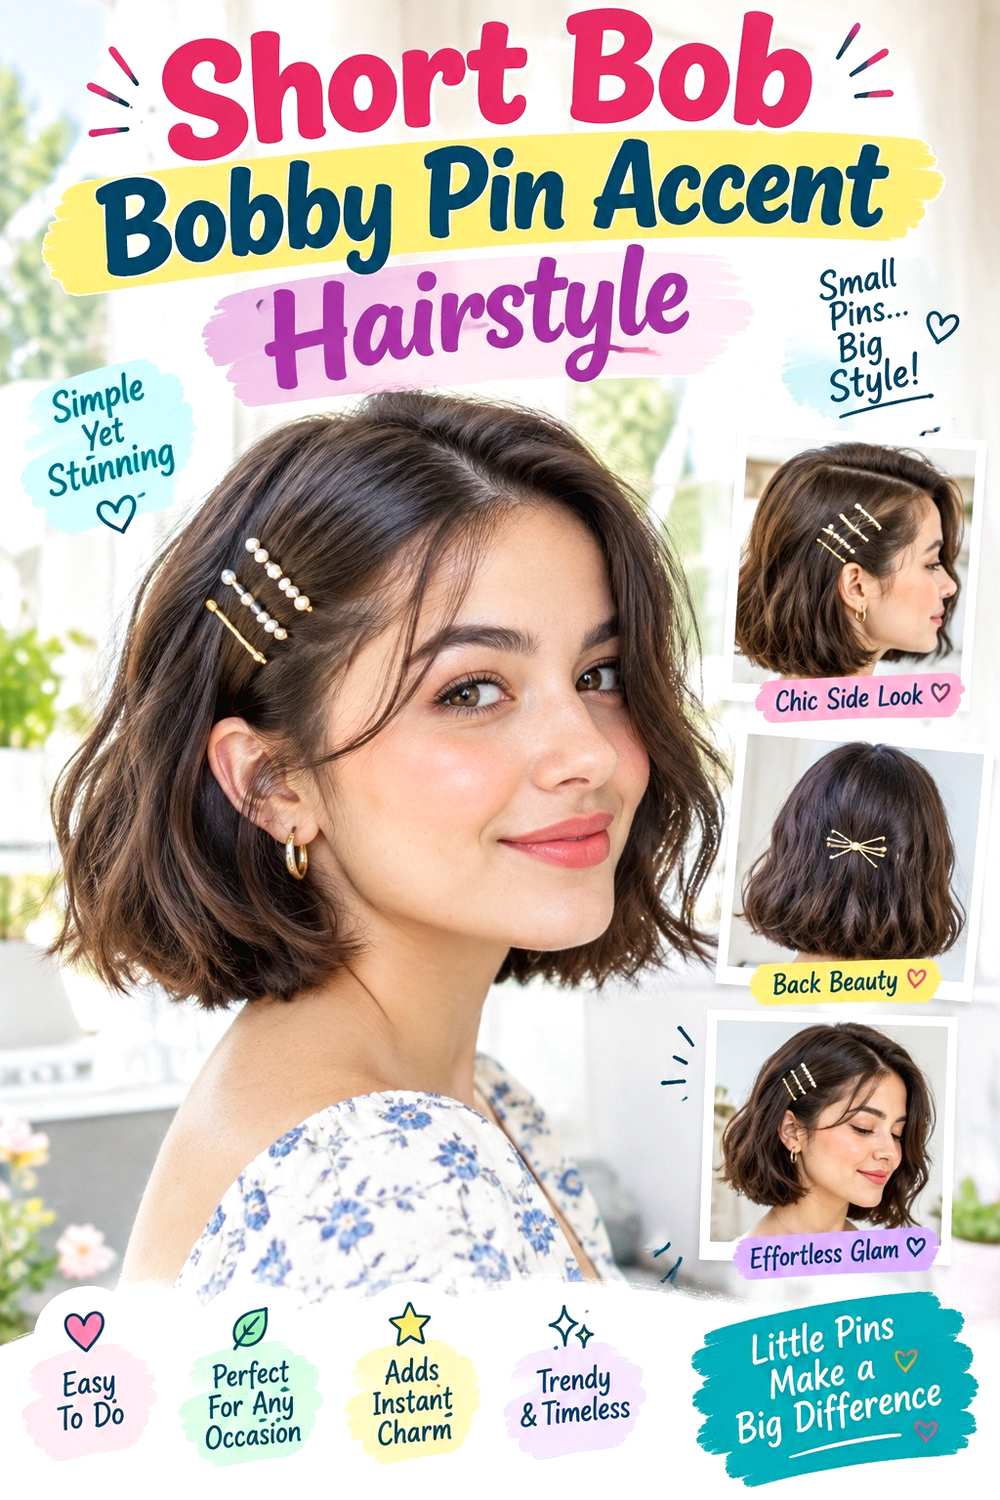
A short bob needs only a small embellished pin arrangement to look intentional. Create a side part, tuck the shorter side behind the ear, and place two decorative bobby pins just above the tuck. Keep the lines parallel or cross them lightly for a compact focal point. The rest of the bob can stay blunt and sleek, softly bent, naturally wavy, or curly. Chin- to shoulder-length cuts work particularly well because the accessory sits close to the face and remains easy to see.
This style suits fine through dense hair, but lightweight pins are usually easier to balance on a shorter section. Use embellished bobby pins for the accent, light texturizing spray to improve grip, and smoothing serum to keep the perimeter polished. A quick dry-hair refresh can take only minutes; full wash-day styling takes longer only if you reshape the entire bob first.
For professional styling, specify which side should be tucked, the exact pin height, and whether the decoration should sit close to the temple or farther behind the ear. The pins do not need to capture every short layer. Letting the lowest pieces remain free can look cleaner than forcing them upward into an unstable anchor.
Pro tip:
Gather only the hair that naturally reaches behind the ear before adding the pins. Shorter nape pieces can stay loose without making the accessory placement look unfinished.
Make It Work for You:
If your bob is very fine, choose narrow lightweight pins with smaller embellishments. Their scale will suit the shorter shape and place less weight on the tucked section.
Watch Out For:
Heavy pins can drag a short side section downward. If the tuck keeps slipping, switch to lighter accessories rather than pinning the hair more tightly against the scalp.
Scattered Gem Updo Bobby Pin Hairstyle
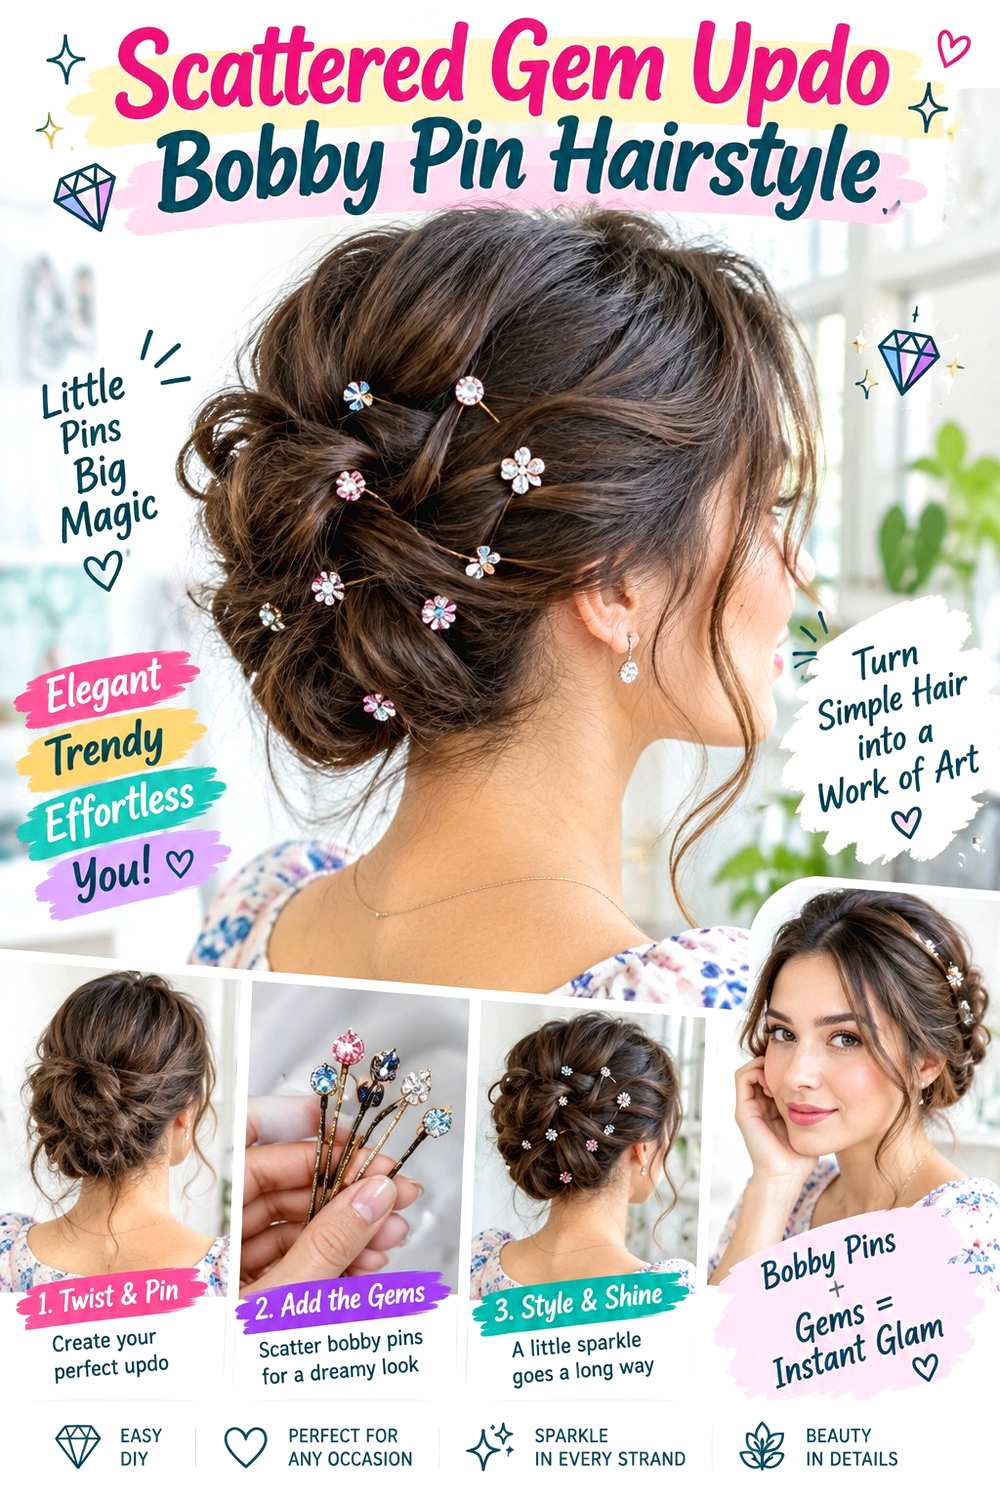
A scattered gem updo spreads embellished bobby pins across a secured style instead of arranging them in one row. Build a low or mid-height twisted updo first, leaving a few controlled pieces around the face if you prefer softness. Once the shape is stable, place gem-tipped pins at several visible points through the outer folds, with more space between them near the edges. The result should look intentionally scattered, not densely studded, and the underlying updo should remain easy to read.
This style works on medium to long straight, wavy, curly, or coily hair because the gem placement can adapt to the texture. Use standard bobby pins to build the structural base, gem-tipped bobby pins for decoration, and flexible hairspray to control flyaways without making the updo rigid. A brief refresh may involve replacing one shifted gem; recreating the entire style takes longer because the foundation must be rebuilt.
For professional styling, specify the updo height, amount of visible texture, number of gem pins, and whether the sparkle should concentrate on one side or remain evenly distributed. Insert decorative pins into supported folds rather than random loose hairs. During takedown, remove every embellished piece before dismantling the structural pins underneath.
Pro tip:
Place the largest gem first, then work outward with smaller pieces. This creates a subtle focal area while keeping the rest of the scattered placement balanced and intentional.
Make It Work for You:
For dense curls or coils, use fewer gem pins with larger decorative ends. Stronger individual accents remain visible without requiring you to flatten the textured updo.
Watch Out For:
Do not hide decorative pins deep inside the updo just to make them secure. Anchor their stems in stable folds while keeping the embellished ends visible near the surface.
Conclusion
Embellished bobby pin hairstyles can be as simple as two pearls beside a bob or as detailed as a gem-scattered updo, crystal French twist, or geometric pin grid. Straight and wavy hair often show linear arrangements clearly, while curls and coils work well with wider spacing and placement between defined groups. Short hair benefits from lightweight accents, whereas longer hair provides more room for braids, buns, and half-up anchors. Consider pin weight, parting, texture, density, placement, and styling effort before choosing your design. A decorative pin should support or embellish a stable section without scraping the scalp, pulling individual strands, or replacing the structural anchor of a larger style.
Before Your Salon Visit
Choose one or two favorite references and save clear front, side, and back views when possible. Tell your stylist about your texture, density, usual part, preferred length, and how long you need the style to remain comfortable. Point directly to the pin spacing, row angle, cluster size, braid placement, bun height, crown volume, or face-framing pieces you like. Because these are temporary styles, focus on grip, anchoring, comfort, and accessory placement rather than requesting a haircut unless you already want one.
FAQs
Can Embellished Bobby Pins Hold Thick or Dense Hair?
They can secure smaller sections, but decorative pins may not be the best sole anchor for a heavy twist or bun. Dense hair often works better with hidden structural support underneath, while the embellished pins sit where they remain visible and comfortable.
How Do I Keep Decorative Bobby Pins From Sliding?
Use a manageable section of hair and make sure the pin catches stable strands instead of only the smooth outer surface. Light texture can improve grip on slippery hair. If the pin still slides, change its angle or section size rather than adding painful tension.
Can I Use Embellished Bobby Pins on Curly or Coily Hair?
Yes. Place them between curl or coil groups where possible so the decoration remains visible without flattening the texture. Judge placement on the finished dry shape because shrinkage can change the accessory position and how much hair reaches each anchor.
How Do I Remove Jeweled or Pearl Bobby Pins Without Snagging?
Remove each pin individually and slide it back along the direction it entered. If a strand catches around a pearl, crystal, or metal setting, stop and release it gently before continuing. Take decorative pins out before brushing or dismantling a larger updo.