15 Grown Out Pixie Hairstyles for an Effortless Chic Look

Grown out pixie hairstyles sit in the useful stage between a cropped pixie and a short bob, with extra length around the ears, nape, crown, and fringe creating more styling options. The defining shape is less precise than a fresh pixie: side sections may begin covering the ears, the nape becomes softer, and the top gains enough length to sweep, wave, curl, or part. That extra movement is what makes the grow-out stage feel intentional rather than simply overdue for a trim.
Straight and wavy textures can use the additional length for bends and side sweeps, while curly and coily hair often develops more visible volume as shrinkage and layers interact. Fine strands may benefit from preserving fuller edges, whereas dense hair can need careful bulk control around the ears and back. Fringe can be worn sideways, split through the center, tucked away, or allowed to blend into the longer sides.
Daily effort varies from air-drying and adding a little separation to a fuller blow-dry or sleek finish. Maintenance is usually about reshaping rather than returning to a very short pixie. Strategic nape cleanup, fringe adjustments, and small changes around the ears can make growing hair feel more balanced while preserving the length you are trying to gain.
Quick List
- Side-Swept Grown Out Pixie Hairstyle
- Tucked-Ear Grown Out Pixie Hairstyle
- Wavy Grown Out Pixie Hairstyle
- Curly Grown Out Pixie Hairstyle
- Coily Grown Out Pixie Hairstyle
- Shaggy Grown Out Pixie Hairstyle
- Curtain Fringe Grown Out Pixie Hairstyle
- Deep Side-Part Grown Out Pixie Hairstyle
- Slicked-Back Grown Out Pixie Hairstyle
- Fine-Hair Grown Out Pixie Hairstyle
- Dense-Hair Grown Out Pixie Hairstyle
- Nape-Length Grown Out Pixie Hairstyle
- Air-Dried Grown Out Pixie Hairstyle
- Textured Crown Grown Out Pixie Hairstyle
- Soft Mullet Grown Out Pixie Hairstyle
Side-Swept Grown Out Pixie Hairstyle
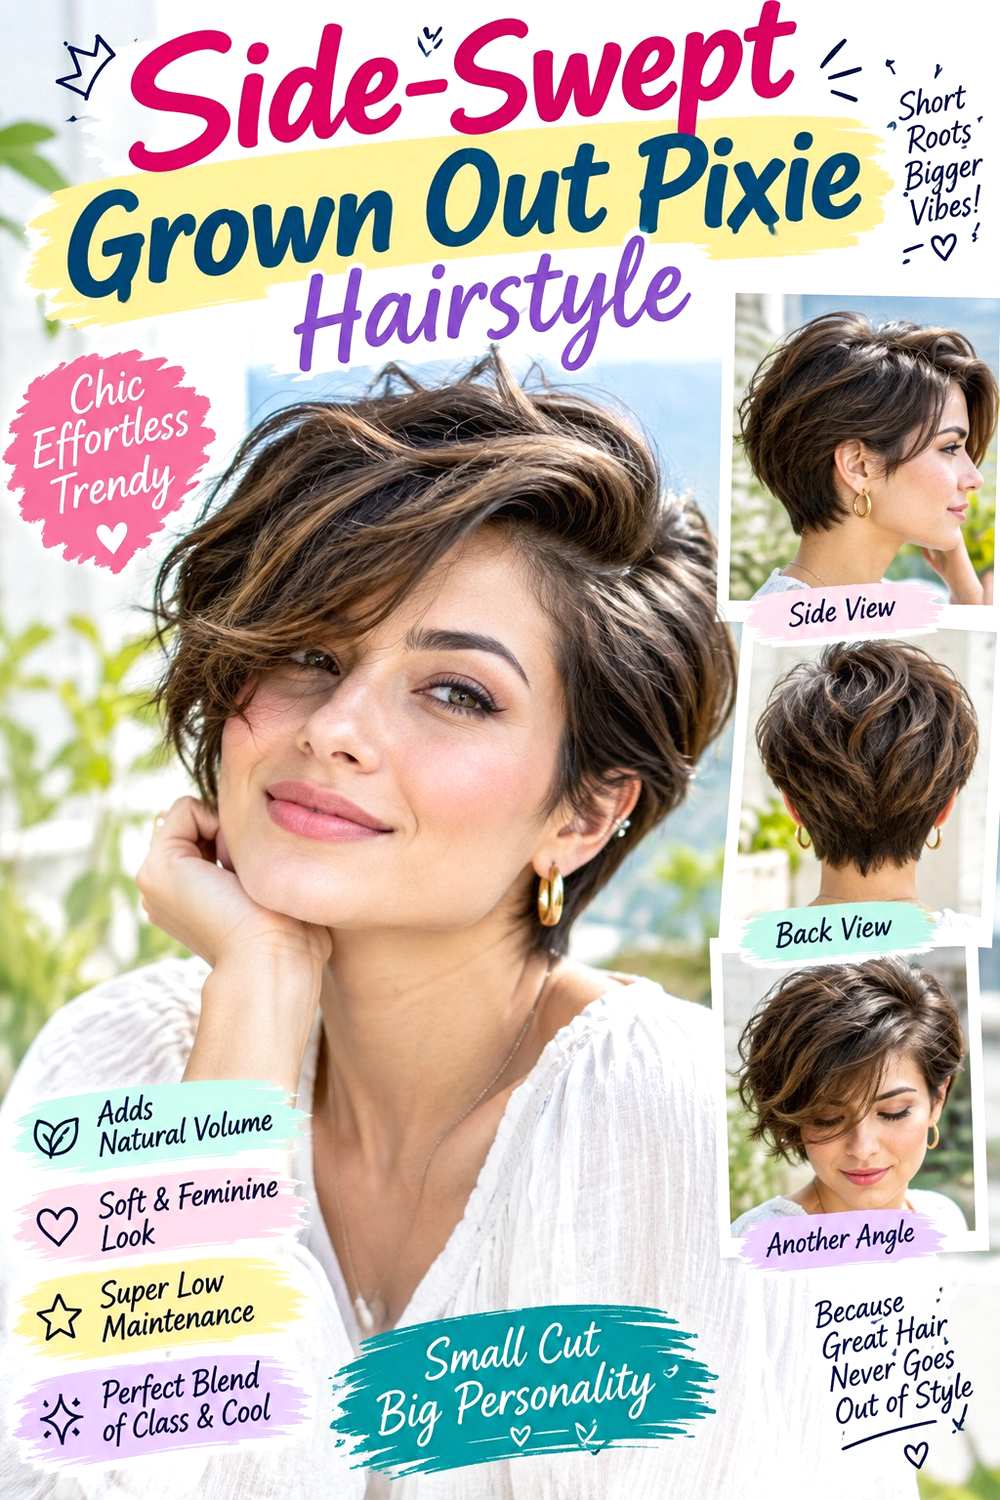
A side sweep is one of the easiest ways to use extra pixie length around the front. Keep the fringe long enough to cross the forehead and finish near the temple or upper cheek, while the side sections begin covering the tops of the ears. The crown can stay softly lifted, and the nape should remain neat enough to give the growing shape a clear outline. A deep or moderate side part makes the extra front length look deliberate.
Straight and wavy hair are convenient for this direction, while softly curly hair can use a looser version of the sweep. Apply heat protectant before shaping the fringe with a round brush, then use a small amount of styling paste to separate the crown and ends. Resetting the front can be a quick morning job; a complete wash and blow-dry takes longer if the roots naturally fall another way.
During grow-out, the fringe may become heavy before the rest of the haircut catches up. At the salon, ask for only enough reshaping to keep the front connected to the sides, and specify the finished point of the sweep. Preserving crown and side length prevents the haircut from being taken back to a shorter pixie unnecessarily.
Pro tip:
Dry the fringe forward first, then direct it sideways while it is still warm. This gives the roots flexibility and helps the sweep fall softly rather than sticking flat.
Make It Work for You:
If your hair is fine, keep more length through the heavy side and use paste sparingly. A fuller sweep can create shape without separating the front into thin-looking pieces.
Watch Out For:
Avoid shortening the fringe every time it becomes awkward. If you are growing the pixie out, reshape its connection to the sides instead of repeatedly resetting the length.
Tucked-Ear Grown Out Pixie Hairstyle
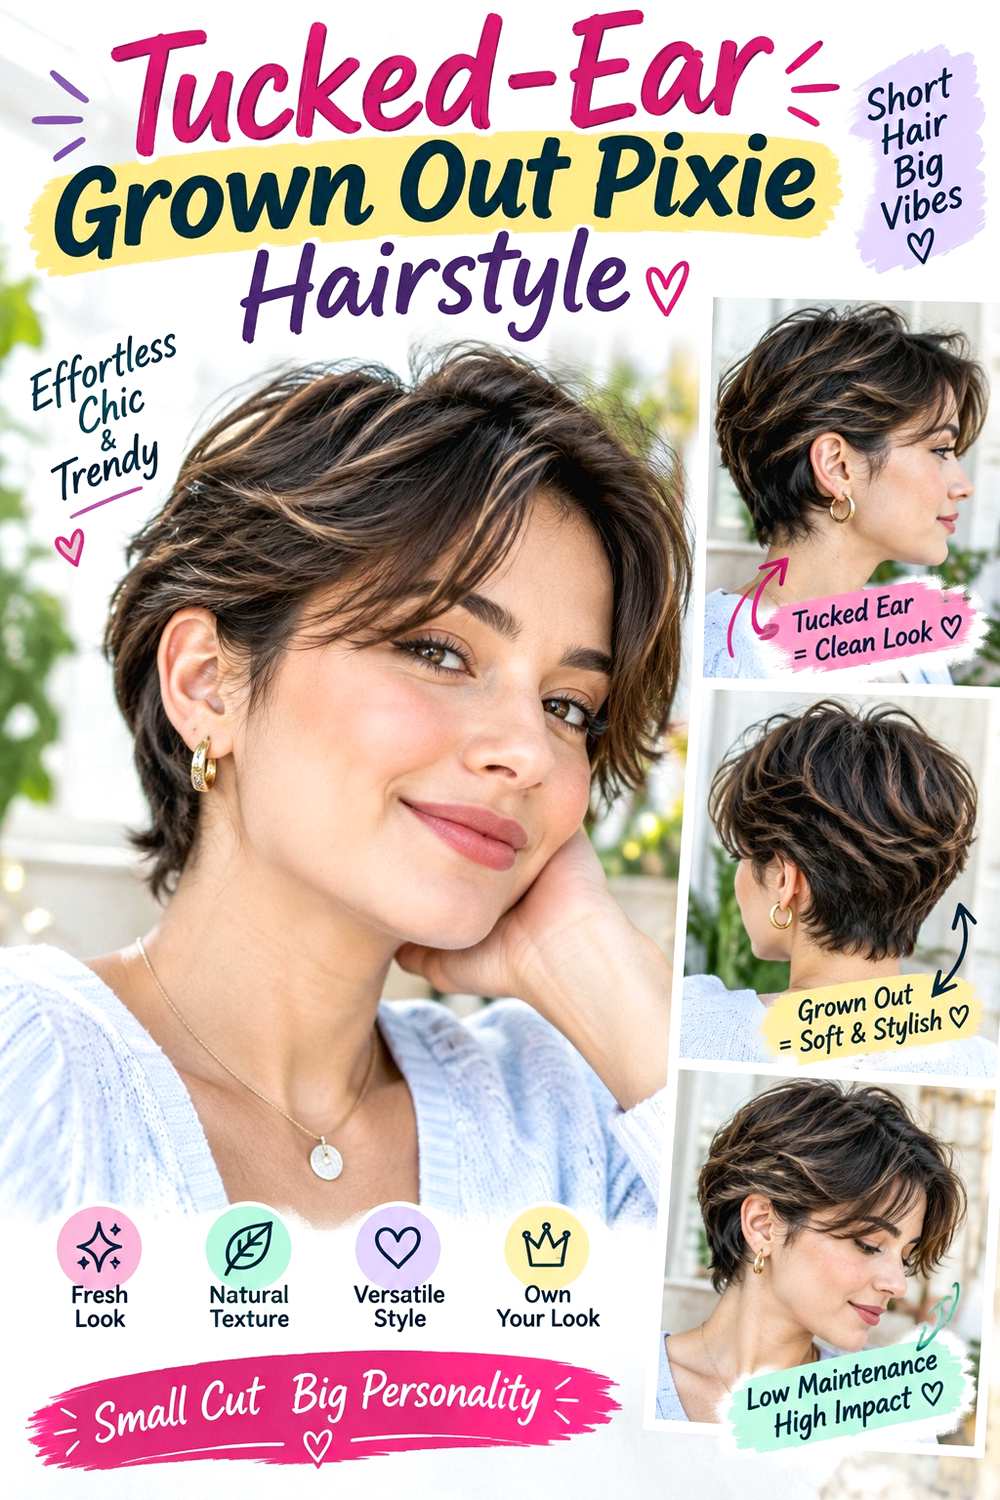
Tucking the sides behind the ears creates instant structure when a pixie reaches the awkward in-between stage. Let the front and crown remain longer, then guide the side sections neatly behind one or both ears. The exposed ear line makes the silhouette look intentional while the nape and top continue growing. A center, side, or natural part can work, and the fringe may remain loose or join the tuck.
Straight and softly wavy textures usually stay tucked with little effort, while curls can use a smaller section near the temple. Apply lightweight styling cream around the sides and use a fine-tooth comb to guide short pieces. A discreet bobby pin can support the tuck if the hair is not quite long enough. The daily refresh is usually quick because the main work is resetting the side placement.
Grow-out maintenance should focus on preventing the area around the ears from becoming bulky without cutting away all the length. At the salon, explain that you are growing the pixie and regularly tuck the sides. Ask for the perimeter around the ears to be softened or connected rather than cropped short. That allows the side sections to gain enough length to eventually blend into a bob or longer short cut.
Pro tip:
Tuck the side sections while they are slightly damp and let them begin drying behind the ears. Early direction can make the placement easier to restore later.
Make It Work for You:
If your hair is curly, tuck only the section closest to the temple and leave the surrounding curls loose. This keeps natural texture visible while opening the side.
Watch Out For:
Do not keep trimming the ear sections simply because they flip outward. A temporary tuck or pin can manage that stage while preserving the length needed for grow-out.
Wavy Grown Out Pixie Hairstyle

Natural or styled waves can make extra pixie length look purposeful by turning uneven growth into movement. Keep the top and fringe several inches long, allow the sides to soften over the ears, and let the nape remain slightly longer rather than sharply clipped. Waves should bend in mixed directions through the crown and front, with the ends left a little straighter so the shape does not become too round.
Naturally wavy hair may need only light encouragement, while straighter hair can create the effect with limited heat. Apply heat protectant before using a small curling iron on selected sections, then work a little lightweight styling cream through the ends for separation. A quick refresh can involve dampening the flattened front or reshaping two or three waves; a full wash-day set takes longer.
As the pixie grows, some areas may wave more strongly because they reach different lengths. That irregularity can be useful rather than something to correct immediately. At the salon, ask for the longest crown and fringe sections to be preserved while bulky areas around the ears or back are blended. The goal is to improve the silhouette without removing the progress you have made toward a longer cut.
Pro tip:
Wave only the sections that fall flat and leave naturally bent pieces alone. Selective styling keeps the finish relaxed and reduces unnecessary heat on a short growing cut.
Make It Work for You:
If your waves are loose, keep the top slightly longer so the bends have room to form. Very short reshaping can remove the movement that makes grow-out easier.
Watch Out For:
Avoid curling every piece in the same direction. Uniform waves can make the short shape overly set, while mixed bends better disguise differences in grow-out length.
Curly Grown Out Pixie Hairstyle
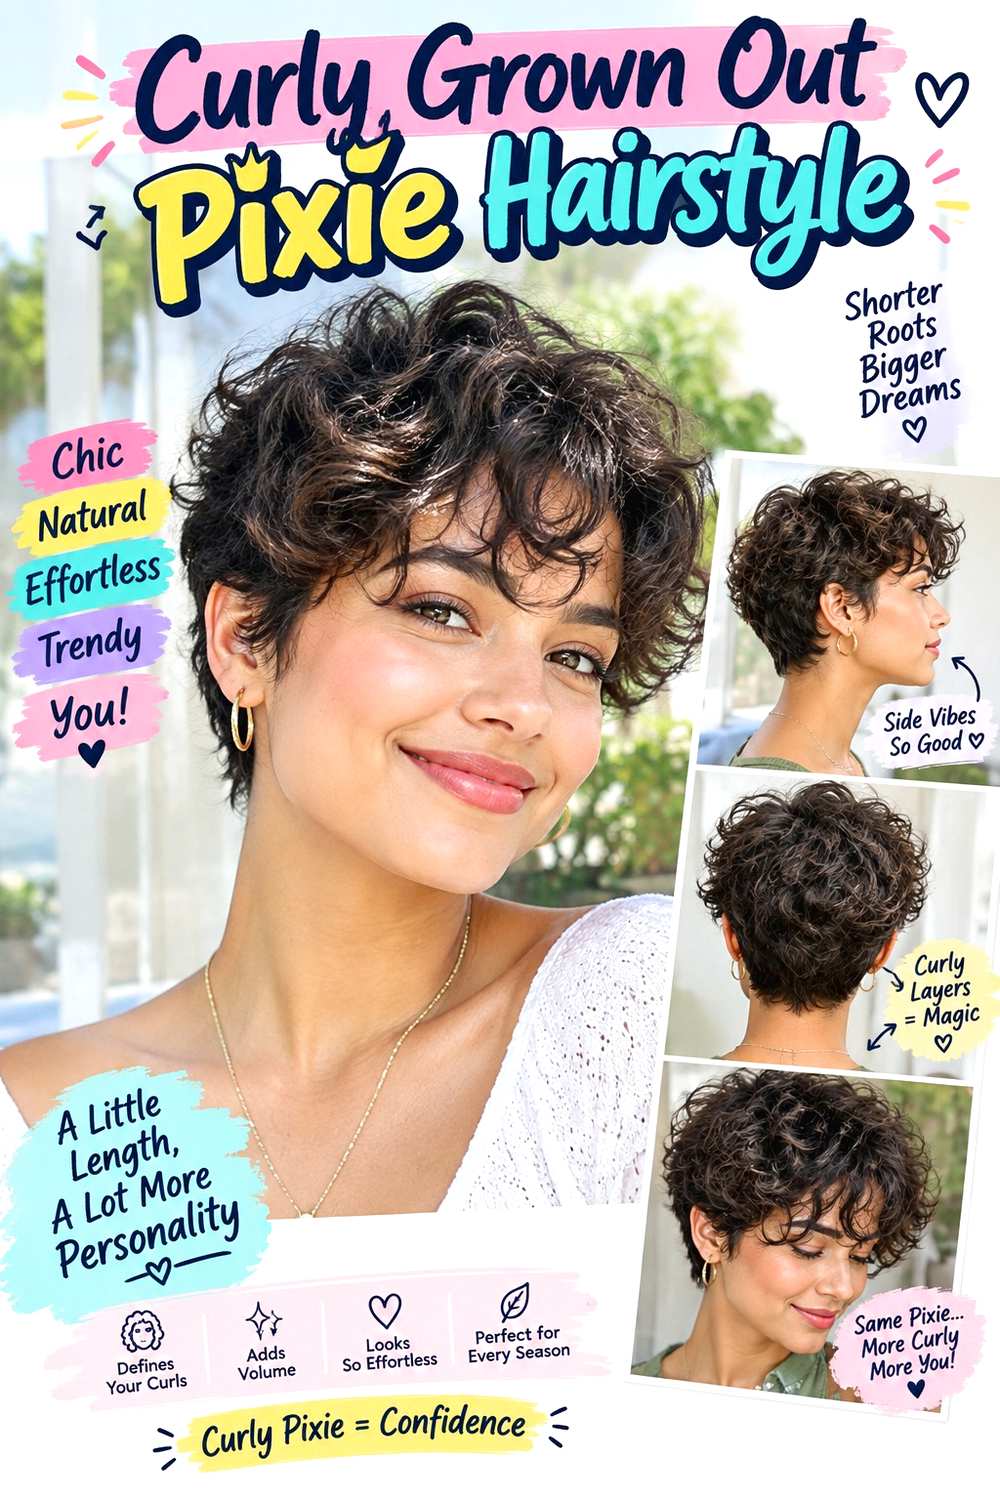
A curly grown-out pixie develops more shape as the top, sides, and nape gain enough length for the curl pattern to become visible. Keep the crown full, let the front curls fall around the brow or temple, and allow the sides to soften over the ears. The lower outline can stay compact, but it should not be trimmed so aggressively that the top begins looking disconnected from the back.
Shrinkage makes dry length more important than stretched measurement. Use lightweight leave-in conditioner for softness, curl gel for definition, and a diffuser for controlled drying. A quick refresh may involve re-wetting only several front curls or sections that flattened overnight; full wash-day detangling, styling, and drying takes more time. Letting different curl groups settle naturally can make uneven grow-out less obvious.
At the salon, explain that the goal is additional length, not a return to the original pixie. Ask for bulk to be adjusted only where the shape becomes awkward, and specify the dry position of the shortest front curl. The sides and nape may need connection as they lengthen, but preserving enough hair there is essential if you eventually want a short bob or longer curly shape.
Pro tip:
Choose the front curl groups while the hair is evenly damp, then leave them mostly untouched during drying. Keeping them intact helps the growing fringe look more deliberate.
Make It Work for You:
If your curls shrink strongly, keep the side and front sections longer than the apparent target. Extra length gives the grown-out pixie a softer, more connected silhouette.
Watch Out For:
Do not remove bulk everywhere simply because the pixie feels fuller as it grows. Adjust only the areas that disturb the dry shape so you preserve useful length.
Coily Grown Out Pixie Hairstyle
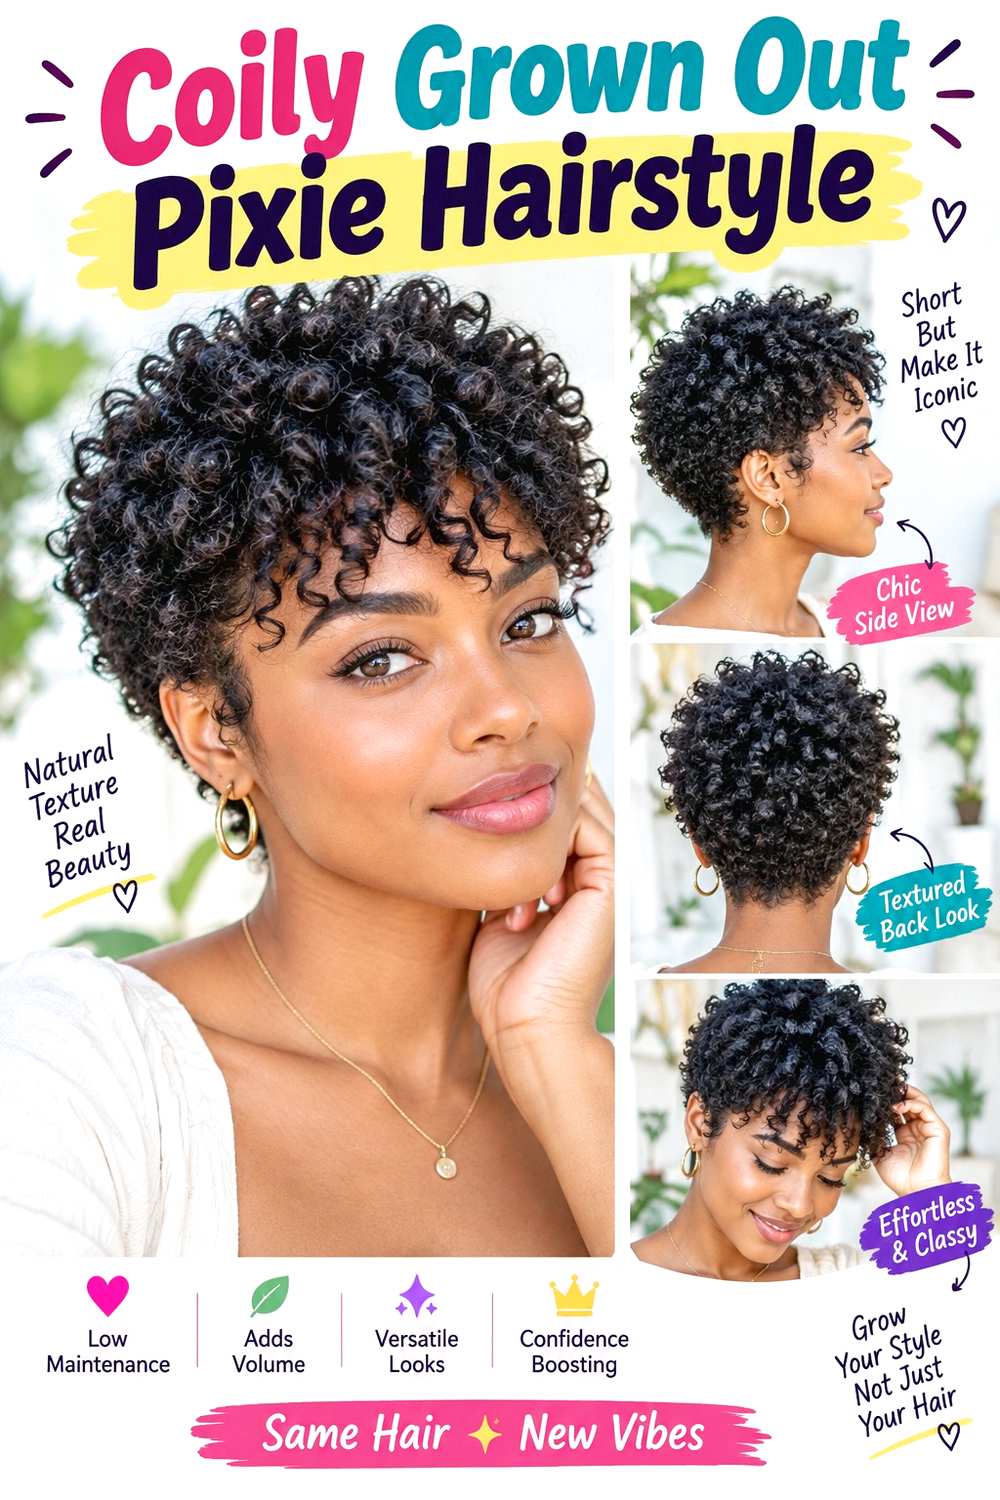
A coily grown-out pixie can develop into a soft rounded shape as the crown and sides gain length. Keep natural height through the top, allow the sides to expand gently around the ears, and let the front coils create an irregular fringe or lifted frame. The nape can remain slightly tapered, but preserving some lower length helps the transition toward a fuller short cut rather than repeatedly returning to a fresh crop.
Shrinkage and density determine how quickly the growth becomes visually noticeable. Use lightweight leave-in conditioner for softness, curl cream for coil grouping, and a diffuser if you prefer controlled drying. A quick refresh can focus on reactivating the front and outer coils; full wash-day detangling, moisturizing, and drying naturally takes much longer. You do not need to stretch the texture to make the grow-out look polished.
At the salon, discuss the desired dry silhouette and explain which areas you are intentionally growing. Very dense hair may benefit from selective internal bulk control, but the outer length should be preserved. Ask for the nape and sides to be connected rather than tightly tapered. That keeps the shape balanced while allowing the coils enough time and length to develop into the next haircut stage.
Pro tip:
Shape the front and side coils while damp, then let them dry with minimal handling. Visible grouping can make the longer pixie look more intentional without extra cutting.
Make It Work for You:
If your density is high, keep the outer shape full and adjust only interior bulk that becomes difficult to manage. This protects the length needed for continued grow-out.
Watch Out For:
Avoid repeatedly tightening the nape taper because it feels neat. Constantly shortening the back can delay the transition into a longer, more connected coily shape.
Shaggy Grown Out Pixie Hairstyle

A shaggy approach turns uneven pixie growth into part of the design. Keep the crown and fringe longer, allow the sides to develop soft points over the ears, and let the nape gain some length. Light layering through the surface can separate the pieces without making the ends too thin. A side or center part works, while irregular bends and slightly flicked ends reinforce the relaxed shape.
Straight and wavy hair show the shaggy separation clearly, while loose curls can create a softer version. Use lightweight mousse for crown support and a small amount of styling paste to define selected ends. If you heat-style a stubborn section, apply heat protectant first. A daily refresh can be quick because perfect placement is unnecessary; full wash-day shaping takes longer when you want more controlled bends.
The main grow-out goal is connection. At the salon, ask for small adjustments where the sides, nape, or crown become bulky while preserving overall length. Avoid requesting many new short layers, because the haircut already contains different lengths from the original pixie. Instead, identify the longest pieces you want to keep and where you would like the silhouette to feel softer as it develops toward a shaggy bob.
Pro tip:
Define only a few crown and side pieces with styling paste. Small points of separation create a shaggy finish without making every section look heavily product-coated.
Make It Work for You:
If your ends are lower in density, keep the shag effect concentrated through the crown and front. Preserve more weight around the lower sides and nape.
Watch Out For:
Do not add lots of new short layers just to make growth look intentional. Too much cutting can slow progress and leave the next grow-out stage more uneven.
Curtain Fringe Grown Out Pixie Hairstyle

A curtain fringe becomes possible once the front of a pixie grows long enough to split and move away from the face. Let the shortest center pieces sit around the brows or upper cheeks, with longer outer sections blending toward the temples and ears. Keep the crown softly lifted and allow the sides to grow fuller so the fringe connects into the developing shape rather than sitting above very short sides.
Straight, wavy, and loosely curly textures can all adapt this front. Use heat protectant before shaping the fringe with a round brush, then apply flexible hairspray lightly underneath the outer bends. A quick fringe refresh can take only a few minutes, while full wash-day styling takes longer if the surrounding pixie also needs smoothing or volume.
The biggest maintenance decision is whether to keep trimming the fringe or let it become part of longer face framing. At the salon, explain your grow-out goal before any shortening. Ask for only enough cleanup to keep the center comfortable around the eyes while preserving the outer corners. Those longer pieces eventually help the former pixie transition into a short bob or bixie shape without an abrupt gap around the temples.
Pro tip:
Dry the fringe forward first, then divide it and guide both halves outward. This gives the roots flexibility while preserving the length needed for continued grow-out.
Make It Work for You:
If your hairline has a strong growth direction, keep the center longer and allow a wider opening. A softer curtain shape can be easier to maintain between trims.
Watch Out For:
Avoid repeatedly cutting the center back to a short bang. If your goal is length, minor eye-clearing adjustments are usually more useful than restarting the fringe.
Deep Side-Part Grown Out Pixie Hairstyle

A deep side part can redistribute awkward grow-out length by giving the longer top a clear direction. Place the part beyond the natural center, sweep the heavier section across the forehead, and keep the lighter side close to the head or tucked behind the ear. The nape can remain softly grown out, while the crown uses gentle lift to connect the front to the back.
Straight and wavy hair can wear this shape with minimal effort, while curls may use a less extreme division to respect natural grouping. Apply heat protectant before shaping the heavy front with a round brush, then use lightweight styling cream around the sides to control flyaways. A quick refresh can focus on resetting the roots and tuck; full wash-day styling takes longer when the hair naturally parts elsewhere.
This version is especially useful when one side of the pixie has reached a more workable length than the other. At the salon, show exactly where you part the hair and ask for the sides to be balanced without shortening the longer top unnecessarily. Small weight adjustments near the heavier temple or behind the ear can improve the silhouette while the overall cut continues moving toward a bob.
Pro tip:
Set the deep part while the roots are damp, then let the heavier side begin drying in its final direction. This reduces the need for repeated reshaping later.
Make It Work for You:
If your hair is lower in density near the part, move the division slightly closer to center. You still get the sweep without exposing more scalp than you prefer.
Watch Out For:
Do not shorten the heavy side simply because it looks bulky. Adjust root direction and internal weight first so you preserve the length needed for the next stage.
Slicked-Back Grown Out Pixie Hairstyle
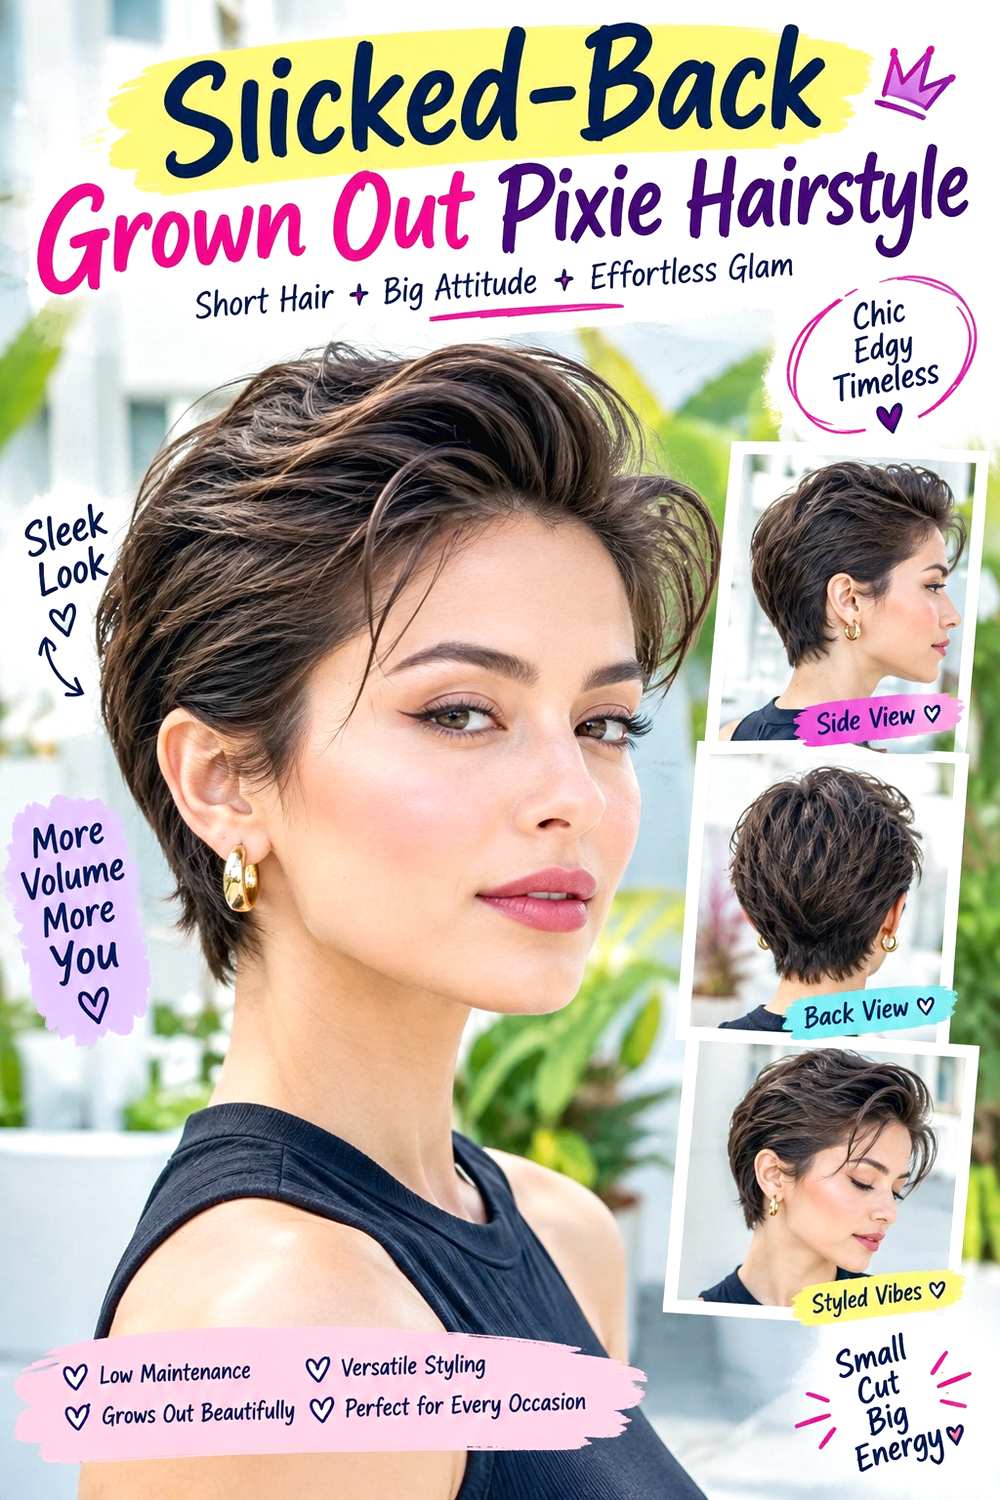
A slicked-back finish can temporarily control a pixie when the fringe and sides become too long to sit neatly forward. Direct the front away from the face, keep the sides close to the head, and let the crown retain a little height so the style does not look completely flattened. The longer nape can stay natural or be lightly smoothed, depending on how far the haircut has grown.
Straight and wavy hair are easy to direct back, while curly and coily textures can create a softer swept-back version without fully stretching the pattern. Use a wide-tooth comb for initial direction and a lightweight styling gel for hold. A small amount of serum can smooth the surface if needed. This can be a quick dry-hair refresh, while a fully polished wash-day version takes longer.
Because the style hides some length differences, it is useful between reshaping appointments. At the salon, explain that you want to preserve the top and side length rather than cutting it short for easier control. Ask for only the bulky or uneven areas to be connected. As the hair gains enough length to tuck or part naturally, you may need less product to keep the front away from the face.
Pro tip:
Comb the hair back while slightly damp, then use your fingers to restore a little crown lift. This keeps the finish controlled without creating a flat helmet effect.
Make It Work for You:
If your hair is curly, sweep back only the front and sides while allowing texture through the crown. The grow-out remains controlled without completely smoothing the curl pattern.
Watch Out For:
Avoid using heavy gel every day if the main problem is excess bulk. Product can control the surface, but a small shaping adjustment may make grow-out easier.
Fine-Hair Grown Out Pixie Hairstyle

Fine strands can make a grown-out pixie look soft and airy, but preserving visible density is important as the sides and fringe lengthen. Keep the crown slightly longer for movement, allow the front to sweep or split softly, and avoid over-layering the sides. A fuller nape and ear area can help the haircut begin transitioning toward a short bob without making the ends look sparse.
Fine hair may still be high density, so the amount of layering should reflect how much hair is actually present. Use lightweight mousse near the roots for support, a fine-tooth comb for direction, and a tiny amount of styling paste on selected ends. A quick morning refresh can take only a few minutes, while full wash-day styling remains relatively manageable because the cut is short.
At the salon, explain that you are growing the pixie and want to keep as much usable length as possible. Ask for perimeter cleanup only where the shape becomes uneven, and avoid aggressive thinning. The goal is to help the crown, sides, and nape gradually meet rather than repeatedly taking shorter areas back. Preserving temple and lower-side density is especially useful if a bob is your eventual target.
Pro tip:
Apply mousse mainly at the roots and keep the longer ends light. Root support adds shape without separating fine tips into smaller, thinner-looking pieces.
Make It Work for You:
If your fine strands are high density, you can support more texture through the crown. Let density, not strand diameter alone, determine how much internal movement is useful.
Watch Out For:
Do not request thinning simply because the hair feels fluffy as it grows. Fine strands can lose visible fullness quickly when too much weight is removed.
Dense-Hair Grown Out Pixie Hairstyle

Dense hair can make the grow-out stage feel bulky around the ears, crown, and nape before the length becomes heavy enough to settle. Keep the top long enough to sweep or bend, allow the sides to cover part of the ears, and preserve the nape while controlling excess interior weight. The outer silhouette should stay soft and connected rather than being repeatedly cropped short.
Straight, wavy, curly, and coily dense hair can all use this approach, though the exact bulk placement differs. Apply heat protectant before using a round brush if you want smoother direction, then use lightweight serum through the ends for control. A quick refresh may focus on the front and side placement, while full wash-day styling takes longer because dense hair needs more drying time.
At the salon, identify where the grow-out feels heaviest rather than asking for general thinning. Controlled internal weight removal behind the ears or through the back may improve the shape while preserving exterior length. Avoid aggressive thinning throughout the whole cut, since short internal pieces can expand and make the grow-out feel even puffier. The objective is to redistribute bulk while allowing the sides and nape to catch up with the longer crown.
Pro tip:
Keep the interior sections closer to the head and create movement only through the visible surface. This controls width without requiring you to shorten the outer silhouette.
Make It Work for You:
If your dense hair is curly or coily, assess bulk in the dry natural state. Areas that look heavy when stretched may settle very differently after shrinkage.
Watch Out For:
Avoid thinning the entire pixie indiscriminately. Short internal pieces can puff outward, so remove weight only where the dry grow-out shape actually becomes bulky.
Nape-Length Grown Out Pixie Hairstyle

Letting the nape grow creates a softer back and helps a pixie begin moving toward a bixie or short bob. Keep the back length visible against the neck rather than tapering it tightly, while the crown and sides remain connected through gentle layering. The front can be side-swept or center-parted, and the ends near the nape may flick outward slightly as they gain length.
Straight and wavy hair show the elongated back clearly, while curls can create a softer rounded version. Use lightweight styling cream through the nape to control separation and a fine-tooth comb around the side sections. If you heat-shape outward flips, apply heat protectant first. A daily refresh is usually short because the lower back can follow its natural movement.
This stage can feel awkward if the nape grows faster visually than the sides, but repeatedly removing it delays the transition. At the salon, ask for the back to be shaped rather than cut back to the original pixie line. Small adjustments around the corners can keep it intentional while preserving length. Explain whether your goal is a bob, shag, or longer short cut so the nape can be connected toward that future silhouette.
Pro tip:
Let the nape follow a small natural bend instead of forcing it perfectly flat. A little movement can make the extra length feel deliberate while the sides catch up.
Make It Work for You:
If the back feels heavy, ask for subtle internal shaping while keeping the visible perimeter. You can reduce bulk without losing the length needed for a bob transition.
Watch Out For:
Do not trim the nape back to a tight pixie every time it looks uneven. Shape the corners instead so the overall grow-out continues moving forward.
Air-Dried Grown Out Pixie Hairstyle

An air-dried approach works well when the growing pixie already has useful bends, cowlicks, waves, or natural texture. Keep enough length through the top and sides for the hair to settle on its own, then use the natural part instead of forcing a precise division. The fringe can fall forward, sweep sideways, or split softly, while the nape remains relaxed and slightly longer.
Straight, wavy, and loosely curly hair may find this routine especially practical. Use lightweight leave-in conditioner for softness, a small amount of styling cream to guide the ends, and sectioning clips to hold the front direction while the roots begin drying. Hands-on styling can be brief, although total drying time depends on density. A quick refresh may require dampening only the fringe or one flattened side.
At the salon, describe exactly how your hair behaves when no heat is used. Strong flips, growth patterns, and uneven bends can guide where tiny adjustments are useful. Ask to preserve the top, sides, and nape whenever possible rather than cutting them into a freshly controlled pixie again. The most helpful grow-out cut is one that supports your natural drying pattern while allowing shorter areas time to catch up.
Pro tip:
Set the fringe and side direction while the hair is still evenly damp, then minimize touching as it dries. Early placement often matters more than extra product.
Make It Work for You:
If your natural texture differs around the head, let those sections behave differently. A grown-out pixie can handle some irregularity as long as the overall outline stays connected.
Watch Out For:
Do not overload the short roots with styling cream to force every piece into place. Excess product can flatten useful movement and make the grow-out feel heavier.
Textured Crown Grown Out Pixie Hairstyle

Extra crown length is one of the advantages of a grown-out pixie because it creates room for visible separation and lift. Keep the top several inches long, leave the sides softer around the ears, and maintain enough nape length that the haircut feels connected. The fringe can sweep sideways or blend into the crown, while individual top pieces move in slightly different directions for an easy textured finish.
Straight and wavy hair can show the separation clearly, while loose curls create a softer interpretation. Use lightweight mousse for root support and a small amount of styling paste to define selected crown pieces. A fine-tooth comb can control the sides without flattening the top. A morning refresh is quick because only a handful of pieces need repositioning; complete wash-day styling takes longer if the roots need deliberate drying.
During grow-out, resist the urge to cut the top short simply because it becomes more noticeable. At the salon, ask for connection around the sides and back while keeping the crown length that creates movement. If the top becomes bulky, selective internal adjustment may help, but preserving the longest pieces keeps the haircut progressing toward a fuller short shape.
Pro tip:
Work styling paste into only three or four crown sections rather than coating the entire top. Selected separation creates movement while keeping the overall finish soft.
Make It Work for You:
If your strands are fine, keep crown lift modest and use very little paste. Extra top length can provide shape without requiring heavy product or teasing.
Watch Out For:
Avoid trimming the crown back to its original pixie length whenever it becomes unruly. Adjust bulk and direction first so you keep the progress needed for grow-out.
Soft Mullet Grown Out Pixie Hairstyle

A pixie often develops a naturally longer nape before the sides fully catch up, and that stage can be shaped into a soft mullet-inspired silhouette rather than immediately cut away. Keep the crown and fringe textured, let the sideburn area stay slightly shorter, and preserve length through the nape. The contrast should remain gentle, with enough connection between sections that the haircut still feels wearable rather than sharply disconnected.
Straight, wavy, and curly textures can all support this shape. Use lightweight mousse for crown movement, styling cream through the nape, and heat protectant if you use a warm tool to bend stubborn ends. A quick refresh can focus on the crown and lower back, while full wash-day styling depends on texture and density.
At the salon, explain that the longer nape is intentional and that you are continuing to grow the pixie. Ask for the side and crown sections to be softened into the back instead of removing the lower length. If your eventual goal is a shag or bob, this stage can preserve valuable growth while giving the silhouette direction. Reshape when the nape becomes too heavy or the crown stops connecting smoothly.
Pro tip:
Keep the nape lightly separated and the crown soft rather than making both areas highly textured. One strong contrast is enough to give this grow-out stage direction.
Make It Work for You:
If your hair is curly, let the nape keep its natural bend and preserve extra length for shrinkage. A softer contrast usually blends more easily as the sides grow.
Watch Out For:
Do not remove the entire nape just because it grows faster visually. Small shaping adjustments can keep it intentional while preserving the length needed for your next haircut.
Conclusion
Grown out pixie hairstyles become easier to manage when the extra length is treated as part of the shape rather than a problem to remove. Side sweeps and curtain fringe make use of a longer front, while tucked sides help control awkward ear-level growth. Waves, curls, and coils can add natural movement, and fine or dense hair may need different approaches to perimeter weight and bulk. A longer nape can support the transition toward a bob, shag, or softer short cut, while crown texture adds flexibility before that stage arrives. Choose parting, fringe, volume, and finish around your natural texture and daily routine, and use salon visits mainly to rebalance the shape without sacrificing unnecessary length.
Before Your Salon Visit
Choose one or two favorites and save references that show the front, sides, and nape clearly. Discuss your natural texture, density, face shape, current length, upkeep, and eventual grow-out goal. Point out the exact fringe length, ear coverage, crown volume, nape shape, parting, or finish you like. Most importantly, tell your stylist which areas you want to preserve so reshaping improves the silhouette without taking the haircut back to a shorter pixie.
FAQs
How do I make a grown-out pixie look intentional?
Give the extra length a clear direction. A side sweep, ear tuck, textured crown, curtain fringe, or softly shaped nape can turn uneven growth into part of the design. Small salon adjustments can remove bulk or connect sections without sacrificing all the length you have gained.
Should I trim my pixie while growing it out?
Light reshaping can help, but trimming does not have to mean returning to the original short cut. Focus on bulky corners, uneven connections, or fringe that interferes with your eyes. Preserve useful side, crown, and nape length if your goal is a bob or longer short style.
What is the hardest part of growing out a pixie?
The sides, ear area, and nape often reach awkward stages at different times, so the silhouette can feel uneven. Temporary styling such as tucks, side parts, textured crowns, and soft clips can help while those sections catch up. Strategic shaping is usually more useful than repeatedly shortening everything.
Can curly or coily hair grow out of a pixie smoothly?
Yes. Plan around dry shrinkage, curl grouping, and where volume develops as the hair gains length. Curly and coily grow-outs often benefit from preserving the outer length while adjusting only bulky areas. Regular straightening is not necessary for the transition to look polished.