13 Hairstyles for Growing Out Bangs Without the Awkward Stage

Growing out bangs becomes easier when the fringe is treated as a moving part of the haircut rather than a problem to hide. As bangs pass the brows and reach the eyes, cheekbones, and eventually the jaw, useful shapes include side sweeps, center splits, twists, braids, and soft face-framing bends. The goal is to redirect the fringe into the rest of the hairstyle while respecting finished length, growth direction, and natural texture.
Straight and wavy bangs can often blend with a part change, soft bend, or small clip, while curly and coily fringe needs extra room for shrinkage before joining side sections comfortably. Fine hair benefits from narrow sections and lightweight accessories, while dense hair may need a wider parting or stronger anchor. Face framing can shift gradually lower as the fringe grows instead of being recut into a new short shape.
Styling effort should stay realistic. A quick refresh may take only a few minutes to redirect the front or rebuild one twist, while full wash-day styling takes longer if the fringe needs drying, curl definition, or heat shaping. Regular trims are optional unless the ends need reshaping; the main maintenance issue is keeping growing fringe out of the eyes without overcutting it. Small changes in parting, placement, and finish can carry the bangs through several stages.
Quick List
- Side-Swept Bend Bangs Hairstyle
- Center-Split Curtain Bangs Hairstyle
- Twisted Temple Tuck Hairstyle
- Braided Fringe Headband Hairstyle
- Double Barrette Side-Sweep Hairstyle
- Half-Up Fringe Blend Hairstyle
- Curly Bangs Side-Pin Hairstyle
- Coily Fringe Twist-Back Hairstyle
- Soft Wave Face-Frame Blend Hairstyle
- Wide Headband Bangs Tuck Hairstyle
- Mini Rope Braid Fringe Hairstyle
- Low Ponytail With Grown-Out Fringe Hairstyle
- Claw Clip Half-Up Bangs Blend Hairstyle
Side-Swept Bend Bangs Hairstyle
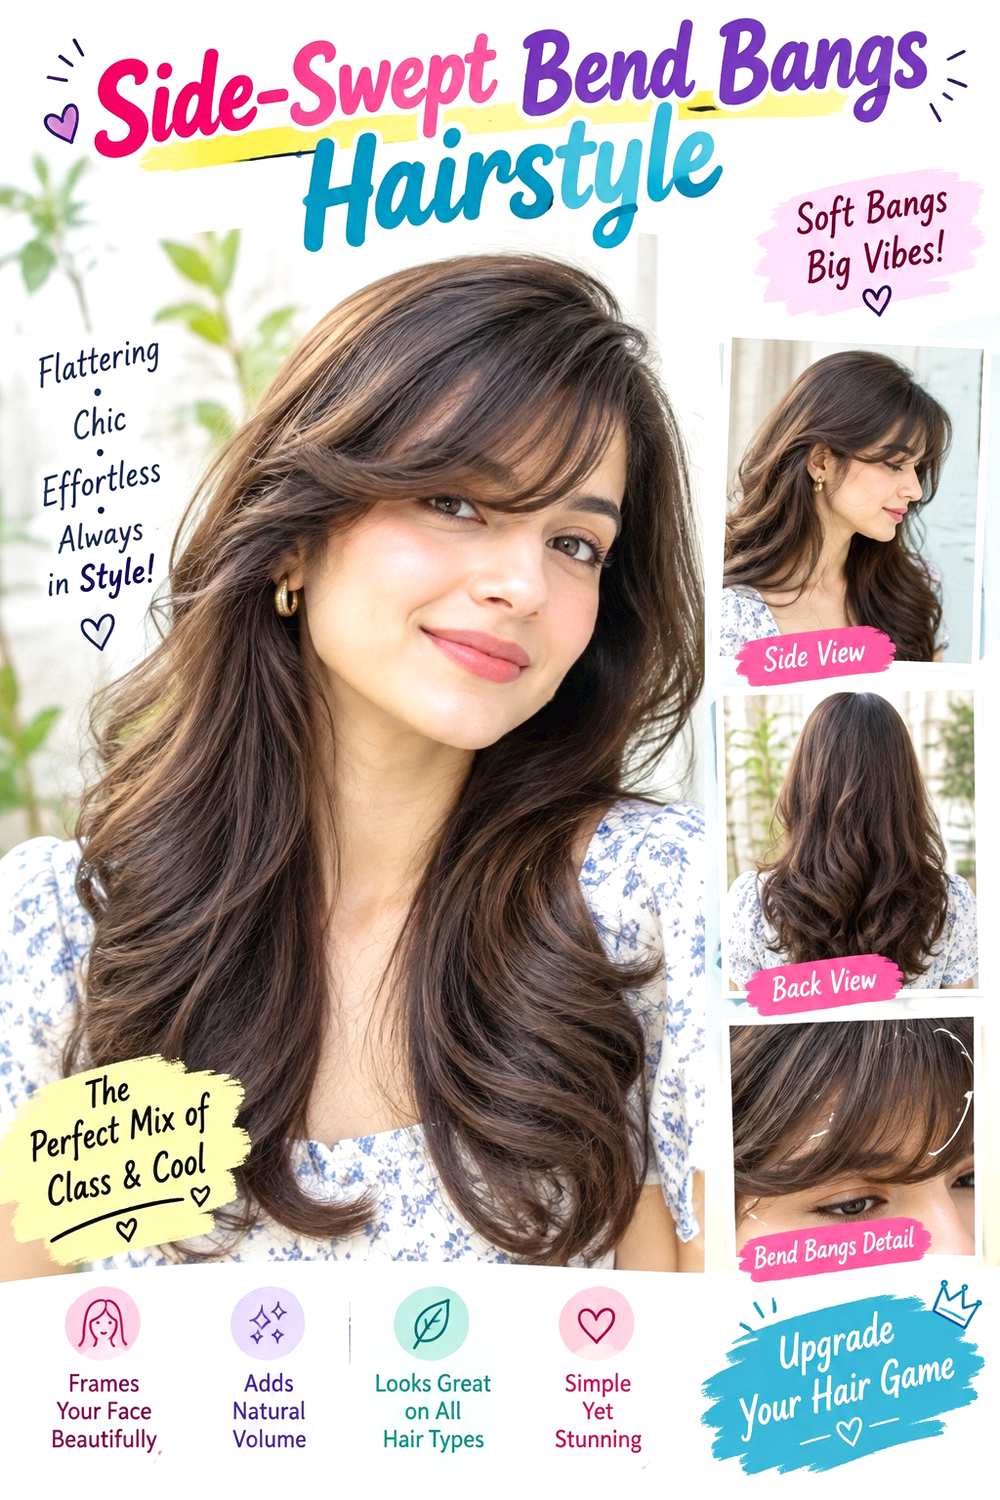
When bangs have grown past the brows but still fall into the eyes, a side-swept bend gives them a clear direction without cutting them shorter again. Make a soft side part, guide the fringe diagonally across the forehead, and let the longest pieces curve toward the cheekbone. Keep the rest of the hair straight, waved, or loosely gathered so the front looks connected rather than isolated. This works especially well on straight and wavy hair, while fine density benefits from a narrow sweep that does not remove too much hair from the opposite side.
Apply heat protectant before using a small round brush to shape the fringe away from the eyes, then use flexible hairspray for light hold. A quick refresh may take four to six minutes because only the front needs reshaping; full wash-day styling takes longer if the rest of the hair also needs drying. As the fringe grows, move the part slightly farther outward so the pieces can blend toward the temple. At the salon, ask for the dry finished fringe length to be checked against your cheekbone and explain which direction the hair naturally wants to fall. That helps avoid trimming the section back into a shorter cycle.
Pro tip:
Set the side part before shaping the fringe, then let the bend cool in place. A cooled direction usually lasts longer and needs less repeated handling.
Make It Work for You:
For wavy hair, keep a little natural bend through the sweep instead of smoothing it completely. The growing fringe can blend more naturally into the side texture.
Watch Out For:
Do not keep trimming pieces that touch the eyes. Redirect them first; cutting them shorter repeatedly can restart the same awkward stage you are trying to leave.
Center-Split Curtain Bangs Hairstyle

A center split works well once growing bangs are long enough to move away from the eyes but still too short to tuck fully behind the ears. Part the fringe through the middle, direct each side outward, and let the shortest pieces sit around the upper cheek while the longer corners blend toward the temples. Keep the crown softly controlled and wear the lower hair straight, wavy, or loosely curled so the front reads as intentional face framing rather than unfinished fringe.
Apply heat protectant before using a small round brush to sweep each side away from the face, then add lightweight mousse at the roots for gentle support. A quick refresh may take about five minutes because the fringe can be restyled separately; full wash-day styling takes longer if the whole head needs drying. This shape suits straight and wavy textures particularly well, while fine hair benefits from keeping the fringe section shallow. At the salon, specify the dry center length and the longer outer-corner length you want to grow toward. Ask that the corners stay long enough to merge into the sides instead of being recut into a full short bang shape.
Pro tip:
Dry the fringe forward first, then split it through the center as it cools. This gives the roots lift before each side opens away from the face.
Make It Work for You:
For lower-density hair, keep the curtain section narrow and the corners long. You still get separation at the center without removing too much density from the temples.
Watch Out For:
Do not over-round the bangs with a brush. Too much curve can make the center pieces spring back into the eyes instead of staying open.
Twisted Temple Tuck Hairstyle
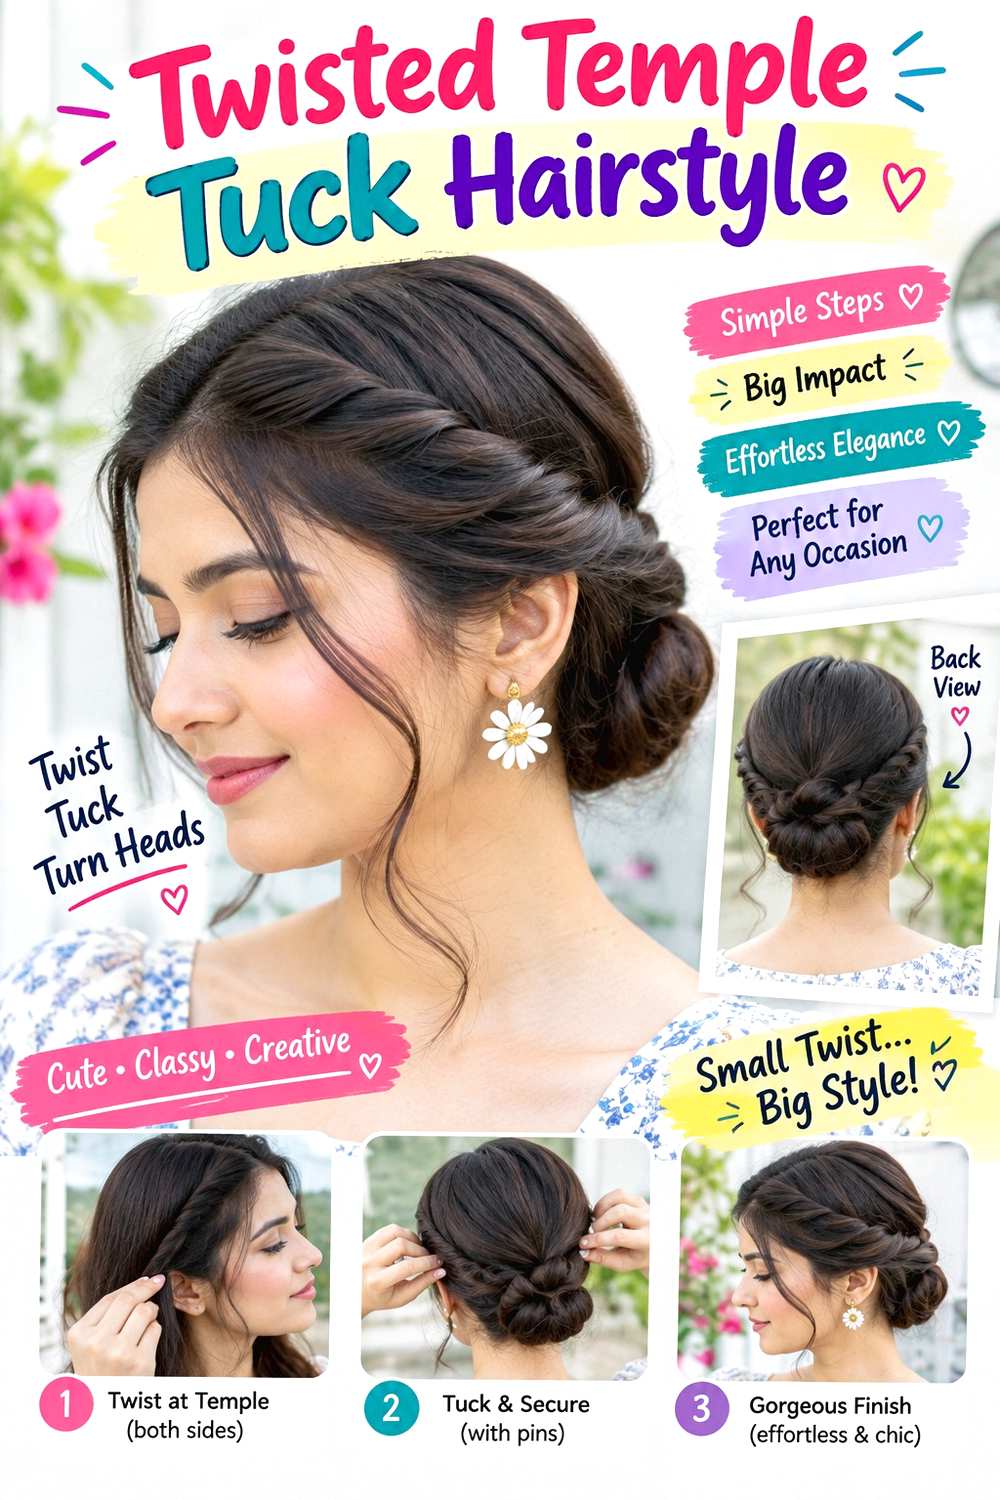
A small temple twist is useful when grown-out bangs can reach sideways but still fall forward if left loose. Make a center or side part, take the fringe together with a narrow section just behind it, and twist the section backward toward the temple. Secure it above or slightly behind the ear, leaving the rest of the hair loose, in a ponytail, or in a low bun. The twist should look shallow and smooth rather than bulky, with enough slack that the hairline stays comfortable.
Straight, wavy, and softly curly textures can use this option, especially on busy days when the front needs control without heat. Use light texturizing spray for grip and bobby pins to anchor the twist. A quick refresh may take three to five minutes; full wash-day styling is separate because the twist itself does not require a new texture. If the front pieces keep escaping, move the anchor closer to the temple instead of twisting harder. At the salon, explain that you are growing the fringe toward a tuckable length and ask to preserve the outer corners. Keeping those edges longer lets the twist become easier over time instead of resetting the grow-out every trim.
Pro tip:
Start the twist slightly behind the shortest fringe pieces. This lets the longer sections carry the structure while shorter strands can join gradually as they grow.
Make It Work for You:
For curly or wavy hair, make the twist looser and let some texture remain visible. A softer twist blends better with movement through the rest of the hair.
Watch Out For:
Do not keep twisting tighter when pieces slip free. Move the anchor closer or use a smaller section so the hairline stays comfortable and secure.
Braided Fringe Headband Hairstyle

A narrow fringe braid can carry short front pieces away from the eyes while creating a visible detail across the hairline. Start near one temple, include the growing bangs, and braid sideways toward the opposite temple or backward along one side. Keep the braid slim so it does not remove too much density from the surrounding hair, and leave the remaining length straight, waved, curly, or gathered. A slightly loose outer edge keeps the braid soft while the base stays secure.
This works on straight, wavy, and curly hair once the fringe is long enough to cross into at least several braid sections. Use texturizing spray for grip, a small clear elastic for the braid end, and bobby pins to hide the finish. A quick refresh may take five to eight minutes; a full wash-day routine takes longer only if the rest of the hair needs styling first. If short pieces pop free, let the braid route sit closer to the hairline rather than tightening it. At the salon, ask to keep the fringe corners long and explain the direction you usually braid. Preserving length along that route makes each later grow-out stage easier to incorporate.
Pro tip:
Keep the first braid crossings close to the hairline and secure the end before softening anything. A stable start helps the short fringe pieces stay incorporated.
Make It Work for You:
For fine hair, use a very narrow braid and leave most of the surrounding hair loose. The detail remains visible without making the front look sparse.
Watch Out For:
Do not pull the braid wide near the forehead. Short growing pieces can slip out quickly, making the braid fuzzy and harder to control securely.
Double Barrette Side-Sweep Hairstyle

Two small barrettes can control a growing fringe when it is long enough to sweep sideways but not yet long enough to disappear into the rest of the hair. Create a side part, guide the fringe toward the temple, and place the clips parallel or slightly staggered above the ear. Keep the opposite side loose and fuller so the front stays balanced. The swept section can lie smooth or retain a little natural bend, depending on the texture and how polished you want the finish.
Straight, wavy, and softly curly hair can use this style, and fine hair often benefits from lightweight hardware that does not drag the section down. Apply a small amount of lightweight styling cream for flyaway control, then secure the sweep with two small barrettes. A quick refresh may take two to four minutes; full wash-day styling is much longer only if the rest of the hair needs a complete reset. As the bangs grow, move the clips gradually farther toward the ear rather than trimming the front back. At the salon, specify which side you usually sweep and ask to preserve the longer temple corner so it can eventually tuck behind the ear cleanly.
Pro tip:
Place the first barrette where the fringe naturally wants to separate, then add the second for support. Working with the growth direction usually improves hold.
Make It Work for You:
For dense fringe, use slightly wider clips and a broader sweep. The section can stay comfortable without stacking too much hair under one small clasp.
Watch Out For:
Do not place clips directly on a stubborn cowlick and force the hair flat. Shift the part or angle the sweep so the root direction works with you.
Half-Up Fringe Blend Hairstyle
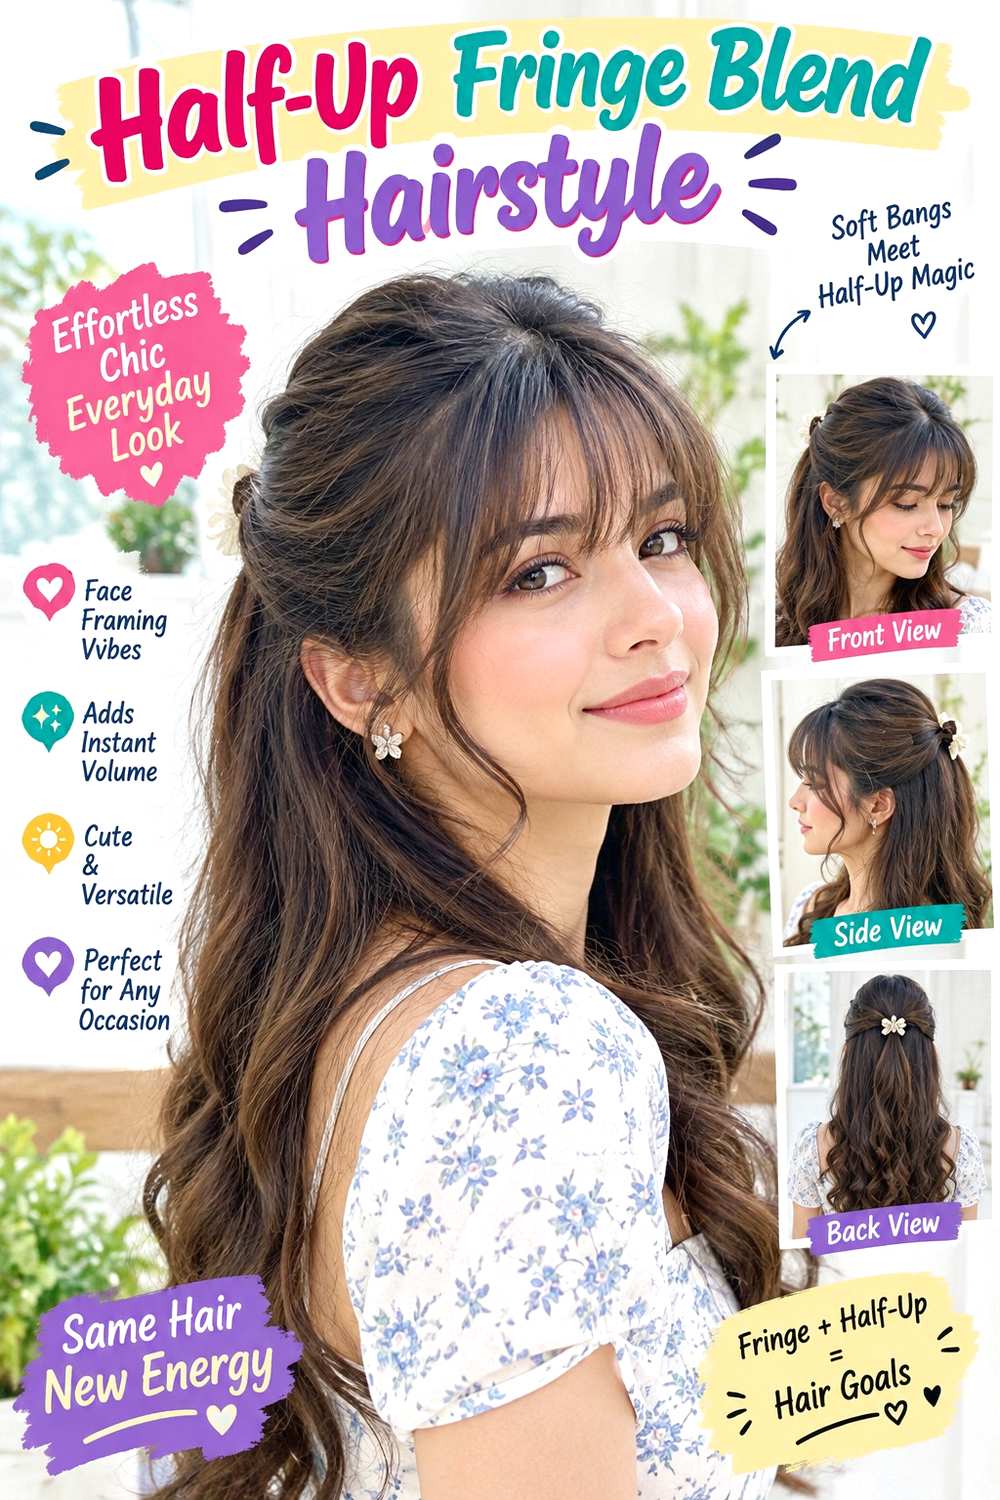
A half-up style can absorb growing bangs once the longest front pieces reach toward the temples but still fall forward on their own. Use a center or soft side part, gather a shallow section from behind the fringe, and include only the bang pieces that reach comfortably. Secure the upper section below the crown, leaving any shorter center pieces loose around the face. The lower hair can stay straight, wavy, curly, or naturally textured, while the half-up anchor gives the front a clear direction.
Medium and long hair works best, especially when the fringe is entering the cheekbone-to-jaw stage. Use texturizing spray for grip and a small fabric-covered elastic for the center anchor. A quick refresh may take three to five minutes; full wash-day styling takes longer if the loose lengths need drying or definition. If the fringe pulls across the temple, gather less rather than increasing tension. At the salon, explain that you are growing the bangs into longer face framing and ask for the outer corners to remain connected to the side layers. That keeps the transition gradual and prevents a new short line from forming around the forehead.
Pro tip:
Gather the upper section from behind the fringe rather than starting at the hairline. This keeps the front soft and prevents the half-up style from looking too tight.
Make It Work for You:
For fine hair, use a smaller half-up section and keep more length loose. The growing bangs can still blend without reducing fullness through the lower hair.
Watch Out For:
Do not force every short fringe piece into the anchor. Let the center pieces stay loose until they reach comfortably, then add them in later stages.
Curly Bangs Side-Pin Hairstyle

Curly bangs often pass through an awkward stage sooner than expected because shrinkage can make the dry fringe much shorter than the stretched length suggests. A side-pin style works by letting the curl pattern remain visible while directing only the longest front curls away from the eyes. Use a natural or side part, gather one or two curl groups toward the temple, and pin them without flattening the roots. Leave shorter curls free if they already sit above the eyes or frame the cheek well.
This approach suits curly hair especially well because it avoids brushing the fringe smooth. Use a fine-mist spray bottle to dampen only flattened curls, curl gel to redefine them, and bobby pins to secure the side section. A quick refresh may take five to eight minutes; a full wash-day routine takes longer depending on density, shrinkage, and drying. As the fringe grows, more curl groups will reach the pin naturally. At the salon, ask for the fringe to be assessed dry and specify the length you want the shortest curl to finish after shrinkage. Trimming based only on stretched length can restart the grow-out stage unexpectedly.
Pro tip:
Choose the curl groups you want to pin only after they are dry. Their settled length shows which pieces can reach the temple without stretching the pattern.
Make It Work for You:
For strong shrinkage, pin fewer curls and let the shortest front pieces remain free. The grow-out still progresses without forcing the fringe into an unnatural shape.
Watch Out For:
Do not judge curly fringe by stretched length alone. A piece that reaches the cheek when pulled may spring much higher once it dries and settles.
Coily Fringe Twist-Back Hairstyle
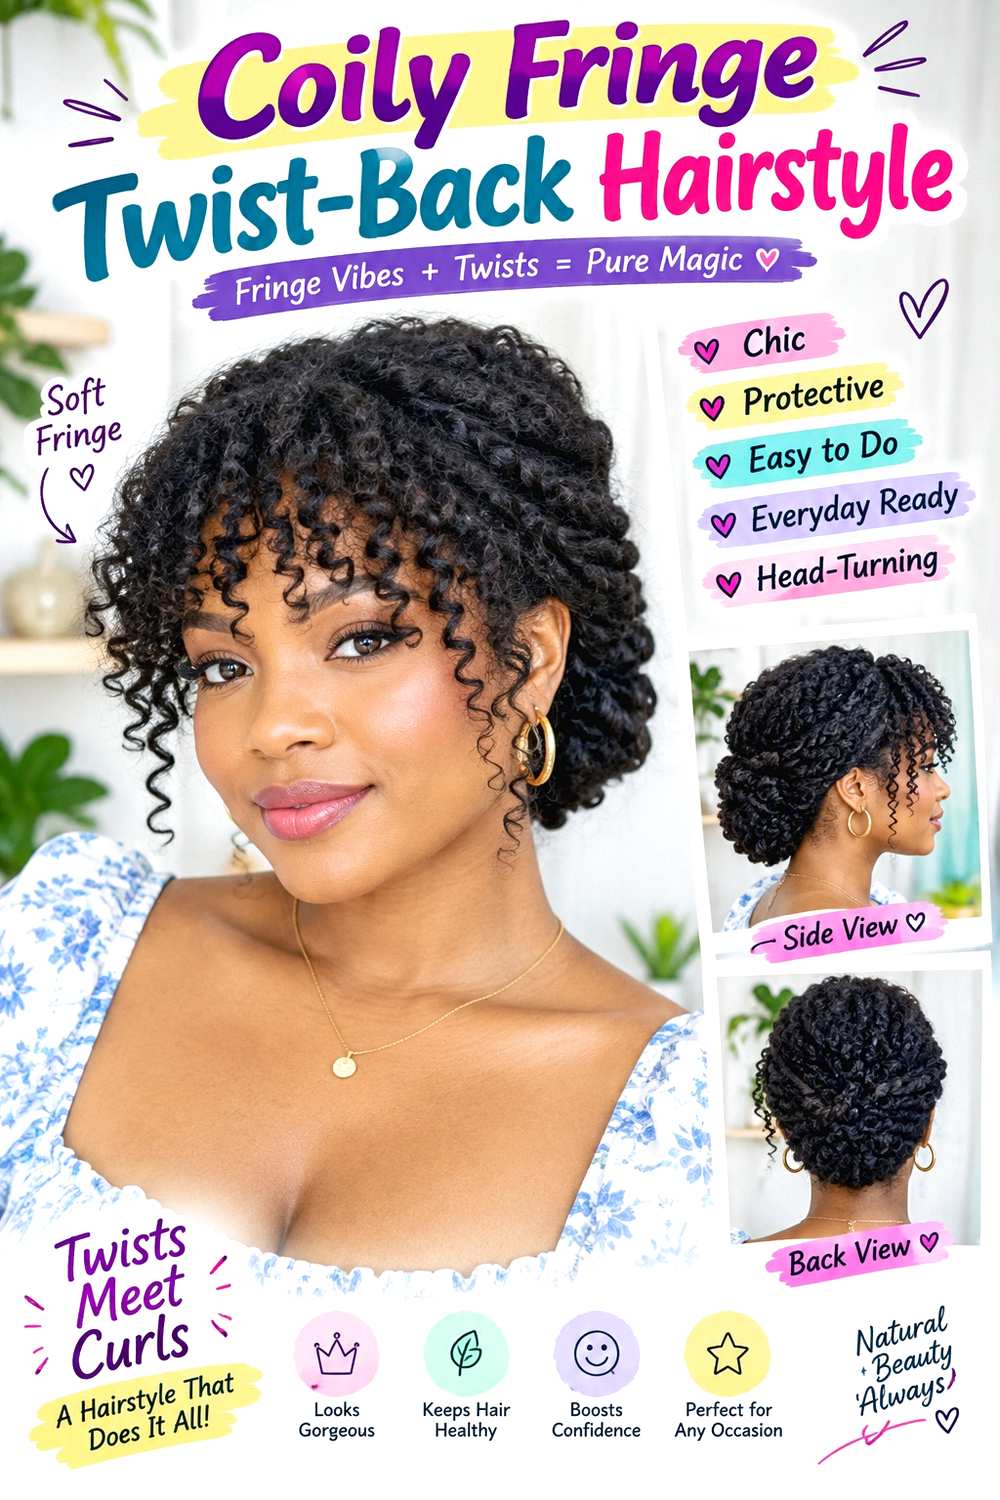
A small twist-back can control coily fringe while respecting shrinkage and natural volume. Part the front where it falls most comfortably, take a narrow section of grown-out fringe, and twist it backward toward the temple or just above the ear. Keep the twist close enough to hold but not so tight that the hairline is stretched flat. Shorter coils can stay free around the forehead or temple if they do not yet reach the anchor, while the rest of the hair remains loose, puffed, or gathered.
Coily hair benefits from this option because the front can be redirected without heat or full stretching. Apply moisturizing leave-in conditioner for pliability, a small amount of curl gel for definition, and bobby pins to secure the twist. A quick refresh may take five minutes; full wash-day styling takes longer because detangling, conditioning, and drying involve the whole head. As the fringe grows, move the anchor slightly farther back instead of tightening the twist. At the salon, specify the dry finished length of the shortest coils and explain that you are growing them into longer face framing. Shrinkage should guide any reshaping decisions.
Pro tip:
Twist the section after the coils have settled into their dry length. This helps you choose an anchor point that does not create extra pull as shrinkage returns.
Make It Work for You:
For dense coils, make the twist slightly wider but keep the section shallow. You get secure control without removing too much volume from the front shape.
Watch Out For:
Do not keep tightening the twist as it shortens during drying. Move the anchor forward or reduce the section instead of adding tension at the hairline.
Soft Wave Face-Frame Blend Hairstyle

A soft wave can disguise the line between growing bangs and longer face-framing layers once the fringe reaches around the cheekbones. Use a center or slight side part and shape the front sections into one broad bend that moves away from the face, letting the shorter bang pieces merge visually with longer side layers. Keep the rest of the hair in matching loose waves or a smoother finish so the front looks connected rather than like a separate fringe section.
Straight and wavy hair works especially well, while medium to long cuts give the front enough length to blend gradually. Apply heat protectant before using a flat iron to create a gentle bend through the front, then use flexible hairspray for light hold. A quick refresh may take five minutes because only the face frame needs reshaping; a full wash-day wave set takes longer. At the salon, ask for the growing fringe to be blended without shortening the center more than necessary. Specify where you want the shortest finished piece to land, such as the cheekbone or jaw. Maintaining that landmark helps the bangs transition into longer layers instead of cycling back into a short fringe.
Pro tip:
Shape the bang section and longer face frame together rather than separately. One continuous bend helps the shorter pieces disappear visually into the side layers.
Make It Work for You:
For fine hair, keep the wave broad and the front section narrow. Larger grouped bends preserve more visible density than many small curls around the face.
Watch Out For:
Do not keep curling the shortest pieces tighter to make them match. Stronger curl can make them look shorter and more separate from the longer face frame.
Wide Headband Bangs Tuck Hairstyle
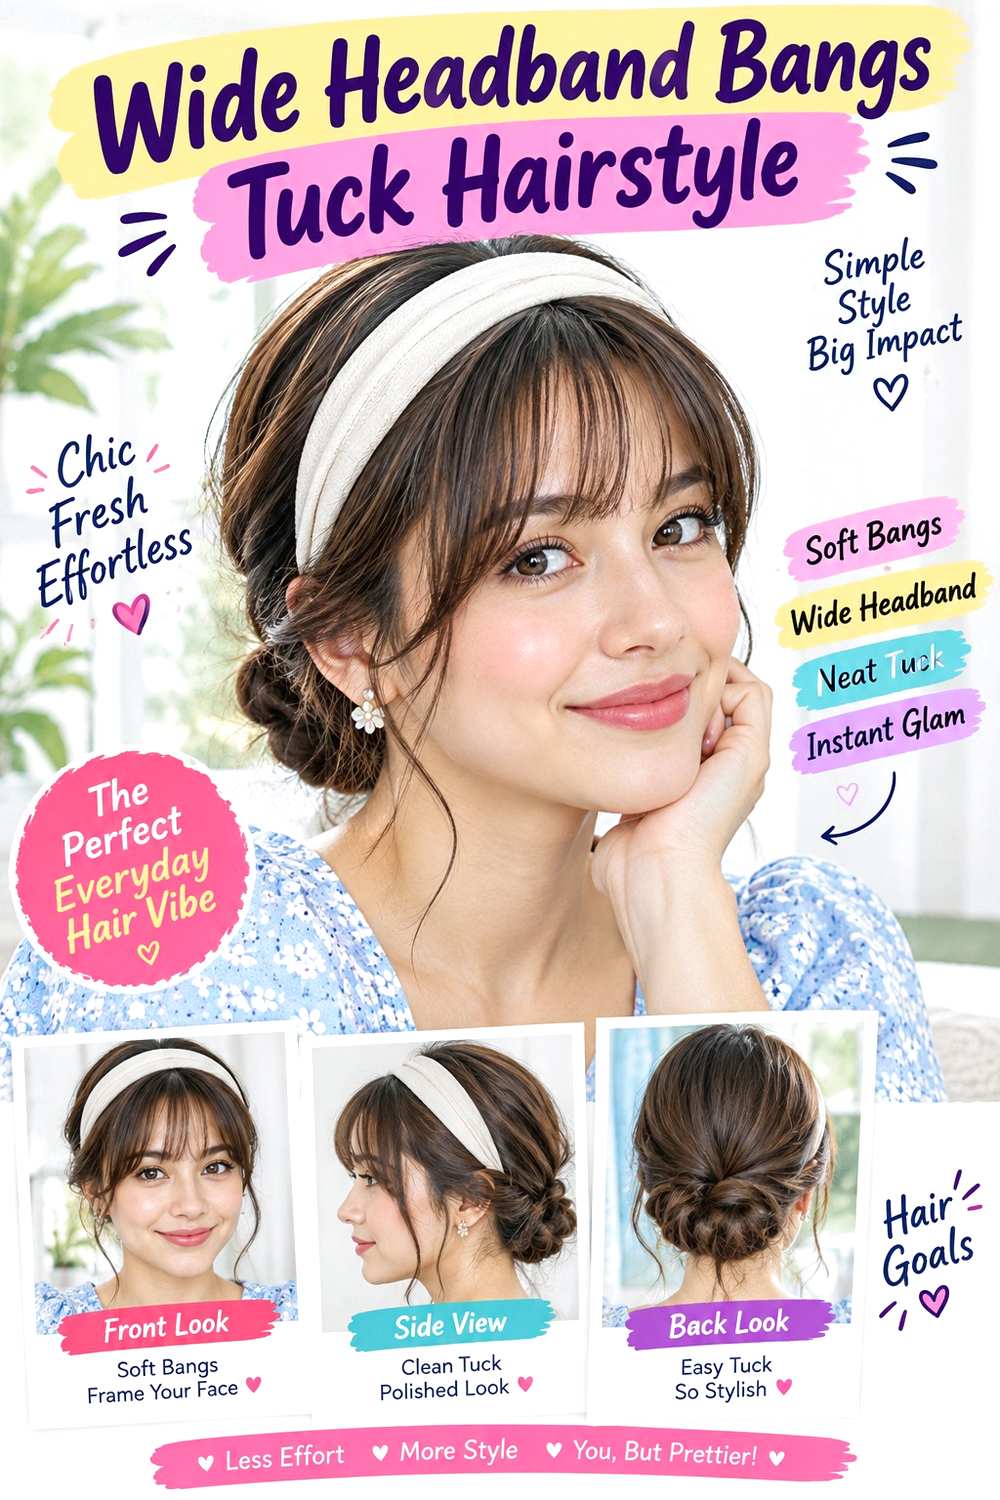
A wide headband is useful when the fringe is long enough to push back but still too short to stay behind the ears. Part the hair naturally or brush the front gently backward, then position the band a little behind the hairline so it catches the growing bangs without flattening the entire crown. Leave some root lift behind the band and keep the lower hair straight, wavy, curly, or coily. The result should look balanced rather than like every front piece has been pressed tightly against the scalp.
Short, medium, and long hair can all use this option, especially on low-effort days. Apply a small amount of lightweight styling cream to control flyaways and use a wide fabric headband with enough grip to stay in place. A quick refresh may take two to three minutes; full wash-day styling is separate because the headband works with the existing texture. If shorter pieces slip forward, move the band slightly closer to the hairline instead of adding more tension. At the salon, ask to preserve the fringe length and reshape only damaged or uneven ends if needed. The goal is to keep gaining length until the pieces can tuck naturally.
Pro tip:
Place the headband after deciding where the part should sit. A deliberate part underneath keeps the style looking intentional even if a few shorter pieces escape.
Make It Work for You:
For curly or coily hair, choose a wider band and keep some texture visible at the front. The accessory can control the fringe without flattening the whole crown.
Watch Out For:
Do not slide the band repeatedly backward and forward through the same area. Reposition it by lifting when possible so the front hair is not unnecessarily pulled.
Mini Rope Braid Fringe Hairstyle
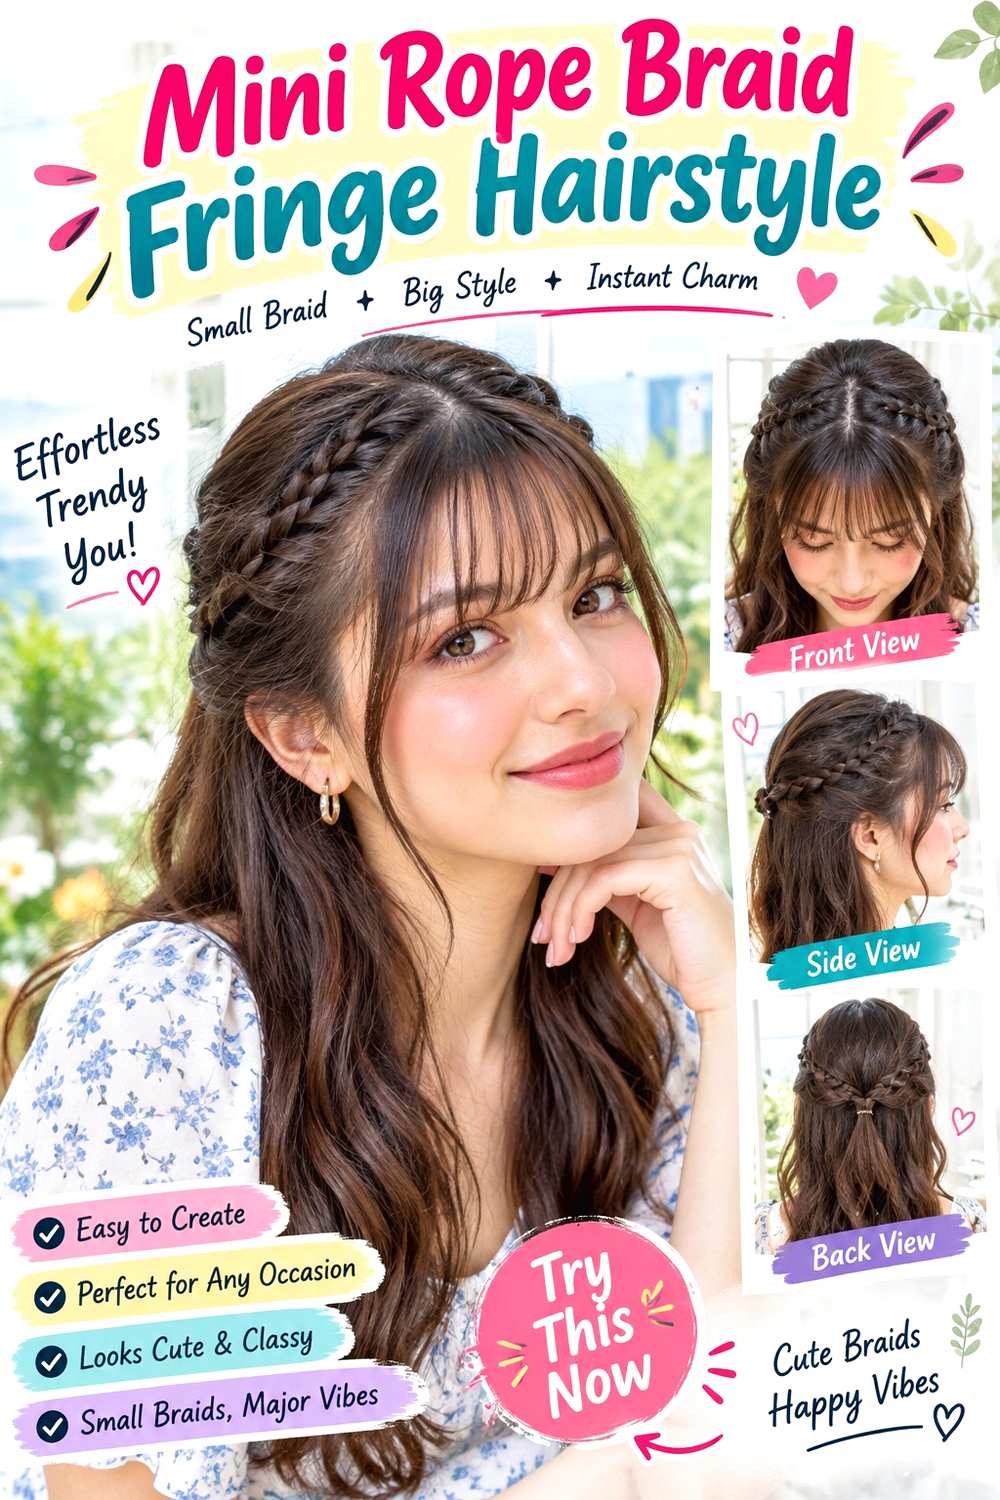
A mini rope braid can redirect growing bangs along the temple while using less hair than a standard three-strand braid. Make a center or side part, divide the fringe section into two narrow pieces, twist both in the same direction, then wrap them around each other in the opposite direction. Guide the rope toward the temple and secure it near or behind the ear. Keep the rest of the hair loose or gathered, and let very short center pieces stay free if they cannot reach comfortably.
Straight and wavy hair works especially well, although softly curly textures can use a looser rope. Apply texturizing spray for grip, secure the endpoint with a small clear elastic, and use bobby pins if the rope needs extra anchoring. A quick refresh may take four to six minutes; full wash-day styling takes longer only if the rest of the hair needs a complete reset. As the fringe grows, extend the rope farther back rather than making it tighter. At the salon, explain the direction you usually wear the front and ask to keep the temple corners long. Those outer pieces are what eventually allow the fringe to merge cleanly into side layers.
Pro tip:
Keep the two rope sections equal from the start. Balanced sections make the twist cleaner and help the growing fringe stay incorporated along the temple.
Make It Work for You:
For fine hair, make a very slim rope and anchor it close to the temple. A narrow section gives detail without exposing too much scalp around the part.
Watch Out For:
Do not loosen a rope braid like a standard braid. Pulling its sides apart can destroy the spiral and release short fringe pieces before they are ready.
Low Ponytail With Grown-Out Fringe Hairstyle

A low ponytail becomes especially useful once growing bangs have reached the cheekbone or jaw but still do not stay fully behind the ears. Use a center or soft side part, gather the main length at the nape, and leave the front pieces loose at first. Tuck the longest fringe sections toward the ears, then decide whether the shortest center pieces should stay out as face framing or join the sides. The ponytail can remain straight, waved, curly, or naturally textured while the front looks deliberate rather than unfinished.
Medium and long hair works best because the nape anchor stays separate from the growing fringe. Use light styling cream to control flyaways, a fabric-covered elastic for the ponytail, and bobby pins only if one side needs a discreet tuck. A quick refresh may take three to five minutes; full wash-day styling takes longer if the tail needs drying or definition. At the salon, specify which front pieces you want to grow past the jaw and ask not to shorten them simply to make the ponytail neater. As the fringe gains length, it can gradually join the nape anchor without changing the rest of the haircut.
Pro tip:
Choose the front pieces before securing the ponytail. Deciding what stays loose first prevents you from pulling sections back out and disturbing the smooth sides.
Make It Work for You:
For wavy hair, let the grown-out fringe keep a soft bend around the jaw. It can read as intentional face framing while the rest stays gathered.
Watch Out For:
Do not cut the longest fringe corners just because they will not tuck perfectly yet. Those pieces are often the bridge between bangs and longer side layers.
Claw Clip Half-Up Bangs Blend Hairstyle

A half-up claw clip can catch growing bangs together with longer temple sections, which helps the front transition without needing a tight anchor. Use a center or side part, gather a shallow section from both temples, and include only the fringe pieces that reach comfortably. Twist the section once at the center back and close a medium claw clip over it. Leave shorter front pieces loose if needed, while the lower hair stays straight, waved, curly, or naturally textured through the shoulders or back.
Medium and long hair works best, especially once the bangs are approaching cheekbone or jaw length. Use texturizing spray for grip and a medium claw clip with smooth teeth for the anchor. A quick refresh may take two to four minutes; full wash-day styling takes longer if the loose lengths need drying or curl definition. If the fringe keeps slipping out, move the clip slightly lower rather than pulling the temple sections harder. At the salon, ask to keep the growing fringe connected to longer side layers and specify the eventual face-framing length you want. That gives the front a clear destination as it grows.
Pro tip:
Gather only the pieces that reach the clip naturally. As the fringe grows, you can include more hair without changing the basic placement or adding tension.
Make It Work for You:
For thick hair, use a slightly deeper claw and a wider half-up section. Better clip capacity is more useful than twisting the sides tighter for security.
Watch Out For:
Do not push short fringe pieces into the claw teeth if they keep escaping. Leave them free until they gain enough length to join without snagging.
Conclusion
Growing out bangs is easier when the front is treated as evolving face framing rather than a fringe that must look finished at one fixed length. Side sweeps work well near eye level, center splits help around cheekbone length, and twists, braids, clips, and headbands control pieces that are not yet tuckable. Straight and wavy hair can use soft bends, while curls and coils need shrinkage-aware placement and less forced tension. Fine hair benefits from narrow sections; dense hair may need wider anchors. Choose parting, fringe placement, volume, finish, and styling effort around your natural texture, face shape, upkeep, and routine. The main goal is to keep gaining useful length without repeatedly cutting the transition back.
Before Your Salon Visit
Choose one or two favorite grow-out styles and save clear front and side references before your salon visit. Discuss your natural texture, density, face shape, current fringe length, preferred final length, upkeep, and normal styling routine. Point out the exact parting, face-framing point, curl or bend, clip placement, braid route, and finish you like. Ask how much can be reshaped without shortening the progress you have already made, especially around the outer corners that eventually need to blend into longer side layers.
FAQs
What length is usually the hardest when growing out bangs?
There is no single awkward length because growth direction, texture, shrinkage, and starting fringe shape all change the transition. Many people notice more difficulty when the bangs reach the eyes but cannot yet tuck. Redirecting them with a part, bend, clip, or twist usually helps during that stage.
Should I stop trimming my bangs completely while growing them out?
You do not have to stop trimming completely. Small reshaping trims can remove damaged ends or balance uneven corners while preserving overall progress. The important part is to agree on the final direction first, so a maintenance trim does not accidentally shorten the fringe back into its previous shape.
How should I grow out curly bangs without losing progress?
Curly bangs should be judged at their dry, settled length because shrinkage can make them appear much shorter than they do when stretched. Refresh only the pieces that need definition, and use pins or twists without pulling the curl pattern tight. Longer dry face-framing landmarks make the grow-out easier to track.
Can changing my part help while my bangs grow out?
Yes. Side parts can redirect eye-length bangs, while a center split can help once the fringe is long enough to open toward the cheeks. Changing the part will not add length, but it can change where the fringe falls and reduce how often it drops directly into the eyes.