18 Hairstyles for Turtleneck Outfits That Look Chic and Balanced

Hairstyles for turtleneck outfits work best when the hair and high neckline occupy clearly defined spaces instead of competing around the neck and shoulders. Updos expose the collar completely, while bobs, lobs, and longer styles can create balance through controlled volume, a clear part, or movement placed away from the neckline. Layers and fringe are optional rather than required. What matters most is where the length finishes, how much hair rests on the collar, and whether the silhouette feels intentional from the front and sides.
Texture and density change that relationship. Straight hair may fall smoothly over a fitted neck, while waves and curls can create more width around the shoulders. Coily hair can be lifted into a high shape or arranged with its natural volume intact. Fine or lower-density hair often benefits from preserving a stronger perimeter, while dense hair may need thoughtful bulk placement rather than aggressive thinning. Face-framing pieces can soften an updo, but their length should be chosen carefully if they tend to rub against the collar.
Styling effort ranges from a quick clip or ponytail to a complete curl set or sleek finish. High collars can also rub against long ends during wear, so easy repositioning and frizz control may matter as much as the initial styling. Comparing shape, comfort, upkeep, and routine makes each option more useful in everyday dressing.
Quick List
- Sleek High Ponytail Hairstyle
- Soft Low Bun Hairstyle
- Shoulder-Grazing Blunt Bob Hairstyle
- Long Side-Swept Waves Hairstyle
- Half-Up Crown Volume Hairstyle
- Textured Pixie Hairstyle
- Braided Low Ponytail Hairstyle
- Claw Clip Twist Hairstyle
- Curly High Puff Hairstyle
- Center-Part Sleek Lob Hairstyle
- Loose Low Ponytail Hairstyle
- French Braid Back Hairstyle
- Messy Top Knot Hairstyle
- Natural Coily Updo Hairstyle
- Tucked-Behind-Ears Waves Hairstyle
- Side Bun With Face Frame Hairstyle
- Long Straight Center-Part Hairstyle
- Short Curly Bob Hairstyle
Sleek High Ponytail Hairstyle
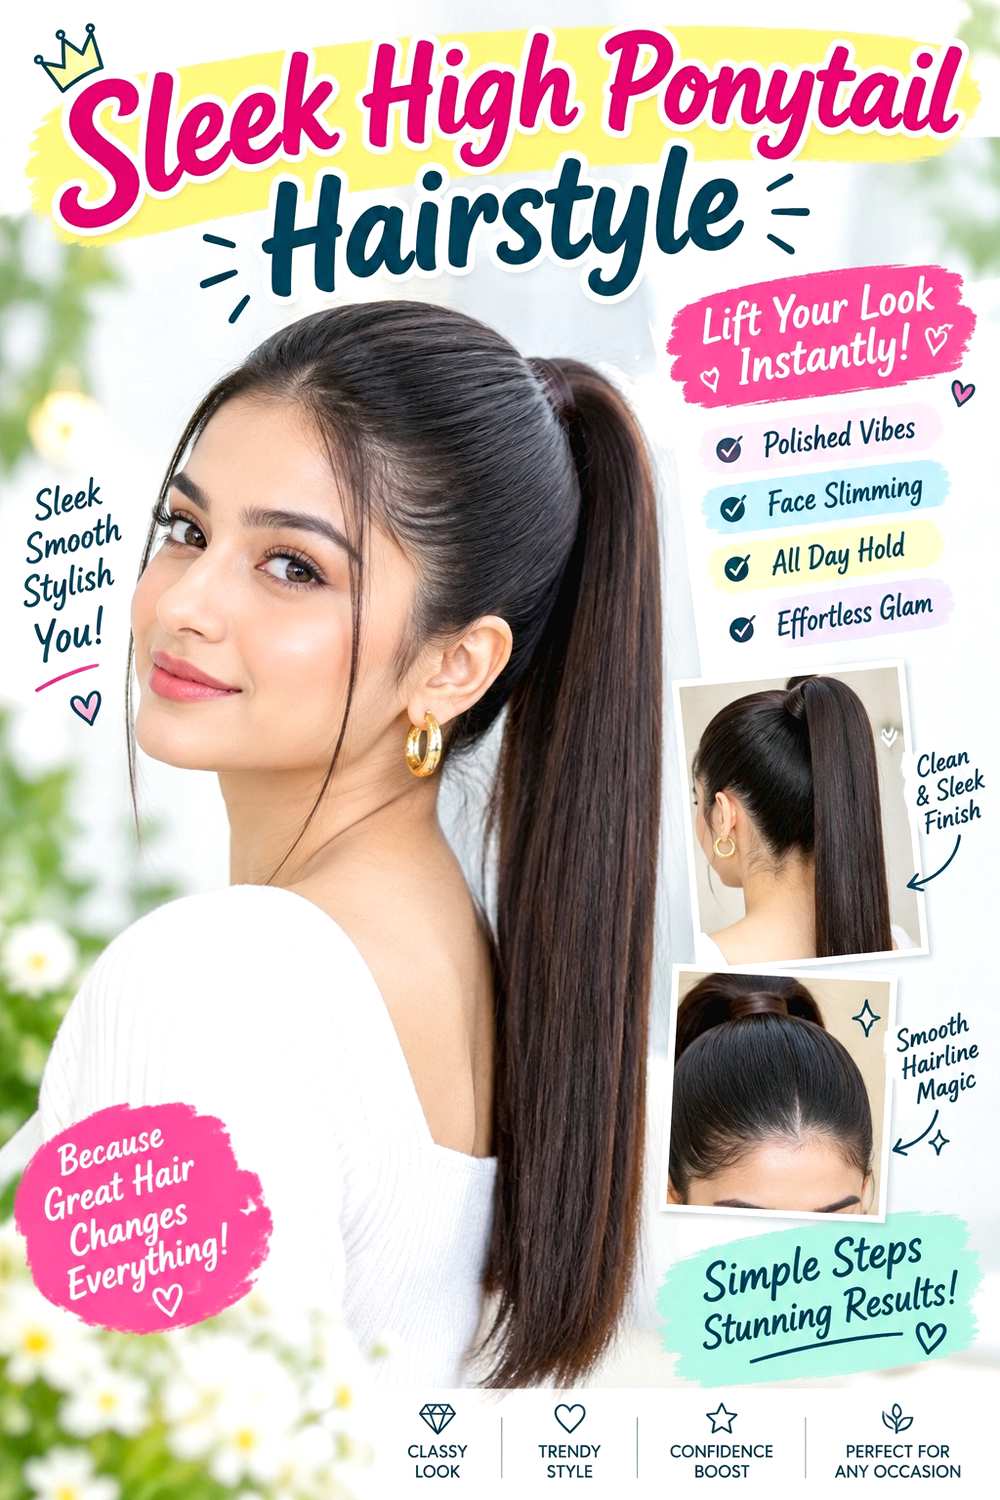
A high ponytail creates maximum separation between long hair and a turtleneck collar. Place the base around the upper back of the head rather than directly on the crown, then let the ponytail fall freely behind it. A clean center or brushed-back front keeps attention above the neckline, while a little lift through the crown can prevent the style from looking overly flat. Straight ends create a sharper finish, but softly waved lengths work too.
Medium to long hair is easiest to gather, and dense hair may need a stronger anchor to support the ponytail comfortably. Apply heat protectant before smoothing the lengths if you use heat, guide the surface with a paddle brush, and secure the base with a fabric-covered elastic. A dry-hair ponytail can be a quick morning style, while washing, drying, and fully smoothing long or textured hair requires considerably more time.
Refresh the style by rebuilding the base once it loosens instead of repeatedly tightening it throughout the day. This reduces pulling and keeps the crown smoother. For an event or salon blowout, explain exactly where you want the ponytail to sit, since moving the anchor higher or lower changes how much space remains between the hair and turtleneck collar.
Pro tip:
Tilt your head slightly back while securing the ponytail so the hair at the nape does not become excessively tight when you return upright. This also leaves comfortable space above a high collar.
Make It Work for You:
If your hair is very dense, position the ponytail slightly lower and keep the base broad rather than extremely tight. You still clear the neckline while reducing concentrated weight on the crown.
Watch Out For:
Avoid tightening the ponytail every time the surface loosens. Rebuild the anchor when necessary instead; repeated pulling can create discomfort and does not always correct bumps through the back.
Soft Low Bun Hairstyle

A low bun creates a compact finish that works particularly well with fitted turtlenecks when it sits just above the collar rather than directly against it. Use a center or gentle side part, gather the hair at the lower back of the head, and form a rounded bun with a little softness through the crown. One or two face-framing pieces can remain loose near the cheekbones or jaw if you want less structure around the front.
Medium and long lengths are easiest to fold into this shape. Straight, wavy, curly, and coily textures can all work, though the bun size changes with density. Use a fabric-covered elastic to create the base, bobby pins to secure the folded hair, and flexible hairspray to control flyaways without making the finish rigid. A simple second-day bun can be quick; a fully polished version after washing naturally takes longer.
If the collar pushes the bun upward or rubs against the pins, reposition the base instead of forcing the hairstyle into the same spot. For professional styling, specify that the bun should clear the top edge of the turtleneck when your head is upright. That placement detail is more useful than asking only for a “low bun,” because collar heights vary considerably.
Pro tip:
Put on the turtleneck before setting the final bun position. You can then place the anchor just above the collar instead of discovering afterward that the neckline presses against the finished shape.
Make It Work for You:
If you have shorter layers, leave a few intentional pieces around the face rather than pinning every strand tightly back. The bun remains compact while the front keeps a softer, flexible finish.
Watch Out For:
A bun sitting directly on a thick collar may be pushed upward throughout the day. Move the anchor slightly higher or make the bun flatter so clothing does not disturb its hold.
Shoulder-Grazing Blunt Bob Hairstyle
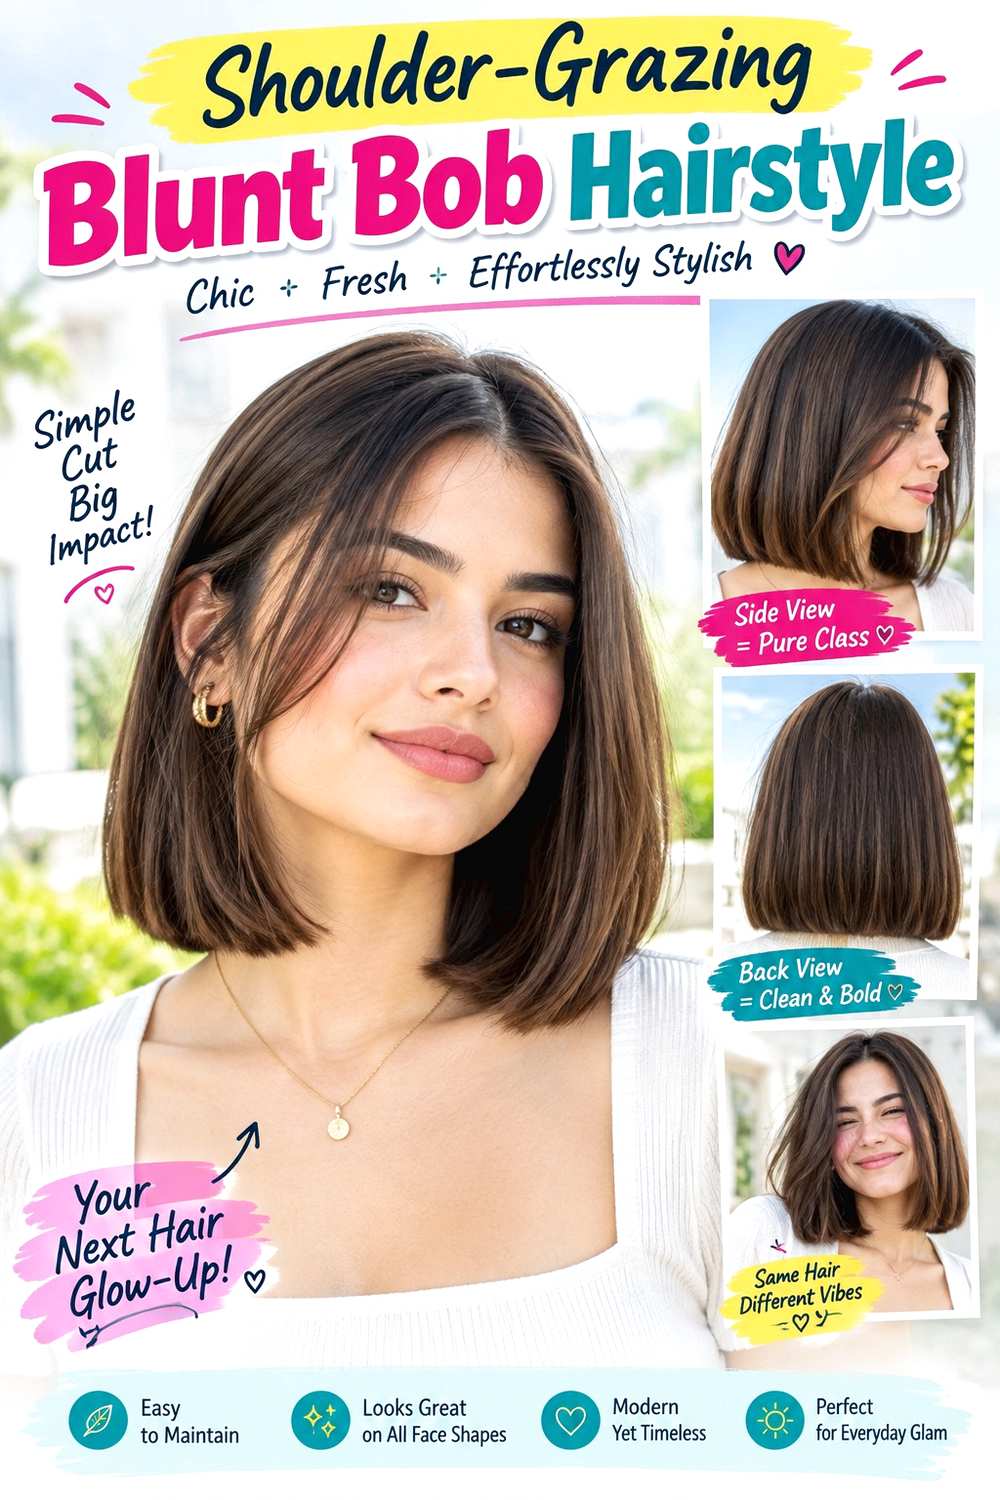
A blunt bob that finishes around the shoulders creates a strong horizontal line just above or near the turtleneck, making the haircut itself part of the outfit’s structure. Keep the bottom edge full, with minimal visible layering and a center or slight side part. The ends can sit straight or curve gently inward, while the front remains long enough to tuck behind the ears when you want more space around the neckline.
Straight and softly wavy textures show the solid perimeter clearly. Fine strands or lower-density hair may benefit from retaining that weight, while dense hair can have internal bulk assessed without thinning the entire bottom edge. Apply heat protectant before shaping the ends with a round brush, then use a small amount of lightweight serum to smooth the surface and reduce friction-related fuzz.
A morning reset may require only the ends and front pieces. A complete wash and blow-dry takes longer, especially on dense hair. Because the collar can push shoulder-length ends outward, check how the haircut falls both over and outside the turtleneck. At the salon, identify whether you want the perimeter to sit clearly above the collar or graze it; a small length difference can noticeably change how often the ends flip.
Pro tip:
When the collar causes the ends to turn outward, work with that movement rather than repeatedly flattening it. A controlled slight flip can make the bob look intentional while reducing unnecessary restyling.
Make It Work for You:
For dense hair, keep the visible bottom line strong but ask whether excess weight inside the shape can be adjusted. This preserves the blunt effect without creating too much width.
Watch Out For:
Avoid choosing the final bob length without considering your usual turtlenecks. A thick folded collar can lift the ends differently from a thin fitted neck and change the apparent silhouette.
Long Side-Swept Waves Hairstyle
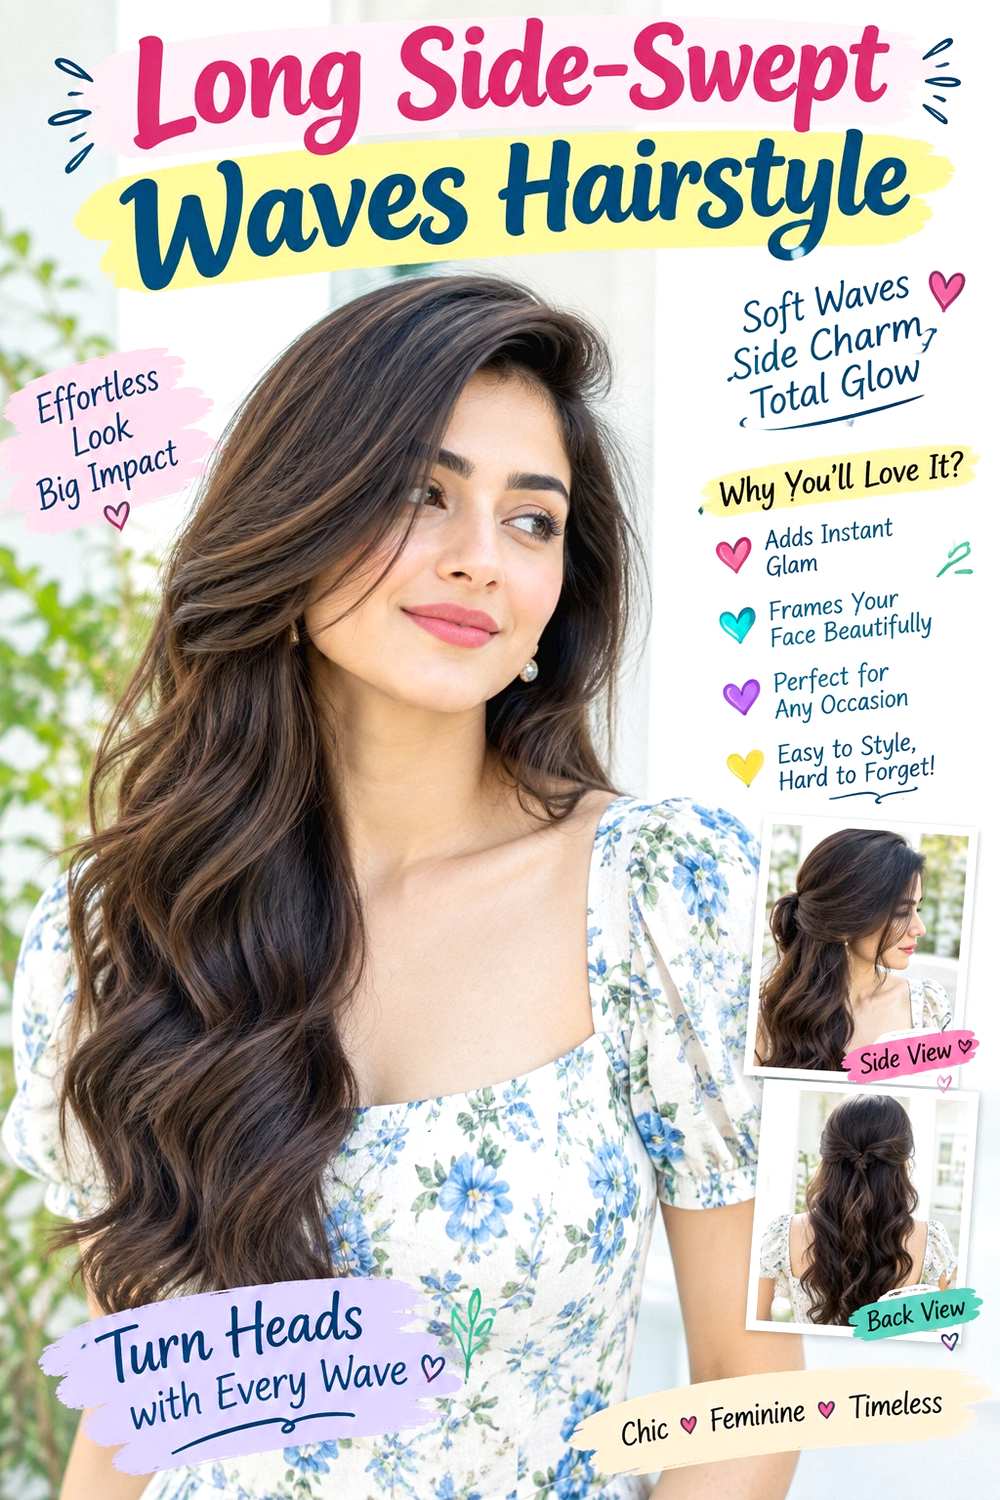
Long waves can work with a high neckline when most of the hair is deliberately placed over one shoulder rather than spread evenly across the collar. Create a deep or moderate side part, sweep the heavier section forward, and leave the opposite side cleaner around the neck. Broad waves beginning below the cheekbones keep the roots controlled while adding movement through the mid-lengths and ends.
Straight and wavy hair can reach this finish with a defined set, while curly hair may use its natural pattern instead of recreating uniform bends. Apply heat protectant before using a curling iron, then finish with flexible hairspray so the waves remain movable. Longer, denser hair takes more time to style fully, whereas a next-day refresh may involve reshaping only the front wave and several sections that flattened overnight.
Turtleneck collars can rub against the underside of long hair, so repositioning the lengths to one side can also reduce repeated friction across the entire back. Refresh the finish when the front loses direction or the waves merge into one heavy mass. If having the style professionally done, show which shoulder you want exposed and where you want the first strong wave to begin; those choices determine the asymmetry.
Pro tip:
Move the heavier side completely forward before arranging the final waves. This keeps stray sections from slipping behind the shoulder and becoming trapped between the hair and collar during wear.
Make It Work for You:
If your natural hair is curly, keep the side-swept placement but use your existing curl pattern. Concentrate definition near the face and exposed shoulder rather than forcing every section into matching waves.
Watch Out For:
Too much volume beside both shoulders can compete with a bulky turtleneck. Keep one side relatively open and place the strongest movement through the heavier side for a clearer silhouette.
Half-Up Crown Volume Hairstyle
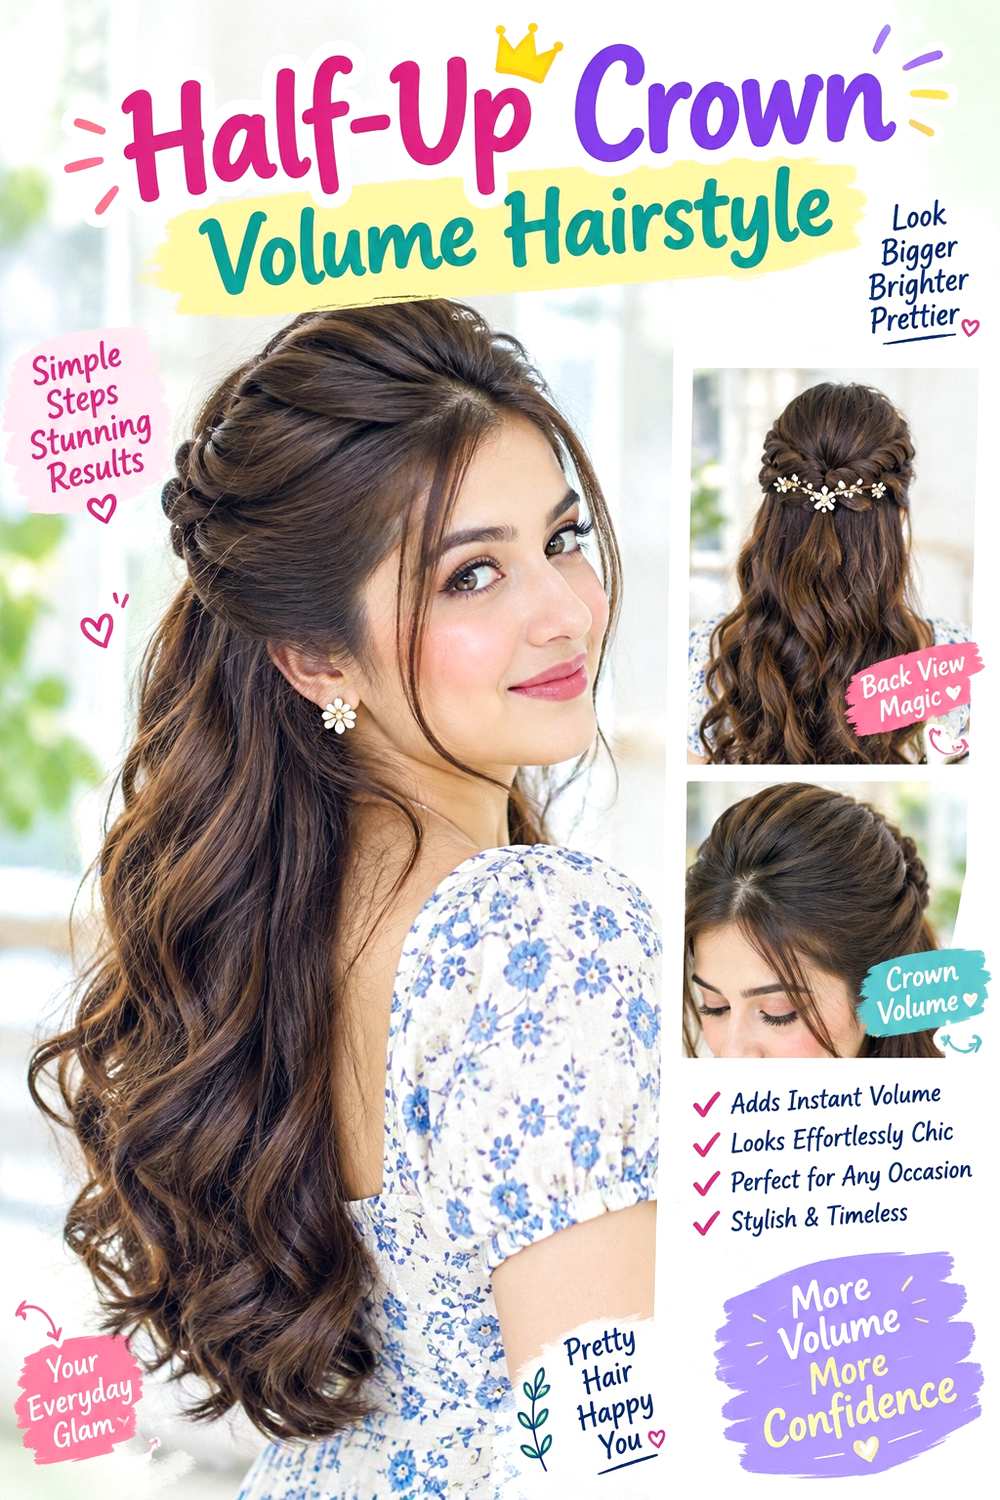
A half-up arrangement keeps hair away from the upper sides of a turtleneck while preserving movement through the lower lengths. Gather a section from just behind the temples and secure it at the back, leaving gentle lift through the crown. The loose hair can remain straight, wavy, or curly, but concentrating volume above the ears helps keep the neckline from feeling crowded. Face-framing pieces can finish around the cheekbones or jaw.
Medium and long hair work well because there is enough length to create a distinct upper and lower section. Use root-lift spray sparingly around the crown, a fabric-covered elastic for the anchor, and bobby pins if shorter pieces need extra support. A second-day version can be a brief refresh; a complete wash-day style takes longer if the loose hair also needs curling or smoothing.
If the lower lengths repeatedly catch on the collar, bring them forward over the shoulders or keep the gathered section slightly larger. The temporary style does not require a haircut. For event styling, describe how much crown height you want and where the half-up anchor should sit. Those placement details matter because too much lift can feel disproportionate, while a very low anchor may disappear against thick turtleneck fabric.
Pro tip:
Secure the upper section before adjusting crown volume. Once the anchor is stable, gently loosen only the areas that need lift instead of pulling large sections and weakening the entire hairstyle.
Make It Work for You:
If your hair has lower density, gather a smaller section so more length remains loose. Keep the crown lift subtle and preserve fullness through the bottom rather than creating excessive separation.
Watch Out For:
Avoid placing the anchor so low that it rests against a thick folded neck. Raise it slightly if clothing pushes the style upward or causes the secured section to loosen.
Textured Pixie Hairstyle
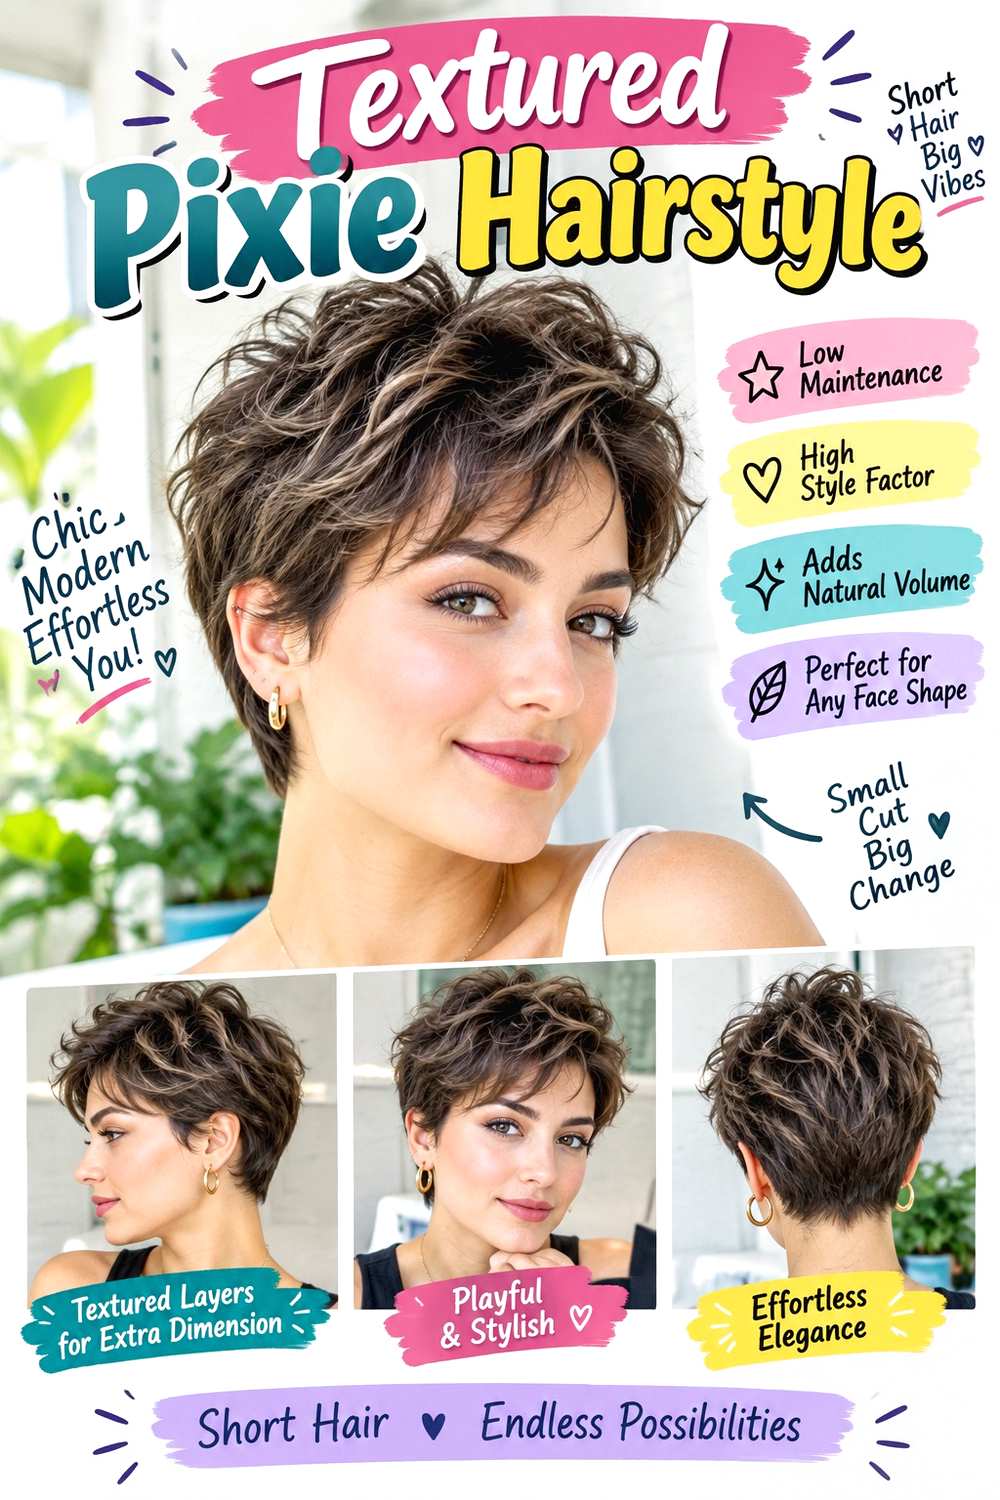
A textured pixie keeps the entire neckline visible, which makes it a practical match for thick, folded, or fitted turtlenecks. Leave more length through the top and front while keeping the sides and nape shorter. A side-swept fringe, separated top pieces, or slight crown lift can add movement without introducing any bulk around the collar. The exposed neck also makes the cut’s outline especially noticeable.
Straight, wavy, and loosely curly textures can all support a piecey pixie, though the amount of styling depends on how the hair naturally dries. Use a small amount of styling paste to define the top and a fine-tooth comb to guide shorter areas around the sides. A dry morning refresh is often brief, while a full wash and reset takes more time if the top needs deliberate direction.
Cut maintenance is more important than turtleneck-specific styling because short growth quickly changes the nape and ear area. When the lower edge begins extending onto the collar, the silhouette can lose some of its clean separation. At the salon, specify how closely you want the nape shaped and where the longest front pieces should finish. Those details let you keep texture on top without adding unwanted length around a high neckline.
Pro tip:
Build texture through the crown before arranging the fringe. Establishing the top shape first makes it easier to see how much front movement is needed without overworking every short section.
Make It Work for You:
If your hair is fine, keep slightly more length through the upper sections and use styling paste sparingly. This can create visible separation without making the hair look overly piecey.
Watch Out For:
Do not ignore the nape once the top still looks good. Growth at the back can start rubbing against high collars sooner, changing the pixie’s outline even when the fringe remains manageable.
Braided Low Ponytail Hairstyle

A braided low ponytail keeps long hair contained while creating a strong vertical line below the back of the head. Start with a center or soft side part, gather the hair slightly above the nape, and braid the ponytail from the base downward. A medium-width braid usually balances a turtleneck without appearing too bulky, while a few longer face-framing pieces can soften the front.
This style works best on medium to long hair, and dense hair creates a naturally thicker braid. A small amount of smoothing cream can control flyaways, a fabric-covered elastic can secure the base, and bobby pins can manage shorter side layers if they escape. On prepared hair, rebuilding the ponytail and braid is generally a quick refresh. Full wash-day styling takes longer when the hair also needs drying or detangling first.
The collar can press against a very low ponytail base, so move the anchor slightly upward if the braid feels pushed out of place. Temporary braiding does not require a haircut. If you are having it styled professionally, explain your preferred braid width, anchor height, and comfortable tension. Those details determine whether the finished braid sits neatly above the neckline or repeatedly catches on the turtleneck as you move.
Pro tip:
Secure the ponytail just above the collar before beginning the braid. Establishing that clearance first prevents the completed braid from being forced upward by the turtleneck once you start moving.
Make It Work for You:
If your hair is very thick, keep the braid moderately loose rather than pulling every crossing tight. The structure remains visible while the base carries less concentrated tension near the nape.
Watch Out For:
A very low anchor may rub constantly against a thick collar and loosen the braid. Raise the base slightly instead of tightening it harder, which can create unnecessary discomfort.
Claw Clip Twist Hairstyle
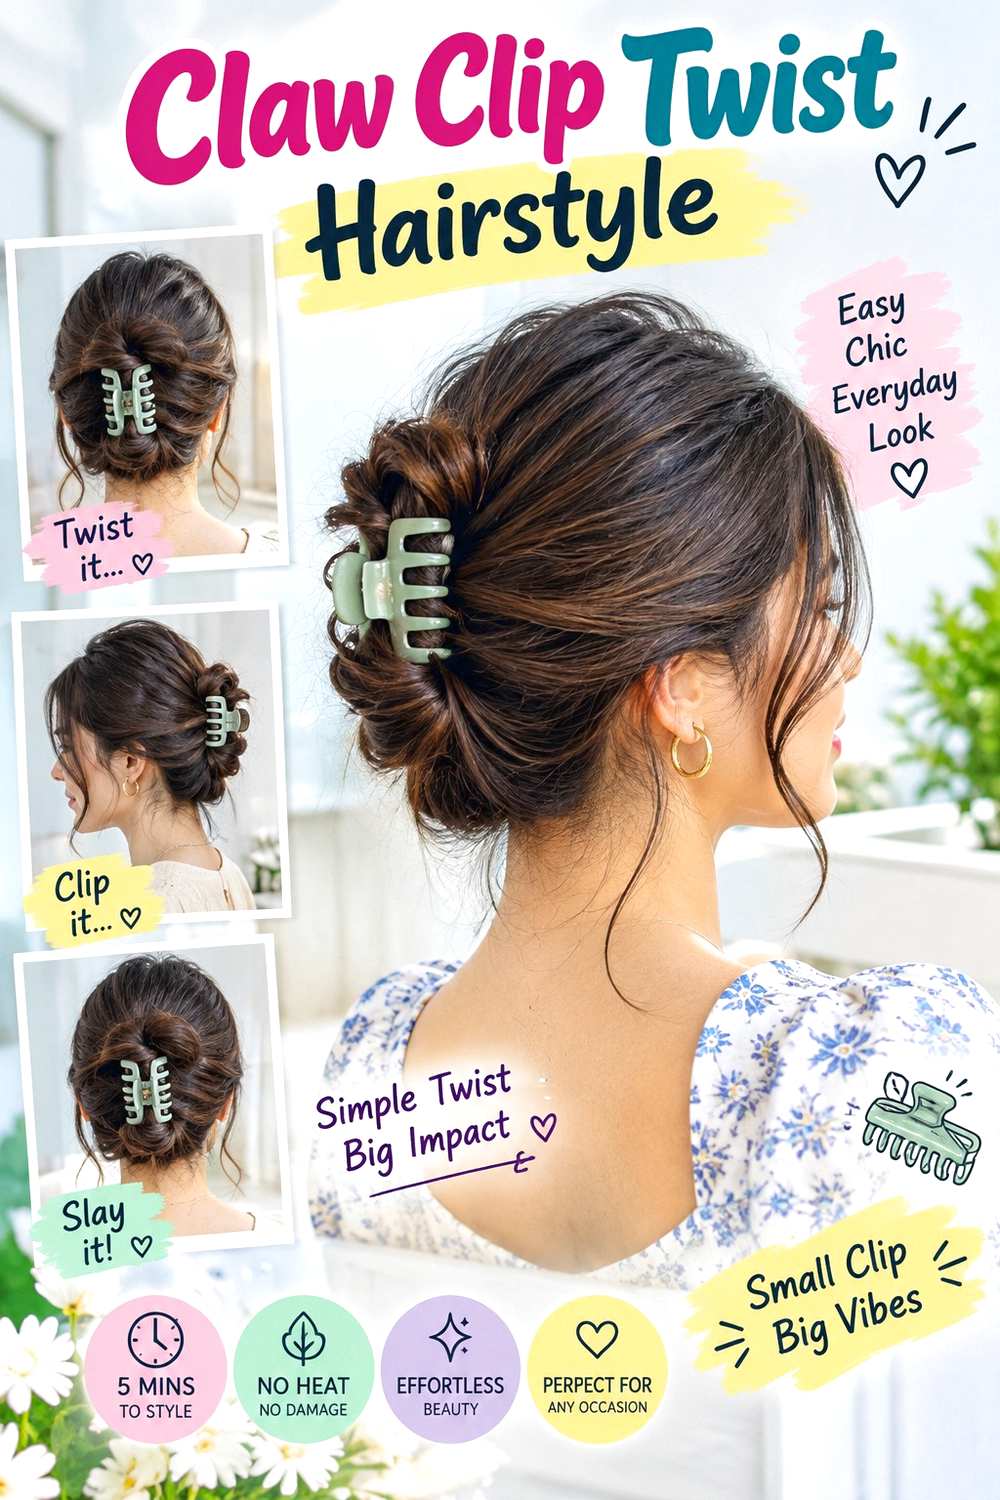
A claw clip twist clears the neckline quickly without creating a formal bun. Gather the hair low, twist it upward against the back of the head, and secure it vertically with the clip. Depending on length, the ends can fan over the top or tuck inside. Keep the crown relaxed and choose whether to leave face-framing pieces loose based on how much softness you want around the turtleneck.
Medium and long hair are the easiest lengths to twist. Straight or slippery hair may need more grip, while curly and coily textures may require a larger clip that closes comfortably around the shape. Use a sturdy claw clip as the main anchor and light texturizing spray through the interior hair if extra grip is needed. A simple twist is usually a short refresh rather than a full styling session; washing and preparing the hair remains a separate, longer process.
If the collar reaches high at the back, position the lower teeth of the clip above it so the accessory is not repeatedly pushed upward. This temporary style needs no special haircut. When preparing it for an event, define the desired clip height and whether the ends should remain visible. Those choices affect both the appearance and how comfortably the twist clears the neckline.
Pro tip:
Put on the turtleneck before clipping the finished twist. This lets you position the lower edge of the accessory above the collar instead of guessing how much clearance the neckline requires.
Make It Work for You:
For very dense hair, create a flatter twist instead of forcing a thick roll into a small clip. Choose enough capacity to close securely without compressing the hairstyle uncomfortably.
Watch Out For:
An undersized clip can slide or pop open as the collar moves underneath it. Use a clip that fully contains the twist rather than depending on extra pressure for security.
Curly High Puff Hairstyle

A high puff moves curly hair above the neckline and concentrates volume around the crown, creating clear separation from a turtleneck. Gather the curls upward while preserving their natural shape, then allow the ends to spread rather than compressing them into a small bun. The front can be brushed back, softly parted, or left with a few curls around the forehead. Keeping the sides controlled makes the upper volume more distinct.
Curly hair with enough length to gather is the natural starting point. Apply lightweight leave-in conditioner for softness, curl gel where definition needs support, and secure the base with a fabric-covered elastic that does not require excessive pulling. Refreshing the puff on already styled curls can be relatively quick, while a full wash, detangle, define, and dry routine is much longer and depends on length and density.
Rebuild the base if it begins sliding instead of tightening it repeatedly. Because the style clears the neck, the curls avoid much of the friction that can happen against a thick collar. For professional styling, specify the puff height and comfortable tension, especially around the edges. The aim is a secure anchor that supports the upper shape without making the scalp feel strained.
Pro tip:
Arrange the puff only after the base feels comfortable. Once it is secured, lift and separate the curls at the top rather than repeatedly tightening the elastic to create extra height.
Make It Work for You:
If your curls are shorter, position the puff slightly lower and allow more width rather than forcing every piece toward the crown. The neckline can still remain clear and balanced.
Watch Out For:
Do not treat tightness as proof of secure hold. If the base feels uncomfortable, loosen and reposition it; a well-placed anchor should support the puff without painful pulling.
Center-Part Sleek Lob Hairstyle
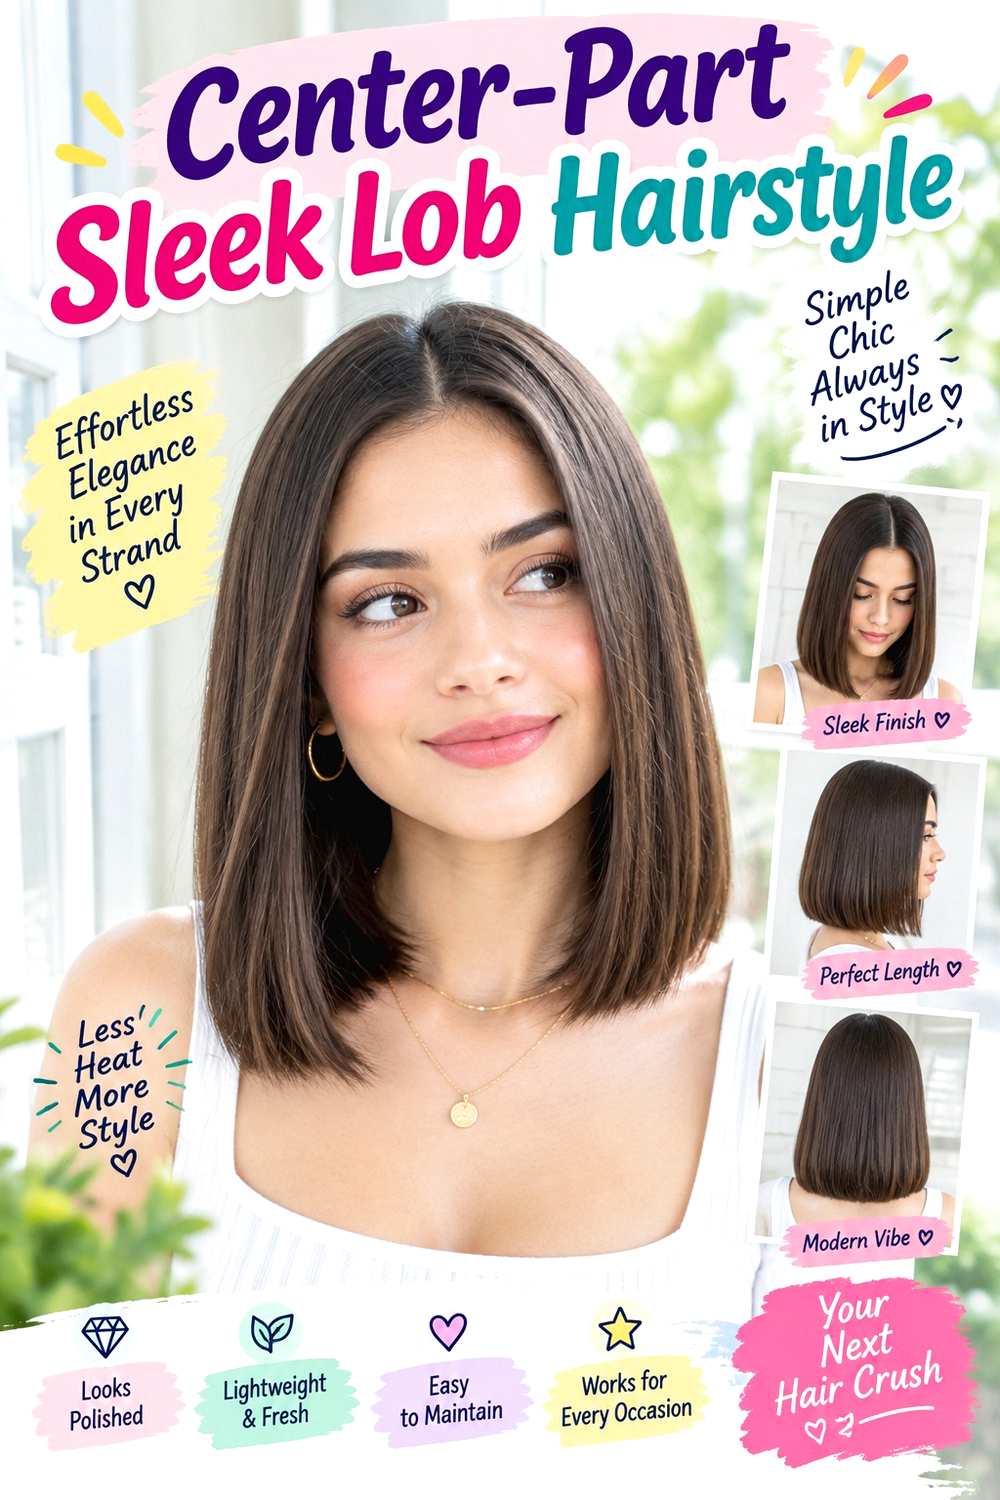
A sleek lob gives a turtleneck a clean, graphic partner because both the neckline and haircut have clear boundaries. Keep the length between the jaw and shoulders, establish a precise center part, and preserve a fairly strong bottom edge. The front sections can sit outside the collar or tuck behind the ears, while a slight bend through the ends prevents the shape from feeling completely flat.
Straight hair can reach this finish with minimal work, while wavy or curly starting textures require more deliberate smoothing if you want the sleek result. Apply heat protectant before using a flat iron, then distribute lightweight serum through the mid-lengths and ends for surface control. A quick refresh may involve only the front and visible top layer; a full wash-day sleek finish takes longer depending on density and natural texture.
Watch how the lob interacts with different collars. If the ends sit exactly on a thick turtleneck, they may flip outward during wear. That movement can be incorporated or avoided by choosing a slightly shorter or longer perimeter. At the salon, discuss the bottom length with your typical high neckline in mind and explain whether you want a blunt-looking perimeter or subtle movement through the front.
Pro tip:
Try the finished lob both tucked and untucked around the collar. Knowing which placement stays comfortable helps you avoid repeatedly moving the front sections throughout the day.
Make It Work for You:
If your hair is dense, preserve the strong outer line but ask whether excess internal weight can be adjusted. This keeps the sleek silhouette from spreading too widely at the sides.
Watch Out For:
Avoid repeated heat passes just because the collar flips the ends. Reposition the hair first; if the neckline keeps causing the same bend, working with it may be more practical.
Loose Low Ponytail Hairstyle

A loose low ponytail creates a softer alternative to a sleek updo while still keeping most long hair controlled. Position the base just above the collar, allow a little natural lift through the crown, and leave longer front pieces around the cheekbones or jaw if desired. The ponytail itself can stay straight, wavy, curly, or softly textured, making this an adaptable choice for casual turtleneck outfits.
Medium and long hair are easiest to gather. Use a fabric-covered elastic for a comfortable base and a small amount of lightweight styling cream to smooth flyaways or define the loose front. A second-day ponytail can take only a brief reset, while a fresh wash-day version requires additional time if the lengths also need drying, curling, or definition.
Maintenance is mainly about anchor placement. If a thick collar continually pushes against the elastic, raise the ponytail slightly rather than tightening it. Long face-framing pieces may also need repositioning when they rub against the sides of the neck. This style does not demand a new haircut, but if you want permanent front layers, show your stylist where you want them to finish when your hair is tied back. That makes the loose pieces intentional rather than accidental.
Pro tip:
Leave a small amount of slack through the crown before securing the final base. That softness helps the ponytail look relaxed without depending on loose tension at the actual anchor.
Make It Work for You:
If your hair has lower density, keep most of the length inside the ponytail and release only one or two front pieces. This preserves fullness while still softening the hairline.
Watch Out For:
Do not position the elastic directly where a folded collar presses into the nape. Constant contact can loosen the ponytail, so move the anchor just high enough to clear the fabric.
French Braid Back Hairstyle

A French braid keeps hair close to the head through the crown and upper back, making it useful when a turtleneck already adds fabric and volume around the neck. Begin near the upper crown, incorporate sections gradually, and continue the braid down the back. A medium braid width provides visible structure without becoming excessively bulky at the nape, and the front can remain clean or softly loosened.
Medium to long hair works best, while straight, wavy, curly, and coily textures can all be braided with different amounts of preparation. Use lightweight leave-in conditioner to improve manageability, a fabric-covered elastic to secure the end, and bobby pins only for shorter pieces that escape. Rebraiding prepared hair is usually a moderate refresh, while a full wash, detangle, and dry routine adds considerably more time.
Because the braid narrows toward the end, it can sit over a turtleneck more neatly than loose long hair. If the neckline catches the lower braid, bring the tail forward or begin the free-hanging section slightly higher. For professional styling, communicate braid width and comfortable tension rather than simply requesting a tight braid. The structure should stay secure without pulling painfully at the hairline or crown.
Pro tip:
Keep the braid comfortably firm through the crown, then allow slightly more flexibility once it reaches the lower back of the head. This can reduce stiffness where the braid meets the collar.
Make It Work for You:
For very dense hair, use broader sections so the braid does not become overly compact and heavy. The same back-centered shape remains visible while the tension stays more comfortable.
Watch Out For:
Avoid tightening the braid because the turtleneck moves the lower section. Redirect the tail or adjust the neckline first; extra scalp tension will not prevent fabric from contacting the braid.
Messy Top Knot Hairstyle

A top knot puts the hair completely above a turtleneck, making it useful with oversized, folded, or particularly high collars. Gather the hair near the crown, form a loose knot, and let a few ends remain softly visible instead of creating a perfectly smooth bun. The front can be clean, center parted, or softened with longer pieces near the temples. Crown height should come from placement rather than excessive pulling.
Medium to long hair is easiest to gather, and dense hair may produce a larger knot that needs additional support. Use a fabric-covered elastic for the base, bobby pins to secure loose sections, and dry texturizing spray if slippery hair needs grip. On second-day hair, this can be a quick style. A newly washed, fully prepared version takes longer when the hair needs drying or additional texture first.
Maintenance is simple: rebuild the knot if its weight shifts rather than tightening the base repeatedly. Since the style is temporary, no haircut is necessary. For event styling, explain how high you want the knot and how much intentional looseness you prefer around the front. Those decisions change whether the result feels polished, relaxed, or too casual for the outfit you plan to wear.
Pro tip:
Secure the ponytail base before building the knot. A stable anchor lets you shape the bun loosely without relying on extra tension to keep the entire hairstyle from sliding.
Make It Work for You:
If your hair is shorter, create a smaller folded knot and pin the remaining ends close to the base. The neckline stays clear even if the bun has less volume.
Watch Out For:
Do not keep pulling sections from the knot to create “messiness” after the anchor loosens. Re-secure the base first, then adjust only the outer pieces needed for softness.
Natural Coily Updo Hairstyle

A coily updo keeps natural volume high on the head while leaving the neck and shoulders open around a turtleneck. Gather the hair upward into a rounded, tucked, or softly spread shape, depending on length, and allow the texture to remain visible rather than smoothing every coil flat. The front can feature a small lifted section, a soft side direction, or a few defined coils near the hairline.
Coily textures with enough length to gather can adapt easily, while shorter hair may need a lower or more compact arrangement. Apply lightweight leave-in conditioner for softness, use curl cream to define any visible front coils, and secure the base with a fabric-covered elastic at comfortable tension. Refreshing an existing updo can be relatively quick, while wash-day detangling, styling, and drying takes substantially longer.
Keeping the hair off the collar also reduces repeated rubbing along the lower lengths. If the updo shifts during wear, redistribute its weight instead of tightening one area. For professional styling, discuss the exact anchor position, desired volume, and comfortable edge tension. These features matter more than forcing every coil into a uniform finish, particularly when the hairstyle will be worn for several hours with a high neckline.
Pro tip:
Choose the anchor position before arranging the visible coils. Once the base feels secure and comfortable, shape the upper volume around it instead of repeatedly moving the entire updo.
Make It Work for You:
If your coils are shorter, use a lower gathered shape and let more texture spread outward. Keeping the lower neck clear preserves the relationship with the turtleneck without requiring extreme height.
Watch Out For:
Avoid tightening the edges just to make the updo look smoother. Comfortable hold is more useful than maximum tension, and natural texture around the hairline can remain part of the finish.
Tucked-Behind-Ears Waves Hairstyle
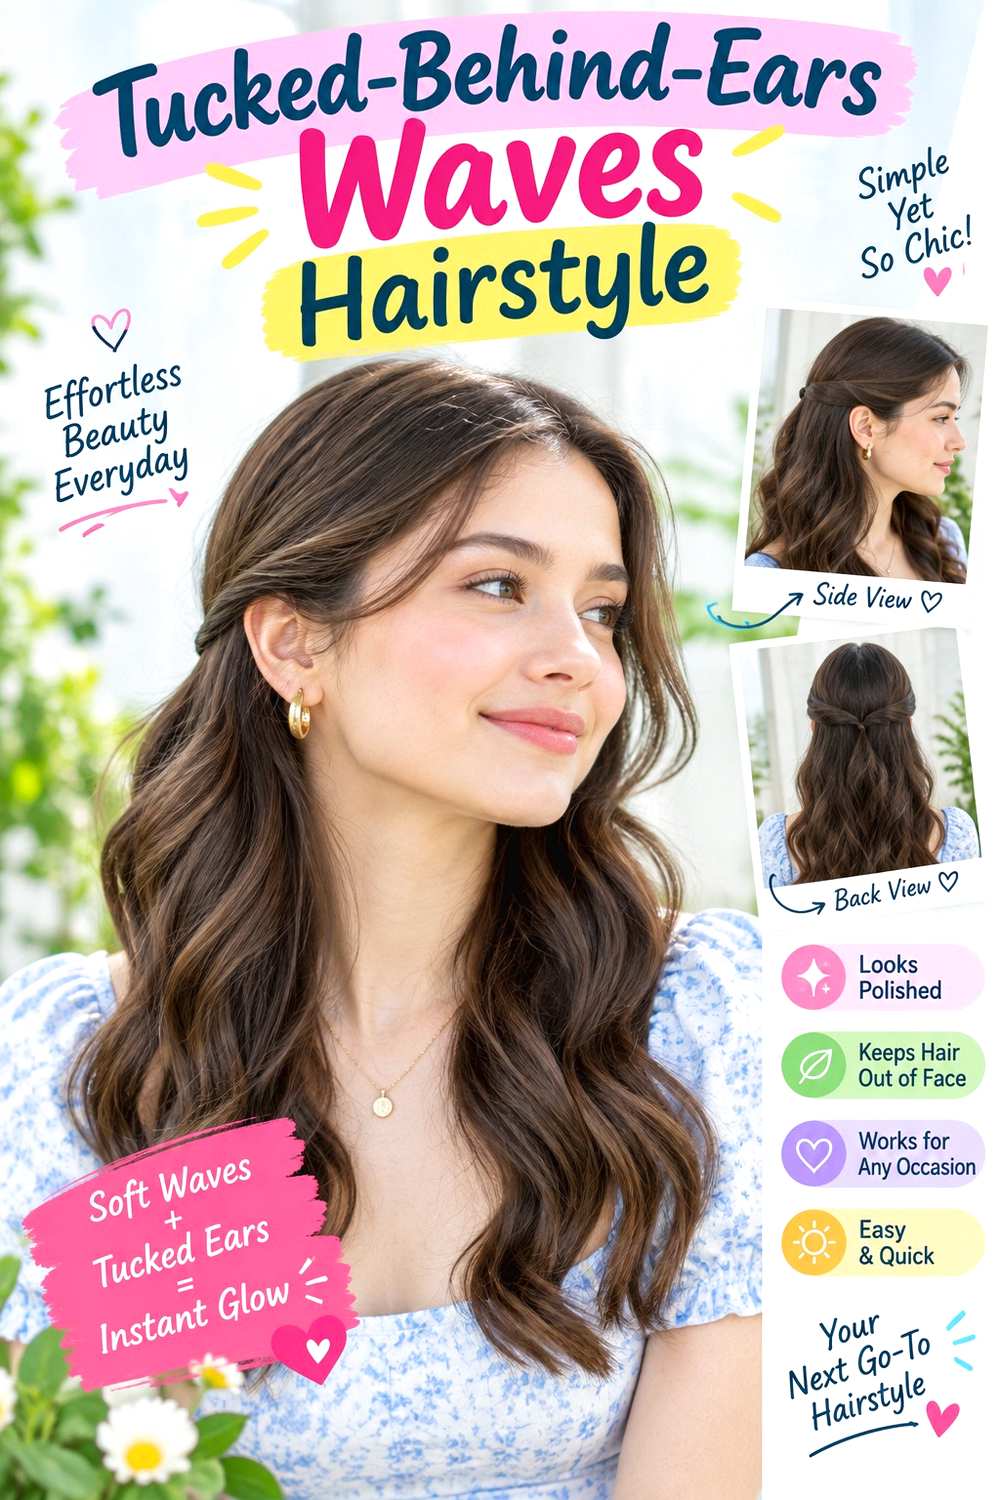
Tucking softly waved hair behind the ears creates an open front while leaving the rest of the length loose over a turtleneck. Keep the part centered or slightly off-center, shape broad bends below the cheekbones, and smooth the temple area enough that it stays neatly tucked. The ends can fall over the shoulders or down the back, while the cleaner upper sides prevent the combination of waves and high fabric from feeling too crowded.
Shoulder-length and longer hair works well, particularly on straight or wavy textures. Apply heat protectant before using a curling iron for broad bends, then add flexible hairspray lightly around the finished waves for movable hold. A next-day refresh may involve only several front sections; setting the full head from freshly washed hair is a longer process.
During wear, the collar may cause the lower waves to expand or change direction. Rather than repeatedly reshaping them, bring the lengths forward or keep them behind the shoulders depending on which placement stays cleaner. At the salon, ask where any face-framing layer will finish when tucked behind the ears. If it ends directly at the temple, it may repeatedly spring free instead of supporting the smooth upper shape.
Pro tip:
Tuck the sides before making final adjustments to the waves. This shows how much movement remains visible and prevents you from shaping sections that will ultimately sit hidden behind the ears.
Make It Work for You:
If your hair is naturally wavy, define only the front and any flattened areas. Keep the tucked upper sides neat while allowing the lower wave pattern to remain varied and natural.
Watch Out For:
Avoid applying too much hold near the ears just to keep the tuck secure. Stiff sections can look separated; adjust the front layer length if the same piece constantly escapes.
Side Bun With Face Frame Hairstyle
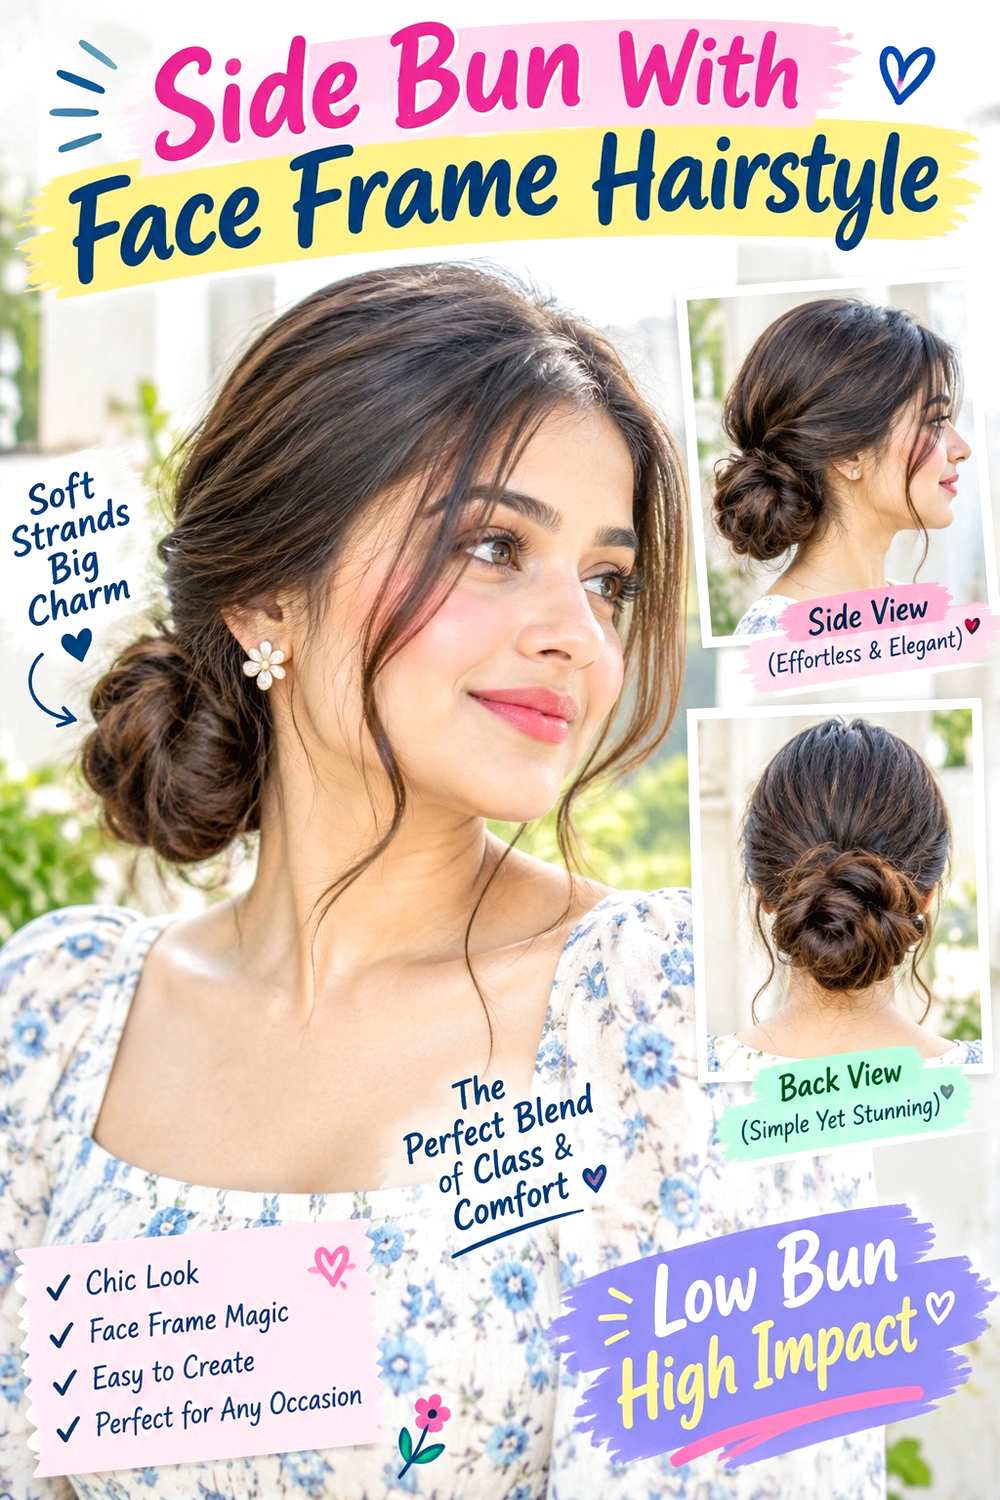
A side bun shifts the hairstyle away from the center back of the neck, where a turtleneck is usually highest. Place the bun low behind one ear but slightly above the collar, and keep the opposite side smooth enough to show the asymmetry. Leave one or two face-framing pieces around the cheekbone or jaw for softness. The bun can be rounded, twisted, or loosely folded without needing excessive size.
Medium and long hair can support this placement, while dense hair may need the bun kept flatter for comfort. Use a fabric-covered elastic to create the base, bobby pins to secure the shape, and flexible hairspray to control short flyaways. A simple side bun on prepared hair can be a relatively quick refresh; achieving a polished surface after washing takes longer.
Check that the bun does not rest directly on the collar when you turn your head. If it does, move the anchor slightly higher or farther behind the ear. This temporary hairstyle does not require a haircut. For professional styling, specify which side you want the bun on, how low it should sit, and how much face framing should remain loose. Those placement choices determine whether the asymmetry stays clear.
Pro tip:
Turn your head both directions before the final pinning. A side bun may clear the collar while facing forward but touch it during movement, so test the placement before completing the shape.
Make It Work for You:
If your hair is very dense, build a flatter bun close to the head rather than a large rounded one. You keep the side placement while reducing weight near the neckline.
Watch Out For:
Too many loose pieces can hide the clean asymmetry and catch against the collar. Keep the face frame deliberate, using only the sections that genuinely contribute to the front shape.
Long Straight Center-Part Hairstyle

Long straight hair creates a simple vertical line that can contrast neatly with the horizontal emphasis of a turtleneck collar. Use a center part, keep the roots relatively flat, and let the lengths fall evenly behind the shoulders or divide them forward in two sections. Minimal face framing preserves the smooth shape, while full ends keep very long hair from appearing overly thin against substantial winter clothing.
Naturally straight hair can make this low effort, while wavy or curly hair requires considerably more styling if a sleek finish is desired. Apply heat protectant before using a flat iron, then smooth lightweight serum through the mid-lengths and ends to control flyaways and friction-related fuzz. Refreshing only the surface can be brief; completely straightening long or dense hair after washing is a longer session.
A high collar may rub against the underside of the hair and create bends or tangles. Moving the lengths fully forward or backward is often more effective than constantly smoothing the affected area. At the salon, discuss how much perimeter weight you want to retain and where any front layers should begin. Keeping the shortest pieces below the collarbone can maintain the long, continuous line while still allowing subtle movement.
Pro tip:
Choose one clear placement—fully behind the shoulders or divided forward—once the turtleneck is on. Repeatedly moving long hair across a textured collar can increase tangling through the underside.
Make It Work for You:
If your ends are lower in density, keep the perimeter fuller and begin any layers farther down. The straight silhouette remains strong without removing additional weight from already sparse areas.
Watch Out For:
Do not repeatedly pass heat over bends created by the collar during the day. Reposition the lengths first and reserve restyling for sections that truly need correction after the outfit is removed.
Short Curly Bob Hairstyle

A short curly bob keeps most of the hair above a turtleneck while adding rounded movement near the cheeks and jaw. Let the finished length sit around the jaw or slightly below it, with layers arranged so curl volume is distributed rather than concentrated at one wide level. A center, side, or naturally shifting part can work, and the front curls can frame the face without touching the collar.
Curly hair is the natural fit, but density and shrinkage determine how compact the shape appears. Use lightweight leave-in conditioner for moisture, curl gel to support definition, and a diffuser to dry the shape without stretching the curls straight. A few front curls can be refreshed quickly between washes, whereas a complete wash-day definition and drying routine takes longer depending on density and curl pattern.
Because the hair sits above the collar, it avoids much of the friction that longer curls experience against knit fabric. Cut upkeep becomes more important when the front drops into the eyes or the lower curls begin resting directly on the turtleneck. At the salon, discuss the desired dry perimeter and where the shortest layers should sit. Curl shrinkage varies, so finished dry length is more useful than relying on one universal wet measurement.
Pro tip:
Arrange the lower curls while wearing the turtleneck you plan to pair with the style. This makes it easier to see whether the finished perimeter stays above the collar or rests on it.
Make It Work for You:
If your curls shrink strongly, keep the initial finished shape slightly longer and assess it dry. You can maintain the short bob effect without risking a perimeter that springs much higher than expected.
Watch Out For:
Avoid removing excessive weight simply because the bob looks full at the sides. The issue may be layer placement; discuss where volume sits before thinning the entire curly perimeter.
Conclusion
The strongest choices balance hair volume with the height and bulk of the neckline. High ponytails, puffs, buns, braids, and clipped twists expose a turtleneck completely, while bobs and lobs create a more structured relationship with the collar. Long waves or straight lengths can work just as well when their placement is deliberate. Density influences how much weight each style carries, and natural texture determines whether a polished finish is quick or requires more work. When comparing hairstyles for turtleneck outfits, also consider fringe, parting, face shape, collar thickness, and how much daily upkeep feels realistic. A style that remains comfortable as you move is usually more useful than one that looks balanced only from the front.
Before Your Salon Visit
Choose one or two favorites and save references that show the exact features you like. Discuss your natural texture, density, face shape, preferred length, turtleneck styles, upkeep, and normal routine. Point out the fringe, layers, volume, parting, perimeter, or finish you want to copy. For ponytails, buns, braids, puffs, and claw-clip options, focus on comfortable anchor placement and neckline clearance rather than assuming the hairstyle requires a new haircut.
FAQs
Should hair sit above or below a turtleneck collar?
Either can work. Short cuts and updos create clear separation above the neckline, while long hair can fall below or over it. The awkward zone is often directly on a thick collar, where ends may flip, tangle, or become pushed upward. Consider your usual collar height when choosing length.
How can I stop a turtleneck from making my hair frizzy?
Reducing repeated friction can help. Keep long hair clearly forward, behind the shoulders, braided, or pinned up instead of constantly moving it across the collar. A suitable lightweight smoothing or conditioning product may help with surface control, but the best approach depends on your texture and normal routine.
Which updos are comfortable with thick turtlenecks?
High ponytails, puffs, top knots, and higher claw-clip twists provide the most neckline clearance. Low buns and ponytails can also work when their anchor sits above the collar. Put the turtleneck on before final positioning so the fabric does not press directly against pins, elastics, or clips.
Do I need shorter hair to make turtleneck outfits look balanced?
No. Long hair can work with a high neckline through deliberate placement, such as side-swept waves, a braid, a ponytail, or straight lengths moved fully forward or back. Shorter hair simply creates automatic neckline clearance. Texture, density, collar thickness, and styling effort are more useful considerations than length alone.