17 Hairstyles for Rainy Fall Days

Hairstyles for rainy fall days work best when they can handle damp air, light drizzle, hoods, scarves, and repeated trips between outdoors and heated indoor spaces. Low braids, compact buns, ponytails, half-up styles, bobs, curls, and puffs can all reduce the amount of hair that needs constant fixing. Placement matters: a low anchor fits beneath many hoods, while controlled face-framing pieces are less likely to stick to the cheeks or blow across the eyes.
Straight, wavy, curly, and coily textures can all suit rainy-day styling, but the right approach depends on density, shrinkage, length, and your usual routine. Fine strands may need lighter product near the roots, while dense hair often feels better when gathered weight is spread through a wider braid or bun. Natural curls and coils do not need to be straightened; keeping their existing pattern can make a damp-weather refresh simpler.
A full wash-day style can take considerably longer than a morning touch-up. Some ideas need only a quick retwist, rebraid, or smoothing pass, while defined curls or a polished lob require more preparation. The most practical rainy-day choice is one that remains secure without painful tension and can be repaired in one small area rather than rebuilt completely.
Quick List
- Hood-Friendly Low Braid Rainy Fall Hairstyle
- Sleek Low Bun Rainy Fall Hairstyle
- Twisted Low Ponytail Rainy Fall Hairstyle
- Double Dutch Braids Rainy Fall Hairstyle
- Curly Low Puff Rainy Fall Hairstyle
- Coily Crown Puff Rainy Fall Hairstyle
- Claw Clip Low Twist Rainy Fall Hairstyle
- Braided Half-Up Rainy Fall Hairstyle
- Bubble Ponytail Rainy Fall Hairstyle
- Scarf-Friendly Lob Rainy Fall Hairstyle
- Side Braid Rainy Fall Hairstyle
- Low French Twist Rainy Fall Hairstyle
- Center-Part Tucked Bob Rainy Fall Hairstyle
- Rope Braid Ponytail Rainy Fall Hairstyle
- Headband Tuck Rainy Fall Hairstyle
- Glossy Low Ponytail Rainy Fall Hairstyle
- Defined Natural Curls Rainy Fall Hairstyle
Hood-Friendly Low Braid Rainy Fall Hairstyle
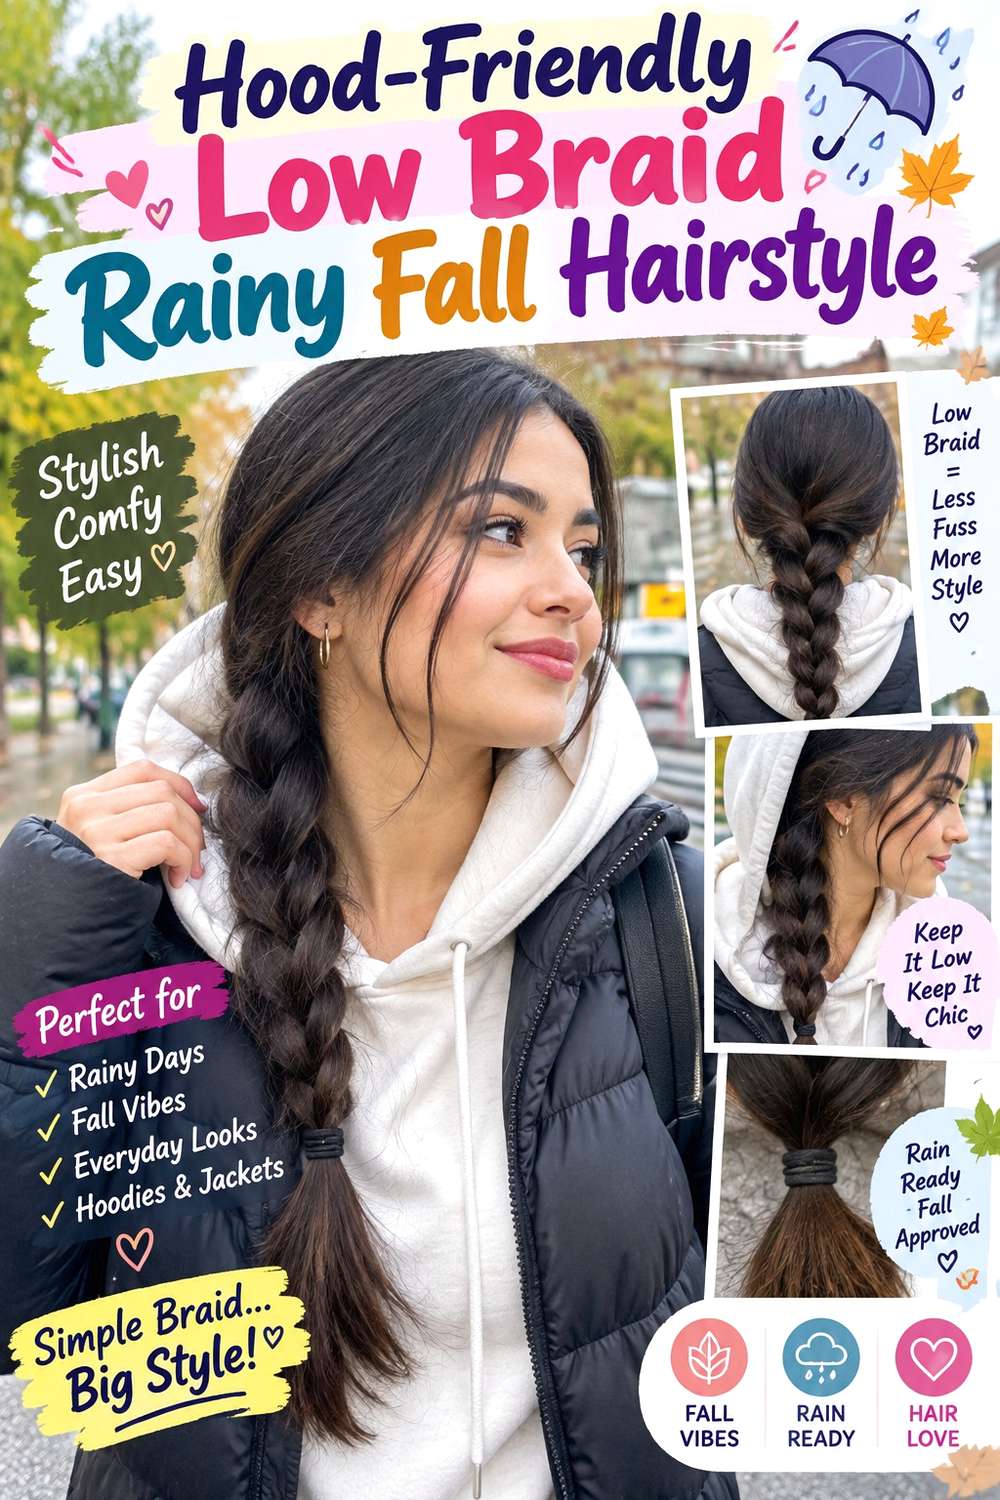
A low braid keeps the crown smooth enough for a hood while gathering the length into one section that is easier to manage in damp weather. Create a center or shallow side part, bring the hair to the nape, and start the braid below the area where your hood normally rests. Keep the roots controlled but not stretched flat, and leave only narrow face-framing pieces if you are comfortable managing them in drizzle. Medium to long hair works best, while wavy or slightly textured lengths often give the braid natural fullness.
Use light texturizing spray to improve grip, a snag-free elastic to secure the end, and flexible hairspray to settle short flyaways. Styling is fairly quick on dry hair, while a full wash-day routine takes longer if the roots need drying first. A rainy-day refresh usually means tightening the last braid passes and smoothing the part after your hood comes off. If a stylist is creating the style, specify where your hood seam lands and ask for the braid to start below it. Keep tension comfortable at the nape. If dampness loosens one section, repair that area instead of pulling the entire braid tighter.
Pro tip:
Put on your hood briefly before loosening the braid. Keep the hidden section compact and add softness only below the hood line, where the woven texture remains visible.
Make It Work for You:
For finer density, keep the braid relatively narrow and loosen only a few central loops. This maintains structure while preventing the lower section from looking overly separated.
Watch Out For:
Avoid starting the braid directly beneath a thick hood seam. Repeated pressure can flatten or loosen that point; move the beginning slightly lower toward the nape.
Sleek Low Bun Rainy Fall Hairstyle
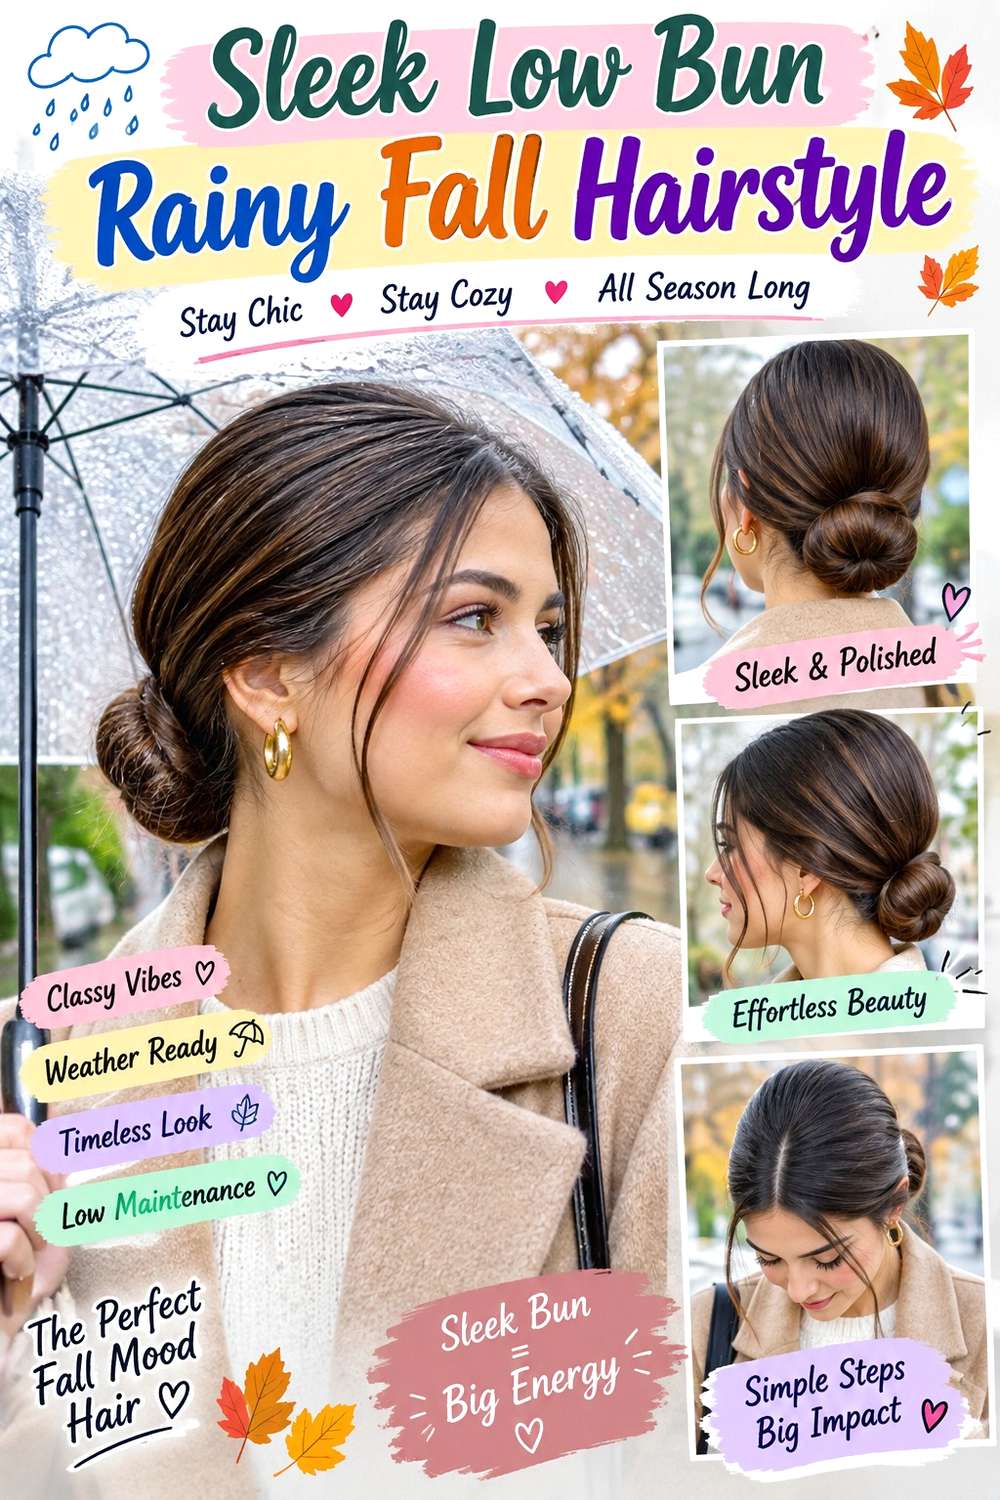
A low bun limits loose ends that can become frizzy or tangled in damp air, while the flatter crown fits under many rain hoods. Choose a center or soft side part, direct the hair smoothly toward the nape, and form a compact bun close to the head. The sides should look controlled without feeling overly tight, and shorter face-framing pieces can either remain intentionally loose or be incorporated into the base. Medium to long hair is easiest to gather, while dense hair may need a broader bun for comfort.
Use lightweight smoothing cream for surface control, a fabric-covered elastic to establish the base, and bobby pins to secure the folded length. The full style is relatively quick on already dry hair, and a rainy-day refresh often means smoothing the surface and replacing one loose pin. If a stylist is preparing it, specify how high your coat collar sits and where your hood touches the back of the head. The bun should sit between those pressure points instead of rubbing constantly against either one. If damp air raises small flyaways, target those sections rather than adding more product through the complete head, which can make the roots look heavy.
Pro tip:
Wear your coat while choosing the final bun height. A slight adjustment upward or downward can keep the knot from rubbing against a stiff collar throughout the day.
Make It Work for You:
For very dense hair, build a wider, flatter bun rather than a compact ball. This distributes the weight and keeps the silhouette easier to cover with a hood.
Watch Out For:
Do not keep tightening the entire bun to control surface frizz. Address visible flyaways locally so the anchor stays comfortable and the front does not become overly stretched.
Twisted Low Ponytail Rainy Fall Hairstyle

A twisted low ponytail adds structure around the nape without creating the bulk of a bun beneath a hood. Part the hair in the center or slightly to one side, take two side sections, twist them backward, and join them above a low ponytail. Let the tail remain straight, softly wavy, or naturally textured. Medium to long lengths work well, and the twisted sides are especially useful when you want the temple area controlled without applying heavy smoothing product.
Use light styling cream to keep the twists neat, bobby pins to secure their meeting point, and a fabric-covered elastic for the ponytail. A full style is moderate effort, while a quick rainy-day refresh may involve only retwisting one side and resetting the ponytail base. If a stylist is creating it, specify how low you want the twists to meet and whether the ponytail needs to clear a scarf or high collar. The twist should have enough tension to hold its shape but should not pull sharply near the temples. If drizzle causes the front to swell or soften, smooth that area gently and preserve the twist rather than taking more hair into the ponytail, which can flatten the crown unnecessarily.
Pro tip:
Secure each twist before joining it to the ponytail. Independent anchors keep the side shape stable even if the tail shifts under a hood or scarf.
Make It Work for You:
For thick hair, use smaller side sections for the twists and leave more density in the ponytail. This keeps the nape from becoming too bulky beneath outerwear.
Watch Out For:
Avoid twisting damp hair tightly against the scalp for long wear. If rain has soaked the hair, let it dry appropriately rather than maintaining concentrated tension for hours.
Double Dutch Braids Rainy Fall Hairstyle

Double Dutch braids contain most of the hair from roots to ends, which makes them useful on days when rain and wind arrive together. Create a center part from the hairline to the nape and braid each side with even, comfortable tension. Keep the braids moderately close to the scalp through the crown, then allow a little more width through the lower lengths. Medium to long hair is easiest, while layered hair may need smaller sections around the temples to keep shorter pieces inside the weave.
Use light texturizing spray for grip, two snag-free elastics for the ends, and flexible hairspray to control surface flyaways. Braiding both sides takes longer than making a ponytail, but the finished style generally needs fewer outdoor touch-ups. If a stylist is braiding the hair, specify braid width and comfortable tension, especially around the hairline. If you wear a hood, ask that the upper braid profile stay relatively flat so fabric does not press on a raised ridge. A quick refresh after drizzle may involve smoothing the part or tightening an end. If one section loosens, repair it locally rather than tightening the entire braid from the front.
Pro tip:
Keep the crown braids compact and add width mainly below the ears. This leaves a smoother surface for a hood while maintaining visible braid texture through the lengths.
Make It Work for You:
For layered hair, work with smaller sections near the temples and larger ones toward the back. This can improve control without changing the overall two-braid design.
Watch Out For:
Do not use painful tension as a substitute for rainy-day security. A consistently woven braid can stay controlled without pulling much harder around the front hairline.
Curly Low Puff Rainy Fall Hairstyle

A curly low puff gathers the hair without requiring the natural texture to be smoothed straight before going outdoors. Let the curls dry into their normal pattern, then gather them near the nape with comfortable tension and allow the puff to expand behind the head. Keep complete curl groups intact through the lengths, and leave only the front curls you want visible. Medium to long curly hair works particularly well, while shrinkage determines the final puff height more accurately than stretched length.
Use lightweight leave-in conditioner for softness, curl gel for definition, and a soft hair tie for the low base. A full wash-day routine takes longer because the curls need time to dry, while a rainy-day refresh can focus on curl groups disturbed by a hood or light moisture. If a stylist is arranging the look, discuss the finished placement on dry hair and show where your coat collar ends. The puff should avoid constant rubbing at the nape. If humidity softens the outer definition, reshape those areas individually rather than brushing through everything. Tightening the base will not restore curl shape and may simply stretch the front more than you intended.
Pro tip:
After removing a damp hood, lift the puff from underneath before adding product. Many compressed curls regain shape with gentle movement and need only limited spot definition.
Make It Work for You:
For shorter curls, move the puff slightly higher and allow more side texture to remain free. This keeps the gathered shape without forcing every curl toward the nape.
Watch Out For:
Avoid brushing through curls that become fuzzy after drizzle. Redefine the affected groups with your existing styling product so the rest of the pattern stays undisturbed.
Coily Crown Puff Rainy Fall Hairstyle

A crown puff keeps coily ends lifted away from wet coat collars and scarves while preserving plenty of natural texture. Gather the hair toward the upper back of the head, keep the base comfortable, and shape the puff into a rounded silhouette after the coils are fully dry. The perimeter can stay softly textured or be more controlled according to your preference. Short-to-medium coily hair creates a compact puff, while longer hair produces more height and may work best with a roomy hood rather than fitted headwear.
Use moisturizing leave-in conditioner for softness, styling gel for targeted perimeter control, and a soft hair tie to secure the base. A full wash and definition routine can take considerably longer than a quick refresh, which may involve reshaping the puff after damp air or a loose hood compresses it. If a stylist is creating the style, specify the crown height and whether your outerwear has a hood that must fit around it. Judge the finished position after shrinkage is visible. If moisture changes the outer texture, adjust those coil groups individually instead of tightening the tie. The goal is to keep the puff secure while letting the natural texture remain flexible.
Pro tip:
Choose a roomy hood when possible and place it around the puff rather than pressing directly over it. This helps preserve volume while still providing rain coverage.
Make It Work for You:
For very dense coils, gather a slightly smaller crown section and leave more texture at the back. This reduces anchor weight while preserving the lifted rainy-day silhouette.
Watch Out For:
Do not pull the perimeter tighter every time moisture creates softness. Use targeted control where needed instead of increasing tension around the entire hairline.
Claw Clip Low Twist Rainy Fall Hairstyle

A low claw clip twist is easy to rebuild if your hairstyle shifts while putting a rain hood on and off. Gather the hair low at the back, twist upward only once or twice, fold the remaining length down, and secure it with a clip near the nape. Keep the crown fairly smooth and avoid placing the accessory where the hood seam presses directly against it. Medium to long hair works well, while dense hair needs a clip with enough capacity to close fully around the folded section.
Use light texturizing spray for grip and a sturdy claw clip sized to your density. Those two supplies are enough for this temporary style. A complete restyle is quick, and the rainy-day refresh may take only a minute if the twist loosens. If a stylist is arranging the look, specify how low the clip must sit to clear your hood and how much hair you want left around the face. The clip should stay secure without requiring a very tight twist. If drizzle dampens the loose front, tuck it back or reshape it after drying rather than repeatedly twisting the entire base tighter.
Pro tip:
Test your hood over the clip before leaving. If the fabric catches the clip arm, lower or flatten the twist so the accessory is not pushed every time you move.
Make It Work for You:
For thick hair, use a wider clip and create a broader folded twist. More accessory capacity gives security without forcing the hair into an uncomfortable narrow column.
Watch Out For:
Avoid an oversized clip that presses through the hood against your head. The twist may be secure, but repeated hard pressure can still make the style uncomfortable.
Braided Half-Up Rainy Fall Hairstyle
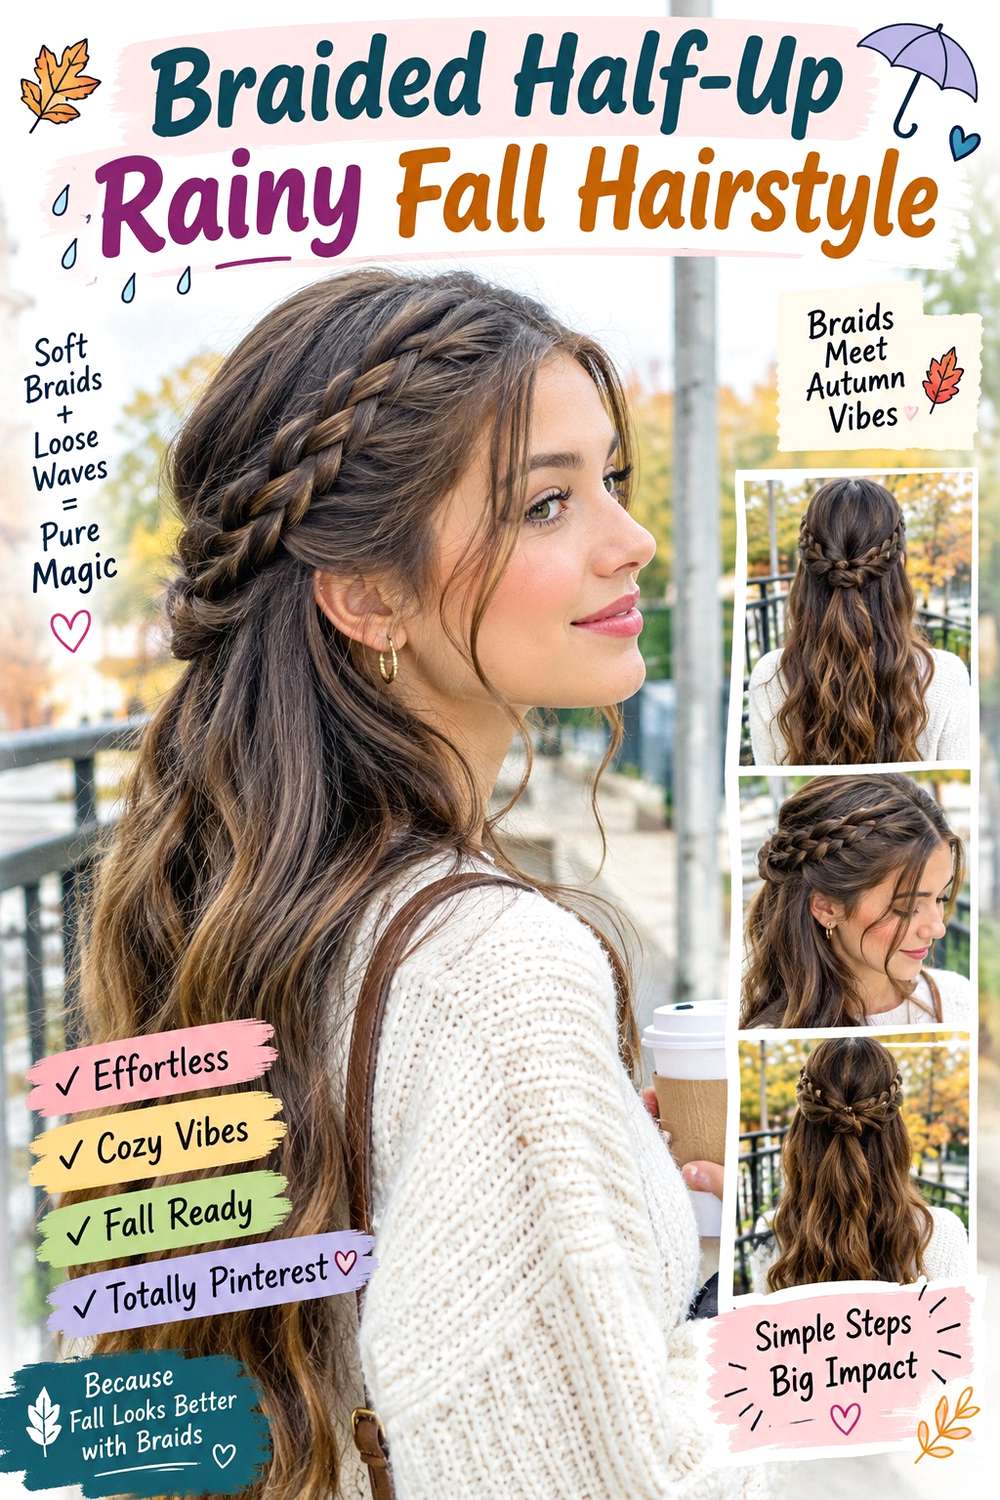
A braided half-up style controls the side sections while leaving the lower hair loose enough to keep natural movement. Create one narrow braid from each temple, direct both toward the back, and overlap or join them below the crown. Keep the lower lengths straight, wavy, curly, or coily according to your natural texture and routine. Medium to long hair works most easily, while lower-density hair usually benefits from smaller braids so the loose section retains visible fullness.
Use light texturizing spray for grip, small clear elastics for the braid ends, and bobby pins to secure the back meeting point. Full styling takes moderate time if the lower hair also needs setting, while a rainy-day refresh may involve only one braid edge or the front part. If a stylist is creating it, specify the braid width and anchor height, particularly if you need the style to fit comfortably beneath a hood. Keep the anchor below the thickest hood seam whenever possible. If humidity raises the loose lower texture, let that movement remain part of the style rather than trying to force every strand back into a polished finish. Repair only the sections that affect the overall silhouette.
Pro tip:
Keep the braids firmer near the temples and soften them slightly toward the back. The front stays controlled while the visible rear section keeps a relaxed texture.
Make It Work for You:
For naturally curly hair, braid only the side sections and leave complete curl groups loose below. This gives rainy-day control without rebuilding the entire natural pattern.
Watch Out For:
Do not gather too much hair into the braids. A heavy upper section can make the loose lengths look sparse and create unnecessary bulk under a hood.
Bubble Ponytail Rainy Fall Hairstyle
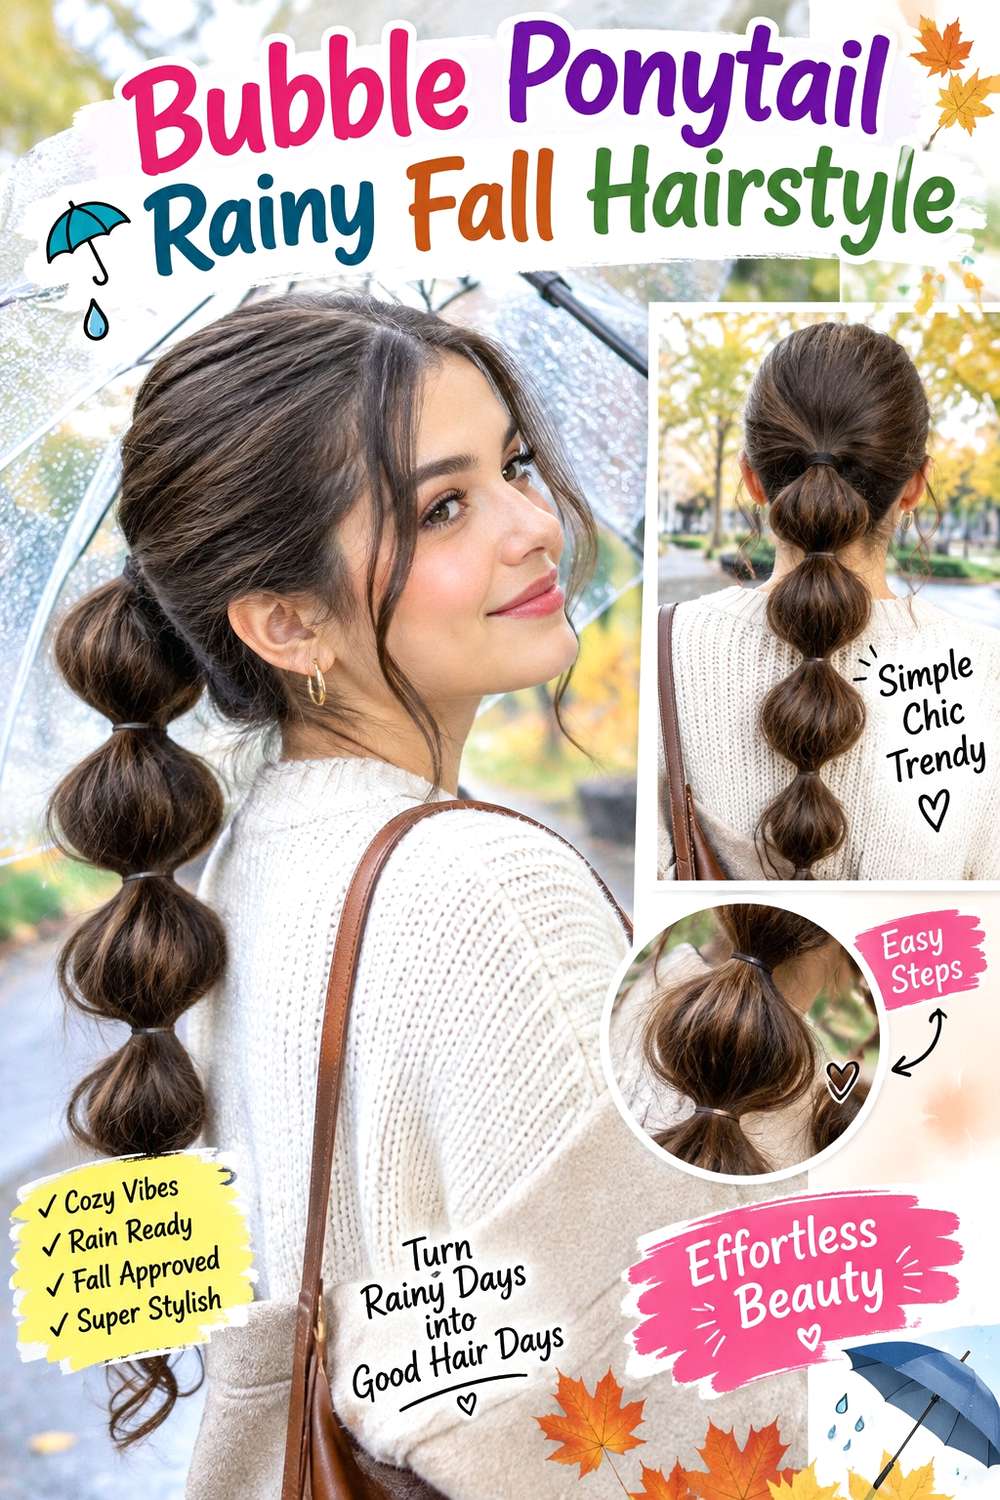
A bubble ponytail divides the length into controlled sections, reducing the amount of loose hair that can whip around or tangle when rain and wind arrive together. Start with a mid-low or low ponytail, add evenly spaced elastics down the length, and expand each bubble gently from both sides. Medium hair may need only one or two bubbles, while longer hair can support several. Keep the crown relatively smooth and let the repeated rounded sections provide the visible texture.
Use lightweight mousse for manageable body, snag-free elastics for every division, and flexible hairspray for flyaways around the base. The style is fairly quick, while a damp-weather refresh usually means reshaping one bubble that was compressed by outerwear. If a stylist is creating it, specify the ponytail height, bubble size, and where a scarf or hood will contact the length. The elastics provide the real structure, so the bubbles do not need aggressive pulling. If drizzle makes one section shrink or flatten, reset that individual bubble rather than tightening the entire ponytail. Keeping each section moderate in size also makes the hairstyle easier to fit under a rain hood without bulky pressure points.
Pro tip:
Put on your coat and hood before fully expanding the bubbles. This shows which sections have space to remain rounded and which should stay slightly more compact.
Make It Work for You:
For fine hair, create fewer, larger bubbles rather than many short divisions. Fewer elastics preserve visible fullness and keep the gathered length from looking too segmented.
Watch Out For:
Avoid expanding bubbles unevenly from one side. Damp weather can exaggerate a twisted shape, so alternate sides in small pulls until each section looks balanced.
Scarf-Friendly Lob Rainy Fall Hairstyle
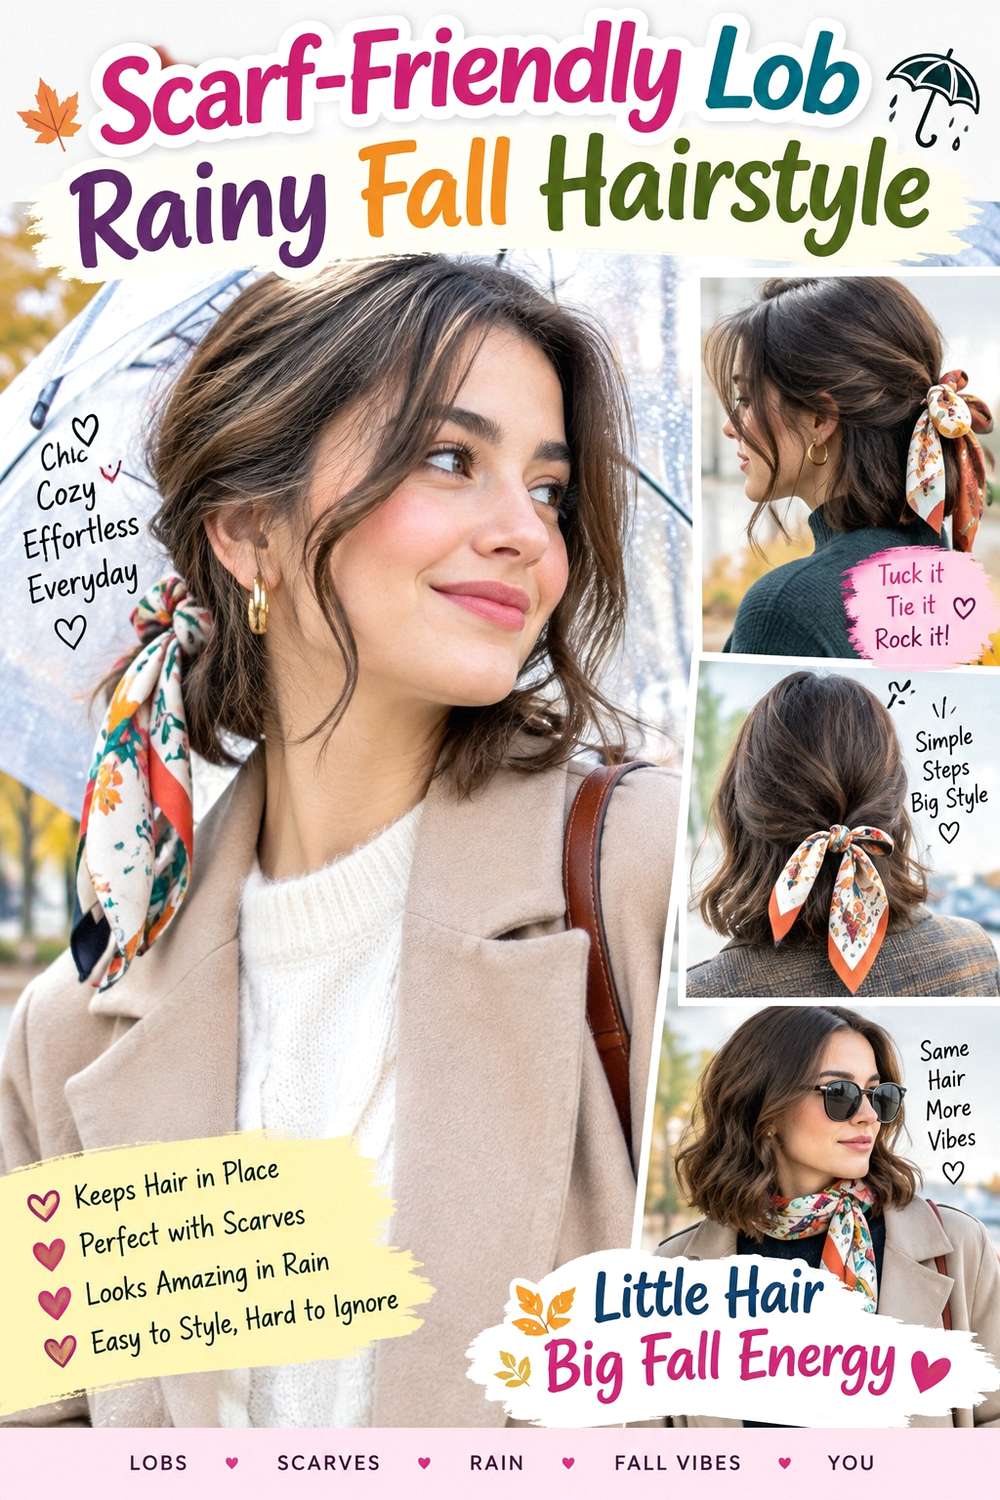
A shoulder- or collarbone-length lob reduces the amount of hair trapped inside damp scarves while still giving enough length for movement. Use a center or shallow side part, create broad bends through the mid-lengths, and keep the ends straighter so the perimeter remains visible. The strongest texture should sit above shoulder level, where scarf friction is less likely to flatten it. Straight and wavy textures adapt especially easily, while fine or sparse ends benefit from maintaining a fuller bottom edge.
Apply heat protectant before styling, use a medium curling iron for open bends, and finish with lightweight texturizing spray to separate the movement. A full wash-day set takes longer, while a rainy-day refresh may involve only the upper layer and front pieces. If you are discussing the cut with a stylist, show the exact perimeter landmark you want and explain how often you wear scarves during fall. Ask whether the bottom edge can retain enough weight for your density while the face frame provides movement. As the cut grows, reshape it when the perimeter stops sitting where intended. If mist softens the waves, refresh the most visible upper bends rather than recurling the entire lob.
Pro tip:
Keep the strongest bends above the scarf line and let the tips stay softer. This preserves visible movement even when the lower edge brushes against damp fabric.
Make It Work for You:
For naturally wavy hair, refine only the top and front sections. Your existing lower movement can remain less polished because it will receive the most scarf contact.
Watch Out For:
Avoid tightly curling the ends before wearing a scarf. Fabric pressure can make strong bends flip unpredictably, especially once moisture softens the styled shape.
Side Braid Rainy Fall Hairstyle
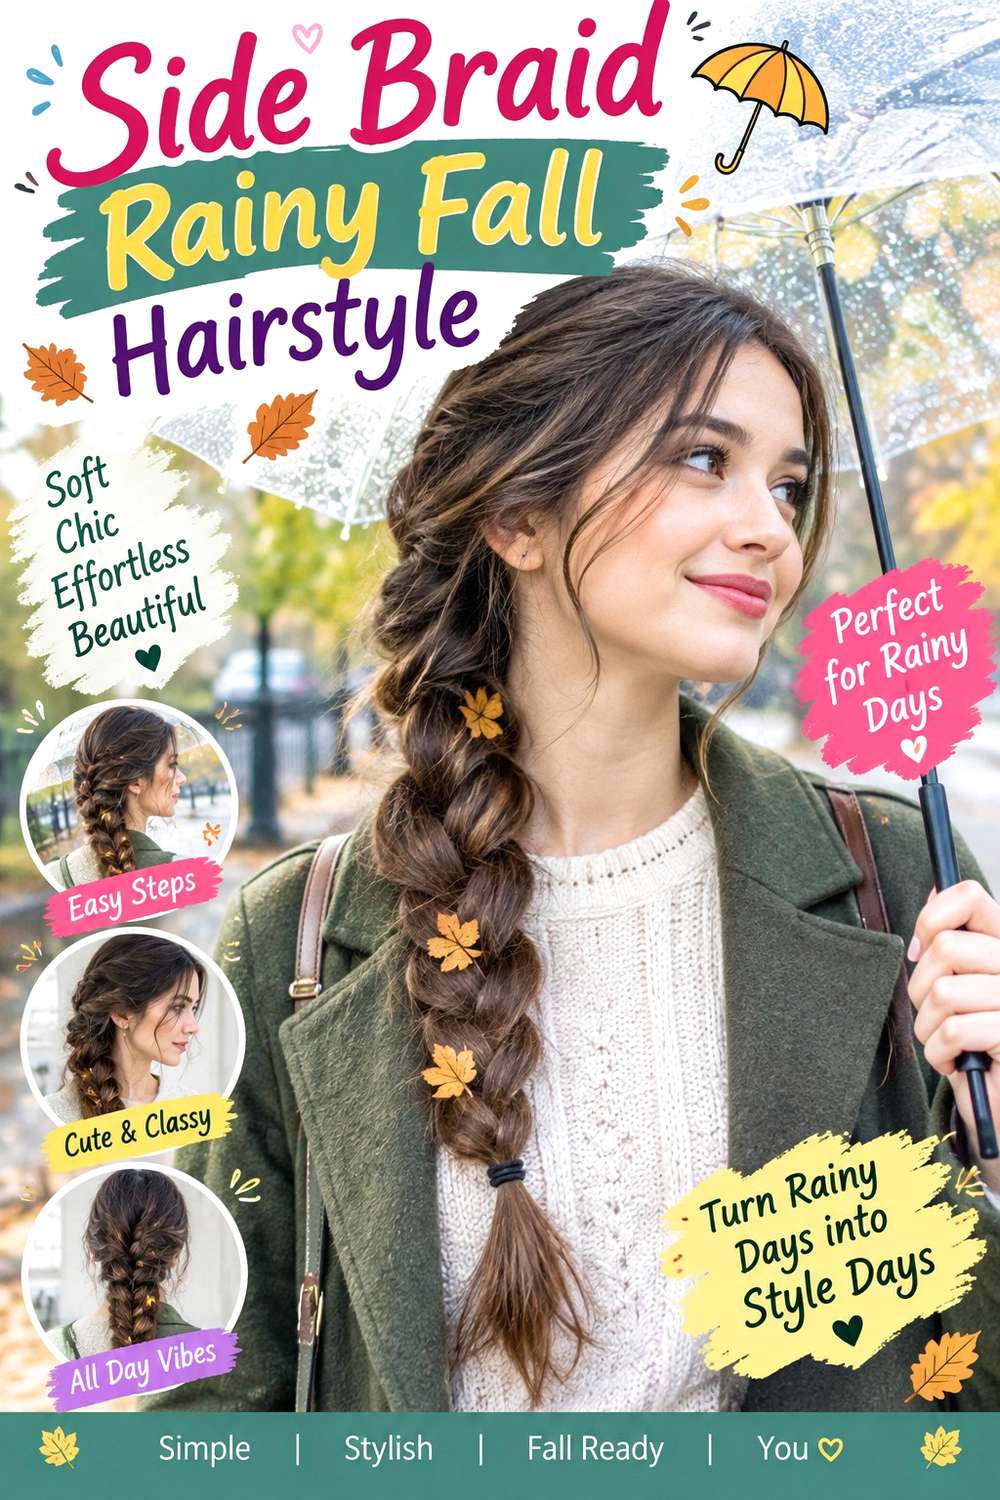
A side braid keeps the length forward over one shoulder, where it is easier to protect beneath an umbrella or coat. Create a shallow side part, sweep the hair to the opposite shoulder, and begin the braid below the ear. Keep the crown relaxed but contained, and leave only a narrow front piece loose if you are comfortable with it in drizzle. Medium to long hair is most practical, and naturally wavy or curly texture can give the woven section extra body.
Use light texturizing spray for grip, a small clear elastic for the end, and flexible hairspray to settle shorter flyaways. The style is relatively quick, and a rainy-day refresh may involve tightening the bottom passes after damp air softens them. If a stylist is preparing it, specify which shoulder you want the braid on, the finished width, and whether you will wear a hood. The upper braid should begin below any thick hood edge to avoid pressure. If layered pieces escape near the face, control those sections individually rather than increasing tension through the entire braid. A slightly relaxed surface can still look intentional, while the woven core keeps most of the hair from tangling outdoors.
Pro tip:
Keep the braid compact until you know how damp the day will be, then widen only the visible middle sections. A stronger internal weave handles moisture better.
Make It Work for You:
For dense hair, use a broader braid and leave the crown relatively flat. The length carries the fullness without creating extra bulk beneath a rain hood.
Watch Out For:
Do not leave several short pieces loose around the face on a wet, windy day. They can stick to the skin; release only sections you are happy to manage.
Low French Twist Rainy Fall Hairstyle

A low French twist keeps the ends contained and sits close enough to the head to fit beneath many loose hoods. Sweep the hair inward from one side, roll it toward the center near the nape, and secure the vertical seam before tucking the remaining ends. Keep the twist broader and lower rather than creating a tall formal roll. Medium to long hair works best, while naturally textured hair may give the hidden structure useful grip.
Use light texturizing spray through the lengths, bobby pins to secure the seam, and flexible hairspray for surface flyaways. Building the style takes more effort than a ponytail, but a rainy-day refresh may need only one additional pin and a quick smoothing pass. If a stylist is creating it, specify how low and flat the twist needs to sit beneath your hood and above your coat collar. Those two pressure points determine whether the updo stays comfortable. If moisture causes short layers to spring loose, secure them locally rather than adding pins everywhere. The hidden seam should carry the structure independently so the hood never needs to hold the roll in place.
Pro tip:
Test the finished twist beneath your hood before leaving. If the fabric pushes the roll upward, flatten or lower the shape slightly before adding the last structural pin.
Make It Work for You:
For dense hair, create a wider roll and distribute the hidden pins along the seam. This controls bulk without building unnecessary height under rain gear.
Watch Out For:
Avoid concentrating every pin in one spot at the nape. A bulky pin cluster can become uncomfortable when a wet hood or collar presses against it.
Center-Part Tucked Bob Rainy Fall Hairstyle

A center-part bob with the sides tucked back keeps short hair neat around the face when damp air makes flyaways more noticeable. Keep the perimeter around the jaw or chin, make the center part clean but not rigid, and tuck the side sections behind the ears. The ends can remain mostly straight with a slight inward bend or follow a soft natural wave. Straight and wavy textures work well, and a fuller perimeter helps the bob retain shape when moisture relaxes a polished finish.
Apply heat protectant before refining the cut, use a flat iron only where smoothing is needed, and finish with lightweight serum through the ends. A full wash-day finish takes longer because drying direction matters, while a rainy-day refresh may focus only on the front and tucked sections. If you are discussing the cut with a stylist, point to the exact finished perimeter length and mention that you frequently tuck the sides behind your ears in wet weather. That detail affects how the front blends with the bottom edge. As the bob grows, reshape it when the perimeter stops sitting cleanly. If mist creates a slight bend, work with it rather than repeatedly reheating dampened hair.
Pro tip:
Let the bob cool completely before tucking the sides. A settled finish is less likely to pick up a sharp crease from the ears or a rain hood.
Make It Work for You:
For naturally wavy hair, preserve the lower wave and refine only the front edge. The tuck keeps the face clear while the texture remains flexible in damp air.
Watch Out For:
Do not use a flat iron on hair that has become damp outdoors. Let the section dry first, then decide whether it genuinely needs a styling touch-up.
Rope Braid Ponytail Rainy Fall Hairstyle

A rope braid ponytail gives the length a compact twisted structure that is easy to rebuild if drizzle loosens the surface. Gather the hair low or at mid height, divide the ponytail into two sections, twist each one in the same direction, then wrap them around each other in the opposite direction. Keep the rope defined rather than heavily loosened. Medium to long hair works best, while dense hair can produce a substantial twist without extra expansion.
Use lightweight styling cream to keep the two sections controlled, a fabric-covered elastic for the ponytail base, and a small elastic for the rope end. Creating the style is fairly quick, and a rainy-day refresh may mean retwisting only the bottom portion. If a stylist is preparing it, specify the ponytail height and finished rope width, particularly if you need it to clear a hood or scarf. The anchor should remain comfortable at the nape or mid-back of the head. If dampness causes the rope to soften, retwist the affected lower section rather than pulling the base tighter. The structure comes from opposing twist directions, not from excessive tension near the scalp.
Pro tip:
Keep steady tension while twisting both sections, then secure the end before making any adjustments. A defined internal rope handles damp-weather movement better than an overly loosened one.
Make It Work for You:
For very dense hair, divide the ponytail into smaller rope sections and combine them near the end. This controls bulk while preserving the twisted visual effect.
Watch Out For:
Do not loosen the rope aggressively before heading outdoors. Moisture can soften the twist further, so start with a clear structure and adjust later if needed.
Headband Tuck Rainy Fall Hairstyle

A headband tuck controls the front without requiring a full updo, which can be useful on mild rainy days when you still want some length loose. Position a comfortable fabric-covered band just behind the hairline, then tuck small side sections beneath or behind it while allowing the lower lengths to remain straight, wavy, or naturally textured. Shoulder-length and longer hair gives more room for a complete tuck, while bobs can use the same idea only around the temples.
Use light styling cream for surface control and a fabric-covered headband with enough grip to stay put without strong pressure. These two supplies are enough for the basic style. Styling is quick, and a damp-weather refresh may involve retucking one side after a hood shifts the band. If a stylist is arranging the look, specify how much hair should remain in front of the accessory and whether you need space for glasses or a rain hood. The tucked section should feel secure without becoming bulky behind the ears. If drizzle changes the loose lower texture, let that movement remain rather than tightening more hair beneath the band.
Pro tip:
Set the headband first, then tuck only the sections that naturally reach it. This prevents you from creating unnecessary bulk by forcing shorter pieces backward under tension.
Make It Work for You:
For curly or wavy hair, keep the lower natural texture untouched and control only the front. This shortens styling time and makes damp-weather changes less noticeable.
Watch Out For:
Avoid a rigid band that becomes uncomfortable beneath a hood. Choose a flexible accessory so rainy-day security does not depend on strong pressure behind the ears.
Glossy Low Ponytail Rainy Fall Hairstyle

A glossy low ponytail gives straight or softly textured hair a controlled silhouette when you expect humidity to disturb loose styling. Create a center or soft side part, smooth the side sections toward the nape, and secure the ponytail low enough to fit beneath a hood but high enough to clear a stiff collar. Keep the tail relatively natural rather than trying to make every strand perfectly straight. Medium to long hair works well, while finer density benefits from using smoothing products sparingly through the ponytail itself.
Use lightweight smoothing serum for shine and surface control, a soft brush to guide the sides, and a fabric-covered elastic for the anchor. A full wash-day finish may take longer if the roots need thorough drying, while a rainy-day refresh often involves only the front and part line. If a stylist is creating it, specify the ponytail height and whether you prefer the ears covered or exposed; that changes how the sides are directed. If moisture creates small flyaways, smooth them selectively instead of layering more serum everywhere. The ponytail should remain secure through the elastic rather than through a heavily coated, rigid surface.
Pro tip:
Apply the smallest amount of serum first and add only where needed. Keeping the roots lighter helps the glossy finish stay separated instead of looking weighed down.
Make It Work for You:
For naturally wavy hair, keep the ponytail lengths softly textured and smooth only the crown. The contrast gives control without requiring complete straightening before rainy weather.
Watch Out For:
Do not overload the roots with serum in an attempt to stop humidity. Too much product can collapse volume and make the surface look heavy once moisture is present.
Defined Natural Curls Rainy Fall Hairstyle

Defined natural curls can be practical in rainy fall weather when the styling plan supports the existing pattern instead of trying to force a different texture outdoors. Let the curls form in their usual part, keep complete curl groups around the face, and choose whether the sides stay loose or tuck gently behind the ears. Short, medium, and long curls can all work. The most useful shape depends on shrinkage, density, and where a hood sits rather than one ideal length or volume.
Use lightweight leave-in conditioner for softness, curl gel for definition, and a diffuser if that drying method is part of your routine. A full wash-day set takes longer because curls should dry fully before a hood goes on, while a rainy-day refresh can target only groups that became flattened or fuzzy. If a stylist is shaping your curls, discuss the dry finished length around the face and crown, especially where the hood may compress volume. Avoid relying on wet measurements for fringe or front layers because shrinkage varies. After light drizzle, let dampened sections settle or dry before judging them. Redefine individual curl groups rather than applying more product over the entire head.
Pro tip:
Make sure the curls are fully dry before putting on a hood whenever possible. Compressing partly damp curl groups can change their shape more noticeably as they finish drying.
Make It Work for You:
For dense curls, tuck only the sections nearest the ears and leave the upper volume free. This creates room for a hood edge without flattening the complete silhouette.
Watch Out For:
Do not brush through curls after drizzle creates frizz. Work with individual curl groups instead; broad brushing can disturb definition far beyond the areas actually affected by moisture.
Conclusion
Hairstyles for rainy fall days are easiest to maintain when they work with your texture, outerwear, and realistic styling routine. Braids and rope styles contain more of the length, while low buns, ponytails, and French twists create compact shapes beneath hoods. Bobs and lobs reduce scarf friction, and curls or coils can stay natural when their finished dry shape guides placement. Density affects how much hair should be gathered, while parting and face framing change how exposed the front remains. Consider the difference between a full wash-day style and a quick damp-weather refresh. The most useful choice is one that stays comfortable, tolerates some softness, and lets you repair one section without starting over.
Before Your Salon Visit
Choose one or two favorite references and save clear front, side, and back views. Discuss your natural texture, density, face shape, preferred length, upkeep, and usual fall routine, including rain hoods, scarves, and coat collars. Point out the exact face-framing length, braid width, ponytail height, bun placement, perimeter, volume, or finish you like. For temporary rainy-day styles, focus on comfortable anchoring and practical placement rather than requesting a haircut solely to make one braid, puff, or ponytail work.
FAQs
What Hairstyles Hold Up Best on Rainy Fall Days?
Braids, low buns, twists, ponytails, and gathered puffs usually keep more hair controlled than fully loose styling. The best option depends on texture and outerwear. Choose a stable anchor, then repair only the sections affected by dampness instead of tightening the entire hairstyle repeatedly.
How Can I Reduce Frizz When It Is Damp Outside?
Use a styling routine suited to your texture and avoid overhandling the hair once you are outdoors. Keep loose sections limited, let dampened hair dry before using heated tools again, and refresh only visibly affected areas. No product can guarantee completely humidity-proof hair in every condition.
Can Curly or Coily Hair Be Worn Naturally in Rainy Weather?
Yes. Curls and coils can remain natural in puffs, loose defined styles, braids, or half-up shapes. Make placement decisions after the hair is fully dry so shrinkage and volume are visible. If drizzle changes a few sections, redefine those groups rather than brushing through the complete hairstyle.
What Should I Do if My Hair Gets Damp Under a Hood?
Remove the hood indoors when practical and let the affected hair dry or settle before judging the shape. Smooth, retwist, or redefine only the sections that changed. Avoid immediately using heated tools on damp hair, and check whether the hood seam or anchor placement caused the flattening.