14 Hairstyles to Wear With Berets for Chic Fall Style

Hairstyles to wear with berets work best when the visible hair and the hat placement are planned together. A beret can sit centered, angled to one side, or pushed slightly toward the back, so the most useful styles keep unnecessary bulk away from the crown while showing shape around the face and below the ears. Soft waves, low buns, braids, bobs, fringe, curls, and coily textures all offer different ways to create movement without competing with the hat.
Texture and density affect how each option behaves. Fine strands may benefit from a fuller perimeter and lighter styling products, while dense hair often needs thoughtful placement so a braid or bun does not become bulky beneath the beret. Curly and coily hair needs enough room for its natural volume and shrinkage. Face-framing pieces can finish near the cheekbones, jaw, or chin depending on the proportion you prefer.
Styling effort ranges from a quick low ponytail or braid to a longer wash-day curl routine or heat-styled wave set. Berets can also create friction, dents, static, or slipping, so secure placement matters. Most ideas are temporary and need no special haircut, although bangs, bobs, and layered shapes require occasional reshaping as they grow.
Quick List
- Soft Side-Parted Waves With Tilted Beret Hairstyle
- Low Chignon Under Classic Beret Hairstyle
- Curly Bob With Angled Beret Hairstyle
- French Braid With Back-Set Beret Hairstyle
- Sleek Low Ponytail With Leather Beret Hairstyle
- Curtain Bangs With Centered Beret Hairstyle
- Natural Curls With Slouchy Beret Hairstyle
- Half-Up Twist With Wool Beret Hairstyle
- Tucked Lob With Side-Worn Beret Hairstyle
- Loose Side Braid With Felt Beret Hairstyle
- Straight Blunt Bob With Minimal Beret Hairstyle
- Low Pigtail Braids With Knit Beret Hairstyle
- Textured Low Bun With Plaid Beret Hairstyle
- Soft Coily Puff With Back-Tilted Beret Hairstyle
Soft Side-Parted Waves With Tilted Beret Hairstyle

A deep or moderate side part works naturally with a beret tilted in the opposite direction, creating an asymmetrical shape without needing extra crown volume. Keep the roots fairly smooth, then form broad waves from around the cheekbones through the mid-lengths. Leaving the final inch or two a little straighter prevents the ends from becoming overly rounded. One side can sit behind the ear while the fuller side falls forward, giving the visible hair movement beneath the angled hat.
Shoulder-length and longer hair carries this shape most clearly, especially straight or wavy textures that hold a loose bend. Use heat protectant before thermal styling, a large-barrel curling iron to make wide curves, and flexible hairspray for movable hold. A quick refresh between washes usually means reshaping the front bend and finger-combing flattened sections; a complete wash-day set takes longer depending on length and density.
Frizz along the beret edge can be smoothed without recoiling every wave. If you are having the hair styled professionally, show exactly where you want the beret to tilt and where the strongest face-framing wave should begin. That placement matters more than creating height at the roots, which the hat will largely cover.
Pro tip:
Curl the visible front section away from the face and let it cool completely before separating it. A settled bend is less likely to collapse when you place the beret.
Make It Work for You:
For fine or lower-density hair, create fewer, broader waves and keep the ends relatively full. Concentrating movement through the front prevents excessive separation through the bottom edge.
Watch Out For:
Avoid placing the beret over freshly lifted roots. Extra height beneath the hat can create an awkward bump and unstable fit, so direct volume toward the visible side instead.
Low Chignon Under Classic Beret Hairstyle
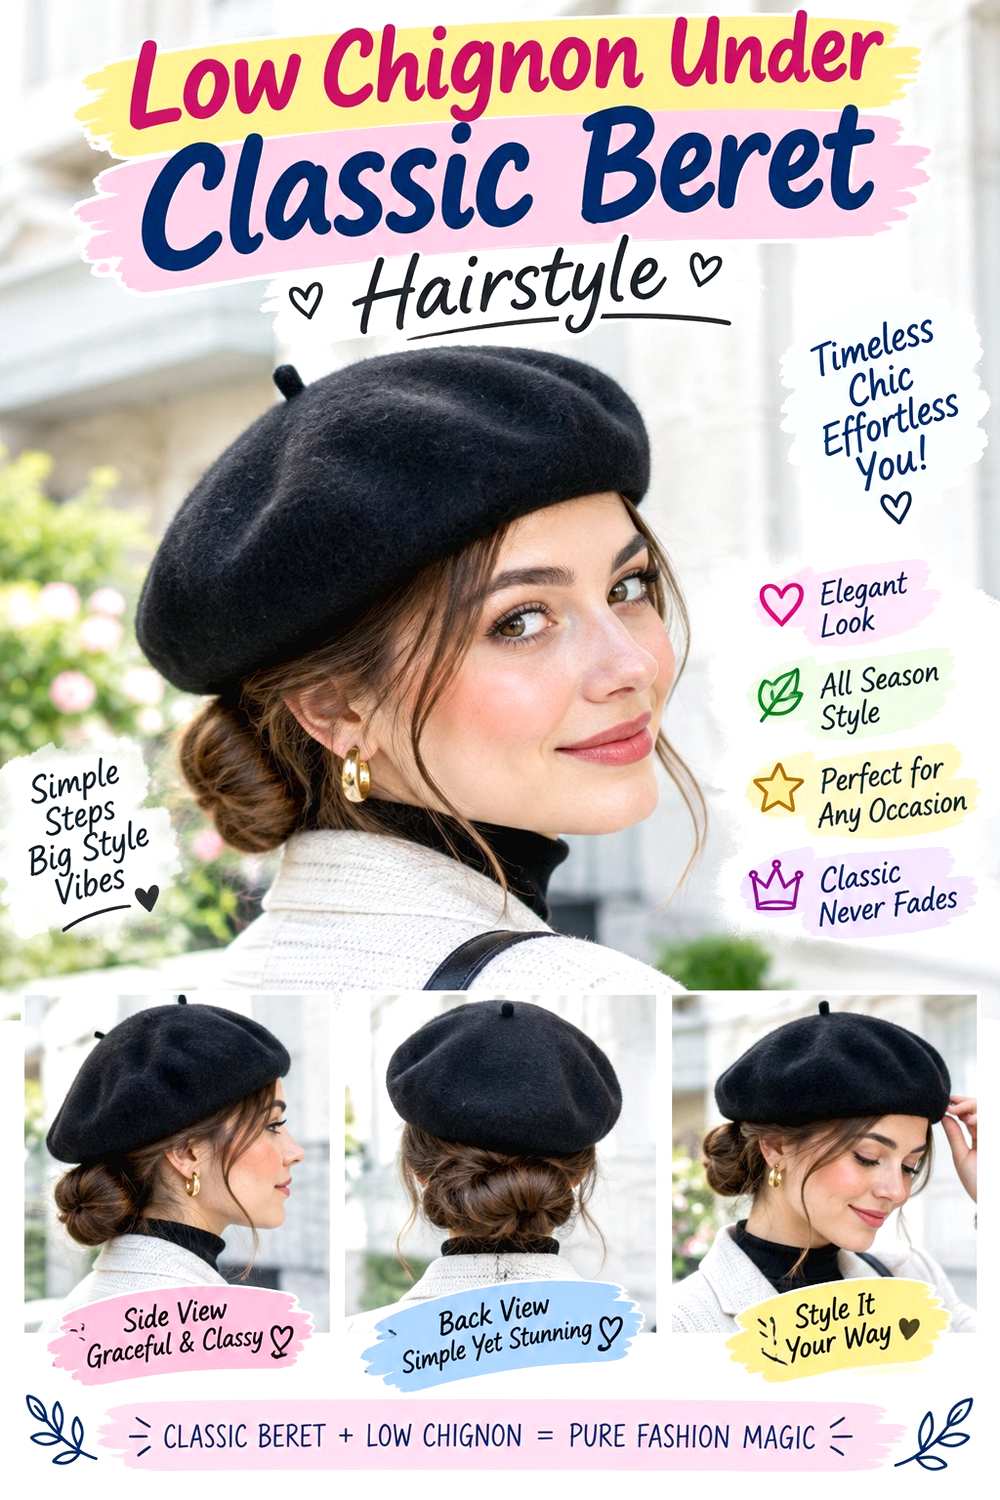
A low chignon keeps almost all of the structure beneath the back edge of a classic beret, making it useful when you want a polished silhouette with little hair on the shoulders. Choose a center or soft side part, smooth the crown, and gather the length at the nape. Twist or fold the hair into a compact horizontal coil rather than stacking the bun upward. Narrow pieces around the temples can remain loose if you prefer a softer frame.
Medium to long hair is easiest to secure this way, and dense hair can be spread slightly wider at the nape to reduce projection. A fabric-covered elastic creates a stable base, bobby pins hold the folded sections, and flexible hairspray controls surface flyaways. A quick refresh usually involves replacing a loose pin and smoothing the front. Starting again after a full wash takes longer if the hair also needs drying or smoothing.
If the chignon begins dropping as the day goes on, rebuild the base instead of adding random pins around the outside. For salon styling, bring the beret and point out where its lower edge rests. Ask for the chignon to sit just beneath that line with comfortable tension around the temples and ears, so the hat can be removed without pulling the entire style apart.
Pro tip:
Test the beret before inserting the final outer pins. Turning your head from side to side will reveal whether the bun touches the hat or creates pressure at the nape.
Make It Work for You:
For very dense hair, spread the chignon laterally across the nape instead of building a tall coil. The wider shape reduces bulk while keeping the same elegant low placement.
Watch Out For:
A chignon positioned even slightly too high can push the back of the beret upward. Lower the bun rather than forcing the hat forward to compensate for the bump.
Curly Bob With Angled Beret Hairstyle
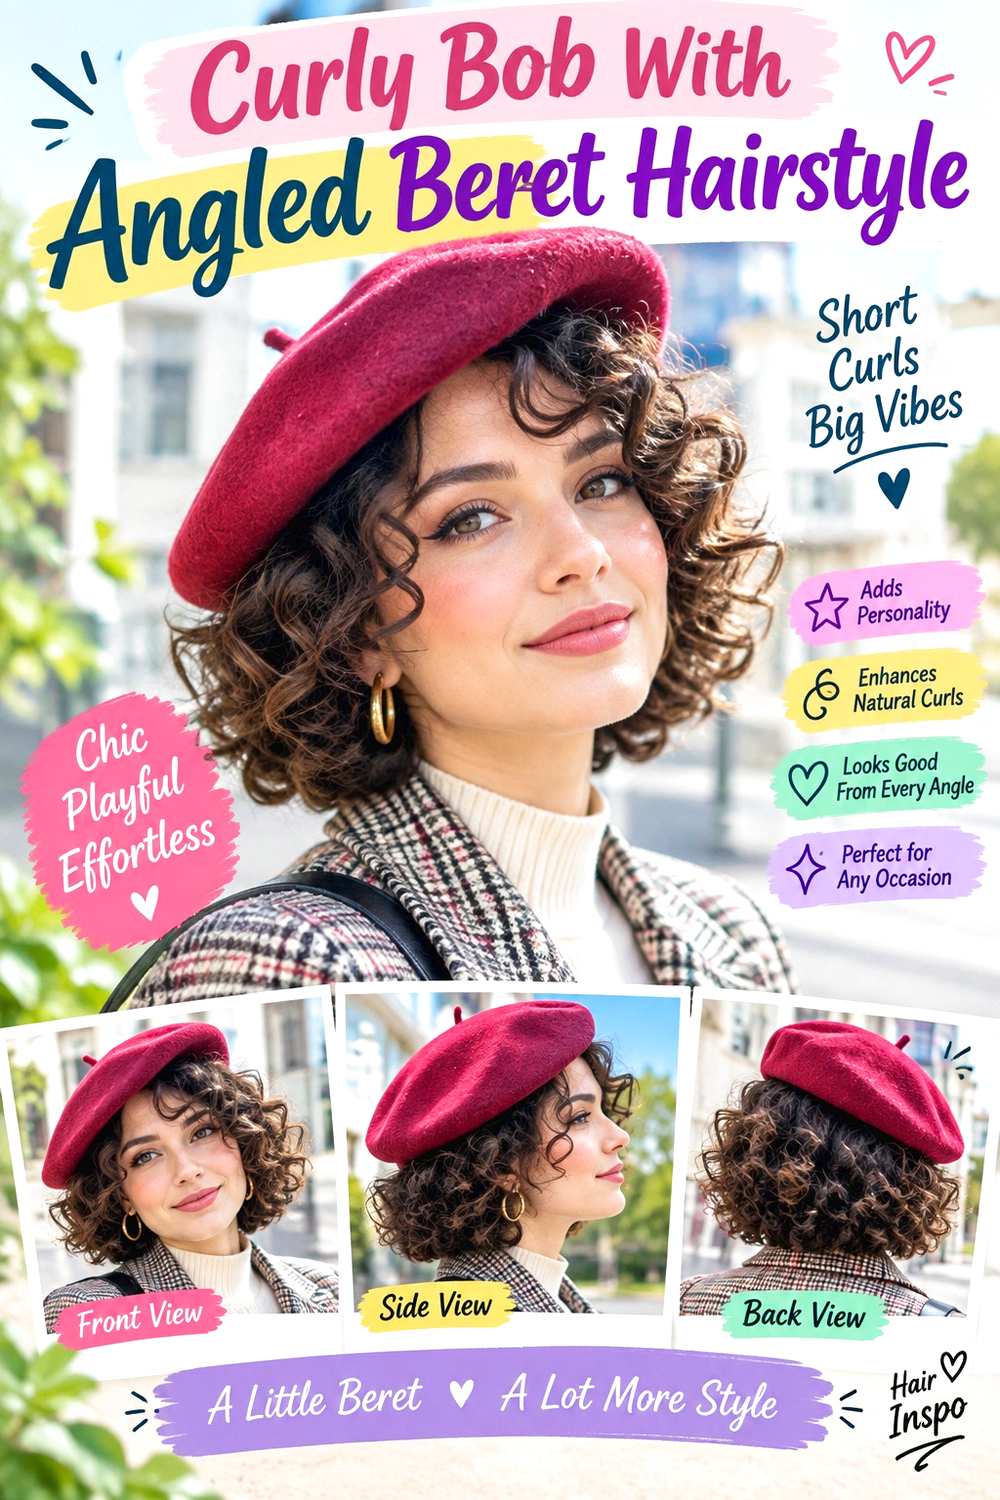
A curly bob gives an angled beret a strong outline because the hat sits above a visible ring of curls around the cheeks, jaw, and neck. The bob can finish near the jaw or slightly lower, while the beret tilts enough to reveal more curl volume on one side. Keep the part natural or gently shifted rather than forcing a severe line through curls that prefer another direction. The shape looks most balanced when curl groups remain defined rather than being brushed into uniform fluff.
Naturally curly hair can use a lightweight leave-in conditioner for moisture, curl gel for definition, and a diffuser for controlled drying. A short refresh between washes may involve dampening two or three flattened curls around the beret edge, while a full wash-day routine takes considerably longer depending on density and drying time. Avoid repeatedly restyling unaffected sections simply because the hat changes the crown shape.
Bob maintenance is separate from daily curl styling. When the perimeter grows beyond the shape you want or the front starts hanging differently, it may be time to reassess the cut. At the salon, show the desired dry finished length and explain where you wear the beret. Curl shrinkage varies, so the front and perimeter should be judged in their normal state rather than by a universal stretched measurement.
Pro tip:
Dry the curls completely before positioning the beret, then lift only the sections that remain visible around its lower edge. This preserves definition while keeping the crown controlled.
Make It Work for You:
If your curls are very dense, keep the strongest width below the ears and let the hat cover a calmer crown. You still retain the rounded bob without excessive side bulk.
Watch Out For:
Do not drag the beret repeatedly across dry curls while adjusting its angle. Lift it completely, reposition it, and set it down again to reduce friction and frizz.
French Braid With Back-Set Beret Hairstyle
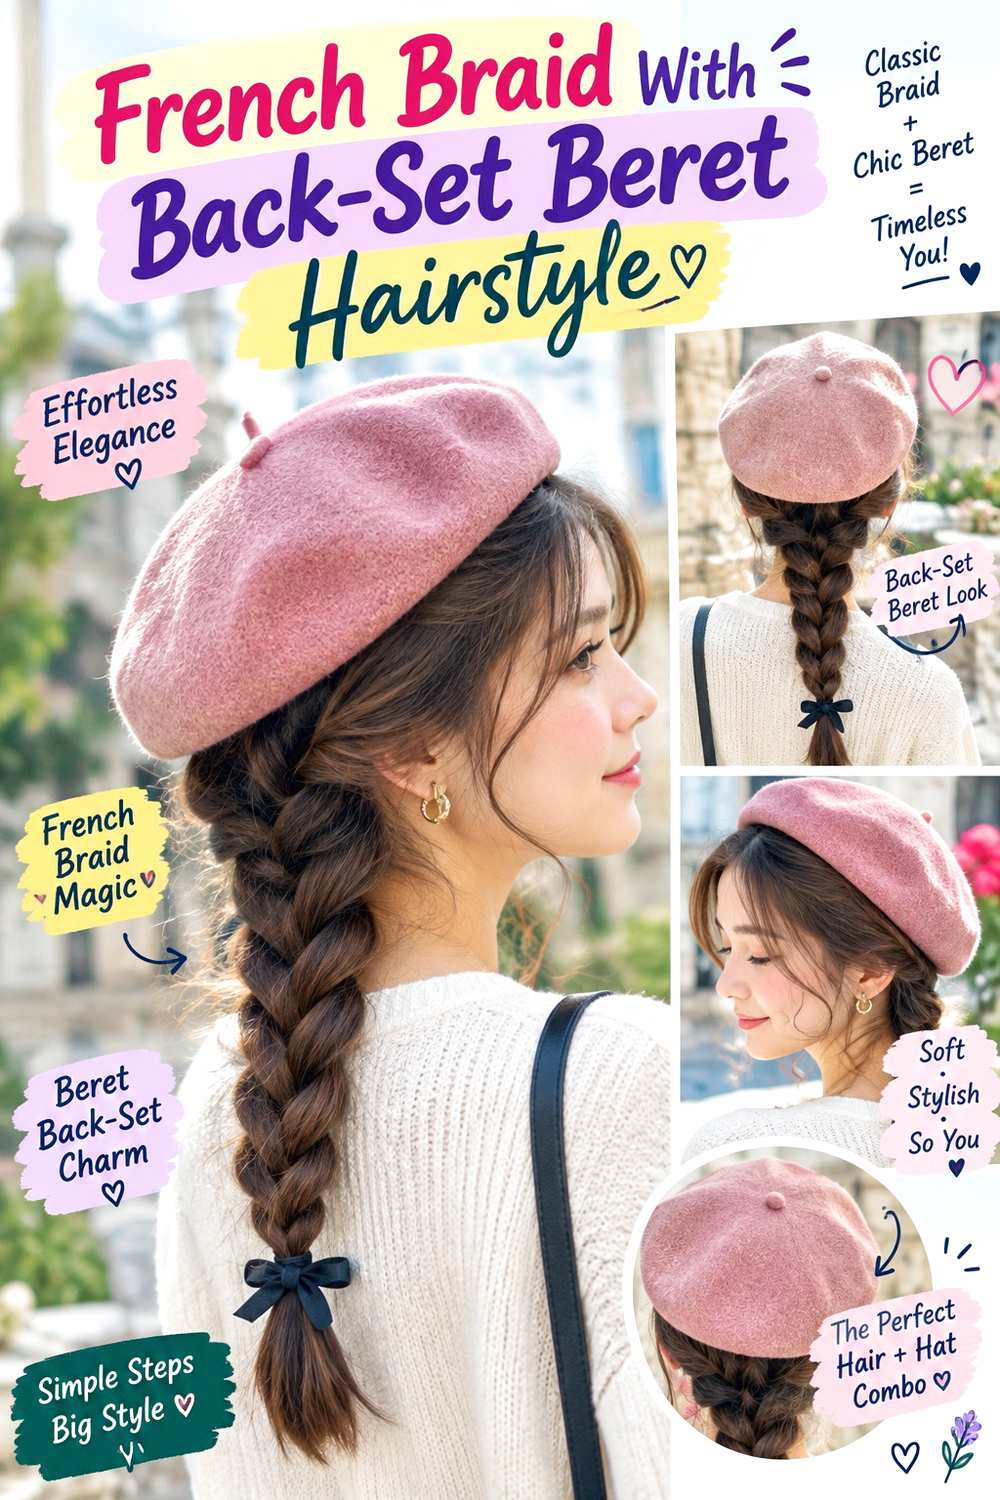
A single French braid creates a neat center line while allowing a beret to sit farther back on the head. Begin the braid behind the front hairline and keep the woven section close to the scalp until it reaches the nape, then continue through the loose length. The crown should remain smooth enough for the beret to rest without a large ridge. A few short pieces near the temples can stay free, especially if the hat is worn behind the hairline rather than low across the forehead.
Medium to long hair suits the design, and it is particularly practical when scarves or windy weather make loose lengths inconvenient. A lightweight styling cream adds enough grip to control flyaways, and a fabric-covered elastic secures the braid end. A quick refresh may mean tightening one loose crossing near the nape; recreating the entire braid after washing takes longer and depends on your braiding experience.
The braid should feel secure without pulling at the scalp. If the upper crossings loosen dramatically after hat removal, adjust the anchor rather than increasing tension everywhere. For professional styling, explain how far back the beret will sit and how wide you want the visible braid to appear. Comfortable tension at the crown is essential because the beret will add contact over that area.
Pro tip:
Keep the first braid crossings fairly flat and compact, then allow a little more width below the beret. This gives the hat a smoother surface while keeping texture visible.
Make It Work for You:
For layered hair, begin with slightly smaller sections near the crown so shorter pieces are caught gradually. Leave only the pieces that cannot reach comfortably instead of over-tightening them.
Watch Out For:
Pulling the braid outward at the crown can create a raised ridge that makes the beret wobble. Loosen only the sections that fall below the hat line.
Sleek Low Ponytail With Leather Beret Hairstyle
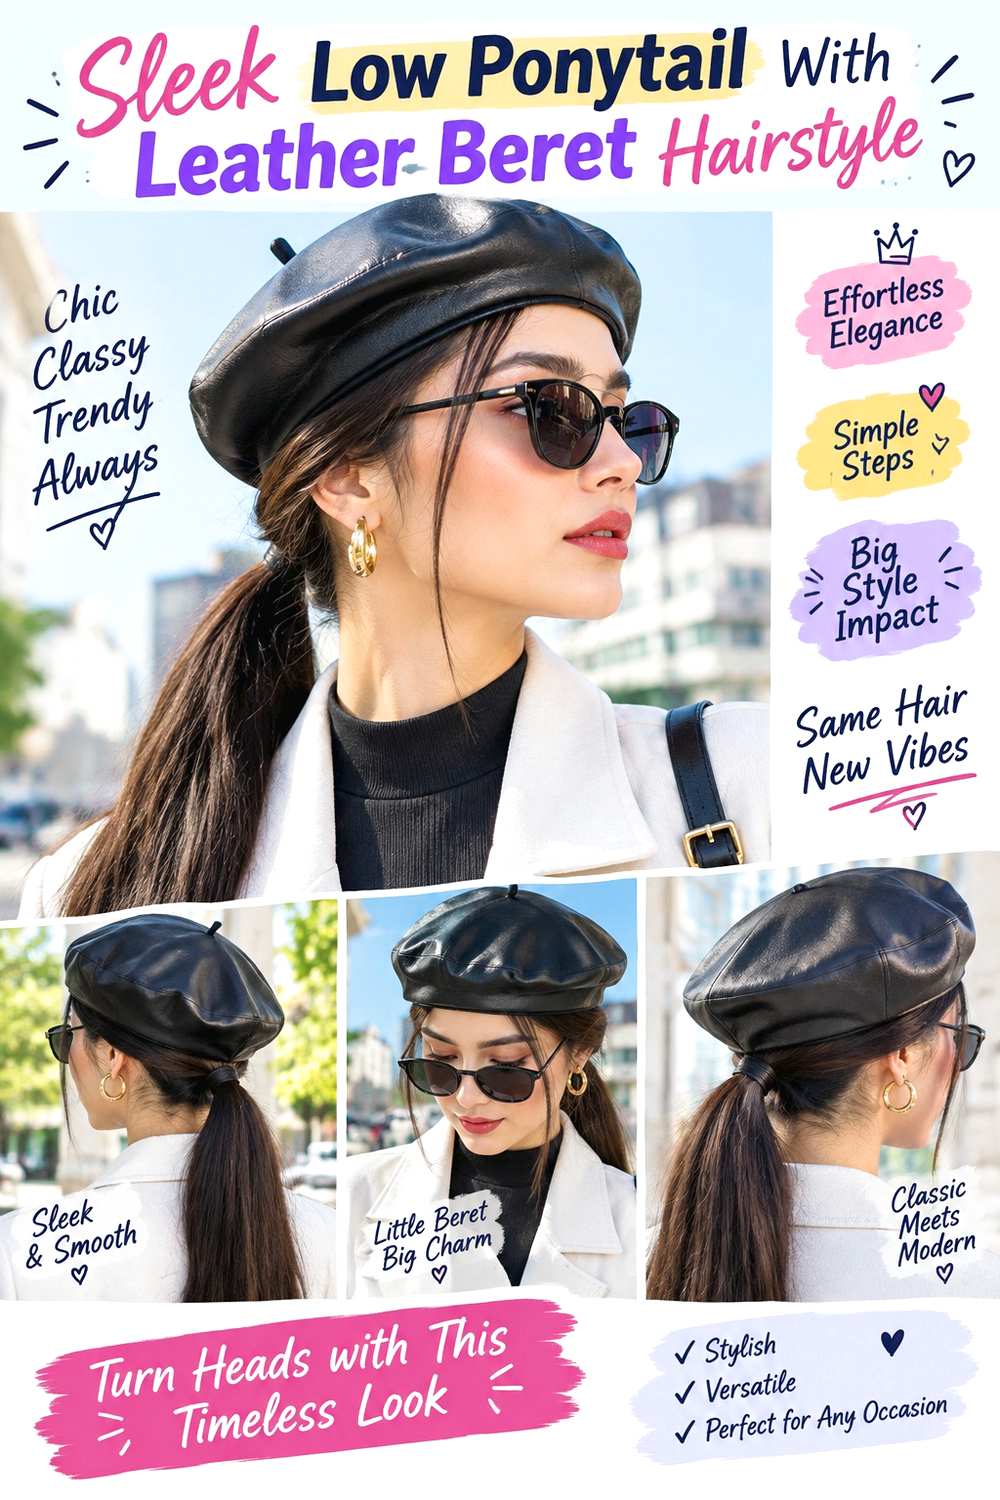
A sleek low ponytail pairs naturally with the cleaner surface of a leather beret because both shapes stay compact around the crown. Create a center or sharp side part, smooth the hair toward the nape, and secure the ponytail below the hat’s lower edge. The lengths can remain straight, softly bent, or naturally textured, but the defining feature is the controlled surface above the elastic. A narrow face-framing piece can be left out if you want less severity around the front.
Straight, wavy, curly, and coily hair can all use this structure without needing the same degree of smoothing. A soft bristle brush guides the surface, a fabric-covered elastic anchors the ponytail, and a light styling cream manages flyaways. A brief refresh between washes means resetting the part or smoothing the crown, while a full styling session depends on whether you are also changing your natural texture.
If the ponytail begins sagging, replace the base rather than making the beret tighter. For salon styling, specify the exact ponytail height in relation to the back of the hat and the amount of tension you find comfortable. If you want the lengths straightened or curled, discuss that separately from the low placement so the anchor remains the main structural detail.
Pro tip:
Place the beret once before securing the final ponytail. Note where its back edge falls, then position the elastic just below that point so the two do not compete.
Make It Work for You:
If you want to preserve curls or coils, smooth only the crown and leave the ponytail texture untouched. The sleek contrast remains without requiring the entire length to be straightened.
Watch Out For:
Combining a very tight ponytail with a snug beret can cause uncomfortable pressure. Loosen the base slightly and rely on a stable elastic instead of extra pulling.
Curtain Bangs With Centered Beret Hairstyle

Curtain bangs can remain fully visible when a beret is centered slightly behind the fringe rather than pulled down over it. The shortest part of the bangs usually opens around the brows or cheekbones, with longer outer corners blending toward the temples. A center part reinforces the split shape, while the rest of the hair can fall straight, wavy, or softly curled. Keeping the beret behind the fringe prevents its lower edge from flattening the main face-framing feature.
This option works best when the bangs already cooperate with a center opening, although growth direction may require extra morning styling. Use heat protectant before thermal shaping, a small round brush to direct each side away from the face, and light hairspray to keep the bend flexible. A fringe-only refresh is relatively quick; washing and styling the full head takes longer based on texture and length.
Bang upkeep is more frequent than maintenance for the rest of many cuts because a small amount of growth can change where the center falls. At the salon, show the exact finished length you want through the middle and the longer outer corners. Explain that you wear berets behind the fringe so the stylist can assess how the bangs sit without relying on the hat to hold them in place.
Pro tip:
Direct each half of the fringe away from the face while it is still slightly damp, then let the shape settle before putting on the beret behind the bangs.
Make It Work for You:
For wavy hair, allow the fringe to keep some natural bend instead of forcing a perfectly smooth curtain. Preserve the center opening and longer outer corners as the defining details.
Watch Out For:
Do not position the beret directly on the fringe roots after styling. The pressure can split or flatten the bangs unevenly; move the hat slightly farther back instead.
Natural Curls With Slouchy Beret Hairstyle

A slouchy beret leaves more visual space for natural curls because it can sit lightly toward the back instead of compressing the entire crown. Let the curls fall around the cheeks, shoulders, or upper back according to your length, and allow the part to follow the way the curl pattern naturally separates. The beret should rest securely without being pulled so low that it flattens the sides. Visible volume can remain below and around the hat rather than being concentrated underneath it.
Curly hair of different densities can use this shape, but dense curls may need a little more room inside the hat. A lightweight leave-in conditioner supports moisture, curl gel helps maintain grouping, and a diffuser dries the pattern with less disturbance. A short refresh may involve rewetting and reshaping only the flattened top curls, while a full wash-day routine takes longer and varies substantially with density, length, and drying method.
Avoid brushing the whole head dry merely to restore volume after removing the beret. For salon shaping, explain how much of your curl volume you like visible around the hat and where your face-framing pieces usually finish. If trimming is involved, discuss the dry shape and normal shrinkage so the silhouette works both with the beret and on days you wear your hair uncovered.
Pro tip:
Arrange the curls you want visible before setting the beret in place. Lower the hat gently from above instead of pulling it through the curl pattern from front to back.
Make It Work for You:
For lower-density curls, keep the beret farther back so more of the front and side pattern remains visible. Avoid separating every curl, which can reduce definition and fullness.
Watch Out For:
Repeatedly fluffing underneath the hat can loosen curl groups and create frizz without useful volume. Adjust visible curls individually, especially around the temples and lower edge.
Half-Up Twist With Wool Beret Hairstyle

A half-up twist controls the front and side sections while leaving the lower hair loose beneath a wool beret. Take small sections from above each ear, twist them backward, and connect them low enough that the fastening point sits beneath the rear edge of the hat. The remaining length can be straight, wavy, or naturally curly. Keeping the crown relatively flat lets the beret sit securely, while the twists add detail around the sides when viewed from an angle.
Medium to long hair works best because the lower lengths remain an important part of the silhouette. Use a small grip clip to secure the twists and a light texturizing spray to add traction when smooth hair tends to slip. A quick refresh usually means tightening the clip or rebuilding one twist; a complete wash-day style may take longer if you also set waves or reshape curls.
The hat should not be responsible for holding the twists in place. If the anchor slips, reset it independently rather than pinning the beret tighter. For salon or event styling, bring the beret and show where its back edge falls. Ask for the twist connection to remain below that line, and specify how much hair you want left around the face so the front does not feel overly pulled back.
Pro tip:
Cross the two twisted sections before fastening them rather than simply laying them side by side. The overlap gives the low anchor more structure without adding noticeable bulk.
Make It Work for You:
For fine hair, gather smaller side sections so more density remains through the loose lengths. Keep the twists narrow and let the lower hair provide most of the movement.
Watch Out For:
A clip placed too high can push the back of the beret upward. Move the fastening point toward the nape rather than trying to conceal the bump beneath the hat.
Tucked Lob With Side-Worn Beret Hairstyle

A shoulder-skimming lob looks especially clean with a beret worn to one side because one section can tuck behind the ear while the opposite side stays loose. Keep the bottom edge full around the collarbone, with only enough layering to create movement without thinning the perimeter. A side or off-center part supports the angled hat placement, and a subtle bend through the ends prevents the lob from looking rigid against autumn collars and jackets.
Straight and wavy textures need relatively little adjustment, while curly hair can use the same asymmetry with a naturally shaped perimeter. Use heat protectant before thermal styling, a flat iron to create a slight bend rather than a pin-straight finish, and lightweight serum to control the visible ends. A quick refresh focuses on the tucked section and front bend; a full wash-day finish takes longer depending on density and starting texture.
Cut maintenance becomes noticeable when the lob grows past the intended collarbone line or its outer edge loses the shape you like. At the salon, point to the exact perimeter length and specify which side you usually tuck beneath a beret. If you want face framing, identify the shortest finished point instead of asking vaguely for extra layers that could remove more weight than you prefer.
Pro tip:
Tuck the smaller side before placing the beret, then angle the hat away from that ear. This keeps the exposed side clean without trapping loose strands beneath the edge.
Make It Work for You:
For fine or sparse ends, preserve a stronger bottom line and place most movement around the face. The lob still feels soft without sacrificing useful visual density.
Watch Out For:
Too much short layering near the crown can puff beneath the beret and weaken the lob’s clean perimeter. Keep the strongest layers lower if fullness at the ends matters.
Loose Side Braid With Felt Beret Hairstyle
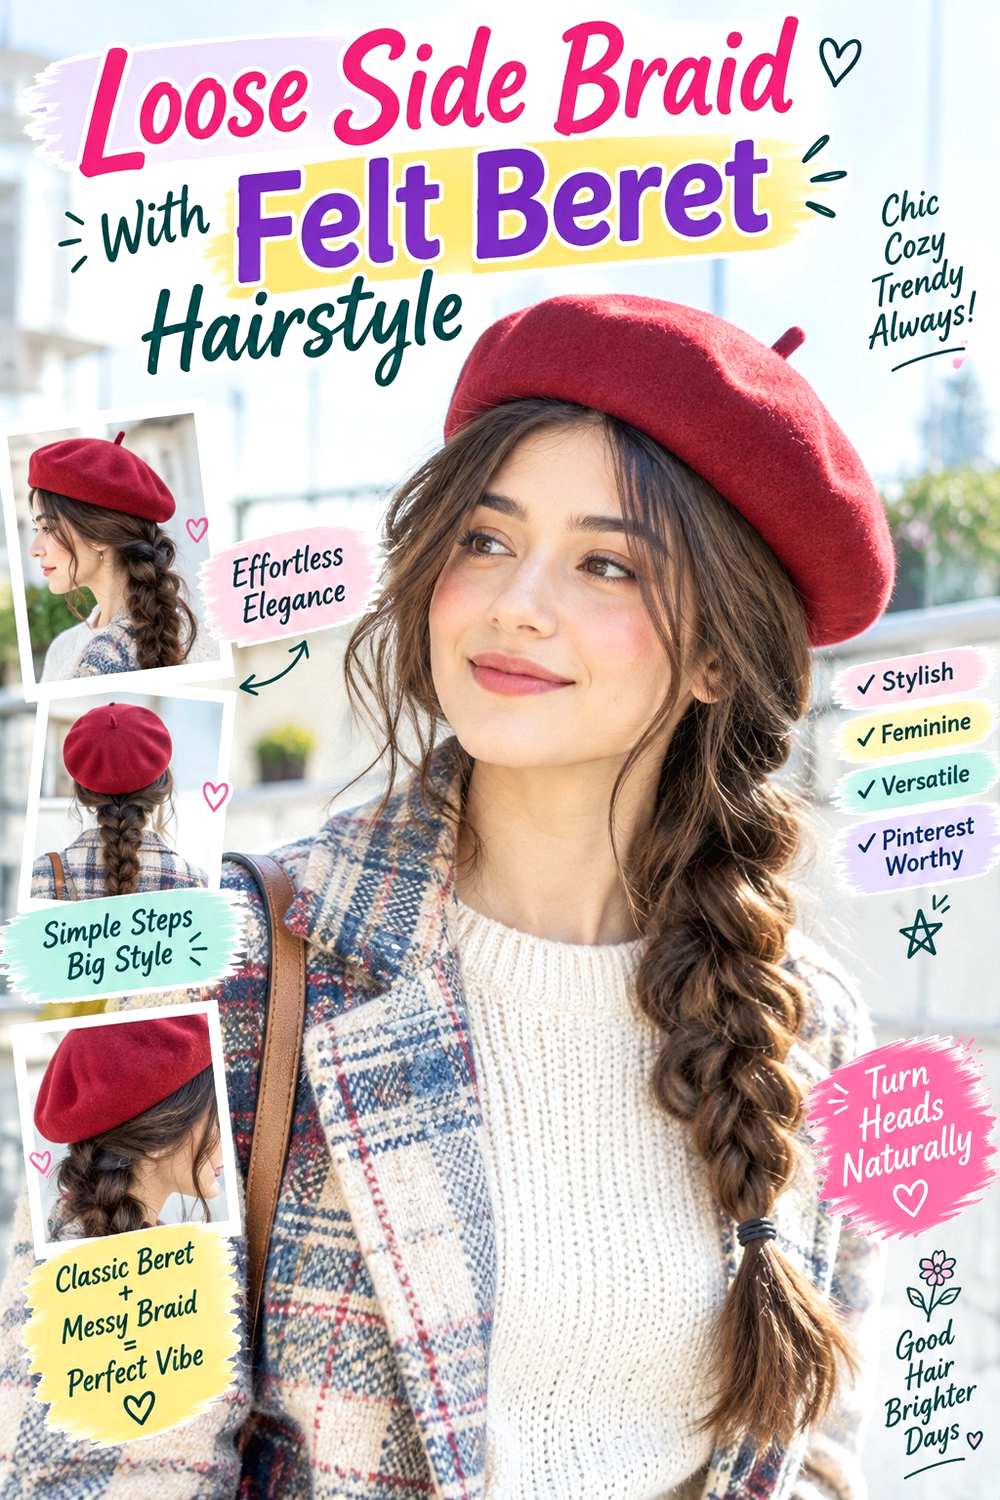
A loose side braid gives a felt beret a relaxed counterbalance by placing most of the hair over one shoulder. Start with a soft side part, gather the length behind the opposite ear, and braid downward with moderate tension. Keep the first crossings fairly compact so the area near the hat stays smooth, then gently widen the lower braid for a softer finish. A few face-framing strands can remain free around the jaw without hiding the angled outline of the beret.
Medium to long hair carries the braid most clearly, and dense hair can create a fuller woven shape without much loosening. Use lightweight styling cream to control short flyaways and a small fabric-covered elastic to secure the end. A quick refresh may involve tightening the top crossing or redoing the final few inches; rebuilding the entire braid after washing takes longer but does not require a special cut.
If the braid becomes loose near its base, correct that point rather than pulling the whole style tighter. For salon or occasion styling, tell the stylist which shoulder you want the braid to fall over and how wide you want it below the hat. Comfortable tension around the ear matters because the beret can add pressure to the same area throughout the day.
Pro tip:
Keep the braid firm until it passes below the shoulder, then loosen selected outer loops. This maintains stability near the beret while creating visible softness farther down.
Make It Work for You:
If your hair is medium length, keep the braid narrower and begin slightly farther back. A compact braid is less likely to release short sections before reaching the end.
Watch Out For:
Pulling the braid apart directly beneath the hat can create a bulky ridge and loosen its anchor. Concentrate any added width through the lower half instead.
Straight Blunt Bob With Minimal Beret Hairstyle

A blunt bob gives a simple beret a crisp frame because the strong bottom edge stays visible around the jaw or upper neck. The part can sit in the center for symmetry or slightly to one side for a softer line. Keep the crown smooth and avoid excessive lift beneath the hat, then let the ends fall with a clean, compact finish. The beret can sit nearly centered or only slightly tilted so it does not compete with the geometric outline of the cut.
Naturally straight or lightly wavy hair usually needs the least styling for this finish. If heat is required, use heat protectant first, a flat iron for controlled smoothing, and a lightweight serum to keep the ends polished without making them heavy. A quick refresh targets only bent sections after hat wear; a full wash-day straightening session can take longer depending on texture and density.
The haircut itself needs attention when the perimeter grows beyond the intended point or begins losing its distinct line. At the salon, specify the exact finished length—jaw, below the jaw, or upper neck—and explain how much fullness you want retained at the bottom edge. If you regularly tuck one side under your beret, mention that habit so the front balance can be assessed accordingly.
Pro tip:
Smooth only the areas that remain visible below the beret instead of repeatedly passing heat over the covered crown. The clean perimeter carries most of the visual impact.
Make It Work for You:
For naturally wavy hair, keep a subtle bend rather than forcing every strand perfectly straight. The blunt bottom edge can remain the defining feature while the surface keeps some movement.
Watch Out For:
Aggressive thinning through the ends can weaken the solid bob outline. If bulk is a concern, discuss where it sits rather than automatically removing weight from the entire perimeter.
Low Pigtail Braids With Knit Beret Hairstyle

Two low pigtail braids create a balanced shape beneath a knit beret and keep longer hair contained around scarves and coats. Use a center part from the forehead through the back, then begin each braid behind or just below the ears. Keep the crown smooth and compact so the beret can sit evenly. The braids can fall forward over both shoulders, while short front pieces may stay tucked or frame the face according to your preferred finish.
Medium to very long hair works well, and dividing dense hair into two sections can feel more manageable than building one thick braid. Use two fabric-covered elastics to secure the ends and a lightweight leave-in conditioner to reduce static and friction. A brief refresh means redoing one fuzzy braid or correcting the center part; full styling after washing takes longer only if drying is also required.
If one braid repeatedly hangs lower, compare the section sizes rather than tightening one side harder. For salon or event styling, discuss the preferred braid width, where each one should begin, and how much tension feels comfortable behind the ears. The beret should rest above the braids without pinching their bases, particularly if you plan to wear it for several hours.
Pro tip:
Start both braids at the same point behind the ears and compare them before completing the lengths. Correcting uneven placement early is easier than rebuilding finished braids.
Make It Work for You:
For layered hair, leave a few intentional front pieces loose and keep the braid bases slightly farther back. This helps capture shorter lengths without pulling tightly around the temples.
Watch Out For:
Unequal sectioning can make the beret appear off center even when the hat itself is straight. Recheck the back part before securing either braid too firmly.
Textured Low Bun With Plaid Beret Hairstyle
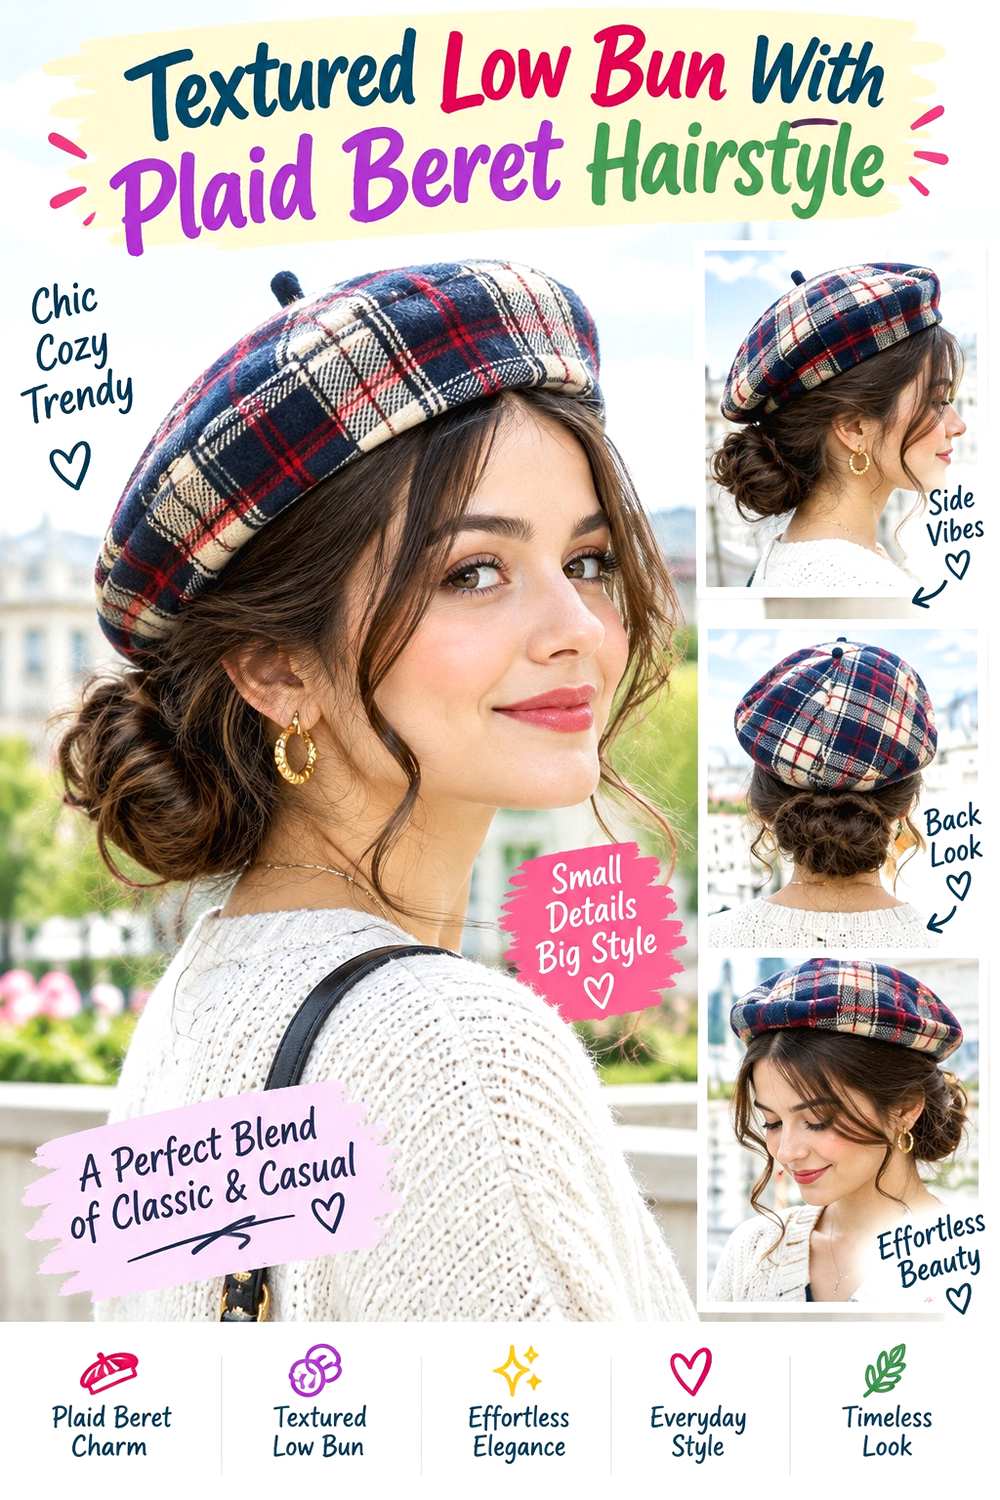
A textured low bun keeps the crown free for a plaid beret while adding softness at the nape. Begin with a center or relaxed side part, gather the length below the occipital area, and twist it into a loose coil that spreads horizontally rather than upward. A few controlled pieces around the cheekbones or jaw can stay free, and the bun’s outer loops can look slightly undone without leaving the central anchor unstable.
Medium to long hair works best, especially when there is enough length to fold securely. A fabric-covered elastic creates the base, bobby pins anchor the loops, and texturizing spray adds grip to smooth strands. A quick refresh generally means repinning one loose section and reshaping the front; rebuilding the style after a full wash takes longer if the hair first needs drying or extra texture.
The relaxed finish should come from the outer sections, not from weak tension at the base. If the whole bun begins sagging, rebuild its anchor. For salon styling, show where the plaid beret will sit and specify how wide and low you want the bun. Mention any short face-framing layers you want left visible, and ask for comfortable tension so removing the beret does not disturb the style.
Pro tip:
Secure the center of the bun first, then loosen only selected outer loops. This creates texture where it can be seen without sacrificing the structure hidden beneath the shape.
Make It Work for You:
For shorter hair, create a smaller folded bun and let a few ends remain visible instead of forcing them all inside. Keep the same low placement beneath the beret.
Watch Out For:
A messy finish can become unstable if every section is loosened equally. Preserve a firm central anchor and soften only the outer areas that do not support the bun.
Soft Coily Puff With Back-Tilted Beret Hairstyle
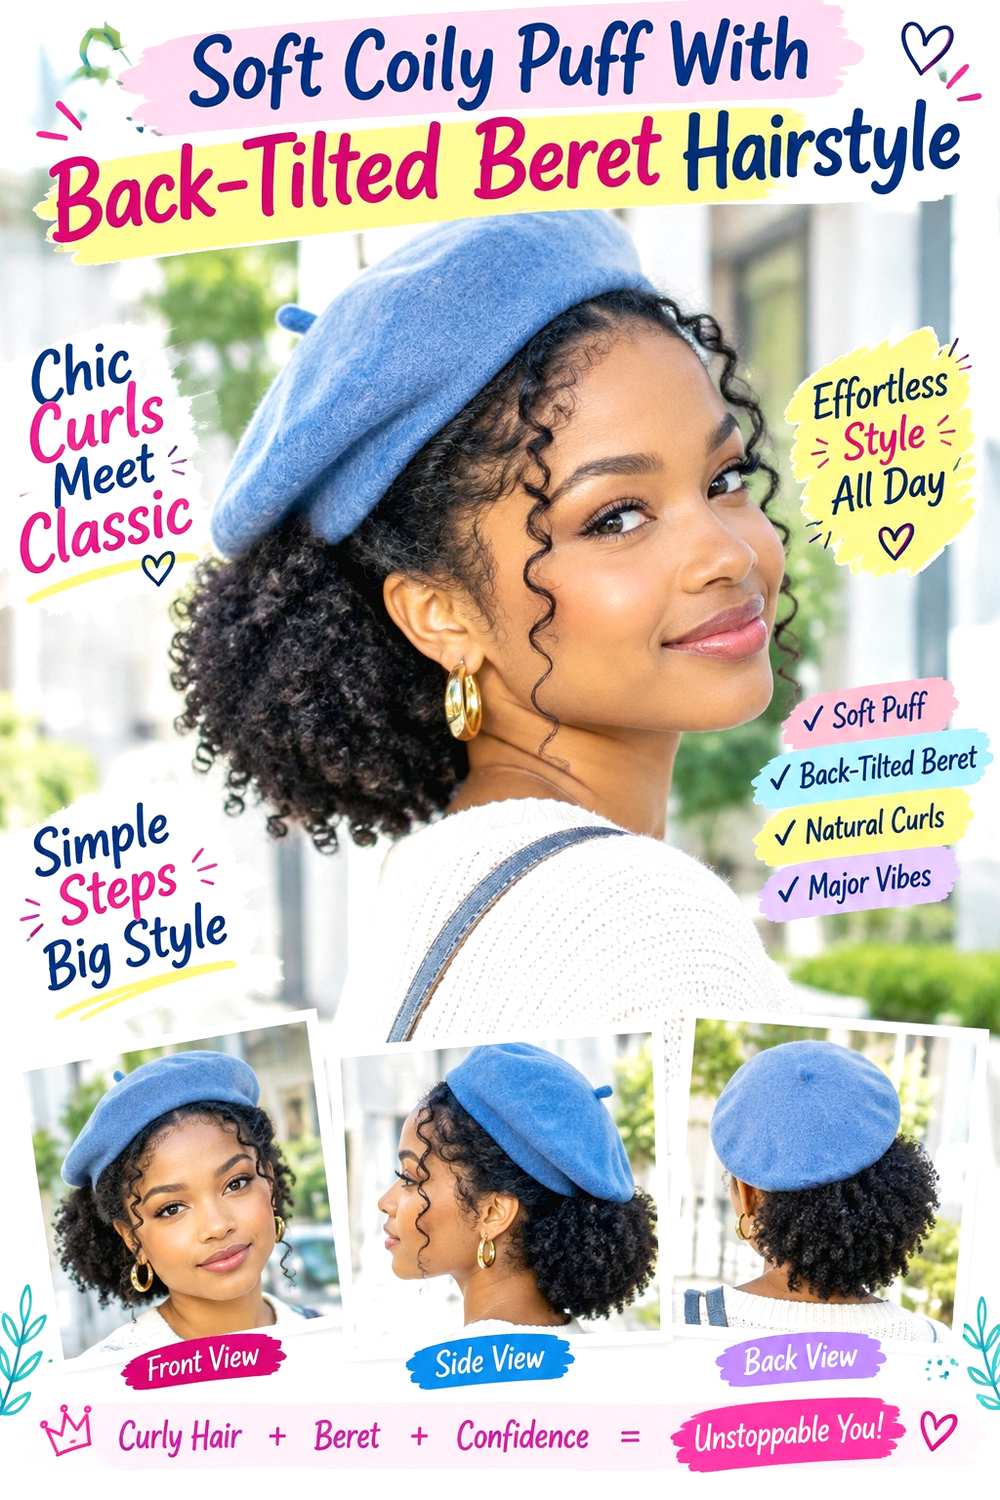
A soft coily puff works with a back-tilted beret by keeping the front and sides controlled while allowing visible volume behind or below the hat. Position the beret slightly behind the hairline, then let the puff sit low enough that it does not force the hat forward. Small coils around the temples can remain visible, and the front can follow a natural part or be gently directed back. The important detail is separating the secure base from the volume of the puff itself.
Coily textures with enough length to gather can use this shape without being straightened. A moisturizing leave-in conditioner supports softness, a fabric-covered elastic forms a flexible base, and curl gel helps define visible coils around the hairline. A short refresh may involve reshaping the exposed coils and adjusting the puff; a full wash-day routine takes longer depending on density, shrinkage, and drying time.
Avoid tightening the base simply because the beret shifts. The hat and puff should each have their own secure placement. If you are having the style arranged professionally, explain where the back of the beret needs to rest and how much puff volume you want exposed. Ask for comfortable tension around the perimeter and respect for your normal shrinkage rather than stretching the hair solely to increase apparent length.
Pro tip:
Secure the puff before placing the beret, then lower the hat gently behind the front hairline. Adjust exposed coils afterward rather than rebuilding the base around the hat.
Make It Work for You:
If your hair has strong shrinkage, keep the puff compact and emphasize visible coil definition around the perimeter. The back-tilted placement still provides contrast without requiring stretched length.
Watch Out For:
Do not make the puff base painfully tight to stop the beret from moving. Reposition the hat independently and reduce tension if the perimeter feels uncomfortable or strained.
Conclusion
Hairstyles to wear with berets can range from crisp bobs and sleek ponytails to loose braids, natural curls, and low textured buns. Shorter cuts make the perimeter more visible, while long hair gives you more options for braiding, twisting, and securing the length. Fine hair may benefit from fuller ends and restrained separation, while dense hair often needs thoughtful bulk placement. Fringe and face-framing layers can remain visible when the beret sits farther back, and curly or coily textures should be planned around natural shrinkage rather than forced into a different finish. Compare not only the silhouette but also your routine: a low braid may need little daily work, while polished waves or straight finishes can require more styling.
Before Your Salon Visit
Choose one or two favorite beret hairstyles and save references that clearly show both the hair and hat position. Talk about your natural texture, density, face shape, preferred length, typical upkeep, and how much styling you want to do on ordinary days. Point out the exact fringe length, face-framing pieces, braid width, bun placement, curl volume, or perimeter you like. For temporary styles, focus on comfortable anchoring and hat fit rather than requesting an unnecessary haircut.
FAQs
Can I wear a beret without flattening my hair?
Yes, but placement makes a difference. Keep major volume below or around the hat rather than directly underneath it, and avoid choosing an overly tight beret. After removal, reshape only flattened sections instead of restyling everything. Curly hair may respond better to a small moisture refresh than dry brushing.
What hairstyles work well with berets for fine hair?
Soft broad waves, a low ponytail, a compact braid, a blunt bob, or a small low bun can all work. Preserve fullness through the visible ends and avoid over-loosening sections. Lightweight styling products are useful because heavy creams or excessive texture products can make fine strands separate and appear less full.
How should curly or coily hair be worn under a beret?
Allow enough room for your natural volume and place the beret so it does not crush the entire curl pattern. Back-set or angled positions often leave more texture visible. Work with normal shrinkage, keep tension comfortable, and refresh only compressed curls or coils after removing the hat rather than automatically stretching or straightening them.
How do I keep a beret from slipping off my hairstyle?
Start with a stable hairstyle rather than relying on the beret to secure the hair. Smooth, low-volume crown sections often give the hat a more predictable base, while large clips or high buns can interfere with its fit. Adjust the beret’s placement first if it slips instead of making your hairstyle excessively tight.