19 Hairstyles With Baker Boy Caps for an Effortless Fall Look

Hairstyles with baker boy caps work best when the hair underneath stays relatively smooth while the visible length provides movement and shape. Because this cap has a rounded crown and short front brim, bulky knots or strong root lift can interfere with its fit. Low ponytails, braids, buns, waves, bobs, curls, and face-framing pieces leave more of the styling visible around the cheeks, shoulders, and nape while keeping pressure away from the crown.
Texture and density affect how each option behaves. Straight and wavy hair can use smooth or bent finishes, while curly and coily hair benefits from enough room for natural volume and shrinkage. Fine strands may look fuller when the bottom edge stays relatively substantial, while dense hair can be arranged to place bulk below the cap instead of underneath it. Face-framing sections can finish near the cheekbone, jaw, or chin depending on the balance you prefer.
Styling effort ranges from a brief ponytail refresh to a longer curl routine or full heat-styled wave set. Friction from wool, tweed, and lined caps can also create static, frizz, or dents. Most ideas need no special haircut; comfort, anchor position, and hat fit usually matter more.
Quick List
- Soft Waves With Tilted Baker Boy Cap Hairstyle
- Low Ponytail With Wool Baker Boy Cap Hairstyle
- Curtain Bangs With Centered Baker Boy Cap Hairstyle
- Loose Side Braid With Baker Boy Cap Hairstyle
- Tucked Bob With Baker Boy Cap Hairstyle
- Natural Curls With Slouchy Baker Boy Cap Hairstyle
- Low Chignon With Baker Boy Cap Hairstyle
- Straight Lob With Baker Boy Cap Hairstyle
- Twin Low Braids With Baker Boy Cap Hairstyle
- Half-Up Waves With Baker Boy Cap Hairstyle
- Low Bubble Ponytail With Baker Boy Cap Hairstyle
- Side-Parted Curls With Baker Boy Cap Hairstyle
- Textured Low Bun With Baker Boy Cap Hairstyle
- Face-Framing Layers With Baker Boy Cap Hairstyle
- Sleek Low Braid With Baker Boy Cap Hairstyle
- Shaggy Midi Cut With Baker Boy Cap Hairstyle
- Soft Coily Puff With Baker Boy Cap Hairstyle
- Rope Braid With Baker Boy Cap Hairstyle
- Loose Low Pigtails With Baker Boy Cap Hairstyle
Soft Waves With Tilted Baker Boy Cap Hairstyle
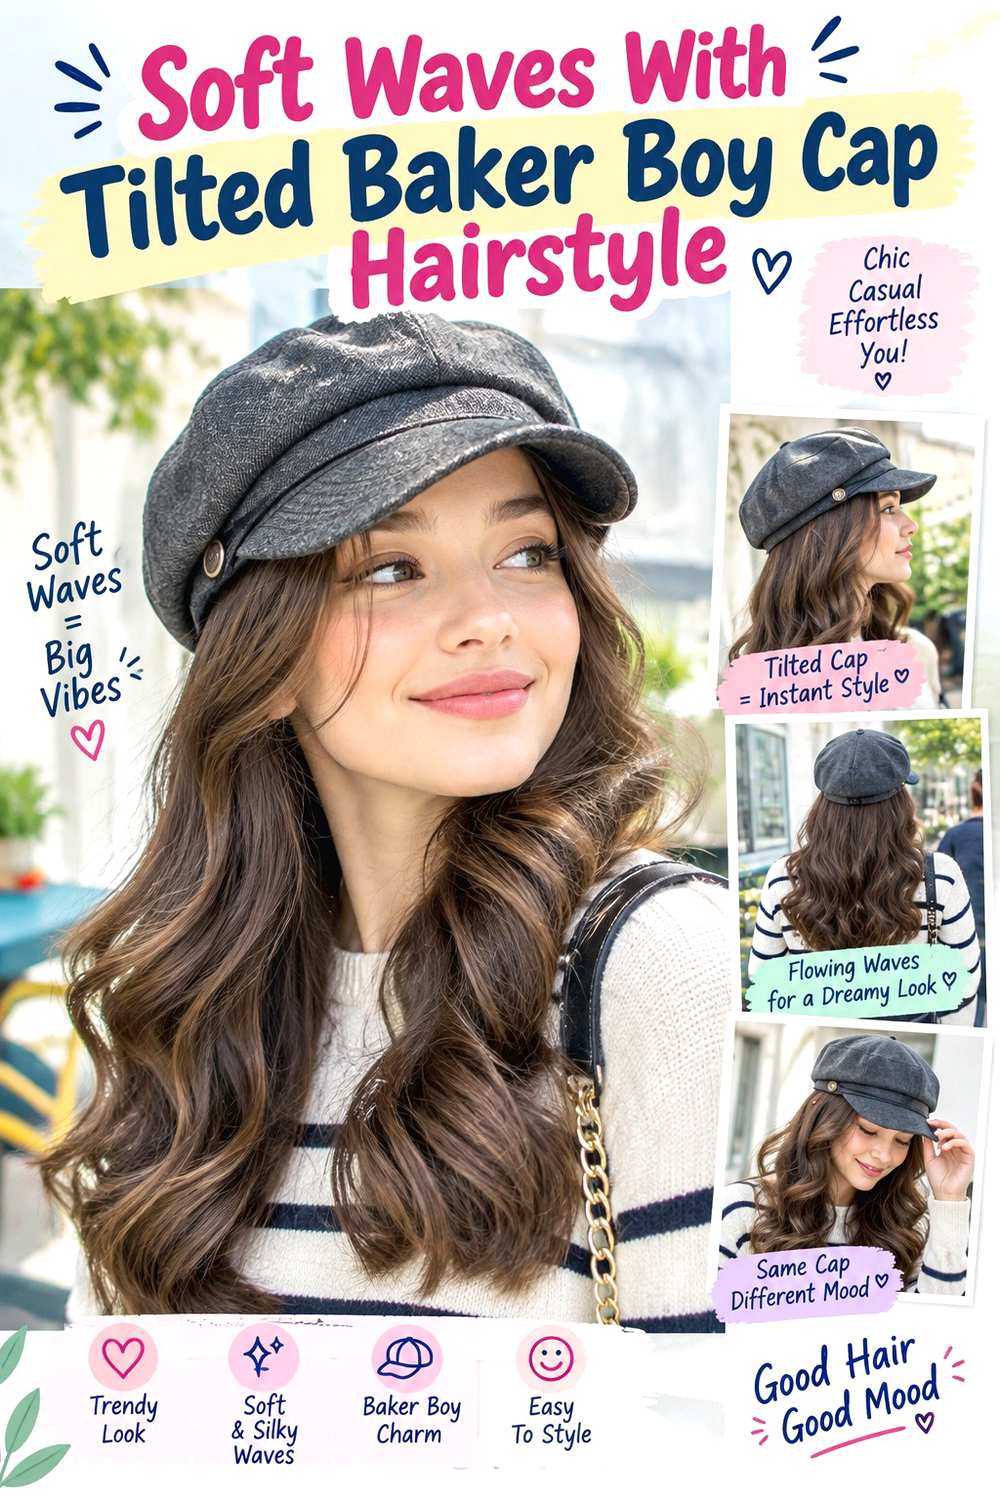
A slightly tilted cap works naturally with loose waves because the asymmetry leaves more hair visible on one side. Start with a center or soft side part, keep the roots fairly smooth, and create broad bends from around cheekbone level through the mid-lengths. Straighter tips stop the shape from becoming too rounded, while one front section can fall forward beside the short brim. Shoulder-length or longer hair gives the wave pattern enough space to show beneath the cap.
Straight and wavy textures usually need the least work, although other textures can use the shape when heat styling fits their routine. Apply heat protectant before using a large-barrel curling iron, then finish with flexible hairspray for movable hold. A quick refresh between washes may involve reshaping only the front bend and a few flattened sections. A complete wash-day set takes longer, particularly on long or dense hair.
Keep strong lift below rather than underneath the cap. If the wave pattern starts collapsing, refresh selected visible pieces instead of reheating every section. For salon styling, show exactly where you want the cap tilted and identify where the strongest face-framing wave should begin so the visible movement supports the hat placement.
Pro tip:
Let each front wave cool before touching it, then separate it lightly with your fingers. The bend will hold its direction better when you place the cap afterward.
Make It Work for You:
For fine strands, create fewer broad bends and leave the lower perimeter relatively full. Concentrating movement around the face keeps the ends from becoming overly separated.
Watch Out For:
Too much root lift can make the cap sit high or wobble. Keep the crown smooth and place most of the visible volume from cheek level downward.
Low Ponytail With Wool Baker Boy Cap Hairstyle

A low ponytail gives a wool baker boy cap a clean base and keeps longer hair from rubbing across scarves and coat collars. Choose a center, side, or natural part, smooth the crown without flattening it painfully, and gather the hair at the nape. The ponytail can remain straight, wavy, curly, or coily; its defining feature is the low anchor beneath the back edge of the cap. Leave narrow face-framing pieces free if you want a softer front.
This arrangement works across hair textures and is especially useful when you need something quick between wash days. A soft-bristle brush guides the surface, a fabric-covered elastic creates a secure base, and a light styling cream controls flyaways without requiring a hard finish. Resetting the ponytail takes only a short refresh when the lengths are already styled, whereas washing, drying, and changing the natural texture will take considerably longer.
If the ponytail starts dropping, redo the elastic rather than tightening the cap. Excessive tension at both the hairline and hat can become uncomfortable. For professional styling, bring the cap and indicate where its rear edge sits. Ask for the ponytail base to clear that line and explain how much tension feels comfortable around your temples and ears.
Pro tip:
Try the cap on once before fixing the ponytail position. Mark where its back edge falls, then place the elastic just below that point for easier removal.
Make It Work for You:
If you have curls or coils, smooth only as much of the crown as you prefer and keep the ponytail texture natural. The low structure still works.
Watch Out For:
Avoid making the ponytail extremely tight to compensate for a loose cap. Secure the hat independently so the hairline is not carrying unnecessary tension all day.
Curtain Bangs With Centered Baker Boy Cap Hairstyle
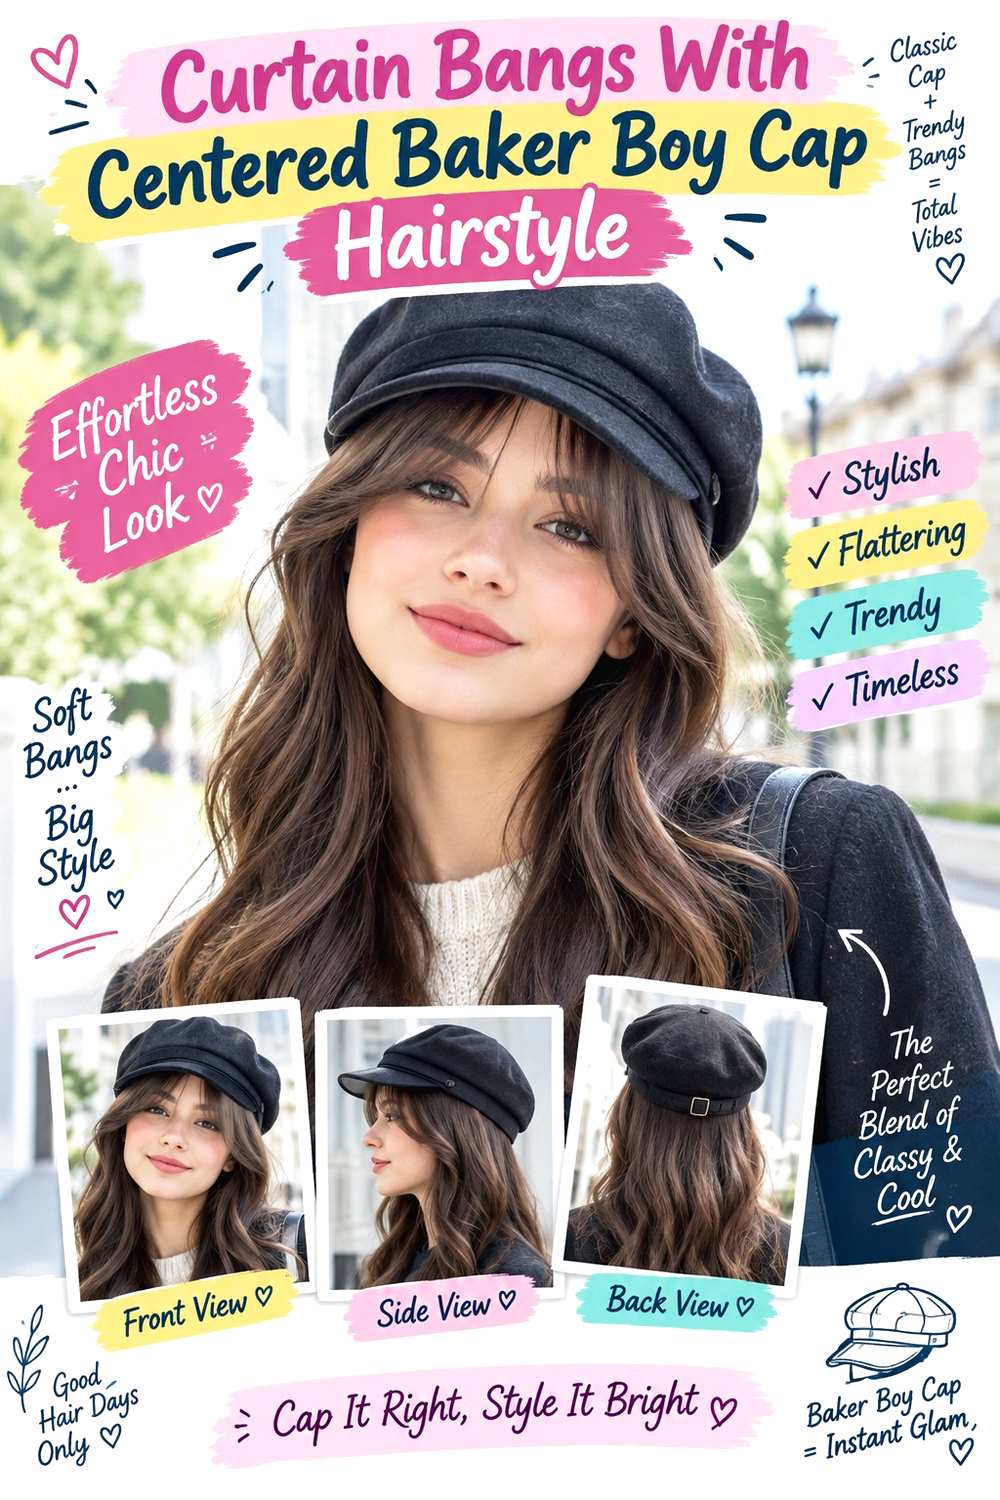
Curtain bangs can become the main visible feature when a baker boy cap is centered just behind the fringe. The bangs should open through the middle, with shorter sections around the brows or upper cheekbones and longer outer corners blending toward the temples. Keep the rest of the crown fairly flat so the cap sits naturally. The remaining hair can be straight, wavy, or softly curled, but the split fringe provides the face-framing detail.
This option is easiest when the fringe already follows a central opening, although growth direction may require a brief daily reset. Use heat protectant before warm styling, a small round brush to direct each side outward, and flexible hairspray for light control. Refreshing only the bangs can be quick; washing and styling the full head requires more time according to length, texture, and density.
Fringe upkeep is separate from maintaining the rest of the haircut. When the center starts dropping into the eyes or the outer corners stop blending cleanly, the shape may need adjustment. At the salon, identify the exact dry finished length you want through the middle and at the outer corners. Mention that you wear the cap behind the fringe so the bangs need to sit well without being held in place by the hat.
Pro tip:
Direct the fringe outward while it is slightly damp, let the bend settle, and place the cap behind it only after the roots have dried into position.
Make It Work for You:
For wavy hair, keep some natural bend through the fringe instead of forcing a completely smooth finish. Preserve the center split and longer outer corners.
Watch Out For:
Do not pull the cap down directly over freshly styled fringe roots. The pressure can flatten one side or make the center split wider than intended.
Loose Side Braid With Baker Boy Cap Hairstyle

A loose side braid moves most of the hair over one shoulder, leaving the crown compact enough for the cap while putting texture where it can actually be seen. Start with an off-center or side part, gather the hair behind one ear, and braid downward with moderate tension. Keep the first crossings controlled, then gently widen the lower sections. A few cheekbone or jaw-length pieces can remain free without interfering with the hat.
Medium to long hair is easiest to braid this way, and dense hair often creates a fuller shape without much loosening. Use a light styling cream to manage flyaways and a small fabric-covered elastic to secure the end. A morning refresh may involve tightening the first crossings or redoing the lower few inches. Rebuilding the entire braid after washing takes longer, particularly if the hair needs drying beforehand.
If the base becomes loose, correct that area instead of pulling every section tighter. A side braid should stay secure without feeling strained near the ear. For salon or event styling, specify which shoulder you want the braid to fall over, how wide you want it to appear, and where the cap edge sits so the braid begins below rather than underneath it.
Pro tip:
Keep the braid relatively firm until it passes the shoulder, then loosen selected outer loops. That preserves stability near the cap while adding softness below.
Make It Work for You:
For medium-length or layered hair, begin the braid slightly farther back and keep it narrower. Shorter pieces are less likely to escape from compact sections.
Watch Out For:
Pulling the upper braid apart too aggressively creates bulk below the cap and weakens the anchor. Add width only through the visible lower half instead.
Tucked Bob With Baker Boy Cap Hairstyle
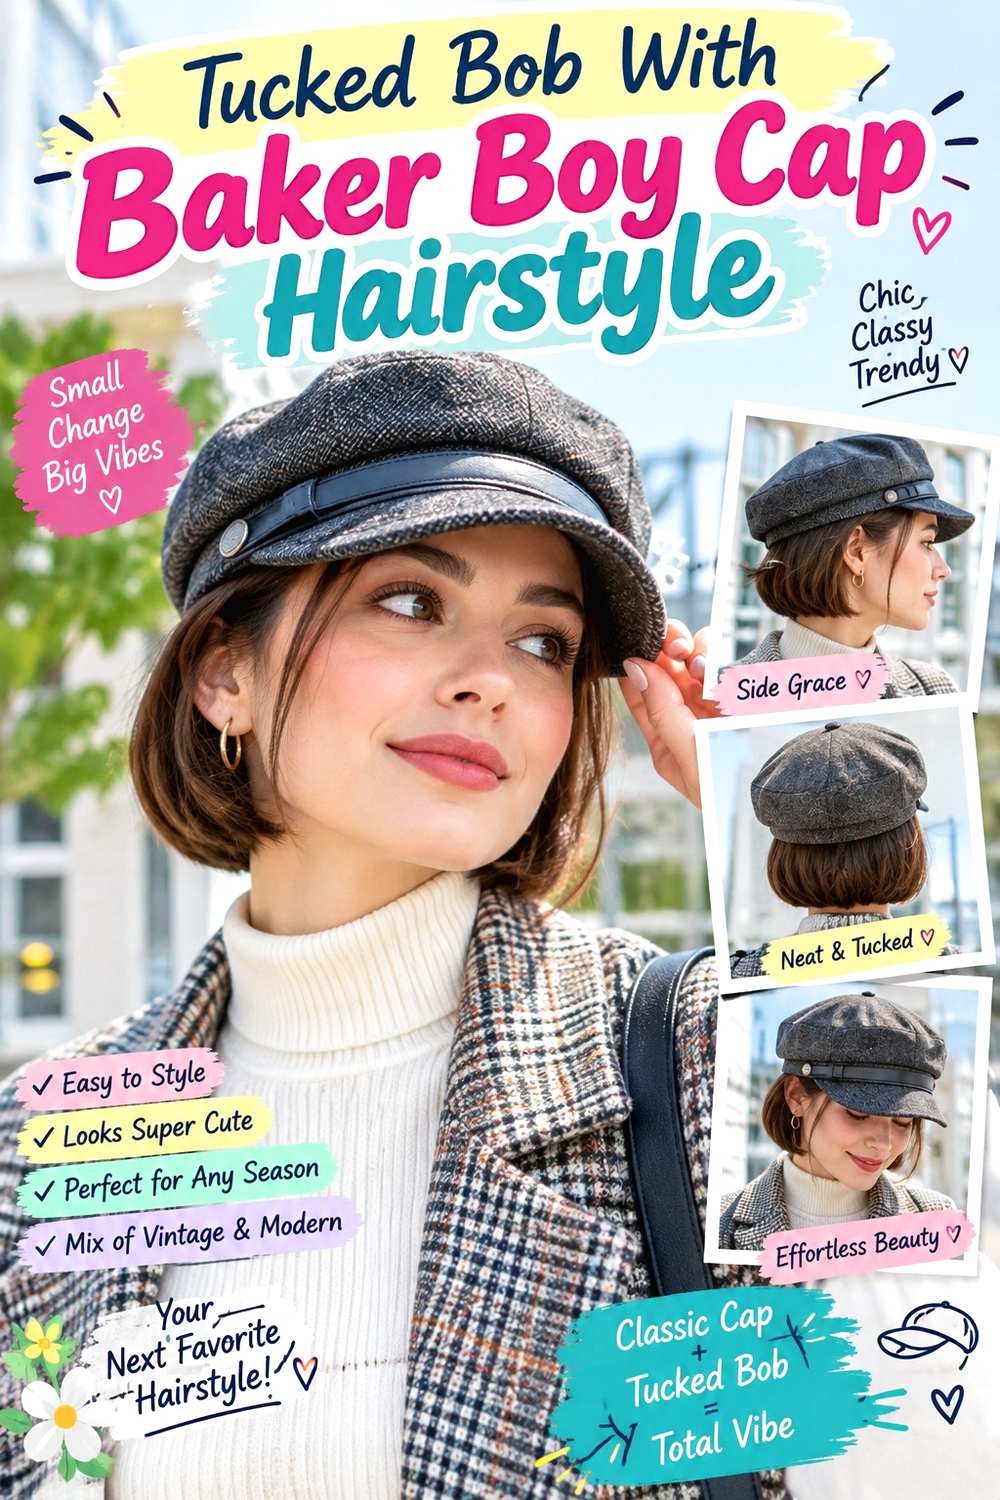
A tucked bob gives the rounded cap a clean outline because the short perimeter stays visible around the jaw and neck. Part the hair in the center or slightly to one side, tuck one side behind the ear, and let the other side fall naturally beneath the brim. The bob can have a fuller blunt bottom edge or subtle movement through the ends, but the crown should stay smooth enough that the cap does not sit unusually high.
Straight and softly wavy bobs are simple to arrange this way, while curly bobs can use the same asymmetry without flattening the natural pattern. A lightweight serum helps control visible ends, and a small grip clip behind the ear can support a tuck that tends to slip. A quick refresh takes only a few minutes when the perimeter is already styled. Wash-day effort depends on how much smoothing, waving, or curl definition you prefer.
Cut maintenance becomes important once the bob grows past the intended jaw or neck point and its outline starts changing. For a salon visit, show the exact dry perimeter length you want visible below the cap and explain which side you usually tuck. If you want layers, discuss their placement carefully so the bottom edge retains the amount of fullness you prefer.
Pro tip:
Tuck the chosen side before putting on the cap, then position the edge so it does not press directly against your ear or dislodge the tucked section.
Make It Work for You:
For a curly bob, tuck only the curls that naturally reach behind the ear. Let shorter pieces stay visible instead of stretching them into place.
Watch Out For:
Forcing a very short front section behind the ear often makes it spring forward repeatedly. Leave it as intentional face framing and secure only longer hair.
Natural Curls With Slouchy Baker Boy Cap Hairstyle
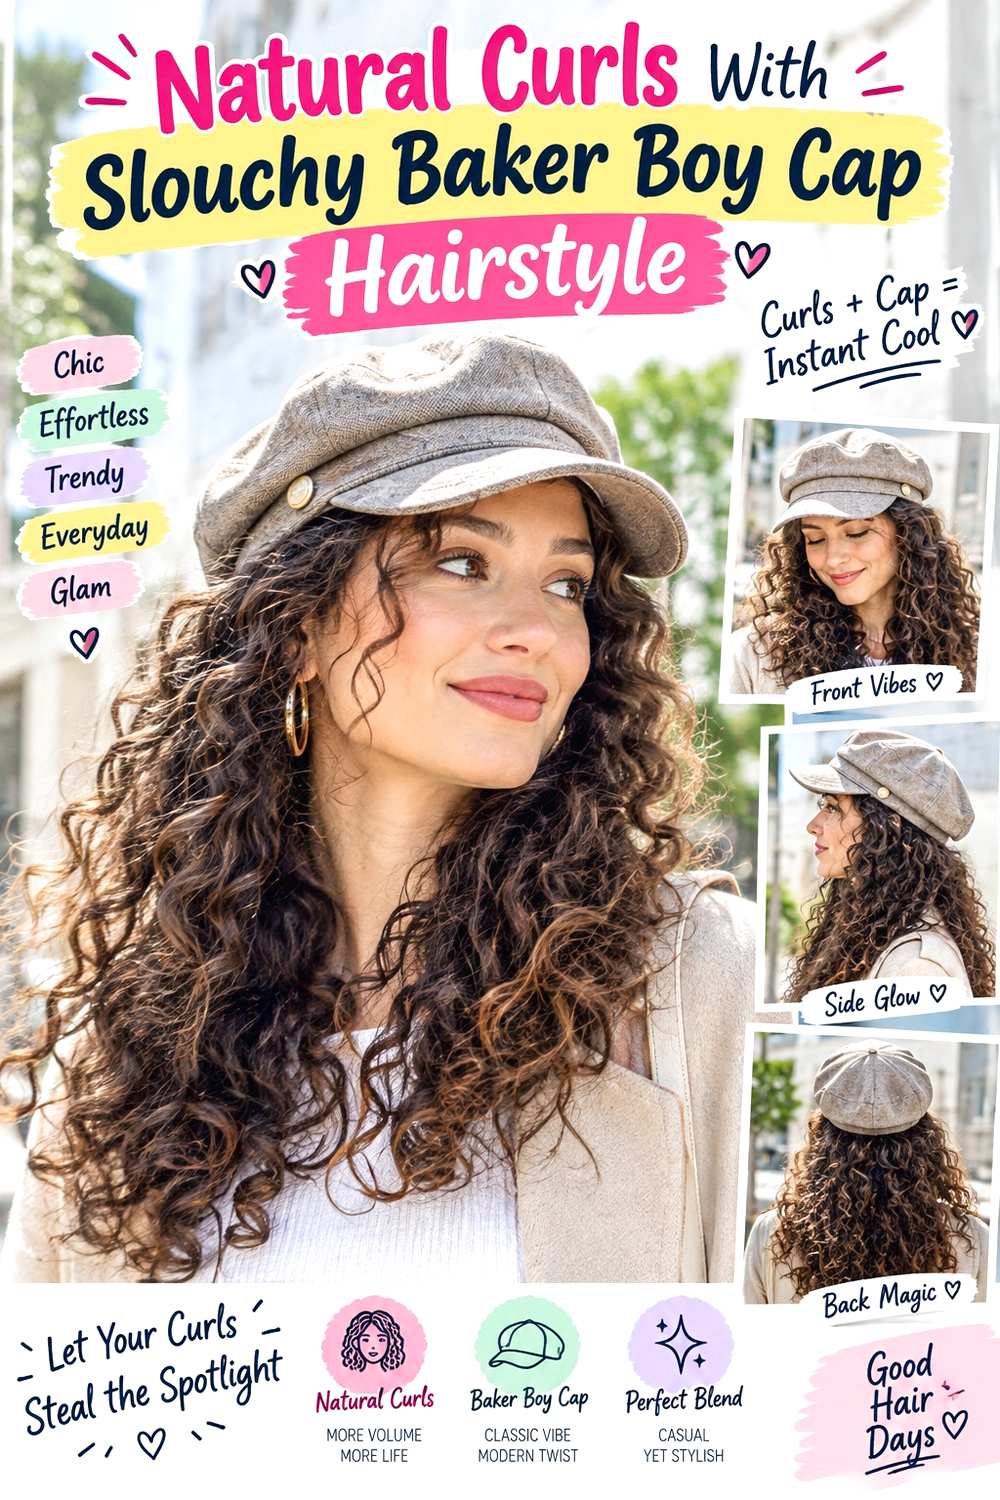
A slightly slouchier cap can work with natural curls when it sits lightly over the crown and leaves the lower pattern visible around the cheeks and shoulders. Keep the part where your curls naturally separate, arrange the front sections before putting on the hat, and let most of the volume develop below the cap line. The curls do not need to be perfectly uniform; preserving defined groups and balanced visible volume is more useful than forcing a smooth helmet shape underneath.
Different curl patterns and densities can use this idea, although very dense hair may need a roomier cap. Apply a lightweight leave-in conditioner for moisture, curl gel for definition, and use a diffuser when drying with less disturbance is helpful. A brief refresh between washes usually means dampening and reshaping only the curls compressed by the hat. A full wash-day routine will take longer according to length, density, and drying time.
Avoid brushing the entire head dry after cap wear, which can break apart curl groups. For salon shaping, explain that you regularly wear caps and show where you want the visible front curls and overall width to sit. Ask the stylist to consider the dry shape and your normal shrinkage rather than using a stretched length as the only reference.
Pro tip:
Arrange the curls you want visible before lowering the cap gently from above. This reduces the need to pull the hat through the finished curl pattern.
Make It Work for You:
For lower-density curls, wear the cap slightly farther back so more front texture remains visible. Keep curl separation restrained to preserve definition and apparent fullness.
Watch Out For:
Repeatedly fluffing underneath the cap can create frizz without useful shape. Adjust only the visible curls around the temples, ears, and lower edge when necessary.
Low Chignon With Baker Boy Cap Hairstyle
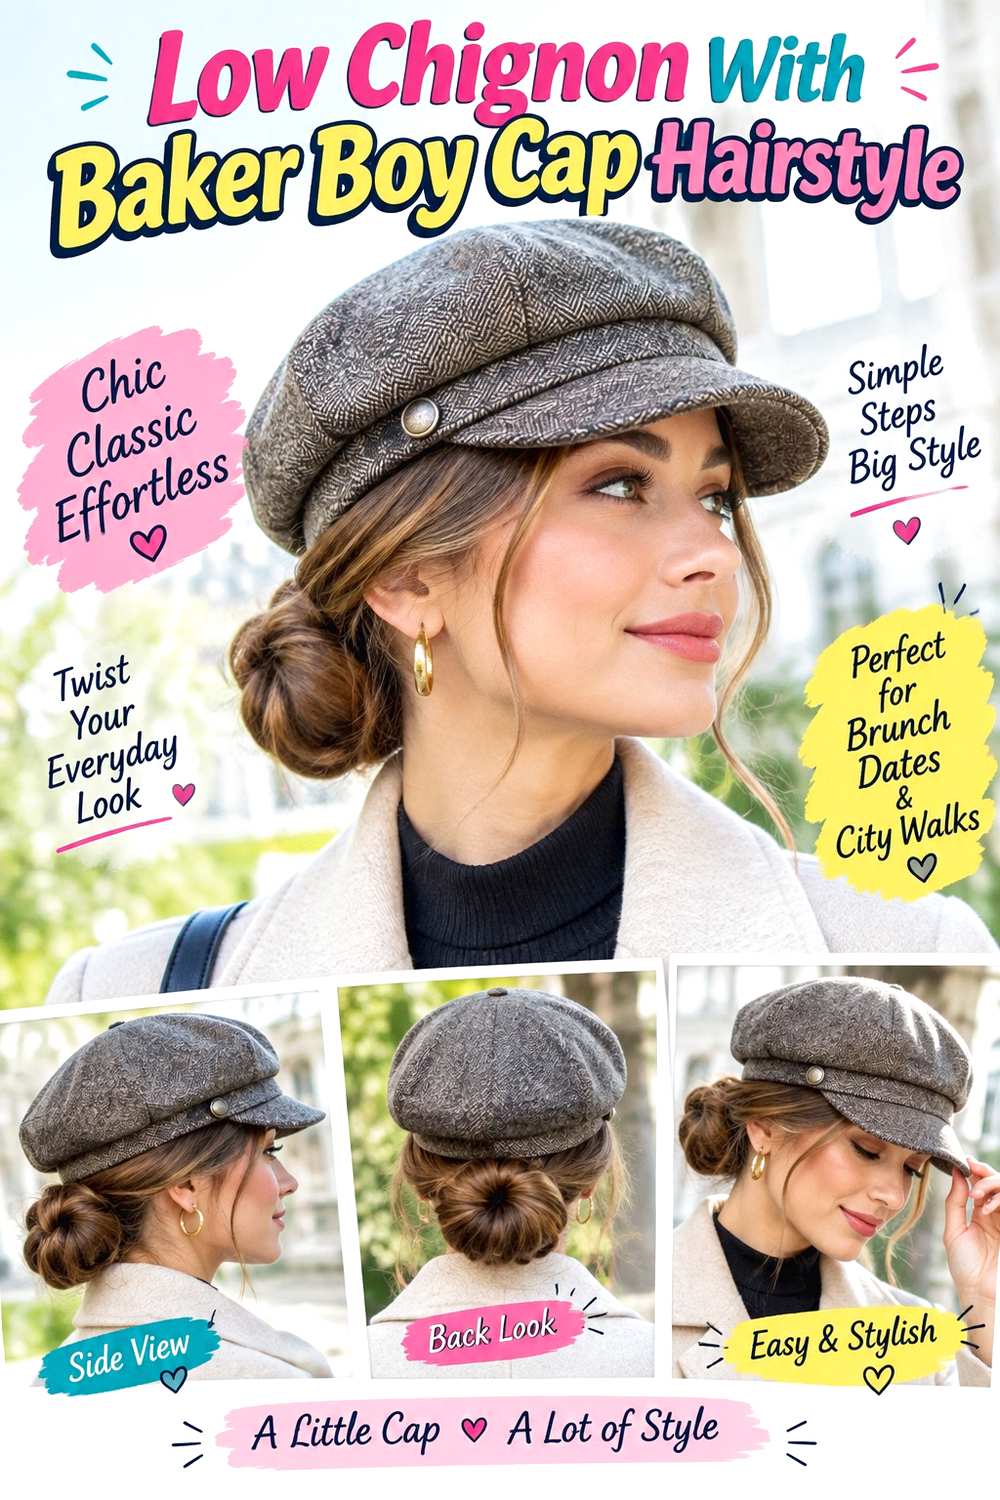
A low chignon keeps the entire crown clear, making it one of the more structured options for a baker boy cap. Part the hair in the center or at the side, guide it smoothly toward the nape, and coil or fold the length into a compact bun. Keep the chignon wider rather than tall so it sits beneath the back of the cap. Narrow front pieces can remain loose if you prefer some softness around the cheeks.
Medium to long hair works best, while dense hair may benefit from spreading the coil horizontally instead of stacking it outward. A fabric-covered elastic creates the base, bobby pins hold the folded sections, and flexible hairspray controls small flyaways. A quick refresh usually means replacing a loose pin and smoothing the part. A full wash-day version takes longer if the hair also needs drying or a polished blow-dry beforehand.
When the entire chignon begins to sag, rebuild the base instead of inserting more pins randomly. For salon styling, bring the cap so the bun can be positioned in relation to its actual rear edge. Ask for comfortable tension around the temples, specify whether you want face-framing pieces, and make sure the bun sits low enough that removing the cap will not catch the outer pins.
Pro tip:
Test the cap before inserting the final pins around the chignon. Turn your head from side to side and lower the bun if its upper edge touches the hat.
Make It Work for You:
For very dense hair, make the chignon wider across the nape rather than deeper. This preserves the polished shape while reducing projection behind the head.
Watch Out For:
A bun placed too high can tilt the cap forward and create pressure. Lower the anchor rather than trying to force the hat over the finished coil.
Straight Lob With Baker Boy Cap Hairstyle

A straight lob gives the cap a simple, defined frame without requiring any updo underneath. Keep the cut around the collarbone or upper shoulders, with a center or soft side part and a relatively full bottom edge. The crown should lie close enough for a comfortable hat fit, while the visible length falls cleanly below the ears. A subtle inward or outward bend at the tips can soften the perimeter without turning it into a wave set.
Naturally straight hair may need little more than smoothing. If you are creating the finish with heat, use heat protectant first, a flat iron for controlled passes, and a light anti-frizz serum on the ends. A quick between-wash refresh should target only creased or bent sections. A full straightening routine takes longer when the starting texture is wavy, curly, dense, or very long.
Cut upkeep matters when the lob grows past the preferred collarbone point or the bottom edge stops feeling deliberate. At the salon, show the exact finished length and discuss how much perimeter weight you want retained. Mention that you frequently wear baker boy caps so the stylist can assess any face-framing pieces both tucked under the hat and left loose beside it.
Pro tip:
Smooth only the lengths that remain visible after you put on the cap. If the covered crown already lies flat, avoid unnecessary repeated heat over that area.
Make It Work for You:
For fine strands, keep the bottom edge relatively solid and limit excessive layering through the ends. A slight bend can add movement without reducing visual density.
Watch Out For:
Do not keep reheating a temporary hat dent throughout the day. Reset the part and smooth the section first, then use heat only if it remains necessary.
Twin Low Braids With Baker Boy Cap Hairstyle
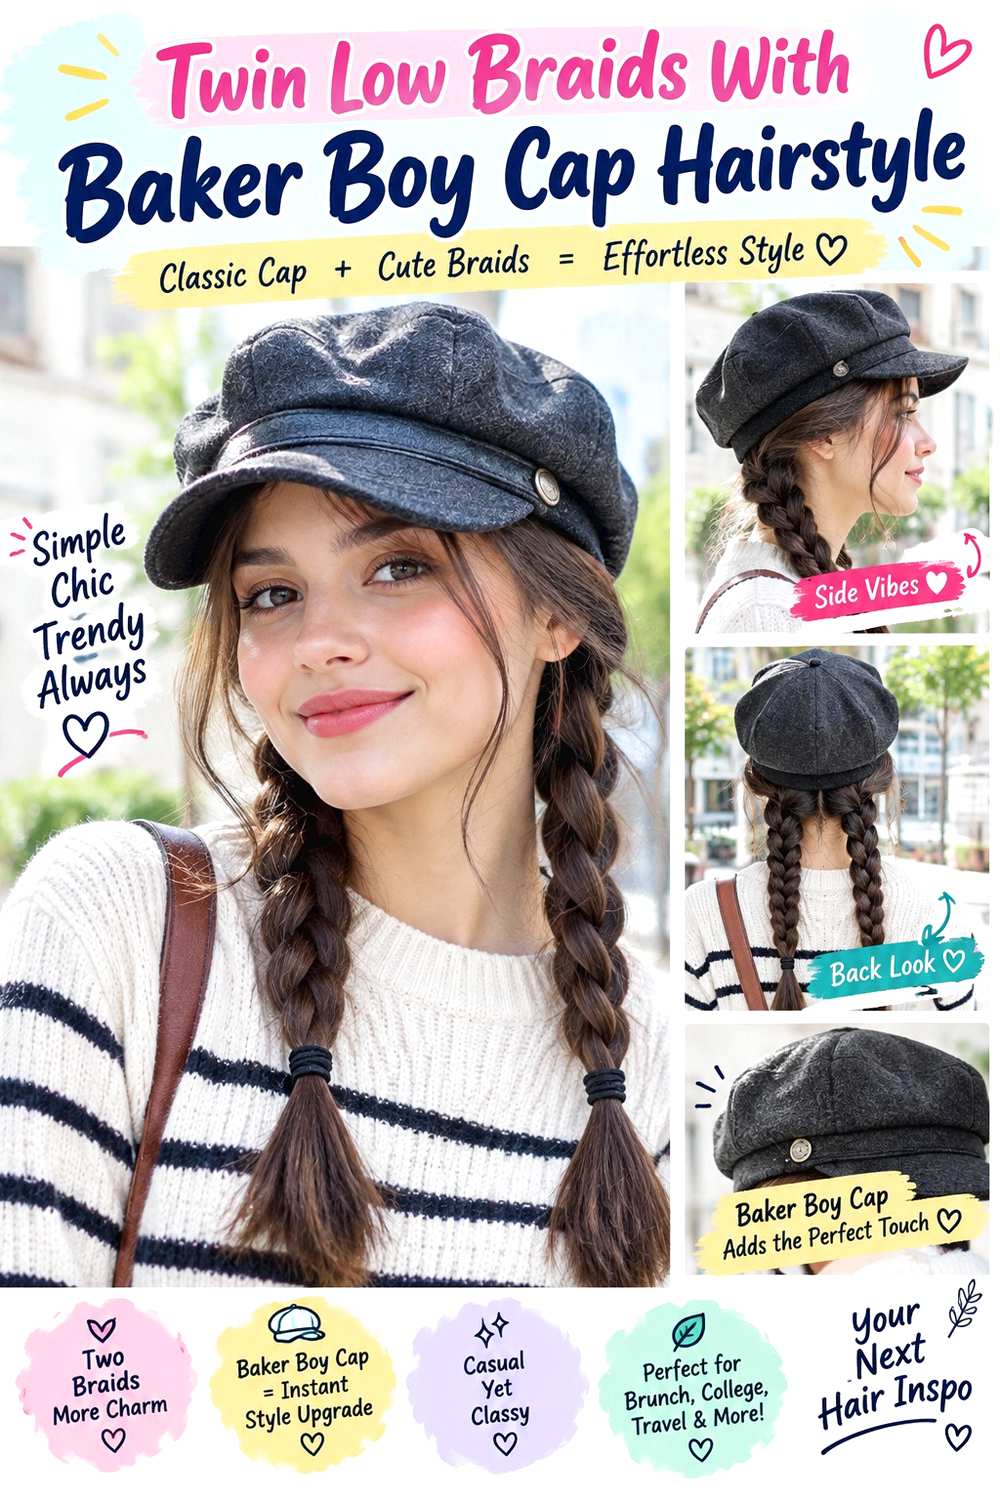
Twin low braids divide the hair evenly and keep long lengths controlled around autumn coats. Create a center part from the forehead through the back, then begin each braid just behind or below the ears. Keep the crown smooth and the first crossings fairly compact so the cap sits evenly. The two braids can fall forward over the shoulders, while selected short pieces stay loose around the face for a softer edge.
Medium to very long hair works well, and splitting dense hair into two sections can be more comfortable than building one heavy braid. Use two fabric-covered elastics to secure the ends and a lightweight leave-in conditioner to reduce friction and static. A quick refresh may mean redoing one fuzzy braid or correcting the center part. Full wash-day effort depends mainly on whether the hair must be dried or detangled before braiding.
If one braid repeatedly hangs lower, compare the section sizes rather than tightening that side harder. For professional styling, explain where the cap finishes behind the ears and specify the braid width and starting point you prefer. Comfortable tension matters because a snug hat can add pressure over an already tight base, particularly during long wear.
Pro tip:
Check both braid bases in a mirror before completing the lengths. Matching their starting height first makes the finished pair look more balanced beneath the cap.
Make It Work for You:
For layered hair, leave a few short pieces intentionally free and start the braids farther back. This catches more usable length without pulling around the temples.
Watch Out For:
Uneven sectioning can make one braid heavier and shift the overall balance. Repart the back before tightening either braid instead of compensating with extra tension.
Half-Up Waves With Baker Boy Cap Hairstyle
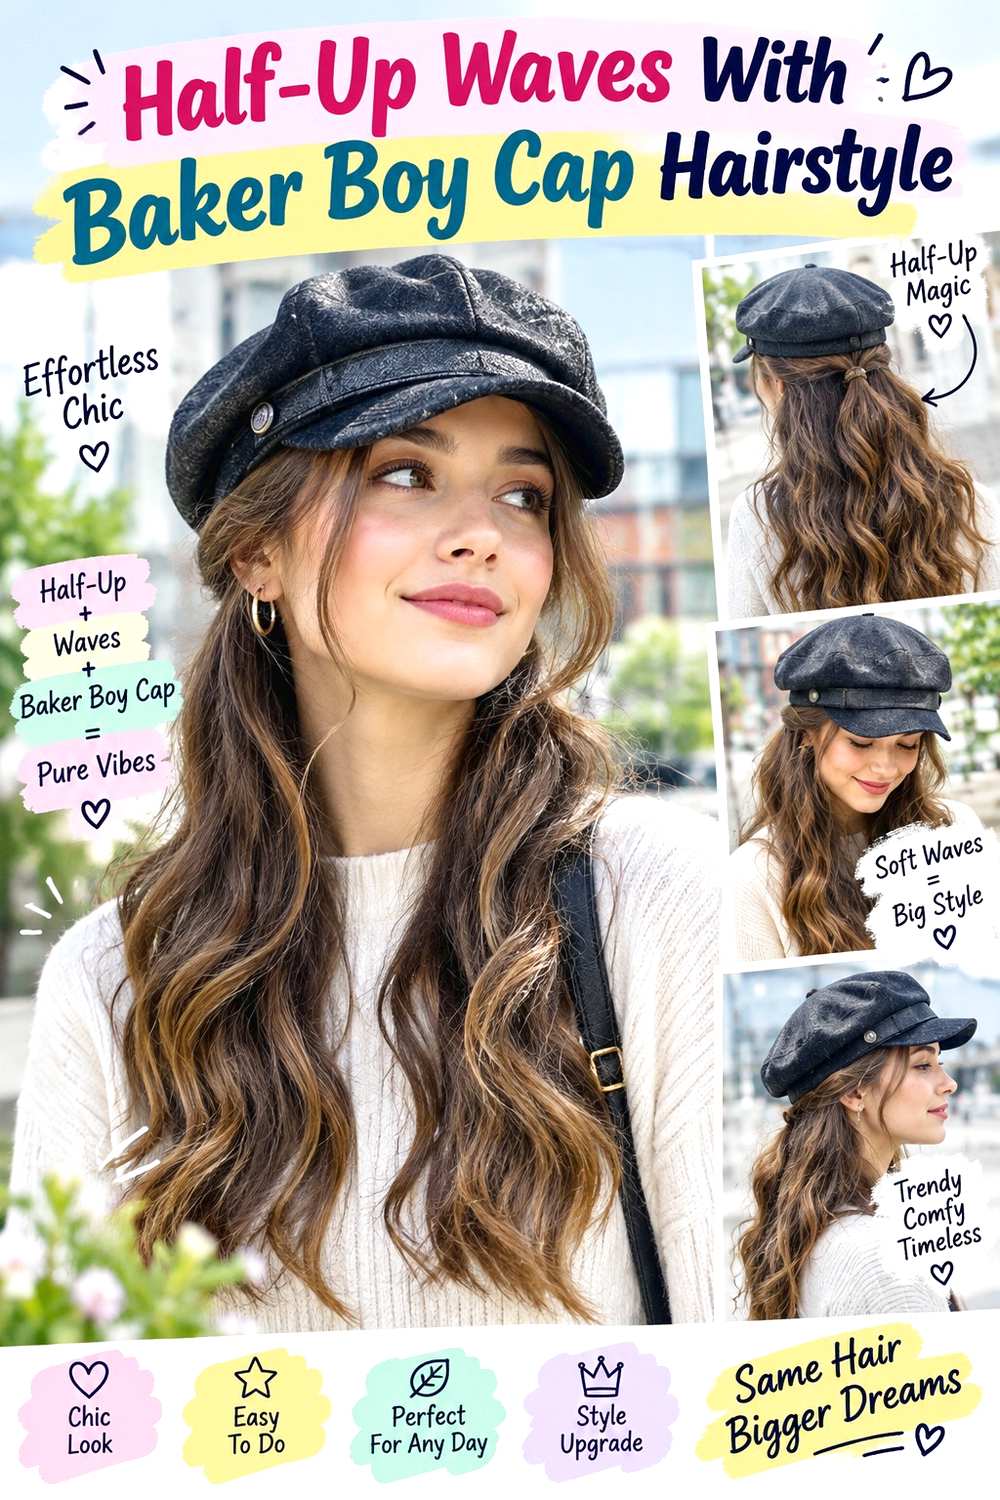
Half-up waves control the front sections without hiding all the length, making them useful when you want movement beneath a structured cap. Take small sections from above each ear, direct them backward, and secure them low behind the head so the fastening point clears the cap. Add broad bends from around cheek or jaw level through the remaining lengths, keeping the roots smoother and the ends softly separated.
Medium and long hair work best because the loose lower portion carries most of the shape. Apply heat protectant before using a large-barrel curling iron, then secure the half-up section with a small grip clip. A short refresh can focus on the front wave and uppermost visible layer. A complete wash-day set takes longer, especially on dense hair or hair that needs significant drying first.
If the clip starts slipping, reset the anchor rather than tightening the cap over it. The fastening point should stay independently secure. For salon or occasion styling, bring the cap and show exactly where its back edge sits. Ask for the half-up anchor to remain below that point and identify how much hair you want left around your face so the brim does not hide every front section.
Pro tip:
Cross the two side sections slightly before clipping them together. The overlap gives the low anchor more grip without creating a large bump beneath the back of the cap.
Make It Work for You:
For fine hair, gather smaller side sections so more density remains through the loose lengths. Keep the waves broad instead of dividing the hair into many curls.
Watch Out For:
A clip positioned too high can lift the cap at the back. Move the anchor downward rather than trying to conceal or compress it underneath the hat.
Low Bubble Ponytail With Baker Boy Cap Hairstyle
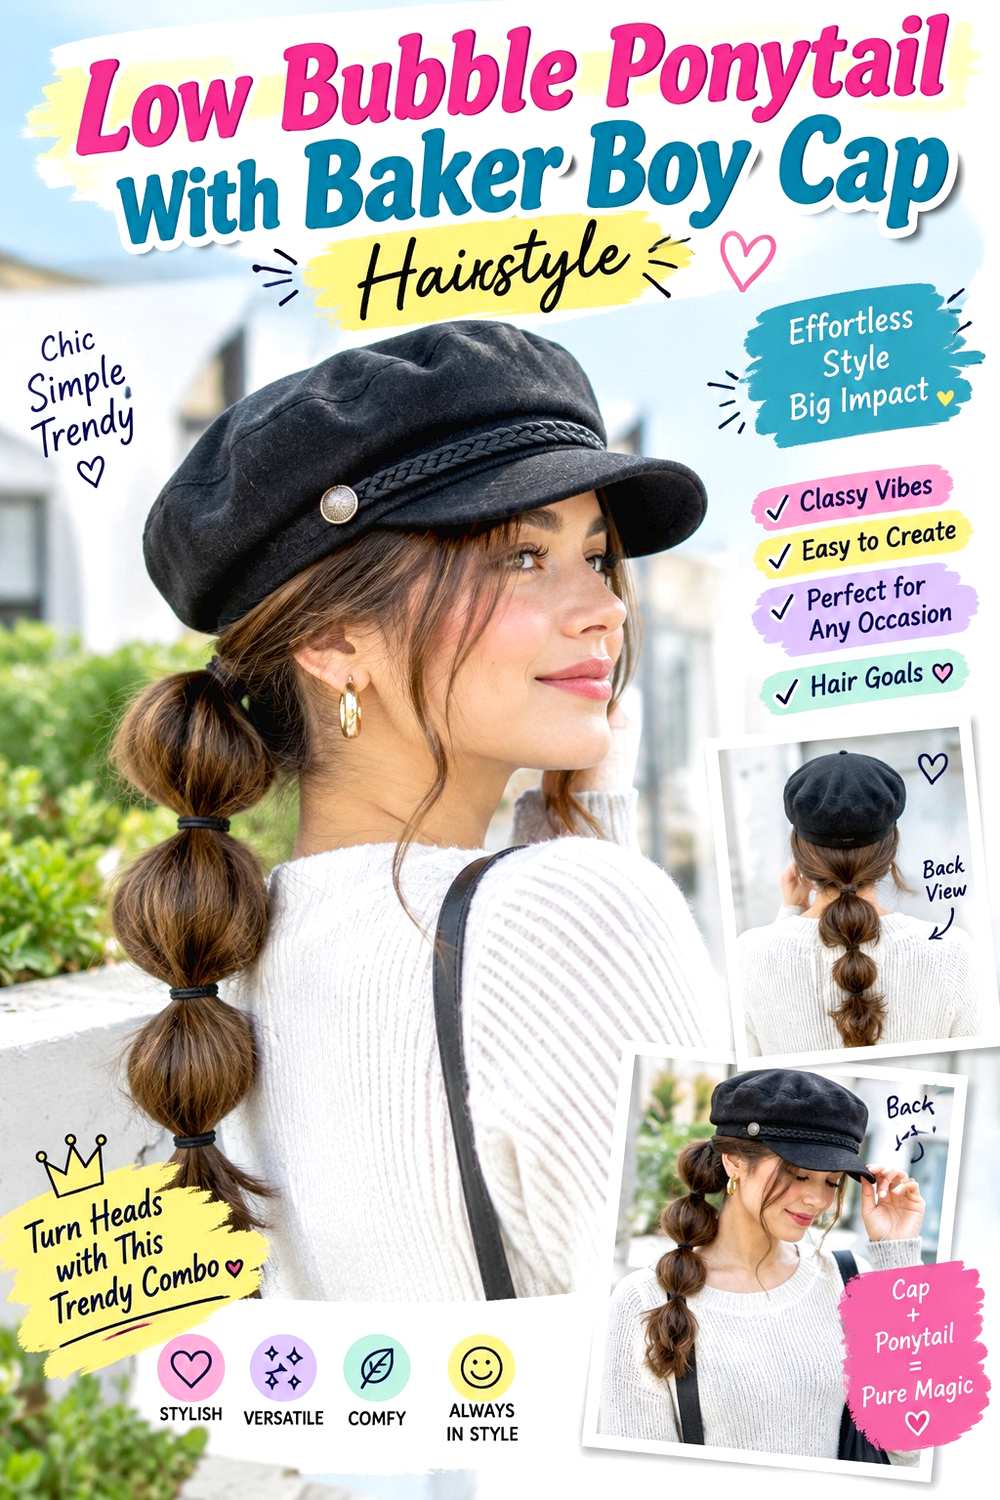
A low bubble ponytail keeps the crown controlled while adding visible shape through the length. Smooth the hair toward the nape, secure the first ponytail below the cap, then place additional elastics at even intervals. Gently widen each section between them to create rounded bubbles. A center or side part can work, and narrow face-framing pieces may be left out if you want movement around the brim.
Medium to long hair gives enough room for several bubbles, while medium or high density tends to create fuller sections with less pulling. Use snag-free elastics for the repeated anchors and a light styling cream to control flyaways at the crown. A quick refresh involves tightening a slipped elastic and reshaping individual bubbles. Full wash-day effort is longer only when drying, detangling, or smoothing is required before the ponytail is built.
Replace stretched elastics when the spacing begins to collapse rather than pulling the hair tighter at the base. For event styling, indicate where the rear edge of the cap rests and ask for the first bubble to begin beneath it. Specify how large you want each section and request even, comfortable tension so the style does not become increasingly tight toward the nape.
Pro tip:
Test the cap first, then place the second elastic below its rear edge. Build the remaining bubbles from that point so the rounded sections stay fully visible.
Make It Work for You:
For finer hair, make smaller bubbles with closer spacing. Gradual expansion gives the same repeated shape without stretching each section until the hair looks sparse.
Watch Out For:
Pulling every bubble out aggressively can loosen the base and make the spacing uneven. Expand each section gradually, comparing it with the previous one before continuing.
Side-Parted Curls With Baker Boy Cap Hairstyle
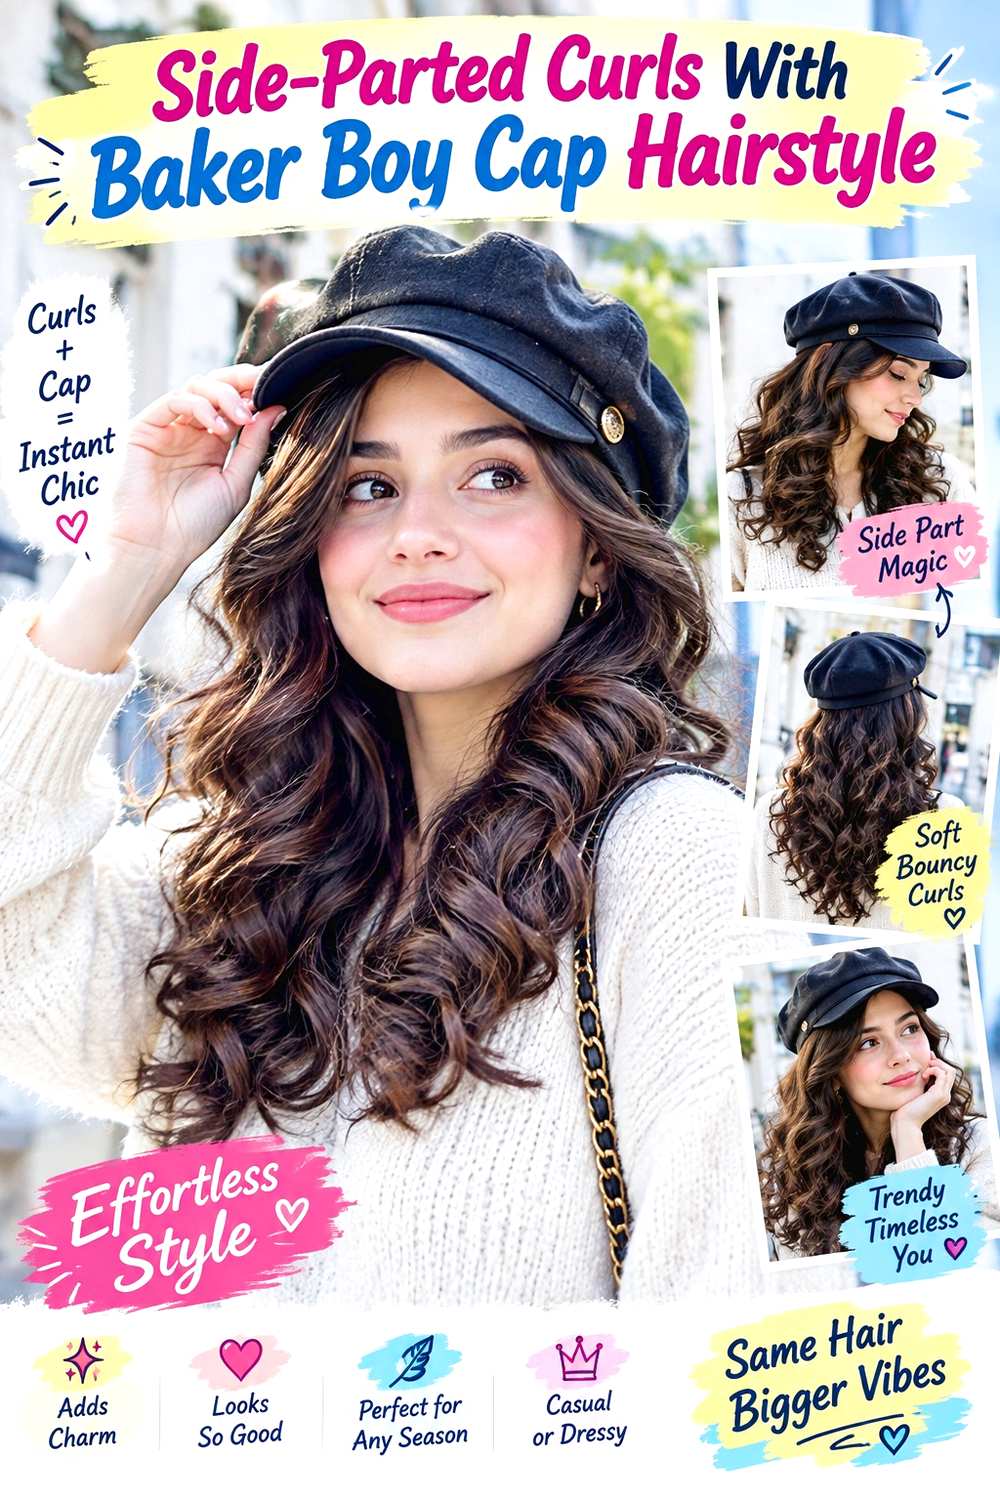
A defined side part creates a clear opening for curls to spill from beneath one side of the cap. Keep the crown controlled enough for the hat to settle, then allow curl volume to build around the cheekbones, ears, and shoulders. One side can be lightly tucked while the fuller side remains forward. The contrast between a calmer crown and visible curl pattern gives the cap structure without hiding the hair’s movement.
Naturally curly hair can use a lightweight mousse for flexible support, curl gel for stronger grouping where needed, and a diffuser to dry without excessive disturbance. A short refresh between washes may involve rewetting only the front curl groups that have flattened under the cap. A complete wash-day style takes longer depending on density, curl pattern, length, and drying time.
If the side part starts widening under the hat, reset the first few curls rather than combing through the entire crown. Frizz control is more effective when targeted. For salon shaping, show which side you normally part and how much curl volume you want visible beneath the brim. Ask the stylist to consider the dry finished position of any shorter front curls, since shrinkage can change where they land around the cheek and jaw.
Pro tip:
Shape the front curls before positioning the cap, then lower it gently behind them. This lets the most visible curl groups keep their direction beside the brim.
Make It Work for You:
For dense curls, concentrate width lower around the ears and shoulders while keeping the covered crown calmer. The pattern remains full without making the cap unstable.
Watch Out For:
Avoid repeatedly dragging the cap across finished curls while adjusting the part. Lift the hat completely, reset the hair, and place it down again to limit frizz.
Textured Low Bun With Baker Boy Cap Hairstyle

A textured low bun keeps the crown smooth enough for the cap but adds softness where the hair remains visible at the nape. Gather the length low, make a loose twist or fold, and secure it in a wide rather than tall shape. The surface can have gentle irregularity instead of a slick finish, while selected pieces near the cheekbones or jaw stay loose. The bun should look relaxed without depending on loose tension for its structure.
Medium to long hair is easiest to fold securely, and naturally wavy hair often provides texture without much preparation. Use a fabric-covered elastic for the base, bobby pins to hold the outer loops, and texturizing spray for extra grip on smooth strands. A quick refresh usually means repinning one section and reshaping the visible front. A full wash-day version may take longer if the hair needs drying before the bun is built.
If the entire bun begins dropping, redo the base rather than adding more pins around its edge. For professional styling, show where the cap sits at the nape and explain the width and looseness you want. Ask for comfortable tension and a bun low enough that the cap can be removed without hooking the pins.
Pro tip:
Secure the central fold first, then loosen only the outer loops. This puts softness where it can be seen while preserving a stable structure underneath.
Make It Work for You:
For shorter hair, make a smaller folded bun and allow a few ends to remain visible. Preserve the low placement rather than forcing every piece inside.
Watch Out For:
Loosening every section before the base is secure can make the bun collapse when the cap comes off. Build stability first, then soften the outline selectively.
Face-Framing Layers With Baker Boy Cap Hairstyle

Face-framing layers remain visible even when the cap covers much of the crown, so the shortest pieces become the main design feature. Keep the overall length from the shoulders downward, with front layers beginning near the cheekbone, jaw, or chin depending on the amount of framing you prefer. A center or soft side part can work, while gentle movement through the front lets the layers curve away from the brim.
Straight and wavy hair can create this finish with relatively predictable movement, while curly hair requires the front length to be judged with shrinkage in mind. Apply heat protectant before warm styling, use a round brush to direct the front away from the face, and add root-lift spray only where uncovered volume is useful. A quick refresh focuses on the visible front pieces. A complete blow-dry takes longer depending on density and length.
Layer upkeep becomes noticeable when the shortest pieces stop blending with the rest of the haircut or no longer sit where intended. At the salon, point to the exact finished landmark for the shortest front section. Explain that you often wear caps, so the framing needs to look balanced below the brim rather than relying on strong crown volume.
Pro tip:
Put the cap on briefly before finishing the front sections, then use its brim as a guide for where the visible layers should curve outward.
Make It Work for You:
For curly hair, choose the shortest layer according to its normal dry position rather than a stretched measurement. This preserves the same framing idea after shrinkage.
Watch Out For:
Too much short layering through the crown can create bulk directly beneath the cap. Keep the strongest movement around the face and lower lengths instead.
Sleek Low Braid With Baker Boy Cap Hairstyle

A sleek low braid combines a smooth crown with a single defined length at the back or over one shoulder. Make a center or side part, guide the hair close to the head, and begin the braid at the nape so its upper section clears the cap. Keep the crossings even and relatively firm rather than pulling them outward. The polished surface above the braid makes this option distinct from softer, deliberately loosened braided styles.
Medium to long hair can use the design, and it is practical for dense hair that you want contained under a coat. A soft-bristle brush smooths the upper sections, light styling cream controls flyaways, and a small fabric-covered elastic holds the end. A brief refresh usually means smoothing the crown or rebuilding the last few crossings. After washing, styling time depends on how much drying or detangling must happen before braiding.
The braid should stay controlled without uncomfortable pulling around the scalp. If it starts loosening from the base, redo that anchor instead of tightening the cap. For professional styling, specify the braid width, whether you want it centered or over one shoulder, and the exact nape position. Ask for gentle, even tension so removing the hat does not disturb the upper braid.
Pro tip:
Keep the first several braid crossings compact and close to the nape. That gives the cap a smooth base while preventing a raised woven section directly beneath it.
Make It Work for You:
For very dense hair, use slightly larger braid sections instead of tightening harder. The braid stays defined while reducing the time and tension needed to contain the length.
Watch Out For:
Pulling the braid too tight near the scalp can become uncomfortable once the cap adds pressure. Reduce tension at the base while keeping the lower crossings neat.
Shaggy Midi Cut With Baker Boy Cap Hairstyle
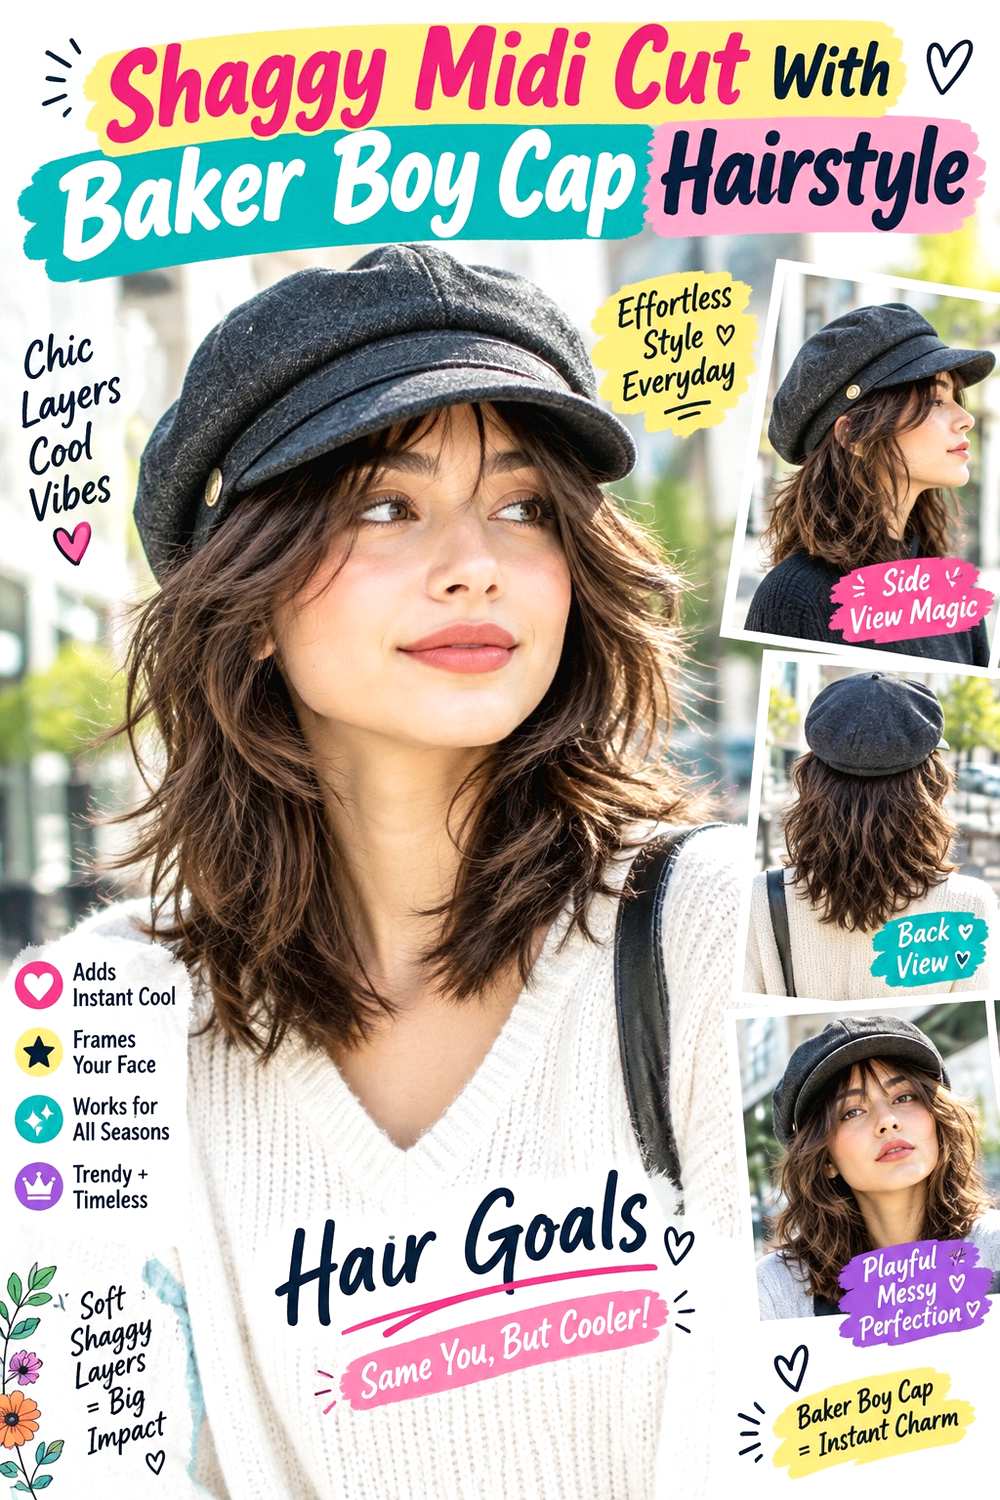
A shaggy midi cut brings visible movement below the cap through layers rather than relying on styled crown volume. Keep the overall length around the shoulders or upper chest, with shorter pieces beginning around the cheekbones or jaw and additional layers creating separation through the mid-lengths. The ends can look slightly piecey instead of blunt, and a center or relaxed side part works well beneath the rounded crown.
Naturally wavy or lightly curly hair often shows the layered shape with minimal manipulation. Use lightweight mousse to encourage movement and a wide-tooth comb to distribute it through damp hair without breaking the pattern apart. A quick refresh may involve dampening a few flattened sections and reshaping them with your hands. Full wash-day styling takes longer, but air-drying can keep the routine simple when it suits your texture.
Cut maintenance matters once the layers stop connecting or the perimeter grows past the midi length you prefer. At the salon, identify where you want the shortest face-framing layer and how much weight you want left through the bottom edge. Mention the cap so crown layers are not made short merely to create volume that will usually be covered.
Pro tip:
Encourage separation through the visible mid-lengths instead of fluffing the crown. The layered shape will still read clearly while the cap sits closer to the head.
Make It Work for You:
For fine strands, keep more weight through the perimeter and use fewer internal layers. Concentrate the shaggy movement around the front and upper mid-lengths instead.
Watch Out For:
Too many short crown layers can puff beneath the cap while leaving the ends sparse. Ask for movement where it remains visible rather than removing weight everywhere.
Soft Coily Puff With Baker Boy Cap Hairstyle

A soft coily puff can sit behind or below a baker boy cap when the anchor stays low enough to avoid pushing the hat forward. Guide the front and side sections back gently, secure the base toward the lower crown or nape, and allow the puff to expand beyond the cap’s rear edge. Small coils around the temples can remain visible, while the front follows your natural hairline rather than being pulled perfectly flat.
Coily hair with enough length to gather can use this design without straightening. Apply moisturizing leave-in conditioner for softness, use a fabric-covered elastic to form the base, and add curl gel to define visible coils around the perimeter. A quick refresh may involve reshaping the puff and a few front coils. A full wash-day routine takes longer according to density, shrinkage, detangling needs, and drying method.
Do not tighten the puff simply because the cap moves; each needs its own secure placement. For salon or occasion styling, show the exact hat and explain where its back edge should rest relative to the puff. Ask for comfortable tension around the perimeter and enough room for your normal shrinkage and volume rather than stretching the hair solely to make the puff larger.
Pro tip:
Secure the puff first, then place the cap from the front and settle it gently ahead of the anchor. Adjust visible coils only after the hat feels stable.
Make It Work for You:
If your hair shrinks strongly, keep the puff compact and emphasize coil definition around its visible edge. The shape does not need stretched length to remain distinct.
Watch Out For:
A painfully tight base is not necessary for security. If the cap slips, reposition the hat separately rather than increasing tension around the hairline or temples.
Rope Braid With Baker Boy Cap Hairstyle
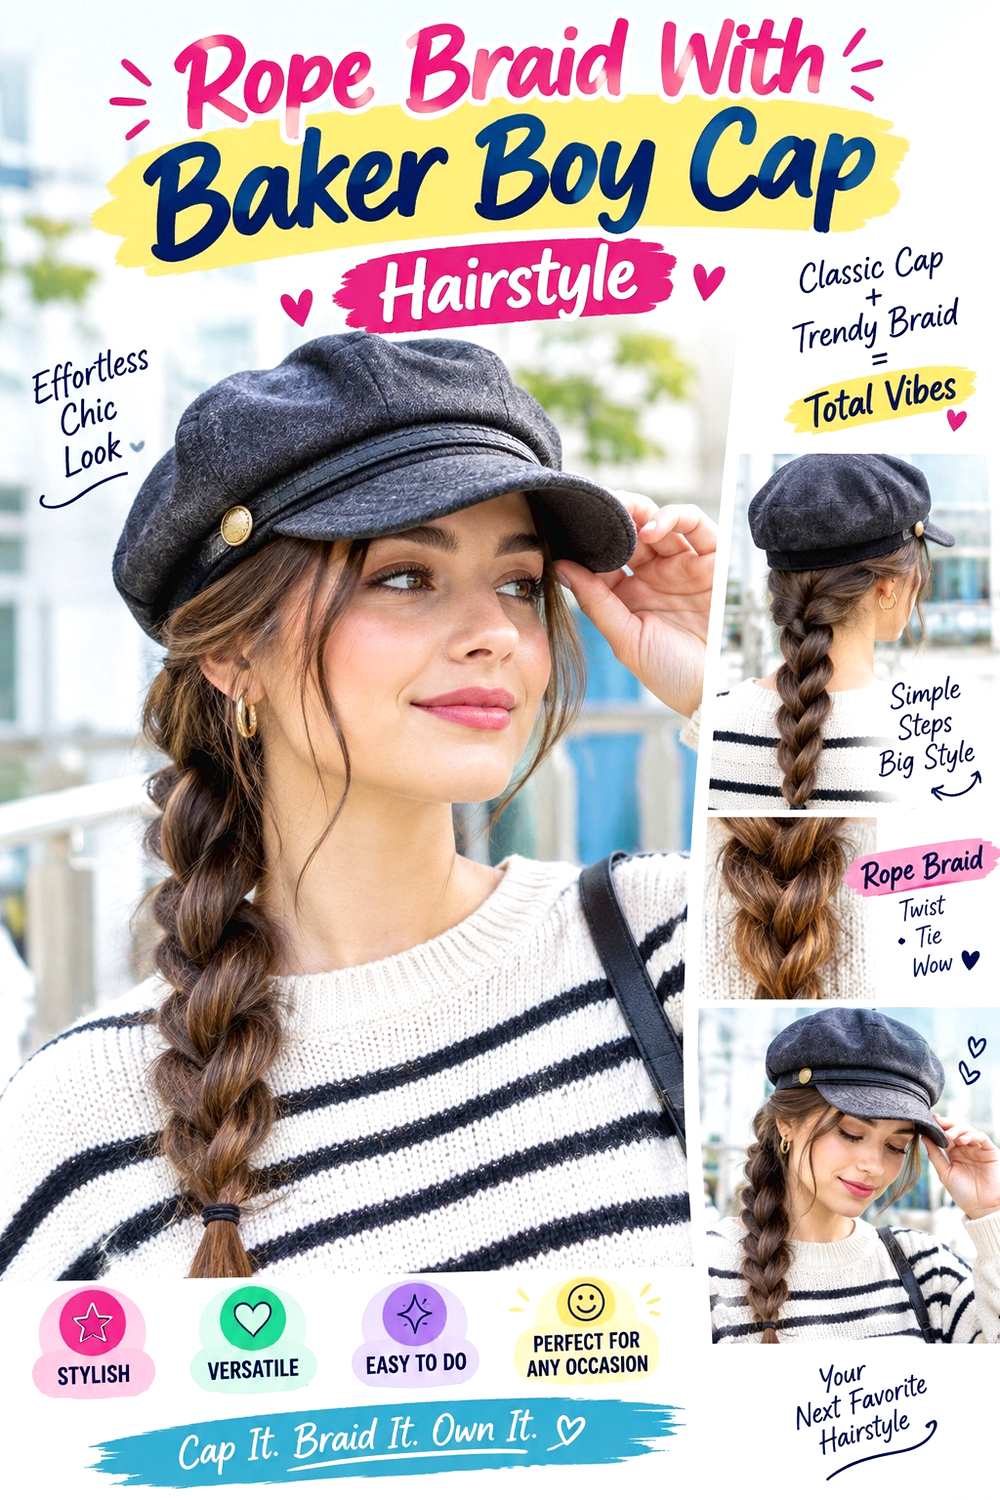
A rope braid creates a compact twisted line that works well with the rounded shape of a baker boy cap. Gather the hair at the nape or slightly to one side, divide it into two equal sections, twist both in the same direction, then wrap them around each other in the opposite direction. Keep the crown smooth and the upper twist narrow, allowing the braid to become more visible below the shoulders.
Medium to very long hair gives the twist enough length to show clearly, and dense hair can be contained without making a wide three-strand braid. Use a light styling cream to improve control and a fabric-covered elastic to secure the end. A quick refresh means retwisting the lower section if it starts opening. A full wash-day version takes longer only when drying and detangling are needed before the braid begins.
If the rope repeatedly unravels, check your twist directions rather than simply pulling harder. For salon or event styling, specify whether you want the rope centered or brought forward over one shoulder and how thick it should appear. Ask for the base to begin below the rear cap edge with comfortable tension around the nape.
Pro tip:
Keep both original sections twisted in one direction while wrapping them together the opposite way. That opposing motion helps the finished rope maintain its structure.
Make It Work for You:
For slippery hair, keep the upper half of the rope firmer and loosen only the lower section slightly. The twist stays secure without looking overly rigid.
Watch Out For:
Twisting and wrapping everything in the same direction makes the rope loosen quickly. Reverse the wrapping direction before increasing tension or adding more product.
Loose Low Pigtails With Baker Boy Cap Hairstyle
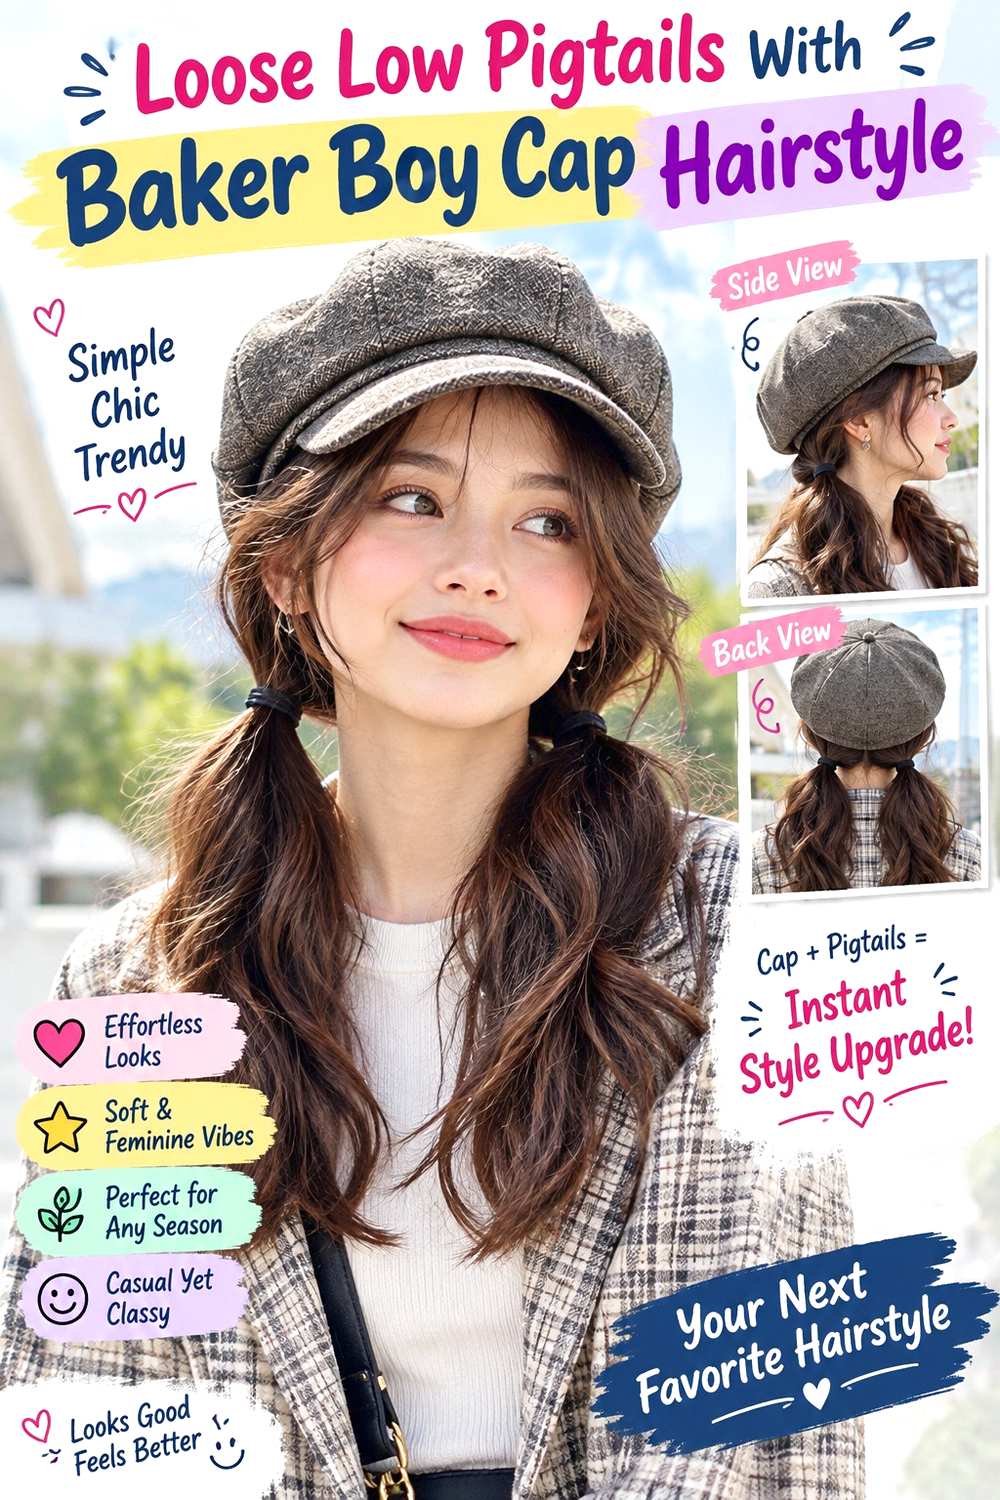
Loose low pigtails give the cap an easy symmetrical frame without adding any bulk at the crown. Make a center part, divide the hair evenly, and secure each section below the ears or closer to the nape. Keep the ties low enough that the cap clears them comfortably. The lengths can remain straight, wavy, curly, or naturally textured, while a few face-framing pieces soften the area around the short brim.
Medium and long hair work best, especially layered hair that may release short pieces from a single ponytail. Use two fabric-covered elastics to secure the sections and a lightweight leave-in conditioner to reduce static where hair rubs against scarves or wool clothing. A quick refresh means smoothing the part and resetting one elastic. Full wash-day effort can stay minimal when you keep your natural texture rather than adding another finish.
If one side drops lower, redistribute the sections instead of tightening only that elastic. For professional styling, bring the cap and show exactly where you want each pigtail base in relation to the ears and rear edge. Specify how loose the finish should feel and which short pieces you want intentionally left around the face.
Pro tip:
Try the cap on before fixing the final tie positions. Both pigtail bases should sit fully below its lower edge rather than creating hidden bumps near the ears.
Make It Work for You:
For shorter layers, position the bases closer to the nape so more hair reaches each elastic. Let selected front sections remain loose rather than forcing them backward.
Watch Out For:
Uneven sectioning can make one pigtail visibly heavier even when the ties match. Recheck the center part and redistribute the hair before tightening either side.
Conclusion
Hairstyles with baker boy caps are easiest to narrow down by deciding how much hair you want visible and how much styling your routine allows. Bobs and lobs emphasize length and perimeter, while layers and waves add movement around the brim. Braids, ponytails, and low buns control dense or long hair without creating crown bulk. Curtain bangs bring attention to the front, while curls and coils can preserve natural texture when the cap leaves enough space. A centered part creates symmetry, whereas a side part can balance a tilted cap. Consider density, shrinkage, face-framing preferences, hat fit, and daily effort together. The best option is one that remains comfortable and still works when the cap comes off.
Before Your Salon Visit
Choose one or two favorites and save references that clearly show both the hairstyle and baker boy cap placement. Discuss your natural texture, density, face shape, preferred length, usual upkeep, and realistic styling routine. Point to the exact fringe length, layer starting point, braid width, bun placement, curl volume, or finish you want. For temporary braids, ponytails, buns, and puffs, focus on comfortable tension and secure positioning rather than requesting an unnecessary haircut.
FAQs
Can baker boy caps work with curly or coily hair?
Yes. Leave enough space for your natural volume and place the cap without dragging it through finished curls or coils. Lower styles and back-positioned volume often work well. Plan around your normal shrinkage, and refresh only compressed sections instead of assuming the hair needs to be straightened for the cap.
How do I stop a baker boy cap from flattening my hairstyle?
Keep most visible volume below the cap line rather than building strong lift directly underneath it. Waves, face-framing layers, curls, and low styles can retain shape around the sides and shoulders. After removing the cap, reset only flattened sections instead of restyling the entire head.
Which baker boy cap styles work well for fine hair?
A fuller bob or lob, broad waves, a compact braid, or a low ponytail can preserve more visual density than heavily separated styles. Keep products lightweight and avoid excessive pulling or thinning through the ends. The cap itself should fit comfortably without compressing the crown more than necessary.
Do I need a haircut to wear these styles with a baker boy cap?
Usually not. Most ponytails, braids, buns, pigtails, waves, curls, and puffs are temporary styling choices. A haircut only becomes relevant when you specifically want features such as curtain bangs, a bob perimeter, or face-framing layers. Choose those changes based on how you also wear your hair without the cap.