18 Infinite Knot Ponytail Hairstyles

Infinite knot ponytail hairstyles are built around a secured ponytail with sections looped and crossed so the center reads like a sideways figure eight or continuous knot. The defining feature is the knot itself, not a haircut. It can sit high, mid-level, low at the nape, or slightly off-center, while the tail can stay straight, wavy, curly, braided, or textured. Face-framing pieces and crown volume can be added, but the anchor should support the decorative loops without pulling at the scalp.
The style is adaptable across straight, wavy, curly, and coily textures, although grip, shrinkage, density, and usable length affect how the knot forms. Dense hair may need smaller loop sections so the center does not become bulky, while lower-density hair can often create a clearer shape with gently widened loops. Shorter front pieces can remain loose instead of being forced into the knot. A middle, side, or brushed-back part changes the mood without changing the basic construction.
Most versions need more care than a plain ponytail but less commitment than a cut. A quick refresh may mean smoothing the surface, tightening the anchor, and reshaping one loop; a full styling session starts from detangled hair and rebuilds the knot from scratch. Comfortable tension matters more than extreme tightness. Because the style is temporary, maintenance is mainly about preventing slipping, frizz, flattened loops, and snagging when the knot is removed.
Quick List
- Classic Centered Infinite Knot Ponytail Hairstyle
- Low Nape Infinite Knot Ponytail Hairstyle
- High Crown Infinite Knot Ponytail Hairstyle
- Side-Swept Infinite Knot Ponytail Hairstyle
- Double-Loop Infinite Knot Ponytail Hairstyle
- Wrapped-Base Infinite Knot Ponytail Hairstyle
- Sleek Middle-Part Infinite Knot Ponytail Hairstyle
- Soft Face-Framing Infinite Knot Ponytail Hairstyle
- Wavy-Length Infinite Knot Ponytail Hairstyle
- Curly Infinite Knot Ponytail Hairstyle
- Textured Volume Infinite Knot Ponytail Hairstyle
- Half-Up Infinite Knot Ponytail Hairstyle
- Braided-Tail Infinite Knot Ponytail Hairstyle
- Rope-Twist Infinite Knot Ponytail Hairstyle
- Bubble-Tail Infinite Knot Ponytail Hairstyle
- Scarf-Accented Infinite Knot Ponytail Hairstyle
- Pearl-Pin Infinite Knot Ponytail Hairstyle
- Short-Length Infinite Knot Ponytail Hairstyle
Classic Centered Infinite Knot Ponytail Hairstyle

A mid-height ponytail gives the infinite knot a clear, balanced position at the back of the head. The front can be brushed away from the face or softly parted, while the knot sits directly over the ponytail anchor and the remaining length falls straight beneath it. Keep the two visible loops similar in size, with tidy edges and a little softness so the shape reads as a continuous figure eight instead of two separate bows.
This version suits medium to long hair that can wrap without the short ends escaping immediately. Straight and wavy textures usually show the loop pattern clearly, while textured hair can keep more natural definition in the tail. Use a fabric-covered elastic to establish the base, bobby pins to secure the crossed center, and flexible hairspray to control flyaways without making the knot rigid. A quick refresh between washes is mostly about pressing loose sections back into place; a full restyle means rebuilding the anchor and loops.
If a stylist is creating it, explain how wide you want the knot compared with the ponytail and ask for comfortable tension at the base. Rebuild the shape once the loops begin to collapse rather than repeatedly tightening the same anchor.
Pro tip:
Shape the two loops before adding the final center pin. Check the knot from behind with a mirror, then widen only the flatter side so the figure eight stays balanced.
Make It Work for You:
If your hair is very dense, build the knot from smaller outer sections and leave more hair in the tail. The centered shape stays visible without creating a heavy lump at the anchor.
Watch Out For:
Do not keep tightening the ponytail when one loop droops. Reposition the pin holding that loop instead; repeated tightening can increase scalp tension without fixing the knot’s actual structure.
Low Nape Infinite Knot Ponytail Hairstyle
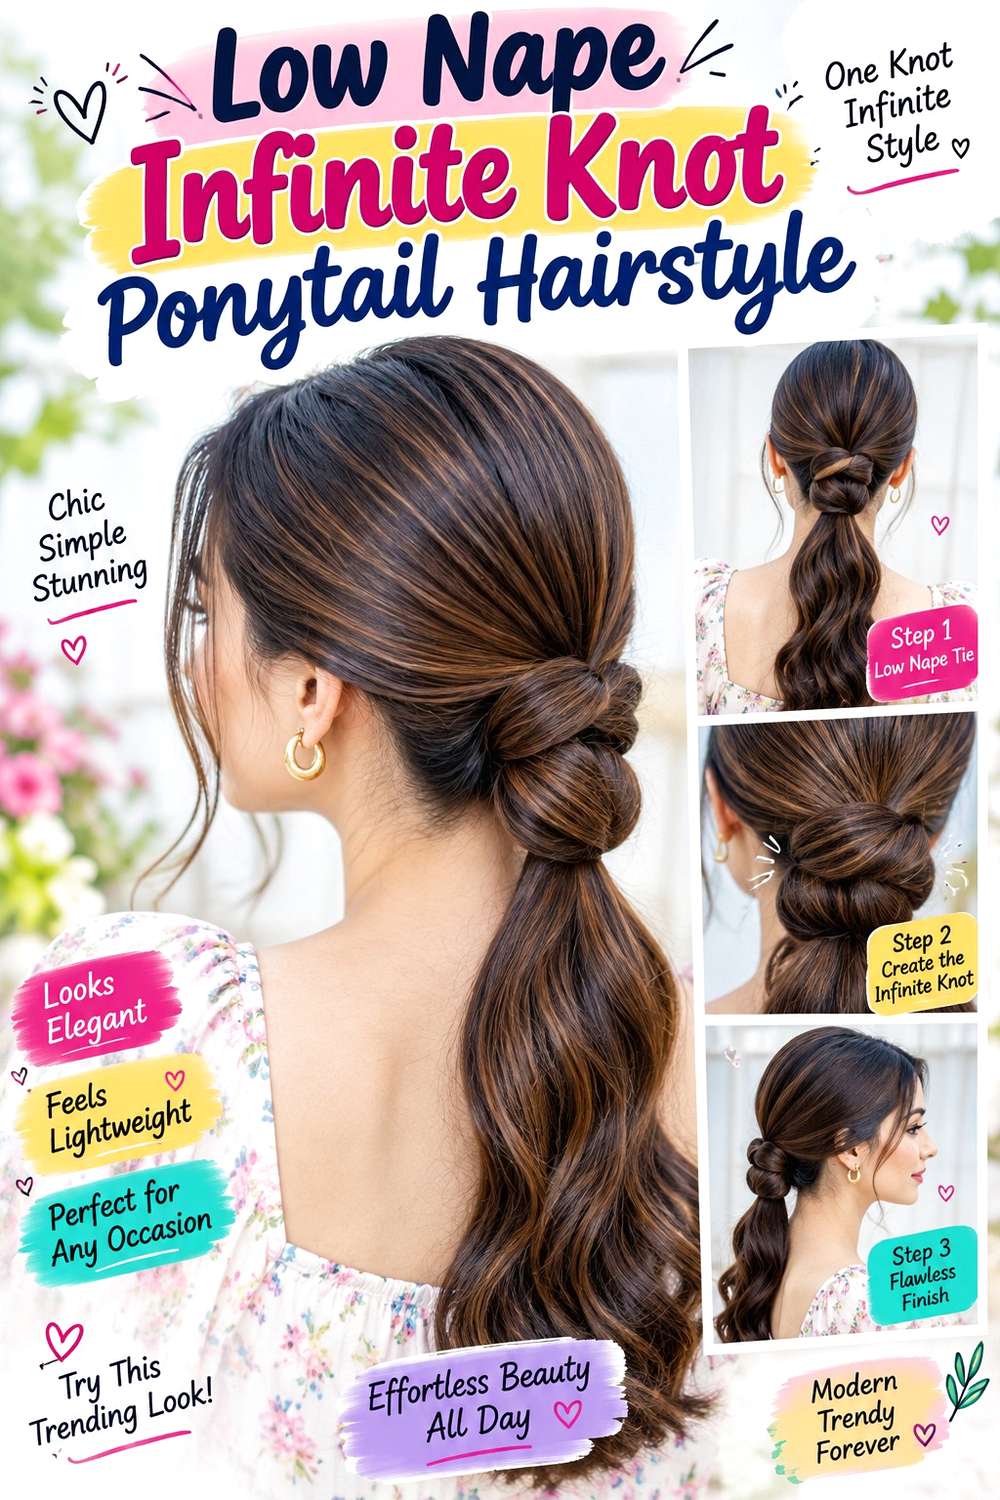
Placing the infinite knot at the nape creates a flatter, more understated profile that works well when you do not want height at the crown. A center or soft side part can feed into a low ponytail, with the looped knot positioned just above the neckline and the loose tail lying close to the back. Slightly elongated loops keep the design visible without making the base feel bulky.
This placement is useful for medium and long lengths, especially when you prefer a style that can sit beneath a hat or work with a higher neckline. Straight, wavy, curly, and coily hair can all use the idea; the important adjustment is how much hair is assigned to each loop. A fabric-covered elastic keeps the anchor gentle, a light styling cream helps gather shorter surface pieces, and bobby pins hold the crossed center. Refreshing is usually brief: smooth the nape and reset any loosened pin. Starting over after a wash takes longer because the low base must be evenly gathered.
For professional styling, specify that the knot should stay at the nape rather than creep upward, and discuss how snug the anchor can feel comfortably. If the neckline starts to frizz, smooth only the visible surface instead of repeatedly tightening the ponytail.
Pro tip:
Keep your chin level while the nape base is secured. Tilting the head upward can make the finished ponytail feel unexpectedly tight when you return to a neutral position.
Make It Work for You:
For curly or coily hair, let the nape texture stay softly defined rather than brushing it flat. A neat anchor and visible knot can still look intentional with natural surface texture.
Watch Out For:
Avoid placing the knot directly where a stiff collar presses against it. Raise the anchor slightly or choose a softer neckline so friction does not loosen the loops during wear.
High Crown Infinite Knot Ponytail Hairstyle

A higher anchor turns the infinite knot into a visible focal point near the crown, with the ponytail falling from the center of the looped shape. The front can be brushed back for a clean outline, while the knot stays compact enough that it does not tip forward. A lifted base gives the tail more swing, so straight lengths look sharper and textured lengths appear fuller in motion.
This version works best when there is enough length to form the loops without leaving the remaining ponytail too short. Dense hair may need narrower sections for the knot, while lower-density hair can benefit from gently spreading each loop after it is pinned. Use a strong fabric-covered elastic for the high anchor, bobby pins for the crossed center, and lightweight texturizing spray to add grip where strands slide. A quick refresh can mean reshaping the loops and smoothing the crown; a full wash-day style takes longer because the high base needs even gathering and secure placement.
If a stylist is building the look, point out the exact anchor height you want and ask that the tension remain comfortable around the hairline. Once the base begins to sag, rebuild it rather than stacking extra tight elastics on top.
Pro tip:
Before forming the knot, test the high ponytail by moving your head gently from side to side. If the base pulls, lower it slightly before adding the decorative loops.
Make It Work for You:
For lower-density hair, keep the knot compact and use modest loop expansion rather than oversized sections. A smaller figure eight usually keeps more visual fullness in the remaining ponytail.
Watch Out For:
Do not stack pins randomly around the high base. Cross only where support is needed and keep the pin ends contained, because bulky anchoring can tilt the knot or feel uncomfortable.
Side-Swept Infinite Knot Ponytail Hairstyle

An off-center anchor gives the infinite knot a more directional shape, with the ponytail falling toward one shoulder instead of straight down the back. A deep side part can echo that placement, or the front can stay softly brushed back while the knot sits just behind one ear. Keep the inner crossing neat and let the outer loop on the visible side open slightly wider so the figure-eight shape can be seen from the front.
This arrangement is practical for medium to long hair and for occasions when the hairstyle needs to photograph clearly from an angle. Wavy and curly textures can keep their natural movement through the tail, while straighter hair creates a cleaner outline. Use a snag-free elastic for the side base, light texturizing spray for grip, and bobby pins to secure the crossing. A short refresh focuses on the visible loop and the hair around the ear; a complete restyle takes longer because the off-center gathering must stay balanced.
When someone else styles it, show exactly how far behind the ear you want the anchor and whether any face-framing pieces should remain loose. If the ponytail starts pulling sideways, rebuild the base closer to the intended anchor rather than pinning the knot against the scalp.
Pro tip:
Angle the center crossing toward the side you want visible from the front. This small rotation helps the figure-eight detail show without pulling the entire ponytail farther toward the face.
Make It Work for You:
If you prefer less hair around the ear, keep the side part shallow and place the anchor slightly farther back. The ponytail still reads as side-swept without crowding the cheek.
Watch Out For:
Watch for uneven tension above the opposite ear. If that side feels pulled, loosen and regather the base rather than dragging the ponytail farther sideways after it has been secured.
Double-Loop Infinite Knot Ponytail Hairstyle

A double-loop treatment makes the figure-eight center more pronounced by allowing each side of the knot to form a fuller oval before the hair crosses through the middle. Keep the ponytail at mid-height, with a clean center crossing and a loose tail that drops directly beneath it. The loops should look connected rather than stacked, and the ends can stay smooth or carry natural bend for softer movement.
This variation suits medium to long hair with enough usable length to create visible loops without sacrificing the tail. Dense hair can form a substantial knot, but smaller working sections help keep the center from becoming heavy. Lower-density hair may need only modest loop width so the shape does not look hollow. Use a fabric-covered elastic for the base, sectioning clips to hold each loop while you shape the other side, and flexible hairspray for controlled finish. A quick refresh means opening a flattened loop and re-securing the crossing; a full rebuild takes longer because symmetry is the main detail.
If a stylist is doing the work, specify whether you want the loops equal or slightly elongated vertically. Avoid over-tightening the center, because a crushed crossing can erase the continuous-knot effect you are trying to show.
Pro tip:
Pin the inner crossing first, then adjust the outer curves of both loops. Working from the center outward preserves the continuous-knot shape while allowing controlled width on each side.
Make It Work for You:
With fine strands or lower density, make narrower loops and let a little air remain inside them. You can show the double-loop outline without spreading the sections until they look sparse.
Watch Out For:
Do not flatten the loops with too much finishing pressure. If the ovals collapse, loosen their outer edges gently and secure the center instead of pressing the whole knot against the head.
Wrapped-Base Infinite Knot Ponytail Hairstyle
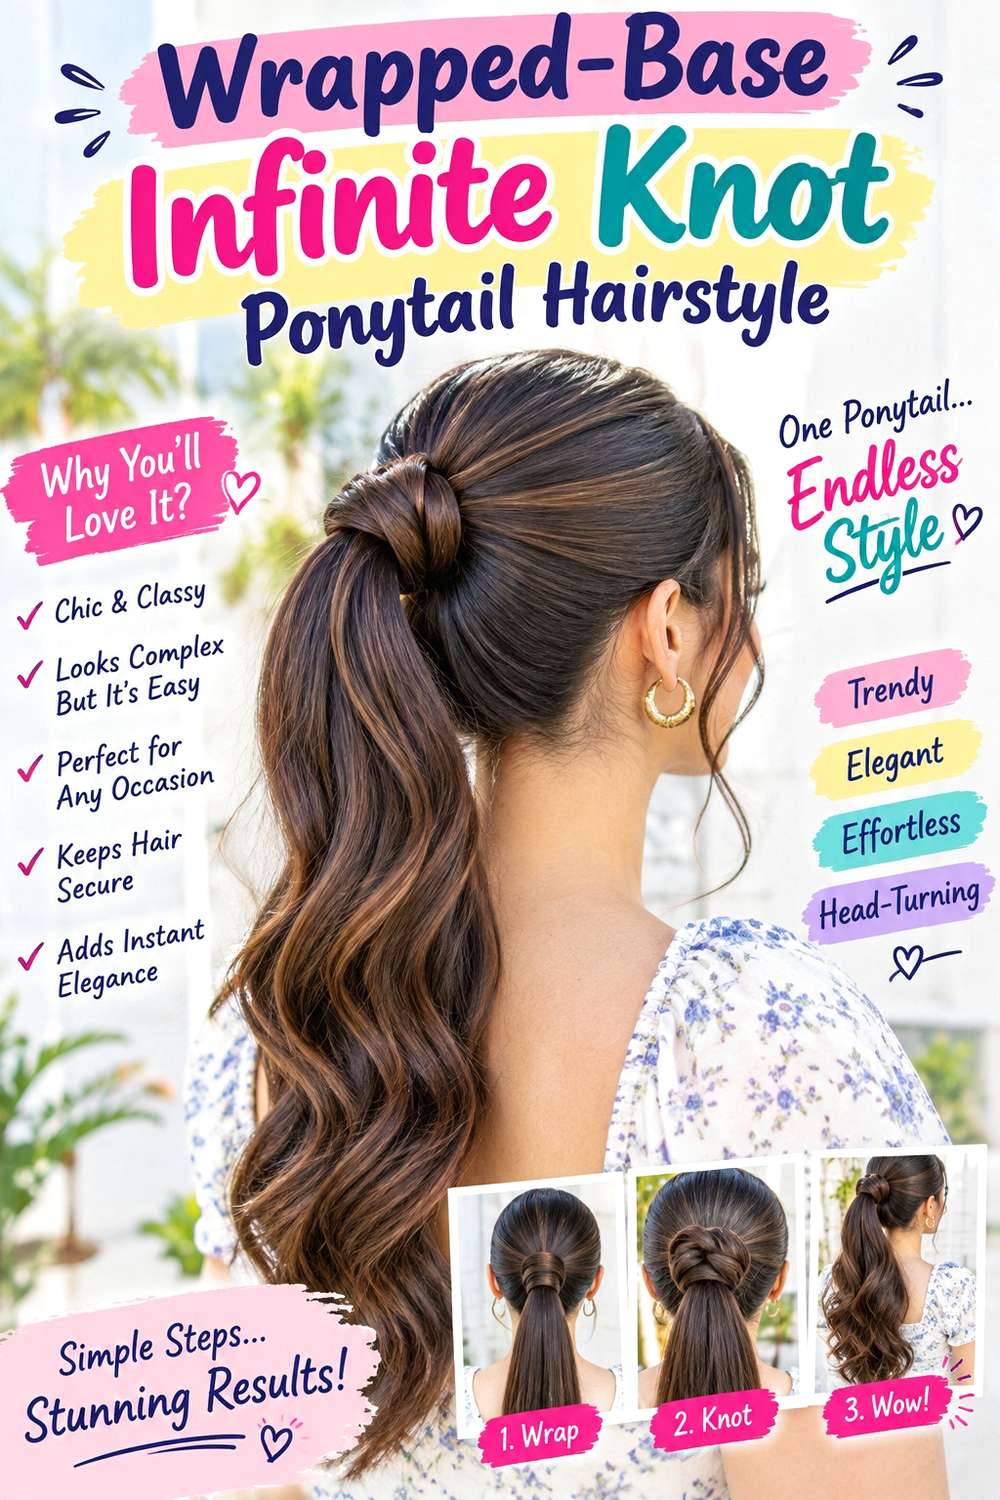
A wrapped base hides the ponytail elastic before the infinite knot begins, giving the design a cleaner transition from the head into the decorative loops. Place the ponytail at mid or low height, reserve a slim section to circle the anchor, then form the figure-eight knot directly below it. The loose tail should emerge from the center without a visible band interrupting the shape.
This option is useful when you want a polished finish but still need security underneath. Medium and long hair are easiest to work with because the wrapped section needs enough length to circle the base. Smooth, wavy, curly, or coily textures can all keep their natural character through the tail. Use a fabric-covered elastic for the hidden anchor, bobby pins for both the wrap and knot, and light styling cream to keep the reserved section controlled. A between-wash refresh is usually limited to smoothing the wrap and replacing a loose pin; a full restyle takes longer because the hidden anchor and knot are built separately.
For professional styling, ask that the wrap remain slim enough not to compete with the knot and identify where you want the crossing to sit. If the wrap loosens, secure its end underneath instead of winding it tighter around the ponytail.
Pro tip:
Hide the end of the wrapped section underneath the ponytail, not on the visible side. That keeps the transition clean and prevents the tucked end from interrupting the knot’s outline.
Make It Work for You:
If your usable length is limited, make the base wrap narrower and reserve more hair for the knot. The wrapped effect only needs to conceal the anchor, not create a thick band.
Watch Out For:
Avoid borrowing too much hair for the wrap. An oversized wrapped section can leave the knot undersized and the tail thin, so reassess the section before winding it around the base.
Sleek Middle-Part Infinite Knot Ponytail Hairstyle
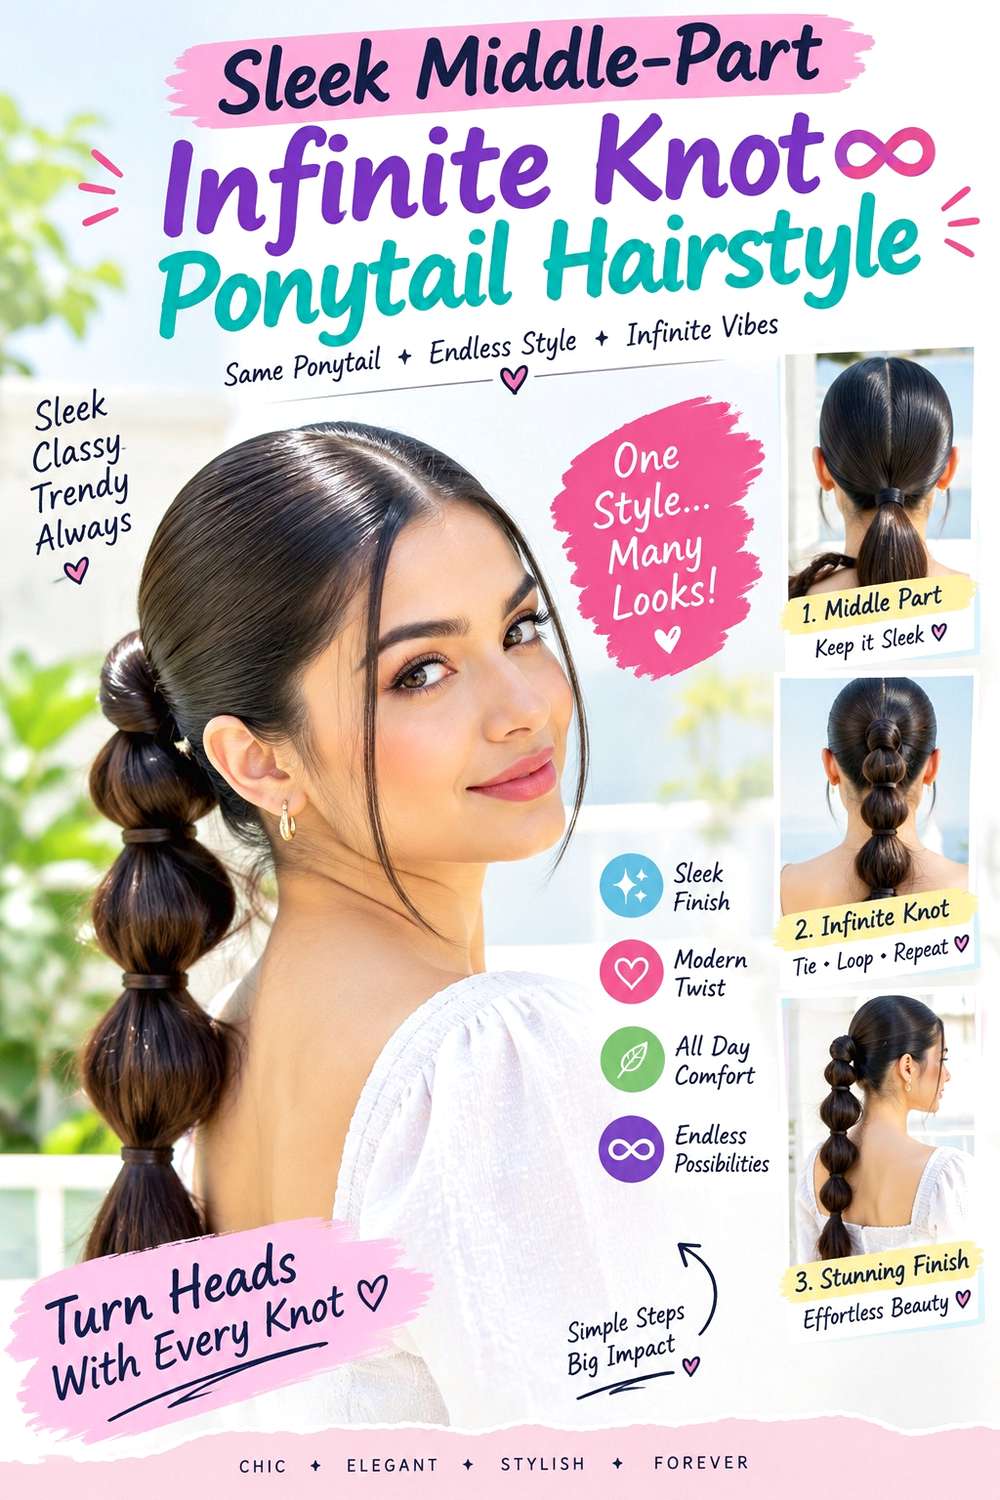
A precise middle part and smooth surface make the infinite knot look especially graphic. The ponytail can sit just below the crown, with the front kept close to the head and the knot centered directly behind it. Keep the loops compact, the crossing narrow, and the tail straight or softly bent so the clean parting remains the strongest line from the front.
This finish works well for readers who like a controlled shape and are comfortable spending extra time on surface smoothing. Straight hair may reach the finish quickly, while wavy, curly, or coily textures can keep their natural pattern in the tail instead of being flattened throughout. Use a tail comb to define the part, a fabric-covered elastic to anchor the ponytail, and smoothing gel sparingly over the visible surface. A morning refresh can be brief if the part and base stay intact; a full wash-day version takes longer because the surface must be gathered evenly without creating uncomfortable tension.
If a stylist is creating it, specify how flat you want the crown and whether the ears should be fully exposed or softly covered. Watch the hairline while securing the ponytail: a sleek appearance should come from controlled placement, not pulling the base progressively tighter.
Pro tip:
Define the middle part before gathering the ponytail, then smooth each side toward the anchor in the same direction. Correcting the part after securing can create bumps around the crown.
Make It Work for You:
For curls or coils, keep the sleekness focused on the top surface and let the ponytail retain texture. The contrast preserves the clean part while reducing the need to alter the full length.
Watch Out For:
Do not overload the roots with smoothing product. Too much can make the surface separate or look heavy; use a thin layer only where flyaways disrupt the clean parting.
Soft Face-Framing Infinite Knot Ponytail Hairstyle
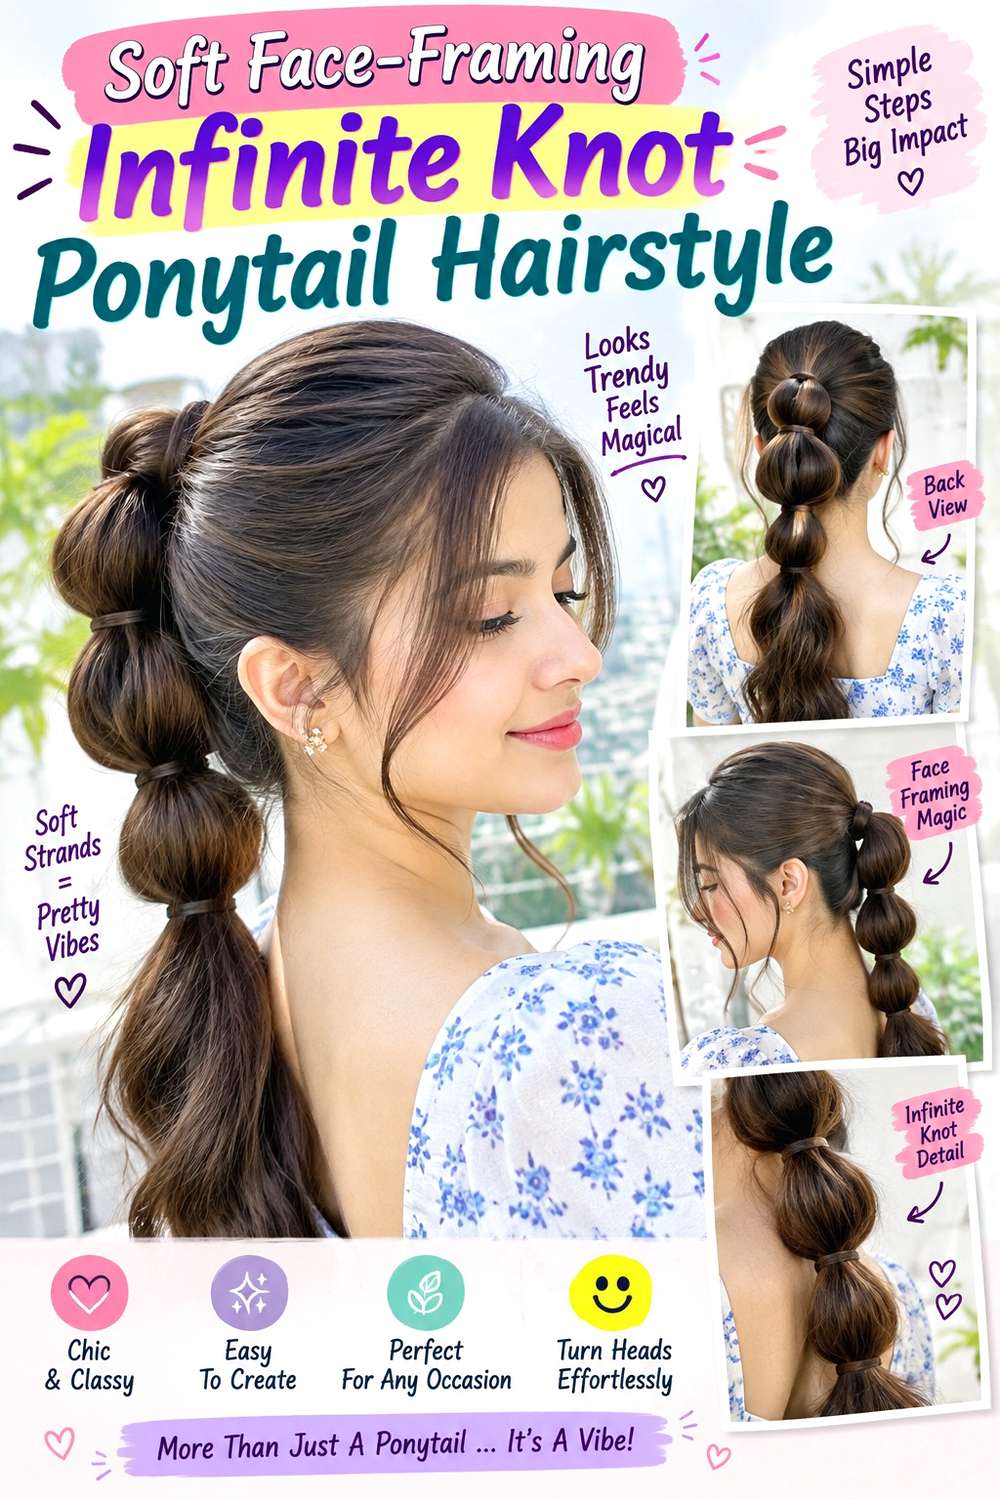
Leaving a few front sections loose softens the structure of an infinite knot without hiding its center. A middle or loose side part can release pieces around the cheekbones or jaw, while the main ponytail sits at mid-height and the figure-eight knot stays centered at the back. Keep the tail relaxed rather than overly sleek so the face-framing pieces feel connected to the overall finish.
This variation is useful when shorter front layers do not comfortably reach the ponytail or when you prefer movement around the face. Straight, wavy, curly, and coily textures can all use their pattern; choose loose sections according to where they naturally fall rather than forcing identical lengths on both sides. Use a fabric-covered elastic for the base, bobby pins for the knot, and a small amount of lightweight styling cream to separate and control the front pieces. A quick refresh may only involve reshaping those pieces and checking the knot, while a full restyle means regathering the ponytail and rebuilding the loops.
If someone styles it for you, point to the exact pieces you want left out and where they should finish. Do not keep pulling more hair free after the base is secured, because that can weaken the anchor and make the knot sag.
Pro tip:
Choose the loose front pieces before securing the ponytail. Separating them early prevents accidental tugging at the base and makes it easier to keep both sides intentionally placed.
Make It Work for You:
If your front layers are very short, release fewer pieces and let them sit at their natural length. The knot remains the focal point while the face frame stays manageable.
Watch Out For:
Avoid pulling random strands out after the style is finished. That can loosen the anchor and create frizz; if you need more softness, rebuild the base with those sections excluded.
Wavy-Length Infinite Knot Ponytail Hairstyle

Broad waves through the loose tail create movement below a neat infinite knot, so the decorative center stays defined while the length feels softer. Set the ponytail at mid-height, keep the knot compact, and begin the visible bends below the knot rather than puffing the base. Straighter tips can keep the waves modern and prevent the tail from becoming overly rounded.
This version suits medium to long hair when you want a more finished occasion style. Naturally wavy hair may need only light reshaping, while straighter hair requires more work to create the bends. Use heat protectant before any hot-tool work, a curling iron to form broad sections through the ponytail, and flexible hairspray to support movement without freezing it. A quick next-day refresh can focus on one or two flattened bends; a full wash-day style takes longer because the ponytail, knot, and wave pattern all need rebuilding.
If a stylist is creating the look, specify where the first visible wave should start and how much straightness you want left at the ends. Avoid curling the knot sections themselves, because extra bulk can blur the figure-eight crossing and make pin placement less stable.
Pro tip:
Let each heated bend cool before you loosen it, especially near the upper tail. This helps the wave hold its shape without requiring a stiff finish around the knot.
Make It Work for You:
If your hair already has a strong natural wave, refine only the sections that fall unevenly. Keeping most of the existing pattern reduces styling effort while preserving the wavy-tail idea.
Watch Out For:
Do not start the first wave too close to the pinned crossing. Extra expansion there can hide the figure eight; keep the area directly below the knot visually clean.
Curly Infinite Knot Ponytail Hairstyle

Defined curls can make the infinite knot feel dimensional while the ponytail keeps its natural spring. Place the base at mid or low height, form the loops from sections that can bend without excessive stretching, and let the remaining curls fall freely beneath the crossing. The knot does not need perfectly smooth edges; keeping some curl definition within each loop helps the design belong to the texture.
This approach suits naturally curly and coily hair when there is enough usable length after shrinkage to build the loops comfortably. Rather than forcing every short curl into the base, leave selected front or nape pieces free if that preserves comfort and shape. Use a fabric-covered elastic for the anchor, curl gel to encourage grouped definition, and bobby pins to secure the knot without crushing it. A quick refresh can involve dampening and reshaping a few visible curls around the tail; full wash-day styling takes longer because definition and the knot both need attention.
If a stylist is creating the look, discuss the finished knot size after shrinkage and where you want the ponytail to sit when dry. Avoid stretching the base so tightly that the curl pattern is flattened only around the scalp; controlled tension should hold the style without discomfort.
Pro tip:
Form the loops with curl groups that naturally stay together rather than splitting every section apart. Preserving those groups can make the knot look defined with less surface frizz.
Make It Work for You:
For tighter shrinkage, place the ponytail slightly lower and keep the loops smaller. The knot can remain visible without requiring the curls to be stretched beyond a comfortable working length.
Watch Out For:
Avoid repeatedly separating dry curls while adjusting the knot. Excess handling can create frizz and weaken the loop shape; reposition the secured section as a unit whenever possible.
Textured Volume Infinite Knot Ponytail Hairstyle

Soft crown volume gives the infinite knot a less rigid frame while keeping the decorative center easy to see. Gather the ponytail at mid-height without flattening every root, then shape a moderately sized figure-eight knot and let the tail keep airy texture through the mid-lengths and ends. The silhouette should feel balanced: lift above the anchor, structure at the knot, and movement below it.
This option works well when your natural texture already has body or when a perfectly sleek finish does not suit your routine. Dense hair may need a smaller knot so volume is distributed rather than concentrated at the base; lower-density hair can keep the crown lift subtle and widen the loops only slightly. Use lightweight mousse for root support, a fabric-covered elastic for anchoring, and bobby pins for the knot. A brief refresh means lifting flattened areas with your fingers and re-securing a loose loop; full wash-day styling takes longer because the crown and tail texture need rebuilding.
If a stylist is handling the style, explain how much crown height you want and where it should peak in relation to the knot. Avoid backcombing the entire ponytail, which can make removal harder and blur the clean loop edges.
Pro tip:
Create crown lift before the knot is built, then leave that area alone. Repeatedly pulling upward after pinning can loosen the base and make the volume look uneven.
Make It Work for You:
If your hair is very dense, keep the crown lift concentrated near the top rather than expanding the sides. That preserves height without making the overall silhouette excessively wide.
Watch Out For:
Do not confuse frizz with useful volume. If the outline starts looking fuzzy instead of airy, smooth only the outermost surface while leaving the internal lift undisturbed.
Half-Up Infinite Knot Ponytail Hairstyle

A half-up base lets the infinite knot sit over loose hair instead of collecting the full length into one ponytail. Take sections from above the ears, secure them at the back of the head, and use that smaller ponytail to form the figure-eight knot. The lower hair remains free, so the knot should stay compact enough to read clearly against the background length rather than disappear into it.
This is a useful choice for medium to long hair when a full ponytail feels too severe or when shorter lower layers are difficult to gather. Straight, wavy, curly, and coily textures can all keep their natural finish through the loose section. Use a small snag-free elastic for the half-up anchor, bobby pins to hold the knot, and light texturizing spray to give slippery sections grip. A quick refresh is usually limited to reshaping the top loops and smoothing the crown; a complete wash-day restyle takes longer because the loose hair and knot both need arranging.
If someone is styling it professionally, show how much hair you want included above the ears and where the knot should sit. Avoid taking sections too low, because that can remove too much fullness from the loose lengths and make the half-up shape feel unbalanced.
Pro tip:
Check the knot against the loose lower hair before widening its loops. A small amount of background separation helps the figure eight stay visible instead of blending into the lengths.
Make It Work for You:
For shorter hair, take the half-up sections from slightly higher on the head so more length reaches the anchor. Keep the knot compact rather than stretching the sections too far.
Watch Out For:
Avoid securing the half-up base with more hair than the lower section can visually balance. If the loose lengths look depleted, reduce the amount gathered into the knot.
Braided-Tail Infinite Knot Ponytail Hairstyle

Combining a smooth infinite knot with a braid below it creates two clear zones: a looped figure-eight center and a structured tail. Keep the ponytail at mid or low height, form the knot first, then begin the braid just beneath the crossing so the sections do not compete for space. A moderate braid width preserves the knot as the focal point while giving the length a tidy, contained finish.
This variation is practical for long hair and for active days when a loose ponytail would tangle easily. Straight, wavy, curly, and coily textures can all work, but the braid should follow the hair’s natural bulk rather than being pulled excessively tight. Use a fabric-covered elastic for the main anchor, bobby pins for the infinite knot, and a small snag-free elastic to secure the braid end. A quick refresh can mean tightening the braid end and reshaping a loop; a full restyle requires undoing both structures and rebuilding them cleanly.
For professional styling, specify the braid width and whether you want it compact or gently expanded after securing. Watch the transition beneath the knot: starting the braid too high can tug on the pinned crossing and gradually distort the figure-eight shape.
Pro tip:
Hold the knot steady with one hand as you begin the first braid crossings below it. This prevents the downward braiding motion from twisting the decorative center off its anchor.
Make It Work for You:
For thick or highly textured hair, use a broader, softer braid rather than forcing a narrow one. The tail stays contained while its scale remains balanced with the knot above.
Watch Out For:
Do not expand the braid by pulling near the knot first. Start lower down and work upward gradually; aggressive tugging at the top can loosen the pinned figure-eight crossing.
Rope-Twist Infinite Knot Ponytail Hairstyle
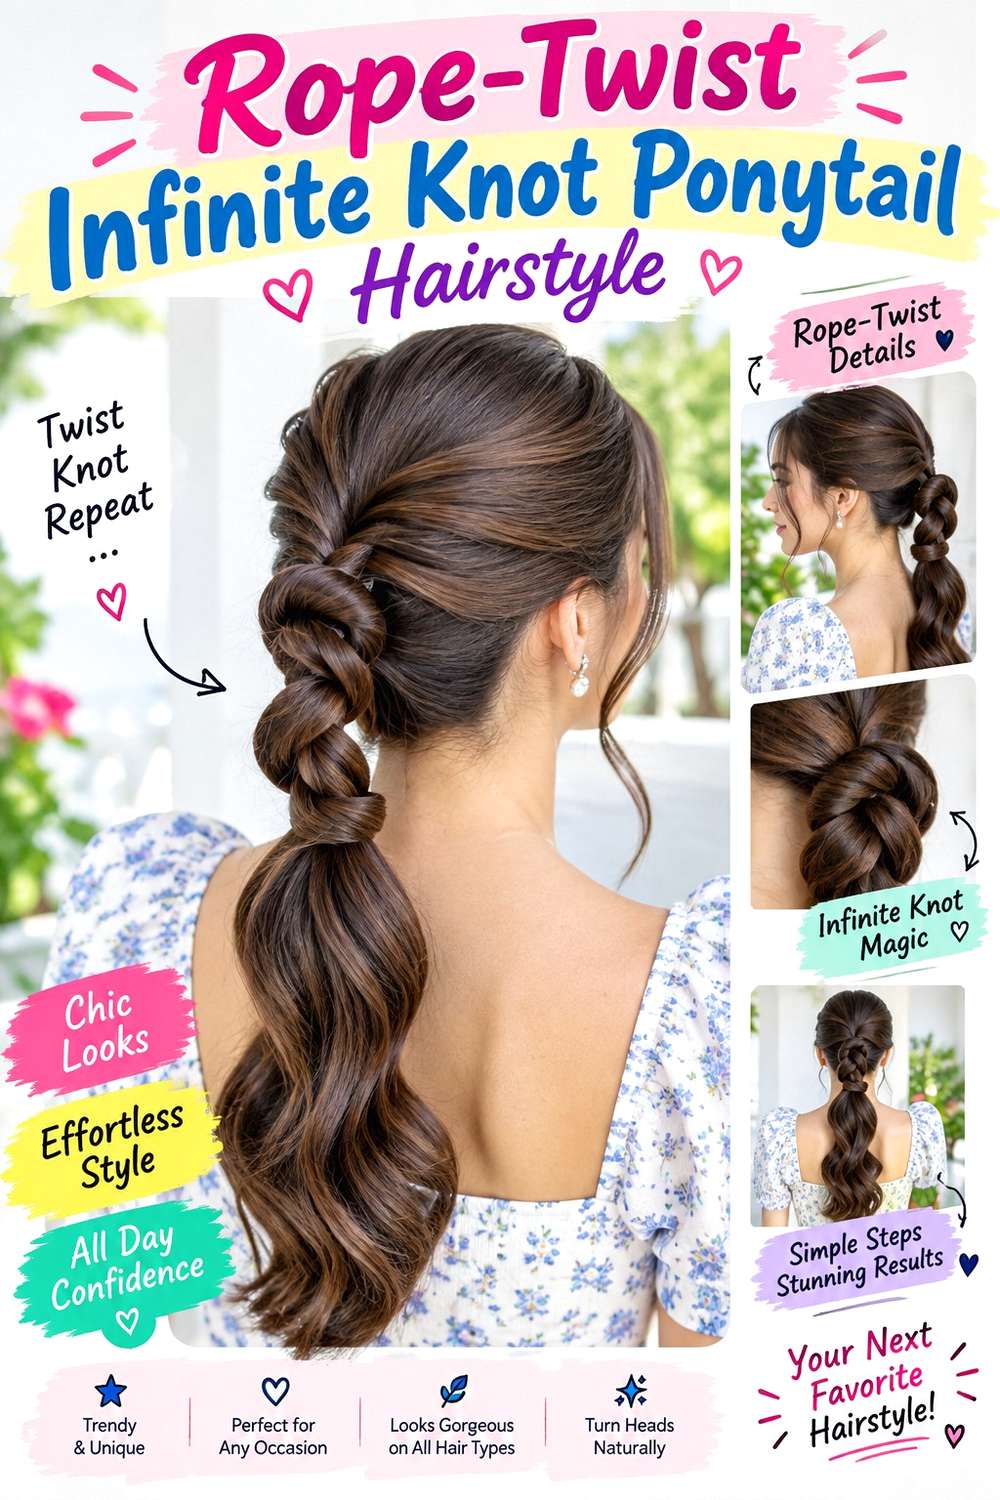
A rope-twisted tail adds a narrow spiral beneath the broader loops of the infinite knot. Secure a mid-height ponytail, shape the figure-eight center, then divide the remaining length into two sections and twist them together from just below the knot to the ends. Keeping the spiral even prevents the tail from visually overpowering the decorative crossing above it.
This option suits medium to long hair with enough length left after forming the knot to show several turns of the twist. It can be especially convenient when loose ends tend to tangle. Straight and wavy hair show the spiral clearly, while curly and coily textures can create a fuller, more textured rope. Use a fabric-covered elastic for the main anchor, bobby pins for the knot, and a small snag-free elastic at the tail end. A quick refresh usually means retwisting the lower section while leaving the base intact; a full restyle takes longer because both the knot and rope need rebuilding.
If a stylist is doing the style, agree on how tight the rope should appear and where the twist should begin. Avoid twisting so firmly that the knot rotates at its anchor, because that can shift the figure-eight off center.
Pro tip:
Twist both tail sections consistently before wrapping them together. Even tension through the lower ponytail helps the spiral hold without transmitting a sudden pull into the knot.
Make It Work for You:
If the tail is shorter, make fewer, larger rope turns instead of forcing many tight rotations. The spiral remains readable and leaves enough length for a secure finish.
Watch Out For:
Watch the direction of the twist while refreshing. Reversing it midway makes the rope unravel quickly; follow the original rotation and stop if the knot begins to turn with it.
Bubble-Tail Infinite Knot Ponytail Hairstyle

A bubble tail introduces repeated rounded sections below the single infinite knot, creating contrast between one intricate center and a simple segmented ponytail. Place the knot at mid-height, leave a short section of tail visible beneath it, then space the bubbles evenly down the remaining length. Gently expanding each segment keeps the tail dimensional while the figure-eight crossing stays crisp.
This design works best on medium to long hair with enough length for at least a few visible sections. Dense hair can support fuller bubbles, while lower-density hair often looks more balanced with smaller expansion rather than exaggerated pulling. Use a fabric-covered elastic for the main anchor, bobby pins for the knot, and small snag-free elastics for the bubble sections. A quick refresh involves evening out a flattened bubble and checking the knot; a full restyle takes longer because every segment must be released and rebuilt without tangling.
If a stylist is creating it, discuss the spacing between bubbles and the amount of expansion you want before the first elastic is added. Avoid pulling each bubble wider after the tail is already loose at the base, since that can transfer tension upward and distort the infinite knot.
Pro tip:
Set the bubble spacing before expanding any section. Once the anchors are evenly placed, widen each segment a little at a time so the tail keeps a consistent rhythm.
Make It Work for You:
For lower-density hair, use closer spacing and gentler expansion. Smaller bubbles preserve the segmented effect while reducing the chance that separated areas expose too much space between strands.
Watch Out For:
Do not pull the bottom bubbles dramatically wider than the upper ones unless that taper is intentional. Uneven expansion can make the tail look lopsided and draw attention away from the knot.
Scarf-Accented Infinite Knot Ponytail Hairstyle

A slim scarf can frame the infinite knot without covering its continuous figure-eight shape. Build a low or mid-height ponytail first, form the knot, then position the scarf around the secured base so its ends fall beside the loose tail. Keep the fabric narrow at the crossing; the loops of hair should remain visible, while the scarf adds color and movement below the anchor.
This version suits medium to long hair and works especially well when you want an accessory that can be removed without rebuilding the entire hairstyle. Any texture can keep its natural finish in the ponytail, but very silky hair may need a firmer base before the fabric is added. Use a fabric-covered elastic for the anchor, bobby pins for the knot, and a lightweight scarf as the accent. A quick refresh means re-centering the scarf and reshaping the visible loops; full styling takes longer because the knot should be secure before the accessory is tied.
If a stylist is helping, specify whether you want the scarf ends equal, staggered, or shorter than the ponytail. Do not let the scarf carry the knot’s weight. Tie it around an already stable base so slipping fabric does not loosen the entire style.
Pro tip:
Fold the scarf to the width you want before tying it to the secured base. A controlled strip is easier to position and less likely to cover the knot’s center.
Make It Work for You:
If your hair is short, choose a shorter scarf so the fabric does not overwhelm the ponytail. Keep the knot visible and let the accessory end near the hair length.
Watch Out For:
Avoid tying the scarf so tightly that it compresses the hair loops. The accessory should decorate a stable base; loosen and retie it if the knot starts flattening or rotating.
Pearl-Pin Infinite Knot Ponytail Hairstyle

Small pearl pins can trace the center of an infinite knot without turning the ponytail into a fully jeweled updo. Keep the base low or mid-height, form two clean loops, then place a few accents near the crossing rather than around every edge. Leaving the tail simple—straight, softly wavy, or naturally textured—helps the knot and its small points of shine remain the main detail.
This approach suits medium and long hair for weddings, dinners, or other dressed-up settings where you want decoration with a secure ponytail base. The pins need enough structure beneath them to stay stable, so very soft or slippery hair may benefit from a compact knot rather than oversized loops. Use a fabric-covered elastic for the anchor, bobby pins for structural hold, and pearl pins only as accents. A brief refresh means checking any shifted decoration and reshaping a loop; a full restyle takes longer because the structural pins should be set before the decorative ones.
When a stylist is placing the details, show whether you want the pearls concentrated at the center or lightly staggered across one loop. Avoid using decorative pins as the main anchor, because loosening one for comfort could destabilize the knot.
Pro tip:
Place the decorative pins only after the knot survives a gentle movement check. This keeps you from using ornament placement to compensate for a base that is not actually secure.
Make It Work for You:
For a quieter finish, cluster just two or three accents near the crossing rather than tracing both loops. The infinite-knot shape stays readable while the decoration remains secondary.
Watch Out For:
Do not push decorative pins repeatedly into the same spot searching for grip. Reposition the angle instead, and avoid any placement that scratches, pinches, or feels sharp against the scalp.
Short-Length Infinite Knot Ponytail Hairstyle

A compact low knot makes the infinite ponytail idea more workable when the hair only just gathers into a ponytail. Set the base near the nape, create smaller side loops from the usable length, and keep the remaining tail short rather than trying to imitate the proportions of a long style. Any front or nape pieces that cannot reach comfortably can stay loose and intentional.
This option is best for shorter medium lengths that still provide enough hair to cross and pin the knot securely. Straight and wavy textures may show the miniature figure eight most clearly, while curly and coily hair should be assessed by its dry, shrunken length before sections are committed. Use a small snag-free elastic for the base, bobby pins for the compact crossing, and light styling cream to control escaping ends. A quick refresh may mean tucking one short piece back under a pin; a full restyle takes longer because the small sections need precise placement.
If a stylist is creating it, ask them to test the knot size against your actual usable length before securing it tightly. Do not force short pieces through repeated wraps. A smaller, stable knot is more practical than one that depends on uncomfortable tension.
Pro tip:
Test one loop before shaping the second. If the section barely reaches the center crossing, reduce the loop size immediately rather than forcing extra length from the anchor.
Make It Work for You:
For curly or coily shorter lengths, judge the working sections when dry or near their intended finish. That helps you choose a knot size that respects shrinkage and comfort.
Watch Out For:
Do not hide every escaped short piece with tighter pulling. Let a few nape or front strands remain loose if necessary; overcorrecting them can destabilize the small knot and increase tension.
Conclusion
Infinite knot ponytail hairstyles can shift from sleek and centered to low, textured, braided, or accessory-finished without changing the main figure-eight detail. Longer hair allows larger loops and more tail variation, while shorter or lower-density hair often benefits from a compact knot that preserves stability. Dense hair may need smaller working sections, and curls or coils need room for shrinkage and natural volume. Parting, face-framing pieces, and crown lift can change the overall balance without requiring a haircut. Choose the version that fits your normal texture and styling patience: a polished surface usually asks for more preparation, while a naturally textured finish may need quicker refreshes. Above all, prioritize a secure anchor, comfortable tension, and a knot size your usable length can support.
Before Your Salon Visit
Choose one or two favorites and save references that clearly show the knot from the angle you like. When discussing the style with a salon professional, mention your natural texture, density, usable length, face-framing preference, and how long you need the ponytail to last. Point out the exact anchor height, loop size, parting, volume, braid or accessory placement, and finish you want. Because these are temporary styles, focus on comfortable styling and secure placement rather than changing your haircut unless you already want a separate cut.
FAQs
Can an infinite knot ponytail work on fine or lower-density hair?
Yes, if the knot is scaled to the available hair. Smaller loops and a fuller remaining tail often look more balanced than stretching sections widely. Avoid excessive pulling or repeated tightening, and use a stable anchor so the design depends on placement rather than artificial volume.
How much hair length is needed for an infinite knot ponytail?
There is no single minimum because density, shrinkage, knot size, and anchor height all affect usable length. Hair that forms a secure low ponytail may support a small knot, while larger loops need more length. Test the loop before tightening the style, especially on curly or coily hair.
Does an infinite knot ponytail require heat styling?
No. The knot itself can be formed on straight, wavy, curly, or coily hair without heat. Heat is only optional when you want a different finish, such as broad waves or a straighter tail. If you use a hot tool, apply heat protectant and limit unnecessary passes.
How do I keep an infinite knot ponytail from slipping?
Start with a secure ponytail anchor, then pin the knot’s crossing rather than expecting the loops to hold themselves. Very slippery hair may benefit from a little texture or grip. If the base loosens, rebuild it instead of adding more tension to the decorative sections.