14 Low Ponytail Hairstyle Ideas

A low ponytail sits close to the nape, but small changes in parting, texture, crown volume, and the gathered base can make the silhouette look completely different. A center part creates clear symmetry, a side part shifts visual weight, and a softly lifted crown gives more height without moving the ponytail itself. Loose lengths can stay straight, waved, curled, coiled, braided, or divided into rounded sections.
Low ponytail hairstyle ideas can work across straight, wavy, curly, and coily textures when the base respects density and natural movement. Fine or lower-density hair may benefit from keeping the ponytail softly gathered and preserving fullness through the ends. Dense hair can support a broader ponytail, though comfortable tension at the nape matters. Face-framing pieces can finish near the cheekbones, jaw, or longer lengths depending on the framing you prefer.
Styling effort ranges from a brief reset of an existing ponytail to a longer wash-day blow-dry, curl routine, braid, or wave set. The base should stay secure without painful pulling, and the ponytail should be rebuilt when it sags rather than repeatedly tightened. Refresh only the texture that has changed, control frizz where it is visible, and separate daily styling effort from any haircut or fringe upkeep.
Quick List
- Sleek Center-Part Low Ponytail Hairstyle
- Soft Side-Part Low Ponytail Hairstyle
- Loose Wave Low Ponytail Hairstyle
- Natural Curl Low Ponytail Hairstyle
- Coily Volume Low Ponytail Hairstyle
- Braided Length Low Ponytail Hairstyle
- Bubble Low Ponytail Hairstyle
- Double-Twist Low Ponytail Hairstyle
- Wrapped-Base Low Ponytail Hairstyle
- Face-Framing Low Ponytail Hairstyle
- Crown-Volume Low Ponytail Hairstyle
- Side-Swept Low Ponytail Hairstyle
- Knotted Detail Low Ponytail Hairstyle
- Polished Straight Low Ponytail Hairstyle
Sleek Center-Part Low Ponytail Hairstyle
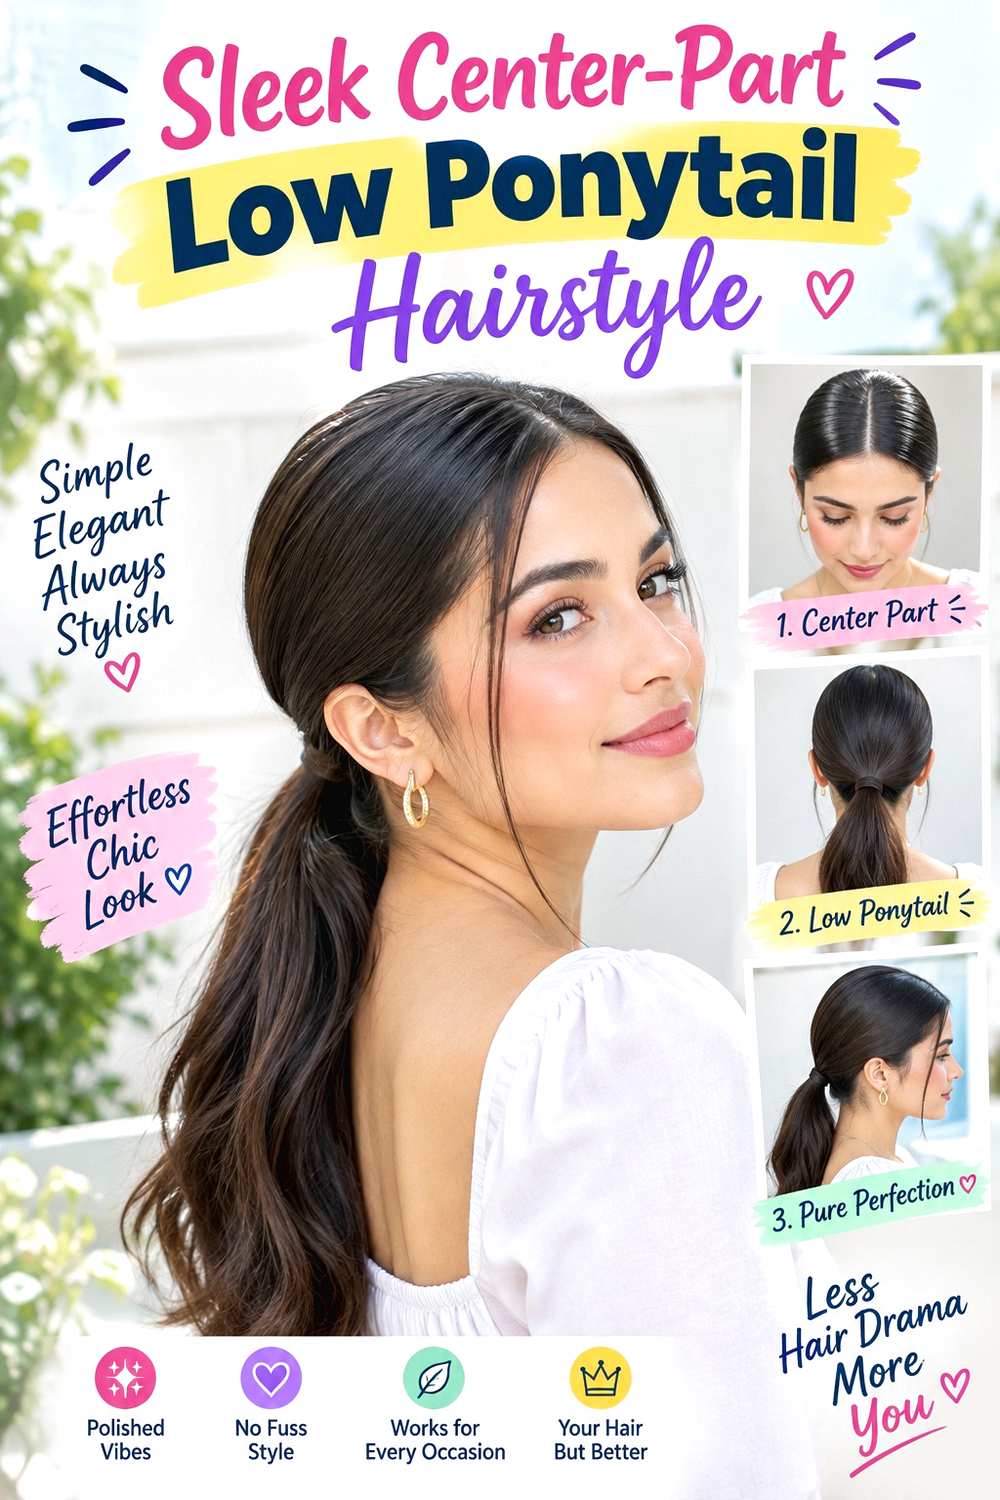
A precise center part and a low anchor at the nape create the defining shape here. Keep the crown close to the head without making it look pasted down, direct both sides evenly toward the back, and let the ponytail fall straight or with a slight natural bend at the ends. The clean symmetry works especially well on medium to long hair when you prefer a controlled finish and do not mind a little surface smoothing.
Use a fine-tooth comb to establish the part, a fabric-covered elastic to secure the ponytail, and a small amount of smoothing gel for flyaways around the hairline. A complete wash-day version takes longer if the hair also needs drying or straightening first, while a next-day refresh may only involve resetting the part and rebuilding the base. Avoid repeatedly adding gel when the problem is simply a stretched elastic.
For professional or event styling, point to the exact nape height you want and explain whether the ears should remain exposed or softly covered. The ponytail should feel stable without pulling the temples. Maintenance means restoring the center line when it separates, smoothing only visible frizz, and rebuilding the anchor when the ponytail begins to droop.
Pro tip:
Create the center part before gathering any hair, then check it from the front before securing the nape so you do not need to disturb the finished base.
Make It Work for You:
For dense hair, let the ponytail remain fuller below the elastic and concentrate smoothing on the surface rather than trying to compress the entire length.
Watch Out For:
Too much gel can make the roots stiff without improving security. If the ponytail sags, replace or reset the elastic instead of adding product.
Soft Side-Part Low Ponytail Hairstyle
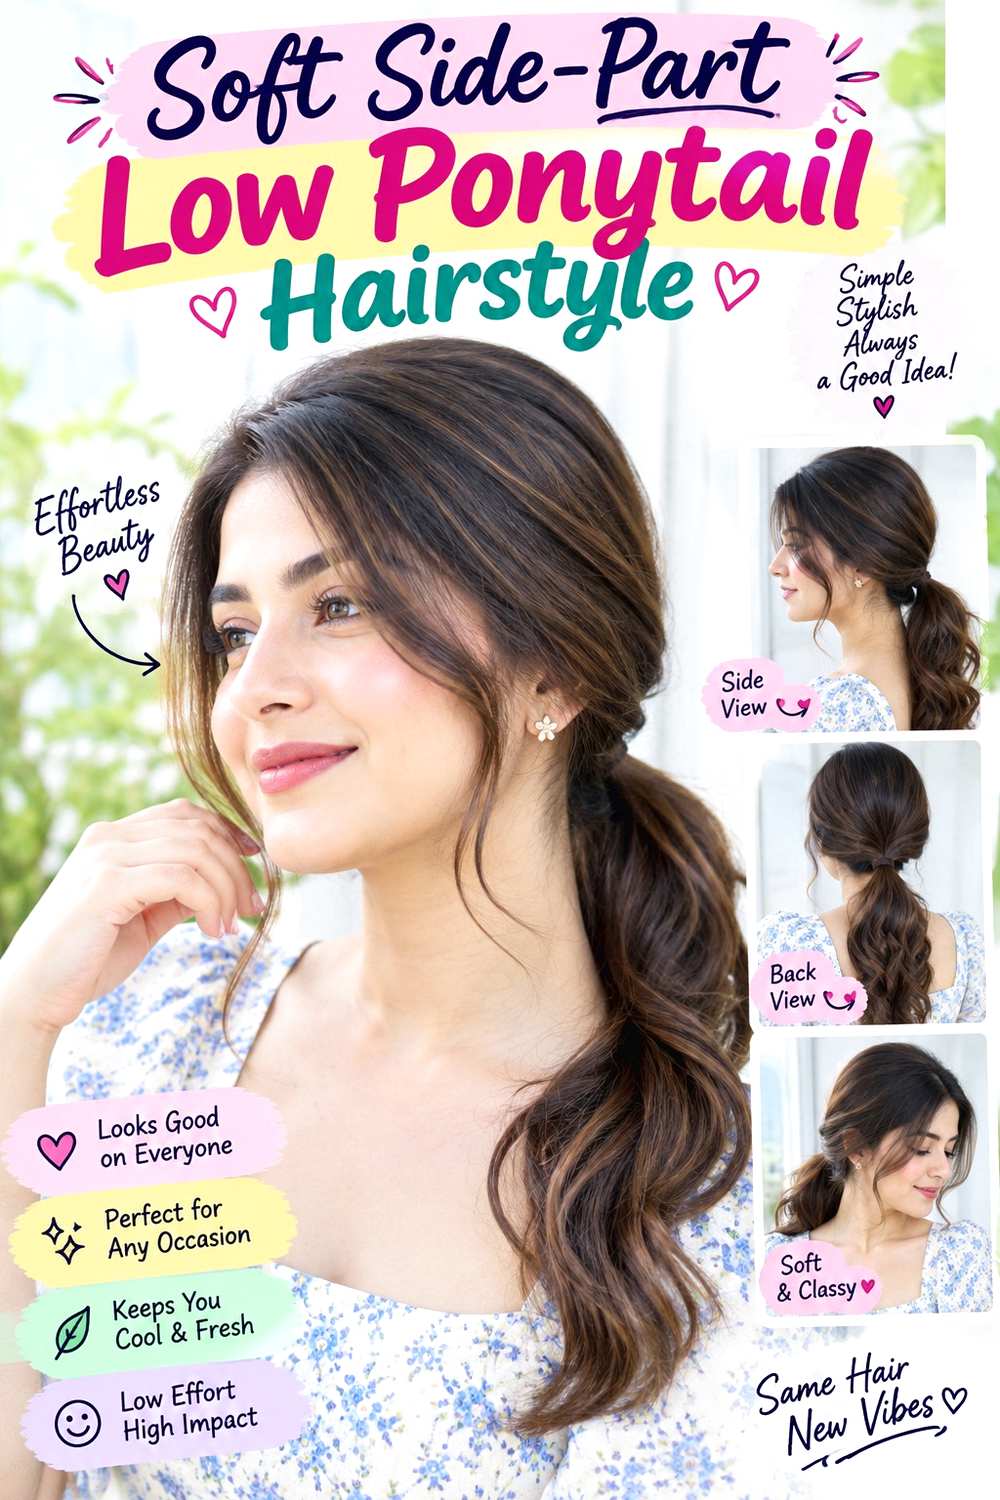
A soft side part shifts more hair across one side of the crown, giving a low ponytail an intentionally uneven front while the nape remains centered. Keep the part less severe than a deep side sweep, let the heavier side follow the curve of the head, and leave a little root softness near the forehead. The ponytail can stay straight, softly bent, or naturally textured. Medium and long lengths work easily, while shoulder-length hair can use a compact version with shorter ends.
Use a wide-tooth comb to arrange the part, a fabric-covered elastic for the nape anchor, and lightweight styling cream to smooth visible flyaways without flattening the roots. A full wash-day finish depends on your starting texture, while a short refresh can simply reset the side part and regather the ponytail. If the heavier side begins to separate, smooth that section with your hands rather than adding more product everywhere.
For salon or occasion styling, explain how far off-center you want the part and whether the ponytail should sit directly in the middle or slightly toward one side. Upkeep is mostly about preserving the part and comfortable base tension. Rebuild the ponytail if one side starts pulling more tightly than the other.
Pro tip:
Set the side part while the hair is loose, then gather toward the nape evenly so the heavier front section does not pull the ponytail off-center.
Make It Work for You:
For curly or wavy hair, keep the side part softer and allow natural root texture to remain visible instead of smoothing every bend into a flat surface.
Watch Out For:
Avoid pulling the heavier side tighter to make it look smooth. Redistribute the gathered hair so both sides meet the nape with comfortable tension.
Loose Wave Low Ponytail Hairstyle
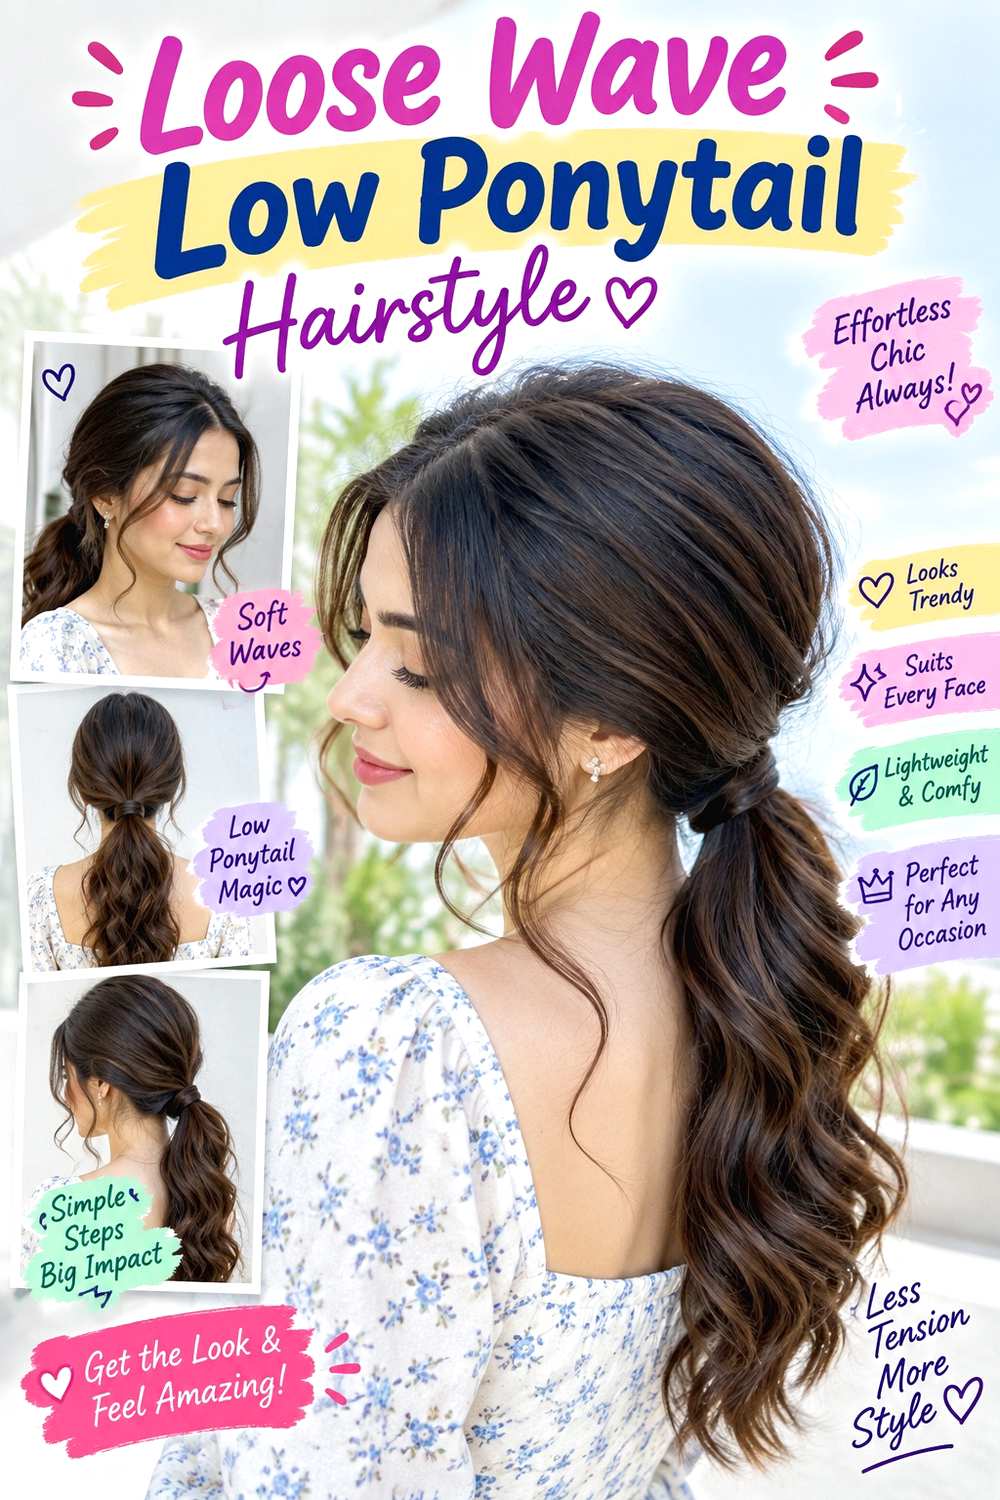
Large bends through the ponytail give this low placement more movement without adding height at the crown. Keep the roots fairly smooth, secure the base at the nape, and let the first visible wave begin below the elastic rather than creating tight curls from the scalp. A center or off-center part can both work, while longer face pieces may blend into the first bend. Medium to long hair provides enough length for broad waves to remain visible.
Apply heat protectant before shaping the loose ponytail with a curling iron, then use flexible hairspray to support the bends without making the ends stiff. A full wash-day set takes longer if the entire length needs drying and shaping first. Between washes, a shorter refresh should target only waves that have flattened rather than reheating every section. Let each bend cool before loosening it.
For professional styling, specify whether you want the ponytail centered and how large the wave pattern should appear through the length. If the base loosens, rebuild it before touching the waves. Maintenance is mainly about preserving movement, controlling isolated frizz, and reshaping only the sections that have dropped. The style should still move rather than look like a tightly curled tail.
Pro tip:
Shape the ponytail in a few larger sections instead of many small curls, then let them cool fully before separating them for broader movement.
Make It Work for You:
For fine hair, keep the waves wide and avoid excessive separation at the ends; a fuller outline can make the loose ponytail look more substantial.
Watch Out For:
Do not keep curling sections that have only softened slightly. Repeated heat can add unnecessary exposure when a gentle reshape or natural movement would work.
Natural Curl Low Ponytail Hairstyle
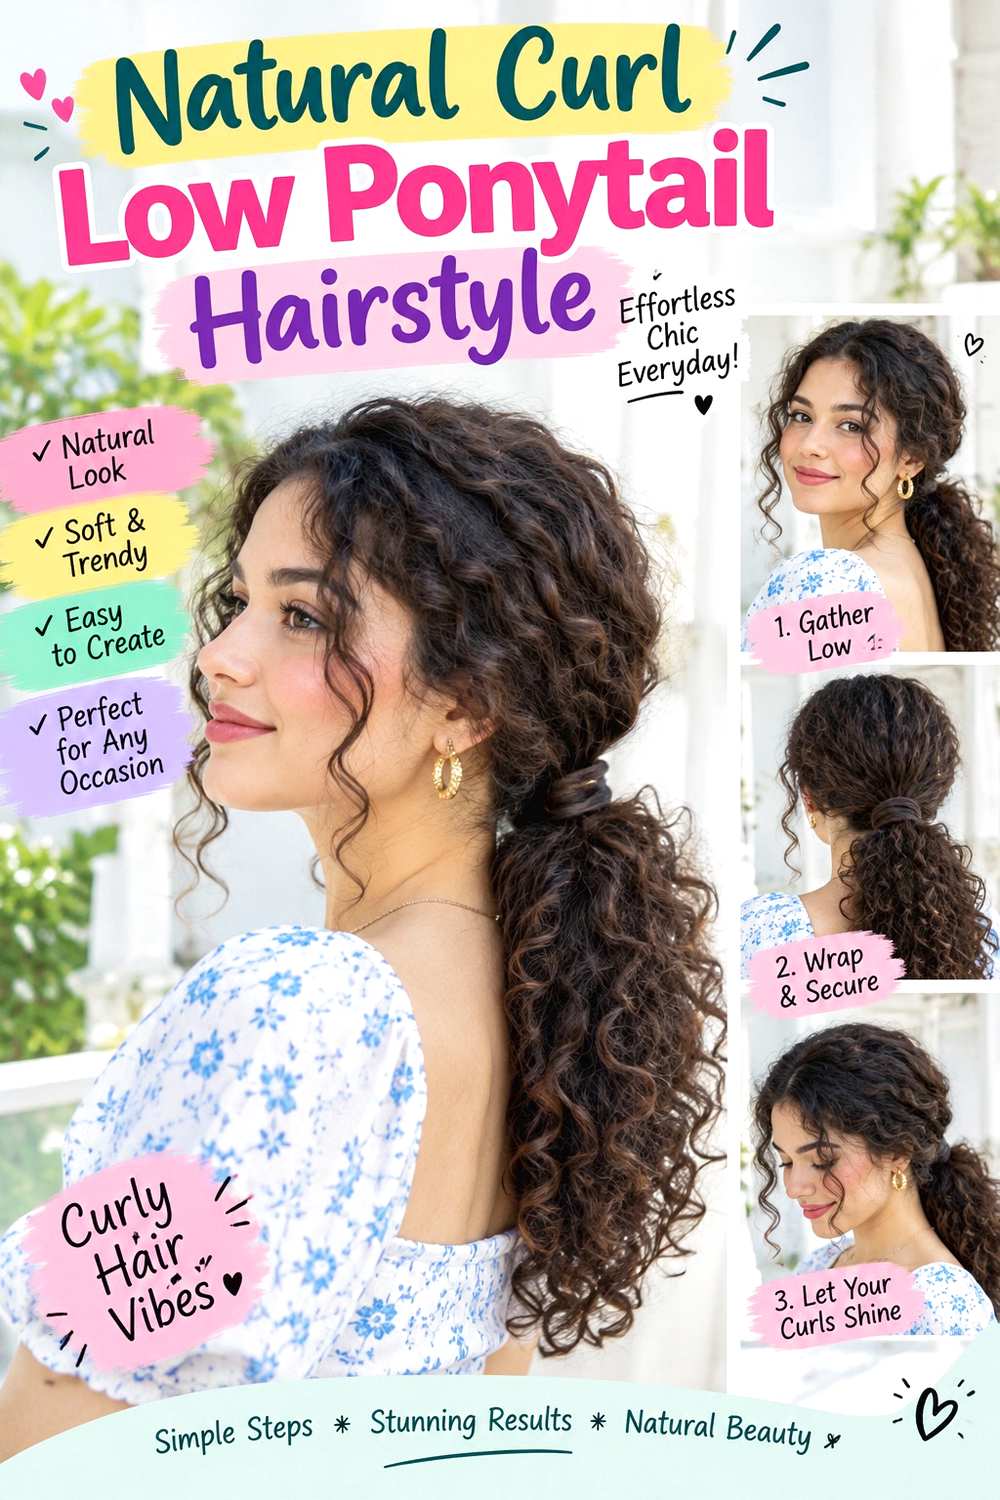
Natural curls gathered at the nape create a low ponytail with visible texture from the base through the ends. Keep the crown softly controlled rather than completely flattened, and allow the ponytail to expand into its natural curl shape below the elastic. A center part gives symmetry, while a side part can leave more curl volume toward one temple. This version works especially well when the goal is to preserve curl grouping instead of stretching the hair into a straighter finish.
On wash day, use lightweight leave-in conditioner for slip, curl gel for definition, and a diffuser if controlled drying suits your routine. Let the curls reach their finished shape before gathering them so shrinkage does not change the intended ponytail position unexpectedly. A quick refresh between washes can focus on flattened perimeter curls and the ends rather than rewetting everything.
For professional styling, specify how low the base should sit and whether you want loose curls around the temples or a fully gathered front. If the ponytail begins to sag, redo the anchor rather than tightening it repeatedly. Maintenance involves refreshing individual curl groups, managing local frizz, and letting the natural volume remain visible below the nape instead of compressing it for uniformity.
Pro tip:
Gather the curls only after they are mostly dry so you can judge the finished shrinkage and avoid placing the nape anchor higher than intended.
Make It Work for You:
For stronger shrinkage, leave any front curls at their natural finished length and adjust the ponytail placement around them rather than stretching them backward.
Watch Out For:
Do not brush dry curl groups smooth just to control the crown. Use your hands to gather them while preserving the definition you want visible.
Coily Volume Low Ponytail Hairstyle
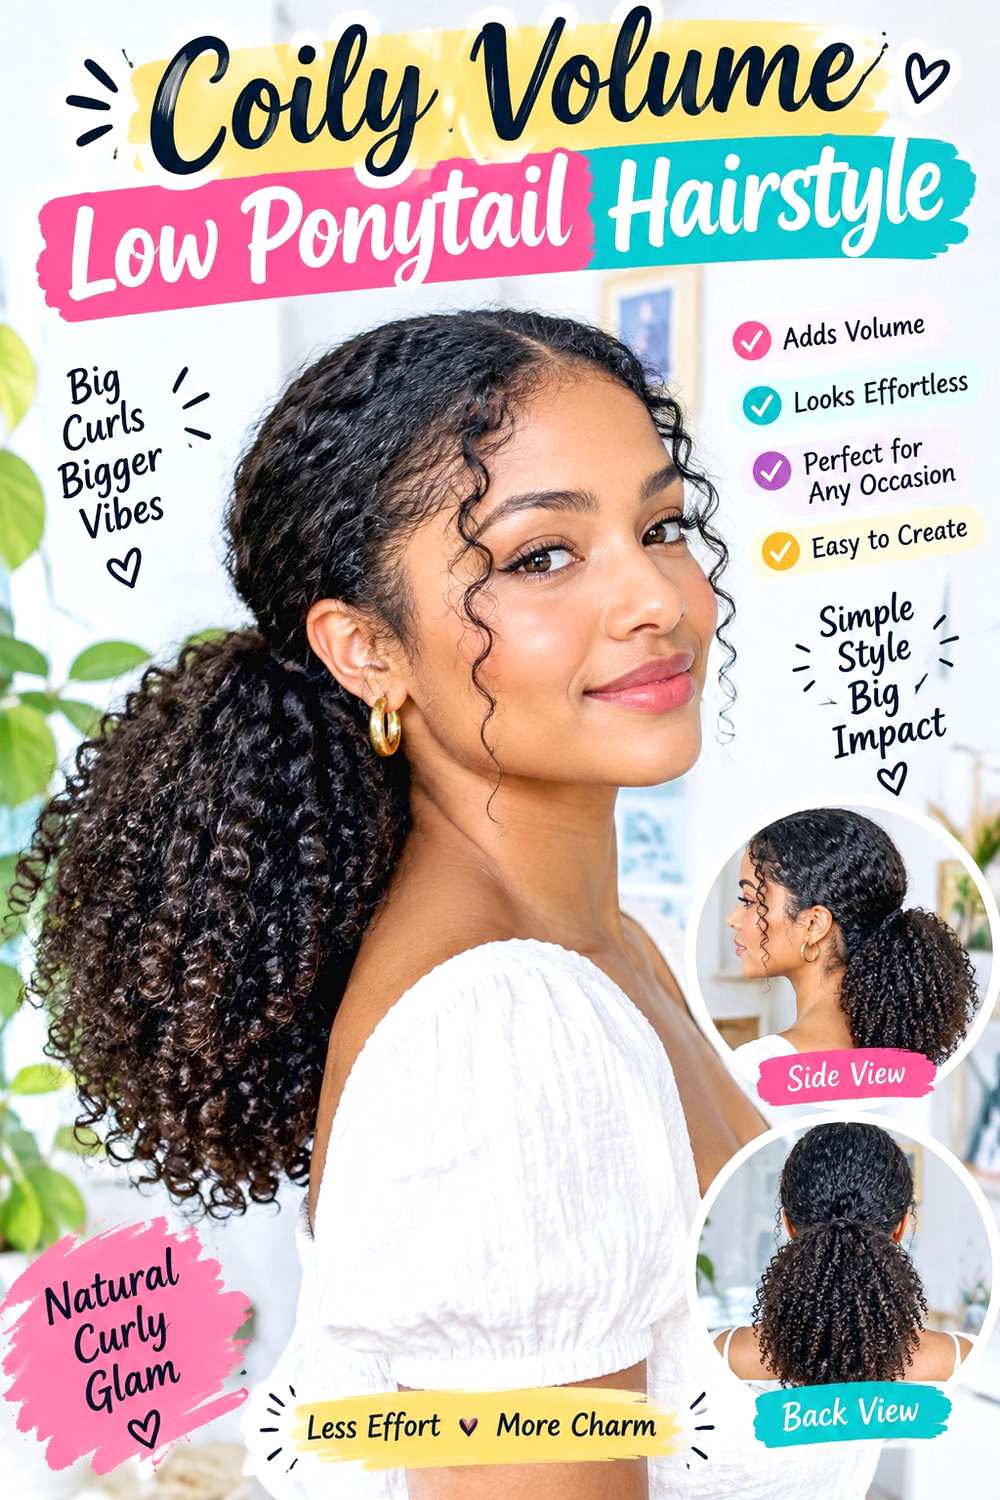
A low ponytail can keep coily texture full by concentrating control at the nape while leaving the gathered ends expanded. Use a center or soft side part, smooth only the surface as much as your preferred finish requires, and let the ponytail form a rounded shape behind the neck. The ends do not need to be stretched for extra length. This works particularly well for coily hair when you want a secured style that still shows natural density, shrinkage, and texture.
Use a soft elastic to create the base, a wide-tooth comb to arrange the front without combing through finished ends, and lightweight curl cream to revive dry-looking coils. A full wash-day style includes detangling, defining, and drying before gathering, while a morning refresh can be limited to fluffing compressed ends and resetting the base. If the nape loosens, rebuild the elastic rather than wrapping it progressively tighter.
For professional styling, explain how low you want the anchor and how much volume should remain through the ponytail. Also mention whether the ears should be exposed or softly framed by coils. Maintenance focuses on keeping the base comfortable, refreshing flattened sections, and respecting shrinkage instead of repeatedly pulling the ponytail longer throughout the day.
Pro tip:
Secure the nape first, then fluff only the outer edge of the ponytail with your fingers so the rounded volume expands without disturbing every coil.
Make It Work for You:
For very dense hair, use a slightly broader gathered base and allow the ponytail to spread naturally rather than forcing the volume into a narrow shape.
Watch Out For:
Avoid repeatedly tightening the base as the coils settle. Rebuild the ponytail if necessary instead of increasing tension around the nape and hairline.
Braided Length Low Ponytail Hairstyle

This version starts as a classic low ponytail and changes below the nape, where the gathered length becomes a single braid. Keep the crown smooth or softly textured, secure the base centrally, and begin the braid close to the ponytail elastic so there is no loose gap. A three-section braid creates a clear woven line and works best on medium to long hair with enough length for several visible crossings.
Use a fabric-covered elastic to establish the ponytail, light texturizing spray to improve grip through slippery lengths, and a second small elastic to secure the braid end. A full style takes longer if the hair first needs washing, drying, or detangling, while a quick refresh may only involve redoing the braid. If the ponytail anchor itself sags, rebuild that base before tightening the woven section.
For professional styling, specify the exact nape height and how broad you want the finished braid. A dense ponytail can support a fuller braid without heavy loosening, while lower-density hair may look cleaner with a more compact weave. Maintenance means rebraiding when the crossings become fuzzy or stretched and keeping the base comfortable. The braid should hang from a stable ponytail rather than being pulled tight to compensate for a weak anchor.
Pro tip:
Start the first braid crossing close to the ponytail elastic so the woven length begins cleanly without a loose, twisting gap at the top.
Make It Work for You:
For fine or lower-density hair, keep the braid compact and gently loosen only its outer edges, preserving structure instead of pulling every crossing wide.
Watch Out For:
Do not tighten the braid when the ponytail itself is sagging. Reset the nape elastic first so the woven length hangs from a stable base.
Bubble Low Ponytail Hairstyle
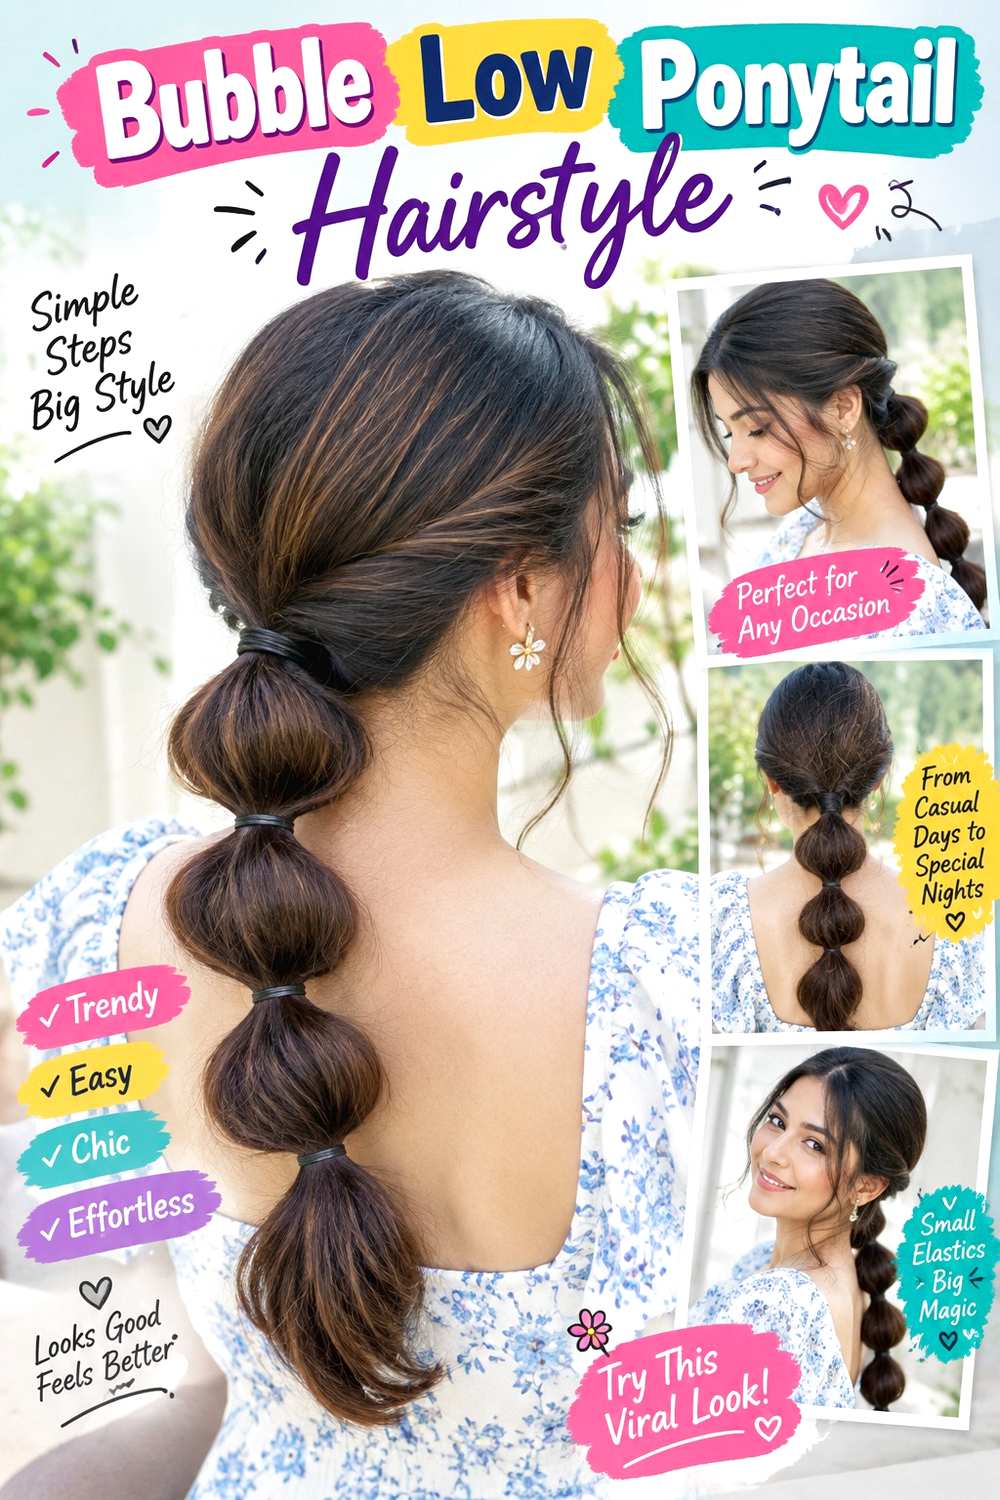
A bubble ponytail keeps the base low at the nape but adds repeated rounded sections through the length. Start with a centered ponytail, place additional elastics at even intervals, and gently expand the hair between them to create soft bubbles. Keep the crown relatively simple so the repeated shape remains the main detail. Medium to long hair is most practical because enough length is needed for several sections, while straight or softly textured hair makes the pattern easy to read.
Use fabric-covered elastics to form the sections, light texturizing spray if the length needs grip, and a wide-tooth comb to organize the ponytail before dividing it. A full style takes longer than a basic low ponytail because every bubble needs balancing. A quick refresh can focus on one flattened section rather than rebuilding everything. Replace stretched elastics when the spacing begins to drift.
For professional or event styling, specify the nape height, bubble size, and how many rounded sections you want visible. Lower-density hair often benefits from smaller bubbles rather than extreme expansion. Maintenance involves checking the spacing and reshaping sections individually. If one bubble becomes uneven, loosen that section gradually instead of pulling hard from only one side.
Pro tip:
Expand each bubble from both outer edges a little at a time, working from the top downward so the repeated sections remain balanced.
Make It Work for You:
For shorter medium-length hair, create fewer bubbles with closer spacing; the repeated shape stays clear without forcing limited length into oversized sections.
Watch Out For:
Avoid pulling one bubble dramatically wider to match another. Adjust both sides gradually so the elastic stays centered and the shape does not twist.
Double-Twist Low Ponytail Hairstyle

Two side twists create detail before the hair reaches the low ponytail, giving the nape anchor a more structured lead-in. Leave a center or soft side part at the front, take sections from above each ear, and twist them backward before joining them with the remaining hair. Keep the crown softly lifted and the ponytail loose enough to move. Medium to long hair works best because the side sections need enough length to reach the nape without excessive pulling.
Use light texturizing spray to help the twists hold, bobby pins to keep each side in place temporarily, and a fabric-covered elastic to secure everything into one ponytail. A full style may take longer after washing, while a short refresh can involve redoing only the side that has loosened. Do not hide an uneven twist by tightening the final ponytail.
For professional styling, specify where the twists should begin, how much crown volume you want, and the exact nape position. If one side collapses, rebuild that twist so the tension stays balanced. Maintenance is mostly about resetting loosened sections and keeping the pins comfortable. The twists should add visible direction without becoming rope-tight or pulling around the temples.
Pro tip:
Twist both side sections to the same meeting point before securing the ponytail, checking their height from the front so one side does not sit lower.
Make It Work for You:
For dense hair, take narrower side sections and leave more hair in the central ponytail, keeping the twists visible without creating excessive bulk at the nape.
Watch Out For:
Do not tighten the final elastic to disguise a loose twist. Rebuild the affected side first so the finished ponytail remains balanced and comfortable.
Wrapped-Base Low Ponytail Hairstyle

A wrapped base hides the ponytail elastic and creates a clean transition between the crown and loose length. Gather the hair at the nape, then take a narrow piece from underneath the ponytail and wrap it around the secured base before fastening it discreetly. Keep the part centered, off-center, or absent according to your preferred finish. The ponytail itself can stay straight, waved, or naturally textured, making this useful for medium and long hair.
Use a fabric-covered elastic to establish a firm base, a bobby pin to secure the wrapped strand, and lightweight smoothing cream to control any small flyaways along that section. A full style may take longer if the length also needs drying or shaping, while a quick refresh usually involves rebuilding only the base wrap. If the strand starts uncoiling, fix its pin rather than adding more tension to the ponytail.
For professional styling, specify the exact nape height and how wide you want the wrapped section to appear. Dense hair can support a broader wrap, while fine hair may look cleaner with a narrow one. Maintenance means checking the hidden pin and rewinding the strand when it loosens. The wrapped section should conceal the anchor without feeling tight or bulky against the nape.
Pro tip:
Take the wrapping strand from underneath the ponytail so its starting point stays hidden, then wind it smoothly around the elastic before pinning.
Make It Work for You:
For fine hair, keep the wrap narrow and make only enough turns to cover the elastic, preserving more visible density in the ponytail itself.
Watch Out For:
Avoid taking too large a wrapping section. Removing excessive hair from the ponytail can make the loose length look noticeably thinner than the base.
Face-Framing Low Ponytail Hairstyle
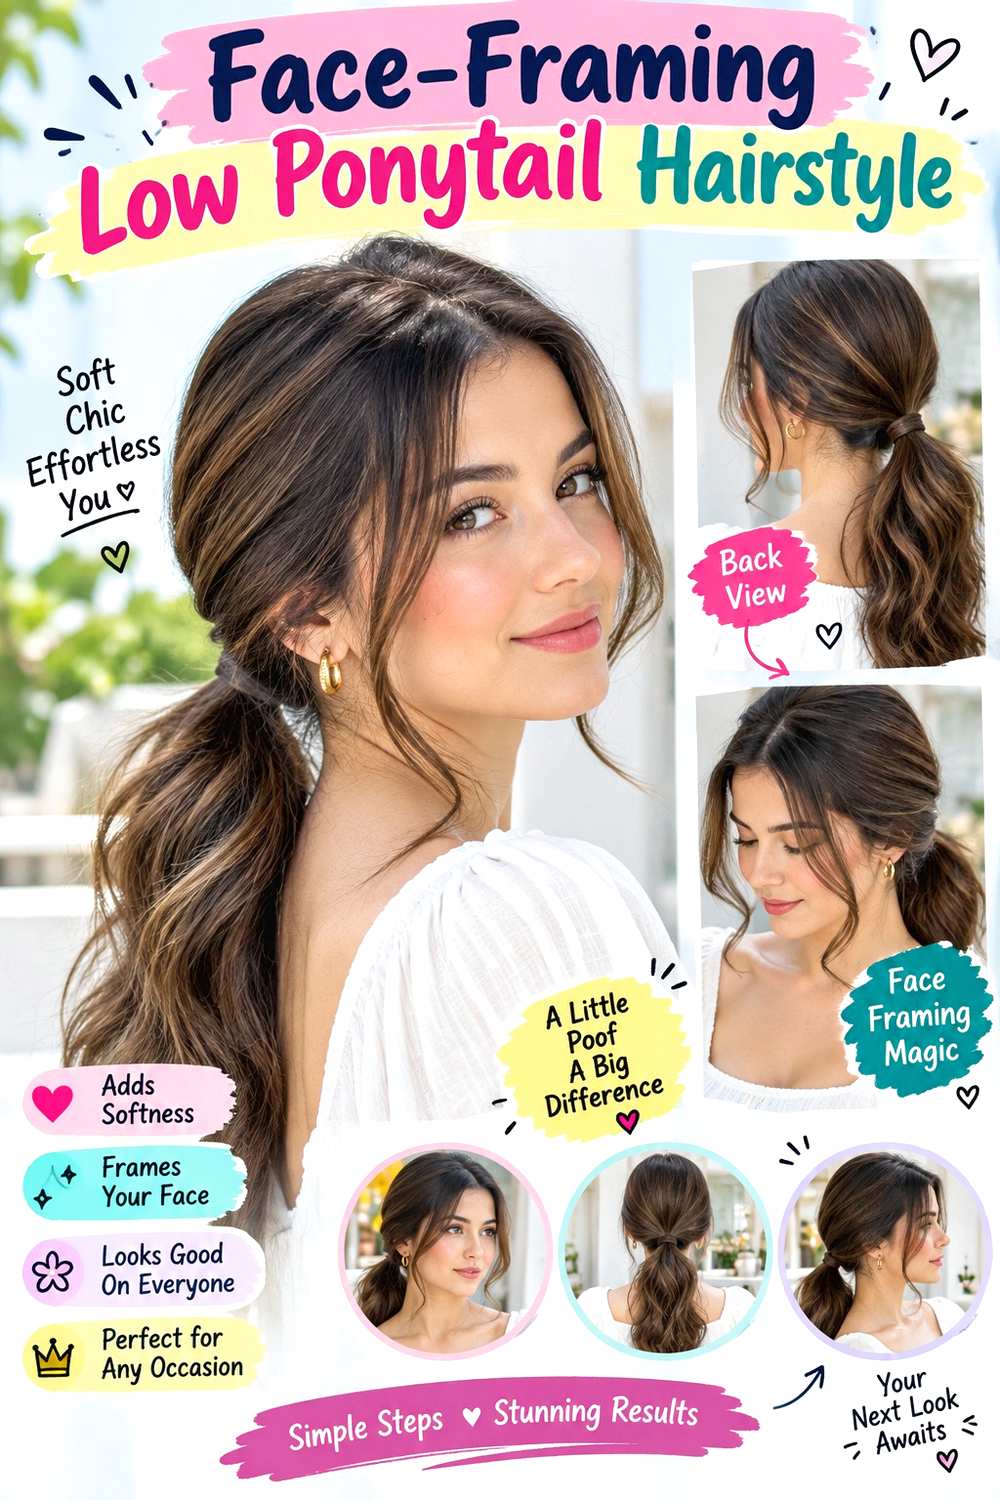
Loose front pieces give a low ponytail a softer perimeter while the rest of the hair stays gathered at the nape. Start with a center or relaxed side part, leave narrow sections around the temples, and secure the remaining hair without pulling those pieces backward. The face-framing lengths can finish around the cheekbones, jaw, or longer, depending on what is already present in the haircut. The ponytail can stay straight, softly waved, curly, or naturally textured.
Use a fabric-covered elastic for the nape, lightweight styling cream to control flyaways, and a wide-tooth comb to separate the front sections without overworking them. A full wash-day style depends on the texture you want through the ponytail, while a quick refresh usually means reshaping the loose pieces and resetting the anchor. If the framing pieces become oily or separated, refresh them locally rather than restyling the entire head.
For professional styling, show the exact amount of hair you want left out and the finished length of the front pieces you like. If you are considering a haircut, discuss how those sections behave in your natural texture before shortening them. Maintenance includes keeping the loose pieces intentional and rebuilding the ponytail when the base begins to sag.
Pro tip:
Separate the face-framing pieces before securing the ponytail so you do not have to pull them back out of a tight base and create unwanted frizz.
Make It Work for You:
For curly hair, choose front pieces based on their dry, finished length and shrinkage rather than copying the apparent length of straighter reference hair.
Watch Out For:
Do not leave out overly wide front sections if you want a defined ponytail. Start narrow, then release a little more hair only if needed.
Crown-Volume Low Ponytail Hairstyle

Volume at the crown changes the proportions of a low ponytail without moving the anchor away from the nape. Keep the front softly parted or swept back, create lift through the upper back section, and let that fullness taper smoothly into the ponytail. The base should remain low and stable while the crown appears rounded rather than sharply teased. Medium and long hair work well, especially when you want more height above a simple gathered length.
Use root-lift spray near the upper crown, a round brush during drying to direct the roots upward, and a fabric-covered elastic for the ponytail. A full wash-day version takes longer because the crown lift is created during drying, while a next-day refresh can be much shorter and focused on the upper roots. If the volume collapses, redirect the crown rather than tightening the nape.
For professional styling, specify exactly where you want the highest point of the volume and how much lift feels natural for your routine. Dense hair may need controlled placement so the crown does not become overly wide. Maintenance involves protecting the rounded shape when regathering the ponytail and refreshing only the roots that have flattened. Avoid treating extra tension as a substitute for root support.
Pro tip:
Direct the crown upward while drying, then let it settle before gathering the ponytail so you can preserve lift without pulling the upper section flat.
Make It Work for You:
For fine hair, concentrate root lift at the crown and keep the ponytail ends relatively full rather than adding heavy texture through the entire length.
Watch Out For:
Avoid aggressive teasing simply to create height. Too much backcombing can leave an uneven surface; build lift at the roots and gather gently.
Side-Swept Low Ponytail Hairstyle
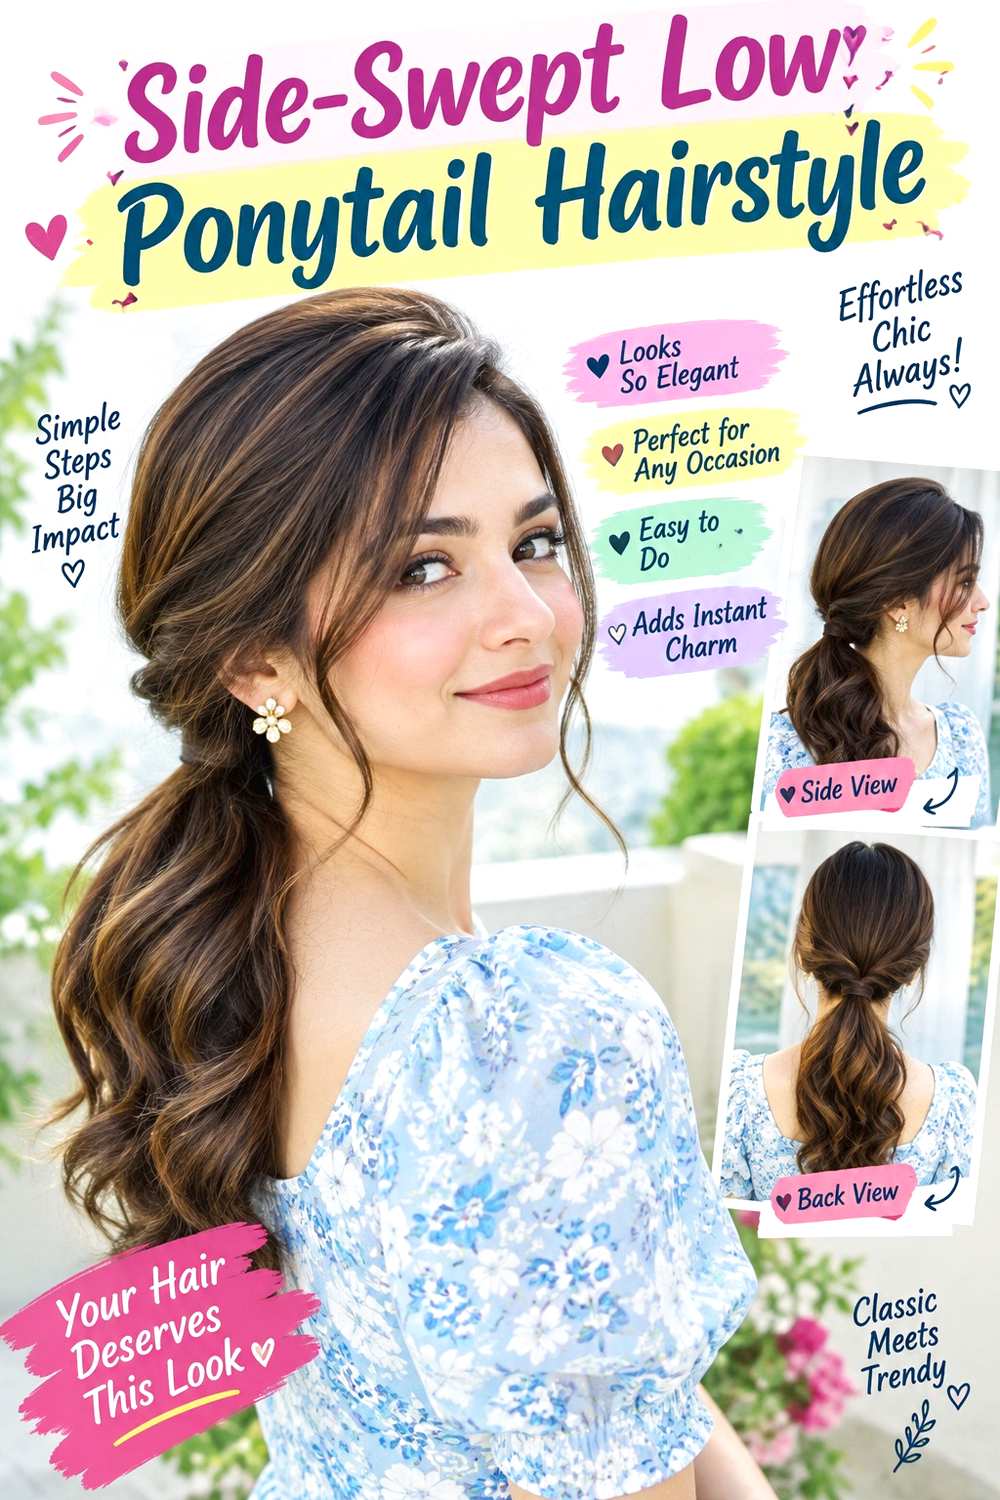
A low ponytail does not have to fall directly down the back. This version positions the base near the nape but guides the loose length over one shoulder, creating visible asymmetry from the front. Use a side part or softly swept front, keep the opposite side close to the head, and let the ponytail remain straight, wavy, curly, or coily. Medium to long hair provides enough length to stay over the shoulder without constantly slipping backward.
Use a fabric-covered elastic for the low anchor, light texturizing spray if smooth hair needs grip, and bobby pins to secure short pieces near the opposite nape. A full styling session takes longer when the length also needs waves or curl definition, while a quick refresh can focus on the anchor and shoulder-side texture. If the ponytail keeps rotating backward, correct the base direction rather than pulling the length forward repeatedly.
For professional styling, specify which shoulder should carry the ponytail and whether you want the nape anchor centered or subtly offset. Maintenance involves checking the opposite side for loose pieces and keeping the base comfortable. The style should angle naturally rather than being pulled so firmly sideways that the front feels uneven.
Pro tip:
Angle the ponytail toward the chosen shoulder before tightening the elastic, establishing the direction at the base instead of dragging the finished length sideways.
Make It Work for You:
For very dense hair, keep the anchor closer to center and let only the loose length move over the shoulder, reducing uneven tension across the nape.
Watch Out For:
Do not pull the opposite side excessively tight to hold the ponytail forward. Adjust the anchor direction and secure only the short pieces that escape.
Knotted Detail Low Ponytail Hairstyle

A small knot above the nape adds a visible detail before the hair becomes a low ponytail. Divide two side sections, bring them toward the back, and tie or cross them over the central gathered length before securing everything below. Keep the knot flat enough to sit comfortably against the head, with a soft center or side part in front. Medium to long hair works best because the side sections need enough length to cross without being stretched tightly.
Use light texturizing spray to give the side sections grip, bobby pins to hold the knot discreetly, and a fabric-covered elastic for the ponytail beneath it. A complete style takes longer than a basic ponytail because the knot must be balanced, while a quick refresh can focus only on the crossed sections. If the detail loosens, reset its pins rather than tightening the entire nape base.
For professional styling, show where you want the knot to sit and how wide the crossed sections should appear. Lower-density hair may benefit from narrower sections so the main ponytail keeps its fullness. Maintenance means checking that the knot remains flat, pins stay comfortable, and the ponytail base does not begin sagging underneath the decorative detail.
Pro tip:
Create the knot before tightening the final ponytail so you can adjust both sides evenly and keep the decorative section centered over the nape.
Make It Work for You:
For fine hair, take smaller side sections for the knot and leave more hair in the ponytail, preserving density through the loose length.
Watch Out For:
Avoid making a bulky knot directly against the neck. Keep the detail slightly above the elastic so it stays visible and comfortable during movement.
Polished Straight Low Ponytail Hairstyle

Straight, aligned lengths make the nape placement especially clear in this polished version. Keep the crown smooth with a center or subtle off-center part, secure the ponytail low, and let the length fall in one clean line with softly finished ends rather than a rigid, overly flat shape. Medium to long hair shows the silhouette most clearly. Naturally straight hair may need little preparation, while other textures can require more styling to reach the same finish.
If heat styling is part of your routine, apply heat protectant before using a flat iron only where smoothing is needed, then use a fabric-covered elastic to establish the low base. A full wash-day straightening session can take considerably longer on long, dense, curly, or coily hair. A quick refresh should target only bends that developed overnight instead of repeating heat through every section.
For professional styling, specify the exact nape height and whether you want completely exposed ears or a softer side profile. The base should stay smooth without being painfully tight. Maintenance includes protecting the straight finish from unnecessary reshaping, smoothing local frizz, and rebuilding the elastic when it stretches. A polished ponytail can still have natural movement through the ends.
Pro tip:
Let heat-styled sections cool before gathering them at the nape so the elastic is less likely to set an immediate bend in warm hair.
Make It Work for You:
If you prefer less heat, smooth only the visible crown and front while keeping more of your natural texture through the ponytail length.
Watch Out For:
Do not repeatedly flat-iron minor bends throughout the day. Refresh only noticeable sections with protection rather than chasing a perfectly motionless finish.
Conclusion
Low ponytail hairstyle ideas can shift from sleek and symmetrical to soft, curly, braided, voluminous, or highly textured without changing the basic nape placement. Center and side parts alter the front balance, while crown volume changes height above the anchor. Straight lengths give a cleaner line, waves add movement, and curls or coils preserve more natural fullness. Braids, bubbles, twists, knots, and wrapped bases introduce detail without requiring a different haircut. Consider density, natural texture, face-framing preferences, and how much daily styling you actually want to do. A simple ponytail may need only a quick reset, while heat-shaped waves or polished straight finishes require more full styling. Comfortable tension and a stable base matter in every version.
Before Your Salon Visit
Choose one or two favorites and save references that clearly show the front, nape, and ponytail length. Discuss your natural texture, density, face shape, preferred length, upkeep, and normal styling routine. Point out the exact parting, crown volume, face-framing pieces, anchor height, braid or twist detail, and finish you like. Because a low ponytail is a temporary style, focus on practical placement and comfortable tension unless you specifically want a haircut or fringe change to support the look.
FAQs
Can Fine or Lower-Density Hair Wear a Low Ponytail?
Yes. A low ponytail can work well when the base is not overloaded with heavy product or oversized details. Preserve fullness through the ends, use a secure but comfortable anchor, and consider narrower twists, smaller bubbles, or a simple wrapped base if removing too much hair from the main ponytail would make it look sparse.
How Low Should a Low Ponytail Sit?
Most versions sit at or just above the nape, but the exact position can change with comfort, hair length, and the desired silhouette. A very low anchor may touch the neck, while placing it slightly higher can give shorter hair more security. Choose the position where the base remains stable without pulling.
Do I Need Heat to Create a Low Ponytail?
No. Natural curls, coils, waves, braids, twists, bubbles, and simple straight textures can all be gathered without heat. Hot tools are only useful when you specifically want a heat-shaped finish. If you use them, apply heat protectant and reserve repeat styling for sections that genuinely need reshaping.
How Do I Stop a Low Ponytail From Sagging?
Start with a stable elastic at the intended nape height and gather the hair evenly from both sides. If the base loosens, rebuild it rather than repeatedly pulling the ponytail tighter. Dense or very long hair may need a stronger anchor, while comfortable tension should remain the priority.