17 New French Twist Hairstyles for an Elegant Modern Look

French twist hairstyles are built around a vertical roll that gathers the hair inward along the back of the head. The classic shape is smooth and compact, but modern versions can sit lower, higher, looser, more textured, or partly braided. Crown volume, parting, loose face-framing pieces, and the height of the roll all change the mood while preserving the recognizable folded structure. Medium and long lengths are easiest to secure, although shorter hair can create a partial twist with careful pinning.
Straight and wavy textures can form a clean roll with relatively little preparation, while curls and coils can keep more visible texture through the surface. Density affects the scale of the twist: fine or lower-density hair often benefits from a slimmer roll with gentle root lift, while dense hair may need a broader fold and several anchor points to distribute weight comfortably. Face framing can be omitted or adjusted around the cheekbones or jaw.
A quick refresh usually involves replacing a few pins or smoothing the outer surface. A full wash-day style takes longer when the hair also needs drying, stretching, curling, or definition. Because the French twist is temporary, the key decisions are anchor placement, tension, roll width, and whether the finish should look sleek or deliberately soft.
Quick List
- Classic Sleek French Twist Hairstyle
- Soft Loose French Twist Hairstyle
- Low French Twist Hairstyle
- High French Twist Hairstyle
- Side-Part French Twist Hairstyle
- Curly French Twist Hairstyle
- Coily French Twist Hairstyle
- Fine-Hair French Twist Hairstyle
- Dense-Hair French Twist Hairstyle
- Braided French Twist Hairstyle
- Pearl-Pinned French Twist Hairstyle
- Claw Clip French Twist Hairstyle
- French Twist With Face Frame Hairstyle
- Half-Up French Twist Hairstyle
- Textured French Twist Hairstyle
- Short-Hair French Twist Hairstyle
- Side-Swept French Twist Hairstyle
Classic Sleek French Twist Hairstyle

A classic sleek twist keeps the silhouette narrow and vertical, with the roll beginning near the nape and traveling upward through the center back. The outer surface stays smooth, the crown has only restrained lift, and the ends are tucked inside so the seam looks clean. A center, side, or fully brushed-back front can work, but the strongest feature is the uninterrupted roll rather than loose texture around it.
Medium to long straight or softly wavy hair reaches this finish most easily. Dense hair may need a slightly broader roll so the lengths are not forced into a narrow fold. Use a fine-tooth comb to smooth the surface, bobby pins to build the hidden anchor, and flexible hairspray for light hold. On already prepared hair, repairing a loosened section can be quick; building the full twist from freshly washed hair takes longer if the surface also needs smoothing. If the roll shifts, replace the internal pins instead of tightening the entire style. For professional styling, specify the roll width, seam position, crown height, and comfortable tension so the result stays compact without feeling rigid.
Pro tip:
Build a vertical line of hidden pins before rolling the outer section over it. A stable internal anchor lets the visible surface stay sleek without requiring excessive tension across the scalp.
Make It Work for You:
If your hair is very long, fold the ends inward in stages instead of forcing the entire length into one narrow roll. The twist can stay slim while the hidden weight is distributed.
Watch Out For:
Do not keep adding surface hairspray when the roll itself is slipping. Reinforce the hidden pins first; extra product cannot correct an anchor that has started moving underneath.
Soft Loose French Twist Hairstyle
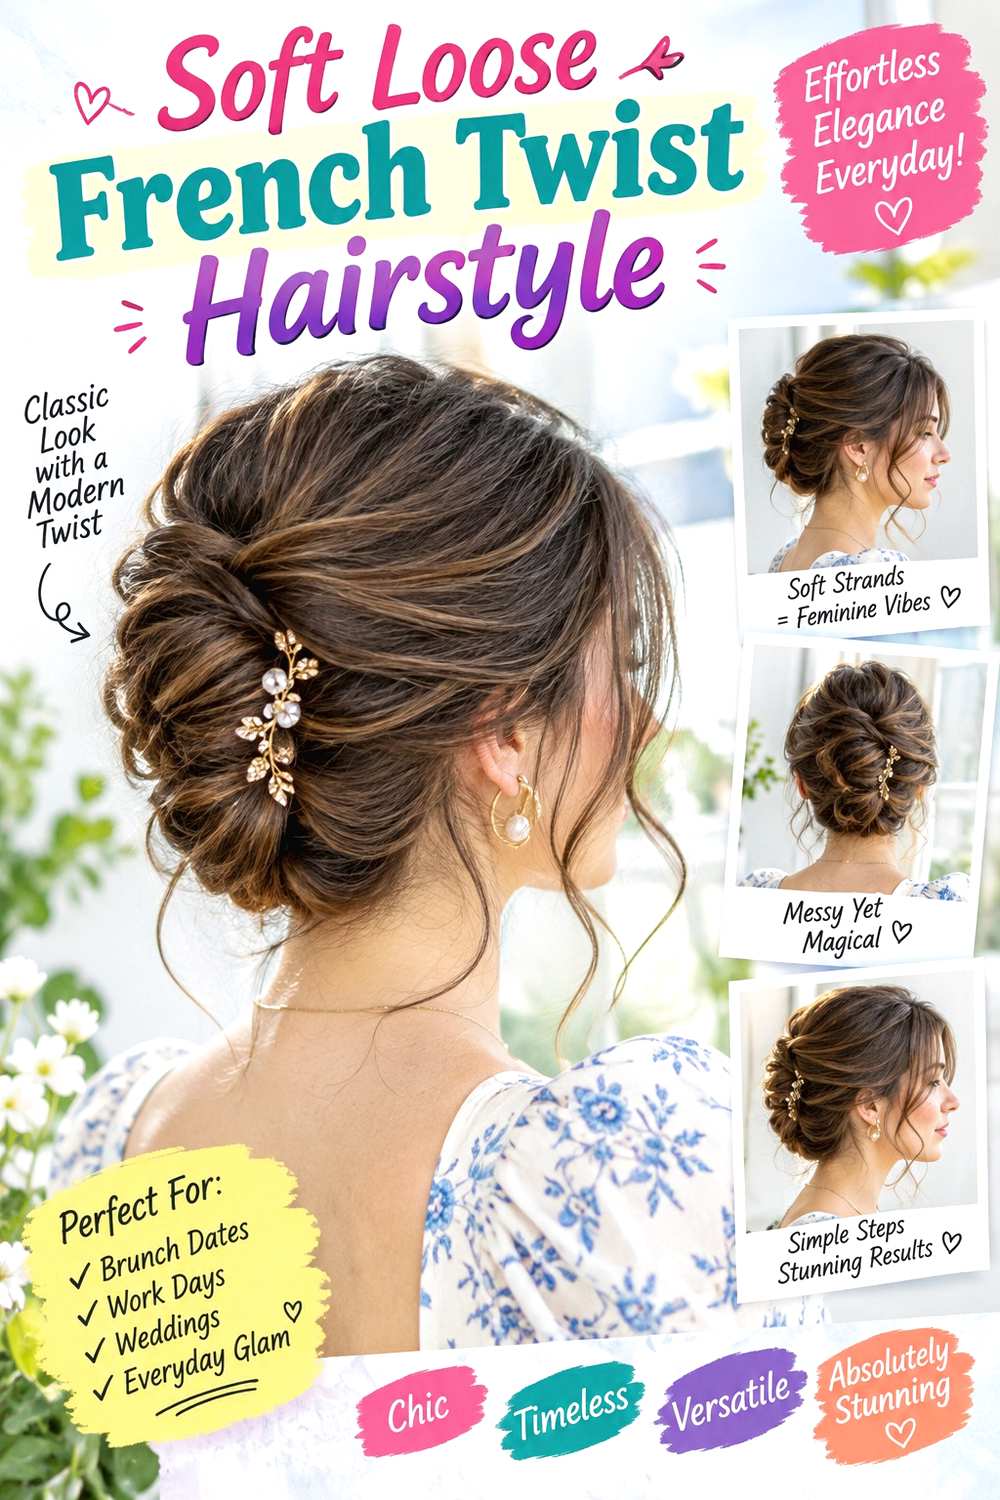
A softer twist keeps the same vertical roll but allows more space through the crown, sides, and seam. Instead of pulling the hair tightly toward the center, leave gentle root lift and let the roll sit slightly wider. A few wisps can remain near the temples, while the outer surface keeps some natural movement rather than being brushed completely flat. The ends are still tucked, which prevents the looseness from becoming an unfinished-looking updo.
This variation suits straight, wavy, and naturally textured hair, especially when you prefer a less formal finish. Use light texturizing spray to add grip, bobby pins for the hidden support, and flexible hairspray to control only the pieces that need it. On second-day hair, the twist can be assembled fairly quickly; a full wash-day preparation takes longer if you want waves or a blowout underneath. If the style relaxes during wear, reinforce the seam locally rather than pulling the crown tighter. When having it professionally styled, explain how much crown softness you want and where the bottom of the roll should sit, because a low, relaxed anchor creates a very different shape from a tall, tightly centered twist.
Pro tip:
Secure the central roll first, then loosen the crown by tiny amounts with your fingertips. Creating softness after the anchor is stable reduces the chance of weakening the entire hairstyle.
Make It Work for You:
If your hair is lower in density, keep the roll slightly narrower and create softness mainly at the crown. This preserves visible fullness without making the twist hollow or unstable.
Watch Out For:
Avoid pulling random sections loose after the twist is finished. Choose the areas you want softened deliberately so the roll stays balanced instead of developing uneven gaps.
Low French Twist Hairstyle

A low French twist keeps most of the rolled shape close to the nape rather than extending high toward the crown. The hair is swept inward from the sides, folded into a compact vertical or slightly diagonal roll, and pinned just above the neckline. Crown volume stays modest, which makes the style feel understated. A center or side part can define the front, while the ends disappear neatly into the lower fold.
Medium-length hair is particularly convenient because there is enough length to form the roll without a large amount of extra hair to hide. Straight, wavy, curly, and coily textures can all adapt the placement. Use bobby pins for the anchor and light styling cream to control short pieces around the nape. A simple low twist can be a quick refresh on prepared hair, while wash-day detangling or smoothing increases the overall effort. If a collar or dress neckline touches the roll, move the anchor slightly higher rather than adding more tension. For event styling, specify the exact clearance you need above the neckline and whether the twist should stay flat or project slightly from the back of the head.
Pro tip:
Put on your planned top or dress before the final pinning. Knowing where the neckline sits makes it easier to place the lower edge of the twist without fabric pushing against it.
Make It Work for You:
If your hair is shorter, use a flatter roll with more overlap at the center. A compact low twist can work without requiring enough length to reach high toward the crown.
Watch Out For:
Do not position the roll directly on a stiff collar. Repeated contact can loosen the pins, so raise the anchor slightly instead of trying to clamp the twist more tightly.
High French Twist Hairstyle

A high French twist stretches the classic roll upward, placing the strongest volume behind the crown and keeping the nape clean. Sweep the hair vertically, build the fold through the center back, and tuck the ends near the upper section instead of leaving the roll concentrated low. The front can stay smooth or softly lifted, but keeping the sides controlled helps the taller silhouette remain distinct.
Medium to long hair works best, and dense hair may need several anchor points because the weight sits higher on the head. Use light texturizing spray for grip, bobby pins to secure the vertical seam, and flexible hairspray for surface control. Building the high roll takes more precision than a low twist, though a quick refresh can focus only on replacing any shifted pins. If the style begins leaning to one side, redistribute the internal weight rather than tightening the front. For professional styling, explain exactly how high you want the roll and whether the top should finish rounded, pointed, or softly folded. Comfortable tension at the nape is important because the elevated placement can otherwise pull upward on lower sections during extended wear.
Pro tip:
Anchor the lower half firmly before shaping the upper roll. A stable base prevents the high section from sliding downward and lets you keep the crown softer and more comfortable.
Make It Work for You:
If your hair is very dense, make the twist slightly wider instead of extremely tall. A broader shape can distribute weight while still creating clear vertical height above the nape.
Watch Out For:
Avoid pulling the nape excessively tight to support the upper roll. If the style feels heavy, add internal support higher up rather than increasing tension at the bottom.
Side-Part French Twist Hairstyle

A side part gives the French twist stronger front asymmetry while the back remains vertically controlled. Create the part first, sweep the heavier section across the forehead or temple, then direct both sides toward the central roll. The lighter side can stay close to the head or tuck neatly behind the ear. Keep the twist slim through the back so the directional front remains the main change from the classic shape.
Straight and wavy hair make the smooth sweep easy to control, while curly textures can keep more surface movement if preferred. Use a fine-tooth comb to establish the part, bobby pins for the twist, and light styling cream to keep flyaways under control. A prepared-hair version can be completed fairly quickly; a polished wash-day style takes longer when the front needs deliberate smoothing. If the heavier side starts separating, reset that front section rather than rebuilding the entire roll. For professional styling, show exactly where you wear the part and whether the heavier section should cover part of the forehead or sweep fully away. That front placement affects the overall balance more than changing the back seam.
Pro tip:
Set the side part before building the twist, then leave the front sweep untouched while you secure the back. Rearranging the part afterward can create bumps through the finished sides.
Make It Work for You:
If your hairline naturally pushes to one side, follow that direction rather than forcing the opposite sweep. The twist stays polished while requiring less correction around the front roots.
Watch Out For:
Do not tighten the twist to control a front section that keeps separating. The problem is usually parting or growth direction, so adjust the front independently of the back anchor.
Curly French Twist Hairstyle
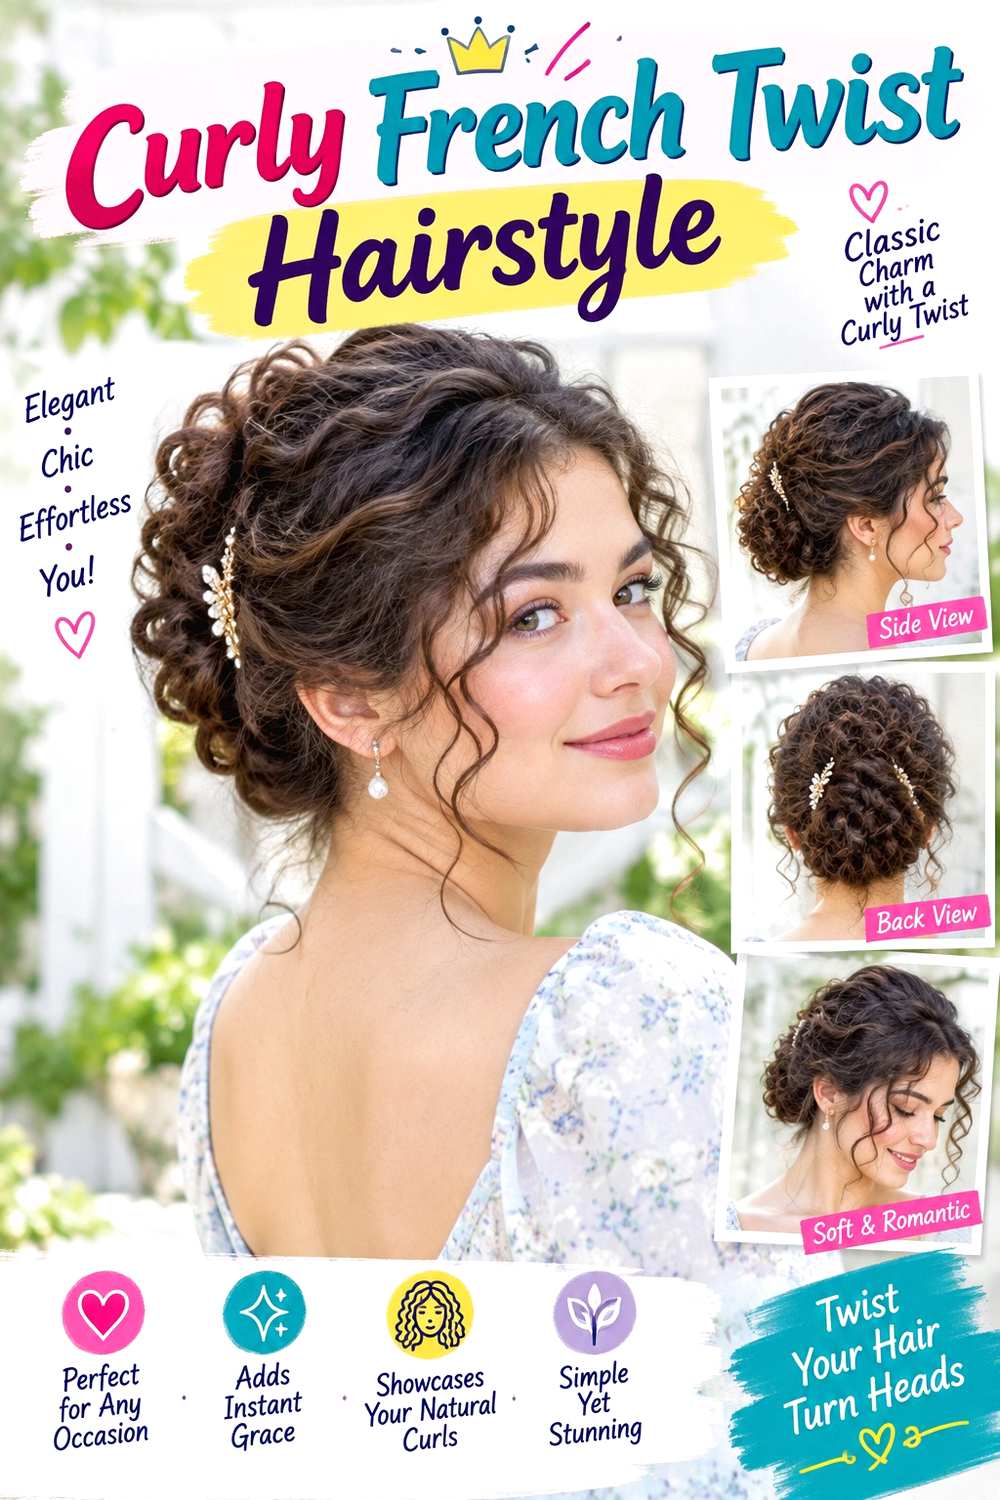
A curly French twist keeps visible texture through the surface instead of smoothing every curl into a uniform roll. Gather the sides toward the center back, fold the lengths upward, and let selected curl groups remain visible along the seam or upper edge. The crown can keep natural lift, while several curls near the temples or cheekbones soften the front. The defining feature is still the vertical tuck, not a completely flattened finish.
Medium and long curly hair can support the shape well, although shrinkage affects how much usable length reaches the anchor. Use lightweight leave-in conditioner for softness, curl gel to define any curls left visible, and bobby pins to secure the roll. A quick refresh can involve redefining several front curls and replacing loose pins; a full wash, define, dry, and updo routine is much longer. If the twist starts spreading, reinforce the center anchor before tightening the sides. For professional styling, discuss how much curl texture you want visible and where the roll should sit. Comfortable tension matters because pulling curls too firmly can distort their shape without adding useful security.
Pro tip:
Choose the curls you want left visible before pinning the twist. Setting them aside early prevents you from pulling random sections from the finished roll and weakening its internal support.
Make It Work for You:
If your curls shrink strongly, keep the roll slightly lower and broader so sections do not need to be stretched excessively. The French twist shape can remain clear with natural volume.
Watch Out For:
Avoid brushing every curl smooth just to make the updo look formal. Control the overall silhouette and anchor while allowing some natural texture to remain visible on the surface.
Coily French Twist Hairstyle
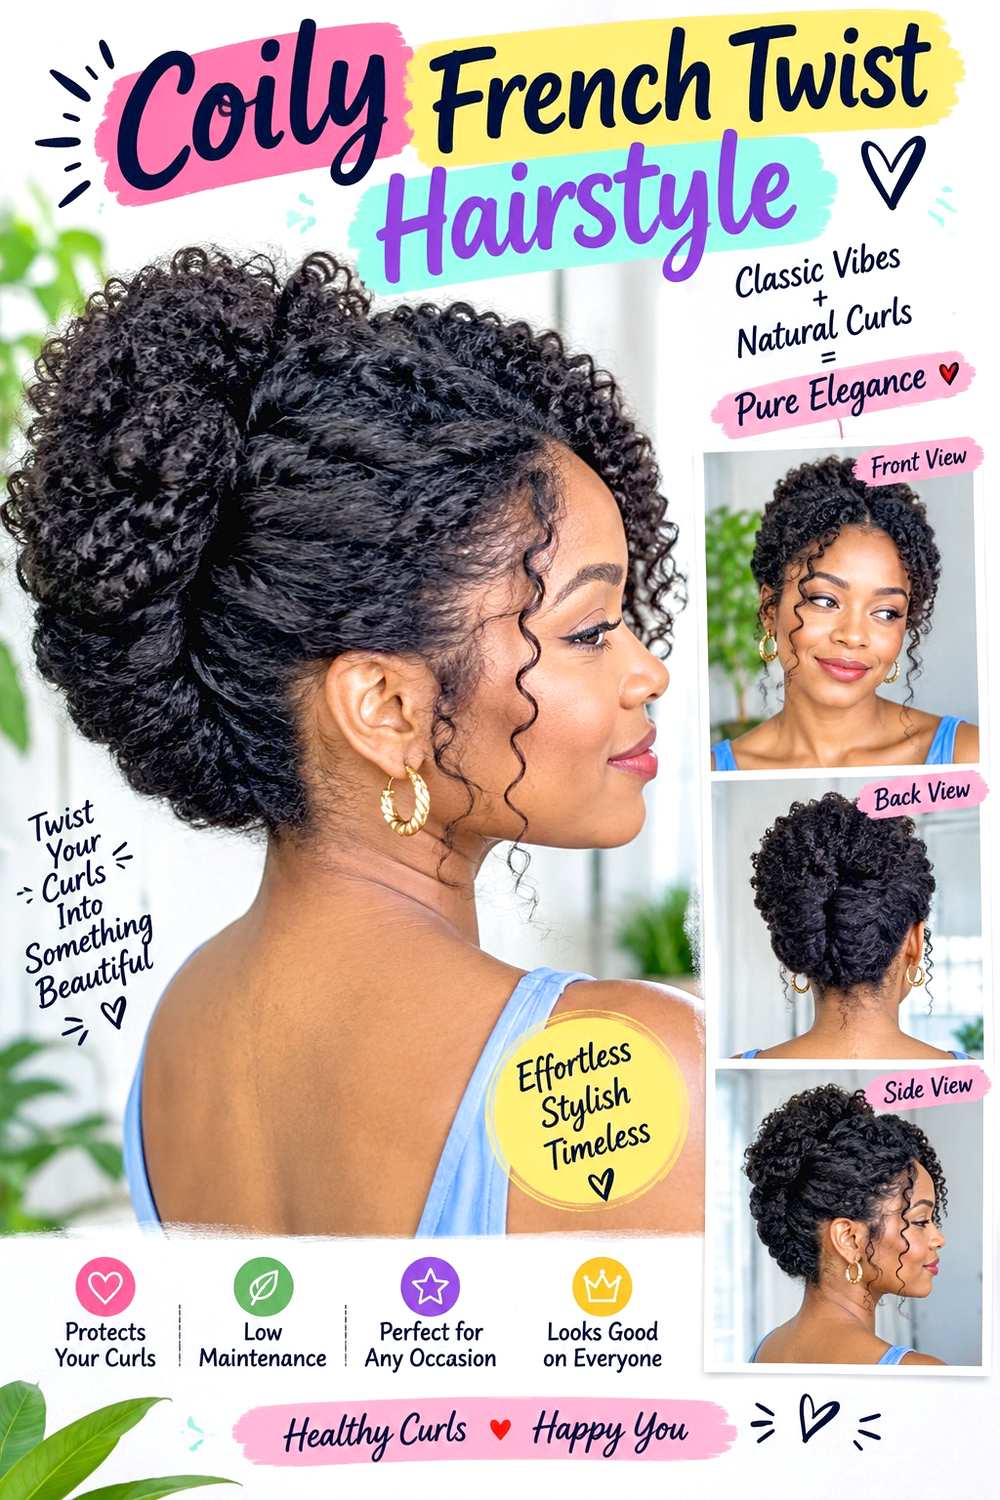
Coily hair can form a French twist without being straightened, using the same inward roll while preserving natural texture through the crown and outer surface. Gather the lengths toward the center back, fold them upward, and secure the roll with enough width to accommodate the coil pattern comfortably. The front can stay softly swept back or include defined coils near the hairline, while the lower nape remains neatly contained.
Shrinkage and density influence how much hair reaches the central seam, so a broader roll may be more practical than a narrow classic fold. Use lightweight leave-in conditioner for softness, curl cream to define any loose front coils, and bobby pins for the main anchors. Refreshing the surface and replacing a pin can be relatively quick; wash-day detangling, moisturizing, and drying add much more time. If the twist feels tight, redistribute the section instead of pulling the sides harder. For professional styling, specify the roll height, width, and comfortable tension, and explain whether you want natural texture visible or a more stretched surface. The style should be secure without depending on painful edge tension.
Pro tip:
Establish the center anchor before arranging the visible front coils. Once the roll feels stable, you can shape the surface without repeatedly tightening the perimeter around the hairline.
Make It Work for You:
If your coils have strong shrinkage, use overlapping pinned sections instead of stretching every length into one continuous roll. The vertical silhouette stays recognizable while respecting the natural pattern.
Watch Out For:
Do not pull the sides tighter just because the surface looks textured. A polished French twist can still show coils; security should come from anchors, not excessive smoothing tension.
Fine-Hair French Twist Hairstyle

Fine strands can create a graceful French twist when the roll stays proportionate and the hair is not overworked. Keep gentle lift at the crown, sweep the sides inward, and build a narrow vertical fold rather than trying to imitate a very large updo. Slight surface softness can make the twist appear fuller, while keeping the ends tucked prevents sparse tips from becoming visible around the seam.
Fine hair can also be dense, so the amount of available hair should guide roll size. Use light texturizing spray for grip, bobby pins for the hidden structure, and flexible hairspray to control flyaways. A prepared-hair twist can be fairly quick, while a complete wash and styling routine takes longer if the roots need extra preparation. If the roll starts collapsing, reinforce the internal seam instead of pulling the outer hair tighter. For professional styling, explain that preserving visible fullness is more important than creating maximum height. Ask for a slim, well-supported roll and controlled crown lift rather than heavy teasing, which can make fine strands look separated instead of airy.
Pro tip:
Apply texturizing spray mainly to the interior sections that need grip, then keep the visible surface lighter. This supports the pins without making fine hair appear coated or rough.
Make It Work for You:
If your fine strands are high density, you can build a broader twist than someone with sparse hair. Let actual density, not strand diameter alone, determine the final roll size.
Watch Out For:
Avoid pulling the roll excessively wide to make it look fuller. A smaller, balanced twist usually looks more substantial than an over-expanded shape with visible gaps.
Dense-Hair French Twist Hairstyle
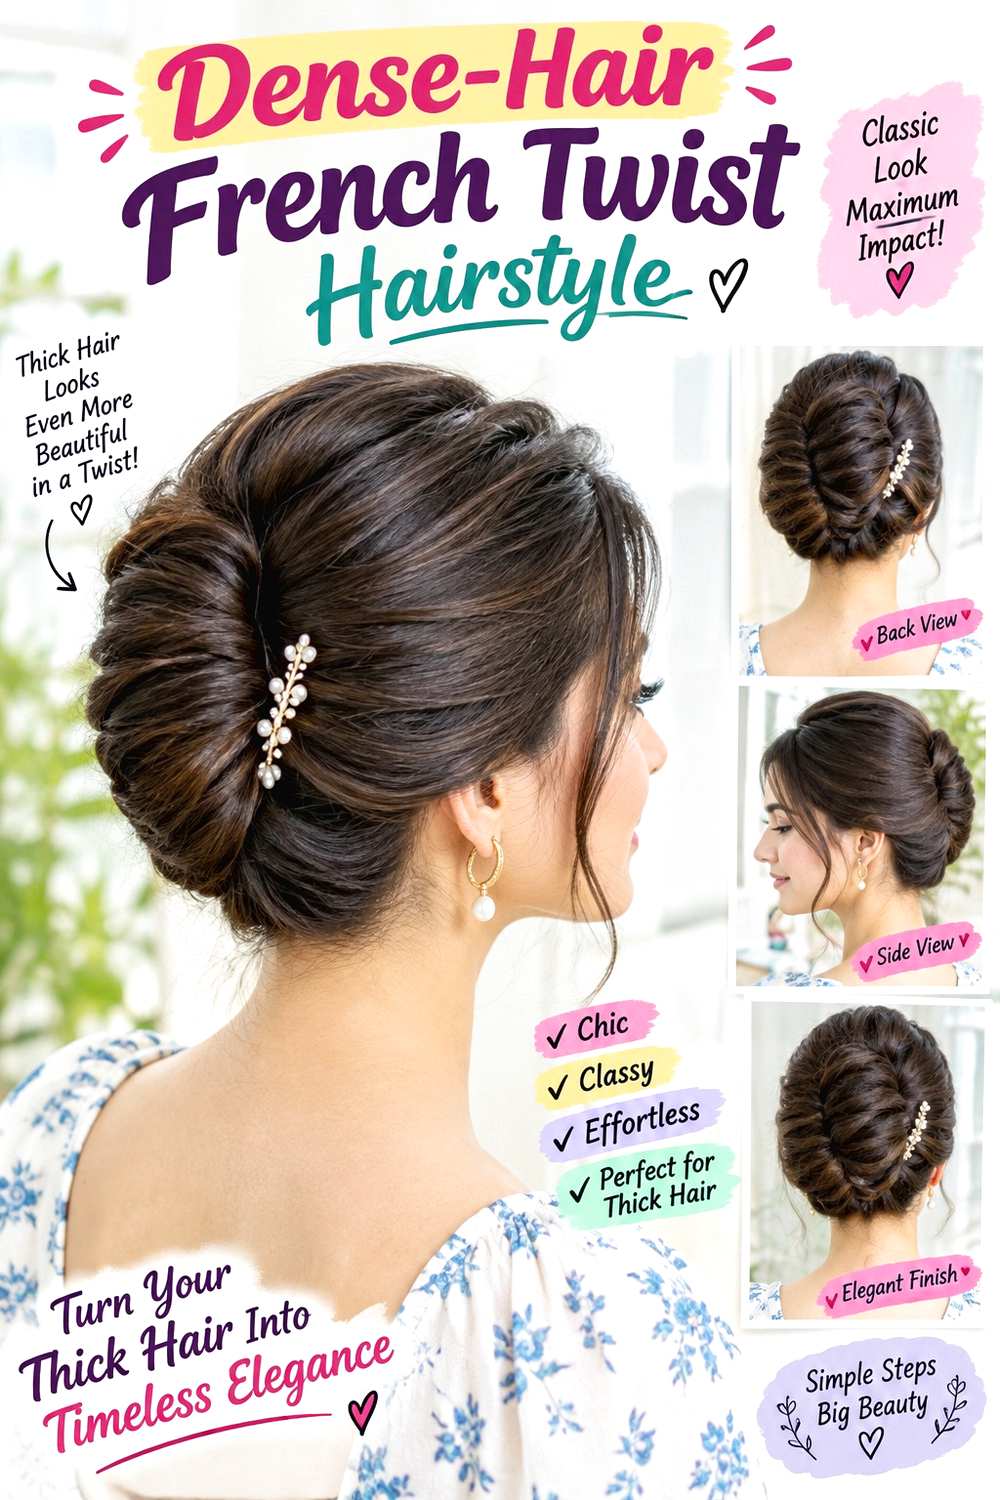
Dense hair can create a strong French twist, but the roll usually needs more width and several anchor points so the weight is not concentrated in one narrow seam. Sweep the sides toward the center, fold the lengths upward in stages, and allow the finished twist to sit slightly broader through the back. Keep the crown controlled rather than adding unnecessary height, since the density already provides substantial volume.
Straight, wavy, curly, and coily textures can all adapt the design. Use bobby pins to distribute support along the seam, light texturizing spray for grip, and flexible hairspray only where surface control is needed. Building the twist from scratch takes moderate effort because the lengths need careful placement; refreshing one shifted section can be quick. If the style begins leaning, redistribute the interior fold rather than tightening the whole updo. For professional styling, explain where the hair feels heaviest and ask for a broader roll with several comfortable anchors. Very dense hair may also sit better when the lower section is folded flatter against the head rather than stacked into one thick vertical tube.
Pro tip:
Pin dense hair in stages as the roll travels upward instead of trying to secure everything at the end. Distributed anchors make the twist more stable and reduce concentrated pulling.
Make It Work for You:
If your hair is long as well as dense, keep the roll broad and fold the extra length inward twice. This manages bulk without forcing an oversized knot at the top.
Watch Out For:
Do not solve slipping by making the entire style tighter. Dense hair often needs more support points, not more tension, so reinforce the seam where the weight actually shifts.
Braided French Twist Hairstyle

A braid can add surface detail to a French twist without replacing the vertical roll. Create a narrow braid along one side or from the crown, then guide it toward the back before folding the remaining hair into the twist. The braid should feed into the anchor rather than carrying the full weight of the updo. Keep the opposite side smoother so the woven detail remains visible and the overall shape does not become too busy.
Medium and long hair provide enough length for both structures. Use a small elastic to secure the braid end, bobby pins for the twist and braid connection, and light styling cream for flyaway control. A complete braided twist takes more time than a basic French roll because both sections need deliberate placement, though small repairs can be quick. If the braid loosens, reinforce its connection point rather than tightening the entire scalp section. For professional styling, specify braid width, route, and where it should disappear into the twist. A narrow braid creates subtle detail, while a wider braid takes more hair away from the roll and can change its final size.
Pro tip:
Build the French twist anchor before attaching the braid into it. A stable roll prevents the decorative section from carrying more weight than it should and keeps the braid easier to adjust.
Make It Work for You:
If your hair is lower in density, keep the braid narrow so most of the length remains available for the twist. The woven detail can stay visible without shrinking the roll.
Watch Out For:
Avoid pulling the braid tighter when the twist shifts. The two structures have different jobs; secure the roll independently and use the braid only as a decorative connected section.
Pearl-Pinned French Twist Hairstyle
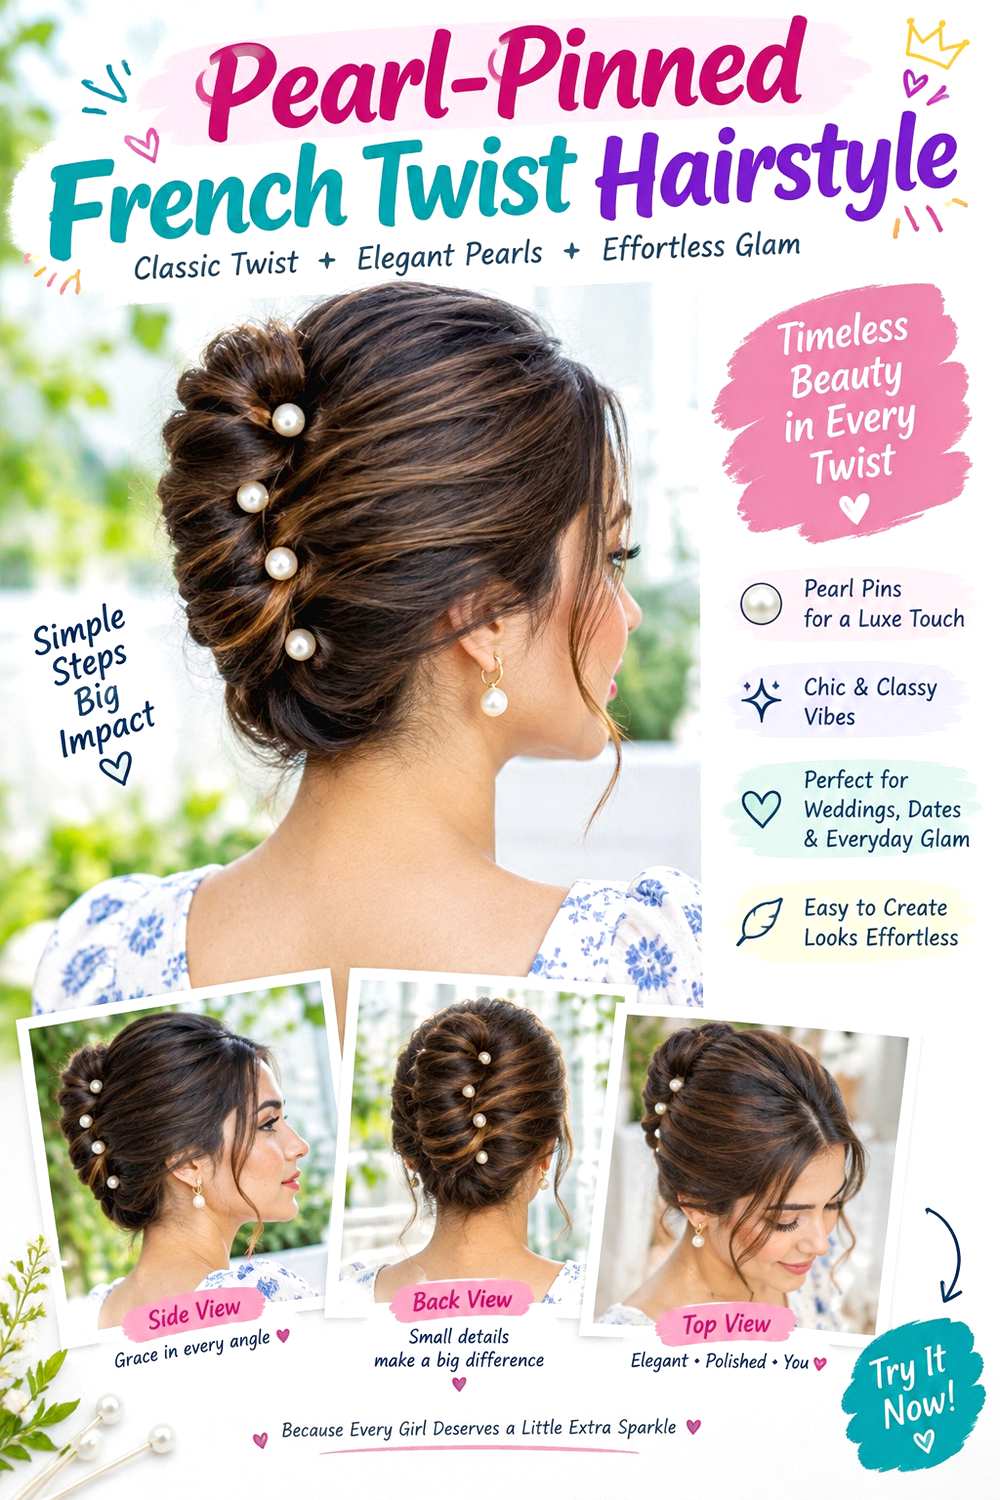
Pearl pins add small points of detail to a French twist while leaving the vertical roll as the main feature. Build a smooth or softly textured twist through the back, then place the pearls along one side of the seam or in a small cluster near the upper fold. Keep the front simple with a center, side, or swept-back part so the accessories do not compete with too many loose sections.
Medium and long hair can support the style, and the accessories work across straight, wavy, curly, and coily textures. Use bobby pins to create the real anchor, pearl pins for decoration, and flexible hairspray for light surface hold. Once the twist is secure, adding or repositioning pearls is quick; building the whole updo takes longer. If a decorative pin slips, move it closer to a stable folded section rather than pushing it repeatedly into loose surface hair. For professional styling, specify whether you want a neat line, a small cluster, or asymmetrical pearl placement. The decorative pins should never be the only elements holding the twist together.
Pro tip:
Finish the entire French twist before adding any pearls. Once the roll feels secure on its own, you can move decorative pins freely without weakening the hairstyle’s structural anchors.
Make It Work for You:
If your twist is narrow, use fewer pearl pins and leave more space between them. A small amount of decoration can look clearer than covering the entire seam.
Watch Out For:
Do not push pearls into the softest outer loops if they keep slipping. Place them closer to supported sections so the accessory stays visible without collapsing the surface.
Claw Clip French Twist Hairstyle
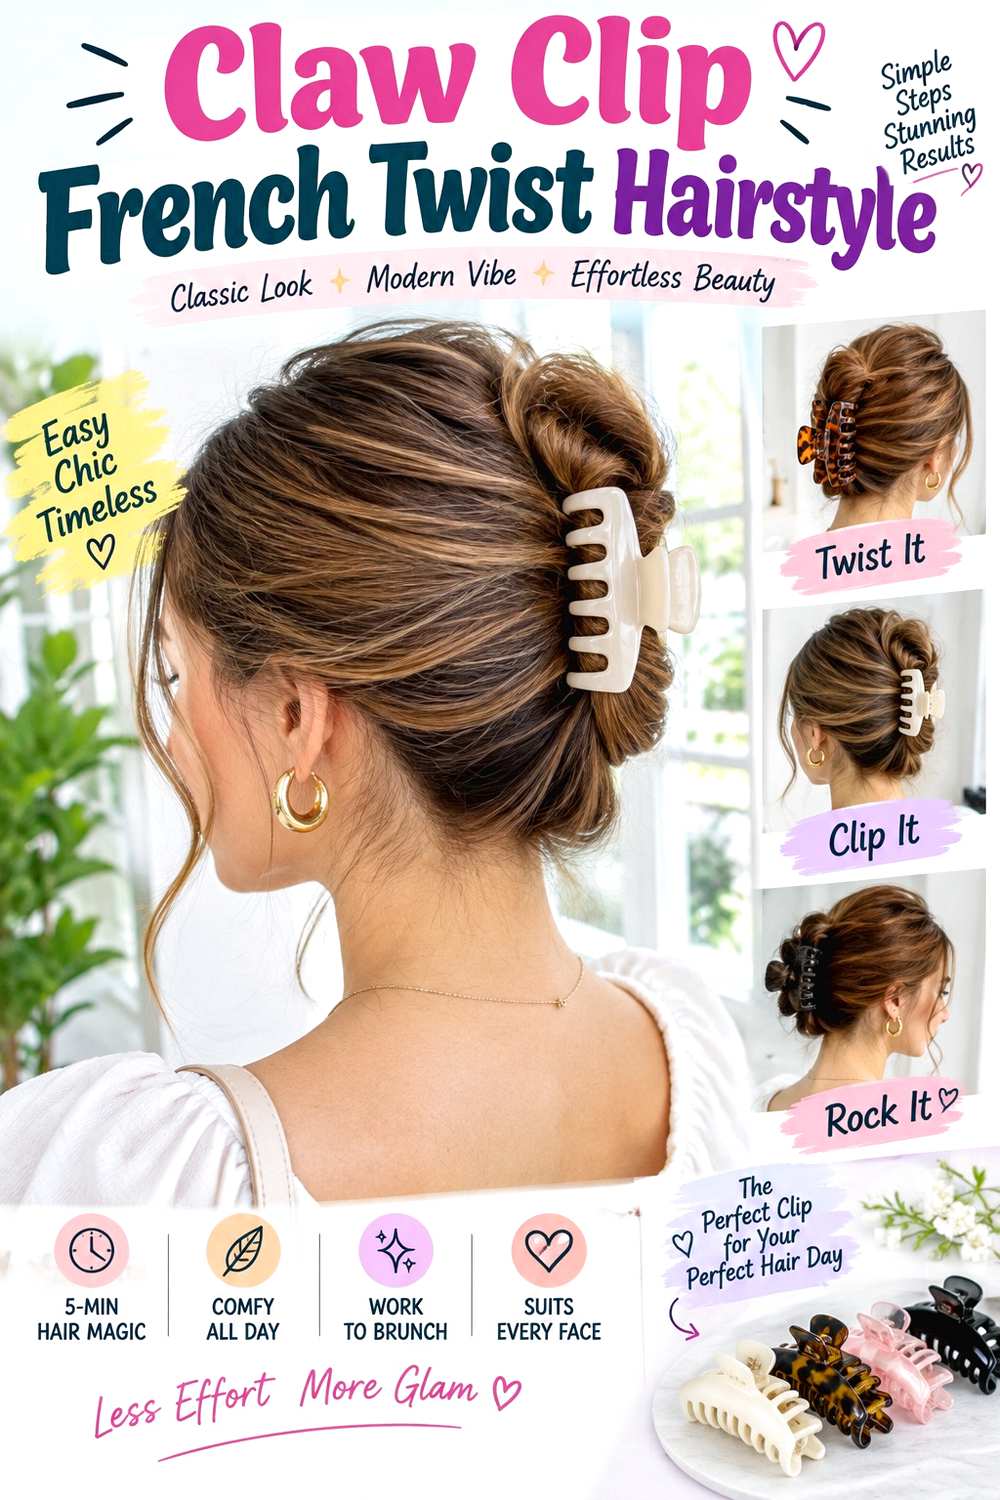
A claw clip creates a quicker French twist by replacing many hidden pins with one visible anchor. Gather the hair low, twist it upward against the back of the head, and fold the roll inward before closing the clip over the center. The ends can tuck inside for a cleaner finish or fan gently above the clip. Keep the crown relaxed and the sides smooth enough that the vertical twist still reads clearly.
Medium and long hair work best, although clip capacity must match density. Straight or slippery hair may need more grip, while textured hair can hold the roll with less preparation. Use a sturdy claw clip as the main anchor and light texturizing spray through the interior sections. A simple twist can take only a minute or two on prepared hair, while a polished surface requires additional styling time. If the clip slides, rebuild the twist or choose a better-fitting size instead of clamping harder. When planning the placement, keep the lower edge above any high neckline and make sure the clip closes comfortably around the full roll.
Pro tip:
Catch both the rolled section and a small amount of hair beneath it when closing the clip. Holding only the twist can let the entire style slide downward during movement.
Make It Work for You:
If your hair is very dense, create a flatter roll and use a clip with greater capacity. The twist can remain vertical without forcing a thick section into undersized hardware.
Watch Out For:
An undersized clip may feel secure briefly but can spring open as the twist shifts. Choose one that closes comfortably instead of relying on uncomfortable pressure for hold.
French Twist With Face Frame Hairstyle
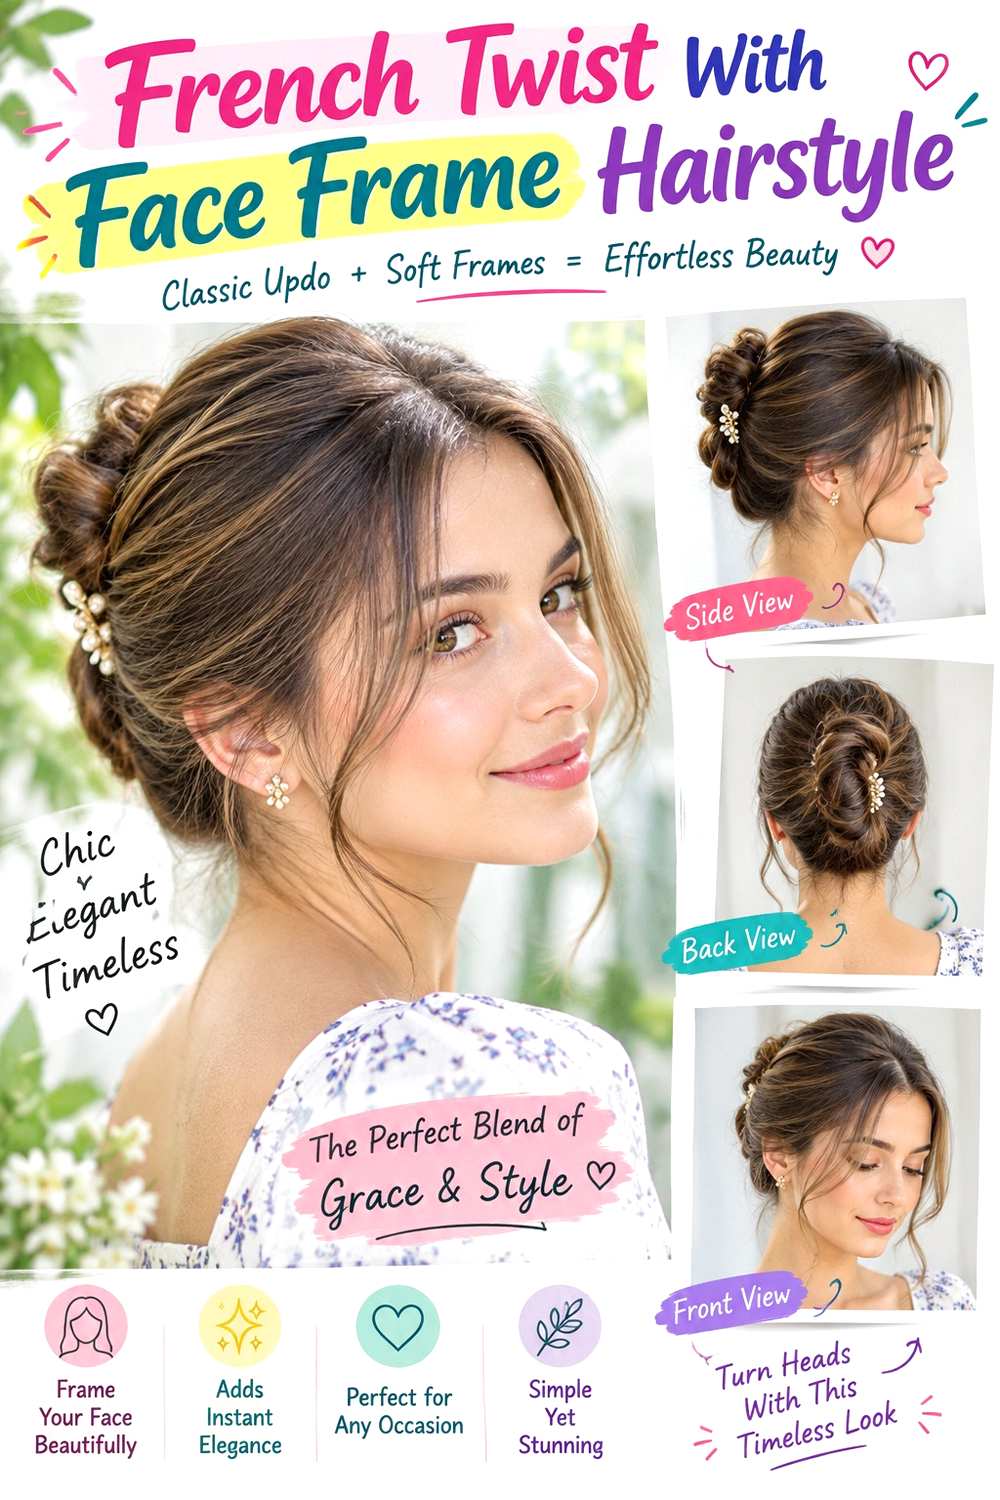
Leaving a deliberate face frame softens the structured back of a French twist. Set aside one or two front sections before gathering the rest, then build a vertical roll through the center back. The loose pieces can finish near the cheekbones, jaw, or slightly below, while the crown remains gently lifted. Keep the number of loose sections limited so the twist still feels intentional rather than undone around the entire hairline.
Medium and long hair can use this approach, especially when existing face-framing layers already fall naturally around the front. Use bobby pins for the twist, flexible hairspray for light hold, and a round brush only if the front pieces need shaping without high heat. A quick refresh can involve resetting those sections and replacing any loose pins; full wash-day styling takes longer. If the frame sticks to the face or catches on earrings, tuck part of it back rather than pulling out additional pieces. For salon planning, specify the exact finished length you want for permanent face-framing layers so they also work when the rest of your hair is worn down.
Pro tip:
Choose the face-framing pieces before you begin pinning. Keeping them separate from the start prevents you from pulling random sections from the finished roll and weakening the anchor.
Make It Work for You:
If your hair has lower density, leave only one narrow piece on each side. A small face frame provides softness while keeping more hair available for the twist itself.
Watch Out For:
Too many loose pieces can hide the clean vertical structure and make the hairstyle look unfinished. Keep the frame deliberate and let the twist remain the strongest shape.
Half-Up French Twist Hairstyle
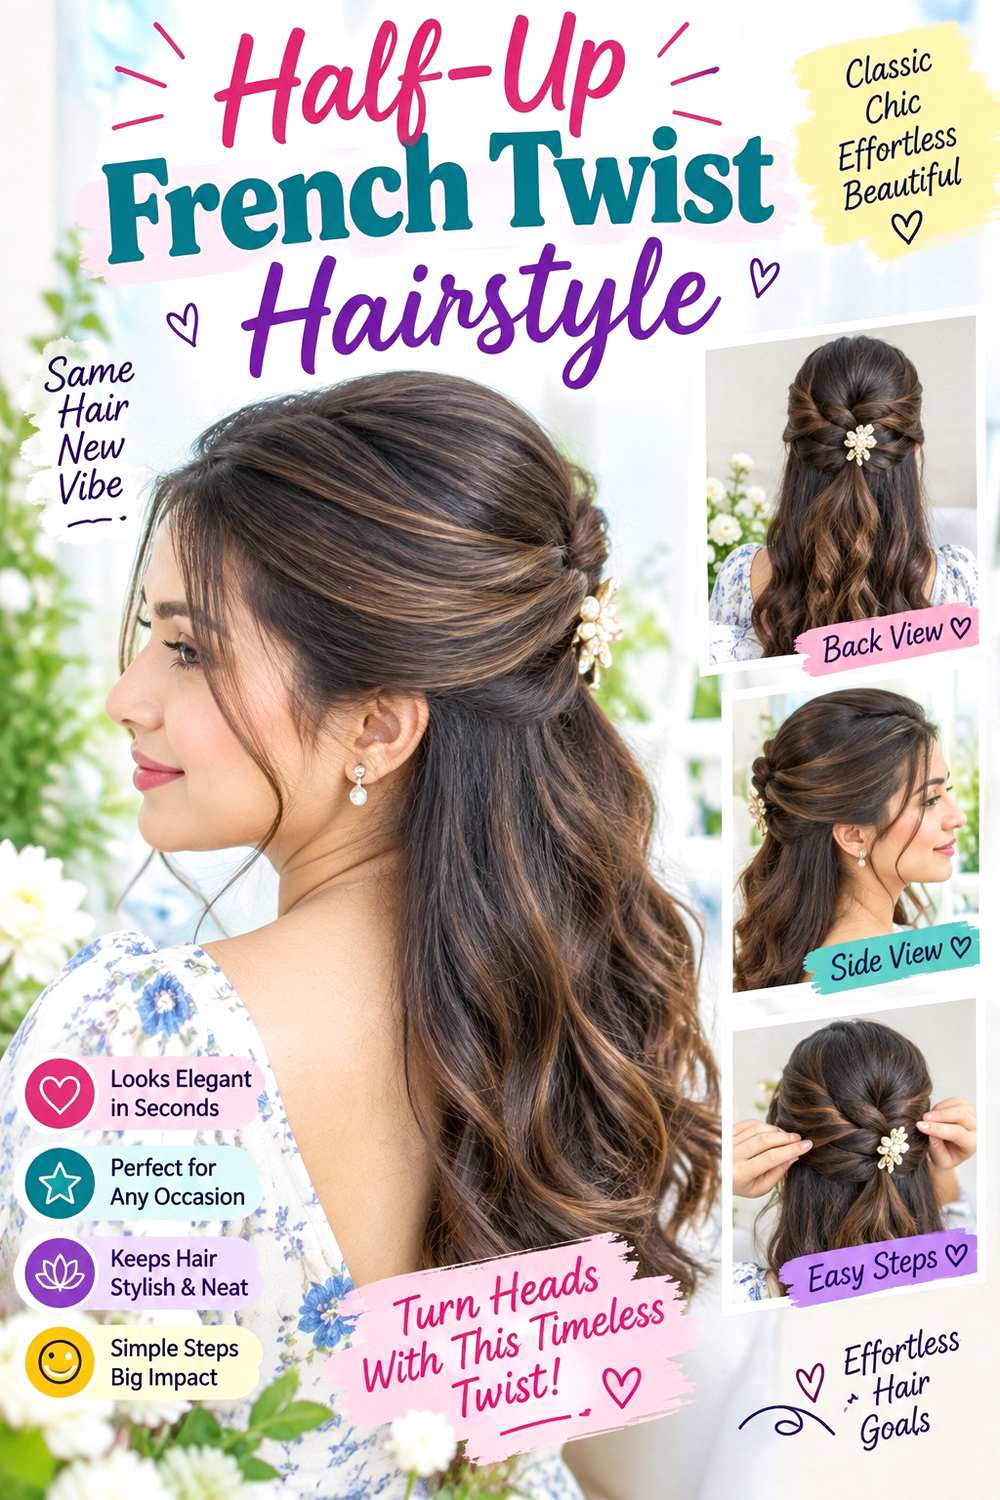
A half-up French twist uses only the upper section of the hair, leaving the lower lengths loose. Gather hair from above the ears, sweep it toward the center back, then fold it into a small vertical roll just below the crown. The remaining length can stay straight, wavy, curly, or naturally textured. Gentle crown lift keeps the mini twist visible without creating excessive height above it.
Medium and long hair work particularly well because there is enough loose length to contrast with the secured upper section. Use bobby pins for the small roll and light texturizing spray for grip. A half-up twist can be fairly quick on prepared hair, while curling or fully smoothing the loose lengths adds considerably more time. If the mini roll starts sagging, rebuild its anchor rather than gathering more hair from the sides. This temporary style needs no haircut, but permanent front layers affect which sections stay loose. For professional styling, explain how much hair you want included and where the twist should sit; taking too large an upper section can reduce fullness through the lower lengths.
Pro tip:
Build the small twist from sections just behind the temples rather than taking the whole upper half immediately. You can add hair gradually without making the loose lengths unnecessarily thin.
Make It Work for You:
If your hair is fine or lower in density, keep the half-up section modest. A narrower mini twist preserves more fullness through the loose hair while still showing the vertical fold.
Watch Out For:
Do not add extra side sections simply because the roll feels loose. Strengthen the center pins first; taking more hair changes the balance without necessarily improving the anchor.
Textured French Twist Hairstyle
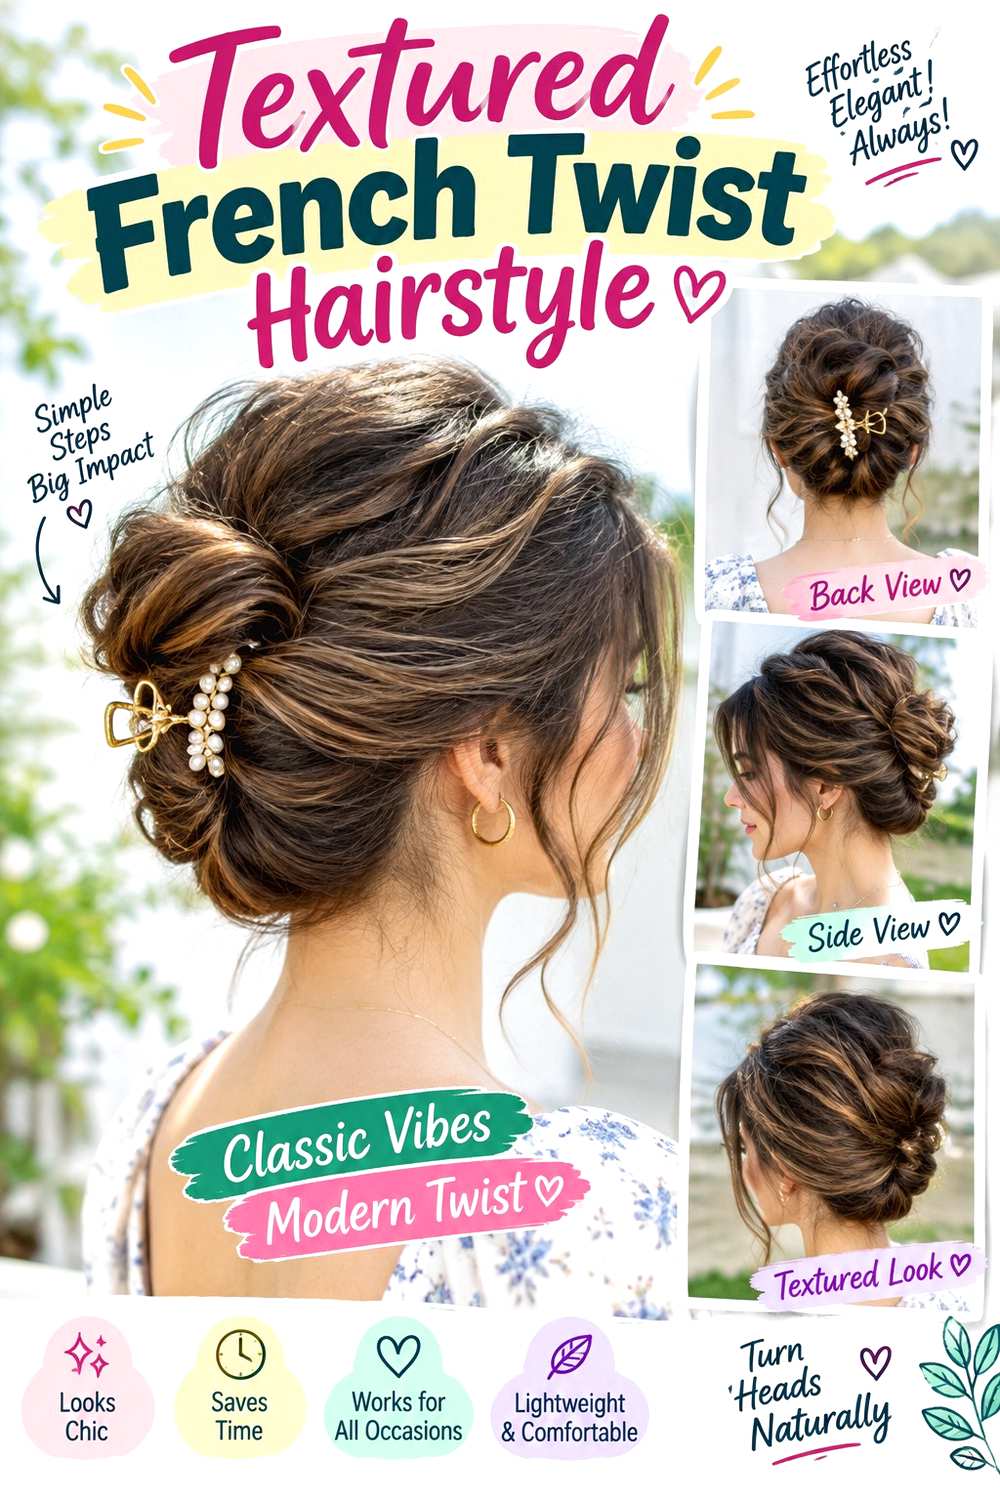
A textured French twist keeps visible bends and separation through the surface rather than aiming for a perfectly smooth shell. The roll can sit vertically through the back with gentle crown lift, while small sections overlap naturally along the outer fold. A few soft pieces near the temples are optional, and the ends stay hidden so the texture looks deliberate rather than unfinished.
Wavy hair is an easy starting point, while straight hair can gain grip and movement through preparation. Use light texturizing spray for traction, bobby pins for the central seam, and flexible hairspray to prevent the outer pieces from becoming too fuzzy. A prepared-hair twist takes moderate effort, and a quick refresh usually involves replacing one pin or smoothing one area. Full wash-day styling takes longer if you first create waves or additional texture. If the roll becomes too wide, reshape the internal fold before removing more hair from the surface. For event styling, specify how loose you want the texture and whether the seam should remain visible. “Textured” can range from subtly separated to deliberately tousled, so the amount of softness should be clear.
Pro tip:
Secure the internal roll firmly before loosening the visible surface. Once the structure is stable, gently separate only selected sections so the twist gains texture without losing its vertical shape.
Make It Work for You:
If your natural hair is already wavy, preserve that movement instead of smoothing it away first. Focus on a secure seam and let the surface texture provide the softer modern finish.
Watch Out For:
Avoid pulling every surface section loose equally. The twist still needs areas of control; selective softness creates texture, while uniform loosening can make the roll collapse or spread.
Short-Hair French Twist Hairstyle
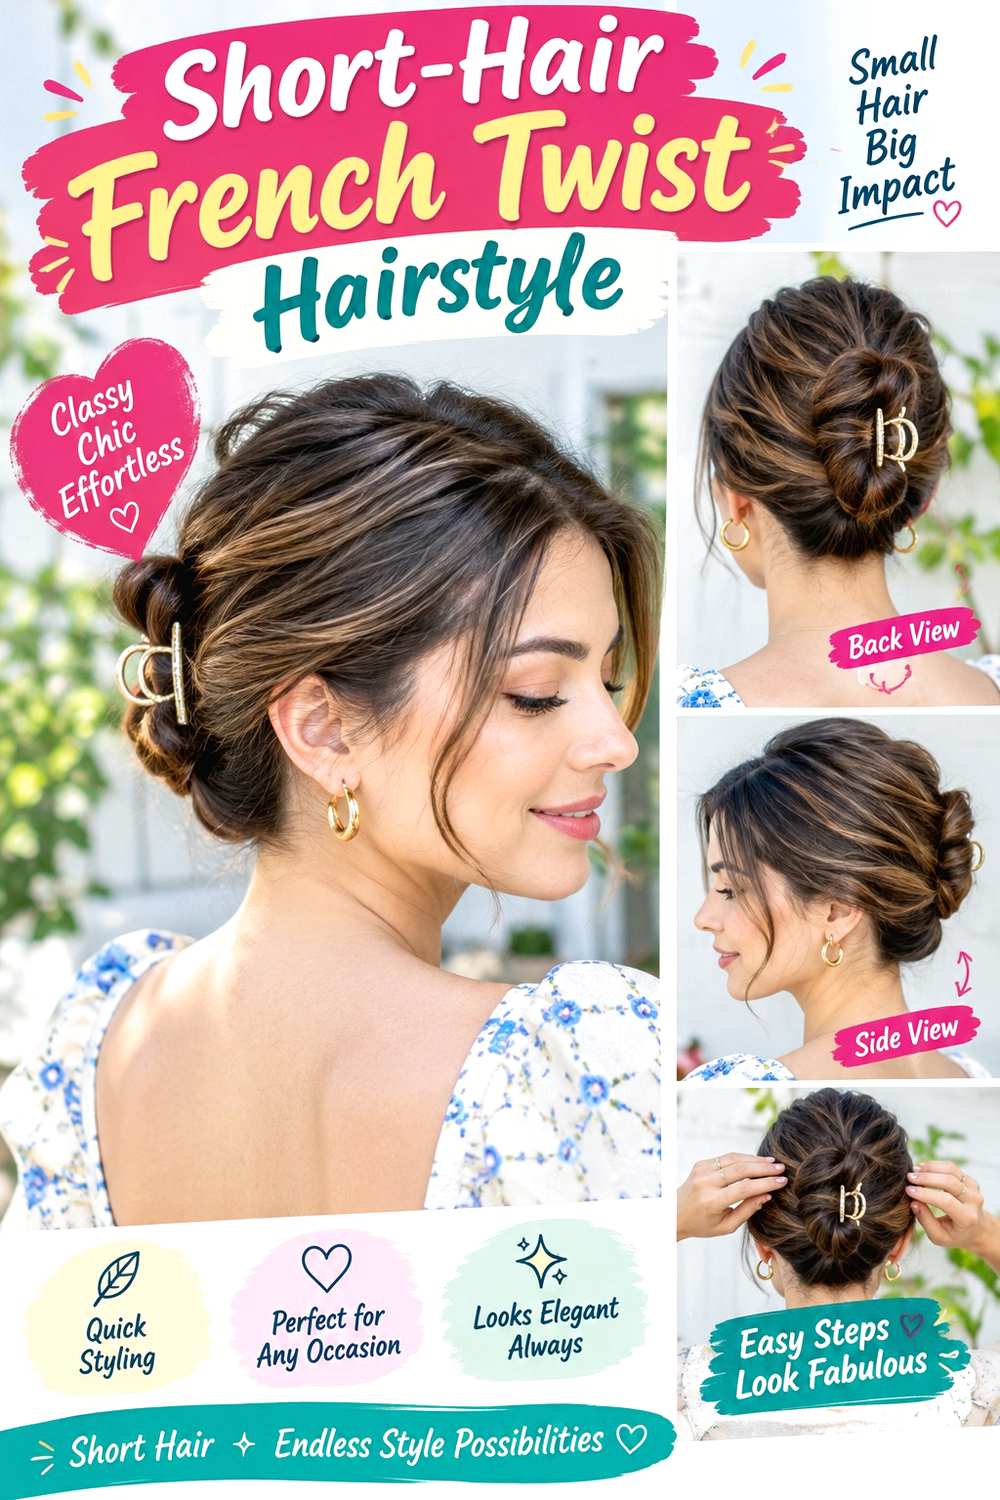
Shorter hair can create a partial French twist when the longest sections reach far enough to overlap through the back. Sweep the sides toward the center and pin them in layers, then fold the available top and back lengths inward to suggest a vertical roll. The result is usually flatter and shorter than a full classic twist, with small ends tucked locally rather than hidden inside one continuous seam.
A long bob or shoulder-skimming cut is the easiest starting point. Use light texturizing spray for grip, bobby pins to anchor overlapping sections, and flexible hairspray for shorter flyaways. On prepared hair, the style can be moderate in effort because the challenge is securing many shorter pieces rather than managing extra length. A quick refresh can focus on any section that escapes. There is no need to cut additional layers for this temporary updo; in fact, very short pieces can make the roll harder to connect. For professional styling, specify how high you want the partial twist and which short front pieces may stay loose. Comfortable pin placement matters because more local anchors may be needed than with longer hair.
Pro tip:
Overlap the back sections instead of trying to stretch them into one continuous roll. Layered pinning can create the French twist silhouette without forcing shorter lengths beyond their natural reach.
Make It Work for You:
If your bob has short face-framing layers, leave a few intentionally loose rather than pinning every section. Keeping the front soft can reduce the number of anchors needed.
Watch Out For:
Do not pull shorter sections tightly toward the center just to make them reach. Use overlapping anchors instead; excessive tension can still leave the ends slipping free.
Side-Swept French Twist Hairstyle
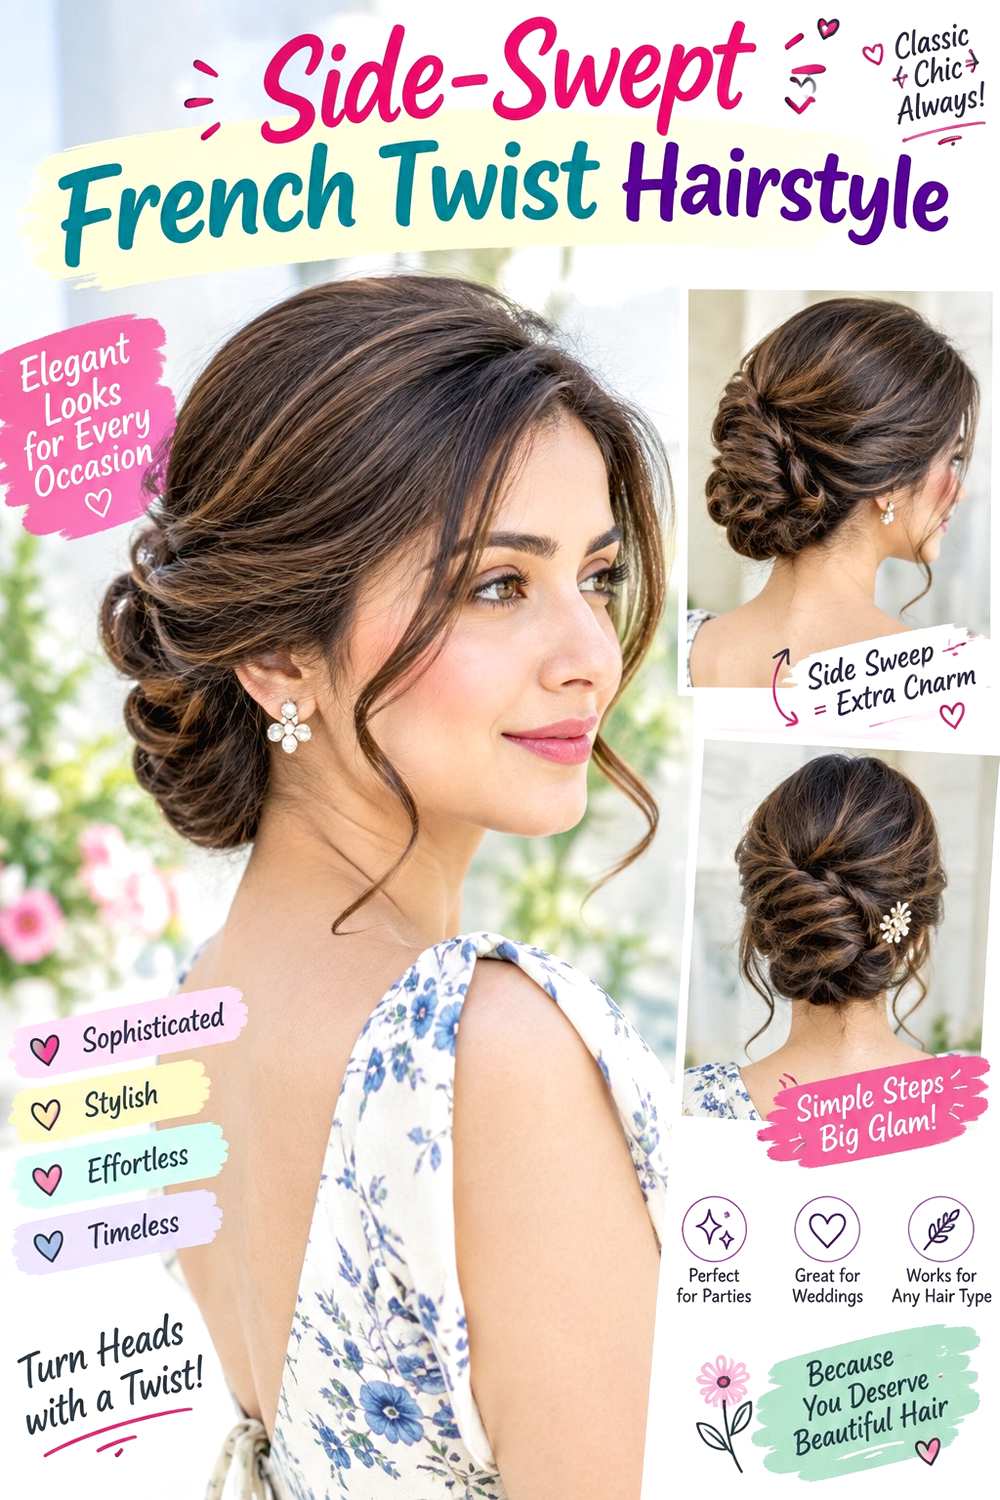
A side-swept French twist shifts the roll slightly away from the center, creating a softer asymmetrical back. Sweep most of the hair diagonally toward one side, build the anchor behind one ear or slightly off-center, then fold the lengths upward into a vertical-to-diagonal roll. The opposite side stays smoother, while the front can follow the same directional sweep for a cohesive shape.
Medium and long hair make the off-center roll easiest to balance. Straight, wavy, curly, and coily textures can all adapt, although dense hair may need a broader fold. Use light styling cream for surface control, bobby pins for the offset seam, and flexible hairspray to keep the sweep in place. A prepared-hair version takes moderate effort; repairing one shifted section can be quick. Turn your head in both directions before final pinning to make sure the off-center anchor remains comfortable. For professional styling, specify which side should hold the twist, how far from center it should sit, and whether the front should sweep toward or away from that side.
Pro tip:
Test the off-center anchor before tucking the ends. Turn your head both ways and adjust the seam until the roll stays secure without pulling unevenly across the opposite side.
Make It Work for You:
If your hair is very dense, keep the offset modest and allow a broader twist. Moving a heavy roll too far sideways can make the style feel unbalanced during long wear.
Watch Out For:
Avoid pulling the opposite side extremely tight to exaggerate the asymmetry. A softer diagonal sweep usually creates clearer balance and more comfortable tension across the scalp.
Conclusion
French twist hairstyles can look sleek, loose, textured, braided, accessorized, or naturally curly while keeping the same defining vertical fold. A high roll adds more crown height, while low and side-swept versions keep the shape closer to the nape. Fine hair often suits a narrower twist with controlled lift, whereas dense hair usually benefits from a broader roll and several anchor points. Curly and coily textures can remain visible rather than being smoothed flat. Parting, face-framing pieces, roll width, and seam placement all change the finish, but comfort should stay central. Choose a version that fits your usable length, density, natural texture, outfit neckline, and the amount of pinning or preparation you realistically want to maintain.
Before Your Salon Visit
Choose one or two favorites and save clear references showing the back, sides, and front. Discuss your natural texture, density, face shape, preferred length, upkeep, and usual styling routine. Point out the exact roll height, width, seam placement, crown volume, loose-piece length, and finish you like. Because most French twists are temporary styles, focus on comfortable tension and secure anchoring rather than requesting a haircut unless you already want one for everyday wear.
FAQs
How long does hair need to be for a French twist?
Medium and longer hair is easiest because the lengths can fold into a continuous roll, but some lobs and shoulder-length cuts can create a partial twist with overlapping pinned sections. The useful question is whether the back sections can comfortably reach the intended anchor without excessive pulling.
How do I keep a French twist secure without making it too tight?
Build a stable internal anchor and distribute pins along the seam instead of relying on maximum scalp tension. Dense or long hair may need several support points. If the twist starts moving, reinforce the section carrying the weight rather than tightening the whole style.
Can curly or coily hair wear a French twist without straightening?
Yes. Curls and coils can remain visible through the surface while the lengths are folded into the vertical roll. The twist may need a broader shape to accommodate texture and shrinkage. Focus on secure anchors, comfortable tension, and the amount of natural texture you want left visible.
What makes a French twist look more modern?
A softer crown, visible natural texture, an off-center seam, restrained face framing, or a simple accessory can change the classic shape without removing its defining roll. The most useful update is one that fits your texture and routine rather than adding unnecessary complexity.