17 Love Layers Haircut Ideas

Love Layers haircut ideas are built around soft, connected layering that adds movement without making the hair look overly chopped. In this guide, the name covers versions with long face-framing pieces, feathered ends, fringe, crown lift, curls, waves, and polished blowout shapes. The key is where the shortest layer begins and how much weight stays through the ends. That placement can make the haircut feel airy, full, rounded, or sleek.
Most versions can be adjusted for straight, wavy, or curly hair, but density matters. Fine hair usually needs fewer layers and a stronger perimeter, while thick hair often benefits from internal bulk removal. Face shape can be balanced by moving the face frame higher or lower, changing the fringe width, or switching the part. Daily styling ranges from a quick front-piece refresh to a full blow-dry or diffuser routine, depending on the finish you choose.
Before choosing a version, think about how often you use heat, whether your hair expands in humidity, and how frequently you want salon reshaping. Short bangs need more upkeep than long fringe, while long layers tend to grow out more gently. Bring clear reference photos and pay attention to bang length, layer starting point, end density, root volume, and the amount of texture you want removed.
Quick List
- Soft Love Layers with Curtain Bangs
- Long Love Layers with Face-Framing Pieces
- Mid-Length Love Layers with Feathered Ends
- Love Layers with Airy Brow Bangs
- Fine-Hair Love Layers with Crown Lift
- Thick-Hair Love Layers with Internal Layers
- Wavy Love Layers with a Center Part
- Curly Love Layers with a Rounded Shape
- Love Layers with Side-Swept Fringe
- Bouncy Love Layers Blowout
- Shaggy Love Layers with Textured Ends
- Sleek Love Layers with a Full Perimeter
- Love Layers with Cheekbone Face-Framing
- Low-Maintenance Love Layers with Long Fringe
- Love Layers with Soft Defined Curls
- Shoulder-Length Love Layers with Flipped Ends
- Love Layers with a Deep Side Part
Soft Love Layers with Curtain Bangs

Curtain bangs give Love Layers a soft opening around the eyes while longer pieces blend into cheekbone and jaw-length layers. The shape works especially well on straight to wavy hair with medium density, and fine hair can wear it when the perimeter is kept full. A middle or slightly off-center part helps the fringe split naturally, while loose bends through the lengths keep the cut moving instead of looking heavily layered. Maintenance is moderate: dry the bangs first after washing and plan on fringe reshaping before the rest of the haircut needs attention. Lightweight mousse, a medium round brush, and flexible hairspray are enough for most mornings. Styling is fairly quick once the fringe has been trained, usually requiring only the front section to be refreshed. At the salon, ask for the shortest curtain pieces to sit around the upper cheekbone and for the outer edges to melt into the first face-framing layer rather than forming a separate shelf.
Pro tip:
Blow-dry the curtain fringe briefly from side to side before splitting it. This helps loosen strong part lines and creates a softer curve around the cheekbones.
Long Love Layers with Face-Framing Pieces
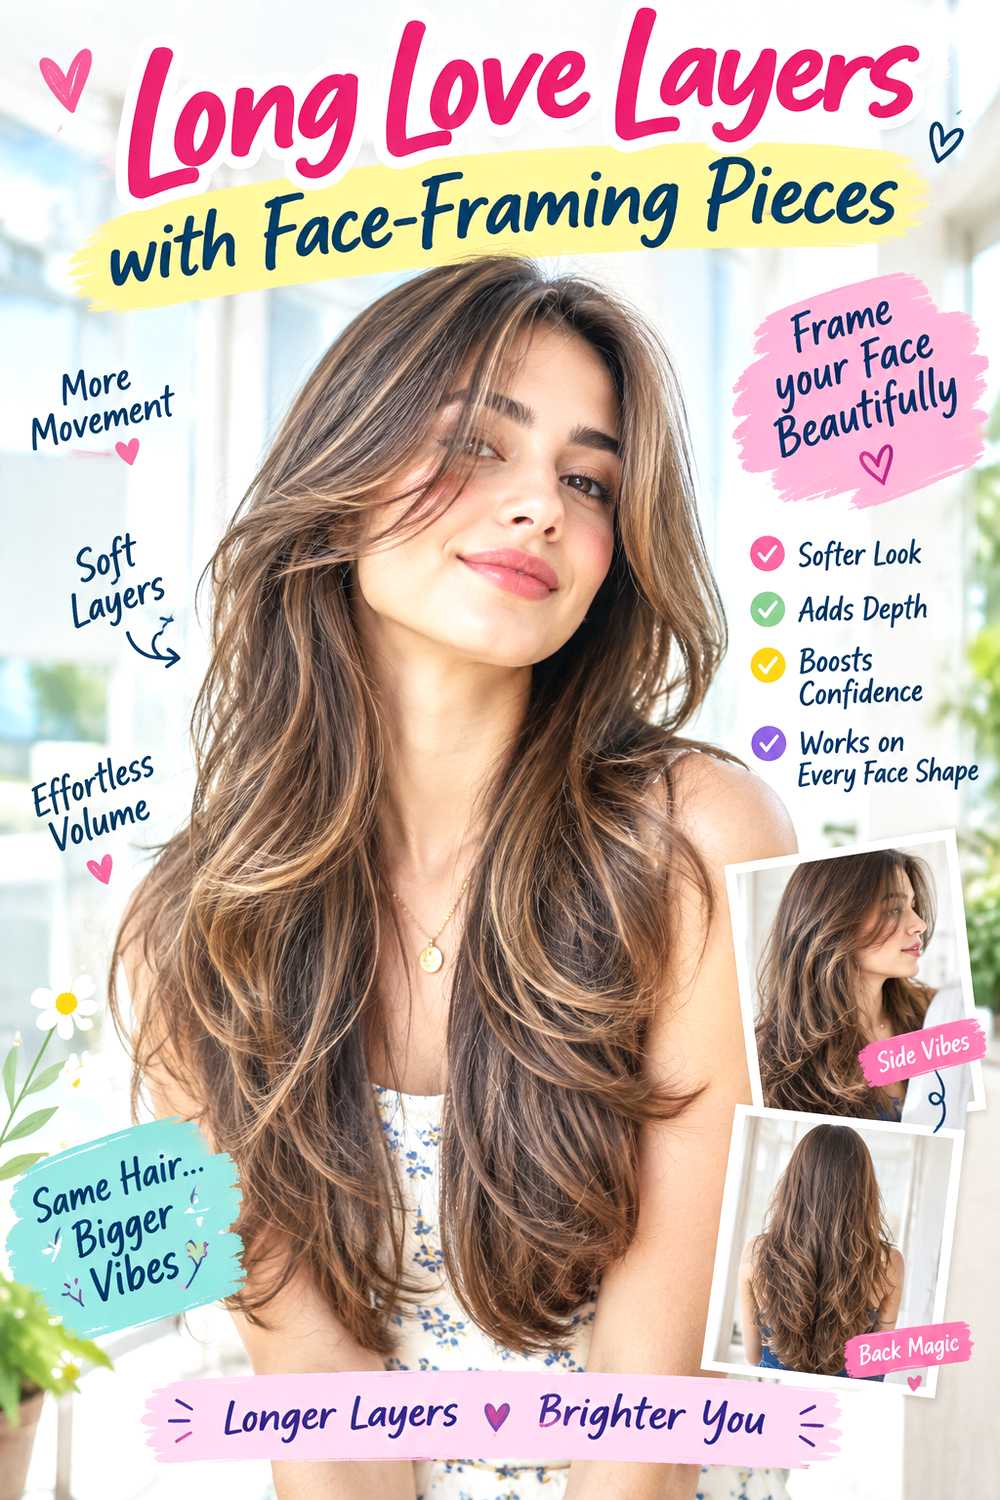
Long Love Layers keep most of the overall length while using front pieces to create shape around the face. The shortest layer can begin near the cheekbone or chin, then graduate into longer sections so the ends still feel substantial. Straight and softly wavy hair show the structure clearly, while thicker hair may benefit from subtle internal weight removal to stop the front from falling flat. This is a practical choice for someone who wants movement without a short fringe or frequent bang trims. A heat protectant, large-barrel curling iron, and smoothing serum help create broad bends that show each layer without making the hair overly curled. Daily styling can be light; often only the front pieces need a quick pass with heat. Salon reshaping is mainly needed when the face frame loses its angle. Ask the stylist to preserve a strong bottom line and connect the front layers gradually, especially if your ends tend to look thin after layering.
Pro tip:
Curl the face-framing sections away from the face but leave the final inch slightly straighter. The layers will look softer and the overall length will retain more visual weight.
Mid-Length Love Layers with Feathered Ends

At mid-length, feathered ends make Love Layers feel lighter without taking the haircut into shag territory. Layers can begin around the lower cheekbone or chin, then open through the sides and ends with a soft, flicked finish. Medium-density straight or wavy hair handles this shape easily; thick hair may need some internal bulk removed, while very fine hair benefits from keeping the lowest layer relatively blunt. Volumizing spray, a paddle brush, and dry texture spray suit the airy finish and keep the ends from collapsing together. Styling takes moderate effort on wash day, especially if you want the feathering to turn outward, but second-day refreshes are quick. The cut generally grows out smoothly because the layers are not extremely short. At the salon, specify that you want feathering concentrated through the last few inches, with enough perimeter weight left to keep the shape from becoming wispy. That distinction matters most on finer or shoulder-grazing hair.
Pro tip:
When showing a reference photo, point out the density at the bottom as well as the feathering. Soft ends should still have enough hair behind them to keep the cut from looking thin.
Love Layers with Airy Brow Bangs
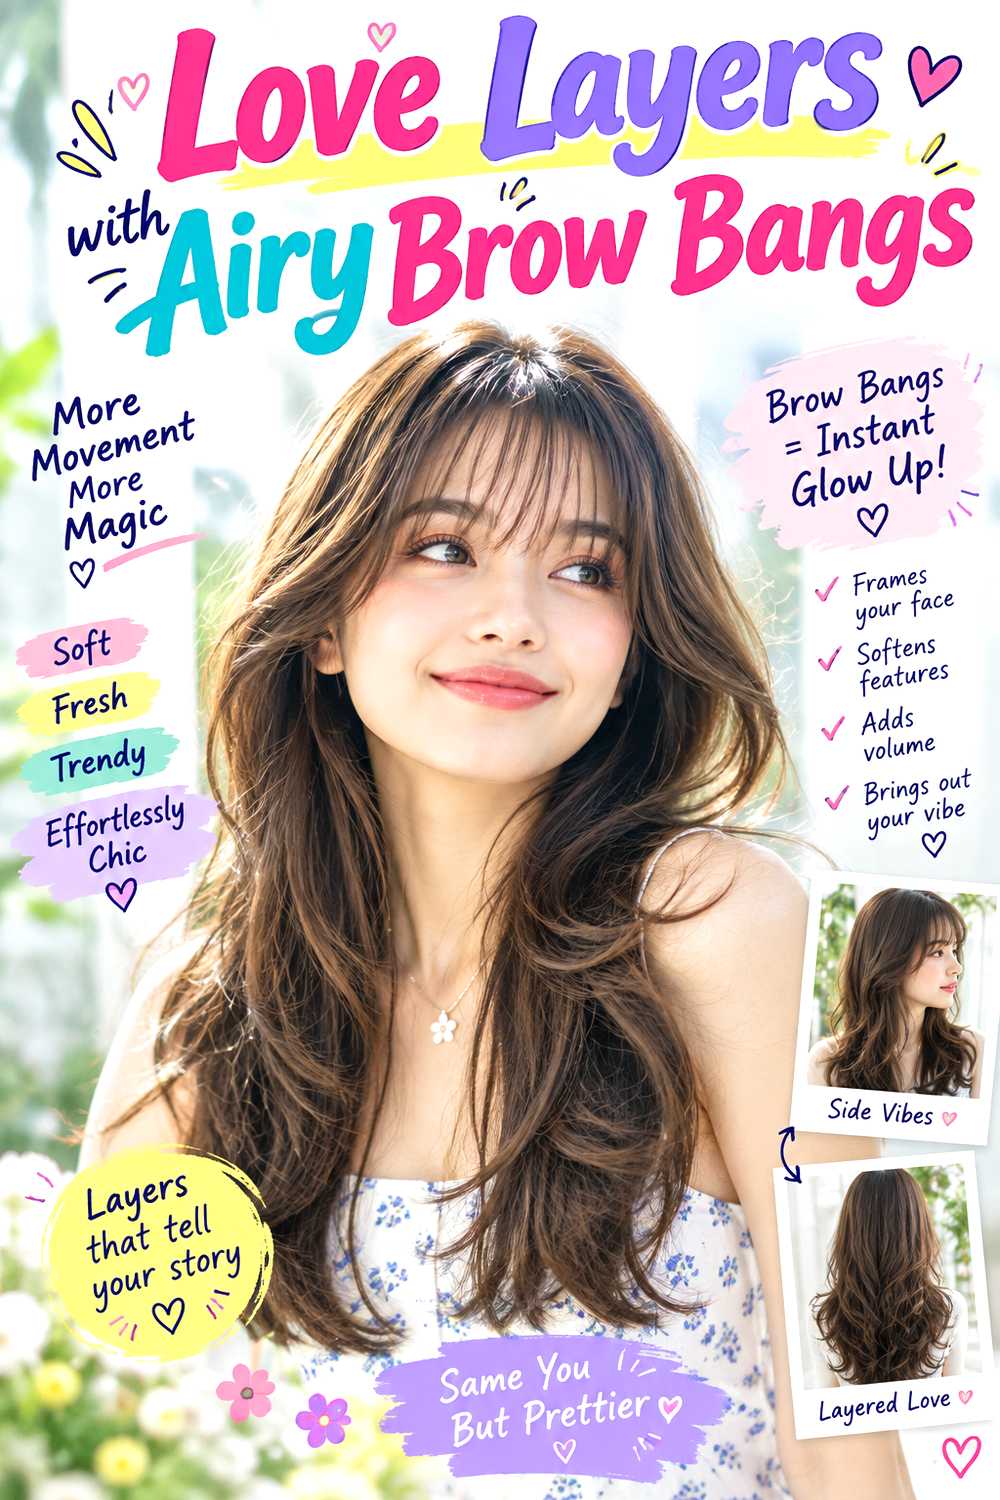
Airy brow bangs add a lighter fringe to Love Layers, with small gaps between strands so the forehead is not fully covered. The fringe should skim the brows and blend into soft temple pieces, while the longer layers keep movement through the sides. Fine to medium-density straight hair is especially easy to manage in this shape, though wavy hair can work when the bangs are cut with natural shrinkage in mind. A small round brush, lightweight mousse, and dry shampoo are useful because the fringe needs lift without becoming stiff or oily. Expect a quick morning refresh for the bangs even when the lengths are left natural. The fringe will need reshaping more often than the rest of the haircut, especially once it starts falling into the eyes. Ask your stylist to keep the bang section narrow and lightly textured rather than deeply cut from the crown; too much hair in the fringe can remove the airy quality and make fine hair look sparse elsewhere.
Pro tip:
Use dry shampoo underneath the fringe rather than coating the top. It absorbs oil near the roots while keeping the visible surface soft instead of powdery.
Fine-Hair Love Layers with Crown Lift
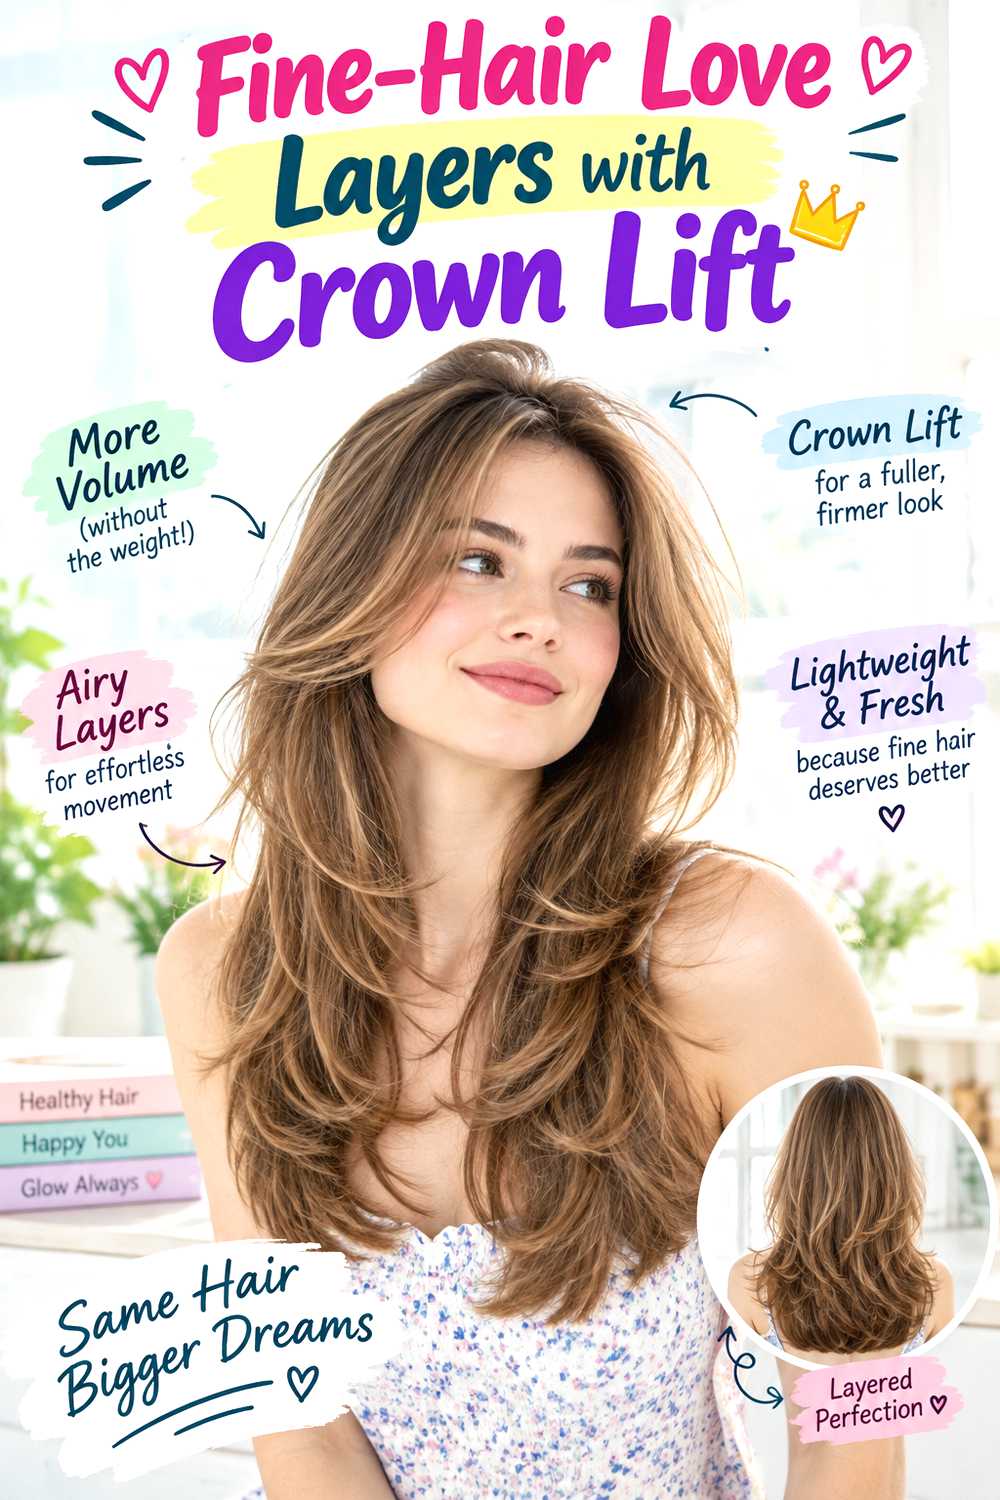
Fine hair needs careful layer placement so Love Layers create movement without sacrificing the density at the ends. Here, the shortest layers stay around the crown and upper sides, while the lower lengths remain fuller and more compact. A subtle crown lift can make the shape feel airier, especially on straight or slightly wavy hair that tends to sit close to the scalp. Root-lift spray, a large round brush, and a few Velcro rollers are useful for building height without overloading the strands. Wash-day styling is moderate, but the crown can usually be refreshed quickly with a roller or brief blow-dry the next morning. Avoid aggressive thinning or too many short layers, which can make the bottom look see-through. At the salon, ask for minimal removal through the perimeter and soft elevation near the crown rather than heavy texturizing throughout. Keeping the first major face-framing layer around the chin can also help preserve visual fullness around the front.
Pro tip:
Place a large roller at the crown while the hair is still warm from blow-drying and let it cool completely. Cooling in an elevated position helps fine roots hold lift longer.
Thick-Hair Love Layers with Internal Layers

Thick hair can carry generous Love Layers, but the cut works better when some weight is removed inside the shape instead of simply thinning the ends. Long internal layers allow dense hair to move while a strong perimeter keeps the finish controlled and substantial. Straight, wavy, and loose curly textures can all use this approach, with the amount of bulk removal adjusted to how much the hair expands when dry. A leave-in conditioner, anti-frizz cream, and wide-tooth comb help manage the extra density without flattening natural movement. Styling can be easy if you air-dry, though a polished blow-dry takes more time because of the volume of hair. Salon reshaping becomes useful when the sides begin to feel heavy or triangular. Ask the stylist to remove bulk beneath the surface around the mid-lengths while leaving the outer layers and bottom edge visibly full. Too much thinning near the ends can create frizz and make thick hair harder, not easier, to control.
Pro tip:
Show your stylist where your hair feels bulky when it is dry and worn normally. Internal weight removal is more useful when it targets those areas instead of being applied evenly everywhere.
Wavy Love Layers with a Center Part
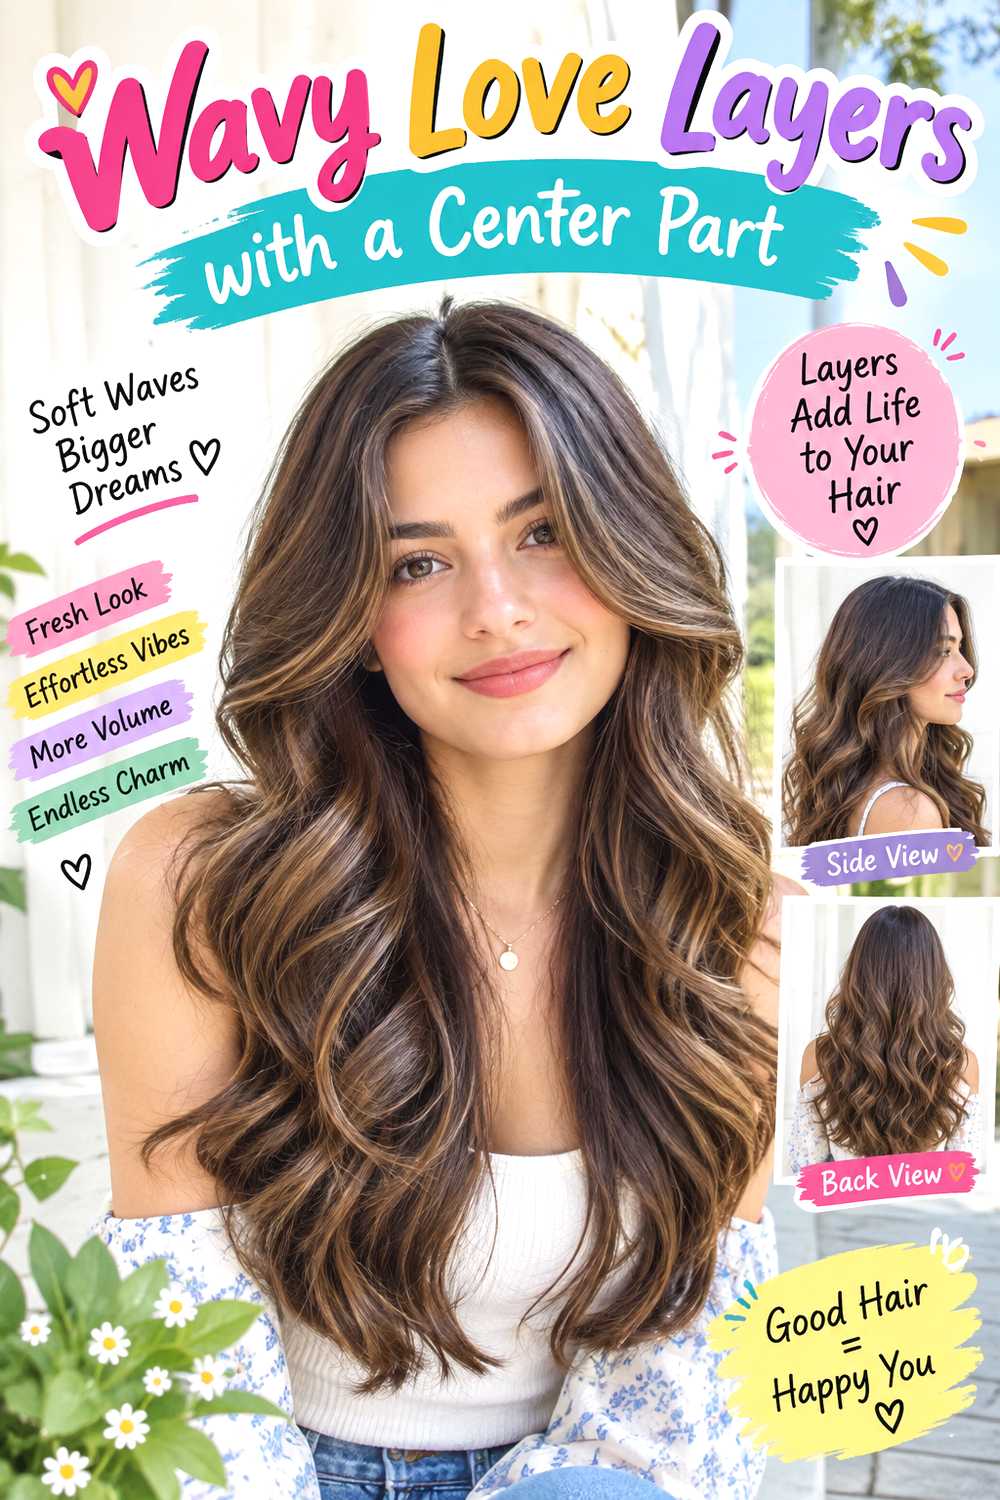
Natural waves give Love Layers built-in movement, and a center part keeps the shape balanced on both sides of the face. Face-framing pieces can start around the cheekbones, then fall into longer layers that follow the wave pattern rather than interrupting it. This works especially well on medium-density wavy hair, while thicker waves may need selective bulk removal so the sides do not become too wide. Curl cream, a diffuser, and a light texture spray help define bends while keeping the finish touchable. Wash-day styling takes a little more time, but later refreshes can be as simple as dampening the front pieces and re-scrunching them. Humidity may increase volume, so avoid overly short side layers if your hair expands easily. At the salon, ask for the layers to be assessed on dry or naturally settled waves, with the shortest face frame placed where the hair actually springs up. That prevents the front from drying much shorter than expected.
Pro tip:
Diffuse the roots before concentrating on the ends. Lifting the center-part area first keeps the crown from drying flat while the heavier lengths are still wet.
Curly Love Layers with a Rounded Shape
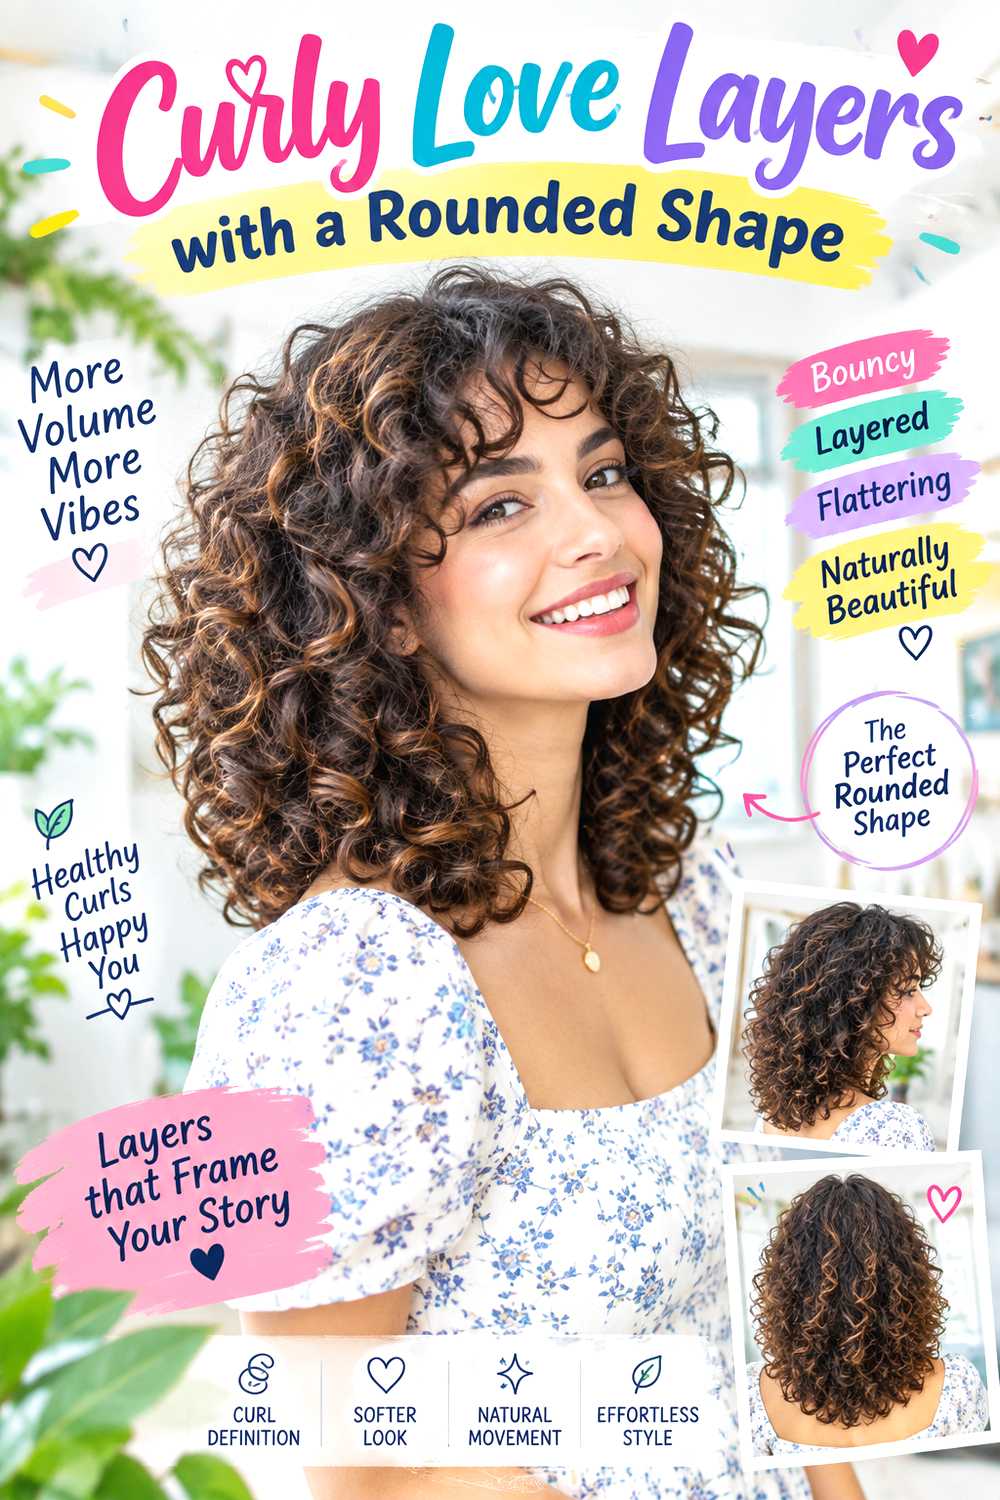
A rounded Love Layers shape lets curls build balanced volume around the crown and sides instead of hanging in one heavy block. The layers should follow the curl pattern, with shorter pieces high enough to encourage lift but enough length left to account for shrinkage. Medium to thick curly hair often carries this cut best, although finer curls can use fewer layers to keep the ends from becoming too light. Leave-in conditioner, curl gel, and a diffuser support definition and help the rounded outline stay controlled. Most of the work happens on wash day; between washes, a water mist and gentle scrunch are usually enough to revive flattened sections. Frizz control matters more in humid weather, but heavy products can pull the crown down. At the salon, explain where you want the widest point of the silhouette and ask that curl shrinkage be considered before the shortest layer is cut. The goal is a rounded shape, not a stepped stack of disconnected curls.
Pro tip:
Choose a reference photo with a curl pattern close to your own. The same layer measurement can dry at very different lengths on loose curls and tighter curl patterns.
Love Layers with Side-Swept Fringe
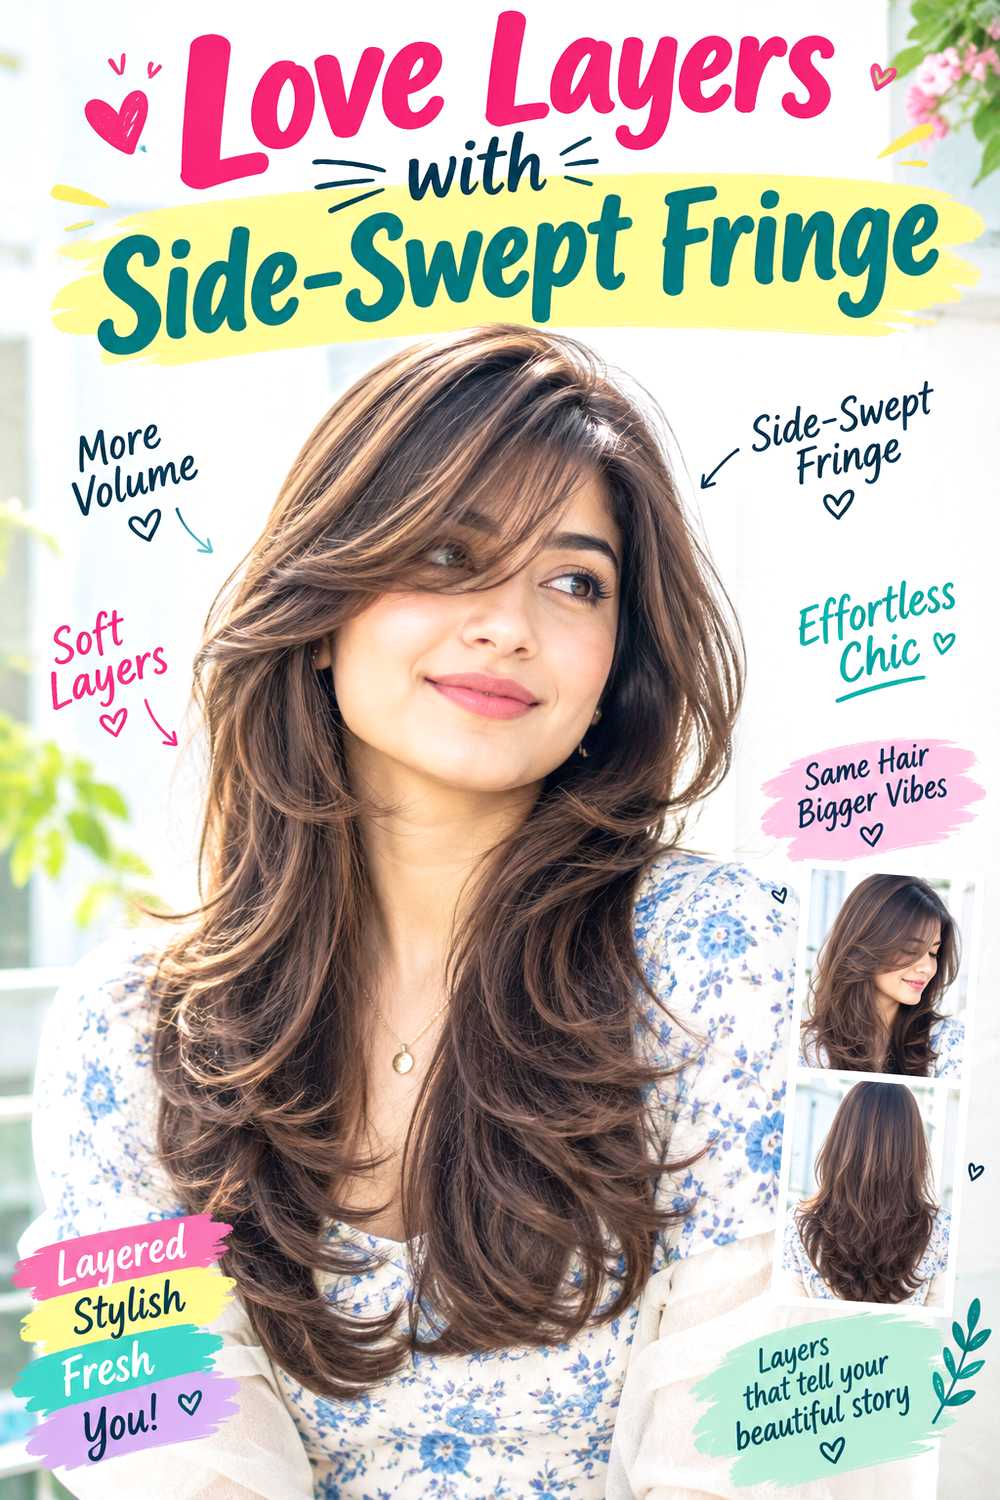
A side-swept fringe shifts the focus of Love Layers away from a centered shape and gives the front a longer, diagonal line. The fringe can begin around brow level on the shorter side and blend toward the cheekbone, then connect into face-framing layers through the rest of the cut. Straight and wavy hair are easiest to direct this way, and medium to thick density gives the sweep enough body without requiring a very deep bang section. Use heat protectant, a medium round brush, and flexible hairspray to guide the fringe across the forehead while keeping movement soft. Styling is quick once the part is established, although cowlicks may need a short blow-dry in the opposite direction first. The fringe usually needs reshaping before the longer layers do. At the salon, show which side you naturally part on and ask for the fringe to remain long enough to tuck or blend as it grows. Avoid making the shortest corner too blunt.
Pro tip:
If the fringe fights its direction, blow-dry it briefly toward the opposite side first. Then sweep it back into place while warm to create a smoother curve.
Bouncy Love Layers Blowout
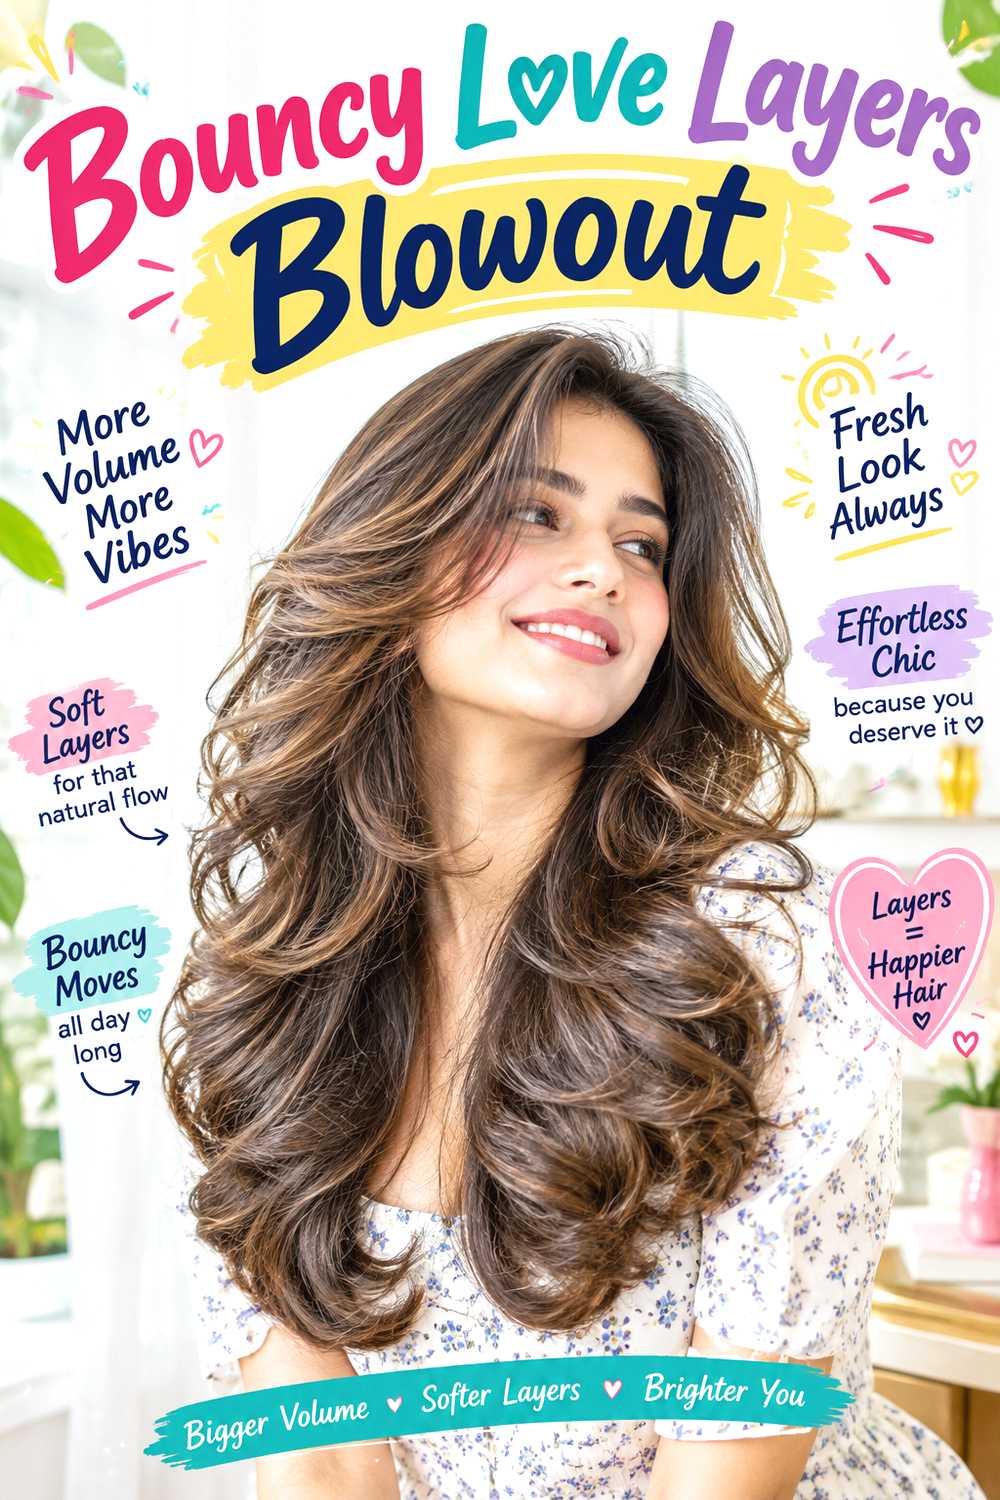
A bouncy blowout puts the volume of Love Layers at the roots and through the curved ends, making each layer easy to see. The cut itself works best with medium to long lengths, rounded face-framing, and enough separation between layers to create lift without looking choppy. Medium or thick straight-to-wavy hair tends to hold the shape well, while fine hair can get a similar effect if the layers are kept longer and the ends stay dense. Volumizing mousse, a large round brush, and a blow-dryer with a concentrator nozzle are the main tools. Expect more time on wash day because each section needs tension and direction, but the result can often be refreshed by reworking only the crown and front pieces. At the salon, ask for layers that begin around the chin and gradually increase through the upper lengths. If the layers are cut too short at the crown, the blowout may look overly stacked instead of softly lifted.
Pro tip:
Allow each round-brushed section to cool in its curved shape before brushing it out. The cooling stage helps preserve bounce without relying on heavy hairspray.
Shaggy Love Layers with Textured Ends

Shaggier Love Layers use more separation through the mid-lengths and ends, creating a relaxed, piecey finish rather than a smooth blowout. The face frame can start near the cheekbones, while broken-up ends keep waves and bends from merging into one solid shape. Wavy hair and medium density suit this approach naturally, and thicker hair can use extra internal texture; very fine hair should keep the perimeter stronger so the ends do not disappear. Sea-salt spray, a diffuser, and a small amount of matte styling paste are useful for encouraging definition without polishing every strand. Styling is low to moderate, especially when natural texture already has movement. The cut will look better with some controlled irregularity, so frequent heat smoothing is not necessary. At the salon, ask for soft point-cutting through the ends rather than aggressive razor thinning. The distinction matters because too much removal can create fuzzy ends and make the shape harder to grow out cleanly.
Pro tip:
Warm a tiny amount of styling paste between your fingers and pinch only selected ends. Applying it through every layer can make the intended separation look heavy and sticky.
Sleek Love Layers with a Full Perimeter
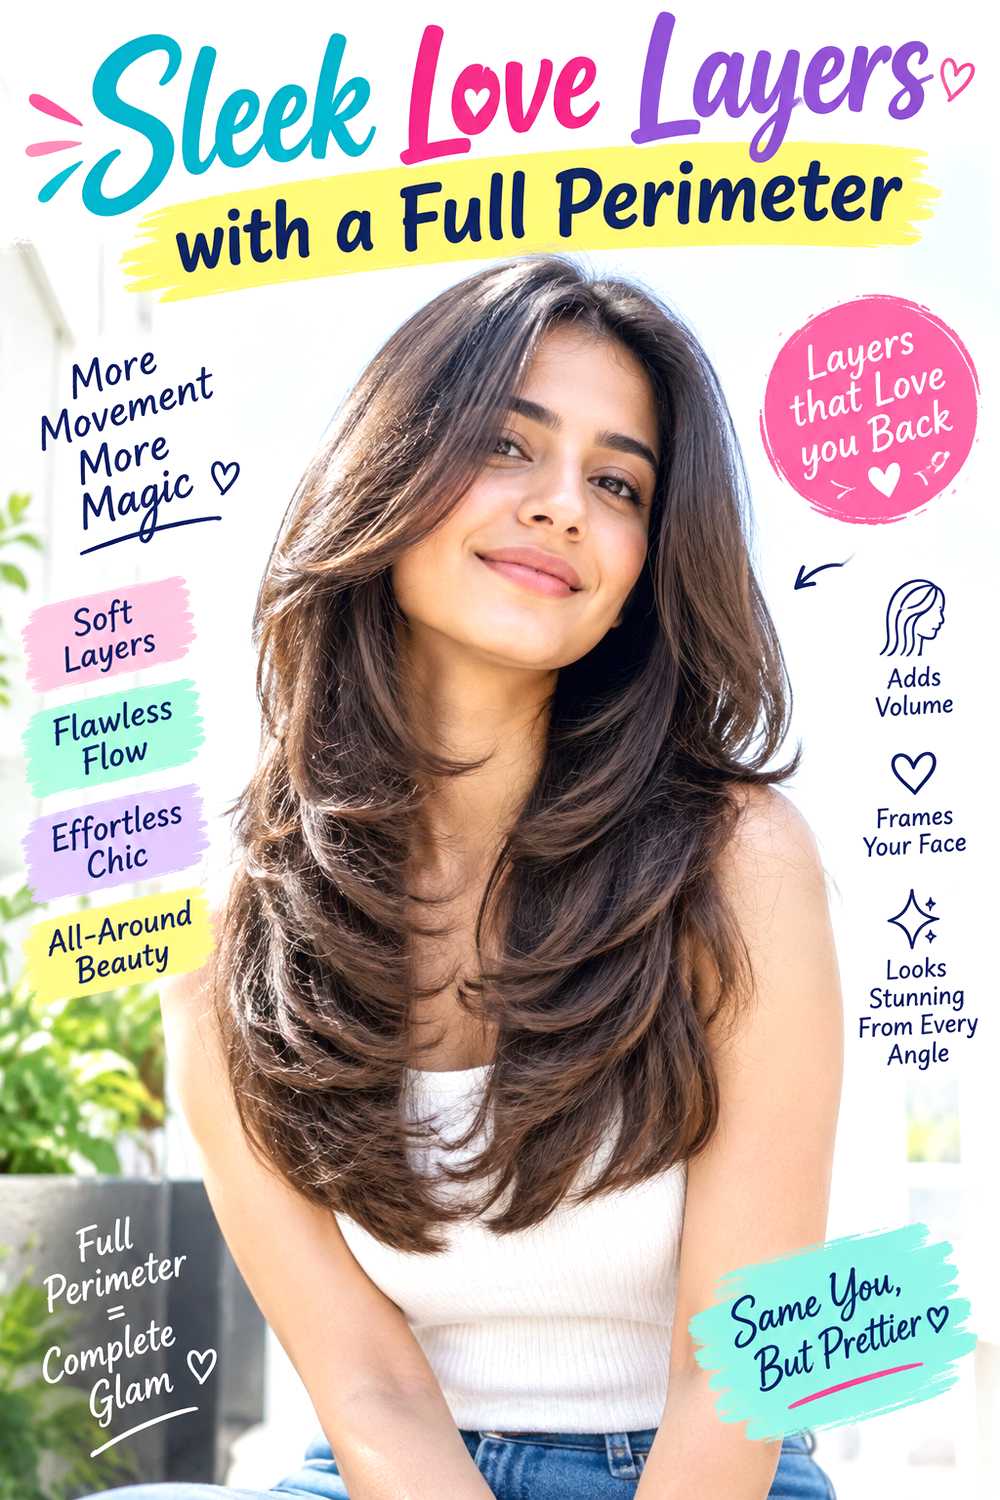
Sleek Love Layers keep the bottom edge noticeably full while using longer, restrained layers to stop the hair from looking flat. The finish is smooth, with most movement appearing around the face and through the last few inches rather than high at the crown. Straight hair shows the shape most clearly, and fine to medium density benefits from the extra perimeter weight. Wavy hair can also wear it when smoothed occasionally. A smoothing serum, paddle brush, and flat iron help create the polished surface, although regular heat protection should be part of the routine if you straighten often. Styling takes moderate time on wash day but is easy to touch up in small sections. Because the layers are long, grow-out is relatively forgiving. At the salon, ask for the baseline to remain blunt or softly softened, not heavily texturized, and keep the shortest internal layer below the chin. That preserves density while still giving the front enough movement.
Pro tip:
If you use a flat iron, slightly curve the tool through the final few inches rather than pulling everything pin-straight. A small bend makes the long layers easier to see while retaining the sleek finish.
Love Layers with Cheekbone Face-Framing
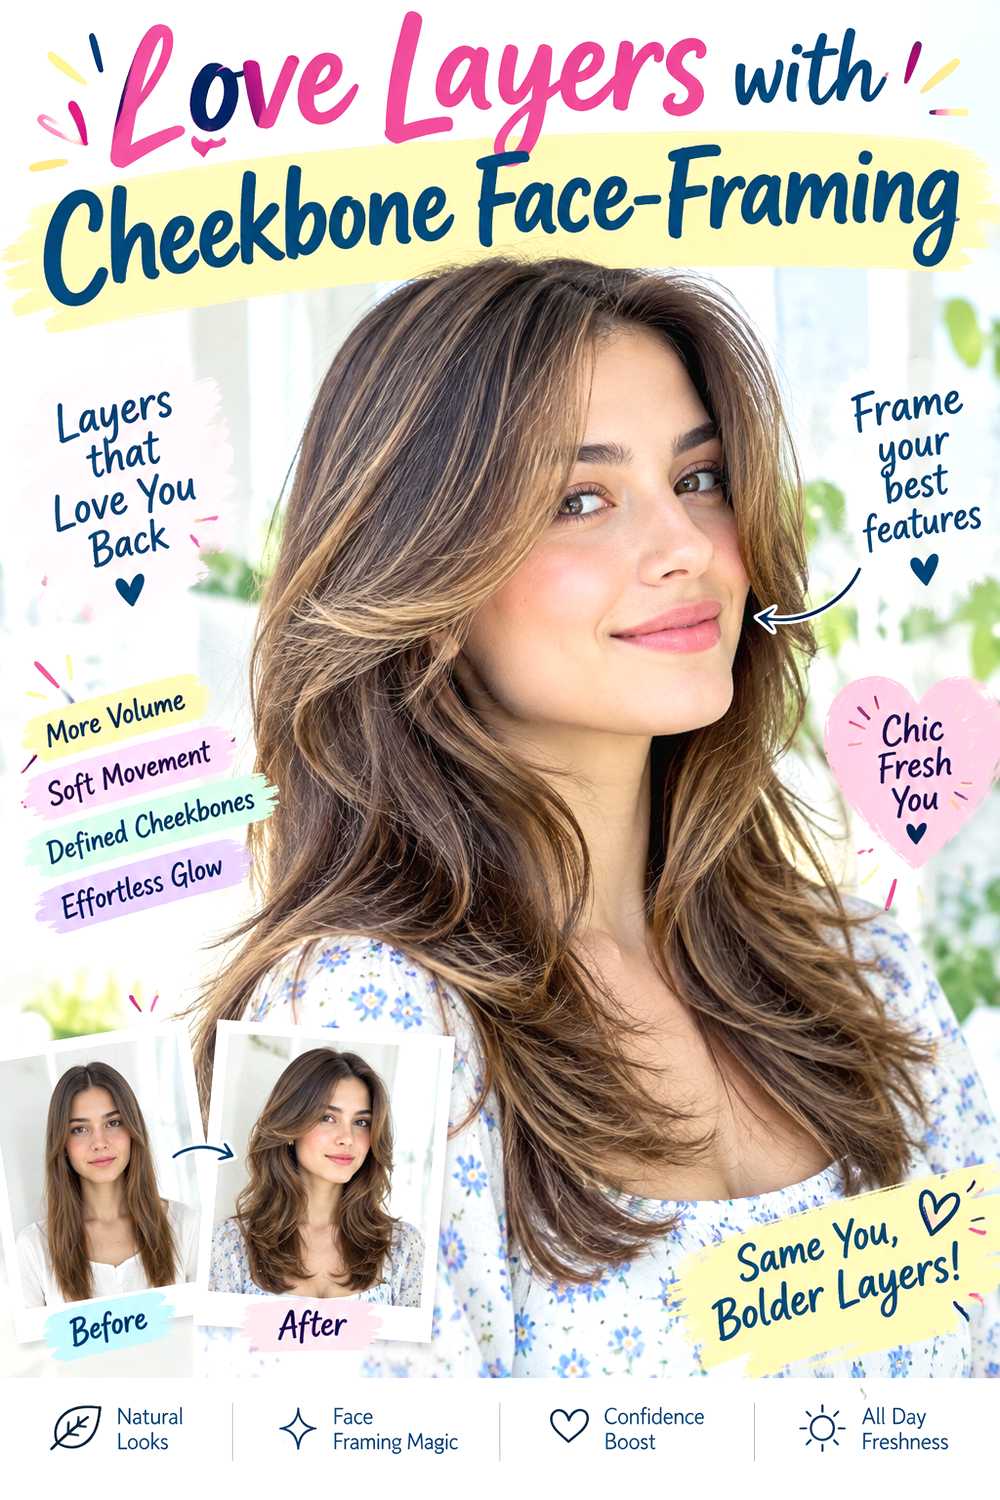
Cheekbone face-framing gives Love Layers a clear focal point around the upper face without committing to full bangs. The shortest pieces sit near the cheekbones, then angle down into longer layers around the jaw and shoulders. This placement can be adjusted wider or narrower depending on face shape, parting, and how much hair you like around the front. Straight, wavy, and softly curled textures can all show the shape, though very fine hair should keep the front section small. Heat protectant, a 1.25-inch curling iron, and light-hold hairspray make it easy to bend the front pieces away from the face. Daily styling is quick because only two or three sections need attention. As the frame grows, it simply becomes a longer layer rather than an awkward fringe. At the salon, point out exactly where you want the shortest piece to hit when dry and ask for a gradual connection into the sides. A steep, disconnected angle can look too severe once the hair moves.
Pro tip:
Mark the desired cheekbone point while your hair is dry and sitting in its normal part. That reference is more useful than choosing the length while the hair is stretched straight and wet.
Low-Maintenance Love Layers with Long Fringe
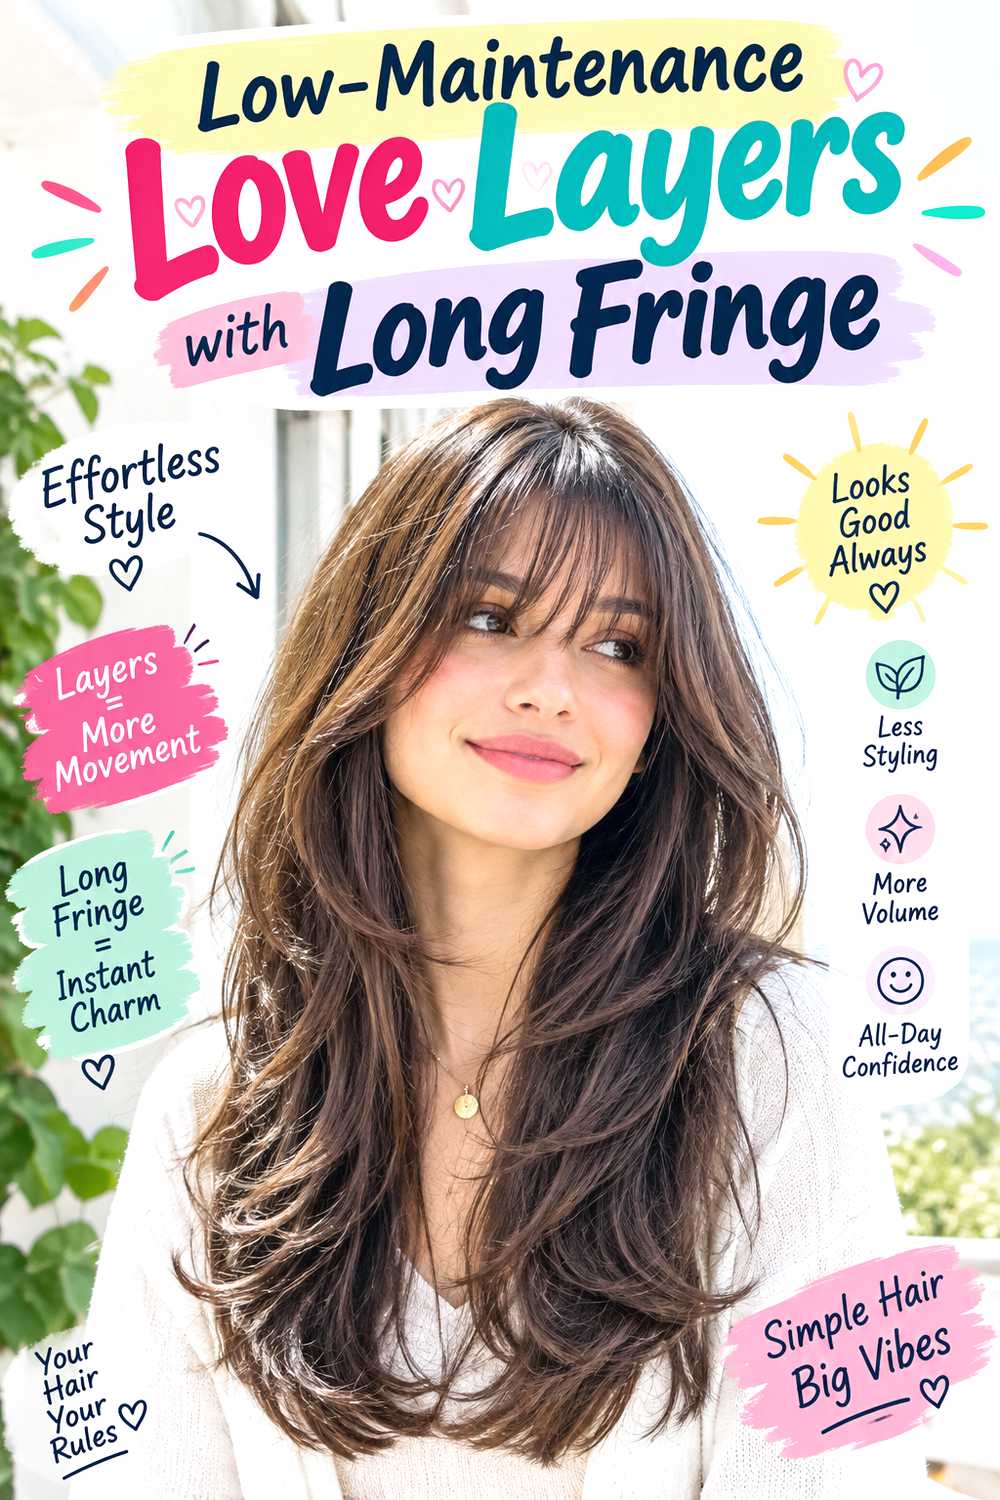
A long fringe keeps Love Layers easy to live with because the front can be worn split, swept to one side, or tucked behind the ears. The shortest pieces usually sit between the cheekbone and jaw, so they frame the face without needing the frequent trims of eyebrow-length bangs. Straight, wavy, and loose curly hair can all adapt to this shape, and it is especially practical for someone who prefers flexible styling between salon visits. A leave-in spray, large round brush, and dry shampoo are enough to refresh the front while the rest of the hair can stay natural. Daily effort is low; a quick blow-dry of the fringe usually restores its direction after sleep. The longer placement also makes grow-out simple. At the salon, ask for the fringe to connect softly into the first side layers and keep enough density near the temples. If the section is thinned too much, the front may separate into stringy pieces instead of forming a smooth frame.
Pro tip:
Keep the shortest point long enough to tuck behind the ear if low maintenance is important to you. That small detail makes awkward grow-out days much easier to manage.
Love Layers with Soft Defined Curls
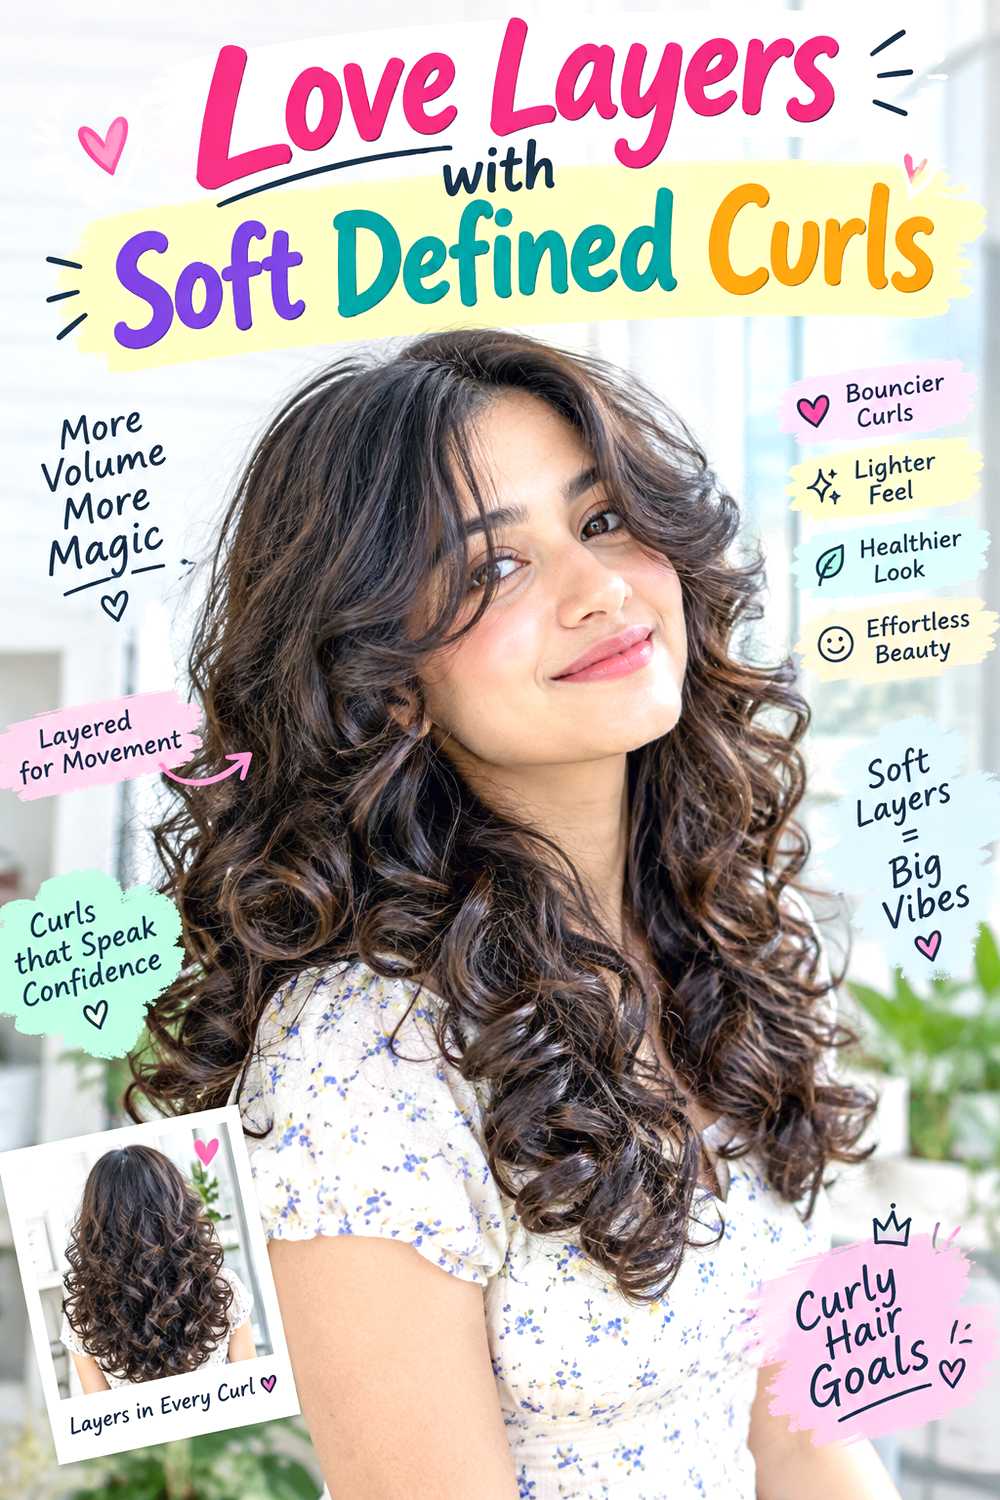
Soft defined curls show Love Layers through repeated curves rather than a brushed-out wave pattern. The layers should be long enough to keep the curl clusters intact, with shorter face-framing pieces placed where they spring naturally after drying. This works well for wavy-to-curly hair with medium density, while thicker curls may need careful internal weight removal so the lower half does not become bulky. Curl cream, a wide-tooth comb, and a diffuser help form consistent clumps without making the finish rigid. Styling takes more time on wash day, but the set can often last several days with small refreshes at the front and crown. Avoid brushing the curls dry if you want to keep definition. At the salon, ask the stylist to judge the layer length with shrinkage in mind and preserve fuller ends rather than over-thinning them. The best reference photo should show both the wet-to-dry curl pattern and where the shortest front curl lands.
Pro tip:
On refresh days, wet only the curl clusters that have lost their shape instead of soaking the whole head. Redefining a few front and crown pieces usually keeps the layered pattern visible.
Shoulder-Length Love Layers with Flipped Ends
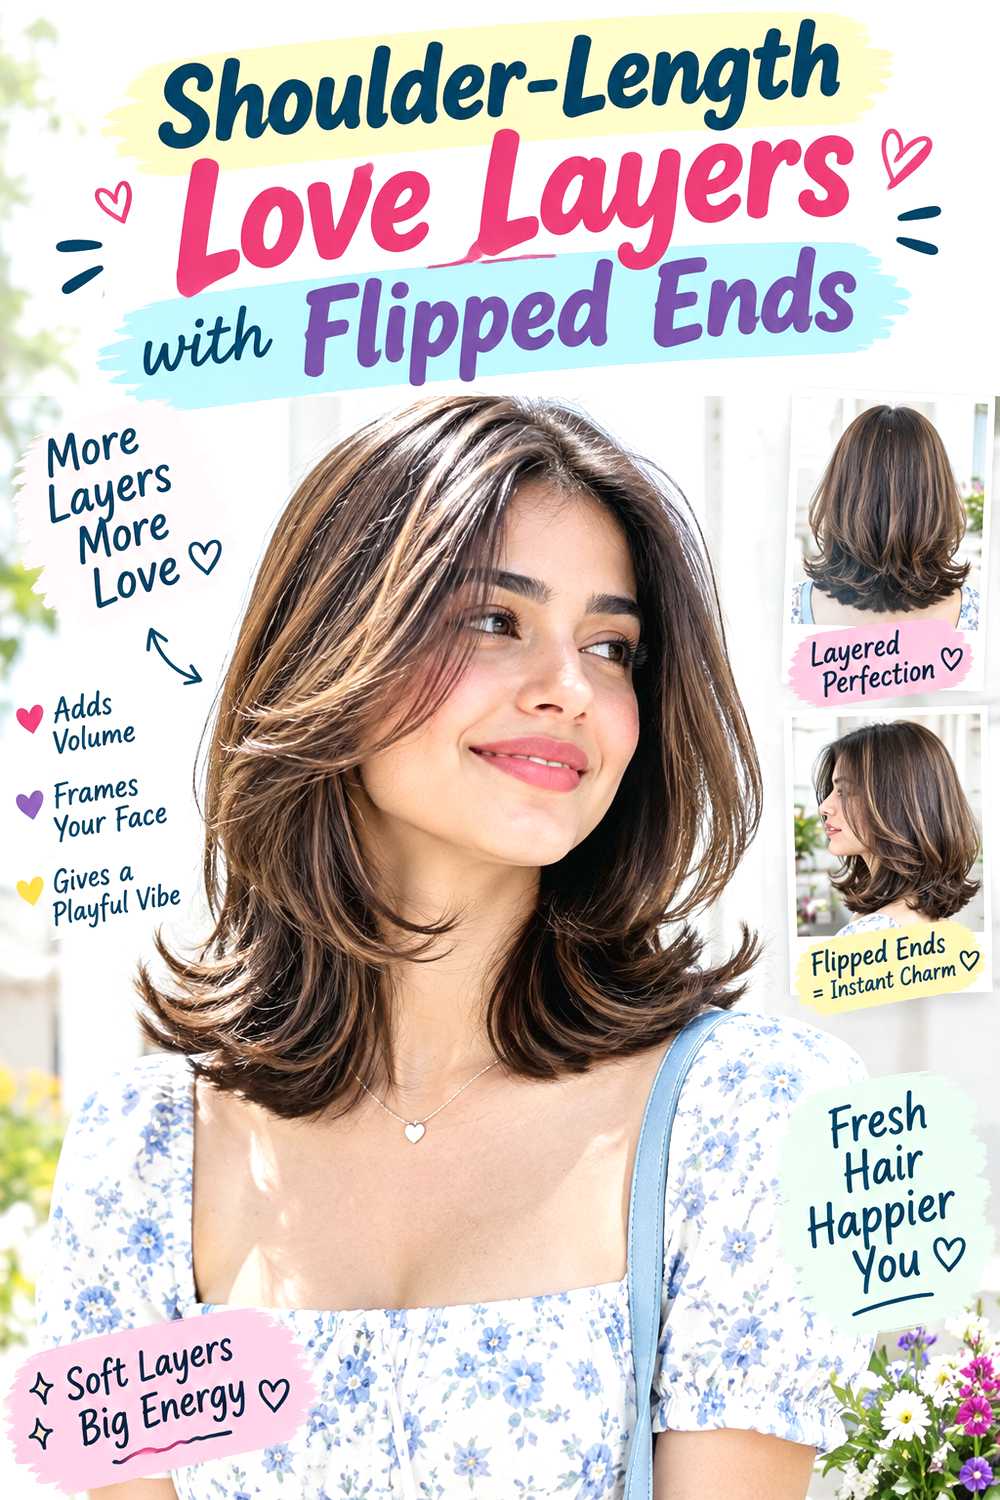
Shoulder-length Love Layers gain extra character when the ends turn outward instead of curving under. The cut sits near the collarbone or shoulders, with medium-length layers that create enough separation for the flip to show around the sides and back. Straight to slightly wavy hair holds this shape most predictably, and medium density gives the ends enough body without feeling heavy. Heat protectant, a round brush, and a flat iron are useful for directing only the last inch or two outward. Styling is moderate but focused; you do not need to curl the full length to create the effect. Humidity can soften the flip, so a small amount of light hold may help on damp days. At the salon, ask for the perimeter to stay substantial and for layers to begin no higher than the lower cheekbone or chin. Too many short layers can make a shoulder-length cut puff at the sides instead of producing a clean outward finish.
Pro tip:
Rotate your brush or flat iron only through the last inch or two. Starting the flip too high can turn a soft outward finish into an exaggerated bend through the whole layer.
Love Layers with a Deep Side Part
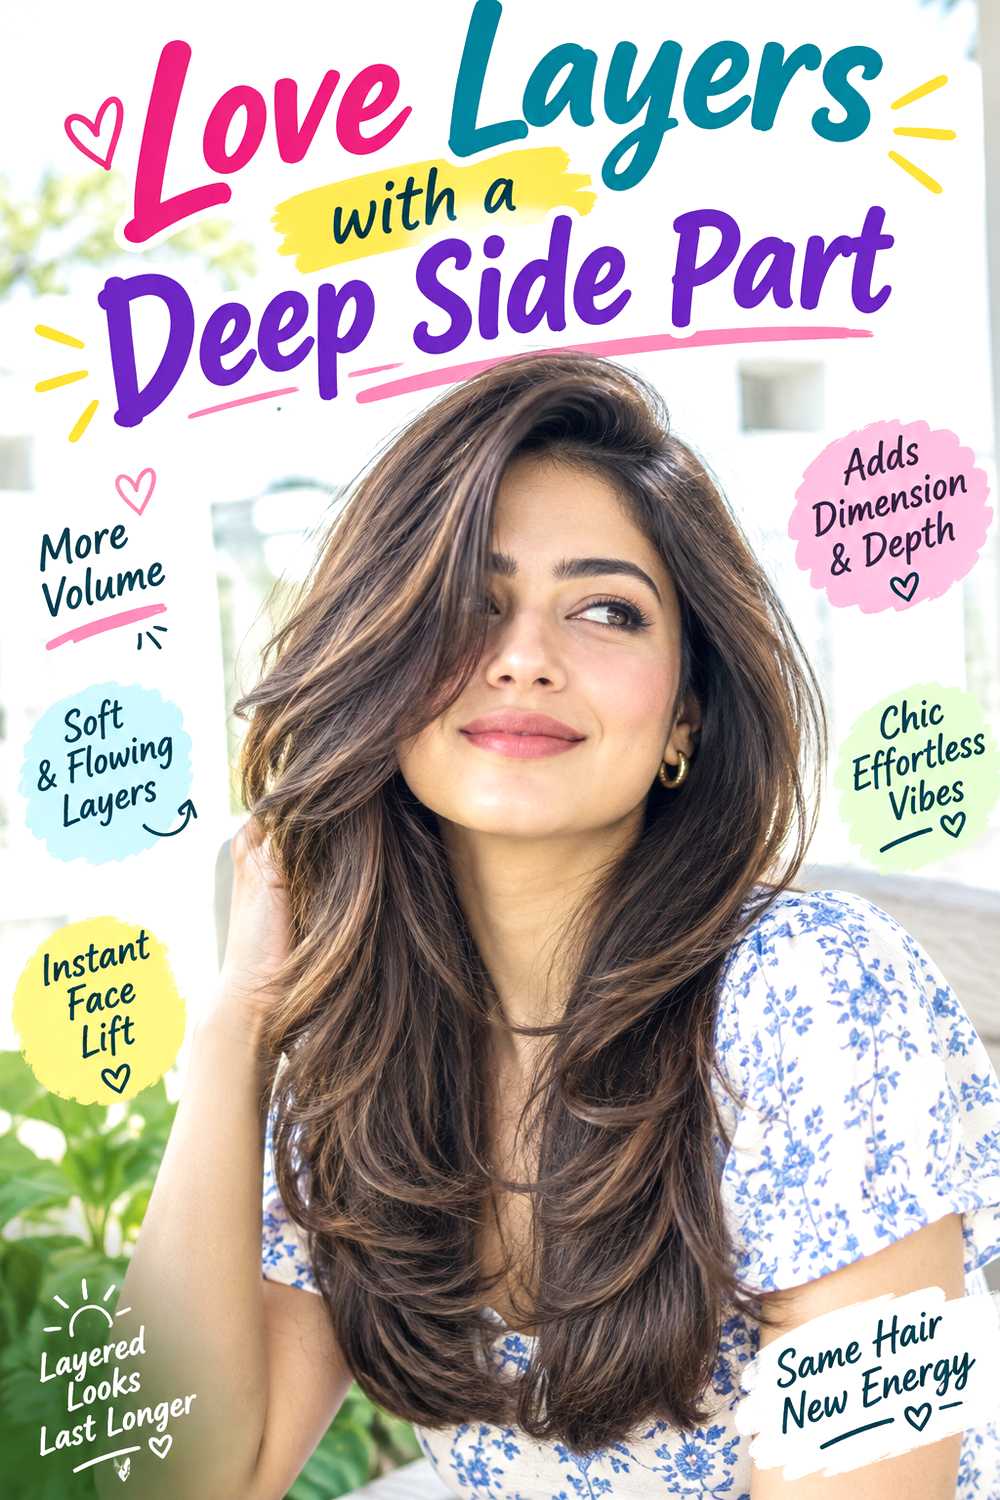
A deep side part gives Love Layers asymmetrical lift, with more volume on one side and a softer fall on the other. Longer front layers work best here because they can sweep across the forehead or curve away from the face without behaving like short bangs. Straight, wavy, and medium-density hair are easy to direct into the shape, while thick hair may need some weight removed beneath the heavier side so it does not collapse at the roots. Root-lift spray, a round brush, and dry texture spray help establish the part and keep the crown from flattening. Styling is quick once the hair is trained, though switching from a long-standing center part may need several wash cycles. At the salon, show the exact side and depth of your preferred part before the front is cut. Ask for the face frame to be balanced visually in that position rather than cut symmetrically for a center part you do not plan to wear.
Pro tip:
Set the deep part while the roots are damp and clip the heavier side slightly lifted while it dries. Repeating that step after several washes can help the new direction settle more naturally.
Conclusion
Love Layers Haircut Ideas can look very different depending on how much length you keep, where the layers begin, and how the front is shaped. A fuller perimeter suits readers who want density, while feathered or internal layers can add movement or reduce bulk. Bangs, long fringe, center parts, deep side parts, curls, waves, and sleek finishes also change the overall balance and daily effort. The best choice depends on your face shape, natural texture, hair density, preferred maintenance, and willingness to heat-style. Instead of copying every detail from one photo, identify the two or three features that matter most—such as cheekbone framing, crown volume, or full ends—and ask your stylist to adapt those features to your own hair.
CTA
Choose one or two Love Layers ideas that match the way you actually wear your hair, then save clear photos showing both the front and overall shape. When you visit your stylist, discuss your face shape, natural texture, density, preferred length, maintenance level, and usual styling routine. Point out the exact layers, fringe length, volume placement, end weight, or finish you want so the haircut can be adjusted rather than copied blindly.
FAQs
What hair type works best with a Love Layers haircut?
Love Layers can be adapted to straight, wavy, and curly hair. Straight hair may need styling to show movement, while waves and curls can use their natural texture. Layer length should be adjusted for shrinkage on curly hair.
Can fine hair wear Love Layers without looking thin?
Yes, but fine hair usually needs fewer layers and more weight through the perimeter. Keeping the shortest layers around the chin or crown rather than heavily thinning the lower lengths can help the ends look fuller.
How often should Love Layers be trimmed?
The longer layers can usually grow for a while before losing their shape, but short bangs or fringe may need attention sooner. Book a reshaping when face-framing pieces stop sitting correctly or the overall movement begins to collapse.
Can Love Layers work without daily heat styling?
Yes. Wavy and curly versions can often be air-dried or diffused, while longer layers on straight hair can be left natural for a softer finish. Choosing a cut that follows your natural texture reduces daily heat needs.
Editorial guidance followed the supplied caption-depth and hairstyle-specific writing principles. Natural wording, reader-focused trade-offs, maintenance advice, and SEO approach also follow the provided human-writing guidance.