14 Rich Espresso Brunette Hair Ideas for a Glossy Fall Look

Rich espresso brunette hair sits at the deeper end of the brown spectrum, with enough visible brown reflection to keep it distinct from flat black. The color can be nearly uniform, softly melted, or broken up with chocolate, mocha, chestnut, caramel, mahogany, or smoky ribbons. Long layers and broad waves reveal dimensional placement clearly, while blunt bobs and straighter lengths emphasize a continuous glossy surface. A center part can make face-framing color feel balanced, while side parts expose more brightness on one side.
Straight, wavy, curly, and coily textures can all carry espresso tones. What changes is how the dimension appears. Broad ribbons may stay clearer through curls, while subtle tonal shifts can be especially noticeable on smoother surfaces. Density also affects placement: finer hair may benefit from restrained highlighting, while dense hair can support larger sections without requiring every strand to be lightened.
Maintenance depends on contrast and starting color rather than one fixed schedule. A deep gloss close to your natural brunette can grow out quietly, while brighter face pieces or cool tones may need more visible refreshing. Full color appointments and daily styling are separate commitments, so compare both before choosing your favorite.
Quick List
- Deep Espresso Glass Gloss Hairstyle
- Black Espresso Brunette Hairstyle
- Chocolate Espresso Ribbon Hairstyle
- Cool-Toned Espresso Brunette Hairstyle
- Warm Chestnut Espresso Hairstyle
- Espresso Mocha Balayage Hairstyle
- Caramel Espresso Face-Frame Hairstyle
- Mahogany Espresso Brunette Hairstyle
- Espresso Root Melt Hairstyle
- Smoky Espresso Dimension Hairstyle
- Espresso Money Piece Hairstyle
- Soft Espresso Ombre Hairstyle
- Curly Espresso Gloss Hairstyle
- Dimensional Espresso Layered Hairstyle
Deep Espresso Glass Gloss Hairstyle
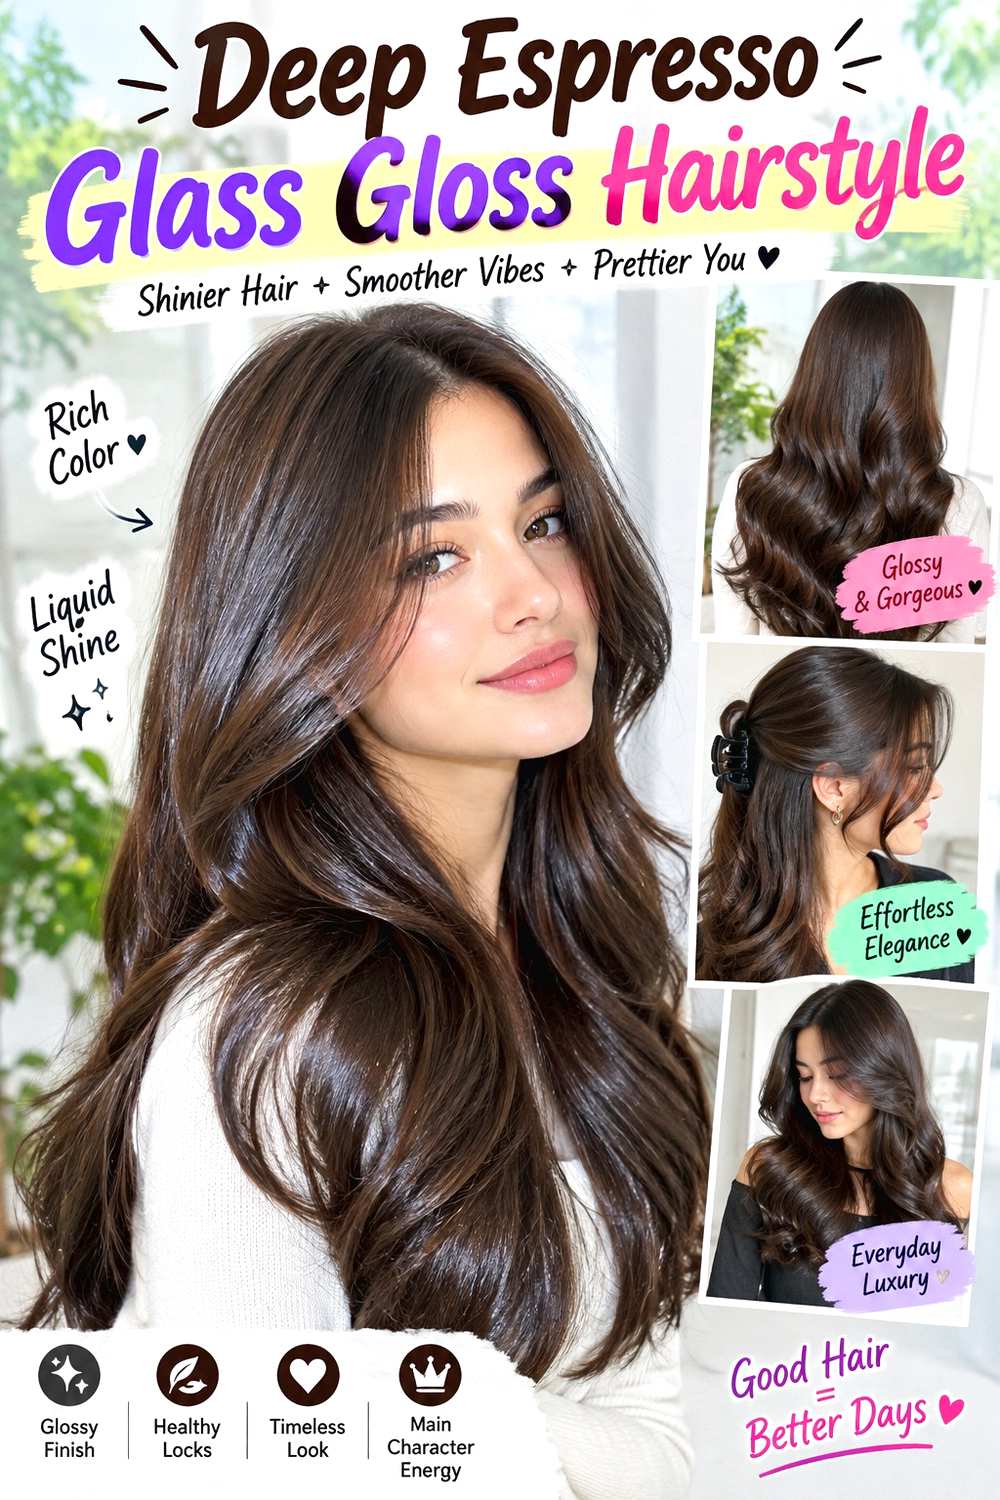
A nearly uniform espresso brown puts the glossy finish ahead of obvious highlighting. The roots, mids, and ends stay within a narrow range of deep coffee brown, so light moves across the surface in smooth reflective bands rather than catching separate ribbons. A blunt bob can make the depth look especially strong, while long hair with minimal layering creates a continuous dark curtain. Center and side parts both suit the design because the consistent shade, rather than placement around the face, carries the effect.
This approach can suit naturally deep brunettes who want richer tone without dramatic brightness. A color-safe shampoo helps reduce unnecessary fading, while a hydrating conditioner keeps the surface soft enough to reflect light cleanly. A complete salon gloss or depth adjustment takes more time than a normal wash-day refresh, but daily styling can remain close to your natural routine.
At your appointment, explain how dark you want the espresso to appear in daylight and whether you still want obvious brown reflection. That distinction helps prevent the result from becoming darker than intended. Maintenance can focus on restoring shine or tone when the surface begins to look dull rather than automatically recoloring every length at each visit.
Pro tip:
Compare your reference near a window rather than under warm indoor lighting. Espresso should still show brown reflection in neutral daylight if you want depth without the appearance of solid black.
Make It Work for You:
If your ends are already noticeably lighter, allow a small amount of tonal variation instead of forcing complete uniformity. That existing softness can make the espresso look dimensional while preserving the overall dark finish.
Watch Out For:
Repeatedly deepening already-dark ends can make them look heavier than the roots. Ask whether the refresh really needs to cover every section or whether selected areas simply need their shine restored.
Black Espresso Brunette Hairstyle

Black espresso sits just above true black, keeping an extremely deep base while revealing subtle coffee-brown undertones in brighter light. The color looks striking on sleek shoulder-length cuts, long blunt lengths, and defined curls because the strong depth emphasizes the overall silhouette. There are no obvious ribbons here; variation comes from the way the dark brunette reflects light across the crown, curves, and ends. A center part creates a graphic balance, while a deep side part can add more movement without changing the color concept.
This option can be practical for naturally very dark hair because the root contrast may remain restrained. A color-safe shampoo helps maintain the dark brunette tone, and a nourishing mask supports smooth ends when previous color services are present. Wash-day styling can stay simple if you wear your natural texture, while achieving an ultra-smooth finish can take longer depending on length and density.
Tell your colorist you want brown to remain detectable rather than requesting generic black. Also discuss future color goals before committing to substantial permanent darkening, especially if you may later want a much lighter shade. Refresh the tone when fading exposes more warmth or when the lengths stop matching the depth you prefer, instead of assuming the entire head needs the same treatment every time.
Pro tip:
Place true-black and deep-brunette references side by side. The comparison makes the desired depth easier to communicate and helps clarify how much brown reflection you expect to see outside direct sunlight.
Make It Work for You:
If very dark color feels severe against your preferred finish, leave the lower lengths a fraction softer than the roots. The hair can still read as black espresso while gaining subtle movement.
Watch Out For:
Do not choose the deepest permanent option simply because the initial color looks glossy. Future lightening can become more complicated, so discuss long-term plans before making a major shift from lighter hair.
Chocolate Espresso Ribbon Hairstyle
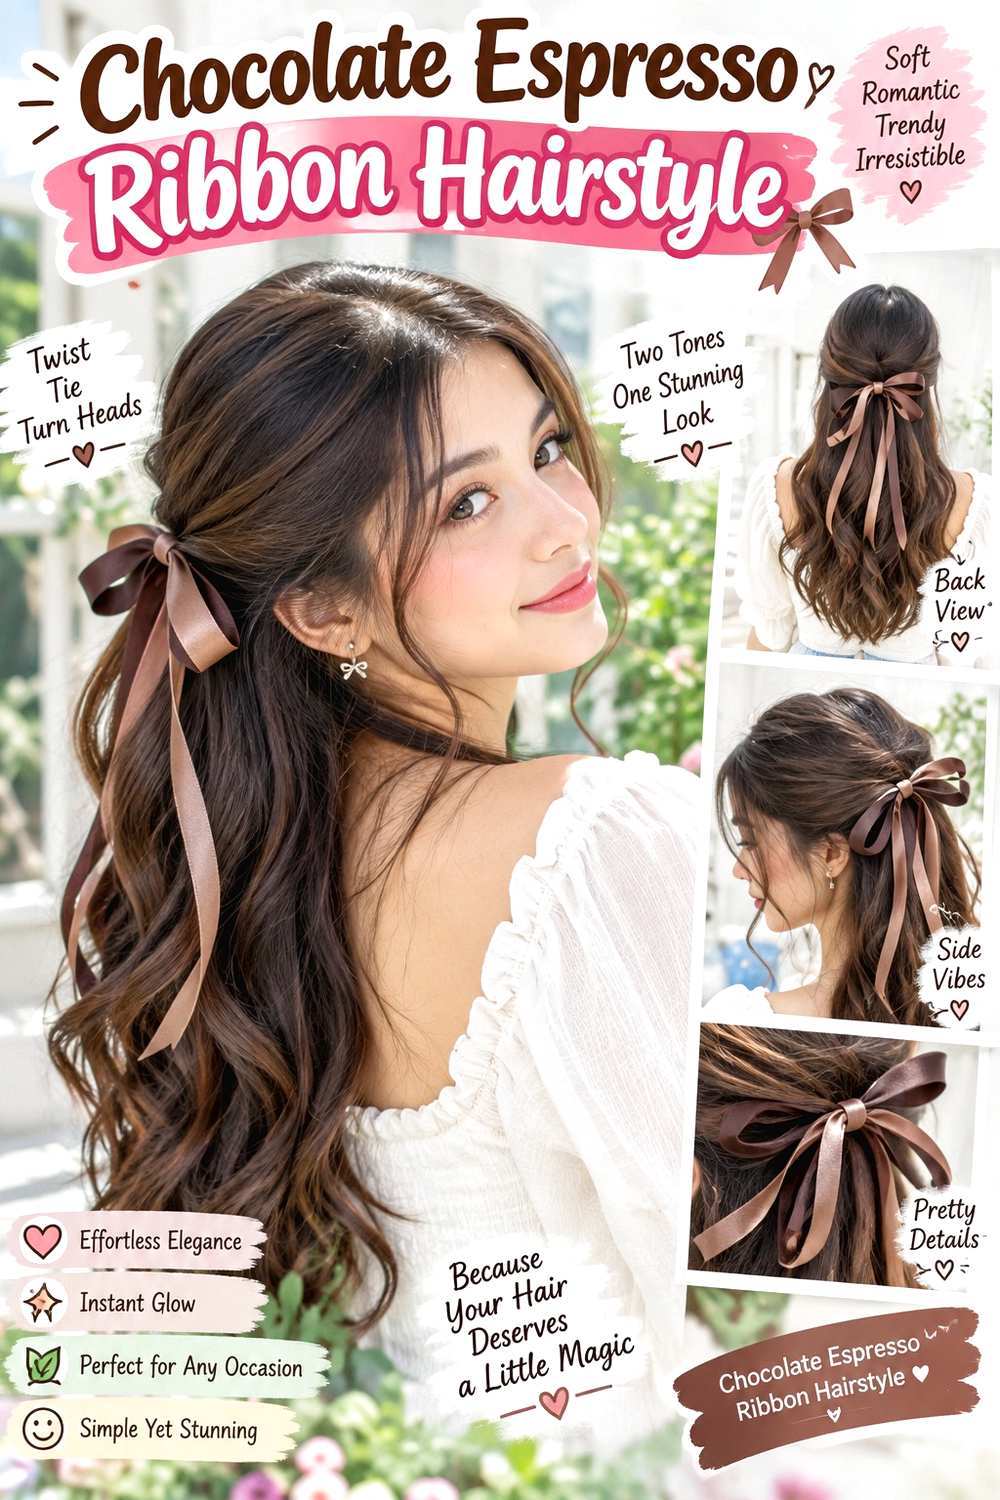
Chocolate ribbons create a gentle lift through an espresso base without changing the overall identity from dark brunette. Medium brown pieces can begin below the roots, weave through the mid-lengths, and become slightly clearer toward the ends. Broad waves show the contrast especially well because alternating curves expose both tones, while straighter hair benefits from slightly wider ribbons that remain visible without curling. Dark spaces between the lighter pieces are essential because they create the espresso depth.
This combination can work for medium or dark brunettes who want movement without blonde-level contrast. A color-safe shampoo supports the overall brunette tone, while a moisturizing mask helps condition any lightened sections. A full placement appointment takes longer than a simple gloss, but a quick styling refresh between washes may involve only reshaping the visible front pieces.
At the salon, specify ribbon width and spacing instead of asking only for “chocolate highlights.” Narrow sections create a finer pattern, while broad pieces look more dimensional and deliberate. Explain how close to the roots the brightness should begin and how much dark color you want at the ends. Maintenance may alternate between tonal refreshing and more substantial placement work, depending on how the ribbons grow out and whether you want to preserve the original contrast.
Pro tip:
Study the darkest spaces in your saved reference as carefully as the highlights. Keeping enough uninterrupted espresso between chocolate sections is what prevents the finished color from becoming medium brown overall.
Make It Work for You:
For curls or dense waves, choose slightly broader chocolate sections that follow visible curl groups. Tiny scattered highlights can become harder to see once the hair contracts into its natural pattern.
Watch Out For:
Closely packed ribbons can erase the dark base. If espresso should remain dominant, keep the crown and interior noticeably deeper and let chocolate pieces act as accents rather than the main color.
Cool-Toned Espresso Brunette Hairstyle

Cool-toned espresso replaces obvious red or golden warmth with a neutral-to-muted coffee brown. It remains deeper and richer than a pale mushroom brunette, but the reflection leans restrained rather than chestnut. Smooth long layers reveal subtle shifts as light travels over the surface, while a blunt lob can make the darker tone look especially clean. A center part reinforces the balanced finish, though the shade itself works with any parting.
This direction can suit someone who prefers deep brown without strong warm undertones, but the outcome depends heavily on the existing base and previous color. A color-safe shampoo helps protect depth, while a toning conditioner selected for the finished brunette can support the intended balance as the color changes between appointments. Daily styling may be quick, whereas the first salon correction can require more work if the starting hair is considerably warmer.
Show your colorist what “cool espresso” means to you in natural daylight. Cool does not need to mean gray or flat, so identify how much neutral brown reflection you still want. Ask whether the roots, mids, and ends should all share the same temperature or whether softer variation would look more natural. Refresh when unwanted warmth becomes more obvious than you prefer rather than following one fixed interval.
Pro tip:
Choose reference photos taken in neutral lighting. Warm bulbs can make even a cool brunette appear reddish, which makes it harder to communicate the actual balance of brown and muted undertones you want.
Make It Work for You:
If an entirely cool brunette feels too subdued, keep the roots neutral espresso and allow slightly softer natural warmth through the ends. The overall impression can remain cool without looking one-dimensional.
Watch Out For:
Overcorrecting warmth can leave the color dull. Ask for enough brown richness to remain visible so the espresso still reflects light instead of becoming an overly muted, flat-looking shade.
Warm Chestnut Espresso Hairstyle
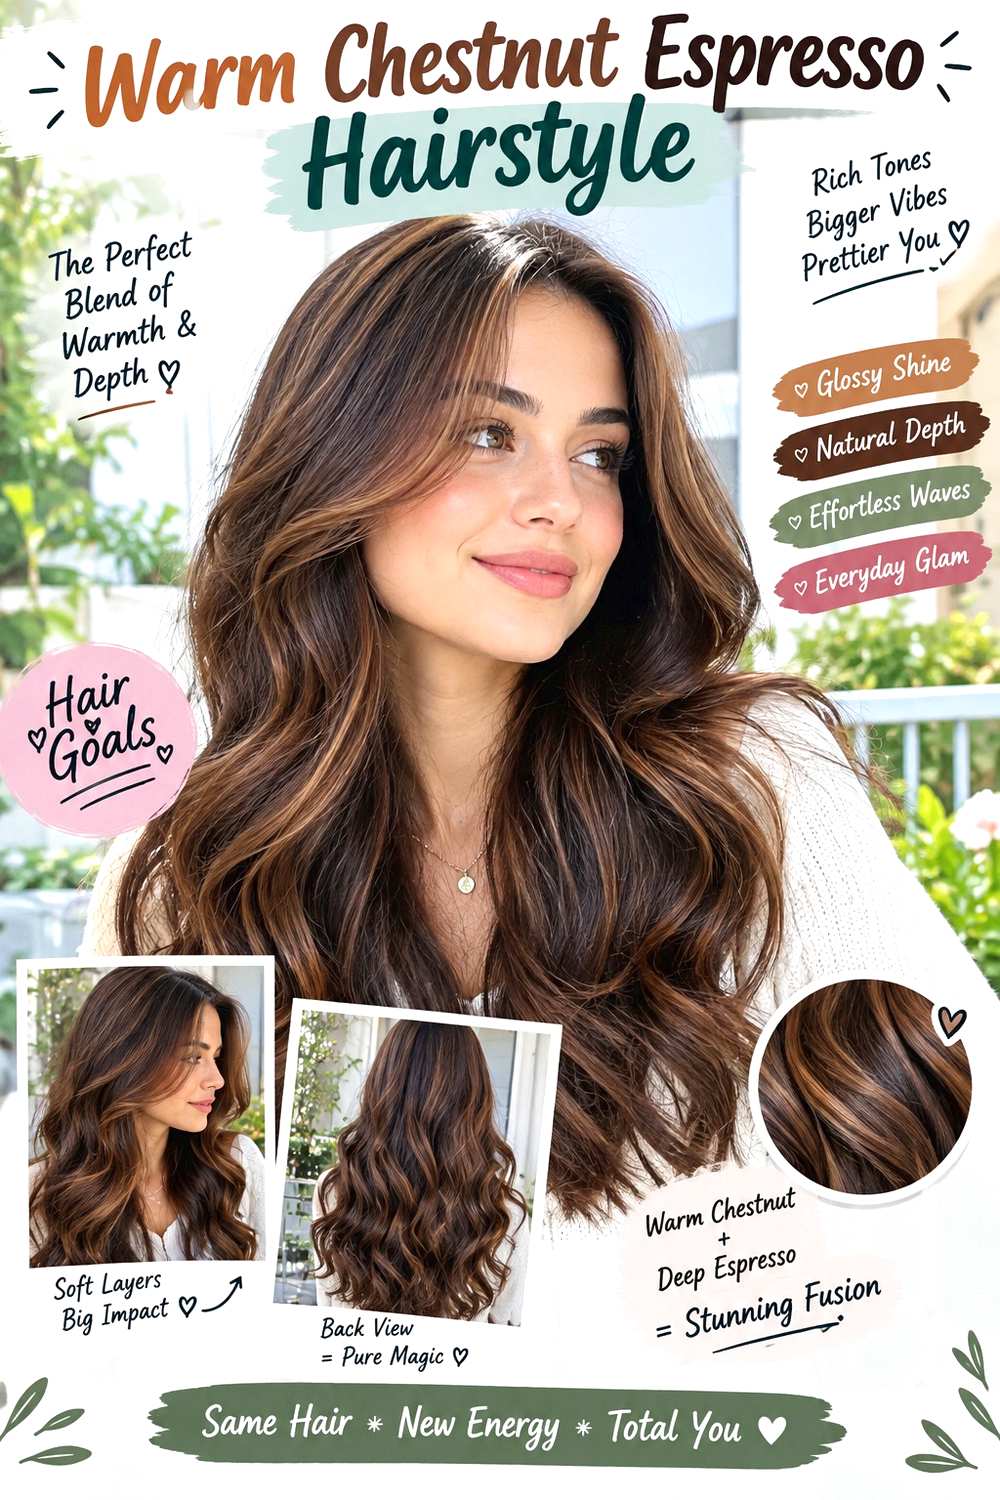
Chestnut warmth gives deep espresso a softer autumnal direction without turning the hair copper. The roots remain dark coffee brown, while subtle red-brown and golden-brown reflections appear through selected mids and ends. Loose waves are useful for showing the difference because each curve catches light differently, while straight hair can display chestnut as smooth panels rather than obvious streaks. A few warmer pieces near the face can connect the color to shorter layers without becoming a bright money piece.
This approach can suit brunettes who enjoy warmth but still want espresso depth to dominate. A color-safe shampoo helps preserve the brunette, while a hydrating conditioner keeps processed sections smooth. A complete color service takes longer than everyday styling; once the placement is established, normal refreshes may focus more on tone than on repeatedly lightening the same areas.
Tell your colorist how much red or gold you want visible in daylight, because chestnut can vary considerably. Also specify whether the warm sections should begin near the upper lengths or stay mainly below the cheekbones. Existing color history will influence what can be achieved safely. As the warmth fades, refresh when the tone no longer resembles your preferred chestnut balance rather than assuming every appointment requires a complete redo.
Pro tip:
Point to the warmest strand in your reference and ask whether that section still reads as brown. This helps keep the target within chestnut espresso instead of drifting toward a distinctly copper finish.
Make It Work for You:
If you want restrained warmth, keep chestnut pieces concentrated through the lower half and around a few face-framing sections. The darker crown will preserve the espresso character and soften visible regrowth.
Watch Out For:
Too many red-brown sections can overpower the coffee base. Leave clear espresso depth through the interior so the warm reflection appears intentional rather than changing the whole head to auburn.
Espresso Mocha Balayage Hairstyle

Espresso mocha balayage starts with a deep coffee root and introduces softer mocha brown through painted sections in the mids and lower lengths. The lightness stays within brunette territory, producing a smoother shift than blonde balayage. Long layers provide plenty of space for the gradient, while medium-length hair can use fewer, broader sections. Loose bends make the placement easy to see, but enough contrast should remain visible even when the hair is worn straight.
This can be a useful option if you want a dark root with relatively soft grow-out. A color-safe shampoo helps maintain the brunette base, and a conditioning mask supports any areas that have been lightened. A full balayage appointment is the larger time commitment; a quick refresh between washes concerns styling, while later salon visits may focus on tone rather than moving every light section higher.
Discuss exactly where the first mocha pieces should become visible. Brightness beginning near the cheekbone feels different from a transition that starts below the shoulders. Also show how light you want the ends and how much espresso should remain between them. Previous permanent color can change what is practical, so share your history. Maintenance can often preserve the existing placement while refreshing tone and shine as the color gradually changes.
Pro tip:
Save a reference showing the hair from behind. Balayage can look beautifully balanced around the face while becoming much brighter through the back, so checking overall distribution helps communicate your preferred depth.
Make It Work for You:
For shorter hair, bring the mocha transition slightly higher so there is enough visible lighter area. On very long hair, a lower starting point can still leave plenty of dimension through the ends.
Watch Out For:
Lightening every lower section can remove the espresso contrast. Keep some deeper strands traveling through the ends if you want true balayage dimension rather than a uniformly lighter bottom half.
Caramel Espresso Face-Frame Hairstyle
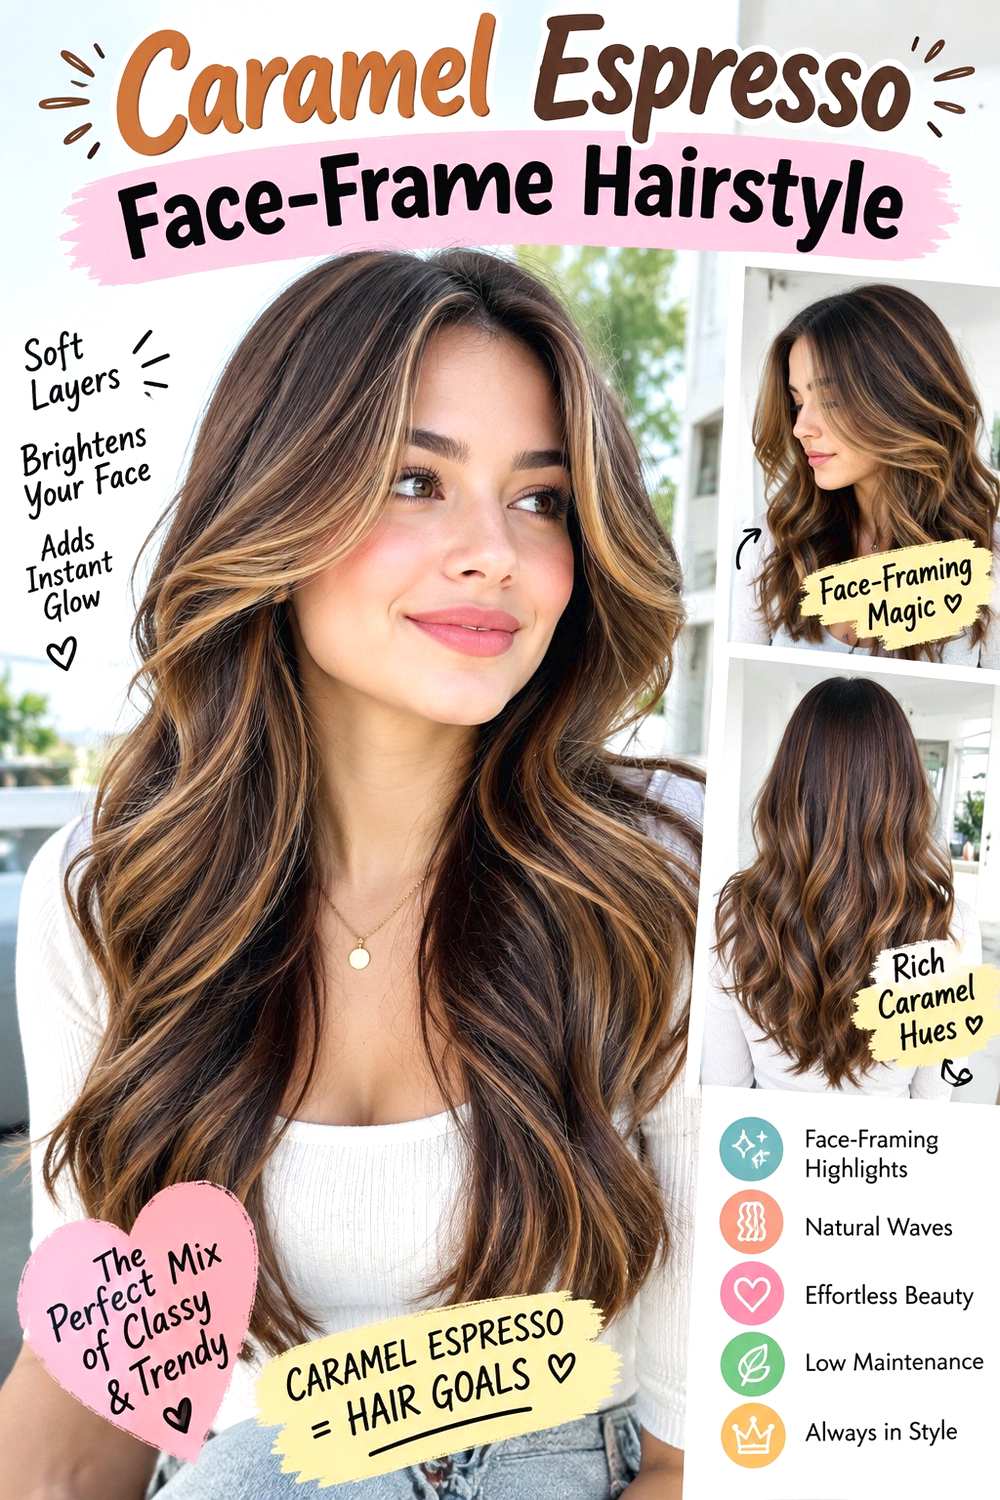
A caramel face frame creates the brightest contrast in this espresso collection while keeping most of the hair deep brunette. Two or more lighter brown sections sit around the hairline, then blend into coffee-toned mids and ends. A center part gives equal brightness on both sides, while a side part makes one panel more noticeable. Long cheekbone- or jaw-level layers can carry the color downward, but a bob can use a narrower version for controlled contrast.
This placement suits someone who wants an obvious front-facing change without highlighting the entire head. A color-safe conditioner helps maintain softness, while a heat protectant spray is useful when heat styling the front pieces to show their shape. Establishing the color at the salon takes more effort than a quick wash-day refresh, and the visible front sections may need tonal attention sooner than hidden interior color.
Show exactly how thick you want the caramel sections and where the brightness should begin. A fine hairline ribbon looks much softer than a solid temple-width panel. Existing dark dye can also limit how bright the front can become in one appointment. For easier grow-out, ask whether the color can remain slightly deeper near the root while becoming clearer through the lower face-framing pieces.
Pro tip:
Look at your reference with the back of the hair covered. Focusing only on the hairline makes it easier to judge whether you prefer a narrow caramel ribbon or a stronger front panel.
Make It Work for You:
If you have lower density around the temples, keep some espresso strands mixed through the face frame. The front can still look brighter without creating a solid light section beside the scalp.
Watch Out For:
Making the front dramatically lighter than everything behind it can disconnect the color. Blend caramel into mocha and espresso farther down so the face frame belongs to the overall brunette palette.
Mahogany Espresso Brunette Hairstyle

Mahogany espresso adds a wine-red or red-brown undertone to a deep coffee base rather than using visibly lighter highlights. Indoors, the hair can read as rich brunette; in brighter light, the mahogany reflection becomes clearer through the mids and ends. Waves and curls show the undertone particularly well because different sections catch light independently, while a sleek bob produces a more continuous red-brown sheen. The shade can remain uniform or become slightly warmer toward the lower lengths.
This idea works for someone who wants warmth with more depth than chestnut and less brightness than copper. A color-safe shampoo helps slow fading, while a conditioning mask supports the glossy surface. Red-leaning tones can change visibly as they fade, so tonal upkeep may matter even when root contrast is minimal. Everyday styling can stay simple if your natural texture already reflects the color well.
At the salon, clarify whether you want mahogany visible only in strong light or noticeable in everyday conditions. That difference affects how dominant the red-brown tone should become. Also discuss whether the root should remain neutral espresso for extra depth. Previous color will influence the final result. Refresh when the mahogany reflection becomes too faint or shifts away from the balance you originally chose.
Pro tip:
Bring a neutral-light reference rather than relying on a photo taken under amber lighting. Warm light can exaggerate red tones and make a subtle mahogany brunette appear much brighter than it really is.
Make It Work for You:
If visible red feels like too large a change, keep mahogany mainly through the mids and ends over a neutral espresso root. You gain warm reflection while preserving familiar darkness near the face.
Watch Out For:
Do not describe the goal only as “red brown.” That phrase covers a wide range. Point out how dark the base should stay and how strongly the mahogany should appear in daylight.
Espresso Root Melt Hairstyle
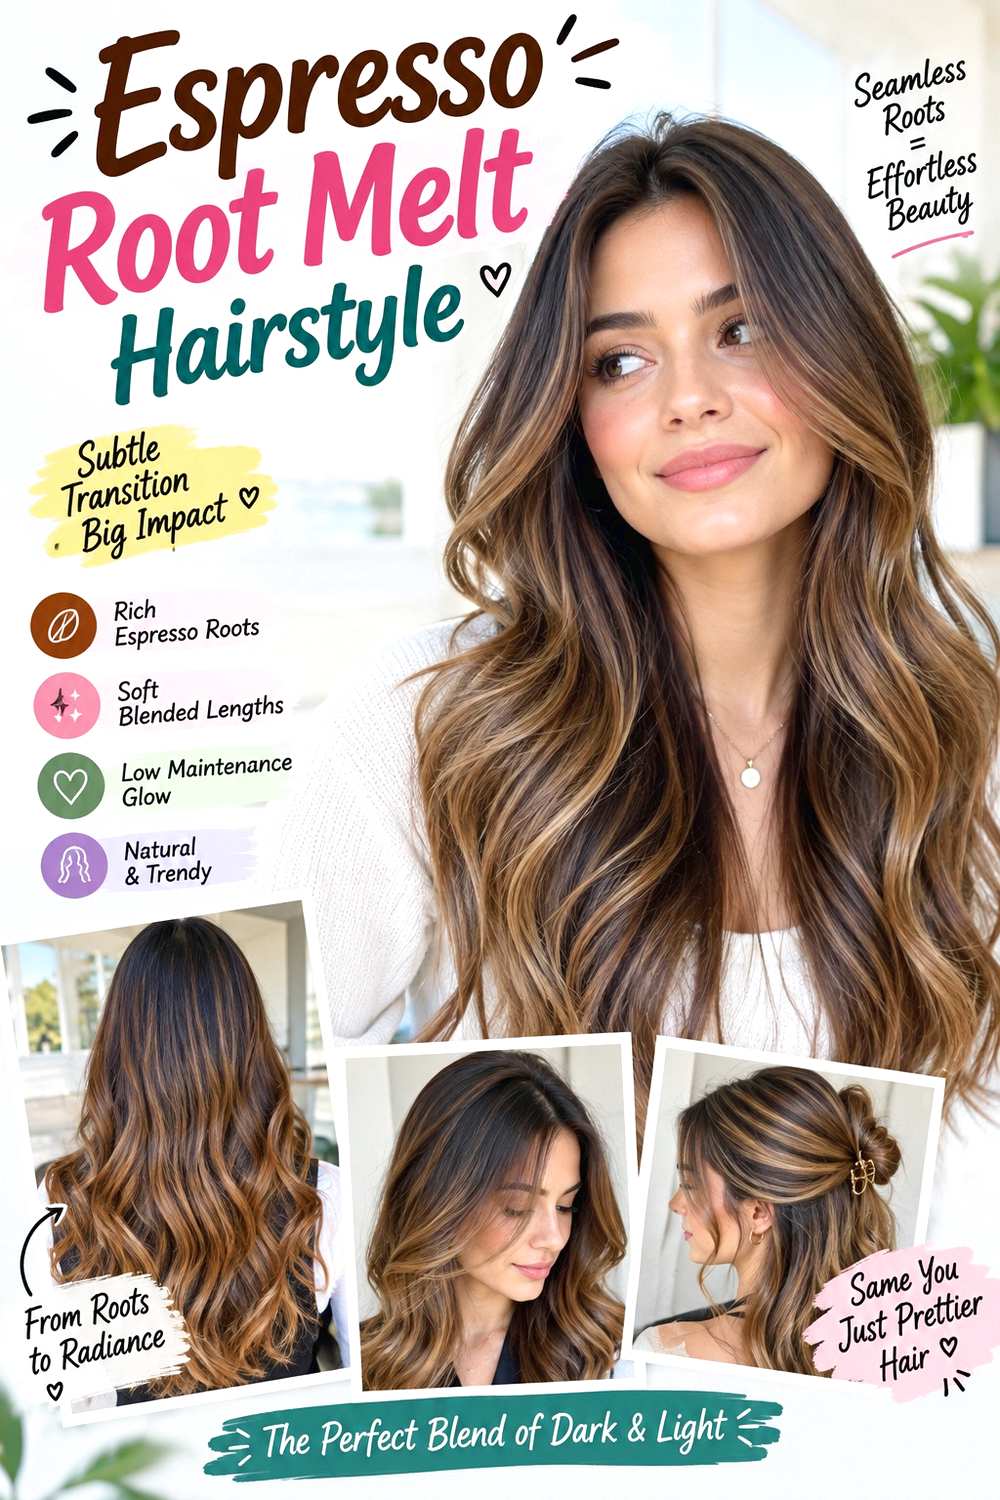
An espresso root melt concentrates the deepest color at the scalp and gradually blends it into softer brunette through the lengths. Unlike a sharp ombre, the transition begins gently and uses overlapping depth so there is no obvious horizontal line. A center part can showcase the rich root area evenly, while layered lengths reveal the softer mocha or chocolate tones below. On a bob, keeping the root section relatively compact leaves enough space for the gradient to remain visible.
This option can be practical when your natural hair is already deep brown and you want a softer grow-out than light color placed directly at the scalp. A color-safe shampoo supports the darker root, while a leave-in conditioner keeps processed ends smoother. A full salon melt takes more time than a normal wash-day refresh, but daily styling does not have to change unless you want waves to emphasize the transition.
Tell your colorist how many visible inches of espresso you want before the blend becomes lighter. Also identify the lightest brown you want at the ends. That information is more specific than simply requesting a shadow root. Maintenance can focus on restoring the transition and tone when it becomes noticeably uneven rather than darkening the roots or lightening the ends automatically at every appointment.
Pro tip:
Check your reference at the back of the crown as well as the front. A good melt should feel gradual from multiple angles, not blended around the face but suddenly dark behind the part.
Make It Work for You:
On shoulder-length hair, use a shorter dark-root zone so the softer brunette remains visible. Very long hair can support a more extended espresso section without losing the dimensional lower lengths.
Watch Out For:
A root shade carried too far downward can resemble a solid dark block. Preserve an overlapping middle zone where espresso and softer brown mingle before the lighter ends become clearly visible.
Smoky Espresso Dimension Hairstyle
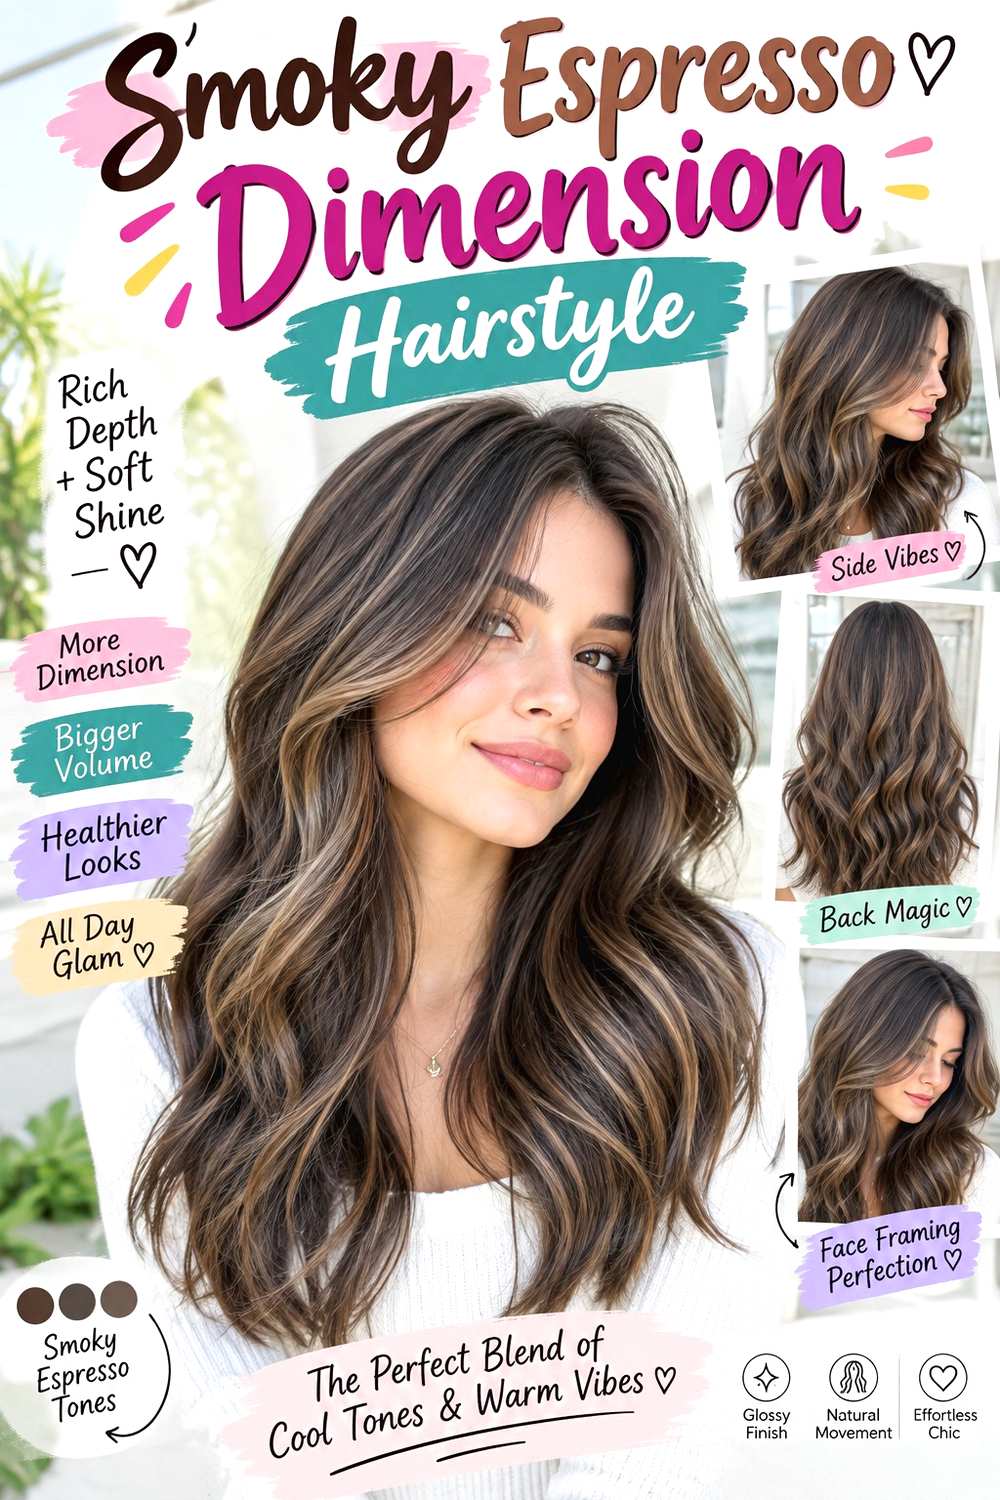
Smoky espresso combines deep brown with muted, slightly taupe ribbons rather than warm caramel or chestnut. The root stays rich and coffee-dark, while cooler pieces appear mainly through the mids and selected ends. The contrast remains low, giving the hair dimension without making it look obviously highlighted. Broad waves reveal the smoky sections particularly well, and a collarbone cut can display the color through a few carefully placed panels rather than numerous fine highlights.
This direction can appeal to someone who likes a cooler brunette but still wants more variation than an all-over gloss. A color-safe shampoo protects the dark base, while a toning conditioner chosen for the final shade helps manage unwanted warmth as the muted pieces change. Full color placement requires salon time, but a simple daily refresh can remain close to your usual styling routine.
At your appointment, distinguish smoky brown from pale ash. Show how subtle you want the lighter ribbons and whether they should be visible near the face or hidden mostly inside the length. Because cooler tones depend on the starting pigment, previous color history matters. Refresh when the taupe dimension becomes warmer or less distinct than you prefer. Avoid automatically adding more highlights if the existing placement is still working and only the tone has shifted.
Pro tip:
Look at the reference’s lightest ribbon and compare it with the base. If the difference is only a few shades, mention that restraint so the smoky sections do not become brighter than intended.
Make It Work for You:
For naturally warm brunette hair, keep the smoky ribbons limited and let some neutral espresso remain between them. This can create a cooler impression without demanding that every section share the same undertone.
Watch Out For:
Too much ash can make deep brunette appear flat. Preserve rich espresso around the root and interior so the muted ribbons have something to contrast with and the color retains visible depth.
Espresso Money Piece Hairstyle
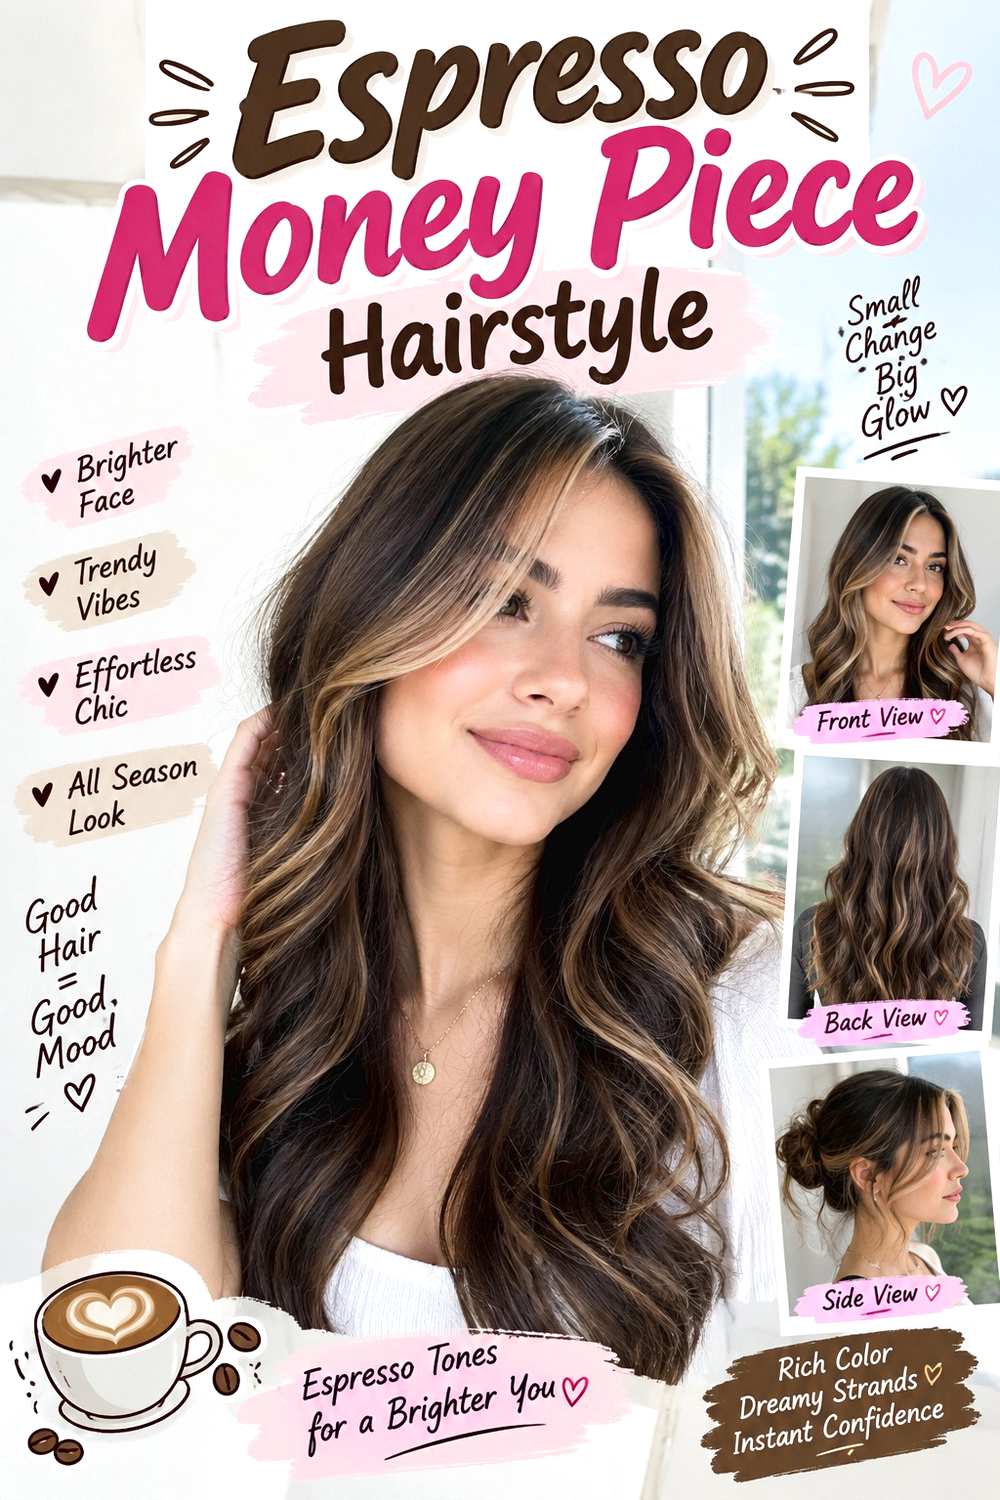
An espresso money piece keeps the overall base very dark while using medium mocha or soft chocolate sections directly around the face. Unlike caramel face framing, the contrast stays restrained and distinctly brunette. A center part displays both pieces evenly, while a side part creates one stronger flash of lighter brown. The sections can begin at the root for clearer contrast or start slightly lower for a softer grow-out, then connect to dimensional pieces through the ends.
This option suits someone who wants a noticeable change in front without committing to widespread lightening. A color-safe conditioner helps keep the face pieces soft, while a heat protectant spray supports them if you regularly use heat to curve the sections away from the face. Full color placement belongs to the salon appointment; a brief daily refresh concerns shape and parting rather than the color itself.
Tell your colorist the exact width and brightness you want around the hairline. A narrow ribbon creates subtle dimension, while a broader money piece becomes a defining feature. Existing permanent espresso or black color can affect the achievable lift, so share your history. Maintenance may involve refreshing the front tone or softening visible root growth while leaving the darker back largely untouched.
Pro tip:
Judge the money piece while imagining your normal part, not only the model’s part in a reference. Moving the part can expose a different amount of brightness and change the apparent width considerably.
Make It Work for You:
If bold contrast feels impractical, choose a mocha piece only slightly lighter than your espresso base. The face still gains dimension while root growth and fading remain less conspicuous.
Watch Out For:
A money piece that turns much lighter than the rest can dominate the entire palette. Keep the front within brown tones if you want the finished result to remain rich espresso brunette.
Soft Espresso Ombre Hairstyle
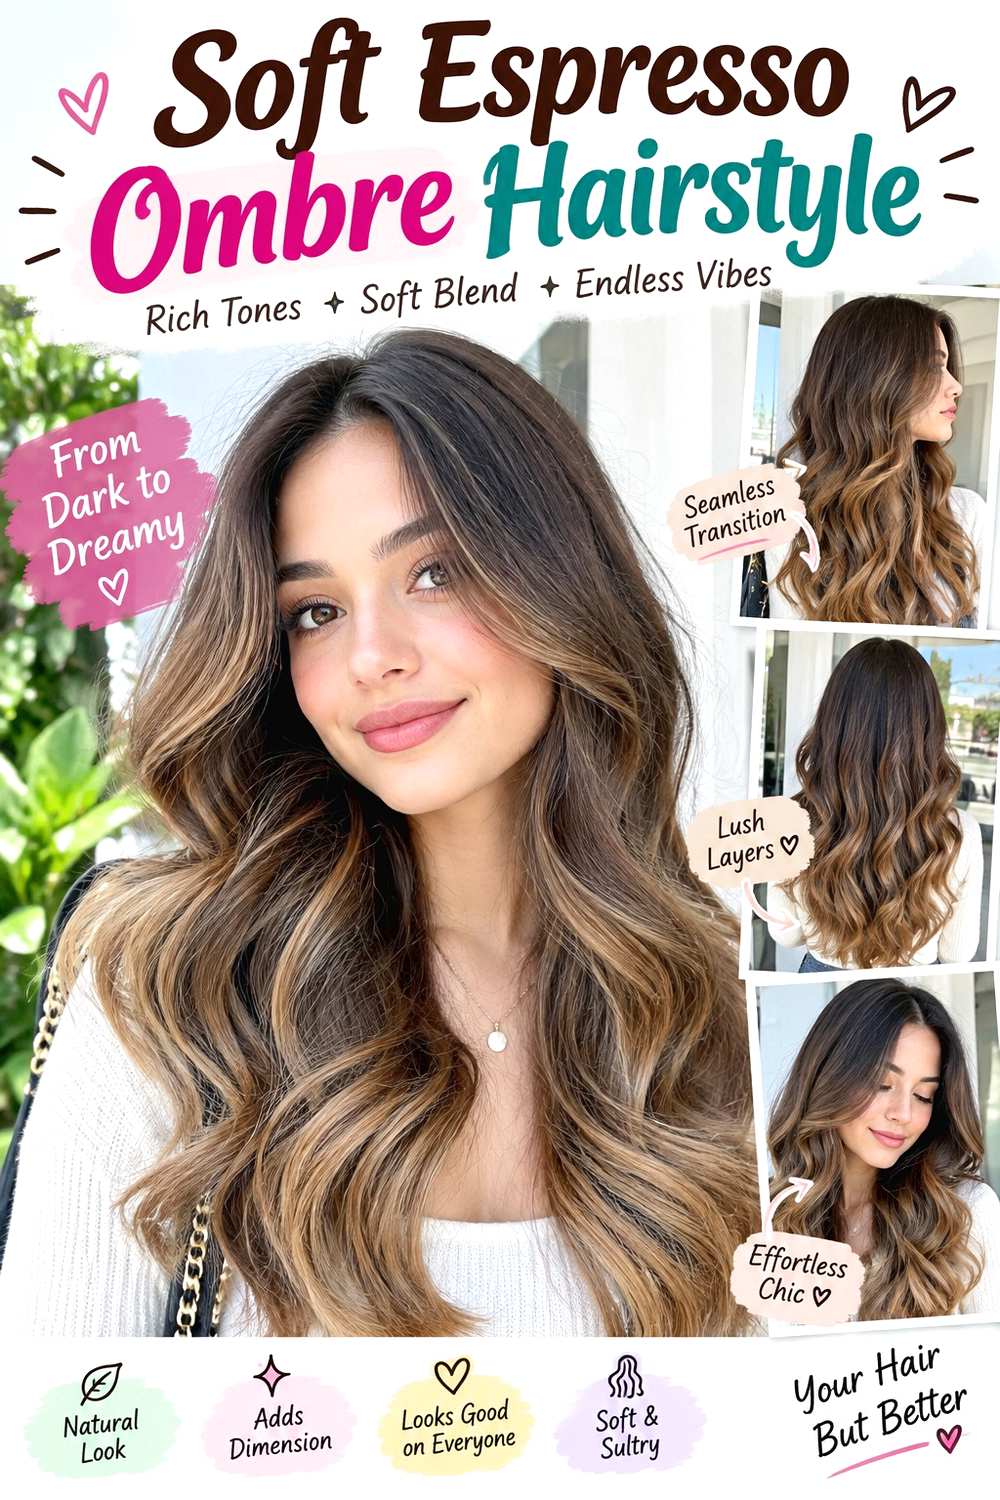
Soft espresso ombre keeps the upper half deep and gradually shifts toward medium coffee brown at the ends. The lighter area begins lower than a typical root melt, so the brunette transformation is concentrated through the bottom third or half. Long hair provides the clearest canvas for this gradient, while shoulder-length hair needs a somewhat higher transition to leave enough space for visible change. Waves soften the boundary, while straight hair makes the gradual shift easier to inspect.
This can suit someone who wants to keep a natural-looking dark root while adding movement through the ends. A color-safe shampoo supports the espresso section, and a hydrating mask cares for the more processed lower lengths. The initial transformation may be a substantial salon service, but daily maintenance can stay uncomplicated if you wear your usual texture.
At the consultation, show exactly where you want the ombre to begin and identify the lightest brown acceptable at the ends. Previous dark permanent color can affect what is practical in one visit, so color history is essential. The grow-out can be relatively soft because the root remains dark, while later maintenance may focus on tone and condition. Avoid relightening the ends automatically when they simply need a brunette tonal refresh.
Pro tip:
Use your jaw, collarbone, or shoulder as a placement landmark when discussing the transition. A concrete point communicates the desired ombre height more clearly than terms such as “low” or “subtle.”
Make It Work for You:
If your hair is shorter, start the blend higher but keep it gradual. This gives the lighter coffee-brown ends enough room to show without creating a sudden two-tone division.
Watch Out For:
An even horizontal starting line can make ombre look abrupt. Ask for sections to transition at slightly different heights so the espresso and softer brown overlap naturally through the middle.
Curly Espresso Gloss Hairstyle
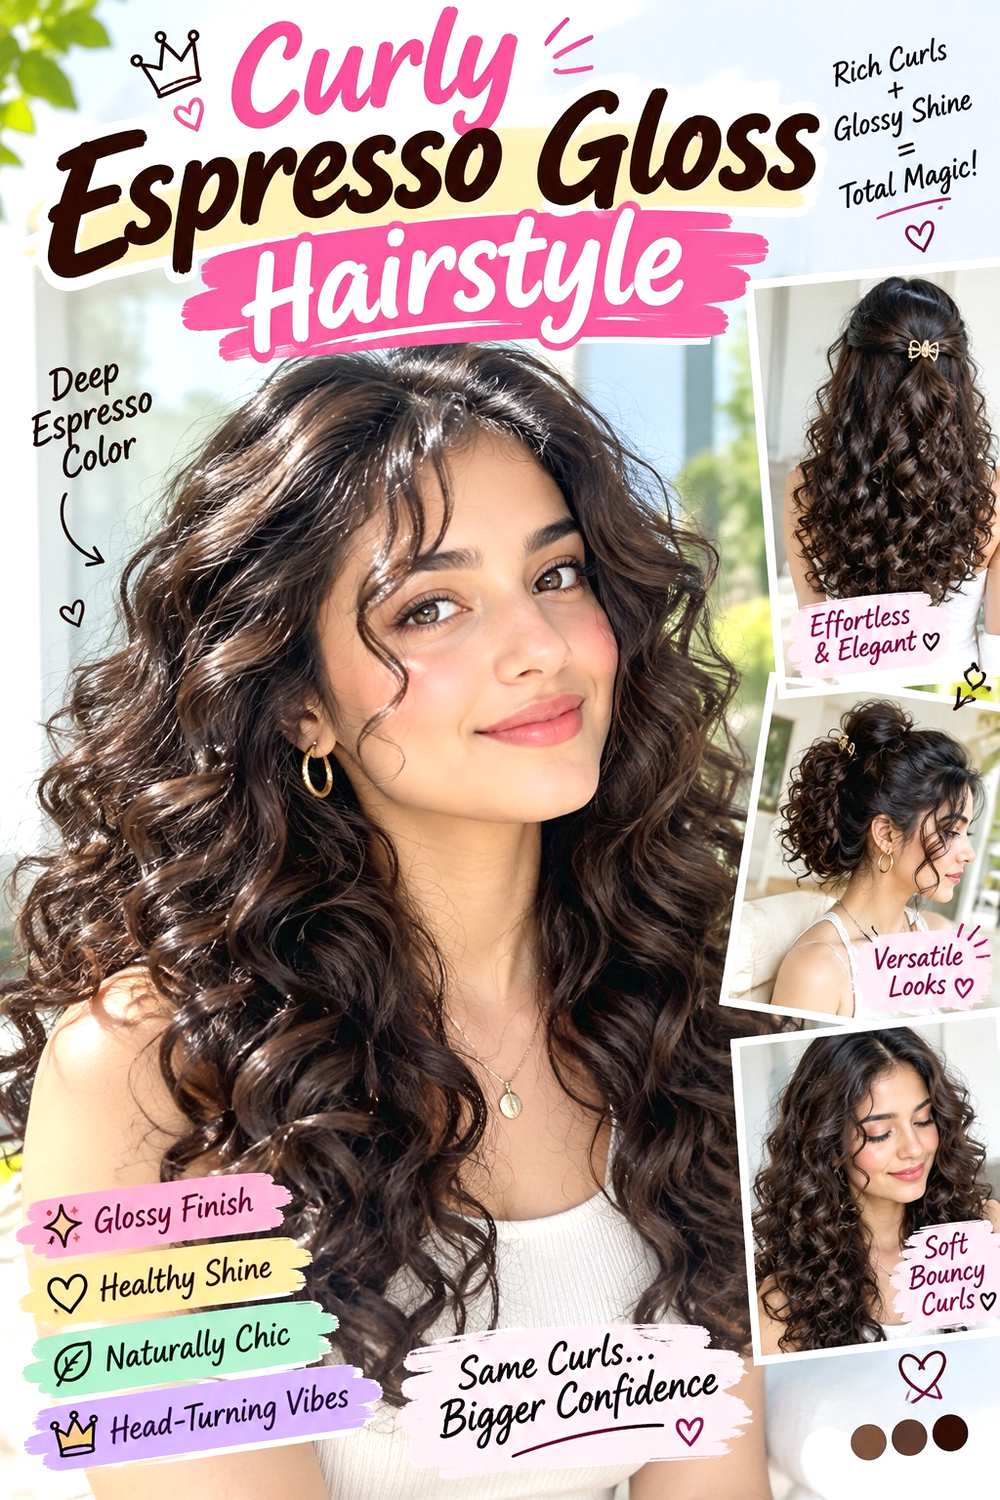
Curly espresso gloss uses a rich, mostly uniform brunette to emphasize curl shape rather than a strong highlight pattern. Deep brown covers the roots and lengths, but natural bends create changing reflections that keep the color from appearing flat. On loose curls, the light may travel across larger sections; tighter curls can show smaller flashes of coffee brown throughout the shape. A few slightly softer ends can add depth, but the overall effect remains dark and cohesive.
This approach can suit curly or coily hair when you want a glossy brunette without depending on straight styling to display it. A color-safe cleanser helps protect the shade, while a moisturizing curl cream supports definition and reduces a dry-looking surface. A full color appointment is separate from wash-day styling, which may take longer depending on density, curl pattern, and drying method. Quick refreshes between washes can focus only on restoring curl definition.
Tell your colorist how the shade should look on your hair in its usual dry state. Shrinkage and curl grouping change where different sections appear, so reference placement should be considered on the finished texture. If you want slightly lighter areas, identify which curl groups should carry them. Maintain the color when fading changes the espresso depth rather than assuming curls require a different shade schedule.
Pro tip:
Bring a reference with a curl pattern displayed in its finished state. Color placement that looks balanced while stretched or wet may appear very different once the curls contract and group together.
Make It Work for You:
If your curl definition creates plenty of natural dimension, keep the espresso mostly uniform and use softer brown only on selected ends. Movement can provide visual variation without extensive highlighting.
Watch Out For:
Do not judge depth only while the hair is wet, when brunette can appear darker. Evaluate the finished dry color before deciding that the espresso needs to be deepened again.
Dimensional Espresso Layered Hairstyle
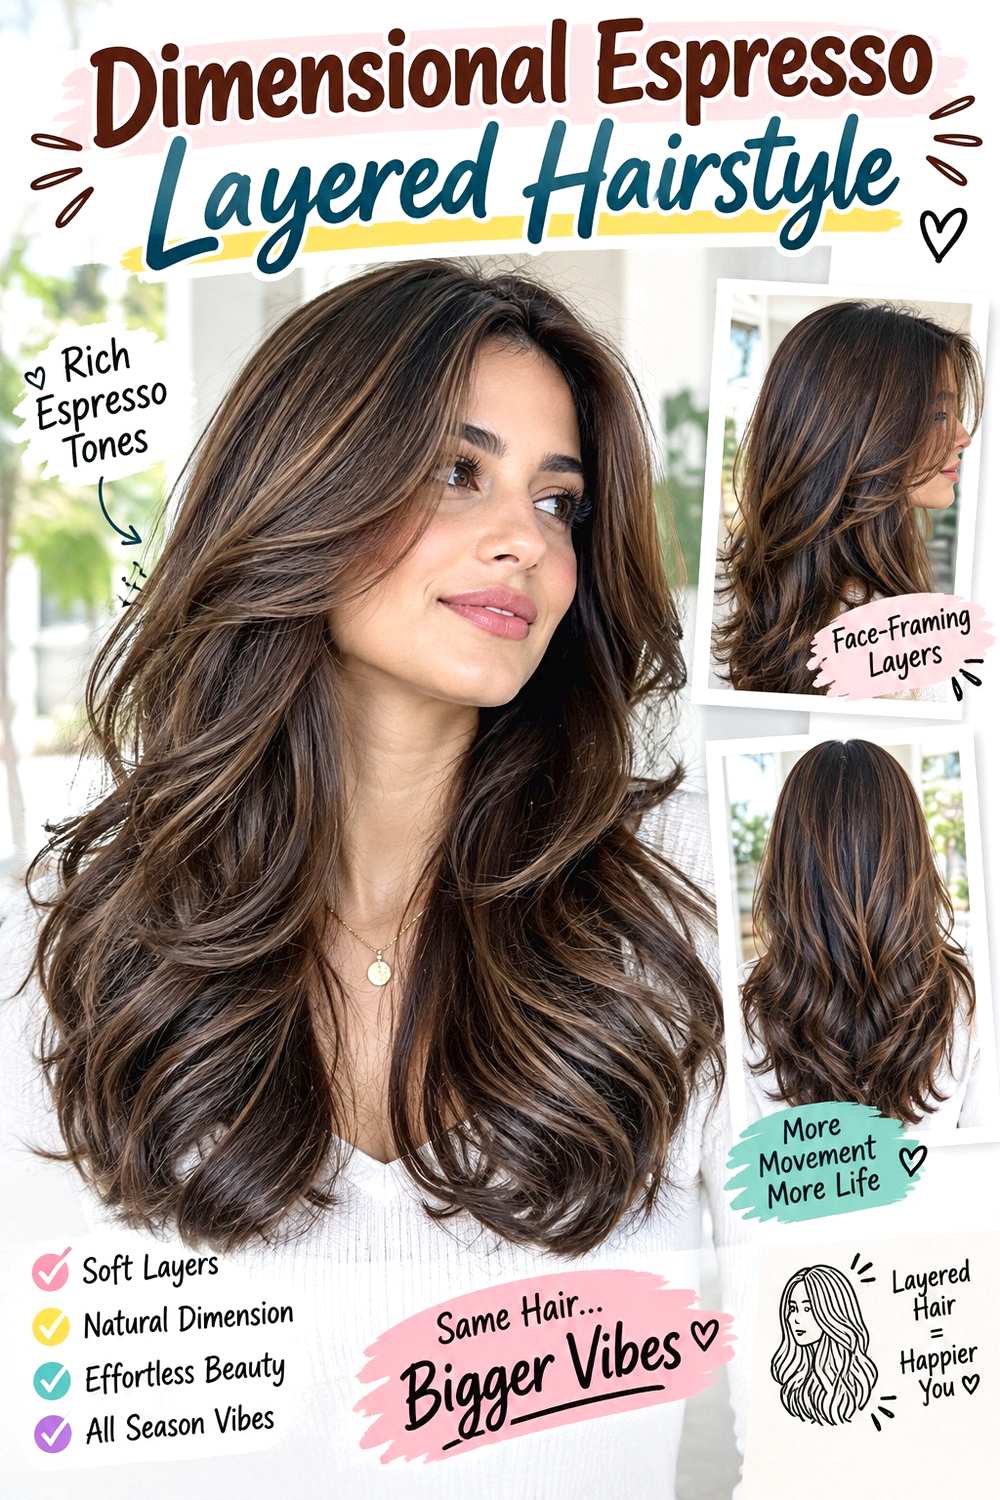
Layered hair creates multiple surfaces for espresso dimension, making it useful when you want dark brunette with several subtle tonal shifts. The root remains the deepest coffee brown, medium mocha ribbons can follow cheekbone- or jaw-length face layers, and slightly softer brown appears through selected ends. Rather than highlighting every layer, strategic placement leaves enough dark sections underneath to preserve depth. Broad waves show the pattern clearly, but the color should still look connected when worn straighter.
This option works well if you enjoy visible movement without a bright highlighted finish. A color-safe shampoo protects the overall palette, a conditioning mask supports processed lengths, and heat protectant spray is useful when heat styling the layers to reveal their shape. A full color-and-style appointment takes considerably longer than a quick between-wash refresh, which may involve only the front and upper layers.
Ask your colorist where the brightest ribbon should begin relative to your actual layers. The color can follow existing movement rather than forcing every section to start at the same height. Also specify how much espresso should remain beneath the surface. When layers grow or are reshaped, the color placement may appear different even before it has significantly faded, so future maintenance should consider both the cut and where the dimensional sections now sit.
Pro tip:
Show which specific layer you want emphasized around the face. Connecting brightness to one clear landmark, such as the jaw or collarbone, makes the intended placement easier to reproduce than requesting general dimension.
Make It Work for You:
If your ends are fine or lower in density, keep more espresso through the perimeter and concentrate lighter ribbons around upper layers. You gain movement without making the bottom edge look visually sparse.
Watch Out For:
Highlighting every visible layer can create stripes and reduce depth. Leave darker sections between brighter pieces so individual layers catch light without turning the whole haircut into one medium-brown shade.
Conclusion
Rich espresso brunette hair can stay nearly uniform and glassy or include chocolate ribbons, cool smoky pieces, chestnut warmth, face framing, or softer ombre ends. A deep root generally keeps the overall effect grounded, while brightness placement determines how dramatic the result feels. Long layers and waves reveal dimensional ribbons clearly; blunt shapes make solid espresso and high-gloss finishes especially noticeable. Curl pattern and density should influence section size rather than limit your options. Consider your natural base, existing color, normal parting, preferred warmth, and styling routine before choosing. The most practical fall version is one whose depth, contrast, grow-out, and tonal upkeep fit the amount of maintenance you actually want.
Before Your Salon Visit
Choose one or two references and save images that show the color in clear, preferably natural light. Explain your current color, previous chemical services, texture, density, length, normal part, and typical styling routine. Point specifically to the espresso root depth, undertone, ribbon width, face-frame brightness, transition height, or glossy finish you want. If you like one photo’s placement but another photo’s shade, say so clearly so those features can be discussed separately.
FAQs
How Dark Is Espresso Brunette Hair?
Espresso brunette is generally a very deep brown that can approach black while still showing brown or coffee-toned reflection. The exact depth varies with lighting and starting color. If you want visible brown rather than true black, show that distinction clearly during your consultation.
Can Espresso Brunette Work on Naturally Lighter Hair?
Yes, but moving substantially darker can create more visible root contrast as the hair grows. Previous color and future lightening plans also matter. Discuss whether you want permanent depth, a softer tonal change, or a more gradual brunette transition before committing to a very dark result.
How Can I Keep Espresso Brunette Hair Looking Glossy?
Use gentle color-safe cleansing, keep the lengths well conditioned, and limit unnecessary repeated processing. A glossy appearance also depends on the hair’s surface and styling finish, not color alone. When the brunette looks faded or dull, ask whether it needs tonal refreshing rather than automatically darkening everything.
Do Espresso Highlights Need to Be Warm?
No. Espresso can be paired with chocolate, chestnut, mocha, caramel, smoky, or neutral-brown dimension. Warm sections create a softer golden or red-brown effect, while cooler ribbons look more muted. Your starting color and preferred maintenance level should guide which direction is most practical.