17 Silver Hair Jewelry Hairstyles for a Modern Statement Look
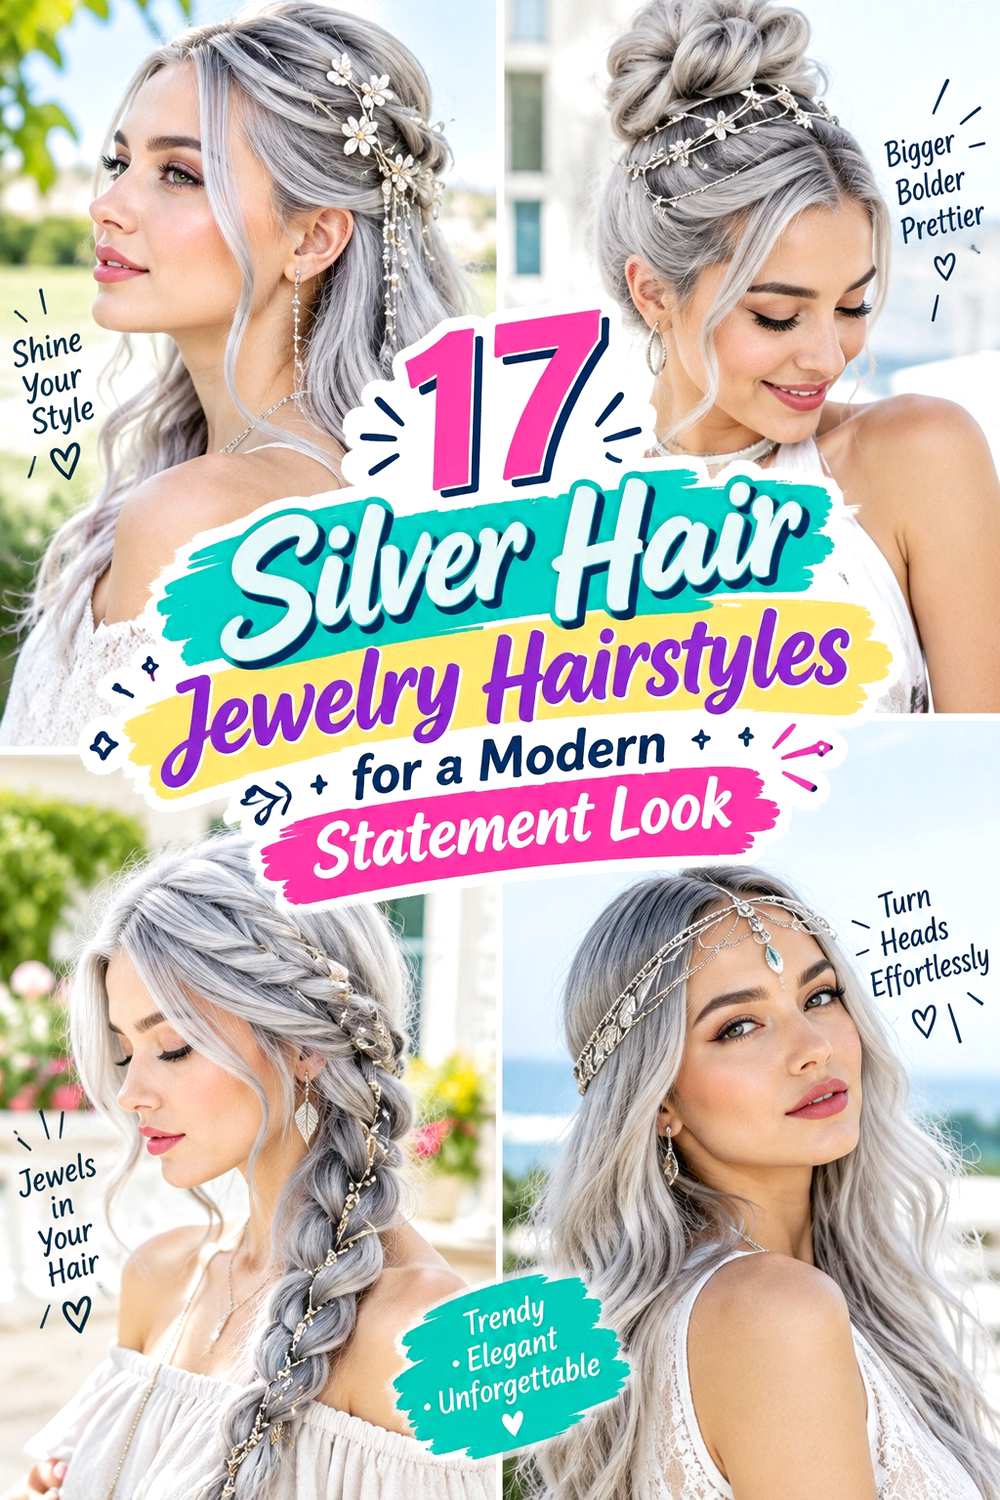
Silver hair jewelry hairstyles combine temporary styling with reflective metal details that can change a simple braid, bun, ponytail, or half-up shape without requiring a new haircut. Chains create movement, cuffs and rings add repeated points of shine, while pins, barrettes, combs, and charms can provide one stronger focal point. Shoulder-length hair can support compact twists and partial updos, while longer hair gives more space for braids, draped chains, wrapped buns, and layered accessory placement.
Straight, wavy, curly, and coily textures can all carry silver jewelry, but the accessory should suit the scale and structure of the hairstyle. Fine or slippery hair may need a stable anchor before adding heavier decoration, while dense hair can support larger pieces if the weight is distributed comfortably. On curls and coils, jewelry can follow visible groups rather than disrupting the natural pattern. Face-framing pieces, parts, crown volume, and accessory height can all be adjusted without changing the defining concept.
Styling effort ranges from a quick clip or cuff placement to a longer braided or pinned updo. Most maintenance involves checking grip, preventing snagging, controlling frizz around anchor points, and removing jewelry carefully. Decorative pieces should add interest without creating painful tension or carrying the entire hairstyle on their own.
Quick List
- Silver Chain Braid Hairstyle
- Minimal Silver Cuff Ponytail Hairstyle
- Moon Charm Half-Up Hairstyle
- Silver Ring Bubble Braid Hairstyle
- Crystal Silver Bun Pin Hairstyle
- Silver Thread Dutch Braid Hairstyle
- Sculptural Silver Barrette Twist Hairstyle
- Layered Silver Chain Updo Hairstyle
- Silver Hair Cuff Cornrow Hairstyle
- Celestial Silver Clip Waves Hairstyle
- Silver Leaf Chignon Hairstyle
- Double Silver Pin French Twist Hairstyle
- Silver Bead Accent Braid Hairstyle
- Asymmetric Silver Chain Ponytail Hairstyle
- Silver Halo Crown Braid Hairstyle
- Sleek Silver Comb Bun Hairstyle
- Silver Charm Curly Updo Hairstyle
Silver Chain Braid Hairstyle
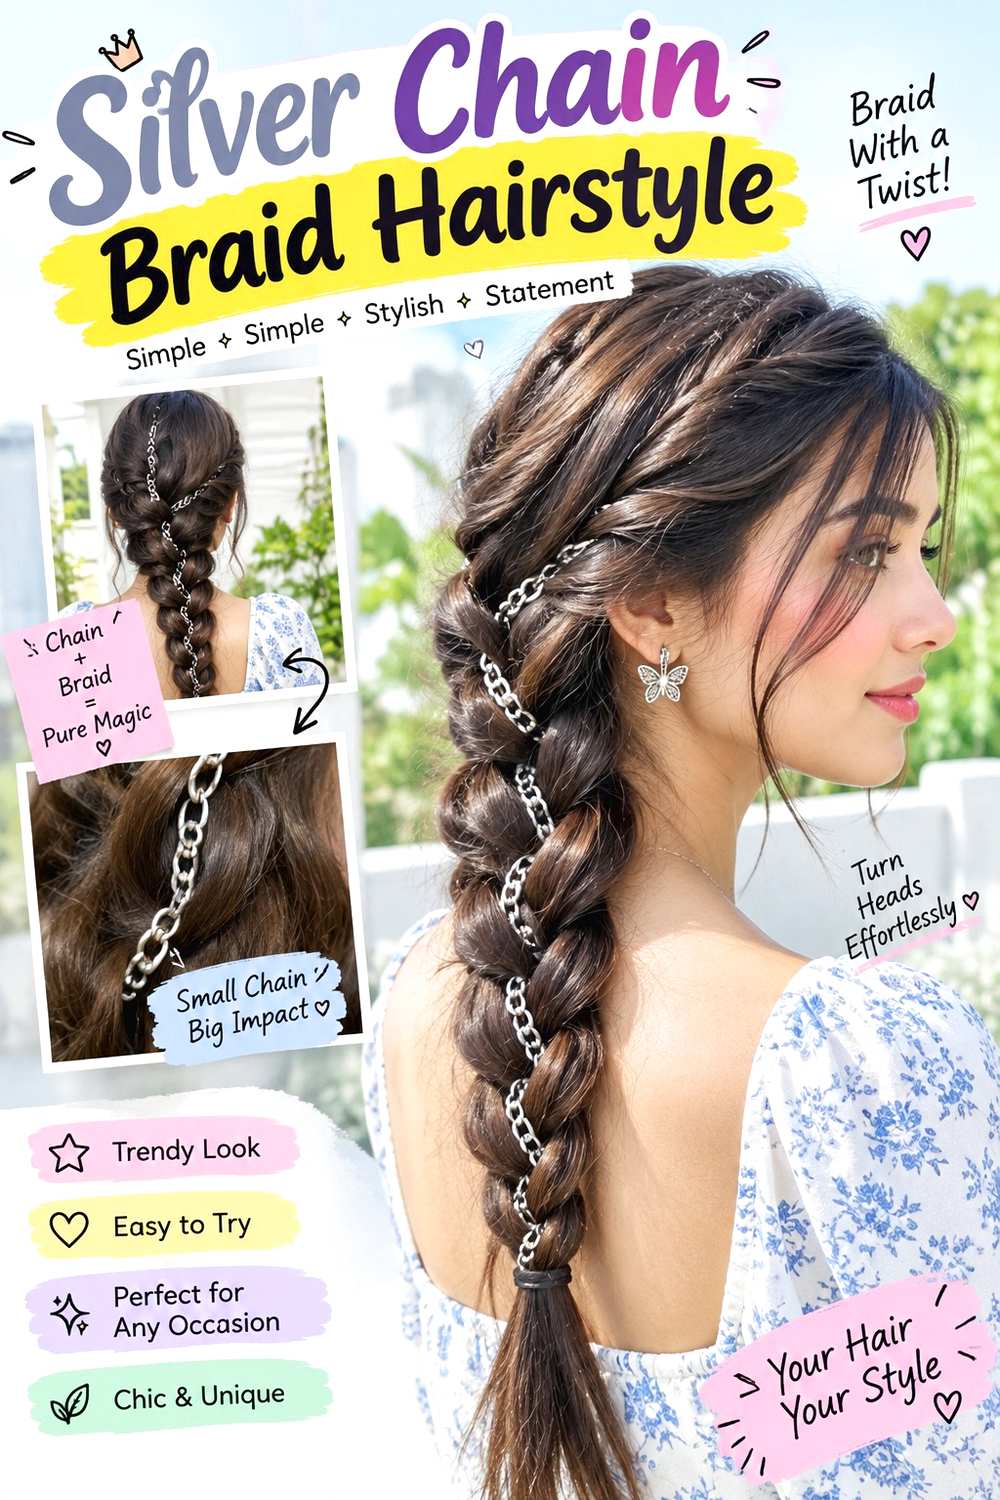
A slim silver chain threaded beside a braid creates shine without hiding the braid pattern itself. Start with a center or side part, then form one medium-width braid down the back or over one shoulder. The chain can enter near the upper braid and follow one outer edge toward the ends, giving each woven section a small metallic accent. Medium to long hair provides enough length for the detail to repeat clearly, while a few controlled face-framing pieces can soften the front.
This design works on straight, wavy, curly, or stretched textured hair as long as the braid is stable enough to support the chain. Use a slim silver chain hair accessory for the decoration, a clear elastic to secure the braid, and light styling cream to keep shorter pieces from catching in the metal. A quick refresh may involve repositioning one loose chain section; building the braid and placing the jewelry from the beginning takes longer.
Keep the chain attached to the braid rather than pulling directly on loose scalp hair. For professional styling, specify braid width, which side the chain should follow, and whether the metal should appear continuously or only at selected points. Remove the chain slowly before undoing the braid to reduce snagging.
Pro tip:
Attach the chain after the first few braid crossings rather than directly at the scalp. This gives it a stable woven base and keeps the first metal connection away from sensitive hairline areas.
Make It Work for You:
If your hair is shorter, use the chain only through the lower half of the braid. A concentrated metallic section can still look intentional without requiring extra length or extensions.
Watch Out For:
Do not pull the chain taut along the braid. Leave a small amount of slack between attachment points so normal movement does not cause the jewelry to tug on individual strands.
Minimal Silver Cuff Ponytail Hairstyle
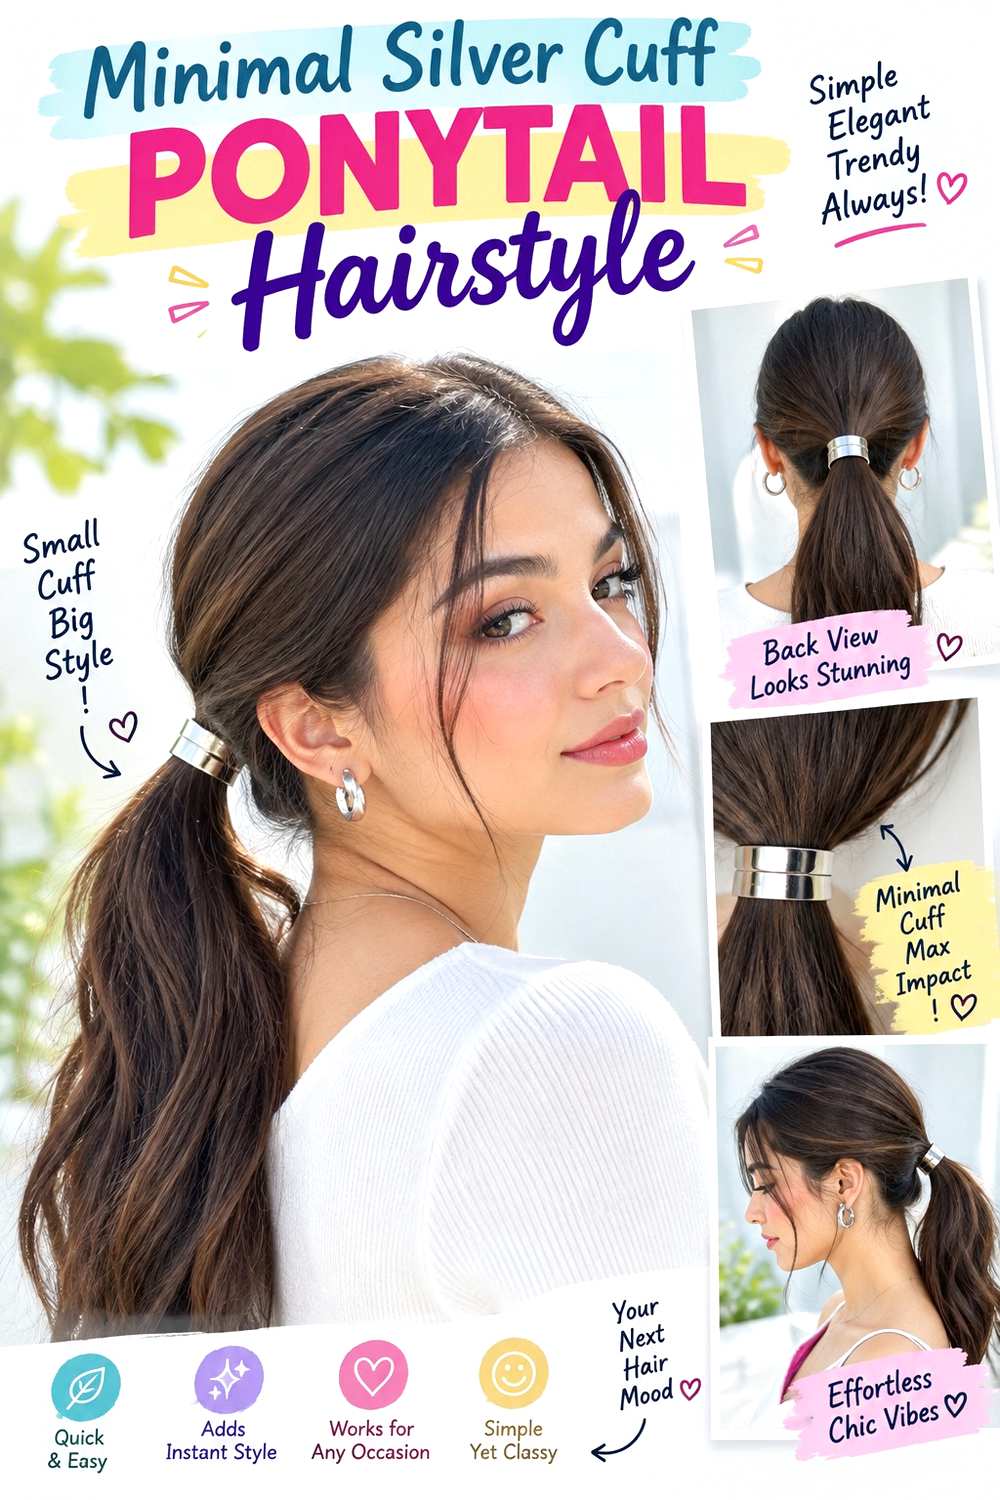
A low or mid-height ponytail becomes more structured when a few silver cuffs are placed around the base or down a narrow accent braid beside it. Keep the front smooth with a center, side, or swept-back part, then gather the hair into a controlled ponytail. Three to five cuffs spaced rather than stacked tightly can create a clean metallic rhythm without making the base feel crowded. Straight lengths emphasize the graphic effect, while waves or curls add softer movement below.
This idea works especially well when you want hair jewelry that is visible but not spread across the whole head. A fabric-covered elastic provides the actual ponytail anchor, silver hair cuffs create the decoration, and light smoothing gel controls flyaways around the hairline. A quick dry-hair version can be done in several minutes, while a full wash-day finish takes longer if you first smooth or define the ponytail texture.
The cuffs should decorate an already secure base rather than hold the ponytail themselves. If they slide, change their position or use fewer pieces instead of crimping them tightly around the hair. For event styling, explain the ponytail height and the exact cuff spacing you like. Removing each cuff individually before releasing the ponytail helps prevent tangles.
Pro tip:
Place the first cuff slightly below the elastic instead of directly over it. This leaves the ponytail anchor undisturbed and gives the jewelry a cleaner starting point.
Make It Work for You:
For fine or lower-density hair, use fewer, smaller cuffs with wider spacing. The metal remains visible without weighing down a slim ponytail or making the decoration look crowded.
Watch Out For:
Avoid squeezing adjustable cuffs tightly around a large bundle of hair. If a piece will not close comfortably, move it to a thinner section rather than forcing the metal inward.
Moon Charm Half-Up Hairstyle

Small moon charms can turn a soft half-up style into a celestial focal point without covering the loose length. Gather the upper sections from the temples, twist them once at the back, and secure the join so the crown stays softly lifted. Place two or three silver moon charms around the twist rather than scattering them randomly. The lower hair can remain straight, wavy, curly, or coily, while narrow pieces around the face keep the front relaxed.
This works on medium to long hair and is useful when you want the jewelry to be noticeable from the back but still keep most of your texture visible. Use silver moon charm pins for the decoration, a mini snag-free elastic to stabilize the half-up section, and light texturizing spray to improve grip. A short refresh usually means repositioning the charms and smoothing the twist; full wash-day styling depends on how you finish the loose lengths.
Build the half-up anchor before inserting the decorative pieces so the charms do not carry the weight. If the pins feel heavy, use fewer rather than placing them closer together. For salon styling, identify the crown height, twist width, and whether you want the moons clustered centrally or following one side of the curve.
Pro tip:
Place the largest charm closest to the stable center of the twist, then use smaller pieces farther outward. This keeps the heavier decoration near the strongest part of the anchor.
Make It Work for You:
If your hair is very curly or coily, let the charms sit between visible curl groups rather than flattening them. The half-up shape can stay soft while the metal remains easy to see.
Watch Out For:
Do not push charm pins repeatedly through the same small section. If a piece will not stay, move it closer to the anchored twist instead of adding pressure to loose hair.
Silver Ring Bubble Braid Hairstyle
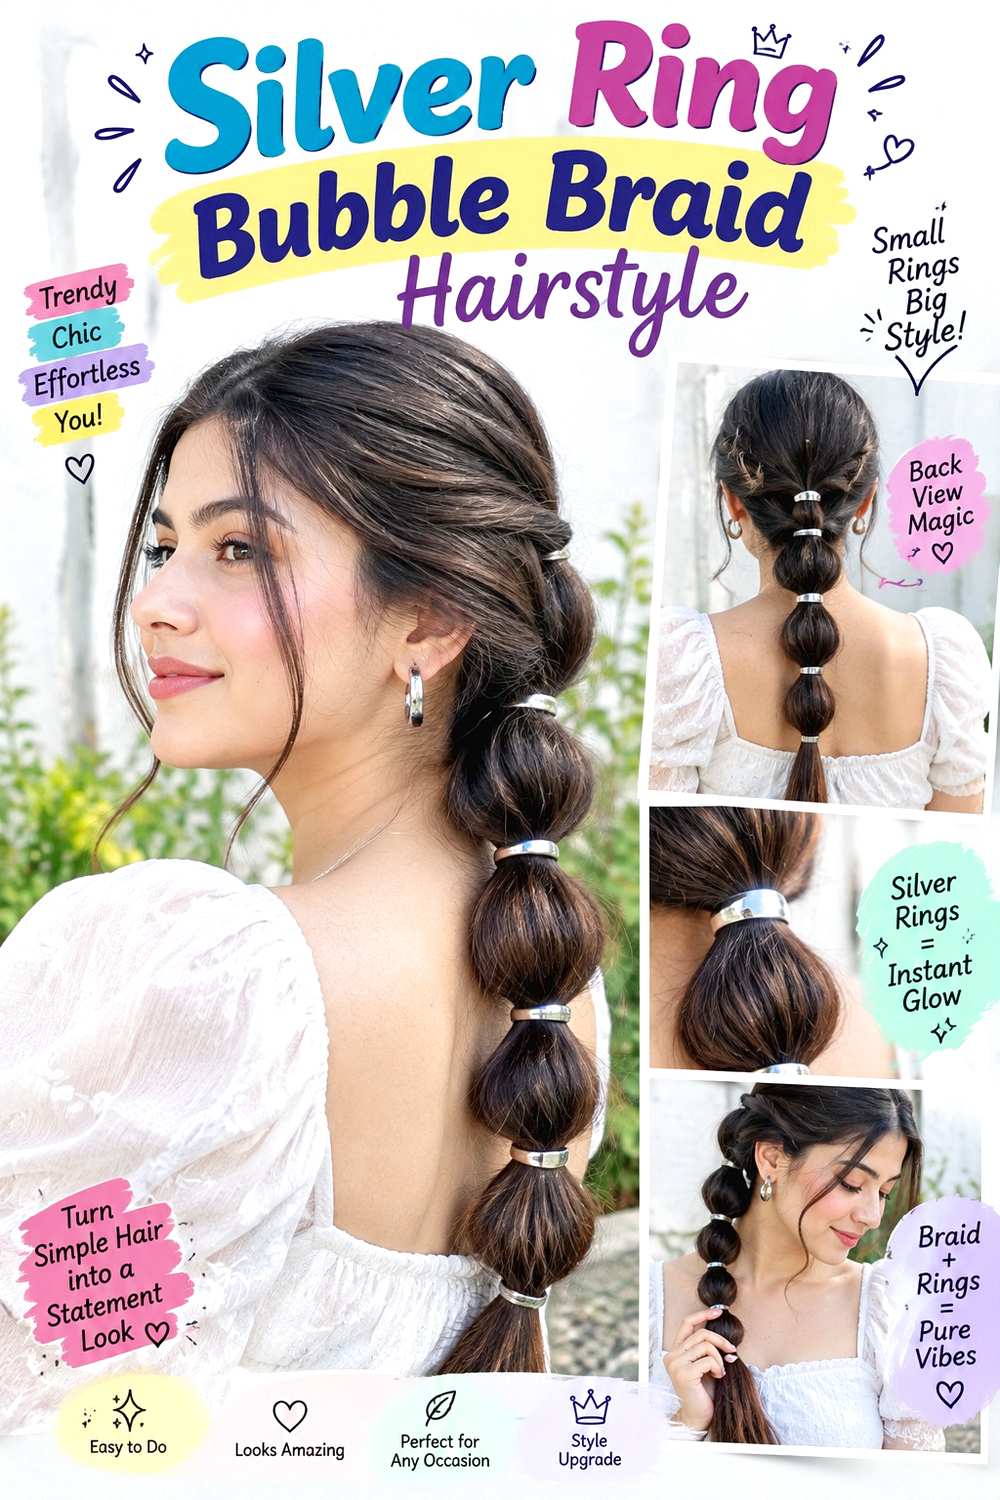
A bubble braid gives silver rings clear spaces to sit between repeated rounded sections. Gather the hair into a low or mid ponytail, add snag-free elastics at regular intervals, then gently widen each bubble. Silver rings can clip along the outer edge of alternating sections rather than appearing on every segment. The look is especially clear on medium to long hair because the repeated shape has enough length to develop, while a sleek crown keeps the focus on the decorated ponytail.
The design can work on straight, wavy, curly, or stretched hair, though the bubble size should suit your density. Use snag-free elastics to create the structure, silver hair rings for the metallic accents, and lightweight mousse to give the ponytail body without making the ends stiff. A quick refresh can focus on one collapsed bubble or shifted ring; rebuilding the full pattern takes longer.
Keep the rings attached to stable outer sections, not individual strands. If a bubble loosens, adjust the elastic and shape before replacing the jewelry. For professional styling, show the desired bubble width, spacing, and whether the rings should form a straight line or alternate from side to side. Remove the metal pieces before taking out the elastics.
Pro tip:
Shape each bubble before adding its ring. Once the jewelry is attached, repeated pulling can catch nearby strands and change the spacing you worked to create.
Make It Work for You:
For dense hair, use fewer, longer bubble sections so the ponytail does not become overly bulky. Larger intervals can keep the silver rings visible without crowding the length.
Watch Out For:
Do not clip rings around thick bundles that force the metal open. Attach them to the outer edge of a bubble where they can close comfortably without pinching strands.
Crystal Silver Bun Pin Hairstyle

A low bun gives a crystal-tipped silver pin enough space to become the main decorative feature. Gather the hair near the nape, form a rounded or slightly oval bun, and secure the structure before sliding the decorative pin diagonally through the upper edge. A center or side part keeps the front controlled, while the bun can stay smooth or retain natural texture. Medium to long hair works best because the shape needs enough length to create a stable base.
This option suits formal events or simple evening styling when you want one strong piece rather than several small accessories. Use bobby pins to build the actual bun, a crystal silver bun pin for the visible accent, and smoothing cream to control the outer surface. Refreshing can be brief if only the decorative pin shifts; recreating the entire bun from wash-day hair takes longer.
The ornament should reinforce an already secure bun rather than function as the sole support unless it is specifically designed for that job. If the piece feels heavy, angle it through the widest part of the bun instead of balancing it on the edge. For professional styling, specify bun height, width, and the direction you want the crystal detail to face.
Pro tip:
Insert the decorative pin after the bun is fully stable. Slide it through the upper third at a shallow angle so the crystal sits visibly without pointing directly into the scalp.
Make It Work for You:
If your hair is fine, keep the bun compact and choose a lighter pin. The silver accent can still look substantial without requiring a large knot to support it.
Watch Out For:
Do not rely on a heavy decorative pin to rescue a loose bun. Rebuild the hidden anchor first, then return the jewelry once the shape stays secure on its own.
Silver Thread Dutch Braid Hairstyle

Silver thread woven through a Dutch braid gives the hairstyle a fine metallic line instead of adding bulky jewelry. The braid can run centrally from the crown, diagonally toward one shoulder, or along one side before joining a low ponytail. Keep the thread visible on selected outer crossings rather than wrapping every strand, which allows the braid texture to remain clear. Medium and long hair give more room for repetition, while shorter lengths can use the detail only through the upper braid.
This option works well when you want subtle shine that moves with the braid. Use metallic silver hair thread for the decorative element, a clear elastic to secure the end, and light braid gel to control short pieces without making the pattern rigid. A small refresh may involve retucking one loose thread section, while creating the complete braid and threading it evenly requires more time.
The thread should follow the braid without pulling tighter than the hair itself. For event styling, specify braid width, direction, and whether you want the silver concentrated near the crown or repeated to the ends. When removing the style, untie or cut only the thread carefully before undoing the braid so it does not wind around loose strands.
Pro tip:
Anchor the thread several crossings below the scalp and weave it through the outer braid loops. This makes the metallic detail visible while keeping the attachment away from sensitive roots.
Make It Work for You:
For thick or highly textured hair, use a slightly wider thread or double strand so the silver remains visible against the larger braid without needing tighter placement.
Watch Out For:
Do not wrap metallic thread repeatedly around one small section. Concentrated tension can make removal difficult, so distribute it along the braid and keep each wrap comfortably loose.
Sculptural Silver Barrette Twist Hairstyle
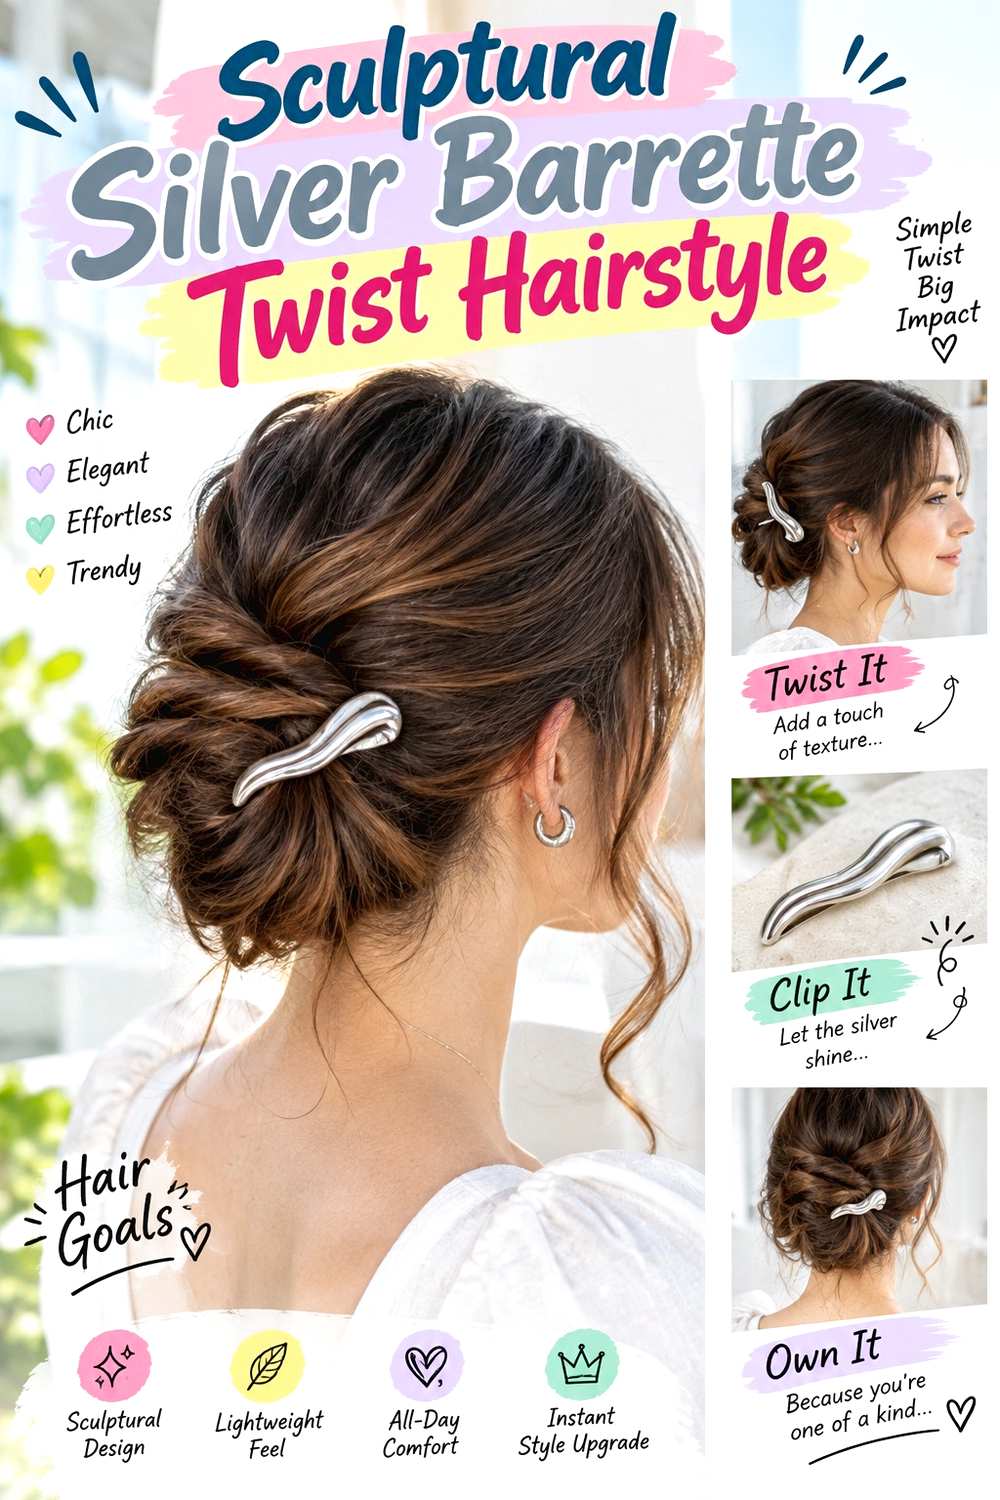
A sculptural silver barrette works best when the twist underneath has enough structure to frame the accessory. Sweep the sides toward the back, overlap them into a horizontal or diagonal twist, and secure the base before placing the barrette across the center. The lower lengths can stay loose or tuck into a compact fold. A side part creates an asymmetric front, while a center part gives the twist a balanced look. Shoulder-length to long hair provides enough material for the back detail to feel intentional.
This style suits straight, wavy, and loosely curly textures, especially for work, dinner, or an event where you want a clean metallic focal point. Use bobby pins to establish the hidden anchor, a sculptural silver barrette for the visible finish, and light texturizing spray to improve grip. A brief refresh involves checking the barrette and flyaways; rebuilding the complete twist takes longer.
The barrette should close over a manageable section rather than the entire thickness of dense hair. If it strains, secure more of the twist underneath and let the accessory cover only the surface. For professional styling, specify whether the barrette should sit horizontally, diagonally, or slightly off center and how much loose length should remain.
Pro tip:
Build the hidden twist first and test that it stays without the barrette. Then add the accessory over the strongest section so decoration and structural support remain separate jobs.
Make It Work for You:
If your hair is dense, use the barrette over only the central surface layer while hidden pins manage the bulk underneath. The sculptural piece remains visible without forcing its clasp.
Watch Out For:
Do not keep closing a barrette that resists. A strained clasp can catch hair or spring open, so reduce the section inside it and let the hidden anchor do more work.
Layered Silver Chain Updo Hairstyle

Several fine silver chains can drape across a low updo to create movement without adding height. Build a low twisted bun or tucked roll first, then attach two or three chains between stable points so they form shallow arcs across the back. Keeping the crown smooth lets the metal stand out, while narrow face-framing pieces can soften the front. Medium to long hair provides the easiest base because the updo can support the chains without depending on them for structure.
This design works well for evening styling, formal events, or a modern bridal direction when you want more detail than a single pin. Use bobby pins to secure the updo, a layered silver chain hair piece for the decoration, and flexible hairspray to control flyaways while preserving movement. A quick refresh can involve reattaching one chain; a full wash-day version takes longer because the updo must be stable before jewelry is added.
Allow each chain a little slack so turning your head does not tug the anchors. For professional styling, specify the number of drapes, their depth, and whether they should sit symmetrically or slope to one side. Remove the chains one by one before dismantling the updo.
Pro tip:
Attach the outer chain points first, then adjust the center drape. This makes it easier to control how low each arc falls without pulling one side tighter than the other.
Make It Work for You:
For shorter hair, use one or two smaller chains across a compact tucked updo. The metallic layering remains clear even when the base has less width.
Watch Out For:
Do not attach chains to loose surface hairs. Use stable pinned sections as the connection points so head movement does not transfer tension directly to individual strands.
Silver Hair Cuff Cornrow Hairstyle

Silver cuffs can emphasize selected sections of cornrows or close-to-scalp braids without covering the underlying pattern. Keep the braid arrangement clean and intentional, then place cuffs at spaced intervals on one or two rows rather than loading every braid. A center design can look symmetrical, while an offset arrangement creates a stronger side focus. The remaining hair may continue into longer braids, curls, a ponytail, or a bun depending on the overall style.
This idea works best when the braid tension is comfortable before any jewelry is added. Use silver hair cuffs for decoration, a rat-tail comb to create clear sections, and light braid gel to keep the parting area neat. A small refresh may involve replacing a shifted cuff or smoothing the perimeter; creating the full braided base takes considerably longer than maintaining it.
The cuffs should sit around the braid without squeezing it. If one will not close easily, move to a narrower point or choose a larger cuff rather than compressing the hair. For professional styling, discuss braid width, comfortable tension, where the cuffs should begin, and how many you want visible from the front and side. Remove the jewelry carefully before taking down the braids.
Pro tip:
Place cuffs on completed braids rather than adding them while tension is still being adjusted. This keeps the jewelry from interfering with how the braid settles against the scalp.
Make It Work for You:
If you prefer minimal decoration, use cuffs only on the two most visible braids near the part. The silver remains noticeable without changing the balance of the full braided style.
Watch Out For:
Do not tighten braids simply to keep a cuff from moving. Choose a better-fitting accessory or reposition it; comfortable tension should come before decorative security.
Celestial Silver Clip Waves Hairstyle

Loose waves gain a graphic edge when a cluster of silver star and moon clips sits above one ear. Create a clean side part, tuck the lighter side behind the ear, and place the celestial clips in a short diagonal line rather than scattering them across the head. The opposite side can keep broad movement through the cheek and shoulders, creating deliberate asymmetry. Medium to long hair makes the wave pattern easy to see, although a wavy bob can carry the same accessory placement on a smaller scale.
This works well for naturally wavy hair or a previously styled wave pattern because the clips do not require the texture to be perfectly uniform. Use silver celestial clips for decoration, light texturizing spray to give the tucked side grip, and a wide-tooth comb to arrange the loose waves without breaking them apart. A quick refresh usually means resetting the clips and reshaping a few outer bends; full wash-day styling takes longer if the wave pattern needs to be created first.
Place the clips into a stable tucked section rather than relying on individual flyaways. For event styling, specify the number of clips, the angle of the cluster, and how much hair should remain exposed around the ear.
Pro tip:
Start with the largest celestial clip closest to the ear, then place smaller pieces upward. The graduated scale makes the cluster look deliberate and keeps weight near the stronger tucked section.
Make It Work for You:
If your hair is short, reduce the cluster to two or three clips and keep them close to the temple. The celestial detail stays proportional to the smaller wave pattern.
Watch Out For:
Avoid placing several heavy clips on one thin surface section. Spread them along the tucked area so each piece grips securely without concentrating weight at a single point.
Silver Leaf Chignon Hairstyle
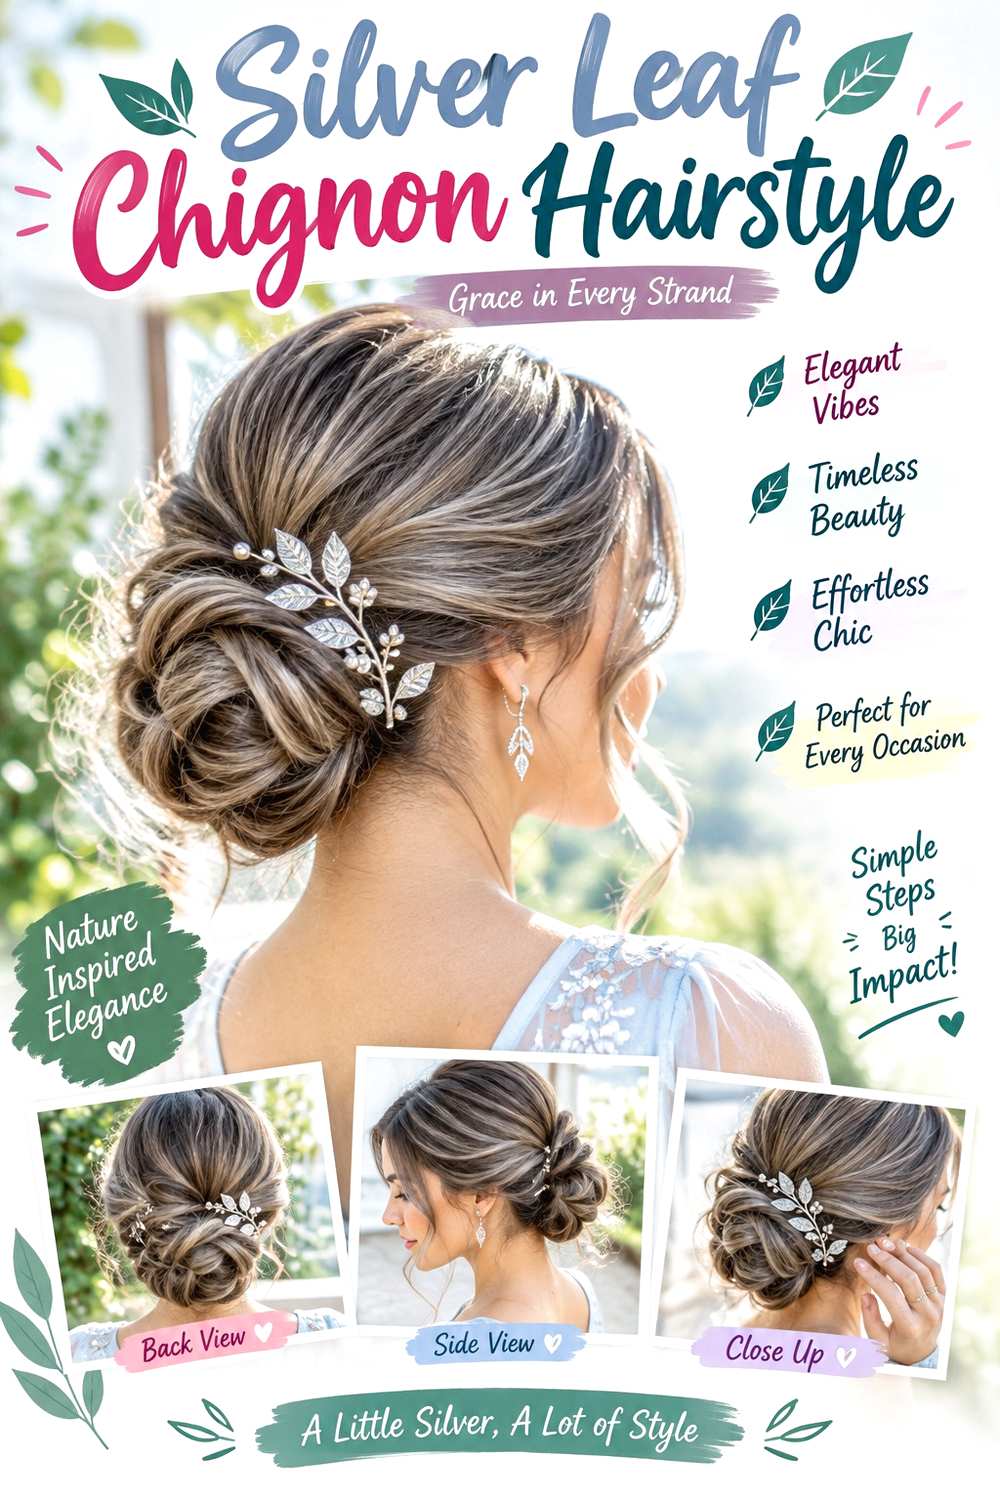
A silver leaf accessory follows the curved shape of a low chignon particularly well. Gather the hair at the nape, fold or coil it into a broad bun, and secure the structure before placing the leaf piece along the upper or side edge. A center or soft side part keeps the front polished, while the chignon can remain smooth or retain subtle natural texture. Medium to long hair provides enough length for a secure bun and enough width for the leaf detail to sit visibly.
This design works for formal occasions when you want jewelry that complements the updo rather than becoming a separate focal point. Use bobby pins to stabilize the chignon, a silver leaf hair vine or pin for decoration, and styling cream to smooth the surface. A short refresh can involve repositioning one end of the leaf piece; building the complete chignon from the beginning takes longer.
The accessory should trace the bun rather than pierce random surface sections. If it feels heavy, place it closer to the pinned center where the hairstyle is strongest. For professional styling, specify the chignon width, whether it sits directly at the nape or slightly higher, and whether the leaves should follow the top curve or one side.
Pro tip:
Curve the leaf accessory to echo the bun before inserting it when the design allows gentle adjustment. Matching the shape reduces the need to force individual anchor points into place.
Make It Work for You:
For a smaller chignon, position the leaf piece along one side instead of spanning the entire bun. The asymmetry keeps the accessory proportional while preserving the same botanical effect.
Watch Out For:
Do not let decorative leaves carry the bun’s weight. If the chignon loosens when the accessory is removed, rebuild the hidden pins before putting the jewelry back.
Double Silver Pin French Twist Hairstyle
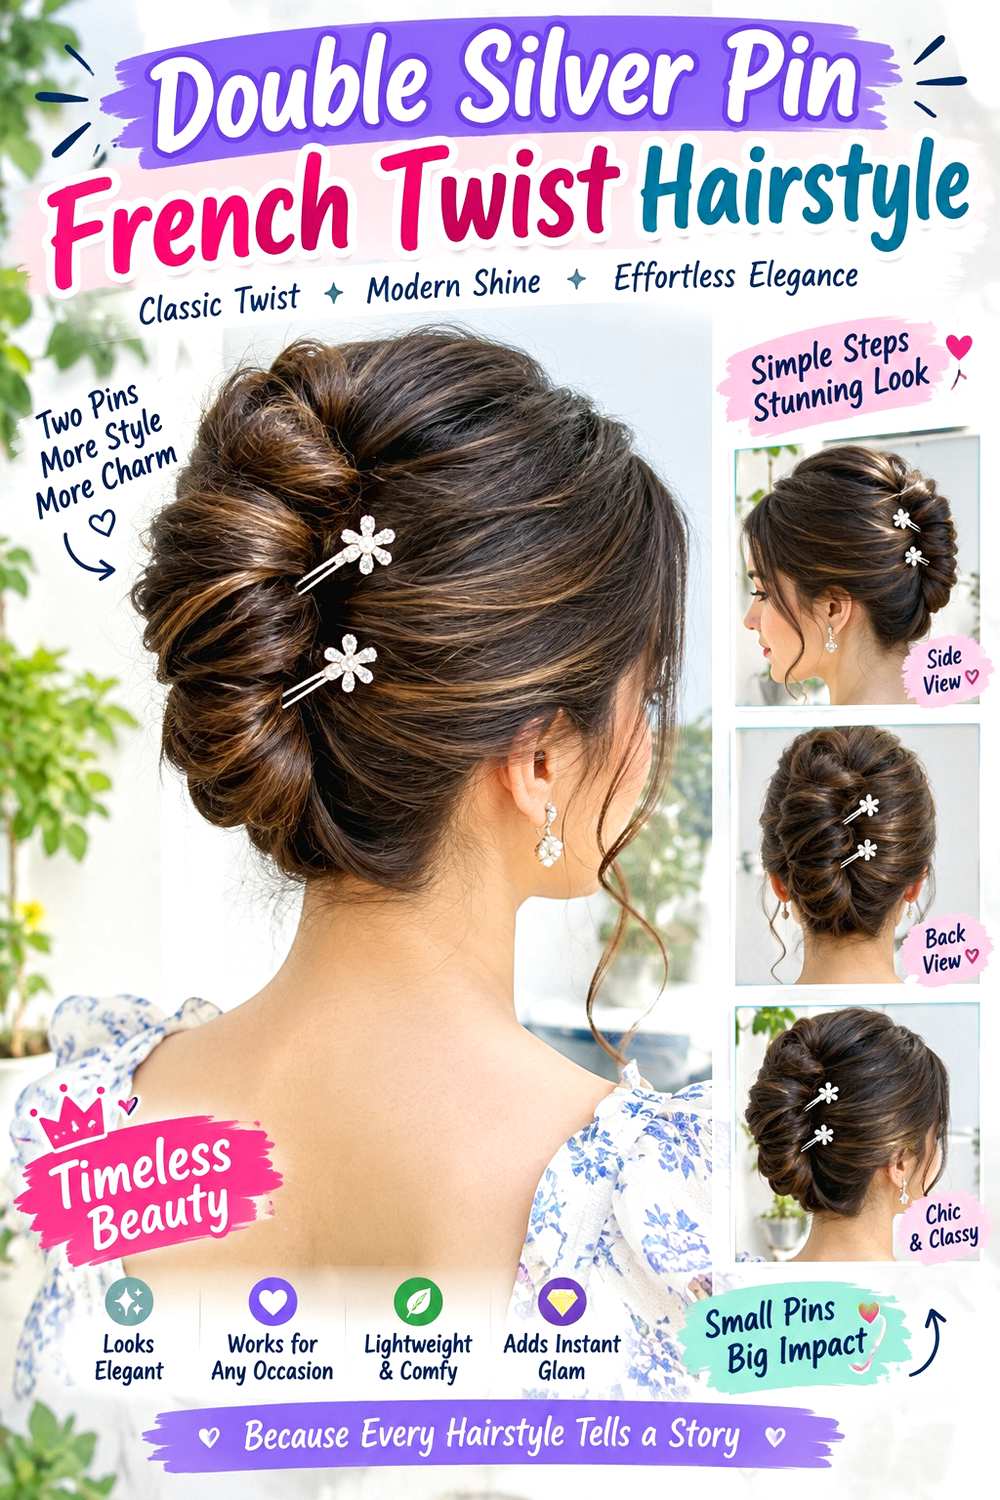
Two long silver pins placed in parallel give a French twist a modern, architectural finish. Sweep the hair inward from one side, roll it vertically from the nape toward the crown, and establish a hidden anchor before adding the decorative pins. The outer surface stays smooth, while the upper tip can remain tucked or form a small controlled fold. Medium to long hair works best because the twist needs enough length to create a stable vertical ridge.
This style suits straight, wavy, or smoothed textured hair when you want a polished evening or work look. Use bobby pins to secure the hidden seam, two silver decorative hair pins for the visible detail, and flexible hairspray to control flyaways without making the twist rigid. A small refresh may involve adjusting one decorative pin, while recreating the whole vertical roll requires more time and practice.
Insert the silver pins through stable sections of the twist rather than directly toward the scalp. They should look parallel without needing identical depth. For professional styling, explain where the twist should finish, how much crown lift you prefer, and whether the two pins should sit vertical, slightly diagonal, or crossed.
Pro tip:
Test the French twist without the decorative pins first. Once it stays secure, insert both silver pieces at matching angles through the outer roll so their placement remains decorative rather than structural.
Make It Work for You:
If your hair is shorter, use a compact twist that ends below the crown and choose shorter silver pins. The double-line detail remains visible without overwhelming the smaller roll.
Watch Out For:
Never push a long pin straight toward the scalp when you meet resistance. Withdraw it, change the angle, and guide it through the twist rather than forcing the point deeper.
Silver Bead Accent Braid Hairstyle

A small accent braid decorated with silver beads can add detail while leaving most of the hair loose. Create one narrow braid near the temple or behind the ear, then thread beads onto selected sections so they sit several crossings apart. The remaining hair can stay straight, wavy, curly, or coily, and the braid can finish near the jaw, shoulder, or blend into the full length. The asymmetry keeps the silver concentrated rather than spreading decoration everywhere.
This is a useful option when you want hair jewelry without committing to a full braided style. Use silver hair beads for the decoration, a bead threader to guide them onto the braid, and a clear elastic to secure the end. A quick refresh may involve sliding one bead back into position; building the accent braid from scratch takes only a short session compared with a full-head braided design.
Choose beads with openings that fit the braid comfortably rather than forcing thick sections through narrow metal. For professional styling, specify the braid width, its starting point, and the number and spacing of beads. Remove each bead before undoing the braid so the metal does not catch loose strands during takedown.
Pro tip:
Thread the bead onto a finished braid section instead of adding it while the braid is still changing tension. This keeps the spacing consistent and makes removal easier later.
Make It Work for You:
For thick or coily hair, make the accent braid slightly wider and choose beads with enough opening space. The detail remains visible without compressing the braided section.
Watch Out For:
Do not force hair through a bead that is too small. If the opening catches or scrapes strands, switch to a larger piece rather than repeatedly pulling the section through.
Asymmetric Silver Chain Ponytail Hairstyle

A side-draped silver chain gives a simple ponytail a directional statement without covering the entire style. Create a low or mid ponytail, then anchor one end of the chain near the base and the other farther down one side so it forms a shallow metallic curve. A deep side part can echo the asymmetry, while the ponytail itself may stay sleek, wavy, or naturally textured. Medium to long hair provides enough length for the chain to move without touching the ends.
This idea works when you want a strong accessory detail but still need a straightforward base hairstyle. Use a fabric-covered elastic to secure the ponytail, a silver chain hair accessory for the drape, and bobby pins to stabilize its attachment points. A quick refresh usually means checking the chain and smoothing the ponytail; a full wash-day style takes longer depending on the finish you choose.
Leave enough slack for comfortable movement when you turn your head. If the chain swings excessively, shorten the drape rather than tightening the anchor against the hair. For professional styling, specify ponytail height, which side the chain should follow, and how deep you want the metallic curve to fall.
Pro tip:
Move your head gently after attaching the chain and watch how far it swings. Adjust the drape before leaving so normal movement does not tug either anchor point.
Make It Work for You:
For shorter ponytails, keep the chain close to the base and create one compact curve. The asymmetry stays noticeable without requiring a long section of loose hair.
Watch Out For:
Do not attach both ends of the chain to loose surface strands. Anchor them to stable points around the ponytail base or hidden pins so the jewelry cannot pull individual hairs.
Silver Halo Crown Braid Hairstyle

A silver halo chain can follow the circular line of a crown braid, creating a bright outline without hiding the woven texture. Form the braid around the head with comfortable tension, secure the tucked end, then position the silver halo slightly inside or outside the braid’s upper edge. Small attachment points should keep the chain from sliding forward. Face-framing pieces can remain loose, but the overall shape works best when the braid line is easy to see.
This style suits medium to long hair and can also work with added braided length when that is already part of the chosen style. Use bobby pins to secure the crown braid, a silver halo chain for the decoration, and light styling cream to keep the perimeter controlled. A quick refresh may involve resetting one attachment point; the full braided foundation takes longer because balance around the head matters.
The chain should rest on the hairstyle rather than press against the scalp. If it shifts, improve the attachment points instead of tightening the braid. For professional styling, discuss braid width, crown height, chain position, and how much loose hair you want around the face. Remove the halo before taking down the braid.
Pro tip:
Attach the halo at several light points around the braid rather than only at the back. Distributed support keeps the chain level without requiring one tight anchor.
Make It Work for You:
If you prefer a softer crown, place the silver chain only across the upper half instead of completing a full circle. The braid remains the main feature with lighter jewelry coverage.
Watch Out For:
Do not tighten the crown braid to stop the halo from slipping. Secure the accessory independently so braid tension stays comfortable around the hairline and scalp.
Sleek Silver Comb Bun Hairstyle
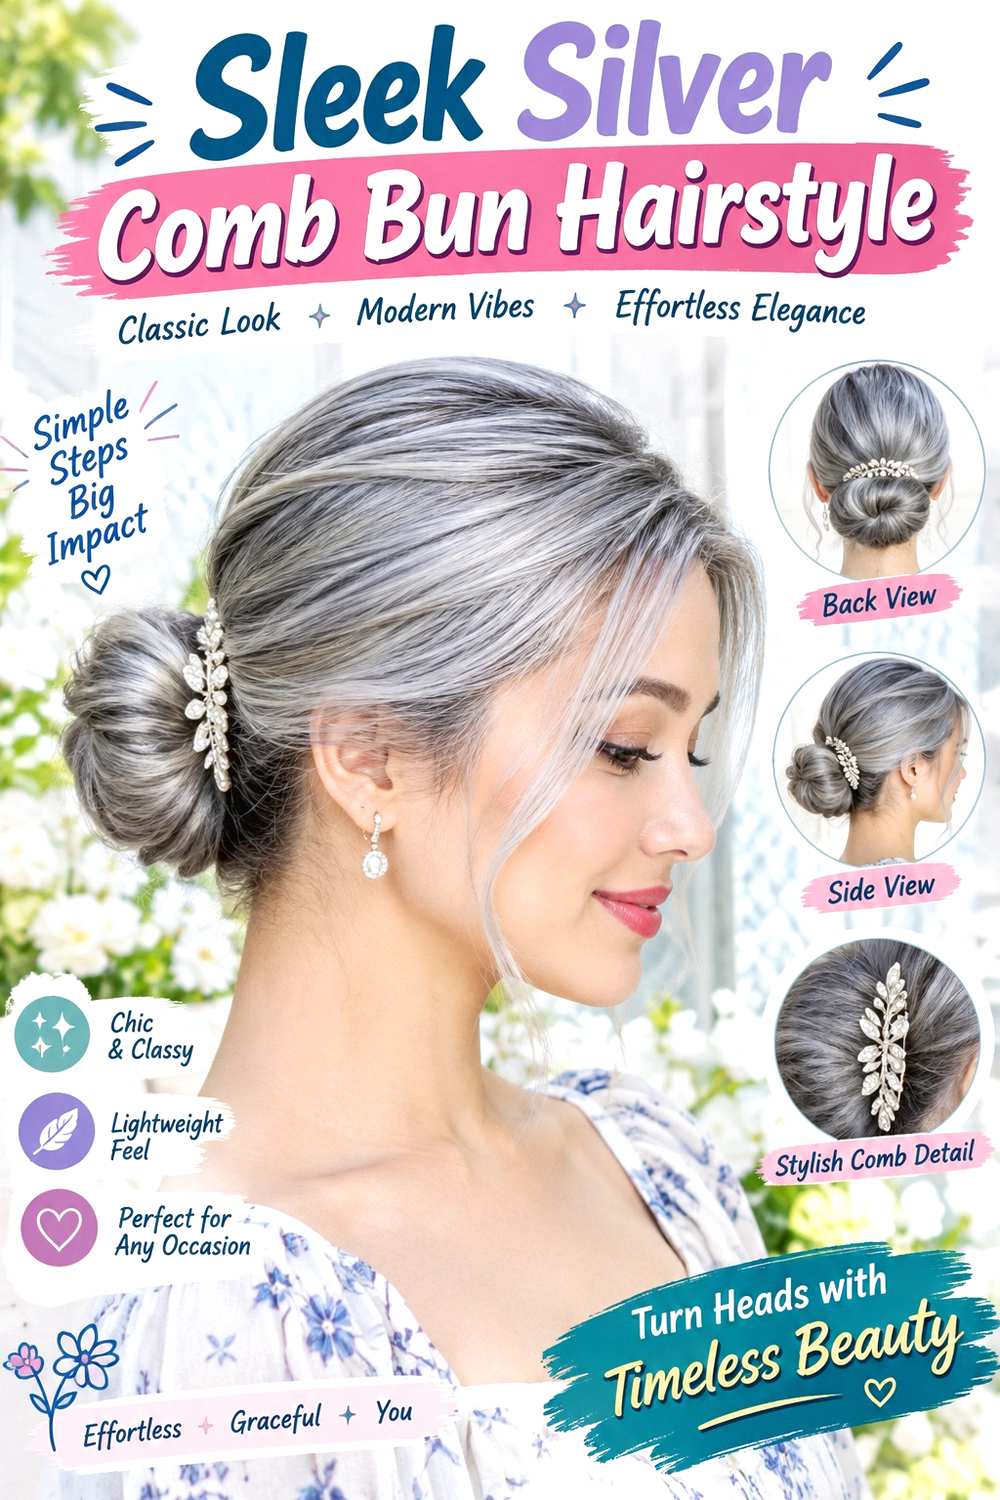
A silver comb placed above a sleek low bun creates one clean horizontal accent. Gather the hair into a centered nape bun, keep the crown close to the head, then insert the comb just above the bun so its decorative edge remains fully visible. A crisp middle or side part can sharpen the front, while the bun itself may be round, folded, or slightly elongated. Medium to long hair works well because a stable low base gives the comb something firm to rest against.
This style suits formal or professional settings when you want hair jewelry without scattered details. Use a fabric-covered elastic to establish the bun base, a silver decorative hair comb for the visible accent, and smoothing gel to control flyaways. A quick refresh involves smoothing the hairline and checking the comb; a complete restyle takes longer if the bun and crown both need rebuilding.
Insert the comb into stable hair above the bun rather than relying on loose surface strands. If it feels heavy, move it closer to the bun where the base provides more support. For event styling, specify the bun width, exact comb height, and whether the decorative edge should sit straight or at a slight angle.
Pro tip:
Insert the comb with its teeth angled slightly downward toward the bun base. This helps the decorative top sit flat instead of tipping away from the head.
Make It Work for You:
For fine hair, choose a lighter comb with closely spaced teeth and keep the bun compact. The metallic line remains strong without requiring a large amount of hair underneath.
Watch Out For:
Do not repeatedly push a slipping comb deeper into loose hair. Move it closer to the stable bun base or choose a better-fitting tooth spacing for your density.
Silver Charm Curly Updo Hairstyle

A curly updo can carry scattered silver charms without sacrificing the shape of the curls. Gather the hair into a loose mid or low updo, securing the base while allowing several defined curls to remain visible around the crown, sides, and nape. Place silver charm pins between selected curl groups rather than through their centers. A few face-framing curls can stay free, creating a softer front while the metallic details appear throughout the back.
This approach works especially well for naturally curly or coily hair because the jewelry can sit within the existing texture instead of requiring a smooth surface. Use bobby pins to build the updo, silver charm pins for decoration, and curl cream to support definition through the visible sections. A quick refresh can focus on a few outer curls and shifted charms; full wash-day styling takes longer because definition and drying happen before the updo is formed.
Plan placement on the dry finished shape because shrinkage changes where each curl sits. The charms should decorate a secure base rather than hold loose curls under tension. For professional styling, specify updo height, the number of loose curls, and whether the silver pieces should be clustered or evenly scattered.
Pro tip:
Place charms in the spaces between curl groups after the updo is secure. This keeps the metal visible while reducing the need to pierce or flatten the curls themselves.
Make It Work for You:
If your curls are very dense, use fewer but slightly larger charms. Bigger pieces can remain visible in the texture without requiring dozens of pins throughout the updo.
Watch Out For:
Do not add charms while the curls are still wet and changing shape. Wait until the updo is dry enough to judge placement so shrinkage does not shift the metal unexpectedly.
Conclusion
Silver hair jewelry hairstyles can range from one sculptural comb or barrette to layered chains, scattered charms, cuffs, beads, and metallic braid details. A braid or crown style supports repeated decoration, while buns and French twists work well with stronger single pieces. Fine or slippery hair may need a smaller decorated section and firmer hidden anchor, while dense hair benefits from distributing accessory weight. Curls and coils can keep their texture visible by placing jewelry between defined groups rather than flattening them. Consider your part, length, density, texture, accessory weight, and how long you need the style to remain comfortable. The most polished result comes from securing the hairstyle first, then adding silver details in positions that enhance rather than carry the structure.
Before Your Salon Visit
Choose one or two favorite references and save clear views showing both the hairstyle and the jewelry placement. Tell your stylist about your texture, density, usual part, preferred updo or braid height, and how long you need the style to stay comfortable. Point to the exact chain drape, cuff spacing, charm cluster, pin angle, braid width, or loose sections you like. Because these are temporary styles, focus on secure anchoring, comfortable tension, accessory weight, and careful removal rather than requesting an unnecessary haircut.
FAQs
How Do I Keep Silver Hair Jewelry From Slipping?
Secure the hairstyle first, then attach jewelry to a stable braid, twist, bun, elastic base, or pinned section. Fine or slippery hair may benefit from light texture for extra grip. If an accessory still moves, adjust its anchor or size rather than tightening it painfully.
Can Silver Hair Jewelry Work on Curly or Coily Hair?
Yes. Chains, cuffs, pins, beads, and charms can be placed around visible curl or coil groups while leaving the natural texture intact. Plan the decoration on the finished dry shape, because shrinkage and grouping change where each accessory appears and how much length reaches the anchor.
How Can I Remove Hair Jewelry Without Snagging My Hair?
Remove decorative pieces before undoing the hairstyle. Open cuffs and rings fully, detach chains one anchor at a time, and slide pins out along the direction they entered. If a strand catches, stop and release it gently rather than pulling the accessory through the hair.
How Much Silver Hair Jewelry Should I Use in One Hairstyle?
The amount depends on accessory scale and the hairstyle underneath. One large comb may be enough for a sleek bun, while a braid can support several smaller rings or cuffs. Keep spacing clear and make sure the decoration does not overwhelm the anchor or create uncomfortable weight.