16 Gold Hair Cuff Hairstyles for a Chic Statement Look
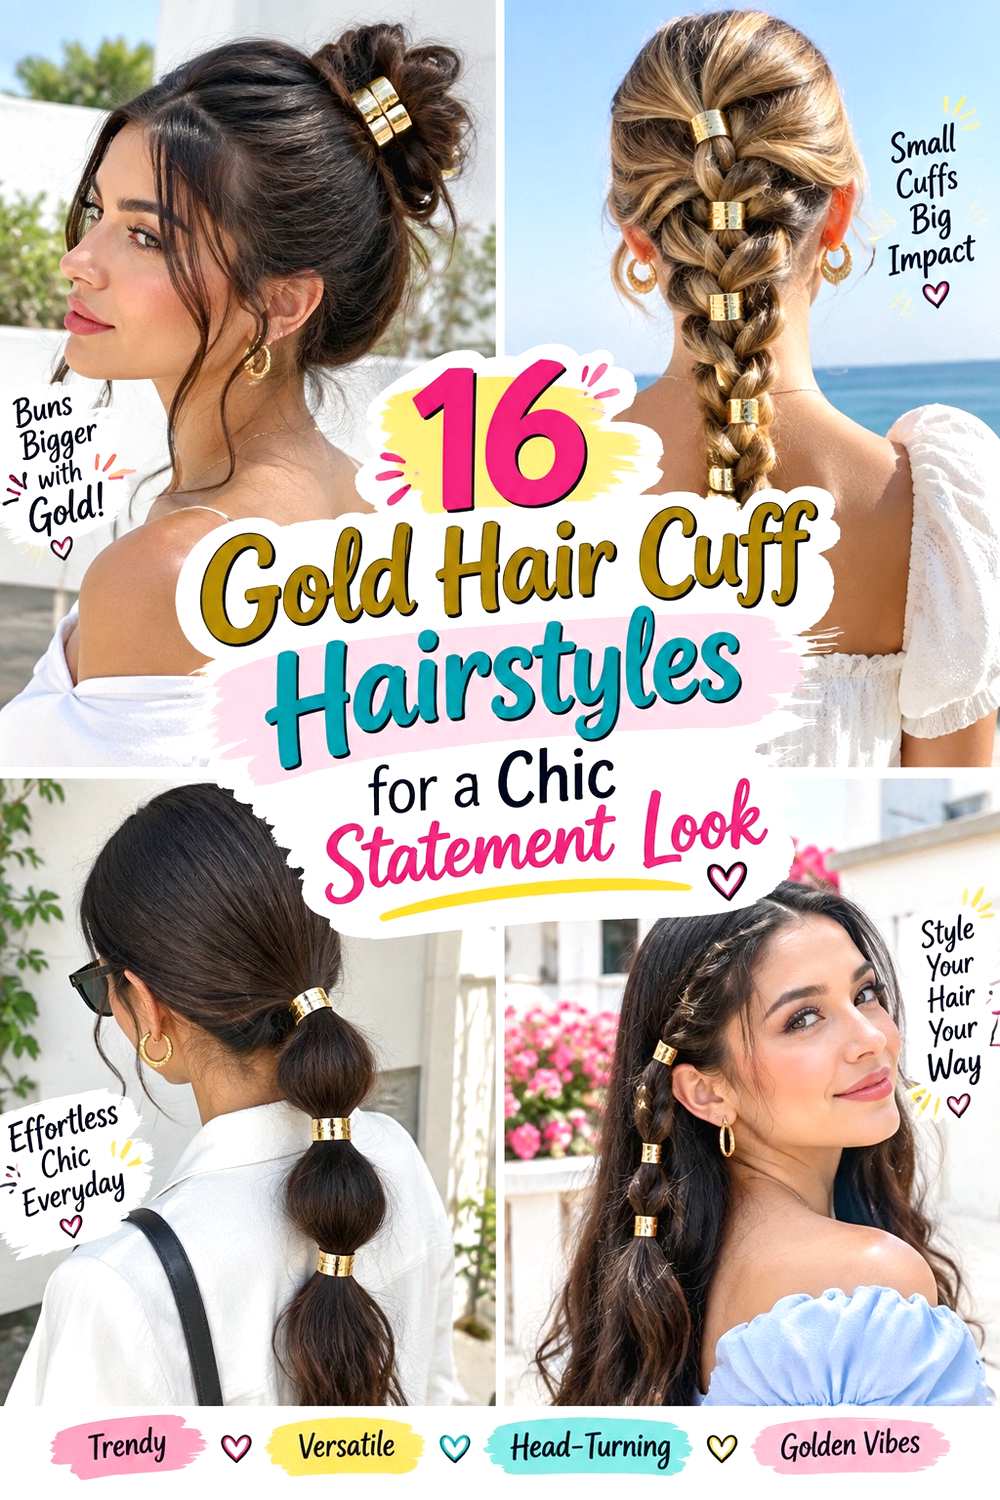
Gold hair cuff hairstyles use small metallic accents to define an anchor, braid, ponytail, twist, or gathered section without needing a heavily decorated finish. A single cuff around a low ponytail creates a clean focal point, while several smaller cuffs can mark braid sections or a bubble ponytail. Placement, parting, fringe, face framing, and overall volume all matter because the gold detail looks strongest when the surrounding hairstyle has a clear shape.
Fine hair usually benefits from lightweight cuffs and compact anchors that do not pull on a small section. Dense hair can support wider ponytails, braids, and buns, but the cuff still needs to close comfortably rather than squeeze the hair. Curly and coily textures can keep natural definition, with shrinkage considered before choosing the finished anchor height. Short bobs can use a tiny side cuff, while medium and long hair offers more room for wrapped ponytails and braids.
Styling effort ranges from a quick mini braid to a longer curled or pinned style. A refresh often means resetting the cuff or tightening the hidden anchor, while full wash-day styling takes longer. Choose cuffs with smooth inner edges and secure closures so they decorate the hair without snagging strands or pressing against the scalp.
Quick List
- Sleek Low Ponytail With Gold Cuff Hairstyle
- Bubble Ponytail With Gold Cuffs Hairstyle
- Side Braid With Gold Cuff Hairstyle
- Half-Up Twist With Gold Cuff Hairstyle
- Coily Puff With Gold Cuff Hairstyle
- Curly Low Ponytail With Gold Cuff Hairstyle
- Braided Crown With Gold Cuff Accent Hairstyle
- Low Bun With Gold Cuff Wrap Hairstyle
- Mini Braid With Gold Cuff Hairstyle
- High Ponytail With Gold Cuff Hairstyle
- Double Braids With Gold Cuffs Hairstyle
- French Twist With Gold Cuff Hairstyle
- Short Bob Side Twist With Gold Cuff Hairstyle
- Rope Braid Ponytail With Gold Cuff Hairstyle
- Half-Up Braid With Stacked Gold Cuffs Hairstyle
- Textured Low Knot With Gold Cuff Hairstyle
Sleek Low Ponytail With Gold Cuff Hairstyle
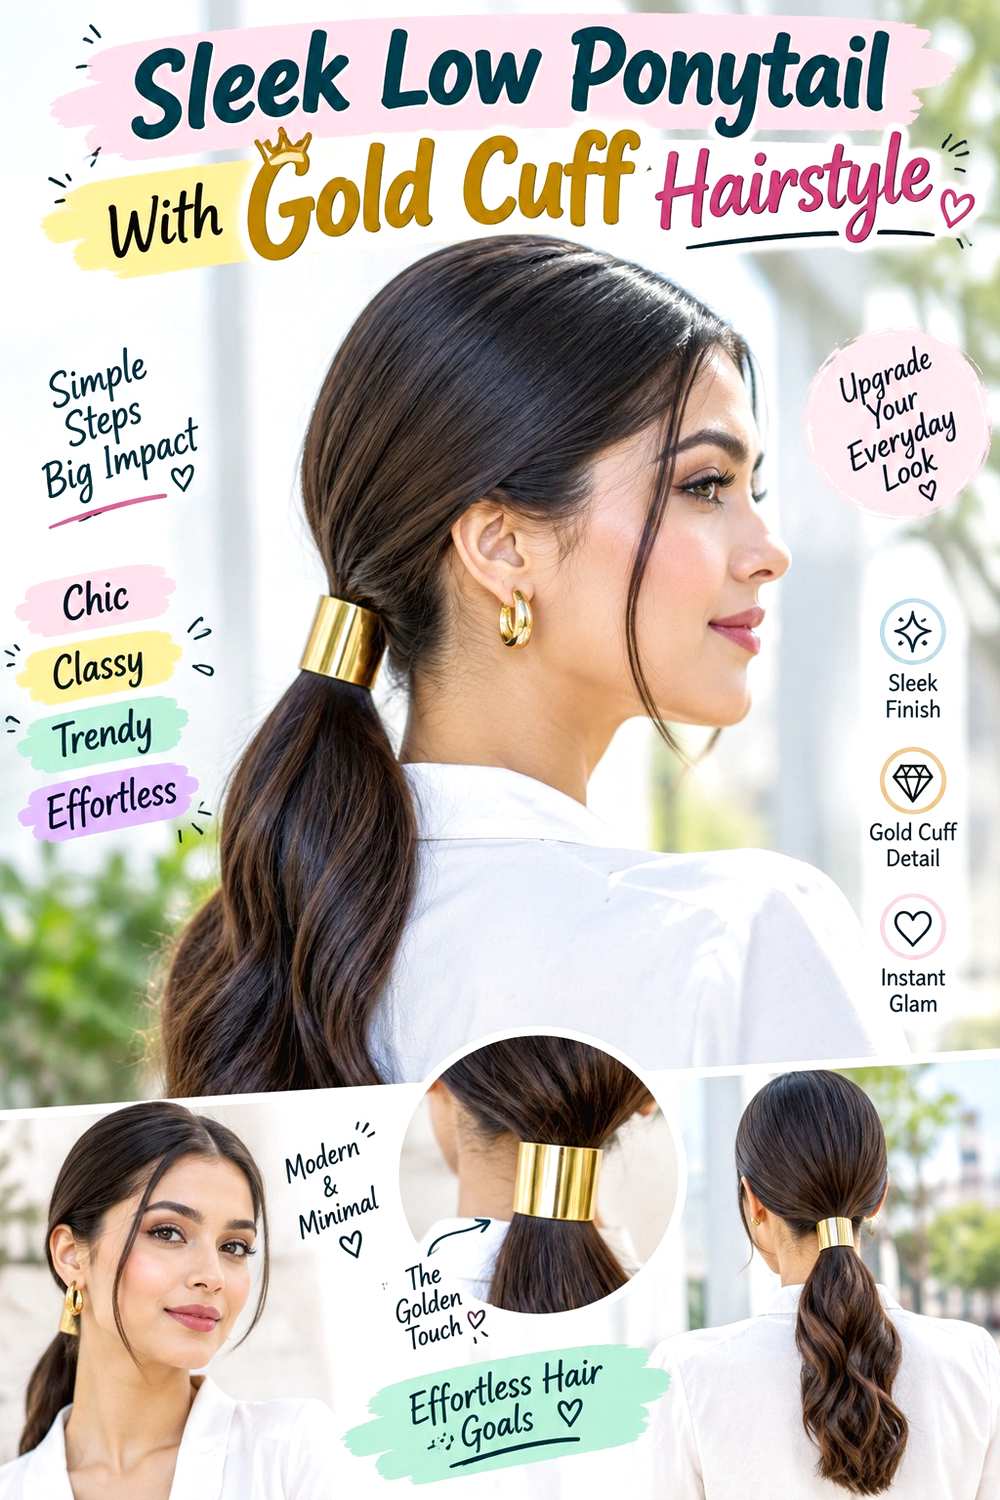
A sleek low ponytail gives a gold cuff a simple, strong focal point at the nape. Start with a center or precise side part, guide the hair backward, and keep the crown smooth without pulling it painfully flat. Secure the ponytail just below the occipital area, then close the cuff around the anchored base so it hides the fastening underneath. The tail can remain straight, softly bent, curly, or coily, while narrow face-framing sections may stay loose if you prefer a softer front.
Medium and long hair works best because enough tail remains visible below the metallic accent. Use a boar-bristle brush to direct the surface, a snag-free elastic for the real anchor, and a smooth-edged gold hair cuff for the finish. A quick refresh usually means smoothing the part and checking that the cuff has not rotated; a full wash-day style takes longer if you also change the tail’s natural texture.
For salon or event styling, specify the exact nape height and whether you want a center or side part. The cuff should sit over a stable ponytail rather than clamp directly around loose hair, which helps prevent slipping and unnecessary pressure.
Pro tip:
Close the cuff only after the ponytail feels secure on its own. That keeps decorative metal from carrying the tension and makes repositioning much easier.
Make It Work for You:
For fine hair, choose a narrower lightweight cuff that fits closely around the base without needing extra hair wrapped inside it for bulk.
Watch Out For:
A cuff that spins repeatedly is usually too loose or poorly anchored. Reset the ponytail base instead of squeezing the metal tightly around the hair.
Bubble Ponytail With Gold Cuffs Hairstyle
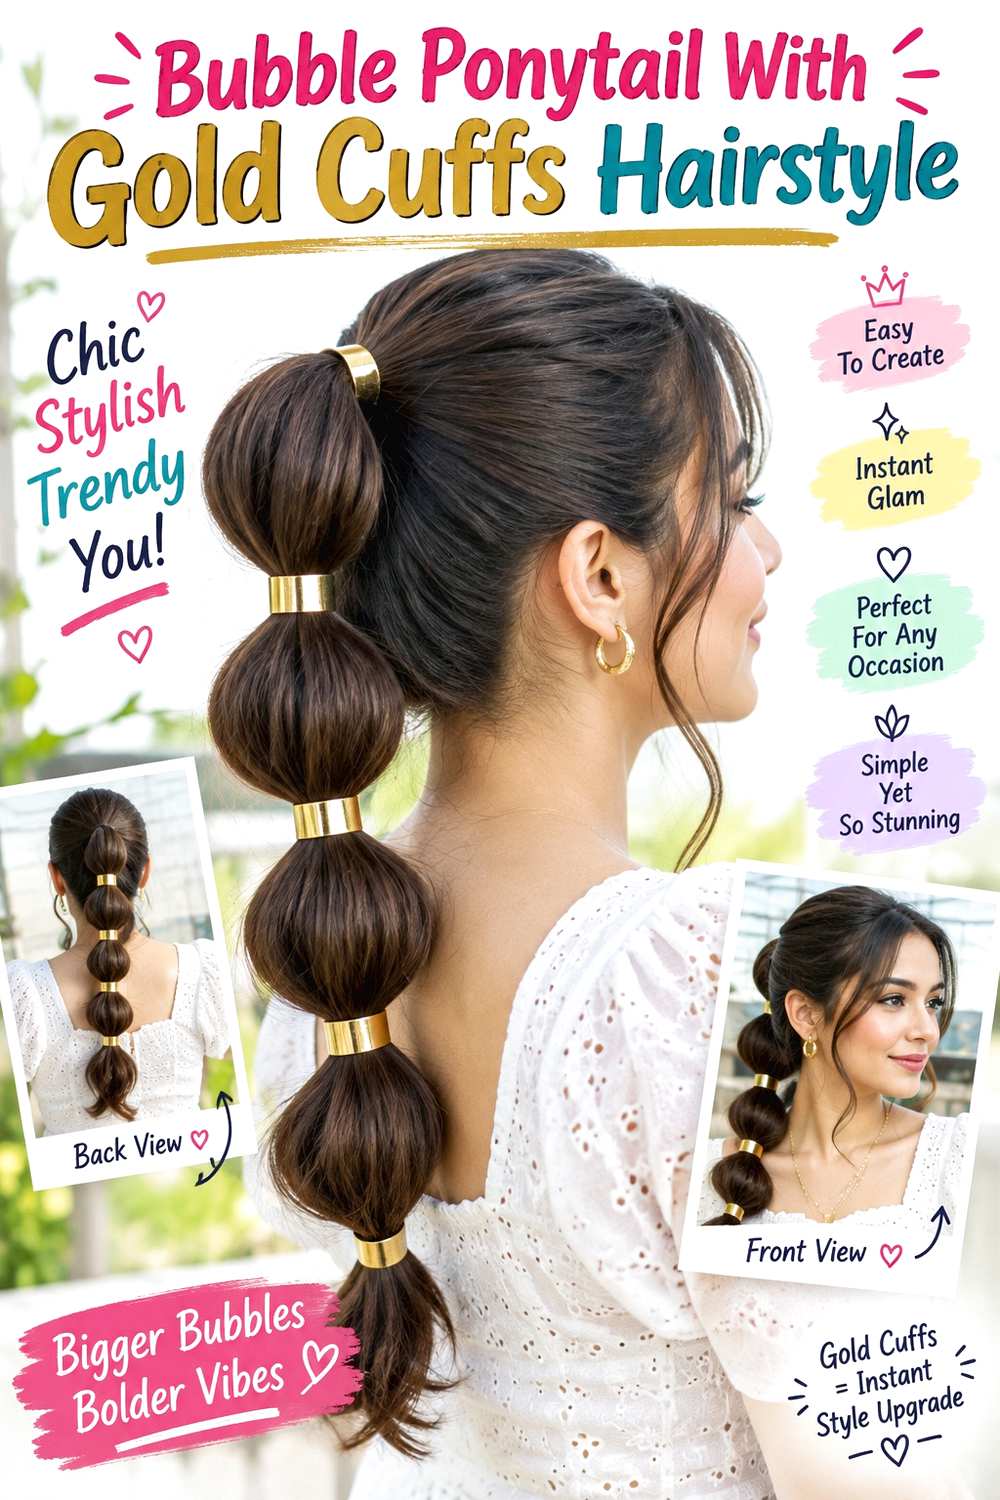
A bubble ponytail turns several gold cuffs into repeated accents along the length. Begin with a center or side part and gather the hair into a low or mid-height ponytail. Add anchors at even intervals, gently expand the hair between them into rounded sections, and place a cuff over selected anchors rather than every single one. Keeping the first bubble smaller and the later sections slightly fuller creates a smoother progression down the tail.
Medium-long and long hair works best because enough length is needed for at least two or three visible bubbles. Use snag-free elastics for the hidden anchors and lightweight gold hair cuffs for the decorative bands. A quick refresh may take only a few minutes to reshape one flattened bubble and straighten a cuff; full wash-day styling takes longer if the hair needs drying, detangling, or smoothing first.
If the tail is fine, keep the spacing closer so you do not use up too much length while expanding each section. For salon or occasion styling, specify the ponytail height, bubble size, and whether you want cuffs on every anchor or only alternating points. The decorative bands should sit over secure elastic sections, not clamp directly onto loose hair.
Pro tip:
Place every hidden anchor before expanding the bubbles or adding cuffs. Seeing the full length first makes balanced spacing much easier to judge.
Make It Work for You:
For dense hair, use slightly wider spacing and modest expansion. Natural fullness already creates strong bubbles, so the cuffs can remain slim and lightweight.
Watch Out For:
Over-expanding the top bubble can loosen the ponytail base. Keep the first section controlled and build more width farther down the tail instead.
Side Braid With Gold Cuff Hairstyle
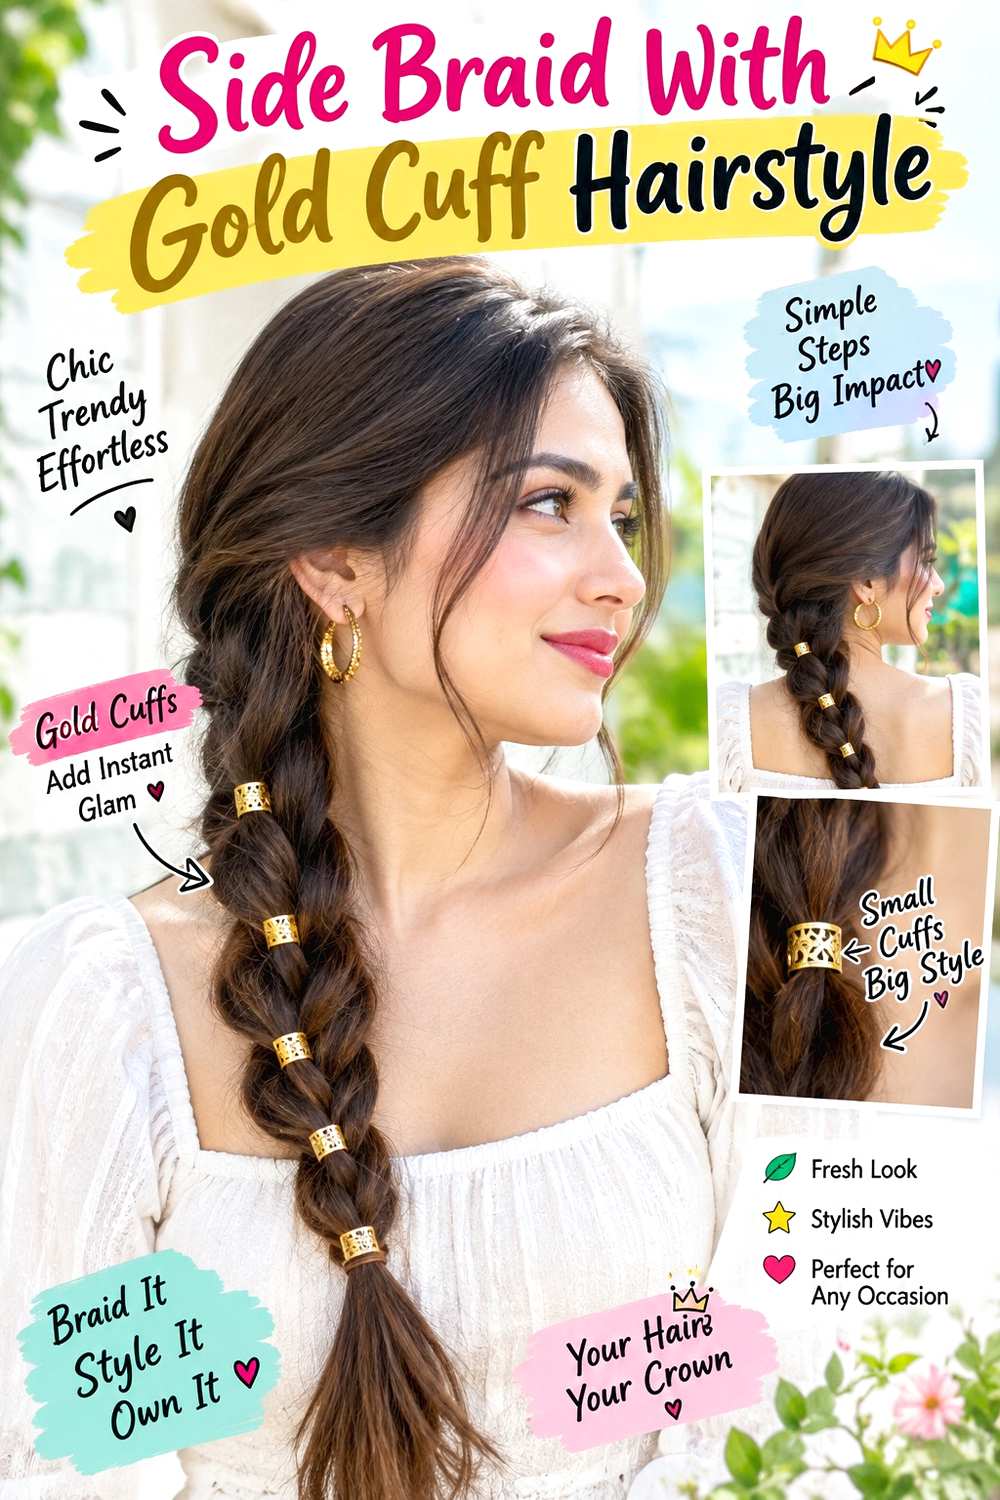
A single gold cuff can make a side braid look more polished without covering its woven texture. Use a side or off-center part, gather the hair behind one ear, and begin a three-strand braid near the lower ear or nape. Keep the first crossings firm, then gently soften selected outer sections through the middle. Place the cuff at the secured tail or around the upper braid base, depending on where you want the metallic detail to sit.
Medium to long hair works best because the braid needs enough length to stay visible around the accessory. Use light styling cream for flyaway control, a small elastic to secure the braid, and a smooth gold hair cuff for decoration. A quick refresh usually means tightening the upper braid and resetting the cuff; a full wash-day routine takes longer only if drying or detangling comes first.
If the braid repeatedly slips backward, repair the starting point rather than tightening the cuff. For salon or event styling, specify which shoulder the braid should fall over, how wide you want the softened sections, and the cuff position. A narrow cuff at the tail creates a cleaner finish, while a larger one near the base becomes the main statement.
Pro tip:
Loosen the braid before attaching the cuff. Seeing the finished width first helps you choose a placement that highlights rather than hides the woven texture.
Make It Work for You:
For fine hair, keep the braid fairly compact and choose a small cuff. Controlled loosening adds softness without creating thin-looking gaps between crossings.
Watch Out For:
A heavy cuff at the braid end can drag a shorter tail downward. Choose lighter metal or move the accent closer to the stronger upper section.
Half-Up Twist With Gold Cuff Hairstyle
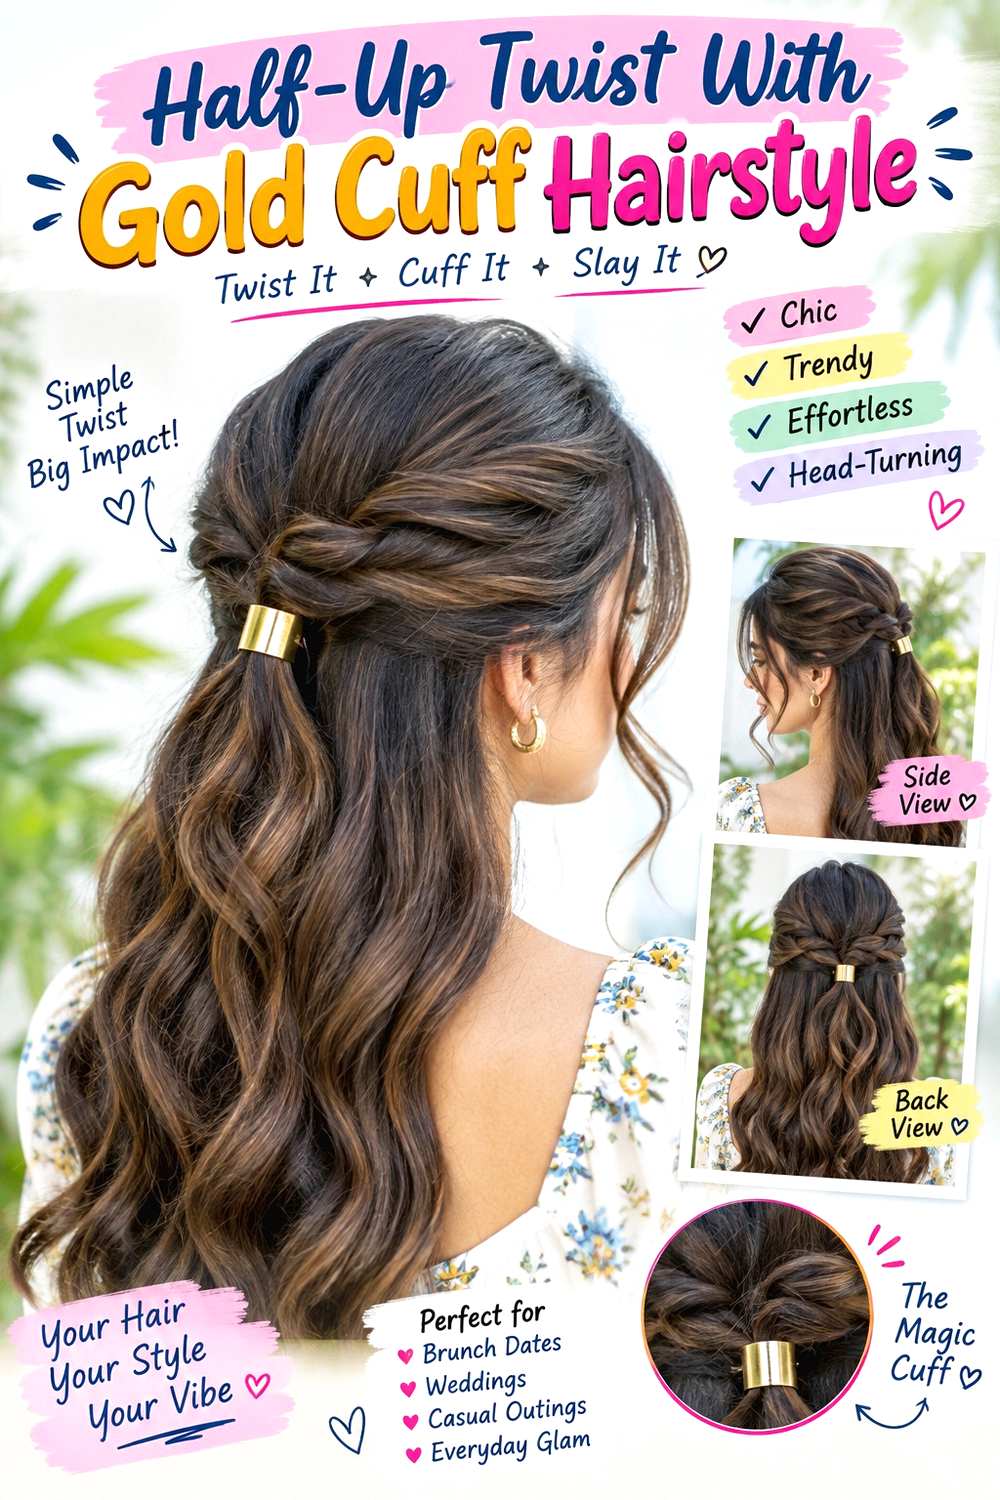
A half-up twist creates a clean center-back anchor for a gold cuff while leaving most of the hair loose. Take narrow sections from above both ears, twist them backward with moderate tension, and join them below the crown. Keep the crown softly controlled and let shorter face-framing pieces remain free. Place the cuff over the joined twists so the metallic band marks the connection without covering the entire twisted texture.
Medium and long hair works particularly well because the side sections need enough length to reach the center comfortably. Use light texturizing spray for grip, bobby pins to stabilize the hidden meeting point, and a gold hair cuff to cover the anchor. A quick refresh usually means retwisting one side and straightening the cuff; full wash-day styling depends on whether the lower lengths remain natural, waved, or curled.
If one twist keeps slipping, lower the center connection rather than increasing tension near the temple. For professional styling, specify the twist width, exact anchor height, and how much hair should stay around the face. The cuff should close over the stable center, not pinch several loose layers together on its own.
Pro tip:
Pin the two twists together before adding the cuff. A hidden stable center lets you adjust the metal accent without loosening either side section.
Make It Work for You:
For fine hair, use narrow twists and a small cuff. Leaving more hair loose below the crown helps preserve fullness through the lower silhouette.
Watch Out For:
A cuff that is too wide can swallow the twist detail completely. Choose one that covers the anchor while leaving woven texture visible on both sides.
Coily Puff With Gold Cuff Hairstyle
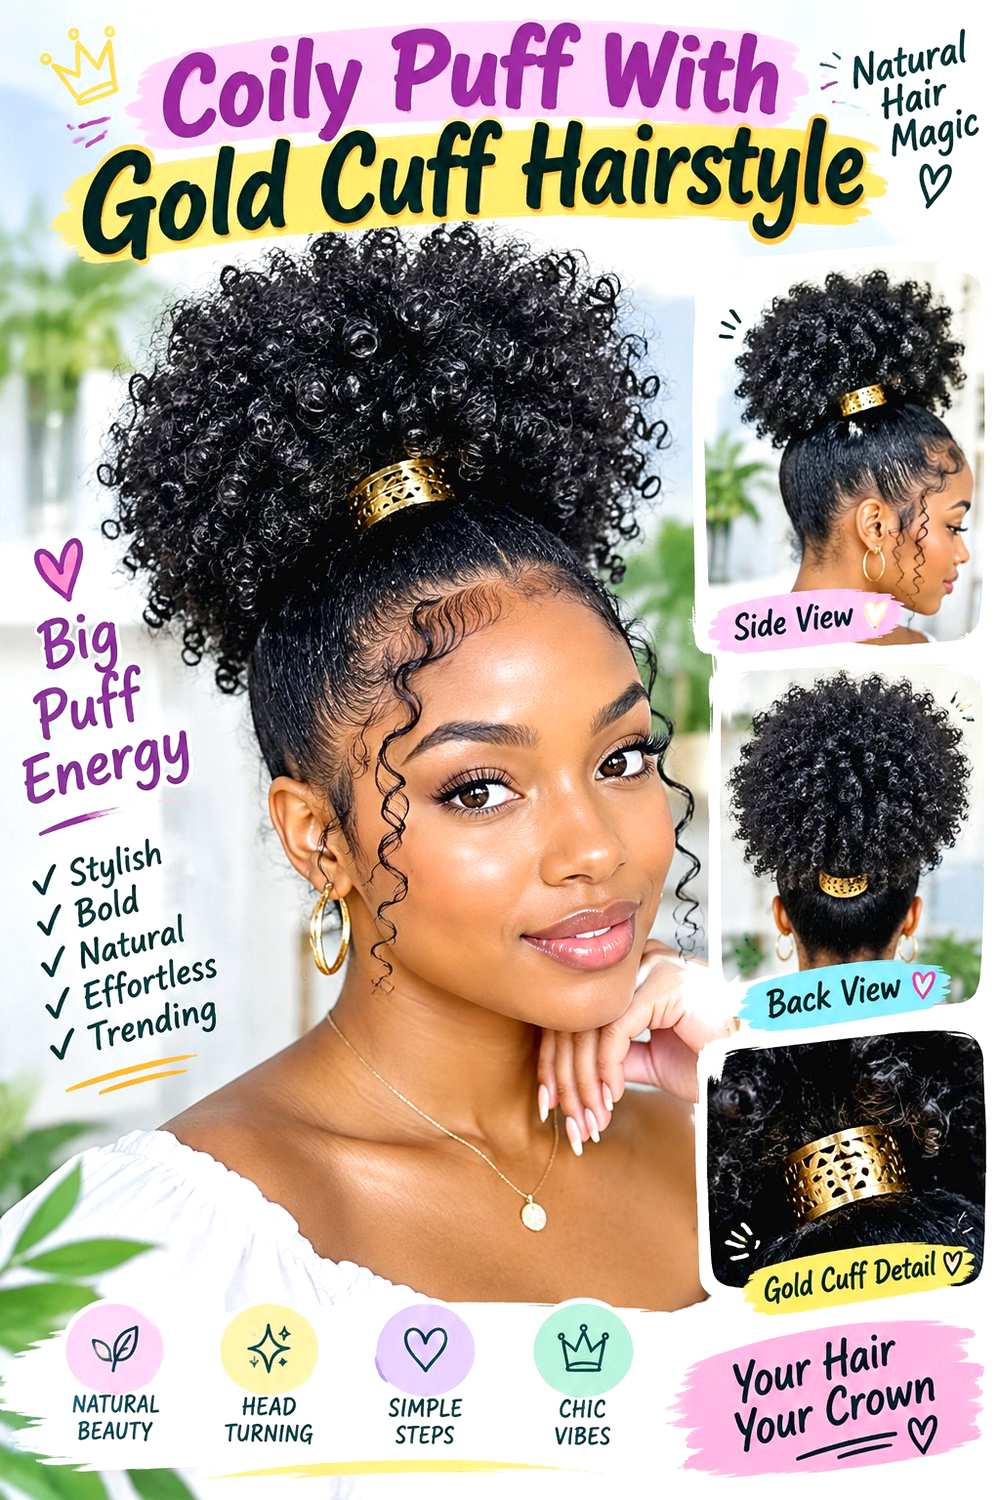
A gold cuff can create a polished accent at the base of a coily puff while leaving the natural texture fully visible. Gather the hair into a low or mid-height puff with comfortable tension, then allow the coils to expand into a rounded shape. Keep several coils around the temples or hairline if you prefer softer framing. Place the cuff around a small secured section near the base rather than clipping it into loose outer coils where it could snag or distort the pattern.
Coily hair with enough length to gather can use this style without straightening. Apply moisturizing leave-in conditioner for softness, use a fabric-covered elastic to create the puff anchor, and add a smooth-edged gold hair cuff once the base feels secure. A quick refresh may involve reshaping the puff and resetting the cuff; a full wash-day routine takes longer depending on density, shrinkage, detangling, and drying.
If the puff settles smaller after drying, work with its normal shrinkage instead of pulling the base tighter. For salon or event styling, specify the puff height, amount of hairline texture left visible, and exact cuff placement. A lightweight cuff positioned near the anchor usually stays more stable than one attached to loose coils.
Pro tip:
Shape the puff completely before choosing the cuff position. Seeing the finished volume makes it easier to place the gold detail where it remains visible.
Make It Work for You:
For strong shrinkage, keep the puff compact and place the cuff close to the base. The metallic accent stays clear without requiring stretched length.
Watch Out For:
Do not clamp the cuff directly onto individual coils. Attach it near the secured anchor so the metal does not pull or separate the texture.
Curly Low Ponytail With Gold Cuff Hairstyle
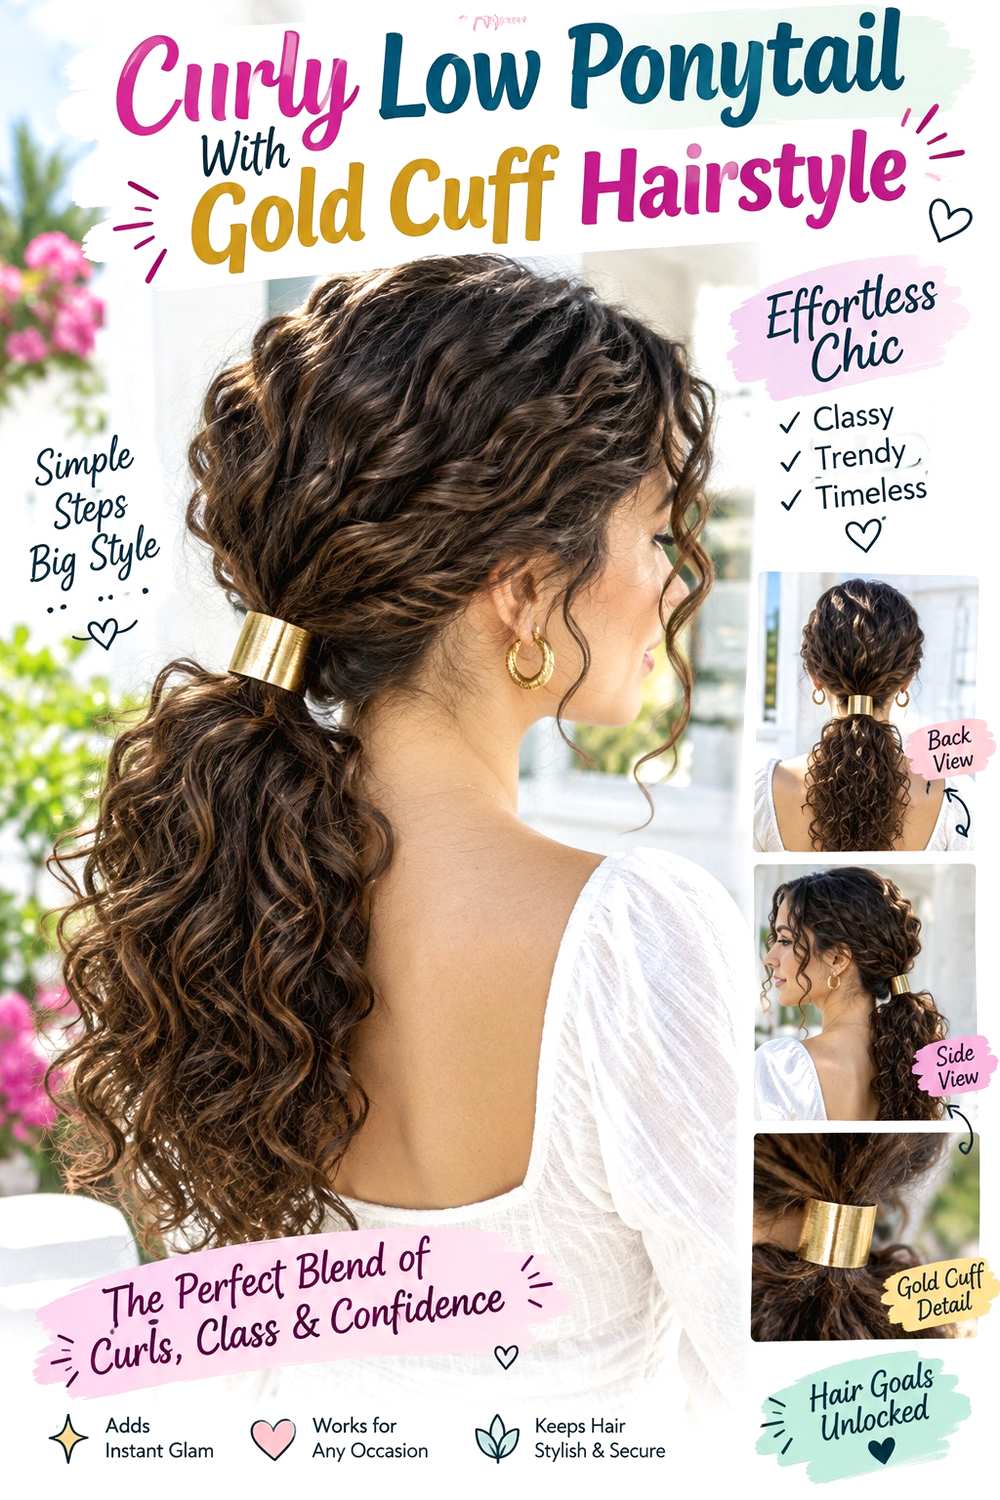
A low curly ponytail keeps the crown controlled while letting defined texture spread below a gold cuff. Choose a center, side, or natural part, leave selected curls around the face, and gather the remaining hair at the nape without stretching the curl pattern excessively. The tail should retain its spring through the ends, with most volume sitting below the anchor. Place the cuff over the secured base so it creates a clean break between the smoother crown and textured ponytail.
Medium and long curly hair works especially well because enough dry length remains to show the tail. Use curl gel to refine the visible curls, a fabric-covered elastic for the ponytail, and a smooth gold hair cuff for decoration. A quick refresh may involve dampening the face-framing curls and straightening the cuff; full wash-day styling takes longer according to density, shrinkage, and drying.
If the ponytail begins dropping, reset the elastic rather than tightening the cuff. For salon or occasion styling, specify the dry face-framing length, exact nape height, and amount of crown smoothness you prefer. The finished placement should be judged with the curls dry because shrinkage affects both tail length and accessory position.
Pro tip:
Choose the face-framing curls before gathering the ponytail. Leaving them free from the start protects their definition and keeps the crown from becoming uneven.
Make It Work for You:
For dense curls, choose a wider but lightweight cuff around the secure base. The extra scale balances the fuller tail without adding uncomfortable weight.
Watch Out For:
Stretching the ponytail very tight can flatten the curls around the crown. Use a secure low anchor while allowing some natural texture near the scalp.
Braided Crown With Gold Cuff Accent Hairstyle
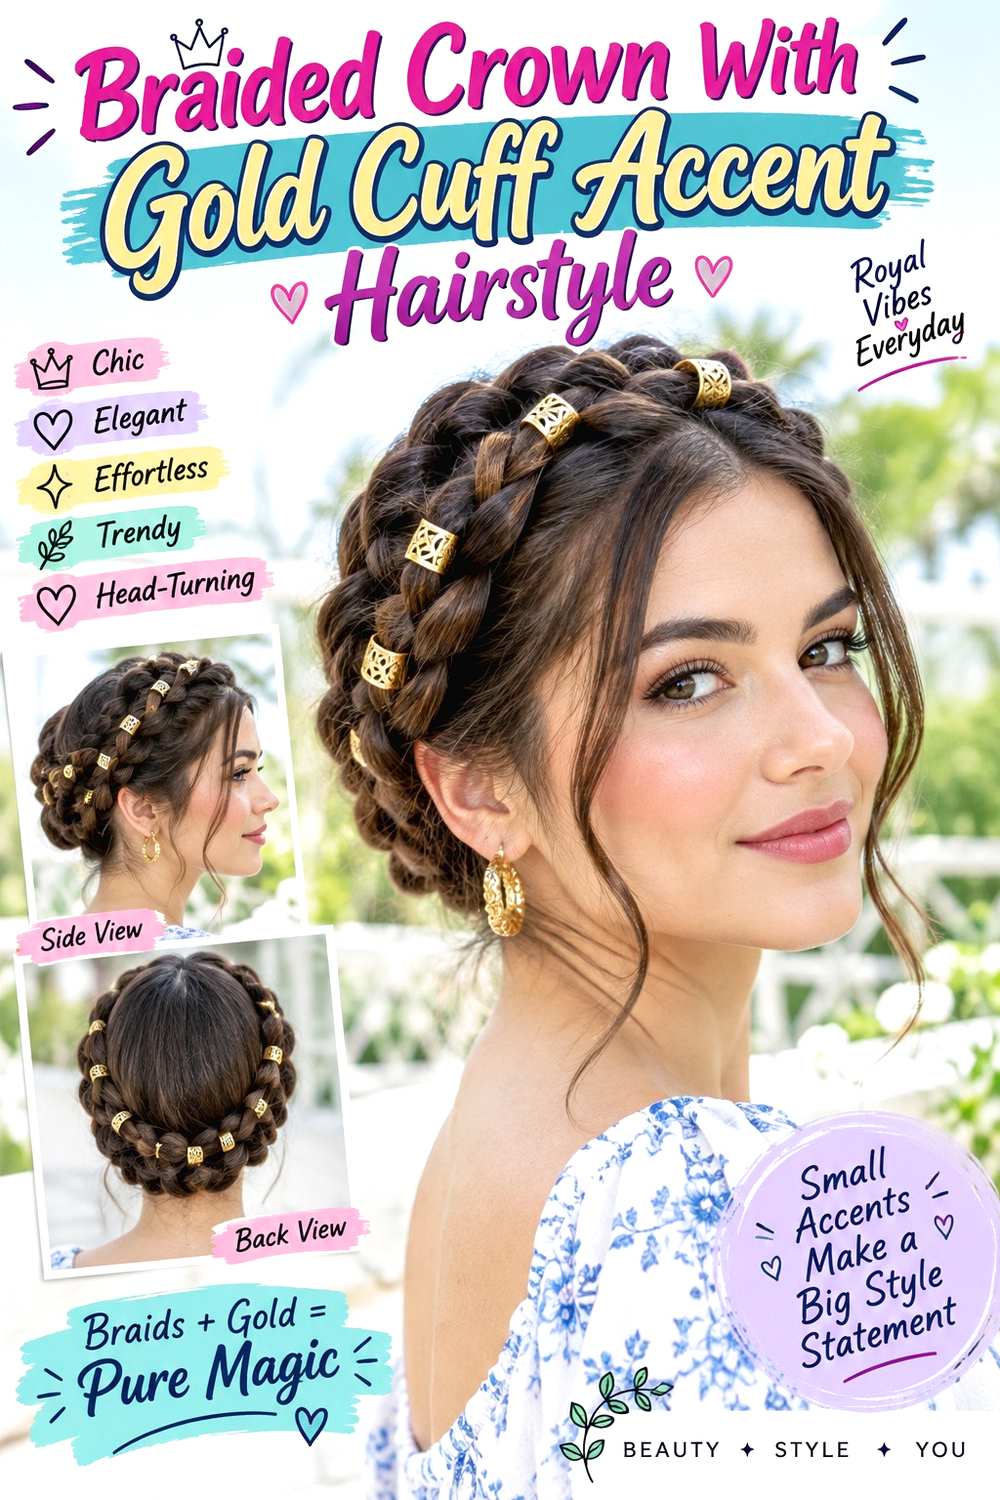
A small gold cuff can punctuate a braided crown without competing with the woven line around the head. Start above one ear and braid backward across the crown, keeping the braid moderately close to the scalp. Finish near the opposite side or center back, then secure the end and place a cuff where the braid terminates. Leave the remaining hair loose, softly gathered, or naturally textured so the crown remains the main structural feature.
Medium to long hair works best because the braid needs enough reach to travel comfortably. Use texturizing spray for grip, bobby pins to secure the finished crown, and a lightweight gold hair cuff to mark the endpoint. A quick refresh usually means tightening one outer crossing and checking the cuff; full wash-day styling depends on the texture worn below the braid.
If the crown feels tight at the temples, adjust its route instead of pulling harder. For salon or event styling, specify how high above the ears the braid should sit, the desired width, and exactly where the cuff should appear. The metal accent should cover a secure finish, not act as the only fastening point.
Pro tip:
Pin the braid end first, then place the cuff over that secured area. This keeps the decorative piece from carrying tension around the crown.
Make It Work for You:
For fine hair, keep the crown braid narrow and use a petite cuff. Leaving more density loose below prevents the upper shape from feeling heavy.
Watch Out For:
A large cuff near the temple can feel bulky and visually interrupt the crown. Keep the accessory smaller than the widest section of braid.
Low Bun With Gold Cuff Wrap Hairstyle
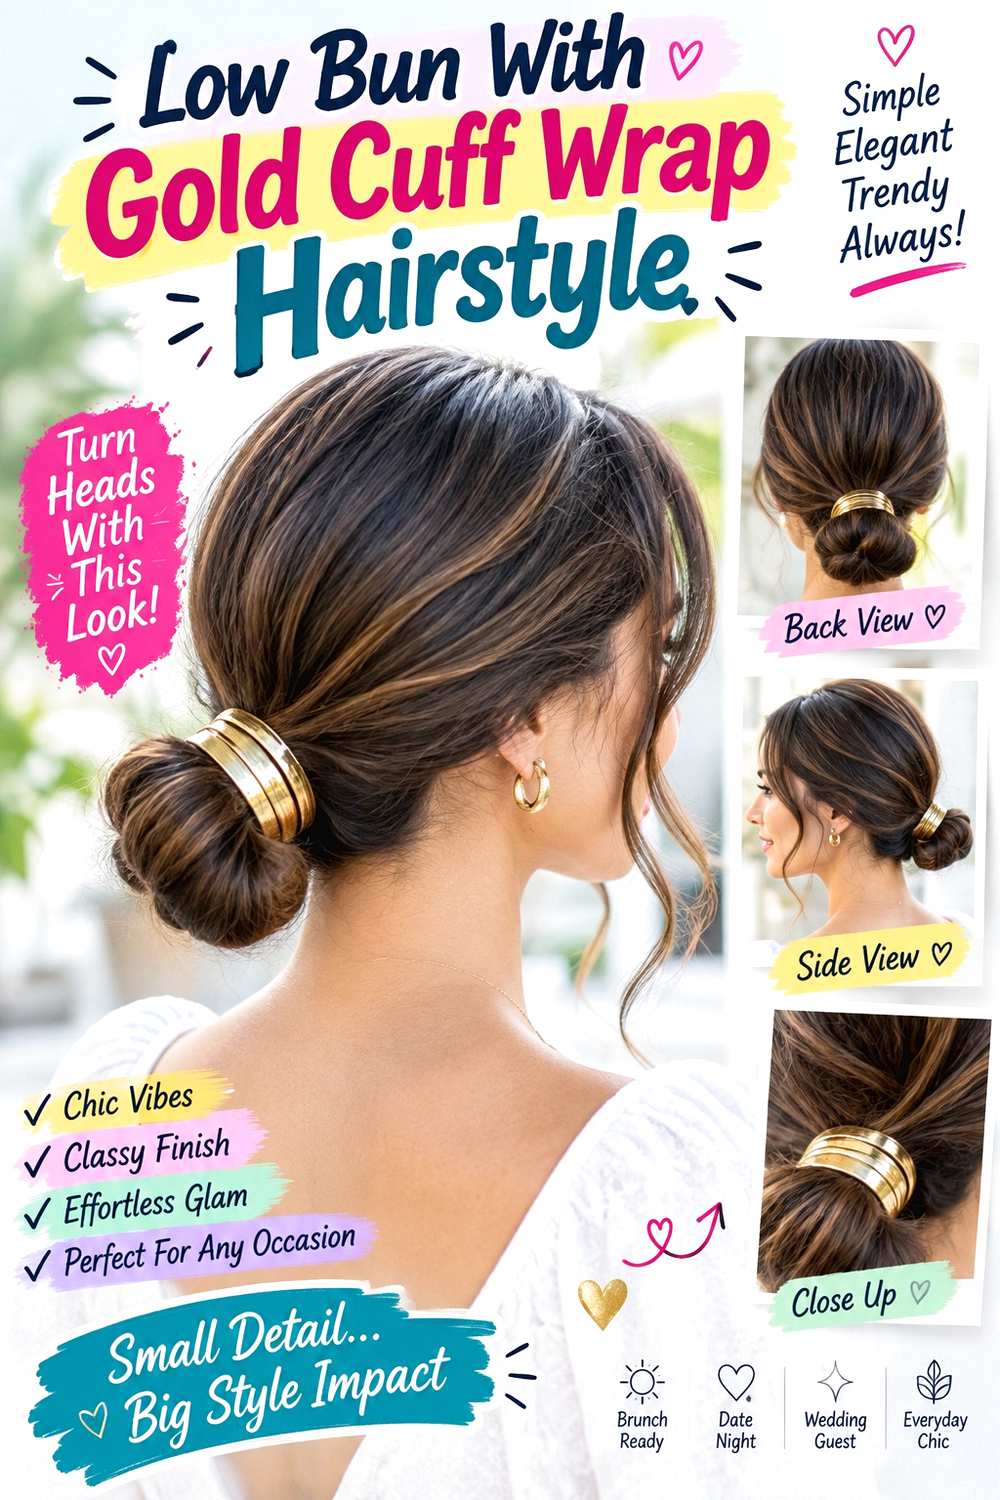
A gold cuff around the base of a low bun creates a clean metallic outline without needing several decorative pieces. Gather the hair at the nape, secure it, and fold or twist the length into a compact rounded bun. Keep the bun broad rather than tall so the cuff sits close to the head, and leave narrow face-framing pieces around the jaw if desired. The metallic band should circle or partially frame the secured center rather than clamp over loose outer sections.
Medium to long hair works best, especially when the length can fold without excessive pulling. Use a fabric-covered elastic for the base, bobby pins to secure the bun, and a smooth gold cuff wrap for the final accent. A quick refresh usually means replacing one pin and checking the cuff alignment; a full wash-day updo takes longer if drying or smoothing comes first.
If the bun rotates, rebuild the central anchor instead of tightening the metal. For salon styling, specify the bun width, exact nape height, and whether the cuff should sit below or around the base. A secure, rounded center gives the accessory a stable surface and keeps its edges away from the scalp.
Pro tip:
Complete the bun before fitting the cuff wrap. A finished shape makes it easier to choose a comfortable metal position without disturbing the structural pins.
Make It Work for You:
For shorter medium hair, make the bun compact and use a narrow cuff. The metallic line adds presence even when the gathered shape stays small.
Watch Out For:
Do not force a rigid cuff around a bun that is wider than its opening. Choose a larger accessory rather than compressing the hairstyle unnaturally.
Mini Braid With Gold Cuff Hairstyle
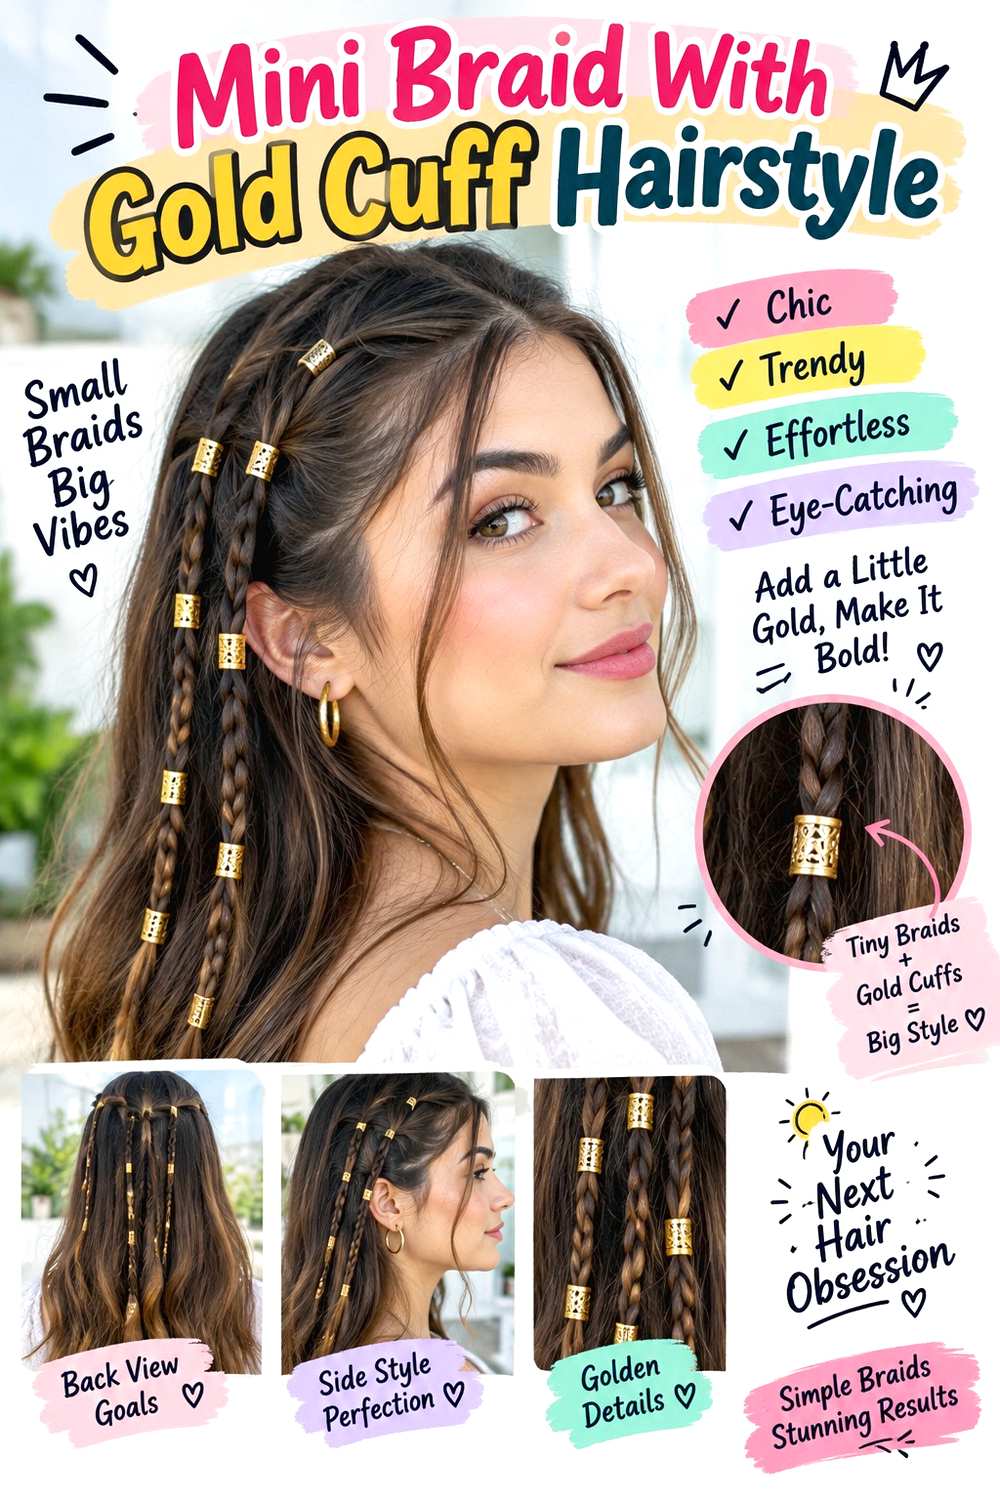
A mini braid with a small gold cuff adds detail to short or medium hair without needing a full gathered style. Use a center, side, or off-center part and take a narrow section near the temple. Braid it downward or backward for a few crossings, secure the short tail, and place the cuff over the end. Keep the surrounding bob, lob, waves, curls, or straight lengths loose so the tiny metallic accent remains easy to see.
Short bobs through long hair can use this idea because the braid needs only a limited amount of length. Use texturizing spray for grip, a small clear elastic for the tail, and a lightweight gold hair cuff for decoration. A quick refresh takes only a few minutes to redo the final crossings and replace the cuff; a full wash-day routine depends on how the rest of the hair is styled.
For salon shaping, specify which side you usually braid and where your shortest front layers finish. The temporary braid should adapt to the existing cut rather than requiring shorter pieces to be forced backward. If the braid tail is very small, choose a cuff that closes securely without crushing the section.
Pro tip:
Secure the mini braid before adding the cuff, even if the elastic will be hidden. The extra anchor keeps short layers from slipping out during wear.
Make It Work for You:
For fine hair, keep the braid extremely narrow and use a tiny cuff. This preserves fullness through the loose perimeter while still creating a visible accent.
Watch Out For:
A heavy cuff can pull a short braid straight downward. Choose a lighter piece or move the braid endpoint closer to a stable section near the ear.
High Ponytail With Gold Cuff Hairstyle
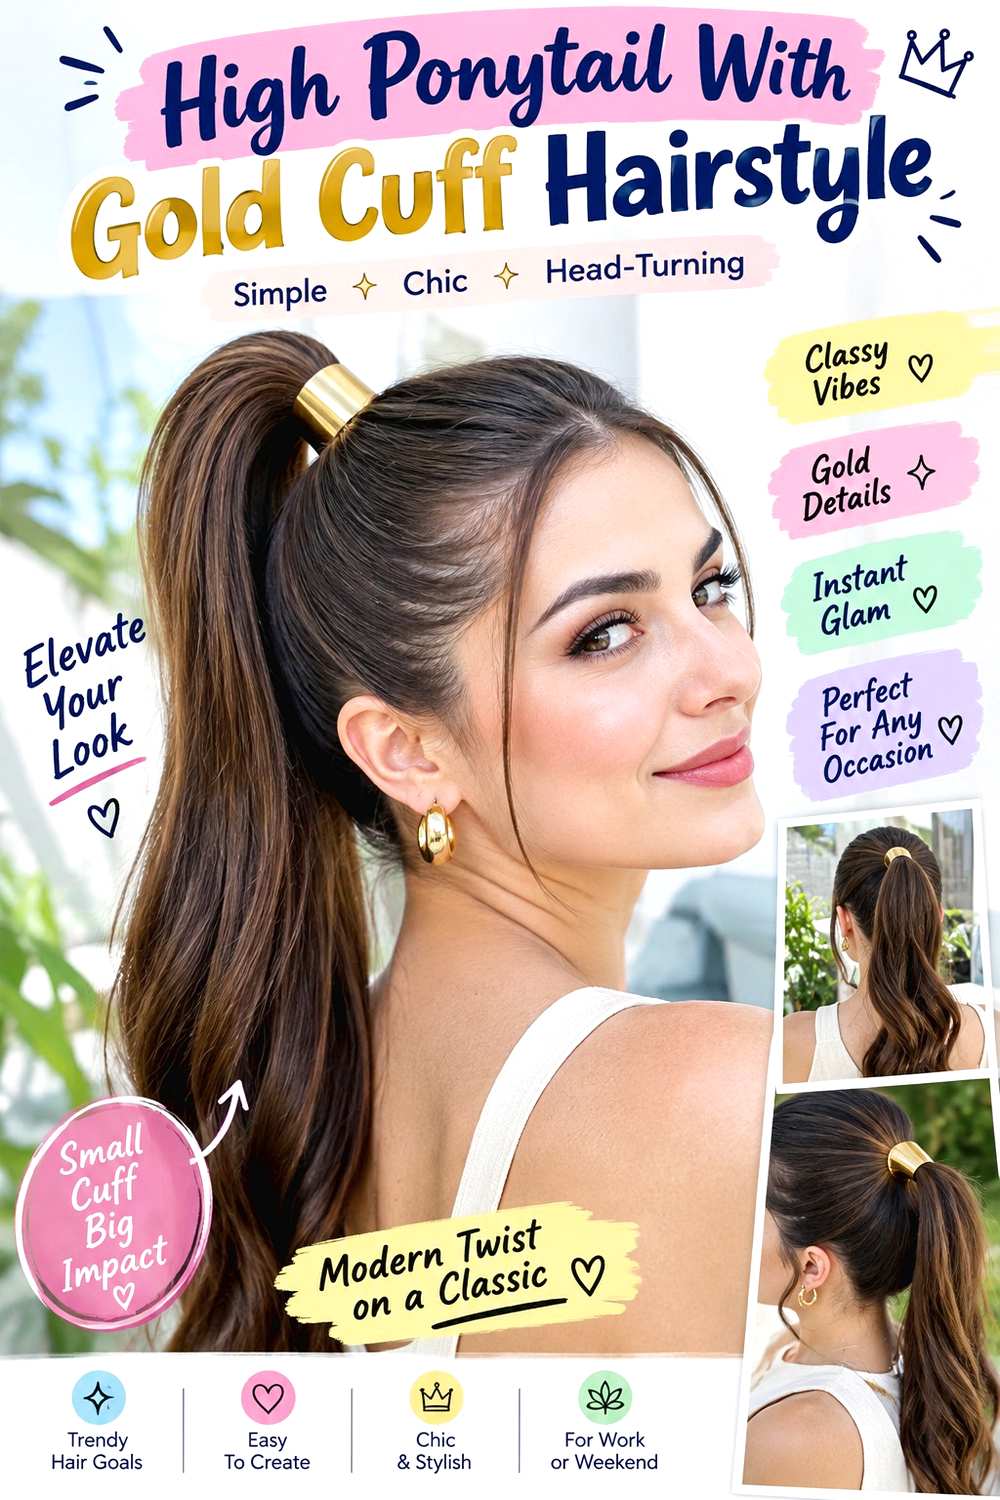
A high ponytail places a gold cuff near the crown, making the metallic accent visible from both the front and back. Gather the hair just behind the highest point of the head, keeping the sides smooth or softly textured, and secure the base before adding the cuff. Let the tail stay straight, wavy, curly, or coily, with volume concentrated through the length rather than beneath the anchor. A clean base makes the cuff look intentional instead of crowded.
Medium to long hair works best because the elevated placement shortens the visible tail. Use a soft-bristle brush to direct the crown, a strong fabric-covered elastic for support, and a lightweight gold hair cuff for the finish. A quick refresh means smoothing the hairline and checking whether the cuff has rotated; full wash-day styling depends on the chosen tail texture.
If the ponytail pulls forward, move the anchor slightly back instead of making it tighter. For salon or party styling, specify the exact ponytail height and amount of crown smoothness you prefer. Dense or very long hair may feel more comfortable with a slightly lower anchor and a lighter cuff.
Pro tip:
Test the ponytail’s comfort before fitting the cuff. If the base already feels heavy, adjust the height first rather than adding decorative weight immediately.
Make It Work for You:
For dense hair, use a wider cuff with a lightweight construction and place the ponytail just behind the crown to distribute weight more comfortably.
Watch Out For:
A tight high ponytail plus a heavy metal cuff can strain the scalp. Reduce accessory weight or lower the anchor instead of increasing tension.
Double Braids With Gold Cuffs Hairstyle
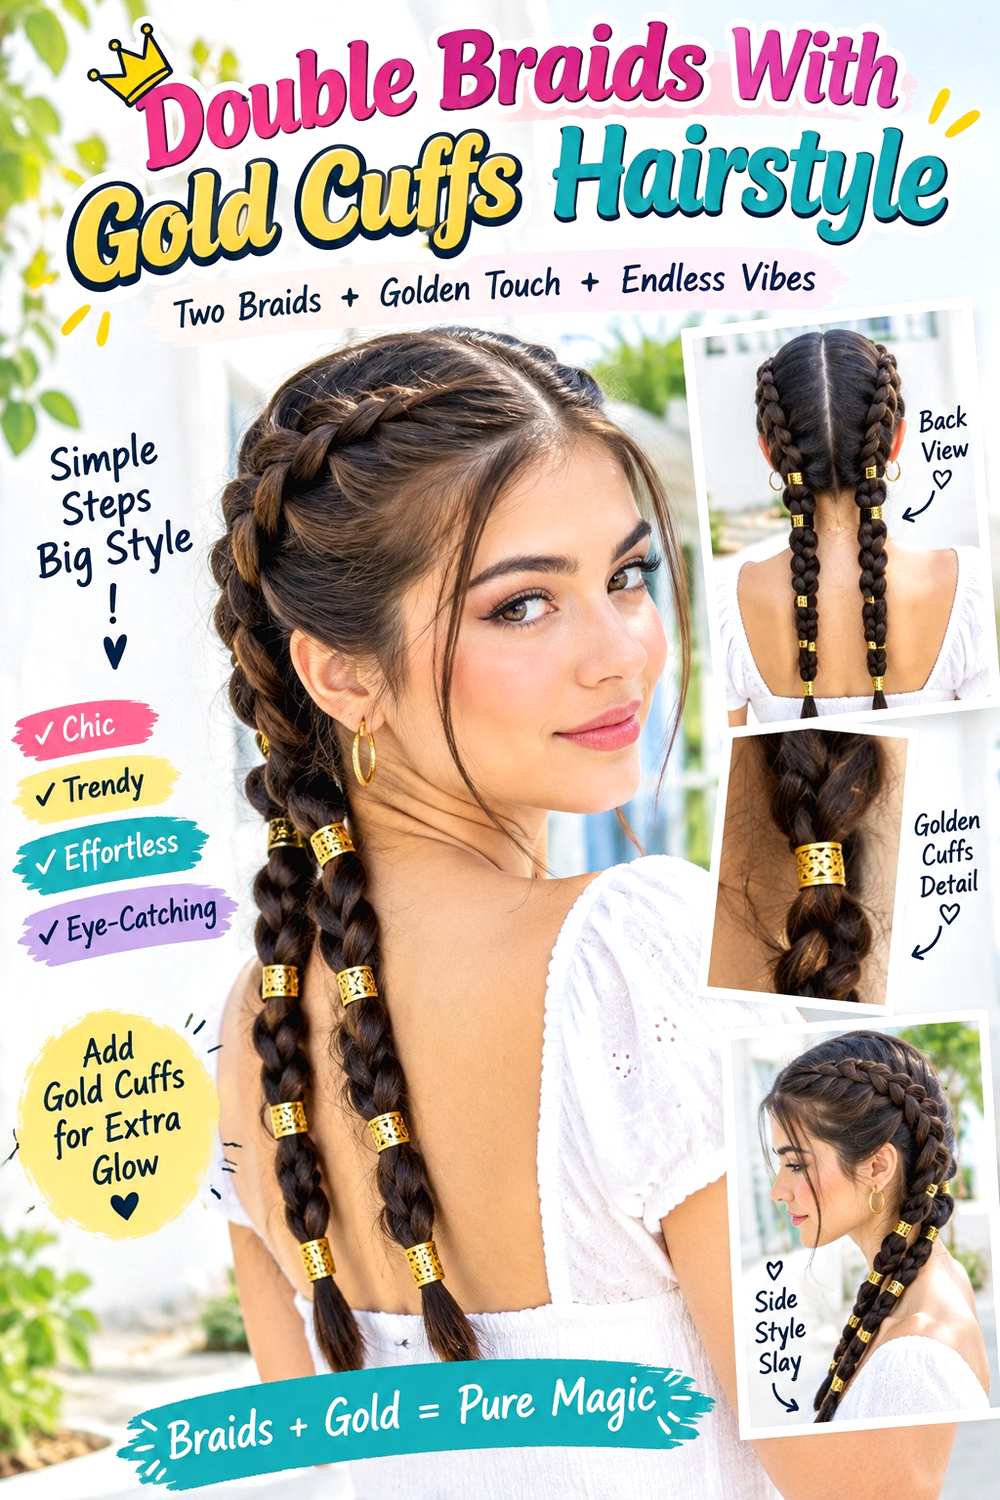
Two low braids with matching cuffs create a balanced metallic detail on both sides. Make a clean center part, divide the hair evenly, and begin each braid below or just behind the ears. Keep the first crossings firm and soften selected middle sections only after the tails are secured. Place matching cuffs over the end anchors or near the braid bases, keeping their size proportional to the width of each braid.
Medium to long hair works best, while dividing dense hair into two sections can make the style more comfortable than one large braid. Use lightweight leave-in conditioner to reduce friction, two small elastics for the braid ends, and matching gold hair cuffs for decoration. A quick refresh may involve redoing one loose crossing and straightening its cuff; full wash-day preparation takes longer if detangling or drying comes first.
If one braid appears heavier, correct the back sectioning rather than pulling the smaller side wider. For salon or event styling, specify the braid starting height, desired width, and whether the cuffs belong at the bases or tails. Symmetrical placement matters more than making every loosened loop exactly identical.
Pro tip:
Finish both braids before placing either cuff. Comparing their lengths first helps the metallic accents sit at matching heights without repeated adjustments.
Make It Work for You:
For layered hair, begin the braids closer to the nape and use smaller cuffs. Shorter pieces have less distance to travel and stay contained more easily.
Watch Out For:
Oversized cuffs can overwhelm shorter braids and add unnecessary swing. Keep the metal accents proportional to the braid length and density.
French Twist With Gold Cuff Hairstyle
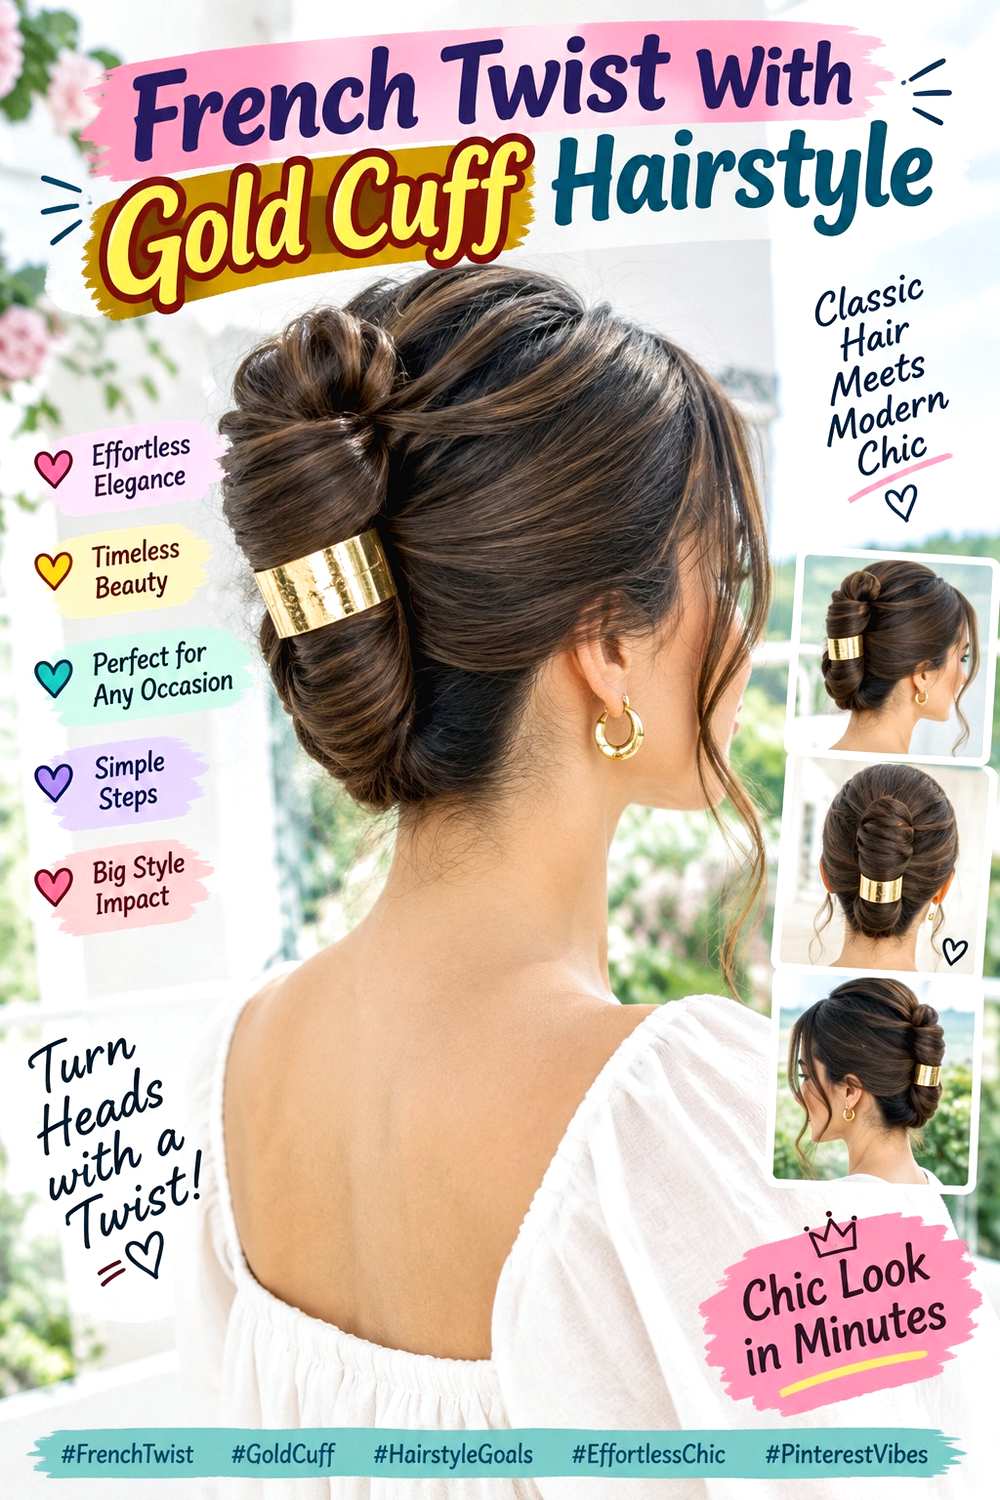
A French twist gives a sculptural background for a single gold cuff placed along the roll. Sweep the hair toward one side at the back, roll the length inward, and tuck the ends into the fold. Keep the crown softly controlled and use a center or side part according to the front shape you prefer. Position the cuff near the upper fold or lower seam so the metal follows the vertical direction rather than interrupting it.
Medium to long straight or wavy hair usually folds most easily into this shape. Use texturizing spray for grip, bobby pins to secure the hidden roll, and a curved gold hair cuff for decoration. A quick refresh means checking the central pin line and resetting the cuff; full styling takes longer if blow-drying or smoothing comes first.
If the twist opens, repair the hidden pin structure instead of asking the metal accessory to clamp it closed. For salon styling, specify how high the roll should finish, how much crown volume you want, and the exact cuff position. The accessory should attach to a stable finished section, with smooth edges that do not catch the outer layer.
Pro tip:
Build and test the entire French twist before adding the cuff. A finished roll keeps the decorative piece from becoming part of the structural tension.
Make It Work for You:
For fine hair, keep the twist compact and choose a narrow cuff. A smaller vertical accent usually stays more stable on a slimmer roll.
Watch Out For:
Do not clamp a rigid cuff across a loose seam to hold it shut. Repair the twist first, then add metal only as decoration.
Short Bob Side Twist With Gold Cuff Hairstyle
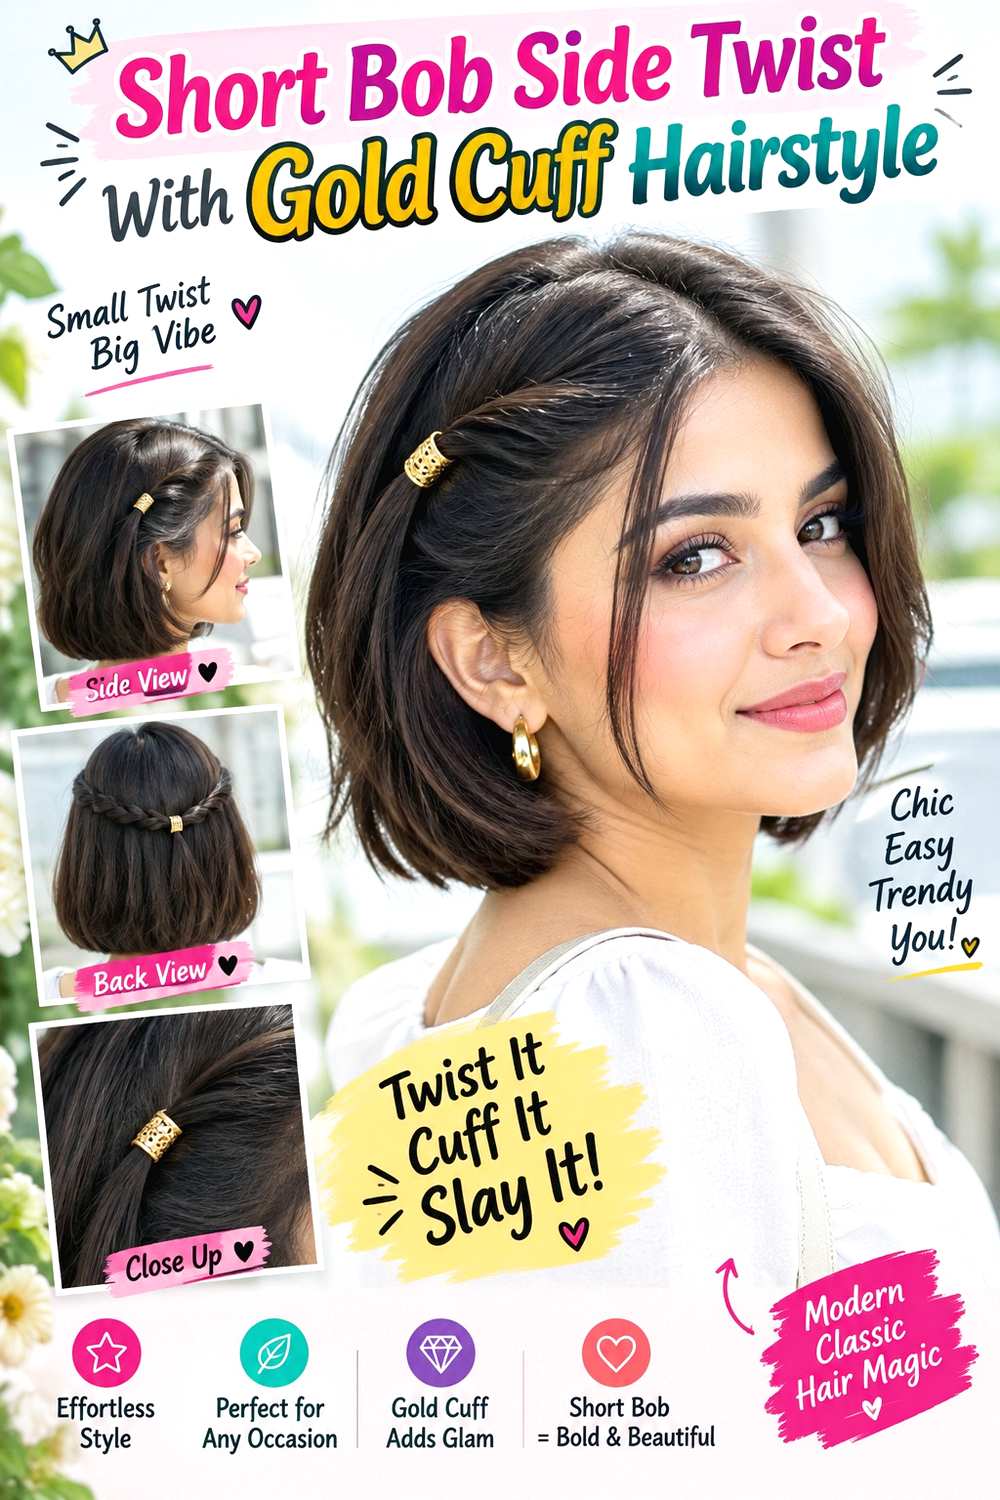
A short bob can carry a gold cuff through a small side twist, giving the cut a statement detail without requiring an updo. Choose a side or off-center part, take a narrow section near the temple, and twist it backward toward the ear. Secure the twist where the available length naturally ends, then close a small cuff over the anchor. Leave the opposite side fuller so the jaw- or neck-length perimeter remains an important part of the silhouette.
Straight, wavy, and softly curly bobs can all use this design. Apply lightweight styling cream to control the twist and use a small gold hair cuff to secure and decorate the endpoint. A quick refresh usually takes only a few minutes to rebuild the twist and reset the cuff; full wash-day styling depends on whether the rest of the bob is worn smooth, waved, or naturally textured.
For salon shaping, specify the exact dry perimeter and which side you normally twist. Very short front pieces should be left loose rather than forced into the anchor. The cuff needs a smooth closure that fits the small section securely without squeezing the hair or resting directly against the scalp.
Pro tip:
Twist only as far as the side section reaches comfortably. A slightly shorter twist usually stays neater than one stretched backward under excessive tension.
Make It Work for You:
For fine bobs, use a tiny lightweight cuff and keep the opposite side full. The small metallic accent adds contrast without overwhelming the compact haircut.
Watch Out For:
A large cuff can pull short side layers loose repeatedly. Choose a smaller closure or place the endpoint slightly farther forward where more hair reaches.
Rope Braid Ponytail With Gold Cuff Hairstyle
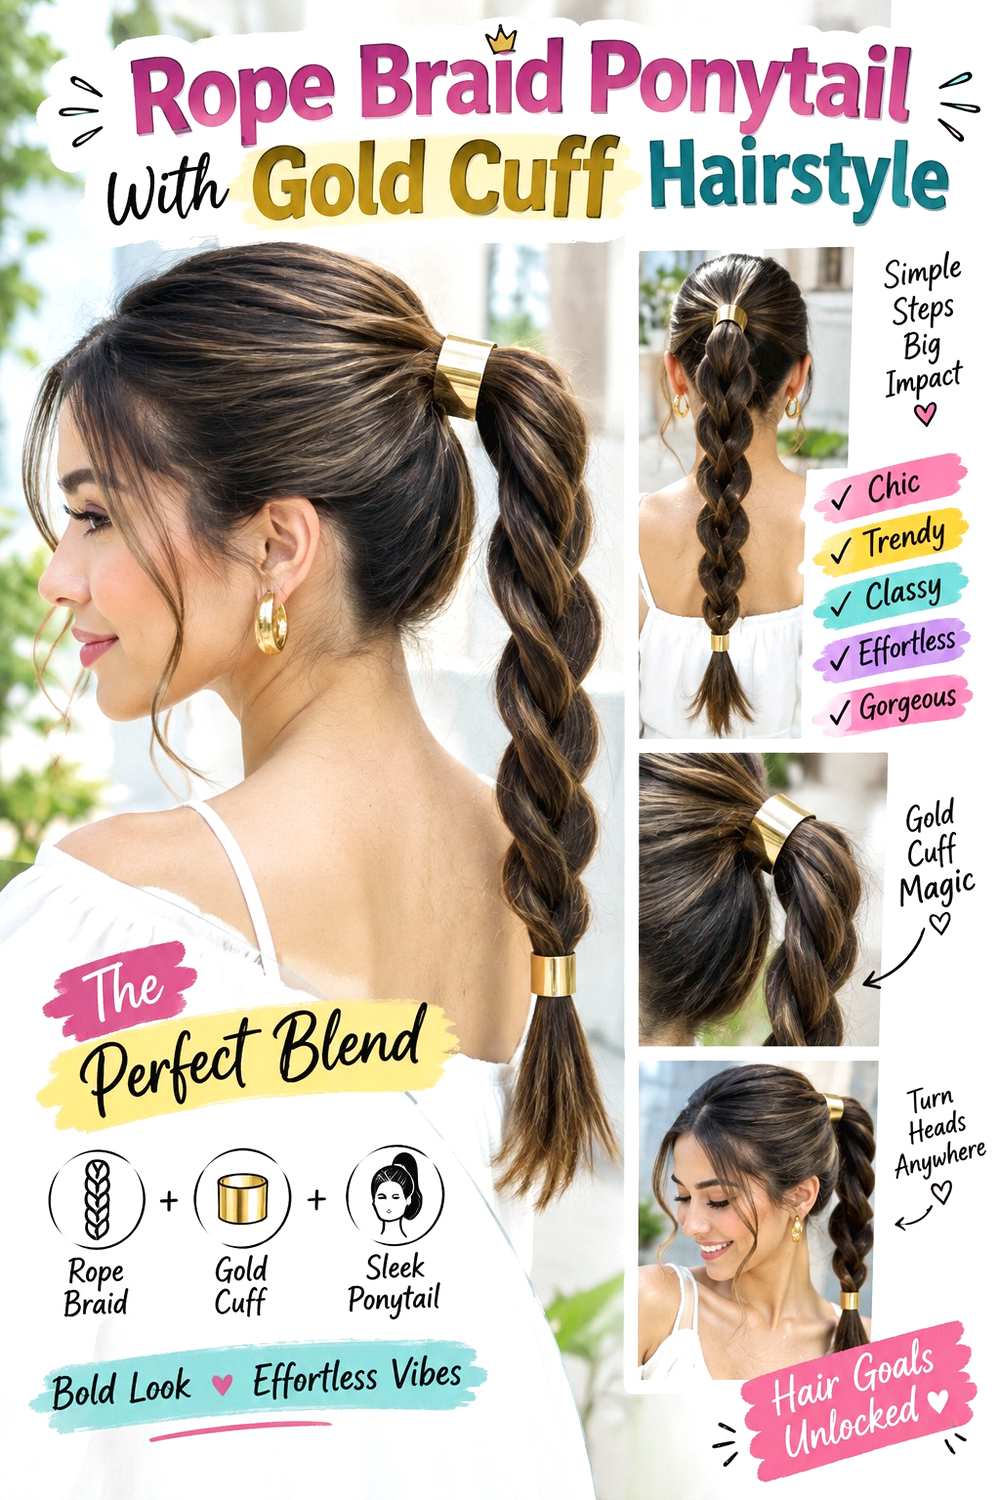
A rope braid ponytail creates a clean spiral that pairs naturally with a smooth gold cuff at the base or tail. Gather the hair into a low or mid-height ponytail, divide the tail into two sections, twist each section in the same direction, then wrap them around each other in the opposite direction. Keep the rope defined through the length and place the cuff over the ponytail base for a polished metallic start.
Medium-long and long hair works best because the rope twist shortens the visible tail slightly. Use light styling cream to control flyaways, a fabric-covered elastic for the ponytail anchor, and a gold hair cuff for decoration. A quick refresh usually means retwisting the final section and checking the cuff; full wash-day styling depends on the natural texture prepared before braiding.
If the rope unravels quickly, make sure both sections are twisted firmly before wrapping them together. For salon or occasion styling, specify the ponytail height and how tight or relaxed you want the spiral. The gold cuff should cover the stable base rather than hold the two rope sections together by itself.
Pro tip:
Twist both sections evenly before wrapping them together. Balanced tension keeps the rope pattern clear and helps the metallic base look centered rather than tilted.
Make It Work for You:
For dense hair, make the rope braid slightly looser through the lower length and use a broader cuff at the base to balance the fuller tail.
Watch Out For:
Do not use the cuff as the only ponytail fastening. A secure hidden base prevents the entire rope braid from loosening when the accessory shifts.
Half-Up Braid With Stacked Gold Cuffs Hairstyle
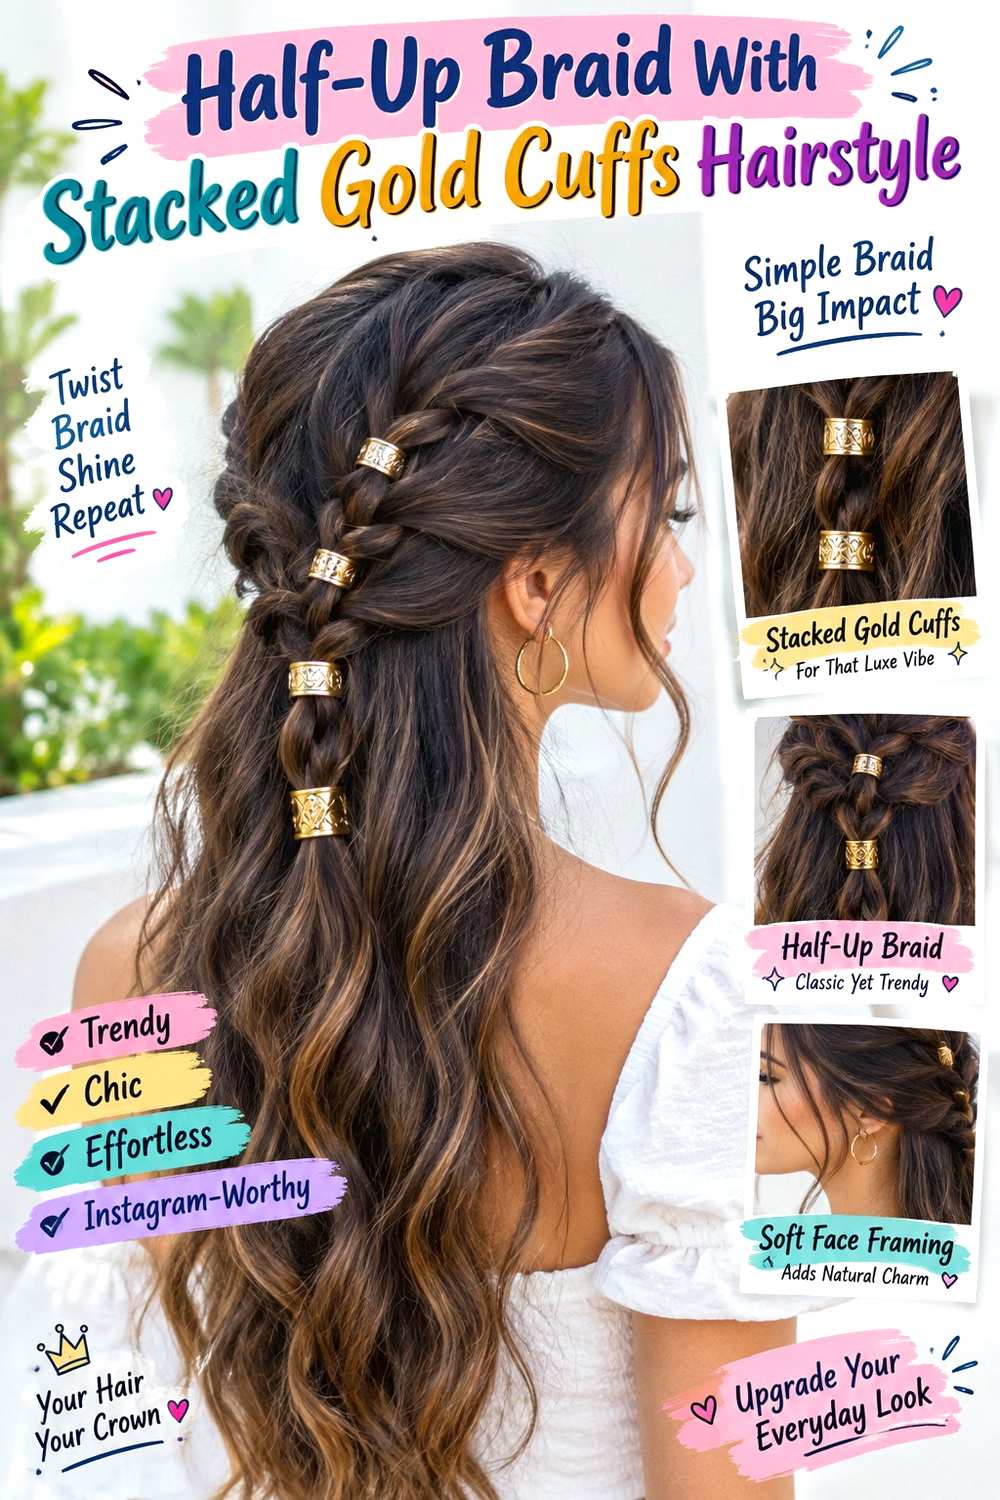
A half-up braid can carry several small gold cuffs without making the full hairstyle feel heavily accessorized. Gather narrow sections from both sides below the crown, braid the joined section down the center for several crossings, and leave the remaining hair loose. Place two or three lightweight cuffs at spaced points along the braid rather than clustering them all at the top. Keep the crown controlled and allow face-framing layers to stay free where they naturally fall.
Medium and long hair works best because the short center braid needs enough length to show multiple accents. Use texturizing spray for grip, a small clear elastic for the braid end, and stacked gold hair cuffs as decoration. A quick refresh may involve straightening one cuff and tightening the final braid crossing; full wash-day styling depends on whether the loose lengths stay natural, curled, or waved.
If the cuffs slide together, increase the spacing or use slightly smaller pieces rather than tightening the braid excessively. For salon or event styling, specify the half-up height, braid width, and number of metallic accents. The cuffs should sit on secure woven sections, leaving enough braid visible between them to preserve texture.
Pro tip:
Add the cuffs from the bottom upward after the braid is secured. This makes spacing easier to judge and reduces repeated handling near the center anchor.
Make It Work for You:
For fine hair, use only two petite cuffs and keep the braid narrow. More loose hair below the crown helps maintain fullness through the overall shape.
Watch Out For:
Too many cuffs can hide the braid and add unnecessary weight. Leave visible woven space between each metallic accent instead of filling every crossing.
Textured Low Knot With Gold Cuff Hairstyle
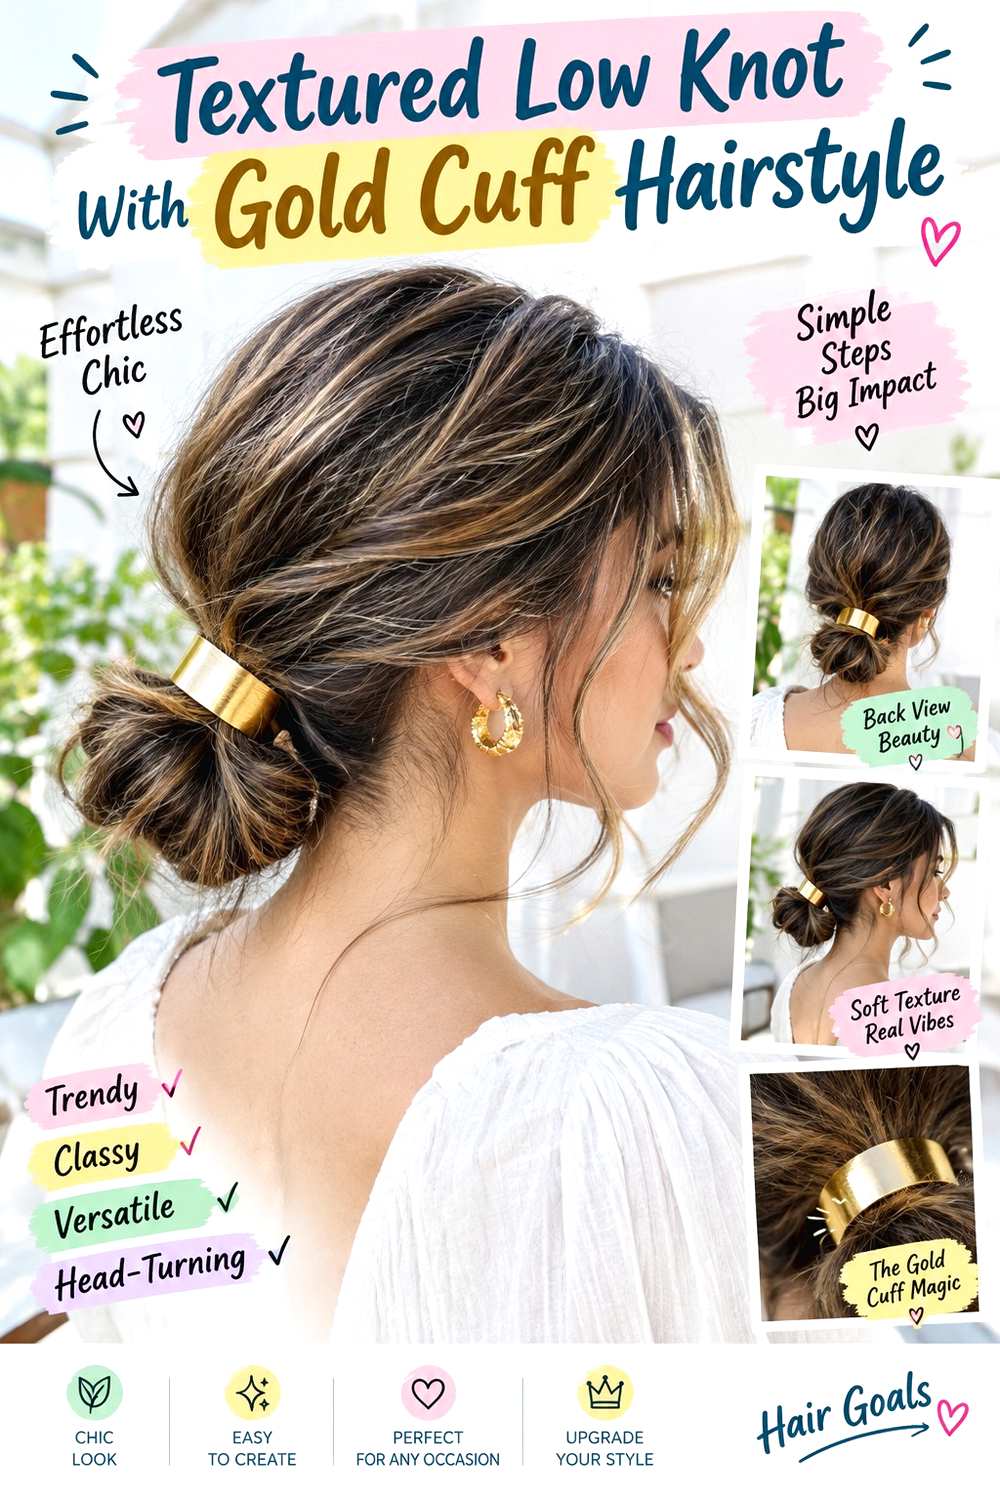
A textured low knot gives a gold cuff a soft, gathered background while keeping the accessory close to the nape. Pull the hair into a low anchor, create a folded loop, and tuck the remaining ends around the center without smoothing every piece flat. Keep the knot compact with selected outer sections loosened for texture, and leave narrow pieces near the jaw if desired. Place the cuff above the knot or around a small secured section at its base.
Shoulder-length and longer hair works well because the knot does not require several wraps of length. Use a fabric-covered elastic to create the center, bobby pins to secure loose ends, and a gold hair cuff for the final accent. A quick refresh usually means retucking one outer section and checking the cuff angle; full wash-day styling takes longer only if the hair needs drying or reshaping first.
If the knot starts sagging, rebuild the folded center rather than clamping the cuff tighter. For salon or event styling, specify the knot width, nape height, and amount of visible texture. The metallic detail should sit near the stable core while the outer surface remains deliberately soft.
Pro tip:
Secure the knot before loosening its perimeter or adding the cuff. A firm center allows the visible texture to stay relaxed without sacrificing the overall hold.
Make It Work for You:
For layered hair, let several short ends remain visible around the knot. A smaller cuff keeps those soft pieces looking intentional instead of crowded.
Watch Out For:
Loosening the central fold can make the whole knot collapse. Keep the core firm and create softness only through selected outer sections and framing pieces.
Conclusion
Gold hair cuff hairstyles can range from small bob accents to sleek ponytails, braids, puffs, buns, and sculpted twists. Fine hair generally works best with lighter cuffs and narrower gathered sections, while dense hair can balance broader accessories and fuller anchors. Curly and coily textures can keep natural definition and shrinkage, and short cuts can use a single side accent instead of a large updo. Parting, braid width, face framing, cuff scale, and overall volume all affect the finished balance. Choose placement according to your natural texture, density, face shape, upkeep, and routine. Most importantly, let an elastic, pin structure, braid, or twist provide the hold while the gold cuff supplies the statement finish.
Before Your Salon Visit
Choose one or two favorite references and save views that clearly show the hairstyle and cuff placement. Discuss your natural texture, density, face shape, preferred length, upkeep, and normal styling routine. Point out the exact parting, face-framing pieces, braid width, ponytail or bun height, volume, and finish you like. Bring your gold cuff when possible so its size, weight, closure, and safest anchoring point can be tested with the temporary style before the final look is built.
FAQs
How do I keep a gold hair cuff from slipping?
Secure the hairstyle first with an appropriate anchor, then place the cuff over that stable section. Choose a cuff that fits the amount of hair without squeezing it. If the accessory keeps rotating, rebuild the hidden anchor or use a better-fitting cuff instead of clamping the metal more tightly.
Can gold hair cuffs work with curly or coily hair?
Yes. Place them near secure ponytail, puff, braid, twist, or bun anchors while leaving most curls or coils undisturbed. Work with normal shrinkage, choose smooth inner edges, and avoid sliding metal through dry textured hair where it can catch individual strands.
What size gold cuff works best for fine hair?
Small, lightweight cuffs generally balance fine strands more easily. Use them around narrow braids, mini twists, or compact ponytail anchors rather than gathering extra hair solely to fill a large accessory. The cuff should close securely without crushing the section or pulling the hairstyle downward.
Can I wear several gold hair cuffs in one hairstyle?
Yes, especially along a bubble ponytail, braid, or half-up section. Keep the pieces lightweight and leave visible space between them so the hairstyle does not become crowded. Multiple cuffs work best when each one sits over a secure section rather than loose hair.