14 Bouncy Blowout Hairstyles for a Glamorous 90s Look

Bouncy blowout hairstyles are built around lifted roots, curved layers, and ends that sweep inward or outward instead of hanging completely straight. The 90s-inspired shape usually places the most movement around the cheekbones, jaw, shoulders, and ends, with enough crown lift to keep the silhouette airy. Long layers create the most dramatic movement, but collarbone and shoulder-length cuts can produce the same rounded effect with less hair to style.
Straight and wavy hair can reach this finish relatively quickly, while curly and coily hair may require more stretching if a smooth blowout is the goal. That is optional rather than necessary for a polished hairstyle. Density also matters: lower-density hair often benefits from a fuller perimeter and fewer short layers, while dense hair may need weight distributed carefully so the sides do not become excessively wide.
A complete blowout is more involved than a quick refresh. Wash-day styling usually includes drying the roots, shaping sections, and allowing the bends to cool, while second-day maintenance can focus on the crown and face frame. Heat protectant, realistic section sizes, and a haircut that supports the intended movement all help reduce repeated styling.
Quick List
- Classic 90s Layered Blowout Hairstyle
- Curtain Bangs Bouncy Blowout Hairstyle
- Deep Side-Part Bouncy Blowout Hairstyle
- Long Face-Framing Blowout Hairstyle
- Shoulder-Length Flipped Blowout Hairstyle
- Collarbone Layered Blowout Hairstyle
- Fine-Hair Full-Ends Blowout Hairstyle
- Dense-Hair Soft-Layer Blowout Hairstyle
- Curly-Texture Bouncy Blowout Hairstyle
- Coily Stretched Blowout Hairstyle
- High-Crown Volume Blowout Hairstyle
- Sleek-Root Bouncy Ends Blowout Hairstyle
- Side-Swept Feathered Blowout Hairstyle
- Soft Shag Blowout Hairstyle
Classic 90s Layered Blowout Hairstyle
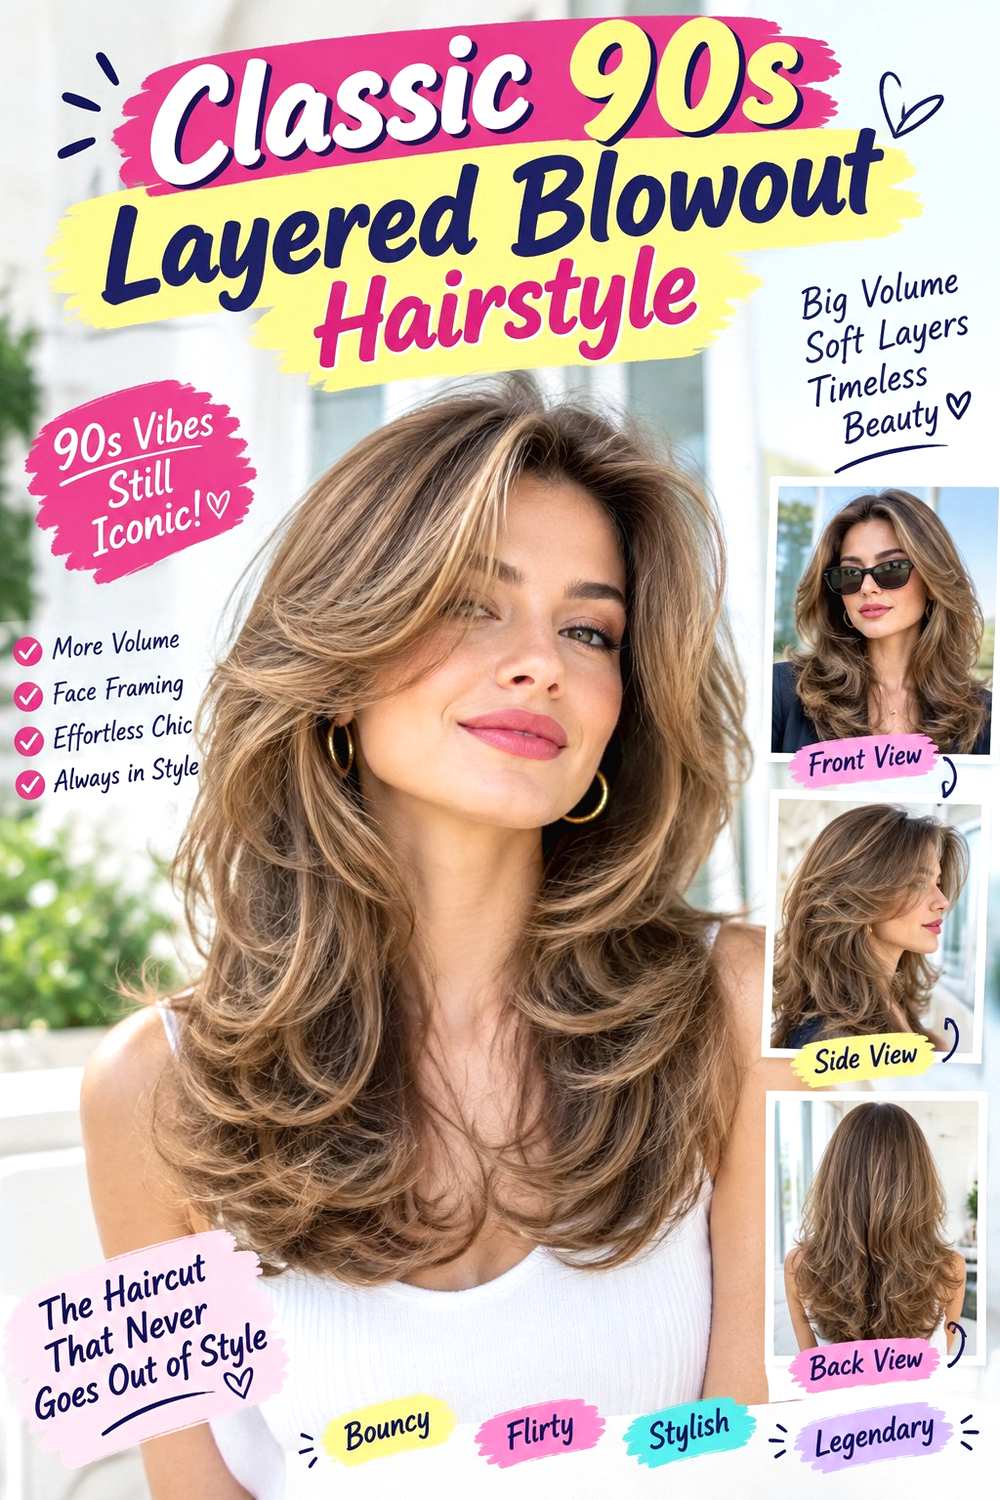
Long, graduated layers give this blowout its familiar full-bodied shape. Keep the overall length below the shoulders, with the shortest visible face-framing layer beginning around the cheekbones or jaw. The crown has controlled lift, while the side layers curve away from the face and the lower ends turn into broad, rounded bends. A center or slightly off-center part keeps the volume balanced without flattening the top.
Straight and wavy hair can form the shape efficiently, while medium to dense hair usually shows the layered movement especially clearly. Apply heat protectant before drying, use a large round brush to lift and curve each section, and add lightweight mousse near the roots when extra support is useful. A full wash-day blowout takes more time because every layer needs shaping, while a next-day refresh can focus on the front and crown.
As the haircut grows, the layers can lose their connection and the ends may stop bouncing together. At the salon, specify exactly where the shortest face-framing layer should begin and how full you want the perimeter to remain. Too many short layers can create width rather than the long, flowing movement associated with this version.
Pro tip:
Let each round-brushed section cool in its curved position before separating it. Cooling helps the bend settle, so you can create movement without repeatedly reheating the same pieces.
Make It Work for You:
If your ends are lower in density, begin the shortest layers farther down and keep more weight through the bottom. The blowout still moves while the perimeter remains substantial.
Watch Out For:
Avoid cutting every layer dramatically shorter just to increase bounce. Too much separation can make the ends look thin and the sides wider than the balanced 90s shape needs.
Curtain Bangs Bouncy Blowout Hairstyle
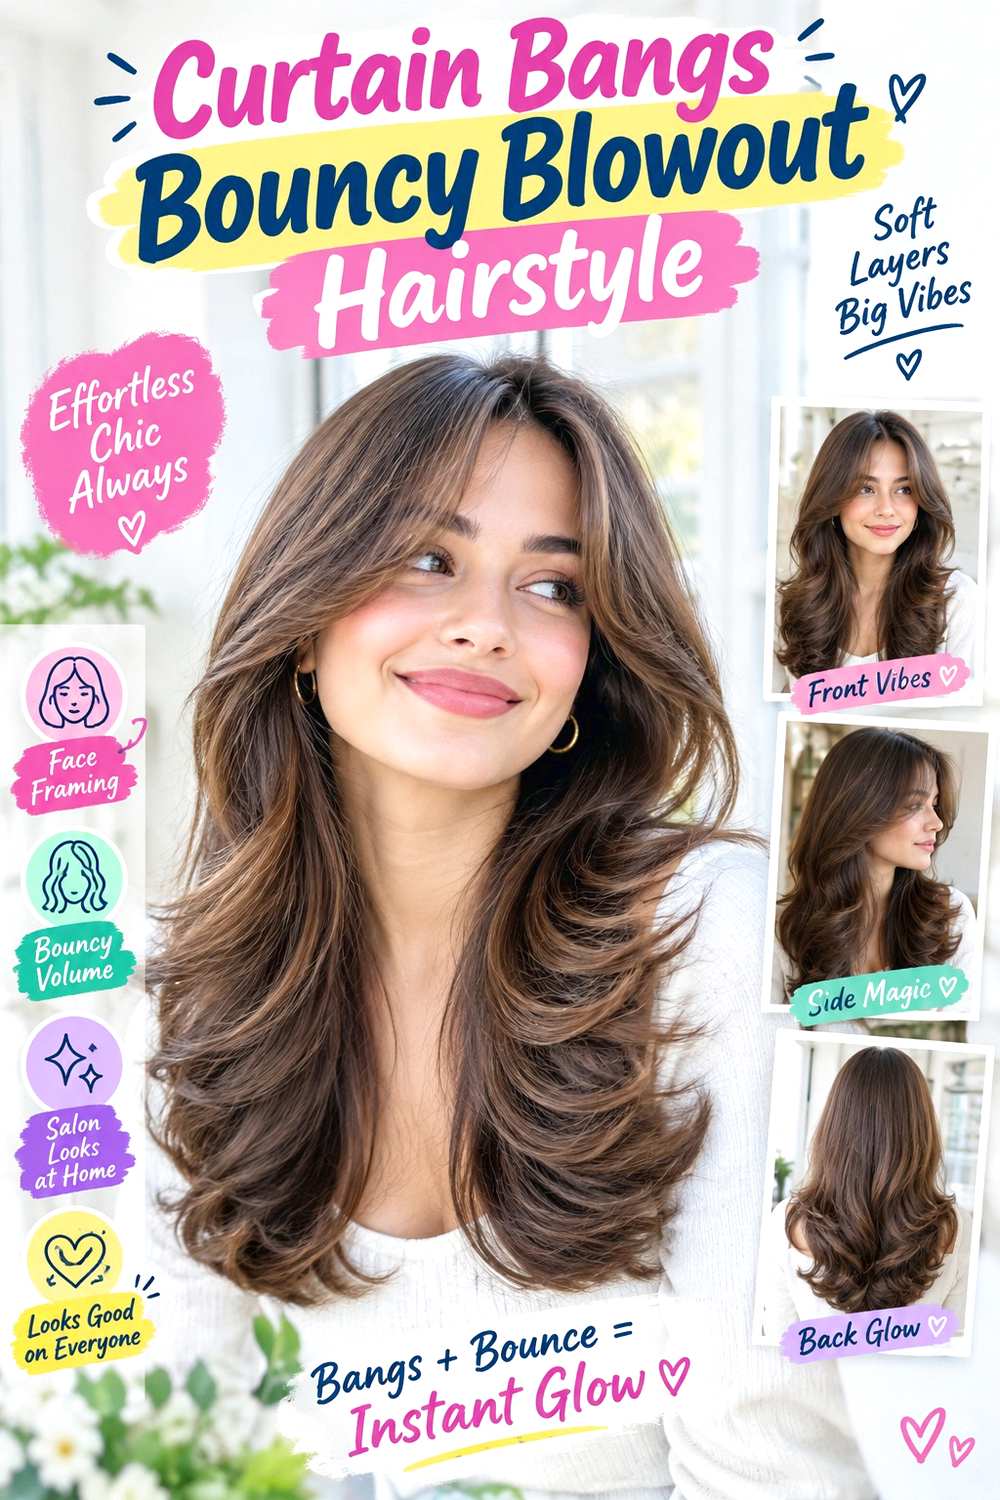
Curtain bangs add a strong front focal point to a bouncy blowout. Keep the center of the fringe around the brows or upper cheek area, then lengthen the outer corners toward the cheekbones. Longer face-framing layers can continue from the jaw through the shoulders, while the rest of the hair falls below the collarbone with broad curved ends. A center or soft middle part supports the open fringe and keeps the front symmetrical.
Straight, wavy, and loosely curly hair can all wear the design, although shrinkage should be considered when the fringe is cut. Use heat protectant before styling, a round brush to direct each half of the fringe away from the face, and flexible hairspray for light support. Refreshing the bangs and top layers may take only a few minutes, while a complete blowout after washing requires considerably more section-by-section work.
Fringe upkeep is separate from the rest of the haircut. Reshape it when the center repeatedly falls into the eyes or the outer corners stop blending into the longer layers. At the salon, specify the finished center length and the point where the fringe connects to the face frame so the front stays soft instead of looking disconnected.
Pro tip:
Dry the curtain fringe forward first, then divide it and guide both halves outward. This direction change gives the roots flexibility and helps the opening sit naturally.
Make It Work for You:
If your hairline has a strong cowlick, keep the fringe slightly longer and allow a wider center opening. You can preserve the curtain effect with less daily correction.
Watch Out For:
Do not make the outer corners as short as the center section. Those longer pieces are what blend the fringe into the larger blowout and keep the front from looking abrupt.
Deep Side-Part Bouncy Blowout Hairstyle
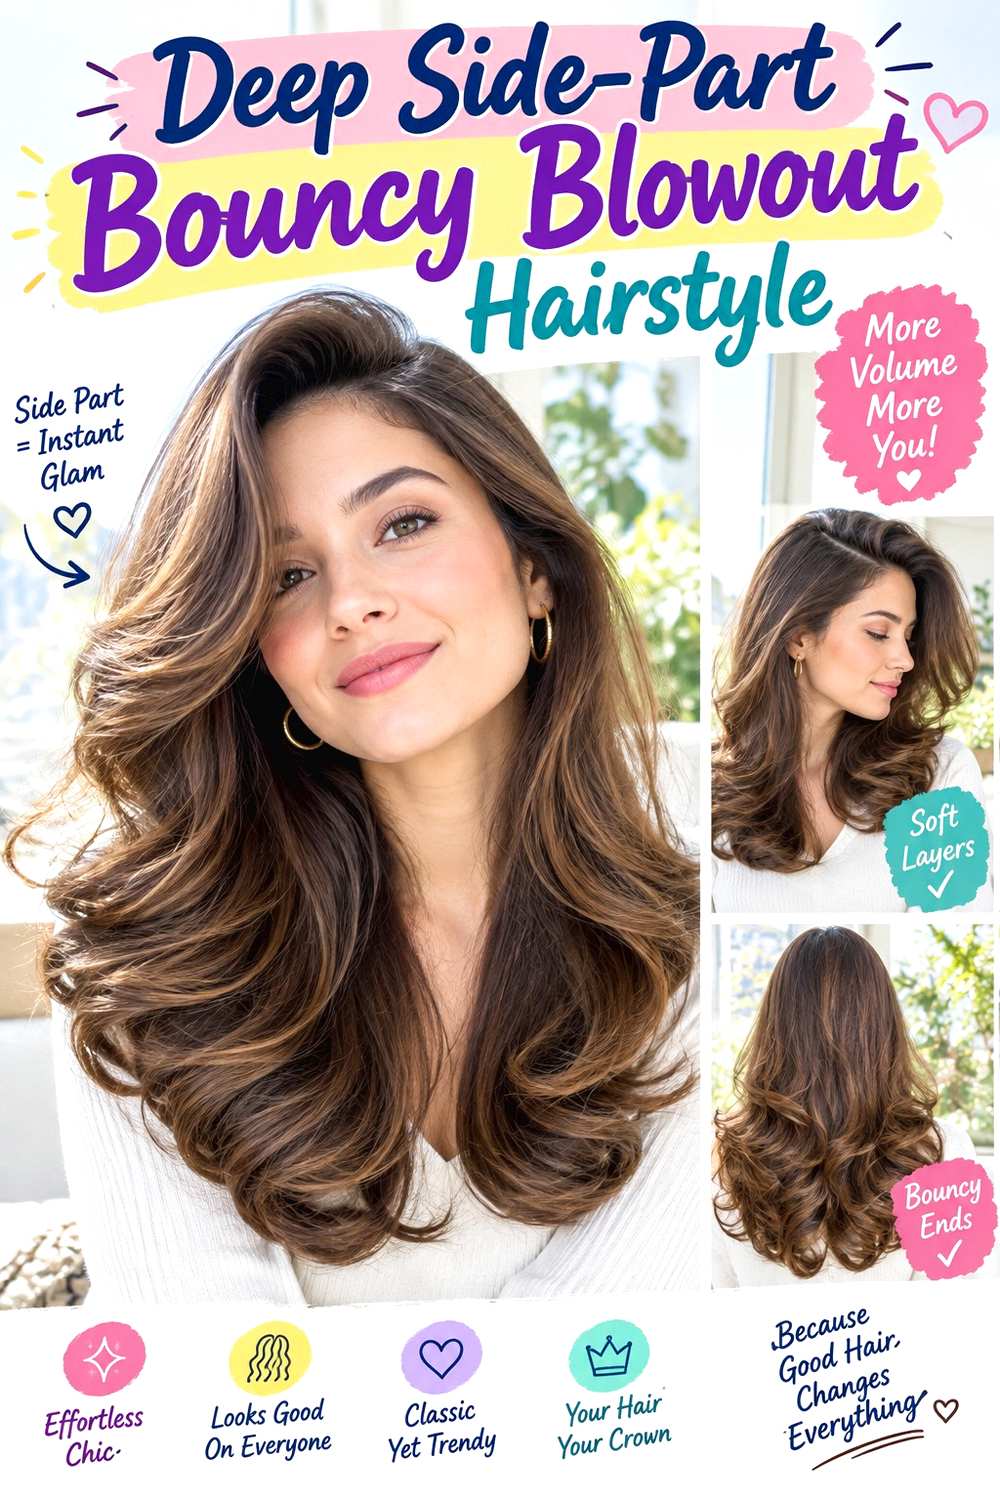
A deep side part shifts the 90s volume toward one side, creating a sweeping front and a less symmetrical silhouette. Keep the hair at collarbone length or longer, with layers beginning around the cheekbones on the heavier side. The roots lift near the part, the front curves away from the forehead, and the ends form broad bends instead of tight curls. The lighter side can stay closer to the head or tuck behind the ear.
This shape works particularly well when your natural growth direction already favors one side. Straight and wavy hair may need relatively little correction, while dense hair often benefits from keeping some interior sections calmer. Apply heat protectant before drying, use a large round brush for the heavier front section, and add lightweight mousse near the part for controlled lift. A quick refresh can focus on the root direction and front bend; wash-day styling takes longer.
Set the part before drying rather than moving finished roots later. At the salon, show exactly where you wear the division and identify the shortest front layer. That matters because the heavier side carries more hair, so overly short layers can create excessive volume beside the cheek instead of a flowing sweep.
Pro tip:
Dry the heavier front section briefly in the opposite direction before sweeping it back. That creates flexible root lift without relying on aggressive teasing or repeated heat.
Make It Work for You:
If your hair is very dense, leave more interior sections smooth beneath the heavy sweep. The visible layers still bounce while the overall width stays easier to control.
Watch Out For:
Avoid creating equal root volume on both sides if you want the deep part to remain obvious. Keep the lighter side calmer and let the heavier section carry the lift.
Long Face-Framing Blowout Hairstyle
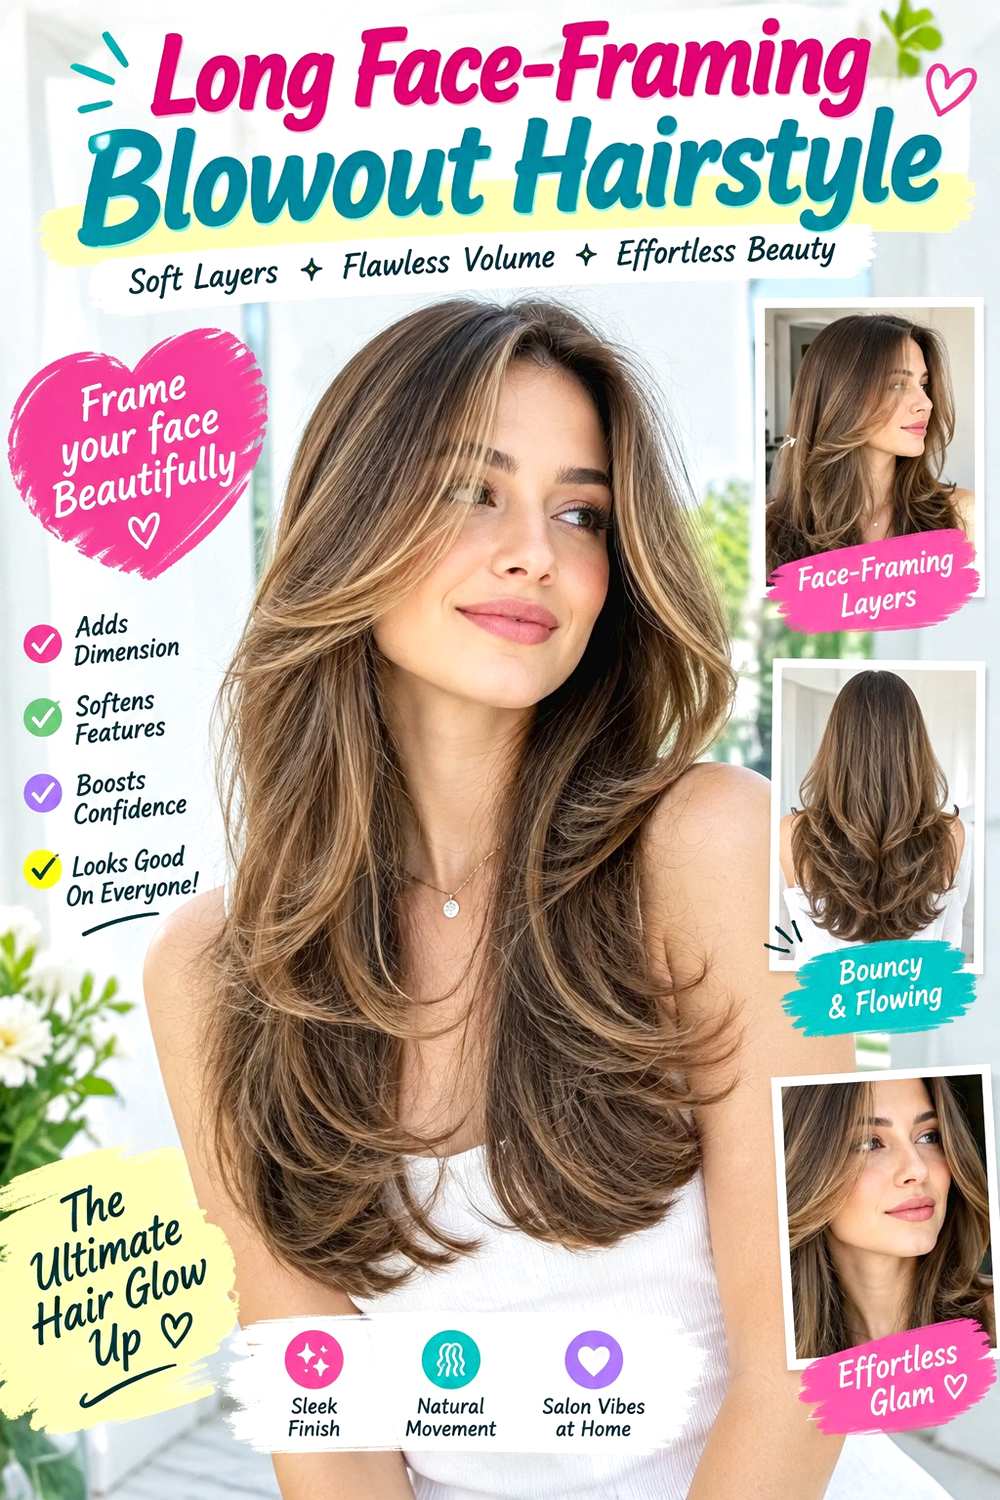
This version keeps most of the haircut long and uses the face frame to create the 90s movement. Let the main perimeter sit well below the shoulders with enough weight through the ends, then begin shorter front layers around the cheekbones, jaw, or collarbone. Those pieces curve away from the face during styling, while the back remains smoother with broad movement through the lower lengths. A center part makes the face frame balanced and easy to compare on both sides.
Long hair with medium or high density can support several graduated front pieces, while lower-density hair usually benefits from keeping most of the shorter layers near the front. Apply heat protectant before styling, use a round brush to sweep the frame outward, and add lightweight serum through the lower ends for smooth separation. A front-only refresh is relatively quick; drying and shaping the full long length after washing takes much more time.
When the face frame grows, the shortest sections may stop lifting away from the cheeks and simply blend into the length. At the salon, identify the exact starting point for those layers and ask to preserve the back perimeter if fullness matters. That keeps the movement concentrated where it is most visible.
Pro tip:
Style the face-framing layers before the back lengths. Once the front bends are established, you can judge how much additional movement the rest of the haircut actually needs.
Make It Work for You:
If your ends are sparse, keep the back almost one length and concentrate shorter layers around the face. The blowout gains shape without reducing fullness through the longest section.
Watch Out For:
Too many short layers throughout long hair can leave the lower perimeter thin. Add movement strategically around the front instead of assuming every section needs heavy graduation.
Shoulder-Length Flipped Blowout Hairstyle
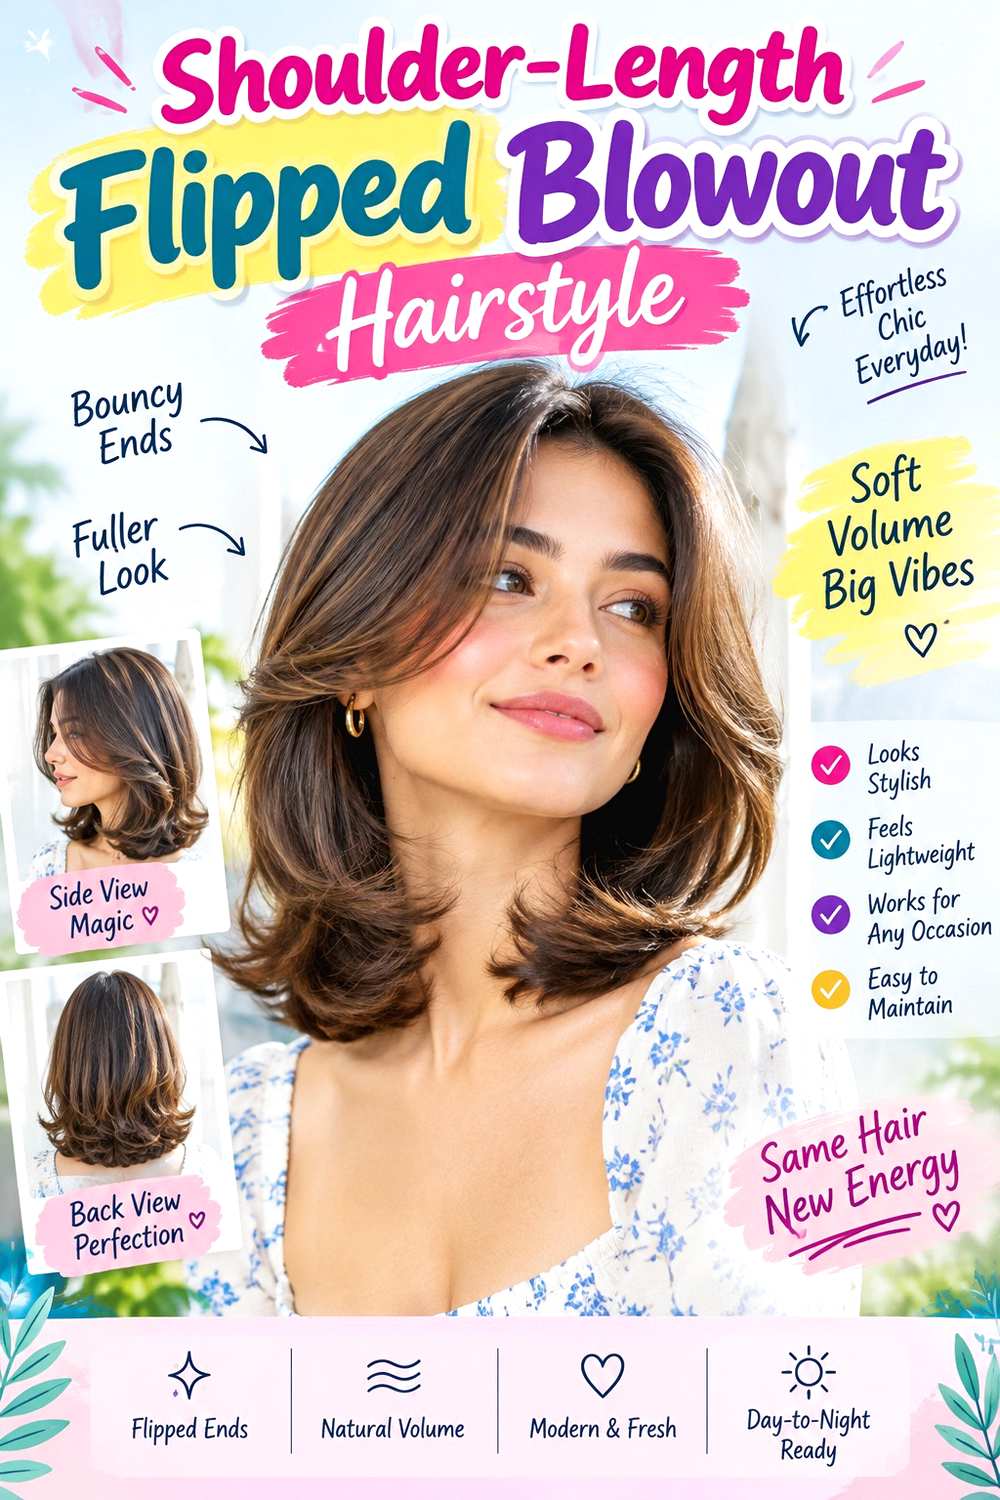
Shoulder-length hair naturally supports a 90s-style flip because the ends can curve outward as they meet the shoulders. Keep the perimeter around shoulder level, use light layering through the front and upper sections, and create the strongest movement only through the final few inches. A center or soft side part works well, while the crown stays lifted but controlled. Jaw-length face framing helps connect the front to the flipped perimeter.
Straight and softly wavy textures are convenient starting points, and medium-density hair usually shows the outward movement clearly. Apply heat protectant before drying, use a round brush to turn the ends away from the neck, and finish with flexible hairspray underneath the flip for light support. A quick morning reset can focus on the front and perimeter, while full wash-day styling takes longer.
Shoulder contact can help or disrupt the flip depending on the exact length. As the cut grows, the ends may stop catching the shoulder cleanly and start bending unpredictably. At the salon, identify where you want the dry perimeter to sit in relation to the shoulder and how much layering you want above it. A small length change can noticeably alter the finished bend.
Pro tip:
Keep the mid-lengths relatively smooth and form the strongest outward bend only through the last two or three inches. This makes the flip clearer without widening the whole cut.
Make It Work for You:
If your hair naturally waves, allow slight variation through the perimeter instead of forcing every end into an identical curve. The shoulder-level movement will still read clearly.
Watch Out For:
Avoid adding many short layers just to create more flip. The shoulder interaction already provides movement, so preserve enough bottom weight for the ends to look substantial.
Collarbone Layered Blowout Hairstyle
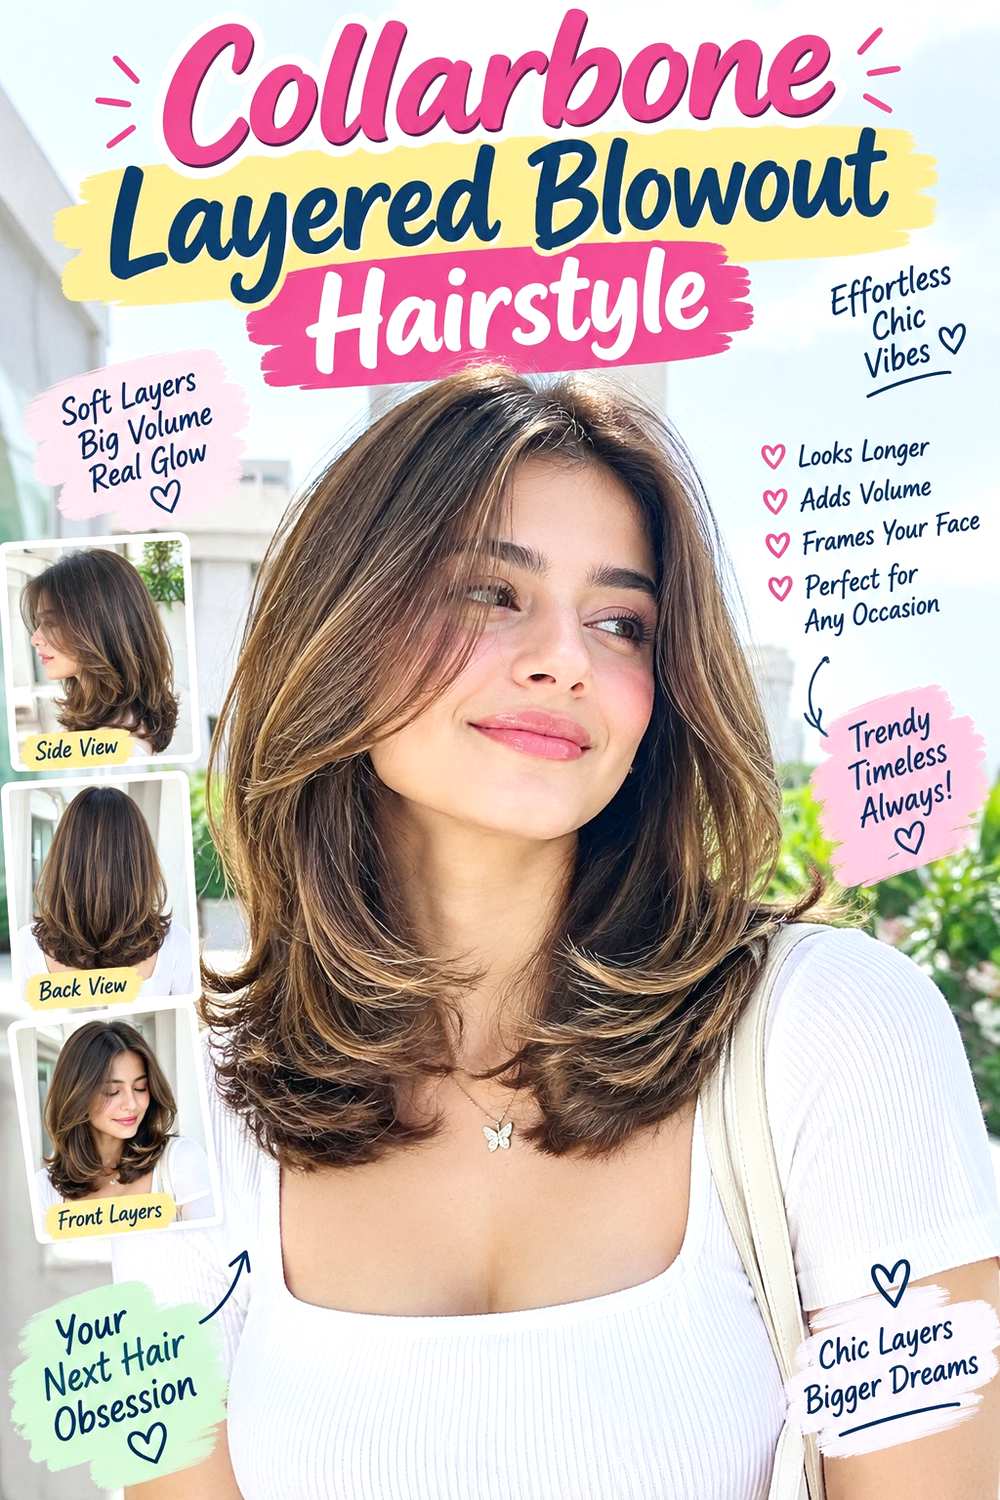
A collarbone-length blowout offers the rounded movement of longer 90s hair with less styling time. Keep the perimeter near the clavicle and use graduated layers beginning around the jaw. The upper sections curve away from the face, while the lower ends turn softly inward or outward depending on the desired finish. Gentle crown volume prevents the cut from looking flat, and either a center or side part can work.
Straight and wavy hair make the layering easy to see, while dense hair may need carefully placed internal weight reduction if the sides become too wide. Apply heat protectant before using a round brush, then add lightweight mousse near the crown for lift. Because the length is moderate, a full blowout can be more manageable than styling very long hair, while a second-day refresh may involve only the front and ends.
The cut needs reshaping when the perimeter falls well below the collarbone or the jaw-level layers stop connecting smoothly. At the salon, specify the dry perimeter and the exact layer starting point. Collarbone hair can flip differently depending on where it hits clothing or shoulders, so discussing your preferred finish helps determine whether the ends should remain fuller or slightly more graduated.
Pro tip:
Dry the front layers away from the face but guide the lower back sections more vertically. This gives the front bounce without making the entire collarbone silhouette excessively round.
Make It Work for You:
If your hair has lower density, keep the jaw layers modest and preserve a fuller perimeter. The front can still move while the collarbone ends remain visibly substantial.
Watch Out For:
Do not remove bulk uniformly through the whole cut. If the sides feel wide, target the actual heavy areas instead of thinning the collarbone perimeter that supports the shape.
Fine-Hair Full-Ends Blowout Hairstyle
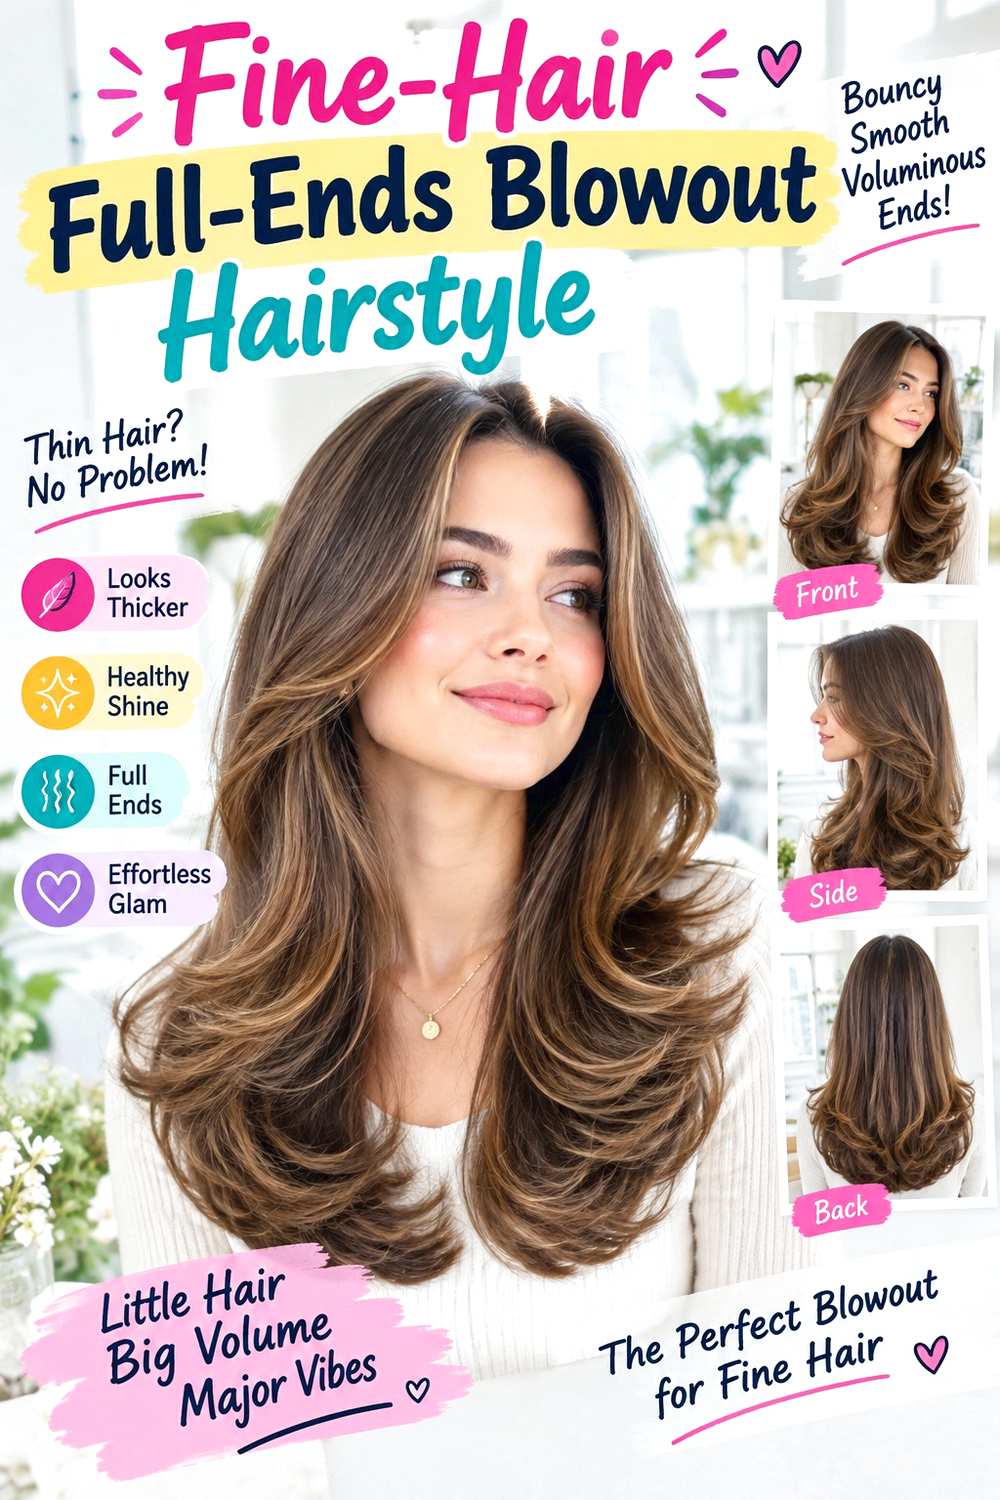
Fine hair can create a bouncy blowout when the haircut preserves enough weight through the ends. Keep the length around the collarbone or below the shoulders, with restrained layers concentrated around the face rather than scattered through the entire cut. The roots gain gentle lift, the mid-lengths stay smooth, and the ends curve into broad bends that make the perimeter appear cohesive rather than separated.
Fine strands can still be high density, so the exact amount of layering should reflect how much hair is present. Apply lightweight mousse near the roots, use heat protectant before drying, and shape the sections with a round brush. Avoid loading the lower lengths with heavy product, since the bounce depends on keeping them light. A root and front refresh can be brief, while a complete blowout after washing takes longer.
At the salon, explain that fullness through the perimeter is a priority. Ask for the shortest face-framing layer to start no higher than necessary and avoid aggressive thinning through the bottom if the ends are already sparse. As the cut grows, reassess when the perimeter starts looking uneven or the front pieces stop lifting properly. Fine hair often benefits more from strategic shape than from adding many short layers.
Pro tip:
Concentrate mousse near the roots and keep most product away from the tips. Supporting the base while leaving the ends light helps the blowout retain movement without looking coated.
Make It Work for You:
If your fine strands are high density, you can support more layering than someone with sparse hair. Let actual density determine how much movement the haircut can carry.
Watch Out For:
Do not confuse fine strands with low density. Excessive layer removal based only on strand thickness can leave a naturally dense head of hair thinner at the perimeter than necessary.
Dense-Hair Soft-Layer Blowout Hairstyle

Dense hair can create dramatic 90s movement, but the layers need to distribute volume instead of stacking it all around the sides. Keep the main length below the shoulders and begin longer layers around the jaw or collarbone. The crown should lift softly, while the front and mid-lengths curve away from the face in broad sections. Preserve enough perimeter weight that the ends move together instead of becoming overly feathered.
Straight, wavy, and loosely curly hair can all reach this blowout with different amounts of preparation. Apply heat protectant before drying, use a large round brush to shape wider sections, and smooth lightweight serum through the ends for separation. Dense hair often takes longer to dry fully, so the wash-day routine is substantial. A quick refresh should target the crown and front rather than reheating every section.
As the haircut grows, bulk may collect behind the ears or around the shoulders before the overall length changes much. At the salon, identify exactly where the hair feels heavy and ask about controlled internal weight placement rather than broad thinning. Short layers everywhere can create even more expansion. The goal is movement through longer sections while keeping the silhouette balanced from crown to ends.
Pro tip:
Dry the lower interior layers closer to the head, then create stronger curves through the visible surface. This preserves bounce while keeping unnecessary width from building underneath.
Make It Work for You:
If your dense hair is naturally wavy, preserve some of that movement and refine only the front and outer layers. A polished blowout does not require every section to be identical.
Watch Out For:
Avoid aggressive thinning throughout dense hair. Short internal pieces can expand during a blowout, creating more puffiness instead of reducing the weight that bothered you initially.
Curly-Texture Bouncy Blowout Hairstyle
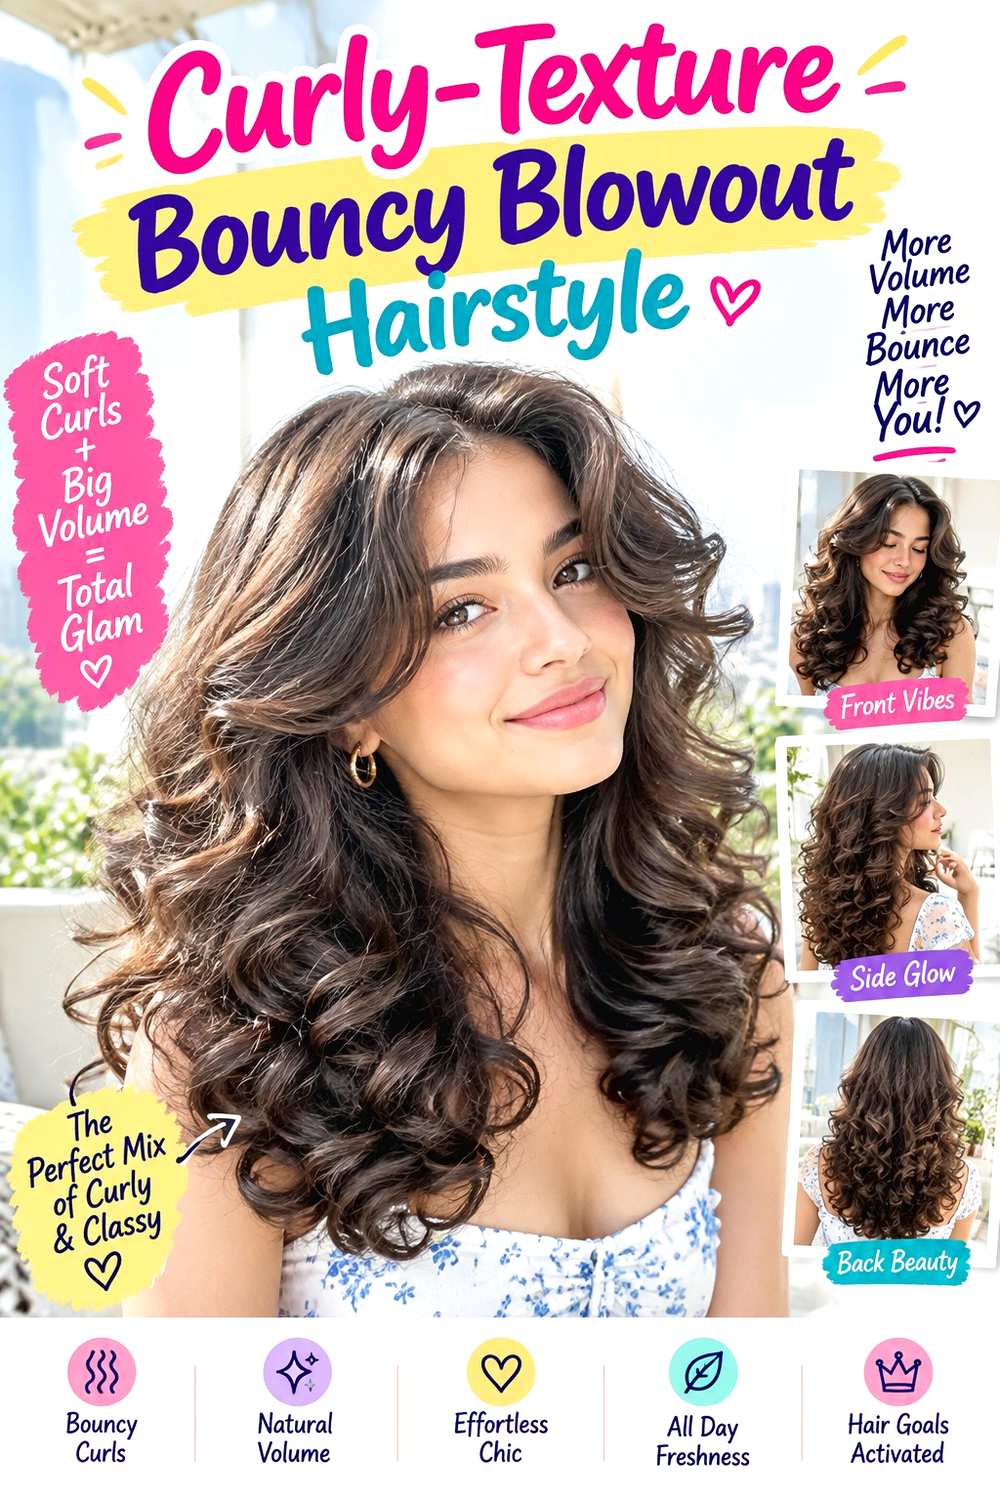
Curly hair can be styled into a bouncy blowout when a smoother, stretched finish suits your preference, but the natural curl pattern does not need to be removed permanently. Keep the cut shoulder length or longer with layers planned around the hair’s usual curl shrinkage as well as its blown-out length. During styling, aim for a soft root stretch, broad movement through the mid-lengths, and rounded ends rather than pressing every section pin-straight.
Heat protectant is essential before using warm airflow, while a round brush can create tension and broad bends through the lengths. Lightweight serum can help smooth the finished ends without making them rigid. A complete blowout takes considerably longer than refreshing naturally curly hair because drying and stretching happen section by section. A later refresh may need only the front and crown.
If you wear the hair both curly and blown out, tell your stylist before cutting. Layers should work reasonably in both states rather than being planned from only one stretched shape. Shrinkage can make a layer that looks long when blown out sit much higher when curly. The salon discussion should include both dry curly length and your preferred blowout movement.
Pro tip:
Work in manageable sections and stop once each one is dry and shaped. Repeatedly passing heat over already finished hair adds exposure without creating proportionally more bounce.
Make It Work for You:
If you alternate between curls and blowouts, keep the shortest layers long enough to behave well in both states. This gives the haircut more flexibility between styling routines.
Watch Out For:
Do not plan the haircut only from the stretched blowout length. Curl shrinkage changes where layers sit, so the natural dry shape should remain part of the cutting decision.
Coily Stretched Blowout Hairstyle
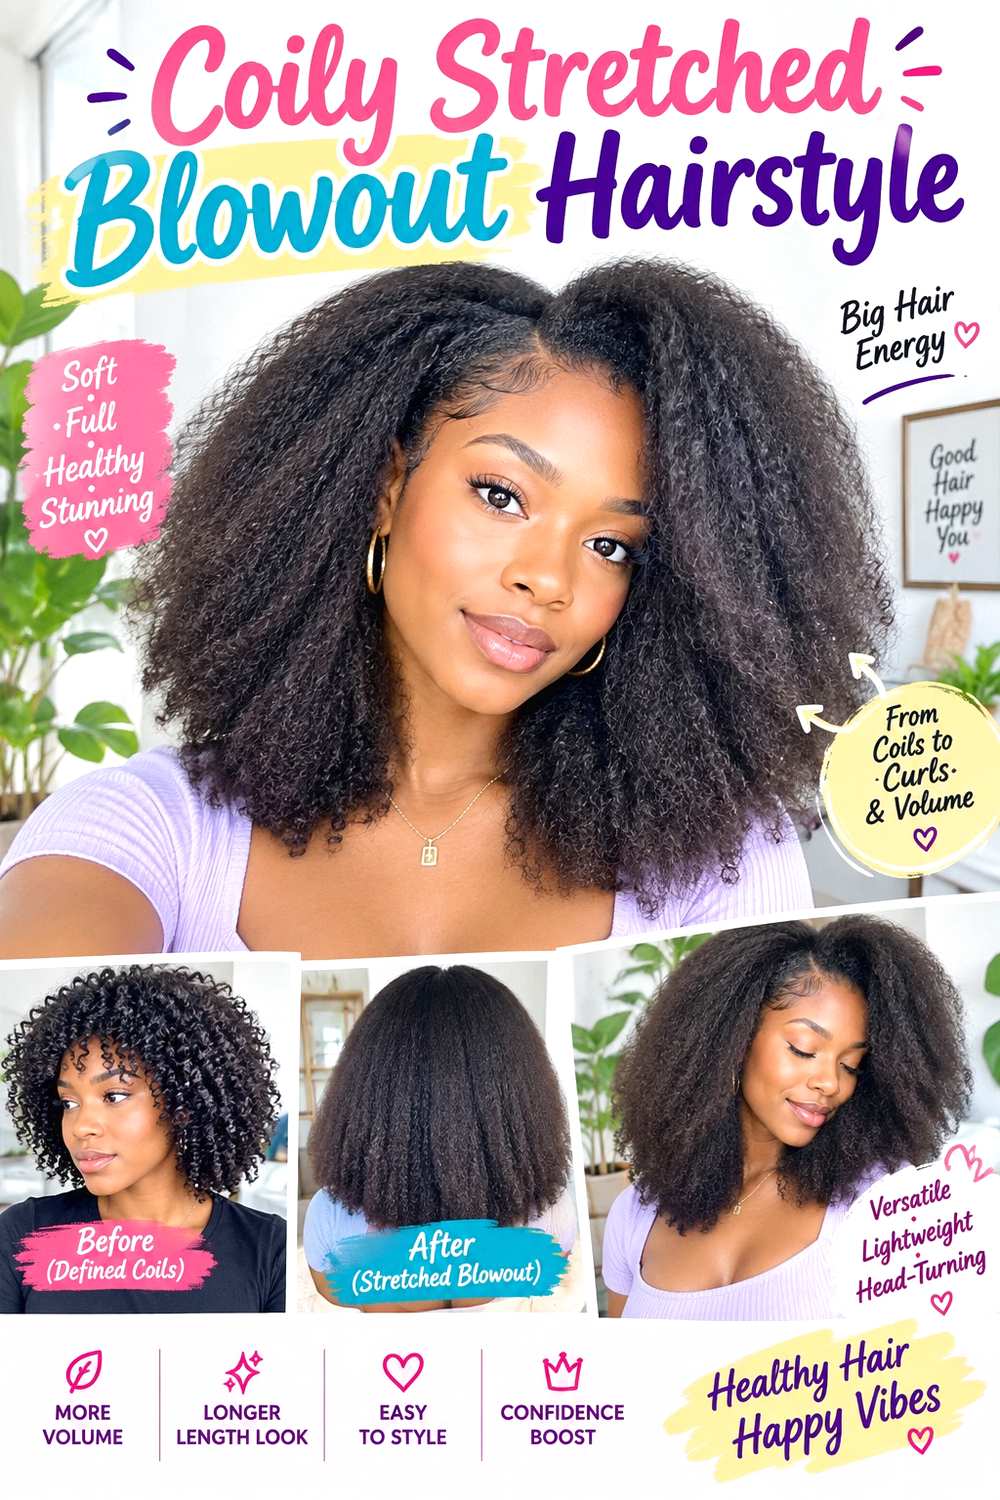
A stretched blowout on coily hair creates a fuller, elongated shape with rounded movement rather than a completely flat finish. Keep the length sufficient for the ends to bend around the shoulders or below, and plan layers with both shrinkage and stretched length in mind. The roots can remain softly full instead of being pressed close to the scalp, while the front sections curve away from the face and the ends stay substantial.
Use heat protectant before warm drying, a round brush to create controlled tension, and lightweight serum through the ends for smooth separation. Full styling can take significant time because detangling, drying, and shaping are separate steps. A quick refresh should focus only on the areas that have lost their direction rather than repeating the entire process. Heat styling is optional, and natural coily styles can remain equally polished when stretching is not part of your routine.
If you switch between natural coils and stretched blowouts, the haircut needs to serve both shapes. At the salon, discuss the dry coily silhouette, shrinkage, and where you want the blown-out layers to fall. Avoid basing the cut only on stretched length, especially around the face where rebound can be substantial.
Pro tip:
Start with the lowest effective airflow and work methodically through each section. Once a section is dry and curved, move on instead of repeatedly reheating it for extra smoothness.
Make It Work for You:
If your coils shrink strongly, keep face-framing layers longer so they remain versatile. They can still curve beautifully in a blowout without becoming unexpectedly short in the natural state.
Watch Out For:
Avoid chasing a completely flat root if soft volume is the goal. Overworking the roots removes the fullness that helps give this blowout its rounded, bouncy silhouette.
High-Crown Volume Blowout Hairstyle
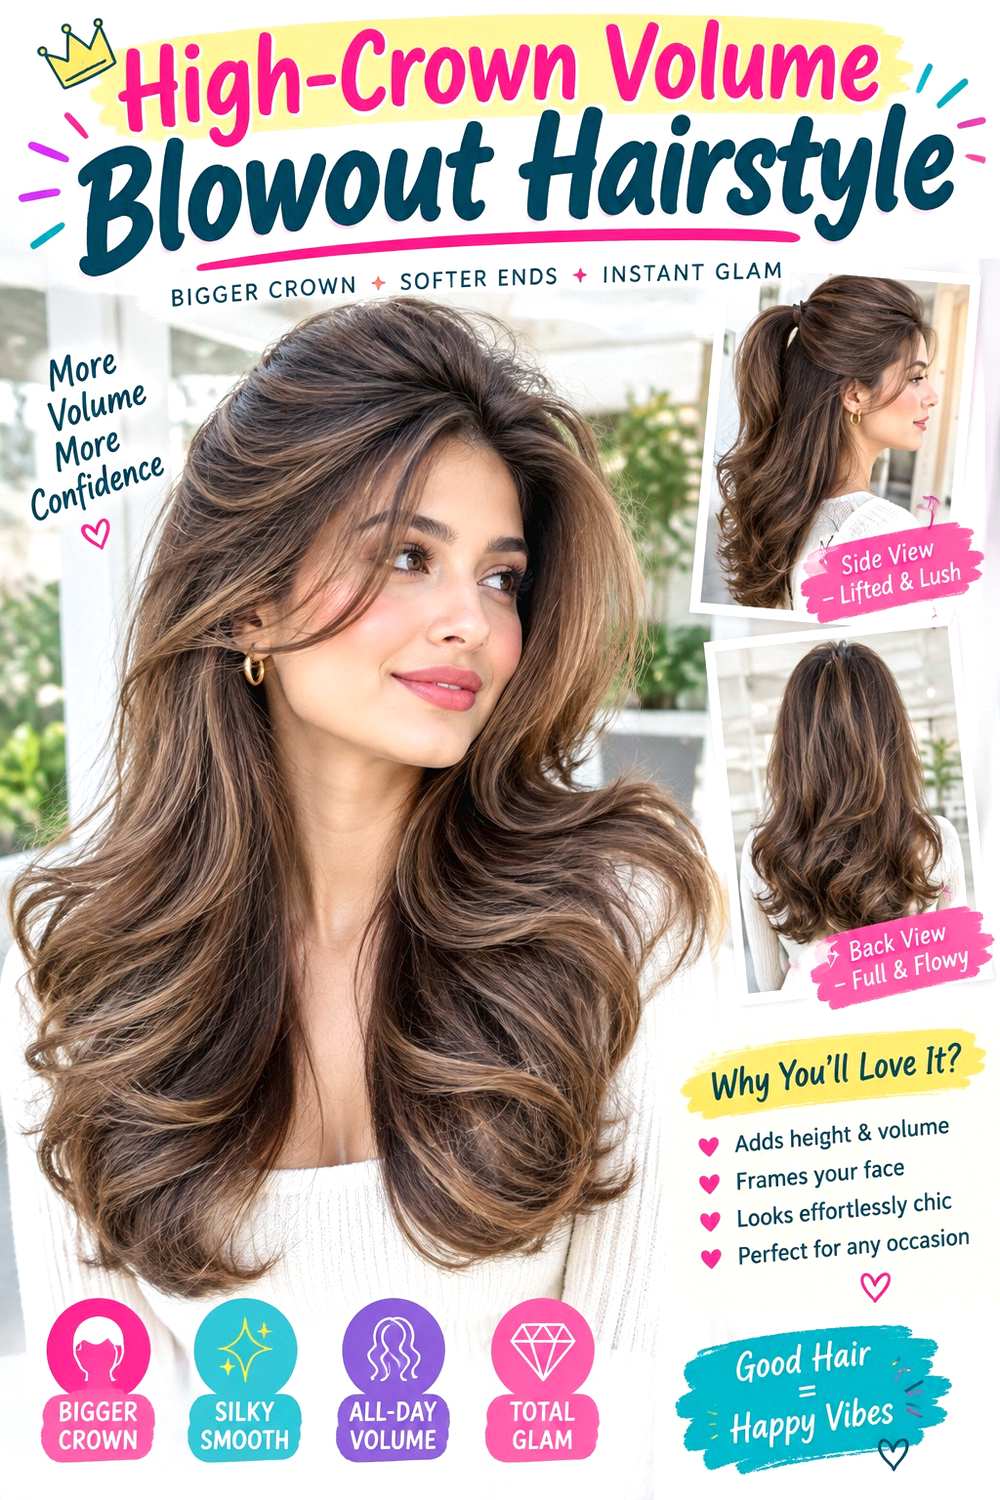
High-crown volume puts the strongest lift at the upper back of the head rather than spreading it evenly through the sides. Keep the hair shoulder length or longer, with long layers that support movement below the crown. The front can open with a center or soft side part, while the crown rises gently and the ends curve into broad, polished bends. This creates height without requiring exaggerated width around the cheeks.
Straight, wavy, and lower-volume hair types can use the placement effectively, though dense hair may need only a small amount of extra crown lift. Apply heat protectant before drying, use root-lift spray selectively near the crown, and shape sections with a large round brush. A quick next-day refresh can focus on the top few sections; a full wash-day blowout naturally takes longer.
At the salon, ask where the shortest upper layer should begin if you want the crown to move without becoming shaggy. Too many short crown layers can create separation instead of smooth height. As the style wears, gravity may lower the volume, so rebuild only the top rather than restyling all the ends. The defining feature is targeted height, not maximum fullness everywhere.
Pro tip:
Dry crown sections upward, then let them cool with their roots lifted before releasing them. This concentrates support exactly where the hairstyle needs height without adding volume through the sides.
Make It Work for You:
If your hair is already dense, use crown lift sparingly and keep the lower layers smoother. A small amount of height can balance the silhouette without increasing overall bulk.
Watch Out For:
Avoid applying root-lift product across the entire head. Concentrated crown placement creates a clearer shape, while all-over product can make the blowout wider and harder to control.
Sleek-Root Bouncy Ends Blowout Hairstyle
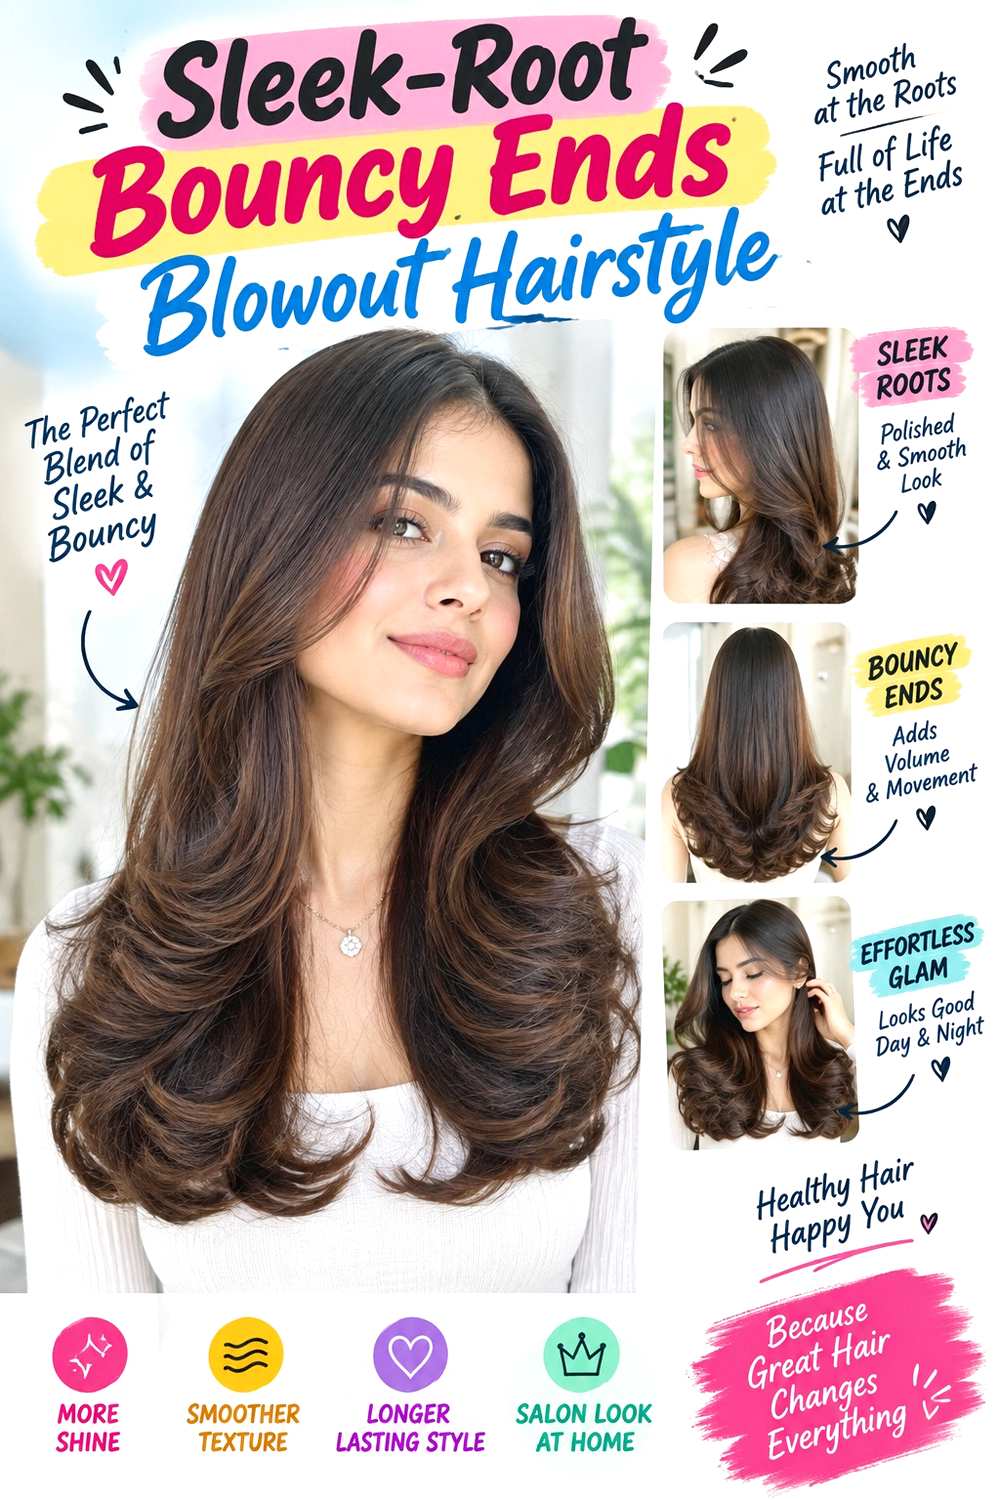
This version keeps the roots and upper lengths relatively smooth while concentrating the 90s bounce through the bottom half. Use a center or precise side part, maintain a calmer crown, and begin the strongest curved movement around the jaw, shoulders, or mid-lengths. The ends can sweep inward and outward in alternating broad bends, creating a polished contrast between the sleek upper section and lively perimeter.
Straight and softly wavy hair are convenient starting points, and dense hair often benefits from the controlled root area. Apply heat protectant before drying, use a round brush mainly through the lower lengths, and finish with flexible hairspray underneath the bends. Because the roots need less volume work, this can be quicker than a full high-volume blowout. A refresh may involve only the ends that flattened overnight.
The haircut works best with enough lower-layer movement to support those bends while keeping the top relatively long. At the salon, ask for face framing and lower layers rather than excessive crown shortening. If the ends begin looking thin as the cut grows, preserving perimeter weight may matter more than adding extra movement. The contrast between smooth roots and rounded ends is what gives this finish its identity.
Pro tip:
Keep the round brush lower on each section and avoid over-lifting the roots. Focusing tension through the final third makes the bouncy ends clearer against the smoother upper shape.
Make It Work for You:
If your hair has lower density, create fewer, broader bends and keep the ends fuller. You can show movement without separating the perimeter into too many small sections.
Watch Out For:
Do not add short crown layers simply because the ends need more bounce. Lower-layer placement and styling direction matter more for this version than extra volume near the roots.
Side-Swept Feathered Blowout Hairstyle

A side-swept feathered blowout places layered movement diagonally away from the face. Use a deep or moderate side part, keep longer layers around the cheekbones and jaw, and let those pieces sweep backward in overlapping curves. The lower lengths can sit around the shoulders or below, with feathered ends that separate softly instead of forming tight curls. The lighter side stays relatively close to the head so the heavier sweep remains obvious.
Straight and wavy hair show the directional layers clearly, while medium to dense hair can support several graduated front pieces. Apply heat protectant before drying, use a round brush to direct the layers back from the face, and mist flexible hairspray lightly underneath for hold. A quick refresh can focus on the heavy front section, while wash-day styling takes longer because each feathered layer needs shaping.
The haircut should use gradual layer transitions rather than short, disconnected pieces. At the salon, show where you wear the side part and identify the shortest feathered layer. If it begins too high, the heavy side can become bulky around the temple. As the layers grow, reshape when the front no longer sweeps cleanly into the shoulder-length sections.
Pro tip:
Direct each front layer backward at a slightly different height rather than stacking all the bends together. This creates a feathered flow while keeping the side sweep light.
Make It Work for You:
If your hair is lower in density, use fewer front layers and keep them longer. The side direction can create enough movement without reducing too much weight near the perimeter.
Watch Out For:
Avoid making every feathered layer very short. Too many short pieces can create a bulky shelf around the cheek instead of the flowing, graduated sweep you want.
Soft Shag Blowout Hairstyle
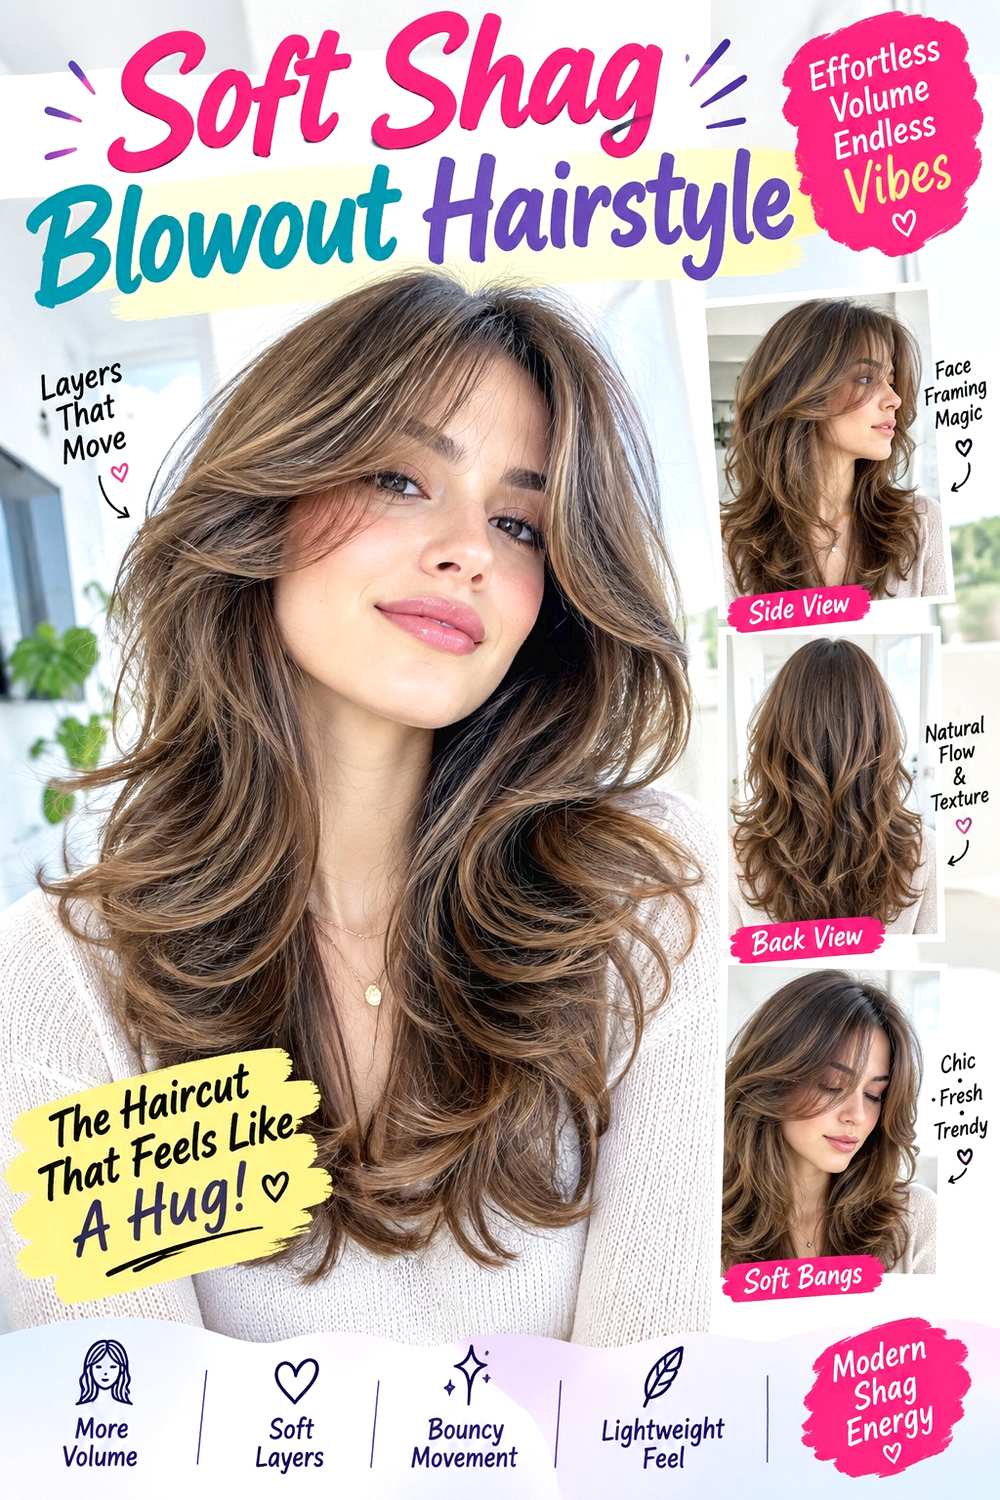
A soft shag blowout combines 90s bounce with more visible crown and face-framing layers. Keep the overall length around the shoulders or longer, with shorter pieces through the crown and front but enough weight through the perimeter to prevent the cut from becoming wispy. The blowout lifts the upper layers, curves the face frame away from the cheeks, and leaves the lower ends looser rather than perfectly rounded.
Naturally wavy hair can support the movement easily, while straight hair may need more styling to show the separation. Apply heat protectant before drying, use lightweight mousse for crown support, and shape the visible layers with a round brush. A quick refresh can target the crown and front, while a full wash-day blowout takes longer because several layer lengths need different handling.
Lower-density hair should usually keep the shag elements restrained, while dense hair can support more internal movement. At the salon, specify the shortest crown layer and how full you want the bottom edge. If the crown is cut too short, a blowout can create more height and width than intended. Reshape when the upper layers stop lifting or the perimeter begins looking disconnected.
Pro tip:
Refresh the shortest crown and face-framing sections first. Those layers create most of the shaggy blowout effect, so the lower lengths may need only light smoothing.
Make It Work for You:
If your ends are lower in density, keep the crown layers longer and preserve more perimeter weight. You can still get 90s movement without making the bottom overly thin.
Watch Out For:
Do not combine very short crown layers with maximum round-brush volume unless you want a much larger silhouette. Start with moderate lift and increase only where the shape needs it.
Conclusion
Bouncy blowout hairstyles can range from high-volume layered shapes to smoother roots with movement concentrated through the ends. Long layers create the fullest 90s effect, while shoulder and collarbone cuts give the same rounded finish with less styling time. Curtain bangs, side parts, and face framing shift where the volume appears, and density should guide how much layering is useful. Curly and coily hair can be stretched for a blowout when desired, but heat styling is optional and shrinkage should still be considered when planning the cut. Choose a version around your natural texture, perimeter fullness, face-framing preference, heat routine, and the amount of wash-day styling you realistically want to maintain.
Before Your Salon Visit
Choose one or two favorites and save references that clearly show the front, side, and layered shape. Discuss your natural texture, density, face shape, preferred length, upkeep, and usual styling routine. Point out the exact fringe, shortest layer, face frame, crown volume, parting, flipped ends, or finish you like. If you wear your hair both naturally textured and blown out, mention both routines so the haircut can be planned around how the layers behave in each state.
FAQs
What haircut works best for a bouncy 90s blowout?
Long or medium-length cuts with connected layers usually create the easiest rounded movement. The shortest layer can begin around the cheekbones, jaw, or collarbone depending on the volume you want. Lower-density hair often benefits from fewer short layers and a fuller perimeter, while dense hair can support more internal movement.
Do I need a round brush for a bouncy blowout?
A round brush is useful for combining root lift with curved ends, but it is not the only method. Other blow-dry techniques can create movement too. Whatever method you use, apply heat protectant when heat styling and avoid repeatedly reheating sections that already hold the desired bend.
Can curly or coily hair wear a 90s-style blowout?
Yes, if a stretched blowout fits your styling preference. The haircut should still account for shrinkage and the hair’s natural dry shape, especially if you alternate between textured and blown-out styles. Straightening is not required for hair to look polished, and heat use is a personal styling choice.
How can I make a blowout last without using more heat every day?
Focus on refreshing the crown, fringe, and face-framing pieces rather than restyling the entire head. Preserve the shape overnight in a way that avoids crushing the bends, and reset only flattened sections as needed. Limiting unnecessary heat passes is more practical than recreating the full wash-day blowout daily.