15 Lace Ribbon Braid Hairstyles

Lace ribbon braid hairstyles combine structured braiding with a softer fabric detail that can be woven through a braid, crossed between two braided sections, or tied at an anchor point. The defining shape depends on where the braid sits: a narrow half-up panel creates a delicate back detail, while Dutch braids, ponytails, crowns, and buns give the ribbon more structure. Length, parting, braid width, loose face-framing pieces, volume, and the amount of ribbon left visible all change the finished effect.
Medium and long hair provide the most space for repeated weaving, although bobs and lobs can support smaller half-up designs. Straight, wavy, curly, and coily textures can all work when braid size and tension suit the starting hair. Lower-density hair may look more balanced with narrow braids and lightweight lace, while dense hair can support broader sections. Existing fringe and short layers can remain loose rather than being pulled tightly into the braid.
Styling effort varies considerably. A small half-up braid may need only a short refresh between wears, while twin braids or an intricate ladder pattern require more sectioning on a full styling day. Because these are temporary styles, maintenance is mainly about secure anchors, comfortable tension, smooth ribbon placement, and preventing delicate lace edges from snagging the hair.
Quick List
- Half-Up Lace Ribbon Braid Hairstyle
- Double Dutch Lace Ribbon Braid Hairstyle
- Side-Swept Lace Ribbon Braid Hairstyle
- Low Pony Lace Ribbon Braid Hairstyle
- Crown Lace Ribbon Braid Hairstyle
- Fishtail Lace Ribbon Braid Hairstyle
- French Lace Ribbon Braid Hairstyle
- Ladder Lace Ribbon Braid Hairstyle
- Lace Ribbon Braided Bun Hairstyle
- High Pony Lace Ribbon Braid Hairstyle
- Twin Pigtail Lace Ribbon Braid Hairstyle
- Curly Lace Ribbon Braid Hairstyle
- Short-Hair Lace Ribbon Braid Hairstyle
- Loose Boho Lace Ribbon Braid Hairstyle
- Four-Strand Lace Ribbon Braid Hairstyle
Half-Up Lace Ribbon Braid Hairstyle

A half-up arrangement keeps most of the length loose while concentrating the lace detail at the back of the head. Take two sections from around the temples and form slim braids that meet near the rear crown. A narrow lace ribbon can cross between them or weave through their inner edges, creating a defined panel without covering the loose hair below. A center part gives the style more symmetry, while a soft side part makes the placement slightly less formal. Leave short fringe or face-framing pieces free if pulling them back changes the front shape too much.
This works especially well on medium and long hair, although the braid width should reflect density. Narrow sections preserve more loose volume on fine or lower-density hair. The three useful supplies are lace ribbon for the decorative weave, mini elastics for stable braid ends, and light texturizing spray for grip on slippery hair. A quick refresh usually means straightening the ribbon or replacing one elastic, while creating the full style after washing takes longer because the sections must be rebuilt. Ask a stylist or braider to match the braid width on both sides and agree on the exact rear-crown anchor point before weaving the ribbon.
Pro tip:
Finish both braids before adding the ribbon, then compare their height from behind. Matching the anchors first helps the lace sit level instead of pulling one side upward.
Make It Work for You:
If your hair is lower density, keep each braid narrow and stop the ribbon after a few crossings. More loose hair remains visible while the lace detail still reads clearly.
Watch Out For:
Do not use the lace ribbon to pull uneven braids into alignment. Reset the higher braid instead, because extra ribbon tension can create an uncomfortable, crooked anchor.
Double Dutch Lace Ribbon Braid Hairstyle
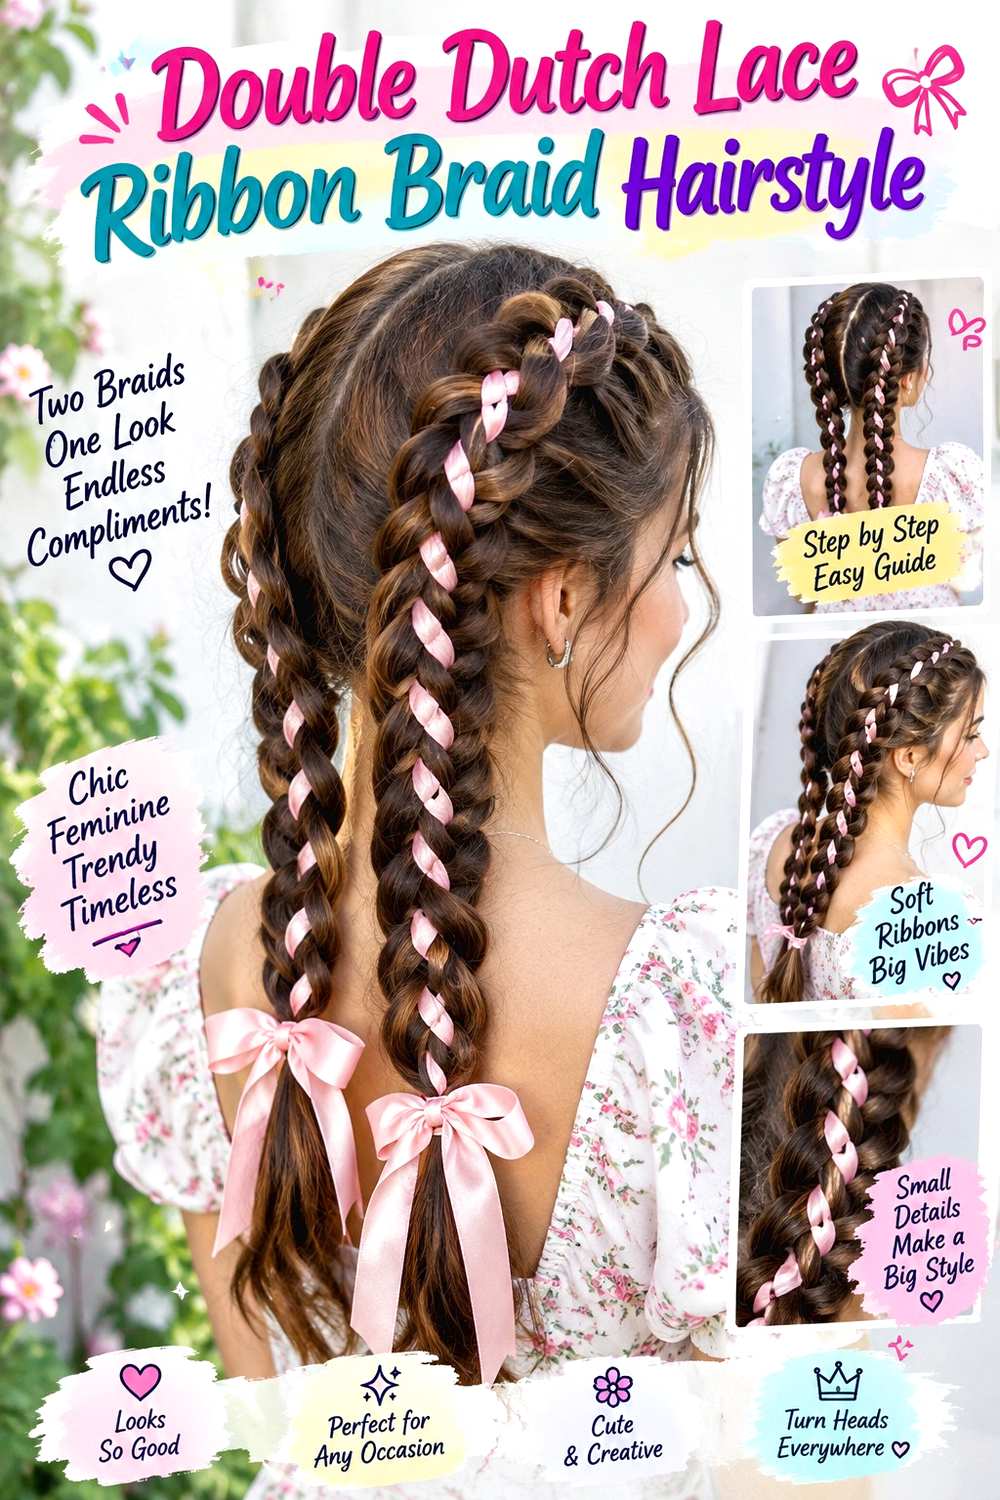
Two Dutch braids create raised edges that make a narrow lace ribbon easy to see. Divide the hair with a center part from the front hairline to the nape, then build one Dutch braid on each side. The ribbon can be threaded through selected outer loops or crossed between the braids where they sit close together. Keep the sections similar in size so one braid does not look noticeably heavier. The lengths can continue as full braids, or the woven ribbon can stop at the nape and leave the remaining hair loose.
Straight, wavy, curly, and coily textures can support this structure, although braid size should increase when dense hair would otherwise feel compressed into narrow rows. Use soft lace ribbon for the visible detail, fabric-covered elastics to secure the ends, and a small amount of styling gel to control short pieces along the part. A next-day refresh may only require smoothing a fuzzy section and resetting loose ribbon. Building both braids from freshly styled hair is a longer session, particularly with thick or long hair. When working with a braider, specify the width of each Dutch braid and how much scalp space you want between them. Comfortable, even tension matters more than creating extremely sharp raised edges.
Pro tip:
Thread the lace through corresponding braid loops on both sides rather than choosing random openings. Repeated placement keeps the decorative spacing balanced from crown to nape.
Make It Work for You:
For a sensitive scalp, request wider Dutch sections with moderate tension instead of very small, firm rows. The raised braid shape remains visible without concentrating pressure along the part.
Watch Out For:
Avoid tightening one braid simply because it looks flatter. Gently adjust its outer edge instead; unequal root tension can make an otherwise symmetrical style uncomfortable.
Side-Swept Lace Ribbon Braid Hairstyle
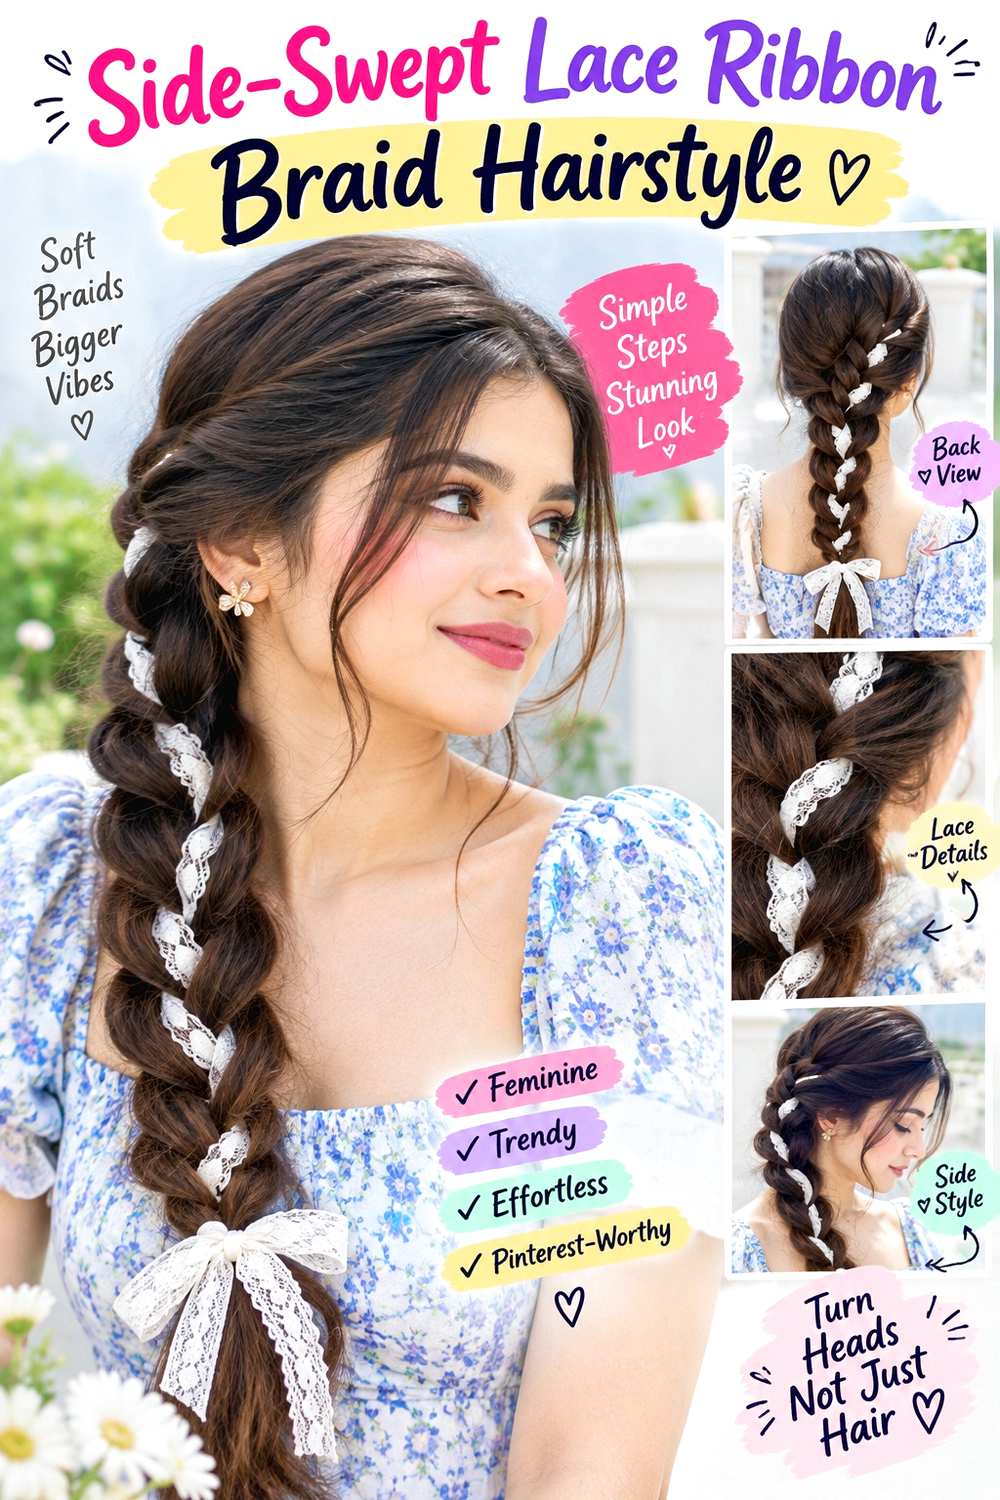
A diagonal braid makes the lace visible from more than one angle and gives the style a clear direction. Begin near one temple and carry the braid behind the opposite ear, allowing the finished length to fall toward one shoulder. Weave a slim lace ribbon through the outer edge rather than covering the center of the braid, so the hair pattern remains visible beside the fabric. A side part naturally supports the diagonal movement, while shorter pieces around the opposite temple can remain loose for softer framing.
Medium to long hair gives the braid enough distance to develop, though shoulder-length hair can use a shorter path that finishes at the nape. The three supplies are lace ribbon for the woven accent, mini elastics for the end, and light styling cream for controlling flyaways along the diagonal section. A quick refresh involves smoothing the upper braid and correcting twisted lace; rebuilding the direction from wash-day hair takes more time because the placement must be deliberate. Dense hair may need a wider braid so the ribbon does not disappear into the texture. Tell a stylist or braider exactly which shoulder you want the braid to fall toward and where the ribbon should start. That placement decision controls the visual balance.
Pro tip:
Keep the ribbon slightly looser as the braid curves behind the ear. A little flexibility there prevents the lace from bunching where the direction changes sharply.
Make It Work for You:
If your hair finishes near the shoulders, start the braid farther back rather than at the temple. The shorter diagonal still shows the lace without stretching small front sections.
Watch Out For:
Do not pull harder behind the ear to keep the braid in place. Adjust the braid path instead, since concentrated tension there can quickly become uncomfortable.
Low Pony Lace Ribbon Braid Hairstyle
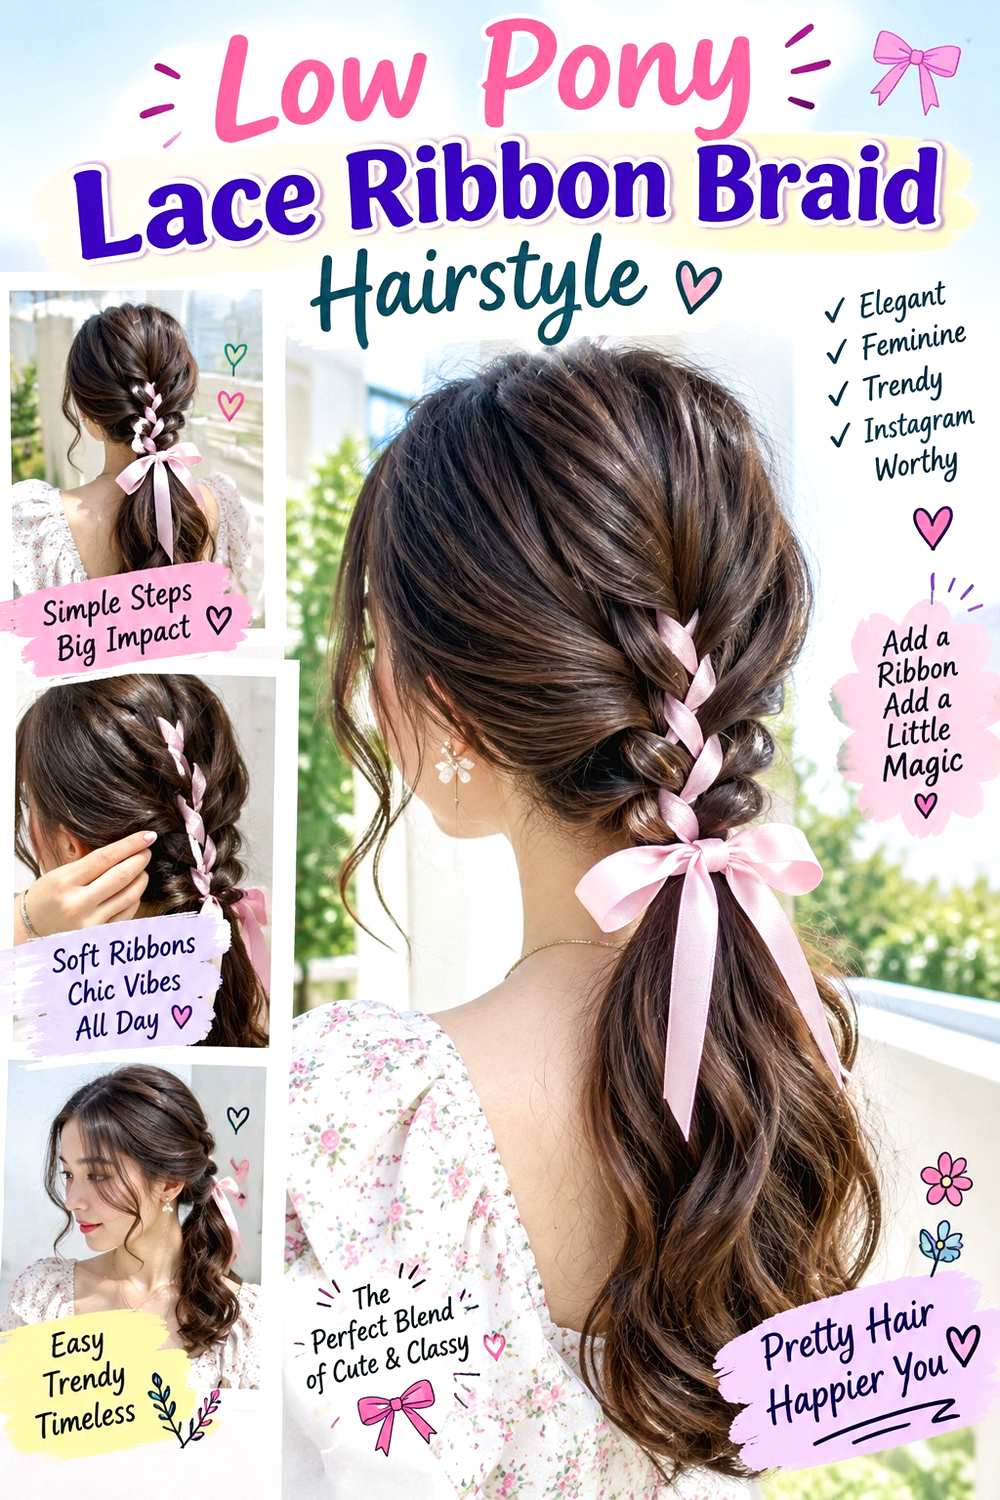
A low ponytail gives the lace ribbon a stable base while keeping the overall shape simple. Gather the hair at the nape, then take a narrow section from the top of the ponytail and braid it down the center. Thread lace ribbon through alternating braid loops, or wrap it lightly around the braid at regular intervals while the rest of the ponytail remains loose. A center part creates a clean finish, while a side part can soften the front. Existing fringe can stay untouched rather than being forced into the ponytail.
This arrangement is useful for medium or long hair and works especially well when you want the ribbon visible without braiding the full density. Use a fabric-covered elastic to support the ponytail, narrow lace ribbon for the decorative path, and light texturizing spray if the braided section slips. A quick refresh usually means resetting the ribbon and smoothing the ponytail base; starting again after washing takes longer because the hair may need its usual drying routine first. If the base begins to sag, reset the elastic instead of tightening the ribboned braid. Ask a stylist or braider to confirm the ponytail height, braid width, and how much loose length you want left around the central braid before securing anything.
Pro tip:
Secure the ponytail firmly enough before making the decorative braid. Separating support from decoration lets you adjust the lace later without changing the nape tension.
Make It Work for You:
On very dense hair, braid only a slim top section of the ponytail and leave the rest loose. This prevents the lace detail from becoming bulky or heavy.
Watch Out For:
Do not use the lace-wrapped braid to lift a sagging ponytail. Rebuild the base elastic first, because decorative tension should not carry the ponytail’s weight.
Crown Lace Ribbon Braid Hairstyle
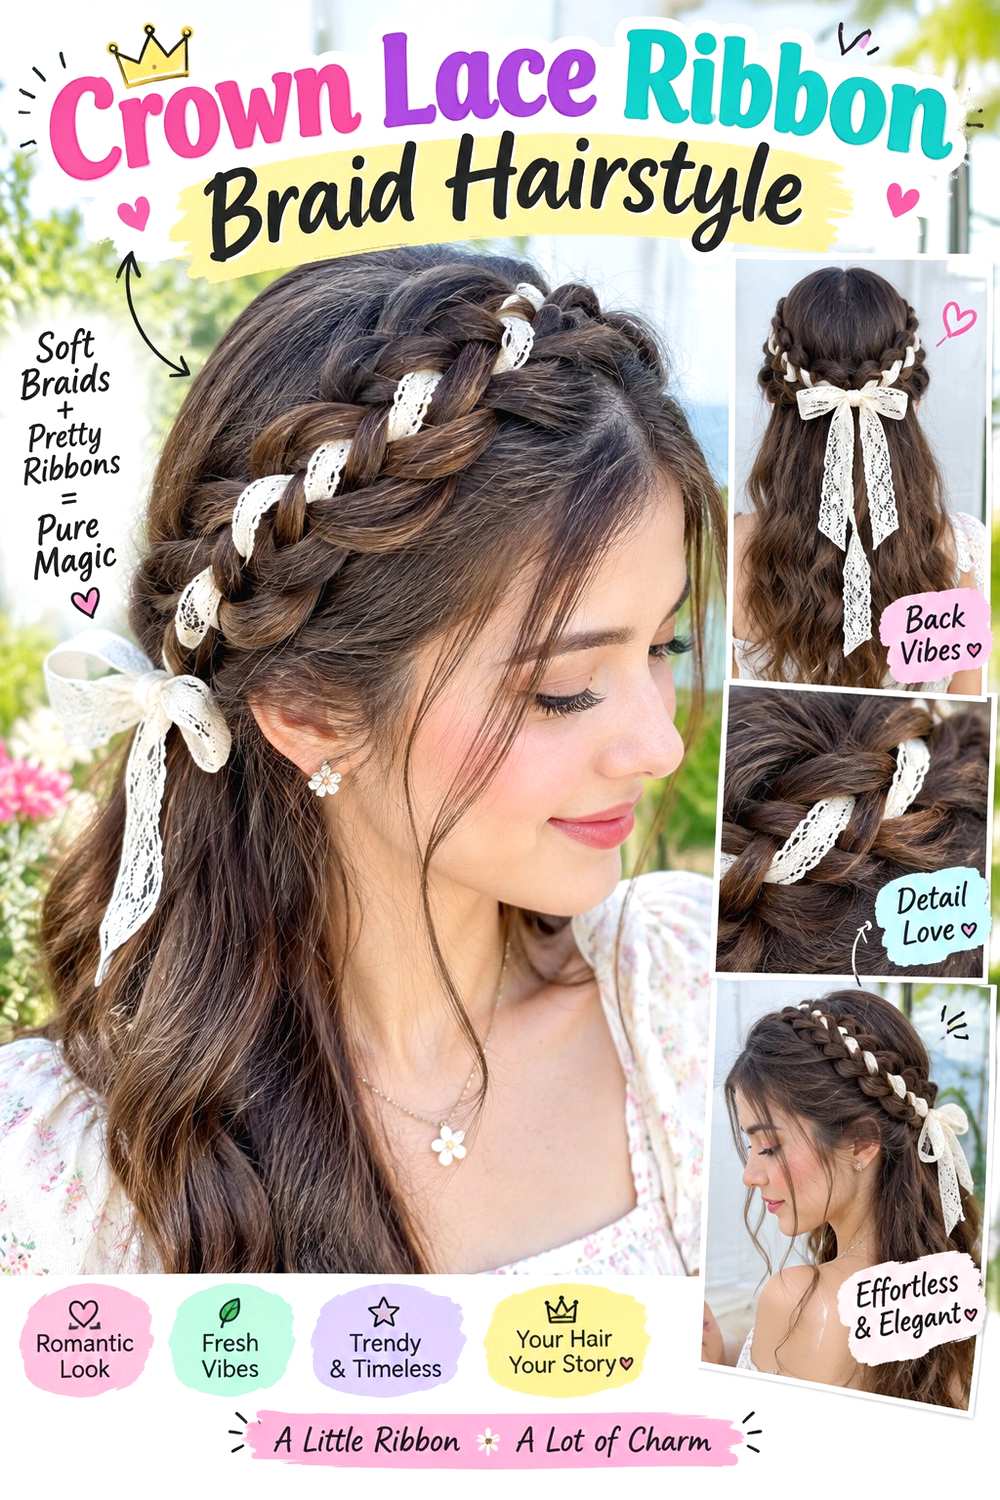
A crown braid places the lace ribbon around the upper part of the head, where it reads almost like a textile headband. Form a braid from behind one ear, guide it across the rear crown, and continue toward the opposite side. Thread the ribbon through the outer braid loops at even intervals, leaving the inner edge mostly visible. Loose lengths can remain down, or a small section can be tucked beneath the crown for a cleaner finish. Face-framing pieces are optional and can soften the outline without changing the main structure.
This placement suits medium and long hair, but it can also work on shorter lengths when two side braids meet at the back instead of forming one continuous crown. Use lace ribbon for the accent, bobby pins to secure the curved braid, and light texturizing spray for added grip. A quick refresh may involve replacing one shifted pin or flattening a twisted section of lace. A complete restyle takes longer because the curve has to be balanced across the head. If the braid feels tight when you turn your head, reposition the anchor rather than adding more tension. Tell a stylist or braider whether you want the crown high, centered, or closer to the back of the head.
Pro tip:
Turn your head gently in both directions before the final ribbon knot is secured. This checks that the curved braid remains comfortable during normal movement.
Make It Work for You:
For shorter hair, use two separate side braids that meet at the rear crown. Lace only their shared section so the crown effect remains without requiring extra length.
Watch Out For:
Avoid stacking several pins in one pressure point when the crown slips. Shift the anchor slightly and redistribute support instead of making the same spot tighter.
Fishtail Lace Ribbon Braid Hairstyle
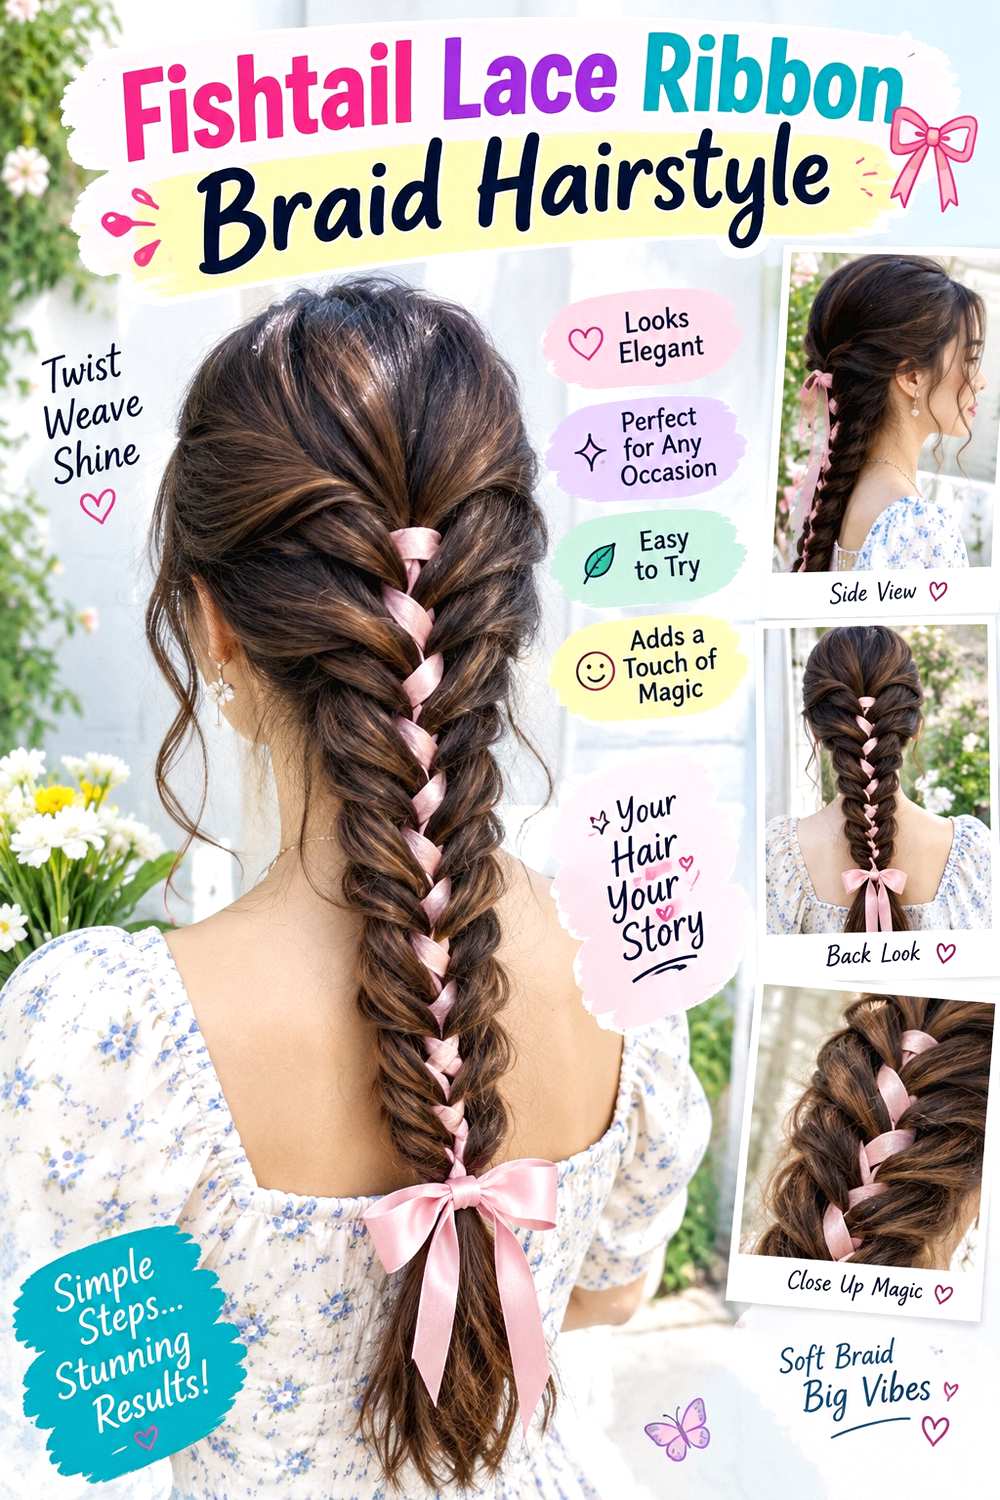
A fishtail braid offers fine, repeating texture that contrasts nicely with the broader surface of lace ribbon. Begin the fishtail at the nape or below a half-up anchor, then weave the ribbon through selected outer sections rather than adding it to every pass. Leaving a little space between ribbon placements prevents the lace from hiding the detailed braid pattern. The braid can stay narrow and defined or be gently expanded along the edges for more width and movement.
Long hair gives the fishtail the most room, although medium length can support a shorter version beginning lower on the head. Fine or lower-density hair generally benefits from a compact braid because heavy expansion can make the ends look sparse. Use narrow lace ribbon for contrast, a small elastic to secure the end, and texture powder for grip if sections repeatedly slide apart. A quick refresh involves correcting one loose fishtail edge or untwisting the ribbon, while a full rebuild can take longer than a standard three-strand braid because the weaving is more detailed. Ask a stylist or braider where the fishtail should begin and how expanded you want its edges. Those two choices affect both visible length and ribbon placement.
Pro tip:
Complete several fishtail passes before adding each new ribbon point. The extra braid texture between lace sections prevents the fabric from visually overpowering the weave.
Make It Work for You:
If your ends are sparse, keep the fishtail narrower and stop it higher. Leave the final length loose instead of pulling the braid edges wide all the way down.
Watch Out For:
Do not expand the braid aggressively after threading the lace. Pulling too far can loosen the loops holding the ribbon and make the decorative spacing uneven.
French Lace Ribbon Braid Hairstyle

A French braid keeps the hair close to the head, allowing the lace ribbon to create a softer line over a smooth braided base. Start at the upper back of the head and add hair evenly as the braid travels toward the nape. Thread a narrow ribbon through alternate outer sections, keeping it flat so the lace pattern stays visible. Below the nape, continue as a regular braid or stop the ribbon and let the remaining length finish without decoration. A centered braid creates strong symmetry, but a slightly offset path can look more relaxed.
The flatter structure suits a wide range of textures, and naturally curly or coily hair does not need to be straightened first. Section control matters more than a perfectly smooth surface. Use lace ribbon for the woven accent, a mini elastic to hold the braid end, and lightweight styling cream to manage shorter flyaways. A small refresh may mean smoothing the crown and resetting one ribbon pass. Full styling takes longer because the French braid must be rebuilt from its starting point. If the ribbon pulls the braid sideways, loosen that section instead of compensating elsewhere. Tell a braider how wide you want the braid and where you want the ribbon to begin and finish.
Pro tip:
Add the lace after the French braid has established several firm sections. A stable upper braid gives the ribbon a cleaner path and reduces early slipping.
Make It Work for You:
For dense hair, use a slightly broader French braid and leave more space between ribbon passes. The fabric remains visible without crowding the braid’s natural texture.
Watch Out For:
Do not thread the lace so tightly that the French braid shifts sideways. Loosen the affected passes until the braid returns to its original centered path.
Ladder Lace Ribbon Braid Hairstyle
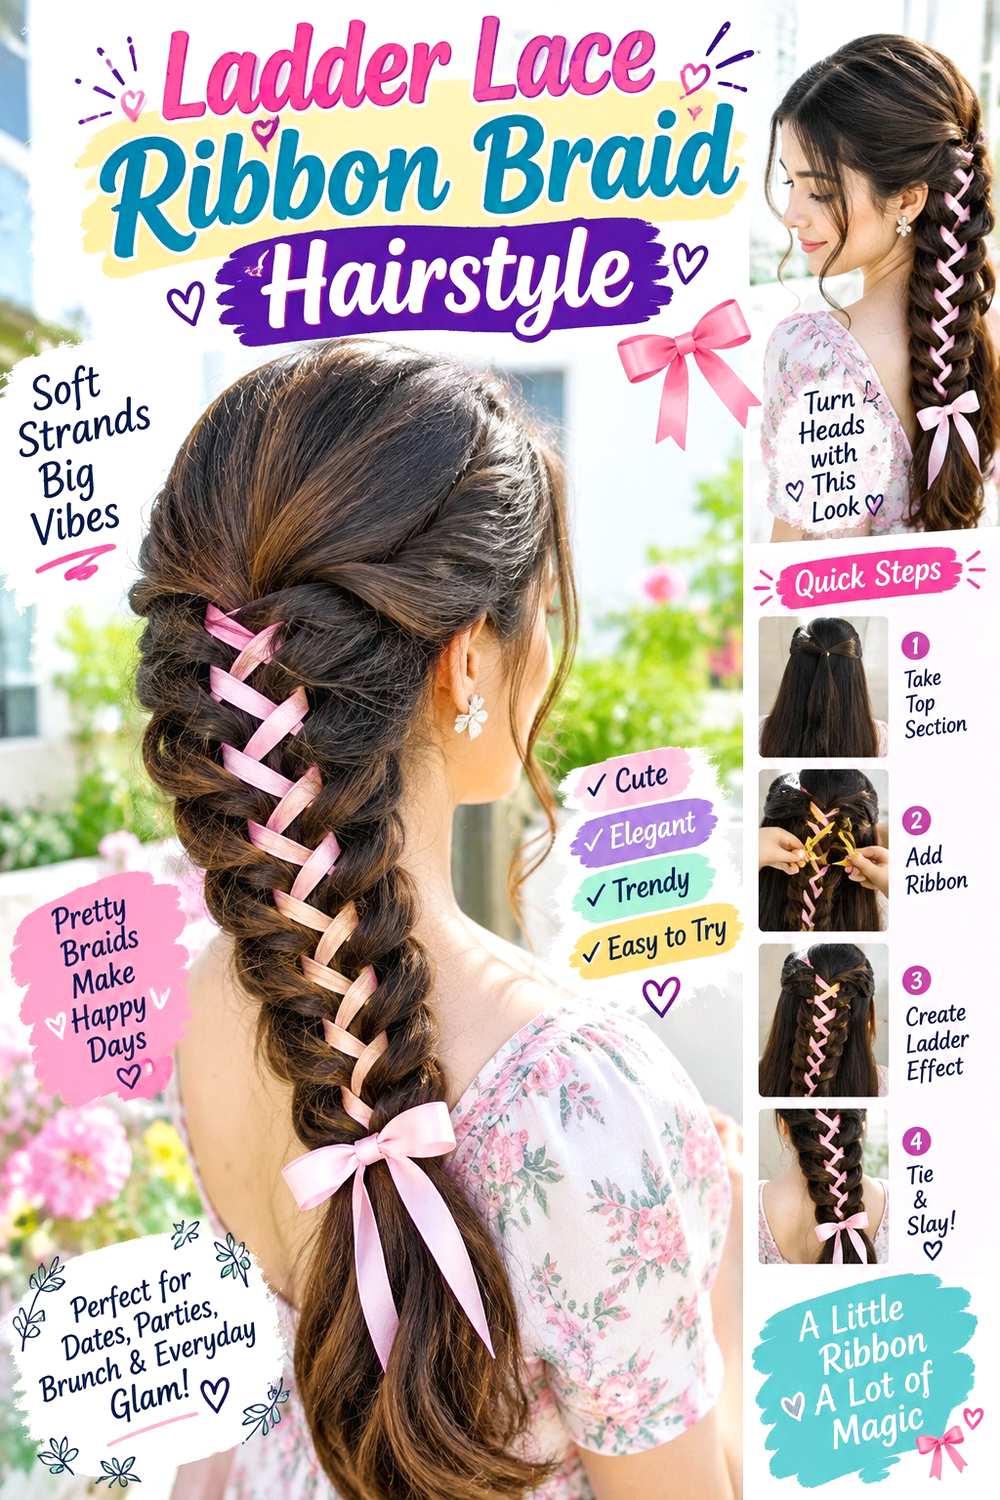
A ladder braid creates intentional openings that can display lace ribbon without hiding the hair underneath. Build a narrow braid with repeated looped sections along one or both sides, then pass the ribbon through those openings like a decorative thread. Keep the loops similar in size so the lace follows a steady rhythm from top to bottom. The design can sit down the center back, beside a ponytail, or within a half-up section, depending on available length.
Medium to long hair is most practical because the ladder needs enough distance to repeat. Lower-density hair can still work when the loops are smaller and fewer rather than widely stretched. The three supplies are lace ribbon for threading, mini elastics to stabilize the braid, and a light wax stick for controlling tiny flyaways along the loop edges. A quick refresh means reshaping a collapsed opening or flattening twisted ribbon. A full styling session requires more time because each ladder section needs deliberate placement. If the lace is broader than the opening, the braid structure may disappear. Ask a stylist or braider to agree on loop size and the width of the ribbon before beginning, since those proportions strongly influence the finished pattern.
Pro tip:
Build and compare all visible ladder openings before threading the lace. Correcting an uneven loop is much easier before ribbon tension begins connecting the sections.
Make It Work for You:
For fine or shorter hair, use fewer compact openings concentrated near the back crown. The ladder remains recognizable without consuming too much hair or visible length.
Watch Out For:
Avoid lace that completely fills each loop. If the fabric is too wide, switch to narrower ribbon so the ladder construction remains visible around it.
Lace Ribbon Braided Bun Hairstyle

A braided bun can use lace ribbon as a visible path leading into the updo or as a detail woven through the bun itself. Begin with one central or diagonal braid and thread the ribbon through its outer sections before gathering the remaining length at the nape. Coil the braid and loose hair together into a low bun, keeping some ribbon visible across the surface instead of burying it inside. Existing fringe or soft temple pieces can remain free if you prefer less tension around the front.
Medium to long hair is easiest because the bun needs enough length to form a stable coil. Very dense hair may feel more comfortable in a broad, flatter bun rather than a compact knot. Use lace ribbon for decoration, bobby pins to support the bun, and flexible hairspray to control surface flyaways. A quick refresh may only require replacing a loose pin or smoothing the outer coil. Full wash-day styling takes longer because both the braid and bun must be reconstructed. The ribbon should never become the main support. Tell a stylist or braider how low the bun should sit and whether it must fit comfortably with a collar, veil, or other accessory.
Pro tip:
Secure the braided section before forming the bun so the lace tension stays independent from the pins supporting the coil. Adjustments become much easier later.
Make It Work for You:
If your hair is dense, spread the bun wider across the nape rather than stacking it outward. This distributes weight while keeping the lace-woven braid visible above it.
Watch Out For:
Do not tighten the ribbon when the bun starts slipping. Replace or reposition the bun anchors instead, because decorative lace should not support the updo’s weight.
High Pony Lace Ribbon Braid Hairstyle

A high ponytail creates movement while giving the lace braid a strong vertical starting point. Secure the pony near the crown, then take one section from its upper surface and form a braid down the center. Thread narrow lace ribbon through alternating loops, stopping halfway if you want more loose movement through the ends. The front can stay smooth, softly parted, or include existing fringe. Keeping the ribbon confined to one braid prevents the entire ponytail from becoming overly structured.
Medium and long lengths show the design clearly, while density determines how much hair should be borrowed for the central braid. On finer hair, use a smaller section so the surrounding ponytail still retains body. The useful supplies are lace ribbon for the accent, a fabric-covered elastic for the main anchor, and light styling gel for neatness around the base. A short refresh usually means tightening the base only when necessary and straightening the ribbon. Full styling takes longer when the ponytail itself requires drying or reshaping first. Tell a stylist or braider your preferred pony height, braid width, and ribbon stopping point so the finished balance between structure and loose movement is clear.
Pro tip:
Check the ponytail height with your head in a natural position before adding the braid. This prevents a comfortable-looking base from becoming tight once you relax.
Make It Work for You:
For finer or lower-density hair, keep the ribbon braid narrow and stop it above the ends. More of the ponytail stays loose, preserving movement around the decorative section.
Watch Out For:
Do not use the center braid to pull a sagging pony higher. Reset the main anchor instead, or the lace section can become distorted and uncomfortable.
Twin Pigtail Lace Ribbon Braid Hairstyle
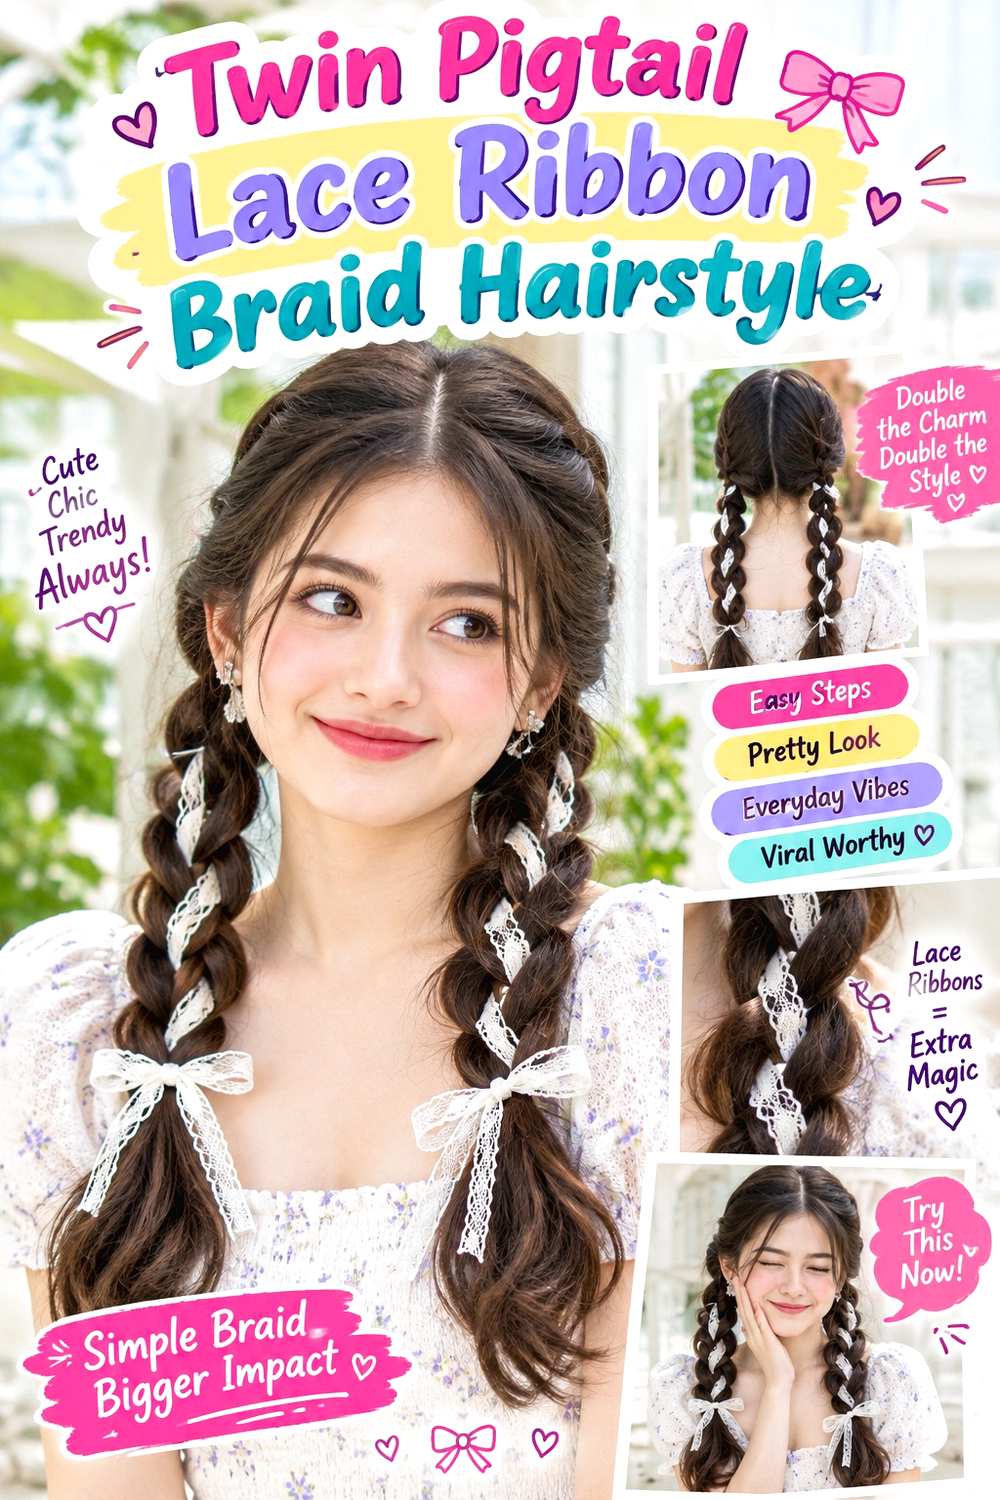
Twin pigtail braids create two separate places for lace detail and make symmetry a central feature. Divide the hair from forehead to nape with a center part, then braid each side beginning at the same height. Lace ribbon can run through the outer edge of each braid or appear only through the lower lengths for a lighter finish. Keeping both ribbons similar in width helps the pair feel balanced, while the braid texture itself does not need to be perfectly identical.
Long hair gives the ribbons more space to repeat, although medium lengths can use shorter decorative sections. Curly or coily hair can keep visible texture within the braids, and there is no need to flatten the pattern for symmetry. Use two lengths of lace ribbon for decoration, fabric-covered elastics for the ends, and light styling cream for controlling flyaways along the part. A quick refresh may involve retying one end or correcting shifted lace. Rebuilding the full pair after washing requires more time because both sides need to be sectioned again. If one braid sits higher, reset its starting point rather than tightening it. Tell a braider the preferred braid width, starting height, and how closely you want the two sides to match.
Pro tip:
Secure both braids before threading either ribbon. Comparing the finished pair first helps you catch placement differences before the decorative detail makes them harder to correct.
Make It Work for You:
If your scalp is sensitive, start the pigtails slightly lower and use broader sections. You keep the twin-braid effect while reducing concentrated tension near the front hairline.
Watch Out For:
Do not correct uneven braid height by tightening the lower side. Undo and reposition its first section so symmetry comes from placement rather than extra tension.
Curly Lace Ribbon Braid Hairstyle
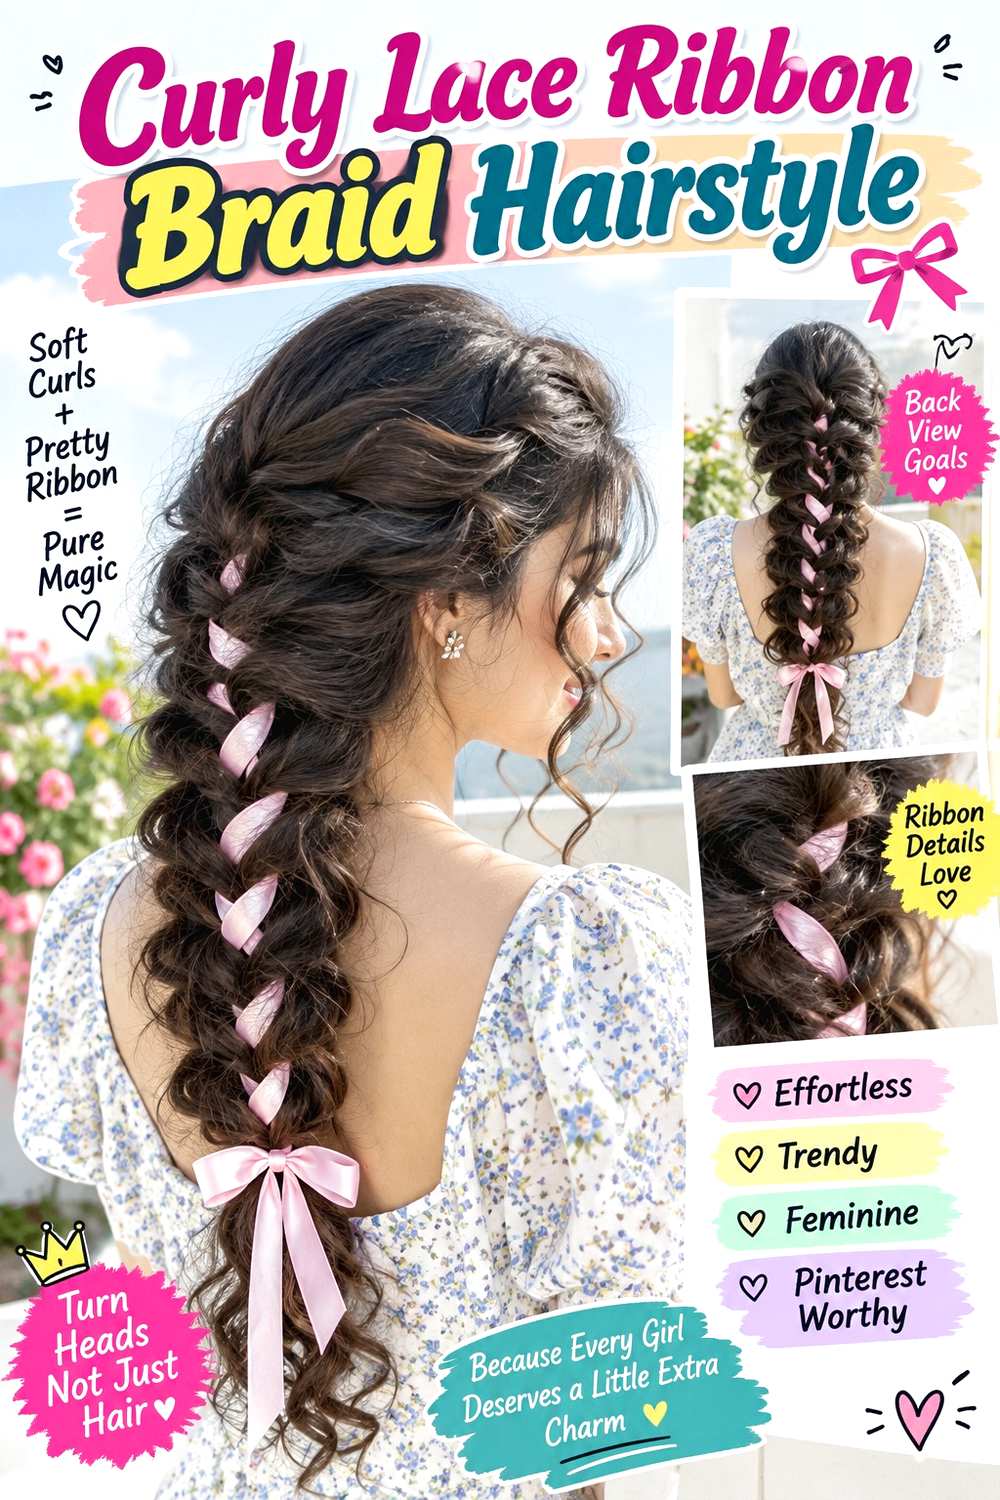
Natural curls can remain the main source of volume while a lace-woven braid adds a controlled decorative section. Create one braid through the center back or a half-up portion, leaving surrounding curls loose so their movement frames the ribbon. The braid can begin at the crown and finish at the nape, or continue through part of the length. Choose lace narrow enough to sit inside the braid without covering the curl texture around it. Face-framing curls can remain free rather than being stretched into the section.
This approach works across different curl patterns, but finished length should be judged after shrinkage rather than while the hair is elongated. Use soft lace ribbon for the weave, fabric-covered elastics for secure ends, and curl gel to define only the sections that need extra control. A quick refresh may mean reshaping nearby curls and straightening one ribbon pass. A full wash-day style takes longer because curls need to settle into their intended shape before final braid placement is assessed. If drying causes the braided area to feel tighter, rebuild it with more slack. Tell a stylist or braider where you want the braid to sit on dry hair and how much surrounding curl volume should remain visible.
Pro tip:
Decide the final braid position after the curls have reached their usual dry volume. This keeps the lace detail from disappearing when the surrounding texture expands.
Make It Work for You:
With tighter coils or strong shrinkage, use a shorter ribboned section near the crown and leave more hair loose. The decorative braid stays visible without stretching the whole length.
Watch Out For:
Do not judge comfort only while curls are damp or elongated. Recheck the braid as the hair dries and loosen it if shrinkage increases root tension.
Short-Hair Lace Ribbon Braid Hairstyle
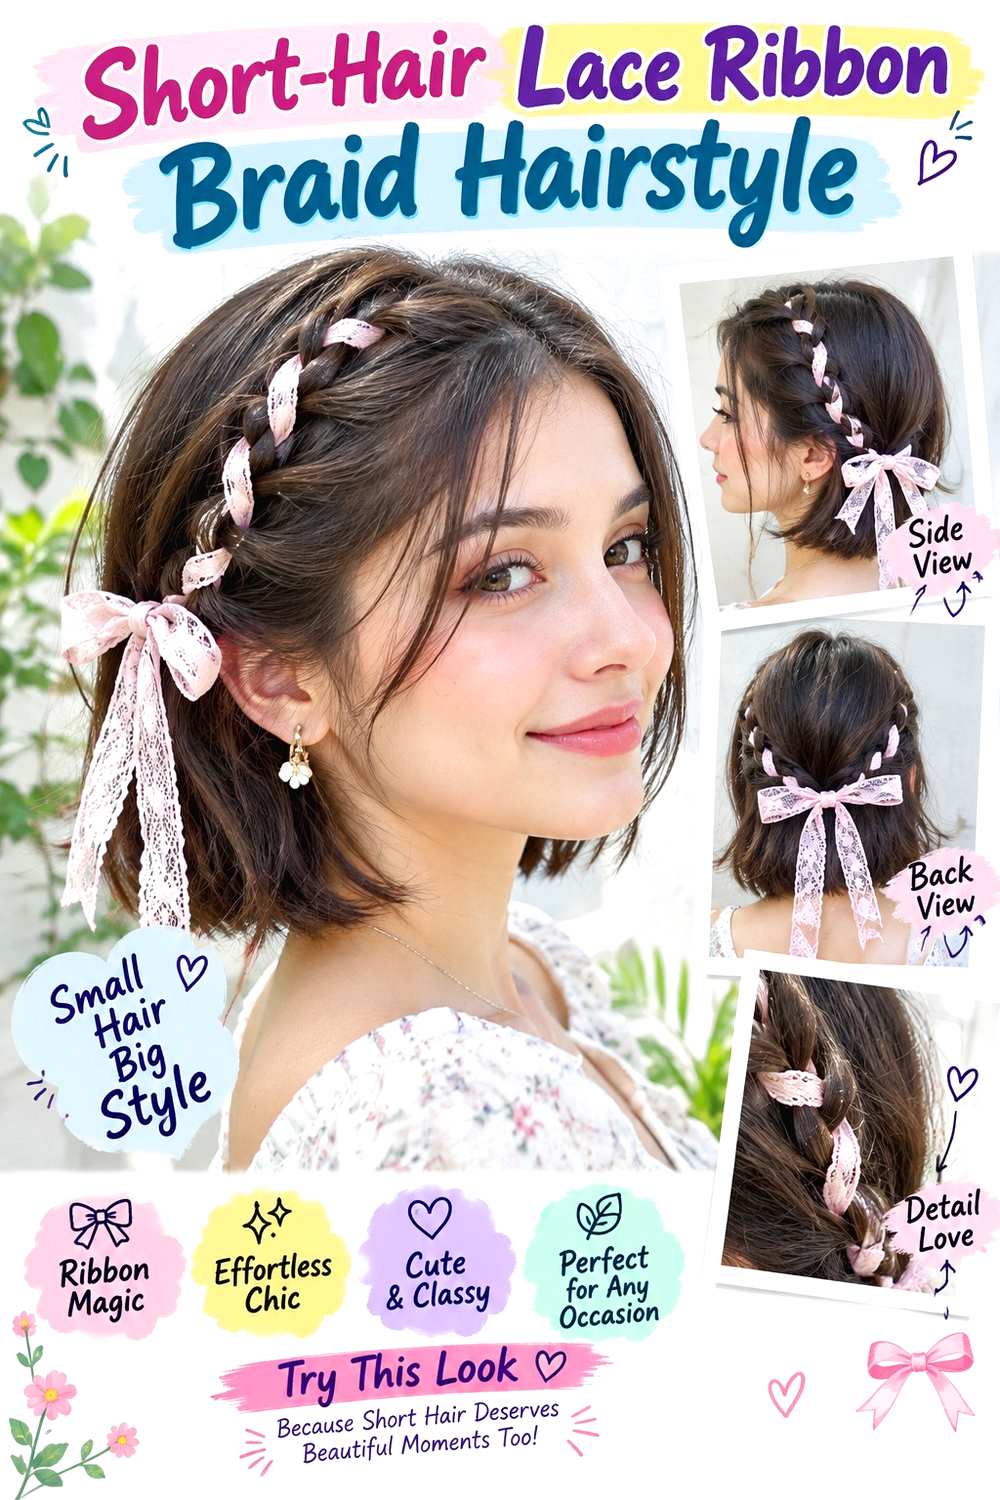
Bobs and lobs can carry lace ribbon successfully when the braid is kept small and positioned where shorter sections naturally reach. Take two slim sections from above the ears and braid them toward the rear crown, then connect or decorate them with a narrow piece of lace ribbon. Leaving the lower length loose preserves the haircut’s shape, while fringe and shorter front layers can remain outside the braid. A compact half-up placement is usually more practical than trying to create a long braid down the back.
Straight, wavy, curly, and coily short hair can all work if the anchor point respects the shortest usable pieces. Use narrow lace ribbon for scale, mini elastics for the braid ends, and light texturizing spray to add grip when short sections slip easily. A quick refresh may take only a few adjustments to the ribbon or one elastic. Starting from wash-day hair takes longer if the loose bob first needs its usual drying or texture routine. Avoid stretching small sections toward an anchor they cannot comfortably reach. When working with a stylist or braider, identify the shortest pieces you want included and agree on the exact rear-crown meeting point before the braiding begins.
Pro tip:
Keep the ribbon crossings small and concentrated near the back crown. Compact spacing makes the lace pattern readable even when the available braided distance is limited.
Make It Work for You:
If your bob has short face-framing layers, leave them loose rather than pinning them backward. The ribboned section can still look intentional while respecting the existing haircut.
Watch Out For:
Do not stretch short strands to reach a distant anchor. Move the braid connection higher or closer together so those pieces can sit securely without constant slipping.
Loose Boho Lace Ribbon Braid Hairstyle
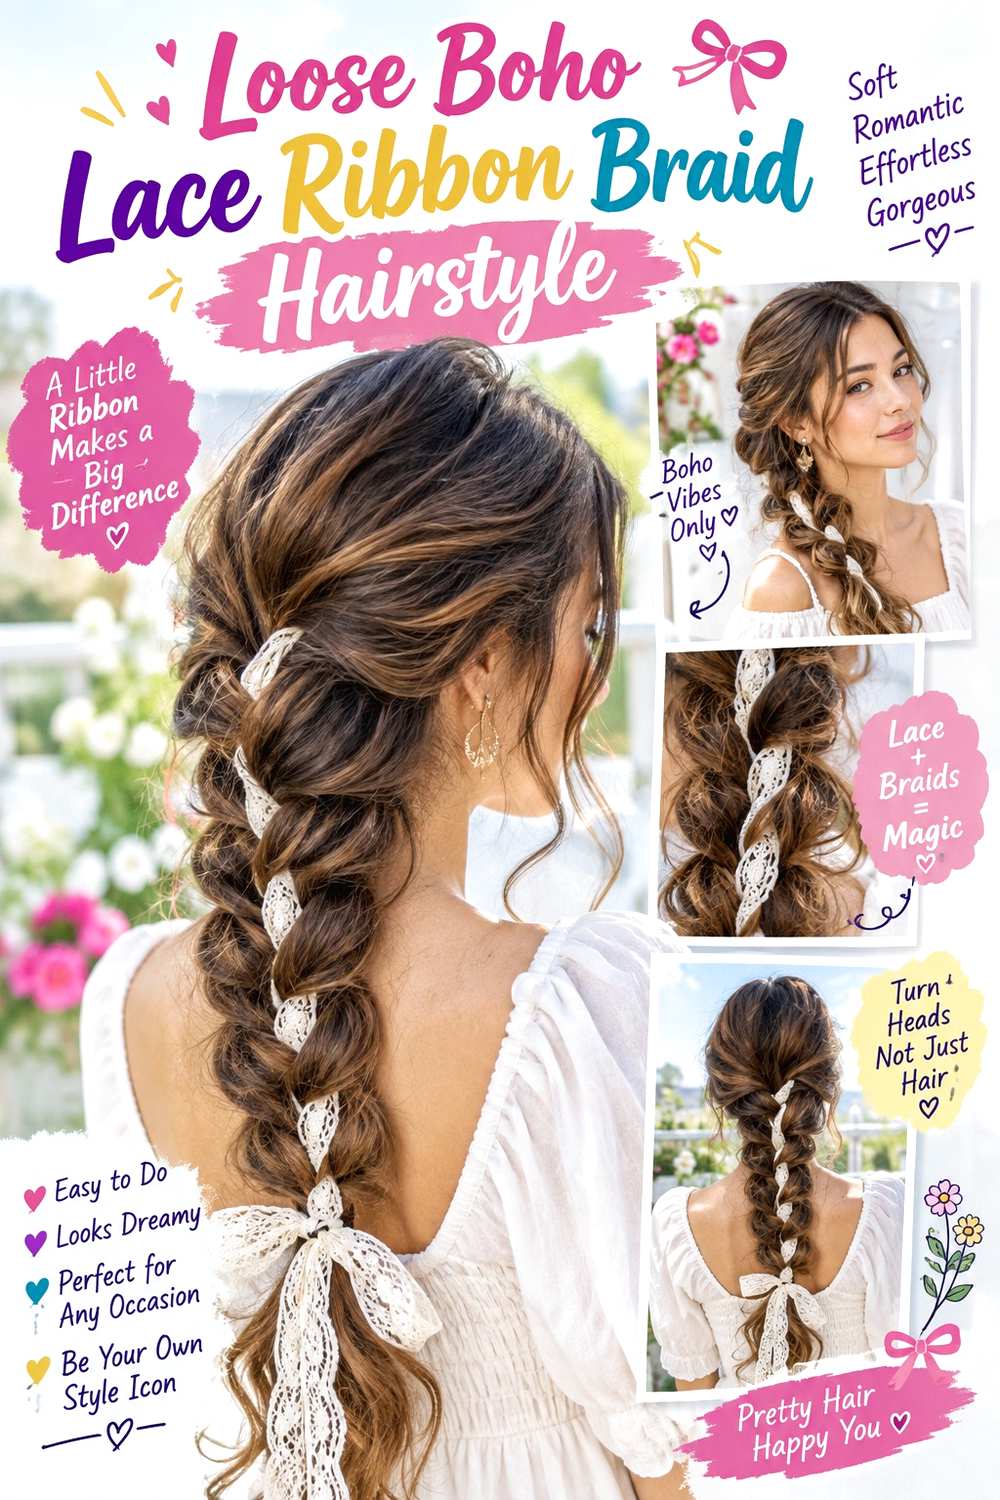
A loose braid gives lace ribbon a softer setting, with visible movement around the weave instead of a tightly controlled outline. Start the braid below the crown or at the nape, keep the outer sections gently expanded, and weave the lace through widely spaced loops. A few shorter pieces can remain around the temples, while the ends may stay slightly undone above the final tie. The ribbon should follow the braid’s relaxed shape rather than pulling it into a sharper line.
Wavy and curly textures naturally support this softer finish, but straight hair can also work when the braid has enough grip to hold its expanded edges. Use lace ribbon for the decorative weave, a mini elastic for the braid end, and light texturizing spray to give slippery strands more hold. A quick refresh means tightening only sections that have genuinely loosened and resetting twisted ribbon. Full styling after washing takes longer because the desired texture and braid both need to be established. Lower-density hair should be expanded cautiously so the braid does not become transparent at the ends. Tell a stylist or braider how loose you want the outer edges and where face-framing pieces should begin. Controlled softness should still have secure anchors.
Pro tip:
Expand the braid edges before weaving the lace. Adjusting fullness first prevents later pulling from changing the spacing and direction of the decorative ribbon.
Make It Work for You:
For very straight or slippery hair, keep the upper braid firmer and loosen only the lower half. The top stays secure while the ends retain the relaxed finish.
Watch Out For:
Avoid pulling every braid loop outward to the same extreme. Over-expansion can weaken the structure, especially near sparse ends, so soften the edges gradually instead.
Four-Strand Lace Ribbon Braid Hairstyle
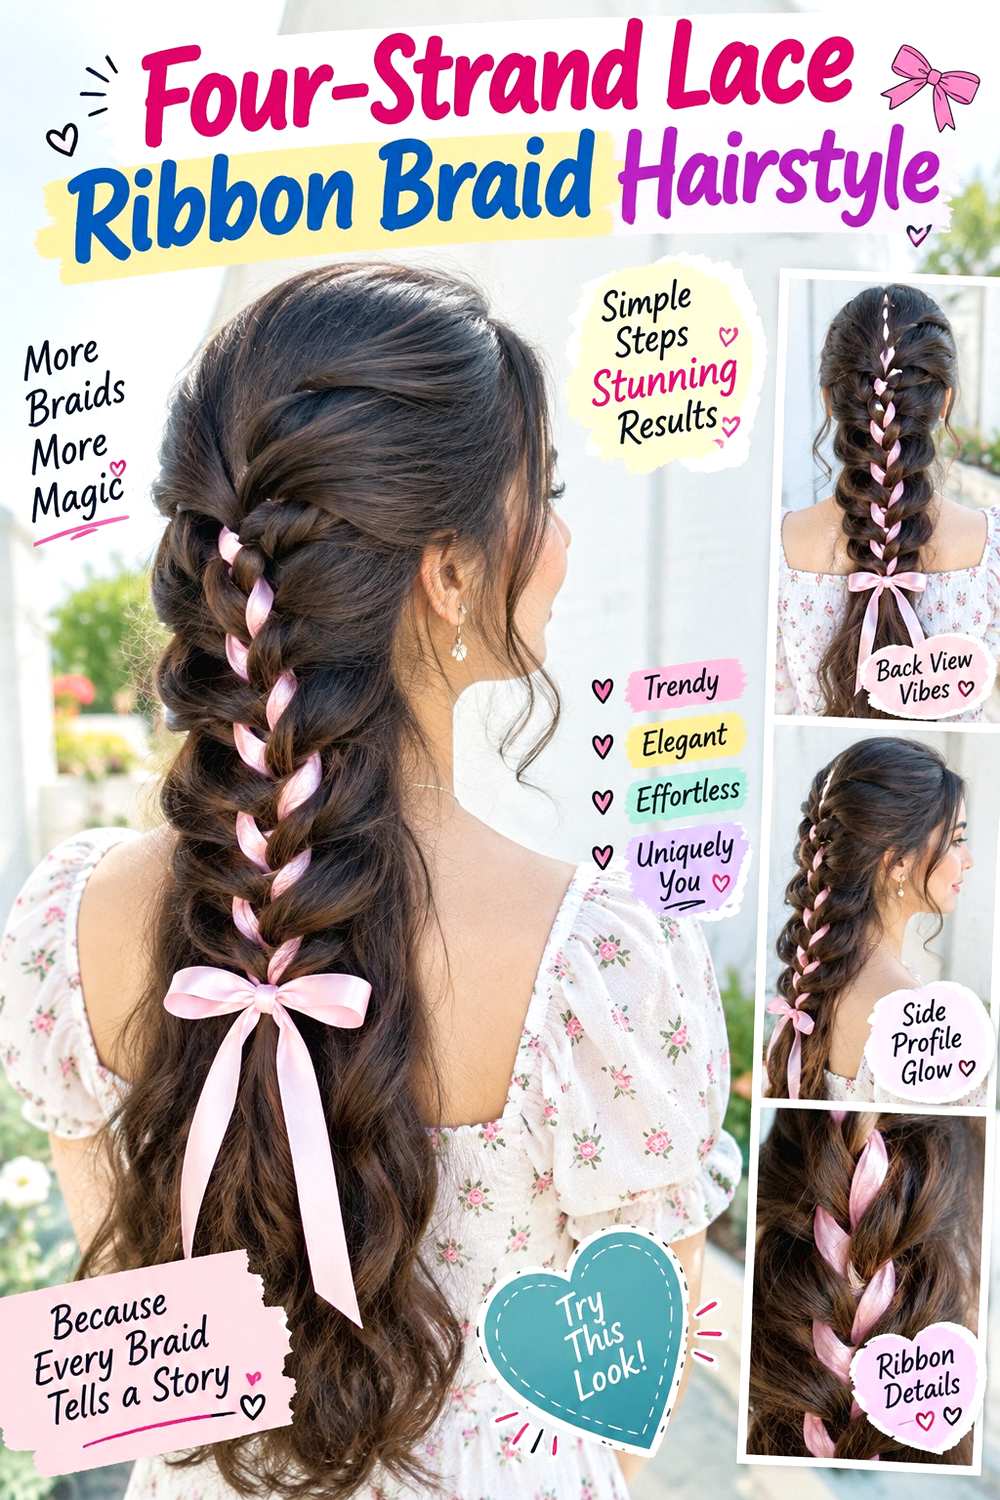
A four-strand braid can make the lace ribbon part of the braid structure rather than an accessory added afterward. Use three hair sections and one length of narrow lace ribbon, then weave them together so the fabric appears at regular intervals through the center or outer edge. Starting at a low ponytail makes the technique easier to control, while beginning higher on the head creates a more integrated finish. Keep the ribbon flat during each pass so its lace pattern remains visible instead of twisting into a narrow cord.
Medium and long hair provide enough length for the repeating structure to become clear. Lower-density hair may benefit from a narrow ribbon that does not visually overpower the three hair sections. Use soft lace ribbon as the fourth strand, a fabric-covered elastic for the starting anchor, and a mini elastic to secure the finished braid. A quick refresh is mostly about correcting a twisted ribbon near the surface; a full rebuild takes longer because the four-part weaving needs consistent hand placement. When working with a braider, specify whether you want the lace running through the center or appearing along one edge, plus the braid width you prefer. Those choices determine the final pattern more than tightness does.
Pro tip:
Flatten the lace between your fingers before every few passes. Correcting small twists as you braid is much easier than trying to rotate the ribbon afterward.
Make It Work for You:
If your hair is fine or lower density, choose narrow lace and smaller braid sections. The fabric can remain visible without dominating the hair portions of the four-strand pattern.
Watch Out For:
Do not pull the ribbon strand more firmly than the hair sections. Uneven tension can curve the braid toward the lace instead of allowing it to hang straight.
Conclusion
Lace ribbon braid hairstyles can be compact and half-up, structured through Dutch or French braids, or extended into ponytails, crowns, fishtails, and buns. Hair length affects how much ribbon can repeat, while density helps determine practical braid width and lace scale. Natural texture can remain visible rather than being changed for the style. Parting, face-framing pieces, crown volume, and ribbon placement offer flexible ways to adjust the proportions. A firm braid gives clearer structure, while an expanded braid creates a softer finish but may need more refreshing. Choose according to your usual texture, available length, comfort with tension, and how much time you want to spend rebuilding the style rather than judging the design on ribbon alone.
Before Your Salon Visit
Choose one or two favorite references and point out the exact braid width, ribbon position, anchor height, loose pieces, volume, and finish you want. Discuss your natural texture, density, current length, face-framing preferences, and normal styling routine so the placement can be adapted realistically. Because lace ribbon braids are temporary styles, focus on comfortable tension, secure anchoring, and ribbon scale rather than requesting an unnecessary haircut. Also mention if the style needs to work with a collar, veil, hat, or other accessory.
FAQs
Can Lace Ribbon Braid Hairstyles Work on Fine or Lower-Density Hair?
Yes, but scale matters. Narrower braids and lighter lace usually preserve more visible hair and prevent the accessory from dominating the shape. Avoid aggressively expanding sparse ends. A compact half-up braid, ponytail accent, or short ribbon section can show the detail without requiring a large amount of hair.
Will Lace Ribbon Snag Curly or Coily Hair?
Some lace can catch more easily if its edges are rough or the pattern has large open loops. Choose soft, smooth-edged ribbon and thread it slowly rather than dragging it through the braid. On curls or coils, maintaining comfortable tension and checking the ribbon during removal can help prevent unnecessary pulling.
Do Lace Ribbon Braids Require Heat Styling?
No. The defining effect comes from braiding and ribbon placement, so straight, wavy, curly, and coily hair can be used in its natural styled state. Heat is optional if you separately want a smoother or more shaped finish. If heat is used, include appropriate heat protection as part of that separate styling process.
How Do I Keep Lace Ribbon From Slipping Out of a Braid?
Start with a secure braid or ponytail anchor, then weave the ribbon through stable sections rather than relying on a decorative knot alone. Slippery hair may benefit from a little added grip. If the ribbon shifts during wear, correct the loose section instead of tightening the entire braid and creating unnecessary tension.