16 Natural Texture Hairstyles for an Effortless Everyday Look

Natural texture hairstyles work with the way hair already bends, curls, coils, falls, or expands instead of forcing every strand into one uniform finish. The defining shape can be long and layered, compact and blunt, rounded, softly side-parted, or gathered into an easy everyday style. Movement usually comes from natural growth patterns, curl grouping, wave direction, and the placement of layers rather than heavy heat styling.
Texture and density should be considered separately. Straight, wavy, curly, and coily hair can all have fine or coarse strands and low or high density. Lower-density ends often benefit from a stronger perimeter, while dense hair may need thoughtful bulk placement. Curly and coily cuts also need enough allowance for shrinkage, especially around face-framing pieces and the lower outline.
Daily effort depends on the style and starting texture. A quick refresh may mean dampening the front, redefining a few curl groups, resetting a part, or rebuilding a simple anchor. Full wash-day styling can take considerably longer, especially when detangling, definition, and drying are involved. The most practical natural texture hairstyles support the way your hair normally behaves instead of requiring constant correction.
Quick List
- Air-Dried Long Layers Hairstyle
- Soft Wavy Lob Hairstyle
- Curly Shoulder-Length Layers Hairstyle
- Coily Rounded Shape Hairstyle
- Straight Full-Perimeter Hairstyle
- Natural Side-Part Volume Hairstyle
- Center-Part Face-Framing Hairstyle
- Wash-And-Go Curl Definition Hairstyle
- Twist-Out Everyday Texture Hairstyle
- Braid-Out Soft Texture Hairstyle
- Half-Up Natural Texture Hairstyle
- Low Puff Natural Texture Hairstyle
- Loose Low Bun Natural Texture Hairstyle
- Claw Clip Natural Twist Hairstyle
- Short Textured Bob Hairstyle
- Textured Pixie Hairstyle
Air-Dried Long Layers Hairstyle
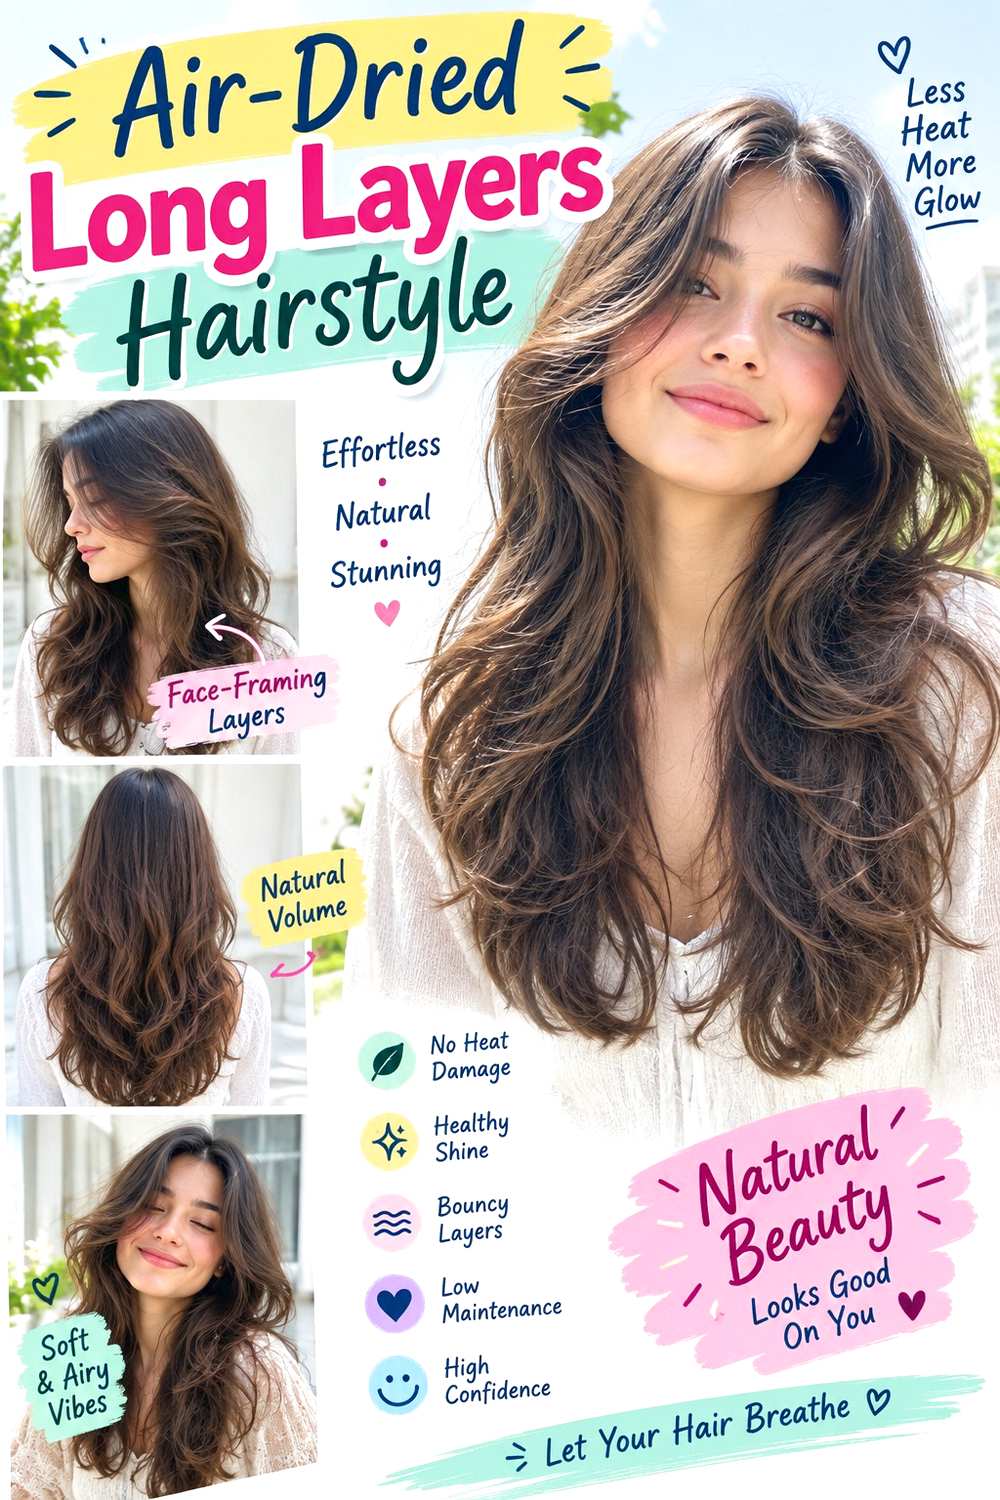
Long layers can make natural movement easier to see without requiring a polished blowout. Keep the overall length below the shoulders, then introduce gradual layers beginning around the jaw or collarbone. A center, side, or natural part can work, while the ends remain full enough to support irregular bends and waves. The shape should move through the mid-lengths without creating a thin, heavily feathered perimeter.
Straight, wavy, and softly curly hair can all suit an air-dried version when the cut works with the normal growth pattern. Use lightweight leave-in conditioner for softness and a small amount of styling cream to guide the front and ends. Sectioning clips can hold the part or several face-framing pieces while the roots begin drying. Hands-on styling may be brief, although complete drying time varies with density and length.
Refresh by dampening only the flattened front or outer sections instead of soaking the whole head. At the salon, explain how your hair naturally dries and identify where the shortest layer should begin. If your ends are lower in density, keep most of the layering higher and preserve more weight around the bottom so the natural texture still looks substantial.
Pro tip:
Set your part and front layers while the hair is evenly damp, then leave them alone during early drying. Less manipulation can help natural bends settle with fewer flyaways.
Make It Work for You:
If your hair is lower in density, start the layers closer to the collarbone rather than the cheekbones. You still get movement without reducing too much weight through the ends.
Watch Out For:
Avoid adding heavy styling cream at the roots to control uneven texture. Too much product can flatten natural lift; guide the shape first and add product only where needed.
Soft Wavy Lob Hairstyle
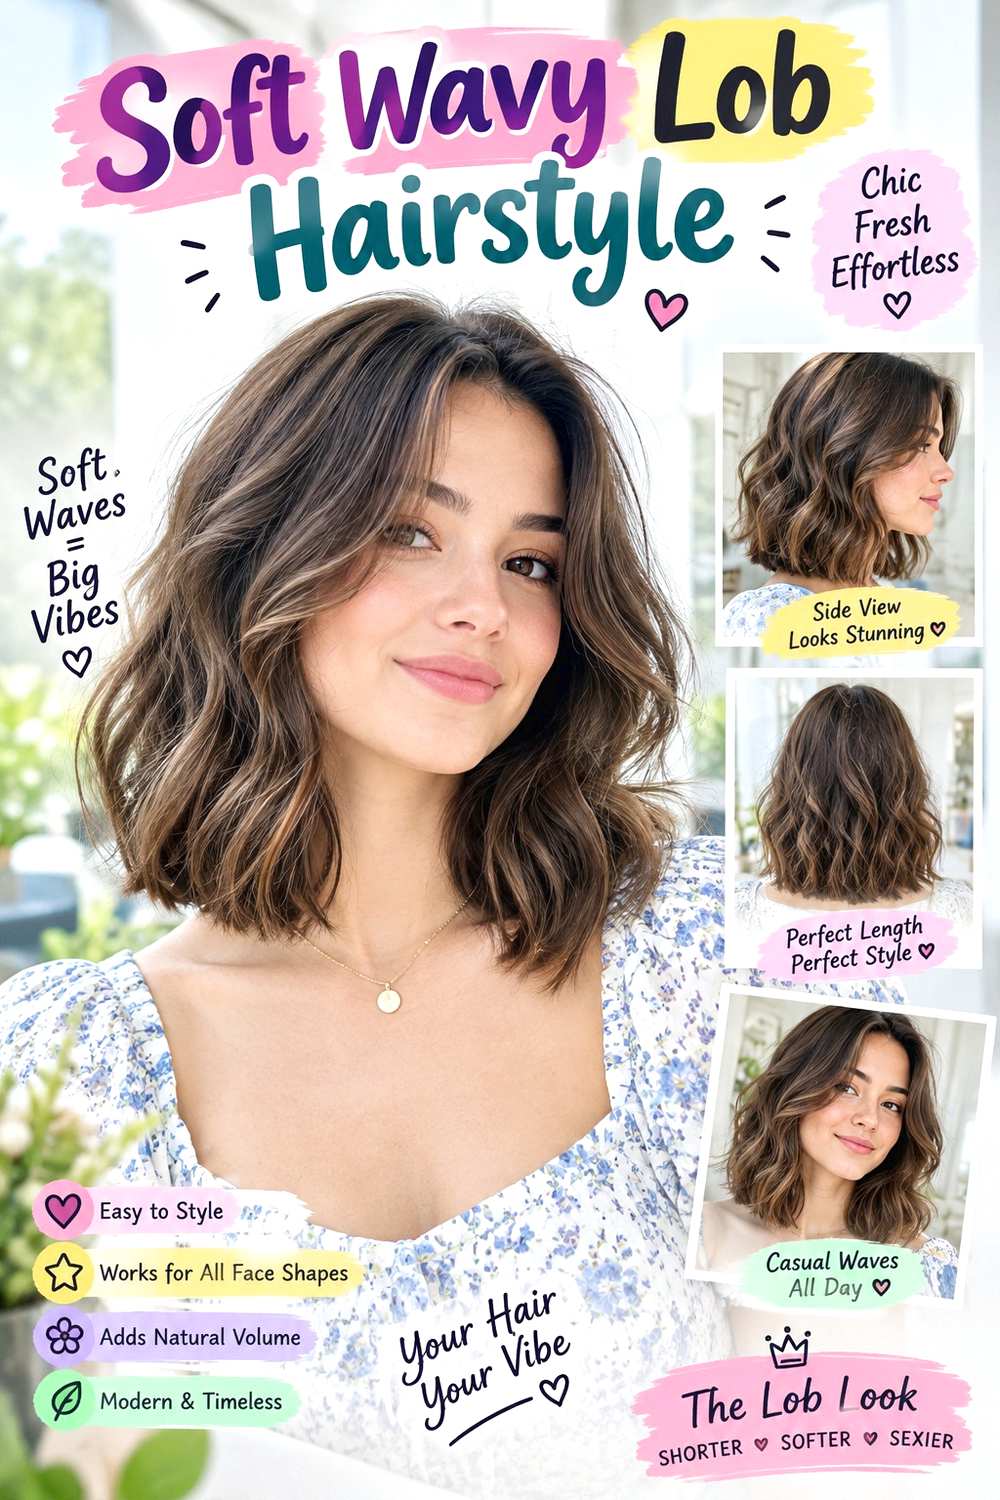
A wavy lob keeps natural movement compact by placing the perimeter between the jaw and shoulders. Keep the bottom edge reasonably strong, with restrained layers through the front and upper surface. A center or slight side part works well, while natural bends can begin around the cheekbones and continue through the mid-lengths. Slightly straighter ends prevent the cut from becoming overly rounded.
Naturally wavy hair can often reach this finish with little more than product placement and drying direction. Use lightweight mousse to support the wave pattern and leave-in conditioner through the drier mid-lengths and ends. A wide-tooth comb can help distribute product before the waves begin setting. Wash-day styling is relatively simple but drying can take time; a quick refresh may involve dampening only the front and scrunching several flattened sections.
The cut should be reshaped when the perimeter drops enough to lose its compact lob shape or the front layers stop blending. At the salon, identify where your natural wave tends to form strongest and where the shortest front layer should finish. If the hair is dense, internal weight can be adjusted selectively, but aggressive thinning may make the ends expand or become fuzzy instead of falling into cleaner wave groups.
Pro tip:
Apply product while the hair is evenly damp, then scrunch from the ends upward instead of repeatedly touching the roots. This encourages wave grouping without flattening the crown.
Make It Work for You:
If your waves are loose and easily stretched, keep the lob slightly above heavy shoulder contact. Less rubbing can help the natural bends remain visible through the lower sections.
Watch Out For:
Do not remove large amounts of weight simply because the lob looks wide when wet. Judge the dry wave pattern first; density and expansion can change significantly as it settles.
Curly Shoulder-Length Layers Hairstyle

Shoulder-length curls gain shape when the layers prevent too much volume from collecting along one horizontal line. Keep the dry perimeter around the shoulders, with graduated layers beginning around the cheekbones, jaw, or lower depending on shrinkage. A natural side or center part can work, while the front curls remain long enough to group instead of breaking into very short pieces.
This cut suits naturally curly hair across different densities, but the layer pattern should respond to how strongly the curls shrink and where bulk develops. Use lightweight leave-in conditioner for softness, curl gel for definition, and a diffuser for controlled drying. A quick refresh may mean re-wetting only several front curl groups; full wash-day detangling, styling, and drying takes much longer.
Cut maintenance becomes useful when the bottom curls lose their shoulder-level shape or the upper layers stop distributing volume evenly. At the salon, discuss the desired dry length rather than relying only on wet measurements. Show where you want the shortest curl to sit around the face and whether you prefer more crown height or more width through the sides. That information helps prevent layers from springing much higher than expected.
Pro tip:
Arrange the front curl groups while they are evenly damp, then avoid separating them repeatedly during drying. Keeping those groups intact can reduce frizz and preserve the intended frame.
Make It Work for You:
If your curls shrink strongly, choose longer face-framing sections and let the natural pattern create the lift. You can gain shape without relying on very short layers.
Watch Out For:
Avoid judging the final layer balance while the curls are stretched or soaking wet. The dry pattern is what determines where volume and length actually sit.
Coily Rounded Shape Hairstyle

A rounded coily shape uses natural volume as part of the haircut instead of trying to compress it. Keep the widest point around the upper sides or crown, then let the lower outline taper gently toward the shoulders or upper back. The part can be defined, softly shifted, or nearly invisible depending on how the coils naturally settle. Front coils can frame the forehead, cheekbones, or jaw without needing a separate straight fringe.
Coily hair benefits from planning around dry shrinkage and bulk placement. Use lightweight leave-in conditioner for softness, curl cream for coil grouping, and a diffuser if you prefer controlled drying. A quick refresh can target the front and outer sections with a little moisture, while full wash-day detangling, styling, and drying takes considerably longer.
The cut should be reassessed when one area begins carrying noticeably more weight or the lower outline loses its rounded taper. At the salon, describe where you want the silhouette to be widest and show the dry length you prefer. Avoid using a single stretched measurement for every section because shrinkage may vary around the head. Controlled internal shaping can help very dense hair, but the outer outline should remain intentional rather than thinned uniformly.
Pro tip:
Style the perimeter early while the hair is evenly damp so you can see where coil groups naturally gather. This makes the rounded outline easier to maintain as it dries.
Make It Work for You:
If your density is very high, keep the outer silhouette full and discuss internal bulk only where the shape spreads excessively. Selective removal preserves the natural rounded form.
Watch Out For:
Do not use stretched length alone to choose the final perimeter. Coils may rebound differently in separate areas, so judge the shape in its usual dry state.
Straight Full-Perimeter Hairstyle

Natural straight hair can look polished without heat when the haircut gives the perimeter enough structure. Keep the main length around the collarbone or below, with minimal layering through the back and sides. A center or soft side part works easily, while longer face-framing pieces can begin near the jaw if you want subtle movement. The ends should remain substantial enough to create a clear lower line.
This design can suit fine or coarse straight strands, but density determines how much internal adjustment is useful. Use lightweight leave-in conditioner through the ends and a wide-tooth comb to distribute it without disrupting the natural fall. A small amount of lightweight serum can control surface flyaways. A quick morning refresh may involve resetting the part and combing the perimeter; full wash-day styling can remain low-effort if the hair naturally dries straight.
The cut needs attention when the bottom edge becomes uneven, loses fullness, or drops past your preferred length. At the salon, specify how strong you want the perimeter and how much face framing you actually use. Lower-density hair often benefits from preserving more weight at the bottom, while dense straight hair may need selective internal adjustment so the shape does not feel heavy around the shoulders.
Pro tip:
Comb the hair into its normal part while damp, then leave the perimeter alone as it dries. Repeated brushing can create more static and disturb the natural straight fall.
Make It Work for You:
If your straight hair is very dense, preserve the visible bottom edge but discuss internal weight placement. You can reduce heaviness without turning the perimeter into thin, feathered ends.
Watch Out For:
Avoid assuming straight hair needs many layers for movement. If the ends are lower in density, extra layering may reduce fullness without adding useful shape to the natural texture.
Natural Side-Part Volume Hairstyle
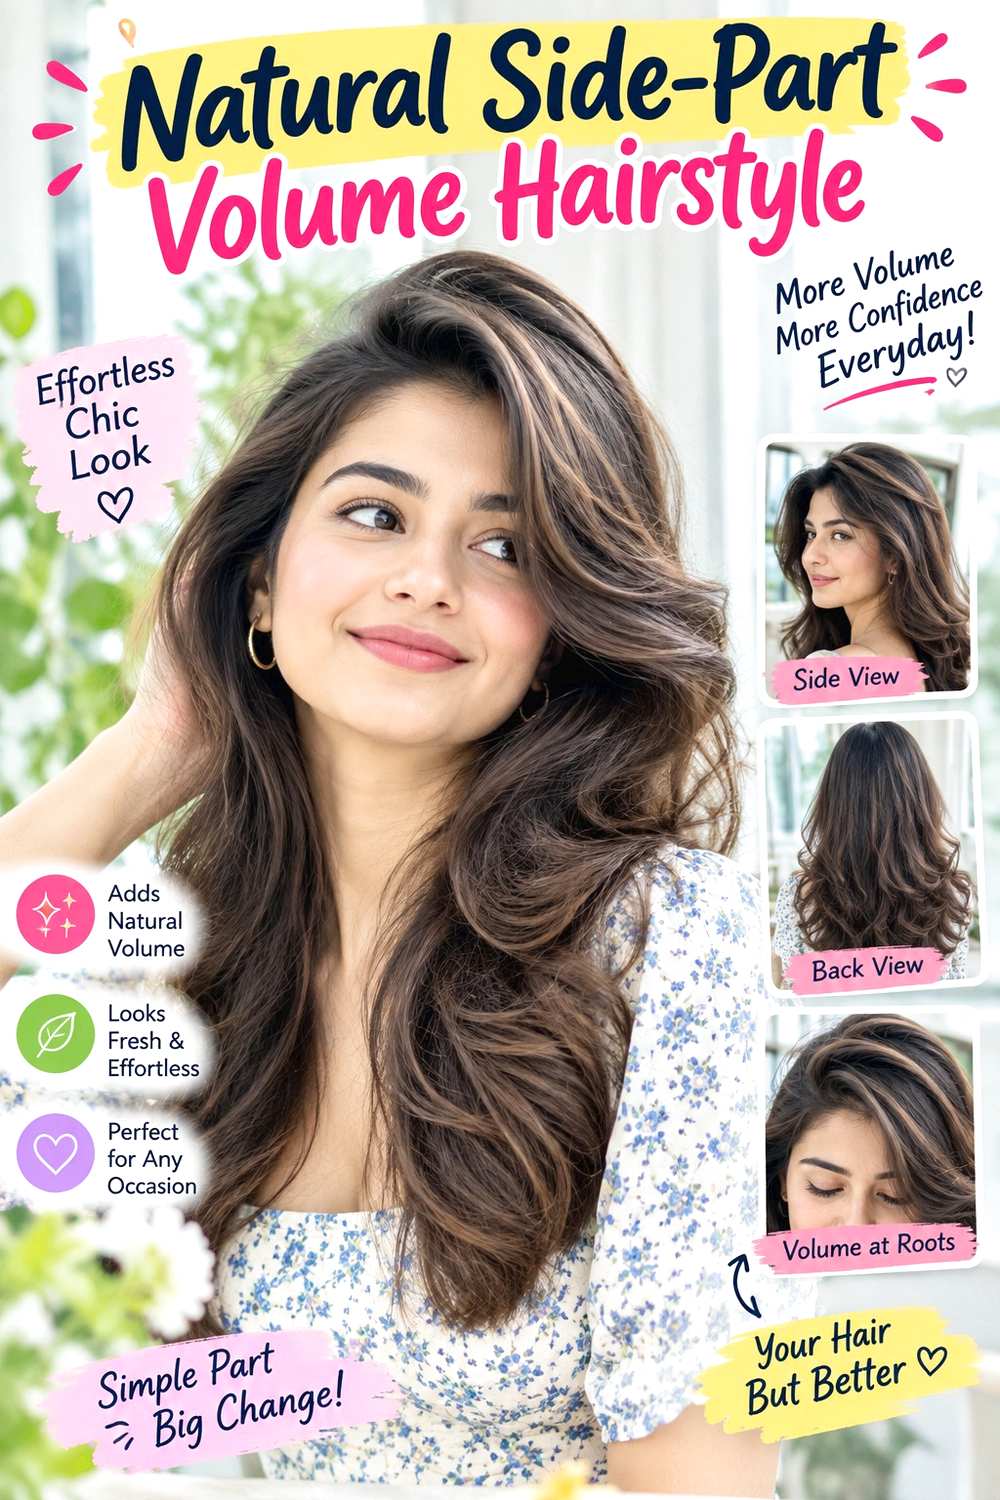
A side part can create natural volume without teasing by moving more hair across the crown. Place the part where the roots comfortably separate, then allow the heavier side to carry more lift and movement. The length can range from a bob to long layers, while face-framing pieces should blend into the fuller side rather than forming a heavy block around the temple.
Straight, wavy, curly, and coily hair can all use this idea, although the result changes with texture. Use lightweight mousse near the heavier roots for support and a few sectioning clips if the part needs help setting while damp. Leave-in conditioner through the ends can keep the lower shape softer without coating the roots. A quick refresh may involve dampening and resetting only the part; full wash-day styling depends on the natural texture and drying time.
If the part consistently falls back toward the center, follow the growth direction rather than forcing an extreme division. At the salon, show where you normally wear the part and ask how the front layers should balance around it. A part that looks flattering in a reference may behave very differently if your density or growth pattern distributes hair unevenly from side to side.
Pro tip:
Set the side part while the roots are damp and let them begin drying in that direction. Early placement can create lift without repeated combing or added backcombing.
Make It Work for You:
If your hair is lower in density near the part, choose a slightly softer side division. The asymmetry remains visible without exposing more scalp than you prefer.
Watch Out For:
Do not pile product onto the roots when the part falls flat. Too much mousse or cream can add weight; start with direction and use product sparingly.
Center-Part Face-Framing Hairstyle

A center part gives natural texture a balanced frame by placing the shortest front sections evenly on both sides. Keep the main length anywhere from shoulder level to long, then introduce face-framing pieces around the cheekbones, jaw, or collarbone. The rest of the haircut can stay relatively full so the front movement does not thin the perimeter. Natural bends, curls, or coils can shape the frame without being forced into matching curves.
This idea suits many textures, but the finished length of the front pieces should be judged according to shrinkage and normal movement. Use leave-in conditioner for softness and lightweight styling cream only where the face frame needs definition. Sectioning clips can hold the center part while damp. A quick refresh may focus solely on the two front sections; full wash-day effort depends on texture and density.
At the salon, point to the exact place where you want the shortest face-framing section to finish when dry. If your hair has lower-density ends, keep the frame concentrated near the front rather than adding extensive layers through the back. Curly and coily hair should be assessed in its settled pattern so the pieces do not spring much higher than expected.
Pro tip:
Set the center part before arranging the face frame, then style each side separately. This makes it easier to compare the finished length and movement without forcing perfect symmetry.
Make It Work for You:
If your natural texture differs from side to side, let the pieces fall slightly differently. Matching the exact bend matters less than keeping both sections connected to the haircut.
Watch Out For:
Avoid cutting the front pieces to an identical stretched measurement on curly or coily hair. Different shrinkage can make supposedly equal sections finish at noticeably different dry lengths.
Wash-And-Go Curl Definition Hairstyle
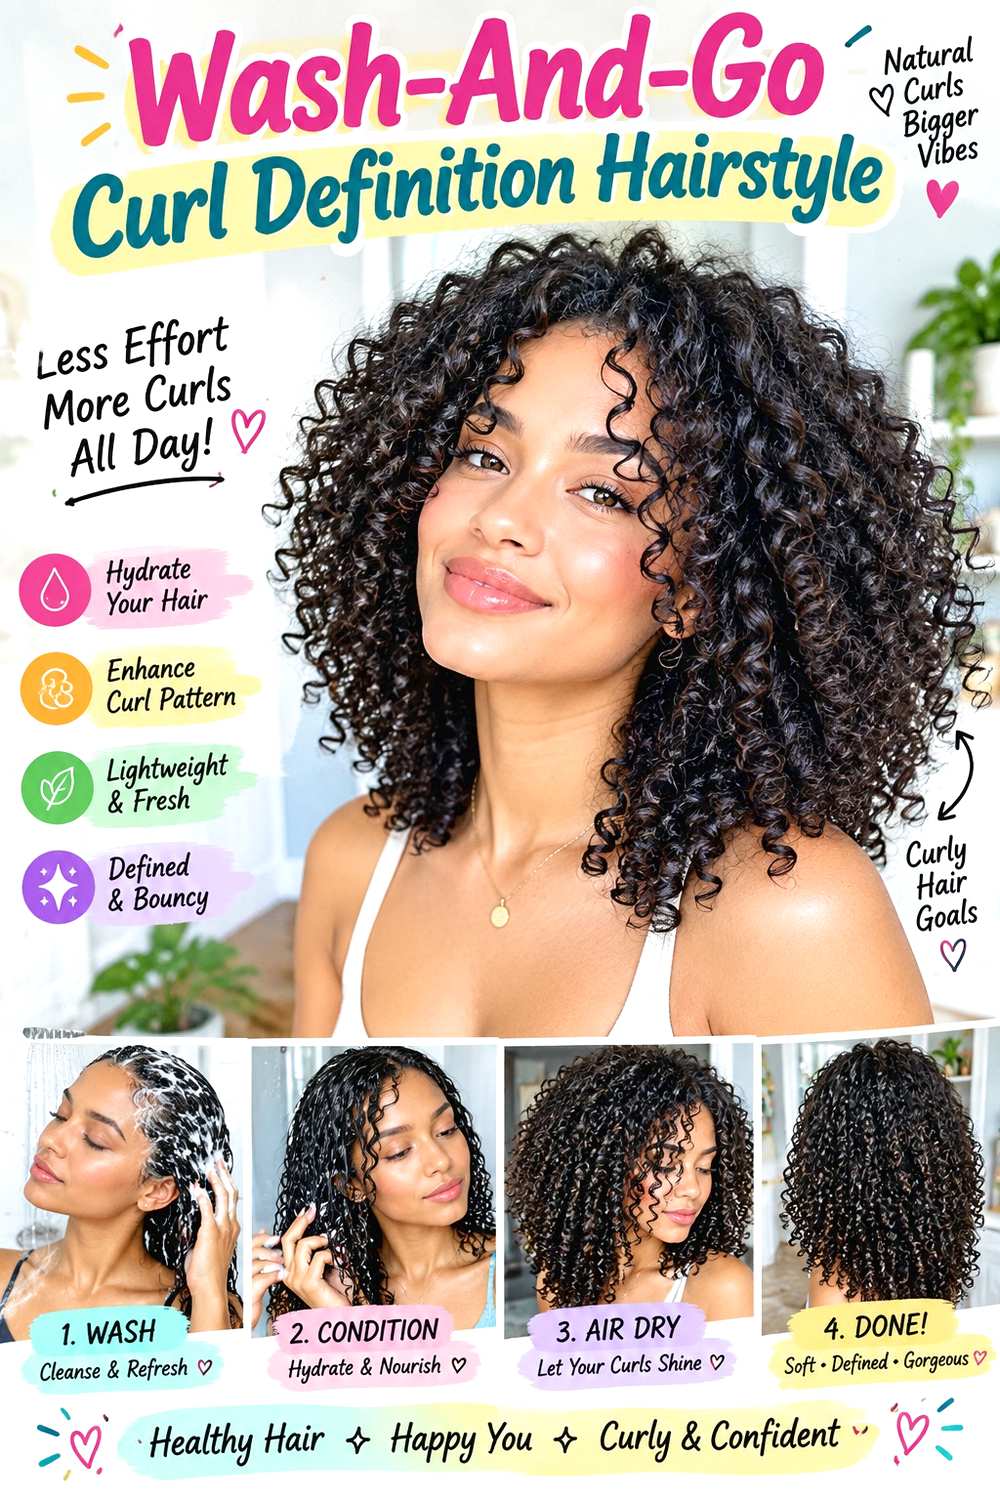
A wash-and-go focuses on defined natural curls or coils without adding braids, twists, or heat-shaped texture. The haircut should support the pattern with a clear perimeter and enough internal shaping to keep volume from collecting in one area. A center, side, or natural part can work, while the front may include shorter curl groups around the brow, cheekbones, or jaw if that suits your routine.
Curly and coily textures benefit most from a sectioning method that encourages existing groups rather than separating every strand. Use leave-in conditioner for moisture and slip, curl gel for definition and hold, and a diffuser if faster or more controlled drying is preferred. Full wash-day styling takes time because detangling, product application, and drying are separate steps. A later refresh can focus on only the curls that became flattened or fuzzy.
Maintenance is driven by the haircut’s dry shape as well as the styling routine. At the salon, explain whether you normally wear your hair with maximum shrinkage or stretched slightly through drying. Point out where you want the widest part of the shape and the dry position of any front pieces. That helps the cut support the wash-and-go without depending on daily reshaping.
Pro tip:
Apply definition product to evenly wet sections, then leave established curl groups alone as they begin drying. Excess manipulation can separate them before the hold has had time to set.
Make It Work for You:
If your density is high, work in smaller sections so product reaches the interior without coating the outer layer excessively. This supports definition while keeping the finished shape balanced.
Watch Out For:
Do not keep adding product when one area looks undefined. Check whether it was distributed evenly or disturbed during drying; more product can add buildup without fixing the pattern.
Twist-Out Everyday Texture Hairstyle
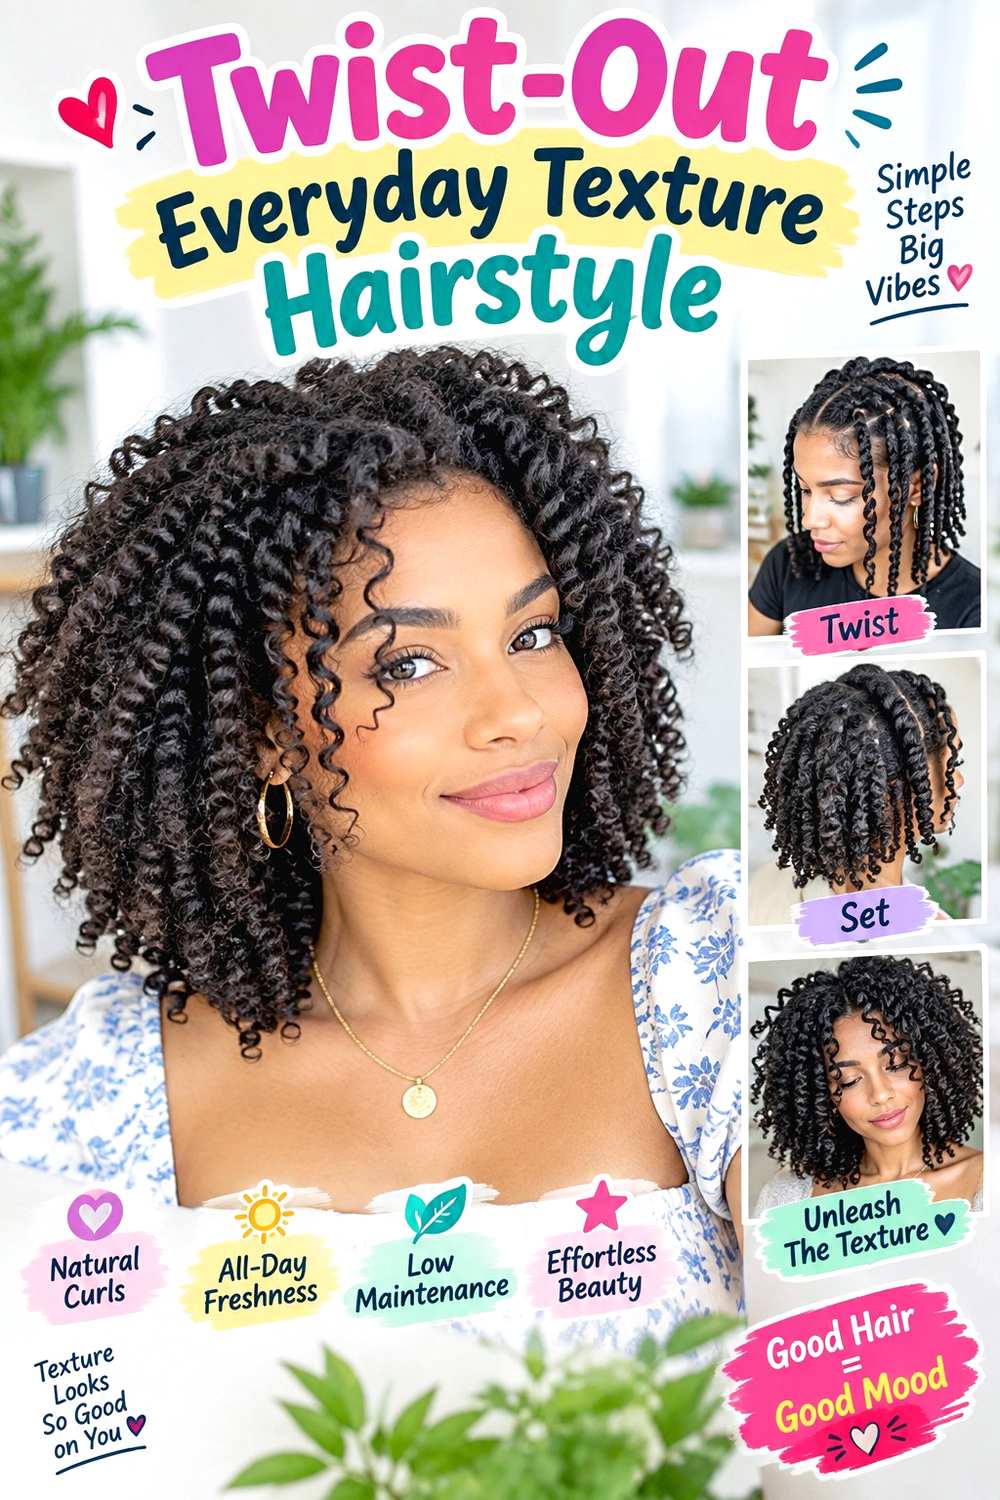
A twist-out creates elongated, rope-like definition that works with natural curl or coil patterns rather than replacing them with a heat-set finish. Divide damp hair into two-strand twists, allow them to dry fully, then separate them gently into soft, defined sections. A center, side, or undefined part can change the silhouette, while the ends may remain rounded or taper naturally depending on the haircut.
Curly and coily textures are common starting points, and twist size affects the finished pattern. Use lightweight leave-in conditioner for softness, curl cream for definition, and small fabric-covered elastics only if the ends need extra security. Full setup takes time because twisting and complete drying are substantial steps. Once established, a quick refresh may mean retwisting only a few stretched or fuzzy sections instead of starting over.
The haircut should still make sense when the hair is worn without a twist-out. At the salon, discuss your normal shrinkage, preferred stretched length, and where bulk sits in the natural state. Avoid cutting specifically for one manipulated pattern unless that is truly how you wear the hair most of the time. The twist-out should enhance an existing shape rather than hide a cut that works only when stretched.
Pro tip:
Untwist only when every section is fully dry, then separate gradually from the ends upward. Slow separation helps preserve the repeated pattern and reduces unnecessary frizz.
Make It Work for You:
If your hair shrinks strongly, use slightly larger twists through areas where you want more visible length. Smaller twists can remain around the front when you want extra definition.
Watch Out For:
Do not make the twists painfully tight at the roots. Tension does not guarantee better definition and can make an everyday style uncomfortable before it is even released.
Braid-Out Soft Texture Hairstyle

A braid-out creates broader, flatter bends than many twist-outs, making it useful when you want soft natural texture with a little more stretch. Braid damp sections from the roots through the ends, allow them to dry completely, then undo them without excessive combing. The finished shape can be shoulder length or longer, with a center or side part and gentle volume through the mid-lengths.
Curly and coily hair can use braid size to control how broad or defined the pattern becomes. Apply lightweight leave-in conditioner for softness and mousse for flexible support, then use small fabric-covered elastics if the braid ends need securing. Full preparation can take significant time because braiding and drying are separate stages, while a later refresh may involve rebraiding only selected areas overnight.
A braid-out is temporary, so the haircut should be planned around the hair’s natural dry shape as well as the stretched finish. At the salon, explain how often you wear braid-outs and where the natural hair normally sits before stretching. If your lower density is limited, preserve a fuller perimeter rather than adding extra layers just to make the braid-out move. The texture itself already supplies separation.
Pro tip:
Use similar braid sizes around the visible surface if you want a consistent pattern, then let interior sections stay slightly larger to reduce setup time without changing the outer finish much.
Make It Work for You:
If your ends are fragile or sparse, keep the lower braids a little larger and avoid excessive separation after release. This can preserve a fuller-looking perimeter.
Watch Out For:
Avoid undoing braids while they are still damp. Incomplete drying can leave the pattern uneven and make sections swell or lose definition soon after release.
Half-Up Natural Texture Hairstyle

A half-up style keeps natural texture visible while clearing the temples and upper sides. Gather hair from just behind the ears or temples and secure it at the back of the crown, leaving the lower length in its natural straight, wavy, curly, or coily pattern. Gentle crown lift and a few selected front pieces can soften the shape without requiring the loose hair to be restyled.
Medium and long hair work most easily because there is enough length to show a clear contrast between the secured and loose sections. Use a fabric-covered elastic for the anchor, bobby pins for short pieces, and lightweight styling cream only where surface flyaways need control. A quick refresh can be as simple as rebuilding the top section and redefining several front pieces; full wash-day styling remains a separate, longer process.
This temporary style does not require a haircut, but permanent face-framing layers affect how much hair stays loose. At the salon, explain which sections you usually leave around the face and whether you wear your texture stretched or fully shrunken. If density is lower, gather a smaller top section so the loose lengths maintain more fullness.
Pro tip:
Secure the half-up section before loosening the crown or arranging front pieces. Once the anchor is stable, small adjustments can add softness without causing the style to sag.
Make It Work for You:
If your hair is lower in density, take only a narrow section from the temples. More hair remains loose, preserving fullness while the upper sides still look controlled.
Watch Out For:
Do not gather the top section too tightly just to make it look polished. Comfortable placement and a stable anchor work better than pulling natural texture flat against the scalp.
Low Puff Natural Texture Hairstyle
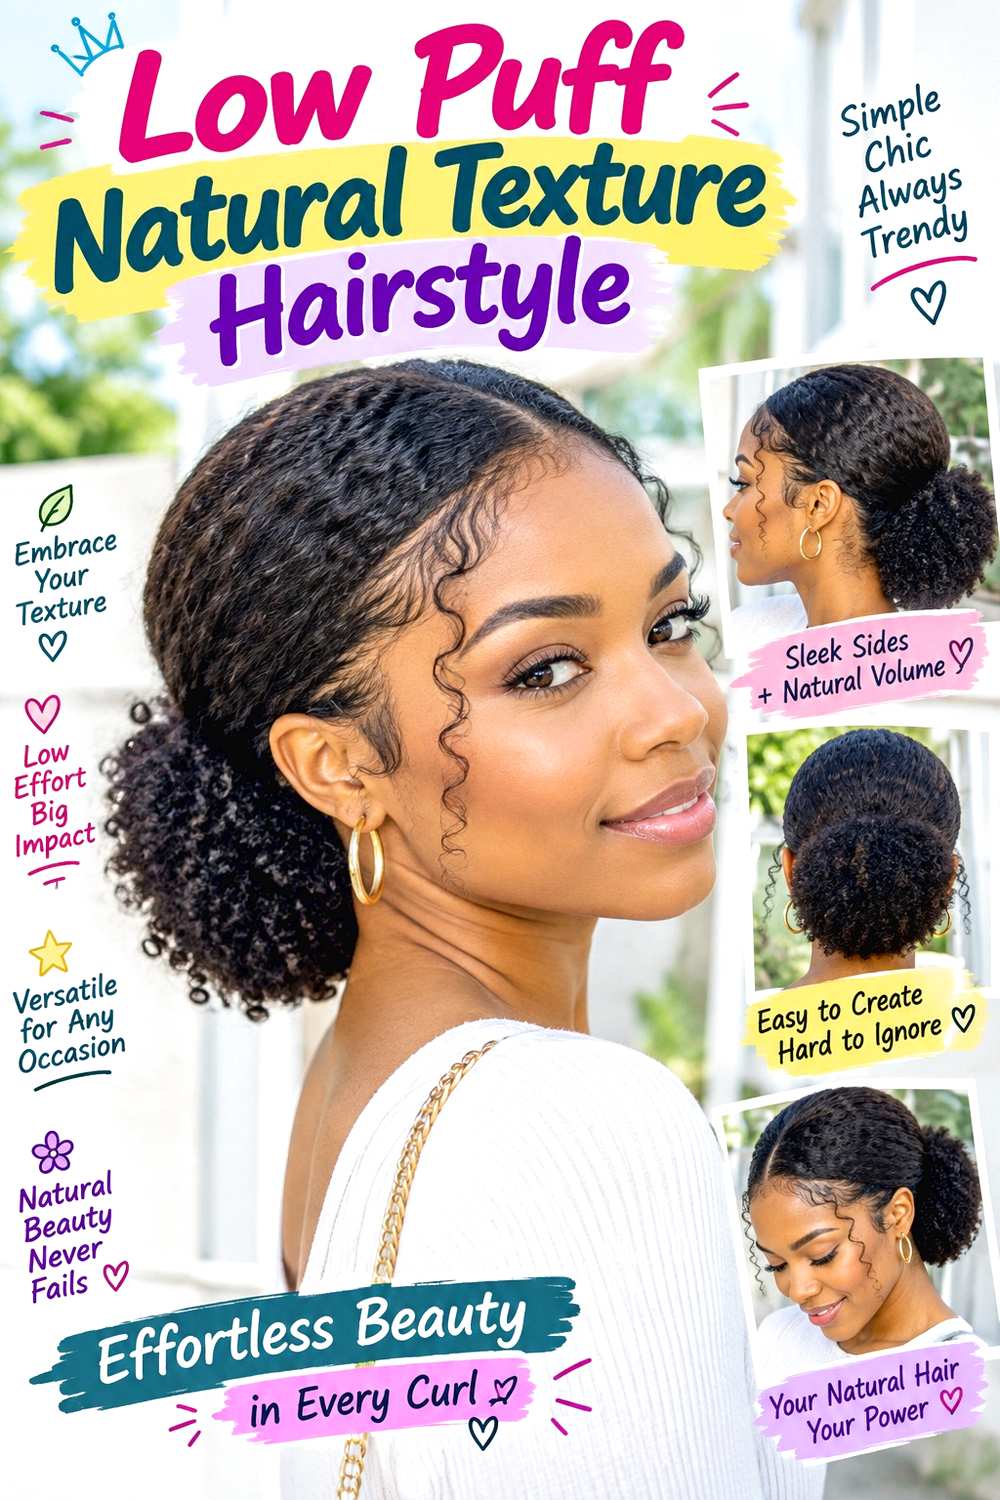
A low puff gathers natural curls or coils near the nape while leaving their texture visible in the back. Keep the front softly swept, side-parted, or center-parted, then secure the hair just above the neckline. Allow the puff to remain rounded rather than compressing it into a bun. A few front curls or coils can stay loose when they fit your routine and do not interfere with glasses or collars.
Curly and coily hair with enough length to gather suits this style naturally. Use lightweight leave-in conditioner for softness, curl gel for any front sections that need definition, and a fabric-covered elastic for the base. A morning refresh can be quick when the texture is already defined; full wash-day detangling, styling, and drying takes much longer.
If the base starts slipping, rebuild it rather than repeatedly tightening the elastic. The puff is temporary, so no haircut is required. At the salon, discuss the dry finished length of any front pieces you want to leave out regularly. Shrinkage can make those sections sit much higher than expected. Comfortable tension should remain a priority because a secure puff does not need to feel tight around the hairline.
Pro tip:
Build the low anchor first, then shape the visible puff with your fingers. Creating fullness in the ends is more comfortable than tightening the perimeter to make the puff appear larger.
Make It Work for You:
If your hair is shorter, place the puff slightly higher so more sections can reach the anchor. The shape can stay compact while preserving visible natural texture.
Watch Out For:
Avoid pulling the base tighter every time a front section loosens. Pin or redefine that area locally instead of increasing tension around the entire hairline.
Loose Low Bun Natural Texture Hairstyle
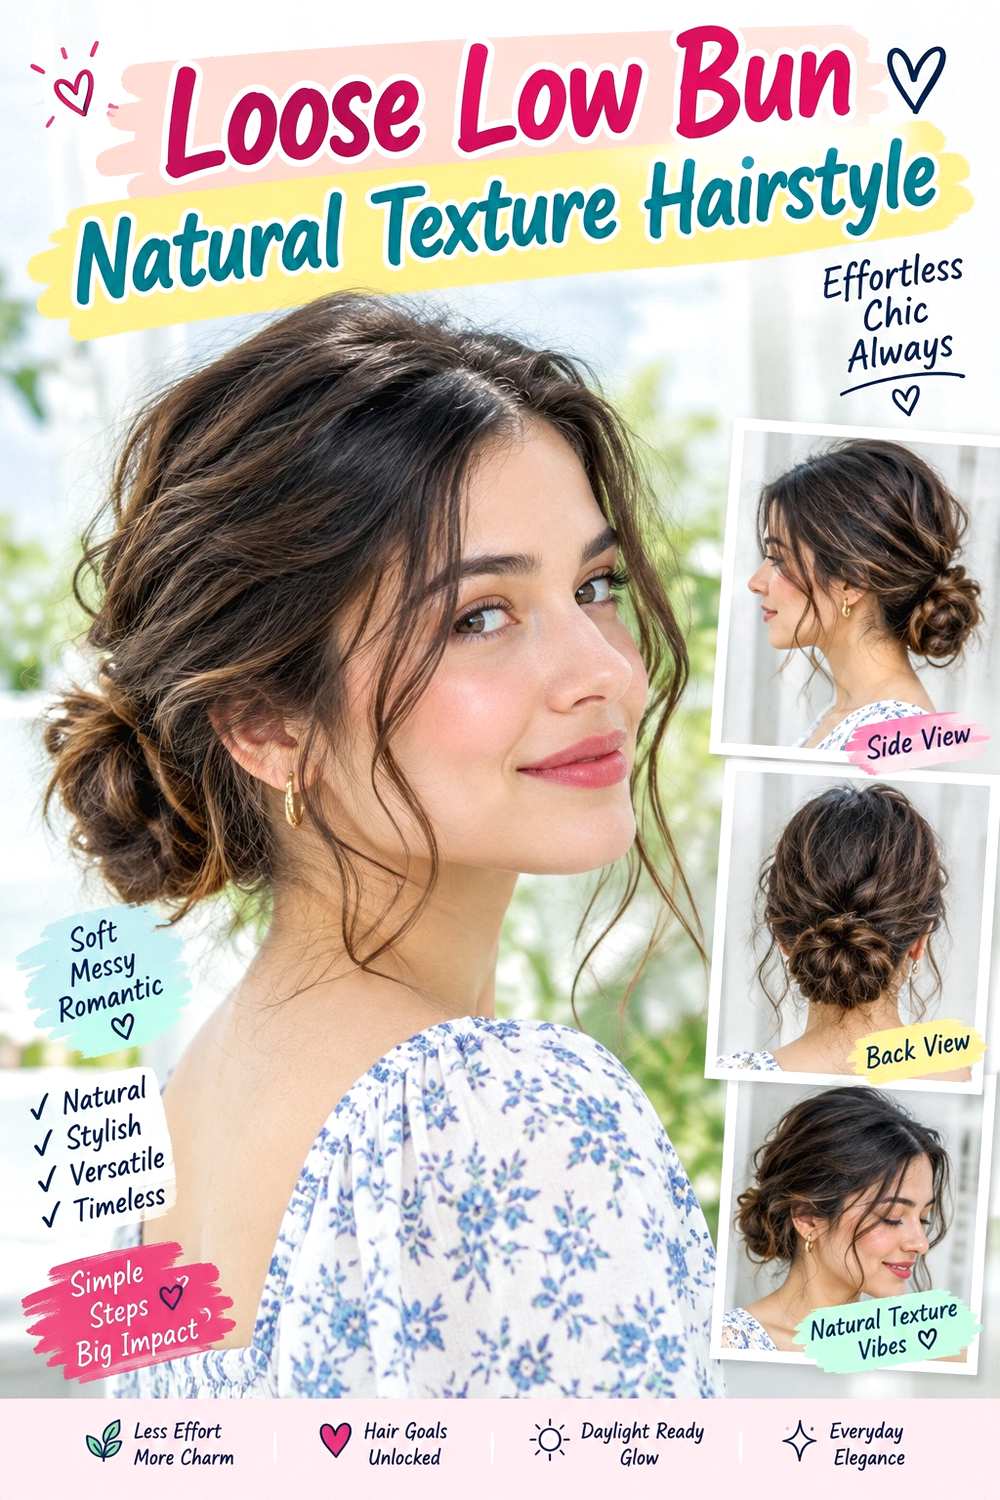
A loose low bun gives natural texture a contained everyday option without requiring the hair to be completely smoothed. Gather the lengths just above the nape, keep soft lift through the crown, and fold or wrap the hair into a broad bun. Let the outer surface retain some natural wave, curl, or coil texture. A center or side part can define the front, while a few longer pieces may remain loose.
Medium and long hair can form the bun easily, although very dense hair may need several pins to distribute weight. Use a fabric-covered elastic for the base, bobby pins for the folded sections, and lightweight styling cream to control only the flyaways that bother you. A prepared-hair bun can be a quick refresh, while complete wash-day styling remains much more involved.
If the bun begins dropping, reinforce the anchor rather than compressing the texture with extra tension. The style itself is temporary, so no haircut is necessary. If you have permanent face-framing layers, tell your stylist whether you usually leave them loose in low styles. For dense hair, a flatter bun can feel more comfortable and sit better above collars than a tightly wound round shape.
Pro tip:
Fold the bun in sections instead of twisting all the texture into one tight rope. Sectioned pinning preserves more natural movement and distributes the weight around the anchor.
Make It Work for You:
If your hair has high density, create a wider, flatter bun close to the head. You can keep the natural surface texture while avoiding one heavy compact coil.
Watch Out For:
Do not brush the entire surface flat simply because the hair is in a bun. Control the silhouette and anchor while allowing some natural texture to remain visible.
Claw Clip Natural Twist Hairstyle
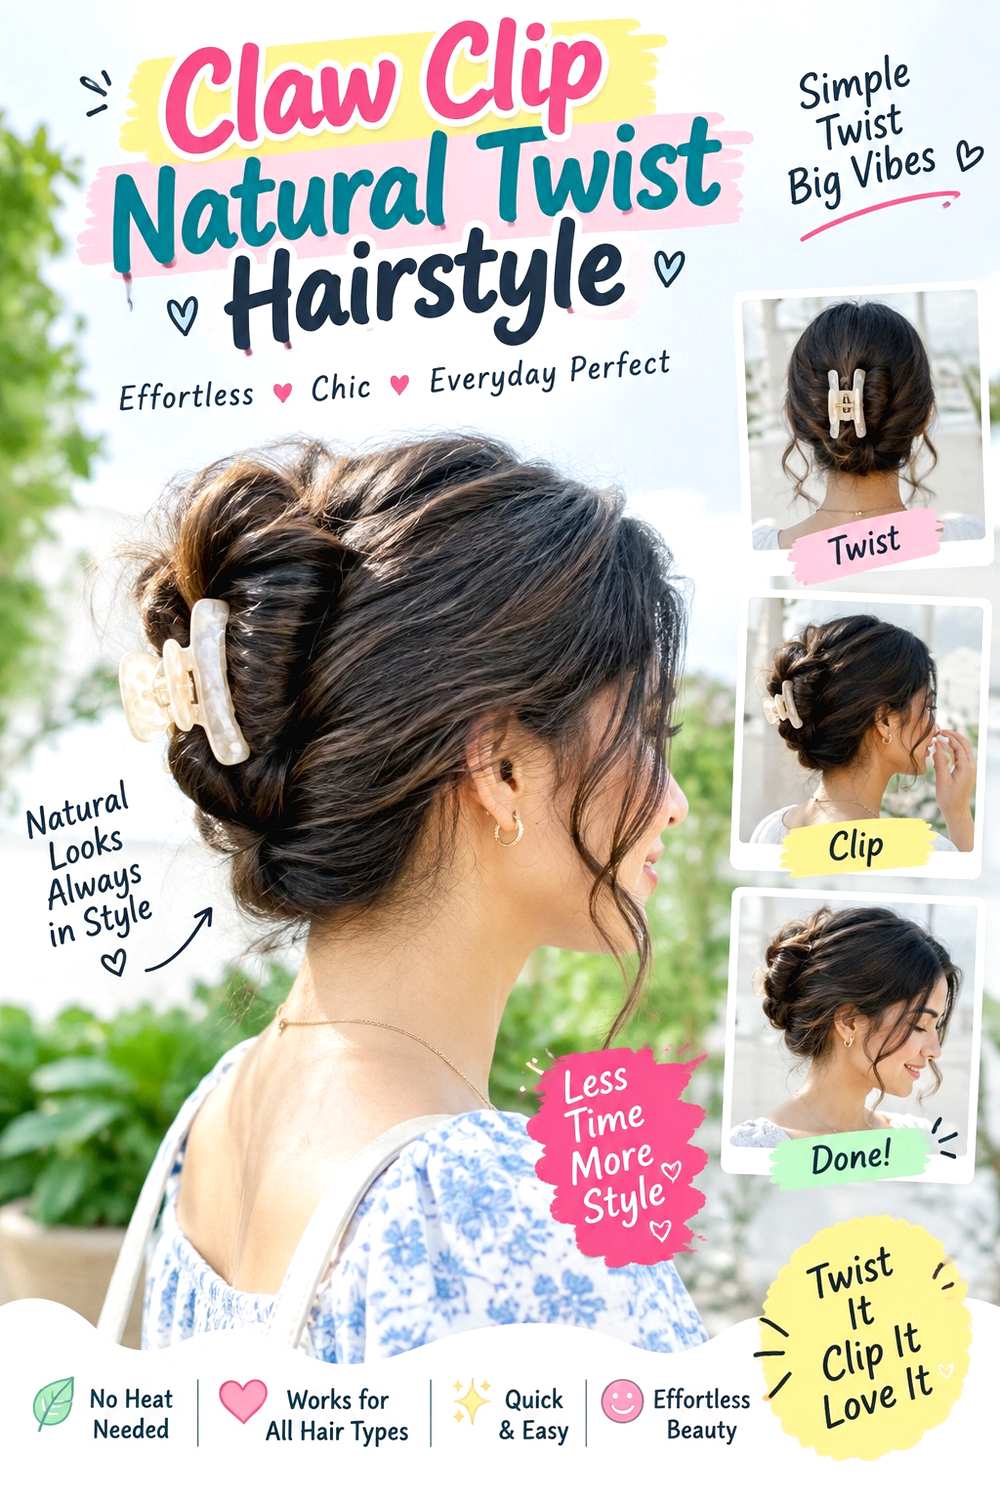
A claw clip twist is a practical way to secure natural texture while leaving some movement visible. Gather the hair low, twist it upward against the back of the head, and close the clip vertically over the fold. The ends can remain loose above the clip, tuck partly inside, or form a soft fan depending on length and texture. The front can stay natural, side-parted, or lightly smoothed.
Straight, wavy, curly, and coily textures can all use the style; clip size and capacity matter more than texture alone. Use a sturdy claw clip as the main anchor and lightweight styling cream only where short pieces need control. On prepared hair, the twist can take very little time. Full wash-day effort is separate and depends entirely on the texture and routine you use before clipping.
If the style slides, choose a larger clip or rebuild the twist rather than clamping harder. This temporary style requires no special haircut. For shorter layers, local bobby pins can be useful, but do not cut extra pieces solely to create a looser effect. The clip should close comfortably around the twist without pulling at the scalp.
Pro tip:
Catch both the twist and a small amount of hair beneath it when closing the clip. This gives the anchor more support and helps reduce downward sliding.
Make It Work for You:
If your hair is very dense, flatten the twist slightly and choose a clip with enough capacity to close easily. Avoid compressing a large amount of texture into undersized hardware.
Watch Out For:
An undersized clip may feel secure briefly but can spring open as the hair shifts. Choose hardware that holds comfortably instead of relying on pressure.
Short Textured Bob Hairstyle

A short textured bob lets natural bends, waves, curls, or soft irregular movement shape the haircut around the jaw or upper neck. Keep the perimeter clear but not necessarily perfectly blunt, with only enough layering to stop the sides from becoming heavy. A center, side, or natural part can work, while the front stays long enough to tuck behind the ears if that suits your everyday routine.
Straight hair with slight bends, naturally wavy hair, and loose curls can all adapt the shape. Use lightweight leave-in conditioner for softness and styling cream to define only the sections that need guidance. A wide-tooth comb can help distribute product before the texture sets. Wash-day effort is often moderate because the short length dries faster than long hair, while a quick refresh may involve dampening the front and reshaping the ends.
At the salon, show where you want the dry perimeter to finish and explain how your hair behaves without heat. If it expands strongly near the jaw, controlled internal weight placement may help, but the outer line should remain substantial. Shorter cuts show growth quickly, so reshape when the perimeter loses its intended jaw or neck relationship.
Pro tip:
Style the front and perimeter first, then leave the interior texture more relaxed. Clear edges give the bob structure even when the natural bends are not perfectly uniform.
Make It Work for You:
If your hair is dense, preserve the visible perimeter but discuss selective internal weight removal. This keeps the bob compact without thinning every section around the lower edge.
Watch Out For:
Avoid cutting too many short layers solely to encourage texture. On a bob, excess layering can create width or fuzzy ends instead of the clean, natural movement you want.
Textured Pixie Hairstyle

A textured pixie uses natural growth direction and short movement as the main styling features. Keep the sides and nape shorter, with more length through the crown and front so the hair can bend, wave, curl, or separate naturally. The fringe may sit forward, sweep sideways, or lift slightly depending on texture. A soft outline around the ears keeps the shape controlled without requiring every section to lie flat.
Straight, wavy, and softly curly textures can all work, and some coily patterns can use a longer top with a compact perimeter. Use a small amount of styling paste to define selected sections and a fine-tooth comb only where you want a cleaner direction. A dry morning refresh is usually quick because there is little length to manage, while a complete wash and restyle takes longer when the crown has strong growth patterns.
Short cuts need reshaping when the nape becomes heavy, the sideburn area loses its outline, or the longer top stops moving as intended. At the salon, specify the fringe length, nape position, and how much natural texture you want visible. Avoid asking for excessive thinning if the top already separates easily; enough weight is needed for the texture to form recognizable pieces.
Pro tip:
Shape the crown first, then arrange the fringe. Once the upper volume is established, you can judge how much product and direction the front actually needs.
Make It Work for You:
If your strands are fine, keep slightly more length through the top and use paste sparingly. A softer crown can create movement without separating into overly thin-looking pieces.
Watch Out For:
Do not remove too much weight from naturally textured short hair. Excess thinning can make the top fuzzy or difficult to group instead of creating cleaner separation.
Conclusion
Natural texture hairstyles work best when the cut and styling routine support the way the hair already behaves. Straight textures may favor strong perimeters and simple parts, while waves benefit from light layering and controlled movement. Curly and coily hair often need dry-length planning, shrinkage awareness, and thoughtful bulk placement. Low puffs, buns, half-up styles, and claw-clip twists provide easy alternatives when you want the hair contained without changing its underlying pattern. Density matters as much as texture: sparse ends usually need more perimeter weight, while dense hair may benefit from selective internal adjustment. Choose your length, layers, parting, face frame, and volume around your actual wash-day routine and the amount of refreshing you want to do between washes.
Before Your Salon Visit
Choose one or two favorites and save clear references that show the texture and shape you like. Discuss your natural texture, density, face shape, preferred length, upkeep, and normal wash-day routine. Point out the exact fringe, layer starting point, perimeter weight, part, volume placement, or finish you want. If your hair shrinks, stretches, or behaves differently when air-dried, explain that too so the stylist can plan the dry shape rather than relying on one temporary state.
FAQs
Do natural texture hairstyles mean I should avoid all heat?
No. Natural texture styling simply works with your existing pattern rather than requiring a completely different finish. You can still use heat occasionally if it fits your routine. When heat styling, use heat protectant and avoid repeatedly reheating sections that already sit correctly.
How do I choose layers for naturally curly or coily hair?
Plan layers around the dry pattern, shrinkage, and where volume collects. Short layers can create more crown height, while longer layers preserve weight and length. Ask your stylist to consider how each area settles naturally instead of relying only on wet or stretched measurements.
What if my natural texture is different on different parts of my head?
That is common. You do not need every section to behave identically. Styling can focus on the areas that need more definition or control, while the haircut should balance the overall silhouette. A few targeted refreshes are often more practical than forcing every section into one pattern.
How can I refresh natural texture without restyling everything?
Target only the areas that flattened, frizzed, or lost direction. Dampening the front, redefining several curl groups, resetting a part, or rebuilding a simple puff or half-up anchor may be enough. Full wash-day styling is usually unnecessary when most of the shape still looks good.