14 Corset Ribbon Braid Hairstyles
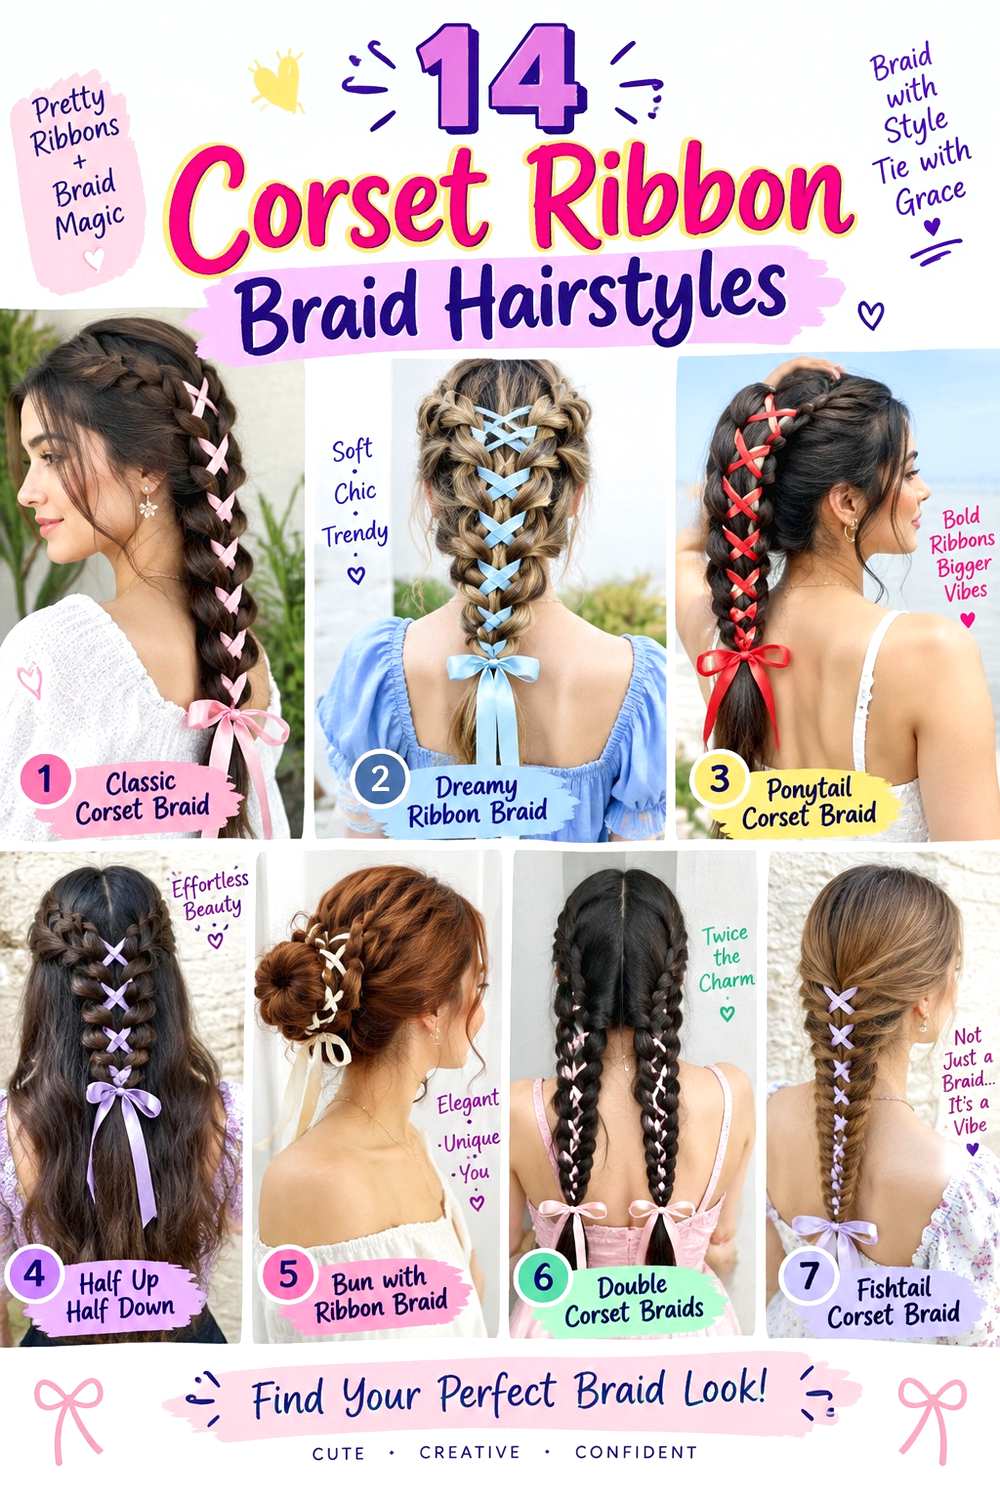
Corset ribbon braid hairstyles use two braided edges as the “eyelets” of a laced panel, with ribbon crossing between them like a corset. The braids may sit at the nape, crown, side, or inside a ponytail, while the ribbon creates the main graphic detail. Length, parting, braid width, loose face-framing pieces, and the amount of visible volume can all change the result without changing the basic idea. Loose lengths can preserve natural movement.
Medium to long hair offers the most room for full lacing, but shorter hair can support a compact half-up version. Straight, wavy, curly, and coily textures can all work when the braid sections are chosen to suit the hair’s density and natural movement. Fine or lower-density hair may benefit from narrower braids and a lighter ribbon, while dense hair can support wider sections. Face-framing can stay tucked back or be softened around the temples according to preference. Existing fringe or short layers can stay loose rather than being forced into the lacing.
These styles are temporary, so the main maintenance is about grip, comfortable tension, and keeping the ribbon centered rather than preserving a haircut. A quick refresh may mean tightening one crossing or resetting an anchor, while a full wash-day style takes longer because the hair must be dried, sectioned, braided, and laced from the beginning. Clear placement and secure anchor points matter more than pulling tightly.
Quick List
- Low Corset Ponytail Braid Hairstyle
- Half-Up Corset Ribbon Braid Hairstyle
- Twin Corset Ribbon Braid Hairstyle
- Side-Swept Corset Ribbon Braid Hairstyle
- Dutch Corset Ribbon Braid Hairstyle
- French Corset Ribbon Braid Hairstyle
- Crown Corset Ribbon Braid Hairstyle
- Ladder Corset Ribbon Braid Hairstyle
- Corset Ribbon Fishtail Braid Hairstyle
- Corset Ribbon Braided Bun Hairstyle
- High Pony Corset Ribbon Braid Hairstyle
- Loose Boho Corset Ribbon Braid Hairstyle
- Short-Hair Corset Ribbon Braid Hairstyle
- Curly Corset Ribbon Braid Hairstyle
Low Corset Ponytail Braid Hairstyle
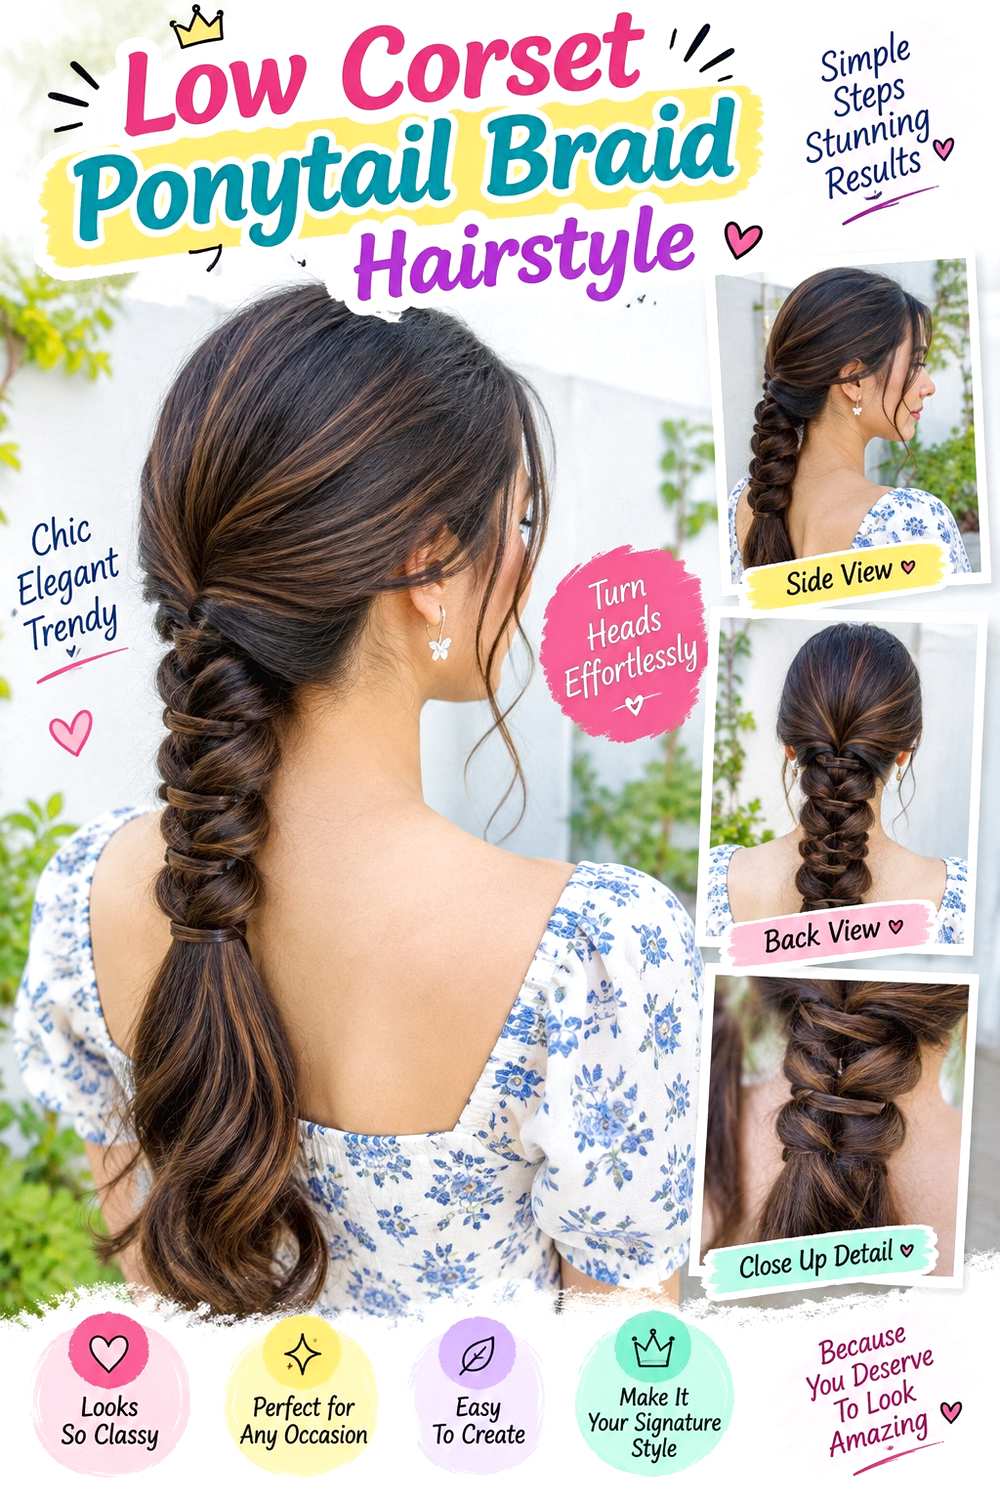
A low ponytail gives the corset detail a clean, vertical path without requiring the entire head to be braided. Gather the hair at the nape with a fabric-covered elastic, then divide a narrow section on each side of the ponytail into matching braids. Cross a narrow satin ribbon between those two braids, keeping each pass flat and evenly spaced. A center or soft side part both work, and short face-framing pieces can stay loose if you prefer less tension around the hairline.
Medium to long hair is easiest because the lacing needs room to show, although narrower braids can keep the design readable on lower-density hair. Flexible hairspray can control flyaways without making the ribboned panel rigid. On a quick refresh, straighten twisted ribbon and snug only the loose crossings; after a full wash day, expect more time for drying, sectioning, braiding, and lacing from scratch. If the ponytail base starts sliding, reset the elastic rather than pulling the ribbon tighter. For a stylist or braider, specify the braid width, how low you want the ponytail to sit, and whether the lacing should stop above the ends or continue nearly to the finish.
Pro tip:
After lacing, gently lift the ponytail away from the nape and check the first two crossings. They should stay flat without tugging the base upward.
Make It Work for You:
If your hair is shorter or lower density, stop the lacing at mid-ponytail and leave more length loose. The corset effect remains clear without using too much hair.
Watch Out For:
Do not tighten a slipping ponytail by yanking the ribbon. Reset the elastic first; otherwise the lacing can distort the braids and create uneven tension.
Half-Up Corset Ribbon Braid Hairstyle
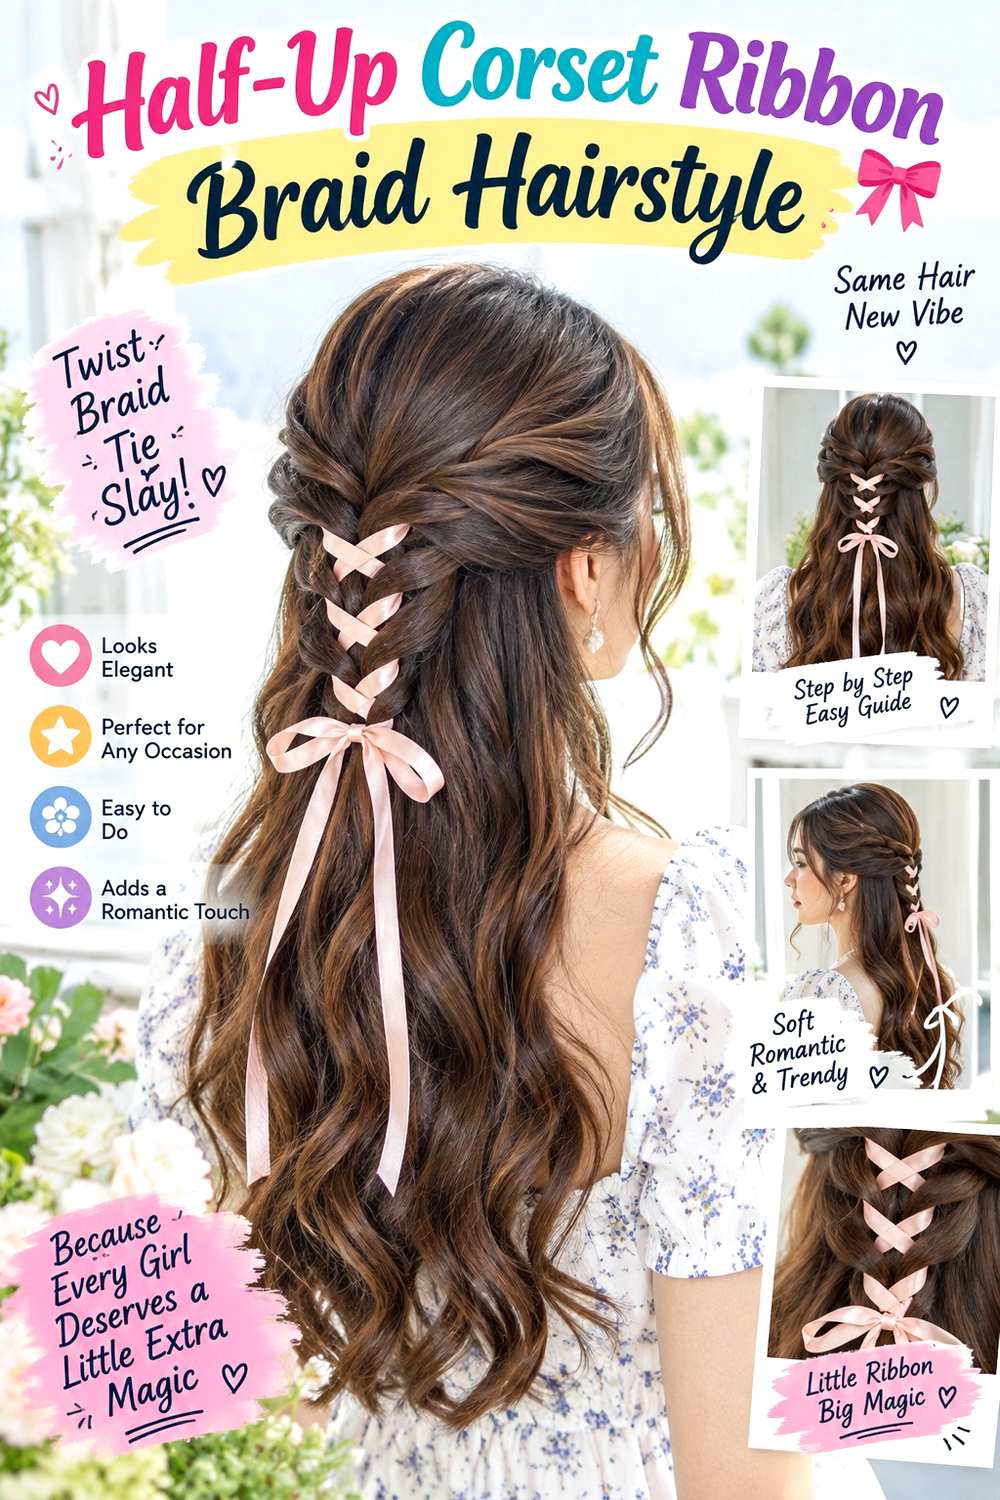
A half-up arrangement keeps the ribbon detail at the back of the head while leaving most of the length loose. Take two slim sections from the temples, braid them toward the back, and secure each with small clear elastics so they sit parallel rather than crossing. Lace a grosgrain ribbon between the braids in neat X-shapes. The remaining hair can stay straight, wavy, or naturally curly, and a center part gives symmetry while a side part makes the panel slightly more relaxed.
This design is useful when you want a visible corset effect without the weight of a full braided style. Light texturizing spray can add grip to very silky hair, but keep it away from dry ends. A quick next-day refresh usually involves retying the ribbon or replacing one small elastic; a full wash-day version takes longer because the loose lengths may need their usual drying and styling before you build the half-up section. If the panel droops, move the anchor braids slightly higher instead of tightening them painfully. When discussing the style with a braider, point out the exact meeting point at the back and how much loose hair you want left below it.
Pro tip:
Before tying the final bow, look at the panel from behind or in a mirror and level the two anchor braids so the X-shapes sit evenly.
Make It Work for You:
For curls or coils, braid only the side sections and leave the back texture untouched. This preserves natural volume while keeping the ribbon panel tidy and visible.
Watch Out For:
A ribbon tied directly onto loose hair may slide. Secure the two braids first, then lace between stable anchors so the decoration is not carrying the style.
Twin Corset Ribbon Braid Hairstyle
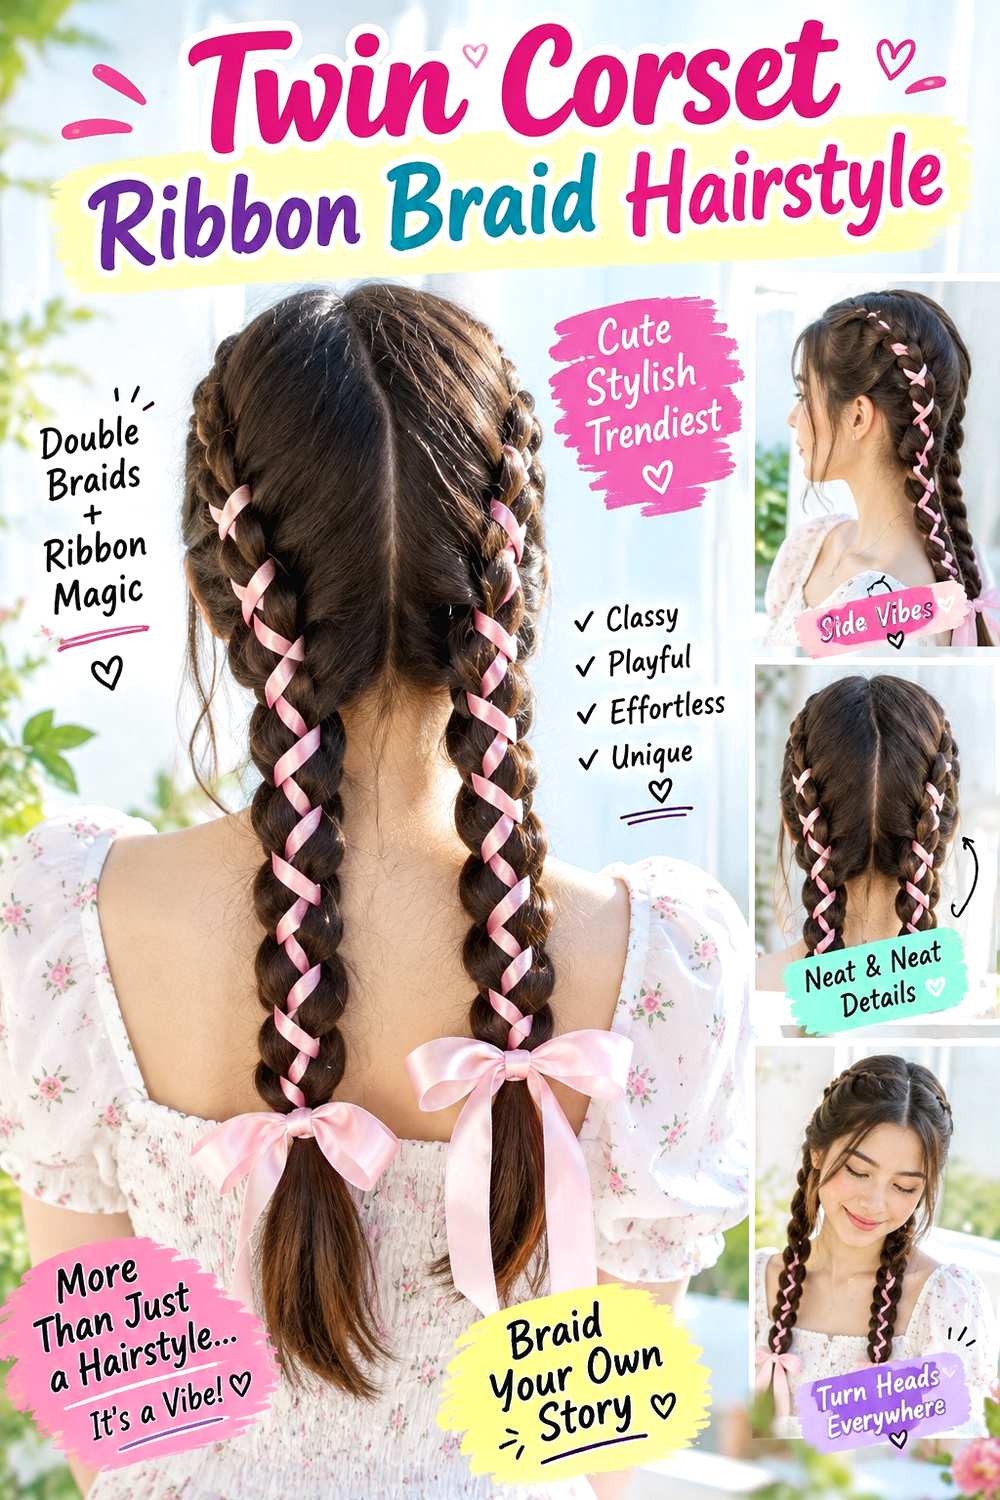
Two vertical braid panels create a balanced corset pattern on either side of a clean center part. Use a tail comb to divide the hair evenly from forehead to nape, then form a narrow braid along the inner edge of each side. A satin ribbon can be threaded across the gap in repeated X-shapes before the remaining lengths continue as two braids or low tails. The finish looks strongest when the braid widths match and the lacing stays centered.
The style suits medium to long lengths and can be adjusted for straight, wavy, curly, or coily hair by changing section size rather than forcing the texture flat. Fabric-covered elastics secure the ends without asking the ribbon to carry the whole style. A quick refresh means smoothing the part and correcting any lacing that has shifted; rebuilding both sides after wash day is a longer process, especially on dense or very long hair. If one side loosens faster, redo that braid instead of overtightening the opposite side. Tell a stylist or braider whether you want the two panels close together or farther apart, and ask for comfortable, even tension around the hairline and nape so symmetry does not come at the expense of comfort.
Pro tip:
Mark the center part all the way to the nape before braiding. A consistent division makes the twin panels look deliberate even if the braid texture stays soft.
Make It Work for You:
If your scalp is sensitive, widen the sections slightly and keep the braids flatter. You can preserve the paired corset pattern without making the roots feel tight.
Watch Out For:
Do not keep correcting small asymmetry by tightening one side. If a braid sits noticeably higher, undo that section and reset its placement instead.
Side-Swept Corset Ribbon Braid Hairstyle
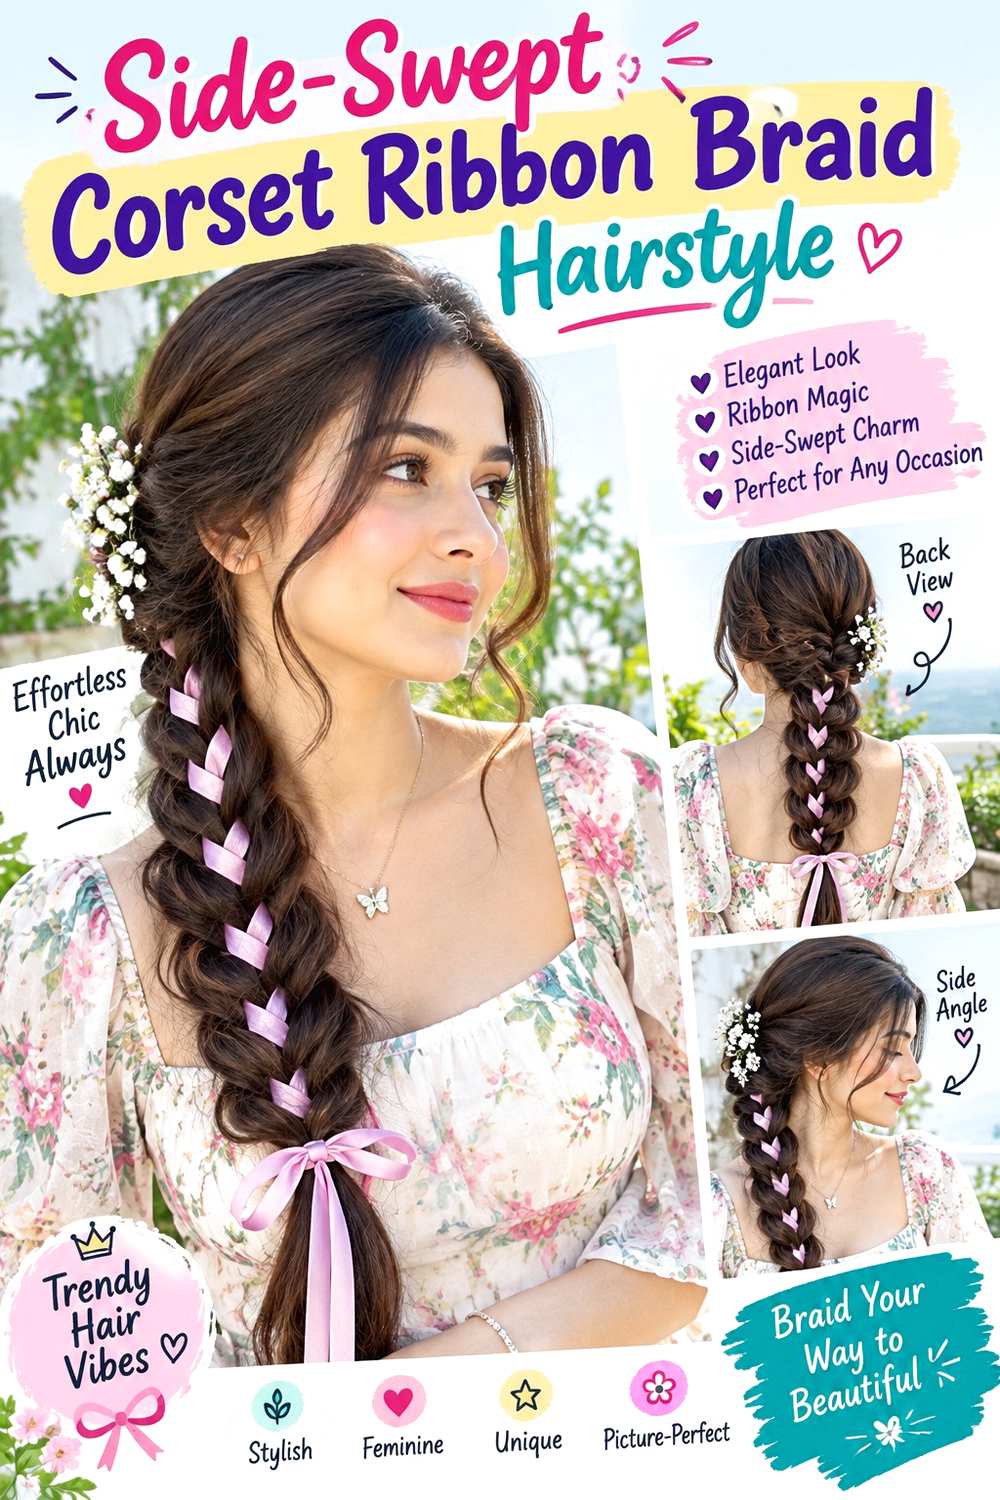
A diagonal corset panel makes the ribbon visible from the front and keeps the design from feeling too symmetrical. Start near one temple, build two slim braids that travel toward the opposite shoulder, and lace a narrow ribbon between them as they angle behind the ear. A light styling cream can keep short pieces from escaping, while bobby pins help secure the lower anchor where the braid changes direction. Leave the remaining length loose or gather it into the side finish.
This placement works especially well on medium and long hair because the diagonal line has space to develop. Dense hair may need slightly wider braid sections so the panel does not disappear, while finer hair often looks cleaner with smaller sections and less ribbon width. A quick refresh is mostly about replacing a shifted pin or flattening a twisted ribbon; a full wash-day setup takes longer because the directional sectioning has to be rebuilt carefully. Avoid solving slippage by pulling harder near the temple. For a braider, identify the starting temple, the shoulder you want the braid to fall toward, and the point where the lacing should end. Those placement choices determine whether the diagonal reads clearly from both the front and back.
Pro tip:
Angle the lacing in the same direction as the braid path near the ear. This keeps the ribbon from bunching where the design changes direction.
Make It Work for You:
For shorter shoulder-length hair, begin the diagonal panel closer to the back of the temple and finish near the nape rather than forcing it toward the shoulder.
Watch Out For:
Watch for pins pressing behind the ear, a common problem with diagonal styles. Move the anchor slightly back or lower instead of adding tighter pins.
Dutch Corset Ribbon Braid Hairstyle
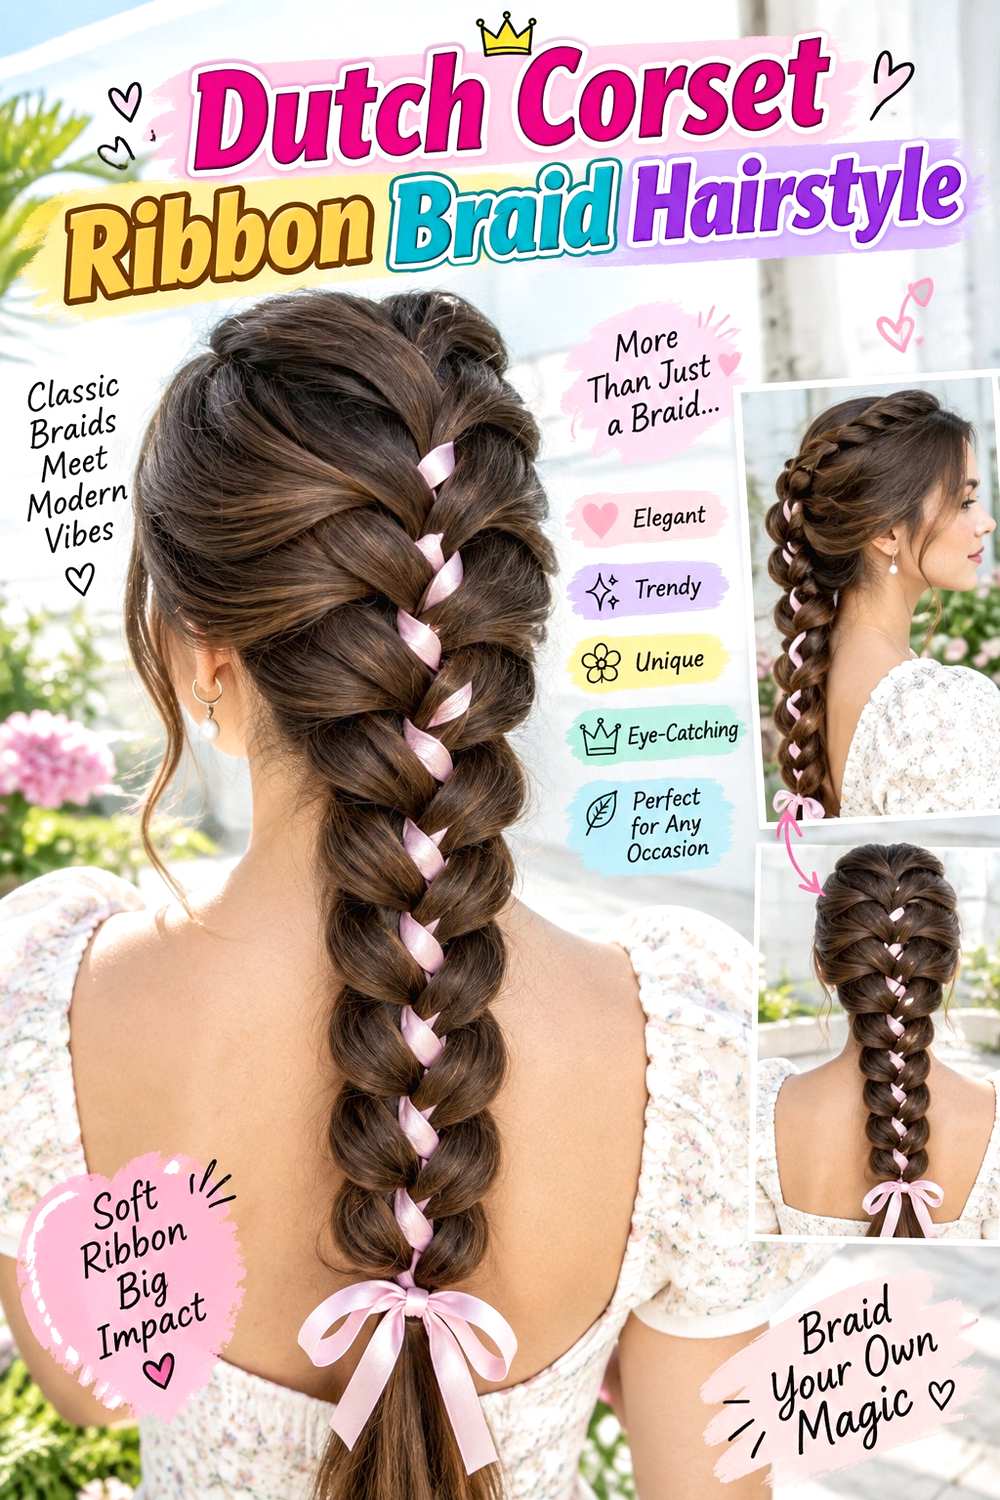
Raised Dutch braids make the corset lacing more dimensional because the braid edges sit above the scalp. Create two parallel Dutch braids from the crown toward the nape, leaving a narrow channel between them, then cross a ribbon through corresponding outer loops. A tail comb helps keep the channel consistent, while a small amount of firm-hold gel can control short hairs along the braid path. Keep the ribbon flat so the raised texture remains visible.
Because Dutch braiding adds height, this version can suit readers who want a more sculpted finish on straight, wavy, curly, or coily hair. Section size should match density; very thick sections can make the panel bulky, while tiny sections may hide the lacing. A quick refresh may only require smoothing one fuzzy braid edge and retightening a loose crossing, but a full wash-day rebuild takes longer because both raised braids need to be recreated evenly. Do not increase tension just to make the ridges look sharper. When working with a braider, specify the width of each Dutch braid, the space you want between them, and where the ribbon should begin. Comfortable tension at the crown and nape matters more than an extremely tight outline.
Pro tip:
Keep the inner edges of the Dutch braids equally raised before threading the ribbon. Balanced ridges give each crossing a clear place to sit.
Make It Work for You:
On dense or coily hair, use slightly larger braid sections and a wider center channel. The lacing stays visible without compressing too much hair into narrow rows.
Watch Out For:
Do not lace through random braid loops when spacing changes. Match each crossing to a similar point on both sides so the center line does not zigzag.
French Corset Ribbon Braid Hairstyle
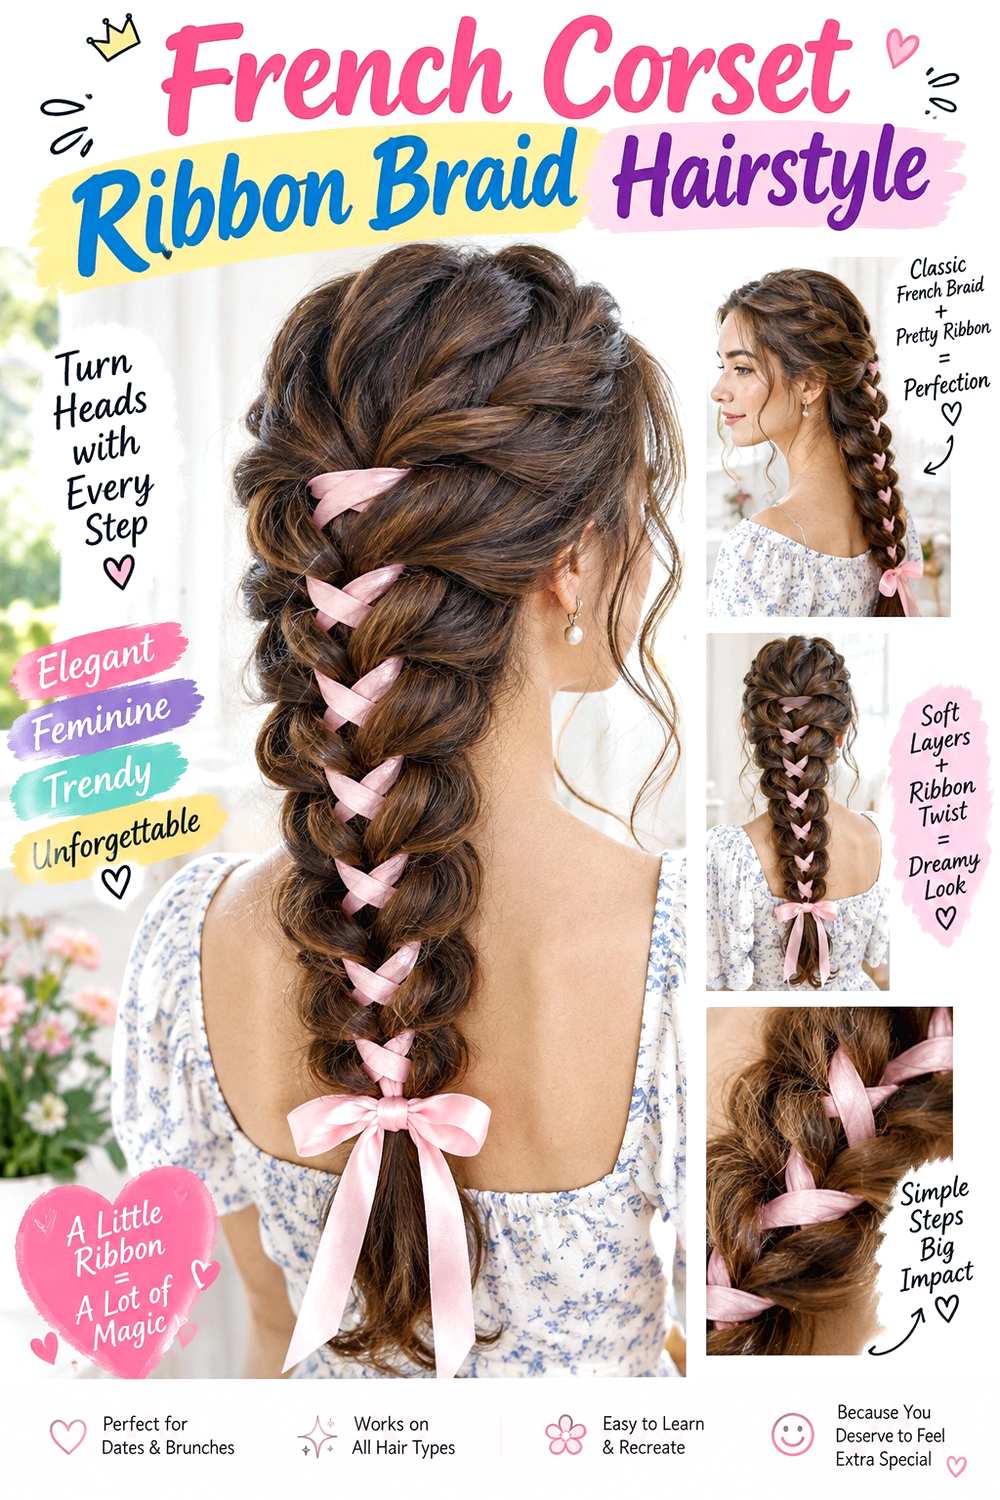
French braids create a flatter corset panel than Dutch braids, so the ribbon becomes the most visible surface detail. Build two parallel French braids down the center back, leaving enough space between them for a clear X-shaped lace pattern. A smoothing cream can keep the sections controlled, small elastics secure the braid ends, and satin ribbon provides the contrast. The flatter profile works well if you want the style to sit close to the head.
Medium to long hair gives the panel the most room, but the braid width can be reduced for lighter density or shorter lengths. Natural texture does not need to be straightened; the sections simply need to stay organized enough for the lacing to read. A quick refresh usually means re-centering the ribbon and smoothing the top, while full wash-day styling takes longer because the two French braids must stay parallel from crown to nape. If the ribbon starts pulling one braid inward, loosen the lacing slightly rather than tightening the opposite side. Tell a braider how wide you want the center channel and whether the ribbon should stop at the nape or continue into the loose braid lengths. That one placement decision changes the entire balance of the design.
Pro tip:
Lace the ribbon only after both French braids are finished. That lets you compare their spacing first and avoids dragging one braid inward as you work.
Make It Work for You:
If your hair is fine or lower density, keep the French braids slim and place them closer together. A narrower panel can look clearer than an oversized ribbon gap.
Watch Out For:
A very tight ribbon can flatten the braids unevenly and pull the panel off-center. Loosen the crossings until both braid edges sit in their original path.
Crown Corset Ribbon Braid Hairstyle
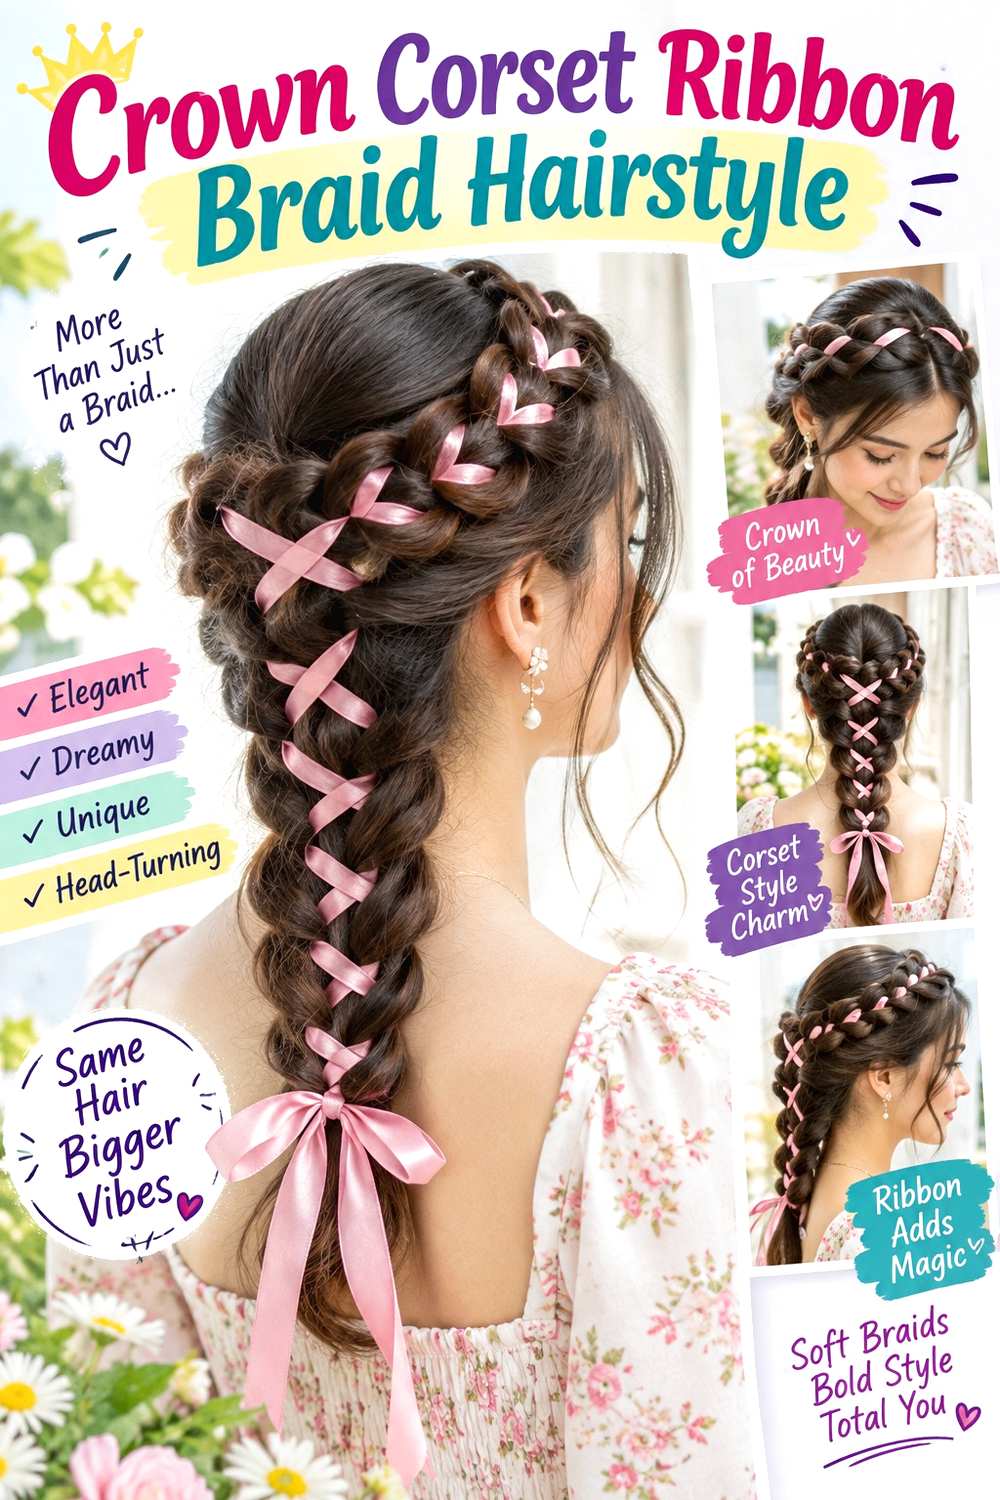
A crown placement turns the corset detail into a band that follows the upper back of the head rather than running straight down. Form two curved braids from behind each temple toward the rear crown, keeping them parallel for several inches, then lace ribbon across the space between them. Texturizing spray can improve grip, bobby pins secure the curved ends, and a soft ribbon keeps the crossing pattern flexible. The rest of the hair can stay loose, braided, or gathered low.
This version is practical for medium lengths because it does not require a long vertical panel. It also works with natural waves, curls, or coils when the braids are sized to hold without compressing the surrounding texture. A quick refresh may involve resetting one pin or loosening a crossing that has shifted; a complete wash-day style takes longer because the curved sections must be rebuilt and balanced. If the crown feels tight, reposition the anchors instead of adding more pins in the same spot. When explaining the design to a stylist or braider, show where you want the ribbon band to sit—high crown, mid-back, or closer to the occipital area—and ask for enough slack that turning your head still feels comfortable.
Pro tip:
Check the crown placement by turning your head left and right before finishing. If the anchors pull during movement, loosen them while the style is still easy to adjust.
Make It Work for You:
For shorter hair, make the corset band only across the rear crown and stop behind the ears. The curved placement still reads clearly without requiring long braid tails.
Watch Out For:
Do not place multiple pins on one sore point just to stop slipping. Shift the anchor slightly and distribute support so the crown remains comfortable.
Ladder Corset Ribbon Braid Hairstyle
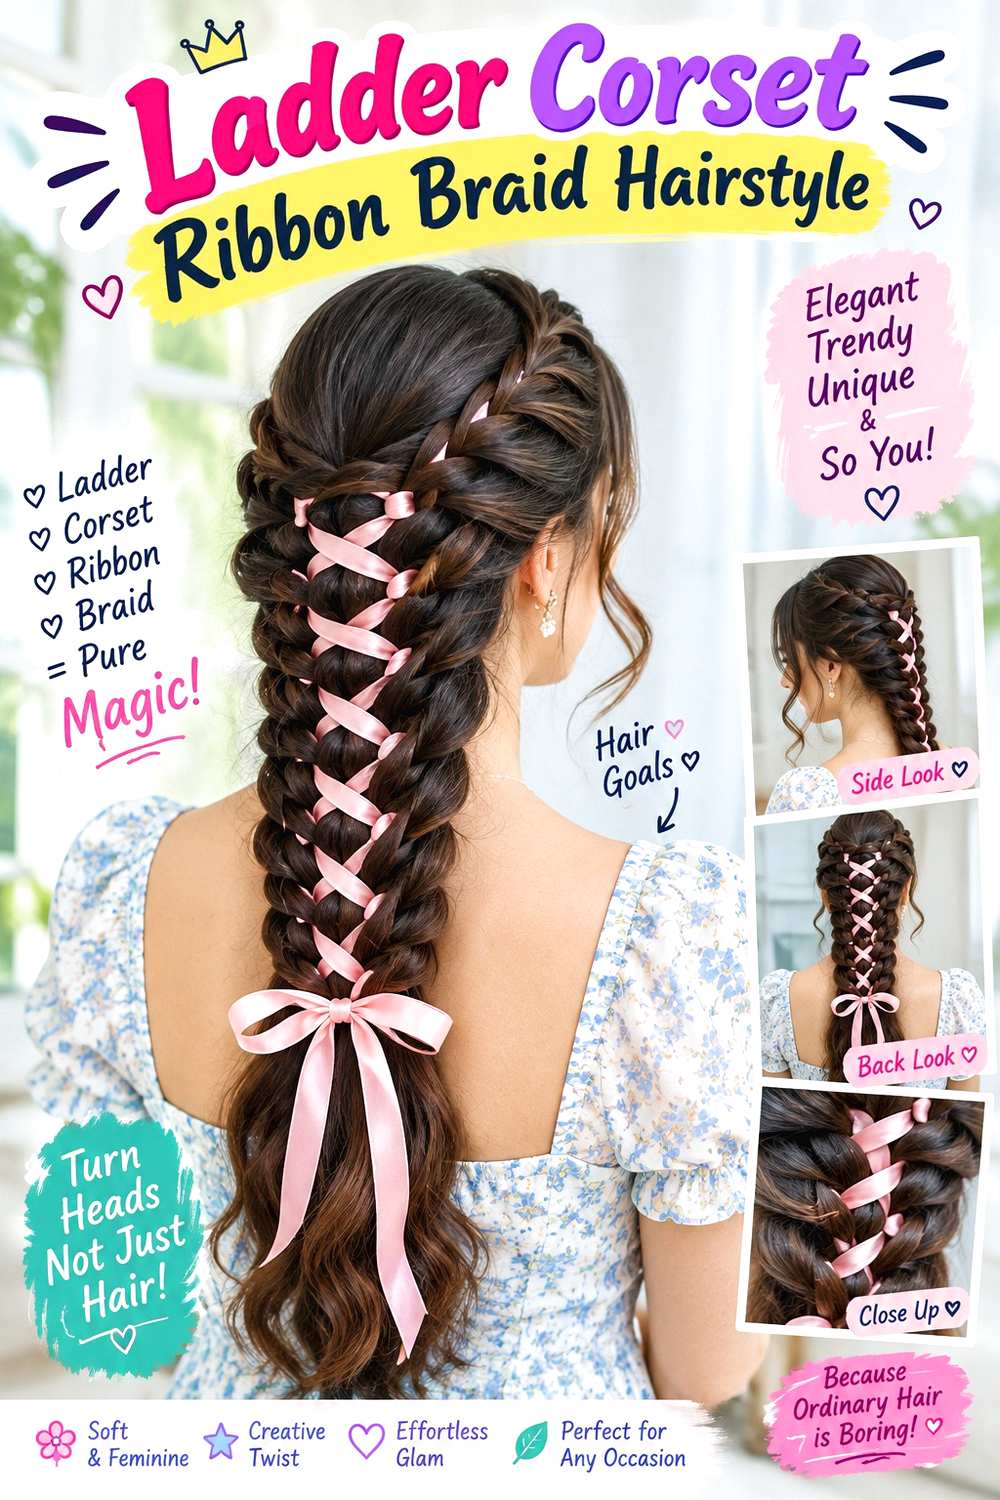
A ladder-style corset braid uses narrow looped braid edges to create visible openings for the ribbon. Form two slim ladder braids in parallel down the back, keeping their loops similar in size, then thread a ribbon through the openings in alternating X-shapes. Mini elastics hold the braid ends, while a light wax stick can smooth tiny flyaways around the looped sections. The result is more intricate than a standard two-braid panel, so spacing matters as much as tension.
Longer hair gives the ladder loops enough room to repeat, though medium lengths can support a shorter panel from crown to nape. On fine or lower-density hair, make fewer, smaller loops so the design does not consume too much of the overall length. A quick refresh means reshaping a collapsed loop and straightening the ribbon; a full wash-day rebuild takes longer because each opening must be formed deliberately. If the ribbon is wider than the loops, it can hide the braid structure instead of highlighting it. Tell a braider the approximate loop size you want and whether the ladder should remain compact or open. Comfortable tension is especially important here because forcing uniform loops too tightly can make the panel feel stiff against the scalp.
Pro tip:
Build all ladder loops before lacing, then compare their size. Correcting one uneven opening is easier before ribbon tension starts influencing the whole panel.
Make It Work for You:
If your hair is fine, use fewer ladder openings and leave more solid braid between them. The pattern stays recognizable without making the edges look overly sparse.
Watch Out For:
Do not choose ribbon wider than the ladder openings. It can cover the looped structure and make the design look like a ribbon strip instead of lacing.
Corset Ribbon Fishtail Braid Hairstyle
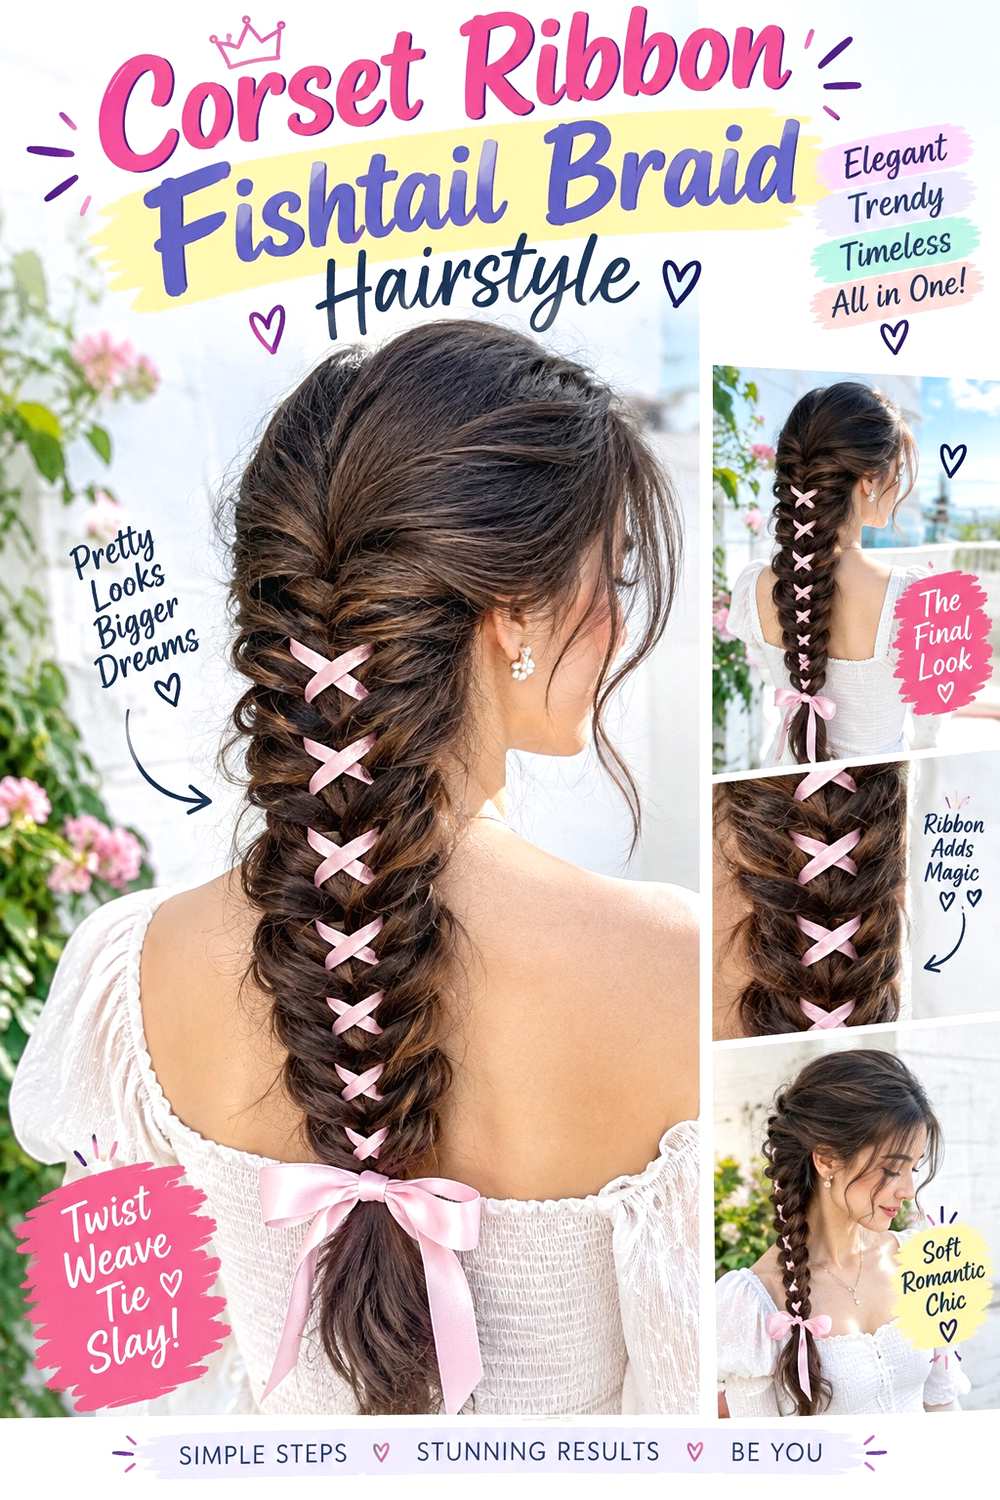
Fishtail braids give the corset panel a fine, woven texture that contrasts with broad ribbon crossings. Create two slim fishtails side by side from the nape or mid-back, secure them with small elastics, then lace a ribbon between their inner edges. A small amount of texture powder can help slippery sections stay separated while you weave. Keep the fishtails narrow enough that the ribbon remains visible rather than disappearing between wide braid bodies.
This option is best on medium to long hair because fishtails shorten the apparent length as they build. Fine hair can still work with compact braids, while dense hair may support a wider panel without looking crowded. A quick refresh usually involves pinching the fishtail edges back into shape and straightening the ribbon; a full wash-day style is slower because two even fishtails require more weaving than standard three-strand braids. Avoid pulling the braid edges so wide that the inner loops lose their grip on the lacing. For a braider, specify where you want the fishtails to begin and whether you prefer a tight woven texture or a slightly expanded one. That choice controls both the panel width and how securely the ribbon sits.
Pro tip:
Work the first few fishtail passes more firmly than the lower ones. A stable upper section gives the ribbon a better anchor while the ends can stay softer.
Make It Work for You:
For shorter or finer hair, start the fishtails lower and use a shorter ribbon panel. You keep the woven contrast without sacrificing too much visible length.
Watch Out For:
Over-expanding the fishtail edges can loosen the inner loops that hold the ribbon. Widen gradually, then stop as soon as the crossings begin to shift.
Corset Ribbon Braided Bun Hairstyle
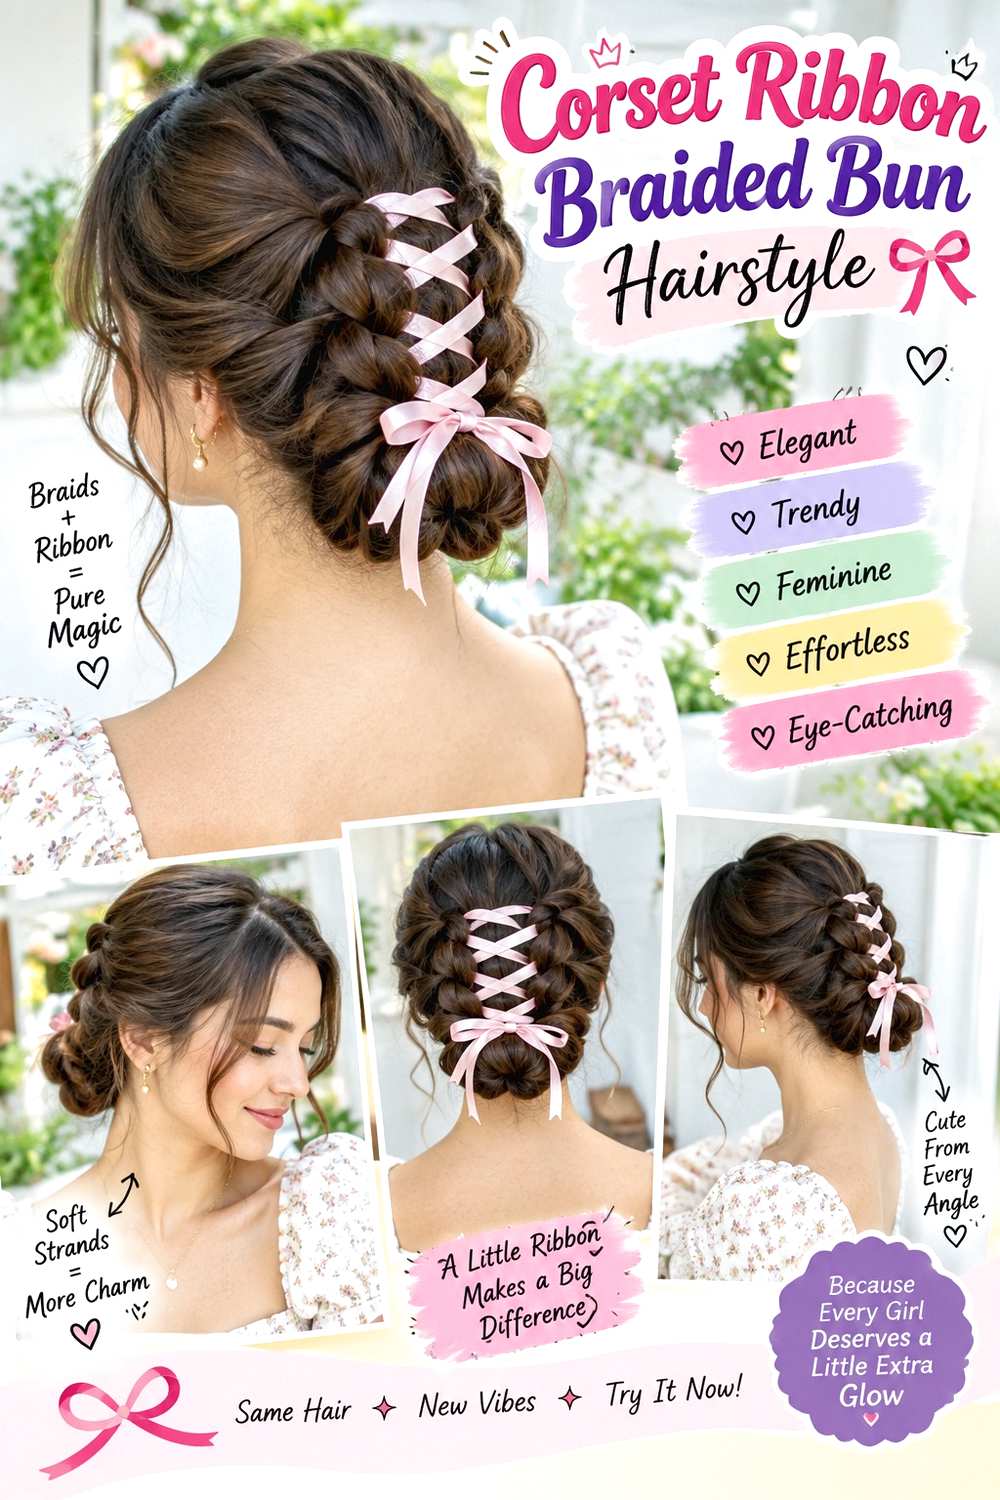
A low braided bun lets the corset lacing act as the pathway into the updo. Build two parallel braids from the mid-back of the head toward the nape, cross a ribbon between them, then coil the remaining lengths into a low bun. Bobby pins secure the bun, flexible hairspray controls surface flyaways, and the ribbon should be tied off before the coil so it does not loosen as the bun is shaped. Soft face-framing pieces can stay out if you want less structure around the front.
Medium to long hair is easiest because there must be enough length to form both the braided panel and the bun. Dense hair may need a flatter coil so the updo does not feel heavy at the nape. A quick refresh is usually limited to replacing a loose pin or smoothing the bun surface; after wash day, the full sectioning, lacing, and coiling is a longer styling session. If the bun pulls downward, rebuild the anchor rather than tightening the ribbon. Tell a stylist or braider exactly how low you want the bun to sit and whether you need it to clear a collar, veil, or accessory. Comfortable anchoring matters more than packing in extra pins.
Pro tip:
Finish and secure the ribbon panel before coiling the bun. This keeps the lacing tension independent from the pins that support the final updo shape.
Make It Work for You:
If your hair is very dense, form a broader, flatter bun at the nape rather than stacking the coil outward. The corset panel stays visible and the weight spreads better.
Watch Out For:
Do not use the decorative ribbon as the main bun support. If the coil loosens, rebuild the pinned anchor so tightening the lacing does not pull the scalp.
High Pony Corset Ribbon Braid Hairstyle
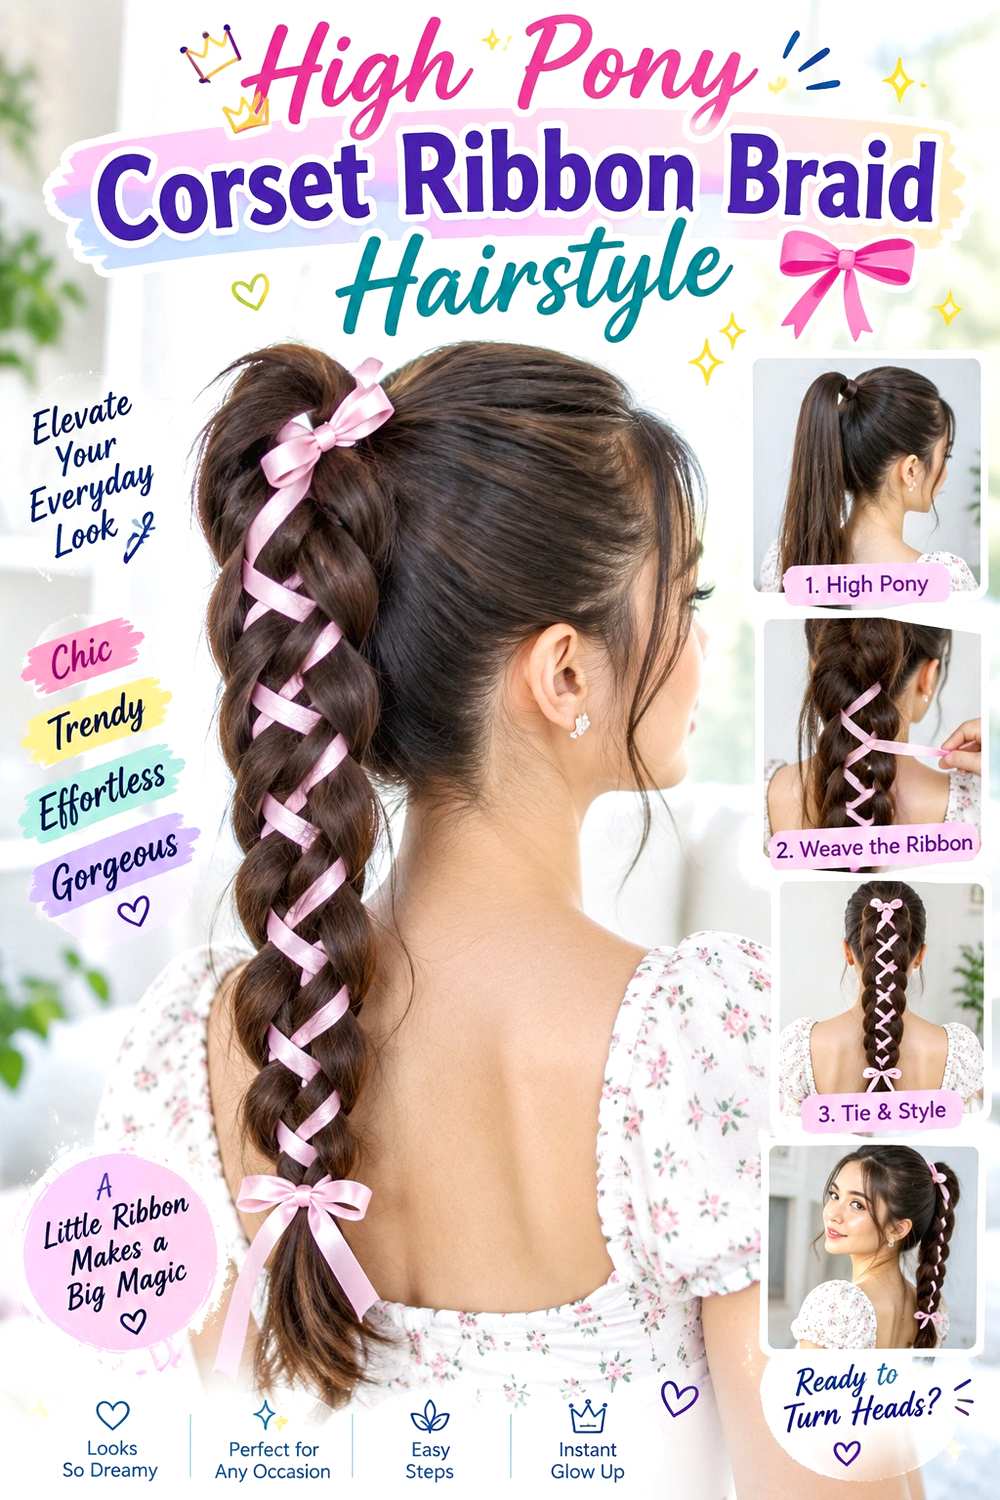
A high ponytail turns the corset braid into a strong vertical detail that moves with the tail. Secure the pony at the crown with a fabric-covered elastic, then create two narrow braids from the upper surface of the ponytail and lace a ribbon between them. A small amount of styling gel can keep the base neat without coating the full length. The ribbon can stop midway for more swing or continue farther down for a longer graphic panel.
Medium and long lengths show the design best, and dense hair can support slightly wider braids without reducing the ponytail too much. On finer hair, take smaller braid sections so the loose tail still looks substantial. A quick refresh means retightening the ponytail base only if it has genuinely loosened and straightening the ribbon; a full wash-day style takes longer because the high base, two braids, and lacing all need to be rebuilt. Do not rely on the ribbon to hold the ponytail up. When working with a braider, specify the ponytail height, braid width, and how far down the tail you want the lacing to travel. Those details determine the balance between structure and movement.
Pro tip:
Before braiding the ponytail, tilt your head naturally and check the base. A pony secured only in an exaggerated position may feel tighter once you relax.
Make It Work for You:
For finer hair, keep the corset panel on the top third of the ponytail and leave the lower lengths loose. This preserves movement and a fuller-looking tail shape.
Watch Out For:
Do not keep raising a slipping ponytail by tightening the ribboned braids. The base elastic should support the height; the corset panel is decorative structure.
Loose Boho Corset Ribbon Braid Hairstyle
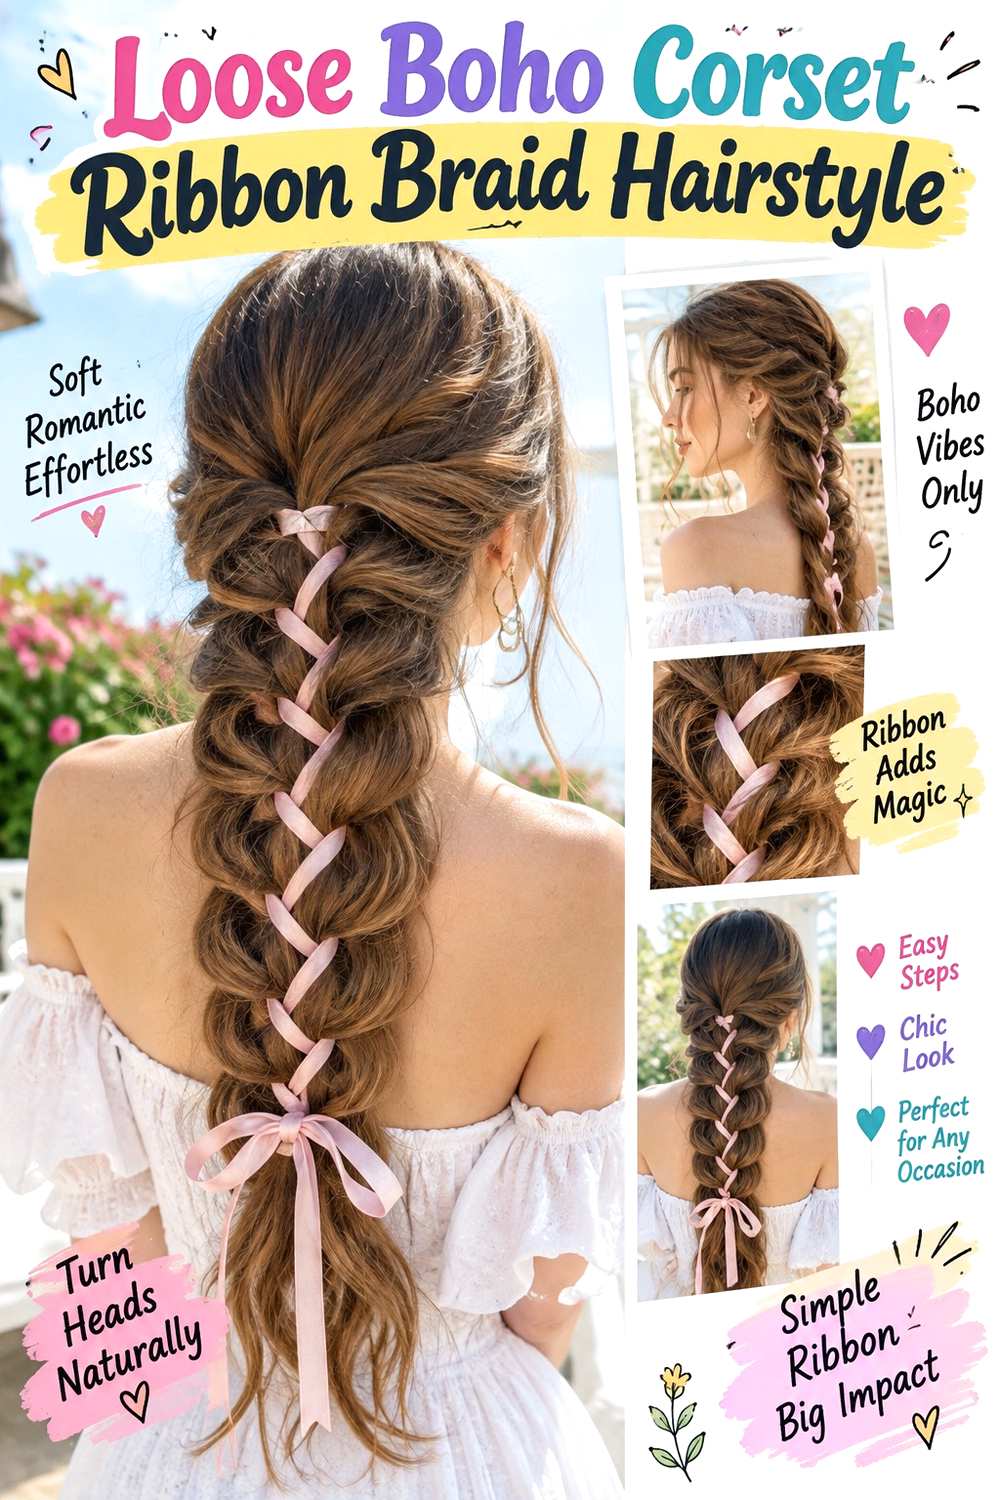
A looser corset braid keeps the lacing visible while allowing soft texture around the edges. Create two relaxed braids down the back, leave a little space between them, and cross a soft cotton ribbon in wider X-shapes rather than pulling every pass snug. Texturizing spray adds grip, and mini elastics secure the braid ends. A center part or slightly off-center part both suit the softer finish, while a few face-framing pieces can remain loose around the temples.
Wavy, curly, and naturally textured hair can support the relaxed shape particularly well, but straight hair also works if the braids have enough grip. Lower-density hair benefits from narrower braids and a lighter ribbon so the panel does not overwhelm the silhouette. A quick refresh may mean tightening only the lowest crossings after they loosen; a complete wash-day set takes longer because the texture, braids, and ribbon all need to be rebuilt. Do not pull the braid edges apart so much that the structure collapses. Tell a stylist or braider how undone you want the finish to look, where loose pieces should begin, and how much tension feels comfortable. The goal is controlled softness, not a braid that is already slipping.
Pro tip:
Loosen the braid edges before adding the ribbon, not after. This prevents later pulling from changing the spacing of the X-shaped crossings.
Make It Work for You:
If your hair is very straight and slippery, keep the braids a little firmer near the crown and relax them only through the lower lengths for controlled softness.
Watch Out For:
Too much deliberate loosening can make the panel collapse within hours. Keep the anchor points secure, then soften only the visible outer braid edges.
Short-Hair Corset Ribbon Braid Hairstyle
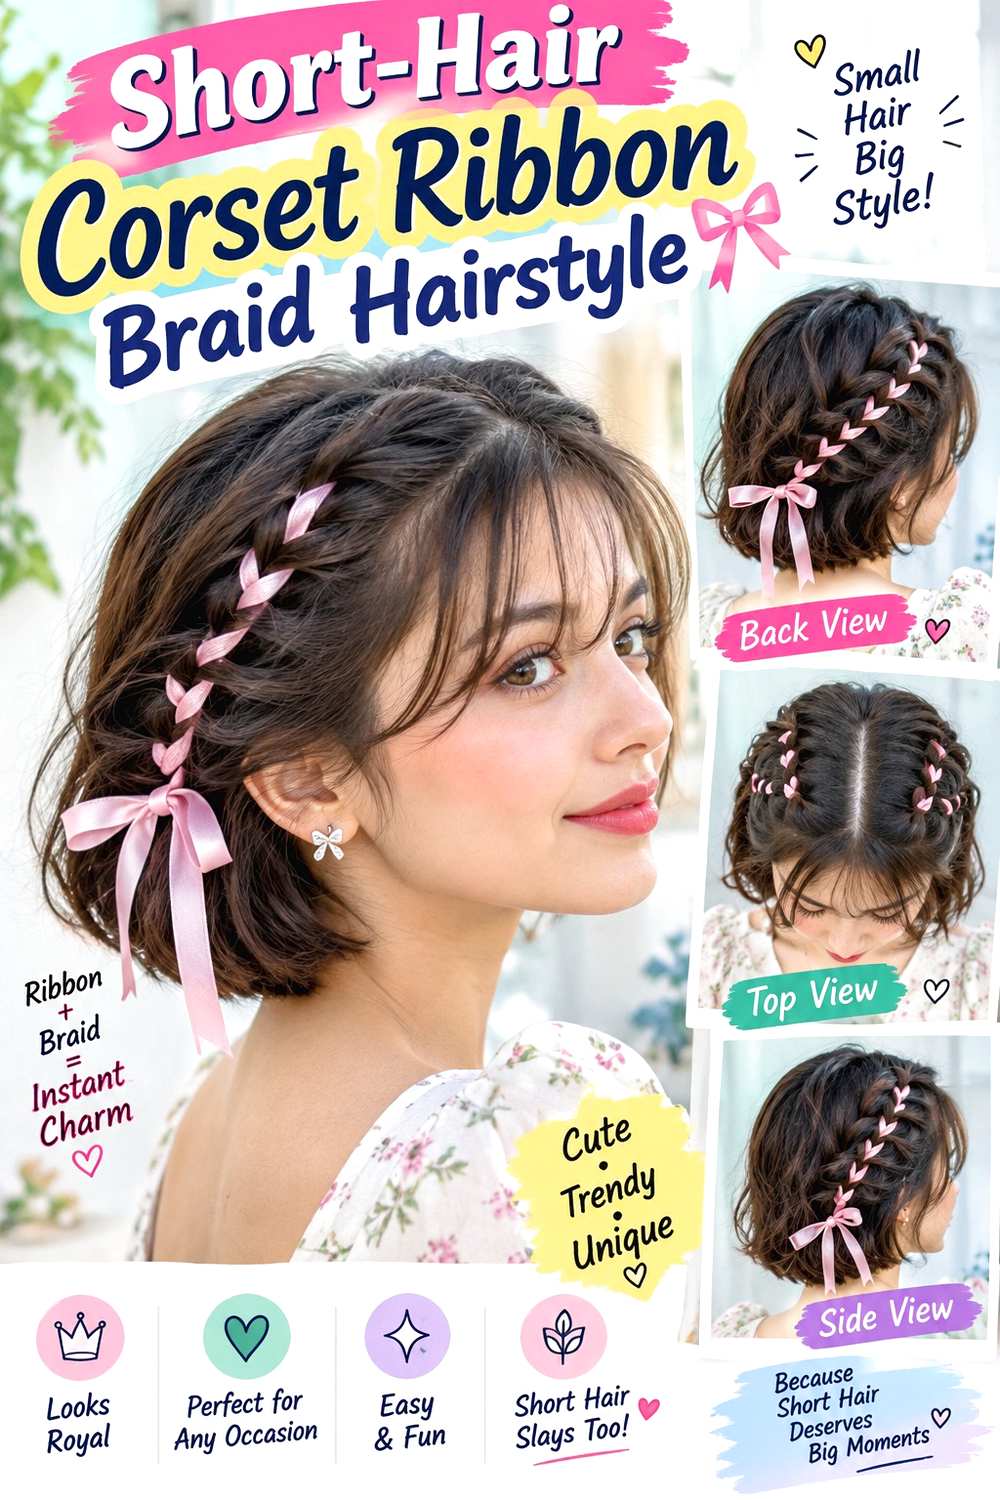
Shorter hair can still carry a corset detail when the panel stays compact and high. On a bob or lob, take two narrow sections from the upper sides, braid them toward the back crown, and lace a slim ribbon between them. Mini elastics secure the short braid ends, while texturizing spray helps small sections grip. Keep the rest of the hair loose so the limited length is not consumed by a full vertical braid.
This half-up approach works on straight, wavy, curly, or coily short hair as long as the front sections can reach the anchor point. If density is low, make the braids especially narrow and use a lighter ribbon so the design does not expose too much scalp. A quick refresh often takes only a few adjustments to the ribbon or one elastic; a full wash-day version takes longer because short layers may need careful sectioning before braiding. Avoid forcing pieces that cannot comfortably reach the back, because they will spring loose quickly. When showing the style to a braider, identify the highest point where you want the panel to begin and the shortest pieces you want included. That keeps the design realistic for your actual length rather than relying on excessive tension.
Pro tip:
Cross the ribbon fewer times and make each X slightly smaller. Compact spacing lets the corset pattern read clearly within the limited distance across the back crown.
Make It Work for You:
If your bob has short face-framing layers, leave them outside the braid instead of pinning them hard toward the back. The panel can stay neat without fighting the cut.
Watch Out For:
Do not stretch short sections to reach a distant anchor. Move the braids closer together or higher so the ends can be secured without constant flyaways.
Curly Corset Ribbon Braid Hairstyle
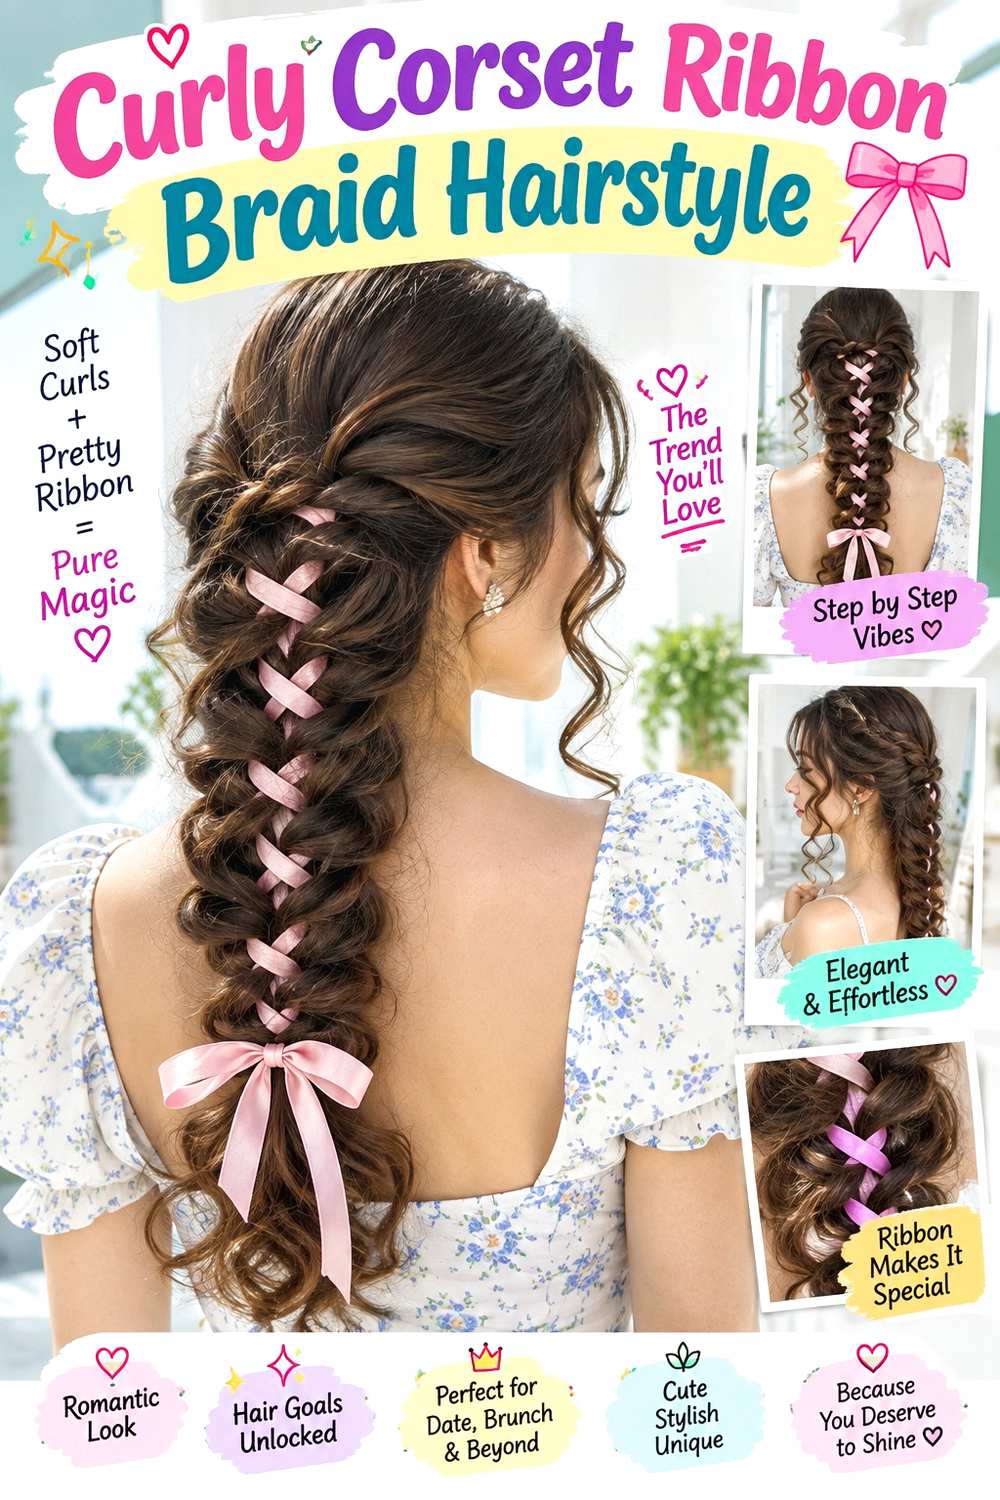
Curly hair can keep its natural movement while the corset detail sits in a controlled central panel. Separate two braid sections at the back, leaving the surrounding curls free, and build the braids with enough slack that the curl pattern is not compressed more than necessary. Fabric-covered elastics secure the ends, curl gel can smooth only the braid sections, and a soft ribbon crosses between them. The loose curls around the panel provide volume without needing a brushed-out finish.
The design works across many curl patterns, but shrinkage changes how long the finished braid appears, so choose the panel length after seeing how the hair sits dry. A quick refresh may involve redefining a few surrounding curls and adjusting one ribbon crossing; a full wash-day version takes longer because the curls should be dried to the desired shape before the final braid placement is judged. If the panel feels tight when the hair dries, loosen and rebuild it rather than waiting for discomfort to pass. Tell a stylist or braider where you want the braids to begin on the dry hair, how much curl volume should remain around them, and how snug the ribbon should sit. Those details preserve both the laced pattern and the natural texture.
Pro tip:
Set the braid placement after the curls have settled into their finished volume. That way the ribbon panel will not disappear when the surrounding texture expands.
Make It Work for You:
For tighter coils or strong shrinkage, shorten the laced panel and keep more curls loose around it. The corset detail remains visible without stretching the whole style.
Watch Out For:
Do not judge tension while the hair is still wetter and elongated. Recheck comfort as it dries, and loosen the panel if contraction creates pulling.
Conclusion
Corset ribbon braid hairstyles can range from compact half-up panels to long ponytail lacing, paired braids, crowns, and braided buns. Longer hair gives more room for repeated crossings, while shorter lengths often work best with a smaller anchor area. Density affects braid width and ribbon scale more than it dictates whether the style can work at all. Natural texture can stay visible, and parting, face-framing pieces, volume, and ribbon placement can be adjusted without changing the core corset effect. Choose a polished, close braid if you prefer stronger structure, or a looser finish if movement matters more. The best option is the one that matches your normal styling time, comfort with tension, and willingness to reset anchors or lacing between wears.
Before Your Salon Visit
Choose one or two favorite references before your appointment or styling session and point to the exact features you want to copy: braid width, ribbon spacing, anchor height, volume, loose pieces, and overall finish. Explain your natural texture, density, current length, face-framing preferences, and how much styling time you realistically use. Because corset ribbon braids are temporary styles, focus on comfortable placement, secure anchors, and the finished shape rather than asking for an unnecessary haircut.
FAQs
Can Medium-Length Hair Work for Corset Ribbon Braids?
Medium length can be enough if the lacing panel is kept compact. Half-up, crown, and short center-back versions need less length than ponytail or long fishtail designs. The key is having sections that reach their anchors without strong pulling; shorter pieces can stay loose instead of being forced into the braid.
Do Corset Ribbon Braid Hairstyles Work on Curly or Coily Hair?
No single texture is required. Straight, wavy, curly, and coily hair can all support corset ribbon braids. The braid size, ribbon width, grip, and tension should be adjusted to the texture and density. Curly and coily hair may also appear shorter after drying, so judge final panel length with shrinkage in mind.
Do I Need Heat to Create Corset Ribbon Braid Hairstyles?
Heat is optional for most corset ribbon braid hairstyles because the defining feature comes from sectioning, braiding, and lacing. You can work with your natural texture. If you choose to heat-style the loose lengths for a separate finish, use appropriate heat protection and treat that as an extra styling step.
How Do I Stop the Ribbon From Slipping Out of the Braids?
Secure the braid base before adding the ribbon, keep each crossing flat, and avoid letting the ribbon carry the entire hairstyle. Slipping usually calls for a better anchor or slightly more grip, not painful tightening. If the style shifts during wear, reset the loose section rather than pulling every crossing tighter.