13 Ear Tuck Bob Hairstyle Ideas

An ear tuck bob combines a clear short perimeter with enough front length to sit behind one or both ears. The bob may finish at the jaw, chin, or lower neck, while the tucked section exposes the side of the face and changes how the haircut’s weight is distributed. Blunt ends create a stronger outline; subtle layers add movement. Fringe is optional because long side pieces, curtain sections, or an open hairline can all work with the tuck.
Straight hair shows the clean perimeter clearly, while waves and curls create softer volume around it. Fine strands may benefit from preserving a fuller lower edge, whereas dense hair can need thoughtful bulk placement around the sides. Curly versions also require shrinkage allowance so the front remains long enough to reach comfortably behind the ear.
Styling effort ranges from a quick re-tuck and surface refresh to a full wash-day blow-dry or curl routine. The haircut itself needs reshaping when the perimeter loses its intended landmark or the front becomes awkward to secure. A practical ear tuck should feel comfortable rather than depending on constant pulling or tight pinning.
Quick List
- Sleek Side-Part Ear Tuck Bob Hairstyle
- Chin-Length Ear Tuck Bob Hairstyle
- Blunt Ear Tuck Bob Hairstyle
- Wavy Ear Tuck Bob Hairstyle
- Curly Ear Tuck Bob Hairstyle
- Center-Parted Double Ear Tuck Bob Hairstyle
- Soft Layered Ear Tuck Bob Hairstyle
- Jawline Ear Tuck Bob Hairstyle
- Long Ear Tuck Bob Hairstyle
- Textured Ear Tuck Bob Hairstyle
- Fine Hair Ear Tuck Bob Hairstyle
- Dense Hair Ear Tuck Bob Hairstyle
- Face-Framing Ear Tuck Bob Hairstyle
Sleek Side-Part Ear Tuck Bob Hairstyle

A deep or moderate side part makes a single ear tuck especially visible. The lighter side sits smoothly behind the ear while the heavier side falls across the opposite cheek, creating deliberate asymmetry. A chin-to-jaw perimeter keeps the bob compact, and minimal layering allows the lower edge to remain clean. The front needs enough length to travel from the part to behind the ear without pulling loose.
Straight and softly wavy hair can show the sleek finish clearly. Apply heat protectant before heat styling, use a paddle brush to direct the surface smoothly, and add lightweight styling cream around the tucked section for flexible control. Re-tucking the lighter side is a quick refresh; a full wash-day blow-dry takes longer because the roots and perimeter need deliberate direction.
At the salon, wear your usual side part and explain that the lighter front section must remain comfortably tuckable when dry. This affects front length and weight placement. As the bob grows, the outline becomes softer and the tucked section easier to secure, but the compact jaw shape gradually disappears. Reshape the perimeter when that change becomes more noticeable than the benefit of the extra length.
Pro tip:
Guide the front section behind the ear while it is still slightly warm from drying, then let it cool there. This can help establish the direction without relying on heavy finishing product.
Make It Work for You:
If your natural part is less dramatic, use a shallow side part and tuck the lighter section. The asymmetry remains visible without forcing the roots into an unfamiliar position every morning.
Watch Out For:
Avoid cutting the tucked side shorter just to expose the ear. Keeping sufficient front length makes the tuck more secure and lets you wear the bob untucked when you want another finish.
Chin-Length Ear Tuck Bob Hairstyle

A perimeter that finishes around the chin creates a classic compact bob with just enough front length for a deliberate tuck. The front can remain slightly longer than the hair immediately behind it, allowing one side to slip behind the ear while the opposite side frames the cheek. A center or soft side part works, and subtle movement through the ends keeps the outline from feeling rigid.
Straight and wavy textures can wear this length with relatively simple styling. Heat protectant prepares the hair for hot airflow, a round brush gives the ends controlled movement, and lightweight hairspray can support the tucked side. A morning refresh may require only smoothing and repositioning the front. Full wash-day styling takes longer because the chin perimeter needs drying into its intended shape.
At the salon, identify the dry chin landmark and ask for enough front length to reach behind the ear comfortably. This is especially important if the hair springs upward after drying. As the cut grows toward the neck, it becomes easier to tuck but loses some of its compact outline. A perimeter reshape restores the chin-length proportion without necessarily changing the internal layering.
Pro tip:
Tuck the front from slightly above the temple rather than pulling a large side section backward. Using a smaller section keeps the visible bob perimeter intact and reduces tension around the ear.
Make It Work for You:
For a softer routine, leave the ends closer to their natural direction instead of rounding them heavily. The ear tuck itself provides enough structure to make the chin-length outline noticeable.
Watch Out For:
A front section ending exactly at the point where it needs to bend behind the ear may slip forward repeatedly. Preserve a little extra length so the hair can travel comfortably around it.
Blunt Ear Tuck Bob Hairstyle

A blunt perimeter gives the ear tuck strong contrast: one side remains a solid bob line while the tucked side reveals the ear and jaw. The cut can sit at the chin or slightly below it, with very little visible layering. A center part creates balanced front lengths, while an off-center part shifts more weight to one side without changing the clean lower edge.
Straight and softly wavy textures display the substantial perimeter particularly well. Use heat protectant before heat styling, a paddle brush for a smooth surface, and lightweight serum through the ends to emphasize the clean finish. Repositioning the tucked side is a quick task. A complete wash-day style takes longer if you want the perimeter smooth and controlled from roots to ends.
At the salon, discuss perimeter weight rather than simply asking for a short bob. Explain that you want the front to remain long enough for an ear tuck without weakening the lower outline. As the cut grows, the blunt edge drops below its intended landmark and begins feeling less compact. Reshaping the perimeter restores the graphic quality while the internal structure can remain simple.
Pro tip:
Smooth only a small amount of serum through the lower lengths after the hair is dry. Keeping product away from the roots preserves movement while making the blunt edge appear more clearly defined.
Make It Work for You:
For fine strands, keep the perimeter strong and minimize unnecessary internal layering. The tucked side supplies visual contrast, so the haircut does not need extensive texture removal to create interest.
Watch Out For:
Do not remove extra weight around the tucked side automatically. Excessive thinning can make that section look noticeably weaker when you decide to wear the bob loose instead of behind the ear.
Wavy Ear Tuck Bob Hairstyle

Soft waves make an ear tuck feel relaxed because the untucked side can retain bends and movement while the opposite side sits closer to the head. The perimeter can finish around the jaw or chin, with light layering to prevent the waves from stacking too heavily at the bottom. A side or off-center part emphasizes the contrast between tucked and free-moving sections.
Naturally wavy hair can often use its existing pattern. Lightweight mousse supports the bends, curl cream helps control frizz, and a diffuser dries the bob without brushing out the texture. A quick refresh may involve dampening one or two flattened waves and re-tucking the side. Full wash-day styling takes longer because the pattern needs to dry before the finished perimeter can be assessed.
At the salon, show where you want the dry perimeter to settle and make sure the front wave remains long enough to reach behind the ear after it contracts. Layering should support movement without removing too much lower weight. As the bob grows, the waves gain length and the outline becomes less compact. Reshaping can restore the original balance while preserving the front’s practical tuckability.
Pro tip:
Tuck the chosen side after its wave pattern has mostly set rather than repeatedly moving it during drying. Less handling can preserve definition in the sections immediately above and behind the ear.
Make It Work for You:
If your waves are loose, keep the layers longer and let the tuck provide most of the side definition. This preserves enough weight for the natural bends to remain visible.
Watch Out For:
Avoid forcing the tucked section completely straight when the rest remains wavy. Keeping a little natural bend near the ends makes the transition behind the ear feel more connected.
Curly Ear Tuck Bob Hairstyle

A curly bob gains clear asymmetry when several front curls sit behind one ear while the opposite side frames the cheek and jaw. The dry perimeter can fall around the jaw or chin, with layers placed to distribute volume through the sides. The tucked curls need enough finished length to bend behind the ear without being stretched tightly out of their natural shape.
Curl shrinkage makes dry planning especially important. Lightweight leave-in conditioner provides slip, curl gel supports grouping, and a diffuser helps set the bob without brushing out the pattern. Refreshing the tucked curls can be brief if they only need light dampening. A complete wash, product application, and diffuse takes longer because the shape cannot be judged reliably until the curls settle.
At the salon, show where the bob and front curls should finish when completely dry. Explain that the selected front section needs enough length for comfortable tucking. As the haircut grows, the tuck becomes easier while the bob gradually develops more lower length and weight. Reshaping can restore the jaw-level silhouette without making the front curls too short to secure.
Pro tip:
Choose a few naturally cooperative front curl groups for the tuck rather than stretching a large section backward. Smaller groups can sit more comfortably while the surrounding curls maintain their shape.
Make It Work for You:
For strong shrinkage, keep the front slightly longer than the apparent target while planning the cut. Extra dry length provides more room for the curls to curve naturally behind the ear.
Watch Out For:
Do not judge tuckability from wet curls. Water temporarily lengthens the pattern, so a section that reaches easily while wet may become too short once it contracts and dries.
Center-Parted Double Ear Tuck Bob Hairstyle

Tucking both sides creates a clean, open front while leaving the bob’s lower perimeter visible behind the ears. A center part distributes the front sections evenly, and the cut can finish around the chin or lower jaw. Minimal face framing works best when both sides need enough continuous length to travel backward, while the ends can remain blunt or softly rounded.
Straight and gently wavy hair can make the symmetrical shape particularly clear. Apply heat protectant before heat styling, use a paddle brush to direct both sides backward, and add lightweight styling cream near the temples for flexible control. Re-tucking both sides takes little time. A complete wash-day blow-dry requires more effort because the center part and front root direction should be established while damp.
At the salon, specify that both front sections must remain long enough to tuck comfortably. Ask to preserve useful length around the temples rather than cutting short face-framing pieces there. As the bob grows, double tucking becomes easier, although the lower outline gradually drops. A perimeter reshape can restore the compact bob while maintaining the front length needed for the symmetrical styling option.
Pro tip:
Set the center part first, then direct each front section diagonally backward rather than pulling horizontally. The gentler path can reduce tension and help the hair follow the head more naturally.
Make It Work for You:
If one side has a stronger growth pattern, allow a little natural asymmetry rather than forcing identical tension. The double tuck can still look balanced when both sides expose the face comfortably.
Watch Out For:
Short temple layers can escape constantly when both sides are tucked. If this finish is important to you, preserve enough front length to travel securely behind each ear without tight pinning.
Soft Layered Ear Tuck Bob Hairstyle

Subtle layers add movement to an ear tuck bob without removing the recognizable lower outline. The perimeter can sit below the chin, while longer internal and face-framing layers prevent the sides from feeling solid. One front section tucks behind the ear and exposes the layered transition, while the opposite side falls forward with a softer, more mobile edge.
Straight, wavy, and loosely curly textures can all use this restrained layering. Apply heat protectant before heat styling, use a round brush to create gentle movement, and finish with lightweight styling cream through the ends. A quick refresh focuses on the front and tucked side. Full wash-day styling takes longer when you want each layer to move clearly rather than simply air-drying the bob.
At the salon, discuss where the shortest face-framing layer should begin. It needs to remain compatible with the tuck, so very short temple pieces may be impractical. Preserve enough perimeter weight for the haircut to read as a bob. As layers grow, they blend into the lower edge and movement becomes subtler. Reshaping the internal progression can restore softness without dramatically shortening the perimeter.
Pro tip:
Direct the upper layer slightly away from the face before tucking the longer section underneath it. This keeps some visible movement around the cheek instead of flattening the entire side.
Make It Work for You:
For lower-density hair, use fewer layers and keep them concentrated around the front. A stronger perimeter preserves fullness while the tuck and limited layering provide enough movement.
Watch Out For:
Too many short layers can make the tuck messy and weaken the bob outline. Keep temple sections long enough to cooperate and preserve substantial weight through the lower perimeter.
Jawline Ear Tuck Bob Hairstyle

A bob ending close to the jaw creates a precise relationship between haircut and facial landmark. The untucked side traces the jaw, while the opposite front section curves behind the ear and exposes more of the side profile. A soft side part creates asymmetry, although a center part can make the haircut feel more balanced when worn loose.
Straight and softly wavy hair can display the jaw-level outline clearly. Heat protectant prepares the hair for styling, a round brush can shape the perimeter, and flexible hairspray supports the tucked side without making it rigid. A morning re-tuck can be quick. Full wash-day styling takes longer because the perimeter needs careful direction to remain close to its intended landmark.
At the salon, show exactly where you want the dry perimeter to meet the jaw and confirm that the front will still reach behind the ear. Jawline placement can shift noticeably with natural bend or shrinkage. As the cut grows, the outline moves toward the neck and becomes softer. Reshaping the perimeter restores the stronger jaw emphasis while maintaining practical front length.
Pro tip:
Keep the tucked section relatively narrow so the remaining hair still traces the jaw. Removing too much from the visible side can make the perimeter seem less continuous than intended.
Make It Work for You:
If you prefer a softer outline, ask for a jaw-level perimeter with gentle movement rather than a rigid straight edge. The ear tuck still creates definition without requiring an extremely sharp finish.
Watch Out For:
Do not choose the jaw landmark from wet hair alone if your texture contracts after drying. Plan the finished position carefully so the bob does not rise significantly higher than expected.
Long Ear Tuck Bob Hairstyle
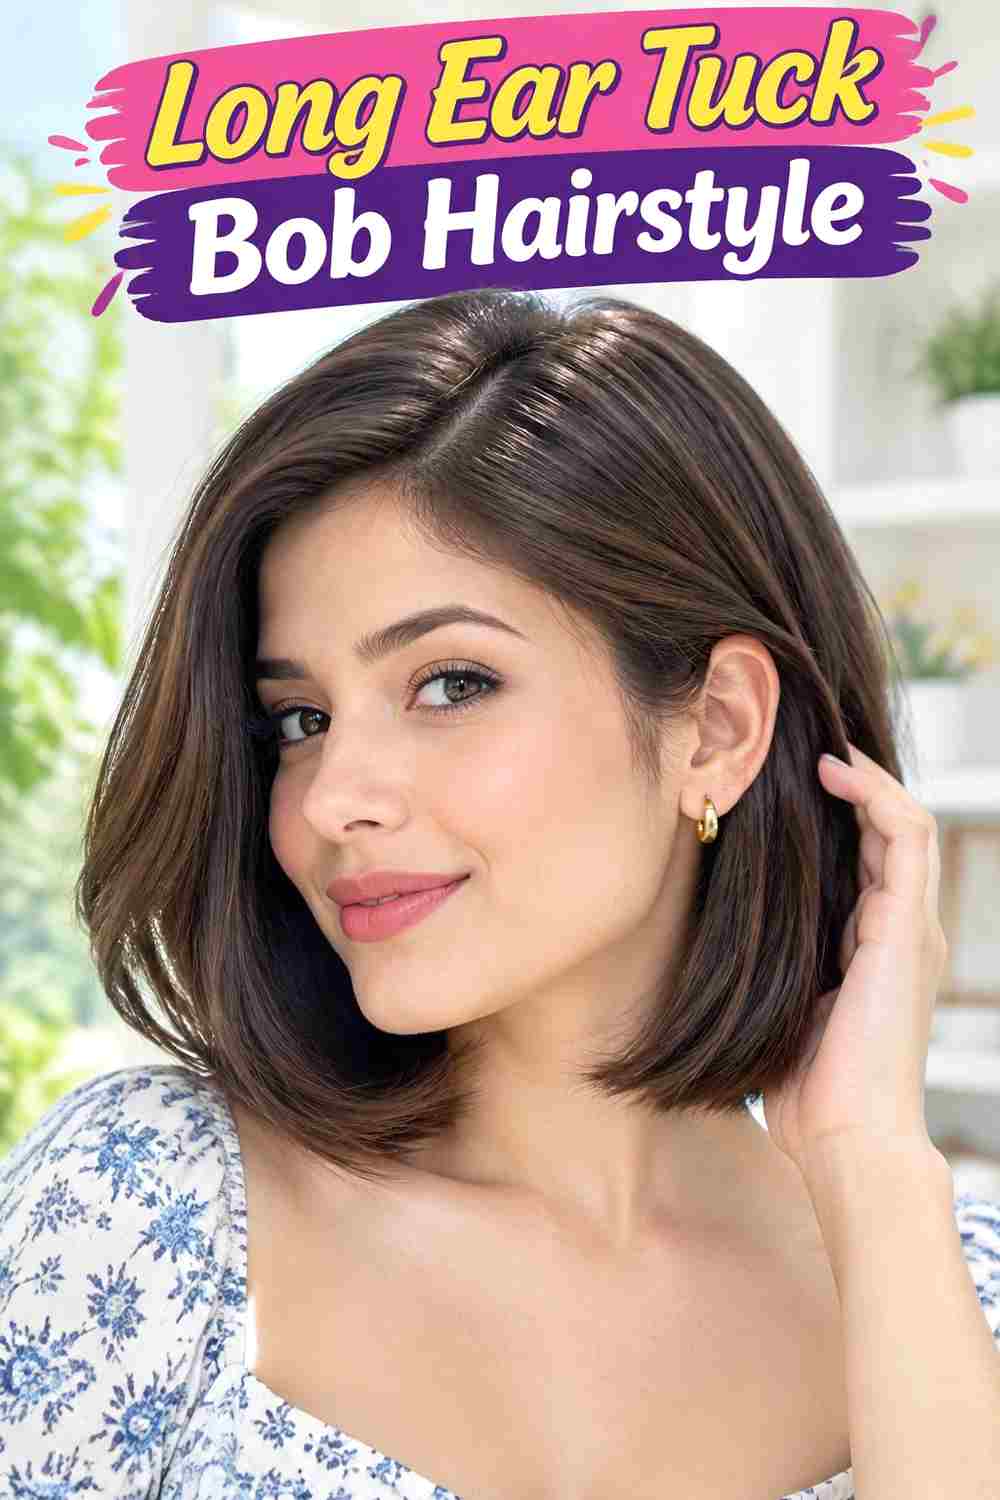
A long bob gives the front plenty of length to tuck securely while keeping the overall haircut around the lower neck or collarbone. The extra length makes one-sided or double tucking possible, and a center, side, or off-center part can change the balance easily. Long face-framing pieces can begin near the jaw as long as they still reach comfortably behind the ear.
This version works across straight, wavy, and loosely curly textures and can suit readers who want more styling flexibility than a short bob provides. Apply heat protectant before heat styling, use a paddle brush for controlled movement, and add lightweight serum through the ends. Re-tucking the front takes seconds, while a full wash-day finish depends more on density and texture.
At the salon, specify the dry perimeter landmark and the shortest front piece you still want to tuck. Preserving those two measurements keeps the cut versatile. Grow-out is forgiving because the perimeter simply moves farther below the collarbone and the front remains secure. Reshaping becomes useful when the haircut starts feeling more like one long length than a defined long bob.
Pro tip:
Tuck only the hair in front of the ear and leave the section directly behind it loose. This preserves movement through the long bob while still creating a clean, exposed side.
Make It Work for You:
If you alternate between loose hair and updos, keep the shortest front layer near the jaw. That length maintains face framing while remaining easier to secure in multiple everyday styles.
Watch Out For:
Avoid shortening the front excessively just to increase face framing. Pieces that stop above the ear’s useful anchoring point may repeatedly fall forward and reduce the versatility of the long bob.
Textured Ear Tuck Bob Hairstyle

A textured bob uses broken movement and separated ends to soften the perimeter, while the ear tuck provides a cleaner focal point on one side. The cut can finish between the jaw and lower chin, with modest internal layering that allows pieces to shift rather than forming one solid edge. A side or off-center part reinforces the relaxed asymmetry.
Straight and wavy hair can show the separated finish particularly clearly. Apply heat protectant before heat styling, use a small flat iron to create several loose bends, and finish with texturizing spray for dry separation. Refreshing a few visible pieces can be quick. A full wash-day style takes longer if you are creating texture throughout the bob rather than working with a natural wave pattern.
At the salon, ask to preserve enough perimeter density while adding movement internally. The tucked front section should remain long enough to anchor comfortably behind the ear. As the bob grows, the separated layers become less distinct and the perimeter drops. Reshaping can restore movement, but styling alone may be enough when the cut still has suitable proportions.
Pro tip:
Create bends in alternating directions before tucking one side. Variation keeps the untucked section mobile and prevents the textured finish from turning into a row of identical waves.
Make It Work for You:
If your hair naturally waves, skip deliberate heat-created bends and use the existing pattern. Concentrate styling on separation and tuck placement so the finish stays practical for your routine.
Watch Out For:
Too much texturizing spray can make short ends stiff or rough. Start lightly on dry hair and keep the tucked section flexible enough to curve comfortably around the ear.
Fine Hair Ear Tuck Bob Hairstyle

Fine strands can benefit from an ear tuck bob that preserves a strong perimeter instead of relying on many short layers. The cut can finish around the chin or slightly below, with minimal internal removal and enough front length to tuck smoothly. A center or soft side part changes the distribution, while a controlled bend at the ends gives the outline movement without sacrificing substance.
Fine describes individual strand diameter rather than overall density, so the haircut should also account for how much hair is present. Lightweight mousse can add support, heat protectant is important before heated styling, and a round brush can create gentle root and end movement. A quick refresh may focus only on the part and front. Full blow-drying takes longer but does not require complicated section-by-section shaping.
At the salon, explain that maintaining perimeter weight is important and discuss your actual density separately from strand thickness. The tuckable front should remain substantial rather than heavily thinned. As the bob grows, its lower line becomes softer and may lose some visual fullness. A perimeter reshape can restore structure while keeping internal layering minimal.
Pro tip:
Tuck a narrow front section instead of sweeping a large amount behind the ear. Leaving more hair loose maintains visible fullness through the side while still creating the defining open detail.
Make It Work for You:
If your fine hair is also dense, you may have more flexibility with subtle internal layering. Keep the lower edge strong while adjusting only areas where extra movement or bulk control is genuinely useful.
Watch Out For:
Avoid assuming fine hair needs heavy layering for volume. Removing too much weight can reduce the substance of the perimeter; controlled styling can provide movement without sacrificing useful density.
Dense Hair Ear Tuck Bob Hairstyle

Dense hair gives an ear tuck bob a substantial outline, but the sides may need thoughtful weight distribution so the tucked section sits comfortably. A chin-to-lower-jaw perimeter can remain visibly full, while carefully placed internal movement prevents excessive bulk around the ears. The untucked side retains more volume, creating a strong contrast with the closer tucked section.
Straight, wavy, or curly dense hair can use the concept with texture-specific adjustments. Lightweight styling cream helps control the surface, a wide-tooth comb distributes product without excessive brushing, and a blow-dryer with concentrator can direct the tucked area when a smoother finish is desired. A quick re-tuck is simple; full wash-day drying can take considerably longer because interior sections hold moisture.
At the salon, explain exactly where bulk tends to collect, especially above and behind the ears. Weight adjustment should be targeted rather than automatically thinning the entire bob. As the cut grows, density can accumulate around the lower sides and make the tuck feel bulky. Reshaping the perimeter and problem areas restores balance while retaining the substantial finish that dense hair can provide.
Pro tip:
Separate the intended tuck section before styling the rest of the bob. Controlling that smaller area independently can make the ear placement cleaner without flattening volume across the entire side.
Make It Work for You:
If you prefer a fuller silhouette, keep internal weight adjustment minimal and tuck a narrower section. You can expose the ear while preserving most of the natural density through the bob.
Watch Out For:
Avoid indiscriminate thinning around the whole head to make tucking easier. Removing weight in unnecessary areas can create uneven ends while leaving the actual bulky section insufficiently addressed.
Face-Framing Ear Tuck Bob Hairstyle

Face-framing pieces add softness to an ear tuck bob, but their length needs to remain compatible with the styling detail. The shortest front sections can begin around the lower cheekbone or jaw, then blend into a chin-to-neck perimeter. One or two pieces may remain loose beside the face while the longer section behind them tucks around the ear, creating layered depth instead of a completely exposed side.
Straight and wavy textures can display the different front lengths clearly. Apply heat protectant before heat styling, use a round brush to shape the frame, and add lightweight styling cream for flexible separation. Refreshing the front can be quick because only a few pieces need repositioning. Full wash-day styling takes longer when the frame and perimeter both require deliberate shaping.
At the salon, identify which front piece should remain loose and which section must be long enough to tuck. This prevents the entire temple area from becoming too short. As the haircut grows, the frame gradually merges into the bob and becomes less distinct. Targeted front reshaping can restore the cheek or jaw placement without unnecessarily changing the perimeter.
Pro tip:
Leave one narrow face-framing piece loose before tucking the longer section behind it. This creates visible depth around the cheek while keeping the main side clean and comfortably secured.
Make It Work for You:
If you want maximum tuckability, begin the shortest frame near the jaw instead of the upper cheek. The front still gains movement, but more of it remains long enough to secure.
Watch Out For:
Too many short pieces around the temple can defeat the ear-tuck effect by constantly falling forward. Keep the strongest face framing deliberate and preserve longer anchoring sections behind it.
Conclusion
Ear tuck bob hairstyle ideas range from compact jaw and chin cuts to longer bobs that reach the lower neck or collarbone. Blunt versions emphasize perimeter weight, while layered and textured options create more movement. Waves and curls soften the outline, and side parts make a single tuck more asymmetrical; center parts work naturally with double tucks. Fine or lower-density hair may benefit from preserving more perimeter fullness, while dense hair can require targeted bulk management.
The most practical version depends on texture, front length, face shape, parting, and everyday routine. Whatever finish you choose, enough hair must remain around the front to reach behind the ear comfortably. A successful tuck should complement the bob rather than require constant pulling, heavy product, or uncomfortable tension.
Before Your Salon Visit
Choose one or two favorites and save references showing both the tucked and untucked shape when possible. Discuss your texture, density, face shape, preferred bob length, usual part, upkeep, and styling routine. Point out the exact perimeter, face-framing length, layer placement, volume, and finish you want. Most importantly, tell your stylist whether you plan to tuck one or both sides so enough dry front length remains to sit comfortably behind the ear.
FAQs
How long does a bob need to be for an ear tuck?
There is no single required bob length because ear position, head shape, texture, and front placement vary. The important detail is that the front section has enough dry length to travel comfortably behind the ear. Chin, jaw, and longer bobs can all work when that section is planned appropriately.
Can curly hair work with an ear tuck bob?
Yes. Curly hair can create a softer, more textured version, but shrinkage should be considered when planning the front. A curl that easily reaches behind the ear while wet may become too short when dry, so tuckability should be assessed in the normal finished curl pattern.
How can I keep an ear tuck from slipping forward?
Start with enough front length and work with your natural part where practical. A small amount of flexible styling product can help, and setting the section behind the ear while it cools after drying may improve direction. Avoid pulling tightly; persistent slipping can indicate that the section is simply too short.
Does an ear tuck bob need frequent salon visits?
Use the haircut’s shape as your guide rather than one fixed timetable. A reshape becomes useful when the perimeter moves well below its intended landmark, front layers stop behaving as planned, or bulk around the ear interferes with the tuck. Longer bobs generally allow more visible grow-out before their proportions change substantially.