15 Vamp Romantic Hairstyle Ideas
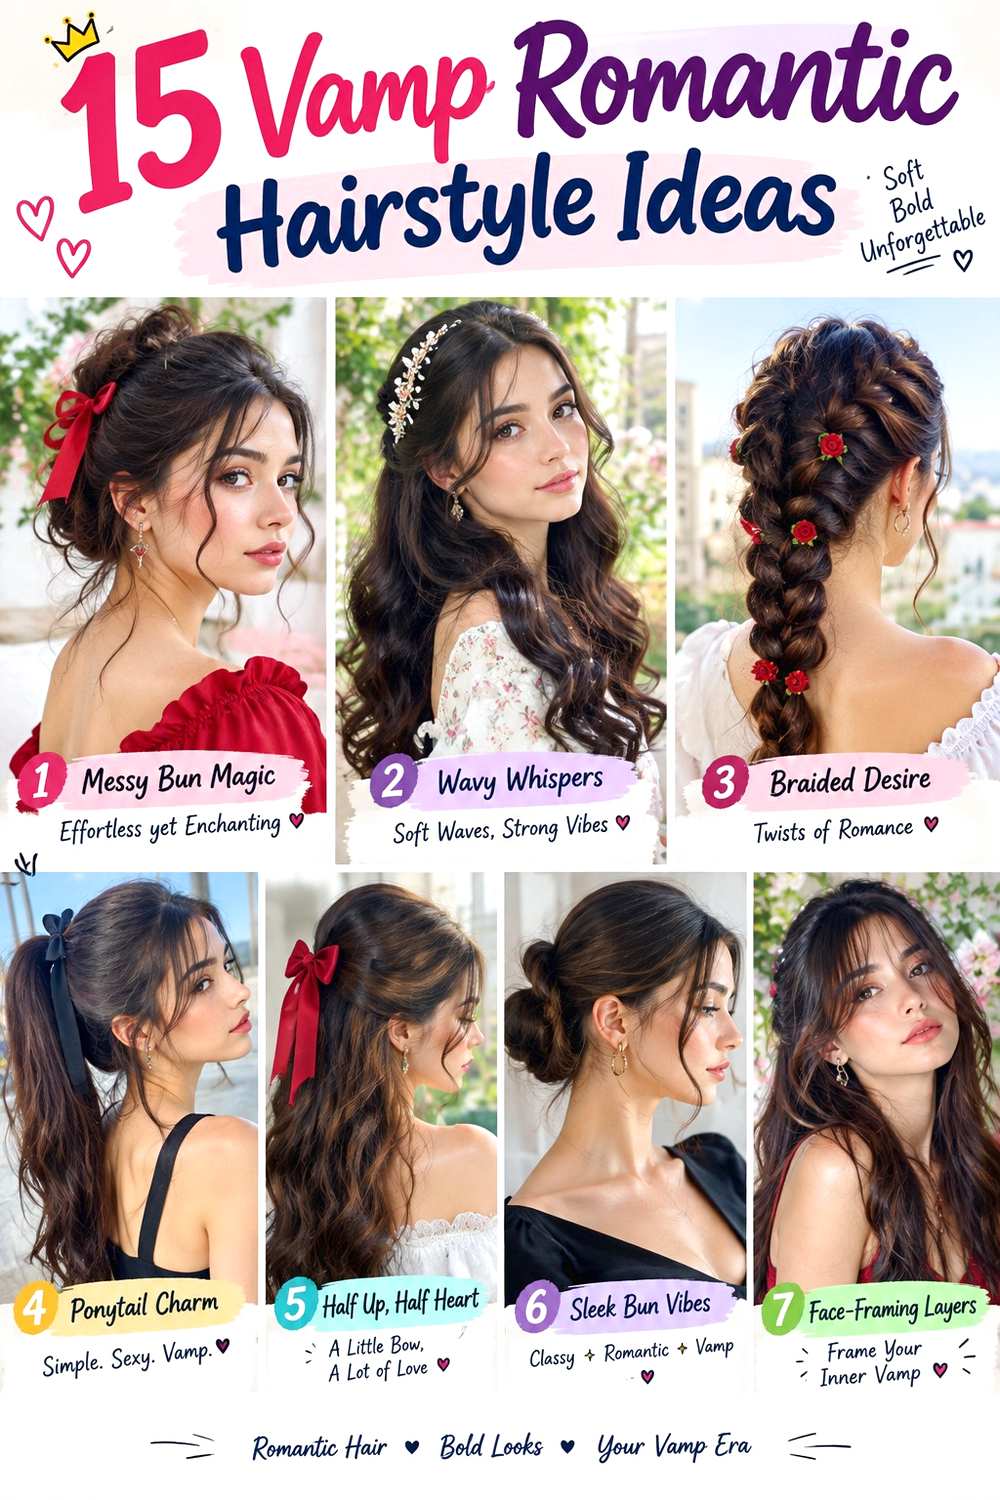
Vamp romantic hairstyles combine dark, polished structure with deliberately soft movement. The family includes glossy waves, low updos, ribbons, braids, wispy fringe, and face-framing tendrils rather than one fixed cut. Length can range from a jaw-length bob to hair well below the shoulders, while the common visual thread is contrast: a sleek part beside loose bends, a controlled bun with soft pieces, or a precise accessory against natural texture.
Straight and wavy hair can create smooth waves or ribbon styles with relatively direct styling, while curly and coily textures can preserve their natural pattern in buns, ponytails, braids, and dimensional half-up looks. Density affects scale more than eligibility. Finer or lower-density hair often suits narrower braids, smaller bows, and fewer released pieces, while dense hair can support fuller knots and wider sections. Face framing can start around the cheekbones, jaw, or temples depending on the balance you prefer.
Effort varies from a quick low ponytail or ribbon refresh to a full heat-styled wave set. Temporary updos need secure, comfortable anchors rather than painful tension, while fringe and shag options add actual haircut maintenance as they grow. Heat-styled versions also require protection and may need selective touch-ups between washes. When comparing these ideas, focus on the feature that carries the mood—parting, bend placement, accessory position, loose pieces, or crown volume—and choose a version that fits your normal texture and realistic routine.
Quick List
- Velvet Wave Side Part Hairstyle
- Soft Gothic Curtain Fringe Hairstyle
- Deep Side-Swept Wave Hairstyle
- Romantic Ribbon Half-Up Hairstyle
- Low Twisted Chignon Hairstyle
- Loose Crown Braid Hairstyle
- Tousled Dark Rose Updo Hairstyle
- Long Cascading Curl Hairstyle
- Wispy Fringe Velvet Bob Hairstyle
- Face-Framing Low Ponytail Hairstyle
- Sleek Center-Part Ribbon Hairstyle
- Soft Finger Wave Lob Hairstyle
- Curly Tendril Bun Hairstyle
- Braided Half-Up Cascade Hairstyle
- Airy Gothic Shag Hairstyle
Velvet Wave Side Part Hairstyle
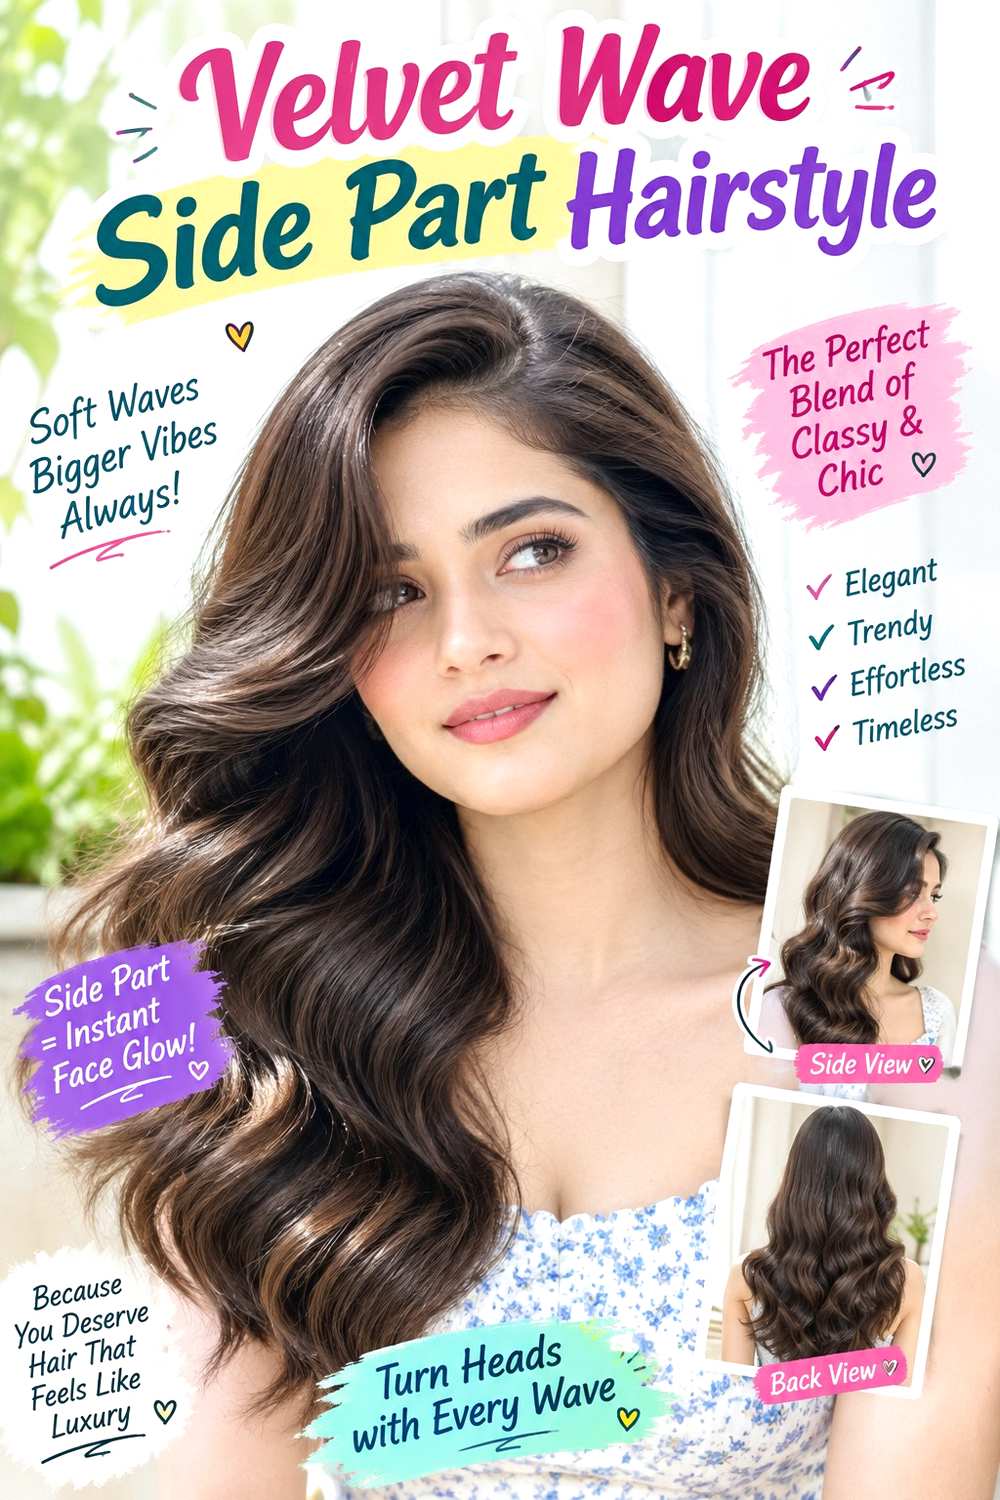
A deep side part and long, brushed waves give this vamp-romantic shape its strongest visual cue. Keep the roots smoother on the heavier side, build broad bends from around the cheekbones downward, and let the ends stay soft rather than tightly curled. One side can tuck behind the ear while the fuller side falls forward, creating an uneven frame that feels dramatic without relying on extreme height. Straight or wavy hair can reach the finish most easily, while naturally curly hair may need more smoothing if you want the same polished wave pattern.
Apply heat protectant before using a large curling iron, then mist flexible hairspray lightly through the lengths and brush the set only after it cools. A quick refresh can focus on two or three front bends; a full wash-day set takes longer, especially on dense or very long hair. If the waves collapse at the crown, reset the part and front section rather than curling every strand again.
If you are having the style done professionally, explain how deep you want the part and where the first visible bend should begin. Ask for volume to stay concentrated on the heavier side instead of expanding both sides equally, which keeps the silhouette sleek and romantic.
Pro tip:
Pin the heavier front wave in its curve while it cools, then release it last. This helps the opening bend stay smooth instead of dropping forward immediately.
Make It Work for You:
If your hair is fine or lower in density, keep the waves broader and avoid expanding every section. A sleeker underside preserves visual fullness while the heavier side still carries drama.
Watch Out For:
Do not brush the set while it is still warm. The wave pattern can collapse quickly; let the sections cool fully before softening them together.
Soft Gothic Curtain Fringe Hairstyle
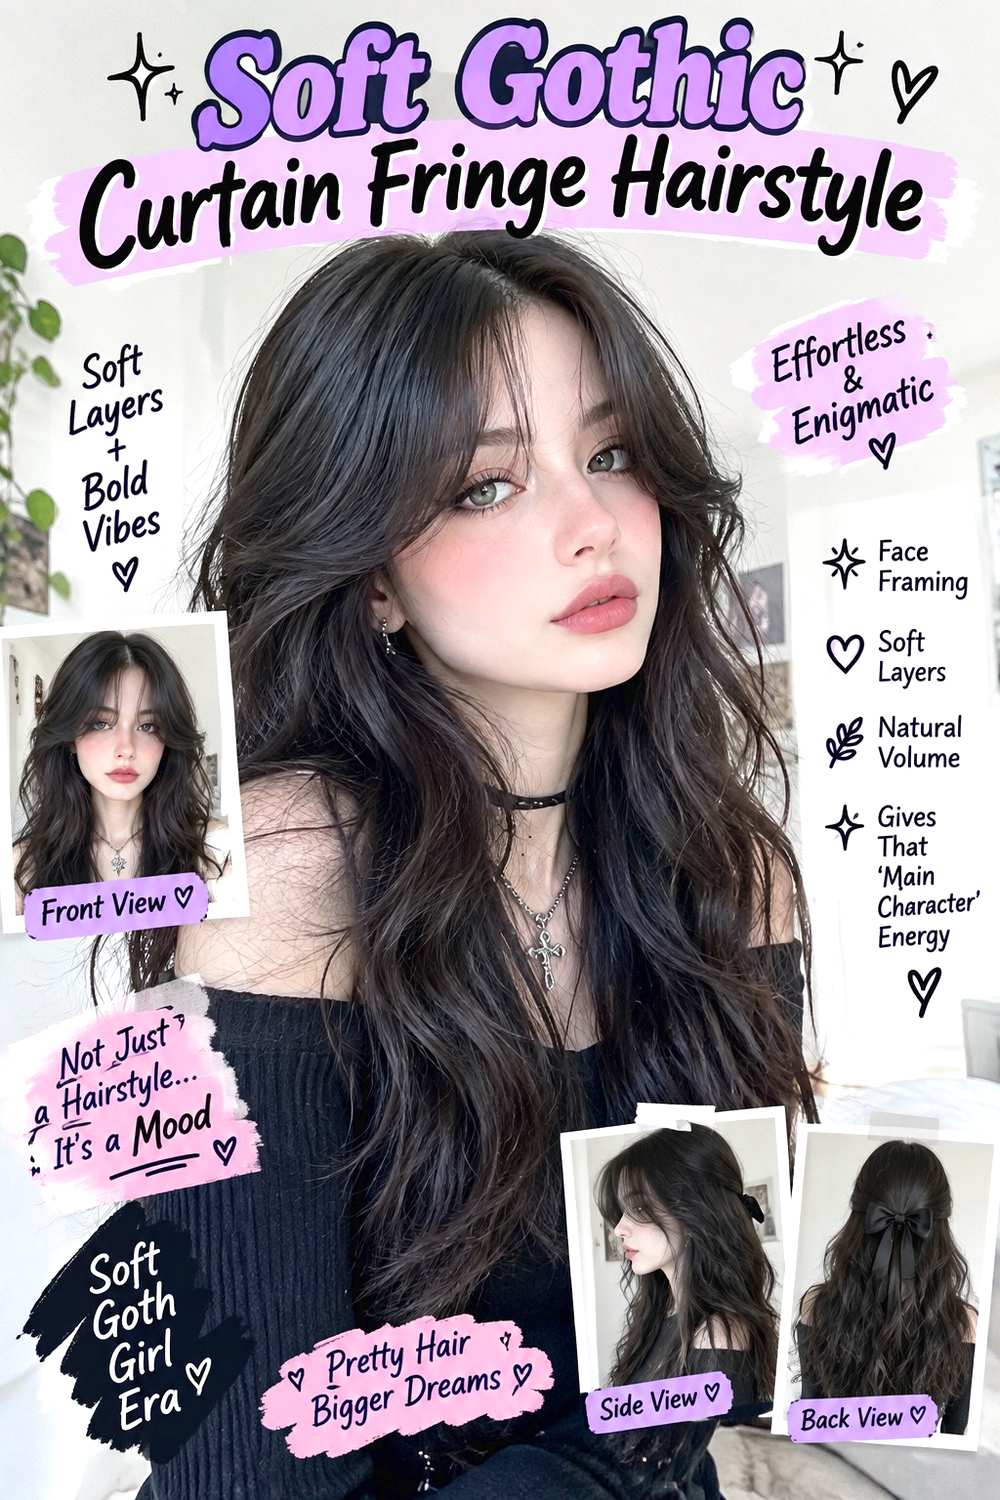
Long curtain fringe softens a dark romantic look by opening at the center and blending into cheekbone or jaw-length pieces. The rest of the hair can fall below the shoulders with loose movement through the mid-lengths and a fuller perimeter, so the fringe feels connected rather than sharply separated. A center or slightly off-center part works well, and the finish can stay airy at the ends instead of heavily curled. Straight and wavy textures usually make the curtain shape easy to manage, while curls need the finished dry fringe length judged with shrinkage in mind.
Use heat protectant before shaping the front with a round brush, then add a small amount of flexible hairspray only after the fringe cools. Between washes, a quick refresh can focus on the bangs and two face-framing pieces; a full blow-dry takes longer according to density and length. Trim or reshape the fringe when the center drops into the eyes or the outer corners stop blending with the sides.
At the salon, point to the exact dry length you want at the shortest center section and ask for longer outer corners. That gradual transition matters because a blunt, uniformly short fringe will change the softer vamp-romantic character into something much more graphic.
Pro tip:
Dry the fringe forward at the roots before splitting it. Once nearly dry, sweep each side outward so the center opens without becoming flat or overly separated.
Make It Work for You:
For curly hair, keep the curtain pieces longer during shaping and judge the final opening after the curls dry. This preserves the split fringe without ignoring shrinkage.
Watch Out For:
Avoid taking the fringe section too far back. An overly deep section can remove side density and make the long outer pieces feel heavy.
Deep Side-Swept Wave Hairstyle
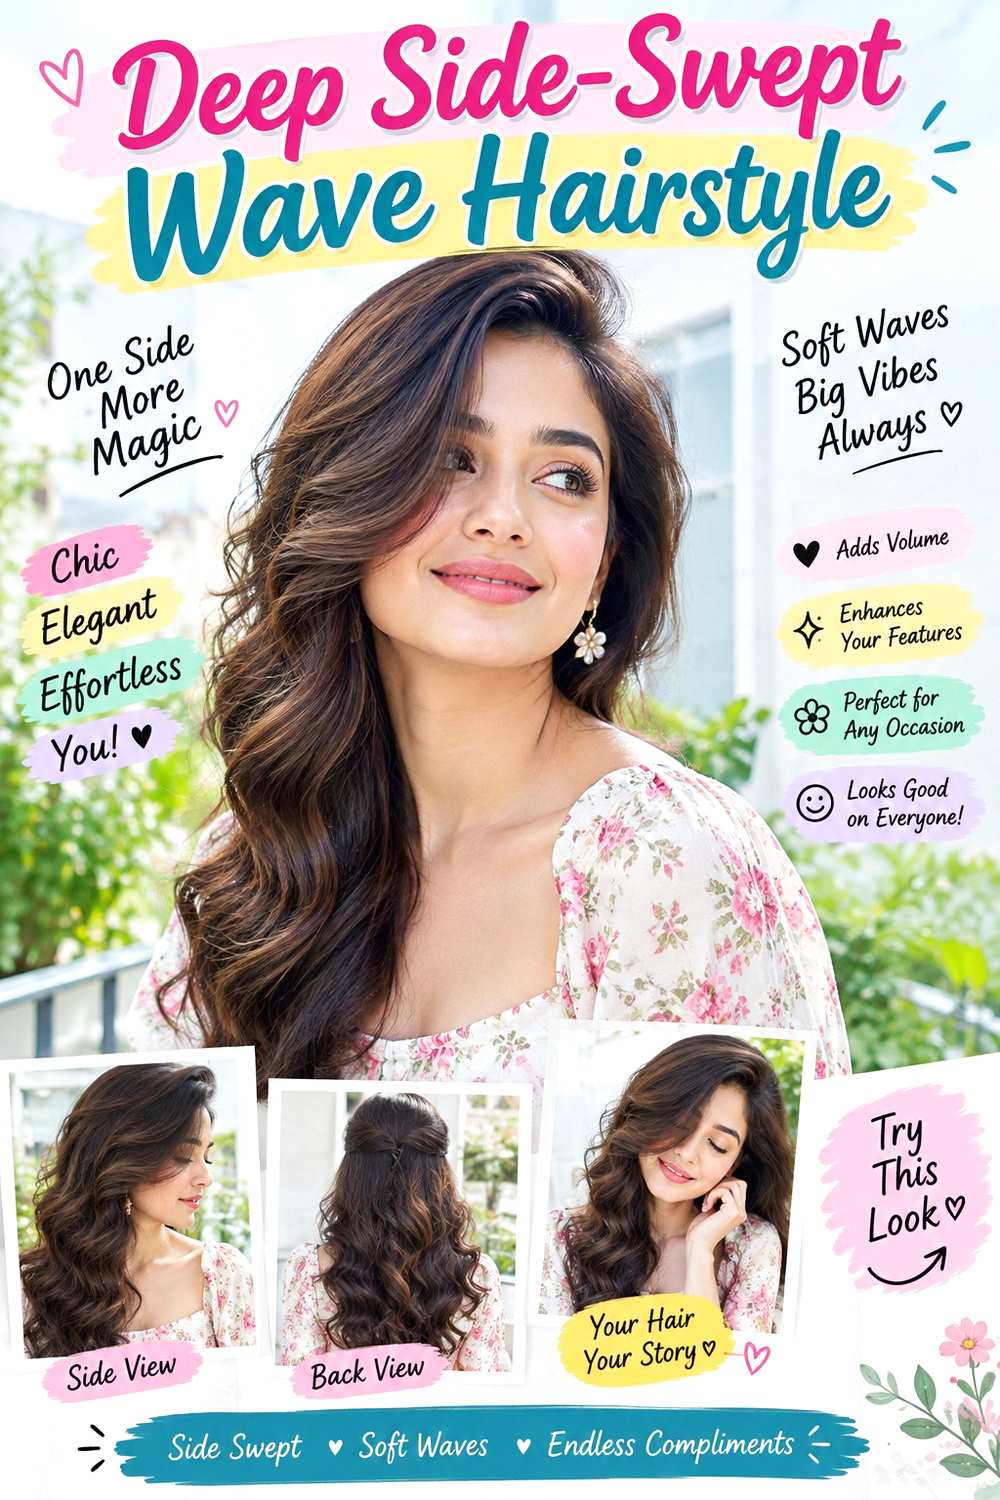
A sweeping front section creates a more cinematic vamp-romantic shape than an open center part. Let the fringe or front layer travel diagonally across the forehead, then merge into smooth waves beginning around the jaw. Keep the opposite side flatter and tucked close to the head so the fuller side carries most of the movement. Longer hair shows the imbalance clearly, and medium to dense hair can support the broad wave pattern without excessive product. Fine hair can also work if the front remains light rather than overloaded.
Apply heat protectant before using a medium curling iron, then finish with flexible hairspray for hold that still allows the wave to move. A short refresh can target the swept front and first two bends, while a complete wash-day style takes longer because the side part and full lengths need resetting. If the sweep starts dropping into the eye, re-establish the root direction before adding more curl.
For a professional styling appointment, show exactly which side you want heavier and how low the sweep should sit across the forehead. Ask for the tucked side to remain smooth but comfortable, with no painful pinning or excessive tension. The contrast between one controlled side and one flowing side is what keeps the style intentional.
Pro tip:
Set the root direction of the sweep before curling the lengths. A secure sideward base helps the front stay off the eye without needing excessive spray.
Make It Work for You:
If your natural part resists a deep sweep, move the part only as far as the roots comfortably allow and keep the diagonal front section slightly longer.
Watch Out For:
Do not pull the tucked side painfully tight. Secure it close to the head with comfortable tension so asymmetry comes from placement, not strain.
Romantic Ribbon Half-Up Hairstyle
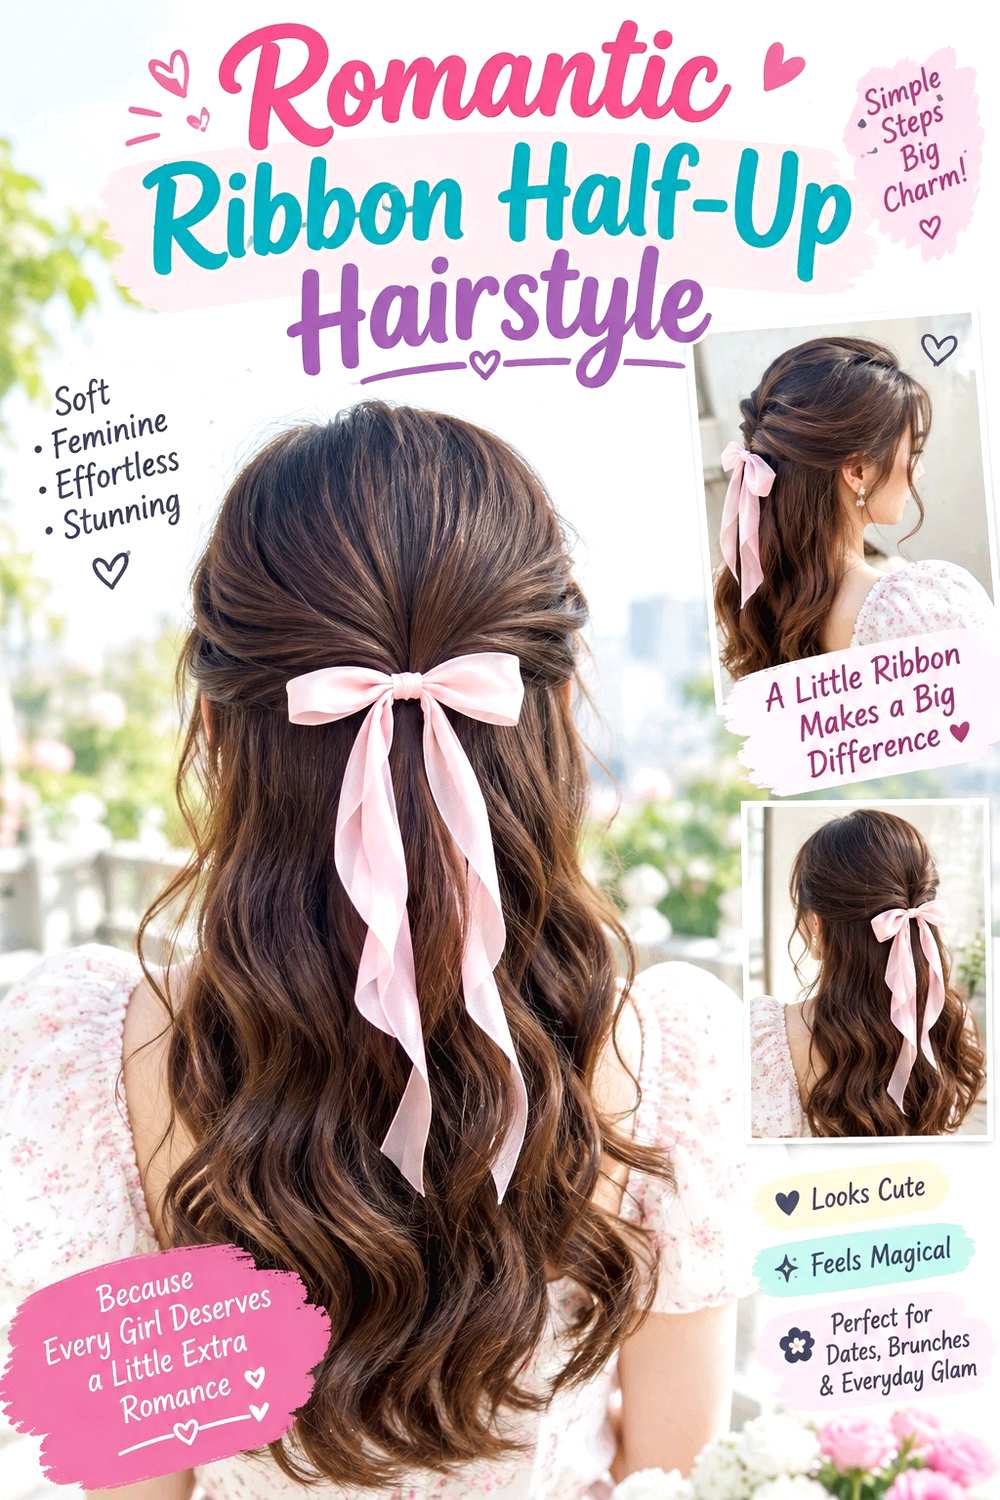
A narrow ribbon turns a half-up style into a softer vamp-romantic option without requiring a new haircut. Gather only the crown and temple sections, leaving the lower lengths loose in natural waves, curls, or a smooth fall. The ribbon should sit at the back of the head instead of high on the crown, with a few face-framing pieces left free so the front does not look severe. Medium and long hair give the bow enough base, while finer hair benefits from a smaller ribbon that does not overpower the section.
Use light texturizing spray for grip, secure the gathered section with bobby pins, then tie a velvet ribbon around the stable base. A quick refresh involves tightening the anchor and smoothing loose pieces; a full wash-day style depends on whether you also create waves or simply use your natural texture. If the ribbon slides, fix the support underneath instead of tying it tighter around the hair.
For salon or event styling, explain where you want the bow to sit and how much hair should remain loose. Ask for comfortable anchoring at the back of the head and specify whether you want the face frame polished or slightly undone. The ribbon should decorate the hairstyle, not carry its entire weight.
Pro tip:
Build the half-up anchor before tying the ribbon, then test it with a gentle head turn. The bow should decorate a stable base rather than provide the hold.
Make It Work for You:
For dense hair, gather a smaller crown section and leave more length loose beneath it. This keeps the ribbon visible instead of burying it inside a bulky half-up shape.
Watch Out For:
A large bow on a tiny gathered section can slip or dominate the style. Match ribbon scale to the amount of hair secured underneath.
Low Twisted Chignon Hairstyle
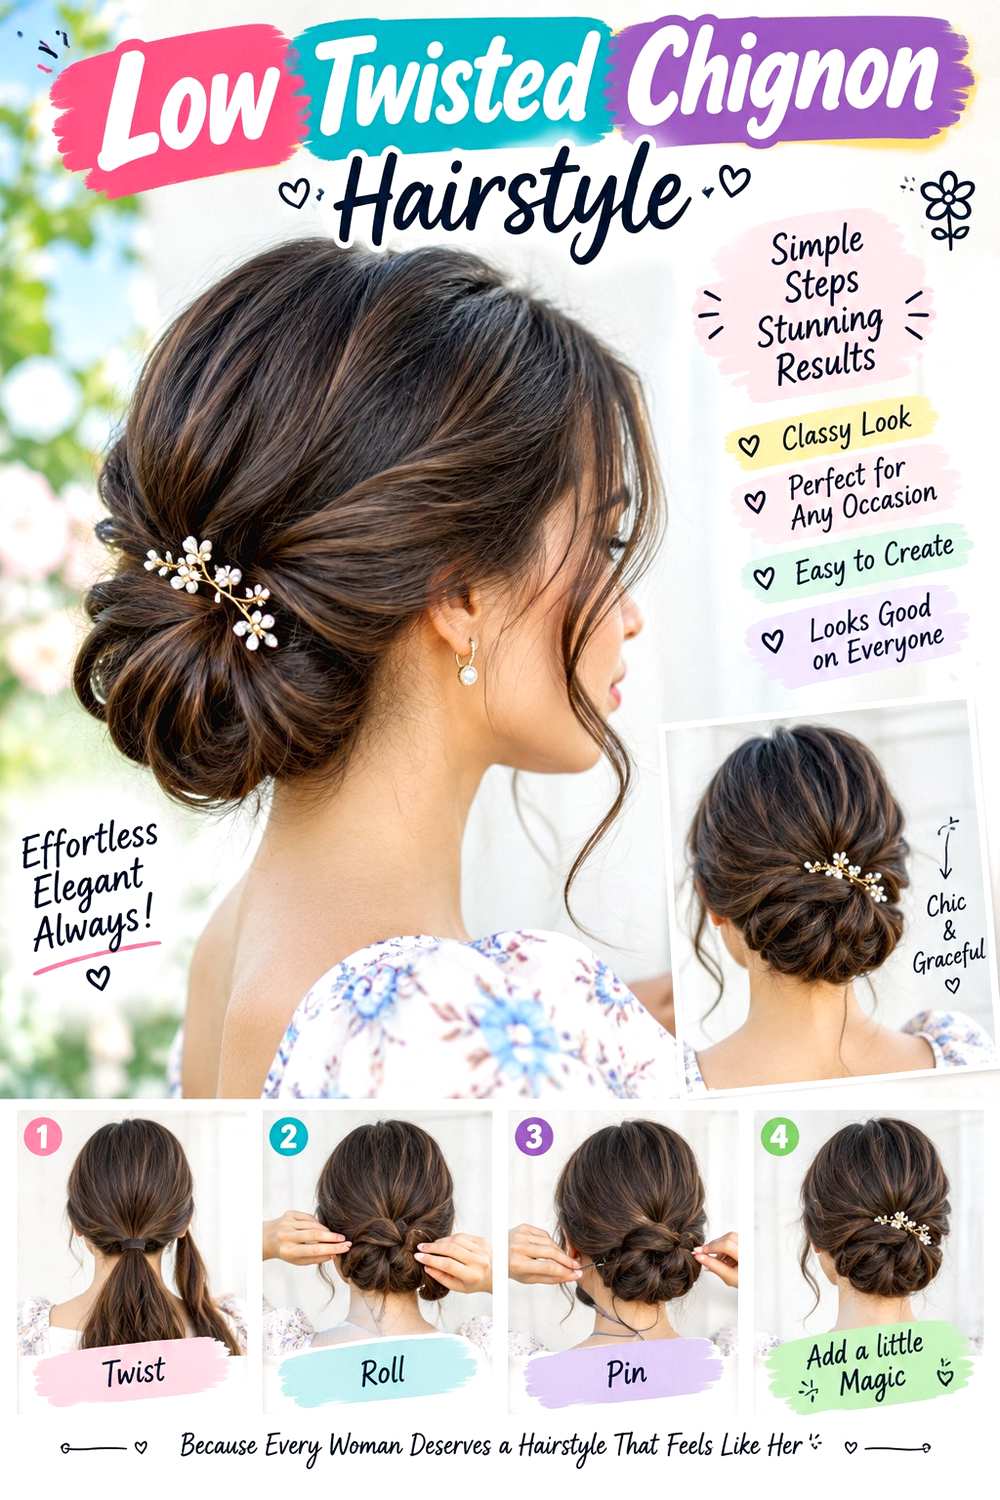
A low twisted chignon creates a restrained vamp-romantic silhouette by keeping most of the volume near the nape. Part the hair in the center or slightly off-center, leave two soft face-framing pieces free, and gather the rest low before twisting it into a compact bun. The surface can stay smooth at the crown with controlled wisps near the ears. Shoulder-length hair can support the shape with careful pinning, while longer or denser hair may need the twist spread slightly wider so the bun does not become too bulky.
Secure the base with a fabric-covered elastic, shape the twist with bobby pins, and finish with flexible hairspray. A quick refresh is mostly about replacing a loose pin or smoothing the front; creating the full style from freshly washed hair takes longer if the texture is very silky or requires drying first. The bun should feel stable without pulling at the scalp.
For a professional updo, specify how low you want the chignon and whether it should sit centered or slightly to one side. Ask for comfortable tension at the temples and nape, especially if you will wear it for several hours. The defining feature is a low, neat anchor with softer movement around the face rather than height at the crown.
Pro tip:
Cross pins through the twist from opposite directions at the nape. Distributing the anchor points helps the chignon stay stable without concentrating pressure in one spot.
Make It Work for You:
If your hair is very long, fold the tail back into the twist instead of winding it into a tall coil. The bun stays low and compact.
Watch Out For:
Do not keep tightening the base when pieces loosen. Add support where the twist moves; excessive tension can make a formal style uncomfortable.
Loose Crown Braid Hairstyle
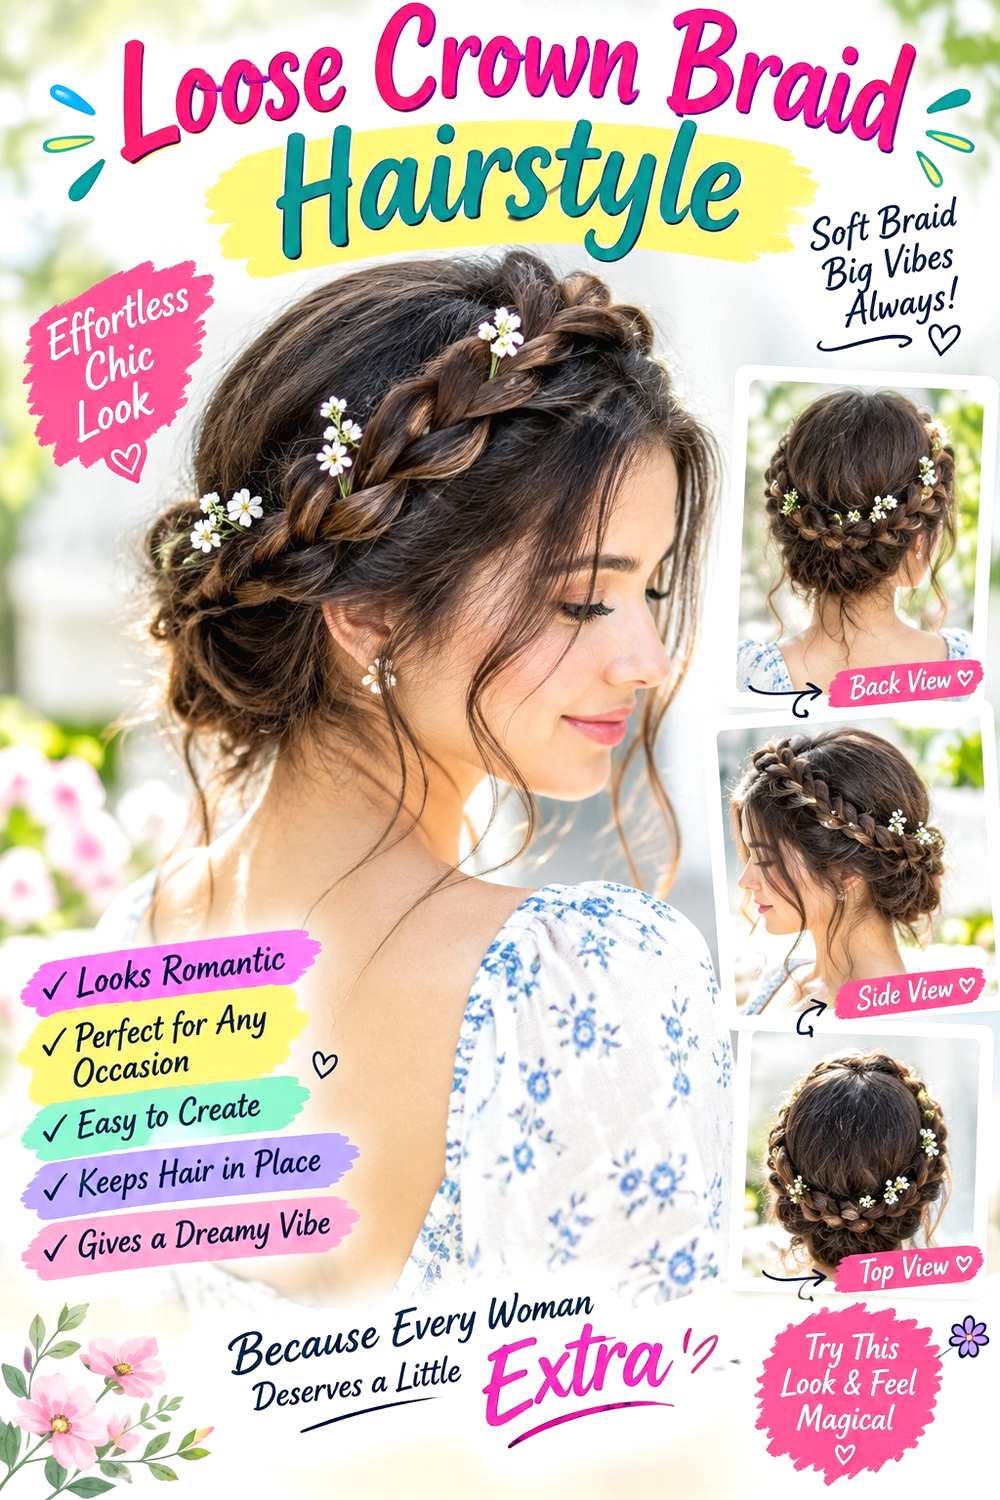
A loose crown braid brings a dark fairytale quality to vamp-romantic styling while keeping the face open. Start the braid above one ear, carry it across or around the back of the head, and leave the rest of the hair loose or gathered low depending on length. Keep the braid broad and softly expanded rather than tight, with a few temple pieces released for movement. Medium and long hair work best, while shorter layers can be tucked into the braid or left intentionally loose instead of being forced into place.
Mist light texturizing spray through the sections for grip, secure the braid with a clear elastic, and use bobby pins to anchor it where the ends overlap. A quick refresh involves tightening one or two anchor points and smoothing flyaways; a full styling session takes longer if the hair is very dense or slippery. Comfort matters more than making the braid extremely tight.
For event styling, explain how wide you want the braid and whether you prefer it to cross the crown or sit lower around the back. Ask for even, comfortable tension and enough pins at the overlap so the braid does not rely on scalp tightness for security. The style should look softly structured, not rigid or painful.
Pro tip:
Expand the braid only after its main anchors are secure. Gently pull the outer edges in small increments so width increases without loosening the entire structure.
Make It Work for You:
For shorter layered hair, let a few ends escape near the temples and nape instead of forcing every piece into the braid. The soft finish remains intentional.
Watch Out For:
A crown braid anchored only at its end can slide as you move. Secure the overlap at several points while keeping scalp tension comfortable.
Tousled Dark Rose Updo Hairstyle
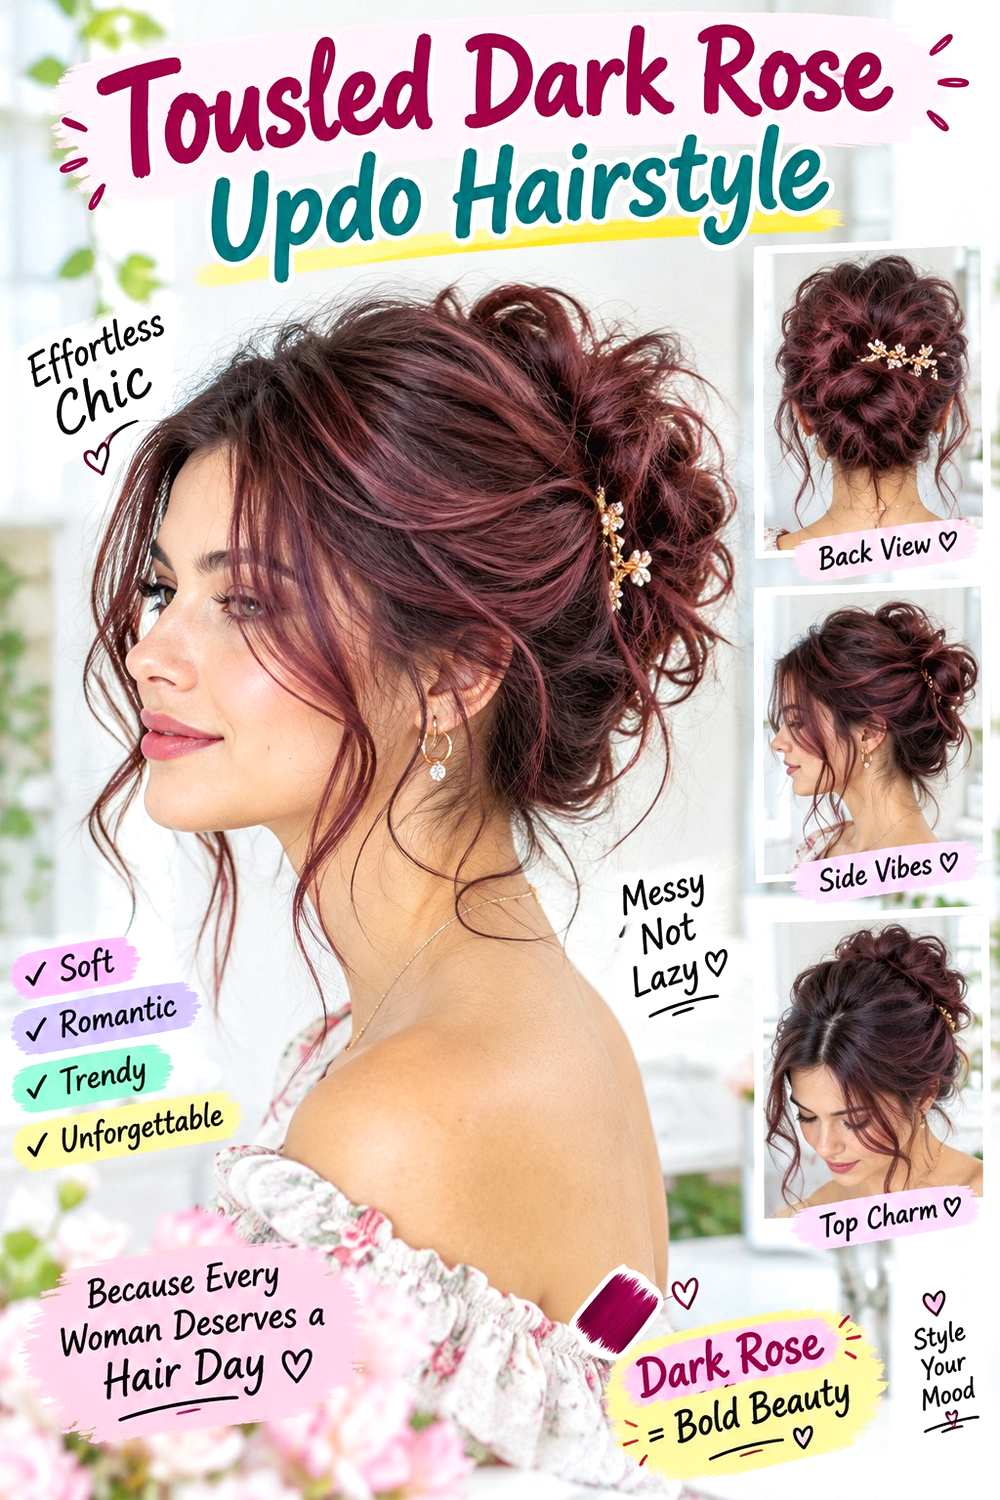
A tousled updo with a rose accessory gives vamp-romantic styling a softer floral focus. Keep the main shape low or mid-height at the back of the head, twist sections loosely into a textured knot, and leave a few narrow tendrils around the temples or jaw. Place the rose slightly off-center rather than directly on top of the bun so it appears integrated with the shape. Medium to long hair offers enough length for a fuller knot, while finer hair can use a smaller accessory for balance.
Use light texturizing spray to add grip, bobby pins to secure each twist, and a floral hair clip for the rose accent. A quick refresh can mean replacing a loose pin and checking the flower anchor; a full style takes longer if you are building texture from freshly washed, very smooth hair. The accessory should attach to a secure section rather than pulling directly on loose strands.
For salon or occasion styling, show where you want the flower to sit and how much softness you want around the face. Ask for comfortable tension and a secure anchor that can support the clip without extra pulling. The best result keeps the rose visible from the front or three-quarter view without letting it overwhelm the updo.
Pro tip:
Place the rose after the knot is fully pinned, then angle the clip into a firm section beneath the surface. This prevents the accessory from dragging loose twists downward.
Make It Work for You:
If your hair is fine, use a smaller rose and a narrower knot positioned closer to the head. The floral accent stays proportional while the updo keeps visible structure.
Watch Out For:
Do not clip the flower onto a single loose strand. Anchor it into secured hair so its weight does not pull the style apart.
Long Cascading Curl Hairstyle
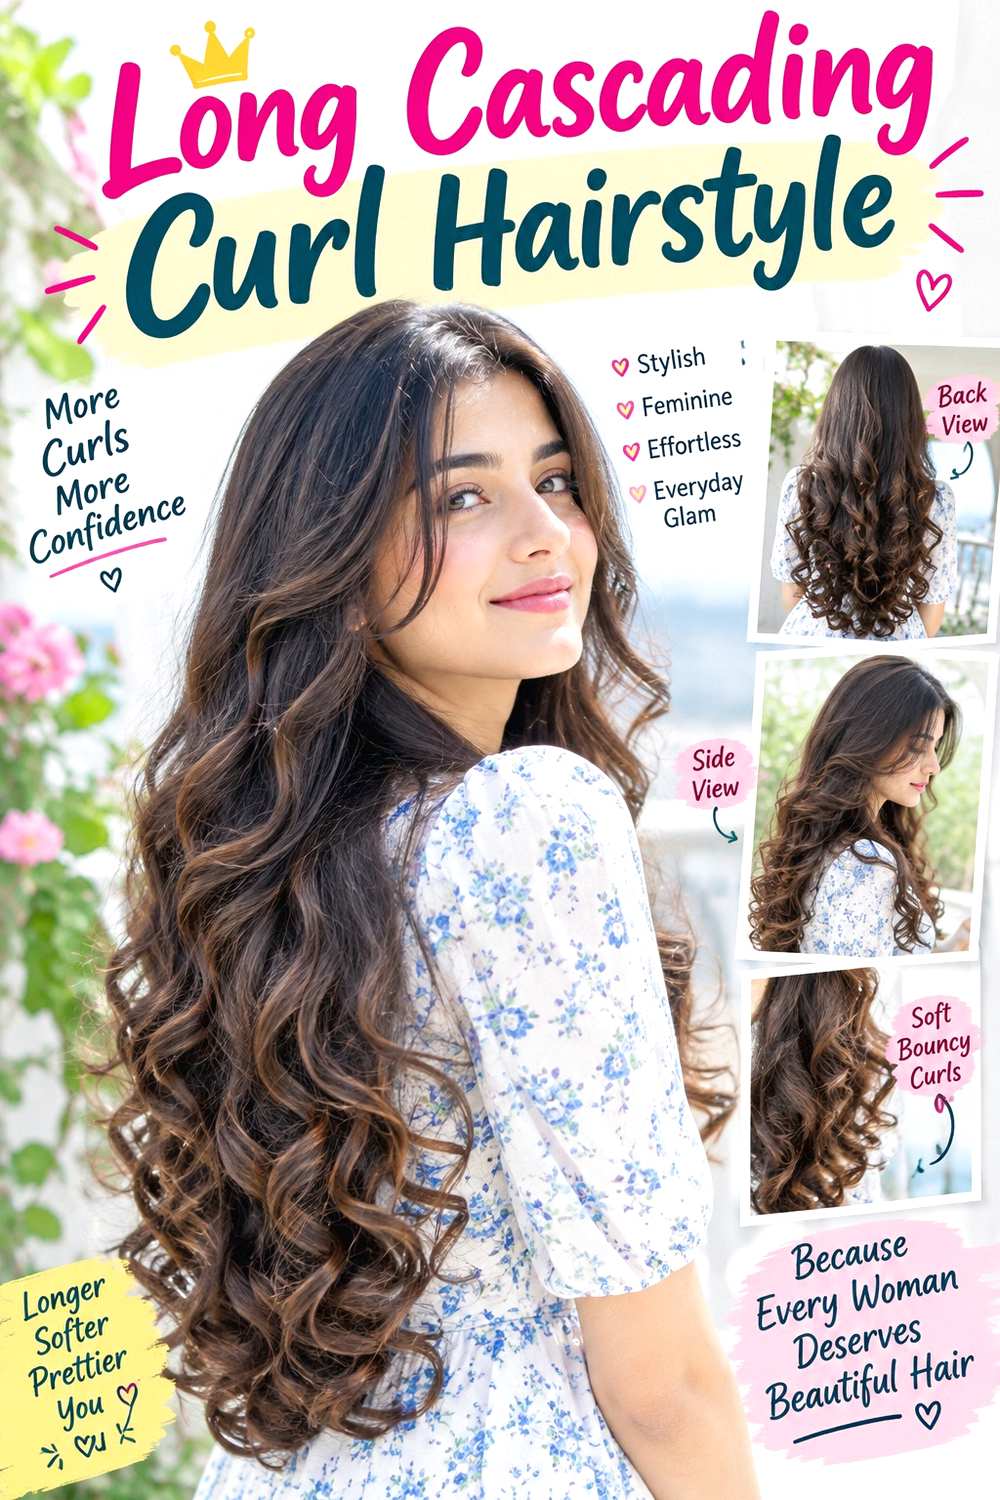
Long cascading curls make the vamp-romantic mood feel lush without requiring a complicated updo. Keep the crown relatively smooth, choose a center or side part, and build large curls from around the cheekbones or jaw through the lengths. The bends should overlap rather than form identical ringlets, with softer ends and enough separation to keep the hair moving. Long hair shows the cascade most clearly, while medium-length hair can use slightly smaller curls for a similar effect. Dense hair may need less product so the shape does not become heavy.
Apply heat protectant before using a large curling iron, then mist flexible hairspray through the finished lengths after the curls cool. A quick refresh can target the front sections and any flattened lower curls; a full wash-day set takes longer, especially on very long or dense hair. If the curls drop unevenly, reset only the sections that have lost shape instead of reheating the entire head.
For professional styling, explain where you want the first curl to begin and how much root volume you prefer. Ask for the ends to remain soft rather than tightly spiraled. That keeps the style romantic and flowing instead of turning the length into a uniform pageant-style curl set.
Pro tip:
Alternate a few curl directions through the lower lengths while keeping the front pieces directed away from the face. This creates depth without making the set look random.
Make It Work for You:
For naturally curly hair, preserve your existing curl pattern and reshape only sections that need a broader bend. You can keep the cascading effect with less heat manipulation.
Watch Out For:
Avoid repeatedly reheating curls that have softened. Reset only collapsed sections and keep the ends flexible so the length does not become stiff or overworked.
Wispy Fringe Velvet Bob Hairstyle
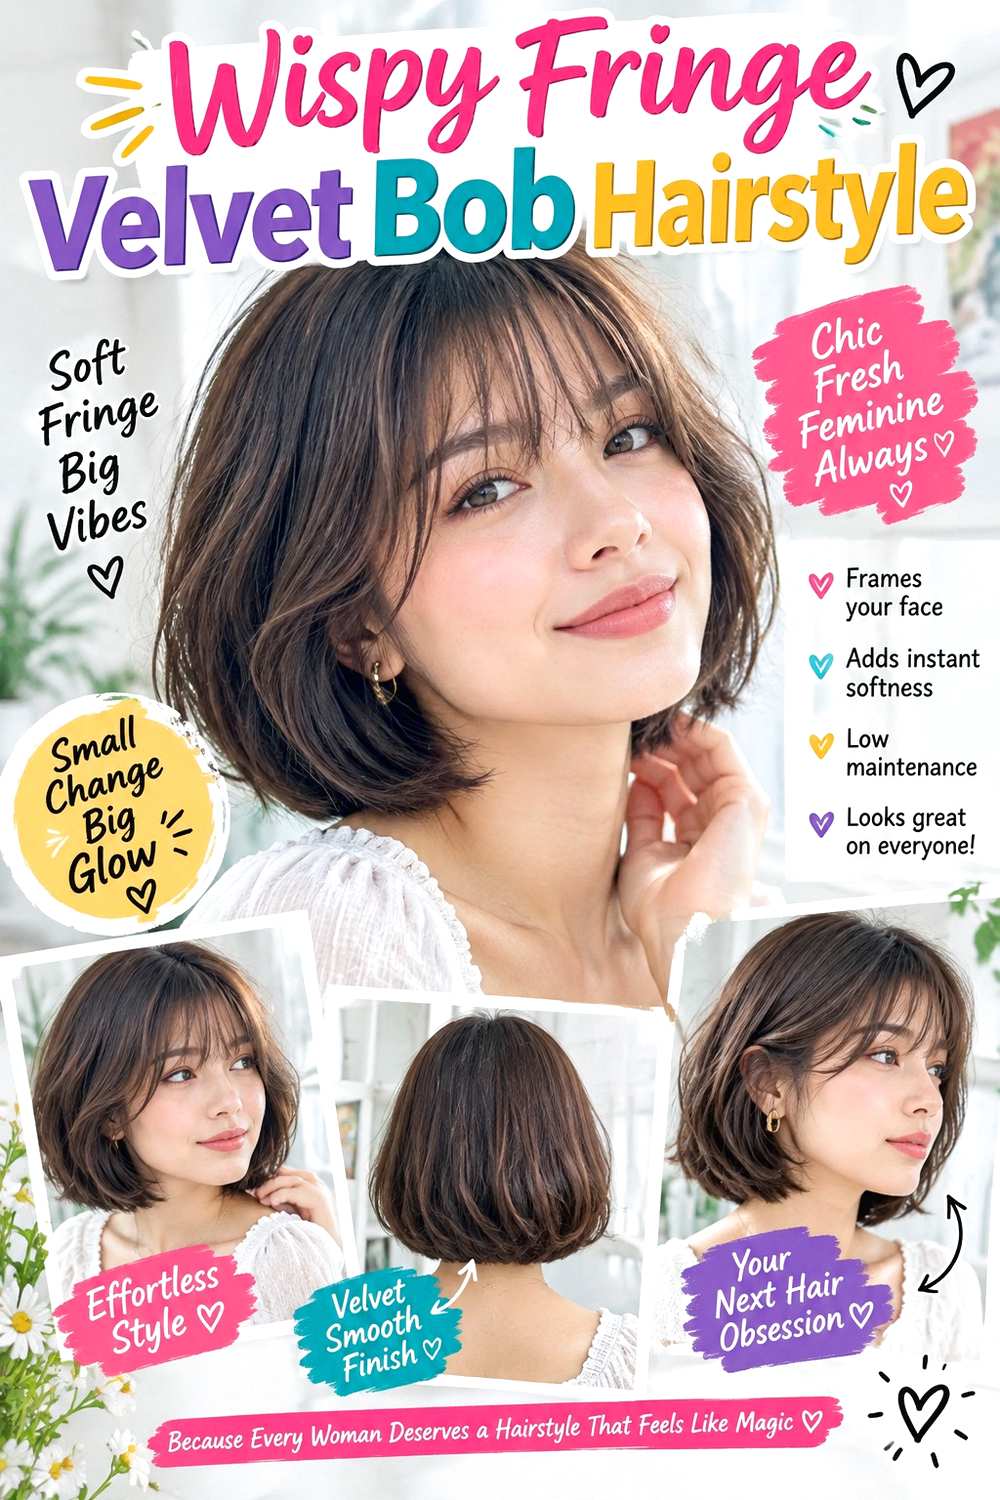
A jaw- or neck-length bob with wispy fringe creates a compact vamp-romantic shape with more softness than a blunt, graphic cut. Keep the fringe narrow and lightly separated around the brows, with longer outer corners that connect to the sides. The bob itself can stay fuller at the perimeter while small bends through the mid-lengths add movement. Straight and softly wavy hair show the combination clearly, and fine strands can benefit from preserving weight along the bottom edge rather than adding too many short layers.
Use lightweight mousse near the roots, a vent brush to guide the fringe forward, and a small amount of shine serum through the ends. A quick refresh can focus on the bangs and one or two side pieces; a full wash-day style takes longer if you want a smooth, polished bob. Fringe upkeep is separate from the rest of the haircut, so reshape it when the center begins reaching the lashes or separating in unwanted places.
At the salon, specify the dry fringe length and ask for longer outer corners that blend into the bob. Also point to the exact perimeter you want at the jaw or neck. Preserving that bottom weight keeps the short shape romantic rather than overly wispy.
Pro tip:
Dry the fringe straight forward first, then separate a few pieces with your fingertips once the roots are set. This keeps the gaps controlled rather than accidental.
Make It Work for You:
If your hair is dense, keep the fringe section relatively shallow and let the bob perimeter carry more weight. The front stays airy without making the sides feel stripped.
Watch Out For:
Do not over-thin the bob just to match the wispy fringe. A stronger lower edge is what keeps the short shape balanced and intentional.
Face-Framing Low Ponytail Hairstyle
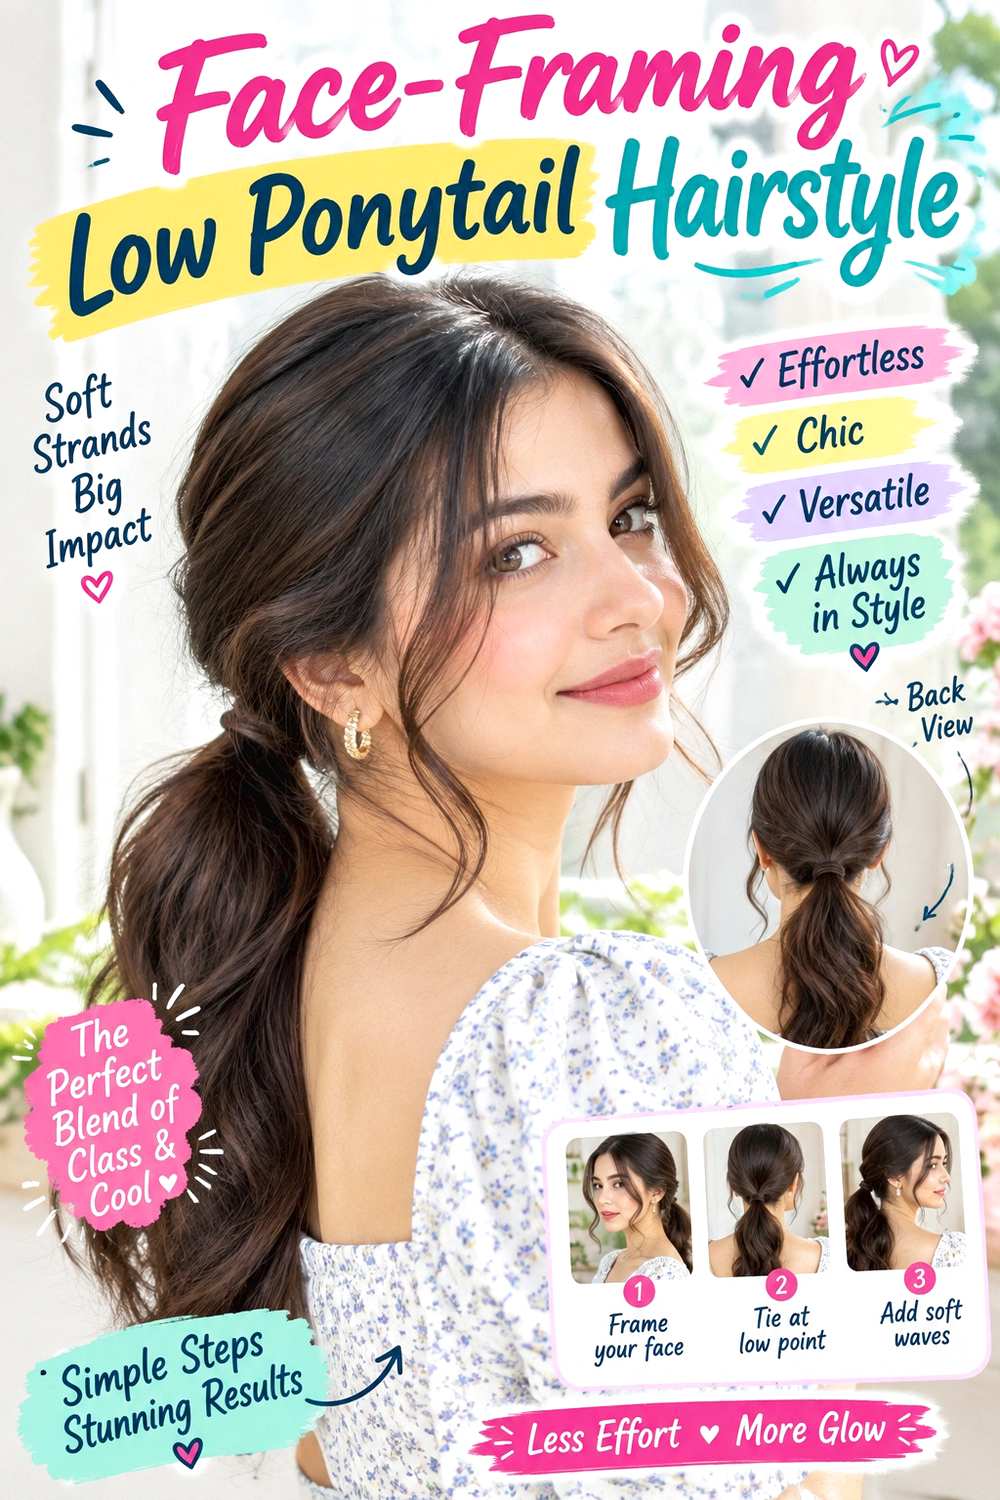
A low ponytail becomes vamp-romantic when the front stays soft and the base sits close to the nape rather than high on the crown. Use a center or gentle side part, release a few face-framing sections around the cheekbones or jaw, and keep the ponytail smooth through the upper surface with movement through the length. Straight, wavy, curly, and coily textures can all work because the defining features are placement and softness, not one specific finish. Longer hair gives the ponytail more drape, while shoulder-length hair may need shorter front pieces pinned or left loose.
Use a fabric-covered elastic for the low base, bobby pins to secure any wrapped or loose sections, and light styling cream to smooth flyaways without flattening the face frame. A quick refresh takes only a few minutes; a full wash-day version takes longer if the hair needs drying or definition first. Avoid pulling the base tighter just because shorter pieces loosen.
For professional styling, explain exactly how low you want the ponytail and how much hair should remain around the face. Ask for comfortable tension at the temples and nape, and specify whether the tail should be sleek, waved, or naturally textured. The style should feel anchored, not painfully tight.
Pro tip:
Secure the ponytail first, then release the face-framing pieces gradually. It is easier to control softness when the main anchor is already stable.
Make It Work for You:
For coily or tightly curly hair, keep the tail in its natural texture and choose only a few defined front pieces. The low placement still delivers the romantic silhouette.
Watch Out For:
Pulling more tightly when the ponytail slips can create discomfort. Reinforce the base instead, keeping the temples and hairline free from excessive tension.
Sleek Center-Part Ribbon Hairstyle
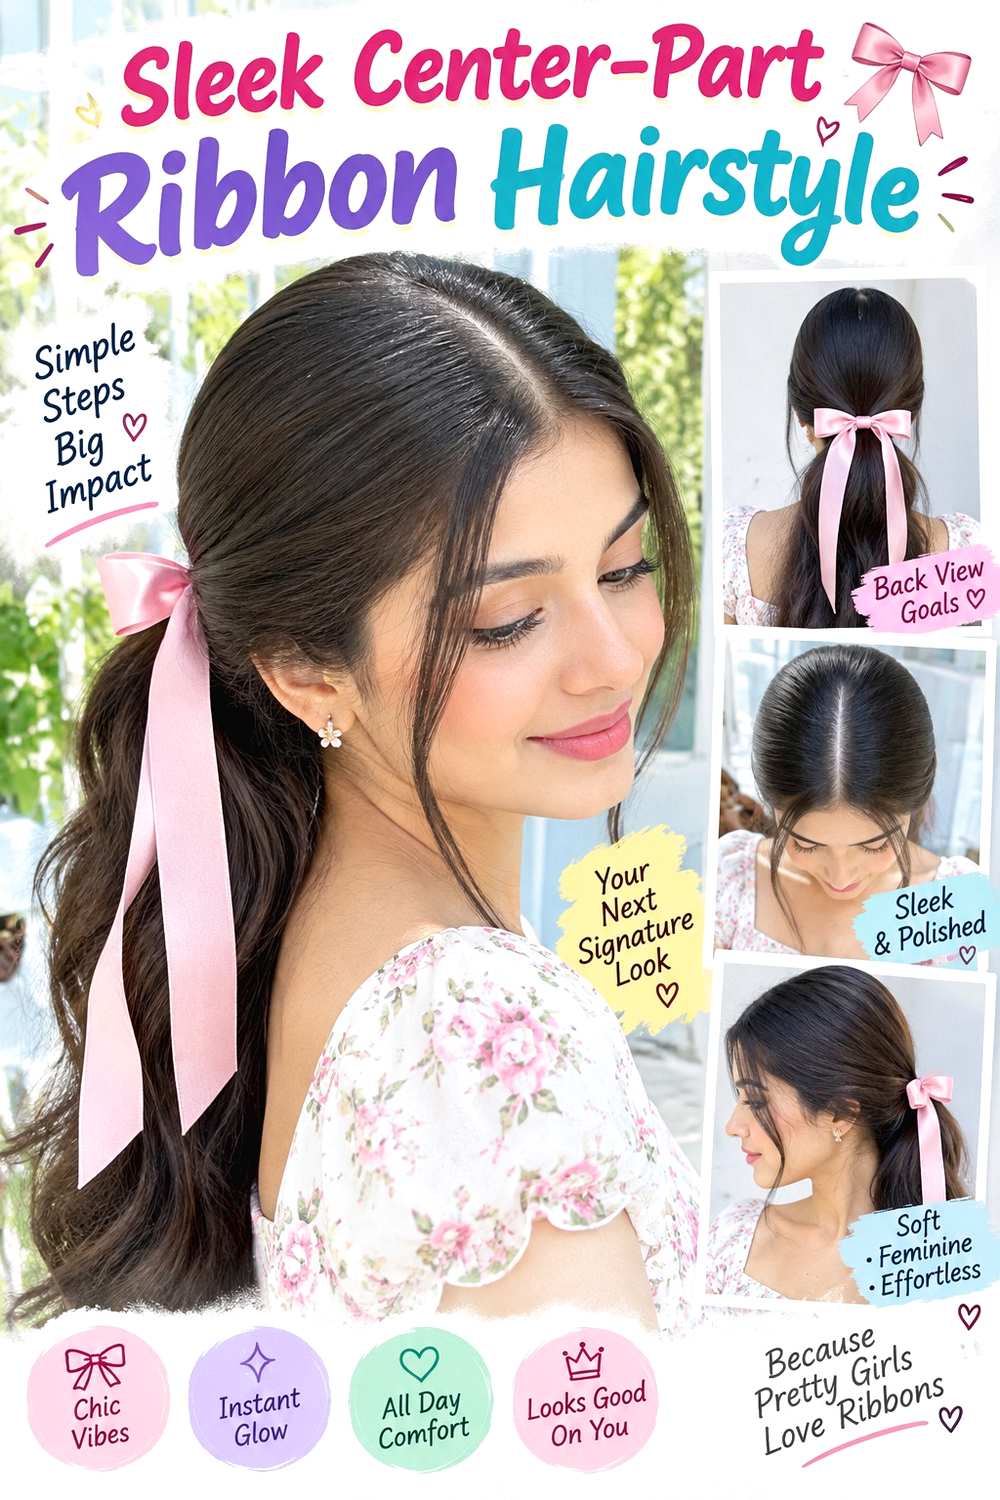
A precise center part paired with a narrow dark ribbon creates a cleaner vamp-romantic look than a voluminous half-up style. Keep the crown smooth and close to the head, tuck or pin the side sections back, and let the lengths fall straight, softly waved, or naturally textured. The ribbon can sit in back where the two side sections meet, forming a small bow instead of an oversized statement. Medium and long hair work especially well, while lower-density hair usually benefits from a slimmer ribbon that does not hide the gathered section.
Apply light smoothing cream through the surface, use bobby pins to secure the side sections, and tie a velvet ribbon around the stable anchor. A quick refresh can involve smoothing the part and retightening the bow; a full wash-day version takes longer if you are also creating a polished texture through the lengths. If the ribbon slips, strengthen the anchor instead of tying it painfully tight.
For salon or event styling, ask for a clean center part and show exactly where the ribbon should sit when viewed from the side and back. Specify whether you want the ears exposed or partially covered. The placement should feel balanced and secure without making the crown look unnaturally flat.
Pro tip:
Create the center part before gathering the side sections, then check it from the front. A clean part makes the small ribbon placement feel more deliberate.
Make It Work for You:
If your hair has natural wave or curl, smooth only the crown and leave the lengths textured. The contrast preserves the sleek top without requiring full straightening.
Watch Out For:
Do not tie the ribbon directly around unsecured loose hair. Build a hidden anchor first so the bow stays centered without repeated tightening.
Soft Finger Wave Lob Hairstyle
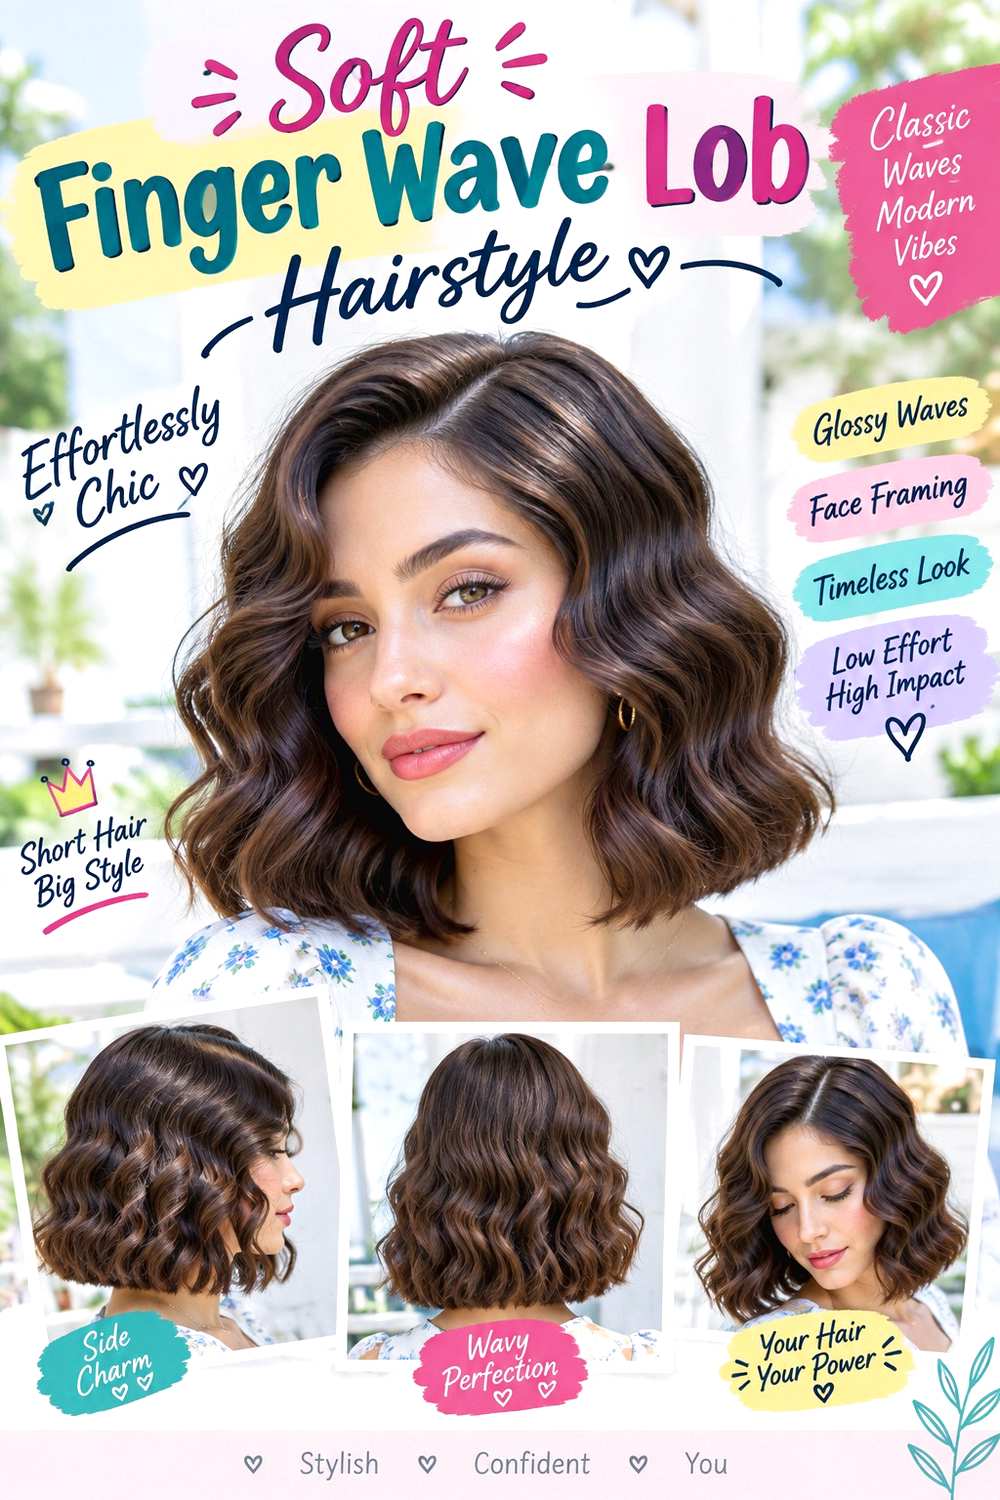
A long bob with soft finger-wave-inspired bends gives vamp-romantic styling a vintage edge without requiring an exact historical set. Keep the part deep or slightly off-center, shape an S-curve through the front and temple area, and let the pattern relax into broader bends toward the jaw and neck. The perimeter can stay blunt or softly textured, but the waves should remain close to the head rather than becoming full curls. Straight or wavy hair can reach this finish with moderate styling, while very curly hair may need more smoothing if the goal is a controlled surface.
Apply heat protectant before shaping sections with a flat iron, then use flexible hairspray to hold the S-curves without making them rigid. A quick refresh can focus on the front wave only; a full wash-day set takes longer because the pattern needs careful sectioning. Allow each bend to cool before loosening it so the shape does not disappear immediately.
At the salon, show how pronounced you want the front S-curve and where the first bend should sit. Ask for the rest of the lob to remain softer so the style does not become costume-like. The balance between one defined front wave and looser lower movement keeps it wearable.
Pro tip:
Shape the front S-curve in small sections and let each bend cool in place. Work backward from the hairline so the most visible wave stays precise.
Make It Work for You:
For a naturally wavy lob, refine only the front and temple bends while leaving the lower pattern softer. This keeps the vintage reference without overworking the whole cut.
Watch Out For:
Too many identical waves can make the finish look rigid. Keep the strongest S-curve near the front and let the lower lengths relax.
Curly Tendril Bun Hairstyle
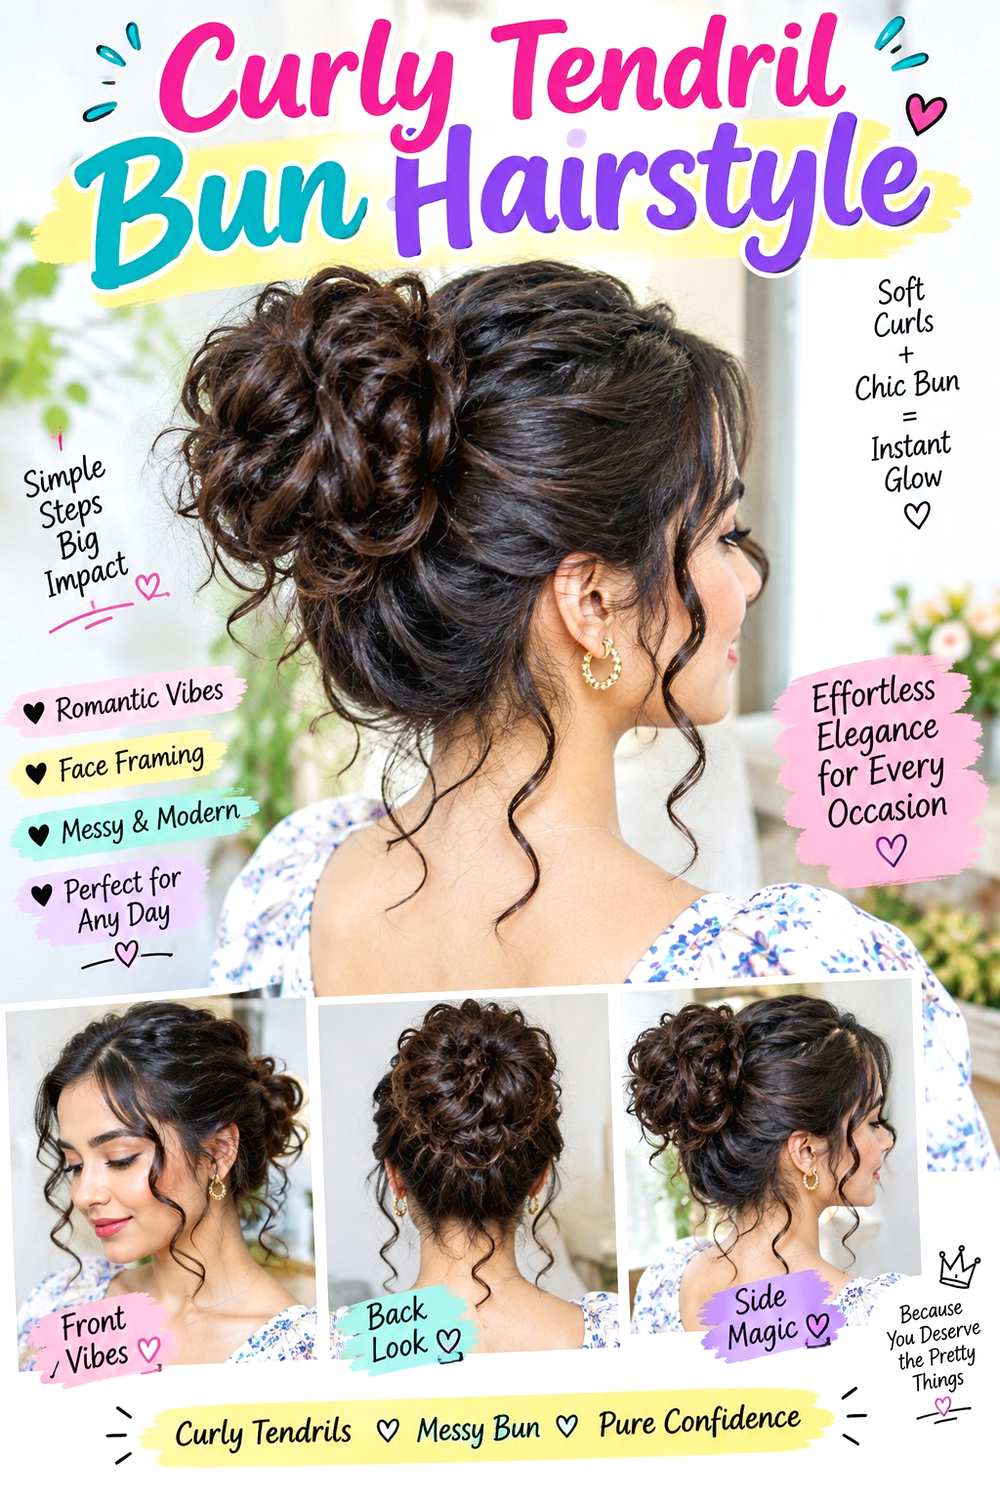
A curly tendril bun keeps the main volume gathered while allowing a few curls to frame the face and soften the hairline. Position the bun low or at mid-height, depending on how much neck exposure you want, and preserve visible curl texture rather than smoothing every section. Release one or two curls near each temple or jaw, keeping them narrow enough that the style still reads as an updo. Curly and coily hair can use the existing pattern, while wavy hair may need more shaping for defined tendrils.
Use curl gel to reinforce definition, a fabric-covered elastic for the base, and bobby pins to shape the bun without excessive pulling. A quick refresh can re-wet and redefine the loose tendrils; a full wash-day style is longer because the curls need to dry and settle before the bun is arranged. If the edges or bun feel tight, loosen the anchor rather than relying on discomfort for hold.
For professional styling, explain the desired bun height, the number of loose tendrils, and how much natural volume you want around the crown. Ask for comfortable tension and pins distributed through the bun rather than concentrated in one spot. The curls should remain recognizable as texture, not be flattened into a generic smooth updo.
Pro tip:
Choose the tendrils before forming the bun and keep them separate while you pin the rest. This prevents accidentally trapping the curls you wanted around the face.
Make It Work for You:
If your curls shrink strongly, leave slightly longer front sections free and judge their position after they dry. The bun stays romantic without unexpectedly short tendrils.
Watch Out For:
Do not stretch the bun base tighter to flatten natural texture. Use distributed pins and preserve comfortable volume around the crown and hairline.
Braided Half-Up Cascade Hairstyle
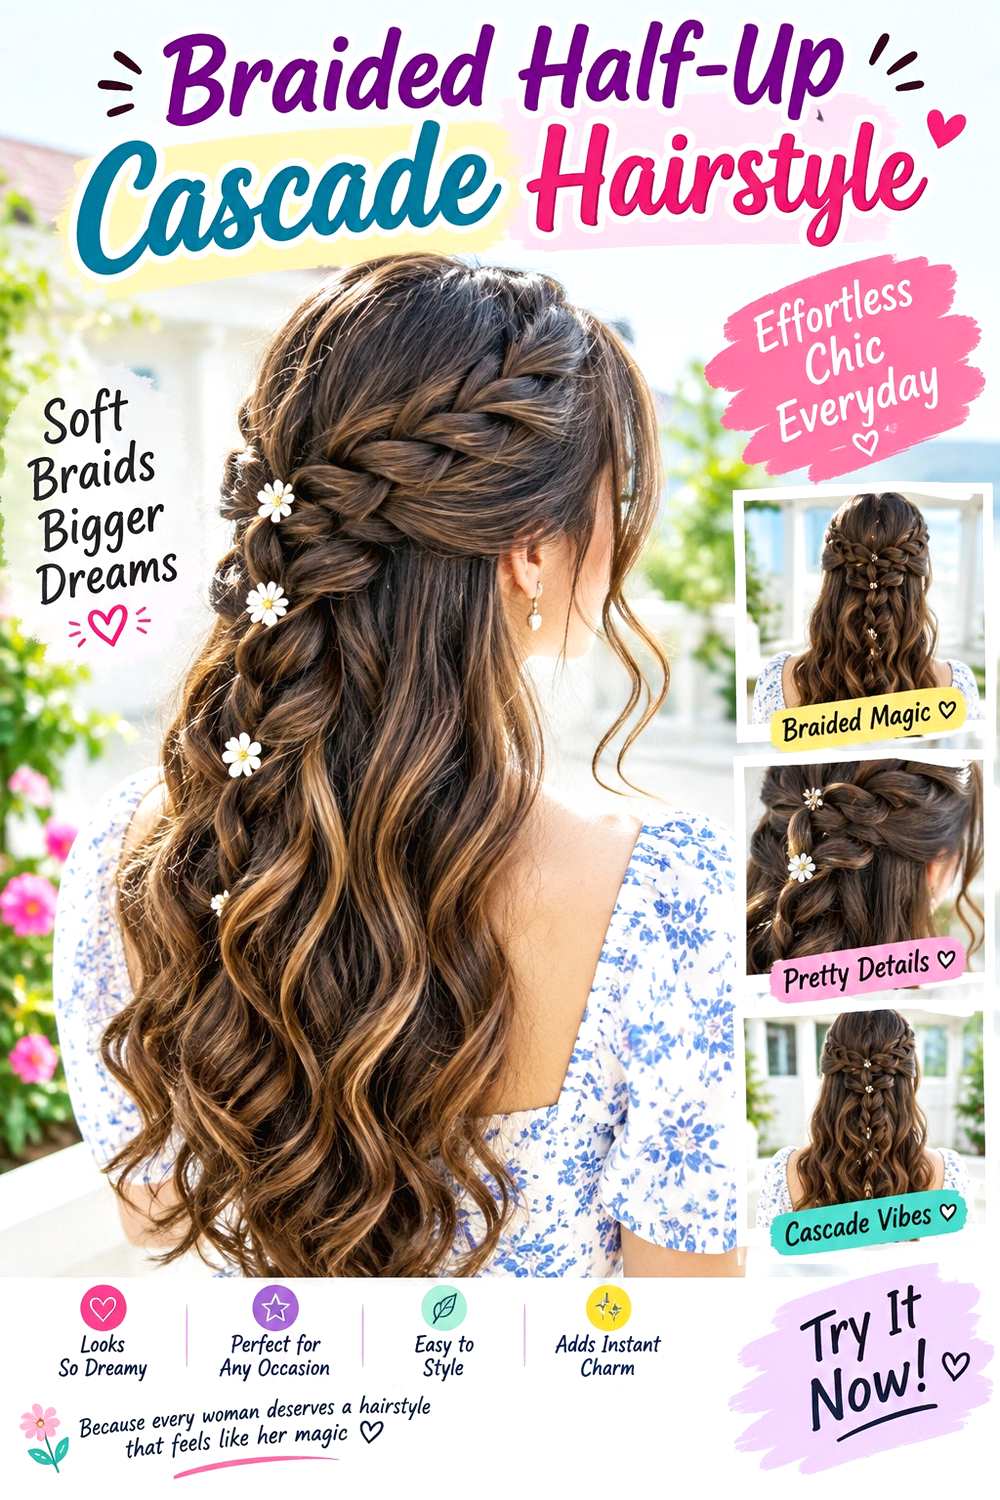
A braided half-up cascade combines a secure upper section with loose romantic length beneath it. Start two narrow braids at the temples, carry them toward the back of the head, and join them above the occipital area so the remaining hair can fall freely. Keep the braids soft rather than extremely tight, and allow a few shorter front pieces to frame the face. Medium and long hair provide enough length for the cascade, while wavy or curly texture adds movement without needing every strand to be reshaped.
Use light texturizing spray for grip, clear elastics to secure the braid ends, and bobby pins to anchor the joined section discreetly. A quick refresh can tighten the center anchor and smooth one or two flyaways; a full styling session takes longer if the lengths are freshly washed and very slippery. The braids should not carry all the weight of the loose hair.
For event styling, specify braid width, how far back the braids should travel, and whether the meeting point should sit high or low. Ask for comfortable temple tension and a stable central anchor. Keeping the join secure allows the braided sections to look soft without slipping, which preserves the romantic effect through several hours of wear.
Pro tip:
Pin the joined braids over a stable center section before loosening their edges. The cascade can look soft without sacrificing the anchor underneath.
Make It Work for You:
For fine hair, keep the temple braids narrow and leave more hair loose beneath them. A lighter braid preserves visible density through the cascading lengths.
Watch Out For:
Avoid using the braids to pull all the loose hair backward. The added weight can make them sag; anchor the join independently instead.
Airy Gothic Shag Hairstyle
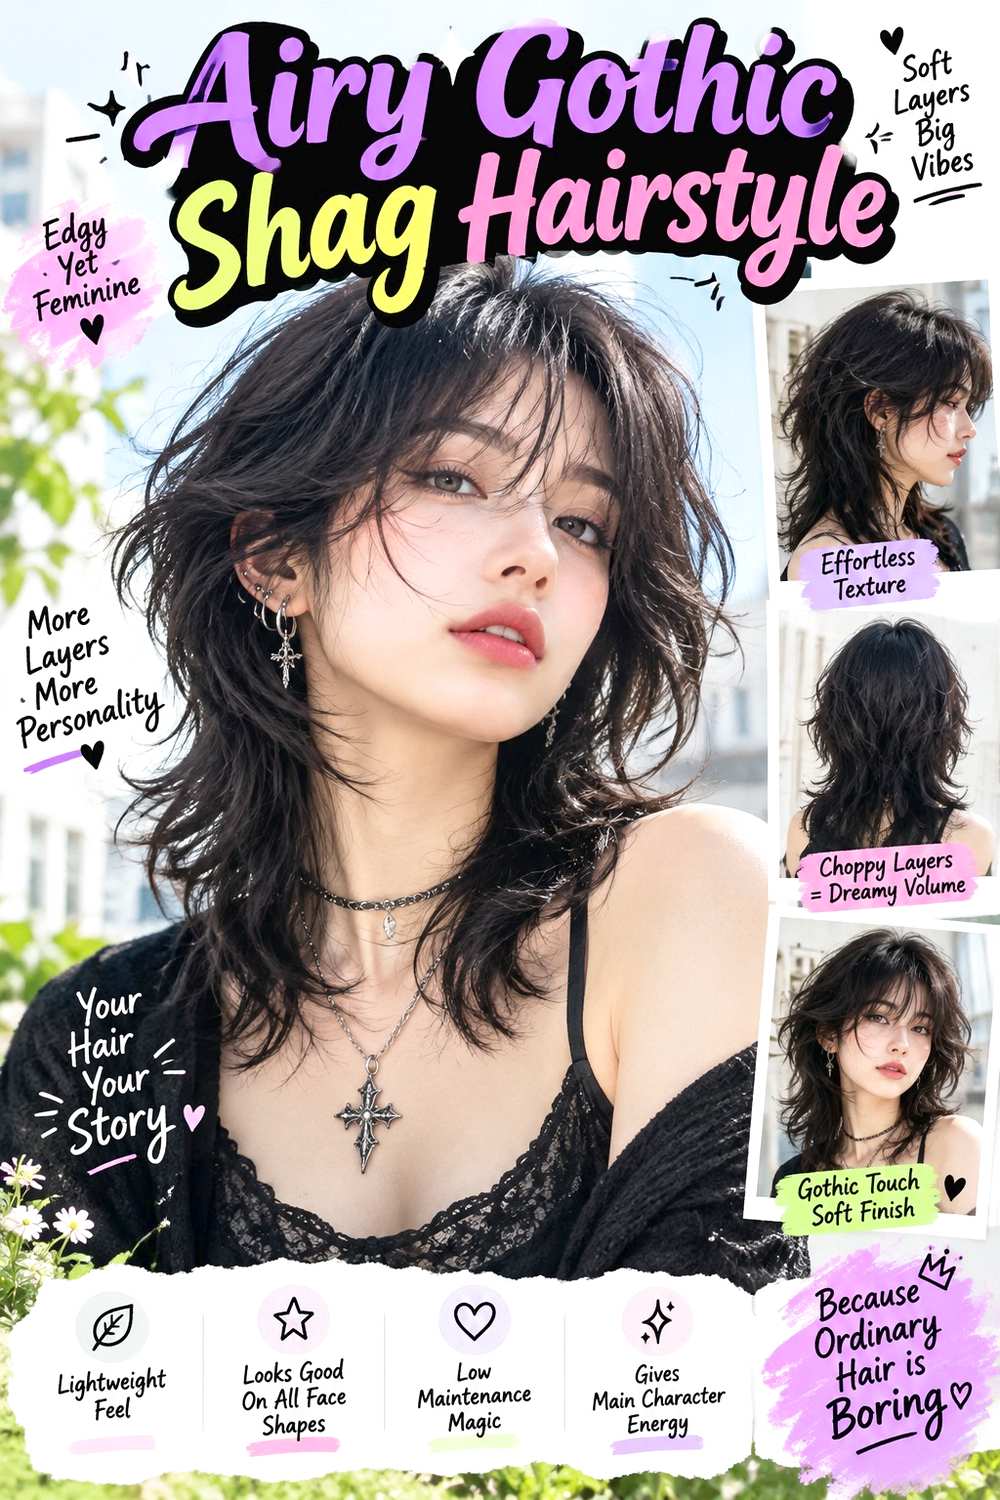
An airy shag gives vamp-romantic styling a less polished, more undone direction while keeping the face frame soft. Use a wispy fringe or open center part, place shorter layers around the cheekbones and crown, and let the perimeter fall around the shoulders with enough weight to avoid a stringy finish. Natural bends, loose waves, or soft curls can separate the layers without making them look sharply choppy. Straight, wavy, and curly hair can all support the shape when layer placement reflects density and shrinkage.
Work lightweight mousse near the roots, use a diffuser to encourage natural movement, and finish with a small amount of texturizing spray through selected upper layers. A quick refresh can involve re-dampening the crown and fringe; a full wash-day style takes longer depending on texture and density. The haircut needs reshaping when the face frame no longer sits at its intended landmark or the crown loses visible separation.
At the salon, point to exactly where you want the shortest face-framing layer to finish and how full you want the bottom edge to remain. If your hair is curly, judge those landmarks in the dry pattern. The goal is softness and movement, not indiscriminate thinning through every section.
Pro tip:
Refresh the crown by dampening only the shortest layers and encouraging them upward from the roots. Targeted movement keeps the lower perimeter from becoming unnecessarily fluffy.
Make It Work for You:
For lower-density hair, keep the bottom edge fuller and concentrate shorter layers around the crown and face. You retain the airy shag character without thinning every length.
Watch Out For:
Aggressive thinning can make the ends look stringy rather than soft. Ask for purposeful layer placement and preserve enough perimeter weight for a clear silhouette.
Conclusion
Vamp romantic hairstyle ideas can move from polished side-part waves to airy shags, ribboned half-up styles, braids, low ponytails, and softly pinned buns. Longer hair offers more room for cascading curls and elaborate anchors, while bobs and lobs can rely on fringe, parting, and controlled bends for the same mood. Fine or lower-density hair often benefits from smaller accessories and less expansion; dense hair can support broader braids and fuller knots. Straight hair may make sleek structure easier, while curls and coils can supply natural movement without being flattened. Compare the amount of face framing, crown volume, texture, accessory placement, and styling effort you actually want. The strongest choice is one that preserves comfort and works with your normal routine.
Before Your Salon Visit
Choose one or two favorites and save references that clearly show the parting, wave shape, fringe, loose pieces, braid width, bun height, or accessory placement you like. Discuss your natural texture, density, face shape, preferred length, upkeep tolerance, and usual styling routine. If the idea is temporary, focus on the exact finish and comfortable anchoring rather than assuming you need a haircut. If you do want fringe or layers, point to the finished dry length and volume you want before any cutting begins.
FAQs
Can vamp romantic hairstyles work with curly or coily hair?
Yes. Curls and coils can suit low buns, half-up styles, braids, ponytails, and loose romantic shapes without being straightened first. Keep the natural pattern visible, choose face-framing pieces in their dry position, and use secure but comfortable anchors rather than relying on tight tension.
Do I need long hair for a vamp romantic hairstyle?
No. Long hair gives you more room for cascading curls, crown braids, and larger updos, but a jaw- or neck-length bob can create the same mood through wispy fringe, a deep part, polished bends, or a small ribbon. Placement and finish matter more than maximum length.
How can I keep a ribbon or floral accessory from slipping?
Build the hairstyle’s anchor first, then attach the accessory to that secure base instead of asking the ribbon or clip to hold the whole style. Textured or slippery hair may need extra grip at the attachment point, but tightening until it hurts is not a useful solution.
Which vamp romantic styles need the most upkeep?
Heat-set waves, shaped finger waves, and short fringe usually need more frequent attention because their finished form changes quickly. Low ponytails, natural-texture buns, and anchored half-up styles can be quicker to refresh. Haircut maintenance and daily styling effort are separate, so compare both before choosing.