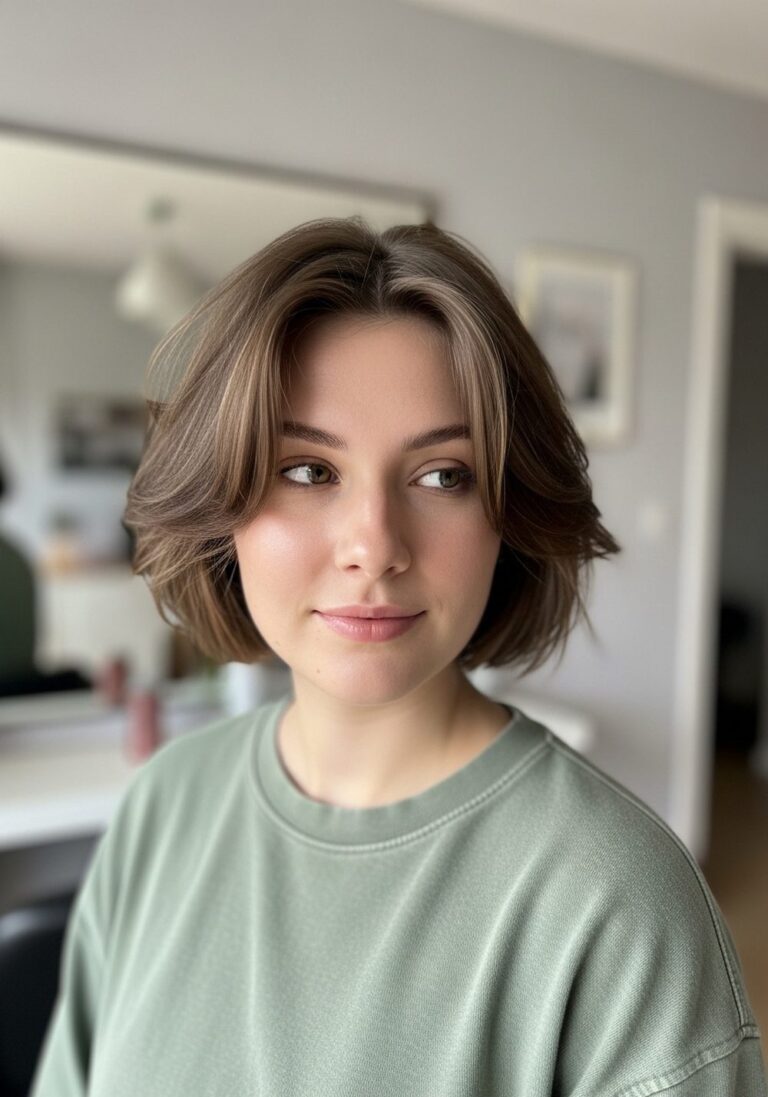
18 Volume Hairstyles for Thin Hair That Make Hair Look Fuller

Volume hairstyles for thin hair work best when they preserve visible density instead of creating height at the expense of the ends. Blunt bobs, collarbone lobs, broad waves, shallow half-up sections, compact buns, and carefully placed root lift can all create a fuller outline. Parting also changes the balance quickly: a side part shifts more hair toward one side, while a center part can make a strong perimeter and soft face framing feel symmetrical.
Thin hair usually refers to lower overall density, while fine hair describes individual strand thickness, so the same technique will not suit everyone equally. Lower-density hair often benefits from restrained layering, smaller gathered sections, and stronger ends. Straight and wavy textures can use broad bends for movement, while curly hair often looks fuller when curl groups remain defined rather than separated excessively. Face-framing pieces are most useful when their length and amount are chosen carefully.
Styling effort can stay realistic. A root or front refresh may take only a few minutes, while a full blowout, curl set, or wash-day definition takes longer. Lightweight styling, moderate heat, and strategic shape usually create softer volume than aggressive teasing or heavy product. Maintenance should focus on keeping the perimeter substantial, reshaping layers when they lose movement, and avoiding unnecessary weight removal.
Quick List
- Blunt Collarbone Lob With Root Lift Hairstyle
- Side-Part Airy Bob Hairstyle
- Soft Curtain Bangs Midi Cut Hairstyle
- Broad Wave Shoulder-Length Hairstyle
- Rounded Blowout Lob Hairstyle
- Half-Up Crown Lift Hairstyle
- Low Ponytail With Soft Crown Volume Hairstyle
- Textured Claw Clip Twist Hairstyle
- Mini Bubble Ponytail Hairstyle
- Loose Side Braid With Fuller Edges Hairstyle
- Rolled Low Bun Hairstyle
- Soft Top Knot With Face Framing Hairstyle
- Short Pixie Lift Hairstyle
- Wavy Shag With Long Layers Hairstyle
- Deep Side-Part Sleek Lob Hairstyle
- Curly Bob With Defined Volume Hairstyle
- Braided Crown With Loose Lengths Hairstyle
- Soft Flipped-End Midi Hairstyle
Blunt Collarbone Lob With Root Lift Hairstyle

A blunt collarbone lob creates fullness through a strong lower edge while keeping enough length for movement. Use a center or slight side part, keep the perimeter close to one length, and limit short interior layers that could make the ends look sparse. Gentle root lift through the crown gives the upper shape some air, while the ends can stay straight or softly beveled. Longer face-framing sections beginning near the jaw add movement without removing too much density from the sides.
Straight and softly wavy thin hair works especially well with this shape because the collarbone length avoids excessive weight while preserving a substantial outline. Apply heat protectant before using a medium round brush during blow-drying, then finish the roots with lightweight volumizing mousse. A quick refresh may take five minutes by lifting only the crown and front; full wash-day styling can take roughly 20–35 minutes depending on density and drying time.
At the salon, ask for the dry perimeter to land near the collarbone and explain that keeping weight through the ends is a priority. If layering is needed, request longer pieces placed only where movement helps. As the cut grows below the shoulders, the root lift may soften and the ends can begin looking flatter.
Pro tip:
Lift only the crown and front roots instead of trying to make every section voluminous. Concentrated height gives the lob shape while the lower edge stays smooth and dense.
Make It Work for You:
For very low density, keep face framing longer and minimal. A jaw-length starting point can add movement without noticeably reducing the fullness of the sides.
Watch Out For:
Avoid heavy thinning at the perimeter. Removing weight from the ends may create movement initially, but it can weaken the fuller outline this lob depends on.
Side-Part Airy Bob Hairstyle

A side-part bob shifts more hair toward one side, which can create soft fullness around the crown and cheek without heavy styling. Keep the cut around the jaw or upper neck with a substantial perimeter, then use a moderate side part rather than an extreme one. The fuller side can curve lightly around the face, while the smaller side tucks behind the ear. Minimal crown layers help the lower edge remain dense, and a soft root lift near the part prevents the top from sitting completely flat.
Straight and wavy thin hair usually adapts easily to this compact shape. Apply heat protectant before using a small round brush to lift the fuller side during blow-drying, then add lightweight mousse at the roots for flexible support. A quick refresh may take three to five minutes by resetting the part and front section; a full wash-day blowout takes longer according to texture and density.
At the salon, specify the dry finished length and which side you normally part. Ask to preserve weight through the visible perimeter even if some internal adjustment is needed. As the bob grows toward the shoulders, the side lift often becomes softer, so a perimeter reshaping can restore the compact silhouette without requiring major layering.
Pro tip:
Dry the fuller side briefly in the opposite direction, then flip it back to the final part. That change in root direction creates lift without aggressive teasing.
Make It Work for You:
If the temples are sparse, use a moderate part rather than moving it very far sideways. This keeps enough coverage on both sides while still adding asymmetry.
Watch Out For:
A very deep side part can expose more scalp on the smaller side. Shift the part inward if the extra root volume costs too much visible coverage.
Soft Curtain Bangs Midi Cut Hairstyle
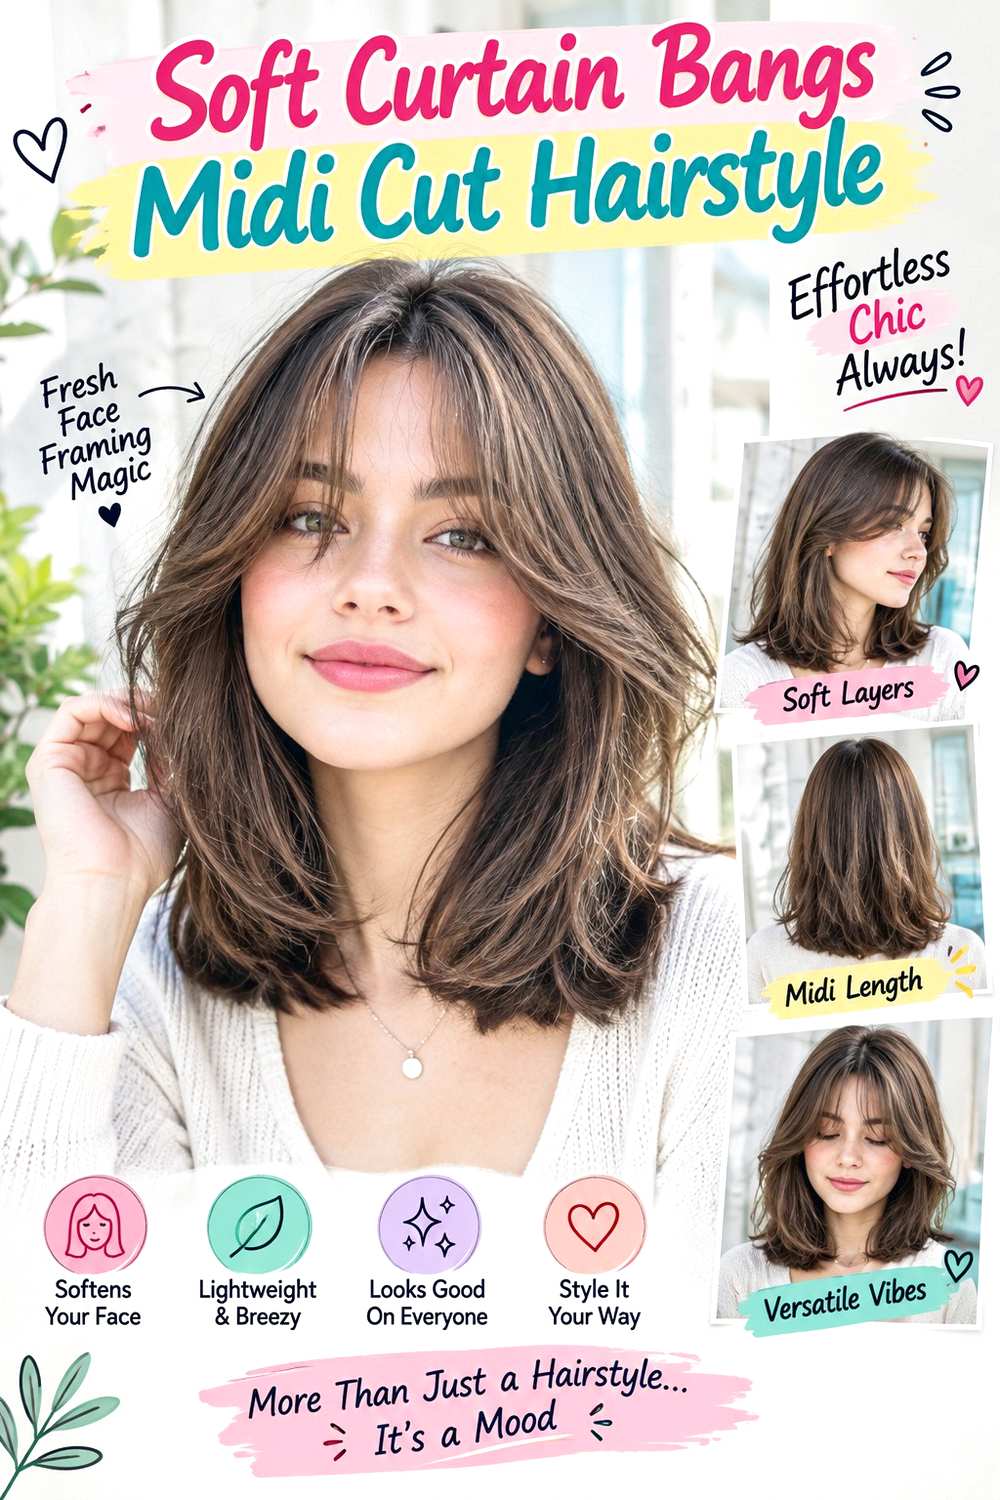
A midi cut with soft curtain bangs adds movement around the face while keeping the main length substantial. Let the perimeter fall between the shoulders and upper chest, maintain a relatively blunt lower edge, and part the fringe through the center. The shortest bang pieces can sit near the upper cheekbones, while the longer corners blend toward the jaw. Keep the crown lightly lifted and use only long layers through the rest of the hair so the ends do not become feathered.
Straight and wavy thin hair works especially well when the fringe section remains narrow. Apply heat protectant before using a small round brush to direct the curtain bangs away from the face, then use lightweight volumizing mousse at the front roots. A quick refresh may take five minutes because only the fringe and crown need attention; full wash-day styling takes longer if the entire length is blow-dried.
At the salon, specify the curtain bangs at their dry finished length and ask for a shallow fringe section if overall density is limited. Keeping the outer corners longer makes grow-out easier and preserves more hair at the temples. The midi perimeter should remain strong enough that the softer front does not make the lower shape look thin.
Pro tip:
Dry the fringe forward first, then divide it through the center as it cools. This creates soft root lift before the bangs open away from the face.
Make It Work for You:
For lower-density hair, keep the curtain fringe narrow and the outer corners long. You still get movement without sacrificing too much hair from the sides.
Watch Out For:
A fringe section that begins too far back can reduce temple fullness quickly. Keep the parting shallow when maintaining visible density is the main goal.
Broad Wave Shoulder-Length Hairstyle

Broad waves can make shoulder-length hair look more substantial because larger sections stay visually grouped instead of separating into many thin curls. Use a center or slight side part, begin the strongest bends around the cheekbones or jaw, and leave the final inch softly curved rather than tightly curled. A full lower perimeter helps the waves look connected, while restrained layering keeps the ends from breaking into wispy pieces.
Straight and naturally wavy thin hair can both use this design. Apply heat protectant before working with a large-barrel curling iron, then allow each section to cool before arranging the waves with your hands. A quick refresh may take five to eight minutes by reshaping only the front and any flattened areas; a full wash-day wave set takes longer depending on length and density.
At the salon, explain that you want movement without extensive layering and specify where any face-framing pieces should begin. Jaw- or chin-length framing often preserves more density than very short cheekbone layers. As the hair grows farther below the shoulders, the added weight may stretch the wave pattern, so trimming the perimeter can restore movement without removing much overall length.
Pro tip:
Work with larger hair sections instead of creating many separate curls. Broad bends help the strands stay grouped, giving the overall shape a softer, fuller appearance.
Make It Work for You:
For very thin hair, wave mainly the front and upper lengths while keeping the lower ends smoother. This preserves a stronger-looking perimeter with less heat.
Watch Out For:
Small tight curls can break the hair into thin-looking pieces. Choose larger bends if your priority is a cohesive, fuller silhouette rather than maximum texture.
Rounded Blowout Lob Hairstyle

A rounded blowout lob creates soft volume by lifting the roots and curving the ends without making the cut look heavily layered. Keep the length around the shoulders or collarbone, use a center or soft side part, and preserve a solid lower edge. The crown should have a gentle arc rather than high teased volume, while the front sections curve away from the cheek and the ends turn slightly inward or outward for movement.
Straight and softly wavy thin hair responds well because the shorter length does not pull the roots down as strongly as long hair can. Apply heat protectant before blow-drying with a medium round brush, then work lightweight volumizing mousse through the root area for flexible support. A quick refresh may take five to eight minutes by reworking the crown and front; a full blowout may take 20–40 minutes depending on density and natural texture.
At the salon, ask for a collarbone perimeter with longer layers placed only where they support the rounded shape. Explain that you want fullness through the ends rather than generalized thinning. As the lob grows, the curve can become flatter, so reshaping the perimeter or shortening a few long layers may restore the movement.
Pro tip:
Allow each lifted root section to cool before brushing it into place. Cooling helps the shape set, so you need less repeated heat to maintain soft volume.
Make It Work for You:
For lower-density hair, keep the blowout smoother through the ends and focus most of the lift at the crown. This protects the fuller lower outline.
Watch Out For:
Over-rounding every section can make the lob look fluffy rather than full. Concentrate the shape at the roots and front while keeping the perimeter cohesive.
Half-Up Crown Lift Hairstyle

A half-up crown lift creates visible height without taking too much hair away from the lower lengths. Gather a shallow section from the upper temples and crown, leave the side lengths mostly loose, and secure the section slightly below the highest point of the head. Before tightening completely, nudge the crown upward so it forms a smooth curve. Keep the remaining hair straight, waved, or softly textured, with only narrow face-framing pieces left out.
Medium and long thin hair works best because the loose lower section remains the main source of visible density. Use texturizing spray at the crown for grip and a small fabric-covered elastic for the half-up anchor. A quick refresh usually takes three to five minutes; full wash-day styling takes longer if you also create waves or a blowout through the lengths.
For salon planning, keep crown layers long enough to reach the half-up anchor, especially if this is a regular style. If the lower hair looks sparse after gathering, reduce the upper section rather than teasing the ends. The defining feature is the softly lifted crown, not the amount of hair pulled back, so a small anchor can create the effect efficiently.
Pro tip:
Lift the center gently before the elastic is fully tight. Small adjustments create crown height while keeping the surface smooth and reducing the need for backcombing.
Make It Work for You:
For very thin hair, gather only the true crown section and leave the temple hair down. More side density helps the overall silhouette stay fuller.
Watch Out For:
Do not pull the half-up section dramatically wide after securing it. Fine coverage can separate quickly and reveal gaps through the crown.
Low Ponytail With Soft Crown Volume Hairstyle
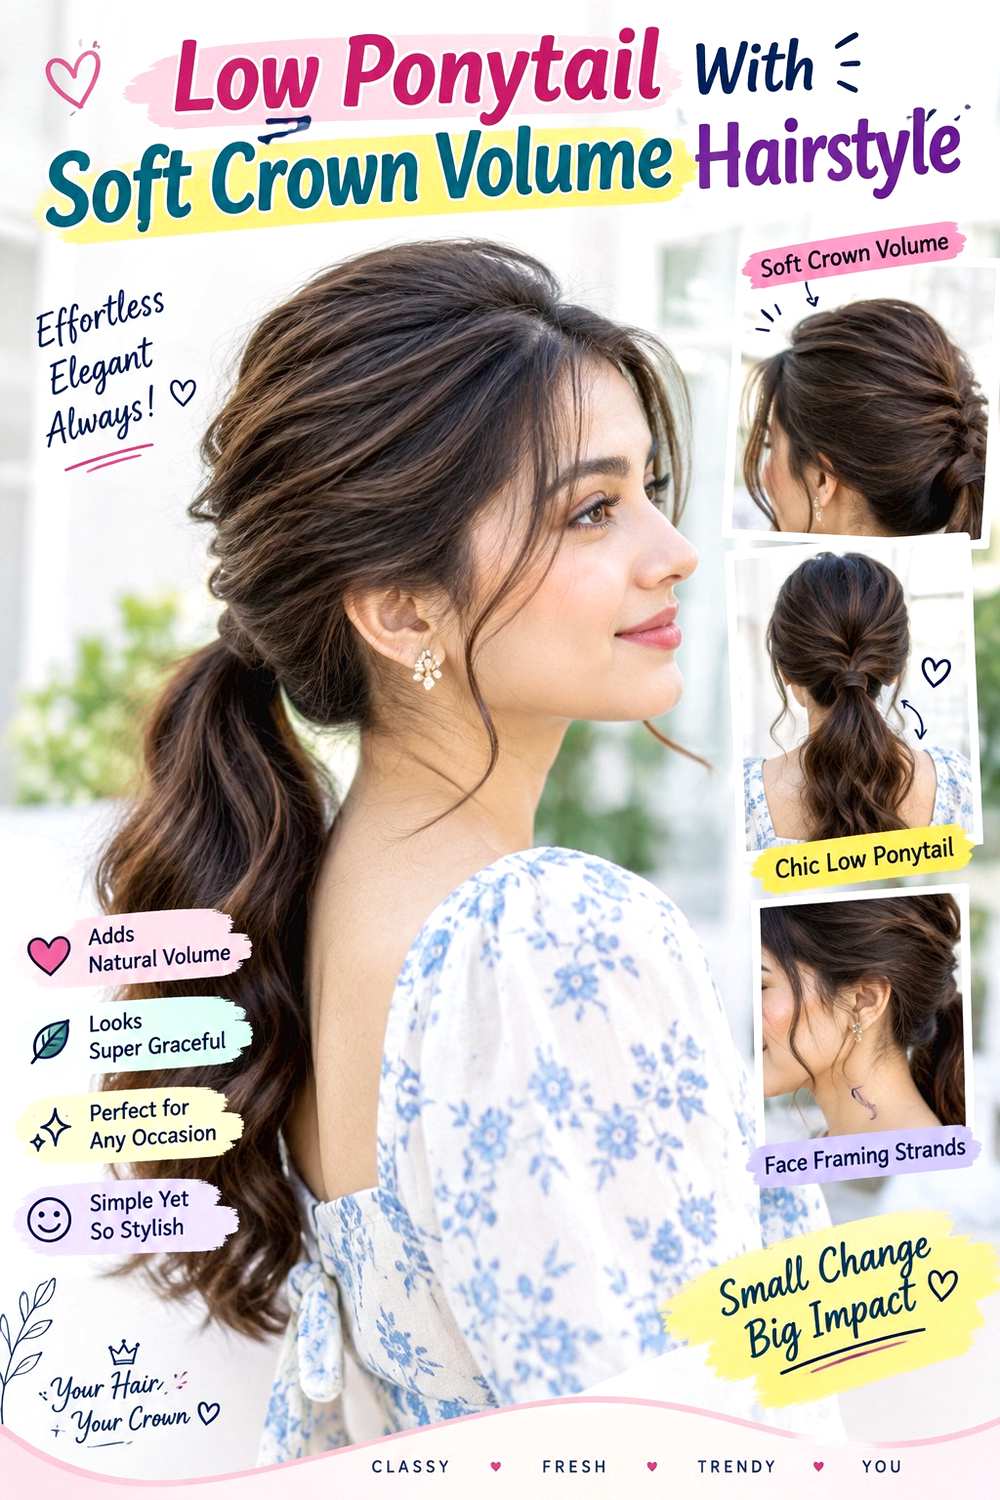
A low ponytail can look fuller when the crown has a soft curve and the tail stays visually compact. Use a center or gentle side part, gather the hair at the nape, and secure it without pressing the upper back completely flat. Lift the crown slightly before the elastic is fully tight, then leave the tail smooth, softly waved, or gently bent. Keep face-framing pieces minimal so enough hair remains in the ponytail to create a substantial lower shape.
Medium and long thin hair works particularly well because the low anchor keeps more visible tail length. Use texturizing spray at the crown, a fabric-covered elastic for the anchor, and a tail comb for small root adjustments. A quick refresh may take five minutes; a full wash-day version takes longer if the tail also needs blow-drying or heat styling.
At the salon, specify how often you wear low ponytails and where the shortest face-framing layer should finish. Longer side and back layers reach the nape more easily and preserve tail density. If the crown goes flat during the day, lift the upper section locally rather than retightening the ponytail or pulling more strands around the face.
Pro tip:
Adjust the crown from the center outward rather than tugging randomly. Small, even lifts create a smoother curve and keep the surface from separating into visible gaps.
Make It Work for You:
For very low density, keep the tail mostly smooth. Grouped strands usually look more substantial than a ponytail divided into many curls or textured pieces.
Watch Out For:
Heavy teasing can make fine coverage uneven around the crown. Use controlled root lift instead of building a large backcombed section beneath the surface.
Textured Claw Clip Twist Hairstyle
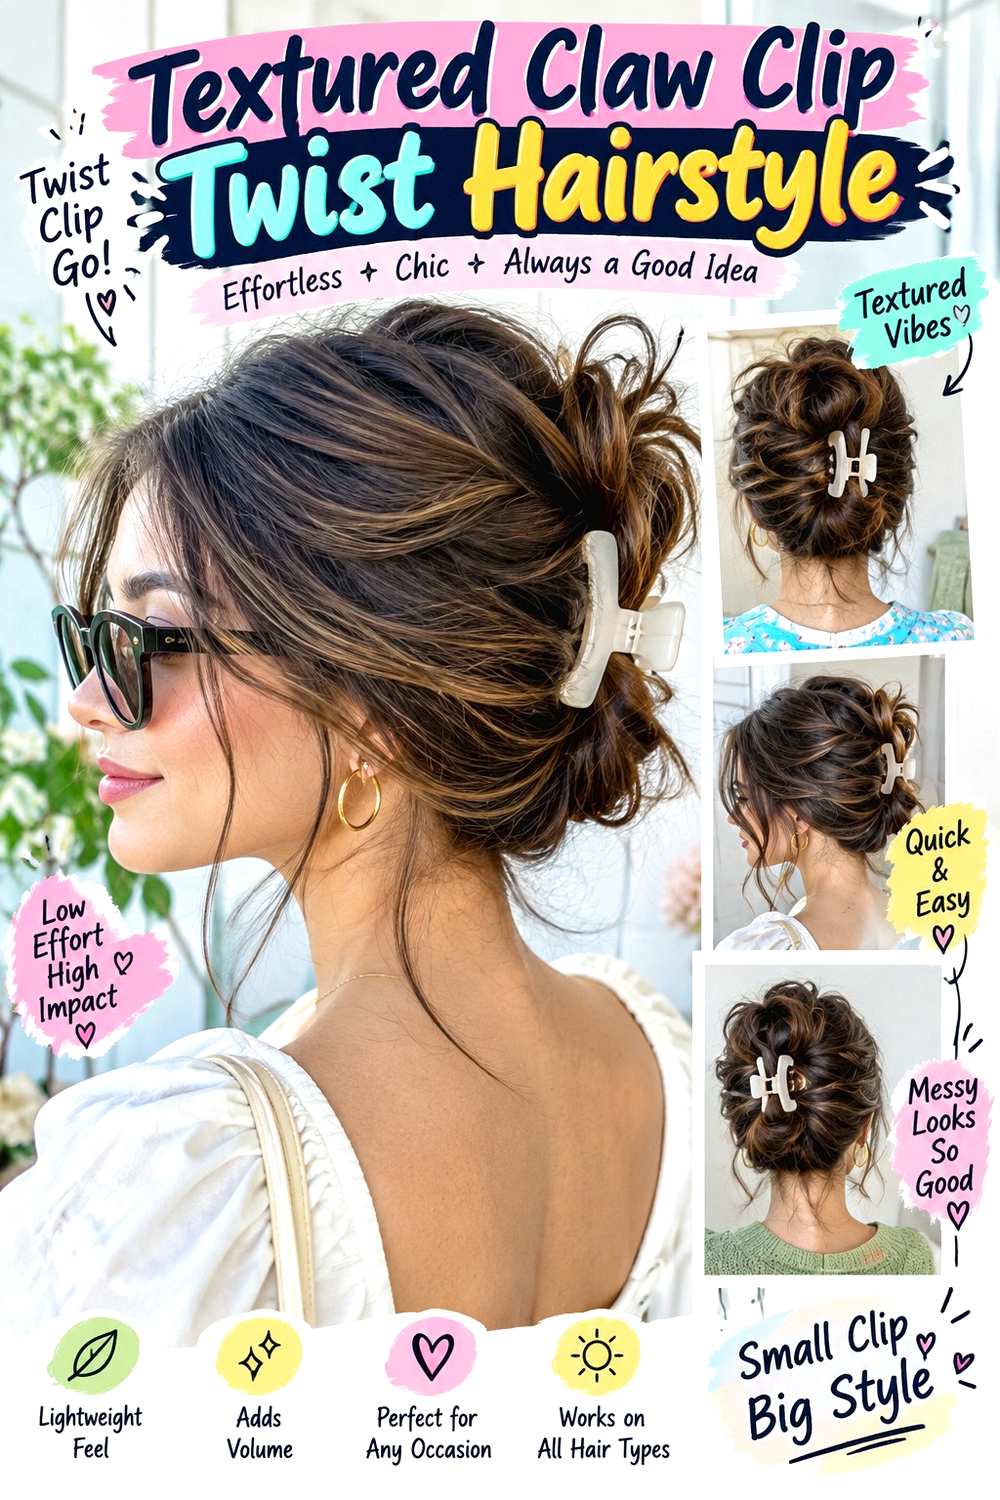
A claw clip twist creates fullness by folding the hair vertically against the back of the head instead of letting it hang in a narrow line. Gather the length at the center, twist it upward, and fold the remaining tail inward or downward. Keep the fold a little wider rather than tightly compressed, then close the clip over the thickest section. A center or side part works, and several controlled ends can remain visible if they add softness.
Medium and long thin hair can use this style when the claw is proportionate to the actual section. Apply texturizing spray through the mid-lengths for grip and secure the fold with a medium claw clip with closely spaced teeth. A quick refresh may take two to four minutes; full wash-day styling takes longer if you want a blowout or waves beforehand.
For salon planning, explain that claw clips are part of your routine so the back layers remain long enough to reach the fold. Excessive short layering can reduce the available density and create many loose pieces. If the clip slides, switch to a smaller or better-fitting claw rather than twisting harder. The volume should come from the width of the folded hair, not increased tension.
Pro tip:
Spread the folded section slightly before closing the claw. A broader vertical shape can look fuller while using exactly the same amount of hair.
Make It Work for You:
For very thin hair, choose a smaller claw with a firm spring. Oversized hardware may not grip a narrow section securely enough.
Watch Out For:
A large decorative claw can overwhelm thin hair visually. Match the accessory scale to the folded section instead of choosing size only for appearance.
Mini Bubble Ponytail Hairstyle

A mini bubble ponytail creates dimension through repeated rounded sections while keeping the tail controlled. Gather the hair into a low or mid-height ponytail, then add small elastics at short intervals down the length. Expand each section modestly, keeping the first bubble compact and the lower ones slightly fuller. A clean center or side part helps the crown look intentional, while a few narrow front pieces can stay loose if the tail still retains enough density.
Medium-long and long thin hair works best because several small bubbles need length to develop. Use snag-free elastics for the anchors and light texturizing spray through the tail for grip. A quick refresh may take six to eight minutes; full wash-day styling takes longer if the hair also needs drying or smoothing.
At the salon, ask to keep the lower perimeter strong if you wear bubble ponytails often. Too many short layers can escape between elastics and make the repeated sections look uneven. For lower density, create fewer bubbles instead of pulling each section dramatically wider. The soft volume comes from controlled shape and spacing rather than from separating the hair until light shows through it.
Pro tip:
Set every elastic before expanding the sections. Seeing the full tail first helps you judge how much width each bubble can handle without creating transparent areas.
Make It Work for You:
For very thin hair, make only two or three modest bubbles. Fewer divisions keep more strands grouped together and can make the tail appear stronger.
Watch Out For:
Over-expanding the bubbles can expose gaps between fine strands. Stop once each section has a rounded shape rather than chasing maximum width.
Loose Side Braid With Fuller Edges Hairstyle
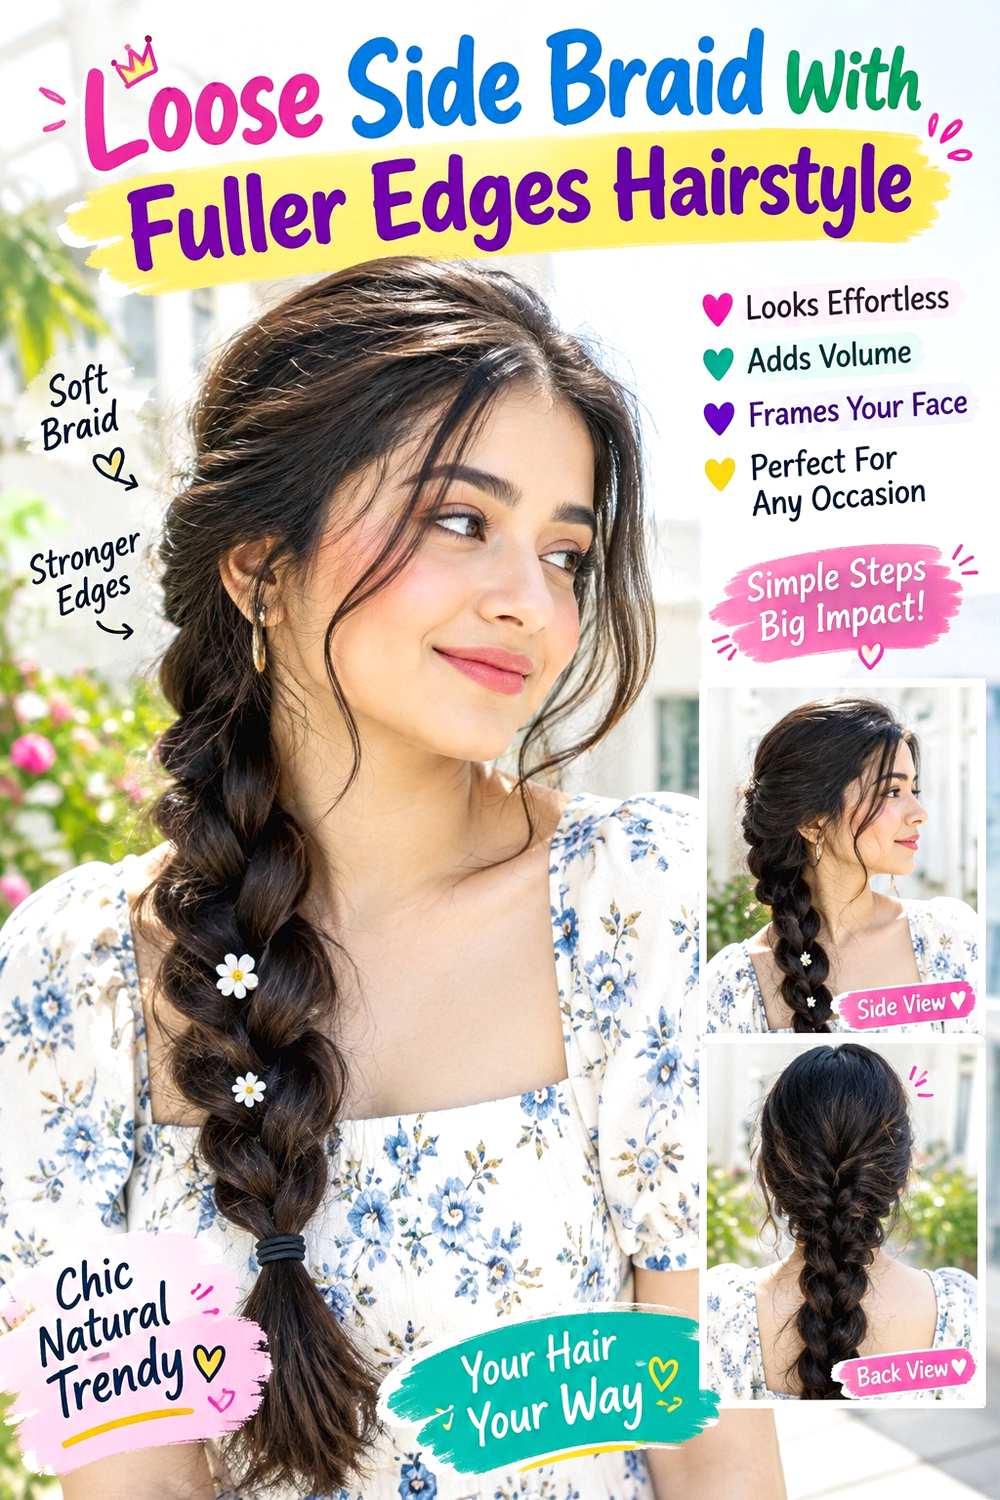
A loose side braid can appear wider when only selected outer loops are softened, while the center remains compact enough to hold visual density. Use a side or off-center part, gather the hair behind one ear, and create a three-strand braid beginning around the lower ear or nape. Keep the first crossings secure, then gently loosen alternating edges through the middle. Leave the tail end firmer so the braid does not taper too dramatically.
Medium and long thin hair works especially well when the side layers are long enough to stay in the braid. Apply texturizing spray for grip and use a small fabric-covered elastic for the tail. A quick refresh may take five to seven minutes; full wash-day styling takes longer if detangling or blow-drying comes first.
For salon planning, specify where you want face-framing pieces to land and avoid heavy short layering through the sides if braid fullness matters. Jaw- or chin-length framing can soften the front without taking too much hair from the woven tail. If the braid still looks narrow, resist pulling every crossing outward. A few fuller edges create dimension while leaving enough structure to keep the braid cohesive.
Pro tip:
Loosen alternating outer loops after the braid is completely secured. Leaving the neighboring crossings untouched gives the woven pattern both width and structural support.
Make It Work for You:
For very low density, start the braid at the nape and keep face framing minimal. More strands stay available for the tail this way.
Watch Out For:
Pulling every loop wide can turn a narrow braid into a transparent one. Preserve the center and soften only the areas with enough coverage.
Rolled Low Bun Hairstyle
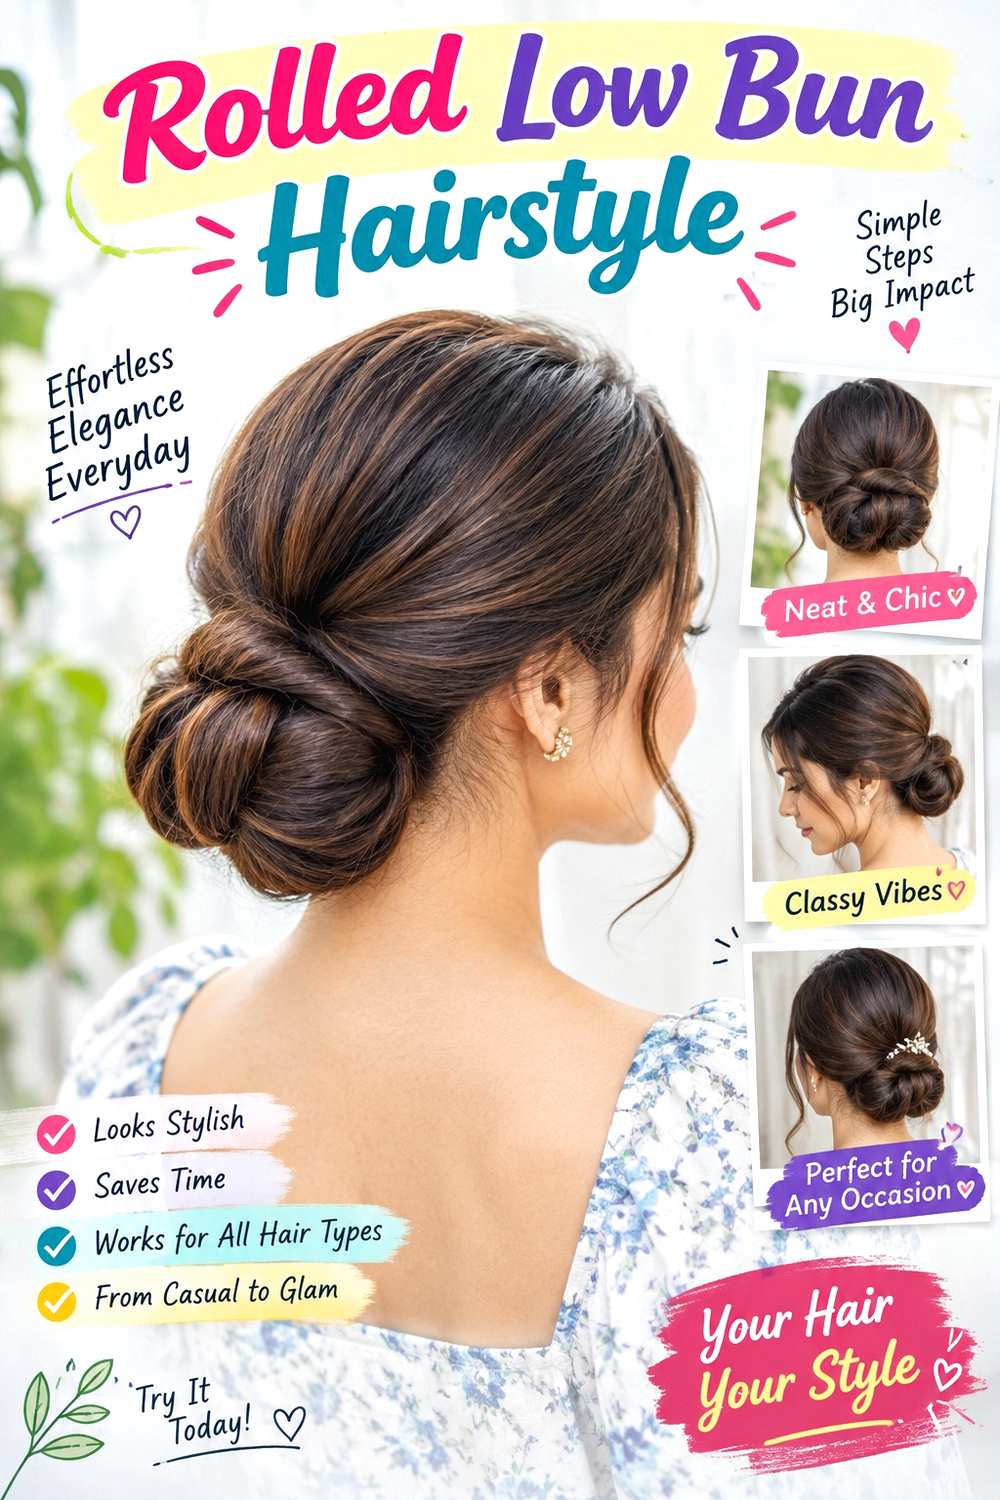
A rolled low bun creates a fuller-looking horizontal shape by spreading the hair across the nape rather than twisting it into a narrow coil. Gather the hair low, secure a ponytail, then roll the length upward toward the head and pin the fold from side to side. Keep the surface soft but controlled, and leave only narrow face-framing pieces loose. A center or gentle side part works, while the wider nape shape gives the impression of more hair without requiring a large bun.
Medium and long thin hair works best because the tail needs enough length for at least one fold. Use a fabric-covered elastic for the base and bobby pins to secure the roll. A quick refresh may take six to eight minutes; full wash-day styling takes longer if the hair needs drying or root shaping first.
At the salon, explain that low gathered styles are common in your routine and keep the back layers long enough to roll cleanly. Excessive nape layering can create many short ends and reduce coverage. If the bun looks narrow, spread the folded hair gently before pinning rather than backcombing it. Width creates the soft volume while the center remains secure.
Pro tip:
Anchor the two outer edges of the roll first, then reinforce the center. Securing the width early helps the bun retain a broader, fuller-looking shape.
Make It Work for You:
For shoulder-length thin hair, keep the roll compact and close to the nape. A smaller fully covered shape often looks denser than a larger one.
Watch Out For:
Do not loosen the structural center after pinning. Create softness along the outer edge so the bun stays secure and evenly covered.
Soft Top Knot With Face Framing Hairstyle

A soft top knot adds height while a few longer pieces around the face prevent the gathered style from looking severe. Position the anchor high but slightly behind the crown, wrap the tail loosely around the base, and pin the knot into a compact rounded shape. Leave one narrow section on each side around the jaw or chin, while keeping the rest of the hair in the bun. The goal is a softly raised silhouette, not an oversized knot stretched until gaps appear.
Medium and long thin hair can use this design when enough length remains for one wrap. Use a fabric-covered elastic for the anchor, bobby pins for the knot, and light texturizing spray through the tail for grip. A quick refresh may take five to seven minutes; full wash-day styling takes longer if the hair needs blow-drying or waves first.
For salon planning, keep face-framing sections relatively long and narrow if density is limited. Crown and nape layers should ideally reach the high anchor comfortably. If the bun looks small, work with a compact proportion rather than adding heavy teasing. A well-covered small knot often reads fuller than a larger shape with visible spaces.
Pro tip:
Spread the wrapped tail around the anchor before pinning it. Even distribution creates a rounder knot without needing extra hair, teasing, or tighter tension.
Make It Work for You:
For lower density, leave only one narrow framing piece on each side. More hair stays available for the knot while the front still feels soft.
Watch Out For:
Do not pull every outer loop wider to enlarge the bun. Thin hair can separate quickly, creating holes that reduce the illusion of fullness.
Short Pixie Lift Hairstyle

A short pixie can create volume by concentrating length through the top and fringe while keeping the sides controlled. Leave enough hair at the crown for a soft lift and directional sweep, with the front slightly longer so it can move across or away from the forehead. The sides should stay close enough to contrast with the top, but they do not need to be extremely short. A small amount of lift near the front can make the whole cut appear more dimensional.
Thin straight and softly wavy hair benefits from the reduced weight of a pixie, provided the top is not over-thinned. Work lightweight styling mousse through damp hair, then use your fingers while blow-drying to direct the roots briefly against their natural fall. A quick refresh may take two to four minutes; full wash-day styling is relatively short because there is less length to dry.
At the salon, specify how much top length you want and avoid generalized thinning through sparse areas. Keeping a substantial fringe and crown gives you more material for movement as the cut grows. When the top becomes too long, the roots may fall flatter, so targeted reshaping can restore lift without taking the sides dramatically shorter.
Pro tip:
Dry the crown slightly against its natural direction before guiding it back into place. That temporary root shift creates lift without needing aggressive teasing.
Make It Work for You:
If the sides are sparse, keep slightly more coverage there rather than clipping them extremely short. Balanced side density can make the lifted top look fuller.
Watch Out For:
Excessive thinning at the crown removes the hair needed to create volume. Preserve enough top weight for the strands to move together as one shape.
Wavy Shag With Long Layers Hairstyle
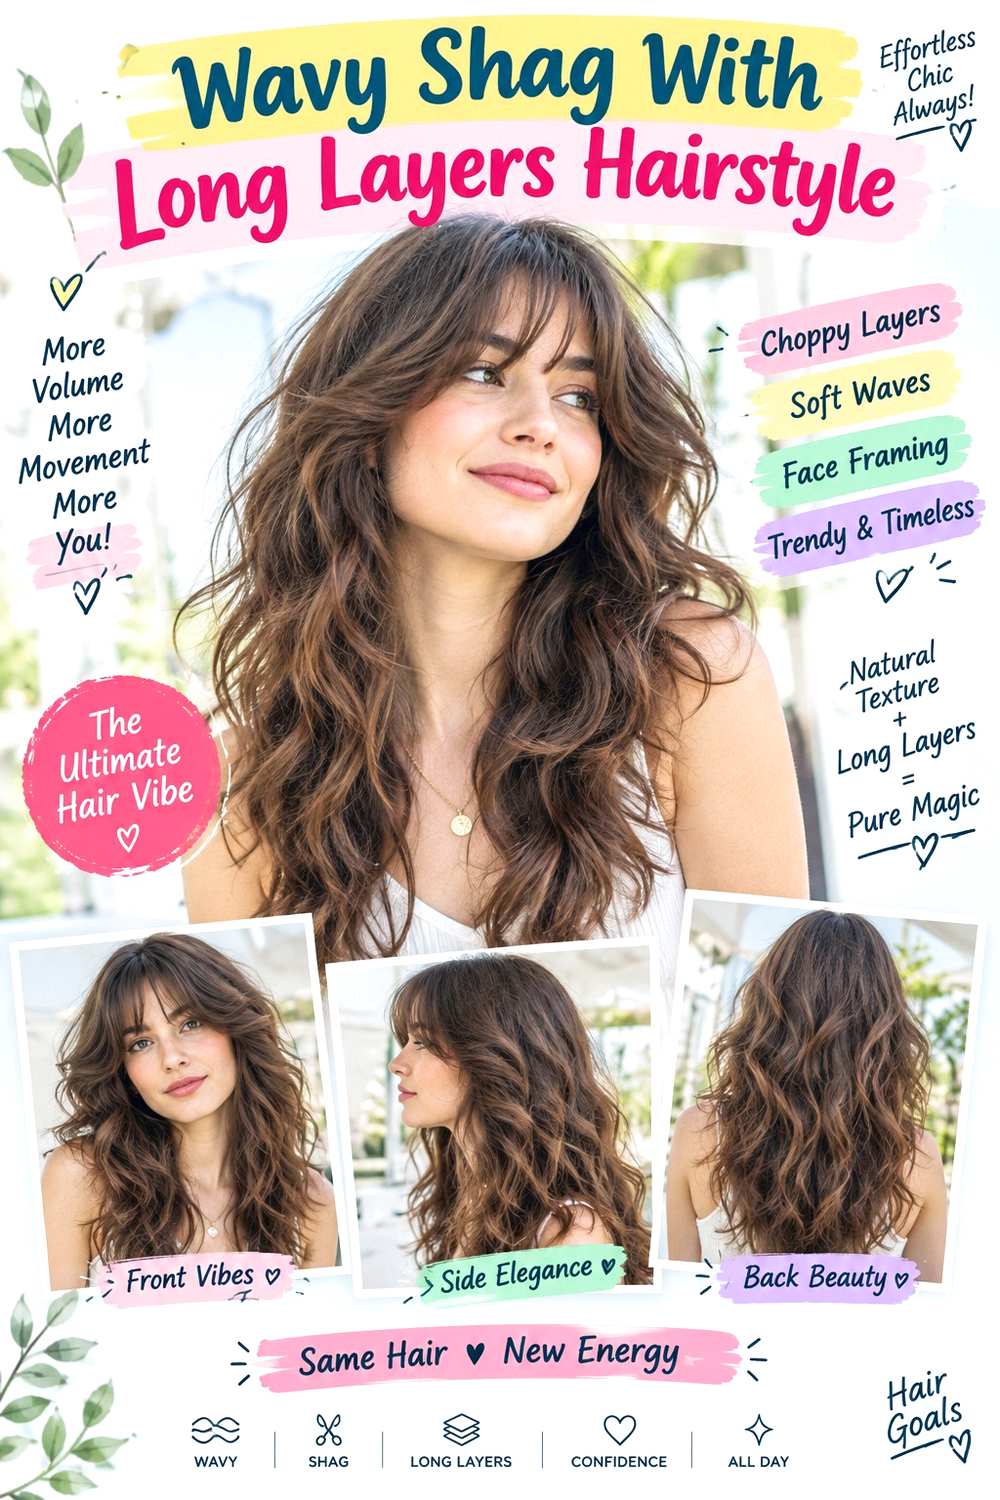
A restrained shag can add movement to thin hair when the layers stay long enough to preserve the perimeter. Keep the main length around the shoulders or upper chest, add face-framing pieces around the jaw, and place the shortest interior layers below the cheekbones rather than high at the crown. Natural or created waves can then open those layers gently while the ends remain substantial. A center or casual side part works, with moderate rather than exaggerated crown volume.
Naturally wavy thin hair often suits this shape because the texture activates layers without requiring much heat. Use lightweight mousse on damp hair and a diffuser to encourage the wave pattern while keeping the ends grouped. A quick refresh may take five to eight minutes by dampening only the flattened front sections; full wash-day styling takes longer according to drying time.
At the salon, ask for long shag layers instead of aggressive thinning and specify exactly where the shortest layer should begin. If overall density is low, keep more weight through the back and perimeter. As the cut grows, upper movement may soften before the length becomes inconvenient, so a small layer reshaping can restore bounce without sacrificing much overall hair.
Pro tip:
Refresh the shortest layers first instead of reworking the whole head. Restoring movement around the face and upper sides can make the entire shape feel fuller.
Make It Work for You:
For very thin hair, keep the shagging concentrated around the front and use fewer interior layers. This preserves more density through the back and ends.
Watch Out For:
Too many short crown layers can separate into sparse pieces. Keep enough length on top for the waves to bend and settle together rather than spike apart.
Deep Side-Part Sleek Lob Hairstyle

A sleek lob can still create the impression of fullness when a deep-but-controlled side part shifts more hair toward one side. Keep the cut around the shoulders or collarbone with a substantial lower edge, sweep the fuller section across the forehead or cheek, and tuck the smaller side behind the ear. The surface stays smooth, but a little lift directly beside the part prevents the shape from looking flat. Minimal layering keeps the ends dense.
Straight and softly wavy thin hair works especially well because the clean perimeter remains visible. Apply heat protectant before using a flat iron to smooth the lengths, then use lightweight volumizing mousse at the roots near the part. A quick refresh may take three to five minutes by resetting the front sweep; full wash-day styling takes longer if the whole lob needs blow-drying first.
At the salon, specify the dry perimeter and how deep you normally wear the part. Ask to keep the bottom edge strong rather than thinning it for movement. If one temple has noticeably lower density, avoid placing the part so far over that it exposes the area. As the lob grows, the sleek finish may begin to feel heavier, and a perimeter trim can restore balance.
Pro tip:
Lift only the first inch beside the part while keeping the lengths sleek. That small root contrast creates dimension without sacrificing the clean, fuller perimeter.
Make It Work for You:
For sparse temples, use a moderate side part and tuck the smaller side gently. You can create asymmetry while preserving useful coverage around the hairline.
Watch Out For:
An extreme part can trade volume for scalp exposure. Move it slightly inward if the fuller side looks good but the smaller side appears noticeably thin.
Curly Bob With Defined Volume Hairstyle

A curly bob can create fullness through a compact silhouette and well-defined curl groups rather than through teasing. Let the dry perimeter fall around the jaw, neck, or upper shoulders, with the widest point placed where the natural curl pattern expands best. Keep layers restrained so the ends remain full, and leave a few shorter curls around the cheekbones or jaw for framing. A center, side, or natural part can all work depending on growth direction.
Thin curly hair usually benefits from lightweight definition because heavy creams can collapse the roots and separate the ends. Apply curl gel to damp sections, then use a diffuser to dry while keeping curl groups intact. A quick refresh may take five to ten minutes by dampening only flattened front curls; full wash-day styling takes longer according to density and drying time.
At the salon, ask for the bob to be judged at its dry finished length and discuss shrinkage before removing length around the face. If overall density is low, keep internal layers longer and preserve a strong outer perimeter. As the bob grows, the widest point may drop, so reshaping can restore the rounded volume without shortening every section significantly.
Pro tip:
Keep curl groups slightly larger instead of separating every strand. Grouped curls create a smoother outer shape and help the perimeter appear more substantial.
Make It Work for You:
For low-density curls, use fewer short layers and concentrate shaping around the outside. This keeps the bob rounded without sacrificing important fullness through the ends.
Watch Out For:
Heavy creams and oils can pull thin curls downward quickly. Use lightweight definition and add moisture only where the texture actually feels dry.
Braided Crown With Loose Lengths Hairstyle
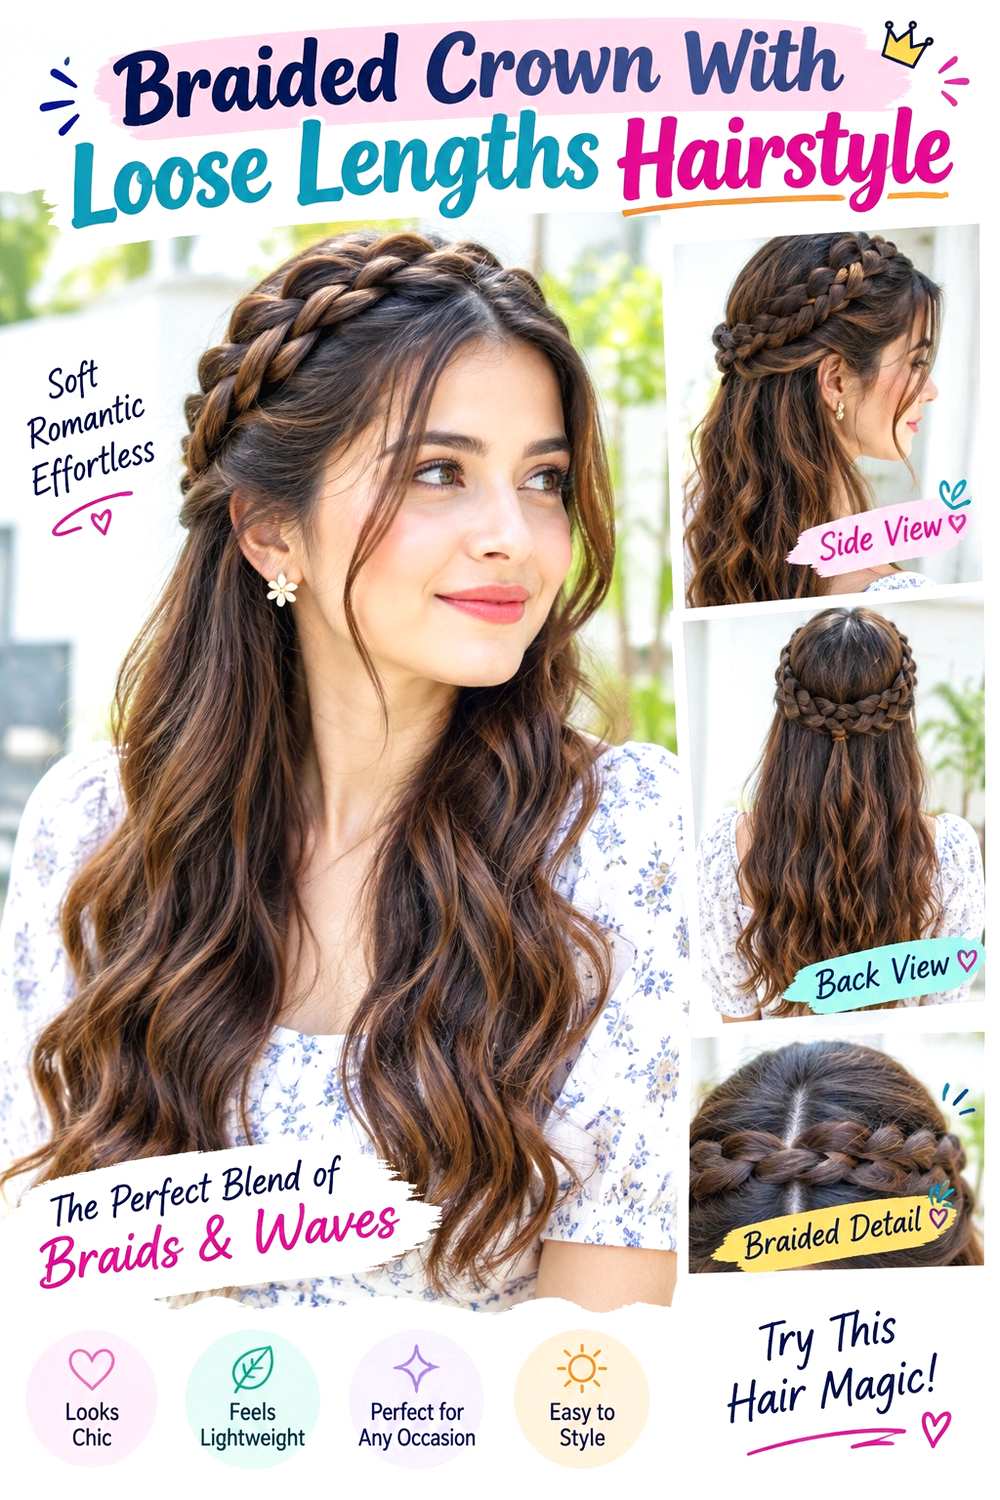
A narrow braided crown adds dimension around the upper head while leaving most thin hair loose, which helps preserve visible density. Take shallow sections from above both ears, braid them backward, and join or pin them below the crown. Keep the braids narrow but slightly softened along the outer edge, while the remaining lengths stay straight, waved, or naturally textured. A little crown lift between the braids can add height without removing more hair from the lower silhouette.
Medium and long thin hair works best because the side sections need enough length to reach the back comfortably. Use texturizing spray for braid grip, small clear elastics for the ends, and bobby pins for the center connection. A quick refresh may take six to eight minutes; full wash-day styling takes longer if the loose lengths also need heat or definition.
For salon planning, keep side layers long enough for braided styles if this is a regular choice. If the lower hair becomes sparse after braiding, reduce the section size rather than teasing the loose lengths. The woven detail should add dimension while most of the hair remains free below, so preserving density matters more than creating a very thick crown.
Pro tip:
Soften only the outer braid edges after the center is pinned. A little width adds dimension while the untouched inner crossings preserve structure and coverage.
Make It Work for You:
For very thin hair, use one slim braid from each side and leave the temple sections shallow. More strands remain loose and visually substantial.
Watch Out For:
Do not pull the braids dramatically wider. Fine coverage can separate into gaps quickly, making the crown appear sparse rather than softly voluminous.
Soft Flipped-End Midi Hairstyle

A midi cut with softly flipped ends creates movement at the perimeter without dividing thin hair into many layers. Keep the length between the shoulders and upper chest, use a center or side part, and maintain a relatively blunt bottom edge. The mid-lengths stay smooth while the final inch or two turns gently outward, creating visual width near the ends. Longer face-framing pieces can curve away from the cheek, while restrained crown lift keeps the top from looking flat.
Straight and softly wavy thin hair reaches the finish easily. Apply heat protectant before using a medium round brush to turn the perimeter outward during blow-drying, then use lightweight volumizing mousse at the roots if extra support is needed. A quick refresh may take five minutes by reshaping only the front and ends; full wash-day styling takes longer according to density and drying time.
At the salon, specify the dry midi length and ask to keep enough perimeter weight for the flip to hold as one line. Avoid excessive short layers through the ends, which can make the outward movement look feathered rather than full. As the cut grows, shoulder friction may change the flip, so a small length adjustment can restore a cleaner shape.
Pro tip:
Start the outward turn only near the ends. Keeping the mid-lengths smoother prevents the silhouette from becoming wide everywhere and preserves a stronger-looking perimeter.
Make It Work for You:
For very thin hair, make the flip subtle and keep the bottom edge dense. A small directional change can create width without separating the ends.
Watch Out For:
If the flip begins too high, the hair can look feathered and sparse. Keep the bend low so the ends remain grouped and visually substantial.
Conclusion
Volume hairstyles for thin hair look most convincing when they preserve density first and add lift second. Blunt bobs, collarbone lobs, midi cuts, and curly shapes benefit from stronger perimeters, while long layers and narrow face framing add movement without removing too much hair. Side parts shift fullness, center parts emphasize symmetry, and broad waves create dimension while keeping strands grouped. Compact buns, ponytails, braids, and half-up styles work best when the gathered sections stay proportionate to overall density. Consider natural texture, face shape, maintenance, and realistic styling effort before choosing more layers or height. Soft volume usually comes from thoughtful shape, lightweight support, and targeted lift rather than heavy teasing or widespread thinning.
Before Your Salon Visit
Choose one or two favorite references and save clear front, side, and back views. Discuss your strand thickness, overall density, face shape, preferred length, upkeep, and usual styling routine. Point out the exact fringe or face-framing length, layer starting point, perimeter weight, parting, crown volume, and finish you like. Explain where your hair tends to look sparse or fall flat so any shaping removes bulk only where appropriate instead of thinning areas that need visible density.
FAQs
What haircut can make thin hair appear fuller?
A strong perimeter often helps low-density hair look more substantial, particularly in bobs, lobs, and shoulder-length cuts. Restrained layers can still provide movement, but their placement matters. Ask how much hair will remain through the ends before removing significant weight from the cut.
Are layers bad for thin hair?
Not necessarily. Longer, selective layers can create movement without sacrificing too much density. Problems usually arise when many short layers or generalized thinning leave the perimeter sparse. The useful question is where each layer begins and whether it supports the overall shape you want.
Can thin curly hair still have volume?
Yes. A compact shape, controlled layering, and defined curl groups can create visible volume without heavy teasing. Judge the haircut at its dry length, account for shrinkage, and avoid products that weigh the roots down. Preserving a strong perimeter is often especially useful when overall density is low.
How can I add volume without teasing thin hair?
Try changing the part, lifting roots during blow-drying, using broad waves, or choosing shallow half-up styles that raise the crown without gathering much hair. Lightweight products and compact clips can also add shape. These methods create dimension without the tangling and visible gaps that aggressive backcombing can cause.