18 Soft Face-Framing Layers for Fall 2026
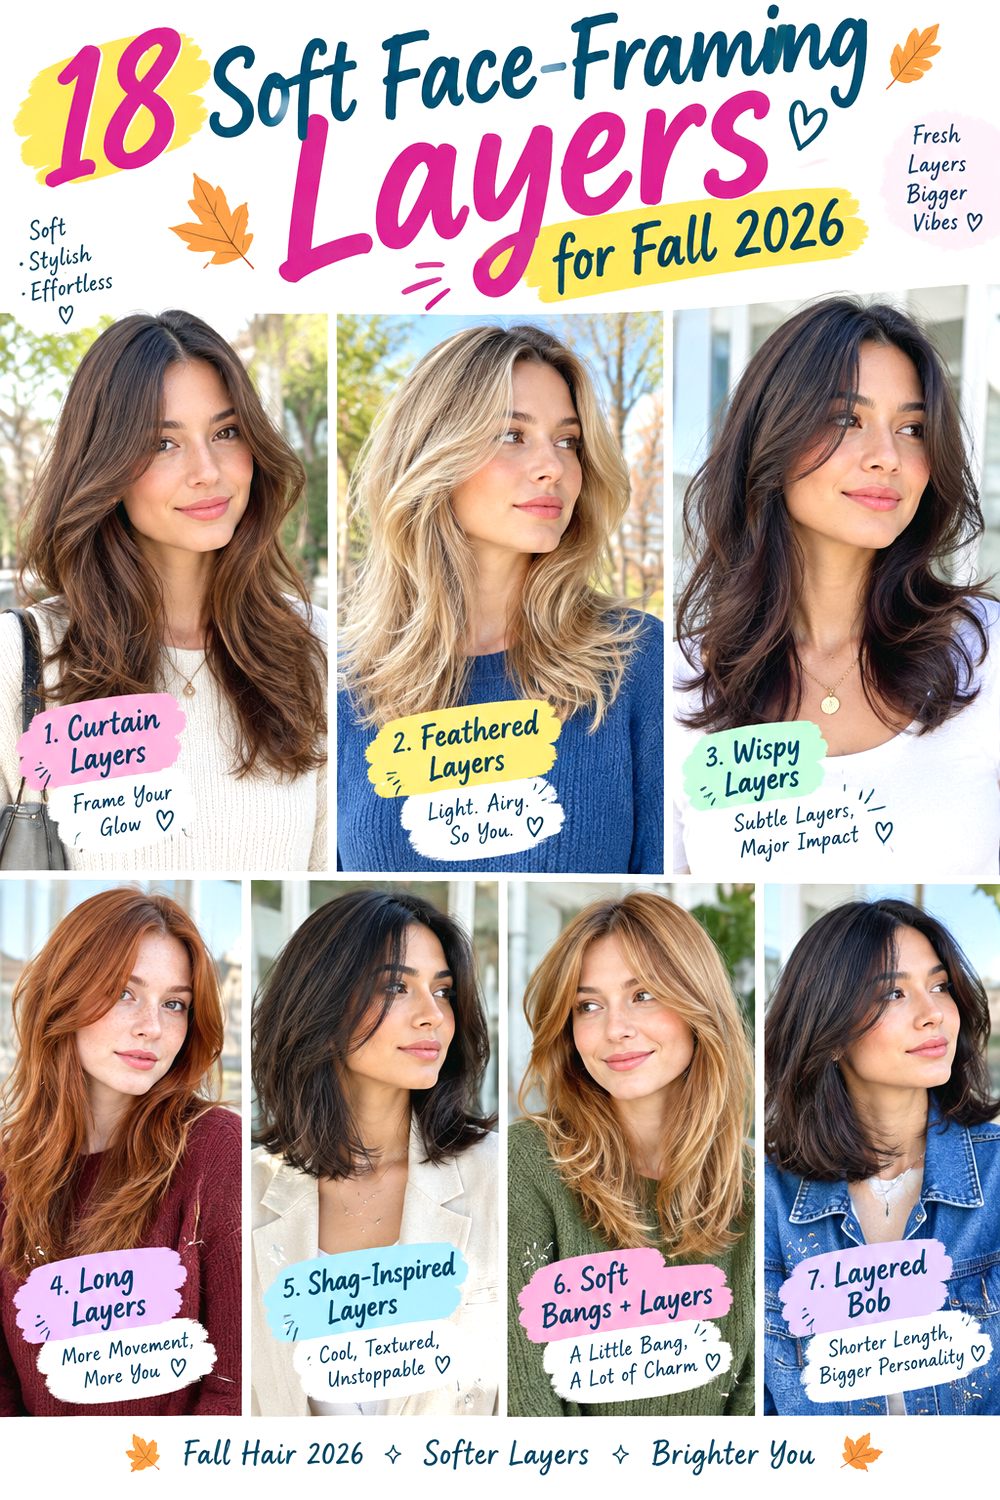
Soft face-framing layers add movement around the front of a haircut without requiring dramatic short layers throughout the rest of the hair. They can begin around the cheekbones, chin, jaw, or collarbone and then blend gradually into longer lengths. Some versions work with curtain bangs or wispy fringe, while others leave the forehead completely open. The result can be subtle and low-maintenance or more noticeable when the front layers are styled into a rounded blowout.
Hair texture and density should influence where those layers begin. Fine hair usually benefits from fewer front pieces and a fuller perimeter, while thick hair may need internal weight removal behind the face frame so the layers move without creating extra width. Straight hair shows every cutting line clearly, whereas waves and curls soften the transition and may need additional length to account for shrinkage.
Daily styling can range from air-drying to a quick round-brush pass through the front. Before choosing a version, consider your natural texture, density, preferred part, heat-styling habits, face shape, and how short you want the first layer to fall.
Quick List
- Cheekbone Soft Face-Framing Layers Hairstyle
- Chin-Length Face-Framing Layers Hairstyle
- Curtain Bangs With Soft Face-Framing Layers Hairstyle
- Long Butterfly Face-Framing Layers Hairstyle
- Fine-Hair Soft Face-Framing Layers Hairstyle
- Thick-Hair Face-Framing Layers With Internal Weight Removal Hairstyle
- Wavy Soft Face-Framing Layers Hairstyle
- Curly Face-Framing Layers With Long Fringe Hairstyle
- Center-Part Soft Face-Framing Layers Hairstyle
- Side-Part Soft Face-Framing Layers Hairstyle
- Collarbone Face-Framing Layers Hairstyle
- Long Hair With Subtle Face-Framing Layers Hairstyle
- Medium-Length Face-Framing Layers With Flipped Ends Hairstyle
- Air-Dried Soft Face-Framing Layers Hairstyle
- Razor-Softened Face-Framing Layers Hairstyle
- Rounded Blowout Face-Framing Layers Hairstyle
- Soft Face-Framing Layers With Wispy Bangs Hairstyle
- One-Length Hair With Minimal Face-Framing Layers Hairstyle
Cheekbone Soft Face-Framing Layers Hairstyle

Starting the shortest layer around the cheekbone gives long or medium-length hair noticeable movement without taking the front too short. The pieces can curve away from the face, fall softly forward, or blend into natural waves depending on how you style them. Straight and softly wavy medium-density hair show this placement especially clearly, while fine hair can use fewer sections to preserve fullness through the sides. Apply heat protectant before styling, use a medium round brush to shape the front, and finish with flexible hairspray if you want the bend to last. Styling takes about five to ten minutes when only the face frame needs attention. The layers grow out smoothly because they already begin at a longer point. At the salon, ask for the shortest piece to land directly around the cheekbone when dry and for each following section to graduate gently into the overall length instead of creating an obvious step.
Pro tip: Keep the cheekbone pieces slightly longer if your hair naturally flips upward, since strong bends can make the finished layer appear shorter.
Chin-Length Face-Framing Layers Hairstyle

Chin-length framing is a useful option when you want movement around the face without the commitment of shorter cheekbone layers or bangs. The first pieces sit near the chin and gradually connect into the remaining length, creating a soft diagonal line through the front. Straight, wavy, fine, and medium-density hair can all carry this placement because relatively little hair needs to be removed. A smoothing leave-in, medium round brush, and light texture spray work well for styling. The daily routine is quick: curve the front inward for a softer shape or direct it away from the face for more openness. This length also grows out easily and can usually be tucked behind the ears. At the salon, ask for the first layer to touch the chin when dry while keeping plenty of weight beneath it. The connection into the sides should be gradual rather than heavily feathered if you want the perimeter to remain substantial.
Pro tip: If you frequently wear ponytails, chin-length framing is often easier to manage than shorter pieces because it can usually tuck behind the ears or blend into the sides.
Curtain Bangs With Soft Face-Framing Layers Hairstyle
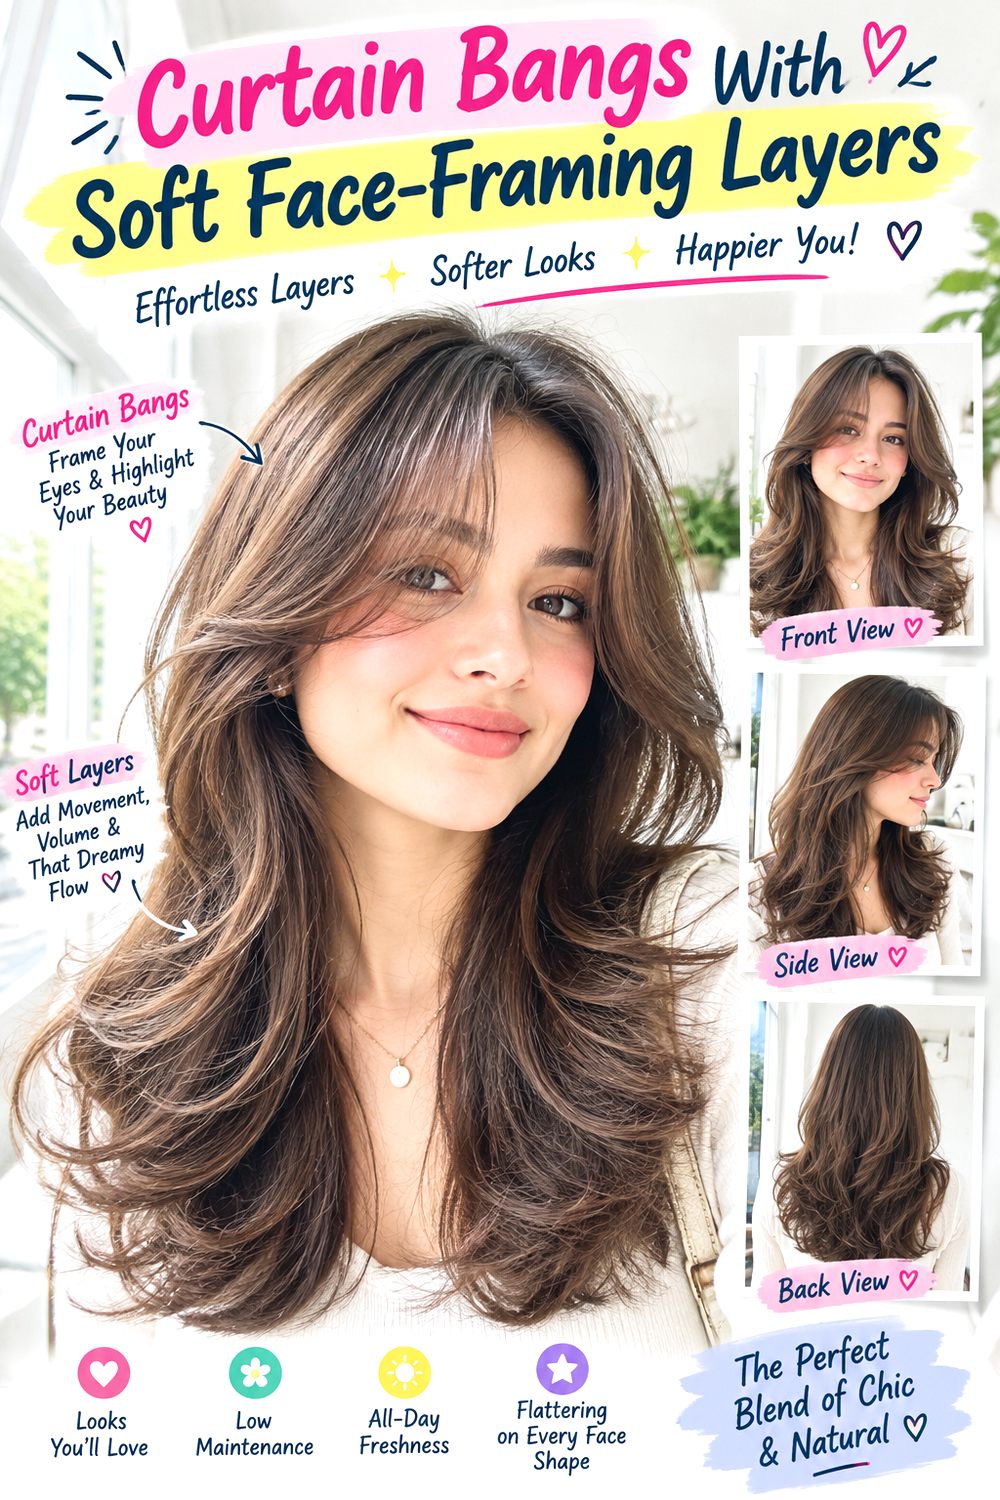
Curtain bangs create the shortest point in this layered shape, usually beginning around the brows before widening toward the cheekbones and blending into longer front pieces. The key is keeping the transition soft enough that the fringe feels connected to the haircut rather than added separately. Straight and wavy medium-density hair are easiest to blow into the curved shape, while curly textures can wear a longer interpretation that accounts for shrinkage. Use heat protectant, a medium round brush, and flexible hairspray to direct the bangs without making them stiff. Styling requires moderate attention because the fringe may need refreshing even when the rest of the hair still looks good. The longer outside pieces make grow-out easier than a blunt bang. At the salon, specify where the shortest center section should fall and ask for the fringe to blend gradually into cheekbone and jaw-level layers instead of ending abruptly at the temples.
Pro tip: Dry curtain bangs forward first and separate them near the end; starting with a hard center split can create a wider gap than you intended.
Long Butterfly Face-Framing Layers Hairstyle
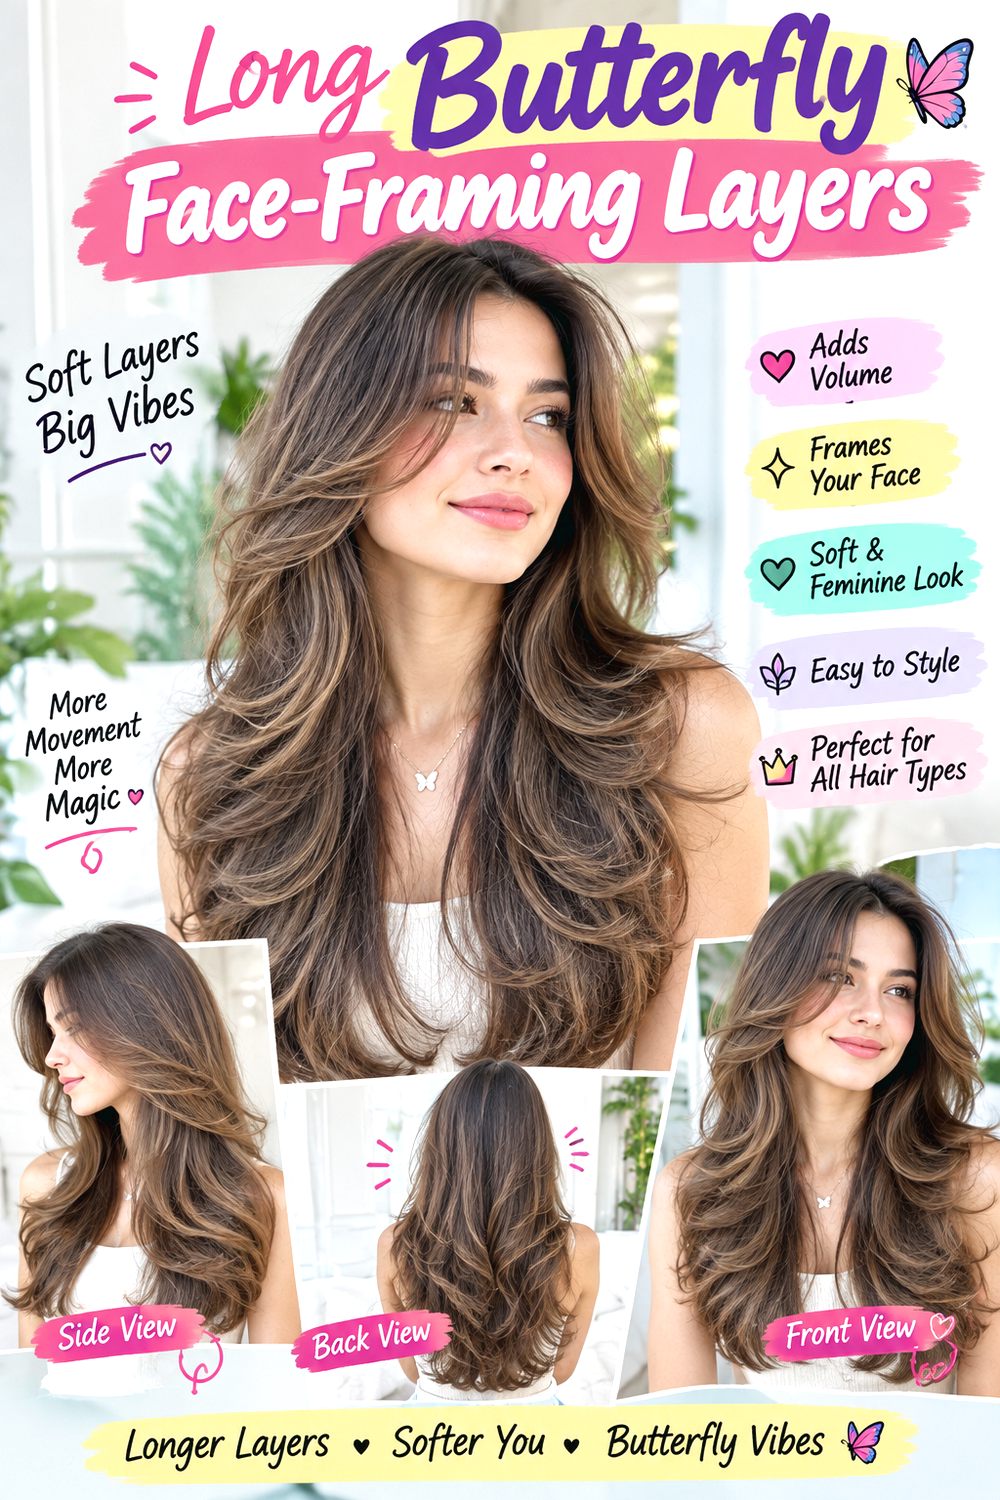
Butterfly-inspired face framing creates more movement through the upper lengths while leaving the overall haircut long. Shorter pieces begin around the cheekbones or jaw, then sweep outward into progressively longer layers that can reach the shoulders and beyond. Medium and thick straight or wavy hair usually hold this shape best because there is enough density to support several layer lengths. Fine hair can wear a lighter version with fewer front sections. Use heat protectant, a large round brush, and volumizing spray to create the signature outward movement. Styling takes moderate time when you want a full blowout but can be simplified by shaping only the front layers. As the pieces grow, they blend naturally into the lower lengths. At the salon, ask for butterfly layers concentrated around the face rather than short layers throughout the entire crown, and preserve enough perimeter weight so the back remains long and full.
Pro tip: Style the upper face frame outward while leaving the lowest lengths softer and straighter; curling every layer equally can make the silhouette wider than necessary.
Fine-Hair Soft Face-Framing Layers Hairstyle

Fine hair benefits from a restrained face frame that creates movement without removing too much density around the front. The shortest pieces can begin around the jaw or chin, while the rest of the haircut stays relatively solid through the perimeter. This works particularly well on straight and softly wavy fine hair because even a small change in length is visible. Use lightweight volumizing mousse at the roots, a small or medium round brush for the front, and a fine mist of flexible hairspray. Styling is quick and should avoid heavy creams that can make the layers separate into thin strands. Maintenance is easy because the longer placement grows out without leaving awkward short sections. At the salon, ask for limited face-framing sections, no aggressive thinning shears, and a strong lower perimeter. If you want additional movement, it is usually better to add one more long layer than to take the existing front pieces much shorter.
Pro tip: Keep the front layering narrow rather than cutting deeply toward the ears; preserving more side density helps fine hair maintain a fuller outline.
Thick-Hair Face-Framing Layers With Internal Weight Removal Hairstyle
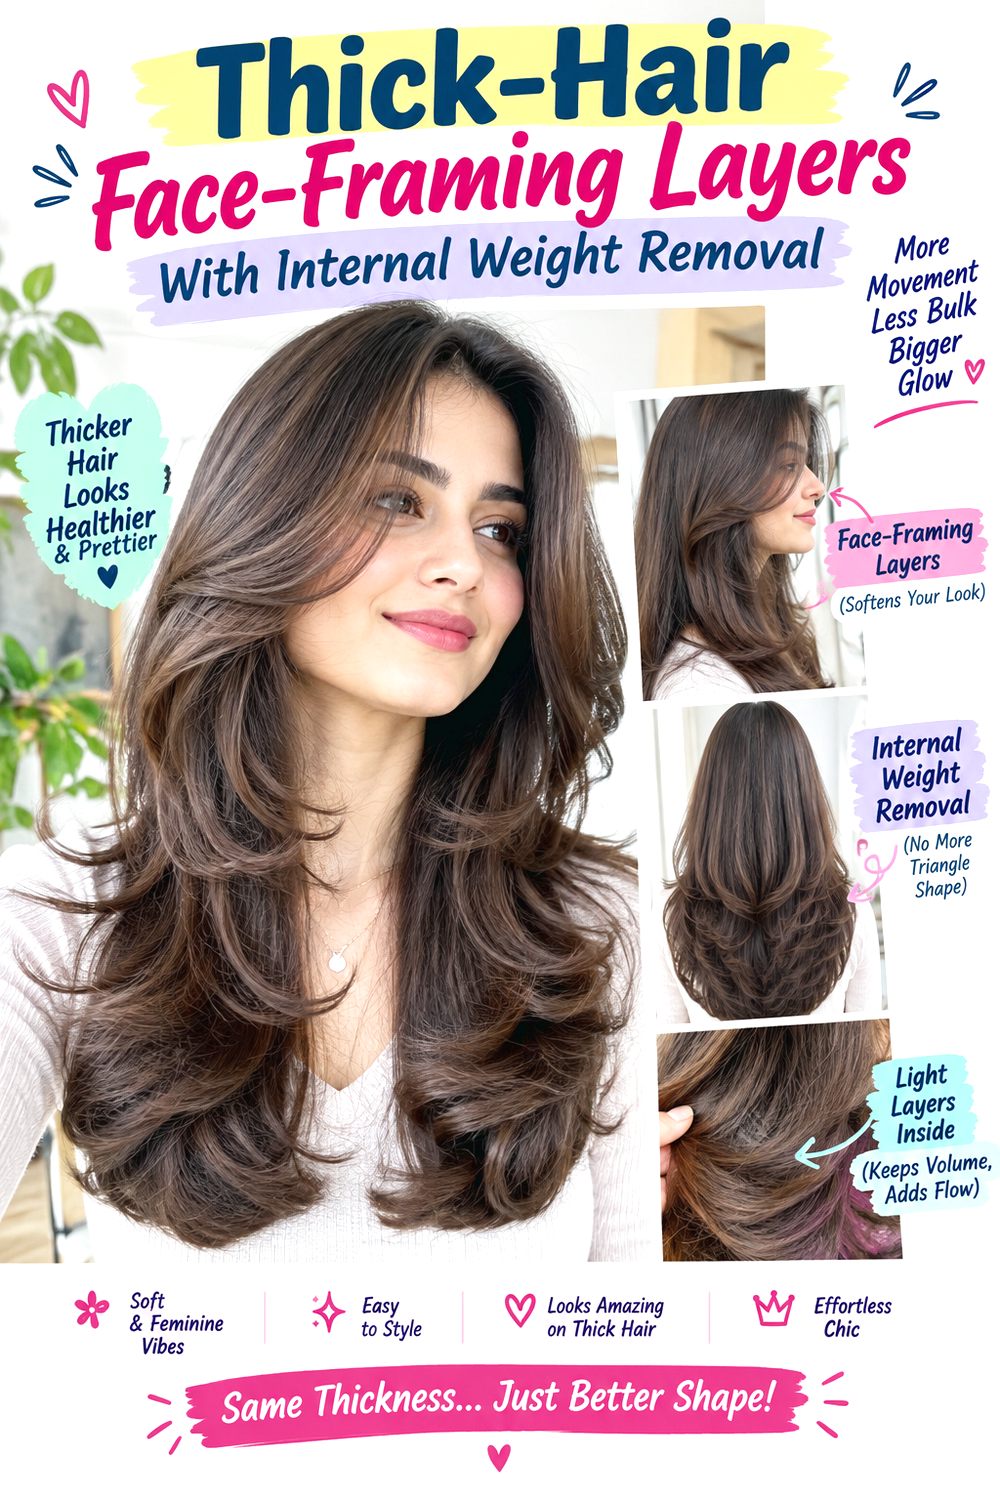
Thick hair can carry generous face-framing layers, but removing surface length alone may create unwanted width around the cheeks and shoulders. This version uses internal weight removal behind the visible front layers so the hair can move while the perimeter remains substantial. Straight, wavy, and coarse textures all benefit from this approach, particularly when the sides tend to expand after drying. Apply anti-frizz cream before styling, use a vent or paddle brush for control, and finish with a lightweight serum through the ends. Styling takes moderate time because dense hair generally needs longer to dry, but balanced weight removal should reduce how much corrective heat is needed. The interior may start feeling bulky again before the outer layers look overgrown. At the salon, ask for hidden weight reduction behind the face frame rather than heavy thinning through the visible ends, and specify the exact cheekbone, jaw, or chin point where you want the front movement to begin.
Pro tip: Show your stylist where the hair becomes widest after air-drying so bulk can be removed from that zone instead of thinning the entire front evenly.
Wavy Soft Face-Framing Layers Hairstyle
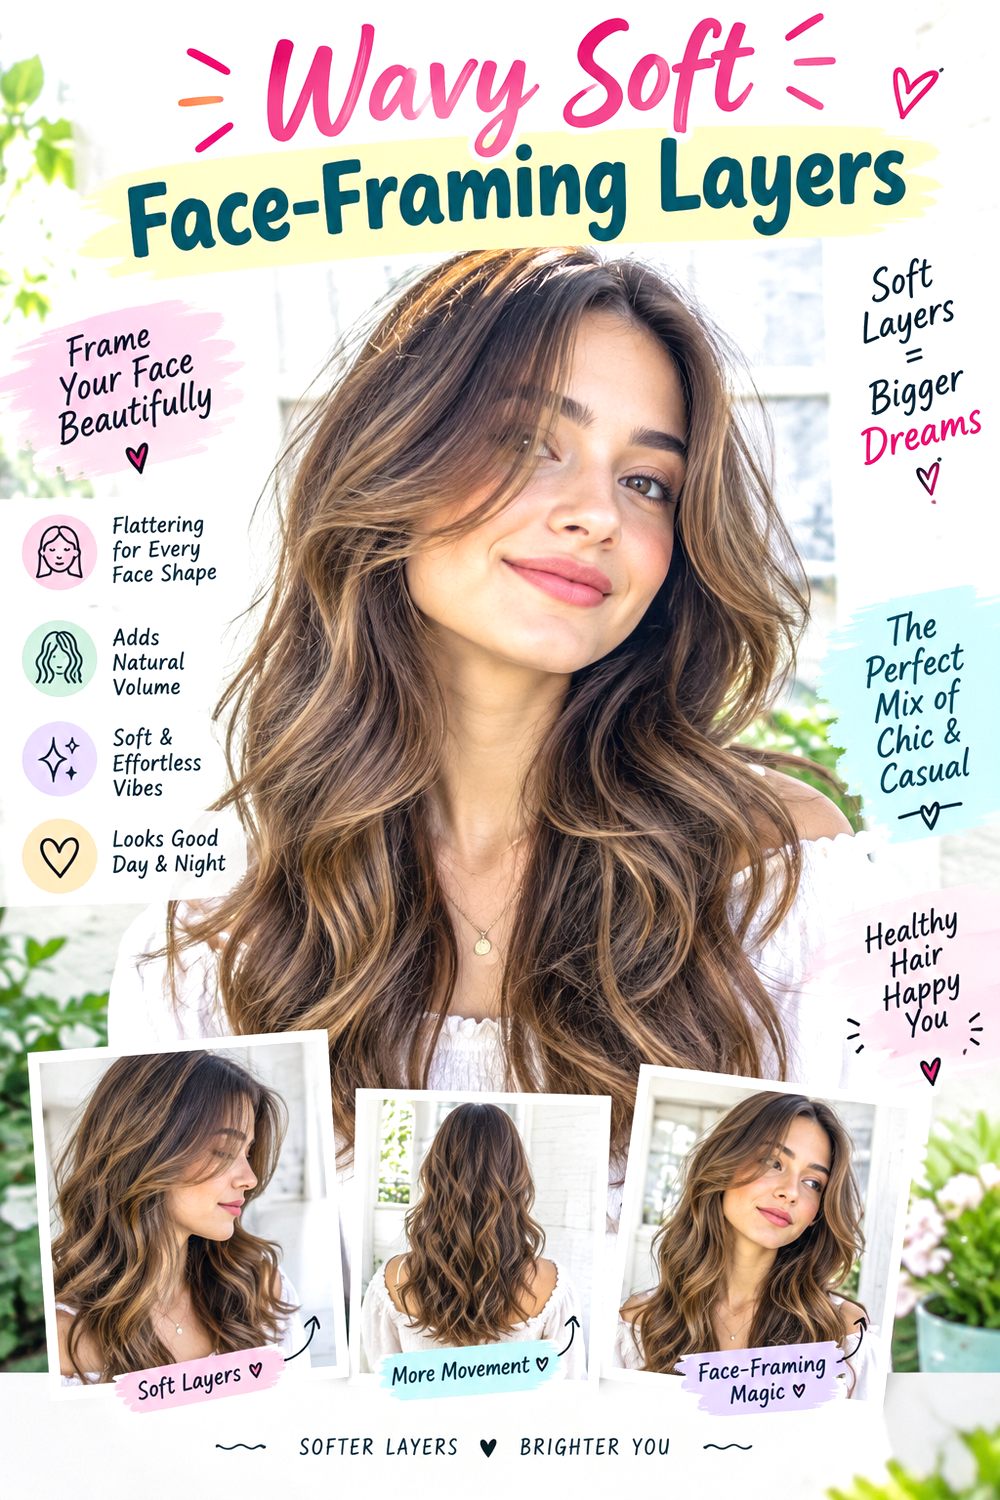
Natural waves make face-framing layers look softer because the cutting lines disappear into bends and movement. Layers beginning around the cheekbones or jaw can encourage the front to spring away from the face while longer pieces blend into the rest of the wave pattern. Medium and thick wavy hair often needs little heat, while finer waves should keep the front layers longer to protect end density. Use leave-in conditioner, wave-enhancing mousse, and a diffuser if you want extra definition without a full blowout. Styling is easy once the haircut works with the natural pattern, and next-day refreshing usually requires only a little moisture. Humidity can expand shorter front sections, so over-layering is best avoided. At the salon, ask for the face frame to be assessed with your natural wave visible and keep enough length for each bend to form. A dry check can help confirm that the shortest piece lands where you intended.
Pro tip: Let the front waves settle completely before deciding they need to be shorter; shrinkage and spring can make freshly dried layers appear higher than they did while damp.
Curly Face-Framing Layers With Long Fringe Hairstyle

A long curly fringe can flow directly into face-framing layers, creating softness around the forehead, temples, and cheekbones without requiring a straight-across bang. The shortest curls may sit around the brows or upper cheekbones when dry, then lengthen gradually into the sides. Medium and thick curly hair can support substantial movement, while finer curls often need fewer layers so the lower lengths remain full. Use moisturizing leave-in conditioner, curl cream, and a diffuser to encourage definition rather than stretching the texture smooth. Wash-day styling takes more time, but refreshing is usually quick with water and finger shaping. Shrinkage is the main salon consideration because the front can spring considerably higher after drying. Ask the stylist to assess the fringe and face frame in the natural curl pattern and preserve enough density near the temples so the transition into the longer hair stays soft.
Pro tip: Choose the shortest fringe point while the curls are completely dry; wet measurements can make the finished front several centimeters shorter than expected.
Center-Part Soft Face-Framing Layers Hairstyle

A center part creates equal movement on both sides, making precise layer placement more noticeable. The shortest pieces can begin around the cheekbones or jaw and then angle gradually toward longer lengths, keeping the forehead open while still shaping the front. Straight and softly wavy medium-density hair show the symmetry clearly, while fine hair can use a longer starting point to retain fullness. Use heat protectant, a medium round brush, and a light styling cream to direct both sides away from the center without making them overly curled. Styling is quick to moderate depending on your natural root direction. Cowlicks can make one side behave differently, so the part should be established before the final cut is checked. At the salon, ask for both face-framing sides to be balanced while your hair is sitting in its usual center part and specify whether the shortest point should land at the cheekbone, jaw, or chin.
Pro tip: Have the stylist check symmetry after the hair is dry and moving naturally; equal wet lengths can appear uneven if one side has stronger root lift.
Side-Part Soft Face-Framing Layers Hairstyle

A side part changes how face-framing layers fall because the heavier side carries more hair and often needs a slightly different connection into the length. The front can sweep across the forehead before curving near the cheekbone, while the lighter side stays tucked or softly layered near the temple. Straight and wavy medium-to-thick hair handle this directional shape well. Fine hair can keep the part less extreme so the lighter side does not lose too much density. Use a root-lifting spray, medium round brush, and flexible hairspray to create a soft sweep without stiffening the front. Styling takes moderate time when the part needs to be trained but becomes faster once the roots are accustomed to the direction. At the salon, establish your normal side part before cutting and ask the stylist to balance visual length rather than simply mirroring both sides. The heavier front section should retain enough density for a clean curve.
Pro tip: Decide on your preferred part before the haircut; switching from a deep side part to center afterward can make one front section appear noticeably shorter.
Collarbone Face-Framing Layers Hairstyle

Collarbone-level framing is one of the lowest-maintenance ways to add shape because the first layer remains long enough to blend easily into medium or long hair. The pieces can curve around the neck and shoulders without creating short sections near the cheeks. Fine, medium, and thick hair can all wear the placement, and it is particularly useful if you often tie your hair back because most of the frame can still reach a ponytail. Use a smoothing leave-in, large round brush, and light texture spray for a gentle bend. Styling is quick because the long pieces do not need precise placement each morning. Grow-out is also forgiving, with the frame gradually merging into the remaining length. At the salon, ask for the shortest front piece to sit around the collarbone when dry and blend it into the perimeter without excessive thinning. Keep more weight through the ends if you want the cut to look substantial.
Pro tip: If your hair naturally bends at shoulder level, place the layer just above or below that bend rather than directly on it to avoid an unwanted outward flip.
Long Hair With Subtle Face-Framing Layers Hairstyle

Subtle face framing works well when you want to preserve the impression of very long hair while adding only a little movement near the front. The shortest pieces usually begin below the jaw or chin, and very few additional layers are needed before they reconnect with the full length. Straight and wavy fine-to-medium hair benefit because the ends remain dense and the haircut does not depend on extensive styling. A leave-in conditioner, large paddle brush, and light shine serum are enough for a smooth finish, while natural waves can be left mostly untouched. Styling is quick and the grow-out is especially easy because there are no short layers to maintain. At the salon, ask for a narrow front section only and preserve the majority of the perimeter. Avoid aggressive feathering if your goal is a soft, almost one-length appearance. The face frame should become visible mainly when the hair moves or is tucked behind the shoulders.
Pro tip: Ask for the shortest layer below the chin if preserving maximum ponytail and braid flexibility is important to your routine.
Medium-Length Face-Framing Layers With Flipped Ends Hairstyle
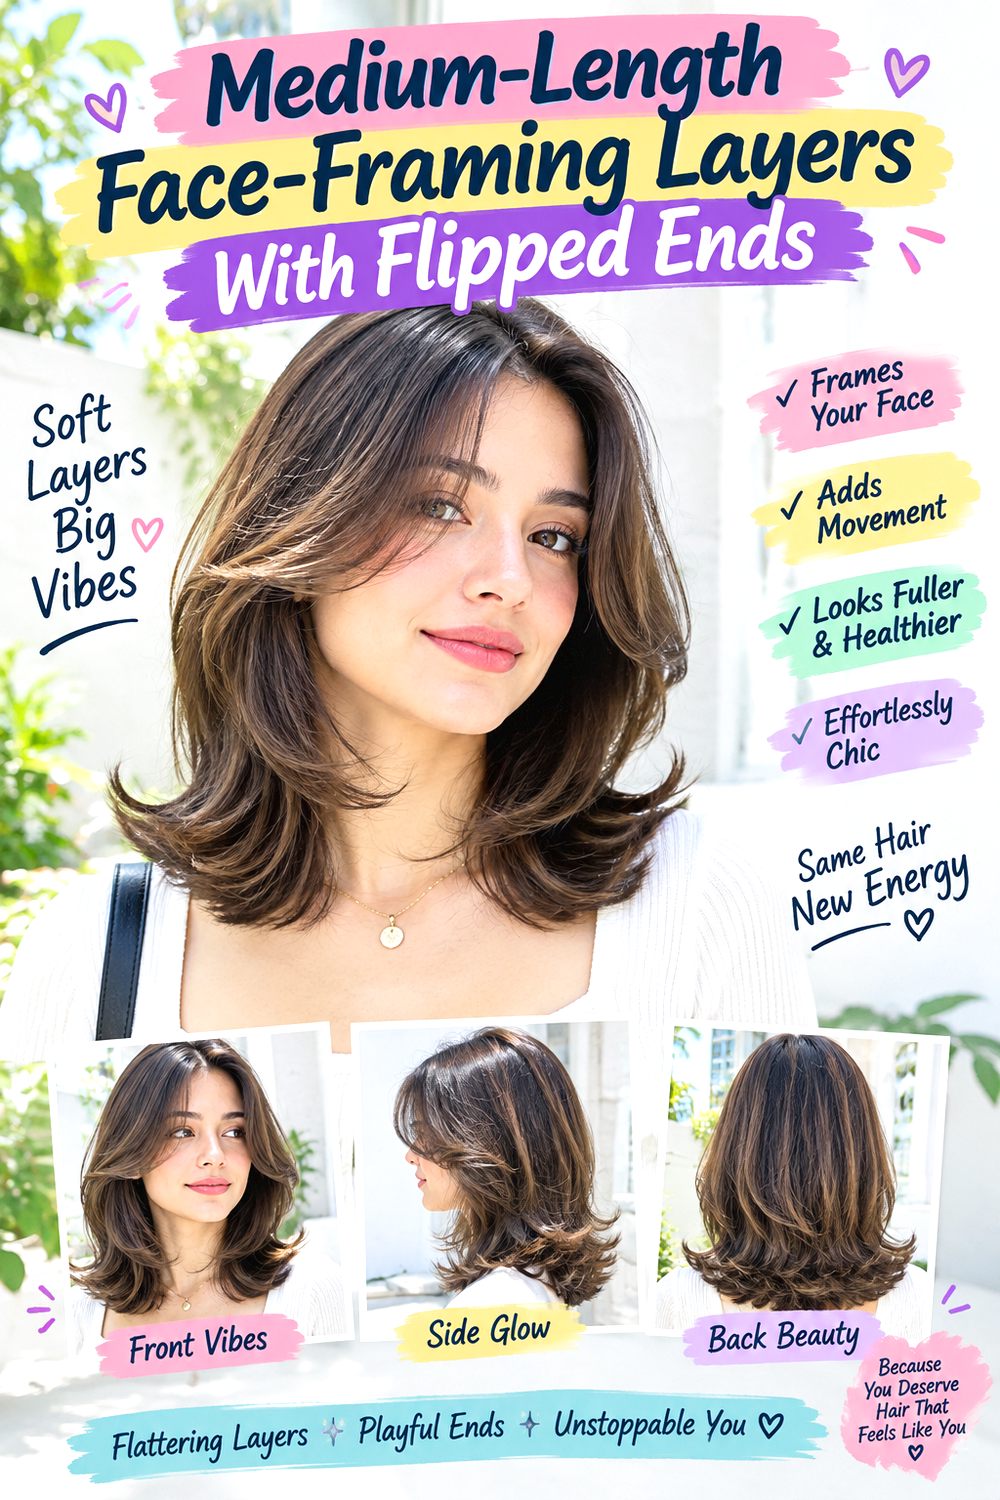
Medium-length hair gains extra movement when face-framing layers are styled with a gentle outward flip. The shortest pieces can begin around the cheekbones or jaw, then continue toward shoulder-level ends that turn away from the neck. Straight and softly wavy medium-density hair respond particularly well because the shape is easy to create with a round brush. Fine hair can use the flip for visual movement without heavy layering, while thick hair may need slight internal weight removal around the shoulders. Apply heat protectant, use a medium round brush, and finish with flexible hairspray to hold the bend without making it rigid. Styling takes moderate time after washing but is easy to refresh by reworking only the front and bottom few inches. At the salon, ask for connected layers that preserve a strong shoulder-length perimeter and enough front length to bend outward rather than spring sharply upward.
Pro tip: Flip only the final inch or two of each layer; starting the bend too high can create excessive width around the cheeks and shoulders.
Air-Dried Soft Face-Framing Layers Hairstyle

Air-dried face-framing layers should follow the hair’s natural movement rather than depend on a round-brush finish. The front pieces can start around the chin or cheekbones, but their exact placement should reflect where waves, bends, or slight curls naturally form. Wavy and softly textured medium-density hair are especially suited to this approach, while straight hair may need a little product for separation. Use leave-in conditioner, lightweight mousse, and a wide-tooth comb while damp, then allow the hair to dry with minimal disturbance. Styling is easy and usually needs only a quick refresh between washes. Humidity may change the amount of movement, so extremely short front pieces can become unpredictable. At the salon, ask the stylist to look at your natural dried texture before deciding final layer length and avoid cutting solely from a stretched or blown-out reference. The face frame should still make sense when you use no heat at all.
Pro tip: Take a photo of your normal air-dried hair to the salon; it gives the stylist a better guide than showing only professionally blown-out references.
Razor-Softened Face-Framing Layers Hairstyle
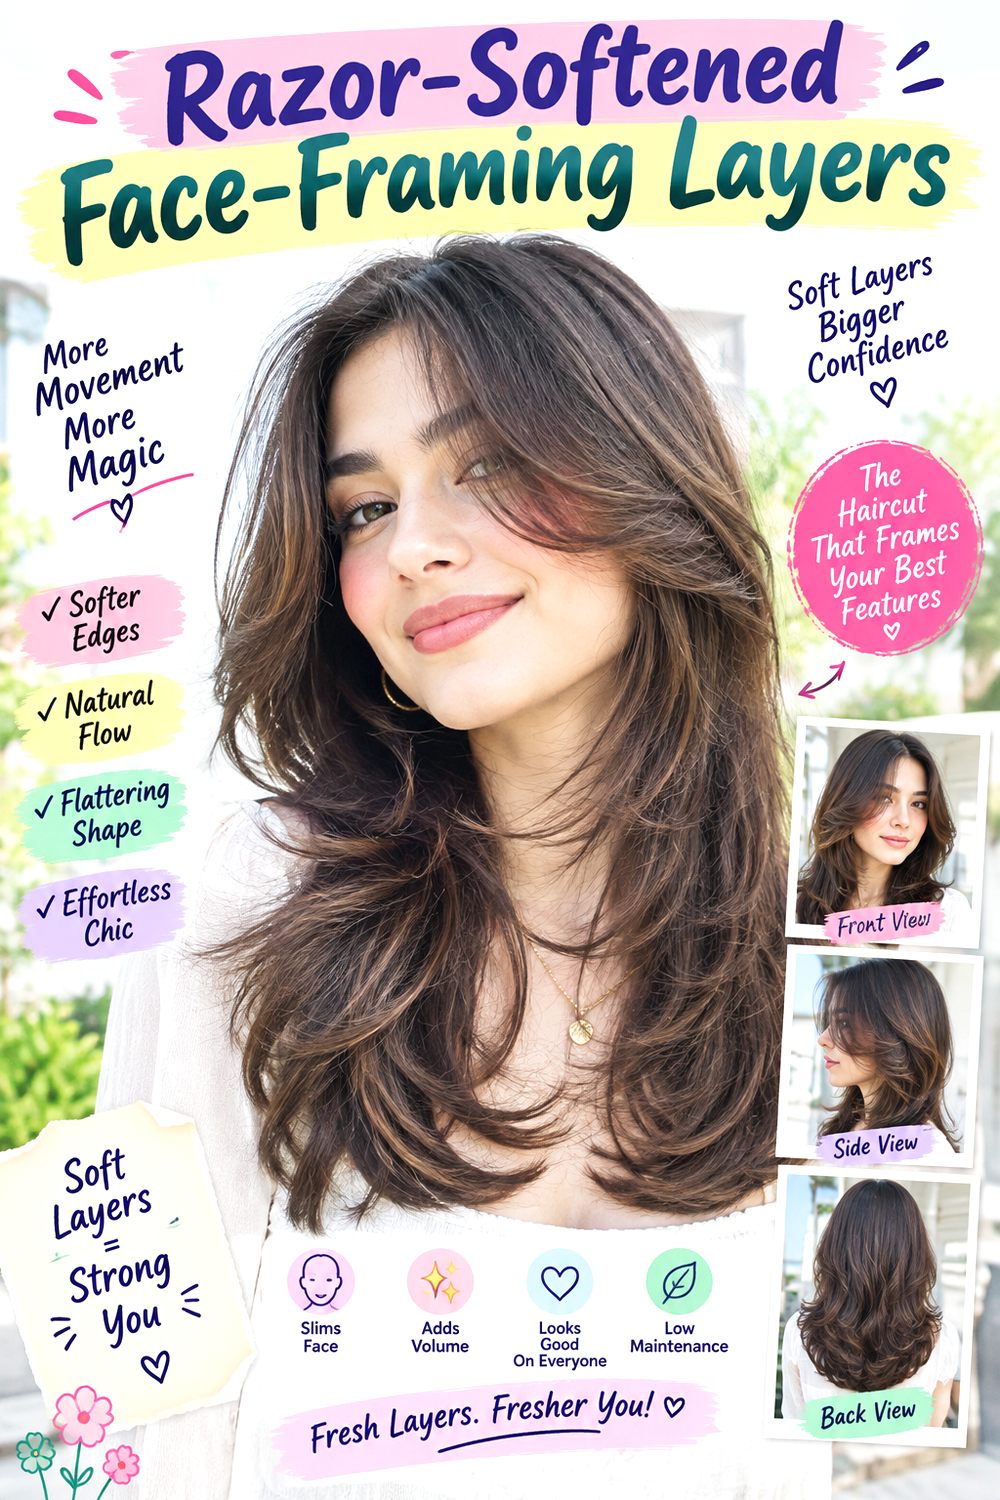
Razor-softened framing creates narrower, tapered ends around the face rather than a blunt layer edge. The technique can make straight and lightly wavy medium-density hair move more freely, particularly when the face frame begins around the cheekbone or jaw. Fine hair needs restraint because too much razor work can reduce end density, while very coarse or fragile hair may respond better to scissor texturizing. Use a moisturizing leave-in conditioner, heat protectant, and lightweight texture cream to keep the tapered pieces separated without making them dry. Styling is quick because the layers already contain movement, and a slightly undone finish suits the cut. The soft edges also grow out without an obvious line. At the salon, ask for razor work concentrated on selected front pieces rather than throughout the entire perimeter, and keep enough solid hair beneath the frame to support the shape. The goal is softness, not transparent ends.
Pro tip: If your front ends already feel dry, request point-cut scissor texture instead of heavy razor work so you can preserve more strength while still softening the edge.
Rounded Blowout Face-Framing Layers Hairstyle
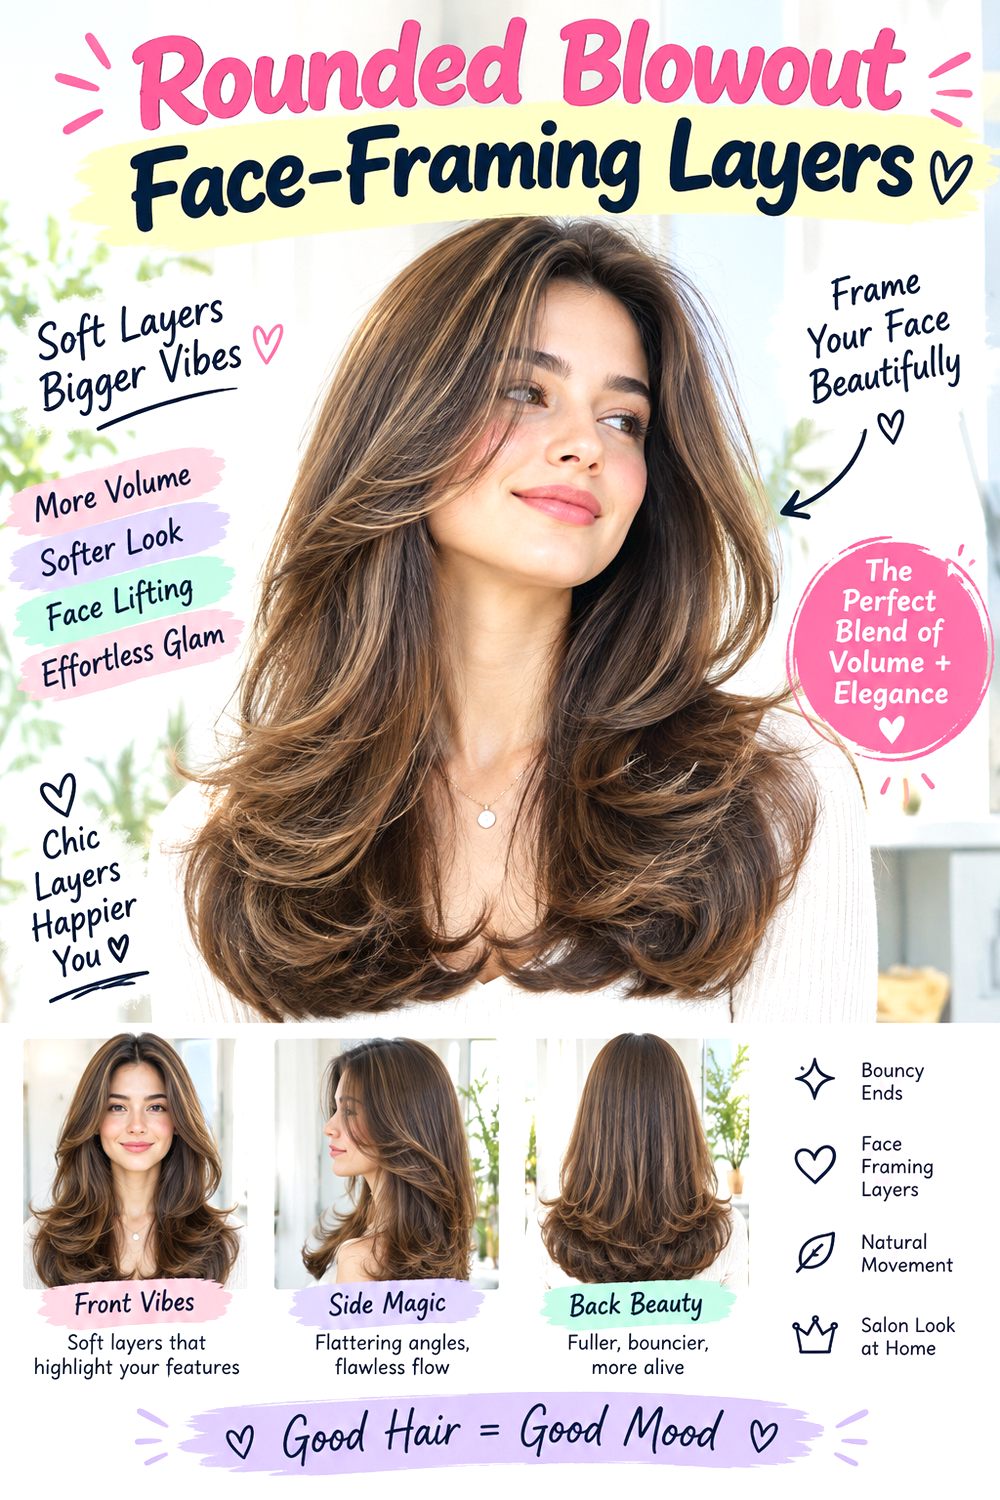
A rounded blowout makes soft face-framing layers more visible by lifting the roots and curving each section away from the face. Layers beginning around the cheekbones or jaw work best because they have enough length to create a broad, smooth bend instead of a tight curl. Medium and thick straight or wavy hair hold the shape particularly well, while fine hair can use root spray for extra lift. Apply heat protectant, use a large round brush, and finish with flexible hairspray or large rollers while the sections cool. Styling needs more time than an air-dried version, especially after washing, but second-day refreshing can focus on the front only. At the salon, ask for connected face-framing layers with enough density at the ends to create visible curves. Avoid excessive thinning, since very light ends can separate instead of forming the full rounded sweep that makes this blowout work.
Pro tip: Let the front sections cool in large rollers before releasing them; the bend usually lasts longer than when the hair is brushed out immediately after blow-drying.
Soft Face-Framing Layers With Wispy Bangs Hairstyle
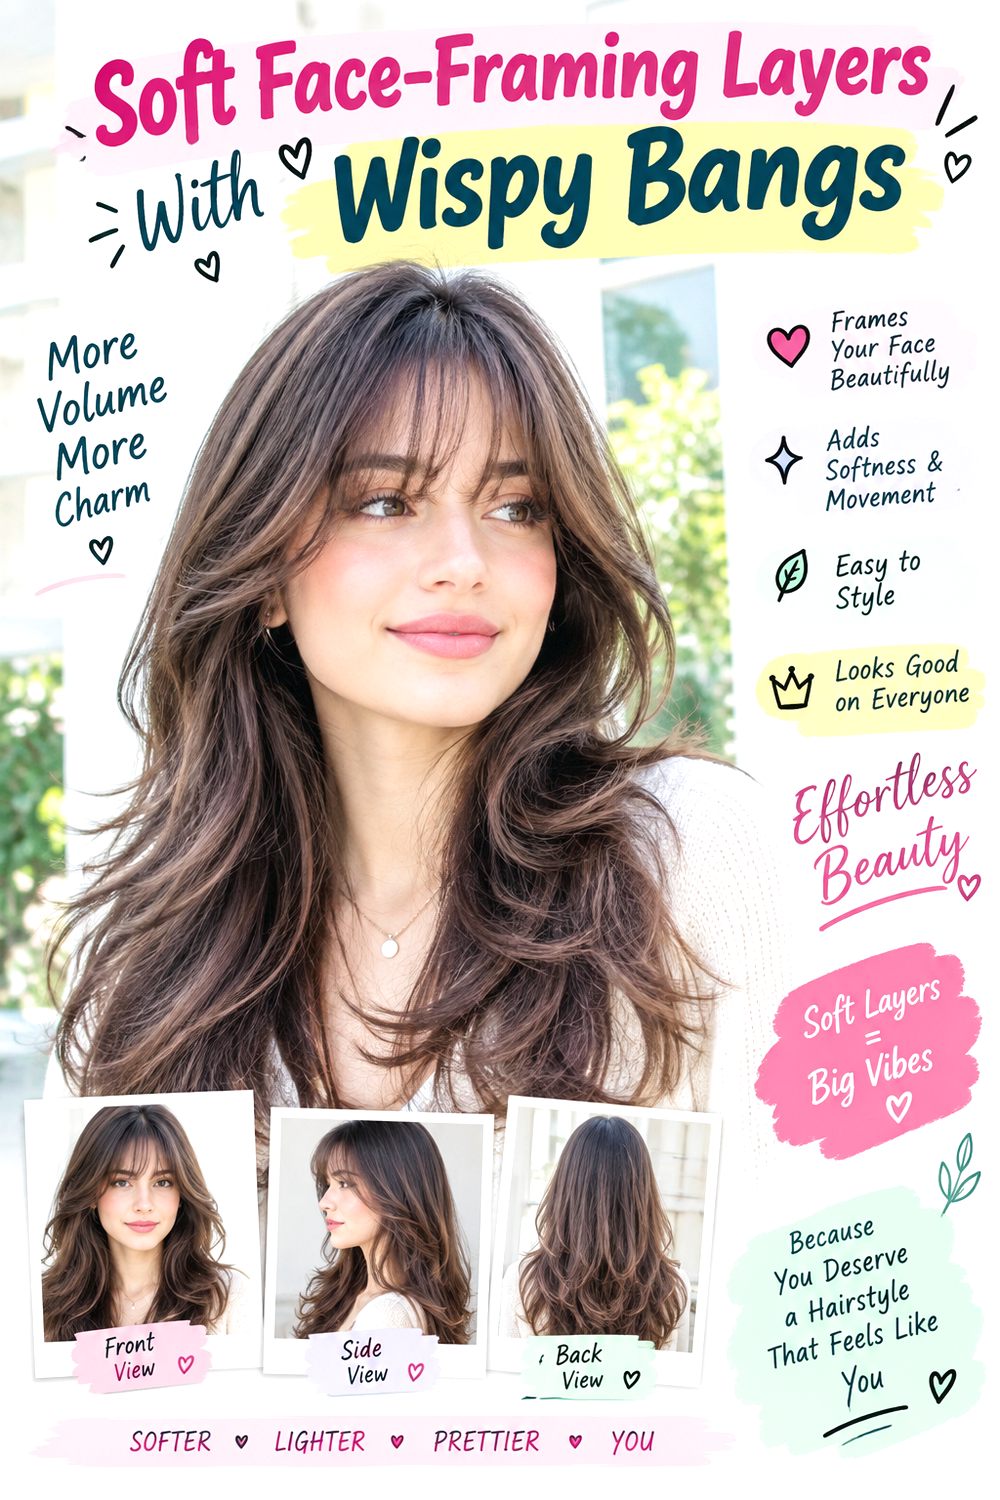
Wispy bangs make the transition into soft face-framing layers especially gentle because the fringe breaks into narrow pieces rather than forming a heavy horizontal line. The center can sit around the brows, while longer temple pieces lead into cheekbone and jaw-level layers. Fine and medium-density straight or wavy hair are well suited to the airy shape, though the fringe should not be over-thinned. Use lightweight mousse, a small round brush, and flexible hairspray to reset the bangs while allowing the longer pieces to move naturally. Daily styling is moderate because the fringe may need attention after sleeping, even when the rest of the haircut still looks good. The bangs will usually need reshaping sooner than the longer frame. At the salon, ask for a light but intentional fringe with slightly longer outer sections and enough density left around the temples to maintain a smooth connection into the layers.
Pro tip: Keep the outer fringe pieces longer than the center so the bangs grow into the face frame instead of developing two blunt corners near the temples.
One-Length Hair With Minimal Face-Framing Layers Hairstyle
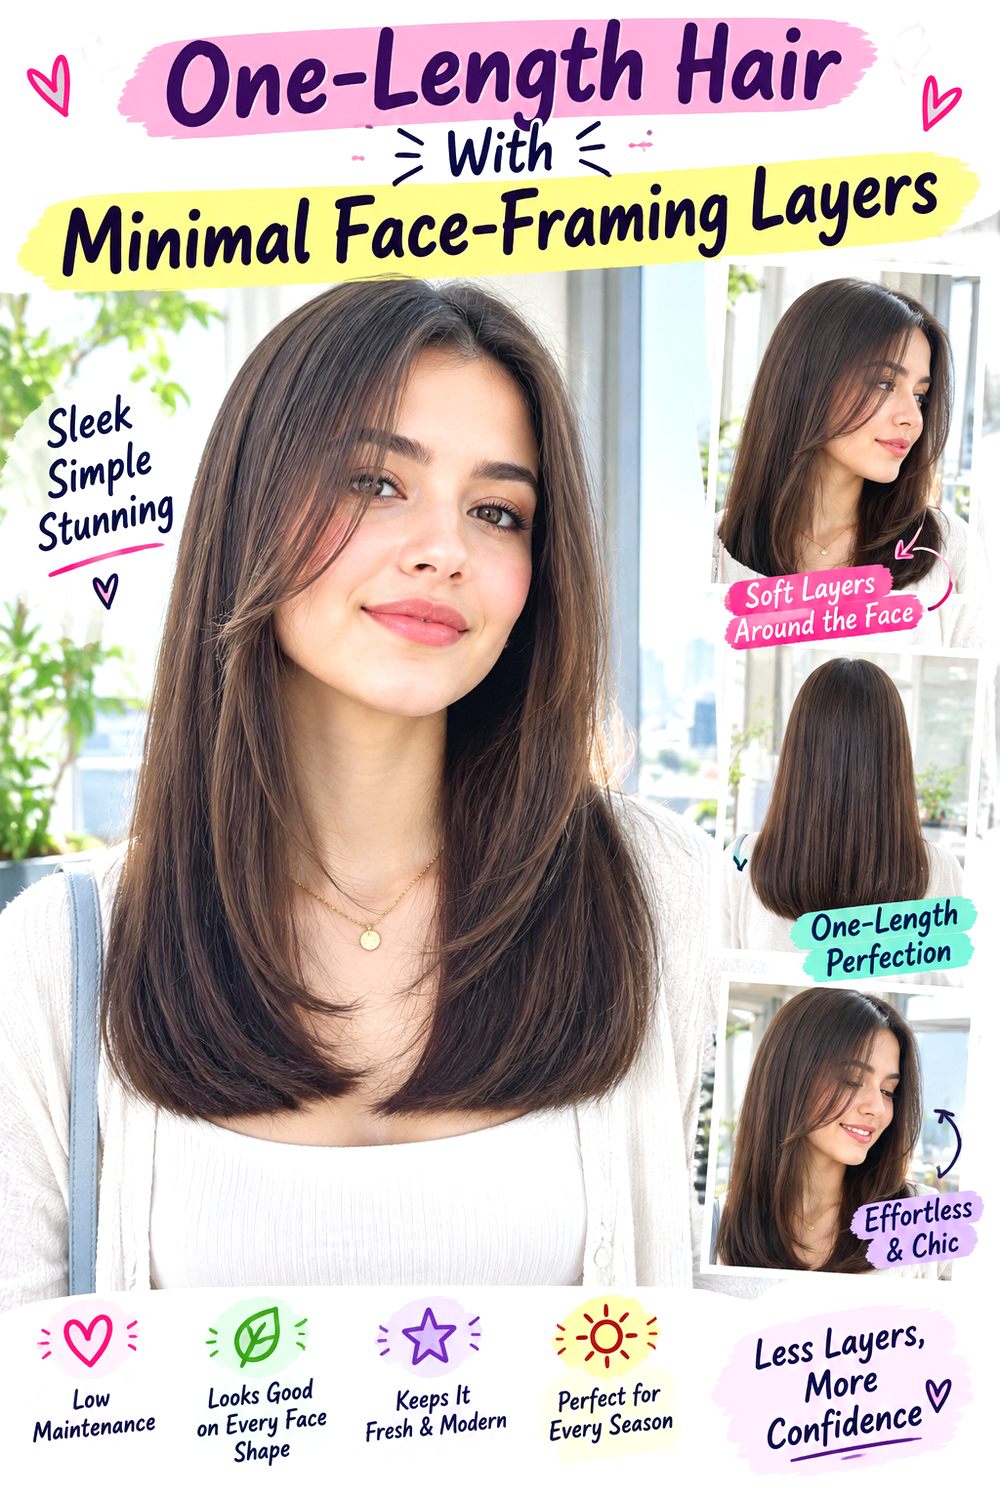
A mostly one-length haircut can still gain softness from a very narrow face frame around the chin or jaw. The back and sides remain dense, while only a small front section is shortened enough to move independently. This is particularly useful for fine or straight hair that loses fullness when heavily layered, but medium-density wavy hair can also wear it well. Styling is simple: use a smoothing leave-in conditioner, paddle brush, and light serum for polish, or allow natural movement to soften the front. The daily routine is quick, and the haircut grows out easily because the face frame gradually rejoins the perimeter. It is also practical for ponytails and braids because most of the length remains intact. At the salon, ask for a strong one-length baseline with a narrow face-framing section beginning no higher than the jaw or chin. Avoid taking the frame too far back toward the ears if maintaining maximum density is your priority.
Pro tip: Start longer than you think you need at the first appointment; a minimal face frame can always be shortened, but preserving perimeter density takes time once too much has been removed.
Conclusion
Soft Face-Framing Layers for Fall 2026 can be adjusted through starting point, density, fringe, parting, texture, and overall haircut length. Cheekbone layers create more visible movement, while chin and collarbone framing offer easier grow-out. Curtain bangs and wispy fringe add softness around the forehead, whereas minimal framing keeps more density through the sides and perimeter.
The right version depends on face shape, natural texture, hair density, maintenance preference, and daily styling routine. Fine hair usually benefits from fewer layers, while thick hair may need hidden weight removal. Curly and wavy textures also require attention to shrinkage and natural movement. Choose the shortest layer placement first, then build the rest of the face frame around how you realistically wear your hair.
Before Your Salon Visit
Choose one or two favorite ideas and save clear photo references from the front and side. Discuss your face shape, natural texture, density, preferred length, maintenance level, and normal styling routine with your stylist. Point out the exact cheekbone, jaw, chin, or collarbone layer you like, along with the fringe, parting, volume, and end finish. Also explain whether the reference photo is air-dried, curled, or blown out. A face frame can look much shorter once styled, so identifying both the cutting length and the finished shape will make your salon reference far more useful.
FAQs
Where should soft face-framing layers start?
They can start around the cheekbones, jaw, chin, or collarbone. Shorter placement creates more obvious movement, while longer layers usually offer easier grow-out and more styling flexibility.
Are face-framing layers suitable for fine hair?
Yes. Fine hair usually works best with a narrow face frame, fewer layers, and a strong perimeter. Avoid excessive thinning around the front if maintaining fullness is important.
Can curly hair have soft face-framing layers?
Yes. Curly hair can use layered framing around the forehead, cheekbones, and jaw, but shrinkage needs to be considered. Cutting and checking the layers in their natural dry pattern can help avoid an unexpectedly short result.
Do face-framing layers require daily heat styling?
No. Wavy and curly textures can often air-dry or diffuse, while straighter hair can wear the layers naturally or style only the front with a round brush. The best layer placement should still make sense on low-styling days.